1
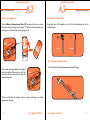
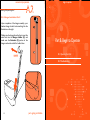
www.accutone.com
Amplifier
A30 SIGMA telephone amplifier
user manual & installation guide
Printed in Hong Kong
AASA30 SigmaR2007AUG
Accutone and the logo device are registered trademarks of Accutone Technologies Limited.
© Copyright 2007 Accutone Technologies Limited, All rights reserved, Do not copy or re-distribute any contents.
Introduction.
table of content.
S
This installation guide and user manual contains the following contents:
PART A
Getting Comfortable.
professional call center amplifier for telephone headset.
Thank you for purchasing the Accutone A30 Sigma Telephone Amplifier.
This unit is designed to be paired with an Accutone telephone headset,
which you can find more information from your distribution agent, or
from our website. The A30 Sigma telephone amplifier is an entirely new
design from our existing models, and is tailor-made for intensive usage in
call centers or large corporations. With enhanced compatibility to fit with
almost all telephones in the market, and top-end acoustics for noisy
environments, the A30 Sigma is the ultimate tool for professional contact
agents.
A.1 Understanding the Controls.
A.2 Connection and Preparations.
A.2.1 connect to telephone
A.2.2 connect to telephone headset
A.2.3 inserting batteries
A.2.4 headset hanger parts
A.2.5 hanger installation part 1
A.2.6 hanger installation part 2
PART B
Begin to Operate.
B.1 Operating the Unit.
Other highlight features of the A30 Sigma include: simple and direct userinterface, low-power consumption for longer battery lifetime, noisefiltering voice enhancement mode, microphone mute, headset hanger and
handset selection switch...etc.
B.1.1 telephone pairing
B.1.2 adjusting the microphone gain level
B.1.3 adjusting the rotary volume control
B.1.4 headset/handset application
B.1.5 microphone mute function
B.1.6 voice enhancement function
B.1.7 caution in setting volume control
Now please spend a few moments to read through this user manual
before connecting the A30 Sigma unit to your telephone. After
familiarizing with the features and functions, you will surely enjoy the
freedom and convenience this unique device offers you.
B.2 Troubleshooting
PART C
Accessories & Specifications.
Any System Telephone
Any Accutone®
Headset
C.1 Accessories
C.2 Specifications
A30 Sigma
1
understanding the controls.
getting comfortable.
A.1
Learning about the interface & controls.
Part A. Getting Comfortable
A.1 Understanding the Controls.
A.2 Connection and Preparations.
1
2
3
5
6
7
8
9
10
11
12
13
14
15
MAIN SWITCHES AND INTERFACE
1.
2.
3.
4.
5.
6.
7.
8.
9.
10.
11.
12.
13.
14.
15.
2
4
Inlet for Headset Cable
Rotary Volume Control
Headset/Handset Application Switch
Microphone Mute On/Off Switch
Voice Enhancement On/Off Switch
Amplifier Base
Inlet for Telephone Handset Cable
Hanger Holder
Inlet for Telephone Connection Cable
Battery Compartment Door
Modular Jack for Input from Telephone Unit
Modular Jack for Telephone Handset
Telephone Configuatrion Switch
Microphone Gain Level Rotary Control
Modular Jack for Telephone Headset
part a. getting comfortable.
3
connection & preparations.
connection & preparations.
A.2
Hooking all the parts together!
A.2
Hooking all the parts together!
A.2.1 Connect to Telephone
A.2.2 Connect to Telephone Headset
Note that all connections jacks are located at the bottom of the unit. Flip over
the amplifier, unplug the handset cord from your telephone base unit and
insert it to the Modular Jack for Telephone Handset (12). Then, use the
phone cord provided with RJ-11 modular plug at both ends to connect the
control unit to your telephone. Plug one end of the cord to your base unit (A)
and the other end to the Modular Jack for Input from Telephone Unit
(11) at the back of the unit.
One thing you will notice right away is that A30 Amplifier comes already
installed with a cable connected to the bottom of the amplifier, specifically to
the Modular Jack for Telephone Headset (15). The other end of the
cable is a Quick Disconnecting Cable (QD) plug, as illustrated below.
To connect to any Accutone telephone headset, disconnect the QD on your
headset, and connect the top half of your headset cable to the QD cable
extended from the amplifier. Please note that this quick disconnector is
specially designed for users who are always on the move, by allowing users
to quickly connect and disconnect to the device.
* For pairing the A30 amplifier with non-Accutone headset, you must unplug the entire cable from the
modular jack (15) and connect it with the telephone headset’s standard modular jack. We do not
recommend such pairing, as not all telephone headsets match the standard A30 configuration.
12
11
QD
15
A
4
part a. getting comfortable.
5
connection & preparations.
connection & preparations.
A.2
A.2
Hooking all the parts together!
Hooking all the parts together!
A.2.3 Inserting Batteries
A.2.4 Headset Hanger Parts
Turn the Battery Compartment Door (10) counter-clockwise to remove
the entire battery housing. Insert a single “C” battery with the positive pole
pointing up, and with the bottom part going in first.
Along with your A30 amplifier, you will find the following parts for the
headset hanger:
I
EJECT
counter-clockwise
II
10
hanger
extenders
A.2.5 Hanger Installation Part 1
Next, insert the entire battery housing back
into the amplifier. Make sure you turn the
housing knob clock-wise to firmly lock the
compartment door.
You should have the following assembled headset hanger.
LOCK
clockwise
10
I
II
When you find that the speaker volume is slowly reducing, you should
replace new batteries.
6
part a. getting comfortable.
part a. getting comfortable.
7
begin to operate.
connection & preparations.
A.2
Hooking all the parts together!
A.2.6 Hanger Installation Part 2
Upon completion of the hanger assembly, your
headset hanger should look something like the
illustration on the right.
I
Making sure the hanger faces the front, insert the
entire unit into the Hanger Holder (8), and
make sure the Extender (II) portion of the
hanger reaches the end of the holder holes.
Part B. Begin to Operate
II
B.1 Operating the Unit.
HANGER
faces front
B.2 Troubleshooting.
8
8
part a. getting comfortable.
9
operating the unit.
operating the unit.
How do I use this device? What can I do with it?
B.1
B.1
B.1.1 Telephone Pairing
2
Different telephones have different configurations, so you need to first pair
your amplifier with your telephone. The Telephone Configuration Switch
(13) at the bottom of the unit allows user to effectively select a proper
setting to pair with their telephone by sliding it to different positions, namely
position (1-2-3).
How do I use this device? What can I do with it?
B.1.2 Adjusting the Microphone Gain Level
While you are still online with someone on the other end, check with them
your microphone gain level. Make adjustments to the Microphone Gain
Level Rotary Control (14) using the screwdriver provided. Turn clockwise
to increase volume, and counter-clockwise to reduce.
14
13
Increase Volume
clockwise
1- 2-3
* You should only need to make this adjustment ONCE.
B.1.3 Adjusting the Rotary Volume Control
To pair your amplifier, you need to make
a call to someone. With all the cables
properly connected, make sure all three
buttons on top of the unit are all
released. (There should not be any
white line on in front of the buttons)
! no white line!
The Rotary Volume Control (2) located on the top of the unit allows user
to adjust the volume of the headset speaker. Rolling the rotary control up
will increase the volume and rolling it down will decrease it. Do not overturn
the control, as high volume will cause damage to your hearing.
Increase Volume
roll upwards
Put on your headset and lift up the
handset to call someone, if the person
on the other end cannot hear you or
you cannot hear them, switch to the
next position until you find the best
position, but don’t hang up yet.
3
!
10
part b. begin to operate.
Refer to Section B.1.6 for
Safety on Volume Settings.
part b. begin to operate.
11
operating the unit.
operating the unit.
How do I use this device? What can I do with it?
B.1
B.1
How do I use this device? What can I do with it?
B.1.4 Headset/Handset Application
B.1.6 Voice Enhancement Function
The Headset/Handset Application Switch (3) located on the top of the
unit allows user to choose between using headset or the handset of the
telephone base unit. When the button is pressed down, the handset is
chosen, which means the default (released) status is for headset usage.
The Voice Enhancement On/Off Switch (5) allows user to enhance a
caller’s voice in a noisy environment. When pressed, the voice enhancer
adjusts the signal so that the background noise of the caller is filtered out
while the caller’s voice is amplified. However, the sound quality may seem to
slightly decreased. Release the button to return to normal mode.
5
3
B.1.5 Microphone Mute Function
The Microphone Mute On/Off Switch (4) allows user to place a caller on
hold by pressing it down. When pressed, the caller does not hear the user,
but the user can still hear the caller. To resume talk, press it again to release
the mute function.
!
Read this section carefully before your proceed to adjust any volume controls.
When adjusting either the Microphone Gain Level or the Headset
Speaker Volume, do not turn to maximum level from the start. You should
first try with a lower volume settings and slowly adjust to an appropriate
level. Be careful if you combine a high microphone gain level with a high
speaker volume, as this may result with a high-pitched feedback noise
(“squealing” sound). Such noise can cause severe damage to your hearing,
and prolonged usage under such settings will damage the headset and the
amplifier.
4
12
B.1.7 Caution in Setting Volume Control
part b. begin to operate.
part b. begin to operate.
13
troubleshooting.
troubleshooting.
I can't make it work, what should I do?
I hooked everything
up exactly as
suggested, but there
is still no response
from my A30 Sigma
unit.
My Caller cannot
hear me at all or
cannot hear me very
well.
I can't make it work, what should I do?
B.2. Troubleshooting - Subsequent Problems
B.2. Troubleshooting - First Time Installation
problem
B.2
B.2
items to check
Check to make sure you have a standard C-battery
#
inserted in the amplifier, as power is required.
Have you selected the proper pin-alignment settings from
#
the configuration switch located in the bottom of the A30?
Make sure the handset button is not pressed.
#
If your telephone has a headset button, press the headset
#
button or lift up the handset from its cradle.
Try to turn the speaker volume up a bit by rotating the
#
rotatory volume control.
Is your headset properly connected to the amplifier, make
#
sure it’s plugged into the frontmost jack on the bottom of
the amplifier.
If all fails, contact your local distributor for another model
#
of amplifier, as your telephone may not be compatible with
the A30 amplifier.
Make sure the Mute button is not pressed down.
#
Check to see if the Microphone Volume is set too low, the
#
microphone volume adjustment is made from the bottom
of the amplifier.
It’s possible that the battery has ran out, try replacing new
#
batteries.
Select through the microphone selector for a better
#
setting.
I hear my voice too
loud and there is a
squealing sound.
The Microphone Volume Control is set too high or the
#
Reception Volume Control is set too high, reduce either
one or both for the perfect settings.
The other end
cannot hear me well
no matter which mic
setting I choose.
The A30 amplifier is designed for optimal performance for
#
the majority of the telephone models, but for some
telephone models the microphone gain level is too low for
the headset. Contact your local distributor for assistance.
items to check
problem
The device was
working fine, but
after a prolonged
period of inactivity,
it has no response
when I turn it on.
Make sure all the cables are properly hooked up, especially
#
the patch cable connecting the amplifier with the
telephone terminal.
Then, check to make sure there is battery or else you
#
should replace new batteries.
Now make sure there is signal coming from the telephone,
#
you can test this by selecting Handset/headset Switch to
HANDSET and pick up the handset to check if there is a
dial-tone. If no, then the problem is with the telephone or
the network; if yes, then un-press the handset button, if
there’s still no signal, then the headset has become
defective. Contact your local distributor for headset
replacements
During a telephone
conversation, the
voice transmission
or reception
suddenly ceased.
Make sure you change your batteries every few months, as
#
The caller can hear
my breathing sound,
and the noise is too
loud.
Telephone calls made to different systems and locations
#
may vary in their reception level. To reduce breathing
sound, you should keep the foam windscreen attached to
the microphone on your Accutone headset, or adjust the
Microphone Volume according to different calls.
When pressed the
voice-enhancement
button the caller’s
voice becomes very
strange.
The Voice-Enhancement feature is used to reduce back#
ground noise from the caller. It works by flattening out the
sound frequency on the loudspeaker, so it’s normal that
the caller’s voice becomes “flattened”. You should be able
to hear them better even in a very noisy environments.
mic-transmission may be affected if the power voltage is
dropped to a certain level.
Even with low-battery, the amplifier will not drop any
#
reception signal (speaker side), so if you hear interruptions
to the speaker side, make sure the headset plug is
fastened, also the Quick Disconnector is firmly connected.
*For problems not listed in the above section, please try to refer to FAQ:troubleshooting section in
our website - http://www.accutone.com.hk.
14
part b. troubleshooting.
part b. troubleshooting.
15
accessories & specifications.
accessories & specifications.
C.1
Any additional information I should know?
C.1 Accessories
The A30 Sigma kit includes:
1. One set of A30 Sigma Amplifier Unit.
2. Telephone Patch Cable with RJ-11 Modular Plugs.
3. Headset Hanger Parts (3 pieces).
4. Screwdriver Pinl.
C.2 Specifications
Part C. Accessories & Specifications
C.1 Accessories.
C.2 Specifications.
Standard Operating Voltage
Operating Current (Max)
Standby Current
Standby Mode Activation
Amplifier Gain - Receive
- Transmit
Battery
1.5V DC
4~5 mA (Max)
0.01 mA
immediately if no signal
0~20 dBmV (Max)
0~14 dBmV Typical (Max)
UM-2 x 1 (size "C")
FCC Registration Information to the end user
Modifications not authorized by the manufacturer may void users authority to operate this device.
NOTE: This equipment has been tested and found to comply with the limits for a Class B digital device,
pursuant to Part 15 of the FCC Rules. These limits are designed to provide reasonable protection
against harmful interference in a residential installation. This equipment generates, uses and can radiate
radio frequency energy and, if not installed and used in accordance with the instructions, may cause
harmful interference to radio communications. However, there is no guarantee that interference will
not occur in a particular installation. If this equipment does cause harmful interference to radio or
television reception, which can be determined by one or more of the following measures:
- Reorient or relocate between the equipment and receiver
- Increase the separation between the equipment and receiver
- Connect the equipment into an outlet on a circuit different from that to which the receiver is
connected
- Consult the dealer or an experienced radio/TV technician for help.
Trademark and Ownership
Accutone and the logo design combined are trademarks or registered trademarks of Accutone
Technologies Limited.
16
part c. accessories & specifications.
17