1
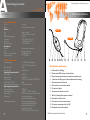
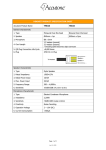
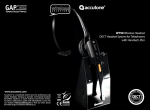
www.accutone.com
USB400 VoIP Communication Headset
installation guide & user manual
© 2005 Accutone Technologies Limited. All rights reserved.
Accutone and the logo device are trademarks of Accutone Technologies Ltd.
Best of Show Award 2006 in VoIP Application.
[ inspiring people, inspiring change ]
Introduction.
Table of Contents
USB 400 VoIP COMMUNICATION HEADSET
designed for those who appreciates good acoustics!
This installation guide and user manual contains the following contents:
Thank you for purchasing the award-winning (Winner of CCM Best VoIP Product
Award 2006) Accutone® USB400 VoIP Communication Headset. This highperformance headset is designed for professional Voice over IP communication,
whether it be SkypeTM chat or any proprietary software. Although the USB400 is tailormade for human voice applications, its 40mm custom-designed stereo speakers excels
in handling top notch hi-fi gaming as well as listening to music with your PC. Aside from
perfect sound reception, it is also equipped with Accutone's noise cancelling
microphone. On top of all that, we have reduced the size of the USB module, added
the control interface while still fitting it into a compact and stylish casing, giving you
digital audio control without compromising convenience.
So now, please spend some time to read through this entire manual to familiarize
yourself with this device, and again thank you for choosing Accutone as your
telecommunication headset brand.
Any PC or
Macintosh**
CM400
stereo headset
Part A. Understanding your Headset
Specifications
Main Switches & Interface
p.3
p.4
Part B. Installing your Headset
Connecting to the Computer
Adjusting your Headset
Multi-status LED Indications
Installing USB Driver & Software
p.5
p.5
p.6
p.6
Part C. Operating your Headset
Operating the Xear 3D Software
Verifying Successful Installation of the USB Driver
Configuring the Audio Devices in Windows®
p.9
p.10
p.10
Part D. Troubleshooting
AU400
USB controller
No sound coming from the headset
Cannot record sound from the microphone
Other problems
p.13
p.13
p.13
Part E. Useful information
** USB400 headset is compatible to both desktop and notebook computers with an USB jack. Only the
operating systems listed under "Operating Environment" in the section of Specifications on p.2 are applicable.
*** Outside the operating environments mentioned on page 2, the headset is not guaranteed to operate with all
computers. USB400 headset is not guaranteed to operate with home built computers, operating systems that
are personally up-graded or multiple operating systems. The headset is also not guaranteed to operate with
functions under system suspend, sleep and hibernation modes.
1
Precautions on Safety
Safety Standards - CE Mark & FCC Statement
Trademarks and Ownership
USB400 - Installation Guide & User Manual
p.14
p.14
p.14
A
[ inspiring people, inspiring change ]
Understanding your headset.
specifications
main switches and interface
Specifications.
Stereo Headset CM400
Cord
Mass
Receiver
Size
Type
Maximum input power
Impedance
Sensitivity
Frequency range
Microphone
Design
Type
Open circuit voltage level
Frequency range
USB Controller AU400
Frequency range
Data resolution
Sampling rate
Operating Characteristics Rx
Receiver gain
Output power
THD +Noise
S/N @ THD <0.4%
Master volume control range
Operating Characteristics Tx
Microphone gain
Volume control range
Power supply
Dimensions
Operating environment
Main Switches & Interfaces.
2m long
120 g (including controller)
AU400
40mm diameter
Open air dynamic driver unit
60 mW
32W
±15% at 1kHz, 1V
116±3dB(3mW/1CM)
140 - 20,000 Hz
CM400
Flexible boom microphone
Electret condenser
-47dB (0dB=1V/Pa)
20 - 20,000 Hz
20 - 20,000 Hz (headphone)
100 - 10,000 Hz (microphone)
16 bit
48 kHz Stereo
14dB Max.
35mW Max.
<0.4% @ P0=30mW 20~20,000 Hz
86dB
0~46.5dB attenuation
20dB Max.
+12dB ~ -34.5dB, 1.5dB step
USB bus power compliant (5V, 100mA)
(excluding projections)
approx. 28x65x18mm (w/d/h)
compliant operating systems:
Windows 98 SE/Windows 2000/
Windows Me/Windows XP
Apple Macintosh OSX
CPU: Pentium II 266 MHz or better
Main Switches and Interface
1.
2.
3.
4.
5.
6.
7.
8.
9.
10.
11.
12.
13.
Cable ends with USB plug
Multiple status LED-indicator (white/red/blue)
Silkscreened muting indications (microphone or speaker mute)
4-direction controlling switch (volume adjustments and muting)
Silkscreened volume indications
Cable ends with connection to headset
Microphone Capsule
Aluminium microphone voice tube
Ear Pad (including 40mm speaker chamber)
Adjustable voice tube holder
Microphone voice tube rotational pivot
Microphone connecting cable (with SR)
Extendable double-arm headband
USB400 - Installation Guide & User Manual
B
connecting the computer
adjusting the headset
multi-status LED indications
installing driver & software
TM
installing AccuSound software
Installing your headset.
[ inspiring people, inspiring change ]
Installation.
Installation.
B1. connecting the computer
Connect the USB plug extended from the USB400 headset to the USB port of your
notebook or desktop computer. The LED indicator will light up indicating correct
connection to the computer.
B3. multi-status LED indications
The LED-indicator on the controller will light up to indicate the various status of the
device. The definitions are listed as below:
_
+
to USB port
Steady WHITE light
Online & Standby
Flashing WHITE light
Data Being Received
Steady RED light
Speaker Muted
Steady BLUE light
Microphone Muted
Note that there can be combined-indications as well:
B2. adjusting the headset
There are multiple points of adjustment with the USB400 headset, designed for comfort
as well as accomodating different preferences. The double-arm headband (A) is
extendable on both sides to fit different head sizes; and the aluminum voice tube (B) is
rotatable so users can place the microphone closer to their mouth if neccessary. The
suggested distance between a user's mouth and the microphone is 1/2 inch.
The voice tube rubber holder (C) also allows
adjustments, so users can shorten the
extension of the microphone capsule when
needed.
A
B
USB400 Headset
C
LED indication:
steady WHITE
flashing WHITE
RED with steady WHITE
BLUE with steady WHITE
RED w/ flashing WHITE
BLUE w/ flashing WHITE
BLUE, RED & WHITE together
Meaning
device in standby mode ready to receive or transmit voice data.
device is operating, voice data is currently being received.
speakers of the headset are muted, while no voice data is currently being received.
microphone is muted, while no voice data is currently being received.
voice data is being received, users cannot hear anything because speakers are muted.
users should be able to hear voice data coming in, but microphone is muted.
both microphone and speakers are muted, meanwhile no voice data is being received.
B4. installing driver and software
To begin, you should restart your computer, and when your operating system finishes
loading, close all applications and connect the USB400 headset to any USB port in your
computer.
This manual will use Windows XP as demonstration but the steps should be identical for Win98SE, ME or 2000 versions.
Please note that after you plug in the USB400 headset, your operating system
may automatically launch the Hardware Installation Wizard. You should abort
such installation by pressing cancel, because you should use the Driver Software
CD for optimal performance.
* Apple Macintosh OS X automatically detects the USB device and loads up the driver instantly, no software or
driver installation is required.
USB400 - Installation Guide & User Manual
USB400 - Installation Guide & User Manual
B
Installing your headset.
connecting the computer
adjusting the headset
multi-status LED indications
installing driver & software
TM
installing AccuSound software
[ inspiring people, inspiring change ]
Installation.
Installation.
B4. installing driver and software
To be environmentally friendly, all Accutone drivers have been shifted from CD-rom
to web-distribution. Start off by restarting your Windows OS and upon restart, open
your internet browser, and log on to www.accutone.com, enter Global website. You
will see the following screen.
B4. installing driver and software
You will be directed to download
the file: USB400_08Driver.zip,
extract all the contents to your
desktop. Open up the folder
USB400 v1.0 and click on the
setup.exe to begin installation
of the driver and software. The
following screen will pop-up
once you start your installation:
Click on the CD-rom photo
under “downloads”, and enter
the product range selection
screen.
when reached this screen, press
Next to continue
Select computer headset by
clicking the small grey arrow
icon to enter the USB headset
drivers and manual page.
you have the option to install
only the USB driver or with the
3D Audio Demo program, we
recommend you check both and
click Next
Select USB400 by clicking on
the download button. You will
be brought to another page
where you can download the
driver file as well as a web
version of this user manual.
the setup program will install the
USB400 USB software to a
default path and folder
click Next
7
USB400 - Installation Guide & User Manual
USB400 - Installation Guide & User Manual
8
B
Installing your headset.
connecting the computer
adjusting the headset
multi-status LED indications
installing driver & software
TM
installing AccuSound software
[ inspiring people, inspiring change ]
Installation.
Installation.
Please note that in some Windows XP system, you may be prompt at this point
asking you about Windows Logo testing issues, simply ignore this message and
click Continue Anyway to continue installation.
the setup program should begin to
copy files into your system,
B5. installing AccuSoundTM Software
All Accutone USB headset comes with a proprietary-designed software for Digital Audio
Status Indication (DASI), called AccuSoundTM. This program will show the current muting
status of the selected USB Audio device, as well as the volume output level.
Within the zip file you’ve downloaded
in the last section, there is another
folder named AccuSound. Extract it and
launch the setup file accusound.exe.
after copying all the files, the
program will automatically install the
required drivers into your system,
please be patient as this may take a
little while.
after successful installation of the
drivers, you will have to reboot your
system, and when you do, you should
be able to see the accutone orange
logo displayed on the bottom right
corner icon tray.
If your PC doesn’t have Microsoft .NET
installed, this program will install it
automatically.
Click install to install .NET Framework.
Click OK to continue installation of
AccuSoundTM.
USB
Software
Icon
After that, if your PC already have
Microsoft .NET installed, this screen
will pop up.
The USB400 driver will only operate when connected to the USB port which you
have installed with. If your computer has more than one USB port, you can
determine if the port is the correct one by checking whether the orange
Accutone icon is in the icon tray as shown above.
9
USB400 - Installation Guide & User Manual
Click next to install AccuSoundTM
USB400 - Installation Guide & User Manual
10
B
connecting the computer
adjusting the headset
multi-status LED indications
installing driver & software
TM
installing AccuSound software
Installing your headset.
[ inspiring people, inspiring change ]
Installation.
Operation.
TM
B5. installing AccuSound Software
C1. operating the Digital Audio Controller (AU400)
Please read carefully the End-User
Licence Agreement for AccuSoundTM.
Select “I accept the terms in the
license agreement”
The AU400 Digital Audio Controller is an interactive remote control that directly
communicates with your PC. Adjusting the volume controls here actually changes the
volume settings in the operating system.
Multi-status LED indicator
Click next to continue installation.
Click the toggle switch up to increase speaker
volume.
Click the toggle switch to right once, the LED
turns to Red and mutes the speaker. Click the
toggle switch to right again to unmute.
The next screen will show you
installation details, like destination
folder and user information.
Click the toggle switch down to decrease
speaker volume.
Click Install to continue installation.
Click the toggle switch to left once, the LED
turns to Blue and mutes the microphone. Click
the toggle switch to left again to unmute. The
LED on the controller turns back to White.
After a few minutes of copying files,
this screen will pop up indication the
successful completion of AccuSoundTM.
Click Finish to exit installer.
11
USB400 - Installation Guide & User Manual
Note that the 4-direction controlling switch is designed for moving in the
specified four directions only. Do not try to press it downward like a button, as
this may result with either muting the speaker or microphone unexpectedly, or
worse may damage the controller itself.
If you are unsure of whether you have accidentally activated any mute function, always
check the LED-indicator to make sure. For details to the various LED-status, please
refer back to p.6 of this manual.
USB400 - Installation Guide & User Manual
12
C
Operating your headset.
[ inspiring people, inspiring change ]
operating digital audio controller
operating the sound configuration software
TM
operating the AccuSound software
Operation.
Operation.
C2. operating the Sound Configuration Software
The USB400 headset is equipped with a Sound Configuation software for sound
adjustments. You can open the program by simply double clicking on the orange
Accutone icon in the icon tray, as shown in section B4 of this manual.
In Main Setting tab, you can choose
your output device from headset to
desktop speakers.
USB400 is also equipped to be used
for digital entertainment
applications like surround sound
movie viewing and gaming.
When connected to a desktop
speaker, USB400 can simulate 7.1
surround sound using Xear 3D
technology.
Simply select your application here.
When selected Xear 3D as your
DSP mode, you can experience the
7.1 3D-surround effect even with
your headset. Choose headset as
your Output Device, turn on Xear
3D, and click the rotating icon
under the 7.1 Virtual Speaker
Shifter during your favorite audio
applications.
In Mixer tab, the top panel is the
Playback Volume Control, and the
bottom panel is the Recording
Volume Control.
In Playback Volume Control, you
can adjust the main volume and
balance by adjusting the knob.
Other volume controls includes
Wave, SW Synth., CD Player and
Microphone realtime playback.
Microphone realtime playback adjusts the feedback volume of the microphone to
yourself. The small hammer icon next to the microphone volume control opens up the
microphone advanced adjustments. You can choose to turn on the microphone
playback mute or microphone boost function.
Please note that in muting function inside the Playback Volume Control advanced microphone adjustments ONLY mute the volume of the microphone
going to the speaker of the headset, the user on the other end can still hear you.
You can also choose to use S/PDIF output
when connected to other digital audio devices.
13
C2. operating the Sound Configuration Software
USB400 - Installation Guide & User Manual
In Recording Volume Control, you can choose the Stereo Mix volume
control and the Microphone transmit/record volume control. In this
microphone control, you are adjusting the actual outgoing volume. Again,
the hammer icon opens up the advanced setting which include mute and
microphone boost.
USB400 - Installation Guide & User Manual
14
C
Operating your headset.
[ inspiring people, inspiring change ]
operating digital audio controller
operating the sound configuration software
TM
operating the AccuSound software
Operation.
Operation.
C2. operating the Sound Configuration Software
The Effect tab controls the various sound effect you can use with your USB400 headset.
There are three panels here: Environment Type, Environment Size and Equalizer.
There are 4 standard environment
types: bathroom, opera house,
underwater and music lounge.
Aside from these four, you can
choose from a drop-down menu
under More Option for 27 other
environment types. Under
environment size, there are 3
selection: small, medium & large.
C3. operating the AccuSoundTM Software
The Digital Audio Status Indication (DASI) software AccuSoundTM is designed to show
the current muting status of the selected USB Audio device, as well as the volume output
level. It’s very common that users forget that they have muted their headset, and this can
sometimes lead to inconvenience when they are in a hurry to answer an incoming Skype
chat. To avoid this panic, AccuSoundTM will remind users that they have muted their
headset, as well as what the current volume will be if they unmute their headset.
To verify that AccuSoundTM has been successfully installed, check the notification area at
the bottom right icon tray.
TM
AccuSound Icon
In the equalizer panel you can
adjust loudness of various
frequencies and save such settings.
You can also choose from the 16
preset options for different types of
music.
TM
AccuSound is a self-initiating program that will automatically pop-up whenever the
headset’s speakers are muted.
Under Karaoke tab, you can adjust
the microphone effect by selecting
the ON button, and checking the
Microphone Echo option.
Various Karaoke functions can be set
in this section, from adjusting echo
loudness to shifting key. You can
even remove the vocal sound from
a n y s o n g u s i n g t h e Vo c a l
Cancellation option, so you can have
a music-only track.
Speakers Muted
Speakers Unmuted Fading
Users should be careful not to set the volume too high prior to unmute, as this
may cause damage to hearing.
These functions are applicable to all
audio programs.
15
Speakers Unmuted
As long as the speakers are muted, the small screen will remained on screen. Note that
in the Speakers Muted diagram, the volume bar on the right is zero, while the words
“Volume at:” indicates 80.00%. The 80.00% indicates what the volume will be once the
speakers become unmuted. Users can adjust this volume level by pressing the volume
control stick downwards during mute; the volume % will decrease accordingly.
USB400 - Installation Guide & User Manual
USB400 - Installation Guide & User Manual
16
D
Troubleshooting.
[ inspiring people, inspiring change ]
verifying successful installation of drivers
configuring your audio devices
frequently asked question
Verification.
Configuration.
D1. verifying successful installation of the drivers
For First-time Users
You have followed all the instructions so far, but there’s still no sound
coming from the headset speakers, the most basic thing to do is doublechecking whether the drivers have been properly installed.
The simplest way to check whether the USB controller is properly
installed, make sure the LED indicator is lit, and press mute to see if the
color changes, if so, then the device is properly installed, if not you should
check the details settings as suggested below.
For most Windows operating systems (Windows 98SE, Windows ME, Windows 2000
Professional, Windows XP and Windows Vista), you can verify the installation of the
USB Audio Device - driver by looking into the Device Manager:
>
click on Start, Settings, and Control Panel.
>
in control panel, click on the System icon
>
open up the System Properties page
>
click on the Device Manager tab
(or Hardware tab and then Device Manager button for Windows XP)
>
in Device Manager, make sure that the View Device by Type is selected.
17
USB400 - Installation Guide & User Manual
D1. verifying successful installation of the drivers
Checking the drivers within the Device Manager
>
scroll down and find the Universal Serial Bus Controllers category
>
open it up and see if you can find the USB Composite Device
>
if yes close it and look for the Sound Video and Game Controllers category
>
open it up and find the USB Sound Device (or Accutone Audio adaptor)
>
if you see both these drivers installed, then the installation is successful
>
if you cannot locate them, try to unplug the USB controller, re-boot the machine, and
do the installation again or check the troubleshooting section in this manual.
D2. configuring your audio devices
For computers which come with an in-built sound card, your have a choice of using the
USB audio device or the original sound card for your multimedia applications. To
configure the currently selected audio device:
>
go to the Control Panel, click the
Multimedia icon or Sounds and
Multimedia icon(for Windows Me, 2000
and XP)
>
select the Audio or Voice tabs, in either one
of the pages you will see Preferred Device
selected for Sound Playback or Sound
Recording to be Accutone USB Audio
Adaptor or USB Audio Adaptor
>
click the arrow within the selection and you
will find your original sound card's name and
choose your preference
(**Remember to close all programs before
you change this settings. Restart your audio
applications if the change is not effective.)
USB400 - Installation Guide & User Manual
18
D
Troubleshooting.
[ inspiring people, inspiring change ]
verifying successful installation of drivers
configuring your audio devices
frequently asked question
Troubleshooting.
Troubleshooting.
D3. frequently asked questions
No sound coming from the headset
>
the USB plug is not properly plugged into the jack : check if the LED is on or replug the
headset and restart installation
>
the headset was connected during music software being played : close all software and
restart installation
>
the audio device selected in your operating system is not correct : go to control panel,
select Sounds and Multimedia Properties or Sounds and Audio Device
Propeties (XP), open Sound Playback tab and select USB Audio Device or
Accutone Audio Adaptor in the Preferred Device scroll-down selection.
>
the volume control for your operating system or music software is set to mute : uncheck
mute from your system or music software.
>
the computer does not recognize the USB headset: restart your system or re-install the
USB headset driver by unplugging and re-plugging the USB plug.
Cannot record sound from the microphone
>
the USB plug is not firmly plugged it : check the connection of the headset with the
computer.
>
the mic muting function is on : go to Sound and Multimedia (Audio Device)
Properties and select Volume control for Sound Recording to check Selected in
the Microphone column.
>
the audio device selected in your operating system is not correct : refer to the above
section on the same problem but open the Sound Recording tab instead.
Multi-directional control button not functioning
>
the USB plug is not firmly plugged it : check the connection of the headset with the
computer.
>
the LED-indicator shows a steady white, and no matter what which angle I press the
control button, the LED-indicator doesn’t change colors. : the proper audio device
driver is not being used, go to Sound and Audio Device Properties and select the
Sound Playback and Sound Recording tabs to see if the proper USB driver (CMedia or Accutone USB Audio Device) is selected, if not choose from the drop down
menu to find it.
19
USB400 - Installation Guide & User Manual
D3. frequently asked questions
Cannot activate AccuSoundTM
>
I have completely installed all drivers and software from the installation CD, but when I
press speaker mute, the AccuSoundTM program doesn’t initiate : check the notification
area in the icon tray at the bottom right of your desktop to see if the AccuSoundTM
icon is there.
If you cannot find the icon, go to Start > All Programs > Accutone > Accusound
> and double click on the AccuSoundTM icon to start up the program. It may seem like
nothing is happening after you start AccuSoundTM because the program runs in the
background. Test to see if the program is functioning by clicking mute in your AU400
USB controller.
If you can see the AccuSoundTM icon, but it still doesn’t activate when you press the
click mute in your controller, it is possible that Windows is not using the proper USBAudio driver, or possibly the driver for your sound card. If you have a keyboard which
supports sound control or volume adjustments, try pushing the mute button on your
keyboard, or simply go to Control Panel and select Sound and Audio Device
Properties, under Sound Playback and Sound Recording tabs to see if the
proper driver has been selected.
Other problems
>
I'm using Windows 98 or 98SE, and the unit just doesn't work properly no matter how
many times I re-install the drivers: PCs running Windows 98SE with AMD processor at
350MHz or faster, and pc that uses VIA Technologies USB Controller will require a
Microsoft USB Update Patch file, go to www.accutone.com.hk website, under "more
information" in the AU400 adaptor section, click "Microsoft Windows 98 Driver
Update" and follow the instructions.
>
can hear sound but unable to listen to CD music-playback: make sure CD-ROM
supports the digital play function, check with your CD-ROM manufacturer.
* For problems not listed in the above section, or more detailed instructions to various troubleshooting, please refer back
to FAQ:troubleshooting section in our website at http://www.accutone.com.hk
USB400 - Installation Guide & User Manual
20
E
Useful Information
product disposal instructions
precautions on safety
safety standards - CE Mark
trademark and ownership
[ inspiring people, inspiring change ]
Useful Information.
Useful Information.
E1. product disposal instructions
The symbol shown here and on the product means that the product is
classified as Electrical or Electronic Equipment and should not be disposed
with other household or commercial waste at the end of its working life.
The Waste if Electrical and Electronic Equipment (WEEE) Directive (2002
/ 96 / EC) has been put in place to recycle products using best available recovery and
recycling techniques to minimise the impact on the environment, treat any hazardous
substances and avoid the increasing landfill.
Product disposal instructions for residential users
When you have no further use for it, please remove any batteries and dispose of them
and the product as per your local authority’s recycling processes. For more information
please contact your local authority or the retailer where the product was purchased.
Product disposal instructions for business users
Business users should contact their suppliers and check the terms and conditions of the
purchase contract and ensure that this product is not mixed with other commercial
waste for disposal.
E2. precautions on safety
This product had been subject to testing requirement for the CE mark, and has been approved to claim
the CE mark for EMC standards (EN55022:09.98+A1:10.00+A2:01.03, EN55024:09.98+A1:10.01+A2
:01.03). The validity of the CE marking is restricted to only those countries when it is legally enforced,
mainly in the countries of the European Economic Area.
FCC Registration Information to the end user.
Modifications not authorized by the manufacturer may void users authority to operate this device.
NOTE: This equipment has been tested and found to comply with the limits for a Class B digital device,
pursuant to Part 15 of the FCC Rules. These limits are designed to provide reasonable protection against
harmful interference in a residential installation. This equipment generates, uses and can radiate radio
frequency energy and, if not installed and used in accordance with the instructions, may cause harmful
interference to radio communications. However, there is no guarantee that interference will not occur in
a particular installation. If this equipment does cause harmful interference to radio or television reception,
which can be determined by turning the equipment off and on, the user is encouraged to try to correct
the interference by one or more of the following measures:
- Reorient or relocate the receiving antenna
- Increase the separation between the equipment and receiver
- Connect the equipment into an outlet on a circuit different from that to which the receiver is connected
- Consult the dealer or an experienced radio/TV technician for help.
Warning - You are cautioned that any change or modification not expressly approved in this manual
could void your authority to operate this equipment.
E4. trademark & ownership
>
Listening with the headset at high volume may damage your hearing.
>
Adjusting the volume for microphone or headphone too high may cause squealing
(feedback sound) and can damage your hearing.
>
Do not use while driving and cycling.
>
Place product far away from water, fire, extended exposure of direct sunlight or magnetic
field, and places of excessive dust, moist, rain, shock or electromagnetic radiation.
>
Do not drop your headset or subject it to external shock which may cause malfunction.
>
Do not disassemble or attempt to open up the casing of either adaptor or headset.
>
Whenever unplugging the headset or the adaptor, apply force to the plug part only.
Jerking the cord instead of the plug may cause damage to the product.
>
Do not use any liquid substance to clean the casing of the product.
21
E3. safety standards - CE Mark & FCC Statement
USB400 - Installation Guide & User Manual
D
Accutone and the logo design combined are trademarks or registered trademarks of Accutone
Technologies Limited.
D
Microsoft and Windows are registered trademarks or trademarks of Microsoft Corporation in the United
States and or other countries.
D
IBM and PC/AT are registered trademarks of International Business Machines Corporation.
D
Pentium is a trademark or registered trademark of Intel Corporation.
D
Skype is a trademark or registered trademark of Skype Technologies S.A.
D
Apple Computer Inc. has intellectual property rights over "Apple", "Macintosh" and "OSX".
D
In this manual, Microsoft® Windows® XP Home Edition and Microsoft® Windows® XP Professional Edition
are referred to as Windows XP, whereas Microsoft® 2000 Professional Edition is referred to as Windows
2000, Microsoft® Millennium Edition is referred to as Windows Me, and Microsoft® Windows® 98 Second
Edition is referred to as Windows 98 SE.
D
All other names of systems and products mentioned are trademarks or registered trademarks of their
®
respective owners. ™ marks and marks are omitted for convenience purposes.
USB400 - Installation Guide & User Manual
22