1
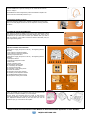
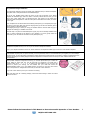
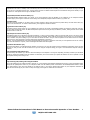
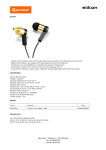
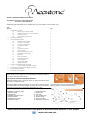
Accutone Telephone Amplifier User Manual
This Guide Covers the Following Model;
- Accutone Model ASP2200
Replacement parts and accessories are available from your usual supplier or from Accutone.co.uk
Index
Section No
1.
Page
Understanding your headset
1
1.a)
Different Types of Telephone Headsets
1
1.b)
Identifying key components of a telephone headset
1
1.c)
Wearing your headset
2
1.d)
Using the flexible microphone boom
2
2.
Using the quick disconnector
2
3.
The Accutone ASP2200 Amplifier
2
3.a)
Main switches and connections
2
3.b)
Connecting to your telephone
2
3.c)
Setting up your headset stand
2
3.d)
Connecting your headset
3
3.e)
Power
3
3.f)
Configuring the control unit
3
3.g)
Power on/off switch
4
3.h)
Telephone/computer selection switch
4
3.i)
headset/handset selection switch
4
3.j)
Mute switch
4
3.k)
Volume control switch
4
3.l)
Microphone volume switch
4
3.m)
Online LED indicator
4
3.n)
Low battery LED indicator
4
3.o)
Headset online indicator
4
4.
Using the Accutone ASP2200 Headset and Amplifier
5.
Trouble shooting the Accutone ASP2200 Amplifier and Headset
5
6.
Accutone ASP2200 Specifications
5
7.
Information & Product support line
5
4.)
4
Receiving calls/making calls using the headset
4
1) UNDERSTANDING YOUR HEADSET
Before setting up your headset it is worth spending a few minutes getting to
know how it works and what it can do.
1.a) Monaural and Binaural telephone headsets
Telephone headsets come in monaural (single ear piece) and binaural (dual
ear piece) to suit different needs.
A monaural headset will be convenient for users who wish to be aware of their
surroundings where as a binaural is better for people who need to concentrate
when their environments are noisy and cut themselves off. (1 & 2)
1.b) Identifying key components of a telephone headset
1.
2.
3.
4.
5.
6.
7.
Headband - metallic or plastic
Stabiliser earpad
Headset body
Rotatable microphone boom
Speaker chamber
Leatherette ear cushion
Microphone capsule
The most common styles of wearing headsets are over-thehead (as shown in 1 & 2) and over-the-ear (3).
8. Quick disconnector
9. Clothing clip
10. Curly cord
11. RJ.11 modular plug
12. Flexible earloop
13. Foam ear cushion
14. Microphone windscreen
Please Follow the Instructions in This Manual to Ensure Successful Operation of Your Headset.
Helpline 0871 200 2276
1
1.c) Wearing your telephone headset
To accommodate left or right ear wearing you can rotate the mic boom as
shown in image A.
The headband can also be adjusted to position the stabiliser earpad in the
correct and most comfortable position for you.
1.d) Using the flexible mic boom
Accutone's telephone headsets have rotatable and flexible mic booms which
allow you to easily adjust the boom so the mic capsule is correctly positioned,
see below.
2.) USING THE QUICK DISCONNECTOR
Each Acctuone telephone headset comes with a quick disconnector linking
your headset portion to the modular plug cable (bottom cord). This is for your
convenience, so you don't have to remove your headset when you want to
leave your desk for a short while. Connect the cables as illustrated, until you
hear a slight clicking sound.
3.) THE ACCUTONE ASP2200 AMPLIFIER
3.a) Main switches and connections
1. External DC supply jack (6V DC to 9V DC) - Not supplied, optional
accessory
2.
3.
4.
5.
RJ11 socket for telephone handset
RJ11 socket for input from telephone
Battery Compartment Door
External DC supply jack (6V DC to 9V DC) - Not supplied, optional
accessory
6. Microphone selector
7. Telephone configuration switch
8. Mute switch
9. Power <On/Off> switch
10. Microphone volume switch
11. Low battery LED indicator
12. Volume control switch
13. LED Mode / Power saving switch
14. Online LED indicator
15. Reception volume gain controller
16. Modular jack for telephone headset
17. Headset/handset selection switch
18. Microphone volume gain controller
3.b) Connecting to your telephone
Unplug the handset from your telephone base unit and insert it to the
RJ11 socket for telephone handset (2) on the amplifier.
Use the phone cord provided with RJ-11 plugs on both ends to
connect the amplifier to your telephone. Plug one end of the cord into
your telephones handset socket (A) and the other end into the
telephone input (3) on the back of the amplifier.
Please Follow the Instructions in This Manual to Ensure Successful Operation of Your Headset.
Helpline 0871 200 2276
2
33.c) Headset Hanger Installation
You will find the following 3 parts (see image right) packaged with your Accutone Amplifier.
One plastic and 2 metal parts that form the headset hanger.
To set up your headset hanger insert the piece (I) first into the bottom of the TM220
Amplifier as illustrated right, make sure that it is correctly inserted into the track, you will
feel a ‘click’, which means that it is inserted correctly. Then gently turn the metal piece
inwards towards the amplifier so that the entire piece is fastened to the bottom, as shown
on the right.
Upon completion of the above attach the remaining metal piece (II) to the plastic piece (III)
as shown on the right. Make sure that the hanging hook (A) and the cord winders (B) are
facing opposite in opposite directions.
The hanging hook (A) is where you hang your headset and the and the cable tidy (B) is
designed for winding your headset cord around.
The final step is to place the assembled pieces (II) & (III) into the already installed metal
base (I) which is fastened to the bottom of your amplifier. To do this, gently insert the
metal rods (I) into the holes at the bottom of the plastic piece (III).
33.d) Connecting your headset
The ASP2200 amplifier allows you to use any of the Accutone Telephone headsets.
Plug in your telephone headset to the RJ-11 socket marked for the telephone headset (16) on the front of the ASP2200 amplifier.
3.e) Power
Your ASP2200 requires power to operate correctly, it can be powered by either 2 x AA sized batteries (not supplied) or a mains adapter
(optional extra). To open the battery compartment, slightly depress the compartment lid (4) and slide it outwards. Install batteries with
polarities according to the battery diagram inside the compartment. Close the lid and turn the power "ON". Alkaline batteries are
recommended.
3.f) Configure the Control Unit
The 6-position telephone configuration switch (7) on the side panel allows you to select the
proper setting to ensure that your unit will work with your telephone. The switch has 6
positions, which are (1 - 2 - 3 - 4 - 5 - 6). Before your start make sure you turn down the
volume to protect your hearing. Put the headset over your head and switch the
Headset/Handset Switch (17) to the headset position (as shown on the right). Now select
each of the positions on configuration switch until you can hear a clear dial tone.
If you hear a clear dial tone, then your connection is working.
Note: that there may be 2 matching settings, choose the clearer setting or either one if both
perform the same.
Please Follow the Instructions in This Manual to Ensure Successful Operation of Your Headset.
Helpline 0871 200 2276
3
3.g) Power ON/OFF switch (9)
The ASP2200 will switch to standby mode automatically after each extended period of inactivity, however we recommend turning it off when
not in use for a prolonged period of time. Turning off the unit does not affect normal telephone communication through the handset, so you
can answer or make phone calls through the handset as usual.
3.h) Headset/handset selection switch (17)
The Headset/handset selection switch (17) allows you to choose between using the handset of your telephone or the telephone headset
provided. Again, don't forget to select the correct setting of the telephone/computer selection switch (13), before use.
3.i) Mute switch
The mute switch (8) enables you to place a caller on hold by pressing it down. When the button is pressed down, the caller cannot hear you,
but you can still hear them. To resume communication, press it again to release the button.
3.j) Volume control switch (12)
The sliding volume control switch (12) is for adjusting the volume of the sound to the headset speaker. By sliding the button left and right,
you can obtain the desired volume. On different telephone systems the volume gain may be different; however, setting the level to the middle
should be safe for initial use.
3.k) Microphone volume switch (10)
The ASP2200 allows you to adjust the microphone sensitivity. To fine tune the sensitivity, make sure that the slide control is set to the middle
on initial adjustment, then make a call and talk as usual using the headset. Slowly slide the microphone volume switch (10) until the desired
level is reached. The person talking to you at the other end should be able to tell you when the optimum sound and tone level is reached.
Once this is set, there should be no need to make further adjustments in the future.
Caution: It is recommended that users should avoid adjusting the sensitivity to maximum at all times, as over-adjustment of the mic volume,
may cause the headset to "squeal", which will damage the headset and the amplifier.
3.l) Online LED indicator (14)
The online LED indictor (14) indicates that the amplifier is currently in use. The LED will be lit during a telephone conversation, and it will shut
off after you end your call. The LED will also be lit if you are using the computer setting, as long as it is connected and computer setting is
selected.
3.m) Low battery LED indicator (11)
The low battery LED indicator (11) will be lit when the battery for the amplifier is running low. Depending on battery condition you should still
be able to operate the amplifier when this indicator is illuminated, but we recommend you replace the batteries as soon as possible to avoid
the amplifier shutting down during a call.
4) USING THE ACCUTONE ASP2200 AMPLIFIER
4.a) Receiving calls/making calls using the headset
Lift up the handset from its cradle and place it off-hook, or if your telephone has handsfree speakerphone function, choose the headset switch
and press the speakerphone button on your telephone. Make sure the headset position is selected on the headset/handset selection switch
(17). After finishing a call, return the handset to its cradle as usual, or turn off the speaker-phone button on your telephone. Remember to
press the mute button (8) to put a caller on hold, and simply press it again to release the mute function.
Please Follow the Instructions in This Manual to Ensure Successful Operation of Your Headset.
Helpline 0871 200 2276
4
5) TROUBLESHOOTING THE ACCUTONE ASP2200 AMPLIFIER
Q, There is no response from the unit.
Q, I cannot hear any dial tone or my caller speaking to me when using the headset supplied.
A, Check if the batteries are low, replace if required, check to see if the batteries are correctly inserted or make sure the on/off switch is
switched to ON.
Q, My Caller cannot hear me at all or cannot hear me very well.
A, Check the Headset/Handset and Telephone/Computer switches are properly selected.
A, Check to see if the telephone patch cable is properly connected.
A, Check the volume control and mute button are adjusted properly.
Q, I hear my voice too loud and there is a squealing sound.
A, Check if the Configuration Switch position is properly selected.
Q, When using with my computer, the sound is too loud even though the volume is set at minimum.
A, Your computers sound card also has a volume setting which may need altering.
6.) SPECIFICATIONS
Standard Operating Voltage
Operating Current (Max)
Standby Current
Standby Mode Activation
(without signal)
Amplifier Gain
- Speaker
- Microphone
Battery
Adapter DC Input
(Adapter not included)
3V DC
600 mA
17 mA
2~3 min.
13 dB (Max)
30 dB (Max)
2 x size "AA"
6V~9V DC
7) INFORMATION!
For your safety we advise that you keep this headset and its components away from any liquids. Do not attempt to effect repairs yourself;
seek qualified advice. Always operate at a safe volume level to protect your hearing. Take regular breaks when using telephone headsets.
Product Support Line
If, after following these instructions and carefully checking the settings, you require assistance please call 0871 200 2276 between 9.00am
and 5.30pm Monday to Friday (except public holidays). Calls are charged at national rate
A copy of the Declaration of Conformity for this product can be found at www.easidirect.co.uk
Please Follow the Instructions in This Manual to Ensure Successful Operation of Your Headset.
Helpline 0871 200 2276
5