1
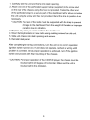
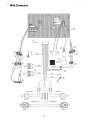
Connection
1. AUX IN L/RNIDEO
2. Rear Monitor 2, Camera
3. Bluetooth Microphone
4. Power Antenna Wire(Blue): Connect to a motorized (power) antenna and/or
to a remote turn-on lead for an amplifier.
5. Front and Rear RCA Outputs(Black/Gray)
6. Left Front Speaker(White, White/Black)
7. Left Rear Speaker(Green, Green/Black)
8. Right Rear Speaker(Violet, Violet/Black)
9. Right Front Speaker(Gray, Gray/Black)
10. ACC Power Wire(Red): Connect to a +12 volt circuit that is only live when the
ignition is on.
11. Parking(Pink): Connect to negative(-) parking brake wire. This wire MUST BE
connected in accordance with the traffic law. It is the end-user's responsibility
to make sure this wire is connected properly.
12. Back Camera(Green with white stripe).
13. Ground Wire(Black): Securely fasten the Ground wire to grounded metal part
of the car's chassis. If you cannot find an existing bolt or screw to fasten it to,
drill a hole in the metal and secure it with a screw. To ensure a good ground,
remove any paint or greese from areas where the wire will contact the surface.
14. Constant Power Wire(Yellow): Connet the 12V PLUS constant power wire to
a live 12 volt wire in the vehicle. Before making a connection, check that the
wire you intend to connect to is always live, even when the car's ignition is
turned off. If a live wire is not found, route the wire to the car's fuse block and
connect it to a live circuit there.
15. Illumination (Orange)
16. Car Phone (Brown)
17. Media connecting cable
18. Rear Monitor 1
/Center RCA Output(Gray): The center output must be connected to an external
amplifier for 3D or 6CH mode.
/Subwoofer RCA Output(Blue): The subwoofer output is available in all sound/
audio modes.
19. Rear Zone Out L/R
20. Radio Antenna
Replacing the Fuse
When replacing a fuse, be sure to use correct type and amperage to avoid
damaging the unit. This unit uses one 1OAMP AGC fuse, located in the black filter
box in-line with the main wire harness.
Reconnecting the Battery
When wiring is completed, reconnect the battery negative terminal.
8