1
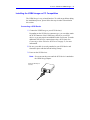
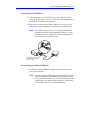
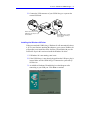
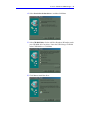
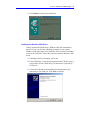
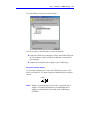
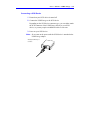
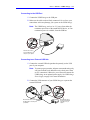
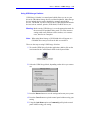
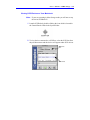
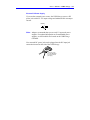
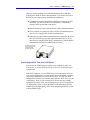
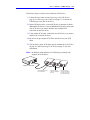
User’s Guide
USBXchange™
Copyright
© 2000 Adaptec Inc. All rights reserved. The user may print one copy for
personal use. Production of multiple copies or copies for sale is strictly
prohibited.
Reading This Document
To read this document
1 Select the hand tool
, and click any part of the document.
2 Press Return, or click to progress through the document.
While you read the document, the hand tool changes
.
3 Continue to press Return, or click until you reach the end of the
document.
At the end of the document, the hand tool changes
.
To reverse direction in this document, do any of the following:
♦ Press Shift-click.
♦ Press Shift-Return.
The hand tool changes
.
♦ To return to the beginning of the document, press Option-click.
The hand tool changes
.
U se r’s G u i de : US B X ch a ng e
•2
Introduction
This user’s guide explains how to use the USBXchange to allow SCSI
devices to plug into the Universal Serial Bus (USB) port of your PC
compatible or Apple Macintosh computer.
The SCSI controller in the USBXchange allows you to connect up to
seven SCSI devices to your desktop, portable PC, or Macintosh computer.
These devices include fixed and removable drives, CD-R/W drives, DVD
drives, hard disk drives, magneto-optical (MO) drives, and most scanners.
The USBXchange provides transfer rates of up to 1.5 MBps or a
maximum sustained rate of 700 KBps.
Overview
The USBXchange is designed as an integrated adapter with a 50-pin highdensity (SCSI-2) connector. For installation, you simply connect the male
HD50 SCSI end of the USBXchange to the female HD50 SCSI connector
on your SCSI device. See Installing the USBXchange on PC Compatibles
on page 5, or Installing the USBXchange on a Macintosh on page 15 for
more information.
HD50 SCSI connector
USB connector
USBXchange
HD50 SCSI-2 Connector
The USBXchange is designed to act as a self-powered device and receives
its power from either the termination power line of attached SCSI devices
or, if not present, from the USB bus. In some cases, especially when using
unpowered USB hubs with attached SCSI devices which do not supply
SCSI termination power, the USB bus cannot supply the needed power for
the USBXchange to operate. In these cases, you may need an external DC
power source. See USBXchange Power Supply on page 13 (PC) and
USBXchange Power Supply on page 20 (Mac) for more information.
U se r’s G u i de : US B X ch a ng e
•3
Note: Adaptec strongly recommends that you plug the USBXchange
directly into a USB port on your system. If you must connect
through a USB hub, use only a self-powered USB hub.
The USBXchange adapter is hot-pluggable, that is you can connect and
disconnect it from a live system. However, by industry standards, SCSI
devices are not hot-pluggable.
Contents of Kit
♦ USBXchange Adapter to 50-pin High-Density SCSI Connector
♦ 50-25 Pin Converter
♦ Installer CD-ROM with Mac and PC Drivers and Electronic User’s
Guide
♦ Quick-Install Guide (printed on the CD jacket)
♦ Registration Card
System Requirements
PC Compatible
♦ Desktop or laptop PC compatible with a USB port
♦ Windows® 98, Windows 98 Second Edition, or Windows® 2000
♦ UL approved DC adapter (optional) for external power supply
Macintosh
♦ Any Apple Macintosh with a built-in USB port
♦ Mac OS v.9.0.4 or above for fixed and removable drives
♦ Mac OS v.8.6 or 9.x for other SCSI peripherals
♦ Apple USB software version 1.4.1 or later
♦ UL approved DC adapter (optional) for external power supply
U se r’s G u i de : US B X ch a ng e
To locate specific information covered in this user’s guide, refer to the
following table:
For information about…
Go to…
PC Compatibles
Installing the USBXchange on PC
Compatibles
page 5
Connecting a SCSI Device
page 5
Connecting to the USB Port
page 6
Connecting to an External USB Hub
page 6
Installing the Windows 98 Driver
page 7
Installing the Windows 2000 Driver
page 9
Uninstalling the USBXchange Driver for
Windows 98 and Windows 2000
page 12
USBXchange Power Supply
page 13
Macintosh
Installing the USBXchange on a Macintosh
page 15
Installing the Driver Software
page 15
Connecting a SCSI Device
page 16
Connecting to the USB Port
page 17
Connecting to an External USB Hub
page 17
Using USBXchange Switcher
page 18
Viewing SCSI Devices on Your Macintosh
page 19
USBXchange Power Supply
page 20
SCSI
Understanding SCSI
page 22
SCSI IDs
page 22
Terminating the SCSI Bus
page 22
Connecting to More Than One SCSI Device
page 23
Problem Solving
Troubleshooting
page 25
Adaptec Customer Support
page 28
•4
U se r’s G u i de : US B X ch a ng e
•5
Installing the USBXchange on PC Compatibles
The USBXchange is easy to install and use. To avoid any problems during
the installation process, please follow the steps in order as described in
this section.
Connecting a SCSI Device
1 Connect the USBXchange to your SCSI device(s).
Depending on the SCSI device connector type, you can either attach
the SCSI connector of the USBXchange directly to your SCSI
device, or you may require an additional cable or converter. To attach
additional SCSI devices, connect them using a SCSI chain. See
Connecting to More Than One SCSI Device on page 23, for more
information.
2 Be sure your cable is securely attached to your SCSI device and
fastened in place with the built-in locking clamps.
3 Power on the SCSI devices.
Note: Do not turn on the power until the SCSI device is attached to
the USBXchange adapter.
Attaching the USBXchange to a
SCSI device
U se r’s G u i de : US B X ch a ng e
•6
Connecting to the USB Port
1 After connecting to your SCSI devices, if your computer is not
powered up, then power it up now. Connect the USB connector into
the USB port located on your computer.
2 Make sure the cable ends are firmly connected. Do not force your
connections as this may damage your system or the USBXchange.
Note: The USBXchange receives its +5V power from either the
terminator power line of the attached SCSI device, or if no
termination power is available, it switches automatically to
receive the power from the USB bus.
Attach the USB connector from
the USBXchange to the USB
port on your computer
Connecting to an External USB Hub
1 Connect the external USB hub (purchased separately) to the USB
port of your computer.
Note: To ensure proper operation, Adaptec recommends using only
self-powered hubs (only hubs that receive their power from
an A/C connection). Otherwise, you will need to connect the
USBXchange to an optional power supply. See USBXchange
Power Supply on page 13 for more information.
U se r’s G u i de : US B X ch a ng e
•7
2 Connect the USB connector of your USBXchange to a port on the
external USB hub.
Attach the USB connector from the
USBXchange to the USB port on your
external USB hub
Attach the USB connector from the
external USB hub to the USB port
on your computer
Installing the Windows 98 Driver
When you attach the USBXchange, Windows 98 will automatically detect
it. If it is your first time attaching the adapter to your system, Windows 98
will prompt you to install the driver from the CD included with your kit.
Follow the steps in this section to install the Windows 98 driver:
1 If Windows 98 is not running, start it now.
2 If the USBXchange is not already plugged into the USB port, plug it
in now. Make sure the USBXchange is connected to a powered-up
SCSI device.
3 An Add New Hardware Wizard dialog box should appear after
connecting to your USB port. Click Next to continue.
U se r’s G u i de : US B X ch a ng e
•8
4 Select Search for the best driver... and then click Next.
5 Select CD-ROM drive for the Add New Hardware Wizard to search
your CD-ROM drive for drivers. Insert the USBXchange CD-ROM
in the CD-ROM drive. Click Next.
6 Click Next to install the driver.
U se r’s G u i de : US B X ch a ng e
•9
7 Click Finish to complete the installation.
Installing the Windows 2000 Driver
When you attach the USBXchange, Windows 2000 will automatically
detect it. If it is your first time attaching the adapter to your system,
Windows 2000 will prompt you to install the driver from the CD included
with your kit. Follow the steps in this section to install the Windows 2000
driver:
1 If Windows 2000 is not running, start it now.
2 If the USBXchange is not already plugged into the USB port, plug it
in now. Make sure the USBXchange is connected to a powered-up
SCSI device.
3 A Found New Hardware Wizard dialog box should appear after
connecting to your USB port. Click Next to continue.
U se r’s G ui de : US B X ch a ng e
• 10
4 Select Search for a suitable driver... and then click Next.
5 Select CD-ROM drives for the Found New Hardware Wizard to
search your CD-ROM drive for drivers. Insert the USBXchange
CD-ROM in the CD-ROM drive. Click Next.
U se r’s G ui de : US B X ch a ng e
6 Click Next to install the driver.
7 Click Finish to complete the installation.
• 11
U se r’s G ui de : US B X ch a ng e
• 12
Uninstalling the USBXchange Driver for Windows 98 and
Windows 2000
Follow these steps to uninstall your USBXchange driver:
1 Remove the USBXchange from the USB port of your system before
running the device driver Uninstall utility.
2 Insert the USBXchange Installer CD into the CD-ROM drive.
3 On your desktop, double-click on the My Computer icon, point the
cursor on your CD-ROM drive icon and double-click again.
4 Double-click on the Adpusbui.exe file.
5 Click the Continue button on the next Windows dialog box.
U se r’s G ui de : US B X ch a ng e
• 13
6 A Windows dialog box will appear when you have successfully
uninstalled the USBXchange driver:
USBXchange Power Supply
The USBXchange receives its power from either the termination power
line of attached SCSI devices or, if not present, the power is automatically
switched to the USB bus. In some cases, especially when using
unpowered USB hubs and the attached SCSI devices do not supply SCSI
termination power, the USB bus cannot supply the needed power for the
USBXchange to operate. In these cases, you may need an external DC
power supply.
Note: Adaptec strongly recommends that you plug the USBXchange
directly into a USB port on your system. If you must connect
through a USB hub, use only a self-powered USB hub.
With Windows 98 SE and Windows 2000, you will receive an error
message if the USBXchange is not supplied with enough power to
operate.
Note: Unlike Windows 98 SE and Windows 2000, Windows 98 does not
provide an applicable error message to notify you of a potential
termination power problem. By following the recommendations
on page 14 however, you should still be able to correct the
problem.
U se r’s G ui de : US B X ch a ng e
• 14
If you click Yes, you may receive this message:
You can try either of the following to correct the problem:
♦ Unplug the USBXchange and plug it directly into another USB port
on your computer or into a self-powered hub that is connected to
your computer.
♦ Connect an external DC power supply to your USBXchange.
External DC Power Supply
If you need an external power source, the USBXchange can use a DC
power jack with 4.5V–9V output voltage and minimum 500 mA output
current.
Polarity:
Note: Adaptec recommends that you use only UL approved power
supplies. For updated information on recommended power
supplies, see the Read Me file located on the USBXchange
CD-ROM.
U se r’s G ui de : US B X ch a ng e
• 15
Your external DC power jack can be plugged into the DC input jack
connection located on the side of the USBXchange.
Connect a DC power
jack to the USBXchange
if you need an external
power supply
Installing the USBXchange on a Macintosh
Installing the Driver Software
1 Power up your Macintosh and insert the enclosed USBXchange
Installer CD-ROM in the CD-ROM drive.
2 Double-click on the USBXchange Installer application:
3 Follow the instructions displayed on the screen.
4 After installing the driver software, restart your Macintosh, then
proceed to the instructions on connecting SCSI devices to the
USBXchange.
Note: The USBXchange should be disconnected from the computer
before following the instructions for Connecting a SCSI Device
on page 16.
U se r’s G ui de : US B X ch a ng e
• 16
Connecting a SCSI Device
1 Ensure that your SCSI device is turned off.
2 Connect the USBXchange to the SCSI device.
Depending on the SCSI device connector type, you can either attach
the SCSI connector of the USBXchange directly to your SCSI
device, or you may require an additional cable or converter.
3 Power on your SCSI device.
Note: Do not turn on the power until the SCSI device is attached to the
USBXchange adapter.
Attaching the USBXchange to a
SCSI device
U se r’s G ui de : US B X ch a ng e
• 17
Connecting to the USB Port
1 Connect the USBXchange to the USB port.
2 Make sure the cable ends are firmly connected. Do not force your
connections as this may damage your system or the USBXchange.
Note: The USBXchange receives its +5V power from either the
terminator power line of the attached SCSI device, or if no
termination power is available, from the USB bus.
Attach the USB connector
from the USBXchange to the
USB port on your computer
Connecting to an External USB Hub
1 Connect the external USB hub (purchased separately) to the USB
port of your computer.
Note: To ensure proper operation, Adaptec recommends using only
self-powered hubs (only hubs that receive their power from
an A/C connection). Otherwise, you will need to connect the
USBXchange to an optional power supply. See USBXchange
Power Supply on page 20 for more information.
2 Connect the USB connector of your USBXchange to a port on the
external USB hub.
Attach the USB connector from
the USBXchange to the USB port on
your USB hub
Attach the USB connector
from the external USB hub
to the USB port on your
computer
U se r’s G ui de : US B X ch a ng e
• 18
Using USBXchange Switcher
USBXchange Switcher is a control panel which allows you to use your
driver for either Mass Storage devices or Other Peripherals. Mass Storage
devices include devices such as hard disks, magneto-optical (MO)
devices, CD-ROMS, Zip drives, and Jaz drives. Other Peripherals include
devices such as scanners, printers, DVD-RAM, CD-R/W devices, etc.
Warning: Make sure the USBXchange is set to the appropriate mode for
the current SCSI peripheral being used. Use of the incorrect
setting could cause problems such as crashes, or in extreme
cases, data loss or corruption.
Note: When using Mass Storage, a DVD-RAM drive will appear as a
CD-ROM device and you will not be able to record to it.
These are the steps to using USBXchange Switcher:
1 To start the USBXchange Switcher application, double-click on the
icon located in the Control Panels folder in the System folder.
2 Select the USBXchange Mode, depending on the device you want to
use.
3 Press the Restart button to save the settings and restart your system.
4 Press the Cancel button to quit the control panel without saving your
setting.
5 Using the Quit Menu option or Command-Q will quit the control
panel without saving your setting.
U se r’s G ui de : US B X ch a ng e
• 19
Viewing SCSI Devices on Your Macintosh
Note: If your are operating in Mass Storage mode you will not see any
devices in SCSIProbe™.
1 Launch SCSIProbe by double-clicking the icon which is located in
the Control Panels folder in the System folder.
2 To view devices connected to a SCSI bus, select the SCSI bus from
the pull-down menu and the devices will appear under SCSI devices.
SCSI buses
SCSI devices
U se r’s G ui de : US B X ch a ng e
• 20
USBXchange Power Supply
The USBXchange receives its power from either the termination power
line of attached SCSI devices or, if not present, from the USB bus. In
some cases, especially when using unpowered USB hubs with attached
SCSI devices which do not supply SCSI termination power, the USB bus
cannot supply the needed power for the USBXchange to operate. In these
cases, you may need an external DC power supply.
Note: Adaptec strongly recommends that you plug the USBXchange
directly into a USB port on your system. If you must connect
through a USB hub, use only a self-powered USB hub.
If your USBXchange is not supplied with enough power to operate, you
will receive this error message:
You can try either of the following to correct the problem:
♦ Unplug the USBXchange and plug it directly into another USB port
on your computer or into a self-powered hub that is connected to
your computer.
♦ Connect an external DC power supply to your USBXchange.
U se r’s G ui de : US B X ch a ng e
• 21
External DC Power Supply
If you need an external power source, the USBXchange can use a DC
power jack with 4.5V–9V output voltage and minimum 500 mA output
current.
Polarity:
Note: Adaptec recommends that you use only UL approved power
supplies. For updated information on recommended power
supplies, see the Read Me file located on the USBXchange
CD-ROM.
Your external DC power jack can be plugged into the DC input jack
connection located on the side of the USBXchange.
Connect a DC power
jack to the USBXchange
if you need an external
power supply
U se r’s G ui de : US B X ch a ng e
• 22
Understanding SCSI
SCSI (pronounced “scuzzy”) stands for Small Computer System
Interface. SCSI is an industry standard computer interface for connecting
up to seven SCSI devices (such as hard disk drives, CD-ROM drives, and
scanners) to a common SCSI bus.
A SCSI bus is an electrical pathway consisting of a SCSI adapter (such as
the USBXchange adapter) installed in a computer and one or more SCSI
devices. When more than one SCSI device is connected to your computer,
it is referred to as a SCSI chain. SCSI cables are used to connect the
devices to the SCSI card. For the SCSI bus to function properly, SCSI IDs
must be assigned to the SCSI devices and the SCSI adapter, and the SCSI
bus must be properly terminated.
The LED display located on top of your USBXchange will flash to
indicate activity in the SCSI bus.
SCSI IDs
Each device attached to the USBXchange, as well as the adapter itself,
must be assigned a unique SCSI ID number from 0 to 7. A SCSI ID
uniquely identifies each SCSI device on the SCSI bus and determines
priority when two or more devices are trying to use the SCSI bus at the
same time.
♦ The USBXchange is preset to SCSI ID 7, which gives it the highest
priority on the SCSI bus.
♦ In Windows 98 and Windows 2000 you can use the Device Manager
to view the SCSI ID and other information about each installed SCSI
device.
♦ If you installed Adaptec EZ-SCSI® software (sold separately), you
can use the SCSIExplorer™ utility to view the SCSI ID and other
information about each installed SCSI device.
♦ On a Macintosh, you can use the SCSIProbe software to view
information about each installed SCSI device.
Terminating the SCSI Bus
To ensure reliable communication on the SCSI bus, terminators must be
installed (or enabled) on the devices at the physical ends of the SCSI bus.
The terminators on all devices between the physical ends must be
removed (or disabled). SCSI termination is required whether you have
one or many SCSI devices connected. Termination on the USBXchange is
permanently enabled, since it is always at one end of the SCSI bus.
U se r’s G ui de : US B X ch a ng e
• 23
There are various methods for terminating hard disk drives and other
SCSI devices. Read the device documentation if you are not sure how to
do this. Here are some general guidelines for termination:
♦ Termination is usually controlled by installing or removing a SCSI
terminator. On some SCSI devices, termination is controlled by
setting a switch on the back of the device.
♦ Most SCSI devices come from the factory with termination enabled.
♦ Devices which use a jumper to select a source of termination power
must be set to supply power to their own terminators.
♦ Some devices require that termintaion power be supplied to the SCSI
bus. The USBXchange does not supply termination power. To use
these devices with the USBXchange, another device (which supplies
termination power) must be added to the SCSI bus.
An external SCSI terminator
may be required in certain
SCSI chains. (Actual
appearance may vary)
Connecting to More Than One SCSI Device
You can use the USBXchange to connect your computer to either one
SCSI device, or several SCSI devices in a series (in a SCSI chain) up to
seven devices.
If the SCSI connector on your USBXchange is not appropriate to use in
your system configuration, you may need to obtain an adapter to properly
connect the USBXchange to your SCSI device(s). You may also need
additional SCSI cables if you connect more than one SCSI device to your
USBXchange. Some of your existing SCSI devices may have already
included SCSI cables which may be appropriate to use. It is important to
use high-quality cables to ensure that data is read and written correctly.
Adaptec provides high-quality SCSI cables designed specifically for use
with the USBXchange.
U se r’s G ui de : US B X ch a ng e
• 24
Follow these steps to connect to more than one SCSI device:
1 Follow the steps in the section Connecting to the USB Port on
page 6, or Connecting to the USB Port on page 17, to connect the
USBXchange to the first SCSI device.
2 Most SCSI devices have a second SCSI port or connector to attach
additional SCSI devices. Using an additional SCSI cable, connect the
next SCSI device you want to attach to the available SCSI
connection on the first device.
3 Using another SCSI cable, connect the next SCSI device you want to
attach to the second SCSI device.
4 Be sure to assign a unique SCSI ID to each device on your SCSI
chain.
5 The last device in the SCSI chain must be terminated. See SCSI IDs
on page 22, and Terminating the SCSI Bus on page 22, for more
information.
Note: In Windows 2000 and Mac OS, USBXchange currently only
supports one SCSI device.
Example of a SCSI chain
USBXchange connects directly
to the first SCSI device.
Additional SCSI device
connected via an additional
SCSI cable.
Additional SCSI device
connected via an additional
SCSI cable. The last SCSI
device must be terminated.
U se r’s G ui de : US B X ch a ng e
• 25
Troubleshooting
If you have problems with the USBXchange, check these troubleshooting
tips:
My device is not recognized. How can I get the system to recognize
my device?
♦ The USBXchange is designed to receive its power from either the
termination power line of the attached SCSI devices or, if not
present, from the USB bus. In some cases, especially when using
unpowered USB hubs with attached SCSI devices which do not
supply SCSI termination power, the USB bus cannot supply the
needed power for the USBXchange to operate. In these cases, you
may need an external DC power adapter. See USBXchange Power
Supply on page 13 (PC) or USBXchange Power Supply on page 20
(Mac) for more information.
♦ The SCSI devices must be powered on before the system
acknowledges the USBXchange. Power on all SCSI devices and plug
back into your Macintosh or desktop PC.
♦ Verify that the drivers are installed on your computer.
♦ If you are using a hub, we recommend using self-powered hubs.
My SCSI peripheral has a different connector than the one provided
on the USBXchange. How can I correct this problem?
Check the Adaptec online store for the correct cable. Adaptec provides a
wide range of SCSI cable solutions.
When I change CDs using Windows, I don’t see the new one in the
drive.
Use the View Menu/Refresh option to refresh your screen.
U se r’s G ui de : US B X ch a ng e
• 26
When I power off/on my SCSI device while still connected to
USBXchange, the system does not detect the USBXchange or the
SCSI device appears to be missing. How can I correct this problem?
Try one of these steps:
1 Remove and reinsert the USBXchange from the USB port.
2 Remove the USBXchange, power off and on the SCSI devices and
reinsert the USBXchange.
3 Remove and then reattach the USBXchange to the SCSI device.
4 Restart the system with the USBXchange attached and the SCSI
devices powered on.
5 Shut down the system, remove the USBXchange, power off and on
all SCSI devices and reinsert the USBXchange. Restart the system
when the USBXchange is reattached.
6 Run the Uninstall utility before reinstalling the driver. See
Uninstalling the USBXchange Driver for Windows 98 and Windows
2000 on page 12 for more information.
If you continue to have problems after trying the steps listed in this
section, go to Adaptec’s World Wide Web site at http://ask.adaptec.com.
If you still cannot find answers to your questions, call the numbers listed
for Adaptec Customer Support on page 28.
U se r’s G ui de : US B X ch a ng e
• 27
Copyright
© 2000 Adaptec, Inc. All rights reserved. No part of this publication may be reproduced, stored in a retrieval system,
or transmitted in any form or by any means, electronic, mechanical, photocopying, recording or otherwise, without the
prior written consent of Adaptec, Inc., 691 South Milpitas Blvd., Milpitas, CA 95035.
Trademarks
Adaptec, the Adaptec logo, USBXchange, SlimSCSI, EZ-SCSI, and SCSIExplorer, are trademarks of Adaptec, Inc.,
which may be registered in some jurisdictions.
Windows, Windows 95/98, and Windows 2000 are registered trademarks of Microsoft Corporation in the U.S. and
other countries used under license. All other trademarks used are owned by their respective owners.
Changes
The material in this document is for information only and is subject to change without notice. While reasonable efforts
have been made in the preparation of this document to assure its accuracy, Adaptec, Inc. assumes no liability resulting
from errors or omissions in this document, or from the use of the information contained herein.
Adaptec reserves the right to make changes in the product design without reservation and without notification to its
users.
Disclaimer
IF THIS PRODUCT DIRECTS YOU TO COPY MATERIALS, YOU MUST HAVE PERMISSION FROM THE
COPYRIGHT OWNER OF THE MATERIALS TO AVOID VIOLATING THE LAW WHICH COULD RESULT IN
DAMAGES OR OTHER REMEDIES.
U se r’s G ui de : US B X ch a ng e
• 28
Adaptec Customer Support
If you have questions about installing or using your Adaptec product, check this user’s guide first—you will find
answers to most of your questions here. If you need further assistance, use the support options listed below.
Technical Support Identification (TSID) Number
♦ The 12-digit TSID can be found on the white barcode-type label included inside the box with your product. The
TSID helps us provide more efficient service by accurately identifying your product and support status. The TSID is
required when contacting Technical Support.
♦ Detach the TSID label and affix it to your CD Jacket for further reference.
Support Options
♦ Search the Adaptec Support Knowledgebase (ASK) at http://ask.adaptec.com for articles, troubleshooting tips,
and frequently asked questions for your product.
♦ For support via Email, submit your question to Adaptec’s Technical Support Specialists at http://ask.adaptec.com.
North America
♦ Visit our website at http://www.adaptec.com.
♦ For information about Adaptec’s support options, call +1 408-945-2550, 24 hours per day, 7 days per week.
♦ Connect to the File Transfer Protocol (FTP) server at ftp://ftp.adaptec.com.
♦ To speak with a Technical Support Specialist, call +1 408-934-7274, Monday–Friday, 6:00 A.M. to 5:00 P.M., Pacific
Time. To expedite your service, have your computer in front of you.
♦ To order Adaptec products, including software and SCSI cables, call +1 800-442-7274 or +1 408-957-7274.
Europe
♦ Visit our website at http://www.adaptec-europe.com.
♦ Connect to the File Transfer Protocol (FTP) server at ftp://ftp.adaptec-europe.com.
♦ To speak with a Technical Support Specialist, call one of the following numbers, Monday–Thursday, 10:00 to 12:30
and 13:30 to 17:30; Friday, 10:30 to 12:30 and 13:30 to 16:30, Central European Time:
♦ English: +32 2 352 3470
♦ French: +32 2 352 3460
♦ German: +49 89 456 40660
To expedite your service, have your computer in front of you.
♦ To order Adaptec software and SCSI cables:
♦ UK: +0800 96 65 26 or fax +0800 731 02 95
♦ Other European countries: +32 11 300 379 or fax +32 11 300 375
Australia and New Zealand
♦ Visit our web site at http://www.adaptec.com.au.
♦ To speak with a Technical Support Specialist, call +612 9416 0698, Monday–Friday, 10:00 A.M. to 4:30 P.M.,
Eastern Australia Time. To expedite your service, have your computer in front of you.
Hong Kong and China
♦ Visit our website at http://www.adaptec.com.
♦ To speak with a Technical Support Specialist, call +852 2869 7200, Monday–Friday, 10:00 to 17:00.
♦ Fax Technical Support at +852 2869 7100.
Singapore
♦ Visit our Web site at http://www.adaptec.com.
♦ To speak with a Technical Support Specialist, call +65 245 7470, Monday–Friday, 10:00 to 17:00.
U se r’s G ui de : US B X ch a ng e
• 29
Regulatory Compliance Statements
Federal Communications Commission Radio Frequency Interference Statement
WARNING: Changes or modifications to this unit not expressly approved by the party responsible for compliance
could void the user’s authority to operate the equipment.
This equipment has been tested and found to comply with the limits for a Class B digital device, pursuant to Part 15 of
the FCC rules. These limits are designed to provide reasonable protection against harmful interference in a residential
installation. This equipment generates, uses, and can radiate radio frequency energy, and if not installed and used in
accordance with the instruction manual, may cause harmful interference to radio communications. However, there is
no guarantee that interference will not occur in a particular installation. However, if this equipment does cause
interference to radio or television equipment reception, which can be determined by turning the equipment off and on,
the user is encouraged to try to correct the interference by one or more of the following measures:
♦ Reorient or relocate the receiving antenna.
♦ Increase the separation between equipment and receiver.
♦ Connect the equipment to an outlet on a circuit different from that to which the receiver is connected.
♦ Consult the dealer or an experienced radio/television technician for help.
♦ Use a shielded and properly grounded I/O cable and power cable to ensure compliance of this unit to the specified
limits of the rules.
This device complies with part 15 of the FCC rules. Operation is subject to the following two conditions: (1) this
device may not cause harmful interference and (2) this device must accept any interference received, including
interference that may cause undesired operation.
Adaptec, Inc.
USBXchange
Tested to Comply
With FCC Standards
FOR HOME OR OFFICE USE
European Union Compliance Statement
This Information Technology Equipment has been tested and found to comply with the following European
directives:
EMC Directive 89/336/EEC, as amended by 92/31/EEC and 93/68/EEC
EN 50081-1 (1992)
EN55022 (1994) Class B
EN 50082-1 (1992)
EN61000-4-2 (1998)
EN61000-4-3 (1998)
EN61000-4-4 (1995)
EN61000-4-5 (1995) Surges
EN61000-4-6 (1996) Conducted immunity
EN61000-4-11 (1994) Supply dips of variation
Australian/New Zealand Compliance Statement
This device has been tested and found to comply with the limits for a Class B digital device, pursuant to the
Australian/New Zealand standard AS/NZS 3548 set out by the Spectrum Management Agency.
Canadian Compliance Statement
This Class B digital apparatus meets all requirements of the Canadian Interference-Causing Equipment
Regulations.
Cet appareil numérique de la classe B respecte toutes les exigences du Règlement sur le matérial brouilleur
du Canada.
Japanese Compliance (Voluntary Control Council Initiative)
Stock No. 512545-00, Ver. AA JG 6/00