1
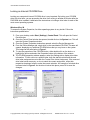
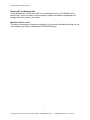
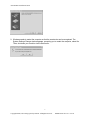
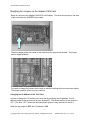
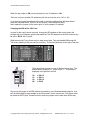
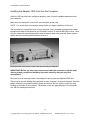
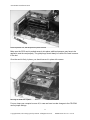
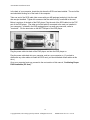
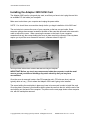
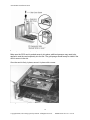
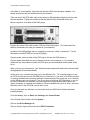
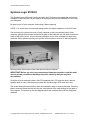
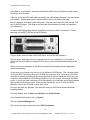
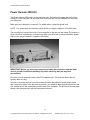
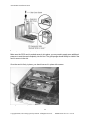
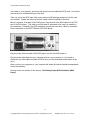
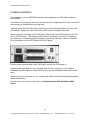
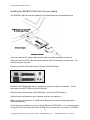
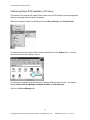
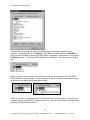
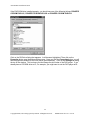
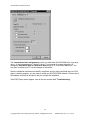
ASI Hardware Installation Guide Copyright2000, Advertising Specialty Institute. All Rights Reserved. HRDW200001.doc Rev. 5/16/00 ASI Hardware Installation Guide Identifying your Hardware The first logical step to any hardware installation is knowing what you are about to install. This section will help you to identify the items that you have received. The hardware package that was sent can be identified by the kit number placed on your shipment, below is a chart listing the kit number and their description. KT1505-01 KT0025-01 KT2931-01 KT8100-01 KT2930-01 KT1460-01 Adaptec 1505 Kit Macintosh Kit (Less Card) Power Domain 2930U Kit SymBIOS Logic 8100 Kit Adaptec 2930 Kit Adaptec 1460 Kit (Laptop) Once you have identified the kit that you have been sent, advance to that section of the hardware installation guide for further instruction. 1 Copyright2000, Advertising Specialty Institute. All Rights Reserved. HRDW200001.doc Rev. 5/16/00 ASI Hardware Installation Guide Locking an Internal CD-ROM Drive Locking your computer's internal CD-ROM drive is very important. By locking your CD-ROM drive to a drive letter, you are preventing the drive from moving to another drive letter after the DVD-ROM drive is added. Listed below are instructions on locking a drive letter for each of the most current operating systems. Windows 95 or 98 To access the System Properties, for either operating system is very similar. Follow the instructions posted below. 1. From your desktop, select Start | Settings | Control Panel. This will open the Control Panel window. 2. Once the Control Panel window has opened, double-click on the System icon. This will open the System Properties window. 3. Once the System Properties window has opened, select the Device Manager tab. 4. From the Device Manager tab, single-click on the area labeled CD-ROM. This area will expand, displaying any additional CD-ROM drives that you may have on the system. This image can be seen below in Figure 1. 5. To view the properties of the CD-ROM device, either double-click on the device, or highlight the device and select the Properties button at the bottom of the window. 6. The CD-ROM properties window appears, select the Settings tab to display drive letter information. To lock a drive to a specific letter, both the start drive letter and the end drive letter assignments must match the Current Drive Letter Assignment. If the reserved drive letter boxes are empty, or do not match the current assignment, utilize their respective drop down boxes to make the correct selection. An example of a locked drive is shown below in Figure 2. As the drive is locked into place, press OK to save the changes. Figure 1 Figure 2 2 Copyright2000, Advertising Specialty Institute. All Rights Reserved. HRDW200001.doc Rev. 5/16/00 ASI Hardware Installation Guide Windows NT and Windows 2000 In both Windows NT and Windows 2000 it is unnecessary to lock your CD-ROM drive to a specific letter. There is a feature in these operating systems that disallows peripherals from jumping around drive letter to drive letter. Macintosh OS 8.x and 9.x This step is unnecessary for Macintosh installations, for the reason that Macintosh does not use a drive lettering convention to differentiate CD/DVD-ROM drives. 3 Copyright2000, Advertising Specialty Institute. All Rights Reserved. HRDW200001.doc Rev. 5/16/00 ASI Hardware Installation Guide Adaptec 1505 Kit 1. At the desktop, click on Start | Settings | Control Panel, as pictured below. 2. The Control Panel window should now appear. Double-click on the Add New Hardware icon. 3. The Add New Hardware Wizard window appears, click on the Next button to advance to the next screen of the installation. 4 Copyright2000, Advertising Specialty Institute. All Rights Reserved. HRDW200001.doc Rev. 5/16/00 ASI Hardware Installation Guide 4. The Hardware Detection window appears, asking if you would like Windows to search for your new hardware, select No, and press the Next button. 5. The Hardware Types window appears use the scroll bar to the right to locate SCSI Controllers, and then press the Next button. 6. The Hardware Selection window appears. On this screen, you must select both the Manufacturer and Model of the hardware you are about to install. In the Manufacturer window on the left, select Adaptec. In the Model window on the right, select one of the following: Adaptec AVA 1505 SCSI Host Adapter Or Adaptec AIC 6X60 ISA Single-Chip SCSI Controller After the proper Manufacturer and Model selections have been made, select the Next button to continue the installation. 5 Copyright2000, Advertising Specialty Institute. All Rights Reserved. HRDW200001.doc Rev. 5/16/00 ASI Hardware Installation Guide 7. The Hardware Settings window appears. This window displays the settings for your hardware device. It is important that these settings are written down; for you will need to refer to them later in the installation, click on the Next button to advance to the next screen of the installation. Note: At this point your computer may ask you for the Windows CD-ROM disc. Your computer needs to copy the SCSI card drivers from the CD-ROM onto your hard drive. If you have a CD-ROM drive that is currently installed and functioning (perhaps an internal player that is built into your computer), put the Windows CD-ROM into the drive. If you do not have a functional CD-ROM player, or you do not have a Windows CD-ROM available, we have sent you a floppy diskette that contains the drivers you need. Simply put the diskette into you’re A: drive, and when Windows asks for the CD-ROM, choose the A: drive. 8. The Hardware Setup complete window will appear, click on Finish to complete the installation. 6 Copyright2000, Advertising Specialty Institute. All Rights Reserved. HRDW200001.doc Rev. 5/16/00 ASI Hardware Installation Guide 9. Windows needs to restart the computer so that the new device can be recognized. The System Settings Change window appears, prompting you to restart the computer, select No. Then, shut down your machine via the Start menu. 7 Copyright2000, Advertising Specialty Institute. All Rights Reserved. HRDW200001.doc Rev. 5/16/00 ASI Hardware Installation Guide Modifying the Jumpers on the Adaptec 1505 Card Below is a picture of the Adaptec 1505 SCSI Host Adapter. The white arrow points to the area of the card where the JUMPERS are located. The arrow above points to the area on the card where the jumpers are located. The jumper area is magnified below: You need to change the jumpers on the card to match the settings that you wrote down earlier. The following section shows you how to do this. Changing the I/O Address of the 1505 Card In order to change the I/O Address, you must start by modifying the I/O Address. The I/O address jumper is the top-most set of pins, labeled ALT. The default position for the jumper is OFF. (The term “OFF” means that the black plastic jumper is only mounted on one pin.) When the top jumper is OFF, the I/O address is 340. 8 Copyright2000, Advertising Specialty Institute. All Rights Reserved. HRDW200001.doc Rev. 5/16/00 ASI Hardware Installation Guide When the top jumper is ON (covering both pins), the I/O address is 140. There are only two possible I/O addresses that this card can be set to, 340 or 140. If you need to change the address of the card to match the settings your Windows-based computer indicated earlier, pull to lift off the jumper, it should slide off easily. Now, replace the jumper on the correct pins, to set the proper I/O address. Changing the IRQ of the 1505 Card In order for the card to be set correctly, change the IRQ address of the card to match the settings that your Windows machine has specified. The IRQ address on the1505 card can only be set to: IRQ 9, 10, 11, or 12. Right below the ALT pins, there are four other sets of pins. They are labeled I12 through I9. The factory labeling of the pins can be confusing. The correct labels are to the right of the pins. There should be a jumper on one of the four sets of pins. The default factory setting is I11, which is IRQ 11. This setting is displayed in the picture to the left. I12 I11 I10 I09 = = = = IRQ 12 IRQ 11 IRQ 10 IRQ 9 Now move the jumper to the IRQ address requested by your Windows-based computer. Just pull the black plastic jumper straight up and then push it on the correct pins. The jumper must be placed on BOTH pins. Please be sure to push the jumpers on the card down all the way. 9 Copyright2000, Advertising Specialty Institute. All Rights Reserved. HRDW200001.doc Rev. 5/16/00 ASI Hardware Installation Guide Installing the Adaptec 1505 Card Into the Computer After the 1505 card has been configured properly, place it into an available expansion inside your computer. Make sure your computer is turned off, and unplug the power cord. NOTE: You should have a screwdriver handy before you begin installation of this card. The next step is to remove the cover of your computer. Some computer systems have screws located on the back of the case that you will need to remove in order to take off the cover. Note: Only the outermost screws fastening the case to the box need to be removed. Some systems require that the cover be pulled forward to remove it. You may need to remove some screws to take the cover off your computer. IMPORTANT! Before you touch any components inside the computer, touch the metal case to ground yourself and discharge any static electricity that you may have accumulated. Once the cover is removed, locate a free expansion slot to place the Adaptec SCSI card. There may be a screw holding the metal plate in place, unscrew it to remove the plate. Once the plate is removed, you should be able to place the card into the slot, with the end of the card sticking out the back of the computer. The picture on the next page displays a free computer slot, with the metal plate removed. 10 Copyright2000, Advertising Specialty Institute. All Rights Reserved. HRDW200001.doc Rev. 5/16/00 ASI Hardware Installation Guide A free expansion slot, with the protective plate removed Make sure the SCSI card is pushed securely into place; additional pressure may have to be applied to seat the card properly. The gold prongs should barely be visible if the card is secure in the slot. Once the card is firmly in place, you should secure it in place with a screw. Securing the SCSI card in place For now, keep your computer’s cover off, in case we have to make changes to the CD-ROM card’s jumper settings. 11 Copyright2000, Advertising Specialty Institute. All Rights Reserved. HRDW200001.doc Rev. 5/16/00 ASI Hardware Installation Guide In the back of your computer, locate the slot where the SCSI card was installed. The end of the card should be sticking out of the back of the computer. Take one end of the SCSI cable (that comes with your ASI package) and plug it into the card that was just installed. Tighten the screws so that the cable is firmly connected to the card. Below is a picture of the back of the DVD player. Plug the end of the SCSI cable into the TOP port of the DVD player. (The other end of the cable is connected to the card you installed in your computer.) Included in the DVD package there is a small gray connector, called a “terminator”. Put the terminator on the BOTTOM port of the DVD player. Plug the power cable into back of the DVD player, and turn the DVD player on. Plug the power cable back into your computer, and turn your computer on. (If you had to disconnect any other cables to install the SCSI card, you should reattach those cables at this time.) Once your computer boots up, proceed to the next section of this manual, “Confirming Proper DVD Installation (PC User)”. 12 Copyright2000, Advertising Specialty Institute. All Rights Reserved. HRDW200001.doc Rev. 5/16/00 ASI Hardware Installation Guide Installing the Adaptec 2930 SCSI Card The Adaptec 2930 card is a plug and play card, so all that you have to do is plug the card into an available PCI slot inside your computer. Make sure to shut down your computer and unplug the power cable. NOTE: You should have a screwdriver handy before you begin installation of the 2930 card. The next step is to remove the cover of your computer so that we can see inside. Some computer systems have screws located on the back of the case that will need to be removed in order to take off the cover. When removing the screws on the back of your computer, remember that only the screws holding the cover in place need to be removed. Some systems require you to pull the cover forward to remove it, whereas others lift right off. You may need to remove some screws to take the cover off your computer. IMPORTANT! Before you touch any components inside the computer, touch the metal case to ground yourself and discharge any static electricity that you may have accumulated. Once the cover is removed, locate a free PCI expansion slot. (PCI slots are short, and are typically white or ivory.) This is where the Adaptec 2930 card is going to be installed. The screw holding the metal plate in place may have to be removed in order to install the card. Once the plate is removed, you should be able to place the card into the slot, with the end of the card sticking out the back of the computer. The picture on the next page shows a free computer slot, with the metal plate removed. 13 Copyright2000, Advertising Specialty Institute. All Rights Reserved. HRDW200001.doc Rev. 5/16/00 ASI Hardware Installation Guide A free expansion slot, with the protective plate removed Make sure the SCSI card is pushed securely into place; additional pressure may need to be applied to seat the card completely into the slot. The gold prongs should barely be visible if the card is secure in the slot. Once the card is firmly in place, secure it in place with a screw. Securing the SCSI card in place 14 Copyright2000, Advertising Specialty Institute. All Rights Reserved. HRDW200001.doc Rev. 5/16/00 ASI Hardware Installation Guide In the back of your computer, locate the slot where the SCSI card has been installed. You should see the card we just installed sticking out the back. Take one end of the SCSI cable (that comes with your ASI package) and plug it into the card that was installed. Tighten the screws so that the cable is firmly connected to the card. Below is a picture of the back of the DVD player. Plug the end of the SCSI cable into the TOP port of the DVD player. (The other end of the cable is connected to the card you installed in your computer.) Included in the DVD package there is a small gray connector, called a “terminator”. Put the terminator on the BOTTOM port of the DVD player. Plug the power cable into back of the DVD player, and turn the DVD player on. Plug the power cable back into your computer, and turn your computer on. (If you had to disconnect any other cables to install the SCSI card, you should reattach those cables at this time.) When you turn your computer on, your Windows-based machine will detect the card and install the appropriate drivers automatically. At this point, your computer may ask you for the Windows disc. The computer needs to copy the SCSI card drivers from the CD-ROM onto your hard drive. If you have a CD-ROM drive that is currently installed and functioning (perhaps an internal player that is built into your computer), put the Windows disc into the drive. If you do not have a functional CD-ROM player, or you do not have a Windows disc available, you have been sent a floppy diskette that contains the drivers necessary to complete the installation. Place the diskette into you’re A: drive, and when Windows asks for the CD-ROM, choose the A: drive. Once you are back into Windows, you can make sure your 2930 driver software has been installed properly. From the desktop, click on Start, then Settings, then Control Panel. In the Control Panel window, click on System. Click on the Device Manager tab. Click on the plus sign located to the left of SCSI Controllers. 15 Copyright2000, Advertising Specialty Institute. All Rights Reserved. HRDW200001.doc Rev. 5/16/00 ASI Hardware Installation Guide You should see the Adaptec AHA-2930CU PCI SCSI Controller. (If it is not there, or if you see a yellow exclamation point or red X in front of the listing for the AHA-2930 Controller, call the ASI Tech Support Department for assistance. The number is listed in the back of this manual.) Proceed to the next section of this manual, “Confirming Proper DVD Installation (PC Users)”. 16 Copyright2000, Advertising Specialty Institute. All Rights Reserved. HRDW200001.doc Rev. 5/16/00 ASI Hardware Installation Guide Symbios Logic 8100 Kit The Symbios Logic 8100 card is a plug and play card. There are no jumpers that you have to configure on the card itself, all you have to do is plug the card into an available PCI slot inside your computer. Be sure to turn off your computer, and unplug it before opening. NOTE: You should have a screwdriver handy before you begin installation of the 8100 card. The next step is to remove the cover of your computer so that you can see inside. Some computer systems have screws located on the back of the case that you will need to remove in order to take off the cover, only the screws holding the cover of the computer on need to be removed. Some systems require you to pull the cover forward to remove it, some lift right off. You may need to remove some screws to take the cover off your computer. IMPORTANT! Before you touch any components inside the computer, touch the metal case to ground yourself and discharge any static electricity that you may have accumulated. Once the cover is removed, locate a free PCI expansion slot. (PCI slots are short, and are typically white or ivory.) We are going to place the Symbios Logic SCSI card into a slot. The screw holding the metal plate in must be loosened in order to remove the plate. Once the plate is removed, place the card into the slot, with the end of the card sticking out the back of the computer. The picture on the next page shows a free computer slot, with the metal plate removed. 17 Copyright2000, Advertising Specialty Institute. All Rights Reserved. HRDW200001.doc Rev. 5/16/00 ASI Hardware Installation Guide A free expansion slot, with the protective plate removed Make sure the SCSI card is pushed securely into place; the addition of additional pressure may be necessary for the card to be seated correctly. The gold prongs should barely be visible if the card is secure in the slot. Once the card is firmly in place, you should secure it in place with a screw. Securing the SCSI card in place 18 Copyright2000, Advertising Specialty Institute. All Rights Reserved. HRDW200001.doc Rev. 5/16/00 ASI Hardware Installation Guide In the back of your computer, locate the slot where the SCSI card is installed, the card should be sticking out of the back. Take one end of the SCSI cable (that comes with your ASI package) and plug it into the card we just installed. Tighten the screws so that the cable is firmly connected to the card. Below is a picture of the back of the DVD player. Plug the end of the SCSI cable into the TOP port of the DVD player. (The other end of the cable is connected to the card you installed in your computer.) Included in the DVD package there is a small gray connector, called a “terminator”. Put the terminator on the BOTTOM port of the DVD player. Plug the power cable into back of the DVD player, and turn the DVD player on. Plug the power cable back into your computer, and turn your computer on. (If you had to disconnect any other cables to install the SCSI card, you should reattach those cables at this time.) When you turn your computer on, Windows will detect the card and install the appropriate drivers automatically. At this point your computer may ask you for the Windows CD-ROM disc. The computer needs to copy the SCSI card drivers from the CD-ROM onto your hard drive. If you have a CD-ROM drive that is currently installed and functioning (perhaps an internal player that is built into your computer), put the Windows CD-ROM into the drive. If you do not have a functional CD-ROM player, or you do not have a Windows CD-ROM available, you have been sent a floppy diskette that contains the drivers you need. Simply put the diskette into you’re A: drive, and when Windows asks for the CD-ROM, choose the A: drive. Once you are back into Windows, you can make sure your 8100 driver software has been installed properly. From the desktop, click on Start, then Settings, then Control Panel. In the Control Panel window, click on System. Click on the Device Manager tab. Click on the plus sign located to the left of SCSI Controllers. 19 Copyright2000, Advertising Specialty Institute. All Rights Reserved. HRDW200001.doc Rev. 5/16/00 ASI Hardware Installation Guide You should see the Symbios Logic 8100ASP PCI SCSI Controller. (If it is not there, or if you see a yellow exclamation point or red X in front of the listing for the Symbios Logic SCSI Controller, call the ASI Tech Support Department for assistance. The number is listed in the back of this manual.) Proceed to the next section of this manual, “Confirming Proper DVD Installation (PC Users)”. 20 Copyright2000, Advertising Specialty Institute. All Rights Reserved. HRDW200001.doc Rev. 5/16/00 ASI Hardware Installation Guide Power Domain 2930 Kit The Power Domain 2930 card is a plug and play card. There are no jumpers that you have to configure on the card itself, all you have to do is plug the card into an available PCI slot inside your computer. Make sure your computer is turned off. For added safety, unplug the power cord. NOTE: You should have a screwdriver handy before you begin installation of the 2930 card. The next step is to remove the cover of your computer so that we can see inside. The manner in which you cover is attached to your case may differ from the model in the picture below; please refer to your owner's manual in regards to this matter. IMPORTANT! Before you touch any components inside the computer, touch the metal case to ground yourself and discharge any static electricity that you may have accumulated. Once the cover is removed, locate a free PCI expansion slot. (PCI slots are short, and are typically white or ivory.) In order to insert the card you must first loosen the screw that holds the metal plate in place, then, remove the plate. Once the plate is removed, you should be able to place the card into the slot, with the end of the card sticking out the back of the computer. The picture on the next page shows a free computer slot, with the metal plate removed. 21 Copyright2000, Advertising Specialty Institute. All Rights Reserved. HRDW200001.doc Rev. 5/16/00 ASI Hardware Installation Guide A free expansion slot, with the protective plate removed Make sure the SCSI card is pushed securely into place; you may need to apply some additional pressure to seat the card completely into the slot. The gold prongs should barely be visible if the card is secure in the slot. Once the card is firmly in place, you should secure it in place with a screw. Securing the SCSI card in place 22 Copyright2000, Advertising Specialty Institute. All Rights Reserved. HRDW200001.doc Rev. 5/16/00 ASI Hardware Installation Guide In the back of your computer, locate the slot where you just installed the SCSI card. You should see the card you installed sticking out the back. Take one end of the SCSI cable (that comes with your ASI package) and plug it into the card you installed. Tighten the screws so that the cable is firmly connected to the card. Below is a picture of the back of the DVD player. Plug the end of the SCSI cable into the TOP port of the DVD player. (The other end of the cable is connected to the card you installed in your computer.) Included in the DVD package is a small gray connector, called a “terminator”. Put the terminator on the BOTTOM port of the DVD player. Plug the power cable into back of the DVD player, and turn the DVD player on. Plug the power cable back into your computer, and turn your computer on. (If you had to disconnect any other cables to install the SCSI card, you should reattach those cables at this time.) When you turn your computer on, your computer will detect the card and install the appropriate drivers automatically. Proceed to the next section of this manual, “Confirming Proper DVD Installation (MAC Users)". 23 Copyright2000, Advertising Specialty Institute. All Rights Reserved. HRDW200001.doc Rev. 5/16/00 ASI Hardware Installation Guide Cardless Installation This installation is for our DVD-ROM customers who already have a SCSI Card installed on their systems. In the back of your computer, locate the slot where you just installed the SCSI card. You should see the card you installed sticking out the back. Take one end of the SCSI cable (that comes with your ASI package) and plug it into the card you installed. Tighten the screws so that the cable is firmly connected to the card. Below is a picture of the back of the DVD player. Plug the end of the SCSI cable into the TOP port of the DVD player. (The other end of the cable is connected to the card you installed in your computer.) Included in the DVD package is a small gray connector, called a “terminator”. Put the terminator on the BOTTOM port of the DVD player. Plug the power cable into back of the DVD player, and turn the DVD player on. Plug the power cable back into your computer, and turn your computer on. (If you had to disconnect any other cables to install the SCSI card, you should reattach those cables at this time.) When you turn your computer on, your computer will detect the card and install the appropriate drivers automatically. Proceed to the next section of this manual, “Confirming Proper DVD Installation (MAC Users)”. 24 Copyright2000, Advertising Specialty Institute. All Rights Reserved. HRDW200001.doc Rev. 5/16/00 ASI Hardware Installation Guide Installing the SlimSCSI 1460 Card into your Laptop The SlimSCSI 1460 Card can be installed in your laptop based on the illustration below: Insert the card into your laptop. Make sure the card is inserted completely into the slot. Take one end of the SCSI cable that comes with the 1460 card and plug it into the card. The cable should click into place. Plug the end of the SCSI cable into the TOP port of the DVD player. Included in the DVD package there is a small grey connector, called a “terminator”. Put the terminator on the BOTTOM port of the DVD player. Plug the power cable into back of the DVD player, and turn the DVD player on. Plug the power cable back into your computer, and turn your laptop on. When you turn your computer on, Windows will detect the card and install the appropriate drivers automatically. At this point your computer may ask you for the Windows CD-ROM disc. Your computer needs to copy the SCSI card drivers from the CD-ROM onto your hard drive. If you have a CD-ROM 25 Copyright2000, Advertising Specialty Institute. All Rights Reserved. HRDW200001.doc Rev. 5/16/00 ASI Hardware Installation Guide drive that is currently installed and functioning (perhaps an internal player that is built into your computer), put the Windows CD-ROM into the drive. If you do not have a functional CD-ROM player, or you do not have a Windows CD-ROM available, we have sent you a floppy diskette that contains the drivers you need. Simply put the diskette into you’re A: drive, and when Windows asks for the CD-ROM, choose the A: drive. Once you are back into Windows, you can make sure your driver software has been installed properly. From the desktop, click on Start, then Settings, then Control Panel. In the Control Panel window, click on System. Click on the Device Manager tab. Click on the plus sign located to the left of SCSI Controllers. You should see the: Adaptec APA 1425/50/60 PCMCIA SCSI Host Adapter. (If it is not there, or if you see a yellow exclamation point or red X in front of the listing, call the ASI Tech Support Department for assistance. The number is listed in the back of this manual.) Proceed to the next section of this manual, “Confirming Proper DVD Installation (PC Users)”. 26 Copyright2000, Advertising Specialty Institute. All Rights Reserved. HRDW200001.doc Rev. 5/16/00 ASI Hardware Installation Guide Confirming Proper DVD Installation (PC Users) This section of the manual will explain how to make sure your DVD player is being recognized, and how to change the drive letter if necessary. When you computer is back into Windows, click on Start, Settings, then Control Panel. You should now see the Control Panel window. Double click on the System icon. (You may have to scroll down the window to see it.) You should see a System Properties window, with four tabs along the top row. The tabs are labeled General, Device Manager, Hardware Profiles, and Performance. Click on the Device Manager tab. 27 Copyright2000, Advertising Specialty Institute. All Rights Reserved. HRDW200001.doc Rev. 5/16/00 ASI Hardware Installation Guide In the window, you should see a list of the different types of hardware installed in your computer. At the top of the list is Computer. Right below Computer should be CD-ROM. (If you do not see CD-ROM, make sure the DVD player is plugged in, and turned on. Then click on the Refresh button.) To the left of CD-ROM, there is a plus sign. Click the mouse on the plus sign. When you click on the plus sign, the list will expand and you should see all of the CD-ROM drives installed on your computer. The picture below to the left is before clicking the plus sign, an the one to the right is after clicking the plus sign. NOTE: If you have a functional internal CD-ROM drive that is not showing up on this list, your computer may be using MS-DOS drivers for that drive. This list will only display CD-ROMS that are using 32-bit Windows 95 drivers. 28 Copyright2000, Advertising Specialty Institute. All Rights Reserved. HRDW200001.doc Rev. 5/16/00 ASI Hardware Installation Guide If the DVD-ROM drive installed properly, you should see one of the following listings: PIONEER CD-ROM DVD-U01, PIONEER CD-ROM DVD-U02 or PIONEER CD-ROM DVD-U03. Click on the DVD drive listing that appears. It will become highlighted. Then click on the Properties button near the bottom of the screen. Once you click the Properties button, you will see the properties window for the DVD player (pictured below). Click on the Settings tab along the top of the window. This is where you can change the drive letter of the DVD player. If you already have a CD-ROM drive as D:, for example, you might want to set the DVD player as E:. 29 Copyright2000, Advertising Specialty Institute. All Rights Reserved. HRDW200001.doc Rev. 5/16/00 ASI Hardware Installation Guide The Current drive letter assignment box tells you what letter the DVD-ROM drive is currently using. (In the example above, it is the D: drive.) If you wanted to change the letter to E:, change the Start drive letter and End drive letter boxes to E:, then hit the OK button. You may have to reboot your PC for the changes to take effect. After the installation has been successfully completed, and you have confirmed that your DVD player is working properly, you are ready to install your ASI DVD-ROM software. Please refer to the separate instructions included to aid you through this installation. If the DVD Player doesn't appear, refer to the next section titled "Troubleshooting". 30 Copyright2000, Advertising Specialty Institute. All Rights Reserved. HRDW200001.doc Rev. 5/16/00 ASI Hardware Installation Guide Confirming Proper DVD Installation (MAC Users) To confirm the proper installation of your DVD player, select the Apple Menu, select Apple System Profiler, and select the Devices and Volumes tab. On this tab there will be a subheading for CD-ROM, click on the arrow to expand this menu. Once the menu is expanded, a listing will appear, if Pioneer DVD-ROM is listed as one of your drives, then the player has installed correctly. After the installation has been successfully completed, and you have confirmed that your DVD player is working properly, you are ready to install your ASI DVD-ROM software. Please refer to the separate instructions included to aid you through this installation. If the DVD Player doesn't appear, refer to the next section titled "Troubleshooting". 31 Copyright2000, Advertising Specialty Institute. All Rights Reserved. HRDW200001.doc Rev. 5/16/00 ASI Hardware Installation Guide Troubleshooting If the DVD-ROM drive is not showing up, try the following: • Is the DVD player plugged into a power outlet, and turned on? There is a green power light on the front. • Was the DVD-ROM drive turned on AFTER the computer was turned on? Your computer only looks to see if the DVD drive is present when you first boot up. Reboot and see if it shows up. • Check all the cables to make sure they are not loose! If none of these troubleshooting techniques seem to work, advance to the section "Contacting Technical Support". 32 Copyright2000, Advertising Specialty Institute. All Rights Reserved. HRDW200001.doc Rev. 5/16/00 ASI Hardware Installation Guide Contacting ASI Technical Support The ASI Technical Support Department is open Monday through Friday, 8:00am to 8:00pm EST. If you are unable to contact us during our business hours, go to our website www.askasi.com for help with any issue you may have. If you are unable to resolve your issues by using the website, e-mail us at [email protected], and a Technical Support Representative will call you back as it is convenient to you. Phone: (800) 546-1350 Fax: (215) 547-4129 33 Copyright2000, Advertising Specialty Institute. All Rights Reserved. HRDW200001.doc Rev. 5/16/00