1
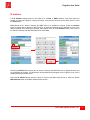
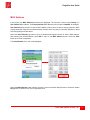
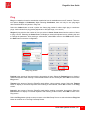
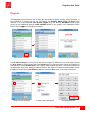
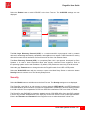
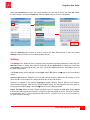
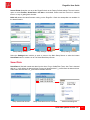
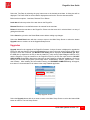
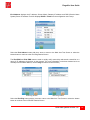
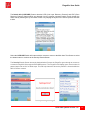
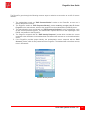
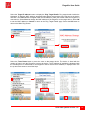
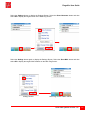
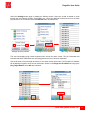
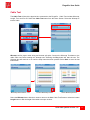
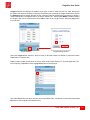
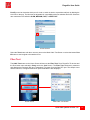
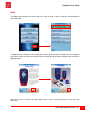
PingerPro User Guide USER GUIDE PingerPro Model 70/75 Psiber Data Systems Revision 1.00 1 PingerPro User Guide Copyright This guide is copyrighted by Psiber Data Systems Inc. with all rights reserved. Under the copyright laws, this guide cannot be reproduced in any form without the prior written permission of Psiber Data Systems Inc. No patent liability is assumed, however, with respect to the use of the information contained herein. © Copyright 2014 by Psiber Data Systems Inc. All rights reserved. Notice Every effort was made to ensure that the information in this document was accurate at the time of printing. However, information is subject to change without notice, and JDSU reserves the right to provide an addendum to this document with information not available at the time that this document was created. PSIBER DATA SYSTEMS INC. AND PSIBER DATA GMBH (PSIBER) PROVIDE NO WARRANTY WITH REGARD TO THIS MANUAL OR ANY OTHER INFORMATION CONTAINED HEREIN AND HEREBY EXPRESSLY DISCLAIM ANY IMPLIED WARRANTIES OF MERCHANTABILITY OR FITNESS FOR ANY PARTICULAR PURPOSE WITH REGARD TO ANY OF THE FOREGOING. PSIBER ASSUMES NO LIABILITY FOR ANY DAMAGES INCURRED DIRECTLY OR INDIRECTLY FROM ANY TECHNICAL OR TYPOGRAPHICAL ERRORS OR OMISSIONS CONTAINED HEREIN OR FOR DISCREPANCIES BETWEEN THE PRODUCT AND THE MANUAL. IN NO EVENT SHALL PSIBER BE LIABLE FOR ANY INCIDENTAL, CONSEQUENTIAL, SPECIAL, OR EXEMPLARY DAMAGES, WHETHER BASED ON TORT, CONTRACT OR OTHERWISE ARISING OUT OF OR IN CONNECTION WITH THIS MANUAL OR ANYOTHER INFORMATION CONTAINED HEREIN OR THE USE THEREOF. Trademarks The Psiber Logo, Psiber and PingerPro are trademarks of Psiber Data Systems Inc. All other brands and product names are trademarks or registered trademarks of their respective companies. Warranty/Service Option Psiber Data Systems Inc. warrants that the product shall be free from defects in parts or workmanship for a period of 12 months from the date of purchase if used in accordance with Psiber Data Systems Inc. operating specifications. THIS IS THE ONLY WARRANTY MADE BY PSIBER DATA SYSTEMS INC. AND IS EXPRESSLY MADE IN LIEU OF ALL OTHER WARRANTIES, EXPRESSED OR IMPLIED, INCLUDING BUT NOT LIMITED TO ANY IMPLIED WARRANTIES OF MERCHANTABILITY OR FITNESS FOR ANY PARTICULAR PURPOSE. Should any parts or workmanship prove defective, Psiber Data Systems Inc. will repair or replace at Psiber’s discretion, with no cost to the Buyer except for shipping costs from the Buyer’s location to Psiber’s location. This is the Buyer’s SOLE AND EXCLUSIVE REMEDY under this agreement. This warranty does not apply to products which have been subject to neglect, accident or improper use, or to units which have been altered or repaired by other than an authorized repair facility. Return of Equipment - Return of product to Psiber Data Systems Inc. requires a Return Merchandise Authorization (RMA) issued by Customer Service. To obtain an RMA, contact us at 619-287-9970 (8am to 4pm PST) or email [email protected]. The RMA# must be clearly marked on the shipping label or package. See sample label: To: Psiber Data Systems Inc. 7075-K Mission Gorge Rd. San Diego, CA 92120 RMA# XXXXXXX Psiber Data Systems Revision 1.00 2 PingerPro User Guide Introduction Thousands of network professionals have relied on Psiber test tools for installing, troubleshooting and maintaining complex, and high performance networks. The PingerPro’s extensive feature set makes it even easier for managers and technicians to meet the growing challenges of cable and network management. The PingerPro brings a new level of connectivity testing with: fault location, Gigabit Ethernet capability, advanced IPv6 support, Logical Link Data Protocol (LLDP/CDP) and other powerful features that you will use every day. As a result, the PingerPro is the complete high performance first-response tool designed to solve your most frequent network problems. Whether installing new network drops or devices, monitoring performance, or troubleshooting problems, the PingerPro quickly provides the answers you need. The PingerPro touch screen interface lets you select discrete tests, or configure a complete Auto Test that provides critical link information; conduct network connectivity tests and provide switch port information in seconds. Document your test results with a few keystrokes to prove the job’s done right. The rechargeable battery pack and rugged weather resistant design lets you test anywhere. The PingerPro is always available and always ready to: • Monitor network health • Manage network changes • Identify cable and network problems • Optimize network performance. Kit Content Psiber Data Systems Revision 1.00 3 PingerPro User Guide Physical Hinged Hood to protect USB and RJ-45 connectors. (Also SFP Connector on the PingerPro75) Speaker Strap Connector Clips for cables Display /Touch screen Power Button Stand Specifications: Dimensions: Weight: Power Adaptor: Graphics Display: Interface: Power: Operating Temp: Storage Temp: 6.5 in. x 4.0 in. x 2.8 in. (165 mm x 102 mm x 71 mm) 13.2 oz.; 387 grams 110/240 VAC 320 x 240 RGB Color Touch Screen Li-Ion Battery Pack 32°F to 122°F / 0°C to 50°C 14°F to 131°F / -10°C to 55°C Psiber Data Systems Revision 1.00 4 PingerPro User Guide Preparing the Unit The PingerPro is portable and can be handheld or placed on a surface large enough for stable use. The PingerPro is designed to withstand the rigors of everyday use and travel. However, to keep your tester in prime operating condition, please observe the following precautions to further reduce the risk of personal injury or damage to the tester. Never apply heavy pressure to the tester, especially on or around the display area. Avoid sharp impacts to the tester. Excessive pressure or impact can damage components or otherwise cause the tester to malfunction. Do not submerge, float or allow liquids to spill into or onto the tester. Do not use excessive force to connect or disconnect cables or peripherals. Use the supplied strap to prevent accidentally dropping the tester. Never use sharp objects on the display/touch screen area. Use only the supplied stylus. Protect the PingerPro from; dust, moisture, direct sunlight, liquids and corrosive materials. Equipment that generates a strong electromagnetic field, rapid changes in temperature or humidity, extreme heat or cold may also damage your tester. Operate the analyzer within the specified temperature range. Battery Use: The tester contains a rechargeable battery pack which is charged by the factory for quick use. The external USB adapter provides power to the tester and charges the battery pack from an AC outlet or computer. The battery pack can be charged while the tester is on or off. Charging time is reduced if the tester is turned off. With the tester turned on, the battery symbol on the display provides the charge status of the battery pack. Caution: To avoid electric shock, never modify, forcibly bend, damage, apply heat to or place heavy objects on top of the power cord. If the power cable becomes damaged or the plug overheats, discontinue use. Never remove the power plug from the outlet with wet hands. Using the wrong AC adapter could damage your tester. Psiber assumes no liability for damage in such cases. Never pull directly on the power cable to unplug it. Hold the power plug when removing the cable from the outlet. Psiber Data Systems Revision 1.00 5 PingerPro User Guide Getting Started Turn on the PingerPro by pressing the power button until the screen lights up, and then release the button. The unit displays the welcome screen for approximately 10 seconds and then the Home Screen automatically displays. Copper Home Screen Fiber Home Screen The Home Screen has Auto Test, Ping, Cable Test, Setup and Help Buttons. • Auto Test tests the network with configured parameters selected from the Setup screen. • Ping is a quick but powerful test that, while in factory default setting, sends a Ping from the tester to the Gateway from any part of the network. The Ping test can be quickly changed to preconfigured profiles to Ping other devices. • The Cable Test tests the physical copper portion of the network by measuring the length of the cable to a short or open, performing a wiremap analysis for incorrect wire connection, sending a tone for traceability or sending a signal to blink the switch port specific LED. • The Fiber Test displays the power detected from the device attached to the fiber SFP port. • Setup allows the user to customize settings for the Auto Test and the Ping test to test specific network parameters. • The Help button displays step-by-step instructions on how to use the PingerPro and displays the quick start guide. Psiber Data Systems Revision 1.00 6 PingerPro User Guide Setup Select the SETUP button from the Home Screen. The available configurable categories are displayed on the screen. Select a category to expand the button. When completed with any setup configuration, select Save and then the Psiber button to return to the Home Screen. Home Screen Main Setup Screen Main Setup Screen 2 Profiles Select the Profile button to show a listing of all the profile names. There are 11 customizable profiles and one Factory Default. The Factory Default profile cannot be changed. Select a customizable profile by selecting the gray box to the left of an unassigned profile. A dialog popup screen will be displayed. Select Set To Current to duplicate the parameters from the currently selected profile. In this case, it will duplicate the Factory Default configurations. Select Set To Default to duplicate the parameters of the Factory Default configuration. Select Cancel to return to the Profile Screen without any changes. Profile Screen Dialog Profile Box Psiber Data Systems Revision 1.00 7 PingerPro User Guide The User Profile 1 is now highlighted green and ready to be used for Auto Test. To edit newly created profiles, select the User Profile 1 green checked box again. Profile Screen Profile 2 Screen A dialogue box will be displayed. Clear will delete the selected profile and return the unit to the Factory Default profile. Select the Rename gray button to display a screen with an alphanumeric keyboard. Enter any profile name with up to 20 characters. Select OK for the name to be saved and to return to the Profile screen where the new name is displayed and highlighted. Profile Dialog Box Full Keyboard Profile Screen Psiber Data Systems Revision 1.00 8 PingerPro User Guide Select the Profile button with the < arrow to return to the Main Setup Screen or select the bottom Link button to continue on to the Link Setup Screen. Setup Profile Screen Main Setup Screen Link Select the Link Button from the Main Setup Screen. The Speed parameter choices are Auto-negotiating or Fixed speed/duplex. Auto selects all five speed/duplex modes; 10H, 10F, 100H, 100F or 1000F. In Fixed, only ONE speed/duplex can be selected. Select the Save button to save the configuration. Setup Copper Link Screen Setup Fiber Link Screen SFP Module Details Dialog Box The Interface setting appears in the PingerPro 75 where there is an option to test either Copper or Fiber cable. Once Fiber is selected, the SFP details and capabilities are displayed. Select the SFP Module Detail button to show all the details of the connected SFP. Select OK to return to the Link Screen. Select the Link button with the < arrow to return to the Main Setup Screen or select the bottom IP Address button to continue on to the IP Address Setup Screen. Psiber Data Systems Revision 1.00 9 PingerPro User Guide IP address The IP Address settings allow for the selection of a Fixed or DHCP address. This must match the network to which the PingerPro is being connected. If the network does not have a DHCP Server, select the Fixed button. Fixed allows the IP, Subnet, Gateway and DNS fields to be available to change. Select the Address button to change the IP address of the PingerPro. A numerical keyboard will be displayed to enter in the desired address. After entering the address, select OK to return to the IP address screen. Next, enter in the Subnet, Gateway and DNS addresses then press Save. 192.168.1.1 Setup IP Address Screen-DHCP Numerical Keyboard Setup IP Address Screen-Fixed Selecting the DHCP button causes the IP, Subnet, Gateway and DNS fields not to appear because they are unavailable for change. This information will automatically be assigned to the PingerPro once a link is established with the DHCP server. Select the IP Address button with the < arrow to return to the Main Setup Screen or select the bottom MAC Address button to the MAC Address Setup Screen. Psiber Data Systems Revision 1.00 10 PingerPro User Guide MAC Address In this screen, the MAC Address parameters are displayed. The user has a choice of the Factory or a User Defined MAC address. The Factory Default MAC Address of the PingerPro CANNOT be changed. User Defined allows the user to enter a MAC address of their choice for device cloning purposes. MAC cloning allows the PingerPro to simulate another network device by using its own MAC address to detect issues originating from that device. Select the User Defined gray button to go to a Hexadecimal keyboard screen to enter a MAC address. After entering the desired address, select OK to return to the MAC Address screen. Select the Save button to save the configuration. The Serial Number of the unit is also displayed. 700000 Setup MAC Address Screen Hexadecimal Keyboard Select the MAC Address button with the < arrow to return to the Main Setup Screen or select the bottom Ping button to continue on to The Ping Setup Screen. Psiber Data Systems Revision 1.00 11 PingerPro User Guide Ping Ping is a network tool used to test whether a particular host is reachable across an IP network. There are two options; Single or Continuous. When selecting Continuous, there can only be one ping target device selected and it only works in Ping Test. Select the Jumbo button to send a jumbo size frame ping packet for either single ping or continuous pings. Jumbo allows for a ping packet payload to be 2K bytes large. (Future Release) Single will ping a device the number of time you select in Count. Count determines the number of times to ping a device. Selecting the Count Button will display a numerical keyboard screen, allowing the user to change the parameter. After entering a valid number, select OK to return to the PING screen. Select the Save button to save the configuration. Setup Ping Screen Numerical Keyboard Payload is the amount of data sent with the ping packet in bytes. Select the Payload button to display a numerical keyboard. After entering a valid number between 56 and 1518 bytes, select OK to return to the Ping screen. Timeout is the amount of time the PingerPro waits before a ping response returns. Select the Timeout button to display a numerical keyboard. After entering a valid number, select OK to return to the Ping screen. Interval is the amount of time the PingerPro waits before sending out another ping packet. Select the Interval button to display a numerical keyboard. After entering a valid number, select OK to return to the Ping screen. Select the Ping button with the < arrow to return to the Main Setup Screen or select the bottom Ping List button to continue on to The Ping List Setup Screen. Psiber Data Systems Revision 1.00 12 PingerPro User Guide Ping List The Ping List screen allows the user to select the devices the PingerPro will ping. Select one target, or any combination of targets from the list. The options are Gateway, DHCP Server, IP Range (user defined), or up to nine separate User Defined Targets (Ping List Entries). GATEWAY allows for the pinging of the established gateway. DHCP SERVER allows for the pinging of the established DHCP Server. Select the∨arrow to display more targets. Setup Ping List Screen Setup Ping List 2 Screen Continuous Ping Error Message The IP Address Range is used to ping a user defined range of IP Addresses or a whole subnet. Select the Gray button to set the range. Select the Subnet button to select the whole subnet the PingerPro is connected to or select Set Start IPv4 to set a specific range within that subnet. A numerical keyboard will be displayed to enter in the starting IP Address. Enter in the desired IP address and select OK to set the IP Address. Do the same for Set End IPv4 address. Select the Save button to save the configuration. Setup Ping List-IP Range IP Range Setup Dialog Box Numerical Keyboard Psiber Data Systems Revision 1.00 13 PingerPro User Guide Unassigned 1 to 9 are user defined ping targets. Select any of the gray buttons to edit. Select Set IPv4, IPv6 or Hostname to bring up a numerical, hex or full keyboard respectively. Enter in the appropriate address or device name to be pinged and select OK. Select the Save button to save the configuration. Setup Ping List-IP Range IP Range Setup Dialog Box Numerical Keyboard Fe80::1cc6:b884:4466:1212 Setup PingIPv6 Screen Hexadecimal Keyboard Select the Ping List button with the < arrow to return to the Main Setup Screen or select the bottom Trace Route button to continue on to the Trace Route Setup Screen. Psiber Data Systems Revision 1.00 14 PingerPro User Guide Trace Route Trace Route displays the path and measures the delay of the packet across an IP network. The path of the packet is recorded as the round-trip time received from each remote node in the path. The sum of the mean times in each hop indicates the total time spent to establish the connection. Select the Enable button to add this test to the Ping Test. The Trace Route settings are now displayed. Setup Trace Route Screen Setup Trace Route Screen-Enabled Select the Type button to toggle through UDP, TCP SYN or ICMP packet. This can help identify incorrect routing table definitions or firewalls that may be blocking ICMP traffic, or high port UDP in Unix ping, to a site. A firewall may permit ICMP packets but no other packets. Setup Trace Route-UDP Setup Trace Route-TCP SYN Setup Trace Route-ICMP The hop count refers to the intermediate devices through which data must pass between the PingerPro and target device. Each router along the path constitutes as a hop. Set the Max Hop limit by selecting the Max Hop button and entering in a number. Select OK. Psiber Data Systems Revision 1.00 15 PingerPro User Guide Timeout is the amount of time the PingerPro waits before a Trace Route packet returns. Hostnames toggles between Off and On. This allows for the device name to be displayed or just the IP address. Select the Save button to save the configuration. Select the Trace Route button with the < arrow to return to the Main Setup Screen or select the bottom VLAN/LLDP button to continue on to the VLAN/LLDP Setup Screen. VLAN/LLDP Select the Enable button to add this test to the Auto Test set. The VLAN settings are now displayed. Setup VLAN/LLDP Screen Setup VLAN Screen-Enabled VLAN partitions a single network to create multiple distinct broadcast domains which are mutually isolated so that packets can only pass between them via one or more routers. The default VLAN typically has an ID of 1. If a VLAN were to exist only on one device, no ports that are members of the VLAN group need to be tagged. These ports would hence be considered "untagged". When the VLAN is to extend to another device, then tagging is used. Since communications between ports on two different switches travel via the uplink ports of each switch involved, every VLAN containing such ports must also contain the uplink port of each switch involved, and these ports must be tagged. To change the VLAN ID select the Assign No. gray button and enter in a number up to 4096 and select OK. VLAN Priority is defined by the 802.1P standard that is a quality of service (QoS) prioritization scheme that indicates the priority level of the frame. The priority level values range from 0 (best effort/lowest) to 7(highest). These values can be used to prioritize different classes of traffic such as voice and video. The VLAN ID tag specifies the VLAN to which the frame belongs. The priority bits define the priority with which the frames are processed. Psiber Data Systems Revision 1.00 16 PingerPro User Guide Select the Enable button to add LLDP/CDP to the Auto Test set. The LLDP/CDP settings are now displayed. Setup VLAN/LLDP Screen Setup LLDP Screen-Enabled The Link Layer Discovery Protocol (LLDP) is a vendor-neutral link layer protocol used by network devices for advertising their identity, capabilities, and neighbors on a network. LLDP information is sent by devices from each of their interfaces at a fixed interval in the form of an Ethernet frame. The Cisco Discovery Protocol (CDP) is a proprietary Data Link Layer protocol developed by Cisco Systems. It is used to share information about other directly connected Cisco equipment, such as the operating system version and IP address. By default, CDP packets are sent every 30 to 60 seconds. Select the gray Timeout button to change the time the PingerPro waits for a LLDP or CDP packet. Select the VLAN/LLDP button with the < arrow to return to the Main Setup Screen or select the bottom Security button to continue on to The Security Setup Screen. Security Select the Enable button to add this test to the Auto Test set. The Security settings are now displayed. The PingerPro uses 802.1X to gain access to secure networks. IEEE 802.1X is an IEEE Standard for Port-based Network Access Control. It provides an authentication mechanism to devices wishing to attach to a LAN or WLAN. The encapsulation of EAP over IEEE 802 is defined as "EAP over LANs" or EAPOL. The PingerPro uses EAP-MD5 to determine network security. EAP-MD5 differs from other EAP methods in that it only provides authentication of the EAP peer to the EAP server but not mutual authentication. Enter in the Username and Password for the PingerPro to use to authenticate itself in Auto Test. Psiber Data Systems Revision 1.00 17 PingerPro User Guide Select the Username then enter in the correct username from the 802.1X Server and select OK. Follow the same steps for entering the Password. Select the Save button to save the configuration. Setup Security Screen Setup Security Screen-Enabled Full Keyboard- Username Select the Security button with the < arrow to return to the Main Setup Screen or select the bottom Settings button to continue on to the Settings Setup Screen. Settings The Settings menu allows the user to customize their PingerPro's operating parameters. Select the gray Date/Time button to change date and time. Select the up and down arrow to change the month then press Select to scroll through the day, year, hour, minute and AM/PM selections. Select OK to return to the Main Settings page. The Sound setting can be changed to either High, Low or Off. Select the ∨arrow to see more settings options. Auto Turn Off allows the PingerPro to turn off with either 5 minutes or 30 minutes of inactivity or set to never turn off. To save battery life, change the Auto turn off time to 5 minutes. PingerPro is available in five different languages: English, Spanish, French, German, and Chinese. Select another language, other than the default English setting, and the PingerPro will cycle power to bring up the selected language. Select the ∨arrow to see more settings options. Export Test Data allows the user to Export test data to your PC through the USB cable. Select Export then plug the USB cord into the PingerPro. A PingerPro Drive will display on the PC. Select the Test Data to be exported to the PC. Copy and paste the data to the PC. (PingerPro Tools for the PC will be available on the Psiber website for reporting) Psiber Data Systems Revision 1.00 18 PingerPro User Guide Secure Delete allows the user to set the PingerPro back to the Factory Default settings. The user has the option to select Profiles, Saved Data or All data to be deleted. Please note that once this is selected there is no way of getting back the data. Build Info shows the latest firmware running on the PingerPro. Check the www.psiber.com website for the latest firmware. 1.00 Setup Settings Screen Setup Settings 2 Screen Setup Settings 3 Screen Select the Settings button with the < arrow to return to the Main Setup Screen or select the bottom Saved Data button to continue on to The Saved Data Setup Screen. Saved Data Saved Data is filled with saved test data from the Auto, Ping or Cable/Fiber Tests. Auto Test is denoted with an A_ prefix before the date and time. Ping test is denoted with a P_ prefix before the date and time. Cable test is denoted with a C_ prefix before the date and time. Setup Saved Data Screen Setup Saved Data Screen-Test Data Saved Data Dialog Box Psiber Data Systems Revision 1.00 19 PingerPro User Guide Select the Test Data by selecting the gray button next to the desired saved data. A dialog box will be displayed. The Profile used for the test data is displayed as well as the Time the data was saved. Below are three options: Load data, Rename File or Delete. Load data will show a preview of the test data on the PingerPro. Rename file allows a user defined name to be entered for the test data. Delete will delete the test data on the PingerPro. Please note that once this is selected there is no way of getting back the data. Select Cancel to go back to the Saved Data screen without making any changes. Select the Saved Data button with the < arrow to return to the Main Setup Screen or select the bottom Upgrade button to continue on to the Upgrade Setup Screen. Upgrades Upgrade allows for the upgrade of the PingerPro firmware. A unique License is displayed to upgrade the Pinger Pro with new features. Select the License button to enter in the new unique license number given by Psiber. Once that is entered, the INSTALL FILE dialog will be displayed, do not dismiss yet. Next, the USB drive is exported to the PC so that the install file (*.sbx) can be copied. Plug the USB into a PC and the PingerPro. Copy the install file to the PingerPro Drive on the PC then eject the drive. DO NOT UNPLUG USB. Select OK to dismiss the dialog box on the PingerPro to finish the installation. On the top banner you can watch the progress cycle through COPY, UNPACKING, VERIFY, INSTALLING… of the new firmware. After installing and successful licensing, an UPGRADE COMPLETE dialog will appear, then about 5-10 seconds later it will reboot to the newly installed application. Setup Upgrade Screen Select the Upgrade button with the < arrow to return to the Main Setup Screen or select the bottom Link button to return to The Link Setup Screen. Psiber Data Systems Revision 1.00 20 PingerPro User Guide Auto Test Once Setup has been configured, select the Auto Test button on the Home Screen to display the Main Auto Test page. Select the play button to start the Auto Test. Note: The Auto Test can be performed immediately, using Factory Default Profile, without navigating through and changing parameters within the Setup Menu. Home Screen Auto Test Screen w/all tests Auto Test Screen w/few tests Depending on how the Auto Test is setup, the test will range from 5 to 60 seconds. Once completed, green checkmarks will be displayed for tests that have passed. If the test fails, then a red button and an X will indicate at which part the test failed. As shown below, the Auto Test in progress screen shows a red count down of the time it will wait until a LLDP or CDP packet is found before the timeout is reached. Main Auto Test Screen in Progress Main Auto Test Screen Failed Psiber Data Systems Revision 1.00 21 PingerPro User Guide Once the Auto Test is complete, select the Save button to save the current Auto Test data. Selecting Save will save the data with the automatic file name. Selecting Save As will allow the user to rename the file. Selecting Cancel will cancel the Save process and return the user back to the Auto Test Results. Main Auto Test Screen Auto Test Save Screen Auto Test Save As Screen Press the Refresh or Play button to start a new Auto Test. Note that this also clears all the data collected. If no link is established within the timeout period, the button will turn red and a warning message is displayed. Below are a few examples of warning messages. DHCP Warning Message Link Warning Message Unsaved Warning Message Psiber Data Systems Revision 1.00 22 PingerPro User Guide Select the Link button to bring up the Link Results Screen. This screen will display the partner’s capabilities and actual connected link status. The linked port is shown with the actual link parameters including connection type (LAN or NIC), speed (10/100/1000) and duplex mode (Half or Full). If VLAN was selected under setup, the VLAN ID and Priority will be displayed. Main Auto Test Pass Screen Copper Link Screen Link Screen with VLAN For the PingerPro +Fiber, the unit measures Optical Power Received (Rx) and Transmitted (Tx) when Fiber is selected. The measurement in displayed in 0.1dBm increment with a Range of -32dBm to +8dBm and accuracy +/- 2 dBm. Fiber Link Screen Select the Link button with the < arrow to return to the Main Auto Test Screen or select the bottom button to continue to the IPv4 Address Results Screen. Psiber Data Systems Revision 1.00 23 PingerPro User Guide IPv4 Address displays the IP address, Subnet Mask, Gateway IP address and DNS (Domain Name System) Server IP address. IPv4 Info displays DHCP or Fixed from the configuration set in setup. IPv4 Address Screen Select the IPv4 Address button with the < arrow to return to the Main Auto Test Screen or select the bottom button to continue to the IPv4 Ping Results Screen. The IPv4 PING and IPv6 PING tests are used to quickly verify connectivity and search a stored list or a range of IP addresses for devices on the network. (For more information on devices detected such as roundtrip time and MAC address, use the Ping test from the Home Screen.) IPv4 Ping Screen IPv6 Ping Screen Select the IPv4 Ping button with the < arrow to return to the Main Auto Test Screen or select the bottom button to continue to the LLDP/CDP Results Screen. Psiber Data Systems Revision 1.00 24 PingerPro User Guide The Switch Info (LLDP/CDP) Screen decodes LLDP (Link Layer Discovery Protocol) and CDP (Cisco Discovery Protocol) frames which are detected from the nearest connected switch. Scroll through the entire data by selecting the up and down arrows or by swiping the stylus on the screen up/down and side to side. LLDP/CDP Test Screen Select the LLDP/CDP Switch Info button with the < arrow to return to the Main Auto Test Screen or select the bottom button to continue to the Security Results Screen. The Security Results Screen shows the Authentication Process the PingerPro goes through to connect to a network using 802.1X through the EAP-MD5 protocol. The PingerPro will display green check marks for passed steps and red X's for failed steps. This will help determine where the problem is located within the 802.1X Secure network. Main Auto Test Failed Screen Security Warning Message Security Screen with Failures Psiber Data Systems Revision 1.00 25 PingerPro User Guide The PingerPro goes through the following common steps to authorize a connection to an 802.1X secure network: 1. The authenticator sends an "EAP Request/Identity" packet to the PingerPro as soon as it detects that the link is active. 2. The PingerPro sends an "EAP Response/Identity" packet containing a unique User ID for the PingerPro to the authenticator, which is then passed on to the authentication (RADIUS) server. 3. The authentication server sends back an “EAP Response/challenge” to the authenticator, such as with a token password system. The authenticator unpacks this from IP and repackages it into EAPOL and sends it to the PingerPro. 4. The PingerPro responds with an “EAP Identity Response” packet which includes the correct password to the challenge via the authenticator and passes the response on to the authentication server. 5. If the PingerPro provides proper identity, the authentication server responds with an “EAP Success” packet, which is then passed onto the PingerPro. The authenticator now allows access to the LAN network. Passed Security Screen Psiber Data Systems Revision 1.00 26 PingerPro User Guide Ping Test The PING test is the quickest way to verify connectivity, measure round trip communication time, check data integrity, determine a MAC address and search a stored list or a range of IP addresses. Select the PING test button from the Home Screen. Select the play button to start the test. Home Screen Main Ping Screen Once the test is complete, a summary of the responsive or unresponsive devices are displayed. The Factory Default profile will only ping the Gateway address. Select the Link Info button to display the Ping Connection Details dialog box. Ping Connection Details include speed and duplex the Pinger Pro is connected at, partner capabilities, MAC address and IP address information. Select the OK button to return to the Main Ping Screen. Main Ping Screen Ping Detail Screen Psiber Data Systems Revision 1.00 27 PingerPro User Guide Select the Target IP address button to display the Ping Target Details. Ping target details include the Hostname, IP address, MAC address, attempted ping packets sent and the round trip time to the device and back. The Clone button will appear when the IP address is within the Subnet mask the PingerPro is connected to. Select Clone to change the MAC address of the PingerPro to the target device. Select OK to set the MAC address or Cancel to return to the Ping Target Details page. Select the OK button to return to the Main Ping Screen. Main Ping Screen Ping Target Details Screen Clone MAC address Screen Select the Trace Route button to trace the route to that target device. The device is listed with the number of hops it took the PingerPro to get to the device. The IP address (if available) is displayed with the roundtrip time in milliseconds. If the PingerPro cannot resolve the IP address, it displays stars. Use the up and down arrow to see all the hops. Main Ping Screen Ping Target Details Screen Trace Route Screen Psiber Data Systems Revision 1.00 28 PingerPro User Guide Select the Settings button to display the Settings Screen. Select the Show Hostname button and then select OK to display the targets name on the Main Ping Screen. Main Ping Screen Settings Screen Main Ping Screen w/Hostname Select the Settings button again to display the Settings Screen. Select the Show MAC button and then select OK to display the target's MAC address on the Main Ping Screen. Settings Screen Main Ping Screen w/MAC address Psiber Data Systems Revision 1.00 29 PingerPro User Guide Select the Settings button again to display the Settings Screen. Select all three buttons including Show Hostname, Show MAC and Replies only. Select OK to display only the targets that have passed the ping test with both the Hostname and MAC address displayed on the Main Ping Screen. Settings Screen Main Ping Screen Selecting the Psiber Home button or the Refresh button before saving will result in a warning message being displayed. Select the Save button to save the current Ping Test data. Select Save to save the data with the automatic file name or select Save As to rename the file. Selecting Cancel will cancel your Save and return back to the Main Ping Test Screen. Unsaved Warning Message Ping Test Save Screen Ping Test Save As Screen Psiber Data Systems Revision 1.00 30 PingerPro User Guide Select the Settings button again to display the Settings screen. Select the < and > arrows to scroll through the User Defined Profiles. Select OK to set a new User Defined Profile and return to the Main Ping Screen to run a new test. Select the Refresh button to start the test. LINK INFO Settings w/Factory Default Settings w/TEST Profile Main Ping Test Screen This new test displays ping packet responses sent across the entire subnet. The top information bar indicates that 254 IP addresses were sent ping packets and only 5 devices responded. Use the V arrow to scroll through the device to see which devices were found. The PingerPro IP address will be displayed in gold to show its own information. Select on the Pinger Pro IP address to bring up the Ping Target Details. Select OK when finished. Main Ping Screen test Completed Ping Target Detail Screen Psiber Data Systems Revision 1.00 31 PingerPro User Guide Select the Settings button again to display the Settings screen. Select all three buttons including Show Hostname, Show MAC and Replies only. Select OK to display only the targets that have passed the ping test with both the Hostname and MAC address displayed on the Main Ping Screen. Select any tested device for more information. Select the Save button to save the results. Settings Screen Main Ping Screen w/Details If Continuous ping is selected in setup, the Pinger Pro will continue to ping a specific target until the user selects the OK button to stop pinging. The banner will show the number of ping packets the PingerPro has sent to the target device. The Ping Target Details Dialog box will be displayed with information including Hostname, IP/ MAC address, number of attempt, lost and bad packets. The minimum, average and maximum round trip times are also displayed. Main Ping Screen Continuous Ping Dialog Box Ping Target Details Screen Psiber Data Systems Revision 1.00 32 PingerPro User Guide Cable Test The Cable Test will check the physical wire connected to the PingerPro. Cable Test includes Wiremap, Length, Tone and Port ID. Select the Cable Test button from the Home Screen. Select the Wiremap to test the cable. Home Screen Main Cable Test Screen Wiremap verifies proper cable wiring and detects split pairs. Connect the Wiremap Terminator to the cable under test before starting the Wiremap test. Selecting the Play button will start the test. The Wiremap test will continue to run until the Stop button has been pressed. Select Save to save the last tested cable. Wiremap Screen before Test Passed Wiremap Screen Failed Wiremap Screen Select the Wiremap button with the < arrow to return to the Main Cable Test Screen or select the bottom Length button to test the length of the cable to an open or short. Psiber Data Systems Revision 1.00 33 PingerPro User Guide Length measures and displays the distance to an open or short of each wire pair in a cable. Disconnect the cable under test from a switch or Wiremap Terminator prior to starting the length measurement. Select the Settings button to change the NVP for the connected cable by selecting the gray button to display a numerical keyboard. The highest NVP is 74 and the lowest is 65. Select either Meters or Feet to display the length in that unit of measurement. Select OK to return to the Length Screen. Select the play button to run the test. Length Screen Length Settings Screen Select the Length button with the < arrow to return to the Main Cable Test Screen or select the bottom Tone button to trace the wire. Tone is used to locate a punch down or trace a cable using a Cable Tracker CT-15 probe (Optional). The tone frequency is adjustable. Select a gray tone button to start the tone. Tone Screen Select the Tone button with the < arrow to return to the Main Cable Test Screen or select the bottom Port ID button to send a signal to the attached Port. Psiber Data Systems Revision 1.00 34 PingerPro User Guide Port ID is used to determine which port of a hub or switch is wired to a particular wall jack by blinking the Link LED on the port. The blink rate is adjustable for compatibility with most switches and hubs. Select the rate at which the LED will blink SLOW, MEDIUM, FAST, or VERY FAST. Port ID Screen Select the Tone button with the < arrow to return to the Main Cable Test Screen or select the bottom Port ID button to send a signal to the attached Port. Fiber Test The Cable Test button on the Home Screen will become the Fiber Test if it’s a PingerPro 75 devices and the fiber button was selected in Setup under the Link Screen. The Fiber Test continuously measures and displays the Received (RX) and Transmitted (TX) power from the fiber SFP port. The sample count and the minimum, average and maximum power detected are also displayed. Home Screen Main Fiber Test Screen Psiber Data Systems Revision 1.00 35 PingerPro User Guide Help The Help Screen displays this step-by-step user guide on how to use the PingerPro and displays the quick start guide. Home Screen Main Help Screen The Help Screen is divided into five categories to easily guide through the different tests the PingerPro can perform. Select the Quick Start Guide button and scroll through the pages. Sample helps screens are displayed below. Getting Started Help Screen Getting Started Help Screen Select the < arrow to return to the Main Help Screen or the up and down arrows to see more help information. Psiber Data Systems Revision 1.00 36