1
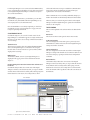
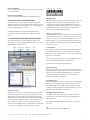
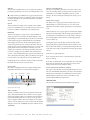
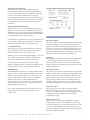
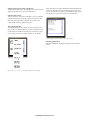
ClockWorks
Digital Timepiece / Windows
User Guide
1280 Massachusetts Avenue
Cambridge, MA 02138
Business voice: (617) 576-2760
Business fax: (617) 576-3609
Technical support: (617) 576-3066
Tech support fax: (617) 354-3068
Tech support email: [email protected]
Web site: www.motu.com
Mark of the Unicorn License Agreement and Limited
Warranty on Software
TO PERSONS WHO PURCHASE OR USE THIS PRODUCT: carefully read all
the terms and conditions of this agreement before using this software package.
Using this software package indicates your acceptance of the terms and conditions
of this license agreement.
Mark of the Unicorn, Inc. (“MOTU”) owns both this program and its documentation.
Both the program and the documentation are protected under applicable copyright
laws. Your right to use the program and the documentation are limited to the terms
and conditions described herein.
License
YOU MAY: (a) use the enclosed program on a single computer; (b) physically
transfer the program from one computer to another provided that the program is
used on only one computer at a time and that you remove any copies of the
program from the computer from which the program is being transferred; (c) make
copies of the program solely for backup purposes.You must reproduce and include
the copyright notice on a label on any backup copy.
YOU MAY NOT: (a) distribute copies of the program or the documentation to
others; (b) rent, lease or grant sublicenses or other rights to the program; (c)
provide use of the program in a computer service business, network, time-sharing,
multiple CPU or multiple user arrangement without the prior written consent of
MOTU; (d) translate or otherwise alter the program or related documentation
without the prior written consent of MOTU.
Term
Your license to use the program and documentation will automatically terminate if
you fail to comply with the terms of this Agreement. If this license is terminated you
agree to destroy all copies of the program and documentation.
Limited Warranty
MOTU warrants to the original licensee that the disk(s) on which the program is
recorded be free from defects in materials and workmanship under normal use for
a period of ninety (90) days from the date of purchase as evidenced by a copy of
your receipt. If failure of the disk has resulted from accident, abuse or misapplication of the product, then MOTU shall have no responsibility to replace the disk(s)
under this Limited Warranty.
THIS LIMITED WARRANTY AND RIGHT OF REPLACEMENT IS IN LIEU OF,
AND YOU HEREBY WAIVE, ANY AND ALL OTHER WARRANTIES, BOTH
EXPRESS AND IMPLIED, INCLUDING BUT NOT LIMITED TO WARRANTIES
OF MERCHANTABILITY AND FITNESS FOR A PARTICULAR PURPOSE. THE
LIABILITY OF MOTU PURSUANT TO THIS LIMITED WARRANTY SHALL BE
LIMITED TO THE REPLACEMENT OF THE DEFECTIVE DISK(S), AND IN NO
EVENT SHALL MOTU BE LIABLE FOR INCIDENTAL OR CONSEQUENTIAL
DAMAGES, INCLUDING BUT NOT LIMITED TO LOSS OF USE, LOSS OF
PROFITS, LOSS OF DATA OR DATA BEING RENDERED INACCURATE, OR
LOSSES SUSTAINED BY THIRD PARTIES EVEN IF MOTU HAS BEEN
ADVISED OF THE POSSIBILITY OF SUCH DAMAGES. THIS WARRANTY
GIVES YOU SPECIFIC LEGAL RIGHTS WHICH MAY VARY FROM STATE TO
STATE. SOME STATES DO NOT ALLOW THE LIMITATION OR EXCLUSION OF
LIABILITY FOR CONSEQUENTIAL DAMAGES, SO THE ABOVE LIMITATION
MAY NOT APPLY TO YOU.
Update Policy
In order to be eligible to obtain updates of the program, you must complete and
return the attached Mark of the Unicorn Purchaser Registration Card to MOTU.
General
This License Agreement shall be governed by the laws of the Commonwealth of
Massachusetts and shall inure to the benefit of MOTU, its successors, administrators, heirs and assigns.
Copyright Notice
Copyright © 2004 by Mark of the Unicorn, Inc. All rights reserved. No part of this
publication may be reproduced, transmitted, transcribed, stored in a retrieval
system, or translated into any human or computer language, in any form or by any
means whatsoever, without express written permission of Mark of the Unicorn,
Inc., 1280 Massachusetts Avenue, Cambridge, MA, 02138, U.S.A.
Limited Warranty on Hardware
Mark of the Unicorn, Inc. and S&S Research (“MOTU/S&S”) warrant this
equipment against defects in materials and workmanship for a period of NINETY
(90) DAYS from the date of original retail purchase. This warranty applies only to
hardware products; MOTU software is licensed and warranted pursuant to
separate written statements.
If you discover a defect, first write or call Mark of the Unicorn at (617) 576-2760 to
obtain a Return Merchandise Authorization Number. No service will be performed
on any product returned without prior authorization. MOTU will, at its option, repair
or replace the product at no charge to you, provided you return it during the
warranty period, with transportation charges prepaid, to Mark of the Unicorn, Inc.,
1280 Massachusetts Avenue, MA 02138. You must use the product’s original
packing material for in shipment, and insure the shipment for the value of the
product. Please include your name, address, telephone number, a description of
the problem, and the original, dated bill of sale with the returned unit and print the
Return Merchandise Authorization Number on the outside of the box below the
shipping address.
This warranty does not apply if the equipment has been damaged by accident,
abuse, misuse, or misapplication; has been modified without the written
permission of MOTU, or if the product serial number has been removed or defaced.
ALL IMPLIED WARRANTIES, INCLUDING IMPLIED WARRANTIES OF
MERCHANTABILITY AND FITNESS FOR A PARTICULAR PURPOSE, ARE
LIMITED IN DURATION TO NINETY (90) DAYS FROM THE DATE OF THE
ORIGINAL RETAIL PURCHASE OF THIS PRODUCT.
THE WARRANTY AND REMEDIES SET FORTH ABOVE ARE EXCLUSIVE AND
IN LIEU OF ALL OTHERS, ORAL OR WRITTEN, EXPRESS OR IMPLIED. No
MOTU/S&S dealer, agent, or employee is authorized to make any modification,
extension, or addition to this warranty.
MOTU/S&S ARE NOT RESPONSIBLE FOR SPECIAL, INCIDENTAL, OR
CONSEQUENTIAL DAMAGES RESULTING FROM ANY BREACH OF
WARRANTY, OR UNDER ANY LEGAL THEORY, INCLUDING LOST PROFITS,
DOWNTIME, GOODWILL, DAMAGE OR REPLACEMENT OF EQUIPMENT
AND PROPERTY AND COST OF RECOVERING REPROGRAMMING, OR
REPRODUCING ANY PROGRAM OR DATA STORED IN OR USED WITH
MOTU/S&S PRODUCTS.
Some states do not allow the exclusion or limitation of implied warranties or liability
for incidental or consequential damages, so the above limitation or exclusion may
not apply to you. This warranty gives you specific legal rights, and you may have
other rights which vary from state to state.
ClockWorks, MIDI Timepiece AV and Mark of the Unicorn are trademarks of Mark
of the Unicorn, Inc.
This equipment has been type tested and found to comply with the limits for a class B digital device,
pursuant to Part 15 of the FCC Rules. These limits are designed to provide reasonable protection
against harmful interference in a residential installation. This equipment generates, uses, and can
radiate radio frequency energy and, if not installed and used in accordance with the instruction manual,
may cause harmful interference to radio communications. However, there is no guarantee that
interference will not occur in a particular installation. If this equipment does cause interference to radio
or television equipment reception, which can be determined by turning the equipment off and on, the
user is encouraged to try to correct the interference by any combination of the following measures:
• Relocate or reorient the receiving antenna
• Increase the separation between the equipment and the receiver
• Plug the equipment into an outlet on a circuit different from that to which the receiver is connected
If necessary, you can consult a dealer or experienced radio/television technician for additional
assistance.
PLEASE NOTE: only equipment certified to comply with Class B (computer input/output devices,
terminals, printers, etc.) should be attached to this equipment, and it must have shielded interface
cables in order to comply with the Class B FCC limits on RF emissions.
WARNING: changes or modifications to this unit not expressly approved by the party
responsible for compliance could void the user's authority to operate the equipment.
FCC ID Number: JYSDTP
Using ClockWorks™ for Windows
with the Digital Timepiece
OVERVIEW
RUNNING CLOCKWORKS
About clockWorks. . . . . . . . . . . . . . . . . . . . . . . . . . . . . . . . . . . . . . . . . . . . . . . . . . . . . 3
Familiarity with Windows . . . . . . . . . . . . . . . . . . . . . . . . . . . . . . . . . . . . . . . . . . . . . 3
System requirements . . . . . . . . . . . . . . . . . . . . . . . . . . . . . . . . . . . . . . . . . . . . . . . . . 3
Installing ClockWorks . . . . . . . . . . . . . . . . . . . . . . . . . . . . . . . . . . . . . . . . . . . . . . . . . 3
Running ClockWorks . . . . . . . . . . . . . . . . . . . . . . . . . . . . . . . . . . . . . . . . . . . . . . . . . . 3
ClockWorks basics. . . . . . . . . . . . . . . . . . . . . . . . . . . . . . . . . . . . . . . . . . . . . . . . . . . . . 4
The File menu . . . . . . . . . . . . . . . . . . . . . . . . . . . . . . . . . . . . . . . . . . . . . . . . . . . . . . . . . 4
Saving and loading configurations. . . . . . . . . . . . . . . . . . . . . . . . . . . . . . . . . . . . 5
Synchronization and MIDI Machine control . . . . . . . . . . . . . . . . . . . . . . . . . . . 5
The Sync tab. . . . . . . . . . . . . . . . . . . . . . . . . . . . . . . . . . . . . . . . . . . . . . . . . . . . . . . . . . . 6
The Video tab . . . . . . . . . . . . . . . . . . . . . . . . . . . . . . . . . . . . . . . . . . . . . . . . . . . . . . . . . 9
When you first launch ClockWorks, the Device List window
appears. If a MIDI Timepiece AV or other similar MOTU MIDI
interface is connected to your computer (with properly installed
drivers), you’ll see it in the list. If not, the list will be empty. In
either case, click the Add DTP button to add your Digital
TImepiece to the list, as shown below in Figure 1:
ABOUT CLOCKWORKS
ClockWorks is a software console for the Digital Timepiece
universal synchronizer. ClockWorks gives you convenient access
to all of the Digital Timepiece’s front panel settings, as well as a
number of Digital Timepiece features not accessible from the
front panel, including:
■
Complete transport control
■
VITC read and write settings
■
Other synchronization settings
■
Video display settings
Figure 1: Click the Add DTP button to add a Digital Timepiece to the ClockWorks device
list.
■
Complete device status information
The Digital Timepiece has two sets of MIDI IN/OUT ports. Make
sure that one set or the other (it doesn’t matter which one) is
connected bidirectionally to a MIDI interface connected to your
computer. Make sure that the connections in the Digital
Timepiece setup window (Figure 1) accurately reflect the MIDI
ports being used for the MIDI cable connections between the
interface and the Digital Timepiece.
This guide explains how to install and use ClockWorks. For
further information about the Digital Timepiece itself, please
refer to the Digital Timepiece Installation & Setup Guide that
accompanies this one.
ClockWorks also serves as the latest console software for MOTU’s
popular line of MIDI interfaces, including the MIDI Timepiece
AV.
FAMILIARITY WITH WINDOWS
In explaining how to use ClockWorks, this guide assumes that you
are already familiar with the standard Windows interface
conventions, such as how to select options using menus, check
boxes, radio buttons, etc. and how to type and edit text, and so
forth.
Troubleshooting
After you click the OK button in Figure 1, ClockWorks attempts a
handshake with the Digital Timepiece hardware itself. If the
handshake is unsuccessful for some reason, you’ll seen an alert:
SYSTEM REQUIREMENTS
ClockWorks requires Windows Me, 2000, or XP.
INSTALLING CLOCKWORKS
Insert the MOTU USB MIDI installer CD and run the Setup.exe
installer.
This behavior is usually caused by one of the following situations:
The Digital Timepiece is turned off. Power it up and choose
Refresh Device from the File menu.
■
3
■ The Digital Timepiece is not connected to the MIDI interface,
or it is connected improperly. Make sure your cable connection(s)
to the Digital Timepiece match Figure 1. Then choose Refresh
Device from the File menu.
Trying again
If you make any adjustments to your hardware, you can make
ClockWorks retry a handshake with the Digital Timepiece by
choosing Refresh Device from the File menu.
Once the handshake is successfully completed, you should see
ClockWorks open up as shown in Figure 2 on page 4. You are
ready to begin using ClockWorks.
Clockworks’ File menu. Doing so reestablishes communication
between the software and hardware, and the software gets
updated to the current state of the hardware.
When communication is successfully established, changes you
make in ClockWorks are immediately reflected in the hardware.
Likewise, when you use the front panel controls on the Digital
Timepiece itself, the Digital Timepiece updates the ClockWorks
software on the computer.
THE FILE MENU
Here is a brief explanation of each item in the ClockWorks File
menu.
CLOCKWORKS BASICS
ClockWorks (Figure 2) serves as the “control center” for the
Digital Timepiece. ClockWorks appears as a single window with
tabs that you can click to access settings. Click the desired tab to
view its settings.
The Device List
The Device List window shows all configurable MOTU MIDI
devices and Digital Timepieces connected to the computer.
Double-click on a device in the list to open its window, which
displays all of its settings.
ROM version
The firmware (ROM) version of your Digital Timepiece is
displayed in the upper portion of the ClockWorks window
(Figure 2).
Understanding the interaction between the software and
hardware
ClockWorks always reflects the current state of the Digital
Timepiece. At least, it should. If, at any time, you suspect that the
windows in the software don’t accurately reflect what’s going on in
the hardware for some reason, choose Refresh Device from
Device List
The Device List menu item opens the Device List window.
Load Configuration
The Load Configuration menu item opens a previously saved
ClockWorks document and restores all of the Digital Timepiece
settings saved in the document.
Save Configuration
The Save Configuration menu item saves all the current Digital
Timepiece settings in ClockWorks as a document on disk. You can
restore the settings by opening it with the Load Configuration
command.
Refresh Device
ClockWorks always reflects the current state of the Digital
Timepiece. However, if at any time you suspect that the windows
in ClockWorks don’t accurately reflect what’s going on in the
hardware for some reason, choose Refresh Device from the File
menu. ClockWorks will be updated to reflect the current state of
the hardware.
Device list window
Sync and
MIDI Machine
Control section
ROM version
Tabs
Figure 2: The ClockWorks windows.
USING CLOCKWORKS FOR MAC OS X WITH THE MIDI TIMEPIECE AV
4
Rename Hardware
Lets you modify the name of the currently selected device in the
Device List window.
Reset to Factory Settings
Restores the factory default settings in the Digital Timepiece.
SAVING AND LOADING CONFIGURATIONS
ClockWorks lets you save the entire contents of the Digital
Timepiece’s memory as a file on disk. The file can later be opened
and modified at any time. This allows you to store an unlimited
number of Digital Timepiece setups.
ClockWorks handles file saving and loading with the Save
Configuration and Load Configuration commands in the File
menu.
SYNCHRONIZATION AND MIDI MACHINE CONTROL
The Sync tab and the sync-related controls at the top of the
window give you control over the Digital Timepiece’s sync and
MMC transport control features.
Transport Clock mode, Frame
controls rate and MMC record
mode menus
SMPTE readout
and Locate
buttons
Device
list
Rewind Stop Play
Pause Record
Figure 4: ClockWorks transport controls.
SMPTE Readout
The SMPTE Readout provides a running update of the time code
being generated or converted by the Digital Timepiece. This
running update is made possible by MIDI Time Code (MTC)
generated by the Digital Timepiece and routed to the computer. If
the SMPTE Readout is not responding, try using the Reset to
Factory Settings command in the File menu.
Cueing to a specific frame
The SMPTE readout shows the Digital Timepiece’s current frame
location in hours: minutes: seconds/ frames. You can also type in
any frame location you wish into the SMPTE Readout to cue the
Digital Timepiece to a specific frame location. Use the tab key to
move from field to field and press return to confirm the SMPTE
location you type in.
Locate Buttons
You can set the eight locate buttons (below the SMPTE counter) to
any SMPTE frame location you wish and then cue the Digital
Timepiece (and all connected devices) as desired by clicking the
appropriate Locate button.
To set a locate point for a locate button, set the SMPTE counter to
the desired location and then shift-click the button.
Locate points are saved with ClockWorks files.
Clock mode menu
The Clock mode menu lets you choose the overall time base for
the Digital Timepiece. This setting is the same as the TIME BASE
setting on the front panel of the Digital Timepiece itself. For a
complete explanation of Time Base modes, see the Digital
Timepiece Installation & Setup Guide.
Figure 3: The synchronization and MIDI machine controls.
Transport controls
The transport controls are just like standard tape deck transports.
From left to right, they are: rewind, stop, play, pause and record.
These buttons control the time code generated by the Digital
Timepiece when it is in any master sync mode in which it controls
the current address (SMPTE location), such as Internal mode.
The record button triggers recorders or video decks that are
connected to the Digital Timepiece and that have been armed for
recording. (See “The MMC record mode menu” on page 5.)
Frame Rate menu
The SMPTE Frame rate menu lets you choose the overall SMPTE
frame rate for the Digital Timepiece. This setting is the same as
the SMPTE setting on the front panel of the Digital Timepiece
itself. For a complete explanation of SMPTE frame rates, see the
Digital Timepiece Installation & Setup Guide.
The MMC record mode menu
The MMC record mode settings let you control exactly when
recording will occur in MMC devices being controlled by the
Digital Timepiece.
The MMC record mode menu has three choices: safe, rehearse,
and record.
Safe
No recording can occur in any MMC device.
USING CLOCKWORKS FOR MAC OS X WITH THE MIDI TIMEPIECE AV
5
Rehearse
This mode causes MMC devices to act as if they are recording,
punching in, punching out, etc. but no recording actually occurs.
☛ Make sure that your MMC device supports rehearse mode
before attempting to use this record feature. If it doesn’t, rehearse
mode may actually record. Consult the manual for your MMC
device for details.
Record
This mode allows recording on the currently record-enabled
track(s) for any MMC device. To actually record, press the record
button in your MMC-compatible host recording software.
Device list
The device list (Figure 3 on page 5) shows all of the MMC or
SONY 9-pin devices connected to the Digital Timepiece. The
Digital Timepiece automatically detects any devices connected to
it and continuously reports that information to ClockWorks,
which displays the devices in the list. The Digital Timepiece
continuously polls for devices (as long as the Enable automatic
ADAT detection option is checked in the Sync tab), so the list will
update within a few seconds whenever a change occurs. For
example, if your DA-88 is currently switched off, and you then
turn it on, it will appear in ClockWorks’ device list after a few
seconds — after the Digital Timepiece powers up and detects the
device during the next regular polling cycle. If it does not appear
for some reason, choose Refresh Device from the File menu.
If multiple devices are connected, use the scroll bar on the right
hand side of the device list to view each device.
Device panels
Each device is displayed in the list as a panel, which provides
information about the device as shown below in Figure 5:
Device
name
MMC
ID
Time code offset
(positive = later)
Time code
offset
Track record-enable buttons
The track record-enable buttons allow you to arm tracks on the
device for recording. When you then press the record button in
ClockWorks (or your MMC-compatible sequencer or other
software), the device will begin recording on the track(s) you’ve
armed.
Wait for device on play
The Wait for device on play option, when checked, causes the
Digital Timepiece to wait for the device to cue to the current
playback location before it begins generating or converting time
code.
When the Wait for device on play option is unchecked, the Digital
Timepiece may, depending on the situation, begin generating or
converting time code while the device is still cueing to catch up to
the current playback location. The device will begin playing as
soon as it catches up.
Turning this option on for all devices will ensure that they all
begin playing at the same time. But the trade-off is that you will
have to wait for all of them to cue before playback begins. Here are
some other reasons why you might want to turn this option off for
a device:
■
The device is particularly slow.
You just don’t want to have to constantly wait for a particular
device to catch up.
■
■ You have several random-access systems that can cue instantly,
along with one device that has a tape transport, and you don’t
want to wait for the one tape transport device.
Do not send timecode until device is locked
This option, when checked, causes the Digital Timepiece to mute
time code until all MMC and SONY 9-pin devices are locked and
rolling. This is useful if there are additional devices slaved to the
Digital Timepiece via time code, and you want them to start
together with the MMC and 9-pin devices.
THE SYNC TAB
The Sync tab has the following status indicators and options:
Track record enable
buttons
Figure 5: Device panel settings.
Time code offset
The time code offset controls let you program an offset for the
device. This means that each device can have its own separate
offset. To program the offset, type in the amount of the offset in
the window and then click the +/- button to create a positive
(later) or negative (earlier) offset. For example, if you create an
offset of -2 hours (negative two hours), and you start the Digital
Timepiece at two hours (2:00:00:00), the device will start at zero
(0:00:00:00).
Figure 6: The Sync tab.
USING CLOCKWORKS FOR MAC OS X WITH THE MIDI TIMEPIECE AV
6
Status section
The status section provides detailed information about what state
the Digital Timepiece is in as a synchronizer. The following
sections provide a brief explanation of each term.
Figure 8: Frame Lock and other check box options.
If the Frame lock option is turned on (checked), and the Digital
Timepiece detects more than five frames in a row that are not
continuous with respect to previous frames received, then it will
stop converting altogether.
Figure 7: The Status section.
Output phase lock
When this status indicator is illuminated, it means that time code
generated by the Digital Timepiece (MTC and LTC) is in sync
with the current time base.
Input frame phase lock
When this status indicator is illuminated, it means that the Digital
Timepiece has successfully achieved lockup with incoming LTC/
MTC full frame messages.
Input quarter frame phase lock
When this status indicator is illuminated, it means that the Digital
Timepiece has successfully achieved lockup with incoming LTC/
MTC quarter frame messages.
External time code detect
When this status indicator is illuminated, it means that the Digital
Timepiece has successfully detected external time code (MTC,
LTC).
Framelocked
This status indicator means that the Digital Timepiece is
successfully locked to an external time base and that it is also
successfully generating or converting SMPTE time code.
Word clock stable
When this status indicator is illuminated, it means that the Digital
Timepiece has successfully achieved a stable time base rate from
its internal time base or by determining the external time base
rate.
Frame lock
To understand the Frame lock option, you first need to know that
the Digital Timepiece continuously monitors incoming time code
to detect any possible discontinuity in the frame times as they
advance. If the Digital Timepiece detects more than five frames in
a row that are not continuous with respect to previous frames
received, then it does one of two things, depending on whether
the Frame lock option is turned on (checked) or off (unchecked).
If the Frame lock option is turned off (unchecked), and the Digital
Timepiece detects more than five frames in a row that are not
continuous with respect to previous frames received, then it
begins to perform a kind of “pseudo jam sync”. In this mode, it
continues to convert an uninterrupted stream of continuous time
code, while at the same time clocking off of the incoming time
code. Even though the frames it is generating no longer match the
frames it is reading, it will continue to remain in sync with the
incoming time code.
In other words, when the Frame lock option is off, the Digital
Timepiece ignores discontinuous jumps in incoming time code
by continuing to clock itself off of the incoming time code without
stopping (or pausing). In doing so, it continues to convert a
continuous, uninterrupted stream of frame times based on the
time code to which it first locked.
Turn on Frame lock when you want the Digital Timepiece’s frame
times to match incoming frame times, and you want it to stop
converting altogether if there are jumps in incoming time code.
Turning off Frame lock can be a life saver if you find yourself in a
situation where you have time code on tape (or other source) but
the frame locations jump around to different times (because of
overlapping SMPTE striping, edits, or whatever). By turning off
Frame lock, you can sync continuously to this type of time code
without glitching or stopping. If the SMPTE on your tape jumps
around as described, you are likely to experience brief drop-outs
at the points where it jumps. If so, just increase the Digital
Timepiece’s freewheeling to cruise past them.
Generate signal when stopped
This option applies to situations in which the Digital Timepiece is
converting time code and the source time code continues even
when it is parked on a frame. The most common case is when the
Digital Timepiece is locked to VITC and generating time code
while still-framed, and the video deck is paused. In this situation,
the Generate signal when stopped option, when checked, makes
the Digital Timepiece continue to output time code (LTC, MTC
and VITC), even while the video is parked on a single frame in
pause mode. It will continue to do so as long as the video head is
engaged and VITC lines can be scanned.
USING CLOCKWORKS FOR MAC OS X WITH THE MIDI TIMEPIECE AV
7
Auto-detect input frame rate
When this option is checked, the Digital Timepiece will
automatically detect the frame rate of incoming SMPTE time
code (VITC, LTC or MTC). In most situations, this is desirable
because it ensures that the Digital Timepiece is properly
interpreting and synchronizing to the time code. If, however, you
find yourself in a situation where you would like to set the frame
rate manually, uncheck this option and set the frame rate in
ClockWorks.
Enable automatic ADAT detection
When this option is checked (the default setting), the Digital
Timepiece continuously polls its ADAT port for the presence of
an ADAT. If you plug one in and turn it on, the Digital Timepiece
will detect it and perform its routine handshake with the ADAT
(or any ADAT device on the ADAT sync chain).
Figure 9: MMC ID and other options.
Some ADAT-sync compatible devices do not respond well to this
sort of continuous polling. If your ADAT device or ADAT sync
chain is not behaving normally, try unchecking this box.
Force ADAT detection
When this option is checked, the Digital Timepiece will send
sync commands to its ADAT SYNC OUT port, regardless of
whether an ADAT device has been detected or not.
When this option is unchecked, the Digital Timepiece only sends
sync commands to the ADAT port when an ADAT device is
detected. If no ADAT device is detected, it sends nothing.
Check this option when you have connected the Digital
Timepiece ADAT SYNC OUT port directly to a MOTU PCI-324
or PCI-424 card SYNC IN port, with no ADATs in between.
MIDI Machine ID
The MIDI Machine ID option lets you change the MMC (MIDI
Machine Control) device ID of the Digital Timepiece. The factory
default ID of the Digital Timepiece is 1. The only situation in
which you really need to change it is if you are using MIDI
Machine Control with two or more Digital Timepieces.
Otherwise, just leave it set to 1, and make sure that your MMC
transport master controller device or computer software knows
that the Digital Timepiece’s ID is 1.
If you change the Digital Timepiece device ID for some reason,
make sure that it does not match the ID of another device
connected to it.
Measured Timebase
This status indicator shows the actual sample rate being generated
by the Digital Timepiece based on the current time base. This
display shows the number of samples being generated per second.
It allows you to measure how accurate external time base sources
are (such as video or LTC). It is also affected by the sample rate
settings in the Digital Timepiece, so it can help you chase down
discrepancies with pull-up and pull-down sample rates.
LTC Output
This slider allows you to adjust the overall gain of the SMPTE time
code from the Digital Timepiece LTC output jack. Move it
towards the left to reduce the level; move it towards the right to
increase it. This level control affects LTC output in all sync modes,
including LTC, MTC, etc.
Still-frame sensitivity
This option lets you control how many frames in a row the Digital
Timepiece needs to receive to consider incoming SMPTE as being
parked on a single frame. While lowering this value makes the
Digital Timepiece more responsive when you pause your video
deck, it is also more likely to misinterpret ordinary transport
shuttling. So make this value as low as you can, but raise it if you
start getting improper frame locations when shuttling your deck.
Freewheel _ frames
This option lets you set the number of frames the Digital
Timepiece will freewheel over when it encounters a time code
drop-out. For a complete explanation of freewheeling, please refer
to the Digital Timepiece Installation & Setup Guide that
accompanies this guide.
Infinite freewheel (zero)
When you choose this option, the Digital Timepiece begins
generating time code on its own indefinitely as soon as it stops
receiving incoming time code. And it will continue to do so until
you stop it with the STRIPE button on the front panel. You can
also stop it by changing the master sync mode or by changing the
Freewheel setting in ClockWorks.
USING CLOCKWORKS FOR MAC OS X WITH THE MIDI TIMEPIECE AV
8
Offset external timebase by
This setting lets you create an offset, positive or negative, between
the time code generated by the Digital Timepiece and the time
code to which it is resolved. Click the +/- button to create a
positive (later) or negative (earlier) offset. For example, if you
create an offset of +1 hour, and you feed the Digital Timepiece
time code starting at two hours (2:00:00:00), it will generate time
code starting at 3 hours (3:00:00:00). This is a global offset for the
entire Digital Timepiece. (For information about programming
offsets for individual MMC or SONY 9-pin devices connected to
the Digital Timepiece, see “Time code offset” on page 6.)
Sample Rate
The sample rate menu sets the digital audio word clock rate for the
Digital Timepiece. There are six possible word clock rates:
normal, pull-up (+0.1%), and pull-down (-0.1%) for both
44.1kHz and 48kHz. These settings correspond to the settings in
the front-panel of the Digital Timepiece. These settings are grayed
out if the Digital Timepiece is in a time base mode where it should
determine the word clock rate on its own, such as when it is
slaving to an external word clock as a time base.
■
The current settings in the Digital Timepiece
■
A large and small SMPTE burn-in display
■
A list of currently connected devices
■
Any text that you wish to overlay
Making video connections
Consult the Digital Timepiece Installation & Setup Guide for
information about how to connect external video equipment,
such as blackburst generators, video tape recorders and video
monitors.
Choosing a video source
The Digital Timepiece’s overlay features require a video source,
which can be external video connected to the Digital Timepiece’s
video input or black video produced by the Digital Timepiece’s
internal video generator. Choose one or the other from the Video
source menu shown in Figure 11 below. The Auto option causes
the Digital Timepiece to use internal video in non-video time
base modes (such as Internal) and external video in video-based
time base modes (such as Internal/video). This setting also affects
whether or not the Digital Timepiece’s video output is in sync
with the rest of the time code formats being generated by the
Digital Timepiece.
Video format
Choose the appropriate video format (NTSC or PAL) from the
Video format menu shown in Figure 11. The Auto option causes
the Digital Timepiece to automatically detect the video format
being received.
Figure 10: ClockWorks’ sample rate settings.
THE VIDEO TAB
The Video tab gives you complete control over the Digital
Timepiece’s video display features. The Digital Timepiece can
overlay a wide assortment of information on a video monitor
connected to its video output, including:
Turning on the video display
Use the check box shown in Figure 11 to turn on the video display.
If the video source option is set to external, there must be a signal
present for the video display to be visible.
Press anywhere on each line to choose
what will be displayed on the line.
These options determine the format and
source of the video.
Drag the outside
edge of this box
to move it.
Turns video overlay
on and off.
These contrast buttons
adjust the amount of black
border around the white
overlaid text.
Figure 11: The Video Setup window
USING CLOCKWORKS FOR MAC OS X WITH THE MIDI TIMEPIECE AV
9
Adjusting the position of the video display
To adjust the position of the video display on your video monitor,
drag any edge of the text box as shown in Figure 11.
Adjusting the contrast
The Text attributes controls shown in Figure 11 let you adjust the
amount of black border around the white overlay text. Increase
the border in situations where the white text requires more
contrast with a white (or light) background.
Most of the choices are status information that should match the
settings on the front panel of the Digital Timepiece itself. If you
choose one of the user text options, you will then see a pop-up box
that allows you to type in your own text, as shown below.
The video display lines
The Digital Timepiece video display consists of 12 lines of text.
You can choose to display whatever you want on each line. Click
on the disclosure triangle on the right side of each line to open a
menu of choices. Here is a summary of what you can display.
Figure 13: Typing in your own text for one of the “user text” options.
Displaying feet/frames
The small SMPTE time display also includes a readout for feet/
frames.
Figure 12: The options for what you can display on any line in the video display.
U S I N G C L O C K W O R K S F O R M A C O S X W I T H ©T 2004
H E M Mark
I D I Tof
I Mthe
E P IUnicorn,
E C E A V Inc.
10