1
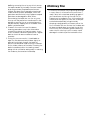
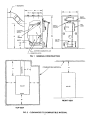
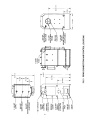
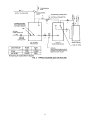
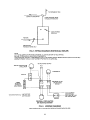
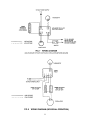
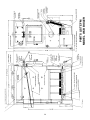
Installation and Operating
Manual for the
EFM Wood/Coal Boiler
Model WCB
EFM Sales Company
Emmaus, PA 18049
www.efmheating.com
Installation And Operating Instructions For
Model WCB Hand Fired Boiler
DANGER: This boiler is equipped with a fuse-able
plug. It is located inside the boiler. It is not
adjustable. In the event that boiler water
temperature exceeds approximately 276° F, a
dangerous condition, the plug will open and boiler
water will fall into the firebox. Follow all operating
instructions carefully to avoid a dangerous condition
that would result in activation of the fuse-able plug.
If the optional domestic hot water coil is installed, a
tempering valve, not provided, must be installed to
avoid scalding water and the potential for serious
burns. Pipe the tempering valve per the
manufacturer’s instructions.
Application
The WCB Hand Fired Boiler is designed for both
wood and coal firing. It is provided with a cast iron
shaker grate and a firebrick combustion chamber
lining with an overhead baffle which provides a
double pass for the flue gases for better heat
extraction from the fuel being burned. This boiler is
primarily intended to be an “Add-On” unit to an
existing oil or gas fired forced hot water boiler. This
boiler is not intended to be the sole source of heat
except for the storage buildings, cabins, etc. where
constant steady heat is not required. See instructions
under heading “To Set Up Boiler” for proper
application. This boiler is not to be used with an
automatic stoker.
This manual contains information for the installation,
operation, care and service of the Model WCB
Hand Fired Boiler. Be sure to follow these instructions
carefully when making the installation. BEFORE
PROCEEDING WITH THE INSTALLATION, BE SURE TO
CHECK STATE AND LOCAL ORDINANCE
REQUIREMENTS. INSTALLATION MUST BE MADE IN
ACCORDANCE WITH THESE ORDINANCES WHICH
MAY DIFFER FROM THIS INSTALLATION MANUAL.
These instructions are to be saved and given to the
equipment owner for operation and maintenance
information.
This unit is subject to shipping damage during transit
or can be shipped with missing parts. Upon receipt,
examine unit for possible missing parts or damage. If
unit is damaged, notify carrier immediately. If parts
are missing, notify factory as soon as possible. The
WCB Boiler is shipped in a single package. The
boiler is shipped with the baffle, grates, firebrick, fire
door and ash pit door in place. The limit aquastat,
theraltimeter, relief valve, drain cock, immersion draft
control and shaker crank are shipped in the ash
pan. Three extra refractory brick (for wood firing) are
shipped with the boiler. (See instructions under
“Wood Firing”). An optional domestic hot water coil
is available on order.
Specifications — Model WCB
Output Rating - 60,000 BTUH (Wood or Coal)
Overall Length - 32-5/8"
Cabinet Length - 27-1/4"
Cabinet Width - 20-1/4"
Cabinet Height - 42-1/2"
Supply Tappings - (1) 2"
Return Tappings - (1) 1-1/4"
Flue Outlet - 7" Dia.
Fire Door Opening - 11" x 11"
Cast Iron Grates - 3
Firebrick Splits - 10
Maximum Log Length - 20"
Shipping Weight (Approx.) - 700 lbs.
Do not use or store flammable liquids, especially
gasoline in the vicinity of the boiler.
Coal
Do not burn garbage, gasoline or naptha in this
boiler. Install this boiler in accordance with the
applicable requirements of N.F.P.A. #211 “Chimneys,
Fireplaces, Vents And Solid Fuel Burning Appliances,”
2002 Edition.
1. The WCB Boiler is designed to burn
anthracite (hard) coal of the “Chestnut” or “Nut”
size. We do not recommend the use of
bituminous (soft) coal. Bituminous coal has a
high ash and sulphur content and produces byproducts that can corrode the boiler fireside
surfaces.
2. An adequate storage bin should be provided for
storage. This should be preferably located
indoors with easy access for coal truck to deliver
the coal with a chute through a cellar window.
The storage volume required for one ton of coal
A stack thermometer, not provided, must be installed
and used to check stack temperature. Stack
temperature must be maintained below 600
degrees F.
1
is 40 cubic feet. Be sure the bin is well supported
to withstand the side thrust load of the coal.
3. Do not store coal within boiler installation
clearances, or within the space required for
charging and ash removal.
4. When securing a supplier for your coal and
before ordering coal in large quantities, buy a
bag or two of the coal you intend to use and try
it in your boiler to be sure you are satisfied with its
burning quality. Coal varies in type, size, and
grade. Just as there is good and bad firewood,
there is good and low quality coal.
3. A build-up of creosote over a period of time can
lead to a chimney fire. When ignited, creosote
makes an extremely hot fire, creating a roaring
noise and producing flames and sparks from the
top of the chimney. A 316 stainless steel insulated
chimney liner will reduce the formation of
creosote.
4. One method suggested to reduce creosote
build-up is to deliberately have a hot fire for 15
to 30 minutes each day. This hot fire tends to
burn off the creosote in very small amounts each
day, thus eliminating the build-up problems.
Wood
Disposal of Ashes
1. Burn dry and well seasoned hardwood, with a
moisture content of 20% or less. Seasoned wood
will produce less creosote and will provide more
usable heat. There are about 8000 BTU’s
available as heat from each pound of wood. It
takes about 1000 BTU’s to evaporate each
pound of moisture from a log. The wetter the
wood, the more energy it takes to get the
moisture out of the wood and the less energy
available to heat your home. Seasoned wood
will often show cracks radiating outward, like
wheel spokes, from the heartwood toward the
bark. Green wood will not show this pattern of
cracks.
2. Firewood is best stored outside, under cover, and
in a dry location. Store for a period of at least six
months to a year prior to using.
3. Softwoods, being resinous, are easy to ignite and
burn rapidly with a high flame. However, they
burn out quickly, require frequent attention and
produce more creosote than hardwoods.
Hardwoods, are generally more difficult to ignite,
burn less vigorously and with a shorter flame, but
last longer, produce more heat and less creosote
than softwoods.
4. Do not store wood within boiler installation
clearances, or within the space required for
charging and ash removal.
1. Ashes should be placed in a metal container
with a tight fitting lid. The closed container of
ashes should be placed on a noncombustible
floor or on ground, well away from all
combustible material, pending final disposal. If
the ashes are disposed of by burial in soil or
otherwise locally dispersed, they should be
retained in the closed container until all cinders
have thoroughly cooled.
Chimney
1. The chimney must be a type suitable for solid
fuel and must provide a minimum draft of .04
IN/WG (as measured with a Draft Gage) at the
boiler flue exit to provide for the proper
operation of the boiler. The chimney should be
masonry with tile lining (8" x 8" x 15 ft. high) or
metal, insulated, with a 316 stainless steel internal
surface (9" dia. inside x 15 ft. high). See Figures 11,
12, and 13 for situations which can cause poor
draft conditions in a chimney.
2. The boiler should be connected to its own
separate flue. Be sure to check state and local
ordinances requirements on chimneys and vent
connections before installing.
3. This boiler can present a serious fire hazard if
connected to a dirty or inadequate chimney.
4. A non-galvanized flue pipe, not provided, shall
be used for connecting the boiler to the
chimney. Materials such a black steel, blue steel
or stainless steel are acceptable.
Creosote
1. When wood burns, the smoke usually contains a
substance called creosote which is dark brown or
black in color. When the stove pipe or chimney
flue temperature drops below 250°F., creosote will
condense on the surfaces. At temperatures below
150°F., the creosote deposit is fluid.
2. The amount of creosote in the stove pipe and
chimney flue lining varies with the intensity of the
fire, the density of the smoke, the dryness of the
wood and the flue temperature. A small intense
fire is preferable to a large smoldering fire, to
reduce the amount of creosote.
Ventilation
1. The area in which the boiler is located must
have an adequate supply of air for combustion.
A total of 400 square inches of free air supply is
required. Open basements without storm
windows or tight fitting doors will generally permit
adequate air infiltration. If the boiler is located in
a separate room with a tight door, ventilation
2
Draft Control
must be provided to an open area within the
building or to the outside. If the building is of
tight construction with exhaust fans, an outside
air supply that is ducted into the boiler room
may be required.
1. The amount of heat produced and level of fire in
this boiler is controlled by a non-electrical, metal
bellows, immersion type of temperature sensing
control. A 3/4" tapping is provided, in the upper
right hand corner on the boiler front, to mount
this control. Refer to Figure 10 when mounting
control. Take care not to damage the control by
over-tightening. Make sure on the final tightening
that the red mark on the control body and the
hexagon screw are on top.
2. The mounting and adjustment of the control arm
is to be done when the boiler is up to desired
temperature. Refer to section under “Control
Settings” for proper adjustment of the draft
control.
To Set Up Boiler
1. The WCB Boiler must be located on a level,
solid, non-combustible surface adequate to
support unit weight (approximately 700 pounds).
2. Locate boiler to maintain a minimum of 36
inches clearance on the front, 18 inches to the
rear, both sides and top to any obstructions or
combustible material. Locate close to chimney
to keep flue pipe as short as possible, while
maintaining recommended clearances.
3. Refer to Figures 4 or 5 when piping boiler to
system. Refer to Figure 3 for proper location of
connections to the boiler and control locations.
4. A circulator (not provided) should be installed to
provide forced circulation between the two
boilers to equalize the water temperature
throughout both boilers. See Figure 4. The
circulator may be set up to run continuously or it
may be controlled by an aquastat control (not
provided).
5. Provide valves so the add-on boiler can be
isolated from the heating system when not in
use.
6. Be sure to mount a pressure relief valve on the
add-on boiler, the release pressure on the valve
must not exceed 30 PSI.
7. An optional domestic hot water coil can be
installed and piped to an existing hot water
heater. See Fig. 4.
8. When adding the boiler to an existing system,
the water capacity of the system is increased by
17 gallons plus the water in the added piping.
Check existing expansion tank size. It may be
necessary to add an additional tank or change
the existing tank to a larger one to
accommodate the add-on boiler.
9. After all piping is complete and controls are
mounted (including the draft control - see
paragraph under “Draft Control”), fill the boiler
and system with water. Purge and bleed all air
from system. Pressurize boiler to 30 PSI and check
for leaks.
10. It is essential that the boiler be installed with at
least one “dump zone” in which hot boiler water
is dumped on a temperature over-ride. See
Figure 9 for wiring diagram.
Flue Pipe Installation
1. A barometric draft control is not supplied with
this boiler. A barometric draft control is required
by code in some areas. The damper, if used,
must be set to maintain a minimum draft of .04
in./water. This amount of draft is required for
proper firing. In cases of marginal draft, this
damper may impair boiler operation, resulting in
smoking or gas-back when fueling the boiler, low
heat output, and excessive creosote formation
when firing with wood. See Fig. 1 for location of
barometric draft control.
2. The flue pipe must be 7" nominal dia. (24 Ga.
minimum thickness). The flue pipe should be as
short as possible (while maintaining
recommended clearances), with a minimum of
elbows and must pitch upward to the chimney
connection. Maintain 18 inches clearance
(minimum) between pipe and combustible
material. Secure each flue pipe joint and boiler
flue outlet connection with sheet metal screws.
Seal opening at chimney connection with boiler
putty. See Fig. 1. Install the flue pipe so that it is
easily removed for cleaning.
3. Manual flue dampers must not be installed
between the boiler and chimney.
Electrical Installation
1. All wiring must be in accordance with local
codes or in the absence of a local code must
comply with the National Electric Code.
2. When doing electrical wiring, refer to Figures 6, 7,
8, or 9. Refer to Figure 6 when using the WCB
Boiler as an add on to an existing boiler with
constant water circulation between the two
boilers. Use Figure 7 for same installation without
circulation between the two boilers. Figure 8 is
3
Boiler Operation
used when the WCB Boiler is used as an
individual heating unit with forced water
circulation. Use Figure 9 when the WCB Boiler is
installed on a system with zone valves.
3. No electrical connections are required if the
WCB Boiler is installed on a gravity hot water
system.
4. Use 14 Ga. copper wire for all wiring. Route all
wiring to avoid hot surfaces. Be sure all electrical
components are well grounded electrically.
Wood Firing
1. Three refractory blocks are furnished for wood
firing. Lay these blocks evenly spaced, over the
grate bars.
2. Before starting a fire: Be sure that the draft
damper (on the ash pit door) is fully open. Pull
overfire baffle handle outward as far as it will
travel. Caution: Flammable liquids must never be
used to start or to rekindle a solid fuel fire.
3. To build a fire: Place a small amount o crumpled
paper on the refractory blocks. This should be
covered with kindling wood and a few small
sticks of wood. The paper is then ignited. Once a
draft has been created in the flue, larger pieces
of wood can be added to the fire. If smoke puffs
out into the room, the draft damper should be
partially closed until the smoke clears and the
chimney vents properly.
4. When a steady fire is established and the flue is
up to operating temperature, push overfire baffle
handle in toward boiler as far as it will go. Set
draft control to maintain desired heat output.
5. This boiler is provided with a cast iron baffle,
inside front end of combustion chamber. This
baffle ducts preheated air over the fire bed to
assure complete combustion of the released
unburned gases from the fire bed. A round swivel
cover on the boiler above the ash door can be
used to admit additional over fire air if desired.
Loosen screw, swing cover to desired opening
and lock in place by tightening screw.
6. Frequent additions of a small amount of wood
will result in more even burning and the
maintenance of a continuous hot fire. This will
reduce the tendency to produce creosote.
7. When loading the boiler with wood, DO NOT
maintain a fire bed above the top of the
firebrick lining.
8. It is not unusual to have a little smoke come into
the room as you open the door to add more
wood. You can generally avoid this by opening
the door slightly for a moment before you open
it completely. Pulling the overfire baffle handle
outward as far as it will go, before the door is
opened, is also helpful.
9. Small gas explosions may occur when refueling
any wood-burning device, always open the firing
door very carefully and keep your face away
from the door until it is completely open.
10. It is best to always maintain an ash bed under
the fire. When this bed gets too thick, use a poker
or stick to poke ashes through the grate (through
spaces between the refractory blocks) into the
ash pan.
11. Always keep fire door and ash pit door closed
when boiler is in operation, maintain all seals in
good condition.
Control Settings
1. Immersion Draft Control: Since this control is
mounted in a horizontal position on the WCB, the
red numerals are used when adjusting. This
control will maintain the boiler water
temperature at the point set on the control. The
draft control is calibrated in celsius temperature
markings. Refer to table below for Fahrenheit
equivalents.
F°
C°
F°
C°
F°
C°
100
38
140
60
180
82
110
43
150
66
190
88
120
49
160
71
200
93
130
54
170
77
210
100
2. Set control at desired water temperature. Start
fire in boiler and raise boiler water temperature
to point set on control. Observe the water
temperature using the supplied temperaturepressure gage. The suggested setting is 180°F.
3. With water temperature in boiler at control set
point, slide draft control arm into hole on control
(hole with wooden plug). The longer part of the
arm (end with knob) must project forward on a
horizontal plane or slightly below horizontal.
Position arm above hole in draft door on the ash
pit door, use the hexagon screw to lock the arm
in place. See Fig. 10. Note: Do not remove the
wooden plug before inserting the control arm.
Press the control arm into the hole, gradually
pushing out the wooden plug.
4. Connect chain between draft control arm and
draft door. See Fig. 10. Shorten chain to a point
that the draft door will be open approximately
1/16" with boiler up to temperature as set on
control.
5. The draft control will now raise and lower the fire
to maintain the desired water temperature.
6. Set the dial on the L4006B aquastat on the addon boiler at 200°F.
7. Set the high limit at 150°F. and the low limit at
140°F. on the primary boiler.
8. Set thermostat at normal desired temperature.
4
Boiler Operation
pieces of ash or clinkers, it may be necessary to
break up the ash with a poker, so that it may be
shaken more easily through the grates.
10. Always keep fire door and ash pit door closed
when boiler is in operation. Maintain all seals in
good condition.
Coal Firing
Warning: All coal fires produce some carbon
monoxide, a highly poisonous gas. Improper care or
operation can cause carbon monoxide to escape
from the boiler, smokepipe or flue. Some conditions
which can cause carbon monoxide to escape are:
blocked chimney or smoke pipe, poor chimney
draft, build up of ashes, or the use of too much fuel.
1. The three refractory blocks, used on the grates
for wood firing, are to be removed for coal firing.
2. Before starting a fire: Be sure that the draft
damper (on the ash pit door) is fully open. Pull
overfire baffle handle outward as far as it will
travel. Caution: Flammable liquids must never be
used to start or to rekindle a solid fuel fire.
3. To build a fire: Place a small amount of
crumpled paper on the grates. This should be
covered with kindling wood and a few small
sticks of wood. The paper is then ignited. After
the fire is started place some coal on the fire. As
the coal ignites, keep adding additional coal.
4. When a steady fire is established and the flue is
up to operating temperature, push overfire baffle
handle in toward boiler as far as it will go. Set
draft control to maintain desired heat output.
5. The swivel cover (referenced in Item 5 under
Wood Firing) does not have to be used when
coal firing.
6. As the burning progresses, a suitable bed of
glowing coal is produced. The coals are overlaid
with fresh coal at intervals as needed, and the
glowing coals ignite the volatile gases in the
fresh coal before the gases accumulate.
However, if the bed of coals is allowed to
become too cool before fresh coal is added,
the gases can accumulate before being ignited
by the low temperature coal bed. These gases
can escape into the dwelling or a mild explosion
can occur. Charging the fire with too much coal
at one time can also cause this condition.
7. When loading the boiler with coal: DO NOT
maintain a fire bed above the top of the
firebrick lining. It is advisable to leave a glowing
area of already burning coal exposed.
8. Always maintain an ash bed between the fire
and the grates. This is done to prevent
overheating of the grates which can cause
them to warp or burn out.
9. The ashes are dropped into the ash pan by
shaking the grates. A grate shaker handle is
provided for this purpose. When shaking the
grates: Do not try to force the shaker handle. The
grates are furnished with a linkage bar that
restricts the amount the bars can be moved. It is
only necessary to vibrate the grates rapidly to
shake down the ash bed. When cleaning large
Operation During
Power Failure
1. An electrical power failure will not affect the
operation of the boiler if it is installed on a
gravity feed hot water system, since there is no
electrical connections to the boiler under this
type of operation.
2. On a circulating hot water system, the flow
control valve can be manually opened to use
the boiler as a gravity feed unit. In this type of
operation, the amount of heat available in the
dwelling will be dependent on the size and
length of piping. For this reason, some
experimenting with the fire level will have to be
done to determine the safe fire level to maintain
without allowing the boiler water temperature to
reach the boiling point. It is advisable to lower
the draft control from the normal setting (in the
range of 150°F. to 160°F.) until the electrical
power is restored. With no power there are no
means to pump the water from the boiler on a
high limit condition. For this reason it is imperative
that the level of fire be maintained very carefully
and under constant attention.
Periodic Maintenance
1. In order for a solid fuel heating system to
operate efficiently and safely, the entire system
must be properly maintained. This means that
the boiler, chimney connectors and joints, and
the chimney flue must be in proper working
order and clean.
2. At the end of each heating season, the chimney
flue and boiler smokepipe should be thoroughly
cleaned of soot and other residues. Then the flue
should be inspected for any needed repairs and
any accumulations of creosote. If creosote does
accumulate, it should be scraped off with a
long-handled scraper. Creosote is difficult to
remove, so care must be taken to prevent
damage to the mortar joints.
3. The inside surfaces of the boiler should also be
cleaned thoroughly each year at the end of the
heating season. These surfaces can be reached
readily through the fire door. Use a wire brush
and a scraper to remove all accumulation of
soot, creosote and other residues. When
cleaning the boiler, remove the sliding overhead
5
Chimney Fire
baffle by removing the set screw which secures
the baffle handle to the baffle. Remove handle
by pulling outward. Drop baffle and remove
through fire door. After thoroughly cleaning all
inside surfaces of boiler and baffle, check the
grate bars and fire brick lining. Replace warped
grate bars or damaged fire brick. When
reassembling the baffle, be sure the set screw
lines up with flat portion on handle rod. This flat
provides a seat for the set screw and prevents
handle rod from slipping out of the baffle when
baffle is pulled forward.
4. If wood is the main fuel used, the above
cleaning procedures may have to be done
several times during the heating season. In any
event the boiler should be inspected on regular
basis to check for accumulation of soot or
creosote.
5. During the summer months, it is advisable to
open the fire door and ash pit door slightly to
allow air to circulate through the boiler to
prevent condensation and resulting in corrosion
on the inside surfaces of the boiler. Cleaning the
boiler immediately after the heating season
along with air circulation aids greatly in reducing
the tendency for corrosion to develop.
1. A chimney fire can be very frightening although
in many cases it will sound much worse than it
really is due to the loud roar and flying sparks. If
you should have a chimney fire, call the Fire
Department immediately. Then while waiting for
the arrival of fire fighters, the fire can usually be
controlled and possibly extinguished by
dumping a large quantity of coarse salt on the
fire in the boiler. Be sure to close the fire door, ash
pit door and draft door to exclude the air from
the chimney flue. If possible, avoid introducing
water into the chimney itself. The water could
damage the relatively brittle heated flue liner.
6
7
8
9
10
11
12
efm Sales Company
Emmaus, PA 18049
13
14
PARTS LIST EFM
MODEL WCB BOILER
CC-7578