1
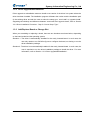
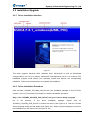
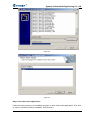
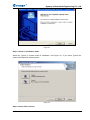
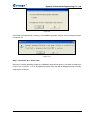
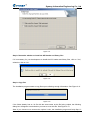
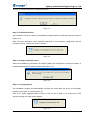
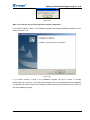
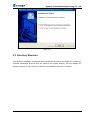
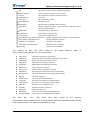
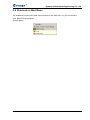
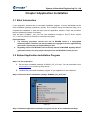
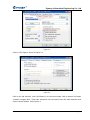
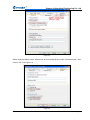
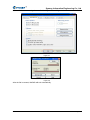
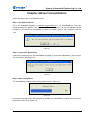
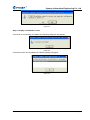
Synway Voice Board
Synway Information Engineering Co., Ltd
www.synway.net
Synway Information Engineering Co., Ltd
Contents
Contents .................................................................................................. i
Copyright Declaration ........................................................................... ii
Chapter 1 Overview .............................................................................. 1
1.1
1.2
1.3
Brief Introduction..........................................................................................1
Installation Packages ...................................................................................1
Common Operations....................................................................................1
1.3.1
Initial Installation.................................................................................................1
1.3.2
Driver Upgrade/Reinstallation ............................................................................2
1.3.3
Add/Replace Board or Change Slot ...................................................................2
Chapter 2 Driver Installation................................................................ 3
2.1
2.2
2.3
2.4
Preparation ..................................................................................................3
2.1.1
Check Hardware Installation before System Boot-up.........................................3
2.1.2
Close ‘Found New Hardware’ Dialog Box ..........................................................3
2.1.3
Backup Important Configuration Files ................................................................3
2.1.4
Check Driver Version and Computer Type .........................................................3
Installation/Upgrade .....................................................................................4
2.2.1
Driver Installation Interface.................................................................................4
2.2.2
Driver Installation Procedure ..............................................................................4
Directory Structure .....................................................................................13
Shortcuts in Start Menu..............................................................................15
Chapter 3 Application Installation .................................................... 16
3.1
3.2
3.3
Brief Introduction........................................................................................16
Embed Application Installation Program ....................................................16
Repackage.................................................................................................17
Chapter 4 Driver Uninstallation......................................................... 21
Appendix A Technical/sales Support ................................................ 23
Driver Installation Manual
Page i
Synway Information Engineering Co., Ltd
Copyright Declaration
All rights reserved; no part of this document may be reproduced or transmitted in any form or by
any means, electronic or mechanical, without prior written permission from Synway Information
Engineering Co., Ltd (hereinafter referred to as ‘Synway’).
Synway reserves all rights to modify this document without prior notice. Please contact Synway for
the latest version of this document before placing an order.
Synway has made every effort to ensure the accuracy of this document but does not guarantee
the absence of errors. Moreover, Synway assumes no responsibility in obtaining permission and
authorization of any third party patent, copyright or product involved in relation to the use of this
document.
Driver Installation Manual
Page ii
Synway Information Engineering Co., Ltd
Chapter 1 Overview
1.1 Brief Introduction
This
document
describes
how
to
use
SynCTI
Driver
Ver.4.7.3.0
or
above
under
Windows98/2000/2003/XP/NT for those people who need to install the driver for any voice board
from Synway.
1.2 Installation Packages
Each version of the SynCTI driver has two installation packages: one for PCI boards and the other
for cPCI boards. Both the driver version and the bus type the installation package matches can be
read from its filename. See below for details.
Synway_xxxx_xxxx.exe
Company Name
Bus Type
PCI: indicates this installation package is
applicable to the board with PCI bus
cPCI: indicates this installation package is
applicable to the board with cPCI bus
Driver Version
Figure 1-1
Below is a list of driver installation packages for different voice boards from Synway, classified on
bus type.
Bus Type
Driver Installation Package
PCI
Synway_PCI_xxxx.exe
cPCI
Synway_cPCI_xxxx.exe
Note
Synway_PCI_xxxx.exe
Using the USB voice box on a PCI PC
Synway_cPCI_xxxx.exe
Using the USB voice box on a cPCI PC
USB
Table 1-1
1.3 Common Operations
1.3.1 Initial Installation
Initial installation means the SynCTI driver was never installed in this system before. You can
easily complete it following the prompts of the installation program. For more details, refer to
Section 2.2.
Driver Installation Manual
Page 1
Synway Information Engineering Co., Ltd
1.3.2 Driver Upgrade/Reinstallation
Driver upgrade or reinstallation means to install a new version of the driver in a system where the
driver has been installed. The installation program will detect the version and the installation path
of the existing driver and ask the user to select the setup type: ‘new install’ or ‘upgrade install’.
Regarding the similarity and difference between ‘new install’ and ‘upgrade install’, refer to ‘Section
2.2.2 Driver Installation Procedure - Step 5: Choose Setup Type’.
1.3.3 Add/Replace Board or Change Slot
When you are adding or replacing a board, there are two situations as shown below, depending
on the board model and the operating system.
Situation 1: The driver is automatically installed for the newly inserted board. In such case, the
user only needs to run ShCtiConfig.exe to configure the board, not having to run the
driver installation package.
Situation 2: The driver is not automatically installed for the newly inserted board. In such case, the
user is required to run the driver installation package to install the driver. For more
information, refer to ‘Section 1.3.2 Driver Upgrade/Reinstallation’.
Driver Installation Manual
Page 2
Synway Information Engineering Co., Ltd
Chapter 2 Driver Installation
2.1 Preparation
2.1.1 Check Hardware Installation before System Boot-up
Check if all hardware devices have been properly installed according to the hardware manual for
the installed voice board. Remove any fault or error before you turn on the computer for the safety
of your PC and other devices.
2.1.2 Close ‘Found New Hardware’ Dialog Box
After the computer is booted up, the operating system will search for new hardware automatically.
Once the ‘Found New Hardware’ dialog box appears, click on ‘Cancel’ to close it.
2.1.3 Backup Important Configuration Files
Although the system will ask for your permission on any modification to important configuration
files during the driver installation, we strongly recommend you to backup those files ahead of time
for safety reasons.
2.1.4 Check Driver Version and Computer Type
Using a wrong installation package may cause improper running of the voice board. Therefore,
you have to be sure before installation that this driver version to be used matches your computer
type (PCI computer or cPCI computer) and is just what you need.
Note: Regarding how to get the driver version and the computer type the installation package
matches, refer to Section 1.2 in this file.
Driver Installation Manual
Page 3
Synway Information Engineering Co., Ltd
2.2 Installation/Upgrade
2.2.1 Driver Installation Interface
Figure 2-1
This driver supports Windows 2000, Windows 2003, WindowsXP as well as Windows98
(unsupported by Ver.5.0.0.0 or above), WindowsNT (unsupported by Ver.5.0.1.0 or above). The
installation program could identify your operating system and perform the corresponding
installation. Follow the procedure below to complete the installation.
2.2.2 Driver Installation Procedure
Here we takes ‘SYNWAY_PCI(USB)_5200_EN.exe’ (the installation package of SynCTI Driver
Version 5.2.0.0 for PCI boards) for example to unfold the installation procedure.
Step 1: Run ‘SYNWAY_PCI(USB)_5200_EN.exe’ and go to ‘Choose Setup Language’
Go
to
the
directory
of
the
driver
installation
package,
double
click
on
‘SYNWAY_PCI(USB)_5200_EN.exe’ to extract the archive (See Figure 2-2). Then the ‘Choose
Setup Language’ dialog box will appear (See Figure 2-3). Select a prompt language you want for
the installation from the option menu and click on ‘OK’.
Driver Installation Manual
Page 4
Synway Information Engineering Co., Ltd
Figure 2-2
Figure 2-3
Step 2: Exit other active applications
Follow the prompt given by the installation program to close other active applications. Then click
on ‘Next’ to continue the driver installation. See Figure 2-4.
Driver Installation Manual
Page 5
Synway Information Engineering Co., Ltd
Figure 2-4
Step 3: Select an installation mode
Select the Typical or Custom mode for installation. See Figure 2-5. If you select Typical, the
system will install with default options.
Figure 2-5
Step 4: Detect other versions
Driver Installation Manual
Page 6
Synway Information Engineering Co., Ltd
The installation program prompts it is detecting whether any other version has been installed in
the system as shown in Figure 2-6.
Figure 2-6
As to the Custom installation, if the installation program doesn’t detect any other version, it will
skip Step 5 and automatically run ShCtiConfig.exe to configure the board once the installation is
finished; otherwise, it will enter Step 5 and ask you to select the ‘setup type’.
Step 5: Choose setup type
The installation program displays the detected version information and asks you to select the
setup type.
z
New Install – Delete the detected version. The old setting and configuration information
will be lost.
If this type is selected, the installation program will uninstall the old driver version detected
and automatically run ShCtiConfig.exe to configure the board after the new installation is
finished. In such case, ShConfig.ini will be modified.
z
Upgrade Install – Replace the detected version with the new version. The old setting and
configuration information will be reserved.
If this type is selected, the installation program will not uninstall the old driver version
detected but replace it with the new one. In such case, Step 6, Step 7 and Step 8 will be
skipped; ShCtiConfig.exe will not run automatically to configure the board after the
installation is finished, and; ShConfig.ini will not be modified either.
If you select Typical in Step 3, the installation program will not show the Setup Type dialog but run
the Upgrade Install automatically.
Select one type and click on ‘Next’ to continue. See Figure 2-7.
Driver Installation Manual
Page 7
Synway Information Engineering Co., Ltd
Figure 2-7
Step 6: Choose destination location
Enter a new folder name or click on ’Browse’ to choose a folder for installation. Click on ‘Next’ to
continue. See Figure 2-8.
Figure 2-8
If the folder you specified doesn’t exist, the following dialog box appears. Choose ‘Yes’ to create it
or choose ‘No’ to set a new one. See Figure 2-9.
Driver Installation Manual
Page 8
Synway Information Engineering Co., Ltd
Figure 2-9
If the folder you specified is not empty, the installation program will give such a prompt as shown
in Figure 2-10.
Figure 2-10
Step 7: Select the 32 or 64 bit mode
Running in a 64 bit operating system, the installation program will query if you’d like to install a 32
bit DLL or a 64 bit DLL. In a 32 bit operating system, this step will be skipped as such OS only
supports the 32 bit DLL.
Driver Installation Manual
Page 9
Synway Information Engineering Co., Ltd
Figure 2-11
Step 8: Determine whether to install the API header and library files
If it is necessary for your development to install the API header and library files, click on ‘Yes’;
otherwise, click on ‘No’.
Figure 2-12
Step 9: Copy files
The installation program starts to copy files upon collecting enough information. See Figure 2-13.
Figure 2-13
If the folder already has an .ini file with the same name as the file being copied, the following
dialog box will appear to ask whether you want to cover this file. See Figure 2-14.
Note: If you choose not to execute the ‘replace’ order, the installation program will skip Step 12
Driver Installation Manual
Page 10
Synway Information Engineering Co., Ltd
and not run ShCtiConfig.exe to configure the board.
Figure 2-14
Step 10: Install board driver
Once all files have been copied, the installation program starts to install the driver as shown in
Figure 2-15.
Note: The time needed for driver installation depends on the computer configuration and the
quantity of boards. Usually it is about 2 minutes.
Figure 2-15
Step 11: Prompt installation result
When the installation is completed, the following dialog box will appear to show the quantity of
installed boards and their serial numbers. See Figure 2-16.
Figure 2-16
Step 12: Configure board
The installation program will automatically configure the board after the driver is successfully
installed. See Figure 2-17 and Figure 2-18.
Note: If you select ‘Upgrade Install’ in Step 5 or click on ‘No’ in Step 9 ( i.e. reserve the .ini file
already existing), this step will be skipped.
Figure 2-17
Driver Installation Manual
Page 11
Synway Information Engineering Co., Ltd
Figure 2-18
Step 13: Finish and choose the program to run after completion
If you select Typical in Step 3, the installation program will prompt installation finished here as
shown in Figure 2-19.
Figure 2-19
If you select Custom in Step 3, the installation program will give a choice of running
ShCtiConfig.exe or test.exe. If you want ShCtiConfig.exe to run automatically after the installation
is complete, tick the first option on the dialog box below (See Figure 2-20) and click on ‘Finish’ to
exit the installation program.
Driver Installation Manual
Page 12
Synway Information Engineering Co., Ltd
Figure 2-20
2.3 Directory Structure
After the driver installation, all software tools and relevant documents are copied to the folder you
specified. Meanwhile, all driver files are copied to the system directory. Here we display the
directory structure for your reference (assume your installation directory is C:\ShCti).
Driver Installation Manual
Page 13
Synway Information Engineering Co., Ltd
Installation Path\
Api
API header and library files for software development
ShCtiConfig.exe
Visual configuration program for voice boards
Test.exe
API function test program provided by the driver
Ss7Monitor.exe
SS7 server
SS7Cfg.exe
SS7 configuration program
MsuDecode.exe
SS7 MSU decoder
ShConfig.ini
Sample system configuration file for the driver
ShIndex.ini
Sample configuration file for a form where lists voice files used for
Ss7server.ini
Configuration file for SS7 server
SccpConfig.ini
SCCP system configuration file
TcapConfig.ini
TCAP system configuration file
memory playback by index
The
ShConfig_advanced_options_sample.ini
Sample configuration file for driver's ‘advanced options’
ShCti_Drivers_User_Manual.chm
SynCti programmer’s manual
SS7Cfg_User_Manual.doc
SS7Cfg.exe user manual
MsuDecode_User_Manual.doc
MsuDecode.exe user manual
Setup.log
Log file for driver installation
following
dll
files
have
been
copied
to
the
system
directory.
Refer
to
‘ShCti_Drivers_User_Manual.chm’ for how to use them:
The
z
SHP_A3.dll
API dynamic link library of SynCti driver
z
SHDPCI.dll
Dynamic link library component for WinNT PCI voice board
z
SHDUSB.dll
Dynamic link library file for USB voice box
z
IsdnUser.dll
ISDN user-side interfacing component
z
IsdnNet.dll
ISDN network-side interfacing component
z
ShReco.dll
Voice recognition component
z
MacmCvt.dll
GSM encoding component for recording
z
MmfClnt.dll
SS7 client-end component for single-computer edition
z
MmfServer.dll
SS7 server-end component for single-computer edition
z
Mtp3.dll
SS7 MTP3 component
z
Ss7Server.dll
SS7 server scheduling component
z
TcpClnt.dll
SS7 client-end component for network edition
z
TcpServer.dll
SS7 server-end component for network edition
z
TCAP.dll
Transaction control application part
z
SCCP.dll
Signaling connection control part
z
Bmputil.dll
Dynamic link library file
z
shinitpci.dll
used to store information about installed board
z
ShPcmHandle.dll
used for format conversion between PCM files
driver
files
(*.sys,
*.bin)
which
have
been
copied
to
the
directory
‘%SystemRoot%\system32\drivers’ can be scheduled and used by the operating system and the
driver via API functions, not requiring any operation by users.
Driver Installation Manual
Page 14
Synway Information Engineering Co., Ltd
2.4 Shortcuts in Start Menu
The installation program will create useful shortcuts in the ‘start menu’ for your convenience.
Path: Start\All Programs\ShCti
Shortcut Name:
Driver Installation Manual
Page 15
Synway Information Engineering Co., Ltd
Chapter 3 Application Installation
3.1 Brief Introduction
If your application software has an executable installation program, it can be embedded into the
driver installation package provided by Synway. Thus a simple ‘Setup’ command can help you to
complete the installation of both the driver and the application software. Follow the procedure
below to enable this feature if necessary.
Here we takes ‘SYNWAY _PCI_4731.exe’ (the installation package of SynCTI Driver Version
4.7.3.1 for PCI boards) for example to unfold the description.
Important Notes:
1. The following procedure involves the use of WinRAR which is a copyrighted
software product. Therefore you need to obtain its copyright or license agreement by
yourselves. Synway has no responsibility for that.
2. Regarding how to use WinRAR, refer to the help manual of WinRAR. Synway doesn’t
guarantee below is the fully proper description for the WinRAR version you use.
3.2 Embed Application Installation Program
Step 1: Do the preparation
A.
Get the driver installation package ‘SYNWAY_PCI_4731.exe’. You can download it from
www.synway.net or contact Synway directly.
B.
Rename the executable installation program of your application to be ‘Install.exe’.
Step 2: Extract the driver installation package ‘SYNWAY_PCI_4731.exe’.
Figure 3-1
Step 3: Embed the application installation program into the driver installation package
Driver Installation Manual
Page 16
Synway Information Engineering Co., Ltd
Copy the renamed application installation program ‘Install.exe’ to ‘. \SYNWAY_PCI_4731\_exe’.
Note: Apart from Install.exe, the application installation program may include other relevant files.
You are allowed to put them under ‘. \SYNWAY_PCI_4731\_exe’ too, but anyhow, you must
ensure all of them can be visited properly by Install.exe.
3.3 Repackage
Note: This step is optional. If you don’t want to repackage the installation program, run
‘SYNWAY_PCI_4731\setup.exe’ to start the installation and perform the other steps as stated
above.
If you want to repackage the installation program, follow the steps below or refer to the help
manual of WinRAR.
Go to the directory ‘\SYNWAY_PCI_4731’ which is generated after decompression (Step 2), select
all files therein, click on the right mouse button and select ‘Add to archive’. See Figure 3-2.
Figure 3-2
Tick the checkbox labeled ‘Create SFX archive’ and click on the tab ‘Advanced’ as shown in
Figure 3-3.
Driver Installation Manual
Page 17
Synway Information Engineering Co., Ltd
Figure 3-3
Click on ‘SFX Options’ shown in Figure 3-4.
Figure 3-4
Click on the tab ‘General’, input ‘ShCtiSetup’ in the text area under ‘Path to extract’ and select
“Create in ‘program files’”. Then input ‘setup.exe’ in the text area under ‘Run after extraction’ and
click on the tab ‘Modes’. See Figure 3-5.
Driver Installation Manual
Page 18
Synway Information Engineering Co., Ltd
Figure 3-5
Select ‘Hide start dialog’ under ‘Silent mode’ and ‘Overwrite all files’ under ‘Overwrite mode’. Then
click on ‘OK’. See Figure 3-6.
Figure 3-6
Driver Installation Manual
Page 19
Synway Information Engineering Co., Ltd
Click on ‘OK’ to start creating the .exe file. See Figure 3-7 and Figure 3-8.
Figure 3-7
Figure 3-8
After the file is created, WinRAR will exit automatically.
Driver Installation Manual
Page 20
Synway Information Engineering Co., Ltd
Chapter 4 Driver Uninstallation
Follow the steps below to uninstall the driver.
Step 1: Run ShUninstall.exe
Go to the installation directory or Start\All Programs\ShCti to run ShUninstall.exe. Then the
following dialog box appears. See Figure 4-1. If you don’t want to do the uninstallation at this
moment or you launch the uninstallation program by mistake, click on ‘No’; otherwise, click on
‘Yes’.
Figure 4-1
Step 2: Close other applications
Follow the prompt given by the uninstallation program to close other applications. Then click on
‘OK’ to continue. See Figure 4-2.
Figure 4-2
Step 3: Start uninstallation
The uninstallation progress will be prompted as shown in Figure 4-3.
Figure 4-3
To prevent important ini files being deleted by mistake, the uninstallation program will ask for your
permission as shown in Figure 4-4.
Driver Installation Manual
Page 21
Synway Information Engineering Co., Ltd
Figure 4-4
Step 4: Display uninstallation result
If the driver is successfully uninstalled, the following dialog box will appear.
Figure 4-5
If some files fail to be uninstalled, the following dialog will appear.
Figure 4-6
Driver Installation Manual
Page 22
Synway Information Engineering Co., Ltd
Appendix A Technical/sales Support
Thank you for choosing Synway. Please contact us should you have any
inquiry regarding our products. We shall do our best to help you.
Headquarters
Synway Information Engineering Co., Ltd
http://www.synway.net/
9F, Synway D&R Center, No.3756, Nanhuan Road, Binjiang District,
Hangzhou, P.R.China, 310053
Tel: +86-571-88860561
Fax: +86-571-88850923
Technical Support
Tel: +86-571-88864579
Mobile: +86-13735549651
Email: [email protected]
Email: [email protected]
MSN: [email protected]
Sales Department
Tel: +86-571-88860561
Tel: +86-571-88864579
Fax: +86-571-88850923
Email: [email protected]
Driver Installation Manual
Page 23