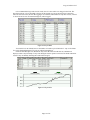
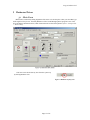
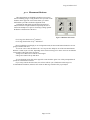
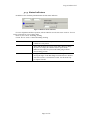
1
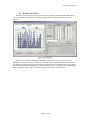
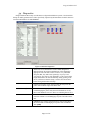
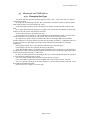
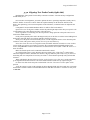
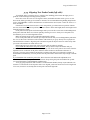
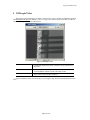
Lifecycle Tester User Manual
Integral Solutions Int'l
December 7, 2007
Copyright ©2003-2007 Integral Solutions Int'l
All rights reserved
Integral Solutions Int'l
3000 Olcott Street
Santa Clara, CA 95054
Phone: (408) 653-0300
Web: http://www.us-isi.com/
Fax: (408) 653-0309
E-mail: [email protected]
While every effort has been made to verify the accuracy of the information contained in this publication,
this publication may contain technical and/or typographical errors. Please contact Integral Solutions Int’l to
report any errors in this publication
Integral Solutions Int'l
Contents
1
INTRODUCTION.......................................................................................................................... 3
1.1
1.2
1.3
1.4
2
LIFECYCLE TEST OVERVIEW................................................................................................ 8
2.1
2.2
2.3
2.4
2.5
3
SPECIFICATIONS ...................................................................................................................... 3
HARDWARE COMPONENTS ...................................................................................................... 5
TESTER INSTALLATION ............................................................................................................ 6
INSTALLING SOFTWARE........................................................................................................... 7
GENERAL SETTINGS ................................................................................................................ 9
READ STRESS ........................................................................................................................ 10
WRITE STRESS ....................................................................................................................... 11
PRETEST ................................................................................................................................ 12
RESULTS AND DATA .............................................................................................................. 13
BARHEATER DRIVER.............................................................................................................. 15
3.1
MAIN FORM........................................................................................................................... 15
3.1.1
Movement Buttons....................................................................................................... 16
3.1.2
Coordinate Plane ........................................................................................................ 17
3.1.3
Status Indicators ......................................................................................................... 18
3.1.4
Navigation Buttons...................................................................................................... 19
3.1.5
Bar Type Selection ...................................................................................................... 20
3.1.6
Miscellaneous Controls............................................................................................... 20
3.2
TESTER CONFIGURATION ...................................................................................................... 21
3.2.1
General Settings.......................................................................................................... 21
3.2.2
Probe Card Maintenance............................................................................................ 22
3.2.3
Probe Card Cleaning .................................................................................................. 25
3.3
BAR SETUP ............................................................................................................................ 27
3.3.1
Slider Setup ................................................................................................................. 28
3.3.2
Bar Configuration Reference ...................................................................................... 29
3.3.3
Bar Lengths ................................................................................................................. 30
3.3.4
Serial Number Setup ................................................................................................... 31
3.4
DIAGNOSTICS ........................................................................................................................ 32
3.5
ALIGNMENT AND CALIBRATION ............................................................................................ 34
3.5.1
Changing Bar Type ..................................................................................................... 34
3.5.2
Aligning Test Probe Cards (right side) ....................................................................... 35
3.5.3
Aligning Test Probe Cards (left side).......................................................................... 36
3.5.4
Aligning Stress Probe Cards ....................................................................................... 37
3.5.5
Setting Up Cleaning .................................................................................................... 38
3.6
OPERATING PROCEDURE ....................................................................................................... 39
3.6.1
Making a setup file ...................................................................................................... 39
3.6.2
Engineering Mode....................................................................................................... 39
4
ISISIMPLEVIDEO ...................................................................................................................... 40
5
STRESS APPLICATION (USB)................................................................................................. 41
6
TROUBLESHOOTING PROBLEMS ....................................................................................... 43
6.1
ERROR MESSAGES ................................................................................................................. 43
7
CONTACT INFORMATION ..................................................................................................... 44
8
TABLE OF FIGURES................................................................................................................. 45
9
INDEX........................................................................................................................................... 46
Page 2 of 47
Integral Solutions Int'l
1 Introduction
1.1 Specifications
Lifecycle tester consists of two parts: testing and stressing. Testing part is connected to QST-2002E,
and conforms to all QST-2002 specifications, set forth in Quasi97 User’s Manual. When examining these,
acknowledge that all the measurements are performed on the test station and some test parameters may not
be applicable to stress.
Bias range is common to all heads. The software will automatically set optimal bias range for all bias
currents on the head list.
Bias Current Range 1
-5mA – 5mA
Bias Current Range 1
Minimum Resolution
0.0025mA
Bias Current Accuracy
+/- 0.010mA
Bias Current Range 2
-10mA – 10mA
Bias Current Range 2
Minimum Resolution
0.005mA
Bias Current Range 3
-20mA – 20mA
Bias Current Range 3
Minimum Resolution
0.010mA
Bias Voltage Range 1
-250mV – 250mV
Bias Voltage Range 1
Resolution
0.125mV
Bias Voltage Accuracy
+/- 0.500 mV
Bias Voltage Range 2
-500mA – 500mA
Bias Voltage Range 2
Minimum Resolution
0.250mV
Bias Voltage Range 3
-1000mV – 1000mV
Bias Voltage Range 3
Minimum Resolution
0.500mV
Stress Resistance
Measurement Accuracy
5% (feature for Diagnostic purposes only)
Stress Temperature
Accuracy
3%
Page 3 of 47
Integral Solutions Int'l
Sine Driver Board Specifications
Maximum Number of heads that can be
enabled for Writing
Any 12 (out of 48)
Supported Writer Resistance
0 – 20 Ohms
AC Write Current Range
20mA – 100mA (0-Peak or DC)
15mA – 70mA RMS
AC Write Current Resolution
0.4mA
DC Write Current Range
20mA – 100mA
DC Write Current Resolution
0.4mA
Write Current Accuracy
5%
Write Frequency
0.000010 MHz – 5 MHz
Write Frequency Resolution
0.028 Hz
Maximum Write Current Turn On Time
(ramping up)
20uS
Maximum Write Current Turn Off Time
35uS
Writer Resistance Measurement Accuracy
5% (feature for Diagnostic purposes only)
Write Head Turning On/Off Transient
2mA (0 – Pk)
Writer->Reader Crosstalk
@100mA 5Mhz
0.5mA
Writer->Adjacent Reader Crosstalk
@100mA 5Mhz
<0.2mA
Maximum Pin Voltage when write is
turned off
20mV
Page 4 of 47
Integral Solutions Int'l
1.2 Hardware Components
QST Tester – QST-2002-E is responsible for testing MR heads. It is located above the computer and
includes two boards on top of the BlazerX5.
QPS – provides DC power for the QST Tester and magnet. It is located below the computer.
Magnet – air core magnet surrounds the probe cards and is located on both sides of the arm.
Stepper Motor Drivers – take off left panel to access.
Z, Y Stages
Heater Arm – top arm is a placeholder for bars.
Cleaner Arm – bottom arm for scrubbing probe cards.
Temperature Controller – located on the right side of the tester; connected to PC serial port.
USB Stress Boards
Computer and Monitor
Alignment Camera
Page 5 of 47
Integral Solutions Int'l
1.3 Tester Installation
BlazerX5L is shipped in reusable ISI crate; it is highly
recommended to keep the crate and use it if necessary to ship the tester
for repairs. To unpack the tester, remove the two screws holding the
front wall on the crate. Remove all clamps holding the front cover.
Remove the front cover and unscrew the loading ramps that are
mounted on the inner side of it. Remove the ropes holding the tester.
Unscrew the bar on the bottom that prevents the tester from rolling out.
Put the two ramps in and wheel the tester out of the crate.
Figure 1 Unpacking Step 1
Figure 2 Unpacking Steps 2 and 3
The monitor, camera and lakeshore temperature controller should come in a separate box. Unpack
monitor and put it on the special stand on the left side of the tester; connect the power and computer to it.
Install alignment camera on right stand, plug 12pin round connector into the camera and plug in power to
LED. Install lakeshore on the right side and connect AC power, heater block, temperature sensor to
terminal B, and DB9 cable from the computer. Make sure that both stress boards are connected through
USB cables and RD WD cables are connected to the universal interface board on the back of the tester.
Once the tester is on site, unscrew holding standoffs on the four corners for stability.
Page 6 of 47
Integral Solutions Int'l
1.4 Installing Software
All software is installed during manufacturing of BlazerX5L. Software installation is necessary when
contents of hard drive were erased or after computer upgrade. Software package contains following
programs:
Matrox Image Library Lite
NI-DAQ Driver
NI FlexMotion Driver
Quasi97
Lifecycle Test
Barheater Driver
ISISimpleVideo Application
USB Stress Board Driver
NI-DAQ DRIVER
Warning! Only Ni-DAQ 6.8.1 Driver is supported.
Run ISIInstall.bat file in NI-DAQ directory for automatic NI-DAQ installation, or, alternatively, run
NI Setup.exe installation file and select
NI-DAQ Device Drivers
Visual Basic Component
NI-FLEX MOTION
Run NI-FLEX Motion setup and select Microsoft Visual Basic DLLs.
QUASI97
Run Setup.Exe file from quasi97 directory. Change installation type to Custom and enable:
Quasi97
Preamps
External Tests
Additional Hardware
Temperature
LIFECYCLE TEST
Run Setup.exe from Lifecycle directory on you backup CD. Change installation type to Custom and
enable all components. ISISimpleVideo and Stress application are a part of this installation.
Page 7 of 47
Integral Solutions Int'l
2 Lifecycle Test Overview
Lifecycle test helps in studying lifetime of heads based on accelerated lifecycle. A fairly large
population of heads (up to 96) is heated up and stressed with high bias and write current. At user defined
intervals stress bias and write current are turned off and heads are tested using any available QST tests.
Results are saved with the timestamp so that engineer can analyze head parameter degradation over time.
Bias currents can be defined individually for each head or group of heads. Only 16 user-defined heads can
be written to during the test and write currents can be set independently for all 16 heads.
The test intervals are limited to whole numbers in minutes. However when the test starts, all heads will
be tested; then stressed with only read bias stress for 10 seconds and then retested. After that fixed
sequence, the heads will be tested with both read and write stress (if enabled) at user-defined intervals.
Since this test can take weeks, it is recommended to clean the probe cards during the test, using
Barheater automatic cleaning routine. If cleaning is enabled Barheater will clean probe cards after Test
cycle and return heads to the Stress station without interrupting the test.
To enable Lifecycle test, add Lifecycle.Application in the Quasi97 Add-Ins Æ Available Modules and
enable it in Selected Modules.
Page 8 of 47
Integral Solutions Int'l
2.1 General Settings
General Settings
tab on the Stress menu
serves for both setting
parameters and
displaying information
during the test.
Figure 3 LifeCycle General Setup
Total Test Time
Total stress time in hours. This time does not include time to test
heads between stress cycles. It can be modified during the test.
Cool Down Time (s)
Minimum time in seconds, bars will cool down from stress bias at
holding height prior to probing and testing. [10 s]
Read/Write/Pretest
Enables/Disables Read, Write and Pretest tabs and their functions
accordingly. [TRUE]
Test Interval Grid
Interval in minutes, number of repetitions for that interval and
Temperature. Interval –1 means that the software will test at this
interval until Total Test Time is elapsed. Test will terminate after
Total Test Time even if Test Intervals are defined past it. [Interval
30m, Repetitions –1, Temp 100]
Tests / Fail On
Parameters
Should include all results that user wants saved in the data log. Up
to 5 results can be displayed on the graph. User can change which
results are plotted any time during the test. At the end of each
interval the results with Fail Check enabled will be tested against
Min, Max and Delta parameters on all heads. Any head with
results exceeding those limits will be disabled for the rest of the
lifecycle test.
Add / Remove
Click on the desired grid and then Add/Remove buttons to
manipulate items on that grid.
HD1-46
Displays head label of the selected head. The label under it shows
the Part ID for that head.
Elapsed Stress Time
Shows elapsed stress time since the beginning of the test.
Est Completion
Shows estimated date and time of test completion. The test can
terminate earlier if all heads failed before Total Test Time.
Next Test
Time till the next test cycle. It is recommended to browse results
during stress cycle, to avoid “Application is Busy” warning.
Page 9 of 47
Integral Solutions Int'l
2.2 Read Stress
This menu will be disabled if Read Stress Board is not found.
Figure 4 LifeCycle Read Stress
Current / Voltage
Global Parameter. Sets current or voltage bias mode on two stress
boards. All bias values will be validated based on that.
Default Stress Bias
In mA or mV depending on Current/Voltage selection. All heads
that do not have special bias defined in the Bias Per Head Group
Grid will be stressed at Default Stress Bias.
Bias Per Head Group
Special bias can be applied to any head on right and left side. This
value will overwrite default value for that particular head or group
of heads. Head number in these grids is zero-based and
corresponds to the channel number on the stress board.
First Stress Interval (s)
The first stress interval duration in seconds. The first stress
interval is read stress only and is applied before the intervals
defined on the General Page. To disable read-only stress before the
main stress sequence, type in 0 for first stress interval.
Page 10 of 47
Integral Solutions Int'l
2.3 Write Stress
This menu will be disabled if writer stress board is not present. When using write stress, keep in mind
that there are only 8 preamp chips on each board, so total of 8 writers can be enabled on each device.
Figure 5 LifeCycle Write Stress
Write Frequency (Mhz)
Writer stress board write frequency. Setting is independent from
Quasi97 write frequency. [100]
Write Current
TBD.
Duration of Stress (%)
Since the test lasts weeks, and the preamp chips may not have
been designed to write for such a long time – lifecycle test can
limit the write time. Duration of Stress (%) limits the write time to
some percentage of the stress interval. After that, write current will
be shut off, but head will still be under read bias stress.
Max Write Duration
(m)
Maximum write duration limits write stress if stress interval get
really long (hours). This will override Duration of Stress (%) [5]
Action if Selected
Reader Channel Failed
No Action and Disable Write Head are currently supported. [No
Action]
Preamp Head Selection
List
Defines which heads will be written to and write current for those
preamp chips.
Page 11 of 47
Integral Solutions Int'l
2.4 Pretest
Pretest can run before the Lifecycle test and at the end. If enabled this test will run at the beginning of
Lifecycle test and test the head at several (or one) different temperatures. All data from selected tests will
be logged and will be available on Pretest summary form. If Manual Head Disable option is selected, the
test will show Pretest summary form, where operator can see the distribution of any result across the head
population and disable heads as necessary.
The test also has Fail On Parameters feature that helps operator to disable heads automatically. Note
that even if Fail On Parameter disables a head, user can still enable that head when reviewing Pretest
summary in Manual Head Disable mode. In Automatic Head Disable the pretest form will not be shown
and heads will be disabled only using Fail On Parameters.
Figure 6 LifeCycle Pretest
Run Sequence
Determines at which temperatures heads will be tested.
Temperatures below 35°C will be considered room temperature
and software will wait only till 35ºC was reached.
Tests
Determines the test to run at each temperature. Note that all results
from those tests will be logged.
Fail On Params
Add results that you want to validate before running Lifecycle.
Validation will occur in both Manual and Automatic Head
Disable Modes.
Auto / Manual Head
Disable
If Manual Head Disable option is selected then the software will
show a map of all 96 heads and mark in red the heads that failed.
Operator can then go through the results and disable/enable heads
as he wishes. Then he can continue the Lifecycle test.
Automatic Head Disable will check all the heads against fail on
parameters and run lifecycle without operator confirmation.
Page 12 of 47
Integral Solutions Int'l
2.5 Results and Data
The first set of results will generally be from Pretest. If you enable pretest and enable Manual Head
Selection option, then the following screenshot will appear and the software will wait until you click
Continue.
Figure 7 Pretest Results
There are a lot of pretest results that are impossible to depict on one plot. So the test only shows
distribution of a single result across all heads. To select which result to plot, first select the temperature in
the combo box. Then click on a row in the result grid and press Refresh to refresh the plot. The plot shows
all enabled heads in blue and disabled in red. Zoom in and double click any column bar on the plot and the
head to which this result belongs will be disabled. Double click again to enable the head.
Page 13 of 47
Integral Solutions Int'l
It is recommended to log results in CSV mode, since it is more stable over long period of time. The
data from each test cycle is appended to the log file after heads go to stress and stress bias is turned on.
Since the test lasts weeks, the raw data logging is not available, and furthermore only those results, selected
in Test/Fail On Params on General Settings tab, will be logged.
Figure 8 Lifecycle Data
Test results list is not limited, however the number of results to plot is limited to 5. Any or all of those
five can be changed during the Lifecycle test without interrupting it.
Unlike all the other QST tests, Results tab only shows the result from the last run, and Data tab
displays results at any timestamp. At any time during the test the operator can browse the heads and look at
results of any one head by choosing the result on the info grid.
Figure 9 Lifecycle Plot
Page 14 of 47
Integral Solutions Int'l
3 Barheater Driver
3.1 Main Form
Main menu is used mainly during alignment of the tester. It is also the place where you select Bar Type
and Length for Lifecycle test. Generally Barheater will be loaded through Quasi97 program as one of the
Selected Modules (Barheater.Driver). Main formcan then be invoked from Quasi97 System –>Setup or File
-> Device Setup
Figure 10 Barheater Main Menu
This form can be invoked at any time from the system tray
by clicking Barheater icon.
Figure 11 Barheater Systray Icon
Page 15 of 47
Integral Solutions Int'l
3.1.1 Movement Buttons
Movement buttons are disabled by default to prevent user
from accidentally going to wrong location. Once you click on the
checkbox in the upper left corner of that frame, you will be
notified that system has switched to alignment mode.
In alignment mode all the speeds and accelerations are
reduced. Also the Navigation buttons will prompt the user to
confirm each simple move prior to executing it, telling operator
the distance and direction of the move.
Figure 12 Barheater Movement
For Y stage, the direction is In ↑ and Out ↓.
For Z stage, the direction is Up ↑ and Down ↓.
Keep in mind that even though you are in alignment mode, the movement buttons themselves are not
going to confirm each move.
To execute a move enter the distance in Y or Z step text box and press one of the movement buttons.
Distance is either in µm or in mils, depending on the selection in Diagnostics menu. Arrow on each button
corresponds to a direction of the movement.
Y Stage moves Bar Lifter in and out of the magnet.
Z Stage moves Bar Lifter up and down.
To exit alignment mode click on the upper left corner checkbox again. You will be prompted that all
speeds are restored back to normal.
If you at any time hit the limit sensor, the software will ask you to find home on that stage. It is
recommended to find home, otherwise the counter on that stage could be off by up to 500µm.
Page 16 of 47
Integral Solutions Int'l
3.1.2 Coordinate Plane
When you start Barheater, it finds home sensor and resets the
counter of steps. After that software keeps track of the current
position on all stages. You can find out the current position by
clicking on the coordinate plane.
Combo Box allows you to select the type of counter to use.
All positions in Barheater are absolute, therefore use absolute
counter when defining them.
Figure 13 Barheater Coordinates
Absolute
Relative
Encoders
Encoder Distance
Counts distance from the home sensor.
Not used
Alternative independent counters count the actual physical
movement of each stage. This counter displays digitally read encoder
counts.
Position in µm or mils from home, derived from encoders.
Even though nothing requires you to use them, software will use
them for self-diagnostics.
Click on coordinate plane to display the coordinates. Coordinate plane does not get updated in real
time, so every time you need to find out current position click on it.
On Y stage (Bar Lifter assembly) positive direction is towards operator and negative toward the
monitor.
On Z stage (Bar Lifter Assembly) positive direction is movement down and negative is up.
Page 17 of 47
Integral Solutions Int'l
3.1.3 Status Indicators
In addition to the coordinate plane Barheater also has Status indicators.
Figure 14 Barheater Status Indicators
For easier alignment and faster operation, software identifies several states tester can be in. You can
see the current state on Current Status label.
Heater Æ Test / Stress Æ Holding / Probing
Cleaner Æ Test / Stress / Unload Æ Holding / Probing
Motion FAILED
Indicates that hardware is not present. No moves will be executed
if hardware is not present.
Low Power Mode
Shows that the drivers are in low power mode. Whenever doing
any move on Z stage, the software exits low power mode.
Barheater only enters low power mode when going to Heater
Stress Probing position.
Override
In alignment mode, the current status can be changed without
moving the stages. To do that change override text box to desired
state in hex (such as 1A) and click override. Use this mode only
per request from ISI.
Page 18 of 47
Integral Solutions Int'l
3.1.4 Navigation Buttons
Navigation buttons simulate the same commands that Quasi97 will give to the Barheater. Use them to
verify your alignment.
Heating
Arm
Moves the arm down to the
heater position (Heater Arm
Height). If Cleaning Arm is
selected then moves bar lifter in
to home sensor (0) and then
down to heater position.
Cleaning
Arm
Moves the arm up to Cleaning
Arm Height. If Cleaning Arm is
selected then moves bar lifter to
home sensor (0) first and then
to cleaning arm.
Go To
Slider
When in Test position, moves
to a different slider on the bar.
If probing, Barheater will move
down by 0 point offset, then
move to a different slider and
probe again. The buttons do not
turn Bias OFF and ON, so
avoid using them if Bias is ON
in Quasi97.
Figure 15 Barheater Navigation
Probe
Moves the bar up to touch the probes (Probe height + Bar height
+ZHeight.) See Probe Height definition later in the manual.
Hold
Moves bar down Zero point offset away from the probes when
Heating Arm is selected and down to heater arm height if tester is
in Sress position.
Stress / Test
Moves the arm to Stress or Test position. Note that when it test
position, software will move to the first enabled slider.
Unload
Selects cleaning arm and moves to Y Stress position.
Video
Shows or hides video screen
Page 19 of 47
Integral Solutions Int'l
3.1.5 Bar Type Selection
You can have several bar lengths in the wafer. That information has to be setup in bar menu before you
can use it.
Figure 16 Barheater Slider Type Selection
Bar Type
Up or down type of bar. By using that you can control the bias
direction, normal slope and the location of the reader on the bar.
See Bar setup menu for definition of UP and DOWN
configuration. In addition to selecting the configuration in this
menu, ensure that the cables going to the bar interface board and to
the stress probe cards are connected to the right place.
Bar Length CH1
The length of the bar on the right side. If Reverse Slider Order in
Bar Setup is disabled then head 0 will be on farthest from the
operator. If slider order is reversed Head 0 will be closest to the
operator. The first slider offset from this bar length will be used to
calculate positions for all sliders on the bar.
3.1.6 Miscellaneous Controls
Load Stress Module
Loads stress application, specified in tester specific menu. It is
necessary for reading resistance in Probe Card Menu (Get
Resistance button).
Load Temp Module
Loads temperature controller driver. This is necessary to read
temperature and compensate slider position when running in
standalone mode. Note that during Lifecycle test this option is not
necessary, because Lifecycle test will update Barheater on current
temperature automatically.
Read Temperature °C
If temperature controller driver is loaded will read the temperature
into the textbox and Barheater will compensate slider position
based on that temperature. User can change set temperature
himself without loading temperature module, by changing the
value in that text box.
Page 20 of 47
Integral Solutions Int'l
3.2 Tester Configuration
Tester configuration file contains all of environment parameters specific to each individual tester and
also some of Probe Card Cleaning and Alignment parameters.
Figure 17 Barheater Tester Configuration
3.2.1 General Settings
Video Driver
Video Application to be loaded on software start-up. Default value
is ISISimpleVideo.Driver.
Show Control Window
Shows main form of video application. It can be used to store
images in BMP format.
Default Setup Directory
Location for bar setup files. On software start up Barheater looks
in that location for STP file and prompts the user to select on of
those files.
Stress Module
Stress Application. The only valid setting is Stress.Application.
Show Control Window
Shows main form of Stress application. It can be used turn bias on
and off and other miscellaneous tasks.
Video ON/OFF,
Operator Form
Click on the button to set shortcuts and use them in Quasi97
production test. Video can also be turned on in Main Form, which
can be is available under Barheater icon in system tray.
Page 21 of 47
Integral Solutions Int'l
3.2.2 Probe Card Maintenance
Figure 18 Barheater Probe Card Maintenance
Test / Stress Station
Selector for the displayed parameters. Determines which device will be
used to get resistance and which Probes Height and Zheight to modify.
Power ON
Turns On/Off Main bias switch in Quasi97 when working with test
probe cards.
Bias (mA)
Bias current in mA, will be used in Get Resistance and Detect 1st
Contact functions. Note that it has no effect when measuring writer
resistances on the stress probe cards.
Reader/Writer
Up/Down
Selects the configuration to be used in Get Resistance and Detect 1st
contact functions. On the right side, Up is the farthest two pads from
the operator.
Page 22 of 47
Integral Solutions Int'l
MR+MRI+I-
Selects the pair of pins that will be used to measure resistance. Note
that I+I- are current source pins, and will measure large resistance when
probes are not touching the slider. MR-MR+ are voltage sense and will
measure 0-2.5Ω if probes are not touching the slider.
Get Resistance
Measures resistance on all available channels and displays it in a grid.
Valid Head Resistance
The range of resistance when detecting 1st contact.
Maximum Distance
Maximum distance to go when detect find 1st contact position. Note
that if find 1st contact was not successful, it will stay at maximum
distance from where you started after you press the command button.
Step Size
Step size to be used during 1st contact detection. Resistance will be
measured after each step.
Find Point Of First
Contact
Goes up Step Size distance and measures resistance until it finds reads
Valid Head Resistance or reaches Maximum Distance. If the function is
successful, it will reprobe 5 times, then show resistance at every
reprobe and stay at first contact position. Note that this function alone
does not set any position. Use calculate position buttons to set desired
height.
Probes Height
Probe Height parameter for test or stress probe cards (depending on the
Stress/Test station selection). Equals first contact height + BarHeight.
Use Calculate Probe Height button to set it.
0 Pt Offset
Distance between the bar and probe cards when moving from slider to
slider. Note the same distance is used during detect 1st contact routine
to remeasure resistance 5 times.
Zheight
Distance barheater will move up from 1st contact position to ensure
good contact. Zheight is dependent on Test/Stress selection. The factory
recommended Zheight values are
Heater Arm Test Probe Card Zheight – 75um
Heater Arm Dual-Side Stress Probe Card ZHeight – 150um
Heater Arm Single-Side Stress Probe Card Zheight – 100um
1st Slider on Stress CH
This parameter should be utilized to better match the test head number
with the stress channel. For example if stress probe card CH0 does not
have probes and CH1 on stress is connected to the very first head on the
bar then set this parameter to 1.
Y Location
Y location of the probe card. Equals 1st slider position – 1st slider offset,
as defined in bar setup. Use calculate probe location button to set it.
Parameter is dependent on Test/Stress selection.
Calculate Probe Height
Calculates the probe height based on current position and Test/Stress
station selection. Sets probes height parameter. Use this function after
Find 1st Contact routine was successful. Warning! Bar height in bar
setup must be set prior to setting probe height. Failure to set up the bar
prior to calculating probe height will result in probe card damage.
Page 23 of 47
Integral Solutions Int'l
Calculate Probe
Location
Calculates and sets probe card location, based on current position
and 1st slider offset, as defined in bar setup. Bar setup must be set
up already before calculating probe location.
Enable Reprobing
Enables reprobing feature. The feature will reprobe the same slider
several times if contact resistance is bad. The feature is required
by scheduled maintenance, so the checkbox is disabled if Schedule
Maintenance feature is enabled.
Miscontact Criteria
Allowed range for contact resistance. Use Probe Contact test in
Quasi97 Static test to find out contact resistance limits of your
probe cards.
# Of Retries on the
same Slider
Maximum number of reprobes Barheater will attempt before
continuing test. [3]
Elapsed Counter
Displays duration of probe card use since the last maintenance. All
counters are independent, so if it displays 1 day and 25 hours, it
means that probe card was used for 1 Day or 24 + 1 Hours.
Reset
Zeroes out the counters.
Schedule Maintenance
TBD
Page 24 of 47
Integral Solutions Int'l
3.2.3 Probe Card Cleaning
Figure 19 Barheater Probe Cleaning
Cleaning Arm Offset
Fixed offset between the cleaning and heating arm. It will be used
to calculate probe height in cleaning arm position. Reset this
parameter only when the arm was changed or the thickness of
cleaning plate was changed.
Calculate Cleaning
Arm Offset
Use this function to set cleaning arm offset after finding point of
first contact for cleaning arm.
Clean Now
Cleans selected probe cards based on parameters set in this menu.
Y Cleaning Stroke
When cleaning, software will move the arm to cleaning position
+/- Y Cleaning Stroke [100]
Number Of Strokes
When cleaning, software will move arm from –Y Cleaning Stroke
to +Y Cleaning Stroke this many times. [10]
Stoke Delay
Delay between each stroke in ms [100]
Stress Probe Cards
Enables cleaning of stress probe cards during the test [TRUE]
Test Probe Cards
Enables cleaning of test probe cards during the test [TRUE]
Page 25 of 47
Integral Solutions Int'l
Stress / Test Card
Cleaning Zheight
When cleaning stress probe cards, software will move arm to
Heater Arm Height – Cleaning Arm Offset - Zheight. Factory
recommended Zheight values for the cleaning arm are
Cleaning Arm Test Probe Card Zheight – 30um
Cleaning Arm Dual-Side Stress Probe Card ZHeight – 40um
Cleaning Arm Single-Side Stress Probe Card Zheight – 40um
Y Stress / Test Cleaning
Position
Miscontact Failure
Threshold
Positions where the probe cards are going to be cleaned.
Max Writer Resistance
∆%
If writer resistance changes more than specified here, will clean
stress probe cards. [100%]
Stress / Test Probe
Card Cleaning
Frequency
Clean Probe Cards
Before Next Cycle
[Interval = 24]
[Repetitions = Total TestTime/24]
Software will automatically clean if N consecutive sliders showed
miscontact and then retest those sliders. This cleaning will be done
only once per interval. [10]
Will force cleaning Stress/Test probe cards after the next test
cycle. [FALSE]
Page 26 of 47
Integral Solutions Int'l
3.3 Bar Setup
Figure 20 Barheatar Bar Setup
Bar setup purpose is to accommodate different lengths of bar. One bar setup can serve several bar
lengths, and UP/DOWN configurations. All parameters set are relative, which means that the file can be
copied to other systems without changing any of the parameters.
Page 27 of 47
Integral Solutions Int'l
3.3.1 Slider Setup
The following parameters are used to define the sliders. You can change the bias current direction,
reader location and slider pitch.
Slider Pitch
The distance to move from one slider to the next one.
Bar Height
Distance from the backside of the bar to the pads.
Measure Bar Height
If probes heights were set before for a different bar, this button can
be used to determine the bar height. Detect the point of 1st contact
using probe card alignment menu and then run this function.
Offset Thermal Adjust /
100 °C
Pitch Thermal Adjust /
100 °C
Normal Slope
Offset to be added to each slider. [0]
Slider pitch adjustment based on temperature. [0.5]
Defines normal sign of the slope in transfer curve test for
particular type of sliders (Up/Down). This parameter is used in the
Transfer Function Test to detect Pin Layer Reversal. If measured
slope has a different sign from normal slope then pin layer reversal
is detected.
Add Pin Reverse Result
Allows adding pin reverse result to Transverse and Longitudinal
Tests. The calculation of the result takes approximately 100ms per
test.
Reverse Slider Order
Changes the direction of movement from N to N+1 slider.
Normally the first slider is the farthest from the operator on right
side. If you reverse slider order, then the first slider will actually
be the closest to the operator.
Bias Direction
The direction of bias current (it can either be normal or inverted).
If normal, the bias current sign will be preserved for all tests. If
inverted then positive bias current will be negative and negative
will become positive. By default RD+ is either the last or the first
pad (depending on the reader location). For example if your
product is R+R-W+W- or W-W+R-R+ then set bias direction to be
positive, on the other hand if you bar is R-R+W+W- or
W-W+R+R- then invert bias current.
Reader Location
The side where the reader is located. “Right” equates to the pair of
pads closer to the back of the tester. “Left” is the pair of pads
closer to the operator.
If you select “Right”, the reader stress board should be connected
to the connector closest to the probes.
If you select “Left”, the reader stress board should be connected to
the probe card connector closest to the stress board.
Page 28 of 47
Integral Solutions Int'l
3.3.2 Bar Configuration Reference
Actual Slider Layout
Test Reader
Position
Selection
Right (U)
Stress
Reader
Cable
A
2xBar
Interface
Board Rev
A-F
Test Bias
Stress Bias
NORMAL
NORMAL
Right (U)
A
E-H
NORMAL
NORMAL
Right (U)
A
A-F
INVERT
INVERT
Right (U)
A
E-H
INVERT
INVERT
Left (D)
B
A-F
NORMAL
INVERT
Left (D)
B
E-H
INVERT
INVERT
Left (D)
B
A-F
INVERT
NORMAL
Left (D)
B
E-H
NORMAL
NORMAL
All settings shown here apply if the MR element is facing the bar heater.
Test Reader Position is either Left (ISI Down) or Right (ISI Up), and the cables to the probe card
should be connected accordingly.
Stress Reader Cable connector (A) is closest to the probes and (B) is farthest from the probes.
2xBar interface board revision E-H equates to Fab-Rev E-E or higher.
Test bias inversion should be set in the bar setup; Stress bias should be inverted in the lifecycle test
setup.
Page 29 of 47
Integral Solutions Int'l
3.3.3 Bar Lengths
Each head type can have several bar lengths cut out from a wafer. This menu allows you to set up 8
different bar lengths for up and down bars.
Figure 21 Barheater Barlengths
Label
Bar length identifier, which the operator is going select.
Up/Down Offset
Distance between the center of the pad on the first slider and the
edge the bar. This parameter must be taken from bar layout
drawing or measured.
# Of Sliders
Make sure that it matches your stress probe card. Remember that if
slider 0 is disabled on the right side, last slider should also be
disabled for the same bar length to work on the left side.
Enable
If disabled then this bar length selection will not be available.
Individual Sliders
For each bar type you can have special naming convention that
will be saved to a log file as Head ID. Select a bar length and click
on this button to modify slider names. This will also allows to
disable sliders and to exclude them from serial number
calculations. Slider number will always correspond channel
number on the stress board. So if channel 0 is not connected on the
stress board, head 0 should be disabled on in the bar length
definition as well.
Page 30 of 47
Integral Solutions Int'l
3.3.4 Serial Number Setup
This allows you to set up different serial number scheme specific to each bar.
Figure 22 Barheater Slider Serial Number
# Of Symbols To Read
The size of your serial number in characters. (Values from 1 to
12).
Numbering Array
Blazer can read only a small fraction of total sliders and must
calculate the numbers for the rest of the bar. Here you can set how
the serial numbers will be incremented. All the character rows are
located in the ascending order from least significant bit to most
significant (top to bottom). “Position From Right” sets the
placement of the characters in the string. Increment sets if that
placement position can be changed from bar to bar.
Test
Verifies serial numbering across all sliders of your bar. To use it,
type a valid serial number into the textbox above Test button, then
type the 0-Based slider number, to which this SN corresponds and
click test. A new window will be open with Part IDs.
Page 31 of 47
Integral Solutions Int'l
3.4 Diagnostics
Integral Solutions Int'l mostly uses this menu to align and troubleshoot systems. User should not
attempt to modify parameters here unless specifically requested by ISI. Parameters from this menu are
saved into SETUP.BCT file and EEPROM.
Figure 23 Barheater Diagnostics
µM / Mil Selector
Allows user to use micrometers or mils. When changed to a
different format, all positions and distances will be changed to
appropriate units. The units will be saved for every individual
setup file (Bar, Tray and Tester separately). If you try to use
“micrometer” bar setup on “mil” BlazerX5, it will convert all the
length and distances to mils automatically during opening of the
file. If you then save that bar setup, it will be converted to mils
before saving and saved as mil setup.
Y Test Location
Position of test probe-cards. At this position the first pin on the
probe card will hit the edge of the heater arm.
Z Find Home Offset
On Barheater startup, program will move down this amount to
avoid damaging the probe cards, then will find home on Y axis,
then it will find home on Z axis. There are 2 limiting factors for it:
If Barheater is in Cleaner Stress Probing position, it has to move
down this amount to avoid damaging test probe card with cleaner
arm.
If Barheater is in Cleaner Unload Position, it has to move down
this amount and avoid damaging stress probe cards with Heater
Arm. [3500]
Page 32 of 47
Integral Solutions Int'l
Y Stress Location
Position where the first pin of the stress probe card is touching the
bar heater arm edge. To stress, software will move to this position
+ 1st slider offset as defined in bar setup. [119000]
Test Probe Height
Position where the heater arm touches the test probe card
Stress Probe Height
Position where the heater arm touches the stress probe card
Cleaner Arm Height
Position of the cleaning arm, lower than both stress and test probe
cards
Heating Arm Height
Position of the heater arm , lower than both stress and test probe
cards
Last User
Last application to write to the EEPROM. Should always be
Barheater.
Feature Vector
TBD
Page 33 of 47
Integral Solutions Int'l
3.5 Alignment and Calibration
3.5.1 Changing Bar Type
You can do basic file operations with bar setup file such as “New”, “Open” and “Save As” from bar
setup form File menu.
Set slider pitch from drawing of the bar. This is the distance from Pad1 on slider1 to Pad1 on slider2.
Slider pitch should be set at room temperature (20°C).
Set the bar height from the bar layout. Bar height is the distance from the backside of the bar to the
pads.
Set 1st slider offset for the bar lengths you are going to use. Slider offset is the distance from the edge
of the bar to the center of the first pad of the first slider.
Set the reader location for up and down bar types.
Set the direction of bias current for your bar. BlazerX5 internal definition is that R+ is always on the
outside of the slider. If it is different on your product, then you need to invert bias current.
Set a label for the operator, number of sliders and enable one bar length. Make sure that slider 0
matches channel 0 on your Stress Board. If not then increase number of sliders by 1 and disable slider 0. If
you plan to use the same bar length on both right and left sides then the head enable lists should be
symmetrical.
Enter Alignment mode, select your enabled bar and slider type in the main menu.
Click Heating Arm, then Test, and bring the bar up to the probes.
Verify that the MR element is facing heater block and that the probes are directly over the bar pads, if
not adjust the bar using in and out movement buttons, then click of the cell in the bar length grid for either
up/down offset and click Calculate 1st slider offset.
Go to the last slider and make sure that slider pitch is correct. Click Unload, then Heater Arm and Test
to verify that the first slider position is correct.
Click “Save Setup” and do steps 6 through 10 for the other type of slider.
If you want a Pin Layer Reversal result to be added, make select normal slopes for your bars.
If you use a special convention for the name of sliders, or you have dummy sliders on that bar, select a
bar length and click Rename Sliders.
Do not forget to save changes in your bar setup.
Page 34 of 47
Integral Solutions Int'l
3.5.2 Aligning Test Probe Cards (right side)
Run Barheater from Quasi97 for the ability to measure resistance. Your bar and tray configurations
should already be set.
Prior to Probe Card Alignment, you need to preheat the arm to operating temperature (usually 100°C)
and let it stabilize for at least two hours. Enter the setpoint manually on the lakeshore and turn on the
heater. After preheating, enter current temperature in the main menu, so that bar heater can adjust the bar
position.
Load Quasi97 first and enable Barheater.Driver in Add-InsÆ Selected Modules.
Open Probe Card Æ Alignment window and set the probe height 500µm lower then you expect it to be
(or add 500µm to the value that was last time). Close the menu.
Put on a good bar. Go to Heating Arm Æ Test position to bring up the bar to the probe card. Go to a
slider in the middle of the bar.
Gently insert right-side probe card in the magnet until you see the first screw holes in the holding block
under probe card PCB. Then screw it down partially, allowing it to move.
Slowly move the probe card forward until you see it on the Alignment camera. Screw down the probe
card more. If left (CH1) probe card is present, move it Up (or out) all the way.
Select Test station in Probe Card Alignment menu, and enable main bias switch (Power On). Set bias
current, slider type and type of resistance to measure. We recommend detecting holding height on the
writers, using MR-MR+ resistance measurement. Set sufficient bias current (5mA - 10mA for writers or 1 2mA on readers).
Make sure that the probe card is connected to Bar Interface board.
Set Valid Head Resistance range, Maximum Distance and Step Size. Click Find 1st Contact button.
Check the alignment camera, and make sure that bar is directly under the probe card; if not, you can move
the heating arm in to compensate. If necessary click find 1st contact button repeatedly until you find valid
resistance.
When valid head is detected, click on calculate probes height to set it. Click Save. On the main menu,
go to alignment mode and click Probe. The tester should confirm a small move up (equals Zheight).
Go to the first slider on the test probe card and click Calculate Y Location to set new probe card Y
position.
Verify the setting by going to the beginning of the bar through Slider Selection combo box, click touch
and measure resistance. Check it on both reader and writer and make sure that I+I- resistance is fairly close
to MR+MR-.
Page 35 of 47
Integral Solutions Int'l
3.5.3 Aligning Test Probe Cards (left side)
To install the probe card on the left or to realign it after installing probe card on the right, put on a
good bar on the left and go to heating arm test position.
Select Test station in Probe Card Æ Alignment menu, and enable main bias switch (power on). Set
bias current, slider type and type of resistance to measure. We recommend detecting holding height on the
writers, using MR-MR+ resistance measurement. Set sufficient bias current (5mA - 10mA for writers or 1 2mA on readers).
If the heater arm is not selected or arm is not in test position, go to heater arm test position. If heater
arm was selected and it was in test position, then move down to heater arm height (heater arm height can be
found in Diagnostics menu)
Gently insert left-side probe card in the magnet until you see the first screw holes in the holding block
under probe card PCB. Then screw it down partially, allowing it to move. Slowly move the probe card
forward until you see it on the Alignment camera.
Make sure that the probe card is connected to Bar Interface board.
Focus on the probes and move the bar up in 50µm increments until you can distinguish the pads on the
bar. Use Get Resistance function to read resistance of the slider as you go up. Slowly move up 50µm at a
time and measure resistance. Align the probe card to the bar pads as they become more visible. Stop when
you read a valid resistance on either CH0 or CH1.
Release the lock (lever on the back of the left probe card) by setting it vertically.
If you found that CH0 touches the probe card first, then go down in 10µm increments until you
measured resistance on CH0 is invalid and then 10µm up. You will be at the point of first contact. Turn the
adjustment screw on the back of the probe card base counter-clockwise and measure resistance. If
necessary, lower the probe card more and measure resistance again until you can measure resistance on
both channels simultaneously. You may need to lock the probe card in between the steps to align it with the
pads.
If you found that CH1 touches the probes first, then release the lock and turn the adjustment screw
clockwise, then move 10µm up and measure resistance. Keep raising the probe card and the bar up until
you can read resistance on both channels simultaneously.
Verify by going 10µm down that resistance is invalid on both channels, then up 10µm and make sure
resistance is valid on both. Your left probe card is now aligned, you do not need to reset Probe Height and
Y Location, because it was already done for the probe card on the right side.
Page 36 of 47
Integral Solutions Int'l
3.5.4 Aligning Stress Probe Cards
The system must preheat to operating temperature (usually 100°C) for at least 2 hours, if it was not
preheated, turn manually set the operating temperature on the lakeshore and turn on the heater.
Click Load Stress Module from the Barheater Main form.
1. Move to the Heating Arm Stress position.
If right probe card is aligned, skip to step 10, otherwise proceed to align right probe card.
Move the left (device 2) probe card up (or out) of the way. You can do it by rotating the screw counterclockwise in the center of left probe card base
Focus on the probes and move the bar up until you can distinguish pads on the bar. Align the probe
card to the pads – you will have to move the alignment camera from the first to the last slider to make sure
the probe card is aligned evenly on all of them. If necessary move the bar in/out.
Open Probe CardÆAlignment menu and click Calculate Y Location.
Select Stress Station in Probe Card Alignment menu. Set up resistance measurement parameters in and
for detecting first contact. Click Find 1st Contact button. Repeat until the point of first contact is found.
Click Calculate Probe Height to set new probing position.
To align left stress probe card, move the arm down to clear both probe cards. Then focus on the probes
of the left probe card and move up until you can distinguish pads on the bar. Align probes to the pads on
the bar. You will have to move the camera to first and last slider and correct probe card angle to make sure
that all probes are aligned with the pads on the bar.
Measure resistance through Get Resistance function. If resistance is not valid, move the bar up and remeasure resistance until you can find valid resistance on either device.
If Device 1(right) probe card touches the bar first, then lower the probe card on the left by turning the
pivot screw clockwise and re-measure resistance until the two probe cards are leveled.
If Device 2(left) probe card touches the bar first, then raise it by turning the pivot screw counter clockwise.
Move the bar up and re-measure resistance, repeat this step until can read resistance on both probe cards.
Note that first contact is defined where at least one head is making contact with the probe card.
Verify that if the bar is 10µm lower, you get no resistance on either device, then move 10µm back up
and make sure both devices show valid resistance (on at least on of heads on each bar.)
Page 37 of 47
Integral Solutions Int'l
3.5.5 Setting Up Cleaning
Cleaning should be performed fairly often to prevent bad results caused by miscontact. We recommend
cleaning every 24 hours during the Lifecycle test. The cleaning arm can either be sandpaper or a metal
strip. Sandpaper should be replaced approximately every month, or in case of metal strip, it should be
cleaned or replaced monthly as well.
Cleaning is done using a fixed offset from the probe height on both Test and Stress stations. Therefore
cleaning offset can only be defined after the probe height was set. Cleaning offset does not need to be
changed unless the thickness of the cleaning plate is changed or the cleaning arm itself is replaced changed.
Use the following procedure to define cleaning arm offset.
Go to Cleaning Arm Æ Stress Position.
Load Stress Module from Main form.
Set 100mV bias voltage and measure resistance, it should be 10000Ω.
Move up until you measure anything different on any of the heads.
Move up 50µm from that point and scrub (move on Y +100 and –100 10 times)
Move down 300µm and measure resistance again. It should be 10000Ω everywhere; if not then move
down more until you see 10000Ω on all heads.
Move up in 10µm steps and find the first position where resistance is less than 10000Ω. This is your
initial contact position. Go to Probe CardÆ Cleaning menu and click Calculate Cleaning Arm Offset.
Set Cleaning Zheight for both test and stress probe cards.
Page 38 of 47
Integral Solutions Int'l
3.6 Operating Procedure
3.6.1 Making a setup file
Creating a Quasi97 setup file is described in more detail in Quasi97 User’s Manual. However there are
a few things that need to be set to use Barheater loading mechanism.
Select Bar2x tester configuration in Quasi97 System menu, then go to Add-Ins → Available Modules
and add Barheater.Driver. Go to Add-Ins → Selected Modules and enable it to load Barheater.
•
Do not set number of sliders, head labels or part ids for each slider, because those parameters will
be overwritten.
Set default bias current (or voltage) in Quasi97 System menu. For consistency, use only positive bias
current in Quasi97 setup, and invert bias current direction in the Bar setup in Barheater.
3.6.2 Engineering Mode
In general testing bars is not different from testing 2x HGAs. Here are some of the differences:
Start loads bars, goes to the selected head (in Quasi97), probes and turns bias on.
Stop turns bias off and unload the bar.
Run Test in production test. Quasi97 will test starting from current head to the end of the bar. Quasi97
will then return to the previously selected slider.
Abort will stop the test and return to the original head in production test.
Page 39 of 47
Integral Solutions Int'l
4 ISISimpleVideo
This purpose of this application is to display video from one of the 3 channels for alignment operation.
Add ISISimpleVideo.Driver to Barheater’s Tester Configuration menu and you will be able to invoke the
video screen using Video button in Main Menu.
Figure 24 ISISimple Video
Grab
Continuously acquires the picture. Uncheck it if you want to freeze
the picture.
Video Channel
Default channel is 1. Cameras can be connected to the channel 1 or
2 or through BNC connector on the video card on Ch0.
On Top
Shows form on top of all other windows.
If ran in standalone mode, it has the ability to save images in bmp format from ISISimpleVideo Main
Form.
Page 40 of 47
Integral Solutions Int'l
5 Stress Application (USB)
Stress application is used only to troubleshoot problems with Stress Boards. It is primarily a driver for
the stress board used by Lifecycle application and Barheater. Nevertheless it has some basic functions like
Reading EEPROM, Bias On and Off, etc.
Figure 25 Stress Application
Board N
Selects the board for operation. Board 1 is on the right, Board 2 is
on the left.
Voltage / Current
Selects bias driver: voltage or current. Current driver is limited to
20mA, voltage to 1000 mV.
Read Head Bias List
Head Number, Bias, Head Enable for all 48 channels on Stress
Board. Use Fill button to substitute bias for all heads with bias in
currently selected cell.
Fill
Fill out bias current on Read Head Bias List
Measure R Resistance
Measures resistance on all 48 heads and shows the result in
Measurements grid.
Bias ON
Turns ON Bias on the selected stress board. Bias value for each
channel is defined in Read Head Bias List. Will only turn bias on
to the enabled channels in Read Head Bias List.
Bias OFF
Turns OFF Bias on the selected stress board on all heads.
Ground MR
Grounds MR heads. It is not recommended to ground heads while
the bias is still on, especially in Voltage bias mode.
Page 41 of 47
Integral Solutions Int'l
Write Head List
Preamp, Head Select, Write current and Enable for writing. Each
of 8 Preamp chips can only write on 1 head simultaneously, but all
preamps can write simultaneously.
Measure W Resistance
Measures resistance on all 8 preamp chips, using write channel
and shows the result in Measurements grid. Note that Write must
be on to measure valid resistance.
Write
Turns on Writing to all enabled preamp chips. If Write Data
Enable is not on then will enable DC Write.
Write Frequency (Mhz)
Write frequency common to all preamp chips on the same board.
Write Data Enable
Enables AC Write.
All
When measuring writer resistance instead of 8 heads, will measure
all 48 head resistances, selecting heads 0 to 7 on each preamp chip.
Page 42 of 47
Integral Solutions Int'l
6 Troubleshooting Problems
6.1 Error Messages
Error-70125[NIMC_wrong Model Error]occurred in Load Acceleration/Deceleration in RPS/sec
[flex_load_rpsps] in Axis 0x03. The function was not executed because it was attempted and illegal time.
Blazer cannot find home axis 3. Restart the computer and release emergency stop button. If an error
persists, check the power supply for motion distribution board is plugged in and the cables to and from
motion distribution board are connected properly.
Many sliders show resistance smaller than 2 ohms or larger than 150 ohms.
1) Those bars are damaged. To make sure, compare the results from both bars and make sure that
different heads are failing on different bars. (For example Head 12 failed on Bar1, but was good on Bar2.)
2) Pads are not clean or the probe card itself is not clean. Try to clean those bars and probe card (for
the probe card use compressed air).
3) The Slider Pitch for those bars is wrong. Please look through the alignment camera and go from
slider to slider. Make sure that probes are always aligned with slider pads.
4) The vacuum gripper is not horizontal. That can happen if at some point it hit the tray, 400 pounds
force is enough to tilt it. To verify that, switch the Reader Side to opposite and run quasi-static tests on both
ends of the bar. (For example if Reader Location was "Right", then change it to "Left", so that you will be
testing writer resistance). Avoid the first two and the last two sliders, because of possible problem
described in step 2. Do not try to write in any test, otherwise you will damage the reader.
The probes seem to align with slider pads, but transfer curve results are out of order.
When running transfer curve, what is measured resistance?
1) It is in the range of 8-15Ohm, reader location in bar setup should be on the opposite side.
2) It is 0-2Ohms then you need to re-detect holding height using probe card maintenance menu.
3) It varies with each slider then check slider pitch.
Page 43 of 47
Integral Solutions Int'l
7 Contact Information
Integral Solutions Int'l
2192 Bering Drive
San Jose, CA 95131
Phone:
(408) 941-8300
Fax:(408) 941-8309
E-mail:
Web:
[email protected]
http://www.us-isi.com/
Page 44 of 47
Integral Solutions Int'l
8 Table of Figures
FIGURE 1 UNPACKING STEP 1
FIGURE 2 UNPACKING STEPS 2 AND 3
FIGURE 3 LIFECYCLE GENERAL SETUP
FIGURE 4 LIFECYCLE READ STRESS
FIGURE 5 LIFECYCLE WRITE STRESS
FIGURE 6 LIFECYCLE PRETEST
FIGURE 7 PRETEST RESULTS
FIGURE 8 LIFECYCLE DATA
FIGURE 9 LIFECYCLE PLOT
FIGURE 10 BARHEATER MAIN MENU
FIGURE 11 BARHEATER SYSTRAY ICON
FIGURE 12 BARHEATER MOVEMENT
FIGURE 13 BARHEATER COORDINATES
FIGURE 14 BARHEATER STATUS INDICATORS
FIGURE 15 BARHEATER NAVIGATION
FIGURE 16 BARHEATER SLIDER TYPE SELECTION
FIGURE 17 BARHEATER TESTER CONFIGURATION
FIGURE 18 BARHEATER PROBE CARD MAINTENANCE
FIGURE 19 BARHEATER PROBE CLEANING
FIGURE 20 BARHEATAR BAR SETUP
FIGURE 21 BARHEATER BARLENGTHS
FIGURE 22 BARHEATER SLIDER SERIAL NUMBER
FIGURE 23 BARHEATER DIAGNOSTICS
FIGURE 24 ISISIMPLE VIDEO
FIGURE 25 STRESS APPLICATION
Page 45 of 47
6
6
9
10
11
12
13
14
14
15
15
16
17
18
19
20
21
22
25
27
30
31
32
40
41
Integral Solutions Int'l
9 Index
H
#
µM / Mil Selector .............................................32
A
Absolute Position Counter................................17
Action if Selected Reader Channel Failed........11
Add Pin Reverse Result....................................28
Auto / Manual Head Disable ............................12
B
Bar Height ........................................................28
Bar Length........................................................30
Bar Length CH1 ...............................................20
Bar Type...........................................................20
Bias (mA) .........................................................22
Bias Direction...................................................28
Bias Per Head Group ........................................10
C
Calculate Cleaning Arm Offset ........................25
Calculate Probe Height.....................................23
Calculate Probe Location .................................24
Clean Now........................................................25
Clean Probe Cards Before Next Cycle .............26
Cleaning Arm ...................................................19
Cleaning Arm Height .......................................33
Cleaning Arm Offset ........................................25
Cool Down Time (s)...........................................9
Current / Voltage ..............................................10
D
Heating Arm .................................................... 19
Heating Arm Height ........................................ 33
Hold ................................................................. 19
I
Individual Sliders............................................. 30
L
Last User.......................................................... 33
Load Stress Module ......................................... 20
Load Temp Module ......................................... 20
Low Power Mode ............................................ 18
M
Max Write Duration (m).................................. 11
Max Writer Resistance ∆%.............................. 26
Measure Bar Height......................................... 28
Miscontact Criteria .......................................... 24
Miscontact Failure Threshold .......................... 26
Motion FAILED .............................................. 18
MR+MR- ......................................................... 23
N
Next Test ........................................................... 9
Normal Slope................................................... 28
Number Of Retries On Same Slider ................ 24
Number Of Sliders........................................... 30
Number Of Strokes.......................................... 25
O
Default Setup Directory....................................21
Default Stress Bias ...........................................10
Duration of Stress (%) ......................................11
E
Elapsed Counter ...............................................24
Elapsed Stress Time ...........................................9
Enable Reprobing .............................................24
Encoder Distance..............................................17
Encoders ...........................................................17
Est Completion ...................................................9
F
Feature Vector ..................................................33
Find Point Of First Contact ..............................23
Maximum Distance......................................23
Step Size ......................................................23
G
Offset Thermal Adjust / 100 °C....................... 28
Override........................................................... 18
P
Pitch Thermal Adjust / 100 °C......................... 28
Power ON ........................................................ 22
Preamp Head Selection List............................. 11
Pretest
Fail On Params ........................................... 12
Run Sequence ............................................. 12
Tests............................................................ 12
Probe................................................................ 19
Probes Height .................................................. 23
R
Read Temperature °C ...................................... 20
Reader Location............................................... 28
Relative Position Counter ................................ 17
Reverse Slider Order ....................................... 28
Get Resistance ..................................................23
Go To Slider .....................................................19
Page 46 of 47
Integral Solutions Int'l
U
S
Schedule Maintenance......................................24
Serial Numbers
Constraints ...................................................31
Number Of Symbols To Read .....................31
Test ..............................................................31
Show Control Window .....................................21
Slider Pitch .......................................................28
Stoke Delay ......................................................25
Stress / Test Buttons .........................................19
Stress / Test Card Cleaning Zheight .................26
Stress / Test Probe Card Cleaning Frequency ..26
Stress Module ...................................................21
Stress Probe Cards............................................25
Stress Probe Height ..........................................33
T
Test / Stress Station ..........................................22
Test Interval Grid ...............................................9
Test Probe Cards ..............................................25
Test Probe Height.............................................33
Tests / Fail On Parameters..................................9
Total Test Time ..................................................9
Unload ............................................................. 19
Up/Down Offset .............................................. 30
Up/Down Slider Type...................................... 22
V
Valid Head Resistance..................................... 23
Video Driver.................................................... 21
Video ON/OFF ...........................................19, 21
W
Write Current................................................... 11
Write Frequency (Mhz) ................................... 11
Y
Y Cleaning Stroke ........................................... 25
Y Location ....................................................... 23
Y Stress / Test Cleaning Position .................... 26
Y Stress Location............................................. 33
Y Test Location ............................................... 32
Z
Z Find Home Offset......................................... 32
Zero Pt Offset .................................................. 23
Zheight............................................................. 23
Page 47 of 47