1
5
What Floor Is Mrs. Jones on, and
What Does Her CBC Look Like Today?
Patient Records on Handheld Computers
Amy Price
All of us have experienced the frustration of arriving at the hospital to make
early-morning rounds and spending considerable time trying to find where
a patient is located and what their latest lab work shows. Of course, if it’s
the weekend, this may be compounded by the fact that your partner’s
checkout list is completely illegible or, worse, lost somewhere in your trunk
or laundry basket. Now imagine doing all this without the assistance of caffeine, as of course, the coffee cart is closed on Saturday mornings.
As a patient care provider, nothing seems more desirable than a handheld computer that manages all the data collection, note writing, and paperwork hassles. Now, imagine being able to do all this while walking into
the hospital from the parking lot (this might allow time to stop somewhere
for a cup of coffee). Indeed, current handheld technology begins to chip
away at the current inefficiencies of medical record keeping, and lays the
groundwork for what is rapidly becoming a reliable, secure, timesaving
development. Certainly, as institutional capabilities advance, using these
record-keeping devices will be natural extensions of the electronic medical
record. There are programs for nearly every specialty, and all the basic programs can be tailored to individual practice preferences.The range of capacity goes from a simple census and “To Do” list to widely configurable
platforms with multiple preset pull-down menus. The specialty-specific software often includes a combination of coding and tracking as well.
Palm OS and Pocket PC units have many similar offerings. For the purposes of this discussion, we’ll look at one premade program for the Palm
OS that is currently one of the most widely used. It is freeware, which is not
an indication of its value; in fact, it seems to be among the most versatile
programs available at this time. We also show you a roundup of all the
various programs available for Palm and Pocket PC handhelds so that you
can get rid of your index cards and start tracking patients using your handheld computer.
97
98
A. Price
The Basics of Keeping Track of Mrs. Jones: Formats for
Patient Trackers
There are two kinds of software for patient tracking: stand-alone programs
or database templates. The database templates are exactly what they sound
like—veritable tabulae rasae that require some work on the front end to
make them what you want. HanDBase is one of the easiest database programs to use for this type of project. The software is available for both Palm
and Pocket PC platforms and can be downloaded at www.handbase.com.
We show you in Chapter 17 how to build a simple procedures log using
this program, and you can also build your own patient tracker using the
same basic skills. Other database programs are covered in more detail in
Chapter 11.
The stand-alone programs also run the gamut of flexibility and capacity
for customization, but are ready to use out of the box. Many are specific to
a certain specialty, thus requiring little in the way of input for basic record
keeping.The more general patient-tracking programs out there have similar
format:
•
•
•
•
•
A patient census
Individual patient data
Location
Medications, labs, vital signs, studies, problem list, notes
“To do” list
Depending on the other interfaces your handheld has, and the hospital
information technology infrastructure where you practice, patient tracking
on handhelds can range from complete manual input to generally “pushed”
data that come magically from central databases every time you synchronize or enter the hospital’s wireless network (if you’re lucky enough to have
one). Many of these programs can be linked into any hospital’s legacy information databases (for a small fee, of course). Table 5.1 lists some common
handheld programs for patient tracking, for Pocket PC and Palm handhelds.
Palm OS Software
PatientKeeper Personal is a Palm application that is a fun and fairly
straightforward system for managing your patient list. It is one of the most
versatile systems, and the most complex! It uses an open platform centered
around a patient list that allows you to add programs from other developers. It comes with “modules” that run databases for labs, tests, notes,
etc. The personal version is a free download available at the PatientKeeper
website, www.patientkeeper.com. Look for the demos: they are a good
introduction to the desktop systems that augment these packages tremen-
Chapter 5. Patient Records
99
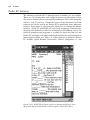
Table 5.1. Palm OS and Pocket PC Programs for patient record keeping.
Software name
{
PatientKeeper
PocketPractitioner
2002
WardWatch
Patient Tracker
Mobile MedData
Charts
Desktop
version
Palm
OS
+
+
+
+
+
+
+
+
+
DOXUITE
Quick Rounds
Noteworthy Clinical
Companion 2.2
Pocket
PC
+
+
+
+
+
Cost
Site
Free
$69.00
patientkeeper.com
PalmGear.com
$29.95
Free
$49.00 for
handheld;
$599.00 for
desktop
$49.00
$19.95
$69.00
pdaMD.com
handheldmed.com
medcomsys.com
Handango.com
medicalpocketpc.com
medicalpocketpc.com
dously. There is also a user manual that is downloadable in PDF format; the
following discussion should clarify much of their text.
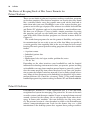
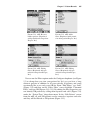
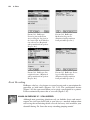
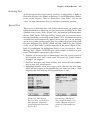
Getting Started: Logon Screens and the Mobile Patient Index
Select the PatientKeeper icon from the application/launch screen of your
Palm (Figure 5.1). The main page in PatientKeeper is called the mobile
patient index, or mPI, which is your patient census (Figure 5.2). From here,
you enter or select an individual patient and start rolling. This is also the
Figure 5.1. PatientKeeper
icon, Palm home page.
(Reprinted with permission
from patientKeeper, Inc.)
Figure 5.2. Mobile patient
index screen (patient census).
Tap on the menu bar at the
top to access pull-down
menus. (Reprinted with permission from patientKeeper,
Inc.)
100
A. Price
screen from which patient information is shared with other users via beaming or printing. Filters can be applied to the patient list so that only certain
populations pop up for a given selection, and patients can be sorted from
this screen into various categories. PatientKeeper is based on several
modules centered around each patient, from notes to labs to demographic
data. Everything is accessed from this mPI page.
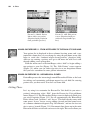
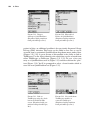
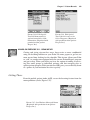
Hands Off! Logon Security
With all the Health Insurance Portability and Accountability Act (HIPAA)
regulations and confidentiality needs of medical record keeping, it’s a good
idea to make the use of your device secure. PatientKeeper has a security
code option. From the mPI screen, tap on the menu bar at the top (Figure
5.2, circled) to access the pull-down menus (Figure 5.3). Under “Configure,”
go to “User Settings” and type in your username. You’ll be “queried” about
setting a password on next startup; say “yes,” and then the next time you
boot up PatientKeeper, you will enter a PIN that you need to remember.
PatientKeeper has a few additional preferences for programming and
memory use.
Memory Use
PatientKeeper has an optional Cache Framework component that maintains information from the program in memory even when the program
itself is not being used; this increases the speed of starting the program, but
requires extra memory. To use the feature, access the Menu pulldown as
above. Under “Configure,” go to “Framework Preferences” (Figure 5.4), and
select “Cache Framework.”
Figure 5.3. User Settings.
(Reprinted with permission
from patientKeeper, Inc.)
Figure 5.4. Preferences for
memory use. (Reprinted with
permission from patientKeeper, Inc.)
Chapter 5. Patient Records
101
Power Users Tip
This feature must be unchecked if you need to install a new version onto
your Palm at a later time, or if you want to add new modules as they come
out. The other selection in this screen allows all the modules to be booted
up at startup, making it faster to use the program once you are in it (but
slower to start). This feature cannot be used if Cache Framework is
enabled.
Power Users Tip
If you toggle frequently between programs on your Palm during the day,
use the Cache Framework setting, but if you get into PatientKeeper and
stay there while you’re rounding, the extra time on the front end to boot
up the modules saves you a lot of time while you’re in the program.
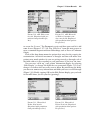
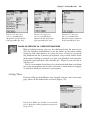
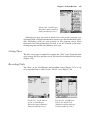
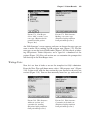
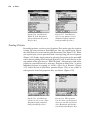
Programming Preferences
This feature allows you to make advanced programming options in the
NoteKeeper module, linking data from individual modules such as vitals or
test results to daily notes. Access this from the NoteKeeper screen (Figure
5.5). Use the Menu Pulldown (Figure 5.6), and choose “Options,” then
“Preferences.” Select the box for Advanced Mode (Figure 5.7) then tap OK.
For the hands-on exercises in the rest of this chapter, we highly recommend that you download a demo version of Patientkeeper (if you have a
Palm handheld, of course), and try these tasks yourself.
Figure 5.5. Programming in
advanced mode. Access this
feature via the NoteKeeper
module. (Reprinted with permission from patientKeeper,
Inc.)
Figure 5.6. In NoteKeeper
mode, choose Preferences.
(Reprinted with permission
from patientKeeper, Inc.)
Figure 5.7. Preferences:
Advanced mode. (Reprinted
with permission from patientKeeper, Inc.)
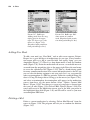
102
A. Price
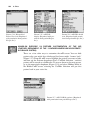
Figure 5.8. Mobile Patient
Index: Add a new patient.
(Reprinted with permission
from patientKeeper, Inc.)
Figure 5.9. mPI: Edit patient
screen. (Reprinted with permission from patientKeeper,
Inc.)
HANDS-ON EXERCISE 5.1. FROM NOTECARDS TO THE PALM OF YOUR HAND
Your patient list is displayed in three columns: location, name, and a customizable column that you can change by using the pull-down arrow (this
helps to avoid that “confused where-are-my-patients” physician look).
After we try entering a patient, we’ll get to the more fun stuff. Let’s walk
through adding a new patient first.
From the main screen of PatientKeeper, select “Add” to begin adding a
new patient to your list (Figure 5.8). The “Edit Patient” screen appears
(Figure 5.9), where you can either type data in or use drop-down menus
that you have customized to enter patient information.
HANDS-ON EXERCISE 5.2. HIERARCHICAL PICKER
PatientKeeper uses the interestingly named Hierarchical Picker as the basis
for editing and customizing pull-down menus for each field. In entering
patient data, you first notice it in the Last Name field.
Getting There
Let’s try using it to customize the Reason For Visit field. As you enter a
patient’s information, select “Edit” from the Reason for Visit pull-down
menu (Figure 5.10). The Hierarchical Picker screen is displayed, which gives
you several options (Figure 5.11). For all customization, the Hierarchical
Picker allows both “branches” and “leaves.” This field already comes with
some preset “leaves,” but we can try adding a branch and then some leaves
of a common admission diagnosis. Tap “New Branch,” and use the free text
site to enter a branch (Figure 5.12). Pneumonia then shows up in the main
Hierarchical Picker screen with an arrow to the right. This arrow allows you
Chapter 5. Patient Records
Figure 5.10. mPI: Edit reason
for visit. (Reprinted with permission from patientKeeper,
Inc.)
103
Figure 5.11. mPI: Hierarchical Picker: Customize your
data entry fields. (Reprinted
with permission from patientKeeper, Inc.)
to access the “Leaves.” Tap Pneumonia again, and then open, and let’s add
some leaves (Figures 5.13, 5.14). Tap “New Leaf” from the main screen to
enter a common diagnosis without subheadings, such as Fever of Unknown
Origin.
Each of the drop-down menus for patient data entry has the capacity for
customization. An initial investment of thought and time will make later
patient entry much quicker. As you are getting started, go through each of
the fields and set it up according to your preference, if you have the time.
You can now “clean up” your patient information display by selecting
“Edit Display” to change the fields that are presented (Figure 5.15). Let’s
change it to reflect what we really want to know. By unselecting the fields,
you decrease unnecessary information and fields you have to scroll through
(Figure 5.16). Finally, tapping OK on the Edit Patient display gets you back
to the mPI where you see your list (growing!).
Figure 5.12. Hierarchical
Picker: New branch.
(Reprinted with permission
from patientKeeper, Inc.)
Figure 5.13. Hierarchical
Picker: New leaf. (Reprinted
with permission from patientKeeper, Inc.)
104
A. Price
Figure 5.14. Hierarchical
Picker: New leaf. (Reprinted
with permission from patientKeeper, Inc.)
Figure 5.15. mPI: Edit
display. (Reprinted with permission from patientKeeper,
Inc.)
Figure 5.16. mPI: Edit details
view. (Reprinted with permission from patientKeeper, Inc.)
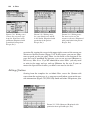
HANDS-ON EXERCISE 5.3. FURTHER CUSTOMIZATION OF THE MPI
(FURTHER REFINEMENT OF THE “CONFUSED-WHERE-ARE-MY-PATIENTS”
AVOIDANCE SYSTEM)
There are a few other ways to customize the mPI screen. You can hide
patients who you might have discharged but know might “bounce back”
(Figure 5.17). From the mPI screen, highlight the patient you want to hide,
and then tap the Patients dropdown. Select “Un/Hide Selection,” and that
patient will be stored on a hidden list. To recover them to the main screen,
go to the upper-right dropdown (Figure 5.18) and select Hidden. While in
the Hidden mPI screen, selecting the Un/Hide Selection will put that
patient back in your active list.
Figure 5.17. mPI: Un/Hide patients. (Reprinted
with permission from patientKeeper, Inc.)
Chapter 5. Patient Records
Figure 5.18. mPI: Recover
hidden patient. (Reprinted
with permission from patientKeeper, Inc.)
Figure 5.19. mPI: Add a
filter. (Reprinted with permission from patientKeeper, Inc.)
Figure 5.20. mPI: Editing
filters. (Reprinted with permission from patientKeeper,
Inc.)
Figure 5.21. mPI: Editing
filters. (Reprinted with permission from patientKeeper,
Inc.)
105
You can use the Filters option under the Configure dropdown (see Figure
5.3) to change how you view your patient list. Let’s say you have a busy
obstetric practice in addition to all your critically ill patients, and you’d
occasionally like to see only your OB list. From “Edit Filters,” tap “Add”
(Figure 5.19) and then, on the “Edit a Filter” screen, highlight “Unnamed
Filter” and type OB (Figures 5.20, 5.21). By editing the filter properties, you
can identify OB patients by calling them inpatient and other (Figure 5.22)
under the “Patient Type” drop-down menu. In the “Edit Patient” screen
from the mPI, all your OB patients can be entered as inpatient and other
and they will be filtered as OB patients (Figure 5.23).
106
A. Price
Figure 5.22. mPI: Identifying
patients for a new Filter.
(Reprinted with permission
from patientKeeper, Inc.)
Figure 5.23. mPI: When
entering patient data in the
mPI, use the identifiers shown
to select them for your new
filter. (Reprinted with permission from patientKeeper, Inc.)
HANDS-ON EXERCISE 5.4. EXPLORING MODULES: WHAT, WHERE, AND
WHEN SANS PAPER
The modules in PatientKeeper are a smorgasbord of data. There are 14 possible features that you can display, 8 of which can be accessed at any time
from the toolbar at the bottom of the mPI. Learning the symbols is fairly
intuitive. Edit the modules on the toolbar by visiting the “Configure” dropdown menu (Figure 5.24). Learn what the individual icons in this display
mean (Figure 5.25) by tapping the “Information” button (i) at the upper
right corner of the screen (Figure 5.26).
Figure 5.24. mPI: Edit
module display. (Reprinted
with permission from patientKeeper, Inc.)
Figure 5.25. mPI: Edit
module display. (Reprinted
with permission from patientKeeper, Inc.)
Chapter 5. Patient Records
107
Figure 5.26. mPI: Information about the icons
in the Edit module display. Access from the
icon in the upper right corner of the screen.
(Reprinted with permission from patientKeeper,
Inc.)
Power Users Tip
Be careful when you’re in this editing site: the “Remove” feature deletes
modules from the program, and will clear the contents of any stored patient
data in that module! You can add the module back, but this requires rebooting the whole program.
HANDS-ON EXERCISE 5.5. DIAGNOSISKEEPER: THE PROBLEM LIST
Sally “I-think-I’m-in-labor-again” Smith is finally admitted and is in active
labor. As you admit her, use the DiagnosisKeeper to house an active
problem list and link to tasks (Figure 5.27). DiagnosisKeeper allows you to
enter free text or to select from drop-down menus (Figure 5.28). For this
Figure 5.27. DiagnosisKeeper main screen.
(Reprinted with permission
from patientKeeper, Inc.)
Figure 5.28. New diagnosis:
Tap “New,” then enter free
text. (Reprinted with permission from patientKeeper, Inc.)
108
A. Price
Figure 5.29. DiagnosisKeeper: QuickProblems.
(Reprinted with permission
from patientKeeper, Inc.)
Figure 5.30. Hierarchical
Picker of QuickProblems.
(Reprinted with permission
from patientKeeper, Inc.)
patient in labor, an additional problem is her previously diagnosed Group
B Strep (GBS) infection. This factor can be added as free text, or can be
accessed from a customized QuickProblem drop-down menu, under labor
(Figures 5.29, 5.30). A great feature of this module is the ability to link to
TaskKeeper. Use the box to identify tasks, which then can be accessed from
either TaskKeeper or DxKeeper (Figures 5.31, 5.32). To save a free text
entry as a QuickProblem, enter it (Figure 5.33) and then click on the “plus”
icon (Figure 5.34). You’ll be prompted to select a branch under which to
store the new QuickProblem leaf (Figure 5.35).
Figure 5.31. Link to
TaskKeeper using the check
box in the Problem Edit
screen. (Reprinted with permission from patientKeeper,
Inc.)
Figure 5.32. View tasks from
TaskKeeper module, as
entered in DxKeeper.
(Reprinted with permission
from patientKeeper, Inc.)
Chapter 5. Patient Records
Figure 5.33. Store free
text as a QuickProblem.
(Reprinted with permission
from patientKeeper, Inc.)
Figure 5.34. Store free
text as a QuickProblem.
(Reprinted with permission
from patientKeeper, Inc.)
109
Figure 5.35. Store free
text as a QuickProblem.
(Reprinted with permission
from patientKeeper, Inc.)
HANDS-ON EXERCISE 5.6. PRESCRIPTIONKEEPER
Billy-everything-is-wrong, who was just discharged from his most recent
200+-day inpatient hospitalization, is on the phone. As the funny sinking
feeling in your chest mounts, he relates the story of how his overjoyed
dog slobbered on the 30 written prescriptions you gave him and he needs
them redone. Smiling to yourself, you open your handheld and remember
how much you hated these calls 6 months ago: “Where do you want me to
call these in?”
This is a neat module that allows you to track meds, link them to problem
lists, write prescriptions, and record events such as when meds are stopped
or started or when you last wrote a prescription.
Getting There
From the mPI, tap the RxKeeper icon (circled) and you come to the main
page, where all the medications are listed (Figure 5.36).
Figure 5.36. RxKeeper: Toolbar icon and main
screen. (Reprinted with permission from patientKeeper, Inc.)
110
A. Price
Figure 5.37. RxKeeper:
Adding meds. Note the magnifying glass in the upper
right. Use that to get to the
macro (see Figure 5.39).
(Reprinted with permission
from patientKeeper, Inc.)
Figure 5.38. RxKeeper: Pulldown menus of common
meds. (Reprinted with permission from patientKeeper, Inc.)
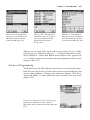
Adding New Meds
To add a new med, tap “New Med,” and an edit screen appears. PatientKeeper has a great database of medications. As you type, several medication names will try to fill in your Rx field. Just typing “Amp” gets you
Ampicillin (Figure 5.37). There is a drop-down menu as well for common
meds (Figure 5.38). From the medication edit screen, a searchable macro is
accessed from the magnifying glass at the upper right. Enter the med name
to access the alphabetical list (Figure 5.39a). This is a handy dosing guide
for many common medications. You cannot add medications to the list, but
you can alter the dosing regimen to suit your style. Let’s say you generally
order acetaminophen as a PRN for patients. Under the standard listing, the
dose is 325 mg. To change this to 650 mg, go to the macro (see Figure 5.39a),
and select acetaminophen. Acetaminophen will appear in the medication
screen; from here, tap the menu button. Select “Update Current Med
Macro” (Figure 5.39b). You then get a screen of categories to choose from
that you can edit (Figure 5.39c). Select PRNs, Tylenol (Figure 5.39d). The
screen will revert to the Medication screen; type in the dose you prefer in
the highlighted dose field (Figure 5.40) and this will be saved as your new
acetaminophen PRN dose.
Deleting a Med
Delete a current medication by selecting “Delete Med Record” from the
screen in Figure 5.39b. The program will ask you to confirm the deletion
(Figure 5.41).
Chapter 5. Patient Records
Figure 5.39a. RxKeeper:
Search medications with a
dosing guideline. (Reprinted
with permission from patientKeeper, Inc.)
Figure 5.39b. RxKeeper:
Select Update Med Macro.
(Reprinted with permission
from patientKeeper, Inc.)
Figure 5.39c. RxKeeper:
Update Med Macro. Customize PRN order set.
(Reprinted with permission
from patientKeeper, Inc.)
Figure 5.39d. RxKeeper:
Update Med Macro. Choose
PRNs. (Reprinted with permission from patientKeeper,
Inc.)
Figure 5.40. RxKeeper:
Screen reverts to Medication
screen. Customize highlighted
dose. (Reprinted with permission from patientKeeper, Inc.)
Figure 5.41. RxKeeper:
Delete med from Macro.
(Reprinted with permission
from patientKeeper, Inc.)
111
112
A. Price
Figure 5.42. RxKeeper:
Event log for medications.
Access using the Log icon in
the lower right of the Medication edit screen. (Reprinted
with permission from patientKeeper, Inc.)
Figure 5.43. RxKeeper:
Medication Log screen.
(Reprinted with permission
from patientKeeper, Inc.)
Figure 5.44. RxKeeper: Prescription feature. (Reprinted
with permission from patientKeeper, Inc.)
Figure 5.45. RxKeeper: Event
log of an Rx dispensation.
(Reprinted with permission
from patientKeeper, Inc.)
Event Recording
RxKeeper also has a log feature to record events such as prescription dispensation or hold times (Figures 5.42, 5.43). The prescription feature
(Figure 5.44) lets you record when you’ve given a prescription to a patient.
It then automatically stores this as an event (Figure 5.45).
HANDS-ON EXERCISE 5.7. VITALSKEEPER
Although most practicing physicians rely on bedside charts and nurse’s
reports for vital signs, hark back to your days as a medical student when
not having the excruciating details of each and every vital would be your
downfall during “Dr. Jones-the-nasty-attending-pimping-rounds.”
Chapter 5. Patient Records
113
Figure 5.46. VitalsKeeper.
(Reprinted with permission
from patientKeeper, Inc.)
Although you may not want to hand enter vitals in the program, synchronizing with a hospital information system to get this information is possible. Recording vitals for your patients in this program serves many
functions. Once this information is stored, it can be accessed by the notewriting program and directly linked to your text.
Getting There
The data entry page is found after tapping the “New” icon. From the main
vitals screen, the date and data can be accessed by scrolling with the arrows
(Figure 5.46).
Recording Vitals
Tap “New” in the VitalsKeeper main module screen (Figure 5.47), or tap
on a recorded item to edit it in the “Detail” view (Figure 5.48).
Figure 5.47. Scroll with the
arrows in VitalsKeeper.
(Reprinted with permission
from patientKeeper, Inc.)
Figure 5.48. VitalsKeeper:
Edit in the Detail View.
(Reprinted with permission
from patientKeeper, Inc.)
114
A. Price
HANDS-ON EXERCISE 5.8. LABKEEPER: HAVING FUN BEING A GEEK
Similar to VitalsKeeper, this is one feature that will certainly delight
the most obsessive-compulsive medical students. Of course, if these data
were uploaded automatically, any physician would welcome it with open
arms.
In the LabKeeper module, patient labs can be entered into standardized panels, which are then displayed by date from the main screen
of the module. Once again, the information from this module will be
accessible for the note-writing function, so you never have to write things
twice!
Getting There
From the mPI, access LabKeeper from the pull-down menu. In the
main screen, labs can be viewed in simple list form (Figure 5.49), or a
more detailed view can be accessed from this screen (Figure 5.50).
This is a feature similar to the DxKeeper main screen. To toggle between
these, simply click the box in the lower-left corner of the screen (Figure
5.50).
New Patient Entry
Data entry is very straightforward. From the New Panel pulldown in the
main screen of LabKeeper, select the type of lab to be added (Figure 5.51).
Enter the data either by tapping on the part of the stick diagram where the
information goes or by using the written prompts (Figure 5.52). Once entry
is complete, click “Done” to return to the main screen.
Figure 5.49. LabKeeper:
Main module screen.
(Reprinted with permission
from patientKeeper, Inc.)
Figure 5.50. Details View of
LabKeeper. Toggle using the
icon in the lower left corner
of the screen. (Reprinted with
permission from patientKeeper, Inc.)
Chapter 5. Patient Records
Figure 5.51. LabKeeper: Add
a new lab. (Reprinted with
permission from patientKeeper, Inc.)
115
Figure 5.52. LabKeeper:
Enter lab values on the stick
figure or on the line.
(Reprinted with permission
from patientKeeper, Inc.)
Editing Patient Data
Once data are recorded, editing is possible by selecting the lab to be edited
from the main LabKeeper screen. Once you are in the panel view, click on
the pencil icon at the bottom of the screen (Figure 5.53) so that the red line
is not apparent in the box; this transforms the lab from a read-only screen
to one that can be edited.
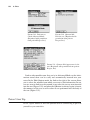
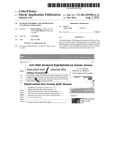
Highlighting Important Labs
While still in the panel view, you can highlight or annotate labs that will
make it obvious in the main LabKeeper screen. To do this, you can’t be in
edit mode, so make sure that the pencil icon at the bottom of the screen
has the red line through it. From the Panel view, click on the result you want
to highlight (Figure 5.54); this will take you to a Result page in which you
Figure 5.53. LabKeeper:
Pencil icon. Change from
read-only to edit mode.
(Reprinted with permission
from patientKeeper, Inc.)
Figure 5.54. LabKeeper:
Flagging important labs
by highlighting the lab.
(Reprinted with permission
from patientKeeper, Inc.)
116
A. Price
Figure 5.55. LabKeeper:
Click on the flag to mark it as
important. (Reprinted with
permission from patientKeeper, Inc.)
Figure 5.56. LabKeeper: Use
the annotation pulldown to
make notes. (Reprinted with
permission from patientKeeper, Inc.)
can click on the flag to note importance, or use the pulldown at the bottom
to enter any pertinent data (Figures 5.55, 5.56). Any lab highlighted as
important will then move to the top of the list (Figure 5.57).
Deleting Patient Data
Labs are also deleted from the panel view. Click on the menu button (Figure
5.58) to a pulldown where you can select Delete Panel.
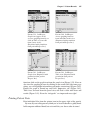
Graphing Patient Data
This module’s most respectable feature is graphing, but it also has a table
form for those of you who remain unimpressed. Can you believe it? You
can look at the sodium rise and fall in fantastic detail. To use the graphing
Figure 5.57. LabKeeper:
Main screen view with important lab flagged. (Reprinted
with permission from patientKeeper, Inc.)
Figure 5.58. LabKeeper:
Delete a lab from the list.
(Reprinted with permission
from patientKeeper, Inc.)
Chapter 5. Patient Records
Figure 5.59. LabKeeper:
Graph icon (upper circle)
accesses graphing function, or
click on Table to view table
form (lower circle).
(Reprinted with permission
from patientKeeper, Inc.)
Figure 5.60. LabKeeper:
Access graphing function
from individual result view.
(Reprinted with permission
from patientKeeper, Inc.)
Figure 5.61. LabKeeper:
Graph view. (Reprinted with
permission from patientKeeper, Inc.)
Figure 5.62. LabKeeper:
Table view. (Reprinted with
permission from patientKeeper, Inc.)
117
function, click on the graph icon from the panel view (Figure 5.59). You can
also view the graphing feature by clicking on the result itself (the same page
where you can highlight information and make annotations) (Figure 5.60).
Finally, the graph is booted up and Voila! Impressive, eh? (Figure 5.61).
Table view, accessed from the panel view, will load a table with dates and
results (Figure 5.62). Even the “infogeeks” are impressed now, right?
Printing Patient Data
Print individual labs from the printer icon in the upper right of the panels.
By now, all your colleagues may think you’ve been reduced to a giddy handheld computer-addicted fiend, but wait until they see these other features!
118
A. Price
Figure 5.63. ProcedureKeeper: Access from the mPI
pulldown. (Reprinted with
permission from patientKeeper, Inc.)
Figure 5.64. Access ProcedureKeeper from the Toolbar.
(Reprinted with permission
from patientKeeper, Inc.)
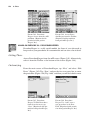
HANDS-ON EXERCISE 5.9. PROCEDUREKEEPER
ProcedureKeeper is a really useful module for those of you who need to
keep track of your procedures. It is customizable and can store a lot of detail.
Getting There
Access ProcedureKeeper from the mPI screen (Figure 5.63). Alternatively,
select it from the Toolbar at the bottom of the screen (Figure 5.64).
Customizing
From the main screen of ProcedureKeeper, tap “New,” and select “Edit
Procs.” (Figure 5.65). Tap “New,” and use the free text entry line to enter
the procedure (Figure 5.66). Tap “Add,” and then you will be asked to enter
Figure 5.65. ProcedureKeeper: To Edit Procedures
from the main screen, tap
“New.” (Reprinted with permission from patientKeeper,
Inc.)
Figure 5.66. ProcedureKeeper: Use “Add” enter a
new procedure in the Proc.
Field. (Reprinted with permission from patientKeeper, Inc.)
Chapter 5. Patient Records
Figure 5.67. ProcedureKeeper: Enter Fields regarding procedure that you want
to track. (Reprinted with permission from patientKeeper,
Inc.)
119
Figure 5.68. ProcedureKeeper: Also track numeric
fields. (Reprinted with permission from patientKeeper, Inc.)
a field, which is any information about the procedure that you wish to
record, such as Attending physician, which is a Text entry (Figure 5.67), or
Date, which is a Numeric entry (Figure 5.68). Although you are editing your
procedure list within an individual patient area, the list is available for any
patient in your census.
Entering Procedures
Once you have entered your procedures and fields, select the patient for
whom you will record a procedure. Tap “New,” and select the procedure
you’ve done. The screen will then come up with the name of the procedure
and the fields that you already entered (Figure 5.69). From here, you can
either manually enter data in a free text screen, by tapping the + sign to the
right of the center column, or you can access a Hierarchical Picker and enter
Figure 5.69. ProcedureKeeper: Screen view of
the newly entered procedure. (Reprinted with
permission from patientKeeper, Inc.)
120
A. Price
Figure 5.70. ProcedureKeeper: Tap Summary to
enter details of the procedure
in a Hierarchical Picker.
(Reprinted with permission
from patientKeeper, Inc.)
Figure 5.71. ProcedureKeeper: Delete a procedure.
(Reprinted with permission
from patientKeeper, Inc.)
common themes (Figure 5.70). See the tutorial for the Hierarchical Picker
(Hands-on Exercise 5.2) for more information.
Deleting Procedures
Delete a procedure from the patient’s list by selecting it from the main
screen in ProcedureKeeper. Tap the Menu pulldown, then choose “Delete
Record” (Figure 5.71).
TestKeeper
TestKeeper is straightforward and allows you to input data that can be
viewed in list format with a brief summary of results. It can also be linked
to your notes.
Getting There
Select from the mPI toolbar or the pulldown menu to the bottom right of
the mPI screen (Figure 5.72).
Customizing Tests
Select “New” from the main TestKeeper screen, and then select “Edit Tests”
(Figure 5.73). In the Tests screen, you can add a new test and specify other
fields of information pertinent to that test.
Chapter 5. Patient Records
Figure 5.72. TestKeeper:
Access from the mPI pulldown. (Reprinted with permission from patientKeeper,
Inc.)
Figure 5.73. TestKeeper: Edit
a test. (Reprinted with permission from patientKeeper,
Inc.)
Figure 5.74. TestKeeper: Add
a new test and access the
drawing feature. (Reprinted
with permission from patientKeeper, Inc.)
Figure 5.75. TestKeeper:
Use the drawing feature.
(Reprinted with permission
from patientKeeper, Inc.)
121
Adding Tests
From the main module screen of TestKeeper, select “New,” and then pick
a test from the pull-down menu (Figure 5.74). What follows is another of
those features in this software that will delight the gadget geeks: the
drawing feature (Figure 5.75).
Power Users Tip
Remember that as in the ProcedureKeeper module, once the Test is added,
there will be a Summary field with a Hierarchical Picker in which you can
enter other data. For instance, if a V/Q scan is ordered, in the Edit mode,
122
A. Price
you enter Probability, and then in the Summary Hierarchical Picker, enter
Low, Intermediate, or High (see the tutorial on Hierarchical Pickers earlier
in this chapter).
HANDS-ON EXERCISE 5.10. NOTEKEEPER: GETTING THE MOST OUT OF
DOING THE LEAST
Notes in PatientKeeper are combinations of pull-down menus and free text
entry that can make quick work of admission and SOAP note writing once
you’ve customized your data sets. All the data entered in other modules can
be accessed from the NoteKeeper for your notes by using links. Your free
text entry can be augmented by Qbuttons, which are customizable text
buttons that allow common word entry by a simple tap of a button.
Getting There
From the mPI, access the NoteKeeper from the icon (Figure 5.76).
Editing Note Types
From the main screen in NoteKeeper, you can create and delete note types
by using the Menu button on your Palm (Figures 5.77, 5.78). The program
comes with the standard note types: Admit, H&P, and Progress Note.
Depending on your practice, you can make detailed note types with links
to data that are very specific to your work. (See the following step-by-step
explanation.)
Getting back to our patient Sally “I-think-I’m-in-labor-again” Smith, let’s
make a note format for her admission. From the main NoteKeeper page,
tap the Menu pulldown. Select “Edit Note Types” under Options. A list of
current note types is shown; to add a note, choose “Add” (see Figure 5.78).
Figure 5.76. NoteKeeper:
Access from the mPI Toolbar.
(Reprinted with permission
from patientKeeper, Inc.)
Figure 5.77. NoteKeeper:
Access the Edit Note Types
feature. (Reprinted with permission from patientKeeper,
Inc.)
Chapter 5. Patient Records
Figure 5.78. NoteKeeper:
Select “Add” to make a new
note type. (Reprinted with
permission from patientKeeper, Inc.)
123
Figure 5.79. Edit Structure:
Making a new note type.
(Reprinted with permission
from patientKeeper, Inc.)
An “Edit Structure” screen appears, and you can choose the note type you
want to make. We’re making an OB progress note (Figure 5.79). For this
note type, we use the basic SOAP format (Figure 5.80) but tailor it to laboring OB patients. Under Subjective, we’ve typed in a thumbnail of the
patient (Figure 5.81). For each section, we can customize the prompts that
will show up in the NoteKeeper view.
Writing Notes
Now, let’s see how it looks as we use the template for Sally’s admission.
From the Note Type pull-down menu, select “OB progress note” (Figure
5.82). It then starts with the first section that you entered in the note you
created (Figure 5.83). You can then manually insert her age and weeks of
Figure 5.80. Edit Structure:
Add new sections and
customize the wording.
(Reprinted with permission
from patientKeeper, Inc.)
Figure 5.81. Edit Structure:
Customize the default text.
(Reprinted with permission
from patientKeeper, Inc.)
124
A. Price
Figure 5.82. Writing notes:
Choose the new note type
from the New Note menu
pulldown. (Reprinted with
permission from patientKeeper, Inc.)
Figure 5.83. Writing notes:
See your default text and fill
in the blanks. (Reprinted with
permission from patientKeeper, Inc.)
Figure 5.84. Writing notes:
For next section, use the
arrows to advance. (Reprinted
with permission from patientKeeper, Inc.)
gestation. By tapping the arrow in the upper right, corner of the screen you
advance to the next section (Figure 5.84). In this screen, you can use Qbuttons to speed up the text entry. These are the fields at the bottom of the
page that can be modified. For instance, you can set up your QButtons so
that to say “Mrs. S is a 39 yo WF admitted in active labor” you only need
to write in the name and age, and tap QButtons for the rest. If you can
master the Special Text feature, you don’t even need to do that!
Editing Qbuttons
Starting from the template for an Admit Note, access the Qbutton edit
screen from the section page (e.g., progress record) where you want the specific information (Figure 5.85). For Sally Smith and other OB patients, your
Figure 5.85. Edit Qbuttons. (Reprinted with
permission from patientKeeper, Inc.)
Chapter 5. Patient Records
Figure 5.86a. Edit Qbuttons:
Enter free text for Button #1.
(Reprinted with permission
from patientKeeper, Inc.)
Figure 5.86b. Edit Qbuttons:
Customize your text to speed
data entry. (Reprinted with
permission from patientKeeper, Inc.)
125
Figure 5.87. Edit Qbuttons:
Main screen view of Qbutton
text. (Reprinted with permission from patientKeeper, Inc.)
QButton set can really make short work of note writing. Up to 11 Qbuttons per page (i.e., Subjective, Objective . . .) can house short bursts of text.
Select “Button #1,” and an Edit Button screen (Figure 5.86a) appears. Put
a “+” in, which can then be inserted into the programmed text of the section
(Figures 5.86b, 5.87).
Advanced Programming
You’ll note that in the Edit Qbutton screen there is an icon for inserting a
Link. To access this feature, go back to the main screen of NoteKeeper and
use the menu pulldown to change your preferences (Figure 5.88). Select
“Advanced Mode” to insert links from other modules into your notes
(Figure 5.89).
Figure 5.88. Preferences: Go to advanced programming to add links to other modules.
(Reprinted with permission from patientKeeper,
Inc.)
126
A. Price
Figure 5.89. Preferences:
Check Advanced Mode.
(Reprinted with permission
from patientKeeper, Inc.)
Figure 5.90. Qbutton link:
Pick the test. (Reprinted with
permission from patientKeeper, Inc.)
Figure 5.91. Qbutton link: Appearance in the
text. (Reprinted with permission from patientKeeper, Inc.)
Link to other modules now that you’re in Advanced Mode so that information stored there can be easily and automatically inserted into your
notes. In the Edit Qbutton mode, the link to the right of the screen allows
you to select the module from which you want to link information. In our
case we want to link to an ultrasound, so we select the test we want inserted
into the text (Figure 5.90), and when the QButton is selected again, it inserts
the summary of the test as well as when it was performed into the body of
the text (Figure 5.91).
Power Users Tip
Leave a space before or after the Qbutton text to avoid having to put it in
yourself as you enter data.
Chapter 5. Patient Records
127
Inserting Text
At the bottom of the section screens, you have an opportunity to build an
Hierarchical Picker. (See Hands-on Exercise 5.2 on the Hierarchical Picker,
earlier in this chapter.) Click on “Insert Text,” then “Edit,” and use the
“trees” to input information that you anticipate frequently entering.
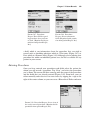
Special Text
This is a way to link other data such as first and last name, age, gender, and
billing information to Qbuttons, not just items in the modules. In the Edit
Qbutton screen, select “Link” (Figure 5.92), and from the pull-down menu,
choose “Edit.” In the “Edit Special Text” screen, now you can enter information about fields you normally track (Figure 5.93a). In this instance, these
are fields that will automatically appear in the note that you are making:
age in years, gender, and reason for visit. Let’s add to the preset fields a link
for other diagnoses. Tap ·LINKÒ, which will add a link to the data (Figure
5.93b). Go to “Edit Links” in the bottom right of the screen (Figure 5.93c).
Link #4 is undefined. By highlighting Link #4, you are asked to “Select
Message Type” (Figure 5.93d). This gets a little complex, so hold on to your
stylus! The modules contain four types of data.
1. Snippets are messages that are unchanging values for a given patient in
this recorded event, such as first name, last name, age, gender. Links 1
through 3 are snippets.
2. Get Data messages come from ancillary data collected in the modules,
such as tests, labs, and diagnoses.
3. Embedded modules allow you to type a new value into the note body,
which will then appear in the module that you linked to, such as a new
diagnosis that then ends up in DiagnosisKeeper as well.
Figure 5.92. Edit Special
Text: Get there via the link in
Edit QButtons. (Reprinted
with permission from patientKeeper, Inc.)
Figure 5.93a. Edit Special
Text: Click Edit Links to customize. (Reprinted with permission from patientKeeper,
Inc.)
128
A. Price
Figure 5.93b. Edit Special
Text: Click <LINK> to add a
link. (Reprinted with permission from patientKeeper, Inc.)
Figure 5.93c. Edit Special
Text: Preset fields. (Reprinted
with permission from patientKeeper, Inc.)
4. Summary Info is printable information that will be used by other
programs.
For the preset fields, the messages should already be set. In the link we
are creating. Let’s use a Get Data message that links additional diagnoses
to the patient’s assessment (Figure 5.93e). This takes you to a screen where
you use the pull-down menu to access the module to which you want to
link (Figure 5.93f). Select DxKeeper, then Selected Diagnoses. After this,
you end up in the Special Text Links page again, where Link #4 shows that
it is “Select Diagnoses” (Figure 5.94).
Figure 5.93d. Edit Special
Text: Select Message Type.
(Reprinted with permission
from patientKeeper, Inc.)
Figure 5.93e. Edit Special
Text: After choosing Get
Data, select module from
which to link information.
(Reprinted with permission
from patientKeeper, Inc.)
Chapter 5. Patient Records
Figure 5.93f. Edit Special
Text: Pull-down menu for
options from which to link
information. (Reprinted with
permission from patientKeeper, Inc.)
129
Figure 5.94. Edit Special
Text: Link #4 is now set for
Select Diagnoses. (Reprinted
with permission from patientKeeper, Inc.)
HANDS-ON EXERCISE 5.11. BEAM ME UP!
Getting and giving sign-out has never been easier or more confidential
using the beaming function on your Palm! No more papers to get lost, no
more wasted time looking for the shredder. This feature allows your Palm
to “talk” to another one equipped with the current PatientKeeper program
and get its data. When you beam, you have the option of sending or receiving lists, small groups or individual patients, and then merging data to
update patient progress.With your infrared (IR) port, you can directly beam
to a printer if your institution has that capacity.
Getting There
From the mobile patient index (mPI), access the beaming feature from the
menu pulldown (circle, Figure 5.95).
Figure 5.95. Send Patients: Menu pull-down.
(Reprinted with permission from patientKeeper, Inc.)
130
A. Price
Figure 5.96. Send Patients:
WHO To Send. (Reprinted
with permission from patientKeeper, Inc.)
Figure 5.97. Send Patients:
Select a new patient to send.
(Reprinted with permission
from patientKeeper, Inc.)
Sending Patients
In sending patients, you have several options. First, make sure the recipient
is using the same version of PatientKeeper. Line up your IR ports. Access
the Send Patient(s) icon from the pull-down menu (see Figure 5.95). When
you tap this icon, you are presented with a screen giving you several options
(Figure 5.96). Send a single patient by selecting that person in the main mPI
screen before pulling down the Send Patient(s) icon. It will then be in the
top window of the selections of “WHO To Send.” Alternatively, send all the
patients in your mPI screen by selecting “Patients in Main View,” or select
individual patients by tapping on “Select a New Set of Patients” (Figure
5.97). Select the box to send those patients (Figure 5.98), or use a filter to
select patients based on properties that you choose (Figure 5.99).
Figure 5.98. Send Patients:
Choose by box, or use a filter.
(Reprinted with permission
from patientKeeper, Inc.)
Figure 5.99. Filter patients:
Use the filters you designated
when you entered raw patient
data. (Reprinted with permission from patientKeeper, Inc.)
Chapter 5. Patient Records
Figure 5.100. Receiving
Patients: Accept prompt.
(Reprinted with permission
from patientKeeper, Inc.)
131
Figure 5.101. Receive
Patients: Select information to
be received. (Reprinted with
permission from patientKeeper, Inc.)
Receiving Patients
To get a patient summary from another user, line up your IR ports, and let
the Palm handhelds “shake hands.” It takes a few seconds to organize the
data, and then your screen will “Query” you about accepting the information (Figure 5.100). Accept the patients, and you will see a screen that lets
you choose which patients you want and what information regarding each
one you wish to store (Figure 5.101).There are three ways of accepting data:
New, Update, and Data-Only (Figure 5.102). For the New option, if you
already have a patient in your list by the same name, selecting New patient
will put that patient on your list twice. In Update mode, the information in
the mPI screen will be changed in addition to the information from the individual modules that are selected. In Data-Only, only the information from
the individual modules will be added.
Figure 5.102. Receive Patients: Select mode of
accepting data. (Reprinted with permission
from patientKeeper, Inc.)
132
A. Price
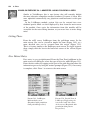
Pocket PC Software
The offerings for Pocket PC’s, although fewer in number, are very similar.
There are a few listings here with regard to patient records software. Now
that you’ve worked your way through PatientKeeper, these other programs
will be a snap. If you have a Pocket PC, many of the documents for Palm
software can also be read by the Pocket PC by purchasing some additional
software. Peacemaker is a program that allows you to transmit documents
between a Palm OS and Pocket PC unit fairly seamlessly. Unfortunately,
the programs themselves cannot be translated yet. HanDBase, one of the
database template-type programs, is available on both the Palm OS and
Pocket PC platforms, and other ready-made software for both platforms is
increasingly available (see Table 5.1). Other software available for Pocket
PC includes Quick Rounds, Noteworthy Clinical Companion 2.2, and
Figure 5.103. DOXUITE program. Quick text buttons prompt data entry.
(Reprinted with permission from Cross Enterprises ON-CALL, INC.)
Chapter 5. Patient Records
133
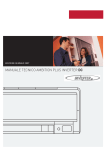
Figure 5.104. DOXUITE program. Data entry fields are shown. (Reprinted with
permission from Cross Enterprises, ON-CALL, INC.)
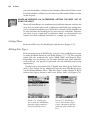
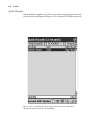
DOXUITE. We’ll look at a few screens of two of these programs so you
can see how they function.
DOXUITE
DOXUITE is a collection of programs that links an information input
program with a calculator and print-friendly module. The text is prompted
by quick buttons of broad-ranging text, which you can then edit (Figure
5.103). Included are all the general components of a history, physical, labs,
and notes (Figure 5.104). It has numbered fields that you can customize to
the right of the screen (see Figure 5.103).
134
A. Price
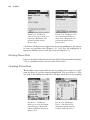
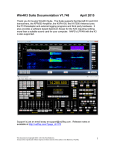
Quick Rounds
Quick Rounds completes the field as an abbreviated program that lists
patient names and diagnoses (Figure 5.105), with an ICD-9 field and several
Figure 5.105. Quick Rounds PC program. Patient list screen with filters.
(Reprinted with permission from SuiteMD)
Chapter 5. Patient Records
135
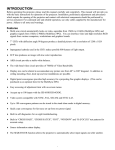
Figure 5.106. Quick Rounds PC program. Pull-down menus grow as you use it
more. (Reprinted with permission from SuiteMD)
other fields that you can customize. It has a handy toolbar with search functions and easy new patient entry. When you enter data, the pull-down menu
remembers what you’ve entered before, making data entry faster as you use
it more (Figure 5.106).
Spend some time doing demos from these and other types of programs
to see which one suits your needs, and then stop wasting all that paper and
time as you begin rounding with your handheld!
136
A. Price
Summary
Well, now you have it. . . . You can finally get rid of those pesky index cards
and start doing all your patient tracking on a handheld computer. In this
chapter, we talked about the various options available for patient tracking
and showed you how to use one of them in great detail. Then, we showed
you patient trackers available for Pocket PC’s, and also an example of a
simple patient tracker that could be used on both Palm and Pocket PC platforms (using HanDBase).