1
COPYRIGHT
1989, RSI. All rights reserved.
TRADEMARKS
The Retailer is a registered trademark of Retail
Software International, LLC (RSI).
COPY AND USE
RESTRICTIONS
Although you are encouraged to make a backup copy of the software for
your own use, you are not allowed to make unlimited copies. The
software is protected by the copyright laws that pertain to computer
software. It is illegal to make copies of the software except for backups.
It is illegal to give copies to another person, or to duplicate the software
by any other means, including electronic transmission. The software
contains trade secrets, and in order to protect them you may not
decompile, reverse engineer, disassemble, or otherwise reduce the
software to human-perceivable form. You may not modify, adapt,
translate, rent, lease, or create derivative works based upon the software
or any part thereof.
The Retailer documentation is furnished exclusively for the user and no
part of the publication may be reproduced, transmitted in any form, or
by any means (electronic, mechanical, photocopying, recording or
otherwise), without prior written permission.
WARRANTY
RSI warrants that the original diskettes are free from defects in material
and workmanship, assuming normal use, for a period of ninety (90) days
from date of purchase. If a defect occurs during this period, you may
return your faulty disk to your point of purchase along with a dated
proof of purchase and it will be replaced free of charge.
EXCEPT FOR THE EXPRESS WARRANTY OF THE ORIGINAL
DISKETTES SET FORTH ABOVE, RSI GRANTS NO OTHER
WARRANTIES, EXPRESS OR IMPLIED, BY STATUE OR
OTHERWISE REGARDING THE DISKS AND RELATED
MATERIALS,THEIR FITNESS FOR ANY PURPOSE, THEIR
QUALITY, THEIR MERCHANTABILITY OR OTHERWISE. IN NO
EVENT SHALL RSI BE LIABLE FOR ANY SPECIAL,
CONSEQUENTIAL OR OTHER DAMAGES FOR BREACH OF
WARRANTY.
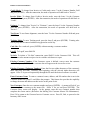
MANUALUPDATED ON 6/12/01
i
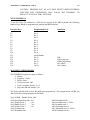
TABLE OF CONTENTS
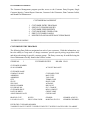
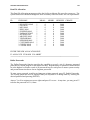
GETTING STARTED .................................................................................................................. v
How The Retailer Works..................................................................................................... v
System Authorization ......................................................................................................... ix
I.
INVENTORY MANAGEMENT.......................................................................................... 1
Inventory Entry Program ......................................................................................... 1
Inventory Adjustment............................................................................................ 15
Single SKU Inquiry ............................................................................................... 16
Print Adjustments Journal ..................................................................................... 17
Inventory Reports Menu........................................................................................ 18
Custom Report Generator...................................................................................... 19
Print Inventory Labels ........................................................................................... 25
Month End and Maintenance Programs ................................................................ 25
Price Maintenance ................................................................................................. 27
Multi-store Control.................................................................................... 26
Extended Price Maintenance................................................................................. 27
Package Maintenance ............................................................................................. 28
Store Kit .................................................................................................... 29
Cross Reference Maintenance ............................................................................... 30
Substitution List Maintenance............................................................................... 30
Label Maintenance ................................................................................................ 31
Blazer Printer Labels ................................................................................. 33
Archive Maintenance ............................................................................................ 34
Sales History Maintenance.................................................................................... 34
Zero Monthly / Yearly Sales ................................................................................. 35
Clear Adjustments Journal .................................................................................... 35
Purge Variance File ............................................................................................... 35
Purge Promotional Markdown Data...................................................................... 35
Reorganize Store Files .......................................................................................... 35
Additional System Programs................................................................................. 35
Inventory Delete by Range (INVPURGE) ................................................ 35
Set Data Fields (SETINV)......................................................................... 35
II.
PURCHASING & RECEIVING....................................................................................... 38
Build Recommended PO....................................................................................... 38
Edit / Print / Post PO ............................................................................................. 43
Receive PO............................................................................................................ 45
Cancel PO.................................................................................................. 45
Multi-store Distribution ............................................................................ 47
Calculate Min/Max Stocking Levels..................................................................... 48
Print Purchase Orders............................................................................................ 52
Print Labels by PO ................................................................................................ 52
Custom Report Generator...................................................................................... 53
Change by Range....................................................................................... 55
Purge PO File ........................................................................................................ 56
Purchasing Parameters .......................................................................................... 57
ii
Vendor Maintenance Menu ................................................................................... 59
III.
POINT OF SALE INVOICING ...................................................................................... 62
Express Invoicing.................................................................................................. 62
Generate Invoice.................................................................................................... 74
End-of-Day Processing.......................................................................................... 81
Print Sales Summary ............................................................................................. 82
Print Month/Year-to-Date Sales History............................................................... 82
Print Promotional Markdown................................................................................ 83
Print Deposit and Sales Journal............................................................................. 83
POS X-out and Z-out............................................................................................. 83
POS Cash Declaration Z-out ................................................................................. 85
Electronic Journal.................................................................................................. 86
Archive Journal ..................................................................................................... 87
Register Control .................................................................................................... 87
Mix/Match and Trade and Save ................................................................ 88
IV.
CUSTOMER MANAGEMENT ...................................................................................... 93
Customer Entry Program....................................................................................... 93
Single Customer Inquiry...................................................................................... 100
Custom Report Generator.................................................................................... 100
Change by Range..................................................................................... 103
Print Customer Labels ......................................................................................... 103
Month End and Maintenance Programs .............................................................. 104
Cross Reference Maintenance ................................................................. 104
Customer Label Maintenance.................................................................. 104
Zero YTD Sales in Customer File........................................................... 106
V.
SYSTEM UTILITIES ...................................................................................................... 108
Backup or Restore Data Files.............................................................................. 108
Reorganize Master Files...................................................................................... 110
Data File Allocation ............................................................................................ 111
Disk Utilities ....................................................................................................... 112
Report Control..................................................................................................... 115
Build Cross Reference Files ................................................................................ 120
Automatic Inquiry System................................................................................... 121
Change Backup Disk Drive................................................................................. 127
Screen Maintenance ............................................................................................ 128
Inventory Entry Screen............................................................................ 128
Single SKU Inquiry (A) and (B).............................................................. 130
Customer Entry and Vendor Entry.......................................................... 131
VI.
BALANCE FORWARD ACCOUNTS RECEIVABLE.............................................. 133
Post New Transactions ........................................................................................ 133
Compute and Post Service Charges .................................................................... 138
Print Statement .................................................................................................... 139
Customer Account Inquiry .................................................................................. 141
Customer Entry Program..................................................................................... 141
iii
Age Accounts and Drop Detail ........................................................................... 141
Print Aged Trial Balance..................................................................................... 142
Post to General Ledger ........................................................................................ 142
VII.
SYSTEM MAINTENANCE......................................................................................... 145
Install Retailer System......................................................................................... 146
Install Program Diskettes .................................................................................... 165
APPENDIX A - Cable Configurations........................................................................................ 168
APPENDIX B - Peripheral Setup................................................................................................ 174
APPENDIX C - Error Messages/Codes ...................................................................................... 181
APPENDIX D - Direct Run Programs ........................................................................................ 183
APPENDIX E - End of Month Procedures ................................................................................. 196
APPENDIX F - Optional Program Instructions .......................................................................... 200
Customer Purchase Profile ...................................................................... 200
INDEX......................................................................................................................................... 209
iv
THIS PAGE INTENTIONALLY LEFT BLANK FOR FUTURE USE.
GETTING STARTED
v
The Retailer is a highly sophisticated Point-of-Sale System developed for the retail needs of the
new millenium. When you are using The Retailer, you are actually working with a large number
of related programs that make up the System. All of these programs are under the control of an
extremely powerful, multi-user, multi-tasking operating system.
You have at your fingertips the ability to print reports based on current inventory levels,
merchandise on order, the past year's sales history, plus all register transactions at the point of
sale. Used effectively, the information contained in these reports provides the "tools" you need
to operate your store, both now and in planning for the future.
HOW The Retailer WORKS . . .
Sales are rung up on point-of-sale devices. Once a day, when End-of-Day processing is
completed, files are updated automatically using data from point-of-sale transactions. Don't you
want to know: when it is time to reorder an item; which SKU’s are most popular; which vendors
are most profitable; when to have a special sale to remove overstocked inventory; which clerks
are making the most sales. The possibilities for saving money are endless, as are the
opportunities for making more money.
There is an art to buying . . . Anticipation of what the consumer will be attracted to in the future
can never be a totally scientific process. The Retailer's Purchasing & Receiving program
removes much of the guesswork by providing precise information based on prior history (monthto-date, year-to-date and the past 13 months), establishing a foundation on which to base many
buying decisions.
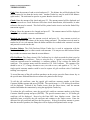
Printed reports make it possible to:
•
Identify best sellers, average sellers, and zero sellers.
•
Determine, through a Vendor Profit Analysis, which vendors provide the best profit margins.
•
Decide, by monitoring the stock on hand, when to mark down items and prepare for a sale.
•
Analyze daily, weekly, monthly, and yearly sales for each salesperson.
•
Analyze the activities of individual clerks in the store; average sales, gross profit margins,
percentage of markdowns to total of sales.
•
Determine daily/monthly/seasonal sales' totals per department and which departments are the
most profitable.
GETTING STARTED
vi
The following is a brief overview of each chapter.
I)INVENTORY MANAGEMENT
Realizing the significance of inventory management, the system has provided you with the
ultimate in flexibility. You may add, delete or change items; maintain notes on specific items,
display and/or print standard reports; make inventory adjustments; print labels. You can access
inventory on hand and on order--by: Location, Cost, Retail Pricing, Cost of Sales, Margins-month-to-date and year-to-date. The Retailer allows full inventory control for up to 65,000 items
and gives you item descriptions of up to 24 characters. You can also use 20-character,
alphanumeric manufacturer's part numbers.
II)PURCHASING AND RECEIVING
Automatically creates, controls and monitors purchase orders, calculates min/max stocking
levels, recommends and tracks SKU’s purchased and received; allows for the editing, printing
and posting of purchase orders, maintains a vendor list; monitors SKU’s not yet received,
including delivery due dates. And provides for the customization of purchasing and receiving
reports.
III)POINT OF SALE INVOICING
Generates invoices and processed data used by and received from cash registers and point-of-sale
terminals. Provides facilities for end of day processing as well as POS x-out and z-out cash
reconciliation. Allows access to specific sales transactions through the Electronic Journal
selection and access to prior sales transactions through the Archive Journal selection. Provides
sales history and promotional mark down information
IV)CUSTOMER MANAGEMENT
Contains information about each of your customers, including demographic information such as
gender, marital status, education, and income may be captured. Specific notes may be entered
and sales to customer tracked, you also have the ability to track charge customers, layaway and
monthly customer activity; and set up a "special" price for preferred customers.
V)SYSTEM UTILITIES
Provides facilities for allocating file space, protecting (backing up) data files, formatting
diskettes, changing backup disk drives, building cross reference files, access to the Electronic
Support System for software maintenance, and entry screen (Inventory, Customer, and Vendor)
maintenance.
VI)ACCOUNTS RECEIVABLE
Balance Forward Accounts Receivable gives you the capability to post new transactions,
compute service charges, print statements, and maintain customer account data and post to the
General Ledger.
VII)SYSTEM MAINTENANCE
This is a very important chapter that instructs you on the installations of your software and
configuration of your hardware.
GETTING STARTED
vii
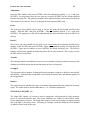
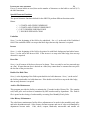
E-MAIL SUPPORT SYSTEM
All Retailer Systems receive a ninety- (90) day full software support warranty provided through
RSI's Home Page http//www.possoftware.com effective on the date of authorization).
Subscription membership – You are a member of RSI’s E-mail support system until one year
from the last day of the month in which this Agreement was accepted by RSI. As a Member, you
will receive from time to time Software updates and manual supplements developed by RSI at no
extra cost. Software updates are any minor modifications designed to make the Software more
efficient, easier to operate, or which enable the Software to perform new functions. System
updates are maintained on the web site for timely extraction and installation. The updates are
available for an annual subscription fee. Subsequent, yearly software maintenance agreements
are available to keep your system at the latest support level. Consult you RSI Authorized Dealer
for information on how to continue this valuable service.
You may choose to further extend your Membership following the initial membership period.
You will receive a bill from your dealer for the upcoming membership renewal before your
Membership expires.
In the event that you permit your Membership to expire, you will not receive further Software
updates or manual supplements.
Reinstating an expired Membership requires payment of a Membership Reinstatement Fee. A
Membership Reinstatement Fee is greater than the Membership Renewal Fee. RSI reserves the
right to modify the Membership Renewal Fee or Reinstatement Fee without prior notices in the
future.
System updates are maintained on the web site for timely extraction and installation. The updates
are available for an annual subscription fee. Subsequent, yearly software maintenance agreements
are available to keep your system at the latest support level. Consult your RSI Authorized Dealer
for information on how to continue this valuable service.
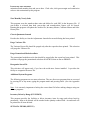
USING THE RETAILER FILES FROM WWW.POSSOFTWARE.COM
For ease downloading, The Retailer software has been concatenated into file groups. To use
these files, you must first download them from our web site, copy them to a diskette and then
transfer them from our web site, copy them to a diskette and then transfer them to a Retailer
system. Once they are on The Retailer system, they can be extracted to make new loadable
Retailer system or option diskettes.
Instructions:
Step 1. Make a new folder on your WINDOWS system and name it for The Retailer files.
Step 2. Select “Download” from www.possoftware.com. The Retailer software groups will be
displayed. Download each of the groups by selecting the button associated with the group. Save
the files into the Retailer file folder.
Step 3. Copy the files to diskettes for transfer to a Retailer system. Write the filenames of the
programs copied to a diskette on the label for use when copying to The Retailer system.
Step 4. From the Retailer menu, press F6 and type DISK. From the Disk Utility program, copy
each of the files from the diskettes to a Retailer using the command (F2) COPY 32filename.ext
40/C. Repeat for each of the files to be copied.
GETTING STARTED
viii
Step 5. Extract the programs from each file group using the command (F2) COPY
filename.ext/E. Once extracted, you can (F3) DELETE the original compressed file with the
PGM extension from drive 40.
Step 6. The operating system (PCMOS) is named PCMOS.OBJ and must be copied to PCMOS
(no extension) separately. To copy the file, use the command (F2) COPY PCMOS.OBJ
PCMOS.
When extracting the programs, your menu file was replaced with the new version. You will have
to reauthorize the installed options.
UPDATES
Updates are periodically placed on the web site. They are a comprehensive update and can apply
to all the program groups. When you receive notification that the UPDATE section has been
updated, you should download the update instructions and the update to apply to your systems.
The update instruction is a MS Word document and provides the information required for
installing the update on the customers systems along with a detail list of the fixes or
enhancements included.
GETTING STARTED
ix
Your dealer has been trained to assist you in setting up (defining) your system. Detailed
instructions for defining a new system or re-defining an existing system are in the System
Maintenance chapter.
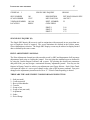
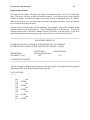
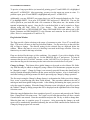
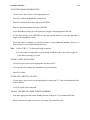
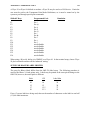
MAIN MENU - SPECIAL FUNCTIONS
At the Main menu, special system maintenance and closing functions are available by using the
"Function" (F) keys.
=====================================================================
F1 - REFRESH SCREEN
Shift F1 - RESTART FAST
F2 – LOGOFF F2 – RELOAD COMMON VAR
F3 - DIAL HOST (T2000 ONLY)F3 – OPEN C/R FILES
F4 - SET SYSTEM DATE & TIMEF4 - RESERVEED
F5 - RESTART MENU F5 - RESERVED
F6 - ENTER PROGRAM TO RUNF6 - RESERVED
F7 - DISCONNECT MODEM (T2000 ONLY)F7 - RESERVED
F8 – RESERVED F8 – CLOSE C/R FILES
F9 – HELP F9 – SET DEF. AND RESTART
=====================================================================
Pressing F9 will display the daily closing procedure. When all terminals are returned to their
respective Main menus, press F1 to close the store. The system will pause for approximately five
(5) minutes, then will automatically reorganize the system's Master Files using the Auto Time
feature (refer to System Utilities, 2. Reorganize Master Files.)
Pressing the F6 key while at any Main menu will allow you to enter the name of the program you
wish to execute. For example, if you type "XMenu", it will take you to the System Utility menu.
To prevent premature aging of the video display unit, the system automatically will clear the
display screen if there is no activity for more than five (5) minutes. The screen saver message
will be displayed and will be moved down one line every minute. Pressing any character will
refresh the display to the screen that was cleared.
GETTING STARTED
x
Since the system is parameter driven most of the software definitions and screen maintenance
changes are stored in a special file called Text.Dat. This file is automatically created during
initialization and recreated at any time by pressing Shift F9 while at the Main Menu. The
initialization program combines your system definitions and Text.Fil to build the new Text.Dat.
Any change in the system's definitions will require building a new Text.Dat file before the
changes will be in effect.
Pressing Shift F1 restarts a background program called FAST and merges any changes made in
system definition into the Text.Dat file without deleting the original customer modifications.
This procedure should be used when a new version of Text.Fil is released that may enhance your
system's operation.
Pressing Shift F2 will reload the "common" system parameters used by all programs into main
memory. It may be used after installing an option program in lieu of rebooting the system for the
option to be acknowledged.
Pressing Shift F3 will open the cross-reference files in the event they were previously closed for
maintenance or deletion purposes.
Shift F4, Shift F5, Shift F6, Shift F7 are keys reserved for future programming adjustments by
RSI.
Pressing Shift F8 will close the cross-reference files if there is a need to perform maintenance on
an active file.
Pressing Shift F9 will delete the current Text.Dat and build a new Text.Dat with user definitions
and the systems’ master Text.Fil. Caution: Using this function resets all customer screen
modifications to their original defaults.
GETTING STARTED
xi
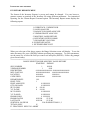
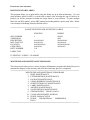
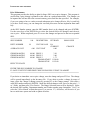
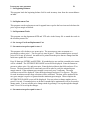
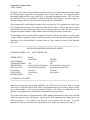
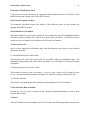
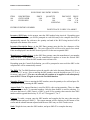
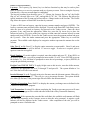
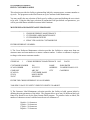
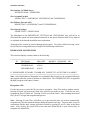
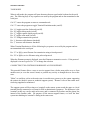
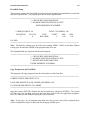
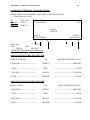
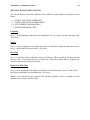
SYSTEM AUTHORIZATION
After your software has been loaded, your systems must be "authorized". This procedure protects
you from illegal use or transfer of this valuable asset. The same procedure must be followed if
you are adding optional programs to your system. A representation of this screen is shown
below.
* * * ATTENTION * * *
RSI software users must obtain an Authorization Code. After installation, each time the system
is initialized (booted-up), a screen similar to the following will appear:
=====================================================================
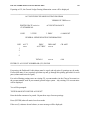
AUTHORIZATION CODE ENTRY
SERIAL NUMBER
SYSTEM NUMBER
:
:
XXXXXX
XXXX-XXXX-XXXX
COMPANY NAME
COMPANY ADDRESS
COMPANY CITY
COMPANY STATE
COMPANY ZIP
COMPANY PHONE
SYSTEM TYPE
:
:
:
:
:
:
:
YOUR COMPANY NAME
99999 STREET NAME
ANYWHERE
CA
99999
435-555-1212
5000 RETAILER,V7.4.0
CHAR
17
17
AUTHORIZATION CODE:
For your authorization code, please call RETAIL SOFTWARE INTERNATIONAL (RSI), at
435-755-8783 and ask for the Authorization Group. You will be given further instructions when
you call. If you cannot reach RSI immediately, simply press (ENTER) to continue, but you
should call at your earliest convenience.
=====================================================================
If you press (ENTER), the following message will appear.
You have fifteen (15) days to get your Authorization Code.
If desired, you may press the “Print Screen” key to print your authorization code entry screen for
the purposes of faxing your request to RSI. When complete, press any key to continue. After
entering the authorization code, this message will no longer be displayed.
GETTING STARTED
THIS PAGE INTENTIONALLY LEFT BLANK FOR FUTURE USE.
xii
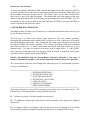
INVENTORY MANAGEMENT
1
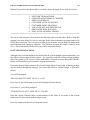
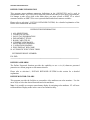
In order to enter into the inventory entry program, select the number that corresponds to
“Inventory Entry Program” from the main menu.
=====================================================================
1. INVENTORY ENTRY PROGRAM
2. INVENTORY ADJUSTMENT
3. SINGLE SKU INQUIRY (A)
4. SINGLE SKU INQUIRY (B)
5. PRINT ADJUSTMENTS JOURNAL
6. INVENTORY REPORTS MENU
7. CUSTOM REPORT GENERATOR
8. PRINT INVENTORY LABELS
9. MONTH END AND MAINTENANCE PROGRAMS
=====================================================================
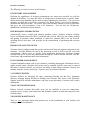
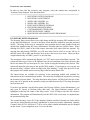
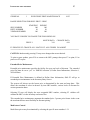
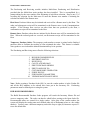
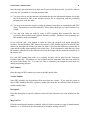
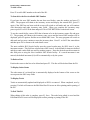
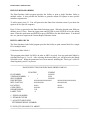
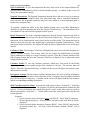
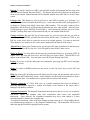
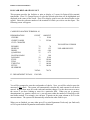
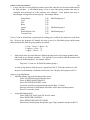
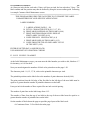
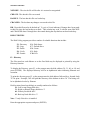
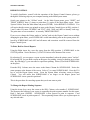
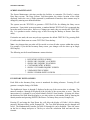
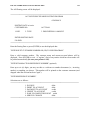
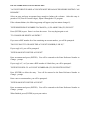
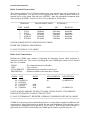
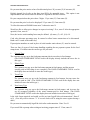
INVENTORY ENTRY PROGRAM
The Inventory Entry screen allows you to add, change and delete inventory SKU numbers as well
as any other field displayed. Access to the Entry screen should be limited by using the password
facility. The Entry screen may be customized, entry prompts moved, name changes made and
option flags installed using the Screen Maintenance selection under the Utilities menu. When
entering new SKU’s, some of the fields require data entry while other fields are optional. By
entering data and pressing (ENTER), you will move from field to field, or use the Tab key to
shift the cursor left or right, and the arrow keys to move the cursor up or down. When you have
completed data entry on a SKU, press F1 to save the data.
The item notes will be automatically flagged “yes” if F7 notes is pressed and data is entered. The
system will allow up to 6 lines of 40 character notes for each inventory item. Since the notes data
has its own master file you must press F1, Save, before leaving the Inventory Entry Screen. This
action will attach the notes entry to the specific SKU number. If you forget to save you may run
the special utility “validate” which is found in the Zero Monthly / Yearly Sales press F2 to run,
this program will validate and correct any flags in the Inventory Master File.
The entered notes are available for reference in the purchasing module and available for
transmission in the communications module. The notes may be displayed or printed by selecting
the Inventory Reports Menu. The long description notes feature will allow the first line of the
notes entry to be printed on the customer receipt provided the notes flag F2 for long description
has been activated.
If you have pre-defined a speed load sequence (Ref: System Utilities, Screen Maintenance), you
may press F3, Speed, to facilitate faster data entry. The Speed Indicator prompt will be
highlighted at the top left corner of the Entry screen. Press F9 Help at any time for reference
information. The program will automatically save the SKU if the screen entry is completed past
the promotional stop date.
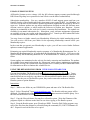
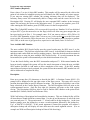
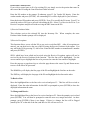
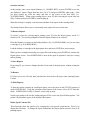
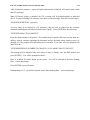
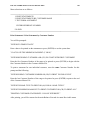
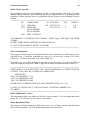
The second Inventory screen (F8, Page) displays Quantity on Hand, Quantity on Order (which
can only be altered through inventory adjustments or physical inventory adjustment), Quantity
Counted, Sales M-T-D, and Sales Y-T-D as well as other valuable information may be changed
on this screen. Upon completion, press F1 to save the data.
INVENTORY MANAGEMENT
2
INVENTORY ENTRY FILE FIELDS:
=====================================================================
STORE NO. 1
INVENTORY SCREEN
10:58
POS 1
SKU NUMBER
SCAN NUMBER
VENDOR NUMBER
LOCATION
100
DESCRIPTION
123674 MFG. PART NO.
100 100
DEPT. NUMBER
SHELF
CODE FIELD
CASE QUANTITY
F.O.B. COST
CASE COST
UNIT REPL. COST
AVERAGE COST
1.00
.50
.50
0.00
0.00
GROSS MARGIN 1
GROSS MARGIN 2
GROSS MARGIN 3
PROMO START DATE
TAX LEVEL
DISCOUNT
87.47
75.00
71.43
11/10/00
NOTES
DELETE ITEM
PET ROCK SMALL SIZE
ABC PET
25
UNIT OF SALE
LABEL TYPE
MINIMUM LEVEL
MAXIMUM LEVEL
AUTO DEPOSIT
EA
1
71.00
171.00
0.00
PRICE 1
PRICE 2
PRICE 3
PROMO STOP DATE
RE-ORDER PROT
3.99
2.00
1.75
11/15/00
APPEND SKU
PACKAGE SKU
ENTER THE SKU NUMBER
TAB SIDE F1 SAVE F2 NEXT F3 SPEED F5 DELETE F7 NOTES F8 PAGE F9 HELP F10 ABORT
=====================================================================
(2ND INVENTORY SCREEN)
=====================================================================
STORE NO. 1
INVENTORY ENTRY
10:55
POS 1
SKU NUMBER
QUANTITY ON HAND
QUANTITY COUNTED
UNITS SOLD TODAY
UNITS SOLD PROMO
AMOUNT SOLD PROMO
INVENTORY DATE
LAST DATE SOLD
LAST ARCHIVE DATE
LAST RECEIVED
100
DESCRIPTION
PET ROCK SMALL SIZE
-9.00 QUANTITY ON ORDER
0.00
2.00 UNITS SOLD
0.00 COST OF SALES
0.00 AMOUNT SOLD
03/03/00
08/03/00 QUANTITY SCRAPPED
08/05/00 AMOUNT SCRAPPED
08/05/00
4.00
M-T-D
15.00
7.00
40.92
Y-T-D
105.00
56.00
175.39
0.00
0.00
ENTER THE PHYSICAL INVENTORY QUANTITY COUNT
TAB SIDE F1 SAVE F2 NEXT F3 SPEED F5 DELETE F7 NOTES F8 PAGE F9 HELP F10 ABORT
====================================================================
INVENTORY MANAGEMENT
SKU Number (Required)
3
Enter a three (3) to six (6) digit SKU number. This number will be entered by the clerk at the
point-of-sale station for automatic pricing and will identify the SKU number on various reports.
If you enter an existing SKU number, the existing inventory data will be displayed. The
Inventory Entry screen will automatically shift to Change mode and the cursor moved to the
Description field. Pressing F2 will display the next sequential SKU number in the inventory
master file and move the cursor to the description entry. To enter a new number, press F10.
After entering the SKU number, press (ENTER) to move to the Description field.
Note: The (2) digit SKU numbers 1-99 are reserved for special use. Numbers 26-45 are defaulted
as Open PLU’s (you do not need to set the flags) which will allow any gross margin that you
have previously set in Price 1. For example, enter .20 if you want to achieve a 20% GM or .90
for a 90% GM. Remember to leave Unit Cost set to zero, yet be careful not to set the Price equal
to zero as this will cause the GM to become zero. (Cost is set equal to price.) In order to generate
100% GM, as in the case of golf green fees, repair service and rentals, enter .99 for Price 1.
Next Available SKU Number:
The next available SKU Search facility uses the second vendor entry for SKU item #1 as the
increment counter. This field was selected since SKU item #1 is the default for items not defined
and the second vendor field not used for another purpose. Enter the desired search increment in
this field prior to using the next available SKU Search facility. If a search increment has not
been entered, the system will automatically use the default increment of ten (10).
To use the Search facility, enter the SKU item number and press F2. If the entered number has
been previously assigned, the system will use the search increment to locate the next available
SKU number and shift to Add mode to allow completion of the entry. If the SKU number
entered has not been previously assigned, the system will not increment the SKU number but will
shift to Add mode to complete the entry.
Description
Enter up to twenty-four (24) characters to describe the SKU. A Position Counter (POS 1-24)
prompt will be displayed at the top right corner of the Entry screen. This entry aid is used to
position description data in specific character locations. The description field data is one of the
range selections in the Custom Report Generator. The full Description field will print on the
system-generated invoice. Only the first eight (8) characters will print on the cash register
receipt. The Description field may also be used to find the SKU number at the point-of-sale
terminal (Ref: Utilities, Build Cross Reference files).
Wild Card lookup of descriptions has been added to inventory. This new lookup facility will list
all items that are found which have entered data. Use the up and down arrow to select the item
you want and press F1. The question mark “?” is hard coded to be the lookup key. At the item
number prompt, press the lookup key or enter a search argument followed by the lookup key.
E.g.? or ROCK? Or |ROCK? If the search argument is entered the program will assume a
description lookup and will display all items that meet the search argument criteria. (For an
example see Wild card Description Lookup in Point of Sale Invoicing).
INVENTORY MANAGEMENT
4
Scan Number
A twelve (12) digit UPC number is automatically generated when a SKU number is entered. The
generated UPC number may be replaced by scanning the UPC label on the selected SKU number
or manually entering a new UPC number.
Mfg. Part No.
Enter up to twenty (20) alphanumeric characters to identify a SKU number by the manufacturer's
part number.
Vendor Number (Required)
Enter a one (1) to four (4) digit, numeric vendor number, designating the primary and the
secondary vendor supplying the SKU.
Dept. Number
Enter a one (1) to two (2) digit department number for the SKU number. This number allows
reports to be generated for specific departments or ranges of departments. The system will default
to department 99 if a department number is not entered.
Location
Enter up to eight (8) alphanumeric characters to describe the area where the SKU is stocked.
Code Field
Enter up to ten (10) alphanumeric characters. This is a user-definable field used for wild card
sort capabilities. All or part of this field may be used as a sort option.
Case Quantity
Enter the number of units per case, or use the default setting of (1).
Unit of Sale
Enter the unit of sale for the SKU number. The default is EA (each), i.e., DZ (dozen), PK (pack)
and CS (case).
FOB Cost
This field is used if you desire to track SKU cost, net of transportation or Management burden
charges.
INVENTORY MANAGEMENT
5
Label Type
Label types one (1) through seven (7) may be defined for different label stock types. If labels are
not used, it will default to 0.
Case Cost
Enter the cost of a case. If you do not enter a cost in this field, the system will calculate the case
cost based on the unit cost entry. The system will calculate the unit cost, by dividing the case
cost, by the case quantity.
Minimum Level
This is a reference field noting the minimum number of units required to be on-hand at all times,
or the minimum quantity on-hand, at which time you reorder more merchandise. By entering this
data you may wish to generate an Overstock/Understock report.
Unit Repl. Cost
The calculated unit cost may be displayed. Press (ENTER) to accept the calculated unit cost, or
enter a different unit cost and press (ENTER).
Maximum Level
If a maximum stocking level is set which is greater than the reorder point, the system will assume
a minimum/maximum stocking strategy for that SKU number. The reorder point becomes the
minimum. The system will not reorder until quantity on hand + quantity on order is less than (or
equal to) the reorder point. It will then reorder up to the maximum stocking level (taking into
account case quantities where applicable).
Average Cost (Do not enter data)
The system computes your average cost by dividing the SKU number's year-to-date cost by the
quantity on hand.
Note: Changes to certain fields will recalculate other entries. Be aware of these fields:
CHANGE
RECALCULATES
CASE QTY
CASE COST
UNIT COST
PRICE
GROSS MARGIN
UNIT COST/GROSS MARGINS OR PRICES
UNIT COST/GROSS MARGINS OR PRICES
CASE COST/GROSS MARGINS OR PRICES
GROSS MARGIN
PRICE
INVENTORY MANAGEMENT
6
Auto Deposit
If the SKU number has a deposit to be charged to it, enter the dollar amount of the deposit. An
example of a deposit charge is a soda bottle with a bottle deposit. When the SKU number is
scanned (or automatically priced), the deposit will be automatically added to the sale. The largest
acceptable Auto Deposit is $325.00.
Gross Margin 1
Enter the gross margin percentage (profit) wanted from the retail price (Price 1) or press
(ENTER) to move to the "Price 1" field. Enter the retail price and the system will calculate the
gross margin percentage for you.
Price 1
Press (ENTER) to accept the price displayed (if you entered the gross margin percentage in the
Gross Margin 1 field) or enter the retail price to be charged for this SKU number. The system
will calculate the gross margin percentage for you. It will also utilize price rounding, as defined
in the POS Control file.
Gross Margin 2
"Gross Margin 2" is currently used as a reference field in conjunction with "Price 2".
Price 2
"Price 2" is used as a special customer price and is used in the Customer Management/Customer
Entry screen. When a customer number, defined as Type 2, is entered at the terminal (or cash
register), the system will obtain Price 2 from the Inventory file as the special customer price.
Gross Margin 3
Enter the "Gross Margin" wanted from the special or promotional (Promo) price (Price 3), or
press (ENTER) to move to the "Price 3" field. Enter the promotional price and the system will
calculate the gross margin percentage for you.
Price 3
"Price 3" is used as the promotional price and may also be used as a special customer price
(defined as Type 3).
Promo Start
Use this field to set the first date when the SKU will be on sale (Price 3 will be used). Press
(ENTER) to accept the default date, or enter the first date the SKU will be on sale.
INVENTORY MANAGEMENT
7
Promo Stop
Press (ENTER) to accept the default date, or enter the last date the SKU will be on sale (return to
regular price using Price 1).
Item Notes
Notes can be utilized to provide customers or clerks with more detailed information about the
product. For example, if the inventory item is a bottle of Chardonnay, the notes could suggest
companion foods, describe the flavor (oak, buttery, etc.) and provide ratings.
If notes are desired press F7. A pop-up screen will display superimposed over the inventory
entry screen:
NOTES
USE ARROW KEYS TO MOVE BETWEEN LINES
F1 SAVE F2 POS F3 ORD F4 LAB F10 ABORT
=====================================================================
Each line of notes may be designated as POS, Order, Label, or any combination of the three by
pressing the corresponding toggle function keys. Up to six lines of notes may be defined.
In order to designate a line of notes as Point of Sale, enter “F2” to and a “P” will be displayed at
the end of the line. This line of notes will now be printed on the customer’s receipt in Point of
Sale. By pressing “F2” a second time, the “P” will not be displayed and the notes will not print
in Point of Sale.
Pressing “F3” will display an “O” at the end of the line. This line of notes will now be printed on
all purchase orders. By pressing “F3” a second time, the “O” will not be displayed and the notes
will not print on Purchase Orders.
Pressing “F4” will display an “L” at the end of the line. This line of notes will now be printed on
labels. By pressing “F4” a second time, the “L” will not be displayed and the notes will not be
printed on labels.
After completion of entering note information, Press “F1” SAVE, to return to the Inventory Entry
Screen, then press “F1” again to save changes to both screens.
FLAG FIELDS
These flags are reserved for specific options or control purposes. If they are marked (NA), they
are not implemented in this release level. If they are marked with (A), they may be used in this
release level.
INVENTORY MANAGEMENT
8
They may be placed on the Inventory Entry screen by using the Screen Editor found in the
System Utilities Section, Screen Maintenance selection. Each Flag field has its own field
number. The field number of all Entry screen items may be printed or displayed by using the F2
Print or F3 Edit functions available in the Screen Entry Editor.
- Tax Level Fld 28 (A)
Enter the tax rate (1, 2, or 3) to be applied to the SKU number. If the SKU number is
nontaxable, enter 0. Note: if using VAT (Value Added Tax), up to six (6) tax rates may be
applied.
- History Fld 29 (A)
If you desire to maintain a thirteen (13) month history on this SKU number, enter Y. If history is
not desired, enter N (for no history).
- Reorder Protect Fld 30 (A)
Activating this Flag field will override the system generated stocking level. (Example:
Regardless of how many expensive lawn mowers you are selling, your stocking level should not
exceed two (2), as they occupy a lot of valuable space).
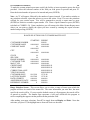
- Append SKU Fld 31 (A)
The Append SKU feature provides the capability of defining up to nine (9) levels of appends.
This provides for 9 different package sizes for a single item.
To use this feature, the base SKU number must end in zero (0) and should be the item with the
smallest unit of sale.
For example: the base SKU number used for ordering COKE CLASSIC could be 120080 with
the Append flag off. Each subsequent package size must have it’s append flag set on.
A six pack of COKE CLASSIC would be 120081 with the Append flag on. A case of COKE
CLASSIC would be 120082 with the Append flag on.
120080 COKE CLASSIC 12oz SINGLE
CASE QTY
24
UNIT OF SALE EA
CASE COST
4.72
UNIT COST
.20
GM
60.67 PRICE 1 .50
120081 COKE CLASSIC 12 oz SIX PK
CASE QTY
4
UNIT OF SALE 6
CASE COST
4.72
UNIT COST
1.18
GM
40.70 PRICE 1 1.99
Note: A single can is the base item.
There are 4 six-packs in a case.
Unit of sale is number of units
in this package size.
INVENTORY MANAGEMENT
9
120082 COKE CLASSIC 12oz CASE
CASE QTY
1
UNIT OF SALE 24
CASE COST
4.72
UNIT COST
4.72
GM
40.70 PRICE 1 7.96
During End-of-Day Processing, the system will recognize an append SKU and the following
special processing will occur:
When append item 120081 is sold, "1" will be added to the month-to-date and year-to-date
quantity sold. The SKU number is then changed to the base item 120080 where the unit of sale
(6) is subtracted from the quantity on hand and added to the MTD and YTD quantity sold.
The unit cost (1.18) is added to the MTD and YTD cost of sales, and the price 1.99 is added to
the MTD and YTD amount sold.
When ordering and receiving base items, the cost and pricing may change. The base item is the
ordered SKU; and, therefore, the only SKU that will have its cost and prices updated. To set the
new costs and prices in the append items, press F6 at any Menu, enter SETCOST and press
(ENTER). The case cost of the appended items will be set equal to the base item, the unit cost
and prices will be calculated as defined in DEFINE STORE INFORMATION.
- Discount Fld 32 (A)
The Discount flag is used to denote a discountable SKU. For example, if the SKU item is not
discountable, set the flag to (N) no and item discounts will not be allowed at the point of sale.
- Commission Fld 33 (A)
The Commission SKU flag is used to denote a commission item. For example, if your sales
clerks are paid commissions on SKU items, the Commission flag must be set to (Y) yes for the
items you wish to pay commission on.
- Food Stamps Fld 34 (A)
If food stamps are to be accepted at the point of sale, the SKU Item flag must be set to (Y) on the
food-stamp items. Refer to System Maintenance, Define Store Information, for a detailed
explanation of food stamp types and set up requirements.
- Scale Comp. Fld 35 (A)
The Scale Compulsory flag is used in conjunction with the Weigh key and a scale installed on the
system to force weighing the item at the point of sale.
INVENTORY MANAGEMENT
- Linked PLU Fld 52 (A)
10
The Linked PLU flag allows multiple SKU items to be linked together. At the point of sale when
the primary SKU is sold, the linked SKU will automatically be sold as the next item. The SKU
to be linked is entered and saved at the Linked SKU flag prompt in the Inventory Entry screen.
For example: The primary SKU #1000 could be linked to SKU 1010 and SKU 1010 linked to
SKU 2000. When the primary SKU item 1000 is sold, items 1010 and 2000 will be
automatically printed on the sales receipt as the next sequential items sold.
Note: When placing the Linked PLU function on the Inventory Entry screen, use row
coordinates other than 19 or 20 to provide sufficient data entry space for the linked SKU number.
- Mix/Match Codes Fld 53 (A)
The Mix/Match Code flag is primarily used by grocery stores to price like-priced items or split
priced items. Please refer to the Mix/Match explanation found in the Point of Sale Invoicing
section of the manual for details.
- Serial Number Required Fld 54 (A)
When the Serial Number Control flag is set on (Y), the POS Invoicing will require an entry of a
serial number. If a Rx Prescription Number is to be used as defined in Store Information found
under Selection 4 Utility Menu , All Selections, the serial number required message is replaced
with Rx number required.
-Open PLU Fld 55 (A)
If the open PLU flag for a SKU item is set on (Y), price entry is compulsory at the point of sale.
Refer to Departments 26-45 for a complete description of this function.
- Calculate Qty Fld 56 (A)
The Calculate Quantity flag is used by the point-of-sale function to sell bulk merchandise where
the quantity sold is determined by dividing the dollar amount entered by the unit cost.
- Non-Inventory Flag Fld 67 (A)
If this flag is set to “yes”, the system will not subtract from the Quantity on Hand for this item.
This function is useful if the item is being used for price control. The quantity and amount sold
are still tracked.
- Notes Fld-68 (A)
If this flag is set to “yes”, the system will allow multiple lines of notes pertaining to the specific
SKU.
- Supp. Tax on Tax (NA)
- Supplemental Code (NA)
INVENTORY MANAGEMENT
- Package SKU Fld 77(A)
11
The Package SKU flag is used in conjunction with the Package Maintenance screen in Inventory
Management Month End Maintenance. The Package SKU flag set on (Y) allows the item to be
sold and listed on the receipt as a single item. Since the item sold is made up of several items,
during the end-of-day processing the transaction is posted as Package Sale and the package detail
items (not listed on the receipt) deducted from inventory.
- Profile Item Fld 78 (A)
The Profile Item flag is used in conjunction with the Customer Profile feature to track selected
SKU items purchased by selected customers. Refer to the Customer Profile manual for details.
-
Price 2 Sales Flag FLD 85
This field is the dollar amount that has been sold using Price 2.
- Beginning On Hand Flag FLD 86
This field indicates the Beginning Balance on hand for the current year. To set the Beginning
Balances, press F6 at any menu and enter SETBOTH and press (ENTER). The current Balance
on Hand will be placed into the Beginning Balance on Hand.
- Negative PLU Flag Fld 87 (A, Terminal Systems Only)
This flag indicates that the price entered at the point of sale is a negative amount. This function is
used for items such as refunds, bottle deposits, gift certificates, etc. It does not subtract from
inventory Balance on Hand.
- Delete Item Flag Fld 88 (A)
When the Delete Item Flag is set to 'Y', this item will be deleted from the inventory at End of
Year by the Purge Inventory program. The flagged item can not be ordered by Purchasing.
- Split Package Price Fld 89 (A)
The unit price is in Price 1.
The whole package price is in Price 2.
Note: Split Package Price will not function when the following flags are set:
Append SKU Fld 31
Scale Comp. Fld 35
Mix/Match Code Fld 53 (If this flag is set, the Split Package Price field will be reset to
zero.)
Open PLU Fld 55
Calculate Qty Fld 56
Package SKU Fld 77
Negative PLU Fld 87
INVENTORY MANAGEMENT
12
When a Split Package Price item is sold, the whole package price is divided by the number
entered in the split pricing field and the result is multiplied by the quantity sold.
To identify an inventory item as a Split Package Priced SKU#:
In Screen Maintenance, add Field 89, Split Package Price, to your Inventory Entry Screen.
In the Inventory Entry Program, enter the number that will be used to divide the package
price (e.g. if the item sells 3 for $1.00, enter a 3 and show Price 2 as $1.00).
Items requiring Split Package Pricing may be numbered 1-99.
Items not requiring Split Package Pricing should be set to or left at zero in the Split
Package Price field.
Note: If this flag is set, promotional pricing will be ignored.
- Units Sold Survey Fld 90 (A)
The Units Sold Survey field is similar to a flag field but is used to count the units sold for survey
purposes. It is used in conjunction with the program called Survey which when run creates a
Survey file that can be transmitted to the party requesting the sales data. The field should be
placed on the Inventory Entry Screen menu in an area allowing sufficient space to display the
numeric units sold. To clear the field for use, run the survey program and delete the survey.fil
that was created. The field is also useful to monitor the units sold between specific time periods.
- ID Required Fld 91 (A)
ID Required is used to flag an inventory item (e.g. alcohol, tobacco, etc.) for an ID prompt at
(terminal) express invoicing. When this field is installed and set on the Inventory Entry Screen,
(see Screen Maintenance in the index), a message will appear prompting the clerk to check the
customer's ID for the correct birth date. The number entered in this inventory field reflects the
youngest age allowed to purchase the item (e.g. 18 for tobacco, 21 for alcohol).
F8 PAGE
On the second Inventory Entry screen, the SKU number and description are displayed for
reference.
Quantity on Hand
The quantity on hand is entered or changed by using the Inventory Adjustments program or by
receiving merchandise through the Purchasing and Receiving module.
Quantity on Order
The quantity on order is entered or changed by using the Inventory Adjustments program or by
ordering merchandise through the Purchasing and Receiving module.
INVENTORY MANAGEMENT
13
Quantity Counted
The quantity counted is entered after a physical inventory for reference to the quantity on hand,
quantity sold and quantity scrapped in order to reconcile the physical count.
Units Sold Today
This is a temporary field used to display the number of SKU’s sold today prior to End-of-Day
posting.
Units Sold M-T-D / Y-T-D
This field displays the month-to-date and year-to-date unit sales and may be edited to insure
correctness.
Units Sold Promo
This field displays the number of SKU’s sold on promotion.
Cost of Sales M-T-D / Y-T-D
This field displays the month-to-date and year-to-date cost of sales.
Amount Sold Promo
This field displays the dollar amount of SKU's sold on promotion.
Amount Sold M-T-D / Y-T-D
This field displays the month-to-date and year-to-date dollar amount sold.
Inventory Date
This field displays the date the SKU was added to the Inventory Master file.
Last Date Sold
Indicates the last date this SKU was sold.
Quantity Scrapped
This field identifies the quantity scrapped due to breakage and/or obsolescence.
Last Archive Date
Indicates the last time the SKU was archived.
INVENTORY MANAGEMENT
14
Last Received
Identifies the date the last order of this SKU was received.
Amount Scrapped
Identifies the dollar amount of the SKU scrapped.
Hot Keys
Pressing Shift F1 will bring up the Cross Reference Maintenance screen. Pressing Shift F2 will
bring up the Substitution List Maintenance screen.
INVENTORY MANAGEMENT
15
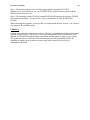
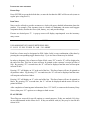
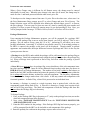
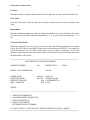
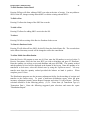
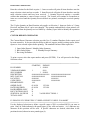
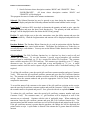
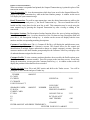
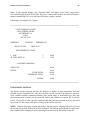
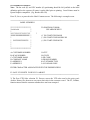
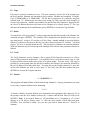
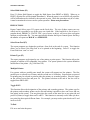
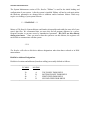
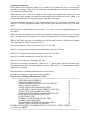
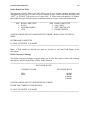
INVENTORY ADJUSTMENT
This program allows you to make adjustments to a single SKU number, or a series of SKU
numbers in the Inventory Master file. You may use the SKU number to make the initial selection
or by using the cross-reference search capability, enter the first few characters of the description
and press (ENTER). Pressing F2 will display the next sequential SKU if the first one displayed
is not the one desired. A report detailing the adjustments, by batch number, is stored in the
adjustment journal for auditing purposes.
All adjustments, orders, receipts, transfers and price changes are logged to the adjustment
journal. The Adjustment Journal Report Generator allows you to select a single or range of
transaction type and dates. This allows you to display or print a report utilizing any one of the
transaction types. e.g. Inventory Receipts by Day. Set the transaction date range to the desired
date or dates then the beginning and ending transaction type to 3.
Transaction Types and dates are used in the sort parameters and range selections screen.
Type 1 – unused
2 – unused
3 – Received
4 – Transfer
5 – Scrap
6 - unused
7 – Adjusted
8 – Order
9 – Price change
Press F1 to shift from SKU number entry to Adjustment mode. Use the up or down arrow to
select the type of inventory correction you wish to make.
=====================================================================
STORE NO. 1
INVENTORY ADJUSTMENTS
10:40
SKU NUMBER
SCAN NUMBER
DEPT. NUMBER
VENDOR NUMBER
100
050000300624
1
2222
UNIT REPL. COST
QUANTITY ON HAND
QUANTITY ON ORDER
ADJUSTMENT
ORDER
RECEIVE
TRANSFER
SCRAPPED
REPLACE
DESCRIPTION
MFG. PART NO.
MINIMUM LEVEL
MAXIMUM LEVEL
.450 AVERAGE COST
0.000 PRICE 1
0.000 PRICE 2
PRICE 3
COFFEE-MATE
ABC 1
100.000
200.000
.450
.900
.900
.900
CHANGES (+) OR (-) QUANTITY ON HAND
INCREASE MERCHANDISE ON ORDER
INCREASE QUANTITY ON HAND, REDUCE ON ORDER
REDUCE FROM STORE ON HAND, INCREASE TO STORE ON HAND
REDUCE BAL ON HAND, INCREASE QUANTITY SCRAPPED
REPLACE QUANTITY ON HAND
ENTER THE SKU NUMBER
F1 CHANGE TYPE F2 NEXT F1
INVENTORY MANAGEMENT
16
Adjustment
Enter the SKU number and press (ENTER). Enter the adjustment quantity (+ or -) and press
(ENTER). At the prompt, enter the new unit cost or press (ENTER) for the default obtained
from the Inventory file. The quantity on hand will be adjusted and the cursor returned to the next
SKU number to be entered. Press F2 to display the next sequential SKU item.
Order
The order type entry should only be used if you are not using the Purchasing and Receiving
module. Enter the SKU and press (ENTER). Enter the quantity ordered (+ or -) and press
(ENTER). The quantity on order will be adjusted and the cursor returned to the next SKU to be
entered.
Receive
The receive type entry should only be used if you are not using the Purchasing and Receiving
module. Enter the SKU and press (ENTER). Enter the adjustment quantity received and press
(ENTER). Enter the PO number or press (ENTER) for default inventory cost. The Receive
function will increase quantity on hand and reduce the on order position. The average cost for
the SKU will be recalculated.
Transfer
This function transfers merchandise from one store to another, reducing on-hand inventory in the
sending store and increasing the on-hand inventory in the receiving store.
Scrapped
This function reduces quantity on-hand and increase quantity scrapped as defective non-saleable
merchandise. It subtracts the average SKU cost from the inventory value and adds the quantity to
the scrapped total.
Replace
The replace function expedites the entry of inventory adjustments following a physical inventory
count. The actual count is entered rather than a (+ or -) inventory adjustment.
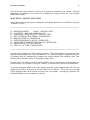
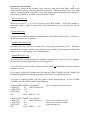
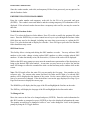
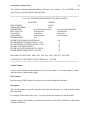
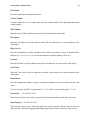
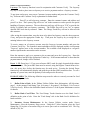
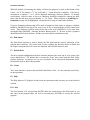
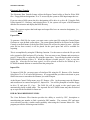
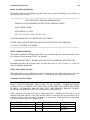
SINGLE SKU INQUIRY (A)
The Single SKU Inquiry (A) screen is used in conjunction with passwords to limit employee
access to restricted inventory data. The access limitations are defined in the Utilities menu,
Screen Maintenance selection. The Single SKU Inquiry screen may be tailored to display limited
data as defined by the stores owner. Following is a sample screen that fields have been deleted
or added to fit the needs of the store.
INVENTORY MANAGEMENT
17
====================================================================
STORE NO. 1
SINGLE SKU INQUIRY
HH:MM
SKU NUMBER
SCAN NUMBER
VENDOR NUMBER
LOCATION
100
12367
100 100
SHELF
DESCRIPTION
MFG. PART NO.
DEPT. NUMBER
CODE FIELD
PET ROCK SMALL SIZE
ABC PET
25
PRICE 1
3.99
PRICE 2
2.00
PRICE 3
1.75
=====================================================================
SINGLE SKU INQUIRY (B)
The Single SKU Inquiry (B) screen is used in conjunction with passwords in case more than one
type of employee access is required. The access limitations are defined in the Utilities menu,
Screen Maintenance selection. The Single SKU Inquiry screen may be tailored to display limited
data as defined by the stores owner.
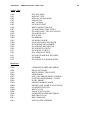
PRINT ADJUSTMENTS JOURNAL
The Print Adjustments Journal provides an audit record, by SKU and department of all inventory
adjustments made prior to clearing the journal. You may print the standard report as defined or
by using the Custom Report Generator, add a report. By selecting the desired sort parameters
and print fields, you may design a customized inventory adjustment journal. You may use the
features in Report Control to archive your adjustments on a floppy diskette. Stock Gains Totals
will report the effect of a cost or price change on the value of the inventory on hand. Post price
changes to the adjustments journal must be set to “Y” if Stock Gains Reporting is desired
THESE ARE THE ADJUSTMENT CODES FOR RANGE SELECTION
1 – Sale (not used)
2 – Credit (not used)
3 – Receive Merchandise
4 – Transfer
5 – Scrap or lost
6 – Scrap or lost (not used)
7 – Adjustment
8 – Order
9 – Price Change
INVENTORY MANAGEMENT
18
INVENTORY REPORTS MENU
The format of the Inventory Reports is pre-set and cannot be changed. You can, however,
generate reports on portions of the Inventory file using different parameters. For customized
reporting, use the Custom Report Generator option. The Inventory Reports menu displays the
following reports.
=====================================================================
1. OVERSTOCK - UNDERSTOCK
2. SALES ANALYSIS
3. BALANCE ON HAND ANALYSIS
4. VENDOR PROFIT ANALYSIS
5. MONTHLY SALES HISTORY
6. INVENTORY ENTRY FORMS
7. ON HAND BY LOCATION
8. INVENTORY NOTES
9. EXTENDED PRICE LIST
=====================================================================
When you select one of the above reports, the Range Selection screen will display. To use the
entire Inventory file, press (ENTER) without specifying any parameters. To select parameters,
use the arrow key to select the field you want to use and press (ENTER). Follow any prompts
given for each entry.
=====================================================================
RANGE SELECTION FOR MONTHLY SALES HISTORY
STARTING ENDING
SKU NUMBER
1
999999
VENDOR NUMBER
1
9999
DESCRIPTION
################## ###################
MFG. PART NO.
################ ###################
LOCATION
########
########
CODE FIELD
##########
##########
DEPARTMENTS
1-99
PRICE TYPE
1
PRICE AMOUNTS
0 999999.99
QTY ON HAND
0 999999.99
M-T-D GM$
0
999.99
Y-T-D GM$
0
999.99
M-T-D SOLD
0 999999.99
Y-T-D SOLD
0 999999.99
PROMO SOLD
0 99999.99
PROMO DATES
01/01/00
12/31/00
LAST DATE
01/01/00
12/31/00
SUBTOTAL ON FIELD
VALID SELECTIONS: 1,2
TOTALS ONLY
N
F1 PROCESS F9 HELP F10 ABORT
=====================================================================
INVENTORY MANAGEMENT
19
To select data using the Description field, enter the description of the SKU and press (ENTER)
or use the spacebar to move the cursor to a particular position in the Description field and type in
the description character(s) for that position. This feature allows you to select inventory data
based on all or part of the SKU description. The location and code fields operate in the same
manner as the Description field. After entering your print parameters, press (ENTER). You will
be prompted to enter a special date for the report and press (ENTER) or just press (ENTER) to
use the current date and process the report.
CUSTOM REPORT GENERATOR
This unique feature will allow you to selectively view and print customized reports for all or part
of your Inventory Master file.
The first step is to define your custom report parameters. This may include presorting,
referencing the desired print data selection fields, selecting up to four (4) print lines of inventory
data and assigning a report name. After completion, the custom report parameters are stored to
be readily accessible for periodic reprinting. Up to twenty (20) custom reports may be defined
and saved for future use. A custom report name must begin with alpha (letters a-z or A-Z)
characters only. You may use numbers in the name after an alpha prefix, i.e., ABC123REP.
Once reports are named and saved, they may be recalled for display or printed by entering their
respective reference number and pressing (ENTER).
Practice and familiarity with the Custom Report Generator will make a vast array of
inventory information available to you in the format most useful to your store's operation.
The Custom Report Generator screen displays the following seven (7) pre-formatted reports for
your use or modification:
=====================================================================
1. GENERAL INVENTORY
2. INVENTORY PRICE LIST
3. UNIT GROSS MARGINS
4. INVENTORY VALUATION
5. COST OF SALES
6. PHYSICAL INVENTORY
7. ZERO SALES REPORT
=====================================================================
These report formats are very useful in assisting you to format your own custom reports. The
Function Keys at the bottom of the screen provide the following:
F1 - To add a new report, a reference number is not required.
F2 - To modify an existing report, first enter the reference number of the report to be modified
and press F2.
F3 - Is a toggle to allow you to display a report on the screen in lieu of printing. It is very useful
when setting up spacing on multiple line print operations prior to saving the final version.
INVENTORY MANAGEMENT
20
F3 resets to the print position upon leaving the Custom Report Generator program. (Be sure to
set this toggle before beginning to process your report.)
F5 - To delete a report that is no longer required, enter the reference number of the report to be
deleted and press F5.
F10 - Is the standard End/Abort selection.
Add a Report - To add a new report, press F1. The Sort Selection screen will display and
should be used if you desire the inventory data to be printed in a selected sorted sequence. The
options allow you to sort the Inventory Master file in any order you choose. You can also choose
to sort by several parameters at one time. Press F1 to save selected parameters or skip if no
parameters are selected. Press F9 (Help) for sort parameter assistance.
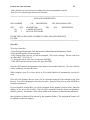
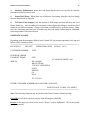
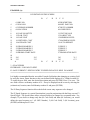
The Enter Print Selection screen will display. To select the detailed information you want to see
on the report, enter the reference number of each field in the order in which you wish to print or
display and press (ENTER). Press F2 to print all the fields that may be selected for custom
report generation. This print out is necessary to use the Custom Report Generator.
=====================================================================
ENTER PRINT SELECTIONS
SP'S
XX
XX
1
XX
1
1
XX
XX
FLD SELECTION
7
1
2
5
1
8
38
37
DEPARTMENT NUMBER
SKU NUMBER
DESCRIPTION
VENDOR NUMBER
VENDOR NAME
LOCATION
QUANTITY ON HAND
QUANTITY ON ORDER
LEN
LINE
( 4)
( 7)
(25)
( 5)
(26)
( 9)
( 9)
( 9)
4
11
37
42
69
79
88
97
ENTER FIELD NUMBER OR (0) TO DELETE.
F1 SAVE F2 PRINT F3 NEW F4 SP'S F6 INSERT F7 DOUBLE F9 HELP F10 ABORT
=====================================================================
New Line - After entering the selected fields, you may insert line breaks (print a new line) by
selecting the field reference number with which you choose to start the second line and pressing
F3 New to insert a new line character.
Note: A maximum of four (4) lines of data may be printed. A field length indicator and a
cumulative line length counter is displayed to assist you in formatting your report.
Insert Space - To make the custom printed report more useful; you may insert separation spaces.
Select the reference number of the field where you wish spaces to be preceded and press F4 SP's.
Enter the desired number of spaces to be inserted and press (ENTER).
INVENTORY MANAGEMENT
21
Note: The number of spaces entered will be displayed under the SP's column. If you make a
mistake on any print data selection, repeat the process to reverse the action.
Insert - Pressing F5 provides the capability to insert fields. Press F9 (Help) for assistance.
Double Space - To insert a double space between print lines, press F7 Double. This facility is
useful on multiple line print reports where legibility is important.
Press F1 to save the print data selected for your custom report. You will be prompted to provide
a report name or press (ENTER) to default to inventory report number 1-10. You will be
prompted to enter a spool filename or press (ENTER) to default to INVREP 1-10. Upon
completion, you will return to the Main Custom Report menu where you can print/display the
report you have created by entering the report reference number and pressing (ENTER).
Range Selection Screen - This screen allows you to select a range of items upon which the
program will base its search of the master file. The more information you enter here, the more
specific the search will be. If you accept the default screen as it first appears, the search will be
as general as possible. The number sign represents a 'wild card' which tells the program to
retrieve anything that appears in that position in that particular field.
After making your range selections; Press F3 to toggle between Display and Print. Note that
each time you press F3, the highlight moves from one choice to the other.
To preview a long report before (or instead of) printing, press F3 until DISPLAY is highlighted
and press F1 to PROCESS. After processing, you may view the report one screen at a time. To
print the report, press F3 until PRINT is highlighted and press F1 to PROCESS.
Additionally, you may EXPORT your report data to an ASCII, comma delimited, text file. Press
F3 to highlight PRINT, next press F2 EXPORT FILE and then, press F1 PROCESS. The text
file will be placed on your hard disk with a file extension of Xnn (where nn = the number of the
terminal originating the report). Once the file is on the hard disk, it can be copied to a floppy
diskette using the Disk Utility, F2 Copy feature.
The command syntax is; Copy
40FILENAME.XNN to 32FILENAME.EXT where FILENAME.XNN is the name given by the
Report Generator and FILENAME.EXT is the filename and extension for the new DOS file.
(Note: Drive A: corresponds to 32 and B: to 33).
Change by Range - A major enhancement has been made to the report generator that allows
global changes to be made to the selected Master File fields. Any field that may be added or
changed by using a Master File Maintenance program may now be "changed by range". It is
highly recommended that a back up be made of the selected Master file before utilizing the
Change by Range feature.
INVENTORY MANAGEMENT
22
When selecting fields in the Inventory Master file, special care must be taken as changing some
fields may affect other related fields. For example, when unit cost is changed, gross margin or
price may change according to the parameters set in the Define Retailer. The order of precedence
is:
1. Unit Cost
2. Gross Margin
3. Price
Example: If the unit cost is changed without changing the gross margin or price, then the price
or gross margin will automatically re-calculate per the definition.
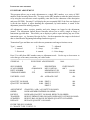
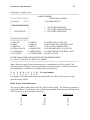
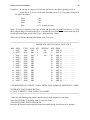
The first step in using the Change by Range feature is to determine the fields you wish to change.
For example: If you desire to change only the Unit Cost field on items costing one dollar (1.00)
to 1.10 because of a cost increase from your vendor, you would use the Add a Report F1 key to
create a report having minimum fields.
ENTER PRINT SELECTIONS
SP'S
XX
XX
XX
FLD
1
2
16
SELECTION
SKU NUMBER
DESCRIPTION
UNIT REPLACEMENT COST
LEN
(7)
( 25 )
( 10 )
LINE
7
32
42
After defining and naming the report, proceed to select the report for printing. When the Range
Selection screen is displayed, press F4 to invoke the "hidden" Change by Range prompt that will
be displayed on the right hand side of the Range Selection screen.
INVENTORY MANAGEMENT
23
Caution: The "hidden" F4 prompt prevents inadvertent use by non-experienced users. Change
by Range is an extremely powerful feature, which should only be used by someone thoroughly
familiar with the system and your business. Also, it should only be used after backing up the
target master file before processing any Change by Range operation.
=====================================================================
RANGE SELECTION FOR INVENTORY REPORT 10
SKU NUMBER
VENDOR NUMBER
DESCRIPTION
MFG. PART NO.
LOCATION
CODE FIELD
DEPARTMENTS
PRICE TYPE
PRICE AMOUNTS
QTY ON HAND
M-T-D GM%
Y-T-D GM%
M-T-D SOLD
Y-T-D SOLD
PROMO SOLD
PROMO DATES
LAST DATE
STARTING
ENDING
1
999999
1
9999
###################
####################
################
#################
########
########
##########
##########
1-99
1
0 999999.99
0 999999.99
0
999.99
0
999.99
CHANGE BY RANGE
0 999999.99
0 999999.99
0 99999.99
01/01/99
12/31/00
01/01/99
12/31/00
SUBTOTAL ON FIELD
VALID SELECTIONS :
TOTALS ONLY
N
F1 PROCESS F2 EXPORT FILE F3 DISPLAY/PRINT F9 HELP F10 ABORT
=====================================================================
When your range definitions have been completed, press F1 to process and proceed to the Match
Data - Change Data Selection screen. In the example, only the Description and Unit Replacement Cost fields will be displayed. The # sign is a wild card character that may be used to force
changes by range. In the example, all items costing $1.00 under Match Data will be changed to
$1.10 under Change Data. Press the Tab key to shift from Match to Change Data, Press F1 to
process the desired changes.
Price Type
This selection directs the program to use the selected price in conjunction with the starting and
ending price amounts in the range selection. When extended prices are used, the extended price
(4 to 10) may be selected to print in place of price 2. When 3P is entered in the price type
selection, the best price is selected, using the promo dates associated with each price, and printed
in place of price 3. If you enter .01 in the Starting Price Amount, the report will only include
items that have a price in the selected price type.
INVENTORY MANAGEMENT
24
Flag Selection Window
The flags provide a finite selection to the range of customers to print. Press F7 to modify the
flags. The cursor will move to the Flag Selection window. Use the arrow keys to select the flag
or flags to change. The allowed settings for the selected flag are displayed below the window.
When a flag entry is set to a (#) that flag is not used in the range selections. Press any function
key to return to the range selections.
Flags are checked for their true of false conditions. For example; if you wish to display all the
customers that have the profile flag set. Set the PFOFILE flag to Y and process. To print all
customers that are not LAYAWAY customer, set the LAYAWAY to N and process. If you have
more than one flag set the item must pass the entire selection criteria before it will print.
=====================================================================
INVENTORY REPORT 10
ENTER MATCH DATA, ENTER (#) IN POSITIONS NOT TO COMPARE.
ENTER NEW DATA OR LEAVE BLANK FOR NO CHANGE. (#=SKIP)
DESCRIPTION
UNIT REPL. COST
MATCH DATA
###################
1.00
CHANGE DATA
1.10
F1 PROCESS F10 ABORT
=====================================================================
After the Change by Range has been processed, an audit report will automatically be generated
indicating by SKU item the field content before and after.
UNIT COST SKU
---------1.00
1.10
1.00
1.10
1.00
1.10
1.00
1.10
1.00
1.10
100
AFTER
101
AFTER
102
AFTER
200
AFTER
800
AFTER
INVENTORY MANAGEMENT
25
PRINT INVENTORY LABELS
This program allows you to print labels using the format set up in label maintenance. You can
print inventory labels for SKU's on order and on hand. After selecting the type of label to be
printed, you will be prompted to define the range limits of your selection. To print multiple
labels for one SKU number, set the SKU starting and ending number equal to each other. Below
is an example of the Range Selection Default screen.
=====================================================================
RANGE SELECTION FOR INVENTORY LABELS
SKU NUMBER
VENDOR NO.
DESCRIPTION
MFG. PART NO.
LOCATION
CODE FIELD
DEPT. NUMBER
LABEL TYPE
STARTING
1
###########
##########
#############
#########
1-99
1
ENDING
999999
9999
###########
##########
##############
#########
F1 PROCESS F9 HELP F10 ABORT
=====================================================================
MONTH END AND MAINTENANCE PROGRAMS
This selection provides access to various Inventory Maintenance programs that should be used to
maintain the integrity of the inventory data after the initial entry process is completed.
=====================================================================
MONTH END AND MAINTENANCE PROGRAMS
1. PRICE MAINTENANCE
2. EXTENDED PRICE MAINTENANCE
3. PACKAGE MAINTENANCE
4. CROSS REFERENCE MAINTENANCE
5. SUBSTITUTION LIST MAINTENANCE
6. LABEL MAINTENANCE
7. ARCHIVE MAINTENANCE
8. SALES HISTORY MAINTENANCE
9. ZERO MONTHLY / YEARLY SALES
10. CLEAR ADJUSTMENTS JOURNAL
11. PURGE VARIANCE FILE
12. PURGE
PROMOTIONAL
MARKDOWN
DATA
=====================================================================
INVENTORY MANAGEMENT
26
Price Maintenance
This program provides the facility to plan for future SKU cost or price changes. This program is
useful when a price change is planned to take effect on a predetermined date. The changes can
be inputted but will not affect the current inventory prices until the date specified. For example,
if you were going to have a vendor cost and subsequent price change effective July 1st, and July
1st is three weeks away, you can change the cost and prices now and not implement them until
July.
At the SKU Number prompt, enter the SKU number that is to be changed and press (ENTER).
Use the arrow keys or the ENTER key to select the desired field to be changed, enter the new
cost or price. When completed, press F1 to save the changes and proceed to the next sequential
SKU.
=====================================================================
SKU NUMBER
100
DESCRIPTION
PET ROCK
SMALL SIZE
DEPT. NUMBER
AVERAGE COST
GROSS MARGIN 1
GROSS MARGIN 2
GROSS MARGIN 3
99
UNIT OF SALE
0.00 UNIT COST
EA
CURRENT
0.00
CHANGE
100.00 PRICE 1
3.99
100.00 PRICE 2
2.00
100.00 PRICE 3
1.75
PROMO START 11/10/00
PROMO STOP
11/15/00
EFFECTIVE DATE
ENTER THE SKU NUMBER TO CHANGE
F1 SAVE F2 NEXT F3 DISP/PRNT/CHNG F4 PROCESS F5 POST F10 ABORT
=====================================================================
If you desire an immediate cost or price change, enter the change and press F5 Post. The change
will be posted immediately to the Inventory file. If you desire to make a change by range of
items, select the Change by Range screen by pressing F3 to the Change prompt. Next enter a
valid SKU number and press (ENTER). Make the desired changes to the cost or to the price 1, 2
or 3 fields, and then press F4 to Process. The Range Selection menu will be displayed. Select
the desired SKU number, Department number and Vendor number range limitations. Use F2 to
select the "All or Match" criteria then press F1 to process. F3, All Stores, will be active if you
have a multi-store system and wish to update all stores.
INVENTORY MANAGEMENT
27
=====================================================================
STORE NO.
1
INVENTORY PRICE MAINTENANCE
16.25
RANGE SELECTION FOR DISP / PRNT / CHNG
SKU NUMBER
DEPT. NUMBER
VENDOR NUMBER
STARTING
100
99
100
ENDING
100
99
100
YOU HAVE CHOSEN TO CHANGE THE FOLLOWING ON
PRICE 1
MATCH DATA
3.99
CHANGE DATA
4.99
F1 PROCESS F2 CHANGE ALL / MATCH F3 ALL STORES F10 ABORT
=====================================================================
CAUTION: Inadvertently pressing F1 may store changes that are not desired.
To print or post updates, press F10 to return to the SKU prompt, then press F3 to print, F4 to
process or F5 to post.
Extended Price Maintenance
Extended price maintenance provides the facility for up to ten levels of discount. The extended
price flag must be set to “yes” in XMENU selection 4, Define Store Information, Selection 1,
All Selections.
If Extended Price Maintenance is defined in Define Store Information, Shift F3 will go to
extended price maintenance in the Inventory Entry Screen.
The system will always use the lowest price as determined by the start and stop dates. This
allows the merchant to select in advance by item SKU number, various levels of discount for
various promotion dates.
Selecting F2 next will display the next sequential SKU number, selecting F5 validate will
validate the SKU’s in the inventory and stores files.
This extended price maintenance augments the standard price 3 promo price feature in the event
the merchant desires more flexibility in discount pricing.
Multi-store Control
Multi-Store prices may be maintained by selecting the specific store numbers 1-21.
INVENTORY MANAGEMENT
28
When a Price Change entry is different for all Remote stores, the change must be entered
individually for each store. When the price change is the same for all stores, the change may be
made for store 1 and batch processed into the other store's price file.
To batch process the changes entered into store 1's price file to the other store, select store 0 at
the Price Maintenance Entry prompt; press F3 to select Change and press F4 to Process. The
Range Selection screen will be displayed after defining the desired ranges, press F1 to Process
the price changes. The next step is to post one store at a time by entering the store number and
pressing F5 to Post, or post all stores by entering store (0) zero and pressing F5 Post. Next, you
will be prompted with a message: "If This Is Correct, Press F1 to Process or F10 to Abort".
Package Maintenance
Upon entering the Package Maintenance program, you will be prompted for a package SKU
number. If the package flag is not set on the item entered, you will be advised, "This is not a
package. Do you want to set up a store kit? (Y or N)." Answering 'N' will allow you to enter
package information. Answering 'Y' will allow you to build a store kit. If an existing package or
kit SKU# is entered, the package or kit items will be displayed. Though similar in general
appearance and construction, the major difference between a package and a kit is in the way the
system processes the two.
A Package item (the SKU# under which the package will be sold) must have the package flag set
(Y) in inventory. Detail sub-component items within the package must not have the package flag
set. When a Package item is processed at End of Day, each item within the package is posted
individually.
A Store Kit item must not have its package flag set nor should any of the sub-component items
have their package flags set. Items in a kit are deducted from inventory at the time you choose to
BUILD the kit(s) in Package Maintenance. The number of kits built is added to the balance on
hand for the base SKU and the number built times the quantity of each sub-component within the
kit is subtracted from the balance on hand for each sub-component. The Inventory Adjustments
Journal reflects the changes made when a kit is built. A Kit may contain sub-components with
fractional quantities. At End of Day, a Store Kit is processed as an individual item.
In summary, a Package is treated as a single inventory item at point-of-sale, with the subcomponents posted during End of Day. A Store Kit is treated as a single item at point-of-sale
and at End of Day processing. The detail sub-components of both the Package and Store Kit
must not have the Package flag set in Inventory.
To Setup a Package:
1. First, set the Package SKU flag in Inventory to 'Y' (only on the package base item, not on the
detail sub-component items in the Package).
2. Next, select 'PACKAGE MAINTENANCE' from the 'INVENTORY MONTH END
AND MAINTENANCE' menu.
3. Enter the SKU number for the package. If the Package SKU flag has been set properly, you
will be prompted for the SKU's to be included as sub-components of the package.
4. Enter the quantity for each item in the package or press enter to leave it at 1.
INVENTORY MANAGEMENT
29
Notice that the unit cost increases according to the items and quantities entered.
Press F1 to save the package when you are finished.
=====================================================================
PACKAGE MAINTENANCE
SKU NUMBER
SKU
101
102
QTY
1
1
100
DESCRIPTION
DESCRIPTION
LARGER PET ROCK
NEST OF PET ROCKS
SKU
PET ROCK SMALL SIZE
QTY
DESCRIPTION
ENTER THE PACKAGE SKU NUMBER TO ADD, CHANGE OR DELETE
F10 END
=====================================================================
Store Kit
To set up a Store Kit:
- Select Package Maintenance from the Inventory Month End and Maintenance Menu.
- Enter the SKU number for the Store Kit.
- If the Package Flag is not set, you will be prompted, "This is not a Package. Do you want to set
up a Store Kit?" (Y or N?) - N.
- To set up this item as a kit, enter Y and press (ENTER).
- If the SKU entered is not the correct one, press (ENTER).
Enter the SKU numbers and quantities of the items to be included in this kit. The cost of the kit
will be updated as you enter the items.
When complete, press F1 to Save the kit or F2 to Build (Build will automatically save the kit
item).
If the Kit Cost changes, the new price will be calculated using the Gross Margin in the Item
Record. You will be prompted to enter the new price. Enter the new price or press (ENTER) to
keep the original price.
If you selected F2 to Build Kits, you will be prompted for the number of kits to build. Enter the
number of kits up to 999 to build. The kit will be assembled from the Items and Quantities
defined in the kit. The number of kits will be added to the Quantity on Hand and the individual
Items Quantity on Hand will be reduced by the quantities defined. The Adjustment Journal will
be updated to reflect the changes.
INVENTORY MANAGEMENT
30
=====================================================================
PACKAGE MAINTENANCE
11:09
STORE KIT
SKU NUMBER
SKU
99999
99998
99997
99996
QTY
4.000
4.000
4.000
1.000
1000
DESCRIPTION
UNIT COST
DESCRIPTION
SKU
#10 SPLIT WASHER
#10 HEX NUT
#10 MACHINE SCREW
PET ROCK MTG. BRKT
PET ROCK INSTALL KIT
.390 PRICE 1 2.99
QTY
DESCRIPTION
ENTER THE NEXT SKU TO BE INCLUDED.
F1 SAVE F2 BUILD KIT F5 DELETE F10 ABORT
=====================================================================
Cross Reference Maintenance
This program provides for the UPC code or manufacturer's part number of a replacement SKU
item to be cross-referenced to the primary SKU item maintained in the Inventory Master file. For
example: Libby glassware may be the primary inventory line with Corning glassware as a
secondary line. Rather than using two different SKU item numbers for an 8 oz. glass, a cross
reference UPC code could be used for a secondary line with all sales of 8 oz. glasses
accumulating under one SKU number.
=====================================================================
STORE NO. 1
CROSS REFERENCE MAINTENANCE
17:06
SKU NUMBER
UPC NUMBER
VENDOR NUMBER
UPC/EAN
12457
235663
100
2222226
100
DESCRIPTION
MFG. PART NO.
UNIT REPL. COST
MFG. PART NUMBER
ABCPET
ABCCOPY
PET ROCK SMALL SIZE
RRR 4/92
VEND
100
200
COST
.30
.25
TAB SIDE F1 SAVE F2 NEXT F3 PRINT F5 DELETE F10 ABORT
=====================================================================
Substitution List
The Substitution List feature is a multiple-use program that is used in conjunction with SKU
Item cross-reference. Its use at the point of sale is to display items that are functionally
equivalent but may have different SKU numbers and prices. For example: The SKU number for
an eight (8) oz. Libby glass may be 1001 @ $1.10 each. A substitute may be an eight (8) oz.
INVENTORY MANAGEMENT
31
Corning glass, SKU number 2010 @ $1.25 each. In the event you are out of stock on the primary
SKU item, you have an equivalent SKU item in stock at a different price.
Another use for the Substitution List is an author cross-reference list. The author is assigned a
SKU number, i.e., SKU number 1000 for Stephen King author. The books written by Stephen
King may be assigned to 202020, 30000, 400600 etc. When item number 1000 is crossreferenced, the books written by Stephen King will be displayed.
The first step in using the Substitution List feature is to define the Function codes used by the
Express screen. With the cursor at the SKU Entry prompt, press the Escape (ESC) key followed
by pressing "S" and "U" to initiate the keyboard set up process. Locate the Item X-REF key and
enter the reference number then press the key for this function and press F1 to Save. If you are
using the Generate Invoice program, the Item X-ref function uses a fixed (") key. Next, select
Inventory Management, Month End and Maintenance programs, Substitution Maintenance. At
the prompt, enter the primary SKU item number followed by the replacement substitution SKU
numbers. The system requires you to enter substitution SKU item numbers in the Inventory
Master file even if the substitution items are not normally stocked. Up to 41 substitution items
are allowed for each primary SKU number.
When at the point of sale, enter the primary SKU item number and press the appropriate item
cross-reference key. The cross-referenced items will be displayed in a window on the screen.
Label Maintenance
This program allows for the customization of inventory labels. The parameters of the selected
label type are defined prior to proceeding to the label layout grid. To print bar codes on labels
the number of characters (selection 3) across each label must be set to a minimum of:
10 pitch = 16 characters
12 pitch = 20 characters
17 pitch = 28 characters
20 pitch = 32 characters
The maximum print positions on an 80-column printer are 80 at 10 CPI and 160 at 20 CPI. At 6
lines per inch, the bar code takes 2 lines; at 8 lines per inch, the bar code takes 3 lines. The label
contents and line position may then be defined by using the screen outline guide.
=====================================================================
INVENTORY LABEL MAINTENANCE
THIS PROGRAM PROVIDES THE FACILITIES TO CUSTOMIZE THE LABEL PARAMETERS FOR YOUR
SPECIFIC APPLICATION
LABEL NUMBER 1
5
10
16
17
LABELS ACROSS PAGE (1 - 20)
PITCH. CHARACTER PITCH (10, 12, 17, 20)
PRINTABLE POSITIONS ON THIS LABEL (8-40)
PRINT POSITIONS FROM LEVEL EDGE OF FIRST
LABEL TO NEXT (8-99)
6 LINES PER INCH. LINE SPACING (6, 8)
9 PRINTABLE LINES ON THIS LABEL (1-12)
11 LINES FROM THE TOP OF ONE LABEL TO TOP OF
THE NEXT (1-99)
ENTER SELECTED DATA AND PRESS (CR). USE ARROW KEYS TO POSITION CURSOR
INVENTORY MANAGEMENT
32
F1 SAVE F2 BLAZER F9 HELP F10 ABORT
=====================================================================
At the Label Maintenance screen, you must enter the label number you wish to edit. Numbers 1-7
are used for inventory items and numbers 8-10 are shelf labels.
Next you must designate the numbers of labels to be printed across the page 1-20.
The character pitch - 10, 12, 17, 20, refers to the printable characters per inch.
The printable positions on the label refer to the numbers of print characters desired (8-40).
The print positions from the left edge of the first label to the left edge of the next label must be
equal to or greater than the number of printable characters on the label.
Lines per inch is the number of lines required for one inch vertical spacing.
The number of print lines on the label range from 1-12.
The number of lines from the top of one label to the top of the next label must be equal to or
greater than the number of printable lines on the label.
Set the number of labels down the page to equal the page layout of the label stock.
0=Continuous Form 5=Five labels down the page.
Note: The bar code (P) and UPC number (O) positioning should be left justified on the label
definition grid as the system will center it on the label prior to printing. Laser Printers must be
Epson Graphics compatible. (E.g. Brother HL-630)
Press F1 Save to proceed to the Label Contents screen.
INVENTORY MANAGEMENT
33
Following is a sample screen:
=====================================================================
LABEL NUMBER 1
*********************
TO POSITION CURSOR
*AAAAAA
CCC *
USE ARROW KEYS
*
*
* BBBBBBBBBBBBBB *
*
*
( ^ ) TO START/STOP BOLD
*
*
( ~ ) TO START/STOP DOUBLE HI
* GGGGGGGGG
*
( + ) TO START/STOP BOTH
*
*
*
*
*LLLLLLLLLLLLLLLL *
********************
A=SKU NO
G=PRICE 1
M=STORE NOS=F.O.B COST
B=DESC
H=PRICE 2
N=MFG PART NOT=PROMO START
C=DEPT NO
I=PRICE 3
O=SCAN NOU=PROMO STOP
D=TODAYS DATE
J=LABEL TYPE
P=SCAN BARCODEV=TAX LEVEL
E=VENDOR NO
K=DEPT NAME
Q=CODE FIELDW=UNIT REPL. COST
F=LOCATION
L=STORE NAME R=UNIT OF SALE
ENTER CHARACTER ASSOCIATED WITH THE DESIRED FIELD
F1 SAVE F5 DELETE F9 HELP F10 ABORT
=====================================================================
Note: When selecting (W) unit replacement cost, a coded alpha cost will be printed. This
encoded amount will disguise the true replacement cost from customers. In order to decode the
price information, a translation of the alpha codes are listed below:
Y O U B E S L I C K X= repeat number
1 2 3 4 5 6 7 8 9 0
For example: If the alpha code for the unit replacement cost is BICX, the true price for this
particular item is $48.99.
Blazer Printer Label Maintenance
The setup for Blazer labels differs from the OKI-320 label setup. The following procedure is
used for the Blazer 2.4 inch printer only. Labels may be printed at the same pitch settings as the
OKI-320; however, the actual pitch is different.
CPI
LABEL MAX
PITCH
10
12
17
20
10
12
15.5
23.3
24
28
37
56
INVENTORY MANAGEMENT
34
If two (2) across labels are used, then set the number of characters on the label to one half (1/2)
the label maximum.
Special Character Functions
The special character functions defined for the OKI-320 perform different functions on the
Blazer.
(^)
(~)
(+)
(`)
STARTS AND STOPS UNDERLINE
STARTS AND STOPS INVERSE PRINT
SET CORNERS FOR DRAW BOX
DOUBLE SIZE BOLD CHAR
Underline
Set a (^) at the beginning of the field to be underlined. Set a (^) at the end of the Underlined
field. If the underlined field is to stop at the label edge, then no stop character is required.
Inverse
Set a (~) at the beginning of the field to be printed in with black background and white letters.
Set a (~) at the end of the Inverse field. If the inverse is to stop at the label edge, then no stop
character is required.
Draw Box
Set a (+) at all corners of the box or boxes to be drawn. There can only be one box start and stop
on a line. If more than one box is desired on a label, they cannot share a common line except for
the last line of the previous box.
Double Size Bold Char
Set a (‘) at the beginning of the field to print double size bold characters. Set a (‘) at the end of
the field to print double size bold characters. If the double size bold is to stop at the label edge,
then no stop character is required.
Archive File Maintenance
This program provides the facility to maintain the 13 month Archive History file. The quantity
sold, retail price and cost data is maintained by SKU number and by department. The Archive
file is posted at the closing of each month by executing Zero Monthly/Yearly Sales.
Sales History Maintenance
The sales history maintenance facility allows adjustments to be made in the monthly/yearly sales
and in the department totals. Sales returns, discount coupons and cost of sales are maintained by
department account totals. Cash, check, coupon, bankcards, non-taxable and taxable are
INVENTORY MANAGEMENT
35
maintained both month to date and year to date. Clerk sales, clerk gross margin and commission
sales are also maintained by this program.
Zero Monthly/Yearly Sales
This program zeros the month-to-date units and dollars for each SKU in the Inventory file. If
year-to-date is selected then both year-to-date and month-to-date figures will be cleared.
Running this program will update the Archive file, Inventory Master, Customer Master and Sales
History files.
Clear Adjustments Journal
Provides the facility to clear the Adjustments Journal after an audit listing has been printed.
Purge Variance File
The Variance Report file should be purged only after the report has been printed. This selection
will purge the Variance file.
Purge Promotional Markdown Data
The promotional markdown sale data should be purged after the report has been printed. This
selection will purge the promotional sales data for all SKU's that are not on PROMO.
Reorganize Stores File
This selection will appear only if you have the multi-store feature installed. It provides the
facility to reorganize the stores file.
Additional System Programs
The following programs are not menu selections. They are direct run programs that are accessed
by pressing F6 at any menu, typing the program name and pressing Enter. (See also Appendix
D.)
Note: It is extremely important to backup the correct data file before making changes using one
of these programs.
Inventory Delete by Range (INVPURGE)
This program provides the facilities to delete inventory items by range and selected activity
parameters. Items to be deleted will be marked in the quantity counted field. An audit trail will
be printed for all items deleted.
SET DATA FIELDS (SETINV)
INVENTORY MANAGEMENT
1. Set Beginning Balances
36
This program loads the beginning balance field in each inventory item from the current balance
on hand.
2. Set Replacement Cost
This program sets the replacement cost for append items equal to the base item and calculates the
price or gross margin as defined.
3. Set Department Totals
This program sets the department MTD and YTD sales in the history file to match the totals in
the inventory master file.
4. Set Average Cost from Replacement Cost
5. Set remote store prices equal to store 1
This program will calculate a new promo price. The operator may enter an amount or a
percentage to reduce price 1. The new price is store in price 3. When extended prices are used,
prices 4 to 10 may be selected. An audit trail is printed from the prices that are changed and the
multi-store update file is written.
Press F6 then type SETPRC and (ENTER). If extended prices are used the extended price master
will be validated. The SET PRICE BY RANGE screen will be displayed. Enter the amount or
percent to reduce price 1 by and press enter. Enter the desired data in the fields and press F1 to
Process. The data entered will be tested and you will be asked to verify the minimum gross
margin entered. If the minimum gross margin is corrected, press Y and enter. The range
selection screen will be displayed. Enter the desired ranges and press F1 to Process. The price
for each item that meets the range selections will be calculated. The item will be updated if the
new gross margin is equal to or greater than the minimum gross margin. When complete the
SET PRICE BY RANGE screen will be displayed. You may select to change another price or
press F10 to end. If extended prices are defined, extended price maintenance will be executed in
change mode. You may edit the price changes made by pressing F2 to step through the changed
items. Press F10 to accept the changes.
6. Set remote store prices equal to store 1
INVENTORY MANAGEMENT
THIS PAGE INTENTIONALLY LEFT BLANK FOR FUTURE USE.
37
PURCHASING & RECEIVING
38
The Purchasing and Receiving module includes Multi-Store Purchasing and Distribution
provided that the Multi-Store main package has been installed. This is accomplished by a
prompt asking for the store number at the beginning of each Menu selection. Enter a one (1) if
executing the selection for the Main store or enter the Remote store number if initiating the
selection on behalf of the Remote store.
Host Store: Purchase Orders may be initiated and received for a Remote store by the Host. The
order and subsequent receipt will be transmitted to the Remote store via the Communications
module. If the Remote store receives an order form that was produced by the Host, a
confirmation receipt will be transmitted to the Host.
Remote Store: Purchase orders that are initiated by the Remote store will be transmitted to the
Host. When the ordered goods are received, an advisement receipt will be transmitted to the
Host.
Temporary Purchase Order: The temporary order number or name is printed on the finalized
purchase order to facilitate the tracking of who originated the order. This feature is valuable
when goods are received and the ultimate destination may be in question.
The Purchasing and Receiving menu offers the following selections:
=====================================================================
1. BUILD RECOMMENDED PO
2. EDIT/PRINT/POST PO
3. RECEIVE PO
4. CALCULATE MIN-MAX
5. PRINT PURCHASE ORDERS
6. PRINT LABELS BY PO
7. CUSTOM REPORT GENERATOR
8. PURGE PO FILE
9. PURCHASING PARAMETERS
10. VENDOR MAINTENANCE MENU
=====================================================================
Note: Before creating a Purchase Order (PO), be sure the vendor number is in the Vendor file
and all the SKU numbers to be ordered have been put in the Inventory file. Purchasing
parameters must be defined prior to using the system.
BUILD RECOMMENDED PO
The Build Recommended Purchase Order program will search the Inventory Master file and
create a temporary order. The order can then be edited before posting to the Open Order file.
Recommended orders are created for a single vendor. After entry of the vendor number, the
system will display the vendor name and a default order title of Ponnnnnn (where n = the vendor
number). You may enter a different temporary order title of up to eight (8) characters or press F1
to use the default title.
PURCHASING & RECEIVING
39
A SKU number
The Order Title feature allows multiple temporary orders to be entered against the same vendor
by different buyers using their own temporary name for the order title. It is suggested that a
meaningful alpha prefix be used, followed by a sequential numbering scheme. This will allow
the temporary PO’s to be identified by using the Disk Directory function. In order to purge or
delete a temporary PO, the order title must be remembered or identifiable.
If the temporary PO order filename already exists, you may press F1 to append to the order, press
F2 to change the name, press F5 to delete the order or F10 to abort. If this is the correct vendor,
and the order title has not been previously used a Temporary Purchase Order file will be created
using the maximum number of lines defined in the Purchasing Parameters Control file.
Vendor number 9999 is used to build a suggested order for all items and vendors; you may select
a range if desired. Suggested orders created using vendor 9999 can be printed using the Print PO
Worksheet or the Custom Report Generator, however, they cannot be posted to the Purchase
Order File.
=====================================================================
BUILD RECOMMENDED PURCHASE ORDER
VENDOR NUMBER: 100
ORDER TITLE :
SKU NUMBER
VENDOR NUMBER
DESCRIPTION
MFG. PART NO.
LOCATION
CODE FIELD
DEPARTMENTS
ABC WAREHOUSE
PO100
STARTING
1
100
######################
####################
########
##########
1-99
ENDING
999999
100
#######################
#####################
########
##########
F1 PROCESS F10 ABORT
=====================================================================
Note: By entering data and pressing (ENTER), you will move from field to field or use the
Arrow keys to select the desired field. SKU's to be purchased may be selected by ranges of SKU
and vendor numbers, wild card descriptions, locations, code fields, or manufacturer's part
numbers. Any department or combination of departments may be selected.
The system will generate a suggested order for SKU numbers that meet the order criteria and fall
within the ranges set up by the operator. An entry in the fields indicated with pound signs (#) are
wild card entries. A (#) indicates any character in this position will be used. If specific
characters are desired, enter them in the positions desired. Otherwise enter pound signs (#).
PURCHASING & RECEIVING
THIS PAGE INTENTIONALLY LEFT BLANK FOR FUTURE USE.
40
PURCHASING & RECEIVING
41
Once the range selections have been made and F1 process has been pressed, you will be asked to
select one of (3) methods to create the purchase order.
(1) You may select to use the min/max calculation that uses the minimum/maximum levels that
has been entered by SKU in the inventory master file in conjunction with the purchasing
parameters to create the order.
(2) You may create an order simply by using the quantity sod-to-date to replenish the sold SKU
items. This method is used most often by C-Stores where shelf space is critical and turn over
is high.
(3) You may also create an order by using a (PDT) portable data terminal file that was
previously down loaded via the physical inventory module. Hardware stores frequently use
this method to order merchandise.
If you select the min / max method to create an order, the program will search through the
inventory file and find those SKU items to be ordered. A SKU number needs to be ordered if the
balance on hand plus the balance on order (in sight) is less than the difference between the in
sight and the reorder point rounded to the nearest case. If the maximum is other than zero, then
the quantity ordered will be the difference between the insight and the maximum rounded up to
the nearest case.
For each SKU number that needs to be ordered, an entry will be placed in the Temporary
Purchase Order file. PO numbers are not assigned until the temporary order has been posted to
the Open Order Master file. You must use care to remember your temporary order name for
editing and posting purposes.
SKU Number
Enter the range of SKU numbers you want to include on this order.
Vendor Number
Some SKU numbers can be purchased from more than one vendor. If you want the system to
look at SKU numbers that have a primary vendor other than the one selected, enter the desired
vendor number range.
Description
Enter the description or specific characters and wild card characters you want included on this
order.
Mfg. Part No.
Enter the manufacturer's number combined with wild cards to produce a range of manufacturers'
numbers, i.e., LAG####### for all manufacturers' numbers starting with LAG.
PURCHASING & RECEIVING
42
Location
Enter the location or specific character and wild card characters you want included on this order.
Code Field
Enter the Code field or specific characters and wild card characters you want included on this
order.
Departments
Enter the department number or range of department numbers you want included on this order.
To create an order for SKU numbers in departments 3, 7, 8, 9, and 20, enter the following: 3, 7-9,
20.
To Process This Order
When your selections are correct, press F1 and select either the min/max calculation, the quantity
sold, or the (PDT) file to create the PO. Enter your selection and press (ENTER). The system will
search the Inventory file for SKU numbers that meet your specific parameters. If the SKU
numbers found meet the order criteria, they will be on this order. The system will then proceed to
the Edit/Print/Post PO screen.
=====================================================================
EDIT/PRINT/POST PURCHASE ORDER
VENDOR NUMBER
100
REMIT: ABC WAREHOUSE
ORDER DATE
DATE REQUIRED
FREIGHT CHARGES
MISC. CHARGES
ORDER TITLE
PO100
SALES:
08/04/00
08/18/00
0.00
0.00
SHIP VIA
BUYERS NAME
CONFIRMING TO
F.O.B.
NOTES:
-----------------------------------------------------------------------------------------------------------------1.
2.
3.
4.
PRINT PO WORKSHEET
CUSTOM REPORT GENERATOR
POST AND PRINT PO
POST PO (NO PRINT)
ENTER REFERENCE NUMBER:
F1 SAVE F2 EDIT F3 TOGGLE R/S F5 DELETE ORDER F8 PAGE F10 ABORT
=====================================================================
PURCHASING & RECEIVING
43
Since the vendor number, order title, and temporary PO have been processed, you may proceed to
edit the Purchase Order.
EDIT/PRINT/POST PURCHASE ORDER
Enter the vendor number and temporary order title for the PO to be processed and press
(ENTER). The vendor's name and address and the existing temporary PO information will be
displayed. If the selected vendor does not have a temporary order on file, one may be created at
this time.
To Edit the Purchase Order
Press F3 to select the Remit or Sales address. Press F2 to edit or modify the pertinent PO order
terms. Press the ENTER key or cursor control arrow keys to cycle through the Purchase Order
fields that may need to be changed, including any notes that are necessary to explain the PO.
Press F1 to save the data and re-display for reference. Press F8 Page to proceed to the Purchase
Order detail data entry screen.
SKU Data Screen
This facility allows viewing and editing the SKU numbers on order. You may add new SKU
numbers to the order, change existing ordered SKU numbers or delete existing ordered SKU
numbers. If order data already exists, the first twelve (12) lines of the order will be displayed.
While at the SKU entry prompt you may enter the manufactures part number of the description to
bring up the desired SKU item number. At any time you may arrow up to edit a line and the
totals will change to reflect the extended line item cost and inventory notes window while at this
screen.
Note: The PO totals reflect the entire PO, not necessarily the first page. Line numbers are for
reference only. The current order status On Hand, On Order and In Sight of a selected SKU
number will be displayed at the bottom of the screen. Use the cursor control keys to select the
line to be processed or changed. If the desired line is not on the page displayed, use Page Up or
Page Down arrows to display the correct page.
The HOME key will display the first page of the PO and highlight the first line on the order.
The END key will display the last page of the PO and highlight the last line on the order.
To Change a Line
Move the cursor to the line to be changed and press (ENTER). Enter the order information for
this SKU number as prompted or press (ENTER) to leave the displayed information the same.
The quantity on order may be changed to reflect a "case" order changed to "each" at the Quantity
prompt by using the F1 Toggle function.
PURCHASING & RECEIVING
44
To Add a Line
Press F2 to add a SKU number to the end of the PO.
To Search for the Next Available SKU Number
If you know the new SKU number has not been used before, enter the number and press F2
ADD. The program will chain to the inventory screen and display the entered SKU, press F2
again, if the SKU has not been used the screen will switch to add mode and you will continue
with description and other inventory entry fields. When you complete the inventory entry
process press F1 to SAVE the data and press F10 to EXIT/RETURN to order detail screen.
To use the search facility, enter a SKU that is known to be in the inventory master file and press
F2. The program will chain to the inventory entry screen and the known SKU number will be
displayed, press F2 again to find the next available SKU item. The entry program will switch to
add mode and you may continue to enter the inventory data. Press F1 to SAVE the entered data
and then press F10 to return to the order detail screen.
The next available SKU Search facility uses the second vendor entry for SKU item #1 as the
increment counter. This field was selected since SKU item #1 is the default for items not defined
and the second vendor field not used for another purpose. Enter the desired search increment in
this field prior to using the Next Available SKU Search facility. If a search increment is not
entered, the default increment (10) will be automatically set by the system.
To Delete a Line
Position the cursor to the line to be deleted and press F5. This line will be deleted from the PO.
To Display Order Status
The order status of a selected line is automatically displayed at the bottom of the screen as the
cursor passes the SKU entry fields.
To Display Totals
Totals are automatically updated and displayed as SKU's are entered. When completed, save by
pressing F1 which will return to the Edit/Print/Post PO screen to allow printing and/or posting of
the PO.
To Exit This PO
When editing of this order is complete, press F1, Save. The order being edited is saved and the
Edit/Print/Post PO screen will be displayed to allow printing or posting of the PO.
PURCHASING & RECEIVING
45
1) Print Worksheet
This selection prints a purchase order work sheet, listing quantity ordered, manufacturers part
number, description, cost, retail, units ordered and on hand. The worksheet is useful when
editing the purchase order as well as when receiving the order.
2) Custom Report Generator
This function allows you to create your own temporary order report by selecting the sort
parameters and the print selections that you want on the report. Refer to Custom Report
Generator in Inventory Management for detailed instructions on adding or modifying a report.
3) Print and Post PO
This function will print the final copy of this order and post it to the Order Master file. The
inventory SKU's ordered will be updated to reflect the new quantities ordered. If the Change
Cost at Order is set in the Control file, the unit replacement cost for the ordered SKU's will be
updated.
4) Post PO (No Print)
This function is the same as 2; however, no printed copy will be made. If you need to send a
copy to your vendor, use the Print and Post option.
To Delete This PO
Press F5 to delete this order from the system. The Inventory or Order file will not be affected
because the order has not been posted. After an order has been posted, it cannot be deleted using
this function. You must use the Receive PO program.
To Abort without Saving Changes
By pressing F10, you will abort the entry on this order without saving the changes. This can only
be used before changing any PO data.
To Save This Purchase Order
Press F1 to save the order as displayed on the screen. It does not post to the Inventory and Order
file. To edit other temporary PO’s, press F10 at the Enter Reference Number prompt. If no
additional PO’s are to be edited, press F10 twice to end the program and return to the Purchasing
and Receiving menu.
RECEIVE PO
The Receive Purchase Order program allows you to quickly receive merchandise into your store.
You may receive an entire PO or receive individual SKU's from an order without receiving the
entire order. You may also add to the PO at the time of receipt.
PURCHASING & RECEIVING
46
If you wish to cancel part or all of an existing PO, you simply receive the portion that came in,
then cancel the PO using the Cancel Purchase Order selection.
Enter the PO number at the prompt. If unknown, press F1 for Vendor PO Inquiry. Enter the
vendor number and press (ENTER). All outstanding PO’s will be displayed for your reference.
Enter the desired PO number and press (ENTER). Press F1 to modify the PO terms. Press F5 to
cancel the order or F8 Page to proceed with editing the PO. Select 1) to Receive the PO or 2) to
Receive Exceptions and proceed with receiving the SKU items on the PO.
1) Receive Purchase Order
This selection receives the selected PO into the Inventory file. When complete, the enter
Purchase Order Number prompt will be displayed.
2) Receive Exceptions
This function allows you to edit the PO as you receive each line SKU. After all exceptions are
entered, you can then receive the rest of the PO using the Receive Purchase Order option. You
may add to the PO by pressing F3, Add a Line. Enter the SKU number or manufacturer's number
and press (ENTER).
SKU's which have been edited and received using the Receive Exceptions option will not be
received by the Receive Purchase Order function. The first line will be highlighted. Use the
cursor control keys to highlight the line to be processed or enter the line number to highlight.
Press the page up or page down key to select the page then use the cursor Up and Down arrows
to move to the line to be processed.
The HOME key will display the first page of the PO and highlight the first line on the order.
The END key will display the last page of the PO and highlight the last line on the order.
To Receive Line
Move the highlighted line to the line to be received and press F1. This line will be received as
displayed. Enter the order information for this SKU as prompted or press (ENTER) to leave the
displayed information the same.
To Change and Receive
Move the highlighted line to the line to be received and press F2. Enter the quantity received and
press (ENTER). You will then be prompted to enter the new cost, margin and retail. At these
prompts, press (ENTER) if there is no change. If there is a change, the line will be flagged
(noted by the "R" at the end of the line) and Receive PO will not receive it.
PURCHASING & RECEIVING
47
To Edit Purchase Order Detail
Pressing F8 Page will allow editing of SKU's on order at the time of receipt. You may add new
SKU's to the PO, change existing ordered SKU's or delete existing ordered SKU's.
To Edit a Line
Pressing F1 allows the change of the SKU line on order.
To Add a Line
Pressing F2 allows for adding SKU's received to the PO.
To Abort
Pressing F10 allows exiting of the Receive Purchase Order screen.
To Cancel a Purchase Order
Pressing F5 will delete all line SKU's for this PO from the Order Master file. The on-order data
in the affected inventory records will be changed to reflect the cancellation.
To Allow Multi-Store Distribution
Enter the Receive PO program as store one (1) Host, enter the PO number to received, select 2)
Receive Exceptions, select the line item SKU you wish to distribute and press F3 Distribute.
Enter the quantity you wish to receive and distribute and press (ENTER). The quantity ordered
and the quantity received will be displayed at the bottom of the screen. Enter the quantity to be
transferred to each store, select the desired store by using the Up/Down arrows. You may
transfer more than the quantity ordered provided the balance on hand is positive. When
complete, press F1 Save.
The Distribution program uses the inventory adjustment facility for the tracking of receipts and
transfers to the remote stores. To create a multi-store distribution report, select the print
inventory adjustment journal Custom Report Generator and select F1 Add a Report. The Sort
selections should be in the following priority. (5) To / From Store (4) Transaction Type (6)
Transaction Date.) Enter the following suggested print selections and name the report
"Distribution Report".
=====================================================================
PURCHASING & RECEIVING
48
ENTER PRINT SELECTIONS
SP'S
FLD
1
2
3
4
21
6
42
SELECTION
SKU NUMBER
DESCRIPTION
DEPARTMENT NAME
ADJUSTMENT TYPE
PURCHASE ORDER NO.
ADJUSTED QUANTITY
DASHES
LEN
(7)
( 25 )
(4)
(4)
(7)
(9)
(6)
ENTER FIELD NUMBER OR (0) TO DELETE.
CURSOR.
LINE SP'S
7
32
36
40
56
65
71
FLD...
LEN
LINE
USE ARROW KEYS TO POSITION
F1 SAVE F2 PRINT F3 NEW F4 SP'S F6 INSERT F7 DOUBLE F9 HELP F10 ABORT
=====================================================================
The report data remains in the file until you purge the adjustment journal. To run the report,
select the reference number of the Distribution Report and press (ENTER). At the Range
Selection screen, enter transaction type 4 starting and 4 ending to limit the report to distribution
transfers. For reference, the transaction types are:
1 = Sale
2 = Return
3 = Receive
4 = Transfer
5 = Lost
6 = Adjustment
7 = Adjustment
8 = Order
CALCULATE MIN/MAX STOCKING LEVELS
This program is designed to assist you in keeping the appropriate stocking level for each SKU in
the Inventory file. Calculation is based on actual sales data from previous periods and from
operator input.
You have the ability to automatically set the minimum/maximum stocking level fields in the
inventory record, thereby influencing future orders generated using Build Recommended
Purchase Order program. Use one or all of the range parameters. This will allow you maximum
flexibility in targeting specific SKU groups.
PURCHASING & RECEIVING
49
The Calculate Minimum/Maximum Range Selection screen follows. Press (ENTER) or use
Arrow keys to cycle through the following fields:
=====================================================================
CALCULATE MINIMUM/MAXIMUM STOCKING LEVELS
STARTING
ENDING
SKU NUMBER
1
999999
VENDOR NUMBER 1
9999
DESCRIPTION
####################
MFG. PART NO.
###########
LOCATION
#########
CODE FIELD
############
DEPARTMENTS
1-99
ENTER % INCREASE OR DECREASE
SET MINIMUM STOCKING LEVEL? (Y/N)
SET MAXIMUM STOCKING LEVEL? (Y/N)
ENTER LEAD TIME IN DAYS
ENTER DAYS OF SHELF/SAFETY STOCK
ENTER ORDER FREQUENCY IN DAYS
#####################
###########
#########
############
0.0
Y
N
14
7
30
MONTHS-JAN FEB MAR APR MAY JUN JUL AUG SEP OCT NOV DEC
F1 PROCESS F5 SET SELECTION TO DEFAULT F10 END
=====================================================================
Vendor Number
If you want to calculate the stocking levels for only one vendor or a selected range of vendors,
enter the desired vendor number range.
SKU Number
Enter the range of SKU numbers you want to be included during this calculation.
Description
Enter the description or specific characters and wild card characters you want included during
this calculation.
For example: Enter Stanley 20 ft. tape. You will calculate the min/max for only this SKU.
Another example: Enter Stanley to calculate the min/max for all SKU's which have a description
starting with Stanley.
PURCHASING & RECEIVING
50
Mfg. Part No.
Enter the Manufacturer's Number combined with wild cards to produce a range of manufacturers'
numbers (i.e., L A G # # # # # # # for all manufacturers' numbers starting with LAG).
Location
Enter the location or specific character and wild card characters you want included during this
calculation.
Code Field
Enter the Code field or specific characters and wild card characters you want included during this
calculation.
Departments
Enter the department numbers or ranges of department numbers to be included. To create an
order for SKU's in departments 3, 7, 8, 9, and 20, enter the following 3, 7-9, 20. Selections 1925 are special parameters that influence the calculation and the posting process.
Enter % Increase or Decrease 0.00
This selection gives you the ability to raise or lower the calculation result by a pre-set percentage,
thus allowing for sales trends or cycles to be an element in the calculation.
Set Minimum Stocking Level? (Y/N) Y
This selection will set the calculated minimum stock level directly into the inventory SKU
record.
If this is set to N, the minimum stock level will only be calculated. This is useful when you want
to review the values the program will set into the inventory SKU's.
Set Maximum Stocking Level? (Y/N) N
This selection, when set to Y, will automatically post the calculation maximum stock level into
each SKU of the selected SKU range. When set to N, the maximum stock level will be
calculated and printed, but will not be posted to the inventory SKU's.
Enter the Lead Time in Days
Lead Time is the time required by the vendor to deliver the ordered SKU's to your store. Enter
the number of days the vendor requires for delivery.
PURCHASING & RECEIVING
51
Enter Days of Shelf/Safety Stock
To prevent out-of-stock situations, you can generate the minimum stock level to include a safety
stock based on your average sales for the SKU selected.
Enter Order Frequency in Days
The minimum calculation requires the number of days between orders to help optimize the
quantity of the SKU's stocked.
Select Months for Calculation
Select the months to be used in this calculation. The months selected will be highlighted and the
sales data for those months will be used as an element in the calculation. If you do not select a
month or a series of months, the calculation will be based on all months.
To Process, Press F1
Once you have entered the calculation ranges, and the parameters have been set, the following
options are available:
1) Calculated Based on the Above Data
This selection will search the Inventory file for each SKU within the established range. The
minimum and maximum stock levels will be calculated. You will return to the same menu upon
completion.
2) Print Report based on the Above Data
This selection works the same as selection 1., however, only a report will be printed for your
review. The minimum and maximum stocking levels will not be posted to the Inventory file.
3) Calculate and Print
This selection will print and post the minimum and maximum stock levels calculated.
To Set Selections Back to Default
Pressing F5 will re-set the selections on the Calculate Minimum/Maximum screen to their
original default values.
To Abort
After all calculations have been made, press F10 to return to the Purchasing and Receiving menu.
PURCHASING & RECEIVING
52
PRINT PURCHASE ORDERS
The Print Purchase Order program provides the facility to print a single Purchase Order or
multiple orders. It also provides the facilities to generate custom PO reports to meet specific
customer requirements.
To add a report, press F1. You will proceed to the Enter Sort selection screen if you desire the
report to be in a specific sequence.
Press F1 Save to proceed to the Enter Print Selection screen. When the desired print fields are
defined, press F1 Save. Enter the report name and ENTER or press (ENTER) to use the default
name. Enter the spool name and ENTER or press (ENTER) to use the default name. You should
now see your new report on the Custom Report Generator screen.
PRINT LABELS BY PO
The Print Purchase Order Label program provides the facility to print custom labels for a single
PO or multiple orders.
1) Purchase Order Labels 1
This program prints labels for SKU's on order or SKU's received. You may print shelf labels by
selecting label type 8, 9 or 10. After selecting the desired label, you will proceed to the Range
Selection screen. When the parameters have been entered, including the "label type" (which is
often forgotten), press F1 to process.
=====================================================================
RANGE SELECTION FOR PURCHASE ORDER LABELS 1
PO NUMBER
VENDOR NUMBER
SKU NUMBER
DESCRIPTION
MFG. PART NO.
LOCATION
CODE FIELD
DEPARTMENTS
LABEL TYPE
STARTING
ENDING
1
9999999
1
9999
1
9999999
####################
###########
#####
#######
1-99
8
#####################
###########
#####
#######
1. ITEMS ON ORDER
2. ITEMS RECEIVED
3. QUANTITY RECEIVED
ENTER REFERENCE NUMBER:
F1 PLUS QTY ON HAND F10 ABORT
=====================================================================
PURCHASING & RECEIVING
53
Enter the selection for the labels to print. 1. Items on order will print all items that have met the
range selection criteria and are on order. 2. Items Received will print all items that have met the
range selection criteria and have been received. 3. Quantity Received employs a resetable
counter that maintains a count of items received. The counter will continue to accumulate as
items are received until the Quantity Received labels are printed, resetting the received quantity
to zero.
The F1 plus Quantity on Hand function only applies to Selection 1. Items on Order or 2. Items
Received, and then only if a price was changed. The quantity-on-hand labels, when printed, will
be separated from the quantity received labels by a 'dummy' space label to identify the separation
point.
CUSTOM REPORT GENERATOR
The Custom Report Generator selection provides five (5) standard Purchase Order reports used
by most customers. It also provides the ability to add new reports, modify existing reports, delete
reports or view selected reports before printing. The standard Purchase Order reports are:
1. Open Order Report4. Monthly Order Summary
2. Back Order Report
5. Monthly Receipt Summary
3. Receiving Worksheet
To print a report, select the report number and press (ENTER). You will proceed to the Range
Selection screen.
=====================================================================
STARTING ENDING
PO NUMBER
1 999999
VENDOR NUMBER
1
9999
SKU NUMBER
1 999999
DESCRIPTION
#################### ######################
MFG. PART NO.
###############
#################
LOCATION
########
########
CODE FIELD
##########
##########
DEPARTMENTS
1-99
ORDER DATE
01/01/98
12/31/00
DATE REQUIRED
01/01/98
12/31/00
BACKORDERS ONLY
N
RECV’D ITEMS ONLY
N
SUBTOTAL ON FIELD
1
VALID SELECTIONS: 1
TOTALS ONLY
N
F1 PROCESS F2 EXPORT FILE F3 DISPLAY/PRINT F9 HELP F10 ABORT
=====================================================================
Use the displayed selections to define a specific range of PO’s or ordered SKU's you want to
print. Entry in fields indicated with pound signs (#) are wild card entries. A (#) indicates any
character in this position will be used. If specific characters are desired, enter them in the
positions desired, otherwise enter pound signs (#).
PURCHASING & RECEIVING
54
PO Number
Enter the beginning and ending PO number.
Vendor Number
To print a report for one (1) vendor, enter the same vendor number for the beginning and ending
vendor number.
SKU Number
Enter the range of SKU numbers you want to be included on this order report.
Description
Enter the description or specific character and wild card characters you want included on this
order report.
Mfg. Part No.
Enter the manufacturer's number combined with wild card to produce a range of manufacturers'
numbers (i.e., L A G # # # # # # # for all manufacturers' numbers starting with LAG).
Location
Enter the location or specific character and wild card characters you want on this order report.
Code Field
Enter the Code field or specific characters and wild card characters you want included on this
order report.
Departments
Enter the department number or range of department numbers you want included on this order
report.
To create an order for SKU's in departments 3, 7, 8, 9, and 20, enter the following 3, 7-9, 20.
Order Date
01/01/94 12/31/99
This selection allows you to print a report for only orders placed between the dates you enter.
Date Required
01/01/94 12/31/99
This selection allows you to selectively print those orders that have delivery days between the
dates you enter. Enter the beginning and ending required dates for the orders you want to print.
PURCHASING & RECEIVING
55
Back Orders Only
This selection allows you to print only the items that are on back order.
Recv'd Items Only
This selection allows you to print only items that have been received.
Subtotal on Field
Subtotals will be printed each time the selected field changes. When Print Report is selected,
subtotals will be printed at the end of each PO. When Print Report Using Sorted file is selected,
you can choose the field to control subtotals. However, the field you choose must be one of the
sort parameters.
Range Selection Screen - This screen allows you to select a range of items upon which the
program will base its search of the master file. The more information you enter here, the more
specific the search will be. If you accept the default screen as it first appears, the search will be
as general as possible. The number sign represents a 'wild card' which tells the program to
retrieve anything that appears in that position in that particular field.
After making your range selections, Press F3 to toggle between Display and Print. Note that
each time you press F3, the highlight moves from one choice to the other.
To preview a long report before (or instead of) printing, press F3 until DISPLAY is highlighted
and press F1 to PROCESS. After processing, you may view the report one screen at a time. To
print the report, press F3 until PRINT is highlighted and press F1 to PROCESS.
Additionally, you may EXPORT your report data to an ASCII, comma delimited, text file. Press
F3 to highlight PRINT, next press F2 EXPORT FILE then press F1 PROCESS. The text file will
be placed on your hard disk with a file extension of Xnn (where nn = the number of the terminal
originating the report).
Once the file is on the hard disk, it can be copied to a floppy diskette using the Disk Utility, F2
Copy feature. The command syntax is; Copy 40FILENAME.XNN to 32FILENAME.EXT where
FILENAME.XNN is the name given by the Report Generator and FILENAME.EXT is the
filename and extension for the new DOS file. (Note: Drive A: corresponds to 32 and B: to 33).
To Change by Range
This feature allows global changes to be made to select Master File fields. Any field that may be
added or changed by using a Master File Maintenance program may now be "changed by range".
Change by Range is an extremely powerful feature that should only be used by someone
thoroughly familiar with the system and your business. Also, it should only be used after backing
up the target master file before processing any Change by Range operation.
PURCHASING & RECEIVING
56
The first step in using the Change by Range feature is to determine the fields you wish to change.
Next, create a report having only those fields defined. This procedure minimizes the risk of
making an inadvertent global change mistake. After defining and naming the report, proceed to
select the report for printing. When the Range Selection screen is displayed, press F4 to invoke
the "hidden" Change by Range prompt that will be displayed on the right-hand side of the Range
Selection screen.
When the range definitions have been completed, press F1 to process and proceed to the "Match
Data - Change Data" Selection screen. The # sign is a wild card character that will force a match
if match data is not entered. Enter the match data and press the Tab key to shift to change data.
When the data entry is complete, press F1 to process. After processing the changes, an audit
report will be automatically generated indicating the selected field contents before and after the
Change by Range program was executed.
To Modify a Sorted File
Select the report and press F2, Mod Report.
To Display the Help File
Press F9 to display the Help screen.
To End Program
Pressing F10 returns you to the Custom Report Generator screen.
PURGE PO FILE
This program will delete all ordered SKU's from the Open Order Master, file which have been
received in full and the PO will be purged. The Inventory-On-Order field located in the
Inventory Master file will be set equal to the quantities left on order in the Open Order Master
file. Upon completion, the Open Order Master file will be reorganized.
PURCHASING & RECEIVING
57
PURCHASING PARAMETERS
This program is used to set up the purchasing operating parameters. Purchasing Control File
Maintenance must be run before any orders are entered.
=====================================================================
PURCHASING CONTROL FILE MAINTENANCE
THIS PROGRAM ALLOWS THE OPERATOR TO SETUP OR CHANGE THE CONTROL
PARAMETERS FOR PURCHASING
NEXT PURCHASE ORDER NUMBER
MAXIMUM NUMBER OF LINES ON AN ORDER
NUMBER OF DAYS TO ADD FOR REQUIRED
CHANGE REPLACEMENT COST AT ORDER?
CHANGE REPLACEMENT COST AT RECEIPT?
CHANGE PRICE 1 WHEN CHANGING COST?
CHANGE PRICE 2 WHEN CHANGING COST?
CHANGE PRICE 3 WHEN CHANGING COST?
PROMPT FOR ITEM DESCRIPTIONS?
DEFAULT THE ORDER QUANTITY TO CASES?
PRE-PRINTED PURCHASE ORDER FORM?
RETAIL PRICES ON ORDERS INCLUDE TAX?
STORE 1 ORDERS ARE FOR ALL STORES?
PRINT SHELF LABELS ON PRICE CHANGE ONLY?
PROMPT FOR NUMBER OF SHELF LABELS?
100
000
500
14
N
N
N
N
N
N
N
N
N
Y
Y
Y
ENTER THE NEXT PURCHASE ORDER NUMBER
F10 END
=====================================================================
Next Purchase Order Number
This selection allows you to enter your starting PO number. Use this function when you initially
set up the system. Note: If you desire to enter your own PO numbers, you must enter 999999 to
override the automatic number generation.
Maximum Number of Lines on an Order
This selection sets the maximum number of lines allowed.
Number of Days to Add for Required
This program will automatically add the number entered here to the order date to generate the
date required. The required date can be edited when the PO is generated.
Change Inventory Cost on Order
PURCHASING & RECEIVING
58
This selection allows you to instruct the program to change the replacement cost of the SKU in
the inventory record when the order is posted.
Change Replacement Cost at Receipt
This selection allows you to instruct the program to change the replacement cost of the SKU in
the inventory record when the items are received.
Change Price(1,2,3)when Changing Cost
These selections allow you to instruct the program to change the retail price in the inventory
record whenever the cost changes.
Prompt for Item Descriptions? - Do you want to be prompted?
Default the Order Quantity to Cases? - Enter 'Y' to instruct the purchase order programs to set
the default order quantities to cases. Enter 'N' to order in units.
Pre-Printed Purchase Order Form? - Enter 'Y' if you are using pre-printed purchase order
forms and the company name and address is printed on the form. Enter 'H' if the pre-printed
form does not have the company name and address printed. Enter 'N' if you are not using preprinted forms.
Retail Prices on Orders Include Tax? - This function is used only in conjunction with VAT,
value added tax. Enter 'Y' if prices include tax. Enter 'N' if prices do not include tax.
Store 1 orders are for all stores? – Enter (Y) if store 1 orders are for all stores or (N) if orders
are for store 1 only.
Print shelf labels on price change only? – Only print quantity received shelf labels when the
price changes (Y or N).
Prompt for number of shelf labels? – If you want to enter the number of shelf labels to print
enter (Y or N).
VENDOR MAINTENANCE MENU
PURCHASING & RECEIVING
59
This selection is used for Vendor Entry, Single Vendor Inquiry, Report Generation, and for
zeroing the year-to-date Vendor file information.
The Vendor Entry screen and single vendor inquiry may be modified by using the Screen
Maintenance program found in the Utilities section.
1) Vendor Entry
The following screen is used to Add, Change or Delete Vendor options.
characters per field are highlighted and displayed on your monitor.
The number of
=====================================================================
STORE NO.
1
VENDOR ENTRY
07:30
POS 1
CHANGE
VENDOR NUMBER 100
REMIT TO ADDRESS
REMIT NAME
REMIT ADDRESS
REMIT CITY
REMIT STATE
REMIT ZIP
STATUS CODE
TERMS
CHECK LIMIT
Y-T-D PURCHASE
Y-T-D PAID
SALES ADDRESS
NAME
ADDRESS
CITY
STATE
ZIP
A
2%NET10
0.00
0.00
0.00
PHONE
FAX PHONE
CONTACT
CUS I.D.
ENTER THE VENDOR NUMBER
TAB SIDE F1 SAVE F2 NEXT F3 SPEED F5 DELETE F8 PAGE F9 HELP F10 ABORT
=====================================================================
Enter a vendor number (4 digits, between 1000 and 9999, required) and press (ENTER). If you
enter an existing vendor number, you will shift to the Change mode. By pressing F2, the next
sequential vendor in the file will display. Vendor 9999 is used by the Purchasing module for
building a suggested order for all items in the inventory. The vendor name is the only field that
will be used in this vendor. If you do not add vendor 9999, the system will use “ALL VENDOR
REPORT” as the vendor name for suggested orders.
The cursor will be placed in the Vendor Name field, and you will be prompted to enter the
vendor name, followed by the other fields.
If using an extended zip code, omit the dash (i.e., 94114-3712, enter 941143712).
PURCHASING & RECEIVING
60
STATUS is either A (active) or I (inactive). You should place a vendor on the inactive file
instead of deleting him (except at end of year), so any previous activity with this vendor will still
appear on the reports.
The TERMS (term of payment agreed on by you and the vendor) are used on PO headings. After
completion, press F1 to save your vendor information.
Y-T-D PAID is used with the Accounts Payable software option.
2) Single Vendor Inquiry
This program allows authorized employee password access to pre-defined vendor information.
The display is defined in the Utilities section, Screen Maintenance.
3) Custom Report Generator
This program provides the facility to print or view selected data contained in the Vendor Master
file. The Vendor Range menu allows you to define the print parameters.
=====================================================================
RANGE SELECTION FOR VENDOR MASTER LIST
STARTING
VENDOR NUMBER
REMIT NAME
ADDRESS
CITY
STATE
ZIP
SALES NAME
ADDRESS
CITY
STATE
ZIP
ENDING
9999
#######################
#######################
#######################
##
########
#######################
#######################
#######################
##
#########
F1 PROCESS F2 EXPORT FILE F3 DISPLAY/PRINT F9 HELP F10 ABORT
=====================================================================
4) Zero Year-to-Date Vendor Amounts
This program provides the facilities to zero the year-to-date purchased and year-to-date paid
amounts in the Vendor Master file.
You may:
- Zero year-to-date purchased amount.
- Zero year-to-date paid.
- Zero both purchased and paid amounts.
Pressing F2 Validate will insure you have valid vendor numbers in your Master file.
PURCHASING & RECEIVING
THIS PAGE INTENTIONALLY LEFT BLANK FOR FUTURE USE.
61
POINT OF SALE INVOICING
62
The Point of Sale Invoicing selection provides the facilities to generate invoices, execute end-ofday processing for terminals and cash registers, print special point-of-sale variances, print
markdown or deposit reports, and display or print POS X-OUT Z-OUT reports.
=====================================================================
1. EXPRESS INVOICING
2. GENERATE INVOICE
3. END OF DAY PROCESSING
4. PRINT SALES SUMMARY
5. PRINT MTD / YTD SALES HISTORY
6. PRINT VARIANCE REPORT
7. PRINT PROMOTIONAL MARKDOWN REPORT
8. PRINT DEPOSIT AND SALES JOURNAL
9. POS X-OUT AND Z-OUT
10. POS CASH DECLARATION Z-OUT
11. ELECTRONIC JOURNAL
12. ARCHIVE JOURNAL
13. REGISTER CONTROL
Note: Before generating an invoice, you must define point-of-sale parameters. At the Main
menu, press F6, enter XMenu at the prompt then press (ENTER). Select Define Store
Information. Enter (1) All Selections and press (ENTER) to the Define Point of Sale menu.
Running this program will tailor your point-of-sale entry parameters to your store's requirements.
EXPRESS INVOICING
Express Invoicing features a unique point-of-sale window emulation screen that combines the
entry of clerk and customer data with SKU and Tender Transaction functions. The Express
screen uses standard cash register conventions and functionality for increased speed and ease of
clerk entry. All transactions are processed line for line using a 40 column receipt printer for
customer receipts and an optional keyboard and/or scanner for clerk entry. The Express screen is
the same one used by the T-2000 Register Series. This provides a common clerk interface for
high-volume sales involving both terminals and T-2000 registers.
The keyboard entry configuration may be customized to meet specific customer requirements.
The T-2000 keyboard with eighty (80) entry keys may be used as a keyboard wedge when
combined with the standard AT-style ASCII keyboard. Other compatible cash register-type
keyboards are customized using the same procedure. Changing a keys function is as simple as
selecting the cash register function you wish to perform and depressing the key on the keyboard
you wish to execute that function. The selections are saved until modified or a keyboard reset
initiated.
POINT OF SALE INVOICING
63
=====================================================================
STORE NO 1
CLERK-TOM
01/10/94 12:05 REGISTER 0
SKU PRICE
QUANTITY
9.00
SKU DESCRIPTION
1500 TOASTER
100 ORANGE SODA
EXT. PRICE
1.00
9.00
EXT. PRICE
40.00
9.00
DESCRIPTION
ORANGE SODA
|SUBTOTAL 49.00
|TAXABLE
0.00
|TAX
0.00
|TOTAL
49.00
|
|_______________________
ENTER QUANTITY, SKU OR SCAN ITEM
F10 VOID TRANSACTION
=====================================================================
Note: The SKU Entry field acts as a multi-purpose entry prompt to change the mode of
operation or to change the function of a specific entry. The Express screen defaults to Invoice
mode / Cash sale to begin any new transaction.
DEFINE KEYBOARD:
With the cursor at the SKU Entry prompt, press the Escape key followed by pressing "S" and "U"
to initiate the keyboard SETUP process. A Function Code screen similar to the following example will be displayed. Pressing F2 will print the Function codes for future reference. Press F1 to
save the keyboard modifications. The Keyboard Configuration file is saved as REG2000.FIL and
may be copied on a backup diskette by using the Disk Utility program.
=====================================================================
FUNCTION CODES
1. PRICE LOOK UP
/
...
37. TAX SHIFT
PgDn
2. QUANTITY
*
...
38. VAL SALE
PgUp
3. WEIGH ITEM
sF9
...
39. INV KEY
End
4. LOGOFF
sF8
...
40. DISC SUBTL
+
.
...
.
36. SERIAL NUMBER
z
...
103. PRESET
25
ENTER REFERENCE NUMBER TO CHANGE
F1 SAVE F2 PRINT F3 MGR OVERRIDE F5 SET DEFAULTS F8 PAGE F10 ABORT
=====================================================================
POINT OF SALE INVOICING
64
Pressing F3 will display the Manager Override functions available on the point-of-sale keyboard.
Clerk ID's are required to activate the Manager Override functions. If a Manager flag has been
set in the Clerk ID definition, the operation will not utilize the Override function.
=====================================================================
MANAGER OVERRIDE REQUIRED.
PERCENTAGE DISCOUNT?
SUBTOTAL DISCOUNT?
ENTER MERCHANDISE?
PAID OUT?
VOID TRANSACTION?
STORE COUPON?
FIXED DISCOUNT?
FIX DISCOUNT PERCENT
N
N
N
N
N
N
N
10.00
USE ARROW KEYS TO SELECT, AND ENTER 'Y' IF MANAGER REQUIRED OR 'N' IF
NOT.
F1 SAVE F2 PRINT F5 SET DEFAULTS F8 PAGE F10 ABORT
=====================================================================
The following Function Key definitions are in the same sequence as a print out of the
Function Codes.
Price Look Up: The Price Look Up function provides the capability to enter the desired SKU
number, display the price; then allows the user to accept or change the price before completing
the transaction. This feature also displays Balance on Hand and price levels as defined in
XMENU.
To perform a price look up, press the Price Look Up function key, then proceed to scan or enter
the SKU number to be displayed. The cursor will highlight the SKU item price; press (ENTER)
to accept the price or enter the price to be used and press (ENTER).
To display notes on the inventory item press “F3”, and a pop up screen will display all notes for
that item. If the item notes have been designated as Point of Sale (POS) in Inventory Notes, they
will be printed on the receipt.
A multi-store customer may display Balance on Hand in the remote stores by pressing “F4” –
store BOH.
Quantity (Times): Prior to entering the SKU number, enter the quantity to be sold and press the
Quantity Function key. Continue the transaction by entering the SKU number.
POINT OF SALE INVOICING
65
Quantity (Times Double Dimension): Prior to entering the SKU number, enter the quantity to
be sold X (times cap X) 1st Dimension X 2nd Dimension, press the Quantity key, enter the SKU
number to be sold and press (ENTER). E.g. 4X2X4 could be a sale of 4 units of 2X4 lumber
times Price 1. The dimensions entered are printed in the Description area above the SKU items
sold.
Weigh Item: Weigh this item. Enter the SKU and press the Weigh Item function key to
complete the transaction.
Logoff: To Logoff, press the Clerk Logoff function key. A Sign Off prompt will be highlighted
and the prompt to "Enter Clerk ID to Proceed" will be displayed.
Logon: If Logon Clerk ID's have been defined, you must enter a valid Clerk ID prior to
beginning a sale transaction.
ID Required (only available on Express Invoicing): If the ID Required flag has been set in the
ID Required field of an inventory item, a prompt appears as soon as the item is entered in
Express Invoicing. At this point, the prompt merely draws attention to the fact that (based on
today's system date) the customer's birth date should be prior to a certain date, depending on the
flag set in inventory. (For instance, an alcohol item might have an ID Required setting of 21,
therefore, the date shown would be 21 years earlier than the current system date.) However, at
the time the sale is tendered, another prompt will appear asking the clerk to enter the customer's
birth date, (thus relieving a busy clerk from calculating the number of years), or the clerk may
press (ENTER) to bypass. Tendering of the sale is completed after this prompt is answered.
Customer Verify: The Customer Verify function is a multi-use entry. The primary purpose is to
validate the customer number for in house charges. It can be used to add a new charge or
layaway customer or to enter or modify the ship to address for the transaction.
If a new customer is not going to be a charge customer, but you would like to enter basic
information for mailing lists, you may press the defined Customer Verify key at the start of the
transaction. An entry sub-screen will appear with the header “cash” where you can enter the
customer’s name and address on the fly.
If the customer is an existing charge customer, enter the customer number at the SKU prompt
and press the Customer Verify key. The selected customer's reference data will appear in the
lower right portion of the Express screen. Pressing the Customer Verify key again will display
the same data in the lower left portion of the screen. The data may then be modified to indicate a
new Ship to Address: and then saved. If the customer's account number is not known, an alpha
search may be invoked by entering the first few upper case alpha characters of the customer's
name and pressing the Customer Verify key. Pressing the Customer Verify key again will bring
up the next sequential customer in the file. Note: The Alpha Search function must be made in
upper case as the Express screen uses lower case alpha characters for Function codes.
To charge to a new customer, enter any non-used number and press the Customer Verify function
key. If the customer does not exist, you will be prompted to press <F1> Add, <F2> Add Charge,
<F3> Add Layaway, <F10> Abort.
POINT OF SALE INVOICING
66
<F1>
Press F1 to add the customer as a mail list customer. This customer will not be
given charge status, however, the name and address entered will be saved in the Customer file.
<F2>
Press F2 to add a charge-type customer. The credit limit is set to zero which will
cause an over-limit condition and if clerk ID's are used, a manager ID will be required to charge
to the customer's account. The name and address entered is saved in the Customer file.
<F3>
Press F3 to add a layaway customer. The Layaway flag will be set 'on' in the
customer record to provide special handling of layaway customers. The Mail Type will be set to
LW to provide the facility to identify and sort layaway customers. The Profile flag will be set
'on' to capture detailed SKU item data by customer. Note: The Charge Tender key will not be
allowed with this customer.
<F10>
If the number entered is incorrect, press F10 to Abort the entry.
Append 1 - 3: The Append Sale function is used for SKU's with varying quantities of the same
merchandise. There must be a base SKU number ending in "0" and up to three (3) sequential
SKU numbers if you are using the Append function keys or up to nine (9) sequential SKU
numbers if you are using the Append Flag feature in the Inventory Master file. Both Append
methods use only the base item for ordering merchandise. To use the Append function key, press
the desired Append function key 1, 2, or 3 prior to entering the base SKU number. To use the
Append Flag feature, the base Inventory Item flag is set off. Up to nine (9) of the next sequential
SKU numbers may be used for appends with their respective flags set on.
Package: The Package Sale function is used to sell two or more SKU's together at a special
"package" price instead of the sum of each individual SKU's prices. At the SKU prompt, press
the Package Sale function key to enter the Package mode. The letter "P" will be displayed with
each subsequent SKU entry. To end Package Sale mode, enter the package sale price for the last
SKU entered at the Price prompt and press (ENTER) to continue with the sale transaction.
Departments 26 - 45: To use the Department feature, enter the dollar amount and press the
appropriate Department function key. The SKU description and amount will display and print on
the transaction line. The system calculates the cost based on the GM set in Price 1. The alternate
way to sell a department item is to enter the item numbers (26 to 45) and press (ENTER). The
system will prompt for the price.
% Discount: After entering the SKU to be discounted, enter the percentage at the SKU prompt
and press the "%" Discount function key. The percentage entered and discount amount will be
displayed and printed on the next line of the transaction. Note: The SKU Item Discount flag
must be set to 'Yes' in the Inventory Master file to allow % discount.
Deposit: To charge a deposit on a SKU, after entering the SKU number, enter the deposit
amount and press the Deposit function key. The deposit amount will be displayed on the next
line following the SKU entry.
Store Coupon: A store coupon is treated as a line item discount on the SKU item number last
entered in the transaction. After entering the SKU item number that has an associated store coupon, enter the coupon amount at the SKU prompt and press the Store Coupon function key.
POINT OF SALE INVOICING
67
The coupon discount amount will be printed on the next line of the transaction. Note: The store
coupon amount can not exceed the price of the item being sold.
No Sale: Press the No Sale function key at the enter SKU number prompt to initiate a No Sale
display, to print a zero sale line on the receipt and to open the cash drawer.
Refund: To refund a SKU item, press the Refund Function key and then enter the SKU item
number to be refunded. The SKU item number, description and amount refunded will be
displayed and printed on the transaction line.
To refund a deposit, enter the SKU item associated with the deposit; press the Price Look Up
Function key; enter a price of zero (0) and press (ENTER). Press the Refund key; enter the
amount to be refunded; press the Deposit key and cash tender the transaction.
Void: If the last SKU item sold was entered incorrectly press the Void Function key then
ENTER to reverse the entry. To void a SKU item that was previously entered in this transaction,
press the Void Function key; enter the SKU item number and press (ENTER).
Serial # / RX #: To record the serial or Rx number of a SKU item being sold on the receipt, first
sell the item; then enter the upper alpha-numeric serial number of up to eighteen (18) characters
and press the Serial / Rx Number Function key. The serial number will be printed in the
Description field below the SKU item last sold.
Rx PRESCRIPTION NUMBERS
Allow definition of Rx Prescription number to be used in Point of Sale. When defined in
XMENU Serial Number Control is disabled in Point of Sale and the Serial Number Required
Function becomes Rx Prescription number required. When an item is sold that has the S/N
Required Flag set, the program requires that an Rx Prescription number be entered. The Rx
number entered is saved in the transaction file and will be posted to the Accounts Receivable
files if the transaction is tendered with charge.
Tax Shift: The Tax Shift function requires the Tax flag in the inventory Master file to be set to
other than (0), No Tax. Prior to entering the SKU item number to be sold, enter the tax rate to be
applied - 1, 2, 3 or 4 for no tax and press the Tax Shift Function key. The tax rate selected will
continue to be applied to all taxable SKU’s until the Tax Shift function is released by pressing
the Tax Shift Function key again. The Sales Tax may be removed entirely by entering a 9 and
pressing Tax Shift.
The tax shift function also provides access to additional tax codes. Tax shift 11 to 110 allows
access to the defined tax rates. If a tax shift is entered that has zero percentage set the shift will
not take effect. Tax shift 11 to 110 will display and print as T6 (tax level 6). You can only use
one of the additional tax codes in transaction however you can sell items with tax levels 0-3
within the same transaction. Tax shift without a number entry turns off tax shift and returns the
taxation back to the control off the tax flag in the inventory file.
Validate Sale: The Validate Sale function may be activated at the end of any transaction.
Pressing the Validate Sales Function key will print the validate receipt information stored in the
POINT OF SALE INVOICING
68
Control file including the date, transaction number and amount of sale on the backside of the
customer's check.
Invoice Key: When pressed at the start of a transaction, this key allows for entry of an invoice
number. At the end of any sales transaction, the Invoice key may be pressed to reprint the sales
transaction on an eighty (80) column printer as if in full Invoice mode. If an invoice printer is
not defined the invoice will be sent to the spooler.
Currency Display: To display the currency conversion rates, press the Current Display key prior
to tendering the sale. A Display window will show the pre-setup currency conversions entered
previously in the XMenu, Define Store Information section. To tender a sale, enter the amount
of foreign currency to be tendered; press the proper Currency key. The foreign currency amount
and the conversion to local currency will display and print. If the amount tendered is less than
the amount due, the remaining balance due will be displayed in local currency. If the amount
tendered is greater than the amount due, the amount of change in local currency will be displayed
and printed.
Resale Number: To record a resale number on the receipt, enter the resale number and press the
Resale Number function key. The resale number will be printed in the Description area of the
receipt.
PO Number: To record a customer PO number on the receipt, enter the PO number and press
the PO function key.
Receipt On/Off: The Receipt On/Off function key acts as a toggle. Pressing it once turns off the
receipt printer, pressing it again turns the printer on. The Receipt Off mode will be displayed at
the top of the Express screen.
Training Mode: To enter Training mode, press the Training mode function key while at the
SKU Entry prompt. Training mode will be highlighted in reverse video at the top left of your
Express screen. Since the Training mode function key acts as a toggle, pressing it again before
beginning the next transaction will turn off Training mode and return to Invoice mode. You may
also exit Training mode by pressing F10 Abort.
Fix Discount %: The Fix Discount function works in conjunction with the SKU Item Discount
flag, the fixed discount percentage entered in the Manager Override section of the Keyboard
Definition and the Fixed Discount Register key. After the SKU item has been sold, press the
Fixed Discount key to apply the fixed discount percentage provided the Discount flag was set on
for the SKU item in the Inventory Master file.
Loan: The Loan function key provides the facility to track beginning cash in drawer advances.
Enter the beginning cash, and press the Loan key to record the transaction.
Drop: The Drop function key provides the facility to track cash amounts removed from the
drawer for deposits or safe drops. The POS X Out and Z Out will display the current status of
each clerk's cash position.
POINT OF SALE INVOICING
69
Print Receipt: The Print Receipt key provides the facility to reprint the last receipt. This
function will override the Receipt Off mode.
Clear: The Clear key function will clear the SKU Item Entry prompt of an erroneous entry. The
Backspace key may also be used to erase the entry.
Cash: The Cash function key provides the capability to tender the entire transaction or split the
transaction between other Tender functions. To tender the transaction, enter the amount received
and press the Cash function key. The cash received and the change due will be displayed and
printed on the receipt. To tender the exact amount, press only the Cash key.
Check: To tender a check, enter the amount and press the Check function key. You will be
prompted to enter a check descriptor of up to 18 alphanumeric characters. This field may be used
to collect ID information from the check maker, press (ENTER) to continue. Upon completion,
the check amount and descriptor will be printed on the receipt noting any change due. If the
check amount is less than the transaction total, a split tender will be allowed between other
Tender functions.
Charge: The Charge function key provides the ability to charge the entire transaction to a charge
customer or split the transaction between other Tender functions. To tender a charge amount, a
charge customer must have been previously entered. At the SKU prompt, enter the amount to be
charged and press the Charge function key. The charged amount and any change due will be
displayed and printed on the receipt.
Received on Account: The Received on Account function key provides the ability to record a
payment made to a charge customer's account. Enter the customer number and press the Customer Verify function key. If the customer displayed is correct, enter the amount received and
press the Received on Account key. The payment will be displayed and printed on the receipt.
Enter the account payment to be tendered and press the appropriate Cash or Check Tender
function key. The payment tendered will be displayed and printed on the receipt.
Bank Card 1 - 6: The Bank Card function keys provide the ability to charge the sale. Enter the
dollar amount to be charged and press the appropriate bankcard number of up to 18 characters
and an expiration date. Upon completion, the amount entered and bankcard number will be
displayed and printed on the receipt. Split tendering is allowed between card types, cash or
check.
Coupon: The use of a coupon is treated as a cash-type of tender. Enter the dollar amount of the
coupon; and press the Coupon function key. The coupon amount will be displayed and printed
on the receipt.
Paid Out: To initiate a paid out transaction, enter the amount and press the Paid Out function
key. The amount to be paid out will be displayed and printed on the receipt.
Currency 1 - 9: Reference currency display to display all conversion rates prior to tendering the
transaction.
POINT OF SALE INVOICING
70
Open Transaction: To view the transactions that have been saved in the Suspend Master file,
press the Open Transaction key while at the Item Number prompt. A window on the screen will
display the open transaction tags.
Suspend Transaction: The Suspend Transaction function allows the user to save an in-process
transaction, initiate and complete other sales transactions then retrieve suspended transaction.
Upon retrieval, the suspended transaction may have items added to it, then suspended again or
tendered as a completed sale.
To suspend a transaction, while at the Item Number prompt, enter up to three alphanumeric
characters to tag the transaction and press the Suspend Transaction key. The transaction will be
saved under the tag until recalled or purged from the system.
Recall Transaction: To recall a suspended transaction, enter the desired transaction tag while at
the Item Number prompt and press the Recall Transaction Function key. The previously saved
transaction will be loaded and the cursor placed on the next line to add. This transaction may be
added to and saved using the same suspend tag by pressing the Suspend Transaction key. If the
transaction loaded is incorrect, the Suspend key must be pressed again before a new recall tag is
entered.
Customer X-Ref: The Customer X-Ref key will display the name cross-references assigned to a
specific customer account. This feature allows for the control and identification of multiple
signers authorized to charge to a single Customer's account. Enter the Customer Number at the
Item Number prompt and press the Customer X-Ref key to display a list of authorized names
assigned to this account.
Customer Profile: To view the customer purchases, which have been saved by the Profile
option, enter the customer number and press the Customer Verify key. The customer data will
display. Press the Customer Profile key: a window on the screen will display the purchase items
that have been recorded.
Description Lookup: The Description Lookup function allows the user to lookup and display
items by description. Enter one or more characters of the 24 character Item Description field and
press the Description Lookup key. A window on the screen will display both the item numbers
and the corresponding matching descriptions.
Wild Card Description Lookup: To invoke the wild card test, enter a vertical bar ‘|’ before the
first work of the lookup parameters. The program will find any description that contains the data
entered. To find a description that contains two specific words, in any order, enter the words or
phrases separated by a vertical bar ‘|’. To find whole words only, add a space before and after the
search argument.
Examples:
1. Search for items whose description starts with ‘ROCK’. Enter “ROCK” and press
the description lookup key. All items whose description starts with ‘ROCK’ will be
displayed.
2. Search for items whose description contains ‘ROCK’. Enter ‘|ROCK’ and press the
description lookup key. All items whose description contains ‘ROCK’ will be
displayed.
POINT OF SALE INVOICING
71
3. Search for items whose description contains ‘ROCK’ and ‘GRANITE’. Enter
‘|ROCK|GRANITE’.
All items whose description contains ‘ROCK’ and
‘GRANITE’ will be displayed.
This program also runs in Vendor and Customer maintenance.
Subtotal: The Subtotal function key may be pressed at any time during the transaction. The
subtotal will display and print the food-stamp subtotal and the normal subtotal on the receipt.
Item Check: To initiate a SKU item check to determine the quantity on hand or price, enter the
SKU item number and press the Item Check function key. The quantity on hand and Price 1
through 3 will be displayed on the line below the SKU Entry prompt.
Freight: To apply freight costs to the sales transaction, enter the dollar amount and press the
Freight function key. Both the freight notation and amount will be displayed and printed on the
receipt.
Purchase Rebate: The Purchase Rebate Function key is used in conjunction with the Purchase
Credit program to rebate earned credit amounts. The Rebate Key functions as a Tender key, on
accounts having a credit balance. You may not use the Rebate Tender function for more than the
account balance.
Gift Certificate: The Gift Certificate function key is a dual-use key that is used to sell and
redeem gift certificates. To use this function, a special easy-to-remember gift certificate
customer must be established, e.g. 25 for a twenty-five dollar Gift Certificate. The customer
name could be entered as $25 Gift Certificate. The customer type should be set to "C" charge,
discount to zero, Tax code to zero, credit limit to zero and ageable to "Y", yes. A single
customer number could be used to capture all gift certificate sales if individual tracking is not
required.
To sell the gift certificate, enter the special gift certificate customer number and press Customer
Verify. Then enter the gift certificate purchase amount and press the Gift Certificate function
key. The amount received and the notation certificate sold will be displayed and printed on the
receipt. Enter the amount tendered and press the appropriate Cash or Check Tender key to
complete the transaction.
To record the name of the customer or the name of the gift certificate recipient on the receipt,
enter the special gift certificate customer number and press the Customer Verify key twice. Enter
the customer name to be printed and press F1 Save, proceed with sale as explained above.
To redeem the gift certificate, enter the special gift certificate customer number and press
Customer Verify. The customer name, i.e., gift certificate will be displayed as well as the
amount not yet redeemed. Continue with the sale of applicable items. When tendering the
transaction, enter the gift certificate amount and press the Gift Certificate function key. The
amount entered and the notation certificate received will be displayed and printed on the receipt.
If the gift certificate amount is greater than the purchase, the change due will be displayed and
printed on the receipt. A split tender is allowed if the amount due is greater than the certificate
amount.
POINT OF SALE INVOICING
72
Layaway: The Layaway function is used in conjunction with Customer Verify. The Layaway
key may be used to place items on layaway or to receive payments made to a Layaway account.
To put items on layaway, enter a new Customer Account number and press the Customer Verify
key. Reference the Customer Verify explanation for further detail.
<F3>
Press F3 to add a layaway customer. Enter the customer's name and address and
press F1 to Save. The Layaway flag will be set "on" in the customer record to provide for special
handling of layaway customers. The two-character mail type will be set to "LW" to provide the
facility to identify and sort layaway customers. The Profile flag will be set "on" to capture
detailed SKU item data by customer. Note: The Charge Tender key will not be allowed with
this customer.
After saving the customer data, enter the items to be placed on layaway; enter the down payment,
if any, and press the appropriate Tender key. Then press the Layaway key to assign the remaining balance to the Layaway account.
To receive money on a Layaway account, enter the Layaway Account number; and press the
Customer Verify key. The customer's name and address will be displayed and the visual prompt
"Layaway" appears next to the account number. The available credit displayed as a negative
number represents the amount due on the account.
Enter the amount to apply as a payment to the account and press the Layaway key. Enter the
amount tendered and press the appropriate Tender key. If the amount tendered is more than the
payment entered, change will be returned.
Preset 1 - 25: Preset keys 1-25 are cross-reference SKU's used for single keystroke high-volume
sales transactions. The preset SKU data must be entered, using the Register Control menu selection; edit preset keys, before the function may be made active. Pressing the desired Preset
function key will automatically display and print the pre-defined SKU transaction line. To sell a
quantity of a preset item, enter the quantity of sale and press the Preset key.
FOOD STAMPS: The following definition steps must be taken to correctly account for food
stamps at the point of sale.
1.
Define Point of Sale: In the XMenu Utilities Define Store Information; All Selections,
page 3. At the prompt: Food Stamp Type, 0 for none, 1 for general, 2 for Illinois, 3 for Texas or
4 for New Jersey. Refer to the definitions found in Section 1 of the System Maintenance section
for details.
2.
Define Bank Card Titles: The Food Stamp Tender function uses the Bank Card 6
definition at the point of sale. Enter the "Food Stamp" title in the Bank Card 6 definition for
bank card titles.
3.
Inventory Screen Maintenance: In the System Utilities section under Screen
Maintenance, select the Inventory Entry screen. Using the F3 Alter function, place the Food
Stamp flag #34 in place of an unused flag or in a new space such as coordinates A18. The flag
default is (N), No.
POINT OF SALE INVOICING
73
4.
Inventory Maintenance: Insure the Food Stamp flag has been set correctly for both the
food and non-food inventory items.
5.
Point-of-Sale Entry: When items are sold that are food stamp allowable, the food stamp
amount subtotal will be displayed.
6.
To Tender Food Stamps: Enter the amount of food stamps received and press the Food
Stamp Tender key. An over tender of food stamps is allowed provided change is returned in food
stamps in one-dollar increments. Change of less than one dollar may be given in currency. Note:
Once the food-stamp total has been exceeded using the Food Stamp Tender function, additional
food stamp tenders will not be allowed.
GENERATE INVOICE
Depending upon the parameters defined in the Control file, the prompts appearing at the top and
bottom of the screen may differ.
=====================================================================
LOCATION 1
INVOICE
CLERK-TOM JONES 02/02/00 18:23
CUSTOMER NUMBER
12330
PURCHASE ORDER
PAYMENT TERMS
COD
AVAILABLE CREDIT 0:00
SHIP TO:
JOE ADAMS
JBK SYSTEMS
1335 SUN VIEW DRIVE
UNIT 2
DENVER
CO
80112
303-555-2391
ENTER CUSTOMER NUMBER OR (CASH) FOR CASH SALE
F8 NEXT PAGE F9 HELP F10 ABORT
=====================================================================
Note: The following functions may be invoked at the Enter Customer Number prompt.
Clerk ID: If clerk ID is required, enter the clerk ID and press (ENTER).
Invoice: In the upper left corner of the screen "Invoice" will be highlighted. This is the normal
mode of operation.
POINT OF SALE INVOICING
74
Credit Mode: To change from Invoice to Credit mode, enter C in the Customer Number field
and press (ENTER). After the transaction, the mode of operation will shift back to "Invoice".
Invoice Mode: To change from Credit to Invoice mode, enter the letter I in the Customer
Number field and press (ENTER). After the transaction, the mode of operation will shift back to
"Credit".
Estimate: To change from "Invoice" to "Estimate", enter the letter E in the Customer Number
field and press (ENTER). After the transaction, the mode of operation will shift back to
"Invoice".
Test Form: To test forms alignment, enter the letter T in the Customer Number field and press
(ENTER).
Training Mode: To enter Training mode, press the letter F and press (ENTER). Training sales
activity may then be entered without being posted at end of day.
Cash Sale: For a cash sale, press (ENTER) without entering a customer number.
Logoff: To Logoff, enter Shift F8.
No Sale: To initiate a "No Sale" transaction, enter Shift F9 in the Customer field. This will
allow a zero sales amount receipt or invoice and the cash drawer to open.
Existing Customer Number: If the Customer screen is defined, scan or enter the customer
number and press (ENTER). The customer data will appear on the screen for review.
Existing Customer (Unknown Number): Enter the first two alpha characters of the customer's
name and press (ENTER). Customer data beginning with the selected alpha characters will
appear. Press F2 to proceed sequentially through the file until the desired customer is reached.
Enter Customer Name: To enter a customer's name, address, and PO number that is not in the
Customer Master file, press F1 and follow the prompts. This feature also provides the capability
to change the name and address on this invoice at the point of sale.
New Customer: Enter the new customer number and press (ENTER). A prompt will ask if you
desire to add this customer to the master file. Select Y for yes and press (ENTER). The
Customer Entry screen will display. At the prompt, enter the new customer number then
complete the screen entries. (Reference the Mailing List Customer Master File Maintenance).
Press F10 to return to the Generate Invoice Customer screen. Press F8, End, to proceed to the
Inventory SKU screen.
POINT OF SALE INVOICING
75
=====================================================================
INVENTORY SKU ENTRY SCREEN
ITEM
100
110
DESCRIPTION
COPY PAPER
ENVELOPES
PRICE
9.00
3.30
QUANTITY
DISCOUNT
3.00
0.00
1.00
0.00
SUBTOTAL
PRICE
27.00
3.30
30.30
ENTER INVENTORY NUMBER
F8 NEXT PAGE F9 HELP F10 ABORT
=====================================================================
Inventory SKU Entry: At the prompt, enter the SKU number being invoiced. Depending upon
the Control file definition, you will be prompted at each field entry or the complete line will be
automatically entered. For reference, the quantity on hand of the SKU being invoiced will be
displayed at the bottom of the screen.
Inventory Description Entry: At the SKU Entry prompt, enter the first few characters of the
SKU description and press (ENTER). The cross-reference file will be used to search for a match.
If the item displayed is not the SKU desired, press F2 for the next sequential SKU.
Manufacturer Number Entry: At the SKU Entry prompt, enter the manufacturer's part number
being invoiced. The system will use the manufacturer's number to locate the desired SKU
number to be invoiced from the SKU number cross-reference file.
Depending upon the Control file definition, you will be prompted to enter each line SKU or the
complete line will be automatically entered.
Tax Shift: The Tax Shift function requires the taxable code in the Inventory Master file to be set
to other than "0", no tax. Prior to entering the SKU number, enter the desired tax rate (1,2,3) or 4
for no tax, and press F5. The tax rate selected will continue to be applied to all subsequently
entered SKU's. Press F5 again to release the Tax Shift function.
Quantity (Times): Prior to entering the SKU number, enter the quantity to be sold and press F6.
Continue the sale by entering the SKU number.
Append Sale: The Append function is used for SKU's with varying quantities. There is a base
number and up to three (3) sequential numbers. Only the base number is used for ordering. To
sell more than one of a SKU, enter # of SKU’s, press F6 for quantity, then enter the base SKU
number and the append function key F1, F2 or F3 for append 1, 2 or 3.
Coupon: To credit a coupon, enter the SKU number and complete the line entry, then enter the
coupon amount and press Shift F2. The coupon amount will be displayed at the bottom of the
screen and the subtotal amount adjusted with the next SKU entry or at the Tender screen.
Scale: Weigh the item, enter the SKU number, and press Shift F3 to complete the entry.
POINT OF SALE INVOICING
76
Deposit: To charge a deposit on a SKU, enter the SKU number and complete the line entry, then
enter the deposit amount and press Shift F1. The deposit amount will be displayed at the bottom
of the screen and the subtotal amount will be adjusted with the next SKU entry or at the Tender
screen.
Package Sale: This function is used to sell two or more SKU's together as a "package" at a
special price instead of each individual SKU price. At the enter Inventory SKU prompt, press F4
to change to "Package Sale Mode", then enter a SKU number. The unit price column will be
highlighted, and the letter P will be displayed following the price when entered. Enter the price
for this package or press (ENTER) for more SKU's. After entering the package sale price on the
last SKU, Package Sale mode will be turned off and you can continue with the sale.
Change an Entry: By using the Up or Down Arrow key, you may select the line you wish to
edit. By pressing (ENTER), you may edit each field in the line entry. You may use CTRL A, the
INS key or the Arrow keys to return the cursor to its original position. You must re-enter the
SKU number if you wish to see the correct prices displayed at the bottom of the screen.
Add an Entry: When at the Tender screen, you may press F8 again to shift back to the Inventory
SKU screen to add a SKU to the sale. Press F8 again to return to the Tender screen.
Delete an Entry: You may delete the last entry by pressing the Delete key or pressing CTRL D
(upper case). By using the arrow keys, select the line you wish to delete. Deleted SKU's will
appear in the reference line. You may enter a new SKU in the Deleted Line field.
Paging: To review or edit the other pages of a transaction, press page up (ESC and u) and page
down (ESC and d).
Home: To return to HOME position on any screen, use the Up Arrow key or press ESC and
CTRL D.
Help: By pressing F9, the Help screen will display special escape and the function codes used in
the SKU entry and Tender Entry screen. Some customers use the Print Screen function to print a
clerk reference sheet. It is intended to be a quick reference in lieu of the manual.
Manager Approval: If a SKU field entry or a tender transaction has been pre-defined as
requiring Management approval, a prompt will display at the bottom of the screen until a
Manager's ID number is entered.
Suspend Transaction: The Suspend Transaction function allows the user to save an in-process
transaction, initiate and complete other sales transactions, then retrieve the suspended
transaction. Upon retrieval, the suspended transaction may have items added to it then
suspended again or tendered as a complete sale.
To suspend a transaction, while at the Item Number prompt, enter up to a 3 digit alpha-numeric
save transaction tag and press (>), the Suspend Transaction key. The transaction will be saved
under this tag until recalled or purged from the system.
POINT OF SALE INVOICING
77
When an estimate is suspended and printed, the Suspend Transaction tag is printed in place of the
transaction number.
Open Transaction: To view the transactions which have been saved in the Suspend Master file,
press (?), the Open Transaction key, while at the Item Number prompt. A window on the screen
will display the open transaction tags.
Recall Transaction: To recall an open transaction, enter the desired transaction tag while at the
Item Number prompt and press (<), the Recall Transaction key. The saved transaction will be
loaded and the cursor placed on the next line to add. This transaction may be saved using the
same suspend tag by pressing the Suspend Transaction key after viewing or adding to the
transaction.
Description Lookup: The Description Lookup function allows the user to lookup and display
items by description. Enter 1 or more characters of the 24 character Item Description field and
press the (\), the Description Lookup key. A window on the screen will display both the item
numbers and the corresponding matching descriptions.
Customer Cross Reference: The (:), Customer X-Ref key, will display the multiple name cross
references assigned to a specific customer's account. This feature allows for the control and
identification of multiple signers authorized to charge to a single customer's account. Enter the
customer number at the Item Number prompt and press the Customer X-Ref key to display a list
of authorized names assigned to this account.
Customer Profile: To view customer purchases that have been saved by the Profile option, press
Shift F7 and enter the customer number. Press F8 to return to the item entry screen. At any time
during the transaction, you may press the Customer Profile key (=). A window on the screen will
display the purchase items that have been recorded.
Finalize the Sale: Press F8 to end SKU entries and shift to the Tender screen. You will be
prompted to enter amount and press Tender key.
=====================================================================
TENDER
AMOUNT
F1 CASH
F2 CHECK
SUBTOTAL
30.30
F3 CHARGE
F4 RCVD ON ACCT
LESS: DISC
Shft BANK CARDS
AMOUNT
NUMBER
SALES TAX
2.03
F1 B OF A
FREIGHT CHARGES
F2 BEST CARD
F3 VISA
INVOICE TOTAL
32.33
F4
RCVD ON ACCT
F5
AMT TENDER
0.00
F6
CHANGE
32.33
ENTER AMOUNT AND PRESS TENDER KEY:
F8 ENTER F9 HELP F10 ABORT
=====================================================================
POINT OF SALE INVOICING
78
TENDER SCREEN:
Cash: Enter the amount of cash received and press F1. The balance due will be displayed if the
amount entered is less than the invoice total. Another Tender key may be used for the balance
(split tender). The total must be equal to or greater than the invoice total.
Check: Enter the amount of the check and press F2. The amount entered will be displayed and
the cursor moved to a Check Reference field where check identification, ABA number, or other
reference data may be entered. This field will be printed on the invoice and on the End-of-Day
transaction register.
Charge: Enter the amount to be charged and press F3. The amount entered will be displayed
along with the available customer credit balance.
Received on Account: Enter the amount received and press F4. Any amount received on
account will increase the balance of the invoice being generated. The amount received must be
tendered as if it is a sale amount. Enter the dollar amount to be credited to the customer's account
and proceed to tender out the sale.
Purchase Rebate: The (Tab) Purchase Rebate Tender key is used in conjunction with the
Purchase Credit Program to rebate earned credit amounts. You may not use the Purchase Rebate
key to tender an amount more than the account balance.
Gift Certificate: The (Down Arrow) Gift Certificate key is a dual-use tender key that is used to
sell and redeem gift certificates. Prior to using the key, a "special, easy-to-remember" gift
certificate customer must be established, i.e. customer number 25 for a twenty-five dollar gift
certificate. The customer name could be entered as $25 Gift Certificate. The customer type
should be set to "C", Charge, discount to zero, tax code to zero, and ageable to "Y", Yes. A
single special customer number could be used to capture all gift certificate sales if individual
tracking is not required.
To record the name of the gift certificate purchaser on the receipt, press the Down Arrow key to
the special name field and enter the new name to be printed on the receipt.
To sell the gift certificate, enter the special gift certificate customer number at the Enter
Customer Number prompt and press (ENTER). The special name, i.e., $25 dollar gift certificate
will be displayed. Proceed to the Tender screen, press the Down arrow, enter the amount
tendered and tender the transaction by using the appropriate Tender key.
To redeem the gift certificate, enter the special gift certificate customer number at the Enter
Customer Number prompt and press (ENTER). The special customer name, i.e. $25 dollar gift
certificate will be displayed. Proceed to the Enter SKU Item Number screen. Enter the
applicable items covered by the gift certificate and continue to the Tender screen. Enter the
amount of the gift certificate and press the Down arrow. If the gift certificate amount is greater
than the amount of purchase, the change due will be displayed and printed on the receipt.
POINT OF SALE INVOICING
79
Layaway: The Layaway (Up Arrow) key is a dual-use function key that may be used to place
items on layaway or to receive payments made to a layaway account. Prior to using the Layaway
Function key, a layaway account must be established.
The layaway customer type should be set to "C", Charge; the Layaway flag set "on"; the Profile
flag set "on"; the mail type set to "LW"; and ageable to "N", No. The Layaway flag allows for
special treatment of the account and will not allow a Charge tender to the account. The Profile
flag allows the capture of detail SKU item data by customer.
To place a SKU item on layaway, enter the layaway customer number and press (ENTER). The
layaway customer name and data will be displayed. Proceed to the Enter SKU Item Entry screen;
enter the item to be placed on layaway and proceed to the Tender screen. Enter the down
payment, if any, and press the appropriate Tender key, press the Up Arrow key to place the
balance on layaway. To receive money on a layaway account, enter the customer layaway account
number and press (ENTER). Proceed to the Tender screen, enter the payment amount and press
the Up arrow. Enter the tender amount and press the appropriate Tender key to record the
payment. The available credit displayed as a negative number represents the amount due on the
account.
Sales Tax (Y or N): Press F5 to flag the entire transaction as non-taxable. Enter N and press
(ENTER). The sales tax will be deleted. F5 acts as a toggle. If sales tax is required, press it
again to return the tax applied.
Resale Number: If a resale number is required, enter the number and press F5. If any SKU's on
the invoice are taxable, you will be prompted to enter taxable (Y or N). Press (ENTER) to accept
the default (Y). You will then be prompted to enter the tax percentage, or press (ENTER) to
accept the pre-defined percentage.
Freight Costs XXX.XX T1-T3: To apply freight costs to this invoice, enter the dollar amount,
followed by the appropriate tax level T1 through T3 and press F6. The system defaults to "no
tax" if the tax level code is not entered.
Invoice Discount % or $: To apply an invoice discount, enter the discount amount, followed by
a percent sign (%) and press F7. This will give you a percentage discount. The system defaults
to a dollar ($) discount, if the percent sign does not follow the amount entered.
Currency Conversion: Enter Shift F8 to display the currency exchange rates as defined in the
Control File Maintenance program.
Void Transaction: Pressing F10 without completing the Tender screen entry process will cause
the transaction in progress to be voided and noted in the End-of-Day Transaction Summary.
Credit Limit: If the customer has exceeded his credit limit, his available credit amount will flash
ON and OFF repeatedly at the Customer screen to alert the sales personnel. A negative credit
balance will also be displayed at the Tender screen. After completion of the sale, you will be
prompted to enter a Function code:
POINT OF SALE INVOICING
80
Shift F1 through F6 Bank Cards: Enter the dollar amount to be charged and press the
appropriate Shift F1 through F6 key. You will be prompted for a bank card number (maximum
of 18 characters). After pressing (ENTER), if the amount tendered is less than the balance due,
you will be prompted to enter another tender type. If the amount entered is greater than the
BALANCE DUE, the amount of change will be calculated by the system and displayed on the
invoice. Only six (6) tender types are allowed per invoice, including the entry “Received on
Account”.
The program will print the invoice or receipt and display the following:
FOR REPRINT, PRESS THE SELECETED FUNCTION KEY
F1 for Receipt F2 for Invoice F10 to End.
Press the function key for the invoice or receipt. When complete, press F10 to return to the
Generate Invoice screen. Each copy will state "REPRINT" at the top of the page.
END-OF-DAY PROCESSING TERMINALS
This procedure gathers the accumulated sales data from each terminal, stored in a Transaction
file, and posts it to the Inventory, History, and Balance Forward Accounts Receivable Master
files. Various reports are printed automatically when End-of-Day processing is complete.
IMPORTANT NOTE: BACK UP ALL DATA FILES BEFORE PROCESSING. To avoid
problems, backup ALL data files daily onto separate diskettes, one for each day of the week
(through UTILITIES, BACK UP ALL DATA FILES). This backup should be executed after all
data has been entered but before processing End of Day. Each store should keep DAILY backup
diskettes for seven (7) days, each clearly labeled with the date and terminal number. These
backups are used to restore files if you have to re-process an end of day.
All POS terminals should be at the Main menu before initiating End-of-Day processing.
The most common causes of End-of-Day processing failures are electrical power failures, system
errors and printer out of paper. If the printer runs out of paper, insert more paper and re-boot
(press CTRL-ALT-DEL); printing will resume at the top of the page being printed (if interrupted
before completion) or at the top of the next page of the report (if at the end of a page). The
system will instruct you to make backups of Transaction files for each terminal.
End of Day will print Tax Report if an additional tax was used during the day. This report prints
the bread down of taxable sales and tax amount for each level used.
Entries processed by terminals build a Transaction file: TTRANS##.FXX (# = Register Number)
(XX = Store Location Number) End-of-Day Processing renames that file to ORTRAN##.FXX
and builds a new, empty TTRANS##.FXX to be used by the terminal. At this point, the date will
be re-displayed on the terminal, and it may be used again.
The system then creates a backup of the ORTRAN##.FXX (called ORTRAN##.BXXD) and
POINT OF SALE INVOICING
81
prompts you to backup this file onto a floppy disk (this is the file used to "RESTORE A
TRANSACTION FILE FROM BACKUP"). "BACK UP THIS FILE!" The program will post
the transactions from the ORTRAN##.FXX file to the data files listed above, then "delete" that
file (which is why it is important that you make a backup of the ORTRAN##.FXX file). End-ofDay (EOD) Processing may be done at any time during the day; each terminal will be inactive for
a few minutes while being closed out by the program. If in the middle of a transaction, the
system receives a "busy" message, it will wait until the transaction is completed.
When the "close out" process is finished, the terminals may be re-started with the date redisplayed, and you may use it. Any transactions processed after this will be included in the next
EOD processing.
1) Process all Terminals
Used to process end of day for any location. At the completion of processing, you will be
prompted to backup the data files.
2) Process a Single Terminal
Used when any terminal displays an ERROR message due to TTRANS file being full. You will
be prompted to enter the terminal number. Follow the instructions given on the screen.
3) Restore a Transaction File from Backup and Process
Used to re-process an end of day due to failure(s) during the printing of reports and/or the
updating of files. You will be prompted to enter the terminal number. Follow the instructions
given on the screen.
You will be prompted to enter a terminal number for the transaction file being restored. You will
be instructed to enter the backup diskette for the specified store and terminal.
After the file is restored, you will have a choice of F1-POST or F2-PRINT ONLY. Choosing F1POST requires that the appropriate data files be restored before re-processing End of Day from
backup. (Choose F1 only if you have already restored the required data files.)
If you only wish to print or re-print End of Day, choose F2-PRINT ONLY. This will print the
End of Day reports without posting to any data files, thus eliminating the need to restore the
inventory, history, summary and receivables data files. (Choose F2 only if End of Day posted
normally, but did not print correctly.)
PRINT SALES SUMMARY
The POS Sales Summary Report provides a list of SKU's that were sold, including the current
SKU-on-hand status from the last time the report was printed. Also provided is the gross margin
amount earned for the period and the current inventory value at cost and retail. Store Managers
find this report of value in restocking high volume SKU's.
Note: Totals are set to zero after running the report.
PRINT MONTH/YEAR-TO-DATE SALES HISTORY
POINT OF SALE INVOICING
82
The Month-to-Date and Year-to-Date Sales Summary provides cumulative X-OUT Z-OUT
totals, department totals, and sales by clerk.
PRINT VARIANCE REPORT
The POS Variance Report displays by clerk all SKU's sold with a price variance for management
review. The variance file should be purged as part of a standard Month End procedure.
Reference: Inventory Control, Month End and Maintenance programs.
PRINT PROMOTIONAL MARKDOWN REPORT
The Promotional Markdown report will print all SKU's by department that were sold during the
selected promo period. The Promotional Markdown file should be purged as part of a standard
Month End procedure.
PRINT DEPOSIT AND SALES JOURNAL
The Daily Deposit Journal displays Cash, Checks, Bank Cards, and Charges totaling gross sales.
The Daily Sales Journal displays sales by department, sales by clerk, and sales by group.
POS X-OUT AND Z-OUT
This program provides the facilities to print or display an X-OUT, Z-OUT or clerk report of the
point-of-sale terminal transactions. Press F1, Change Report, to select the desired report that will
be highlighted and displayed at the center of the screen. Press F2 to display, print or save the
desired report on the spooler. Enter the reference number and press (ENTER) to process the
report. Note: Only the file pointers are reset, not the actual transaction being accumulated for
EOD processing.
=====================================================================
X - REPORT
STORE 01
TERMINAL 00
CASH
4
136.59
CHECK
1
2.00
____ _____________
TERMINAL TOTAL
5
138.59
TOTAL TRANSACTIONS
7
NON TAXABLE
23.94
TAXABLE 1
60.00
_____________
SUBTOTAL (NET SALES)
83.94
TAX 1
4.65
LOAN
1
100.00
DROP
1
-50.00
_____________
TOTAL
138.59
VOID TRANSACTION
1
68.64
F1 CONTINUE F10 ABORT
=====================================================================
Pressing F10, Abort, ends the operation and returns to the Point Of Sale Invoicing menu.
POINT OF SALE INVOICING
THIS PAGE INTENTIONALLY LEFT BLANK FOR FUTURE USE
83
POINT OF SALE INVOICING
84
POS CASH DECLARATION Z-OUT
This program provides the facilities to print or display a Z report for Point-of-Sale terminal
transactions. Press F1, Change Report, to select the desired report that will be highlighted and
displayed at the center of the screen. Press F2 to display, print or save the desired report on the
spooler. Enter the reference number of the terminal for which you wish to run the report. The
following screen will appear:
=====================================================================
CASH DECLARATION TERMINAL 01
DENOMINATION
CHECKS
CREDIT CARDS
CUST. CHARGES
COUNT
2
3
AMOUNT
50.00
225.00
TO POSITION CURSOR
PENNIES
NICKELS
DIMES
QUARTERS
HALF DOLLARS
DOLLARS
FIVES
TENS
TWENTYS
FIFTYS
HUNDREDS
F1 DEPARTMENT TOTALS
70
25
60
35
2
56
24
13
5
2
.70
1.25
6.00
8.75
1.00
56.00
120.00
130.00
100.00
100.00
TOTAL
798.70
USE ARROW KEYS
F10 END
====================================================================
=
You will be prompted to enter the total number of checks. Next, you will be asked to enter the
amount of each check. The system will automatically calculate the total amount for all checks
entered. Repeat these steps for credit cards and customer charges. Use the down arrow to move
the cursor if you have nothing to enter for a particular field. When you get to currency
denominations (e.g. pennies, nickels, etc.), you may enter either the number of coins/bills or the
total dollar amount. For example, you can enter 70 pennies in the count column or $0.70 in the
amount column. The system will automatically calculate the other field for you.
When you are finished, you may either press F1 to print Department Totals only (no final total)
or F10 to print both the Department totals and the final total.
POINT OF SALE INVOICING
85
Note: If your terminal balances, the “Terminal Total” will match “Your Total” exactly and a
zero will be displayed in the Proof field. However, if the terminal is short, the Proof will show a
negative amount and if it is over, the Proof will show a positive amount.
Following is an example of a Z-report:
=====================================================================
YOUR COMPANY NAME
99999 STREET NAME
ANYWHERE, CA
99999
435-555-1212
Z-REPORT
STORE 01
DATE 06/13/00
TERMINAL 01
TIME 09:27
DEPARTMENT TOTALS
1 ABC
98 TEST DEPT 98
5
6
10.00
15.00
YOUR TOTAL
TERMINAL TOTAL
60.00
50.00
110.00
25.00
PROOF
85.00
CASH DECLARATION
TWENTYS
FIFTYS
=====================================================================
ELECTRONIC JOURNAL
The Electric Journal program provides the facilities to display or print transactions from the
selected register transaction file. After the selection is made, you have the option to search by
clerk, customer number, transaction number, time period range, or transaction type. Once the
desired transaction is found, you may print the screen, and continue to scan the file or end the
search. The facility to void a specific transaction that may have been entered in error is provided
by pressing F5, this action will require a reentry of the correct sales data.
NOTE: Both the Electronic Journal and Archive Journal requires a backup hard drive (41) and
the desired time periods defined in the POS definition. The backup media should be used for the
entire month before changing to insure capturing all transactions for that month in one file.
POINT OF SALE INVOICING
86
ARCHIVE JOURNAL
The Archive Journal program provides the facilities to display or print transactions from the
monthly transaction archives. A specific history file may be extracted for re-posting or printing.
Once a file is selected the display procedure is similar to that of used in the Electronic Journal
program.
REGISTER CONTROL
The Register Control program provides user communication to the attached register terminals
and is used to define and edit Preset keys.
=====================================================================
1. MONITOR EXPRESS TRANSACTIONS
2. EDIT PRESET KEYS
3. DEFINE MIX MATCH CODES
4. DEFINE STEP PRICING
5. DEFINE DISCOUNT MATRIX
6. DOWNLOAD REGISTER SERVERS
ENTER REFERENCE NUMBER
F10 END
=====================================================================
Selection 1 applies to terminals only running Express Invoicing and allows monitoring of a
specific terminal while sales are being entered and tendered. Note: This selection is invalid for
T-2000 registers or any system not using terminals at point of sale.
Selection 2 applies to Express Screen editing for up to eighty (80) presets where item numbers
(6-digits) are assigned to the Preset keys.
Selection 3 applies to assigning Mix and Match codes to a SKU item with the Mix/Match or
Trade & Save flag turned on.
Each product in a Mix/Match file has two basic characteristics:
1.
Like-priced are items that are automatically tracked and discounted as required.
2.
Split-priced-items. (One SKU. See also Split Package Price field in Inventory
Management)
POINT OF SALE INVOICING
87
1. A store may have several different products priced the same that can be mixed and matched
for bulk purchase. A Mix/Match group is two or more like-priced products that may be
combined and purchased as if the products were identical. Each product that may be
interchanged is assigned to the same group. An example follows:
String Beans
Corn
Peas
Beets
Apples
Pears
Whole Kernel Corn
Creamed Corn
3/.89
3/.89
3/.89
3/.89
3/.79
3/.79
3/.99
3/.99
Mix/Match group 1
Mix/Match group 2
Mix/Match group 3
If one (1) can of string beans is purchased, the selling price would be the retail price in the Item
file. However, the program will identify the item as part of a Mix/Match group and discount
them automatically when the group quantity is reached.
1 Corn + 1 Peas + 1 Beets = .89
2 Apples + 1 Pear = .79
1 Apple + 2 Pears = .79
2.
Split-priced items are items that have different pricing when sold in single quantities than
when sold in pre-defined quantities. The discount is not realized until the number sold
reaches the defined quantity. An example follows:
Dog food .75 each or 6 for $4.00 Mix/Match group 4
As cans of dog food are sold, the price is registered as $0.75. When the sixth can is sold,
the price is automatically calculated to reflect the 6 for 4.00 price and registers as $0.25.
Steps to set up Mix/Match:
1.
Add Mix/Match Code to the Inventory Entry screen.
Select UTILITIES from The Retailer menu.
Select SCREEN MAINTENANCE.
Select INVENTORY ENTRY screen.
Locate the desired screen position and enter the Row / Column.
Enter the selection for Mix/Match code and it will be placed in that position.
Press F1 to save the screen
2.
Assign Mix/Match fields.
Select POINT OF SALE from The Retailer menu.
Select REGISTER CONTROL.
Select DEFINE MIX MATCH CODES.
Enter the mix/match group descriptions, types, flags, quantities and prices/SKU’s.
POINT OF SALE INVOICING
88
Following are three different ways in which you can define the Type and Flag fields:
a) Type = M/M and Flag = Price
See like-priced and split-priced items.
b) Type = M/M and Flag = SKU
If Mix/Match is set up with reference to a SKU, the system will get the sale price from the
referenced SKU# when that Mix/Match combination is rung up at point-of-sale. (You will need
to set up an additional SKU for the special pricing.)
For example, let’s say you have four different types of Budweiser beer sold in 12-pks. - Bud Dry,
Light, Ice and Regular. You want your customers to be able to buy any two of these 12-pks and
receive the sale price for a case. Instead of going into Mix/Match and changing the price each
time you put cases of Bud on sale, you would create a new SKU# in Inventory just for the special
pricing and enter it into the Mix/Match screen. Whenever you put cases of Bud on sale, you will
only have to change the special pricing SKU in Inventory. Anytime two 12-pks are sold, the
customer will automatically be charged the sale price of the case.
c) Type = T&S and Flag = SKU
This function is used when a customer buys a certain quantity of one item and gets a different
item free or at a discounted price. The SKU# of the rebate item should be entered in Mix/Match
along with the quantity that must be bought in order to receive the rebate. Price 1 of the rebate
item contains the normal retail price for that item. Price 2 contains the Trade and Save price.
The rebate amount is the difference between Price 1 and Price 2. If Price 2 is zero, then the
rebate amount will equal Price 1.
At the point-of-sale, the rebate item is entered just like a regular sale. When the last item of a
“Buy X Get Y for Z” series is entered, the rebated amount will be shown on the screen.
Example 1:If you buy two glasses at $2.00 each and receive one plate worth $1.50 for free,
Price 2 of the plate should be set to zero. The point-of-sale screen will appear as
follows:
Plate
Glass
Glass
Plate
1.50
2.00
2.00
-1.50 (rebate amount)
POINT OF SALE INVOICING
89
Example 2: If you buy two glasses at $2.00 each and receive one plate (regularly priced at
$2.00) for $1.25, Price 2 of the plate should be set to $1.25. The point-of-salescreen
will appear as follows:
Plate
Glass
Glass
Plate
2.00
2.00
2.00
-0.75 (rebate amount)
Note: To sell a set quantity of one type of item and give away the same item for free, e.g. Buy
three widgets and get a fourth widget free. Calculate the cost yourself and use the same set-up as
for like-priced and split-priced items (Type = M/M and Flag = Price).
When you are finished defining Mix/Match, press F1 to save.
=====================================================================
DEFINE MIX / MATCH CODES PAGE 1 OF 6
REF
1.
2.
3.
4.
5.
6.
7.
8.
9.
10.
11.
12.
13.
14.
15.
DESC
MIX 1
MIX 2
MIX 3
MIX 4
MIX 5
MIX 6
MIX 7
MIX 8
MIX 9
MIX 10
MIX 11
MIX 12
MIX 13
MIX 14
MIX 15
TYPE
T&S
M/M
M/M
M/M
M/M
M/M
M/M
M/M
M/M
M/M
M/M
M/M
M/M
M/M
M/M
FLAG QTY
SKU
3
PRC
4
SKU
2
PRC
PRC
PRC
PRC
PRC
PRC
PRC
PRC
PRC
PRC
PRC
PRC
SKU/PRC
101
9.00
104
REF
16.
17.
18.
19.
20.
21.
22.
23.
24.
25.
26.
27.
28.
29.
30.
DESC
MIX 16
MIX 17
MIX 18
MIX 19
MIX 20
MIX 21
MIX 22
MIX 23
MIX 24
MIX 25
MIX 26
MIX 27
MIX 28
MIX 29
MIX 30
..........
..........
..........
..........
..........
..........
..........
..........
..........
..........
..........
..........
..........
..........
..........
..........
..........
..........
..........
..........
..........
..........
..........
..........
..........
..........
..........
..........
..........
..........
..........
..........
USE ARROW KEYS TO SELECT CODE. PRESS PgUp / PgDn FOR ADDITIONAL CODES.
ENTER MIX / MATCH DESCRIPTION
F1 SAVE F2 PRINT F3 TYPE F4 FLAG F10 ABORT
=====================================================================
3.Enter the Mix/Match group number into the item records assigned to each group.
Select INVENTORY CONTROL from The Retailer menu.
Select INVENTORY ENTRY PROGRAM.
Enter the SKU number and assign the desired mix/match group for all items to be grouped.
POINT OF SALE INVOICING
90
Note: Remember to set the Mix/Match Code under all applicable SKU’s in Inventory Entry,
including any special pricing SKU’s and SKU’s for rebate items.
Selection 4 refers to Define Step pricing. One hundred eighty step pricing schemes may be set
up. The scheme can be set for percent discount or a fixed price (not a discount) for quantities of
items. Each scheme has eight levels of step discount or prices. When step pricing is defines,
Express Invoicing will not print until the transaction has been tendered.
Selection 5 refers to Define Discount Matrix. The Define Discount Matrix program allows
different discounts by departments depending upon the assigned customer code and discount
percentage applied. Customers may be assigned a code number, 101 through 109, in the
Customer Master file, Discount field. Use F2, Next Code, to increment to the desired code
number. Next assign the appropriate department discount percentage to be applied to the sale.
The discount percentage may be applied to the SKU cost by pressing F3 Above Cost. In effect,
F3, Above Cost, provides for a 4th price as the percentage amount is added to the SKU cost
rather than deducted from a price.
CUSTOMER BY DEPARTMENT DISCOUNT MATRIX
CUSTOMER CODE: 101
DISCOUNT %
PAINT
ELECTRICAL
LUMBER
PLUMBING
DEPARTMENT 1
...
...
0.10
0.05
0.15
0.02
0.00
....
....
DISCOUNT %
DEPARTMENT 6
DEPARTMENT 7
...
...
...
DEPARTMENT 25
MISC. AND OTHER
0.00
0.00
....
....
....
0.10
0.00
USE THE ARROW KEYS TO POSITION THE CURSOR. PRESS (TAB) TO TOGGLE
SIDES.
ENTER DISCOUNT PERCENTAGE
F1 SAVE F2 NEXT CODE F3 ABOVE COST F5 DELETE F10 ABORT
=====================================================================
Selection 6 provides capability to download register servers. Provides the facilities to transmit
the inventory, customer, notes, suspend and extended price master files to the register servers.
POINT OF SALE INVOICING
THIS PAGE INTENTIONALLY LEFT BLANK FOR FUTURE USE
91
CUSTOMER MANAGEMENT
92
The Customer Management program provides access to the Customer Entry Program, Single
Customer Inquiry, Custom Report Generator, Customer Label Generator, Print Customer Labels,
and Month End Maintenance.
=====================================================================
CUSTOMER MANAGEMENT
1.
2.
3.
4.
5.
6.
CUSTOMER ENTRY PROGRAM
SINGLE CUSTOMER INQUIRY
CUSTOMER FIXED REPORTS
CUSTOM REPORT GENERATOR
PRINT CUSTOMER LABELS
MONTH END AND MAINTENANCE PROGRAMS
F10 PREVIOUS MENU
=====================================================================
CUSTOMER ENTRY PROGRAM
The following Data fields are maintained on each of your customers. With this information, you
have the ability to "keep track of" charge customers, provide special pricing, target direct mail,
and adjust advertising for specific customer groups. The Entry screen may be modified using the
Screen Maintenance facility found in the Utilities section.
=====================================================================
STORE NO.
1
CUSTOMER ENTRY
HH:MM POS 1
CUSTOMER NUMBER
SCAN NUMBER
ACCOUNT BALANCE
CUSTOMER NAME
COMPANY NAME
ADDRESS 1
ADDRESS 2
CITY
STATE
ZIP CODE
PHONE NUMBER
FAX PHONE NO
CUSTOMER SINCE
DATE OF BIRTH
ANNIVERSARY DATE
CUSTOMER TYPE
MAIL TYPE
TAX CODE
TERMS CODE
PRICE CODE
AGEABLE
DISCOUNT
SVC. CHARGE
MIN. PAYMENT
CREDIT LIMIT
CHECK LIMIT
PROFILE CUST
LAYAWAY ACCT.
NOTES
EDUCATION CODE
GENDER
MARITAL STATUS
NUMBER ADULTS
NUMBER CHILDREN
ENTER THE CUSTOMER NUMBER
TAB SIDE F1 SAVE F2 NEXT F3 SPEED F5 DELETE F7 NOTES F8 PAGE F9 HELP F10 ABORT
=====================================================================
CUSTOMER MANAGEMENT
93
SECOND CUSTOMER SCREEN
=====================================================================
STORE NO.
1
CUSTOMER ENTRY
HH:MM
POS 1
ADD
CUSTOMER NUMBER
10000
YEAR TO DATE
CASH PURCHASE
BANK CARD PURCHASE
0.00
0.00
0.00
LAST YEAR
PRIOR YEAR 1
PRIOR YEAR 2
0.00
0.00
0.00
ENTER THE YEAR TO DATE PURCHASED AMOUNT
TAB SIDE F1 SAVE F2 NEXT F3 SPEED F5 DELETE F8 PAGE F9 HELP F10 ABORT
=====================================================================
CUSTOMER ENTRY FILE FIELDS:
Customer Number
Enter up to six (6) digits to identify the customer. If you desire to change a customer's data, you
may select the customer by entering the customer name in the Customer Entry field and pressing
(ENTER). The system will use the cross-reference file to match the customer name with the
customer number and display the data.
Note: The customer number is left justified and will sort accordingly.
Sorted Example:
100
1011
500
6302
Next Available Customer Number
The Next Available Customer Number Search facility assumes a search increment of ten (10).
To use the Search facility, proceed to the Customer Entry screen. At the prompt, enter the
customer number and press F2. If the entered number has been previously assigned, the system
will use the search increment to locate the next available customer number and shift to Add mode
to allow completion of the entry. If the customer number entered has not been previously
assigned, the system will not increment the customer number, but will shift to Add mode to allow
completion of the entry.
Scan Number
Up to a fourteen (14) digit UPC Scan number may be either manually entered or scan entered to
identify the customer. The scan number automatically cross-references to the customer number,
if used at the point of sale.
CUSTOMER MANAGEMENT
94
If the bank account number of a bad check is entered in this field, and a negative number entered
in the Check Limit field, the two field will act as a bad check flag any time the bank account
number is entered at point-of-sale and the sale is tendered. (Be sure to build the proper crossreference file).
Customer Name (Last Name/First Name)
Twenty-four (24) characters are available. The slash (/) function is optional. It may be entered if
you desire the program to reverse print the name entry. The program "reverses" at the slash for
displaying or printing, (John E. Smith, Jr.). To use a single name (Thomas), precede the name
with a slash (/Thomas).
Company
Twenty-four (24) characters are available to enter the company name.
Address 1
Twenty-four (24) characters are available to enter the customer's address. Two (2) lines are
available, so you may use this line for an address, department within a company or whatever you
choose.
Address 2
Twenty-four (24) characters are available for the second address line. If the first character is a
space, the following entries will display at the Point-of-Sale screen but not print. It may be used
to indicate authorized signers on an account or other pertinent information.
City
Twenty-four (24) characters are available for the customer's City, Province or Country.
State
Use the standard two (2) digit state abbreviation.
Zip Code
Nine (9) characters are available. Enter the standard five (5) digit zip code. Omit the hyphen if
using the extended code (94086-1486). It should be entered as 940861486.
Phone Number / Fax Phone Number
Enter the area code and telephone number (including dashes, as if writing the number i.e., 435563-6019), or press (ENTER) to skip.
CUSTOMER MANAGEMENT
95
Note: The phone number will accept twelve (12) numeric entries, including dashes. Since it is
stored as a packed number, it will not accept spaces or alpha characters.
Customer Since
This entry may be used to determine valued long-term customers.
Last Purchased
Indicates the last date this customer purchased merchandise.
Date of Birth
Customer's date of birth or can be used to track some other date relating to a customer. A handy
feature for sending out timely birthday greetings.
Anniversary Date
Field for customer's wedding or other anniversary date.
Customer Type
Enter Customer Type (1 character) A through D has been assigned. Any character outside this
range will be treated as a non-tender type to be used in conjunction with mail type to expand the
sort capability of customer types within the Customer Master file.
A = Cash Type: The terminal or register will accept cash tendering on sales made to this
customer.
B = Check Type: The terminal or register will accept either cash or check tendering on sales
made to this customer.
C = Charge Type: The terminal or register will accept either cash, check or charge tendering on
sales made to this customer.
D = Delinquent Type: Treated as a charge customer, will indicate a delinquent prompt if a
charge sale is made to the customer. If the credit limit is set to zero (0), additional charge sales
will not be allowed unless a manager authorizes the charge sale. If the mail type is set to “DL”,
the POS will display “This Customer has a delinquent balance. Please call office”, and the
transaction will not be allowed to continue. You must press F10 to abort the transaction.
CUSTOMER MANAGEMENT
96
Mail Type
ENTER MAIL TYPE (2 characters)
This special code is used for sorting mailing lists/labels for printing. You may assign any letters,
numbers, or a combination of both to define groups of your choice. Example follows:
A1 = Professional Cyclist
B1 = Avid cyclist
C1 = Weekend cyclist
D1 = Other
Tax Code
This tax code will be applied to invoices, which are generated at the point of sale. For example,
with an add on tax entry of:
"101" = Tax Rate 1
"102" = Tax Rate 2
"103" = Tax Rate 3
"104" = No Tax
Value Added Tax (VAT) allows up to six different rates 101 through 106.
Terms
These terms will be applied to all invoices or cash register sales.
Enter a terms code (1-99) which was set through "Control File Maintenance" (an entry of zero
will default to code 1), or press (ENTER) to use the code shown.
Price Code
The price level to be used for this customer. Code 1 will select price 1, code 2 will select price 2,
and code 3 will select price 3.
Ageable
Enter 'Y' if customer is ageable. If using Open Item Accounts Receivable, this flag is not
checked.
Discount
Enter the customer discount percentage to be used or simply press (ENTER) if it is not being
used. Enter discount codes 101-109 to use the Discount Matrix feature.
CUSTOMER MANAGEMENT
97
Service Charge
Enter the annual service charge rate this customer is charged. Press (ENTER) to use the rate
shown.
Minimum Payment
Enter the minimum monthly payment expected.
Credit Limit (Maximum = 9999999)
Once the customer exceeds this amount, you will be notified by one (1) of two (2) ways:
If ringing a sale through the cash register, a "tone" and customer limit will be displayed on the
cash register.
If posting an invoice, the available credit (if negative) will flash on the screen when the
customer's account is displayed.
Store policy should determine how to handle each situation. (E.g. call management and get
approval).
Check Limit
Indicates the maximum amount of a check you will accept from this customer. A negative
amount can be used to indicate a bad check was received from this customer. This feature
becomes even more powerful when used in conjunction with the Customer Scan number field.
Reference number
A six digit numeric field that can be used as another cross-reference number for the customer.
Gives another search field in Custom Report Generator. If this customer is a layaway account
and you are using Customer Profile, enter the real customer number and the purchases will be
profiled once the layaway is paid off.
Yr. Gross Income
If desired for customer demographics, enter the applicable code for the household’s annual gross
income. When the cursor is in position, the following defined codes will appear:
1 - < 25,000
2 – 25,001 to 50,000
3 - 50,001 to 75,000
4 - 75,001 to 100,000
5 - 100,001 to 150,000
6 - > 150,000
CUSTOMER MANAGEMENT
98
Profile Customer
Set this flag to 'Y' and set the profile item flag in Inventory on those items you wish to maintain
in this customer's profile. View the profile in Customer-Month End Maintenance or at POS
using the profile key (Express Invoicing only).
Layaway Account
This flag is used in conjunction with the customer type (C) charge to indicate that this customer
is a layaway account.
Notes
This option allows up to six 40 character notes to be added for each customer. The flag field at
the bottom of the entry screen must be set to “Y” to utilize this option. If desired, press F7 and a
pop-up screen will allow for note entry.
Note: When notes are utilized, it diminishes the maximum database capacity for customers by
one. However, when a note is deleted, the capacity is increased by one again.
Education Code
The applicable code may be entered to track customer demographics. When the cursor is in
position, the following options will be displayed. Codes have been defined by the system as
follows:
1 – High School
2 – Trade School
3 – Associates Degree
4 – Bachelors Degree
5 – Masters Degree
6 – Post Graduate
7 – Doctorate
Gender
Enter M or F for the customer’s gender.
Marital Status
The following codes will apply to denote the customer’s marital status:
S – Single
M – Married
D – Divorced
W – Widowed
CUSTOMER MANAGEMENT
99
Number of Adults
Enter the number of adults in the household.
Number of Children
Enter the number of children in the customer’s household.
F8 Page - page to second customer screen.
Year to Date
The year-to-date figure is the account activity for the year-to-date purchases (whether they were
cash or credit). It is for reference only.
Cash Purchase
Indicates the amount of cash purchases made by this customer. It is used by the Customer
Purchase Credit option.
Bank Card Purchases
Indicates the amount of Bank Card purchases made by this customer. It is used by the Customer
Purchase Credit option.
Last Year, Prior Year 1 & 2
Reflects customer purchases posted at the end of the prior years.
Shift F1
Shift F1 is a hot key (short cut) that will bring up the Cross Reference Maintenance screen.
SINGLE CUSTOMER INQUIRY
The Single Customer Inquiry screen is defined in the Screen Maintenance section of the System
Utilities menu. The Inquiry screen may be used in conjunction with Password Control to display
selected customer information.
CUSTOMER MANAGEMENT
100
CUSTOM REPORT GENERATOR
This unique feature will allow you to selectively view and print customized reports for all or part
of your Customer Master file.
The first step is to define your custom report parameters. This may include presorting,
referencing the desired Print Data Selection fields, selecting up to three (3) print lines of
customer data and assigning a report name. After completion, the custom report parameters are
stored so as to be readily accessible for periodic reprinting. A maximum of twenty (20) custom
reports may be defined and saved for future use. Once reports are named and saved, they may be
recalled for display or print by entering their respective reference numbers and pressing
(ENTER).
Practice and familiarity with the Custom Report Generator will make a vast array of
customer information available to you in the format most useful to your store's operation.
The Function Keys at the bottom of the screen provide the following:
F1 - Is used to add a new report. (A reference number is not required.)
F2 - To modify an existing report, enter the reference number of report to be modified and press
F2.
F3 - Is a toggle to allow you to display a report on the screen in lieu of printing. It is very useful
when setting up spacing on multiple line print operations prior to saving the final version. F3
resets to the print position upon leaving the Custom Report Generator program.
F5 - To delete a report that is no longer required, enter the reference number of the report to be
deleted and press F5.
F10 - Is the standard program End or Abort selection.
To add a new report, press F1. The Sort Selection screen will display and should be used if you
desire to have the customer data printed in a selected sorted sequence. The options allow you to
sort the customer file in any order you choose. You can also choose to sort by several parameters
at one time. Press F1 to save selected parameters or skip if no parameters are selected. The Print
Data Selection screen will display. For reference purposes, you may print out the field number
and title by pressing F2. To select the detail information you want to see on the report, enter the
reference number of each field in the order in which you wish to print or display and press
(ENTER).
Note: Since up to four (4) lines of selected data may be printed, a line length and unused print
position counter has been provided to assist you in formatting your report. After entering the
selected fields, you may insert line breaks (print a new line) by selecting the field reference
number you wish to start the second line with and pressing F2.
Note: An "L" will appear ahead of the field selected indicating the start of the second line.
CUSTOMER MANAGEMENT
101
To make the custom printed report more useful, the facility to insert separation spaces has been
provided. Select the reference number of the field you wish spaces to precede and press F3.
Enter the desired number of spaces to be inserted and press (ENTER).
Note: An "S" will appear, followed by the number of spaces inserted. If you make a mistake on
any print data selection, repeat the process to reverse the action. Press F1 to save the print data
selected for your custom report. You will be prompted to provide a report name or press
(ENTER) to default to customer report number 1-20. Enter a spool filename or press (ENTER)
to default to CUSREP 1-20. Upon completion, you will return to the Main Custom Report menu
where you can print or display the report you have created by entering the report reference
number and pressing (ENTER).
=====================================================================
RANGE SELECTION FOR CUSTOMER MASTER LIST
STARTING
CUSTOMER NUMBER
CUSTOMER NAME
COMPANY NAME
CITY
STATE
ZIP CODE
PHONE NUMBER
CUSTOMER TYPE
MAIL TYPE
CREDIT LIMIT
CHECK LIMIT
CURRENT BALANCE
YTD PURCHASES
CUSTOMER SINCE
LAST PURCHASED
DATE OF BIRTH
ANNIVERSARY DATE
REFERENCE NUMBER
#########
##
#########
##
#########
##
##
#########
#########
#########
01/01/90
01/03/00
#######
#######
0
ENDING
999999
#########
#########
#########
#########
#########
#########
0999999999.99
0999999999.99
0999999999.99
0999999999.99
12/31/48
12/31/48
#######
#######
9999999
Range Selection Screen - This screen allows you to select a range of items upon which the
program will base its search of the master file. The more information you enter here, the more
specific the search will be. If you accept the default screen as it first appears, the search will be
as general as possible. The number sign represents a 'wild card' which tells the program to
retrieve anything that appears in that position in that particular field.
After making your range selections, Press F3 to toggle between Display and Print. Note that
each time you press F3, the highlight moves from one choice to the other.
CUSTOMER MANAGEMENT
102
To preview a long report before (or instead of) printing, press F3 until DISPLAY is highlighted
and press F1 to PROCESS. After processing, you may view the report one screen at a time. To
print the report, press F3 until PRINT is highlighted and press F1 to PROCESS.
Additionally, you may EXPORT your report data to an ASCII comma delimited text file. Press
F3 to highlight PRINT. Next press F2 EXPORT FILE and press F1 PROCESS. The text file
will be placed on your hard disk with a file extension of Xnn (where nn = the number of the
terminal originating the report). Once the file is on the hard disk, it can be copied to a floppy
diskette using the Disk Utility, F2 Copy feature.
The command syntax is; Copy
40FILENAME.XNN to 32FILENAME.EXT where FILENAME.XNN is the name given by the
Report Generator and FILENAME.EXT is the filename and extension for the new DOS file.
(Note: Drive A: corresponds to 32 and B: to 33).
Flag Selection Window
The flags provide a finite selection to the range of customers to print. Press F7 to modify the
flags. The cursor will move to the Flag Selection Window. Use the arrow keys to the select the
flag or flags to change. The allowed setting for the selected flag are displayed below the
window. When a flag entry is set to a (#) that flag is not used in the range selection. Press any
function key to return to the range selections.
Flags are checked for their true or false conditions. For example: if you wish to display all the
customers that have the profile flag set. Set the PROFILE flag to Y and process. To print all
customer that are not LAYAWAY customer, set the LAYAWAY to N to process. If you have
more than one flag set the item must pass the entire selection criteria before it will print.
Change by Range - This feature allows global changes to be made to select Master File fields.
Any field that may be added or changed by using a Master File Maintenance program may now
be "changed by range". Change by Range is an extremely powerful feature that should only be
used by someone thoroughly familiar with the system and your business. Also, it should only be
used after backing up the target master file before processing any Change by Range operation.
The first step in using the Change by Range feature is to determine the fields you wish to change.
Next, create a report having only those fields defined. This procedure minimizes the risk of
making an inadvertent global change mistake. After defining and naming the report, proceed to
select the report for printing. When the Range Selection screen is displayed, press F4 to invoke
the "hidden" Change by Range prompt that will be displayed on the right-hand side of the Range
Selection screen.
When the range definitions have been completed, press F1 to process and proceed to the "Match
Data - Change Data" Selection screen. The # sign is a wild card character that will force a match
if match data is not entered. Enter the match data and press the Tab key to shift to change data.
When the data entry is complete, press F1 to process. After processing the changes, an audit
report will be automatically generated indicating the selected field contents before and after the
Change by Range program was executed.
CUSTOMER MANAGEMENT
103
PRINT CUSTOMER LABELS
This selection provides the facility to print mailing labels by customer name, customer number or
zip code. The program uses the label format set up in Customer Label Maintenance.
You may modify the sort selection of label types by adding a report and defining the sort criteria
to be used. Using the label type selection in conjunction with pre-defined sort parameters, you
will be provided almost unlimited customer label variations.
MONTH END AND MAINTENANCE PROGRAMS
=====================================================================
1. CROSS REFERENCE MAINTENANCE
2. CUSTOMER LABEL MAINTENANCE
3. CUSTOMER REGISTERY
4. ZERO YTD SALES IN CUSTOMER FILE
ENTER REFERENCE NUMBER:
=====================================================================
1) The Cross Reference Maintenance selection provides the facilities to assign more than one
customer name and scan number to a master customer number. It allows a customer’s employee
to charge to the master customer number.
=====================================================================
STORE NO. 1
CROSS REFERENCE MAINTENANCE 14:42
PAGE 1
CUSTOMER NUMBER
SCAN NUMBER
COMPANY
SCAN NO.
123456
234567
100
111222333
ABC INC.
CUSTOMER NAME
MARY SMITH
JOHN DOE
NAME
ADDRESS
CITY
JOHN SMITH
130 MERRYOAKS AVE.
CAMPBELL
ENTER THE CROSS REFERENCE SCAN NUMBER.
TAB SIDE F1 SAVE F2 NEXT F3 PRINT F5 DELETE F10 ABORT
=====================================================================
2) The Customer Label Maintenance selection provides the facility to build custom labels by
defining the print parameters of the labels. The program allows up to ten (10) different label type
fonts to be stored for use by the Print Custom Label program. To print bar codes on labels, the
number of characters across each label must be set to a minimum of:
10 pitch = 16 characters
12 pitch = 20 characters
17 pitch = 28 characters
20 pitch = 32 characters
CUSTOMER MANAGEMENT
104
At 6 lines per inch, the bar code takes 2 lines; at 8 lines per inch, the bar code takes 3 lines. The
label contents and line position may then be defined by using the screen outline guide. Following
is a sample Customer Label Maintenance screen.
=====================================================================
THIS PROGRAM PROVIDES THE FACILITIES TO CUSTOMIZE THE LABEL
PARAMETERS FOR YOUR SPECIFIC APPLICATION
LABEL NUMBER 1
5
10
16
17
LABELS ACROSS PAGE (1 - 20)
PITCH. CHARACTER PITCH (10, 12, 17, 20)
PRINTABLE POSITIONS ON THIS LABEL (8-40)
PRINT POSITIONS FROM LEVEL EDGE OF
FIRST LABEL TO NEXT (8-99)
6 LINES PER INCH. LINE SPACING (6, 8)
9 PRINTABLE LINES ON THIS LABEL (1-12)
11 LINES FROM THE TOP OF ONE LABEL TO TOP
OF THE NEXT (1-99)
ENTER SELECTED DATA AND PRESS (CR).
USE ARROW KEYS TO POSITION CURSOR.
F1 SAVE F9 HELP F10 ABORT
=====================================================================
At the Label Maintenance screen, you must enter the label number you wish to edit; Numbers 1-7
for inventory, or 8-10 for shelf.
Next you must designate the numbers of labels to be printed across the page 1-20.
The character pitch - 10, 12, 17, 20, refers to the printable characters per inch.
The printable positions on the label refer to the numbers of print characters desired (8-40).
The print positions from the left edge of the first label to the left edge of the next label must be
equal to or greater than the number of printable characters on the label.
Lines per inch is the number of lines required for one inch vertical spacing.
The number of print lines on the label range from 1-12.
The number of lines from the top of one label to the top of the next label must be equal to or
greater than the number of printable lines on the label.
Set the number of labels down the page to equal the page layout of the label stock.
0=Continuous Form 5=Five labels down the page.
CUSTOMER MANAGEMENT
105
Note: The bar code (P) and UPC number (O) positioning should be left justified on the label
definition grid as the system will center it on the label prior to printing. Laser Printers must be
Epson Graphics compatible. (E.g. Brother HL-630)
Press F1, Save, to proceed to the Label Contents screen. The following is a sample screen.
=====================================================================
LABEL NUMBER 1
***********************
*AAAAAA
*
*
*
*CCCCCCCCCCCCCCCC
*EEEEEEEEEEEEEEEEE *
*
*
* GGGGGGGGGGGG *
*
*
*
*
*
*
***********************
A=CUSTOMER NUMBER
B=SCAN NUMBER
C=CUSTOMER NAME
D=COMPANY NAME
E=ADDRESS 1
F=ADDRESS 2
TO POSITION CURSOR
USE ARROW KEYS
*
(^) TO START/STOP BOLD
(~) TO START/STOP DOUBLE HI
(+) TO START/STOP BOTH
G=CITY
H=STATE
I=ZIP CODE
J=PHONE NUMBER
K=CUSTOMER TYPE
L=SCAN BAR CODE
ENTER CHARACTER ASSOCIATED WITH THE DESIRED FIELD
F1 SAVE F5 DELETE F9 HELP F10 ABORT
=====================================================================
3) The Zero YTD Sales selection F1, Process, moves the YTD sales total to the prior year's
Archive History file, then zeros out year-to-date sales in the customer record. The F2, Validate,
function insures that the customer numbers have not been corrupted.
CUSTOMER MANAGEMENT
THIS PAGE INTENTIONALLY LEFT BLANK FOR FUTURE USE.
106
SYSTEM UTILITIES
107
The System Utility menu selections allow you to effectively manage the system data files that are
necessary for optimum operation.
=====================================================================
1. BACKUP OR RESTORE DATA FILES
2. REORGANIZE MASTER FILES
3. DATA FILE ALLOCATION
4. DISK UTILITIES
5. REPORT CONTROL
6. BUILD CROSS REFERENCE FILES
7. AUTOMATIC INQUIRY SYSTEM
8. CHANGE BACKUP DISK DRIVE
9. SCREEN MAINTENANCE
ENTER REFERENCE NUMBER:
F10 PREVIOUS MENU
=====================================================================
BACKUP OR RESTORE DATA FILES
This selection will display a menu similar to the following.
=====================================================================
ID FILENAME
CREATED BACKUP CHANGED BK
INVENTRY.MAS 10/4/00
10/9/01
Y
HISTORY.DAT
10/8/00
10/8/01
Y
SUMMARC.DAT 10/8/00
10/8/01
Y
VARIANCE.DAT 10/4/00
INVJRNL.DAT
10/4/00
10/6/01
Y
ARCHIVE.MAS
10/8/00
10/8/00
10/8/01
VENDOR.MAS
10/4/00
10/8/01
** STORES.DAT
10/4/00
10/9/01
Y
...
...
MARK THE DESIRED FILES TO BE BACKED UP OR RESTORED.
F1 BACKUP F2 MARK F3 MARK ALL F4 RESET F6 RESTORE F10 ABORT
=====================================================================
** A STORES.DAT file will appear only at location one (1) of a Multi-Store organization.
SYSTEM UTILITIES
108
Note: To avoid problems, backup all data files daily onto separate diskettes or a separate fixed
disk. The backup created will automatically be assigned a file extension (BAK1 - BAK7)
depending on the day of the week the backup is performed. Thus seven (7) days of file backups
may be created before the sequence is repeated. This file backup procedure provides a greater
safety margin in the event a file reconstruction (restore) is required.
Back Up a File
To backup a file, you must first use the Arrow key to select the file you wish to backup. Press F2
to mark it with an asterisk, pressing F2 again will remove the mark. If all files are to be backed
up, press F3 Mark All. Pressing F4 will reset all marks. After marking the desired files, press F1
to begin the backup process. You will be prompted to load the correct backup diskettes or you
may change the backup drive by pressing F2 to toggle to the next available backup system drive.
Press F1 to continue the backup process.
When backing up files, it is important to note that certain files are "chained" together. Changes in
one file will affect changes in another. In the list below, if any changes are made to the file listed
to the left of the plus (+) sign, then all the files in that chain should be backed up. The chained
files are:
(For location 1 of Multi-Store)
INVENTRY.MAS + STORES.DAT
(For Accounts Payable)
APSPAY.DAT + APSGLR.DAT, APSCHK.DAT and VENDOR.MAS
(For Balance Forward A/R)
BFADET.DAT + BFAGLR.DAT, and CUSTOMER.MAS
(For General Ledger)
GENDET.DAT + GENLEG.MAS
When the backup is complete, the screen will return to the Utilities menu.
Restore a File
To restore a file, you must first use the Arrow key to select the file you wish to restore. Press F2
to mark the file with an asterisk. Pressing F2 again will remove the mark if an erroneous
selection was made. Press F6 Restore. A "Warning" prompt will appear (restoring files from
backup will replace current data). Press F1 to continue. A directory of backup by date created
will be displayed, select the file reference number or use the default selection and press F1 to
continue. When the selected file is restored, you will return to the Utilities menu.
When restoring files, it is important to note that certain files are "chained" together. If restoring
any of the files listed below, restore all the files in that chain. The chained files are:
SYSTEM UTILITIES
109
(For location 1 of Multi-Store)
INVENTRY.MAS + STORES.DAT
(For Accounts Payable)
APSPAY.DAT + APSGLR.DAT, APSCHK.DAT and VENDOR.MAS
(For Balance Forward A/R)
BFADET.DAT + BFAGLR.DAT, and CUSTOMER.MAS
(For General Ledger)
GENDET.DAT + GENLEG.MAS
The information in the REPORT.DAT, TEXT.DAT and CUSTOM.DAT files will not be in
effect until the system has been restarted (rebooted) or the special Function Shift F keys utilized
as explained in the Introduction Main menu explanation.
Transaction files cannot be restored through this program. Use Point-of-Sale Invoicing, select
End-of-Day Processing and Restore a Single File from Backup and Process.
REORGANIZE MASTER FILES
This selection displays a menu similar to the following:
=====================================================================
ID
FILENAME
CREATED
BACKUP CHANGED BK
INVENTRY.MAS
10/9/99
10/9/99
10/9/00
VENDOR.MAS
10/4/99
OPENORD.MAS
10/4/99
F1 REORGANIZE F2 MARK F3 MARK ALL F4 RESET F6 AUTO TIME F10 ABORT
=====================================================================
Note: Only ISAM (Indexed Sequential Access Method) files (keyed) can be reorganized through
this program when the system is defined as a Multi Store. The STORES.DAT file is reorganized
through a program in Inventory Control.
Reorganize a File
Use the Arrow key to select the file you wish to reorganize. Press F2 to mark it with an asterisk.
Pressing F2 again will remove the mark if the selection was made in error. If all files are to be
reorganized, press F3 Mark All. Pressing F4 will reset all the marks. After marking the desired
files, press F1 to begin the reorganization process.
Note: Selecting F6 Auto Time, will allow you to pre-select the time you wish to automatically
reorganize any files that incurred changes during the normal work day. This auto time is used in
conjunction with the daily closing procedure invoked by pressing F9 and F1 while at the Main
menu. After closing, the system will use the auto time default 00:00 or your selected time to
reorganize the Master files.
SYSTEM UTILITIES
110
DATA FILE ALLOCATION
The Data File Allocation menu is similar to the following:
=====================================================================
ID
FILENAME
NRALL NRWRI NEWSIZE CREATE
INVENTRY.MAS
101
15
100
10/9/00
UPC.MAS
102
MFG.MAS
101
DESC.MAS
102
...
...
ENTER THE NEW ALLOCATION SIZE
F1 ALLOCATE F2 MARK F10 ABORT
=====================================================================
Initial data file allocation is automatically assigned during system initialization. The actual
allocations may be reduced or expanded to meet specific customer file requirements.
Allocate a File
To allocate a file, you must first use the Arrow key to select the new size you desire to change
and enter the new allocation number. This entry will change the "NEWSIZE" column, but will
not affect the actual file size until the file is backed up and restored. Enter the number of records
to be placed in this file. Press F1 Allocate. Repeat this procedure until you have finished
allocating the file sizes. After you exit, use the BACKUP, RESTORE or REORGANIZE options
to process the new file sizes.
FOR THE MAIN SYSTEM OF A MULTI-STORE ORGANIZATION:
Although the file STORES.DAT appears on your screen, you cannot directly allocate its size.
Each time you change the size of the Inventory file, the STORES file will be adjusted automatically.
Definition of Terms:
ID - Used in conjunction with the ID Control option.
FILENAME - The name of each data file.
NRALL - The number of records allocated in this file. This number will match the NEWSIZE
entry (or be 1 higher) once the file has been reorganized.
NRWRI - The number of records written into the file. To avoid wasting fixed disk space, the
file size allocation (NRALL) should be close in size to this number (never less).
SYSTEM UTILITIES
111
NEWSIZE - The size the file will be after it is restored or reorganized.
CREATE - The date this file was created.
BACKUP - The last date this file was backed up.
CHANGED - The last date any changes were made to this file.
BK - Does this file need to be backed up? Y (yes) or N (no) indicates if changes have been made
to this file since the last backup was made. This column may read Y with the same BACKUP
and CHANGED dates if changes have been made during the day that has not been backed up.
DISK UTILITIES
The Disk Utility program provides a number of valuable functions that include:
F1 - Directory
F2 - Copy
F3 - Delete
F4 - Verify
F5 - Format
F6 - Disk Status
F7 - Default Drive
F8 - Create
F9 - Help
F10- Exit
F1 - Directory
The files stored on each diskette or on the fixed disk may be displayed or printed by using the
Directory function.
To display the Directory, press F1, at the prompt enter the disk address (30, 31, 40, or 41) and
press (ENTER). The displayed directory will be in alphabetical order indicating filename and
extension.
To print the directory press F1, at the prompt enter the disk address followed by a forward slash
"P" for print. Example; 30/P will print the directory of the diskette in drive 30. The listing will
be in alphabetical order by filename.
Disk locations (based on cabling) are usually numbered as follows:
30 - Left (or top) floppy disk drive
31 - Right (or bottom) floppy disk drive **
40 - Primary fixed disk drive
41 - Back up fixed disk drive **
Note: ** only if the drive is installed
Enter the appropriate response and press (ENTER).
SYSTEM UTILITIES
112
F2 - Copy
Files may be copied in a number of ways. The most common is to press F2, at the prompt enter
the drive number, filename and extension to drive number, filename and extension. Example;
Copy 30 PRI00I.OBJ to 31, PRI00I.OBJ. The file that is copied may be verified by using the
forward slash "/V" following the last entry in the string, F9, Help, provides brief examples of
various Copy functions. Another easy method is to use the Directory function to display the file
on a drive or diskette then move the cursor to the filename to be copied, depress "C" for Copy
and enter the destination drive and filename, press (ENTER) to execute the Copy function.
F3 - Delete
You may delete a file by pressing F3, at the prompt enter the disk drive number, the filename, the
extension and press (ENTER). The filename will be displayed at the bottom of the screen, you
may then press F1 to skip it, F3 to delete or F10 to Abort. Another method is to use the Display
function F1 and move the cursor to the file you wish to delete and press "D" to delete. You need
to press "D" twice to actually delete the file. This was done to minimize an erroneous deletion.
Wild card deletions may be executed provided multiple files with the same parameters need to be
deleted.
F4 - Verify
The Verify function is used to compare a file or group of files located on one drive to a file or
group of files located on another drive. It is normally used to verify that a correct copy of a file
or group of files has been made in the course of a system update. You may verify a file copy by
pressing F4, at the prompt enter the disk drive number, the filename, the extension followed by
the (to xx) address of the other disk drive. You may also use the Display function F1, move the
cursor to the filename you wish to verify, press "V" for verify, enter the drive number and press
(ENTER) to execute the Compare function.
F5 - Format
*** WARNING ***
This program will erase all data on the diskette being formatted. Copy any information you want
to save onto a separate diskette before formatting.
******
To format a diskette, insert the diskette to be formatted in the appropriate drive and press F5. At
the prompt, enter the drive number followed by a comma and the disk label (if used). Press
(ENTER). Note: If you want to format a 3 1/2 inch diskette as a 1.2 megabyte or a 5 1/4 inch
diskette as a 320 kb low density, enter “/L” after the drive number or disk label and press
(ENTER). You will then be asked, “Are you sure you want to format drive xx”. Press F1 to
continue.
SYSTEM UTILITIES
113
While the diskette is formatting, the display will show the progress, by track, at the bottom of the
screen. An "F" for format, a "V" for verify and a "." when the track is complete. If an error is
encountered, a number 1, 2 or 3 will be displayed indicating a defective diskette. To identify
each diskette, a label or name of up to six characters should be assigned by entering the label
name after the disk drive selection number i.e., 30, Today. When complete, a formatting xx formatted message will be highlighted. Repeat the above steps to format other diskettes.
If you are formatting diskettes that will be used as backup for daily entries or changes, a diskette
should be labeled for each day of the week (a set of five or more diskettes will be rotated each
week). These diskettes could be named by the day of the week (MONDAY) or by some other
meaningful label (MOINB1 = Monday Inventory Backup disk # 1). Be sure to place a gummed
identification label on the diskette. Include any written detail you think necessary.
F6 - Disk Status
The Disk Status function is used to display the disk label and the capacity utilization of the
selected disk or diskette. The sectors used, sectors available, the directory entries available and
the largest contiguous block of sectors are displayed when F6 Disk Status is used.
F7 - Default Drive
The drive number highlighted on the date and time indicator line at the top of your screen is the
system default drive. The default drive is always the "from" drive when using the Disk Utility
program functions. Its primary use is to save keystrokes for an experienced programmer and is
not normally used in day-to-day operation.
F8 - Create
The Create function is used to allocate ISAM and Relative Files. It is not normally used in dayto-day operations.
F9 - Help
The Help function, F9, displays in mid-screen the instruction order necessary to use the function
selected.
F10 - Exit
The Exit function, F10, and pressing (ENTER) takes the system back to the Main menu or you
may enter in the program name you wish to run and press (ENTER) to execute the selected
program.
SYSTEM UTILITIES
114
REPORT CONTROL
To quickly familiarize yourself with the operation of the Report Control features, please go
through the following steps on your computer starting at the Main System menu.
Switch your printer to the "off-line" mode. At the Main System menu, press "SHIFT" and
"PRINT SCREEN" three (3) times to print three (3) copies of the Main Menu screen. Select
'System Utilities' from the Main Menu and press (ENTER). Select REPORT CONTROL. You
will notice that the screens you printed are now on the Report Control Queue in SEQ. position 1,
2 and 3 under I.D. name "SCREEN" and "EXT" .0001, .0002 and .0003 to identify each copy.
The print status of screen number 1 is currently "PRINT PRINTING".
If you were to change the Printer mode to "on-line" and exit the Report Control screen without
changing the print status, your SCREEN.0001 would immediately print on the system printer followed by SCREEN.0002 and .0003 and all names and extensions would be removed from the
Report Control Queue.
To Print, Hold or Cancel Reports
Using the Right Arrow key, move the cursor from the SEQ. position 1, SCREEN.0001 to the
STATUS position. Notice the three (3) STATUS choices at the bottom of the screen.
By selecting (P), you can queue a report to print immediately when the printer comes "on-line".
By selecting (H), you can hold a report on the queue for printing, viewing or backing up at a later
time. By selecting (C), you can cancel a report from printing. Select (H) to Hold SCREEN.0001
on the queue.
From the SEQ. Column, move the cursor to the Status Column for SCREEN.0002. Notice the
status prompts at the bottom of the screen. Select (C) to cancel SCREEN.0002. Press the F10
key to exit the Report Queue screen. From the System Menu selections, return to Report
Control. You will notice that SCREEN.0002 is no longer on the Report Queue and
SCREEN.0003 is now queued in position 2.
This is the procedure for canceling reports that you do not want to print.
To Change the Report Printing Sequence
Using the Arrow keys, move the cursor to the SEQ. Column, select number 2, SCREEN.0003.
The prompt at the bottom of your screen is requesting the print sequence number for this report.
Enter 1 and press (ENTER). SCREEN.0003 is now queued to print in sequence 1 and
SCREEN.0002 is now in print sequence 2. This sequencing feature allows you to print reports in
any selected order.
SYSTEM UTILITIES
115
To Print Multiple Copies of a Report
From SEQ. Column number 1 SCREEN.0001, move the cursor to the COPIES Column. Enter 2
for the requested number of copies to print and press (ENTER).
When the report is printed, you will receive two (2) copies printed one after the other. Move the
cursor back to the SEQ. Column, report 1 "SCREEN.0003". At the bottom of your screen below
the ENTER PRINT SEQUENCE NUMBER prompt, there are four (4) available "F" Key
functions.
To View a Report
To view a report on the computer monitor/terminal, position the cursor on the desired report
sequence number in the SEQ. Column and press F1. The first page of the report will appear on
the screen with the name of the report in the upper left-hand corner.
With your cursor positioned on report 1, press F1 TO VIEW SCREEN.0003. You will see the
Main System menu on the screen. If this were a multiple page report, you could page down to
view the next pages of the report in sequence. By using the horizontal Arrow keys you may scroll
the report in increments of eight characters either right or left to view all 132 columns. You may
also search a report sequentially by using the "S" key search prompt and entering the search
criteria.
Note: If using an ASCII String Search function the match (if found) will be displayed on the top
line of the screen. You may have to scroll the line left or right to view the matched criteria. Press
the F10 key anywhere in the report to abort viewing and return to the Report Queue screen.
Viewing a report saves printing time and paper if the report is the wrong one or is not longer
needed.
To View/Print Reports from Terminals
If you want to print the report on a remote terminal with an attached serial printer, position the
cursor on the desired report sequence number in the SEQ column and press F1 to View. The first
page of the report will display along with the report name.
Press Page Down to view the next page and return to the Report Queue screen.
This feature allows multiple printers to run simultaneously on one system.
To Backup Reports
To backup a report, make sure your backup drive is set to drive 30 or 31 if you intend to backup
on floppy disks, or drive 41 if you intend to backup on a removable cartridge drive.
Position the cursor on report sequence number 1 in the QUE column and press F2 to Backup.
The screen will display the name of the report file you selected, (i.e., SCREEN.0003) and the
current backup name of the report file, (30,SCREEN.BAK).
SYSTEM UTILITIES
116
At the prompt, enter a new report filename, (i.e., EOMINV.RPT) or press (ENTER) to use the
one displayed. Insert a floppy disk into drive 30 or 31 and press (ENTER) when ready. After
you have backed up, write the name and date of the report on the disk label, (i.e.,
30,SCREEN.BAK). When using cartridge drives, press F2 after selecting the report from the
SEQ. Column and press (ENTER) to start backing up.
When the backup is complete, write the name and date of the report on the cartridge label.
The backup feature allows you to conveniently store reports for use at a later time.
To Restore Reports
To restore a report for viewing and/or printing, press F3 from the Report Queue screen, To
Restore a File. You will be prompted to enter the report filename to be restored.
Enter the filename, as written on the backup diskette, (E.g. 30,SCREEN.BAK) or if you are using
a cartridge, (E.g. 41,SCREEN.BAK).
Load the diskette or cartridge in the appropriate drive and press (ENTER) to start restoring.
When you have completed restoring your report file from backup, press (ENTER) to return to the
Report Queue screen. Your SCREEN.0003 is now on the queue in position 2 ready for viewing
and/or printing.
To Save Reports
By pressing F4, you can save changes that have been made to the print queue without exiting the
screen.
To Restart
F5 allows you to see all of the print jobs that have been sent to the queue since entering Report
Control.
To Print Reports
To print the reports currently on your Report Queue, move the cursor to the STATUS position of
report SCREEN.0003. From the selections at the bottom of the screen, select (P) To Print this
report. SCREEN.0001 in SEQ. Column 2 is also ready to print.
Switch your printer to the 'on-line' setting and press F10 to exit to the Special Menu options. The
printer will print three copies of the System's Main menu.
Define Spool Controls (F9)
These functions allow the spooler to be customized to your specific requirements. Press F9 to
display the selections. To change the Spool Definitions, the Report Queue must be clear of all
pending reports.
SYSTEM UTILITIES
THIS PAGE INTENTIONALLY LEFT BLANK FOR FURTURE USE.
117
SYSTEM UTILITIES
118
Select Hold Status (F1)
Press F1 (Select Hold Status) to toggle the Hold Status from PRINT to HOLD. When set to
PRINT, all print files will be printed immediately. When the status is set to HOLD, all print files
will be held and must be released by the operator to print. While this procedure may be of value,
it must be monitored to insure correct system operation. Please note precautions.
PRECAUTIONS
Report Control allows up to 255 reports on the fixed drive. The size of these reports can vary
widely and it is possible to use all the space on a hard disk. If the hard disk is out of space, a
program break, ERROR 74 STATUS 700C, (out of space on drive) will occur when a program
attempts to add another file. You must periodically monitor the Report Control Queue and keep
the number of reports on 'HOLD' to a MINIMUM.
Select Form Feed (F2)
The report programs are designed to perform a form feed at the end of a report. This function
allows you to select if the form feed is to be printed at the beginning. Press F1 to toggle the
Form Feed from “start” to “end”.
Printer Type (F3)
The report programs are designed to use a line printer to print reports. This function allows the
program to emulate a HP compatible Laser printer. The system printer in the system definition
must define a line printer. (E.g. Oki Data 320.)
Multiple Printers
For systems with two parallel ports install, the system will support two line printers. The first
parallel port is referred to as Primary and the second one is Secondary. Reports that are queued
for printing may be selected to print on either the primary or secondary printers. Place the cursor
on the selected report line and press F6. The printer selection at the end of the line will be
toggled from PRI to SEC.
Toggle P1/P2
This function allows the designation of the primary and secondary printers. The printer type for
the primary and secondary printer can be selected making it possible to have one Laser and one
line printer on the system. You may then place the cursor on the same line as any print job and
press F6 (Printer) to toggle between P1 and P2. This function is extremely useful when you have
two print jobs that require different forms. For example, you may need to print checks on P1 and
invoices on P2.
To End
F10 saves and exits the queue.
SYSTEM UTILITIES
119
Electronic Data Transfer
The Electronic Data Transfer feature utilizes the Report Control utility to Read or Write DOS
files. Floppy diskette designations 32 or 33 are used by the system as DOS input/output devices.
If you are using a DOS system, the drive designation will be drive A or drive B. Using the Disk
Utility function, F1, Directory, and selecting drive 32, the system will expect a DOS-formatted
diskette files structure and display the DOS directory.
Note: The system requires that both input and output files have an extension designation, (i.e.,
LEDGER.XXX).
Export File:
To generate a DOS file for export, you must create a print spool file using the Custom Report
Generator or a pre-defined system report. The system printer should be de-selected or the Report
Control set on hold status so the desired DOS export file will not be printed in error. After the
print file has been created, it will be placed on the spool queue and will be available for
exporting.
This is accomplished by using the F2 Backup, function. Use the cursor to select the file you wish
to be exported to DOS and press F2 to backup. You may enter a new filename and extension or
press F1, Export File, to export the file using the same name. You will then be asked to load the
DOS-formatted diskette in drive 32. When the diskette is loaded, press F1, Copy, to copy the
export file. After the file has been copied, it will be placed on hold to be backed up on a
PC/MOS formatted diskette or canceled from the print queue.
Import File:
To import a DOS file, you must create a Print Spool file using the F3, Restore a File, function.
Select drive 32 or 33 to read a DOS directory. It is suggested that you either write down or press
Shift Print screen to remember the filename you wish to import.
At the Report Control Utility menu, press F3, Restore a File. At the prompt, enter the filename
and extension to be restored and press F1, Import File. You will be prompted to load the floppy
in drive 32 and press F1, Copy. The DOS file will be copied to the spool queue and
automatically placed on hold status. The imported file in PC/MOS format may then be backed
up or copied to the fixed disk for future use.
BUILD CROSS REFERENCE FILES
The Cross Reference Files function provides the ability to search by UPC, description or
manufacturing part number to find a particular SKU number. The customer UPC and name
cross-reference provides a similar search capability when using the Customer Master file. This
program provides the following menu facilities:
SYSTEM UTILITIES
120
=====================================================================
1. UPC CROSS REFERENCE TO ITEM NUMBER
2. MFR P/N CROSS REFERENCE TO ITEM NUMBER
3. DESCRIPTION CROSS REFERENCE TO ITEM NUMBER
4. CUSTOMER SCAN CROSS REFERENCE TO CUSTOMER NUMBER
5. CUSTOMER NAME CROSS REFERENCE TO CUSTOMER NUMBER
=====================================================================
These files are used in conjunction with the Inventory and Customer Master files, it is very
important that they be rebuilt when SKU’s or customers are added, deleted or changed. The files
are automatically reorganized if a system reset is invoked. The automatic reorganization
prevents ISAM index errors but does not remove deleted entries. If the F9 Daily Closing
procedure is used and Automatic Reorganization is selected, the cross-reference files will
automatically be rebuild.
AUTOMATIC INQUIRY SYSTEM
The Automatic Inquiry System (AIS) provides the facility to access RSI's Bulletin Board System
for ESS data or to allow you to operate as a full-function terminal on a remote system.
INITIAL SET UP PROCEDURES
-
Select the AIS option. The AIS screen will display.
-
Press F5 to toggle to the appropriate modem baud rate; 300,1200, 2400, 4800, 9600, 19200,
or 38400.
-
Press F6 to toggle to the appropriate data selections.
N = (no parity) - (8)=BITS, 1=(STOP BIT)
O = (odd parity) - (7)=BITS, 1=(STOP BIT) is the selection for
The Retailer System not using at least Version 6.2 PC/MOS.
-
The cursor will be at the port prompt.
-
Enter the communications port number that the modem is attached.
-
The device type must be "M" for modem.
-
The directive must be "D" for dial.
Once all the settings are as stated press (ENTER) to initialize the modem and move to the
Dialing Directory screen. The Dialing Directory stores twenty (20) names/locations, modem
phone numbers and data information for easy access and use. Once the Directory Information is
loaded, simply enter the AIS, check the port setting (the cursor will be there), and press (ENTER)
to go to the Dialing screen. Use the Down Arrow key to move to the appropriate line and press
return to dial the number.
SYSTEM UTILITIES
121
TO ENTER DIALING INFORMATION:
-
Use the Arrow keys to move to the appropriate line.
-
Press F2 to edit the highlighted Location field.
-
Enter the location/system name and press (ENTER).
-
Enter the telephone number and press (ENTER).
-
At the Baud Rate prompt, press the Spacebar to toggle to the appropriate baud rate.
-
At the Data prompt, press (ENTER) to enter the system default or press the Spacebar to
toggle to the appropriate setting.
-
When this entry is complete, use the Down arrow to enter additional numbers, Press F1 to
Dial or press F10 to Exit the Dialing Directory.
Note: 1) Press CTRL “C” to interrupt dialing at anytime.
2) If your system is connected to a pulse dialing telephone system, press F4 to toggle to
pulse before pressing F1 to dial.
TO EDIT A PREVIOUS ENTRY:
-
Use arrow keys to move to the appropriate line and press F2.
-
If you decide not to change the information, just press Return.
-
Press F10 to End.
TO DELETE A PREVIOUS ENTRY:
-
Use the Arrow keys to move to the appropriate line and press F3. After confirmation the line
will be deleted.
-
Use F10 to End when completed.
TO DIAL THE BBS OR OTHER STORED NUMBERS:
-
Select the appropriate line on the Dialing Directory and press F1 to Automatically Dial.
-
When connection is made you will see a message. Proceed as directed.
SYSTEM UTILITIES
122
TALK MODE
When in talk mode, the program will pass characters that are typed on the keyboard to the serial
port. The following keys or key sequences are used by the program and are not transmitted to the
serial port.
Ctrl “P” causes the program to return to command mode.
Ctrl “T” causes the program to toggle Terminal Emulation mode (on/off).
Esc “A” toggles auto line feed mode (on/off).
Esc “B” toggles debug mode (on/off).
Esc “C” toggles capture display mode (on/off).
Esc “F” toggles echo mode (on/off).
Esc “X” changes transmission protocol.
Esc “(“ decreases talk character threshold.
Esc “)” increases talk character threshold.
When Terminal Emulation is off, the following key sequences are used by the program and are
not transmitted to the serial port.
Esc “U” or PgUp, enter filename for transmission using selected protocol.
Esc “D” or PgDn, receive filename using selected protocol.
When the filename prompt is displayed, enter the filename to transmit or receive. If the protocol
displayed is incorrect, press Esc “X” to change the selection
CONNECTING TWO SYSTEMS FOR REMOTE ACCESS/SUPPORT:
This powerful feature allows a store to receive support from a dealer many miles away or from
another store (or even the owner's home) to perform any activity as though the user was at the
store.
"Main", as used here, refers to the main store in a multi-store system or to the system supporting
the remote site (dealer's system or technical support system). "Remote" refers to the remote store
site being supported or monitored.
The support system will be acting as a 'terminal' on the remote system much the same as a local
terminal directly connected to a system for POS or administrative purposes. The difference is the
'terminal' in this case can be many miles away and is connected by modems and the phone line
instead of the familiar cable. For purposes of the remote support feature, we 'trick' the 'host'
system into thinking its 'terminal' is sitting in the same room.
SYSTEM UTILITIES
123
Setup
Note: Remember, you must re-boot the system after making changes to Comm ports in XMenu.
System Requirements
Software: Retailer with Automatic Inquiry System at each location.
Hardware: Available serial ports, modems 38400 BAUD max, connecting cables and telephone
lines at each location.
Note: The quality of the phone line is most important; a 'noisy' phone line can destroy
communications! Also, make sure the phone line has no extra features, like 'call waiting' or
extension phones. These could interrupt communications.
Remote (Host) Modem Setup
Begin by selecting an unused port on the system and designating it "off-line" in XMenu. Turn
off the system and connect the modem to the port just defined. Return to the Main Menu and
select System Utilities and then the Automatic Inquiry System (AIS). During the following key
sequences, do not press Enter until you are finished with AIS setup and are ready to enter
terminal mode in order to set up the modem.
1. Install modem on an undefined port.
2. Select Automatic Inquiry System.
3. Press F2 to set directive to TALK.
4. Press F7 to set type to TERMINAL.
5. Enter the port number to which the modem is attached.
6. Press F6 to select N-8-1.
7. Press F5 to select BAUD rate.
8. Press (ENTER) - the screen will be cleared.
9. Enter ATZ and ENTER. Response OK.
10. Enter AT&F and ENTER. Response OK.
11. Enter ATQ1E0S0=1&C1&D0&W0 and ENTER. Response OK.
SYSTEM UTILITIES
124
The modem is now set to function as a Host. However, some modems are not 100% Hayes
compatible even though they are advertised as such. If you experience problems using these
settings, you will need to refer to the manual for your modem.
Exit from AIS and run XMENU. Configure the Host modem port as a Wyse 50 operating at the
same baud rate as the modem. When finished, re-boot the computer to load the changes made.
The system now 'thinks' it has a terminal attached to the port you defined.
If the terminal is to be used infrequently, you may wish to define the modem port as "off-line"
and only set it up as a terminal shortly before it is needed. This might be helpful if the system is
supporting several terminals already and memory (RAM) is a problem or a distinct slow-down is
experienced.
Setup of the Support Terminal
Install the support modem on an undefined (off-line) port of a Retailer system. Run AIS and
setup as follows:
1. Install modem on an undefined port.
2. Select Automatic Inquiry System.
3. Press F2 to set directive to TALK.
4. Press F7 to set type to TERMINAL.
5. Enter the port number to which the modem is attached.
6. Press F6 to select N-8-1.
7. Press F5 to select BAUD rate.
8. Press (ENTER) - the screen will be cleared.
9. Enter ATZ and ENTER. Response OK.
10. Enter AT&F and ENTER. Response OK.
TO DIAL AND CONNECT TO A REMOTE SYSTEM:
- Select the appropriate line on the Dialing Directory and press F1 to automatically dial.
- When the connection is made to the other system, the screen will prompt with
CONNECT and the baud rate.
SYSTEM UTILITIES
125
- Press CTRL "C".
- You will receive a prompt to enter the authorized password (if used) for the system.
- Press (ENTER) to display the Retailer Main Menu.
- You can now operate as a full-function terminal on the remote system.
Note: Remember that reports generated on the remote system will print on that system. They
can be viewed in Spool Control and printed through a terminal to a serial printer only if AIS is
running from a terminal.
TO EXIT FROM THE REMOTE SYSTEM:
- Bring the remote system to the Main menu to close the files you were using.
- Press CTRL "P" once to return to the AIS screen.
- Press F10 to close the port and hang-up.
- Press F10 again to return to the System Utilities Menu.
OPTIONAL DIALING METHODS
TO BYPASS THE DIALING DIRECTORY:
- Follow the procedures listed above for setting the baud rates (F5) and the data type (F6).
- Press F2 to move to Talk mode, the Directive prompt will display "T".
- The cursor will prompt for a modem port entry. Enter the port number.
- Once the settings are correct, press (ENTER). The screen will go blank.
Note: To test the modem, type in AT and press (ENTER). The modem will respond with OK.
- To dial another system, type in ATDT and the telephone number. Dashes are not
required. Press (ENTER) to dial.
When the connection is made with the other system, the screen will prompt with CONNECT and
the baud rate. To exit, press CTRL "P" to go to the AIS screen. Press F10 once to hang-up.
Press F10 to End session.
SYSTEM UTILITIES
126
CHANGE BACKUP DISK DRIVE
This selection will display the following prompt:
THE CURRENT BACKUP DRIVE ADDRESS IS (##) ENTER THE NEW BACKUP DRIVE
ADDRESS.
Enter the desired backup address and press (ENTER).
30 - Left (or top) floppy disk drive
31 - Right (or bottom) floppy disk drive **
40 - Primary fixed disk drive
41 - Back up fixed disk drive **
Note: ** if drive is installed
If your backup drive address is 41, you have the option of two (2) odd/even backups or seven (7)
one for each day of the week. Enter the desired number and press (ENTER). The backup location will change and you will return to the Utility menu automatically.
Note: The number of used and free sectors may be displayed by using the Disk Status function.
(a sector is 512 bytes of information). When file data is entered or edited, the next available
sector is used. One particular file may consist of numerous segments located in various sectors
on the disk. When data is deleted, fragmented portions of disk space are made available.
If at some point you try to save some information and get an "OUT OF SPACE ON DISK"
message, the directory may show that there are plenty of free sectors for your file, but the Largest
Extent (continuous/contiguous group of sectors) is too small for your file.
If you are using a diskette, you can simply save your file onto a different diskette, but if this
happens on the fixed disk it will need to be reformatted. To reformat either the fixed disk or a
diskette, all the information stored on the disk will need to be copied (to one or more diskettes).
Copying the files/programs is necessary since reformatting will wipe out all existing information
on the disk.
SYSTEM UTILITIES
127
SCREEN MAINTENANCE
The Screen Maintenance selection provides the facilities to customize The Retailer's various
Data Entry screens. The Entry Screens’ field description, the relative location of the fields
displayed, and in the case of fields generated by mathematical formulas, their contents may be
changed by entering user defined formulas.
The system uses the TEXT.FIL to generate a TEXT.DAT file for defining the Entry screen
parameters. Upon initial system operation, a standard default TEXT.DAT file is generated that
meets the needs of most users. However, if changes are made, they are stored in the TEXT.DAT
file. It is prudent to make a backup copy of this file using the Backup or Restore Data Files
utility.
If mistakes are made, the user may always regenerate the default TEXT.DAT by pressing Shift
F9 while at the Main menu or restore TEXT.DAT from backup.
Note: Any changes that you make will be carried over into all other screens within that section.
For example, if you edit the Inventory Entry screen, your changes will also show up in Single
SKU Inquiry.
The following are the Screen Maintenance menu selections.
=====================================================================
1. INVENTORY ENTRY SCREEN
2. SINGLE SKU INQUIRY (A) SCREEN
3. SINGLE SKU INQUIRY (B) SCREEN
4. CUSTOMER ENTRY SCREEN
5. SINGLE CUSTOMER INQUIRY SCREEN
6. VENDOR ENTRY SCREEN
7. SINGLE VENDOR ENTRY SCREEN
=====================================================================
INVENTORY ENTRY SCREEN
Each field on the Inventory Entry screen is numbered for editing reference. Pressing F2 will
generate a complete listing of all fields.
The alphabetical letters A through G displayed at the top of the screen relate to columns. The
numeric numbers 4 through 20 displayed at the left side of the screen relate to rows. Thus the
intersection of A (column) 4 (row) would identify Field 03 Scan Number. Selecting A4 allows
the deletion of the field from the display or you may replace it with another field by entering the
identity number and pressing (ENTER). Reference: Inventory Entry screen, Example (A).
Pressing F3 and using the Page Down key will allow the display of Fields 1-84 for editing
purposes. Reference Entry screen, Example (B). The Text field description may be changed and
saved. The Mathematical Formulas for fields 59 through 66 can be modified. Place the cursor
on the line to change and press to Tab key to select the calculation field and enter the new
formula.
SYSTEM UTILITIES
128
EXAMPLE (A):
=====================================================================
INVENTORY ENTRY SCREEN
A
4
5
6
7
8
9
10
11
12
13
14
15
16
17
18
19
20
B
C
D
E
F
G
01.SKU NO
03.SCAN NO
05.VENDOR NUMBER
08.LOCATION
02.DESCRIPTION
04.MFG. PART NO.
07.DEPT. NUMBER
09.CODE FIELD
10.CASE QUANTITY
12.F.O.B. COST
14.CASE COST
16.UNIT REPL. COST
18.AVERAGE COST
11.UNIT OF SALE
13.LABEL TYPE
15.MINIMUM LEVEL
17.MAXIMUM LEVEL
19.AUTO DEPOSIT
20.GROSS MARGIN 1
22.GROSS MARGIN 2
24.GROSS MARGIN 3
26.PROMO START DATE
21.PRICE 1
23.PRICE 2
25.PRICE 3
27.PROMO STOP DATE
28.*
32.*
A
29.*
33.*
B
C
D
30.*
34.*
E
F G
31.*
67.*
* = FLAG FIELDS
ENTER ROW / COLUMN TO EDIT
F1 SAVE F2 PRINT F3 EDIT F4 ENTRY F5 SPEED F8 PAGE F9 HELP F10 ABORT
=====================================================================
It is highly recommended that the user add a Formula field rather than changing an existing field
by using the Arrow Down function to the user defined fields displayed (i.e., Blank location 81).
To create the new field, enter the desired description and press (ENTER). Press F1 to save. The
new field will have an identity number of 81. It may be displayed on the screen by selecting the
(column/row) location; enter field identity number 81 and press (ENTER).
The F4 Entry Sequence function allows the default screen entry sequence to be changed.
The F5 Speed Sequence is a special function that is used in conjunction with the Entry screens F3
Speed Toggle. The Speed feature allows selected fields to be changed in a sequential order. For
example, if you desire to change only the (09 Code field) and then (08 Location), you would
define the speed sequence as 1 (01 SKU Number), 2 (09 Code field), 3 (08 Location), press
(ENTER) and then press F1 Save.
SYSTEM UTILITIES
129
SINGLE SKU INQUIRY (A) AND (B)
The system provides two different Single Item inquiry screens. The screens may be defined for
different access required when used in conjunction with passwords. Example: Inquiry (A) may
be used for sales quotations, and may only display SKU numbers, description, quantity on hand,
quantity on order and price 1. Inquiry (B) may be used in purchasing; and may show SKU
numbers, description, manufacturer's part number, vendor number, quantity on order, and cost
information. All non-essential fields may be deleted. Example (B), displayed on the following
page, shows how to edit both the Inventory Entry and SKU Inquiry screens.
EXAMPLE (B)
====================================================================
=
FLD
1
2
3
4
5
6
7
8
.
(A)
(B)
(C)
(D)
.
63
64
65
66
67
68
69
70
81
INVENTORY ENTRY SCREEN
TITLE
MATH
SKU NUMBER
DESCRIPTION
SCAN NUMBER
MFG PART NO
VENDOR NO
VENDOR NO
DEPT NO
WAREHOUSE
....
FLD 8 Title changed LOCATION to WAREHOUSE.
FLD 63, G/M DOLLARS
ST indicates the field may be subtotaled.
46 designates field (amount sold).
- minus sign
44 designates field (cost of sales).
FLD 81, NEW MATH FLD
[100] Brackets define a literal number
/ Division sign
MD designates the day of month, defined as MD
YD designates day of year
DV designates divisor
DV = 1 (no decimals in price)
DV = 100 (2 decimals in price)
NOTE; CALCULATIONS ARE EXECUTED LEFT TO RIGHT
....
G/M DOLLARS
ST46-44
G/M DOLLARS
ST47-45
G/M PERCENT
46-44/46*[100]
G/M PERCENT
47-44/47*[100]
MULTI XREF FLAG
PRICE PENDING
SUPPLEMENTAL CODE
INVENTORY DATE
NEW MATH FIELD [100]/MD
SYSTEM UTILITIES
130
====================================================================
=
SYSTEM UTILITIES
131
CUSTOMER ENTRY AND VENDOR ENTRY SCREENS
Each field on the Customer Entry and Vendor Entry screens is numbered for editing reference.
The facilities for making changes are the same as used and described in the Inventory Entry
Screen section. Following are examples of the Customer Entry and Vendor Entry screens.
=====================================================================
CUSTOMER ENTRY SCREEN
4
5
6
7
8
9
10
11
12
13
14
15
16
17
18
19
20
A
01.CUSTOMER NUMBER
02.SCAN NUMBER
03.CUSTOMER NAME
04.COMPANY NAME
05.ADDRESS 1
06.ADDRESS 2
07.CITY
08.STATE
09.ZIP CODE
10.PHONE NUMBER
11.FAX PHONE NO
28.CUSTOMER SINCE
38.LAST PURCHASED
40.DATE OF BIRTH
41.ANNIVERSARY DATE
30.OPEN ITEM
37.LAWAWAY
A
B
26.ACCT. BAL.
12.CUSTOMER TYPE
13.MAIL TYPE
14.TAX CODE
15.TERMS CODE
16.PRICE CODE
17.AGEABLE
18.DISCOUNT
19.SVC. CHARGE
20.MIN. PAYMENT
21.CREDIT LIMIT
36.CHECK LIMIT
39.REFERENCE NUM
33.NOTES
44.EDUCATION CODE
B
31.GENDER
32.MARITAL STATU
C
ENTER ROW / COLUMN TO EDIT
F1 SAVE F2 PRINT F3 EDIT F4 ENTRY F5 SPEED F8 PAGE F9 HELP F10 ABORT
=====================================================================
SYSTEM UTILITIES
132
=====================================================================
VENDOR ENTRY SCREEN
A
01.VENDOR NUMBER
4
5
6
7
8
9
10
11
12
13
14
15
16
17
18
19
20
02.NAME
03.ADDRESS
04.CITY
05.STATE
06.ZIP
14.STATUS CODE
16.TERMS
17.CHECK LIMIT
18.Y-T-D PURCHASE
19.Y-T-D PAID
A
B
07.NAME
08.ADDRESS
09.CITY
10.STATE
11.ZIP
12.PHONE
13.FAX PHONE
15.CONTACT
22.CUS I.D.
B
ENTER ROW / COLUMN TO EDIT
F1 SAVE F2 PRINT F3 EDIT F4 ENTRY F5 SPEED F8 PAGE F9 HELP F10 ABORT
=====================================================================
BALANCE FORWARD ACCOUNTS RECEIVABLE
133
Balance Forward Accounts Receivable is a software feature designed for use with The Retailer.
=====================================================================
1. POST NEW TRANSACTIONS
2. COMPUTE & POST SERVICE CHARGES
3. PRINT STATEMENTS
4. CUSTOMER ACCOUNT INQUIRY
5. CUSTOMER ENTRY PROGRAM
6. AGE ACCOUNTS AND DROP DETAIL
7. PRINT AGED TRIAL BALANCE
8. POST TO THE GENERAL LEDGER
=====================================================================
The use of each selection is described on the following pages in menu order. Before using this
program, you must define The Retailer using the Define Store Information program found in the
Utility Menu selections. This is required in order to post customer account detail for transactions
entered through cash registers or terminals. "Post Detail to Accounts Receivable?” must be set to
(Y)es. If not, statements will not reflect any of these transaction details.
POST NEW TRANSACTIONS
Although most receivable balances are entered into the system through register transactions, you
may also use this program for that purpose. It is especially useful for entering existing balances
when first setting up The Retailer system with Balance Forward Accounts Receivable (BFAR).
Entries will be posted to each customer's account automatically.
If a manual general ledger system or the General Ledger option is being used, offsetting postings
may be entered through this program. (You must select Post to General Ledger to post these
entries).
You will be prompted:
"DO YOU WANT TO POST TO G/L (Y or N)?"
If you enter N, the A/R Posting screen will be displayed (shown below).
If you enter Y, you will be prompted:
"ENTER THE G/L ACCT. NUM. OR "E" TO END"
Enter the existing General Ledger account number (in the Chart of Accounts) or the account
number used in your manual general ledger system.
Enter E to return to the Post New Transaction screen.
BALANCE FORWARD ACCOUNTS RECEIVABLE
134
The A/R Posting screen will be displayed:
=====================================================================
ACCOUNTS RECEIVABLE POSTING PROGRAM
02/02/000:31
POSTING DATE xx/xx/xx
CUSTOMER NO.
ACCT BAL.
1. REF.
3. DESCRIPTION4. AMOUNT
2. TYPE
ENTER POSTING DATE
F10 END
=====================================================================
Enter the Posting Date or press (ENTER) to use the displayed date.
"ENTER NEXT CUSTOMER NUMBER OR (CR) TO END PROGRAM"
Enter a valid customer number. The customer name and current account balance will be
displayed. Press (ENTER) to exit. A "register" (list) of any entries which have been made will
be printed automatically (be sure your printer is ON).
"ENTER TRANSACTION REFERENCE NUMBER" (optional)
Enter up to six (6) digits; you may use this as a reference to another document (i.e., invoicing
number) or anything you choose. This number will be printed on the customer statement (and
dropped when the account has been "aged").
"ENTER REFERENCE NUMBER"
Selections are as follows:
=====================================================================
1. INVOICE
debit
2. DEBIT TO ACCOUNT
debit
3. PAYMENT TO ACCOUNT
credit
4. CREDIT TO ACCOUNT
credit
5. EARLY PAYMENT DISCOUNT credit
6. SERVICE CHARGE
debit
=====================================================================
BALANCE FORWARD ACCOUNTS RECEIVABLE
135
After exiting this program, a report will print automatically listing all A/R entries made (other
than G/L postings).
Note: If General Ledger is installed, the G/L accounts will be debited/credited as indicated
above. To print offsetting G/L amounts, select Post to General Ledger, Print the General Ledger.
"ENTER DESCRIPTION " (optional)
You may enter up to twenty-five (25) characters; this line will be printed on the customer
statement (and dropped when the account has been "aged"). Press (ENTER) to skip this entry.
"ENTER TRANSACTION AMOUNT"
Enter the dollar amount to be posted. The number must be greater than zero and less than one
million, with no commas separating the thousands and no decimals unless entering cents (.01
through .99). The program will add trailing zeros (example: if you enter 1054, the program will
enter 1054.00).
"ENTER REFERENCE NUMBER TO CHANGE, (A) TO ABORT OR (CR) TO POST"
This prompt will be displayed after each entry; to make a change, enter the REF number and
press (ENTER). You will be prompted as above.
Enter A to delete all entries shown on the screen. You will be returned to the Enter Posting
Date... screen and prompt.
Press (ENTER) to post all entries:
If not posting to G/L, you will be returned to the "Enter Posting Date... screen and prompt.
BALANCE FORWARD ACCOUNTS RECEIVABLE
136
If posting to G/L, the General Ledger Posting Information screen will be displayed:
=====================================================================
ACCOUNTS RECEIVABLE POSTING PROGRAM
VERSION X TIME xx:xx
POSTING DATE xx/xx/xx
CUSTOMER NO.
ACCOUNT BALANCE
1. REF
3. DESC
2. TYPE
4. AMOUNT
GENERAL LEDGER POSTING INFORMATION
REF
ACCT
xxxx
DESC
ACCT REC
DEB AMT
xxx.xx
CR AMT
xxx.xx
0.00
1
2
:
9
TOTALS
ENTER G/L ACCOUNT NUMBER OR (CR) TO END
=====================================================================
For posting, the Debit and Credit column must be equal, and only nine (9) postings may be made.
If more than nine (9) are required, split them up and go through this posting procedure for each
part (column totals must be equal).
For each offsetting posting enter an existing G/L account number (in the Chart of Accounts) or
the account number used in your manual general ledger system. Any existing G/L account name
will be displayed.
You will be prompted:
"ENTER AMOUNT FOR THIS ACCOUNT"
Enter the dollar amount to be posted. Repeat these steps for more postings.
Press (ENTER) when all entries have been made.
If the two (2) columns do not balance, an error message will be displayed:
BALANCE FORWARD ACCOUNTS RECEIVABLE
137
"ACCOUNTS RECEIVABLE ACCOUNTS MUST BE BALANCED BEFORE POSTING CAN
BE MADE."
Select an entry and post an amount large enough to balance the columns. After this entry is
posted to G/L (Post to General Ledger), adjust it through the G/L program.
If the columns balance, the following prompt will appear (any last minute changes?):
"ENTER REFERENCE NUMBER TO CHANGE, (A) TO ABORT OR (CR) TO POST"
Press (ENTER) to post. Enter A to clear the screen. You may begin again or exit.
"TO CHANGE OR DELETE AN ENTRY:"
If you enter a REF number for a line containing an account number, you will be prompted:
"DO YOU WANT TO CHANGE THE ACCOUNT NUMBER (Y OR N)?"
If your reply is N, you will be prompted:
"ENTER AMOUNT FOR THIS ACCOUNT"
Enter an amount and press (ENTER). You will be returned to the Enter Reference Number to
Change... prompt.
If your reply is Y, or if you enter a REF number of a blank line, you will be prompted:
"ENTER THE NEW G/L ACCOUNT NUMBER OR (CR) TO DELETE POSTING."
Press (ENTER) to delete the entry. You will be returned to the Enter Reference Number to
Change... prompt.
Enter a new account number; you will be prompted:
"ENTER AMOUNT FOR THIS ACCOUNT"
Enter an amount and press (ENTER). You will be returned to the Enter Reference Number to
Change... prompt.
When finished, press (ENTER) to post your entries.
BALANCE FORWARD ACCOUNTS RECEIVABLE
138
COMPUTE AND POST SERVICE CHARGE
This program is used to calculate and post late charges to past due accounts prior to printing
statements. Menu selections are as follows:
=====================================================================
1. POST SERVICE CHARGES USING PERCENTAGE FROM CUSTOMER FILE
2. POST SERVICE CHARGES USING A FIXED PERCENTAGE
ENTER REFERENCE NUMBER
F10 END
=====================================================================
Select option 1 to use individual "late charge" rates defined in the Customer Master File. Select
option 2 to use the same rate for all customers.
Late charge rates must be set up correctly in the Customer Master File. Any payments received
should be posted before using this program.
You will be prompted:
1. Post Late Charges Using Percentage from Customer File
"ENTER DATE MM/DD/YY:"
Press (ENTER) to use the system date or enter a cutoff date for accepting payments for the
statement period.
If G/L is not installed, posting will begin; the following message will be displayed until posting
is completed. You will be returned to the Main menu.
"SERVICE CHARGES ARE BEING COMPUTED AND ADDED TO EACH CUSTOMER'S
BALANCE"
2. Post Late Charges Using a Fixed Percentage
You will be prompted:
"ENTER DATE MM/DD/YY:"
Press (ENTER) to use the system date or enter a cutoff date for accepting payments for the
statement period.
"ENTER THE ANNUAL PERCENTAGE TO COMPUTE THE SERVICE CHARGE (99.99)."
Enter the percentage rate for computing late payment charges for past due balances.
BALANCE FORWARD ACCOUNTS RECEIVABLE
139
You will be prompted:
"IS xx.xx% THE CORRECT ANNUAL PERCENTAGE (Y or N)?"
Enter N and press (ENTER) to re-enter a different percentage.
Enter Y if correct. If G/L is not installed, posting will begin; the following message will be
displayed until posting is complete and you will be returned to the Main menu:
"SERVICE CHARGES ARE BEING COMPUTED AND ADDED TO EACH CUSTOMER'S
BALANCE"
* * * With G/L:
If using the BFAGLR.DAT file, with either General Ledger installed or a manual G/L system, the
following prompts will be displayed prior to posting:
"ENTER THE G/L ACCOUNT NUMBER FOR ACCOUNTS RECEIVABLE OR (E) TO END"
Enter the appropriate G/L account number for Accounts Receivable.
"ENTER THE G/L ACCOUNT NUMBER FOR SERVICE CHARGES OR (E) TO END"
Enter the appropriate G/L account number for Service Charges. Posting will begin automatically.
With General Ledger installed, if you have not set up this account number, enter E and press
(ENTER) to exit. Set up the account number through General Ledger, General Ledger Master
File Maintenance and Add New Accounts.
The following prompt allows you to set a minimum service charge amount:
"ENTER MINIMUM AMOUNT FOR SERVICE CHARGES, OR (CR) FOR NONE:"
EXAMPLE: If you enter .50 (fifty cents) as a minimum amount, an actual service charge of
fifteen cents will be converted to .50.
PRINT STATEMENT
This program is used for printing customer statements prior to aging accounts / closing the
month. Statements may be printed only for customers with a debit balance.
If statements do not print correctly or accounts require adjustment, you may select Print
Statements again. There is no limit to the number of times you may use this program.
When finished, print a complete set of statements on blank paper as a historical record of
the current month's transaction detail.
BALANCE FORWARD ACCOUNTS RECEIVABLE
140
Menu selections are as follows:
=====================================================================
1. PRINT STATEMENTS
2. PRINT STATEMENTS BY CUSTOMER NAME
3. TEST FORM ALIGNMENT
ENTER REFERENCE NUMBER
F10 END
=====================================================================
Print Statements / Print Statements by Customer Number
You will be prompted:
"ENTER STATEMENT DATE"
Enter a date to be printed on the statements or press (ENTER) to use the system date.
"CALCULATE THE MINIMUM PAYMENT (Y OR N)"
"ENTER BEGINNING CUSTOMER # OR (CR) TO START WITH FIRST CUSTOMER"
Enter the first Customer Number of the range to be printed or press (ENTER) to begin with the
first Customer Number in the Customer Master File.
To print a statement for one individual customer, enter the same Customer Number for this
prompt and the following:
"ENTER ENDING CUSTOMER NUMBER OR (CR) TO PRINT TO END OF FILE"
Enter the last Customer Number of the range to be printed or press (ENTER) to print to the end
of the Customer Master File.
"ENTER THE MAIL TYPE TO PRINT OR (##) FOR ALL MAIL TYPES."
"ENTER THE MINIMUM AMOUNT TO PRINT STATEMENT OR (CR) TO PRINT ALL."
"PRINTING CUSTOMER STATEMENTS. DO NOT INTERRUPT."
After printing, you will be returned to the main Balance Forward Accounts Receivable menu.
BALANCE FORWARD ACCOUNTS RECEIVABLE
141
Test Form Alignment
You may use continuous-feed pre-printed statement forms (Key Business Form, Number 6001 One Part) or the system will create a form for you. If using the pre-printed forms, insert them
into the printer; line up the printing head directly over "+" mark on the left feeder border of the
form. Select option 3; a “dummy” statement will be printed automatically. If needed, realign the
form and select option 3 again; repeat these steps until the form is aligned correctly.
CUSTOMER ACCOUNT INQUIRY
This program is used to display and/or print the activity for a selected customer account. Details
for a previous month may be obtained only from copies of a printed statement or by restoring
files from that month.
Following is the first prompt displayed:
"ENTER CUSTOMER NUMBER"
After a Customer Number is accepted, the current month's detail will be displayed with the
following prompt:
"PRESS ENTER FOR NEXT PAGE OR (E) TO END OR (P) TO PRINT"
Press (ENTER) to display any following page(s) of a multi-page report. Press (E) to exit from
this program and return to the Main menu or press (P) to print all pages of the customer detail
and aging summary. You will be returned to the first prompt.
Except for a one-page report, the above message will be repeated on any successive pages until
the last page of the report. The prompt displayed on the first page of a one-page report and on
the last page of a multi-page report is as follows:
"PRESS ENTER TO CONTINUE OR (P) TO PRINT"
Press (ENTER) to repeat the above steps for this same customer detail and aging summary. You
will be returned to the first prompt.
CUSTOMER ENTRY PROGRAM
This selection gives you access to the main customer entry screen. You may view, add or change
customer records here.
AGE ACCOUNTS RECEIVABLE
This program reorganizes the accounts receivable detail transaction file. After aging each
account, new balances are carried forward and detail transactions from the month just ended are
dropped.
"ENTER THE MAIL TYPE TO AGE OR (##) FOR ALL MAIL TYPES."
BALANCE FORWARD ACCOUNTS RECEIVABLE
142
The following messages will be displayed as the program runs:
BUILDING TEMPORARY FILE.
RECREATING RECEIVABLES DETAIL FILE.
REBUILDING CUSTOMER CHAINS.
PRINT AGED TRIAL BALANCE
This program prints the aged trial balance. One line will be printed for each account balance
(positive or negative) or for any account which has received a payment during the period being
aged, making the balance zero.
Account totals are printed at the end of the report.
You will be prompted:
"ENTER THE MAIL TYPE TO PRINT OR (##) FOR ALL MAIL TYPES."
The program will automatically begin running, this message displays:
"PRINTING AGED TRIAL BALANCE. PLEASE DO NOT INTERRUPT."
POST TO GENERAL LEDGER
This program posts the transactions from Accounts Receivable to the General Ledger. Each
transaction is printed on the posting register. Totals are printed and posted to the G. L. account.
Make your selection from the menu.
"ENTER DATE MM/DD/YY:"
Enter the date to be printed on the report or press (ENTER) to use the system date. You will be
prompted:
"SYSTEM WILL POST TO GENERAL LEDGER
_________________IS THIS DATE CORRECT? (Y/N):"
USING
THE
DATE
OF
Enter N to re-enter a different date.
Enter Y to continue.
The program will begin running automatically. The following messages will be displayed during
this process:
"SORTING THE BFAGLR.DAT FILE. ONE MOMENT PLEASE. PRINTING GENERAL
LEDGER POSTING INFORMATION FOR ACCOUNTS RECEIVABLE."
BALANCE FORWARD ACCOUNTS RECEIVABLE
143
Adjustment postings for incorrect or inaccurate postings may be made through the General
Ledger programs.
Customer Number 999999 is created by the system and will include cash, checks, and bank card
receipts collected at cash registers, processed during End-of-Day Processing.
Three transaction types are entered through the A/R Post New Transactions program:
DIS = Early payment discount
JED = Journal entry debit
JEC = Journal entry credit
BALANCE FORWARD ACCOUNTS RECEIVABLE
THIS PAGE INTENTIONALLY LEFT BLANK FOR FUTURE USE.
144
SYSTEM MAINTENANCE
145
The System Maintenance section of The Retailer "XMenu" is used for the initial loading and
configuration of your system. After the system is installed XMenu will not be used again unless
the hardware parameters are changed due to additions and/or hardware failures which may
require a re-loading of your system software.
* * * WARNING * * *
Misuse of The Retailer System diskette could render it inoperable and could also erase all of your
store's data files. We recommend that you store this and all program diskettes in a secure,
fireproof location, to prevent access by unauthorized personnel. DO NOT use this diskette
during store hours. Since you must re-boot the system to use this diskette, the registers will
not be able to communicate with the system.
*****
The Retailer will refer to disk drive address designations other than those referred to in DOS
nomenclature.
Disk Drive Address Designations
Disk drive locations and addresses (based on cabling) are usually defined as follows:
=====================================================================
PC/MOS
MS-DOS
30
A
TOP FLOPPY DISK DRIVE
31
B
BOTTOM FLOPPY DISK DRIVE
40
C
FIRST FIXED DISK DRIVE
41
D
SECOND FIXED DISK DRIVE
=====================================================================
SYSTEM MAINTENANCE
146
INSTALLATION PROCEDURE FOR A NEW SYSTEM:
To install your system, insert The Retailer SYSTEM DISKETTE (MSUTIL) in drive 30, close
the drive latch, and press ALT/CTRL/DEL. The following menu will be displayed.
=====================================================================
UTILITY MENU
07/23/94
08:03
SERIAL NUMBER = 999991
1.
2.
3.
4.
5.
6.
INSTALL RETAILER SYSTEM
INSTALL PROGRAM DISKETTES
DEFINE SYSTEM CONFIGURATION
DEFINE STORE INFORMATION
DEFINE PASSWORDS
DEFINE MONITOR COLORS
ENTER REFERENCE NUMBER:
F10 END
=====================================================================
To select one of the Menu options, enter the corresponding reference number and press
(ENTER).
INSTALL RETAILER SYSTEM
This program provides the facilities to install a new Retailer system. You will be stepped
through the entire Install procedure. The system default definitions should be modified to meet
your store's requirements. At the completion of each step, you must press (F1) to save. If you
wish to proceed, press F1 or F10 to end.
Installation of a new system entails the following steps:
- Fixed Disk Initialization
- Copy Programs to Fixed Disk
- Define Color Monitor Parameters
- Define Printer Characteristics
- Define Terminal Characteristics
- Define Communications Ports
- Define Store Locations
- Enter Company Name and Address
- Define Point-of-Sale Software Parameters: (3) screens
- Enter Clerk Logon ID's
- Enter Sales Tax Information
- Enter Department Titles
- Enter Bank Card Information
- Enter Currency Exchange Data
- Enter Sales Receipt Headings
- Enter Validation Headings
- Enter Discount Matrix Parameters
- Set Automatic Execution Times
- Allocate System File Space
- Define System Access Passwords
Installation of the system software is complete.
SYSTEM MAINTENANCE
147
Fixed Disk Setup
This program assumes the fixed disk has been low-level formatted and partitioned to match the
end user's requirements. The program provides the following functions:
=====================================================================
1. CREATE RETAILER PARTITION
2. MAKE RETAILER PARTITION ACTIVE
ENTER REFERENCE NUMBER:
CURRENT DRIVE: 40
PARTITION
1
STATUS
A
TOTAL CYLINDERS: 641
TYPE
RETAILER
START
0
END
640
SIZE
641
F10 END
=====================================================================
Note: The Retailer partition may be deleted by running FDISK. While at the Main XMenu
screen, press F6 and enter FDISK as the program name to be run.
The Expanded Disk Set Up menu will then be displayed.
=====================================================================
1. CREATE RETAILER PARTITION
2. MAKE RETAILER PARTITION ACTIVE
3. DELETE RETAILER PARTITION
ENTER REFERENCE NUMBER:
=====================================================================
Copy Programs to the Fixed Disk
This program will copy programs from the selected drive to the fixed disk.
=====================================================================
CURRENT INPUT DISK DRIVE IS 30
LOAD THE DISKETTE TO BE COPIED AND PRESS (CR).
F2 CHANGE DISK DRIVES F10 ABORT
=====================================================================
Insert the system (MSUTIL) diskette into the specified drive and press (ENTER). The system
will first copy the operating system to the fixed drive followed by the application programs.
Press F10 when you are finished copying the system diskettes.
Note: If you copy a set of programs more than once, the previous copy will be replaced; there
will be no duplicated copies on the fixed disk using up valuable space.
SYSTEM MAINTENANCE
148
Define Monitor Colors
This program provides the facilities to personalize video attributes on color monitors.
=====================================================================
THIS IS UNDERLINED
>
BACKGROUND COLOR
CHARACTER COLOR
TITLE BLOCK COLOR
TITLE CHARACTER COLOR
UNDERLINE BACKGROUND
UNDERLINE CHARACTER
WINDOW BACKGROUND COLOR
WINDO INPUT CHARACTER COLOR
THIS IS A POP UP WINDOW
INPUT LINE COLOR
USE UP AND DOWN ARROWS
SELECT COLOR FUNCTION
USE RIGHT AND LEFT ARROWS
TO CHANGE COLORS.
F1 SAVE F2 DEFAULT COLORS F3 SET MONOCHROME F10 EXIT
=====================================================================
Define Printer Characteristics
This program provides the facility to define up to five (5) different printer types that may be
attached to the system. For example: there may be bar code, receipt or invoice printers which are
separate from the system printer which may be used at the point-of-sale terminal. You may use a
parallel receipt printer in lieu of a serial printer by assigning the printer type to a parallel port.
Pressing F2, Parallel Port, will toggle the P1, P2 ON or OFF. This feature allows greater
utilization of available serial and parallel I/O ports.
Use the Up / Down Arrow keys to position the cursor to the field you wish to change. Enter the
required data and press (ENTER). UNCPR, VALON, VALOF and LF's refer to uncompressed
print, validate on, validate off, paper cutter code, and the number of line feeds required to space
the printer to the tear bar or to the cut position. Refer to the Printer User's Manual to obtain the
hexadecimal codes for each printer type you are defining if they differ from the default printer
setup provided.
Press F3 Drawer to bring up a window that will allow the entry of drawer codes to select the cash
drawer that will open.
System Printer Form Feed - The system printer and programs are set up to form feed before
initiating printing. See Spooler instructions in System Utilities to instruct the spooler to form
feed at the completion of a print file.
=====================================================================
PRINTER DESCRIPTION 10CPI 12CPI 17CPI UNCPR VALON VALOF CUT LF’s
SYSTEM
TYPE 1
TYPE 2
TYPE 3
TYPE 4
OKIDATA 320
1200 1B4D 1B0F
OKIDATA 320
1200 1B4D 1B0F
STAR SP312/342 1B3A 1B50 1B4D
PCOS MOD 50
1E00 1C00 1D00
BLAZER
FFFF FFFF FFFF
1200
1200
0000
0000
0000
0000
0000
1D00
1B11
0000
0000
0000
0000
1B14
0000
0000
0000
6430 8
0000 8
0000
USE THE ARROW KEYS TO POSITION THE CURSOR.
ENTER THE PRINTER DESCRIPTION
F1 SAVE F2 PARALLEL PORT F3 DRAWER F5 DELETE F10 ABORT
=====================================================================
SYSTEM MAINTENANCE
149
Define Terminal Characteristics
This selection displays five (5) default terminal types. Any terminal type may be changed to fit
the user's requirements. Use the Arrow keys to position the cursor. Enter the name of the new
terminal device in the Name field and press (ENTER). Enter the appropriate transparent print
codes and press (ENTER). Press F1 to save, F5 to set defaults or F10 to abort.
=====================================================================
TERMINAL
TRANSPARENT PRINT
AUXILIARY
TYPE
1
2
3
4
5
NAME
TV910
TV921
WYSE60
QUM102
WYSE50
ON
OFF
READ ON
12000000
121B6000
18120000
121B6000
18120000
1B410000
1B610000
14000000
143F1B41
14000000
00000000
00000000
1B642100
00000000
00000000
USE THE ARROW KEYS TO POSITION THE CURSOR.
ENTER THE TERMINAL DESCRIPTION
F1 SAVE F5 DEFAULT F10 ABORT
=====================================================================
Define Serial Comm Devices
Defining the COMM ports consists of informing the Operating System which peripheral is
attached to which port. The screen for defining the serial COMM ports and devices is divided
into five (5) columns:
COMM
TYPE
ATTACHMENTS
DESCRIPTION
-
The Communications Port Number
Type of Device
Optional hardware attached to each device
Options available for the other three columns
=====================================================================
BAUD
ATTACHMENTS
DESCRIPTION
COMM TYPE
00
01
02
03
04
D-DISPLAY
OFFLINE
T-WYSE50
R-RX 64
S-SERIAL
9600
9600
9600
R1
R=OKIDATA
00R1
R=OKIDATA
USE UP & DOWN ARROWS TO SELECT COMM. TAB TO SELECT ATTACHMENTS
PRESS FUNCTION KEY TO SELECT DEVICE TYPE.
F1 SAVE F2 TERMINAL F3 REGISTER F4 SERIAL F5 MODEM F6 OFFLINE F10 ABORT
=====================================================================
COMM 00 is the main system terminal that may have a receipt printer attached in addition to the
system printer. Press Function keys to define the types and attachments. When you have only a
4-port board, COMM ports will be defined 01, 02, 03, and 04. With a single ASYNCH and a 4port board, the ASYNCH will be defined as COMM port 01 and the 4-port board as 02 – 05.
SYSTEM MAINTENANCE
150
Select F2, TERMINAL. You will be prompted to select the terminal type you wish to use. F2
through F6 displays terminal types accordingly.
Select F3, REGISTER. You will be prompted to select the register type you wish to use. F2 and
F3 displays register types accordingly.
Select F4, SERIAL. You will be prompted to define the communications port number to which
this serial device is to be assigned. The serial device may be used as an input or output device.
If the serial device is a register server, press F1 after entering the port number. Note: If you do
not know the port number, select any unused port. The system will automatically locate and
assign the correct one.
Select F5, MODEM. You will be prompted to select the method of dialing to be used by the
modem. F2 through F4 displays the various dialing methods that are available.
Define Store Locations
Use this program to define the total number of store locations in your organization. You must
define if this store is the Main store, a Remote store, or a Single store system.
=====================================================================
THIS PROGRAM PROVIDES THE FACILITIES FOR TAILORING The Retailer TO YOUR
STORE'S REQUIREMENTS.
DEFINE STORE LOCATIONS
NUMBER OF LOCATIONS IN THIS ORGANIZATION IS 1
SINGLE STORE SYSTEM
STORE IDENTIFICATION NUMBER. 100
ENTER THE NUMBER OF STORE LOCATIONS IN THIS ORGANIZATION.
F1 SAVE F10 ABORT
=====================================================================
Correct definitions are important for defining how your stores will maintain and distribute
inventory, as well as share information. The Main store system maintains and distributes the
inventory for the entire organization. It generates management reports and maintains the sales
and inventory history of all remote locations.
Remote stores do there ordering and receiving through the Main store system, which will always
be designated as location 1.
Store Locations - The Main store is designated 01, with the remote stores being 02, 03, and so
on, to a maximum of twenty-one (21) locations. The four (4) digit store identification number is
only used to identify the source of transmitted data to a host mainframe. It defaults to (1) if not
used. If you define more than one (1) store location, the system assumes that you are the Main
Store system.
Remote Locations - If your store is a Remote location, enter the number of stores in the
organization and press (ENTER). Then press F4, Remote store. You will be prompted to enter
your store's assigned remote location number. Press F1, to save and exit this program. Remote
location numbers must be equal to or less than the total number of stores defined.
SYSTEM MAINTENANCE
151
Company Name and Address
This program is essential to insure correct installation and to obtain an authorization code. It also
provides the capability to change the name, address, or telephone number of your store.
=====================================================================
** WARNING **
CHANGING NAME AND ADDRESS WILL REQUIRE A NEW AUTHORIZATION CODE
NAME
ADDRESS
CITY
STATE
ZIP
PHONE
YOUR COMPANY NAME
99999 STREET NAME
ANYWHERE
CA
99999
435-555-1212
USE THE ARROW KEYS TO POSITION THE CURSOR.
F1 SAVE F5 DELETE F10 ABORT
=====================================================================
Note: If you change the name or address on a system which has already been authorized, RSI
requires written notice from the owner of the software (by fax or letter) before the system can be
authorized with the changed information.
If you are using Multi-Store Communications, you must define all correct store names and
addresses as well as method of data transmission, i.e., modem or floppy diskette.
Define the COMM TYPE in each of the store name and address for each store of multi-store
system. The system defaults to “M”. You must set each store to “F” that requires floppy
transmission.
When you set the COMM TYPE to “F” the transmission files will be written to the defined
transmit disk. If you transmit again before processing the file at the remote store the existing
update file will be overwritten and lost.
Define Point of Sale
The following Menu screen is one (1) of five (5).
=====================================================================
MAINTAIN PRICES OR GM WHEN COST CHANGES?
N
NUMBER OF DECIMAL PLACES IN QUANTITY?
0
NUMBER OF DECIMAL PLACES IN COST?
2
NUMBER OF DECIMAL PLACES IN PRICES?
2
PRICE ROUNDING CONSTANT?
1
DEFAULT GROSS MARGIN?
35
DEFINE TAX 4-6 AS NOT TAX SHIFT 1 TO 3
N
POST PRICE CHANGES TO ADJUSTMENT JOURNAL
N
USE PRICE MASTER FILES FOR REMOTE STORES
N
USE EXTENDED PRICE MASTER?
N
USE STEP PRICE DISCOUNTING?
N
STEP PRIC ONLY WITH CUSTOMER ACCOUNTS?
Y
NUMBER OF MONTHLY TRANSACTION ARCHIVE FILES?
DRIVE ADDRESS TO STORE ARCHIVE FILES
41
ENTER (Y) TO MAINTAIN THE PRICES OR (N) FOR GROSS MARGINS
F1 SAVE F10 ABORT
=====================================================================
SYSTEM MAINTENANCE
152
Define Point of Sale begins by asking if you would like to maintain the price or gross margin
when the cost changes. Enter Y if you would like to maintain the price when the cost changes or
N to maintain the gross margin.
When the unit cost is entered or changed, your system may maintain the current price and
calculate new gross margins, or maintain current margins and calculate new prices. Note: You
cannot maintain both prices and gross margins when the cost changes.
You are then asked, consecutively, how many decimal places you would like in Quantity, Cost
and Price. Fill in the appropriate number, after each one; most customers define two (2) decimal
places.
Would you like a fixed decimal in cost or price? If so, enter Y after the appropriate question, if
not, enter N.
When the prices are changed, your system can be defined to round to the nearest .01 or .05 cents.
Enter 1 to round to the nearest penny, 5 to round to the nearest nickel, or 0 for no rounding at all.
When a SKU does not have a cost entered, you will be asked to select a default gross margin.
The system default is thirty five percent (35%).
Enter (Y) to allow tax 4 to 6 as non-tax shift 1 to 3 or (N) if not.
Enter (Y) to post cost/price changes to the adjustments journal or (N) if not.
Enter (Y) to use price master files for remote store prices or (N) if not.
Enter (Y) to use the extended price master file or (N) if not.
Enter (Y) to use step price discounting, (N) if not.
Step Price for customer accounts only. When set to “Y” the step price discount will work only
on transactions that have a customer number entered. When set to “N” all transactions will be
eligible for step pricing.
Enter the number of monthly transaction archive files to keep.
Enter the drive address to store archive transaction files.
Page down for 2nd Page of Define Point of Sale
=====================================================================
FIXED DECIMAL IN PRICES?
N
DEFAULT APPEND LEVEL?
0
COMPOSITE BARCODE PRICES HAVE 5 DIGITS?
N
DISPLAY PRICE LEVELS?
N
ALLOW DISCOUNTS ON PROMO ITEMS?
N
ALLOW PRICE CHANGES IN EXPRESS INVOICING?
N
INVOICE TOTAL ROUNDING FACTOR?
0
CASH VALUE DISCOUNT TENDER PERCENTAGE?
0
PRESCRIPTION NUMBERS (RX) USED?
N
FOOD STAMP TYPE?
0
CURRENCY DESCRIPTOR CHARACTER?
0
CLERK LOGON REQUIRED?
Y
AUTO LOGOFF AFTER EACH TRANSACTION?
Y
PROMPT WHEN EXITING INVOICING?
N
ENTER (N) TO ENTER CUSTOMER SCREEN (Y) FOR S.K.U. ENTRY SCREEN
F1 SAVE F10 ABORT
=====================================================================
SYSTEM MAINTENANCE
153
Do you want the price entries to have fixed decimal places? If yes enter (Y) if not enter (N).
Default Append Level refers to the base item SKU# for appended items. This option is not
implemented in this release and will default to 0 regardless of what is entered.
Do your composite barcode prices have 5 digits. If yes enter (Y) if not enter (N).
Do you want the price levels to be displayed? If yes enter (Y) if not enter (N).
To allow discounts on PROMO items enter Y otherwise enter N.
Would you like to allow price changes in express invoicing? If so, enter Y after the appropriate
question, if not, enter N.
Next, the invoice total rounding factor may be defined. (0)=none, (5) =.05, (10)=.10
Cash value discount percentage may be entered to allow barter transactions to be discounted.
Bank card 5 is used as the tender key.
If prescription numbers are used in place of serial number entries then a (Y) must be entered.
There are four (4) types of food stamp handling regarding the tax payment system for the food
stamp items. You must enter the correct type for your state.
1.
General Type
The customer may pay up to the food-stamp amount plus its taxes due in food stamps.
(The FOOD STAMPABLE TOTAL read in the display already includes the taxes due in
this type.)
2.
Illinois Type
The customer may pay up to the food-stamp amount in food stamps, and the amount
actually paid in food stamp is tax exempted. (The FOOD STAMPABLE TOTAL read in
the display does not include its taxes due in this type.)
3.
Texas Type
The customer may pay up to the food-stamp amount in food stamps, but any taxes due
must be paid in cash. (The FOOD STAMPABLE TOTAL read in the display does not
include its taxes due in this type.)
4.
New Jersey Type
The customer may pay up to the food-stamp amount in food stamps, and its taxes due
are all exempted regardless of the actual amount paid in food stamps. (The FOOD
STAMPABLE TOTAL read in the display does not include its taxes due in this type.)
Is the clerk Logon required, and would you like an Auto Logoff after each transaction? Enter Y
or N. (You may wish to answer ‘Y’ is several clerks will be using the same register during a
shift.)
Do you want to automatically logoff the clerk after each transaction. Enter Y or N.
If you would like a prompt when exiting an invoicing program enter Y. If not, enter N.
SYSTEM MAINTENANCE
154
The next items are for Generate Invoice only.
Page down for 3rd Page of Define Point of Sale.
=====================================================================
ENTER POS CUSTOMER OR S.K.U. ENTRY SCREEN?
N
ENTER DESCRIPTION ON OPEN PLU?
N
ENTER THE TENDER AMOUNT?
N
ENTER THE BANK CARD NO.?
N
ENTER THE CHECK NUMBER?
N
CREDIT AUTHORIZATION PROGRAM?
0
GENERATE INVOICE ONLY
ENTER THE ITEM DESCRIPTION?
ENTER THE UNIT PRICE?
ENTER THE QUANTITY?
PROMPT TO ENTER DISOCUNTS?
PROMPT TO ENTER A SERIAL NUMBER?
PROMPT TO ENTER NOTES?
PROMPT TO PRINT FIRST INVOICE?
N
N
N
N
N
N
ENTER THE NEXT INVOICE NUMBER
F1 SAVE F10 ABORT
=====================================================================
Select the initial entry screen (Customer of Inventory SKU) by entering Y or N.
Enter Y to allow the operator to change the item descriptions in Generate Invoicing and OPEN
PLU’s in Express Invoicing or enter N for no entry.
Enter Y to prompt for quantity sold in Generate Invoicing and mandatory entry of amount
tendered in Express Invoicing of N for no entry.
Enter the check bank information.
If credit cards are not used enter (0). If credit card transactions are handled through ICVERIFY
enter (1) or (2) for XCHARGE.
Page down for fourth page of Define Point of Sale
DEFINE POINT OF SALE
PRE-PRINTED INVOICE FORM?
INVOICE FORM HAS COMPANY NAME PRE-PRINTED?
PRINT LINES IN THE BODY OF THE INVOICE?
PRINT DISCOUNT PERCENTAGE ON INVOICE?
N
Y
34
N
PRINT MANUFACTURERS PART NUMBERS?
N
PRINT COMPANY NAME AND ADDRESS ON RECEIPT?
PRINT SAVINGS AMOUNT ON RECEIPT?
Y
Y
F1 SAVE F10 ABORT
Enter (Y) if form has name and address, (H) if not, (N) if no pre-printed form.
If the company name is to be printed on the Invoice Form enter (Y).
SYSTEM MAINTENANCE
155
Enter the number of line items to print on a single page.
Enter (Y) to print percentage, (N) for discount amount.
To print manufacturers part numbers enter (Y) on receipts and invoices, (N) if not.
Enter (1) to print name and address. Enter (2) to print name only. (0) for nothing.
Enter (Y) to print savings amount on customer receipt, (N) if not.
Page down for the fifth Define Point of Sale screen.
DEFINE POINT OF SALE
NEXT INVOICE NUMBER?
NEXT CREDIT MEMO NUMBER?
NEXT ESTIMATE NUMBER?
200106
1
4
POST DETAIL TO ACCOUNTS RECEIVABLE? Y
POST TRANSACTIONS TO GENERAL LEDGER? N
GENERAL LEDGER NUMBER FOR CASH?
GENERAL LEDGER NUMBER FOR TAX?
GENERAL LEDGER NUMBER FOR SALES?
GENERAL LEDGER NUMBER FOR RECEIVABLES?
PRE-PRINTED A/R STATEMENT FORM?
N
STATEMENT FROM HAS COMPANY NAME PRE-PRINTED?Y
PRE-PRINTED ACCOUNTS PAYABLE CHECKS? N
F1 SAVE F10 ABORT
Enter the next invoice number.
Enter the next credit memo number.
Enter the next estimate number.
Do you want to post detail to accounts receivable? If yes enter (Y) if not enter (N).
Do you want to post transactions to general ledger? If yes enter (Y), if not enter (N).
Enter the general ledger number for cash.
Enter the general ledger number for tax.
Enter the general ledger number for sales.
Enter the general ledger number for receivables.
Do you have pre-printed account receivables statement forms? If yes enter (Y), if not enter (N).
Is the company name printed on the statement form? If yes enter (Y), if not enter (N).
Do you have pre-printed accounts payable checks? If yes enter (Y), if not enter (N).
SYSTEM MAINTENANCE
156
Define Clerk Logon IDs
This program provides for the assignment of four (4) digit manager and clerk I.D. Logon
numbers and the Discount Tender functions that they are authorized to use. The Manager/Clerk
Authorized Tender functions work in conjunction with the Express Screen Manager Override
function.
=====================================================================
I.D.
CLERK NAME
M FUNCTION
TILL
COMM %
1111
2222
9999
JOHN DOE
MARY DOE
NOT ASSIGNED
NOT ASSIGNED
....
MISC. CLERK I.D.
(M) YYYYYYYY
YYYYYYYY
1
%
1.00
0.00
USE ARROWS TO POSITION THE CURSOR. PRESS PgUp AND PgDn FOR MORE
CLERKS.
ENTER CLERKS NAME ASSIGNED TO THIS LOGON I.D.
F1 SAVE F2 MANAGER F5 DELETE F10 ABORT
=====================================================================
Sales Tax Information
The program for Define Sales Tax Information allows you to define three (3) different tax levels
with add on tax, (3) different Australian tax levels or six (6) tax levels if using VAT (Value
Added Tax). Use F2 to select Add-on or Value Added Tax.
With add on tax, you will be prompted to enter the new tax percentage, or to press (ENTER) to
accept the displayed current rate. Note: Long form tax tables are not activated in Version 6.2.7.
=====================================================================
WHEN ADD ON TAX IS SELECTED, TAX 1 MAY BE DEFINED AS A PERCENTAGE OR
A TABLE. TAX 3 MAY BE A TABLE OR A PERENTAGE.
ADD ON TAX
TAX 1 IS CURRENTLY 7.750
TAX 2 IS CURRENTLY 0.000
TAX 3 IS CURRENTLY 0.000
ENTER NEW TAX PERCENTAGE (CR) FOR CURRENT RATE (6.5% = 6.5).
F1 SAVE F2 TOGGLE TAX F3 TOGGLE TABLE F4 TOGGLE COMBINE 1 & 2
F10 ABORT
=====================================================================
Define Additional Tax Codes
This enhancement allows the addition of 100 tax code percentages. You can backup and restore
the tax file. Tax code three can be a table or a percentage.
Define Department Titles
The program to Define Department Titles allows you to set a reference number and description
title for each department. Up to 99 different departments may be tracked.
SYSTEM MAINTENANCE
157
Define Bank Card Titles
The program to Define Bank Card Titles allows you to set a reference number and bank card
description for each type of credit card your company accepts. Bank card titles that begin with
“GIFT” or “STORE” will not process as credit cards. If “Enter bank card numbers” is defined,
these bank card types will not request a bankcard number or require credit card authorization.
=====================================================================
REF BANK CARD TITLE
REF BANK CARD TITLE
1. B OF A
4. AAA CARD
2. MASTERCHARGE
5. GIFT CERTIFICATE
3. VISA
6. STORE CREDITS
USE THE ARROW KEYS TO POSITION THE CURSOR. PRESS (TAB) TO TOGGLE
SIDES.
ENTER BANK CARD TITLE
F1 SAVE F5 DELETE F10 ABORT
=====================================================================
Note: If food stamps are allowed, you must use reference 6 and enter Food Stamps as the
description.
Define Currency Exchange
The Define Currency Exchange program allows you to enter the currency names and exchange
rates that are allowed at the Point- of-Sale Tender function.
=====================================================================
EXCHANGE RATES
CURRENCY NAME
YEN
PESO
...
...
EXCHANGE RATE
.012000
.009000
0.000000
0.000000
USE THE ARROW KEYS TO POSITION THE CURSOR.
ENTER THE CURRENCY DESCRIPTION
F1 SAVE F5 DELETE F10 ABORT
=====================================================================
SYSTEM MAINTENANCE
158
Define Sales Receipt Heading
The Define Sales Receipt Heading program allows you to print the heading of your choice on
each sales receipt or invoice.
=====================================================================
SALES RECEIPTS HEADING INFORMATION
THANK YOU FOR SHOPPING WITH (YOUR COMPANY NAME)
99999 STREET NAME
ANYWHERE, CA 99999
TEL: 435-555-1212 FAX: 435-555-1212
USE THE ARROW KEYS TO POSITION THE CURSOR.
ENTER THE SALES RECEIPT HEADING DATA FOR THE INVOICE PRINTER.
F1 SAVE F5 DELETE F10 ABORT
=====================================================================
Define Validation Heading
The Define Validation Heading program allows you to define what you want printed on the back
of a customer's check at point of sale. For example:
FOR DEPOSIT ONLY. BANK NAME ACCOUNT NUMBER XXXXXXXXXXXX
Depending upon the type of printer used, you may insert one (1), two (2), three (3), or four (4)
lines of validation information.
Define Pole Display Welcome
This option allows you to define the message to be displayed at the POS pole display. Enter the
desired welcome message and press F1 to save. F5 deletes the previously defined message.
Automatic Execution Times
FILE REORGANIZATION, BACKUP FILES, END OF DAY PROCESSING AND POST
PRICE UPDATES REQUIRE THE STORE TO BE CLOSED. COMMUNICATIONS
UPDATE IS AN AUTOPOST FUNCTION AND CAN BE ESECUTED WHILE THE STORE
IS OPEN. AUTOMATIC END OF DAY WILL NOT PROCESS REMOTE STORES.
BACKUPFILES WILL BE WRITTEN TO DRIVE 41 IS INSTALLED.
When automatic execution of an end of month procedure is enabled, the date will be set in
relation to the time entered. If the time entered is before 12:00 noon the execution date will be
set to the first day of the next month. If the time is entered after 12:00 noon then execution date
will be set to the last day of the current month.
OPEN STORE:
CLOSE STORE
FILE REOGANIZATION
BACKUP DATA FILES
8:00
8:00
8:00
8:00
ENABLED
ENABLED
ENABLED
ENABLED
06/20/00
06/20/00
06/20/00
06/20/00
SYSTEM MAINTENANCE
159
REBUILD XREF FILES
8:00
ENABLED
06/20/00
PROCESS END-OF-DAY
8:00
ENABLED
06/20/00
POST PRICE UPDATES
8:00
ENABLED
06/20/00
SERVER FILE UPDATE
8:00
ENABLED
06/20/00
COMMUNICATION UPDATE 8:00
ENABLED
06/20/00
ENV. END OF MONTH
8:00
ENABLED
06/20/00
PUR. END OF MONTH
8:00
ENABLED
06/20/00
USE ARROW UP/DOWN TO CHANGE SELECTIONS AND ENTER NEW TIME.
F1 SAVE F2TOGGLE ENABLE/DISABLE F10ABORT
CLOSE STORE – Will close the store at the selected time and start the automated functions.
FILE REORGANIZATION - Reorganizes ISAM files then rebuilds the cross-reference files.
BACKUP DATA FILES - Backs up all data files to the second hard disk (if installed).
Otherwise, backup files will be written onto drive 40.
REBUILD XREF FILES – Rebuilds the cross reference files for the master files.
PROCESS END OF DAY - Processes End-of-Day for all terminal registers and T2000 registers
attached. Upon completion, any data files that were changed will be backed up again. RX
registers and remote store transaction files must be processed manually.
POST PRICE UPDATES - Posts the price updates previously entered using the Price
Maintenance program. All changes with the EFFECTIVE DATE set to today's date will be
posted. On a multi-store host system, all stores will be posted.
SERVER FILE UPDATE – The Server Master File will be updated at the specified time. Autoexecution will download only the changes since the last backup to the servers. If you select the
download server function, the entire file will be sent.
SYSTEMS WITH COMMUNICATIONS
If you have Communications Auto Post active, the following option will be displayed.
COMMUNICATION UPDATE - HOST builds and transmits the inventory, customer, and
vendor update files to the REMOTE store. REMOTE builds and transmits the inventory,
customer, vendor and transaction files to the HOST system.
The system will execute any functions enabled at the time specified. Please be sure these times
are scheduled in the proper sequence.
Host and Remote stores, without a server system attached, must perform steps 1, 2, 3 and 4 in
sequence. This will guarantee that all of today's activities will be in the backup files. In the event
End-of-Day aborts restore the data files from the backup and reprocess End-of-Day.
Automatic processing of events; 1, 2, 3 and 4 only occur when the store is closed. Use the
following procedure to close the store:
1. Return all terminals to the Main Retailer Menu.
2. All T2000 registers should be in the EXPRESS INVOICING screen with no transaction in
process.
3. Press F9 on the system keyboard. The HELP screen will display.
4. Press F1 to close the store. Pressing any key will re-open.
SYSTEM MAINTENANCE
160
The program will close all registers and request T2000 registers to send any transaction records,
which have not been transmitted. Data files will then be tested. If a file is in use by another user,
the message "FILES IN USE. AUTOMATIC EVENTS WILL NOT BE PROCESSED" will be
displayed. Press any key to re-open the store. Return all terminals to the Main Menu before
attempting to close again.
The program will wait 5 minutes before checking the automatic execution times. This will allow
you time to re-open the store before automatic processing starts in case you want to make a last
minute posting. Once the automatic processing starts, the entire process should run to
completion. As the programs are executed, the normal screens will be displayed. Should the
process abort, a status message will be displayed on the screen.
Communication Update works the same at the Host as at a Remote location. However, additional
files are sent from the remote to the host system.
Host: The system will automatically build and transmit the inventory, customer, and
vendor update files to all remote stores. The posting times will be set to immediate
for all transmitted files.
Remote: In addition to the inventory, customer, and vendor update files, the remote will
transmit the current day's transaction files to the Host system for processing. To be
sure the transaction files are transmitted, you must set the communication update
time to occur after End-of-Day has been processed.
Transaction files received from a remote store are be processed by selecting END-OF-DAY
PROCESSING from the POINT OF SALE menu. Enter 1. to PROCESS ALL TERMINALS
then select 2. PROCESS TRANSACTION FILES RECEIVED FROM REMOTE LOCATIONS.
SYSTEM MAINTENANCE
THIS PAGE INTENTIONALLY LEFT BLANK FOR FUTURE USE.
161
SYSTEM MAINTENANCE
162
Data File Allocation
This Data File Allocation program provides the facility to allocate file space for system use. The
system default size should be changed to more accurately reflect the store's file size requirements.
=====================================================================
ID
FILENAME
NRALL NRWRI NEWSIZE CREATE
* INVENTRY.MAS
* UPC.MAS
* MFG.MAS
* DESC.MAS
* SUSPEND.MAS
* VARIANCE.DAT
* INVJRNL.DAT
* ARCHIVE.MAS
* VENDOR.MAS
* OPENORD.MAS
* CUSTOMER.MAS
* CUSUPC.MAS
* CUSXRF.MAS
*
*
*
*
*
*
*
*
*
*
*
*
*
0
0
0
0
0
0
0
0
0
0
0
0
0
0
0
0
0
0
0
0
0
0
0
0
0
0
5000
5000
5000
5000
5000
5000
5000
5000
5000
5000
5000
5000
5000
ENTER THE NEW ALLOCATION SIZE
F1 ALLOCATE F2 MARK F10 ABORT
=====================================================================
Define Passwords
The Define Passwords function provides the capability to use of a six (6) character password
protection to a Menu program or sub-menu selection. Responsibility for password control should
be at the highest level and a record of all passwords kept in a safe place to ensure system security
and prevent down time due to lost or forgotten passwords.
To enter a new password, to add or to change an existing password, press F2, Enable Passwords.
The existing passwords will be displayed and you may add to or change them by entering the
desired password and pressing (ENTER).
Answer Y or N to assign menu access rights and press F1 to save. At any time, you may press F5
to delete the password or F10, Abort.
SYSTEM MAINTENANCE
163
=====================================================================
DEFINE PASSWORDS UTILITY
CHANGE PASSWORD - AAABBB
MAIN MENU
Y SYSTEM
Y > INVENTORY MANAGEMENT
Y > PURCHASING AND RECEIVING
Y > POINT OF SALE
Y > CUSTOMER MANAGEMENT
Y > SYSTEM UTILITIES
N > GENERAL LEDGER
N > ACCOUNTS PAYABLE
N > ACCOUNTS RECEIVABLE
N > SERIAL NUMBER CONTROL
N > COMMUNICATIONS
MOVE CURSOR WITH ARROW KEYS. PRESS (Y) OR (N) TO CHANGE ACCESS
PRESS ENTER FOR NEXT SUB-MENU.
F1 SAVE F5 DELETE F10 ABORT
=====================================================================
After the system passwords have been defined, press F1 to save and return to the Enable/Disable
screen. F2 functions as a toggle between the enable/disable states. Press F10 End, to return to
the Utility menu.
At this point, you have completed the initial installation of The Retailer. Any changes you
desire to make will involve selections 2 - 6 of the Utilities menu.
SYSTEM MAINTENANCE
164
INSTALL PROGRAM DISKETTES
This program provides the facilities to install optional programs or features to The Retailer
system. Verify the current input disk drive, insert the option diskette and press (ENTER). After
the programs are copied, the following Authorization screen will be displayed.
=====================================================================
STOCKED OPTION AUTHORIZATION CODE ENTRY
OPTION SERIAL NUMBER
SYSTEM SERIAL NUMBER
OPTION CONTROL NUMBER
:
:
:
240000
9999915
552545
COMPANY NAME
COMPANY ADDRESS
:
:
YOUR COMPANY NAME
99999 STREET NAME
AUTHORIZATION CODE: ________
=====================================================================
You should now enter the Authorization Code.
If you have not yet received an Authorization Code for the option you wish to install, call
RETAIL SOFTWARE INTERNATIONAL (RSI) at 435-755-8783 You must have the serial
number(s) available for any option you need to install. Press (ENTER) to skip this installation
step.
F10 ABORT
=====================================================================
DEFINE SYSTEM CONFIGURATION
This program provides the facilities to add, change or delete the hardware components of your
system. It also provides the capability to define communication port assignments and if necessary change the Company Name and Address of your store.
Please refer to selection 1, INSTALL RETAILER SYSTEM, for a detailed explanation of the
Define System Configuration sub menus.
=====================================================================
DEFINE SYSTEM CONFIGURATION
1.
2.
3.
4.
5.
6.
ALL SELECTIONS
PRINTER CHARACTERISTICS
TERMINAL CHARACTERISTICS
COMMUNICATIONS PORTS
STORE LOCATIONS
COMPANY NAME AND ADDRESS
ENTER REFERENCE NUMBER
F10 END
====================================================================
SYSTEM MAINTENANCE
165
DEFINE STORE INFORMATION
This program stores software parameter definitions in the ORCONT.FIL and is used in
conjunction with the TEXT.DAT file to tailor the point-of-sale entry to your store's requirements.
For changes to take effect while at the Main menu, you must execute a SHIFT F2 to reload
common variables or SHIFT F9 to reset system defaults and reload common variables.
Please refer to selection 1, INSTALL RETAILER SYSTEM, for a detailed explanation of the
Define Store Information sub menus.
=====================================================================
DEFINE STORE INFORMATION
1. ALL SELECTIONS
2. CLERK LOGON I.D.s
3. SALES TAX INFORMATION
4. DEPARTMENT TITLES
5. BANK CARD TITLES
6. CURRENCY EXCHANGE
7. SALES RECEIPT HEADING
8. VALIDATION HEADING
9. POLE DISPLAY WELCOME
10. AUTOMATIC EXECUTION TIMES
ENTER REFERENCE NUMBER:
F10 END
=====================================================================
DEFINE PASSWORDS
The Define Passwords function provides the capability to use a six (6) character password
protection to a Menu program or sub-menu selection
Please refer to selection 1, INSTALL RETAILER SYSTEM in this section for a detailed
explanation.
DEFINE MONITOR COLORS
This program provides the facilities to personalize video attributes on color monitors. Use the
arrow keys to select the desired functions and color attributes.
Note: It is possible to corrupt a monochrome display by assigning color attributes. F2 will reset
to Monochrome Display mode in the event of an erroneous entry.
SYSTEM MAINTENANCE
THIS PAGE INTENTIONALLY LEFT BLANK FOR FUTURE USE.
166
APPENDIX A – CABLE CONFIGURATIONS
167
Recommended Cable Type
For optimum system operation, the interface cables should be a color-coded twisted pair with
shield and drain. Recommended use is category-5 shielded pair.
Note: Use of non-twisted pair will cause signal line cross talk and undefined error conditions
during system operation. Cable gender (M/F) refers to housing type, not pin type.
The trend in the industry is to use RJ-45 connectors and plugs. The RJ-45 9-pin and 25-pin
hoods are color coded. You may use any color to connect pin-to-pin, however, to be consistant,
RSI recommends you use the following color coded hood connections:
IBM CPU TO TERMINAL, ECR, SCANNER & PRINTER
IBM 9 PIN (M)
TO
TERMINAL 25 PIN (F)
GND STRAP FRM GND --------------
SHIELD
---------------------------- 1 FRM GND
2 RXD -----------------------------------
WHITE
----------------------------------- 2 TXD
3 TXD -----------------------------------
RED
----------------------------------- 3 RXD
5 SIG GND ------------------------------
BLACK
------------------------------ 7 SIG GND
4 DTR ------------------------------------
ORANGE
------------------------------------ 6 DSR
7 RTS ------------------------------------
GREEN
------------------------------------ 5 CTS
8 CTS ------------------------------------
BLUE
---------------------------------- 20 DTR
IBM 25 PIN (M)
TO
TERMINAL 25 PIN (F)
GND STRAP FRM GND --------------
SHIELD
---------------------------- 1 FRM GND
2 TXD -----------------------------------
WHITE
----------------------------------- 3 RXD
3 RXD -----------------------------------
RED
----------------------------------- 2 TXD
4 RTS ------------------------------------
GREEN
------------------------------------ 5 CTS
5 CTS ------------------------------------
BLUE
---------------------------------- 20 DTR
7 SIG GND ------------------------------
BLACK
------------------------------ 7 SIG GND
20 DTR ----------------------------------
ORANGE
------------------------------------ 6 DSR
APPENDIX A – CABLE CONFIGURATIONS
168
IBM CPU TO TERMINAL, ECR, SCANNER & PRINTER (CONTINUED)
RSI 4 PORT 9 PIN (F)
TO
TERMINAL 25 PIN (F)
1 FRM GND ----------------------------
SHIELD
---------------------------- 1 FRM GND
2 RXD -----------------------------------
WHITE
----------------------------------- 2 TXD
3 TXD -----------------------------------
RED
----------------------------------- 3 RXD
4 RTS ------------------------------------
GREEN
------------------------------------ 5 CTS
5 CTS ------------------------------------
BLUE
---------------------------------- 20 DTR
7 SIG GND ------------------------------
BLACK
------------------------------ 7 SIG GND
9 DTR ------------------------------------
ORANGE
----------------------------------- 6 DSR
IBM CPU TO T-2000
9 PIN IBM HOST
TO
9 PIN T-2000
FRM GND STRAP ---------------------
SHIELD
--------------------- FRM GND STRAP
2 RXD -----------------------------------
WHITE
----------------------------------- 3 TXD
3 TXD -----------------------------------
RED
----------------------------------- 2 RXD
4 DTR ------------------------------------
ORANGE
---------------------------------- 6 DSR
5 SIG GND ------------------------------
BLACK
----------------------------- 5 SIG GND
7 RTS ------------------------------------
GREEN
----------------------------------- 8 CTS
8 CTS ------------------------------------
BLUE
----------------------------------- 7 RTS
APPENDIX A – CABLE CONFIGURATIONS
169
IBM TO METRO LOGIC SCANNER
IBM 9 PIN (M)
TO
SCANNER 15 PIN (F)
GND STRAP FRM GND --------------
SHIELD
--------------------------- 15 FRM GND
2 RXD -----------------------------------
WHITE
----------------------------------- 3 TXD
5 SIG GND ------------------------------
BLACK
----------------------------- 7 SIG GND
4 DTR ]
6 DSR 7 RTS ]
8 CTS -
IBM 25 PIN (M)
TO
SCANNER 15 PIN (F)
GND STRAP FRM GND --------------
SHIELD
--------------------------- 15 FRM GND
3 RXD -----------------------------------
WHITE
----------------------------------- 3 TXD
7 SIG GND -----------------------------
BLACK
------------------------------ 7 SIG GND
4 RTS ]
5 CTS 6 DSR ]
20 DTR RS1 4 PORT 9 PIN (F)
TO
SCANNER 15 PIN (F)
1 FRM GND ----------------------------
SHIELD
--------------------------- 15 FRM GND
2 RXD -----------------------------------
WHITE
----------------------------------- 3 TXD
7 SIG GND -----------------------------
BLACK
------------------------------ 7 SIG GND
APPENDIX A – CABLE CONFIGURATIONS
170
TERMINAL & ECR TO PRINTER
25 PIN (F)
TO
PRINTER 25 PIN (F)
1 FRM GND ----------------------------
SHIELD
---------------------------- 1 FRM GND
2 RXD -----------------------------------
WHITE
----------------------------------- 2 TXD
3 TXD -----------------------------------
RED
----------------------------------- 3 RXD
- 4 RTS
[
- 6 DSR
20 DTR ----------------------------------
ORANGE
---------------------------------- 20 DTR
7 SIG GND ------------------------------
BLACK
------------------------------ 7 SIG GND
TERMINAL TO BLAZER PRINTER
AUX. TERM. PORT (F)
TO
PRINTER 9 PIN (F)
3 TXD -----------------------------------
RED
----------------------------------- 2 RXD
7 SIG GND ------------------------------
BLACK
------------------------------ 5 SIG GND
20 PRINTER READY -----------------
BROWN
--------------------------- 7 RTS/BUSY
4 RTS ------------------------------------
GREEN
------------------------------------ 8 CTS
FOR IBM TO WEIGHTRONIX SCALE
IBM 25 PIN
TO
WEIGHTRONIX 9 PIN
GND STRAP ----------------------------
SHIELD
------------------------ 5 FRAME GND
2 TXD -----------------------------------
RED
----------------------------------- 9 RXD
3 RXD -----------------------------------
WHITE
----------------------------------- 3 TXD
4 RTS
]
5 CTS
7 SIG GND ----------------------
BLACK/RED & BLACK/WHITE
------------------ 1 SIG GND
APPENDIX A – CABLE CONFIGURATIONS
171
FOR A/B BOTHWAY SWITCH
TERMINAL 25 PIN (F)
TO
SWITCH 25 PIN (F)
1 FRM GND ----------------------------
SHIELD
---------------------------- 1 FRM GND
2 RXD -----------------------------------
WHITE
----------------------------------- 3 TXD
3 TXD -----------------------------------
RED
----------------------------------- 2 RXD
5 CTS ------------------------------------
BLUE
------------------------------------ 5 CTS
6 DSR ------------------------------------
YELLOW
---------------------------------- 20 DSR
20 DTR ----------------------------------
ORANGE
------------------------------------ 6 DTR
7 SIG GND ------------------------------
BLACK
------------------------------ 7 SIG GND
TO
SMART SWITCH PORT 25 PIN (F)
FRM GND ----------------------------
SHIELD
---------------------------- 1 FRM GND
3 TXD -----------------------------------
RED
----------------------------------- 3 RXD
7 SIG GND ------------------------------
BLACK
------------------------------ 7 SIG GND
20 DTR ----------------------------------
BLUE
TERMINAL TO SMART SWITCH
TERMINAL AUX PORT 25 PIN (F)
----------------------------------20DTR
APPENDIX A – CABLE CONFIGURATIONS
172
DIAGRAM OF TERMINAL TO SMART SWITCH
POWER INDICATOR LED (RED) PORT INDICATOR LED (YELLOW)| | (Flashes faster on Port B)
| |
TO
DATA OUT-3 |PORT C
GND------5 |9 PIN MALE
INVOICE
PRINTER
DTR IN---8 |
ON
OFF
SMART
SWITCH
PORT B
25 PIN FEMALE
3
7
20
3
PORT A
25 PIN MALE
7
20
DATA OUT
DATA IN
GND
GND
DTR IN
DTR OUT
TO RECEIPT PRINTER FROM TERMINAL
SMART SWITCH TO RECEIPT PRINTER
PORT B 25 PIN (M)
TO
RECEIPT PRINTER 25 PIN (F)
1 FRM GND ----------------------------
SHIELD
---------------------------- 1 FRM GND
3 TXD -----------------------------------
RED
----------------------------------- 3 RXD
7 SIG GND ------------------------------
BLACK
------------------------------ 7 SIG GND
20 DTR ----------------------------------
ORANGE
---------------------------------- 20 DTR
SMART SWITCH TO INVOICE PRINTER
PORT C 9 PIN (F)
TO
INVOICE PRINTER 25 PIN (F)
1 FRM GND ----------------------------
SHIELD
---------------------------- 1 FRM GND
3 TXD -----------------------------------
RED
----------------------------------- 3 RXD
5 SIG GND ------------------------------
BLACK
------------------------------ 7 SIG GND
8 DTR ------------------------------------
ORANGE
---------------------------------- 20 DTR
APPENDIX B – PERIPHERAL SETUP
173
DIGIBOARD PC/4 AND PC/8 SETUP
Dip Switches:
DS1 through DS5 for PC/4
DS1 through DS9 for PC/8
DS1 (140H)
1=ON 2=OFF 3=ON 4=OFF 5 - 10=ON
DS2 (100H)
1=ON 2=OFF 3 - 8=ON
DS3 (108H)
1=ON 2=OFF 3 - 6=ON 7=OFF 8=ON
DS4 (110H)
1=ON 2=OFF 3 - 5=ON 6=OFF 7 & 8=ON
DS5 (118H)
1=ON 2=OFF 3 - 5=ON 6 & 7=OFF 8=ON
DS6 (120H)
1=ON 2=OFF 3 & 4=ON 5=OFF 6 - 8=ON
DS7 (128H)
1=ON 2=OFF 3 & 4=ON 5=OFF 6=ON 7=OFF 8=ON
DS8 (130H)
1=ON 2=OFF 3 & 4=ON 5 & 6=OFF 7 & 8=ON
DS9 (138H)
1=ON 2=OFF 3 & 4=ON 5 - 7=OFF 8=ON
The interrupt selection is determined by the machine configuration. The hierarchy of board
addressing is:
IBM COM 1 (serial port)
IBM COM 2 (serial port)
APPENDIX B – PERIPHERAL SETUP
174
Digi Board IRQ Assignments
The first board in this hierarchy must be assigned to IRQ4. The next board is assigned to IRQ3
and the last will be assigned to IRQ2 (only 3 are supported). IRQ5 is not used for our
applications. Determine which interrupt will be required for the Digi Board.
Digi Board Only: Jump J89 for IRQ4.
Digi Board & IBM Asynch card or Modem: Jump J85 for IRQ3.
Digi Board & 2-IBM Asynch (Dual Asynch card): Jump J90 for IRQ2.
Note: The RSI 4-port board will not be active.
The last step before installing the Digi Board is to set jumpers J1 through J4 on the PC/4 board or
J1 through J8 on the PC/8 board.
Set the jumpers in the lower position (2-3) if IRQ2 or IRQ4 is used, (even interrupt).
Set the jumpers in the upper position (1-2) if IRQ3 is used.
Jump the middle two pins (2-3) on both P2 and P3.
After rechecking all the settings, the board can be installed in the computer. Copy the Digi
Board driver software to the fixed disk. After the software has been authorized, the ports will be
available for use.
MCT-AMS HIGH SPEED MULTI-SERIAL PORT CARD
To configure your MCT-AMS board to function properly with The Retailer, the following
I-O port address and IRQ assignments must be jumped.
COMM 1
COMM 2
COMM 3
COMM 4
IO PORT
3F8
2F8
3E8
2E8
IRQ
4
3
2
5
(9 ON MCT-AMS PLUS)
Refer to your MCT-AMS documentation. If you have other Asynch boards in your system, you
must disable the corresponding port on the MCT-AMS board.
APPENDIX B – PERIPHERAL SETUP
METRO LOGIC - 290 CONNECTED TO RX CN-7
(DS 1)
12345678
COOCCOOC
(DS 2)
12345678
C = CLOSED
OOOOOOCO
O = OPEN
REGISTER SCANNER SETTINGS
4800 BAUD
7 BIT DATA
PARITY TO ODD
DON'T TRANSMIT PREFIX'S
DON'T TRANSMIT SUFFIX'S
CARRIAGE RETURN
NO LINE FEED
PARITY TO ODD
METRO LOGIC - 290 CONNECTED TO SYSTEM
(DS 1)
12345678
COOCOOOC
(DS 2)
12345678
C = CLOSED
OOOOOOOC
O = OPEN
SCANNER SYSTEM SETTINGS
9600 BAUD
8 BIT DATA
NO PARITY
DON'T TRANSMIT PREFIX'S
DON'T TRANSMIT SUFFIX'S
CARRIAGE RETURN
NO LINE FEED
175
APPENDIX B – PERIPHERAL SETUP
176
SETUP PARAMETERS FOR WYSE 50 TERMINALS WITH The Retailer
1.
2.
3.
4.
Enter terminal setup by pressing the Shift and Setup keys.
Move from field to field using cursor keys: left and right arrow keys move correspondingly
through the setup line. Up and down arrow keys select the parameters and automatically
wrap to the beginning set when finished.
Press Shift and Enter to toggle the Key click function.
Below are the settings for use with The Retailer.
HANDSHAKE .............................. DTR
SCREEN ......................................... 80
CURSOR........................................ LINE
BLINK?.......................................... ON
MODE............................................ FDX
(Down arrow for next set)
DATA BIT..................................... 8
STOP BIT ..................................... 1
PARITY BIT ................................ NONE
MODEM PORT BAUD RATE ..... 9600
BLK END .................................... US/CR
AUTO NL .................................... ON
CR ................................................ CR
AUTO SCRL ................................ ON
AUX BAUD RATE ...................... 9600
(Down arrow for next set)
(BLOCK. User preference.)
(OFF. User preference.)
(or 19200 if supported)
(or match attached device)
SCRL ........................................... JUMP
STATUS ...................................... OFF
SCREEN SAVER ........................ ON
PROT .......................................... NORM
TEST ........................................... OFF
(Down arrow for next set)
KEYS? ........................................ US/UK
RET/ENTER................................ CR/CR
COMPATIBLE MODE .............. WY50
ENHANCE ................................. ON
5.
Set the function keys according to the RSI manual by pressing the key marked “funct”,
pressing the desired key assignment and pressing 'return'. The next function key to assign
will appear next. If you make a mistake, press the incorrect function key and re-enter the
correct information.
6.
Exit setup by pressing Shift-Setup and then choosing 'A' to save the settings, including the
function key settings.
APPENDIX B – PERIPHERAL SETUP
177
CAUTION: PRESSING 'ESC' AT ANY TIME, EXCEPT WHEN ENTERING
FUNCTION KEY DEFINITIONS, MAY CAUSE THE TERMINAL TO
DEFAULT TO ITS FACTORY SETTINGS.
WYSE TERMINAL
To use the Wyse 50 terminal as a POS device instead of the IBM keyboard, the following
function keys should be programmed to emulate the IBM keyboard.
Function Keys
Programmed Code
Emulation
F1
F2
F3
F4
F5
F6
F7
F8
F9
F10
F11
F12
F13
F14
F15
F16
Esc 1
Esc 2
Esc 3
Esc 4
Esc 5
Esc 6
Esc 7
Esc 8
Esc 9
Esc 0
user definable
Esc E
Esc U
Esc D
Esc I
Ctrl D
End
PgUp (page up)
PgDn (page down)
Ins (insert)
Del (delete)
MAGNETIC STRIP READER
The SUPERPOS keyboard is setup as follows:
1. Header :
2. Separator: <TAB>
3. Suffix:<Entr>
4. Track(s) to read : 1&2
5. Track’s sequence format : 1-2-3
6. Strip start and end sentinel : No
The Preh keyboard needs to have the MSR setup program run. The program name is KBD-130
and sets the necessary parameters for the MSR.
Type of MSR – Double Tracks 1&2
Alt B Send Start/Stop code : Yes
Alt C Enable Track 1
: Yes
Alt D Enable Track 2
: Yes
Alt E Enable Track 3
: No
Alt F Preamble char
:
Alt G Postamble char
:
Alt H Preamble track 1:
Alt I Preamble track 2:<TAB>
Alt J Preamble track 3:
Alt K Postamble track 1:
Alt L Postamble track 2 :<ENT>
Alt M Postamble track 3 :
APPENDIX B – PERIPHERAL SETUP
178
A Wyse 30 or Wyse 60 defined to emulate a Wyse 50 may be used as a POS device. Particular
care must be paid to the Transparent Print Mode Definitions, as it must be turned on by the
system to pass through special print commands.
Shifted F Keys
Programmed Code
F1
F2
F3
F4
F5
F6
F7
F8
F9
F10
F11
F12
F13
F14
F15
F16
Esc !
Esc @
Esc #
Esc $
Esc %
Esc ^
Esc &
Esc *
Esc (
Esc )
user definable
user definable
user definable
user definable
user definable
user definable
Emulation
When using a Wyse 60, define it in XMENU as a Wyse 60. In the terminal setup, choose 'Wyse
50 plus' emulation and turn off the 'enhanced' setting.
SETUP FOR BLAZER LABEL PRINTER
The setup for Blazer labels differs from the OKI-320 label setup. The following procedure is
used for the Blazer 2.4 inch printer only. Labels may be printed at the same pitch settings as the
OKI-320; however, the actual pitch is different.
Pitch
CPI
Label Max
10
12
17
20
10
12
15.5
23.3
24
28
37
56
If two (2) across labels are being used, then set the number of characters on the label to one half
(1/2) the label maximum.
APPENDIX B – PERIPHERAL SETUP
179
SPECIAL CHARACTER FUNCTIONS
The special character functions defined for the OKI-320 perform different functions on the
Blazer.
(^)
(~)
(+)
(‘)
STARTS AND STOPS UNDERLINE
STARTS AND STOPS INVERSE PRINT
SET CORNERS FOR DRAW BOX
DOUBLE SIZE BOLD CHAR
Underline
Set a (^) at the beginning of the field to be underlined. Set a (^) at the end of the underline field.
*See Note 1.
Inverse
Set a (~) at the beginning of the field to be printed in with black background and white letters.
Set a (~) at the end of the inverse field. *See Note 1.
Draw Box
Set a (+) at all four corners of the box or boxes to be drawn. There can only be one box start and
stop on a line. If more than one box is desired on a label, they cannot share a common line
except for the last line of the previous box.
Double Size Bold Char
Set a (‘) at the beginning of the field to print double size bold characters. Set a (‘) at the end of
the field to print double size bold characters. See Note 1.
Note 1: A stop character is not required if the function; underline, inverse or double size bold
characters, are to stop at the label edge.
APPENDIX C – ERROR MESSAGES AND CODES
180
Error Messages / Codes Referenced by Numerical Code
IMPORTANT - An ERROR CODE may be a 2-digit numeric code (assigned within the
program) or a 4-character code with the letter F (generated by the system).
The phrase "BREAK AT ####..." refers to programming information and is not explained here.
CALL YOUR DEALER FOR ASSISTANCE.
Any 4-character code beginning with FBxx is always a hardware error (computer, keyboard,
monitor, printer, etc.). The second 2-characters are a status code regarding the hardware error.
When calling your dealer for assistance, be sure to print the screen or write down the error
information, verbatim, for reference.
Codes
Message
3
RETURN WITHOUT GOSUB
4
OUT OF DATA
5
ILLEGAL FUNCTION CALL
6
OVERFLOW ERROR
7
OUT OF MEMORY
9
SUBSCRIPT OUT OF RANGE
10
REDIMENSIONED ARRAY
11
DIVIDE BY ZERO ERROR
13
TYPE MISMATCH
15
STRING TOO LONG
20
RESUME WITHOUT ERROR
31
OUT OF MEMORY IN PC/MOS
32
BAD RECORD LENGTH
33
COMMON ERROR
34
CONTROL-C FROM TERMINAL
50
FIELD OVERFLOW
51
INTERNAL ERROR (various messages)
52
BAD FILE NUMBER
53
FILE NOT FOUND
54
BAD FILE MODE
55
FILE IN USE
57
DISK I/O ERROR (hardware)
58
FILE ALREADY EXISTS
59
WRITE-PROTECTED FILE
60
INVALID KEY
61
OUT OF SPACE ON DISK
62
INPUT PAST END
63
BAD RECORD NUMBER
64
BAD FILE NAME
68
ISAM INDEX ERROR
69
BAD KEY LENGTH
70
BAD KEY OFFSET
71
BAD NUMBER OF RECORDS
72
RECORD IN USE
73
SPOOL CONTROL
APPENDIX C – ERROR MESSAGES AND CODES
Status Codes
F000
F001
F002
F003
F004
F005
F006
F007
F008
F009
F00A
F00B
F00C
F00D
F00E
F00F
F010
F011
F012
F013
F014
F015
FILE NOT OPEN
BAD FILE TYPE
ILLEGAL ACCESS MODE
END OF FILE
KEY LOCKED
INVALID EXTENT
WRITE-PROTECTED FILE
INVALID DIRECTORY ENTRY
INVALID NAME - FILE NOT FOUND
INVALID DEVICE
FILE IN USE
NO MEMORY
NO ROOM ON DISK
ISAM ORGANIZATION ERROR
INVALID RECORD NUMBER
INVALID RECORD LENGTH
INVALID KEY LENGTH
INVALID KEY OFFSET
FILE ALREADY EXISTS
INVALID NUMBER OF RECORDS
I/O ERROR
INVALID KEY IN ISAM REQUEST
Hardware:
FB00
FB01
FB03
FB06
FB07
FB08
FB09
FB0A
FB0B
FB0C
FB0D
FB0E
FB0F
FB12
FB13
FB14
UNDEFINED HARDWARE ERROR
DRIVE NOT READY
WRITE-PROTECTED FLOPPY
SEEK ERROR
DATA CRC ERROR (DISK I/O ERROR)
CONTROL MARK ERROR – FLOPPY
ID CRC ERROR
MISSING ADDRESS MARK
MISSING ADD. MARK IN DATA FIELD
NO INDEX DETECTED
WRITE FAULT
TRACK 0 NOT FOUND
UNDEFINED HARDWARE ERROR
BAD TRACK FLAG
BAD COMMAND
ILLEGAL DISK ADDRESS
181
APPENDIX D – DIRECT RUN PROGRAMS
182
BFAFIX
This program can be used when you receive the message that your customer file does not match
your accounts receivable detail file. This program corrects the pointers in the Accounts
Receivable detail file.
At the main menu press (Ctrl) and © simultaneously. Enter your password, if any, and at the
Enter Program Name to Run prompt, type in BFAFIX (ENTER).
After you have entered the fix program, simply Press (F1) to process your files.
Note: Make sure all registers and/or terminals on the main menu when running this program.
Once the program has completed and returned you to the main menu, all terminals and registers
can be used.
DEFINE
The Define program provides the capability to set the memory sizes for each partition defined.
The Retailer operates in 640 kilobytes (K) of memory. The operating system and support
programs utilize 144K of this, leaving a total of 496K for the remaining partitions.
Only the main partition is defined when the system is initially installed. During DEFINE
SYSTEM CONFIGURATION, additional terminals can be defined on the system. Each one of
these terminals operates in their own allocated memory space called a partition. When the
additional partitions are defined, the system automatically sets their size to 52K. The only
programs which require more than this amount of memory are EXPRESS INVOICING,
GENERATE INVOICE, and END OF DAY. If you plan to execute any of these programs on a
particular terminal, its partition size must be changed to 60K or an "out of memory error" (Error
= 7 Status = 0) may occur during execution.
To execute the Define program, you must return to any menu and press F6. You will be
prompted to enter the program name to run, enter Define and press (ENTER). The following
will be displayed:
=====================================================================
SYSTEM DEFINITION
DEVICE 40
PROGRAM NAME SYSINIT
PARTITION SIZE 60
PRIORITY 1
CAPS LOCK Y
NUM LOCK Y
DATE FORMAT 0
TERMINAL 00
PART
01
02
PORT
03
04
SIZE
52
52
F1 SAVE F2 PARTITION SIZES F10 ABORT
=====================================================================
APPENDIX D – DIRECT RUN PROGRAMS
183
Device 40 - is the device that contains the operating system to be defined. You may select a
floppy disk drive (30 or 31) to define the MSUTIL disk.
Program Name SYSINIT - is the program which initializes the system and should not be
changed except by a trained technician.
Partition Size 60 - The main partition is assigned by RSI to be 60K and if required, may be
increased. This only applies to partition one (1).
Priority 1 - During system initialization, all partitions are set to have equal priority. Each
partition has the same level of priority to access the system resources. When one of the invoicing
programs is executed, it will be elevated to a higher priority level. This will place them in front
of the normal programs for system resources.
Caps Lock Y - Sets the default caps lock position for the system keyboard.
Num Lock Y - Sets the default number lock position for the system keyboard.
Date Format 0 - 0 sets the system date format to mm/dd/yy. European format, dd/mm/yy, is set
by entering a 2.
Terminal 00 - Sets the terminal for the main partition to the system monitor and keyboard. This
should not be change unless instructed by an RSI technician.
Use the arrow up and down keys to position the cursor on the field to change. When all data are
correct, press F1 to save.
At any time, you may press the F10 key to abort Define, no data will be saved.
If you are defining the operating system on drive 40 and additional partitions have been assigned
during Define System Definition, you may change the size of these partitions by pressing F2.
PART
01
02
PORT
03
04
SIZE
52
52
The cursor will be positioned on the size of partition 01. Enter the new size between (48 and 72)
and press (ENTER). The cursor will move to the next partition. When complete, Press F2 again
to return to the system definition portion or press F1 to save.
When F1 is pressed to save the data, you will be prompted:
DO YOU WISH TO UPDATE THE DISK WITH THIS DATA (Y OR N)
At this prompt, only a Y or N will be accepted. If a (N) is entered, the changes will be discarded.
If a (Y) is entered, the changes will be written to the disk. In both cases, the definition data will
be cleared from the screen and the cursor moved to the device prompt. You may define the
operating system on another device or press F10 to end the program.
APPENDIX D – DIRECT RUN PROGRAMS
184
DELCUS
This program provides the facilities to delete all customers that do not have a current balance or
year-to-date purchased amount. You may select to delete customers by number with or without
purchase history.
Note: Make sure you have a current copy of CUSTOMER.MAS AND BFADET.DAT.
Typically this program is used to delete a customer record that has been damaged, i.e. a % before
their balance, etc. and you cannot correct the balance. Before deleting any customer, print both
pages of the customer record and detail Press (Print Screen) on the customer record. Use the
DELCUS utility. Re-enter the customer number, correct information balances. Reorganize
CUSTOMER.MAS AND BFADET.DAT.
The delete customers without sales only is a mass delete for customer files that have grown out
of date. After using selection 1, reorganize CUSTOMER.MAS and BFADET.DAT. At the enter
program name to run prompt, type DELCUS and Press (ENTER).
EDIT
Command Mode
In Command mode, the Function Keys on the IBM Keyboard perform the following commands.
F1 - Edit [Line Number]
(Escape 1)
Will go to Data mode and display the current page of data. After a Load command, the current
page will always be the first page.
If a valid line number is entered, that line will be the beginning line of the page displayed.
F2 - Load [Drive,]Filename
(Escape 2)
Will load the specified file into memory from the drive specified in Drive. If the drive address is
not entered, default drive 40 will be searched.
If a filename is not entered and a current filename is displayed, that file will be loaded.
F3 - Save [Drive,]Filename[/B]
(Escape 3)
Will save the data in memory into the specified filename. If a drive is entered into Drive, the file
will be saved on that drive.
If the drive address is not entered, default drive 40 will be used. When using drive 40, SAVE
will rename the existing file to have an extension of BACK.
If a filename is not entered and a current filename is displayed, that filename will be used.
F4 - Exit [Drive,]Filename[/B]
(Escape 4)
Same as SAVE. After SAVE has been completed, the Edit program will exit to compile.
APPENDIX D – DIRECT RUN PROGRAMS
185
F5 - Quit
(Escape 5)
The Edit program will exit to compile. No data will be saved.
F6 - Run [Drive,]Program Name
(Escape 6)
Runs program specified. No data is saved.
F7 - Find DFFF[DRRR]
(Escape 7)
D = Delimiter
The delimiter may be any character that is not used in the Find argument.
FFF = Find argument.
RRR = Replace argument.
Find always starts at the beginning of the file and searches for the Find argument.
--
The record which contains the Find argument will be displayed and the cursor will be on
the first character of the Find argument.
--
To find the next occurrence, press F2 to recalls the Find command.
If a Replace argument is specified, the Find argument will be replaced with the Replace
argument. The entire file will be searched and each occurrence of the Find argument will be
replaced.
F8 - Merge [Drive,]Filename
(Escape 8)
Merge requires a filename to be entered if a drive address is entered. The disk is searched,
otherwise the default drive will be used. Merge will merge an existing file into the data file in
memory. Position the cursor on the record where the merge file is to be loaded before issuing the
Merge command. If the filename is /M a Merge file from memory will be merged.
F9 - Define NNN
(Escape 9)
Changes the maximum number of records allowed in memory. The default is 800. When the
number of records is changed, the existing data file in memory will be erased.
F10 - Run [Drive,] Program Name
(Escape 10)
Runs program specified. No data is saved.
Shifted Function Keys
F3
CHAIN DISK
Chains to Disk Utility program. No data is saved.
APPENDIX D – DIRECT RUN PROGRAMS
F4
USER ID [XX]
Sets the User ID to the 2 character string.
F5
SMAIL MB,DATA
Send mail to another task. MB = mailbox number. Data is data to send.
F6
RMAIL MB
Receive mail from another task. MB is mailbox to read.
F9
KILL [Drive,]Filename
Deletes file.
186
Special Functions Keys
PgUp
Reset the block markers.
PgDn
Sets the last filename into common line.
DnArrow
Set the default extension for load and save.
UpArrow
Last command.
Data Mode Commands
F1 - Go to Command Mode
(Escape 1)
The Command screen will be displayed. The current cursor position will be saved as you may
return to Data mode at the same screen position.
F2 - Recall Find/Edit
(Escape 2)
This key has two functions. If you entered Data mode using the Edit function, you may recall the
Edit function to edit another line without returning to Command mode. Press F2 and enter the
line number to be edited and press (ENTER). The program will search from the beginning of the
data file for the line number entered. When located, that line will be the first line of the new
screen displayed. If the new line number is not found, the display screen will not change.
If you entered Data mode using the Find function, pressing F2 will recall the Find and search for
the next occurrence of the Find argument.
F3 - Delete Block
(Escape 3)
Will delete the data starting with the character where the Begin Block Mark is set to the character
where the End Block Mark is set. The block marks will be reset after the block has been deleted.
A block mark error will be displayed if:
a) No block marks have been set.
APPENDIX D – DIRECT RUN PROGRAMS
187
b) Only one block mark is set.
c) Beginning block mark is after the ending block mark.
When a block mark error is sensed, the beginning and ending block marks will be reset.
F4 - Insert Block
(Escape 4)
Will move the block previously marked into the record number of the current cursor position.
A block mark error will be displayed if:
a) No block marks have been set.
b) Only one block mark is set.
c) If the cursor is inside the area that is marked.
After the move, the block marks are not reset.
F5 - Delete Record
(Escape 5)
Will delete the record of the current cursor position.
F6 - Insert Record
(Escape 6)
Will clear the screen starting with the record of the current cursor position and position the cursor
at the beginning of the new record. Enter as many records as needed ending each record by
pressing (ENTER). After all records have been entered, press F6 again to end insert.
F7 - Down NNN Record
(Escape 7)
Will move the cursor down by the number of records entered in NNN. Press F7 and enter the
number of records you want to move down and press (ENTER). The program will count down
the number of records entered and display the data beginning with the new record.
F8 - Up NNN Records
(Escape 8)
Will move the cursor up the number of records entered in NNN. Press F8 and enter the number
of records you want to move up and press (ENTER). The program will count up the number of
records entered and display the data beginning with the new record.
F9 - Delete to Character
(Escape 9)
Will delete the data starting with the current cursor position to the first occurrence of the
character entered or to the end of the record if the character entered is not found. Press F9 and
then the character to delete to.
F0 - Search Record to Character
(Escape 0)
APPENDIX D – DIRECT RUN PROGRAMS
188
Will move the cursor to the first occurrence of the character entered after the current cursor or to
the end of the record if the character entered is not found. Press F0 and then the character to be
found.
Shifted Function Keys
F2 - Clear All
(Escape @)
Erases all data in memory and positions the cursor to home.
F3 - Clear Before
(Escape #)
Erases all data prior to the current cursor position.
F4 - Clear After
(Escape $)
Erases all data after the current cursor position.
F5 - Print Block
(Escape %)
Will print the data between the beginning and ending block marks.
F6 - Print
(Escape ^)
Prints the entire file.
F7 - Set Begin Block
(Escape &)
Sets the beginning block mark to the current cursor position. An << character will be displayed
at that cursor position until the screen is refreshed.
F8 - Set End Block
(Escape *)
Sets the end block mark to the current cursor position. An >> character will be displayed at that
cursor position until the screen is refreshed.
F9 - Reset Block Marks
(Escape ( )
Will reset the beginning and ending block mark pointers.
F0 - Save Block
(Escape ) )
Will save the data beginning with the record that contains the beginning block marker through
the record which contains the ending block marker.
Enter filename:
Enter the filename to save. If /M is specified, the block will be saved in memory until Edit is
exited.
APPENDIX D – DIRECT RUN PROGRAMS
189
Special Escape Functions
Esc - Refresh Screen
Will refresh the screen starting with the record display on the first line of the display.
Ins - Insert Character
Inserts data into an existing line. Position the cursor on the character to the right of the position
where the data is to be inserted. Press INS. The screen will be cleared from that position to the
end of the screen. Type the data to be added. When complete, press INS again.
To break an existing record into two records, place the cursor on the first character of the new
record. Press INS then ENTER.
Pg Dn - Page Down
(Escape D)
Displays the next page of data. The first line displayed will become the last line of the new page
displayed.
Pg Up - Page Up
(Escape U)
Displays the previous page of data. The first line displayed will become the last line of the new
page displayed.
End - End of Screen
(Escape E)
The first depression will position the cursor on the first character of the last line displayed. The
second depression will clear the screen and display the last record in the data file.
Home - Home
(Escape CTRL D)
The first depression will position the cursor on the first character of the first line displayed. The
second depression will clear the screen and display the first display page in the data file.
- Left Arrow
(Control H)
Moves the cursor to the left one character position. Left arrow only moves the cursor inside a
record.
- Down Arrow
(Control J)
Moves the cursor down one line. Down arrow only moves the cursor inside the displayed page.
If down arrow is pressed while in Insert Character on Insert Line mode, that mode will be exited.
- Up Arrow
(Control K)
Moves the cursor up one line. (Same as down arrow.)
APPENDIX D – DIRECT RUN PROGRAMS
190
- Right Arrow
(Control L)
Moves the cursor to the right one character position. When the end of a record is reached, right
arrow will not move the cursor.
| - Tab
(Control I)
Moves the cursor to the right eight (8) character positions.
|
- Backtab
(Control U)
Moves the cursor to the left eight (8) character positions.
DEL - Delete Character
(Control D)
Deletes the character of the current cursor position.
<__| - Carriage Return
(Control M)
If in an Insert Line mode, ENTER will end the record being entered and return the cursor to the
left and down one line starting a new record. If in Insert Character mode, the existing record will
be broken at the current cursor position and Insert Character mode will be exited.
Control B - Set Cursor to Start of Line
Sets the cursor to the first character of the record that contains the cursor.
- Rubout
Deletes the character to the left of the current cursor position.
Control E - Set Cursor to End of Line
Sets cursor one position past the last character of the line.
Control X - Display Position Bar
Displays position bar above the cursor line.
Control Y - Display Characters between Block Marks
Displays the number of characters between block marks when they are on the same line.
EXTRAN
This program will extract transactions from a transaction file backup and write them the same
filename with an extension of F01.
APPENDIX D – DIRECT RUN PROGRAMS
191
FIXVS
This program provides the facilities to correct the boot sector on a floppy diskette and also the
partition table and boot sector of a hard disk.
At the main menu press “F6”, then type in FIXVS. Select (2) to repair the hard disk, then (F10)
to end. Reboot the system and rerun the FIXVS program. Select (1) to repair all backup floppies
and program disks used on the system prior to repairing the boot sector on the hard disk. Press
(F10) to end.
IMPORT
This program extracts selected data from an imported ASCII file. The master file records will be
updated or added if not found. The maximum input record length is 255 bytes and must be
terminated with a CRLF (0D0A hex).
INVPURGE
This program provides the facilities to delete inventory items by range and selected activity
parameters. Items to be deleted will be marked in the Quantity Counted field. An audit trail will
be printed for all items deleted.
Note: Used correctly it is a quick and easy way to purge the inventory of unused item numbers,
particularly at end-of-season or end-of-year. Always have a backup of INVENTRY.MAS. A
delete single item feature is available using selection (5).
To delete items, select (1), Clear Quantity Counted Field and Press (F1). This puts a 0 in each
inventory record at the Quantity counted field and erases all previous marks. Select (2), Mark
Items for Deletion. This selection also allows for clearing previous marks, use (F2) the Press
(F1) to continue. Select the range parameters. Down arrow to select activity parameters, if
applicable. Use (F2) to toggle selected parameter. Press (F1) to Process. (Do not be alarmed at
the range of numbers in the Working On Field. They may be out of your selected range. It is the
program searching all item numbers for the 1 in Quantity Counted Field.
After marking a range of items, Selection (3) gives you the option of printing or displaying
marked items.
Selection (4) allows you to delete marked items. Press (F1) to Process. After deleting the items,
reorganize the IVENTRY.MAS and ARCHIVE.MAS files and rebuild cross-reference files 1
through 3. All terminals and registers should be at the main menu when reorganizing the
INVENTRY.MAS file.
Selection (5) performs like the DELINV utility, with one exception. If you make an error, you
can still go back to the inventory item record, call up the item and Press (F1) to restore it
provided you have not reorganized. Enter the item number to de deleted and Press (F1).
Reorganize and rebuild cross reference files as per selection (4).
We suggest that before exiting the INVPURGE utility, you rerun selection (1) and clear all
marks.
APPENDIX D – DIRECT RUN PROGRAMS
192
INVRENUM
This program provides the facilities to renumber inventory items or merge two inventory files.
The items from the merge file will be renumbered to the item range defined.
MERGE
This program is used to synchronize the item numbers in a remote store to the items in the main
store. If you have items in one store, the others use this program and procedure to correct them.
At the REMOTE store, format the number of diskettes required to backup the inventory master
file. Using the SYSTEM UTILITIES, change the backup drive to drive 30.
Step 1. Backup the remote store inventory master to a floppy disk. Note the backup name. E.g.
INVENTRY.BAK3.
Step 2. Take the backup to the main store
At the MAIN STORE:
Step 1. Insert disk 1 of the backup into drive 30.
Step 2. At the main menu Press F6 and type, MERGE and press enter.
Step 3. You will be prompted to enter the backup name. Type the backup name you recorded for
the backup in the remote store and press enter. The backup file on drive 30 will be merged into
the inventory master file.
Step 4. You will be prompted to load the next diskette or press F10 to end. If there is more than
1 backup diskette, enter each disk sequentially and press enter.
Step 5. Select Validate Store Master Files and process. When complete the inventory and stores
master files will be backed up.
During the merge process, the program generated a Inventory Update file for the items that sere
in the main store that did not exits in the remote store backup. This file needs to be transmitted
to all remote stores.
Step 1. Transmit the Inventory Update file from the main store to the remote store.
Step 2. Process the receive file at the remote store.
To complete the synchronization you must now transmit the balance on hand and average cost
from the remote store to the main store.
Step 1. Transmit the inventory master file from the remote store to the main store. Select only
Avg. Cost and BOH for transmission. Make sure you set the inventory item range to 9999999.
Step 2. Process the receive file at the host.
You have now synchronized the item numbers in two stores.
APPENDIX D – DIRECT RUN PROGRAMS
193
RECOVER
This program will attempt to recover a corrupted ISAM file.
To recover a corrupted file, go to Utilities and select (4), Disk Utilities. Press (ENTER). At the
directory prompt, Press (ENTER) to display all system files. Using the arrow key and/or (Page
Up) or (Page down), highlight the corrupted file name. Press ® to rename. At the prompt type in
the new file name with .SAVE as the extension, i.e. INVENTRY.SAVE and Press (ENTER). A
message will confirm your change.
Press (F10). At the Exit prompt, type RECOVER and Press (ENTER).
The recover program will prompt for the file name. Now type in the corrupted file name with the
extension .MAS, i.e. INVENTRY.MAS and Press (ENTER). Press (F1) to process. In almost
every case, the RECOVER program will rebuild your file successfully. If RECOVER stops
before returning you to the main menu, the problem is severe and could involve a damaged hard
drive. Please call RSI technical support team. (435) 755-8783.
After RECOVER successfully rebuilds the corrupted file, go to Utilities, selection (4), Disk
Utilities. Press (ENTER) at the directory prompt to display system files. Locate and highlight
the file with the .SAVE extension. Press (D) once and (D) again to delete the file. Press (F10)
and (ENTER) to exit.
SETBOH
Use the SETBOH utility to set the beginning balance field in each item from the current balance
on hand for The Retailer system only.
The only time you need to run this utitltiy is if you notice that immediately after end-of-day your
price look-up quantity at the registers is different that the balance-on-hand quantity in the item
inventory record.
Press (F6) and at the enter program name to run prompt, type SETBOH and Press (ENTER).
Press (F1) to process.
SETINV
Refer to Inventory Management.
VER
This program will compare program dates on a diskette to the target drive. This program is
useful for determining if the system programs and/or diskettes are at the same level. Differences
will be displayed and written to the VER.FIL for use with the disk program.
Press (F6). At the prompt, type (VER) and Press (ENTER). Load the diskettes in the floppy
drive and Press (ENTER). If, there is a difference between the program dates on the floppy and
hard drive, the selected programs and dates will be displayed. If the dates match, you will be
returned to the load the diskette to compare prompt.
APPENDIX D – DIRECT RUN PROGRAMS
194
ZEROINV
Use ZEROINV to reset the following fields to zero:
1. Minimum level
8. Quantity sold
2. Maximum level
9. Daily Sales Summary
3. Balance on hand and average cost
10. All Fields 1-9
4. Quantity on order
11. Unit cost
5. M-T-D sales
12. Price 1
6. Y-T-D sales
13. Price 2
7. Y-T-D sales
14. Price 3
Most often, ZEROINV is used to zero a Daily Sales Summary report that was not printed for an
extended period and now contains meaningless data. Rather than take the time to process, simply
zero the file and begin running the Daily Sales Summary at end-of-day or end of week.
Press (F6). At the prompt, type ZEROINV and Press (ENTER). Select (9) to zero Daily Sales
and press (F1) to process. All other selections will zero the selected field for all items in
inventory.
APPENDIX E – END OF MONTH PROCEDURES
195
INTRODUCTION:
Prior to zeroing the Month-to-Date sales information in the Inventory and Department files, all
End-of-Days should be processed and the following reports should be printed:
Adjustments Journal
Variance Report
Promotional Markdown
Cost of Sales
Month to Date Sales History
Sales Analysis (M-T-D)
Balance on Hand Analysis
Deposits Journal
Verify the data and make any necessary adjustments. Now, back up all data files as this reflects
the status prior to closing. Perform the following:
Zero Month to Date Sales
Purge Variance File
Purge Promo Markdown
Purge PO File
In order to close Accounts Receivable, print the following for your reference:
Print Aged Trial Balance
Print GL Posting Information
Make adjustments where necessary, post any service charges, back up the AR files, and print
statements. Now you can age accounts, drop detail and post to the GL.
Back up all files again. DO NOT overwrite the back up files you made earlier, these are your
only archival records for the month.
Details of the above procedures are provided on the following pages.
APPENDIX E – END OF MONTH PROCEDURES
196
*Print Adjustments Journal
*Print Sales Analysis
Inventory Management (1)
Print Adjustments Journal (5)
Adjustments Journal 1(1)
F3 to Print
F1 to Process
Run totals only if you prefer to!
Inventory Management (1)
Inventory Reports Menu (7)
Sales Analysis (2)
Change Totals Only to "Y"
F1 to Process
Store locations (#)
Print M-T-D Information
Print Y-T-D Information
*Print Variance Report
Point of Sale Invoicing (3)
Print Variance Report (6)
Print Department and Detailed Items (1)
Put in Last Day of Month!
*Print Promotional Markdown Data
Point of Sale Invoicing (3)
Print Promotional Markdown Report (7)
Print Department and Detailed Items (1)
Beginning Date of Last Month or
Start Date of Sale
*Print Cost of Sales Report
Inventory Management (1)
Custom Reports Generator (8)
Cost of Sales (5)
F3 to Print
Change Totals Only to "Y"
Put in First of Last Month Date
F1 to Process
*Print End Of Month Report
Point of Sale Invoicing (3)
Print Month End Report/Year (5)
*To Zero Sales Count
Inventory Management (1)
Month End / Maintenance Programs (10)
Zero Month / Year Sales History (8)
Change to Last Day of Month
F1 to Process
*Print 13-Month Sales History
Inventory Management (1)
Inventory Reports Menu (7)
Monthly Sales History (5)
SKU# 1-???
Departments 1-99
Change Totals Only to "Y"
*Print Sales Analysis Report
Inventory Management (1)
Inventory Reports Menu (7)
Sales Analysis (2)
Change Totals Only to "Y"
F1 to Process
Store location (#)
Print Y-T-D Information (2)
DO NOT Print M-T-D Information!
APPENDIX E – END OF MONTH PROCEDURES
197
*Balance on Hand
*Clear Files
Inventory Management (1)
Inventory Reports Menu (7)
Balance on Hand Analysis (3)
SKU# 1-???
Departments 1-99
Change Totals Only to "Y"
Store locations (#)
F1 to Process
Inventory Management (1)
Month End / Maintenance Program (10)
Clear Adjustments Journal (9)
F1 to Process
Purge Variance File (10)
Print (P)
Purge Promo Markdowns Data (11)
Put in Last Day of Month
Purchasing (2)
Purge PO File (8)
F1 to Process
*Print Deposits Journal
Point of Sale Invoicing (3)
Print Deposit & Sales Journal (8)
Print Both Deposit/Sales Journal (3)
Store Locations (#)
Put in First of Last Month and
Last of Last Months Date
*Reorganize Files
System Utilities (5)
Reorganize Master File (2)
F3 Mark All
F1 Reorganize
*Print Bal. of Accounts Rec.
*Back Up all Files
Accounts Receivable (8)
Print Aged Trial Balance (7)
Enter Mail Type( )
Put in Last Day of Last Month
*Post to General Ledger
Accounts Receivable (8)
Post to General Ledger (8)
Post to General Ledger (2)
Put in Last Day of Last Month
System Utilities (5)
Back up / Restore Data Files (1)
F3 Mark All
F1 Back UP
30/1=Floppy
40/1=Hard Drive
APPENDIX E – END OF MONTH PROCEDURES
THIS PAGE INTENTIONALLY LEFT BLANK FOR FUTURE USE.
198
INDEX
207
CUSTOMER PURCHASE PROFILE
INTRODUCTION
Customer Purchase Profile provides the historical perspective of what each customer has
purchased by SKU item by date. The stores owner can define specific items and customers to be
tracked by setting the Profile flags in the inventory and customer records. During End-of-Day
processing, the Customer's purchase history is updated and is available for reporting purposes.
INSTALLATION
To install the Customer Purchase Profile option, press F6, enter XMENU and press (ENTER).
At the Utilities Main menu, select 2. Install Program Diskettes and press (ENTER). Copy the
option diskette and at the prompt, enter the Authorization Code.
GETTING STARTED
The first step in using the Customer Purchase Profile option is to define the SKU items and
customers that are to be profiled. This is accomplished by using the Screen Maintenance
function in System Utilities. On the Inventory Entry screen, select the position on which you
wish the flag to display. Enter the coordinates, for example, 18A and press (ENTER). The
cursor will highlight the selected position. Enter 78 for Profile flag and press (ENTER). The
Profile flag description will display. On the Customer Entry screen, select an unused position
such as Column A, Row 17, and enter 29 (Profile Customer) and press (ENTER) to place it on
the screen.
Use the Change-by-Range feature in the Custom Report Generator to set the SKU "Profile Item"
flag and the "Profile Customer" flag to the ON or "Y" position. This process may also be accomplished by using the Inventory and Customer Entry screens to selectively turn on the appropriate
Profile flags.
DATA COLLECTION PROCESS
After running the End-of-Day Posting process, the Customer Profile record will be updated
listing the SKU number, description, quantity purchased, purchase price and date. This file is
available for review and editing under the Customer Management selection, Month End
Maintenance, and Customer Profile Maintenance.
Part of the End-of-Month processing should include running the Customer Profile End-of-Month
selection. This program will archive the customer profile record to the Profile Master file and
zero out the customer profile record for the next month's profile activity.
To manage the archive file size and content, you may select Purge Customer Profile Archive
Records. This program provides the facility to delete by date any records that are older than the
date entered for the Purge process.
INDEX
207
CUSTOM REPORT GENERATOR
To use the Custom Report Generator, select the Customer Management menu, then select
Customer Profile reports. You may use the standard reports that are included with the feature or
define a Profile report to fit your specific requirements. The Sort and Print Selection options
may be displayed or printed for reference.
Knowing your customer's purchase history provides you the vehicle for improving customer
service resulting in increased sales and customer satisfaction.
ACE COMMUNICATIONS INTERFACE
This document describes how to use the ACE Communications to send Purchase Orders to the
ACE Order Entry System.
There are two parts to setting up the ACE communications, first you must set up an ACE
Purchase Order Report then define the communications interface.
Select the Custom Report Generator on the Purchasing and Receiving Menu. Press F1 ADD
REPORT. The Sort Selections screen will display. The purchase order file is in order by
purchase order number and in this case does not need to be sorted. Press F1 SAVE to continue to
the Print Selections screen. You need three selections for the ACE purchase order, 1) Purchase
Number, 2) SKU number and 3) QTY Ordered Units. These must be entered in the following
order:
1 PURCHASE ORDER NO.
6 SKU
15 QTY ORDERED
If you are using the MFG. Part Number for the ACE part number, select 7 instead of 6 for the
SKU NUMBER.
Press F1 SAVE to save the print selections.
You will now be prompted for the report name. This name will appear on the selections menu.
Enter ACE PURCHASE ORDER REPORT and press (ENTER). The next prompt will ask for
the spool name, enter ACEPO and press (ENTER).
The Custom Report Generator screen will be displayed with the new ACE PURCHASE ORDER
REPORT selection.
Select ACE COMMUNICATIONS from the Purchasing and Receiving menu. The
Communications Interface screen will display. Press F4 COMM PORT to select the port that
you have a modem attached. Note: If you are a Main or Remote store of a multi-store system,
you can choose the modem that is used by Multi-store Communications otherwise the modem
must be attached to an undefined port.
INDEX
The Request Type will display “Order”
207
Press F5 SETUP to enter the ACE information.
DISTRIBUTER: ACE ORDER
EXPORT FILE: ACEPO.XOO – this is the spool file name you entered plus the extension “X”
for export and the terminal number of the system monitor.
PHONE NUMBER: 1-800-899-4028
CUSTOEMR I.D. : your Ace customer ID.
Press F2 BAUD RATE to select the speed you modem will communicate. If your modem will
support speeds of 14,400 or faster, Press F2 until 38,400 is displayed. If you have an older
modem, select the speed that your modem will support.
Press F1 SAVE to save the configuration information.
The setup is complete.
To use the ACE interface, you must create a purchase order, build an EXPORT file and transmit
it to the ACE Order Entry System using the Ace communications selection.
After you have created a purchase order, select the Custom Report Generator from the Purchase
and Receiving Menu. You must use the system monitor for this as we entered “ACEPO.XOO”
for the export filename. Enter the selection number for the ACE PURCHASE ORDER REPORT
and press (Enter). The Range Selections will display, enter the purchase order number you
created in the starting and ending P.O. NUMBER. Press F3 to highlight PRINT the Press F2 to
highlight EXPORT FILE. If you are prompted for a store number enter (0) and press (Enter).
You will be asked if you want to include items with zero on order. The default answer to this
prompt is “N” so just press (Enter). The program will build the export file (ACEPO.XOO).
To transmit ACEPO.XOO to the Ace Order Entry System, select the ACE Communications
Interface from the Purchasing and Receiving Menu. Press F1 Process to send the order. The
program will dial the number you entered during setup and transmit the purchase order to the
ACE Order Entry System. When complete the status will be displayed. At the prompt “ENTER
(Y) IF PO WAS ACCEPTED, (N) IF NOT?”, enter (Y) if ACE accepted the order and the
ACEPO.XOO will be deleted from the system. The file will not be deleted if a (N) is entered.
INDEX
207
CUSTOMER ARCHIVE
Customer Archive is approved to operate with The Retailer Version 7.3.2 or later. The product
will archive all accounts receivable detail to the customer archive master file and may be
displayed or printed using Customer Archive Inquiry.
This option adds two new selections to the Accounts Receivable menu.
1. Customer Archive Inquiry
2. Purge Customer Archive
Customer Archive Master file is added to Data File Allocation, Bakcup, Restore, and Reorganize.
When Age Accounts and Drop Detail is executed, the accounts receivable records are written to
the customer archive before being purged from the A/R detail file.
Customer Archive Inquiry will display or print the detail of a selected customer starting with
oldest detail first. The first record is the starting balance. When all the records in the archive file
have been displayed the program will display the records from the current A/R Detail file
(BFADET.DAT).
Purge Customer Archive will purge all detail records from the archive file that have a posting
date prior to the date entered.
CUSTOMER REGISTRY
INTRODUCTION
A Customer Registry is undoubtedly most popular with the bride-to-be. However, it certainly
can be used as any type of gift registry; such as new home, anniversaries, etc. This option allows
store personnel to record the original "Wish List" of the registrant, as well as subsequent
purchases against the list.
As most registrants have many decisions to make (and are known to change their minds fairly
frequently), manual entries after-the-fact are allowed. Further, the "registration appointment" is
typically conducted as a personal interview; and this feature gives store personnel the ability to
freely "guide" the customer to places they want them to go.
GETTING STARTED
You will find your Customer Registry Entry screen under Customer Management, Month End
and Maintenance programs, Customer Registry. The Customer Registry Entry screen will appear
as follows:
INDEX
207
=====================================================================
CUSTOMER REGISTRY
CUSTOMER NUMBER
SCAN NUMBER
COMPANY
SKU #
MFG.
100 LEN
101
700010101239
7/7/94
NAME
ADDRESS
CITY
MARY SMITH/JOHN DOE
123 EASY STREET
ANY TOWN, USA
PART NUMBER
DESCRIPTION
RETAIL QTY
12345
5 PC PL SETTING
129.99
REC
12
PR
1
ENTER SKU # TO REGISTER, USE ARROWS, PgUp, PgDn TO POSITION LINE
TAB SIDE F1 SAVE F2 NEXT F3 PRINT F5 DELETE F10 ABORT
=====================================================================
NEW REGISTRANT
All data is entered from the Customer Registry Entry screen. First, you assign a new customer
number to the individual; then, enter the name, address, etc.
Note: You can enter two names into one customer number for cross referencing; i.e., a bride and
groom's names, up to a maximum of 24 characters. If you are abbreviating the names, it is a good
idea to also set up the cross-reference file. Go to Customer Management, Month End and
Maintenance programs, Cross Reference Maintenance. Enter the customer number. You can
enter up to 14 variations of the original customer name.
To record the actual list, enter all SKU's in any order, including quantity desired and priority (199, 1 being the highest). On original entries, all QTY (quantity desired) and REC (number
purchased to date) fields will be blank (none).
REGISTRY PURCHASES
When ringing a sale for a registry item, the purchaser will give you the registrant's name. This
can be entered at the point of sale (this should be the first entry made on your POS screen), or
afterward in the Customer Registry screen. Items purchased for a registrant are posted during
End-of-Day processing to the Customer Registry file as being received. You can also enter
SKU's not on the original list for total record-keeping purposes (enter QTY as 0; REC as 1).
The registry may remain "open" indefinitely. To purge items in the file, enter the registrant's
customer number and press (ENTER). Use the Arrow keys to select the items to be deleted;
press F5 to Delete.
INDEX
207
THIS PAGE INTENTIONALLY LEFT BLANK FOR FUTURE USE.
INDEX
207
INDEX
207
A
Accounts Payable/General Ledger. See separate manual
Accounts Receivable. See Balance Forward
Add
Customer, 93
Inventory, 1,
Password, 163
Vendor, 59
Adjust
Account Totals, 34
Monthly/Yearly Totals, 35
Adjustments
Inventory, 16
Journal, 17
AIS (Automatic Inquiry System), 121
Allocate
Files, 111, 163
Append Keys, 67, 76
Archive File
Maintenance, 34
Authorization Code, xi
Auto Deposit, 6
Automatic Execution Times, 159
Average Cost, 5
B
Back Up
Drive (change), 127
Files, 108, 160
Balance Forward Accounts Receivable, 133–43
Bank Card
Titles, 73
Baud Rate, 122–25, 149
Blazer Printer, 148, 171, 179
Bulletin Board, 121
C
Cable Configurations, 168
Cancel
Purchase Order, 46
Case Cost, 5
Case Quantity, 4
Cash Key, 70
Chained
Data Files, 109–10
Change
Customer, 93
Drive, Backup, 127
Inventory by Range, 21
Inventory Item, 1
Password, 163
Vendor, 57
Change by Range, 21
Change By Range, 55-6, 103
Code Field (Inventory), 4
Comm Port
Define, 149
Commission, 9
Communication Update, 159
Communications. See Separate Manual
Copy
Programs, 147
Cost of Sales Report, 197
Coupon, 34,64, 67, 70,76
Create a Partition, 147
Cross Reference, 30
Currency Exchange, 80,148,157
Custom Report Generator
Customer Management, 101-103
Inventory, 19–24
Customer
Cross Reference, 75
Entry, 93–95
Inquiry, 100
Verify, 66
Customer Management, 93–106
Customer Purchase Profile, 199
D
Data Files, 108–12,128
Date and Time, vi
Define
Keyboard, 63
Main Partition, 183
Delete
Customer, 184,93
Files, 113
Inventory Item, 1
Partition, 147
Password, 162
Vendor, 59
Department
Groupings, 3
Number, 4
Deposit, Automatic, 63, 74
Description, 3
Digi Board, 174–75
Direct Run Programs
BFAFIX, 182
DELCUS, 184
EDIT, 184
EXTRAN, 190
FIXVS, 191
IMPORT, 191
INVPURGE, 192
INVRENUM, 192
RECOVER, 193
SETINV, 35
VER, 193
Discount Matrix, 191
Disk Utilities, 108,112-114
Copy, 113
Create, 114
Default Drive, 114
Delete, 113
Directory, 112
Disk Status, 114
Format, 113
Help, 114
Verify, 113
Drive Designations, 145
INDEX
207
E
Edit
Keyboard Layout, 63
Education Code, 99
Electronic Data Transfer, 120
E-mail, viii
End-of-Day, 80, 160
End-of-Month/Year. See Individual Chapters
Error Messages/Codes, 180
Export, 120
Express Invoicing, 62-63
F
FDISK, 147
Fields
to Transmit, Customer. See Communications Manual
to Transmit, Inventory. See Communications Manual
to Transmit, Vendor. See Communications Manual
Files
Data, Chained, 108–9
Flag Fields, 7–12
FOB Cost, 4
Food Stamps, 9,72,153,157
Function Keys (Special Codes), vi
G
General Inventory Report, 19
Gift Certificates, 71, 78
Gross Income, 98
Gross Margin 1,2,3, 6
H
Heading
Sales Receipt, Define, 158
History (Inventory), 7, 35, 82
Host Store, 38
I
Import, 120
Installation Procedure, 146
Inventory
Add, 1
Change, 1
Delete, 1
File Maintenance, 1
Multi-store Control, 27
Purge, 11, 35
Set Beginning Balances, 35
Set Department Totals, 36
Set Replacement Cost, 36
Inventory Adjustment, 15
Inventory Management, 1–36
Inventory Price Maintenance, 26
Inventory Reports Menu, 18
Custom Reports Generator, 19
Invoice (Generate)
80-column, 73
K
Key Definitions, 64–72
Kit Sales, 28
L
Labels
Customer, 100–104
Inventory, 25-32
Mailing, Print, 104
Maintenance, 30, 32, 104
Types, 4
Layaway, 71,79
Location
Inventory Item, 4
Store, 150
Logon I.D.s, 155
M
Mail Type, 96
Maintenance
Archive File, 34
Sales History File, 35
Manufacturer's Part Number, 4
MARITAL STATUS, 92
Minimum/Maximum Stocking Levels, 5, 48
Mix/Match, 86–90
Modem
Define, 149–51
Monitor Color, 147
Month-/Year-to-Date Sales History Report, 80
Multi-Store. See Communications Manual
Pricing, 26
N
New System, 144–64
NEWSIZE, 110, 111, 161
Next Available
Customer, 93
SKU, 3
No Sale, 67, 74
Notes, 1
Notes Fld - 68 (A), 7
NRALL, 110, 161
NRWRI, 110, 161
O
Open Item Accounts Receivable. See Separate Manual
Open Order Report, 53
Overstock/Understock Report, 5, 18
P
Package Maintenance, 28–30
Package Sale, 11,66,76
Paid Out Key, 69
Partition, 146
Passwords, 161, 164
Peripheral Settings, 172
Physical Inventory
INDEX
207
(Also see separate manual), 19
Point of Sale (menu screen), 62-90
Point of Sale Invoicing, 62-90
Port, Communications, 121, 148
POS Cash Declaration Z-out, 62, 82–83
Preset Keys, 86,72
Price 1,2,3, 6
Price Look Up (PLU), 64
Print
Customer List, 100
Inventory Adjustments Journal, 17
Inventory Labels, 25
Labels, Mailing, 103
Purchase Order, 43
Receipt, 68
Sales Summary, 81
Vendor List, 59
Printer Characteristics, 147
Printer Setup
RX Register, 174
Various Others. See Appendix D
Promo Start/Stop Date, 6
Purchase Credit Program. See Separate Manual
Purchase Order
Build, 38
Cancel, 46
Edit, 47
Multi-Store, 47
Print, 52
Receive, 45
Temporary, 38
Purchasing and Receiving, 38–61
Custom Report Generator, 53
Purge
Inventory, 11, 35
P.O., 56
Promotional Markdown File, 35, 82
Variance File, 35, 82
Q
Quantity, 64
R
Range
Change By, 21, 55, 102
Receipt
Sales Heading, 157
Register Control, 86
Remote Modem, 123
Remote Store, 36, 159
Remote System - connecting, 123
Reorder Point - minimum level, 5
Reorganize Files, 107, 158
Report Control, 114–16
Restore Data Files, 107
Rx Prescription Number, 9,67
S
Sales Account Totals
Adjust, 33
Sales Analysis Report, 18
Sales by Logon ID Report, 80
Sales History File Maintenance, 34
Sales Summary Report, 81
Sales Tax, 155
Sales Totals, 82
Monthly/Yearly, Adjust, 82
Scale, 8, 61, 74
Screen Maintenance
Customer, 130
Inventory, 129
Vendor, 130
Serial Comm Devices (definition), 148
Serial Number Control. See Separate Manual
Set Beginning Balances, 35
Set Department Totals, 36
Set Replacement Cost, 36
Single SKU Inquiry (A & B), 17
SKU, 3, 11, 16
Sort
Customer, 100
Inventory Adjustment Journal, 18
Labels, 25
Parameters, Inventory Reports, 18
Purchase Order, 52
Split Package, 12
Status
Vendor, 59
Store Kit, 29
Store Locations, 107–9, 150
Stores.Dat File, 107
Substitution List, 30
System Maintenance, 144–64
System Utility, 107–31
T
Tax Shift, 67,149
Tender, 78–79
Terminal Characteristics, 148
Terms, 56, 95
Text.Dat, vii
Trade & Save, 86-90
Training Mode, 68
Transactions
Open, 70, 75, 77
Recall, 70, 75, 77
Suspend, 70, 75, 77
Void, 78
U
Unit of Sale, 4
UPC Number, 3
Utilities, 105
V
Validate Sale, 67
Validation Heading, 157
Vendor
Maintenance, 59
Number, 4
Profit Analysis Report, 17
Void, 65
INDEX
207
W
Wild Card, 70
X
XMENU, vi
X-Out, 62, 82
Z
Zero
YTD Customer, 105
YTD Sales, 35
YTD Vendor File, 59
Zero Monthly/Yearly Sales, 35
Zero Sales Report, 20
Z-Out, 62, 82
INDEX
210