1
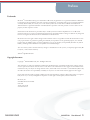
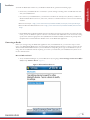
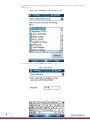
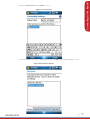
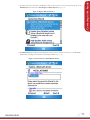
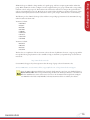
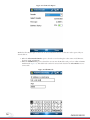
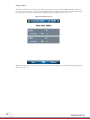
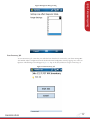
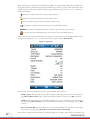
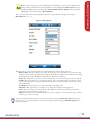
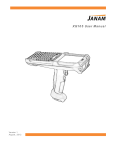
MobileTrak
for Windows Mobile
discover. track. monitor.
User Manual
Contents
Preface
3
3
3
MobileTrak
4
4
4
4
5
5
5
8
12
15
15
15
15
16
17
18
19
19
22
23
Warranty & Service
24
24
24
24
24
Trademarks
Copyright Statement
Introduction Requirements
Features
Installation
Connecting to Reader
Microsoft Bluetooth Stack Broadcom’s Widcomm Bluetooth Stack
Configuration Setup
Launching Application
Configuration Screen Options Select Reader
About MobileTrak
Diagnostic Mode
Start Inventory Job Inventory Job Screen
Tag Search
Select Asset Category
Select Zone Category
Stop and Complete Jobs Limited Standard Warranty Terms
Standard Warranty Limitations Obtaining Service & Support
RF Code Customer Support
PN00555 REV02
MobileTrak User Manual 2
Preface
Trademarks
RF CodeTM and the RF Code logo are trademarks of RF Code, Inc. Windows is a registered trademark of Microsoft
Corporation in the United States and other countries. The Bluetooth® word mark and logos are registered trademarks
owned by Bluetooth SIG, Inc. and any use of such marks by RF Code is under license. Broadcom’s Widcomm®
Bluetooth Stack is a registered trademark of the Broadcom Corporation. All other product or service names are the
property of their respective owners.
Information in this document is provided solely to enable system and software implementors to use RF Code
products. There are no express or implied copyright licenses granted hereunder to design or fabricate any integrated
circuits or integrated circuits based on the information in this document.
RF Code reserves the right to make changes without further notice to any products herein. RF Code makes no warranty, representation or guarantee regarding the suitability of its products for any particular purpose, nor does RF
Code assume any liability arising out of the application or use of any product, and specifically disclaims any and all
liability, including without limitation consequential or incidental damages.
The user of this system is cautioned that any changes or modifications to this system, not expressly approved by RF
Code, Inc., could void the warranty.
Bluetooth® QD ID: B012541
Copyright Statement
Copyright © 2008-2009 RF Code, Inc. All Rights Reserved.
This document, as well as the hardware and firmware described therein, is furnished under license and may only be
used or copied in accordance with the terms of such license. The information in these pages are furnished for informational use only, are subject to change without notice, and should not be construed as a commitment by RF Code,
Inc. RF Code assumes no responsibility or liability for any errors or inaccuracies that may appear in these pages.
Every effort has been made to supply complete and accurate information. However, RF Code assumes no responsibility for its use, or for any infringements of patents or other rights of third parties, which would result.
RF Code, Inc.
9229 Waterford Centre Blvd.
Suite 500
Austin, TX 78758
www.rfcode.com
PN00555 REV02
MobileTrak User Manual 3
MobileTrak
Introduction
MobileTrak is designed for use with the M210 and M220 Mobile Readers, and enables mobile inventory collection
of very large numbers of RF Code tags and tagged assets. MobileTrak is designed to work as a standalone inventory tracking/inventory collection application that does not require a specific back-end server to manage asset data.
Instead, MobileTrak exports data in common formats for use with a broad variety of applications.
MobileTrak enables users to inventory and search thousands of tagged assets using a simple to use and understand
graphical interface. MobileTrak makes inventorying large numbers of assets quick and painless. Using customizable
job inventory definitions, MobileTrak gathers data about all RF Code tags the reader encounters. Users can browse
the collected tag data, ”drilling-down” into the data gathered from each tagged asset to examine details or to add
information about the location and status of the asset. Stored tag inventory data can be saved, exported, or e-mailed
for later use.
MobileTrak also enables users to set the antenna range setting to one of the 8 preset modes. And when searching for
a specific tagged asset MobileTrak reports signal strength indication (SSI) values to provide visual and audible alerts
to indicate proximity.
Requirements
MobileTrak prerequisites:
• Touch screen capability (the device has a stylus)
• One of the following:
◊ Bluetooth Wireless support (for connectivity to the M220 Mobile Reader)
◊ PC Card slot (for the M210 PC Card Reader)
• Required Operating System:
◊ CE.NET 4.2+
◊ Windows Mobile Pocket PC version 5 (Premium Edition, Professional Edition, Phone Edition)
◊ Windows Mobile version 6 (Professional Edition, Classic Edition)
• .NET Compact Framework version 2.0 SP2 (or higher)
Compatibility issues:
• MobileTrak will NOT work with Windows Mobile 5 for Smartphones
• MobileTrak will NOT work with Windows Mobile 6 Standard
• All Windows Mobile 6 Professional and Classic devices come with the .NET Framework 2.0 or later.
• Many Windows Mobile 5 devices come with an older (unsupported) version of .NET Compact Framework
and may need to be upgraded. See the following Microsoft Web page about upgrading the .NET Compact
Framework:
ttp://www.microsoft.com/downloads/details.aspx?familyid=AEA55F2F-07B5-4A8C-8A44h
B4E1B196D5C0&displaylang=
Features
Some of the features included with the MobileTrak are:
• Inventory and manage thousands of tagged assets without requiring a dedicated back-end server
• Runs on mobile devices running the Windows Mobile operating system
• Use Bluetooth or USB connectivity
• Easily locate and inventory assets
• Capable of searching up to 500 tags/MB of free RAM available
PN00555 REV02
MobileTrak User Manual 4
To install the MobileTrak software on your Windows Mobile device, perform the following steps:
Installation
Installation
1. Ensure that you handheld device is connected to your PC through a docking station or USB cable that came
with your handheld device.
2. To connect to your handheld device you will need to use Microsoft ActiveSync 4.5 (XP users) or Microsoft
Windows Mobile Device Center 6.1 (Vista users) software. To download the latest versions use the following
websites:
• Microsoft ActiveSync - http://www.microsoft.com/windowsmobile/activesync/activesync45.mspx
• Microsoft Windows Mobile Device Center - http://www.microsoft.com/windowsmobile/devicecenter.
mspx
3. Install MobileTrak for Windows Mobile from the CD. If the CD autorun program does not launch the main
menu, you can use Windows explorer to browse to the CD drive and double-click on the autorun file to bring
up the menu. Select the appropriate menu (MobileTrak for Windows Mobile) and follow the prompts in the
Setup Wizard to install the Windows Mobile version of the MobileTrak application.
Connecting to Reader
Before you can begin using the MobileTrak application with your handheld device, you must first setup a connection to your M220 Mobile Reader that is part of the RF Code mobile tracking solution. To do this you must pair the
Bluetooth enabled M220 Mobile Reader to your handheld device. Depending on the type of handheld device you are
using, there are two different methods of pairing. To connect your reader with your handheld device, follow one of
the two methods below:
Microsoft Bluetooth Stack
1. Access the Bluetooth Manager on your handheld device by navigating to Start>Settings>Connections>Bluet
ooth, and tap Add New Device. (Figure 1).
Figure 1 Add New Bluetooth Device
PN00555 REV02
5
2. The Bluetooth Manager will automatically generate a list of Bluetooth enabled devices. Select your Reader and tap
Next. (Figure 2).
Figure 2 Select M220 Reader in Bluetooth Device List
3. Enter the passkey (the default is 0000) and tap Next as seen in (Figure 3).
Figure 3 Enter Passkey
6
PN00555 REV02
Connecting
to the Reader
Introduction
4. Check the Serial Port box and tap Finish. (Figure 4).
Figure 4 Select Serial Port
5. Your reader will now show up as a Bluetooth paired device. Tap OK to exit the Bluetooth Manager. (Figure 5).
Figure 5 Bluetooth Paired Reader
PN00555 REV02
7
Broadcom’s Widcomm® Bluetooth Stack
1. Access the Bluetooth Manager on your handheld device by navigating to Start>Settings>Connections>Blueto
oth>Bluetooth Manager, and tap on the Active Connections tab. (Figure 6).
Figure 6 Bluetooth Manager Active Connections Screen
2. Create a New connection by taping on Menu>Paired Devices. (Figure 7).
Figure 7 Add Bluetooth Paired Device
8
PN00555 REV02
Connecting
to the Reader
Introduction
3. Tap the Add button and the following screen will display (Figure 8)
Figure 8 Add New Bluetooth Device
4. Tap the Search icon to the right of the Device box, and a list of Bluetooth enabled devices will automatically
be found by your handheld device (Figure 9).
Figure 9 Add New Bluetooth Device
PN00555 REV02
9
5. Select your reader from the list, set the passkey (the default is 0000) and tap OK as seen in (Figure 10).
Figure 10 Enter Passkey
6. Your reader will now appear in the in the list of paired devices (Figure 11). Tap OK to continue.
Figure 6 Paired Bluetooth Devices List
10
PN00555 REV02
Connecting
to the Reader
Introduction
7. You must now create a shortcut to the Reader so that you can connect to it. To create a Shortcut, tap on the
My Shortcuts tab and browse to New>Explore a Bluetooth Device (Figure12).
Figure 12 Explore Bluetooth Devices
8. The Bluetooth Manager will automatically find the reader. Create a shortcut connection to your M220 Mobile Reader by selecting it from the list and selecting Serial Port (Figure 13).
Figure 13 Create shortcut to M220 Mobile Reader
PN00555 REV02
11
9. Your M220 Mobile Reader will now appear in the My Shortcuts tab. Highlight the reader and access the
dropdown menu and select Connect to connect to your reader (Figure 14).
Figure 14 Add New Bluetooth Device
Your handheld device is now paired with your M220 Mobile Reader. You can now begin using the MobileTrak
software to track and inventory your tagged assets.
Configuration Setup
Prior to launching the MobileTrak application, an XML configuration file must be generated for the tagged assets
you intend to inventory and track. For assistance in the creation of a configuration XML file, please refer to the MobileTrakXMLSpecification.pdf document that is available on the CD provided with your software.
It is very important to insert the correct Tag Group IDs and Treatment Codes in this configuration file. The
group ID is printed on the label of a tag (Figure 15). A support page is available to help you determine you
specific Group Code and Treatment Code at:
http://www.rfcode.com/codes
Figure 15 Group ID, Tag ID, and Treatment Code Location
M100-M000-04A
Group Code Tag ID Treatment Code
12
PN00555 REV02
Configuration Setup
All RF Code tags are defined as being members of a specific group, and have a unique tag ID number within that
group. When an RF Code reader is configured, it can be supplied with up to 8 group code IDs and a corresponding
treatment code for each group code. The treatment code instructs the reader how to interpret the payload data for
each tag event within that group code. RF Code tags are smart and have the ability to transmit various types of data
within its radio frequency beacon such as indicators for motion, panic, tamper, infrared location, and low battery.
The following is a list of RF Code Group Codes and their corresponding tag Treatment Codes. Most RF Code tags
utilize Treatment Code 02 or 04.
Treatment Code 02:
• TRTTWO
• INTJDS
• RFCMII
• EDSAMS
• CUBIXX
• SMYLCM
• GDASST
• GDLOCK
• GDTAPR
Treatment Code 04:
• RFCLOC
• AHSAAA
• RFCSEC
• LOCATE
The list above is a compilation of the most current codes at the time of publication, however, a support page with the
most updated list of group/treatment codes is available to help you determine your specific Group Code and Treatment Code:
http://www.rfcode.com/codes
Contact RF Code support if you have questions about the usage of group codes and treatment codes.
512.439.2200 (main), 877.969.2828 (toll-free), [email protected], or http://www.rfcode.com/support
Once the XML configuration file has been generated, the file must be copied onto your handheld devices’s
My Documents folder. This can be performed using the Microsoft ActiveSync (XP users) or the Microsoft
Windows Mobile Device Center (Vista users) to browse to the documents folder and place the configuration XML file in this folder. Only XML files in the My Documents folder are visible by the software.
PN00555 REV02
13
Figure 17 Select Reader Option
Within the Select Reader Option a menu can be accessed that allows the user to select two reader options. They are
described below:
1. When the About Attached Reader option is selected a screen describing the readers name, model, firmware,
frequency, DSP, and MAC ID.
2. When the Add IP Reader option is selected the user can enter the IP address and port for an additional M220
Mobile Reader (Figure 18). The added reader can then be accessed and selected in the Select Reader screen to
connect with.
Figure 18 Add IP Reader
14
PN00555 REV02
Launching Application
Launching Application
After installing MobileTrak and pairing the M220 Mobile Reader to your handheld device, select and open the MobileTrak application by going to Start>Programs> MobileTrak . The initial screen is shown in Figure 16.
Figure 16 MobileTrak Initial Screen
The initial screen will show a list of configuration files that have been copied to your device.
Configuration Screen Options
In this configuration screen there are two menu options. They are describe in detail below:
Select Reader
This option allows the user to select an M220 Mobile Reader that they have paired with the device in the steps mentioned above. This feature can be accessed by taping on Menu>Select Reader (Figure 17) and selecting the reader
from the drop down list. You have successfully selected the reader when the message “connected” appears next to the
Select Reader field and you may close out of the Select Reader option.
About MobileTrak
Select this option if you would like to see information regarding the version of MobileTrak that you are running on
your device.
PN00555 REV02
15
Diagnostic Mode
This feature indicates the noise level present within the immediate vicinity of the M220 Mobile Reader that the user
has connected to. This feature can be accessed by highlighting the Configuration file and pressing which will bring up
the Diagnostic Mode option. Select Diagnostic Mode to bring up the diagnostic screen (Figure 19).
Figure 19 Diagnostic Screen
Within the Diagnostic Screen, the Option menu can be selected to change the range settings affecting the Diagnostic
Mode read (Figure 20).
16
PN00555 REV02
Start Inventory Job
Figure 20 Diagnostic Range Setting
Start Inventory Job
To start an inventory job, ensure that your reader has been selected and is connected to your device running Windows Mobile. Select a configuration from the list from the initial configuration screen by tapping once on the configuration. The following screen will appear (Figure 21). Tap on the Start Job button to begin an inventory job.
Figure 21 Start Inventory Job
PN00555 REV02
17
Once you have started the job, you may be prompted by the Zone Selection Screen if you have if defined this in
your XML configuration (See MobileTrakXMLSpecification.pdf included on the MobileTrak CD). The following
screen will appear (Figure 22). Select a preset zone from the drop down menu that has been previously specified by
the XML configuration as your Default Zone. Alternatively, if you do not see your desired Default Zone in the drop
down menu, select New Zone and type in your desired zone name. Tap OK to continue.
Figure 22 Default Zone Selection
Inventory Job Screen
The Inventory Job Screen will appear (Figure 23).
Figure 23 Inventory Job Screen
18
There are several options available to the user in the Inventory Job Screen. These options are described in detail
below:
PN00555 REV02
Inventory Job Screen
Tag Search
Users can search for a specific tag a groups of tags if the tag ID or group code is known. Select Menu > Search and
the following screen will display (Figure 24). Input the tag ID or group code and tap Search. The tag or tag group
information will display.
Figure 24 Tag Search Option
Select Asset Category
Users can select any of the asset categories that were defined by the configuration. A screen similar to the following
(Figure 25) will appear when an asset category is selected.
Figure 25 Asset Category Screen
72F
PN00555 REV02
19
When viewing assets, each found tag is identified by its TagID and a signal strength indicator that visually denotes
the proximity of the tag. Generally, stronger signals indicate the tag is closer to you and a weak signal means the tag
is farther away. Also, various state indicator icons may appear with an asset tag as shown in Figure 23. These icons
indicate the following:
Motion icon indicates that asset is moving or being relocated.
Tamper icon indicates that tag has been removed from asset.
Panic icon indicates that panic button has been activated on tag.
Low battery icon indicates that the tag’s battery is low and should be replaced.
Dry contact icons indicate the current dry contact tag sensor is either open or closed.
Sensor low battery icon indicates that tag’s sensor battery is low and should be replaced.
The user can select an asset from the list in the asset category and a screen that provides detailed information about
the tagged asset will appear (Figure 26). This can also be accessed by browsing to Menu>Details.
Figure 26 Tag Details
From this view of the Asset Details there are three options available. These options are:
• Add
Description: This option allows you to add a description of the tagged asset and can be accessed by tapping Menu>Add Description. Once you have typed in the description for the asset, tap OK to continue.
• Add
Note: This option allows you to add detailed information or a note to the particular asset. This can be accessed by tapping Menu>Add Note. Once you have finished entering the note for the tagged asset, tap OK to
continue.
• Beacon
Sound On/Off: This option allows you to turn on/off an audible alert for each beacon of the tagged
asset. This is accessed by tapping Menu>Beacons Sound On (or Beacon Sound Off).
20
Once you have completed the desired tasks for a particular tagged asset, tap OK to return to the Asset Category view.
PN00555 REV02
Inventory Job Screen
Within the Asset Category Screen the Add Description and Add Note options are also available without
having to click on the Details view of the particular asset that is highlighted. Add Description can be accessed by highlighting the asset and browsing to Menu>Add Description. Add Note can be accessed by
highlighting an asset and browsing to Menu>Add Note.
Also a user can modify certain options globally for all assets in a particular Asset Category by browsing to
Menu>Options (Figure 27).
Figure 27 Global Options
This feature allows you to customize global aspects of the MobileTrak software. These aspects are:
• Range Settings: This option allows you to change the read range of the reader that you are connected to. The
range has various settings, 1 through 8 with 1 being the minimum read range (less than 10 meters) and 8 being
the maximum read range (70-100 meters, depending on deployment conditions).
• Sound: The sound can be set to emit on a beacon from the tag, on an alert from the tag, or can be turned off.
• Sort By: This option allows you to sort the tagged assets by zone, time, signal strength, or by motion, tamper,
panic or low battery alerts. You can also utilize the drop down list on the main screen of the software to access
the Sort By feature.
• Sort Order: This option allows you to sort by ascending or descending order.
• Show Zone: This option allows you to display or not display the assigned zone for tagged assets.
• Color: This option allows you to change the color that displays the signal strength of the beacon from the
tagged asset to either a red, blue, or green color.
• Vibrate: The vibrate feature of the handheld device can be set to happen on a beacon from the tag, on an alert
from the tag, or can be turned off.
TIP
At any point during an Inventory Job, a user can pause the job by browsing to Menu>Pause Job in the Inventory
Job Screen (Figure 23). Alternatively, the user can then resume the job by browsing to Menu>Resume Job in the
Inventory Job Screen.
PN00555 REV02
21
Select Zone Category
Within the Inventory Job Screen (Figure 23), a user can access the Zone Category (Figure 28) by selecting and holding on Zones.
Figure 28 Zone Category
Within the Zone Category the user can search for tagged assets by zones that have been setup with the XML configuration (Figure 29).
Figure 29 Sort by Zone
22
PN00555 REV02
Stop and Complete Jobs
Once the user has completed the intended Inventory Job, the job should be stopped and the resulting XML file with
inventory job information will be either saved to the device or exported to a location that has been setup in the beginning XML configuration file
To stop a job, browse to Menu>Stop & Complete and you will receive a confirmation message (Figure 30). If you
would like to proceed, click Yes.
Figure 30 Sort by Zone
Once you have successfully finished the job you may close out of MobileTrak by tapping on Exit.
PN00555 REV02
23
StopAnd
and Complete
Complete Jobs
Stop
Jobs
The tagged assets will appear in either “Defined Assets” or “Undefined Assets”. In Defined assets a tagged asset can
be located in Expected in Zone(s), Found in Zone(s), Found in Unexpected Zone(s), and Missing From Zone(s).
Each of these Zone areas can be selected to bring up a view of the assets that are in the zone areas and a particular
asset can be selected and viewed in Detail by selecting Menu>Details.
Warranty & Service
Limited Standard Warranty Terms
RF Code warrants its products to be free from defects in materials and workmanship for a period of 1 year (12
months) for hardware and software from the date of purchase from RF Code. Its obligation under this warranty is
limited to repairing or replacing, at its own sole option, any such defective products. This warranty does not apply to
equipment that has been damaged by accident, negligence, or misapplication or has been altered or modified in any
way. This warranty applies only to the original purchaser (end-user) and is not transferable.
Standard Warranty Limitations
xcept as provided herein, the entire liability of RF Code and its suppliers under this limited warranty will be
E
that RF Code will use reasonable efforts to repair or replace, without charge, all defective Products returned to RF
Code by Customer, all as more particularly described in the End User Warranty. Except for the express warranties
STATED HEREIN, RF Code makes no other representations or warranties and RF Code hereby disclaims, all other
warranties, express, implied, statutory, or otherwise, including without limitation, any warranty of merchantability,
non-infringement of third party intellectual property rights, fitness for a particular purpose, performance, satisfactory
quality, or arising from a course of dealing, usage or trade practice.
Obtaining Service & Support
or in-warranty service, customers have several options. Customers having difficulty with RF Code products should
F
attempt to solve those problems through RF Code’s Technical Support Problem Escalation Process:
irst, contact the RF Code representative or other distributor from whom the RF Code product was purchased for
F
information on how to obtain local support.
Second, contact the RF Code Customer Support via e-mail.
Third, contact the RF Code Customer Support via the Support Line.
or product returns, the support engineer will give you a return material authorization (RMA) number. No returns
F
will be accepted without an RMA number. If the warranty expired, there is a charge for repair or replacement per RF
Code’s out-of-warranty policy. For full details of the RF Code RMA policy, please review the “RF Code Warranty,
RMA, and Extended Warranty Policy” document.
RF Code Customer Support
F Code Customer Support gives entitled customers and partners the ability to contact RF Code about installation
R
and usage-related questions as well as make defect inquiries about eligible products that are covered under RF Code
warranty agreements. A team of technical specialists can be contacted electronically or via phone.
e Support Line is available to provide General Support during normal business hours: Monday through Friday,
Th
8:00am to 5:00pm Central time, excluding national holidays.
PN00555 REV02
E-mail: [email protected]
Support form: http://www.rfcode.com
Voice: 512.439.2244 or toll-free at 866.830.4578
MobileTrak User Manual 24
discover. track. monitor.