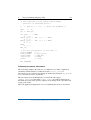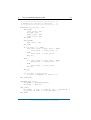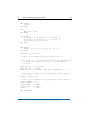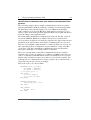
1
User Manual
for the
Program Development System
EX_PRESS 5
H. Zander GmbH & Co. KG
Am Gut Wolf 15
52070 Aachen, Germany
[email protected]
www.zander-aachen.de
Edition: F04
©2015 - All rights reserved.
This document is the original document.
Subject to changes.
All the information has been carefully
compiled to the best of our knowledge; but is
provided without guarantee.
Table of contents
1 The Program Development System EX_PRESS 5 ....................................... 5
1.1 The Project Manager .............................................................................. 5
1.1.1
Functions of the Project Manager ................................................ 6
1.2 The Device Manager .............................................................................. 7
1.2.1
Basic functions ............................................................................. 7
1.2.2
Additional functions ...................................................................... 9
1.3 The source code editor ........................................................................ 10
1.3.1
Functions and features of the editor .......................................... 10
1.4 The ST Compiler .................................................................................. 12
1.5 The Fitter .............................................................................................. 12
1.6 The Programming Tool ........................................................................ 13
1.6.1
Programming modes.................................................................. 13
1.6.2
Opening the Programming Tool ................................................. 14
1.7 The information window ....................................................................... 16
1.7.1
The Output Window ................................................................... 16
1.7.2
The "I/O-assignment" window .................................................... 17
1.7.3
"Error Messages" window .......................................................... 17
1.7.4
"Messages Preview" window ..................................................... 17
1.7.5
"Network Variables" window ...................................................... 18
1.7.6
The "Info" window ...................................................................... 18
1.7.7
"Library Contents" window ......................................................... 18
1.7.8
User manual / Help .................................................................... 19
1.8 Individual setup of the user interface ................................................... 19
1.8.1
Language selection .................................................................... 19
1.8.2
Show and hide toolbar icons ...................................................... 20
1.8.3
Open and close the information window .................................... 20
1.8.4
Rearrangement of the information windows .............................. 20
H. ZANDER GmbH & Co. KG • Am Gut Wolf 15 • 52070 Aachen • Germany • Tel +49 241 9105010
Fax +49 241 91050138 • [email protected] • www.zander-aachen.de
2 The programming language ST16 ............................................................... 23
2.1 General information about the structured text ...................................... 23
2.1.1
The main program ...................................................................... 23
2.1.2
Functions.................................................................................... 25
2.1.3
Integration of libraries ................................................................ 26
2.2 Variables and naming conventions ...................................................... 26
2.2.1
Naming of variables ................................................................... 26
2.2.2
General declaration format and variable types .......................... 26
2.2.3
Data types in ST16 .................................................................... 30
2.2.4
Declaration of data-related variables ......................................... 31
2.2.5
Declaration / configuration of variables with periphery
reference .................................................................................... 35
2.3 Properties of variables ......................................................................... 45
2.3.1
Properties sorted according to the variable types: .................... 46
2.3.2
Syntax of configuration instructions ........................................... 49
2.3.3
Data types and their properties .................................................. 52
2.4 Instructions and operators .................................................................... 53
2.4.1
General instructions about allocations ....................................... 54
2.4.2
Presentation of constants .......................................................... 54
2.4.3
Expressions in ST16 .................................................................. 55
2.5 Instructions in ST16 ............................................................................. 56
2.6 Selection Instructions in ST16.............................................................. 57
2.6.1
IF, ELSIF, ELSE ......................................................................... 57
2.6.2
CASE instruction ........................................................................ 59
2.7 Functions in ST16 ................................................................................ 59
2.7.1
Definition of function .................................................................. 60
2.7.2
Function declaration................................................................... 61
2.7.3
Use of a function in the main program ....................................... 61
2.8 Auxiliary conditions for code development in ST16 ............................. 62
H. ZANDER GmbH & Co. KG • Am Gut Wolf 15 • 52070 Aachen • Germany • Tel +49 241 9105010
Fax +49 241 91050138 • [email protected] • www.zander-aachen.de
2.9 Three examples.................................................................................... 64
3 Error messages of the Compiler .................................................................. 73
3.1 Compiler ............................................................................................... 73
3.1.1
Warning messages .................................................................... 73
3.1.2
Severe warnings ........................................................................ 77
3.1.3
Error messages .......................................................................... 78
3.2 Error messages for Fitter ..................................................................... 97
4 Functions in standard.lib .............................................................................. 99
5 Keywords reserved in ST16 ....................................................................... 105
5.1 ZX20T ................................................................................................. 106
5.2 ZX20AT .............................................................................................. 106
List of terms
................................................................................................. 107
H. ZANDER GmbH & Co. KG • Am Gut Wolf 15 • 52070 Aachen • Germany • Tel +49 241 9105010
Fax +49 241 91050138 • [email protected] • www.zander-aachen.de
1
The Program Development System EX_PRESS 5
5
1 The Program Development System
EX_PRESS 5
The EX_PRESS 5 Program Development System offers a software package,
which facilitates the creation of user programs for the ZANDER PLCs ZX20T
and ZX20AT. An integrated development environment (IDE) provides a
graphical user interface, with which you can select all the modules essential for
software development in the programming language "Structured Text".
These modules are:
- Project Manager
- Device Manager
- Editor with syntax highlighting for the Structured Text
- Compiler
- Fitter
- Programming Tool
Given below is a precise description of these modules and their operation
through the user interface.
1.1
The Project Manager
The Project Manager enables you to handle a
PLC project easily. Depending upon the
application, one or more PLCs of the type ZX20T
and/or ZX20AT can be part of a project, each of
which is allotted an individual user program.
The functions of the Project Manager are
available in the "File" menu (see Fig. 1, above)
and include the menu items "New Project",
"Open Project" and "Close Project". You can also
select these functions with the corresponding
icons in the toolbar (see Fig. 1, below) or with the
keyboard entries "Ctrl+N", "Ctrl+O" or
"Ctrl+W".
Fig. 1: Project commands
H. ZANDER GmbH & Co. KG • Am Gut Wolf 15 • 52070 Aachen • Germany • Tel +49 241 9105010
Fax +49 241 91050138 • [email protected] • www.zander-aachen.de
1
The Program Development System EX_PRESS 5
1.1.1
6
Functions of the Project Manager
"New Project" creates a new project folder. A Windows file selection window
titled "Create new project folder" opens. In its navigation line (above), select
the storage location (path specification) and then enter the name of the new
project folder in the entry field after "File name:”. Click "Open" to create a new
file directory (folder) with the selected name on the hard disk, where all the
files belonging to the project are saved.
"Open Project" opens an existing project folder. Click once with the mouse or
double-click on the corresponding file directory to see the project folder name
in the field behind "Folder". Click on "Select folder" to open the project folder.
Note: If you double-click, the project folder in the file selection window opens,
but the files contained therein are not displayed (the file selection window is
empty), because the folder has to be selected and not the files contained
therein.
With the menu item "Close Project", an open project is closed. If you did not
save the modified data yet, a message window appears, in which you can save
all the changes with "Save all". You can discard the changes with the "Discard"
button. If you click on "Cancel" the "Close Project" action is cancelled and the
project remains open.
Note: "Close Project" is always automatically executed if a project is open and
you click on "New Project" or "Open Project" or if EX_PRESS 5 is finished.
If a project is open, the "Overview" tab appears in the editor region of the user
interface. In the lower area of this tab under "Description", you can enter
information and comments about the project, e.g. project name, author, date of
last change, project description etc. and save it with the "Save" button.
H. ZANDER GmbH & Co. KG • Am Gut Wolf 15 • 52070 Aachen • Germany • Tel +49 241 9105010
Fax +49 241 91050138 • [email protected] • www.zander-aachen.de
1
The Program Development System EX_PRESS 5
1.2
The Device Manager
After creating a new project or opening a
project, the PLCs of the project can be
managed in the Device Manager. The PLCs
are displayed with their name, the PLC type
and the corresponding source code file
("<file name>.s16”) in the "Device Manager"
window. The basic functions of the Device
Manager are available in the "File" menu (see
Fig. 2, above); they include the menu items
"New PLC", "Open PLC", "Save PLC" and
"Save PLC as …". You can also call these
functions via the corresponding icons in the
toolbar (see Fig. 2, centre) or the "+" icon in
the "Device Manager" window (see Fig. 2,
below).
The PLC can be removed from the project
only with the "-" icon in the "Device
Manager" window and via context menus,
which open when you right-click with the
mouse (for a precise description: See below,
section "Delete PLC").
The PLC can also be saved via the shortcut
"Ctrl+S".
1.2.1
Fig. 2: Device Manager
commands
Basic functions
"New PLC" adds a new PLC to the project. If the command is called from the
file menu, a window opens requesting for the PLC type. If you click the "+"
icon in the "Device Manager" window, the default PLC type is accepted. The
new PLC appears with the default name "SPS_<Number>" in the Device
Manager. This can be changed later by using the context menu, which appears
when you right-click on the name. A subsequent change of the PLC type is
possible in the same way by using its context menu.
H. ZANDER GmbH & Co. KG • Am Gut Wolf 15 • 52070 Aachen • Germany • Tel +49 241 9105010
Fax +49 241 91050138 • [email protected] • www.zander-aachen.de
7
1
The Program Development System EX_PRESS 5
8
A template for a source code file in the language "Structured text" is created,
which can be opened and edited by double-clicking on "Open *new*" in the
program editor.
The "Open PLC" command also adds a new PLC in the project; the only
difference is that an existing source code file can be selected and loaded via a
file selection window that opens. A copy of this file is generated in the
memory, which can be saved in the current project directory with "Save PLC"
or opened and edited in the program editor by double-clicking on "Open
*new*".
The "Save PLC" command saves the source code file, which belongs to the
PLC marked in the "Device Manager" window with a single mouse click or
which was selected in the program editor, in the current project directory as
"<file name>.s16". If this source code file is not yet given a name (to be
identified with "Open *new*"), a request for entering a name appears in a file
selection window.
With "Save PLC as…", the source code file of the currently marked or edited
PLC can be saved under a different name, either in the currently active project
directory or in another project directory. As soon as this directory is opened
(once again), a new PLC with this source code file appears in the Device
Manager.
Removal of a PLC from a project takes place with the "-" icon at the top of the
"Device Manager" window. For this, the PLC to be deleted is marked with a
single mouse click and then the "-" icon is clicked. Alternatively, you can rightclick the name of the PLC to be deleted and click "Delete" in the context menu,
which opens thereafter. In both the cases, a dialogue appears with the following
query: "Shall the ST file be removed from the project file, too?" If you select
"No", the PLC is removed from the project only temporarily for the ongoing
session. The PLC appears once again after you close and reopen the project. If
you click "Yes", the PLC is permanently deleted from the project and moved to
a sub-directory "removed_devices". If required, you can retrieve it from here
back into the project (e.g. after accidental deletion) via "Open PLC".
H. ZANDER GmbH & Co. KG • Am Gut Wolf 15 • 52070 Aachen • Germany • Tel +49 241 9105010
Fax +49 241 91050138 • [email protected] • www.zander-aachen.de
1
The Program Development System EX_PRESS 5
1.2.2
9
Additional functions
The Device Manager offers certain additional functions, which are accessible
via context menus (by right-clicking on elements):
If you right-click on the project name, a context menu opens with the menu
items "New PLC…", "Rename" and "Information".
- "New PLC" is synonymous with "New PLC" from the file menu (see
above).
- With "Rename", you can change the project name. In this process, the
name of the project directory on the hard disk is also changed.
- With "Information", the "Overview" window in the editor area is
displayed.
If you right-click on the PLC name, a context menu opens with the menu items
"Rename", "Delete" and "Clean folder".
- "Rename": Change the name of the PLC.
- "Delete": Remove the PLC from the project.
- "Clean folder": All the temporary files generated while compiling and
fitting are deleted from the project directory. Only the source code file
(structured text) and the target file (XSVF file) for downloading in the
PLC are retained.
By right-clicking on the PLC type, you can subsequently modify the target
system: "ZX20T" or "ZX20AT" can be set.
If you right-click on the name of the source code file, the context menu item
"Import PLC" opens. With this command, you can replace the existing source
code with the source code of another file.
ATTENTION: This operation cannot be undone!
H. ZANDER GmbH & Co. KG • Am Gut Wolf 15 • 52070 Aachen • Germany • Tel +49 241 9105010
Fax +49 241 91050138 • [email protected] • www.zander-aachen.de
1
The Program Development System EX_PRESS 5
1.3
10
The source code editor
If you double-click on the name of a source code file in the Device Manager,
the corresponding source code opens in the editor. You can now edit the source
code in the editor window. If multiple PLCs are available in the active project,
multiple source code files can also be opened simultaneously for editing. These
are opened in the source code editor in different tabs. You can switch between
the individual source codes by clicking on the corresponding tab at the upper
edge of the editor window.
1.3.1
Functions and features of the editor
For increasing the legibility of a source code in the structured text, the editor
has got the feature "Syntax highlighting". The keywords and language
elements in the structured text are displayed on the screen in a blue colour,
remarks are grey and character strings in inverted commas are red. All other
elements (variable names, operators etc.) are displayed on the screen in black.
The additional functions of the editor are
accessible via the "Edit" menu (see Fig. 3, above)
or via corresponding icons in the toolbar (see
Fig. 3, below).
With the "Undo" function, all the text entries or
changes up to the latest compilation process can
be cancelled. In the same way, the cancelled text
entries or changes can be restored with the
"Redo" function.
With the functions "Copy", "Cut" and "Paste",
source code segments can be transmitted to other
Fig. 3: Editor functions
locations of the same source code or into other
source codes or also into other applications by
using the Windows clipboard. With "Copy", a copy of the selected text
segment is copied to the clipboard, with "Cut", the text segment is copied to the
clipboard and deleted from the source code, whereas "Paste" inserts the text on
the clipboard at the location of the cursor in the source code.
With the "Mark all" function, the entire source code in the enabled Editor
window is marked.
H. ZANDER GmbH & Co. KG • Am Gut Wolf 15 • 52070 Aachen • Germany • Tel +49 241 9105010
Fax +49 241 91050138 • [email protected] • www.zander-aachen.de
1
The Program Development System EX_PRESS 5
11
With the "Find" function, it is easy to
find character strings in the source
code.
With the "Replace" function, a found
character string can be replaced with
another. You can set further options in
the dialogue window that opens (see
Fig. 4). Meaning of items:
Fig. 4: Find and Replace
- Case Sensitive: If the box is
checked, a differentiation is
made between the capital and small letters, not otherwise.
- "Normal Search" mode: A search is conducted for the character string
entered in the "Searching Text" field.
- "Regular expressions" mode: During the search, so-called "metacharacters" are taken into account in the searched text, e.g. Wildcards,
number of letters, only numbers etc., see e.g. Wikipedia: Regular
expression.
- Direction forward: A search is conducted from the current cursor
position till the end of the source code.
- Direction backwards: A search is conducted from the current cursor
position till the beginning of the source code.
The buttons have following functions:
- "Find next": The cursor goes to the next match in the source code while
searching for the character string, without replacing it.
- "Replace": If a match is found with "Find next", the found character
string is replaced with the character string in the "Replace Text".
Otherwise the next match is searched from the current cursor position
onwards and the found character string is replaced with the character
string in the "Replace Text".
- "Replace All": Within the source code, all the matches for “Searching
Text” are replaced with the character string in "Replace Text" without
a query. Then, a message window appears with the number of
replacements made.
When you click on the menu item "Print" in the "File" menu, the Windows
Print dialogue opens, with which you can print the content of the currently
H. ZANDER GmbH & Co. KG • Am Gut Wolf 15 • 52070 Aachen • Germany • Tel +49 241 9105010
Fax +49 241 91050138 • [email protected] • www.zander-aachen.de
1
The Program Development System EX_PRESS 5
12
open editor window. The syntax highlighting is retained on the expression.
Additionally, line numbers are added to the text.
1.4
The ST Compiler
If a source code is completed in the structured text such that all the minimum
required elements are available (see section 2.1.1), a run of the compiler can be
executed, which first examines the source code to ensure that it is free of errors
and, provided that it is fault-free, translates the structured text in VHDL code
(Very High-Speed Integrated Circuits Hardware Description Language).
A compiler run can be executed with a
mouse-click on the item "Compile" in the
menu "Compile / Program" (Fig. 5,
above), the corresponding icon in the
toolbar (Fig. 5, centre) or by doubleclicking on "Compile" in the "Process
view" window (Fig. 5, below). Besides,
the Compiler execution can be triggered
with the "F9" functional key.
The Compiler is started automatically if
Fit (see section 1.5) or programming of
PLC (see section 1.6) is selected after a
source code change.
1.5
Fig. 5: Compile
The Fitter
After a fault-free Compiler run, the VHDL code generated by the Compiler
must be further processed by the Fitter, so that the program file is generated,
which can be loaded into the FPGA. The Fitter has a VHDL Compiler in
combination with a placer and router, which ensures that the program created
by the user can be fitted optimally into the available resources of the FPGA.
H. ZANDER GmbH & Co. KG • Am Gut Wolf 15 • 52070 Aachen • Germany • Tel +49 241 9105010
Fax +49 241 91050138 • [email protected] • www.zander-aachen.de
1
The Program Development System EX_PRESS 5
The Fitter is started with a mouse-click on
the item "Fit" in the menu "Compile /
Programming" (Fig. 6, above), the
corresponding icon in the toolbar (Fig. 6,
centre) or by double-clicking on "Fit" in
the "Process view" window (Fig. 6,
below). Additionally, the Fitter execution
can be triggered with the "F10" functional
key.
The Fitter is started automatically along
with the Compiler, if programming of
PLC (see section 1.6) is selected after a
source code change.
1.6
13
Fig. 6: Fit
The Programming Tool
The Programming Tool in EX_PRESS 5 facilitates the transmission of a
program file, which has been generated by the Compiler and the Fitter, into a
PLC. For this purpose, the PLC must be connected with the same network as
the PC via its Ethernet interface (direct connection with the PC via the Cat. 7
patch cable enclosed in the EX_PRESS 5 package or connection via one or
more network switches). The voltage supply to the PLC must be switched on.
1.6.1
Programming modes
There are two programming modes, which can be selected alternatively:
1. "Programming PLC": The program file is transmitted in a non-volatile
manner to the Flash memory of the FPGA. This process lasts for 40
seconds.
2. "Test program on PLC": The program file is transmitted to the volatile
memory of the FPGA. This process lasts for only a few seconds and
enables quick testing of an application during the program
development phase.
ATTENTION: In this mode, the program is not saved in a non-
H. ZANDER GmbH & Co. KG • Am Gut Wolf 15 • 52070 Aachen • Germany • Tel +49 241 9105010
Fax +49 241 91050138 • [email protected] • www.zander-aachen.de
1
The Program Development System EX_PRESS 5
14
volatile manner in the FPGA, i.e. after disconnecting and connecting
the operating voltage once again, the program last transmitted in
mode 1 ("Programming PLC") is executed once again!
Also, the variables of the "EXTERN VAR_INPUT" and "EXTERN
VAR_OUTPUT" categories (see section 2.2.4) do not function
correctly if they are not transmitted to the PLC at least once in mode 1
"Programming PLC" after being generated in the source code. The
same is applicable to application-specific messages, which have been
defined with "VAR_MESSAGE" (see section 2.2.5).
1.6.2
Opening the Programming Tool
The Programming Tool can be opened by
clicking with the mouse on one of the
items "Programming PLC" (mode 1) or
"Test program on PLC" (mode 2) in the
menu "Compile / Program" (Fig. 7,
above) or with the corresponding icon in
the toolbar (Fig. 7, centre). Mode 1 can
also be selected by double-clicking on
"Programming PLC" in the "Process
view" window (Fig. 7, below).
Alternatively, the Programming Tool can
be enabled with the "F11" (mode 1) or
"F12" (mode 2) functional key.
Fig. 7: Opening the Programming Tool
In both the modes, a dialogue window opens (see Fig. 8), with which you can
control the programming process.
In the uppermost entry line under "Program file", you can select the program
file to be transmitted (file ending ".xsvf"). When you call the Programming
Tool, the program file, whose source code is marked as active in the Device
Manager, is already entered here. When you click with the mouse on the
"Select…" button, a file selection window opens, where you can select another
program file.
H. ZANDER GmbH & Co. KG • Am Gut Wolf 15 • 52070 Aachen • Germany • Tel +49 241 9105010
Fax +49 241 91050138 • [email protected] • www.zander-aachen.de
1
The Program Development System EX_PRESS 5
15
Fig. 8: Programming Tool
Three more steps must be executed for transmitting the selected program:
1. Under the heading "1. Interface", there is a drop-down menu,
where you have to select the network interface of the PC,
through which the PLC can be addressed.
2. When you have selected the correct interface, you must click
with the mouse on the field "Search ZanderNet-compatible
PLCs", under the heading "2. Search". Then, all the PLCs that
are accessible via the network are displayed under "3. PLCs"
with their MAC addresses, the CPU version and the PLC names
("PLC_NAME") of the last transmitted program files.
3. With the help of the MAC address, you can identify the PLC,
on which the program file has to be transmitted, as this address
is affixed on a label on the right side of the PLC. By doubleclicking on the desired MAC address in the list (alternatively:
Single mouse-click + Clicking the button "Transmit &
Program"), the program file can be transmitted to the selected
PLC.
Note: Step 1 and step 2 must be executed only when the Programming Tool is
opened for the first time. The selected network interface is saved and
H. ZANDER GmbH & Co. KG • Am Gut Wolf 15 • 52070 Aachen • Germany • Tel +49 241 9105010
Fax +49 241 91050138 • [email protected] • www.zander-aachen.de
1
The Program Development System EX_PRESS 5
16
automatically entered when the Programming Tool is opened the next time, so
that the list of PLCs accessible in the network appears immediately.
During the programming operation, two message
windows appear (see Fig. 9): The first window
shows the transmission of data via the network to
the PLC, while the second reflects the
programming process of the FPGA within the PLC,
which naturally lasts for a longer period in the
programming mode 1 (see section 1.6.1). Since no
feedback is sent by the PLC to the PC about the
progress of programming during this span of time,
the progress bar in the second message window is
retained at 50% throughout the process and reaches
100% only at the end of the programming.
1.7
Fig. 9: Message window
Programming Tool
The information window
Besides the Editor window, the Device Manager and Process View, the user
interface has other windows, which display information about the programmed
application or messages of the Compiler or Fitter. The total number of
windows is seven, whereby four of these are located in the lower part of the
user interface as tabs. These windows are "Output window", "Error Messages",
"I/O assignment" and "Messages Preview". To the right of the editor window,
another window "Network Variables" can be displayed. Yet another window
shows the installed version of EX_PRESS 5 and contains the copyright and
licensing information. In addition there is a window that displays the contents
of libraries. The information windows are described in detail below.
1.7.1
The Output Window
Messages generated by the Compiler or Fitter are displayed in the Output
Window. In the basic settings, only the information about the start and end of
the Compiler or Fitter is displayed along with the required running time. If the
“diagnostic mode” is enabled via the "Settings" menu, item "Output Window",
H. ZANDER GmbH & Co. KG • Am Gut Wolf 15 • 52070 Aachen • Germany • Tel +49 241 9105010
Fax +49 241 91050138 • [email protected] • www.zander-aachen.de
1
The Program Development System EX_PRESS 5
17
further information appears in the Output Window: If required, the Compiler
will display warning messages, the meanings of which are explained in section
3.1.1 .
The Fitter also puts out a series of additional information in the diagnostic
mode: Particularly if the Compiler run takes place fault-free, however, the
Fitter identifies an error in the VHDL code, you can find the relevant
information here.
1.7.2
The "I/O-assignment" window
After a smooth Compiler run, a list of the input and output variables used
appears in the "I/O assignment" window along with their assignment to the
connecting terminals of the PLC. This information must particularly be taken
into account if the assignment is not explicitly specified in the source code via
the keyword "AT" (see section 2.2.4), because the Compiler then makes the
assignment automatically.
1.7.3
"Error Messages" window
The "Error Messages" window is shown or enabled whenever the Compiler
puts out error messages or severe warnings. At the same time, the lines of the
source code, which the error messages or severe warnings refer to, are
highlighted in red in the editor window.
1.7.4
"Messages Preview" window
If the output of messages was configured in the application using the variable
class "VAR_MESSAGE" (see section 2.2.5), a preview of these messages is
displayed in the "Messages Preview" window. This corresponds to the
presentation on a LCD display module.
H. ZANDER GmbH & Co. KG • Am Gut Wolf 15 • 52070 Aachen • Germany • Tel +49 241 9105010
Fax +49 241 91050138 • [email protected] • www.zander-aachen.de
1
The Program Development System EX_PRESS 5
1.7.5
18
"Network Variables" window
The "Network Variables" window can be displayed at the right side of the
editor window via the menu "View", sub-menu "Window", menu item
"Network Variables". A list of network variables declared in the source code,
having the variable class "EXTERN VAR_INPUT" or "EXTERN
VAR_OUTPUT" (see section 2.2.4) is given out. If appropriate external output
variables of another PLC are found for the external input variables within the
project, these are displayed as "source".
Note: The contents of the "Network Variables" window are updated only after
closing and opening the project once again.
1.7.6
The "Info" window
The "Info" window is called with the menu item "About…" in the "Help" menu
or alternatively via the icon in the toolbar. In the message window that
opens, information appears about the installed version of EX_PRESS 5, the
copyright details as well as e-mail and Internet contact data of ZANDER
(manufacturer) as well as the license data for the user, which is inserted at the
time of installation.
1.7.7
"Library Contents" window
After selecting the menu entry "Library Contents…" in the "Library" menu, a
file selection dialogue opens, with which a library (<library name>.lib) can be
selected. Then an information window appears, in which the functions included
in the library are displayed along with their parameters, return values and
descriptions.
H. ZANDER GmbH & Co. KG • Am Gut Wolf 15 • 52070 Aachen • Germany • Tel +49 241 9105010
Fax +49 241 91050138 • [email protected] • www.zander-aachen.de
1
The Program Development System EX_PRESS 5
1.7.8
19
User manual / Help
You can open this user manual any time via the "Help" menu, item "Display
help", or via the icon in the toolbar, provided that a PDF Reader is installed
on the PC.
1.8
Individual setup of the user interface
The user can set up the user interface of EX_PRESS 5 according to his own
requirements by hiding icons in the toolbar for instance or by hiding certain
windows. It is possible to switch between German and English language and
also to change the arrangement of the windows on the user interface in such a
way that it is optimally suited for the size of the monitor used or for a
workstation with several monitors.
1.8.1
Language selection
It is possible to switch between "German" and "English" by using the
"Settings" menu, sub-menu "Languages". This setting affects all the menus as
well as information and dialogue windows. Also, this user manual is displayed
in the PDF Reader in the set language if it is opened using the corresponding
menu function or the corresponding icon in the toolbar.
H. ZANDER GmbH & Co. KG • Am Gut Wolf 15 • 52070 Aachen • Germany • Tel +49 241 9105010
Fax +49 241 91050138 • [email protected] • www.zander-aachen.de
1
The Program Development System EX_PRESS 5
1.8.2
20
Show and hide toolbar icons
The toolbar has got four sections (see
Fig. 10), which can either be shown
or hidden. You can navigate in the
"View" menu in the sub-menu
"Toolbar" and show or hide the
corresponding fields of the toolbar
by clicking the entries available
there: "Standard", "Window", "Info"
and "Process".
Fig. 10: Toolbar fields
1.8.3
Open and close the information window
As known from Windows, all information windows (see section 1.7) can be
closed and hidden by clicking the "×" button in the upper right corner with the
mouse.
You can open the closed information windows via the menu "View", sub-menu
"Windows" or with the icons of the toolbar section "Window" (see Fig. 10). An
exception is the "Error Messages" window, which opens automatically only if
an error or a severe warning occurred at the time of compiling.
1.8.4
Rearrangement of the information windows
It might be reasonable to change the default window layout of the user
interface after the installation, for example while using a wide screen monitor
(16:9 format etc.), or while working with 2 monitors. The information windows
(see section 1.7) can be removed from their fixed location and moved
anywhere. To move a window, hold the mouse pointer on the title bar of the
window, keep the left mouse key pressed and simultaneously move the mouse.
To position the freely moving window, release the mouse key in the desired
position, even on the extended Desktop of the second monitor.
H. ZANDER GmbH & Co. KG • Am Gut Wolf 15 • 52070 Aachen • Germany • Tel +49 241 9105010
Fax +49 241 91050138 • [email protected] • www.zander-aachen.de
1
The Program Development System EX_PRESS 5
21
A window can also be detached when tabs are used. In this case, the currently
active tab can be changed to a separate window by clicking and moving its title
bar (see also Fig. 11).
Fig. 11: Detaching an information window from a group of tabs
If the detached window shall again form a group of tabs with another window,
or shall be integrated into a group of tabs, it should be slowly moved over the
corresponding window or group until this is coloured (see Fig. 12). After
releasing the left mouse key, the window is integrated in the group of tabs.
H. ZANDER GmbH & Co. KG • Am Gut Wolf 15 • 52070 Aachen • Germany • Tel +49 241 9105010
Fax +49 241 91050138 • [email protected] • www.zander-aachen.de
1
The Program Development System EX_PRESS 5
22
Fig. 12: Integration of information windows in the group of tabs
The information windows can also be adjusted next to one another (lower part
of the user interface) or below each other (left and right part). For this purpose,
the window to be adjusted must be slowly moved to the position, where it has
to be fitted, till a coloured gap opens (see Fig. 13). When the left mouse key is
released, the window is fitting into this gap.
Fig. 13: Adjusting an information window
All the adaptations of the user interface that are described in this section are
saved without any query while closing EX_PRESS 5.
H. ZANDER GmbH & Co. KG • Am Gut Wolf 15 • 52070 Aachen • Germany • Tel +49 241 9105010
Fax +49 241 91050138 • [email protected] • www.zander-aachen.de
2
The programming language ST16
23
2 The programming language ST16
The topic “Structured Text” is dealt with in eight sections and two examples
given below. A short description of the overall structure of a ST16 program is
given in the first section.
A detailed description is given in section 2.2 and the subsequent sections.
2.1
General information about the Structured Text
2.1.1
The main program
ST16 generally represents a subset of the Structured Text (ST) language, which
has been defined for the special compiling requirements of FPGA-compliant
descriptions. ST itself is defined within the IEC/DIN EN 61131-3 standard.
With ST16, the PLC programs can be described in a familiar form for a
completely new type of PLC, which operates on the basis of Programmable
Logic Devices (PLD) without any cycle times. This can be done by a Compiler
by converting the ST16 source code to VHDL (Very High-Speed Integrated
Circuits Hardware Description Language), i.e. a hardware description
language.
Like any other program, which is written in a standard language for a target
system, ST16 also has a definite form, which must be maintained. The (main)
program is enclosed by a frame formed by the keywords PROGRAM and
END_PROGRAM. This frame must include the declaration of the variables
and the functions that are used, as well as the instructions, which influence
these variables. Every text outside this frame is evaluated as a comment and is
thus, indispensable for the PLC description; it can increase the legibility of
your program considerably.
Comments within the actual program can be inserted between the character
strings (* and *). In addition to this, a line comment can be initiated with //
(equivalent to C/C++/C#).
H. ZANDER GmbH & Co. KG • Am Gut Wolf 15 • 52070 Aachen • Germany • Tel +49 241 9105010
Fax +49 241 91050138 • [email protected] • www.zander-aachen.de
2
The programming language ST16
24
The frame structure of a ST-16 program (without using functions) looks like
this:
Any description at the beginning
USELIB <library>; (* Optional library integration *)
USES <function>.<library>;
PROGRAM
<program name>
(* The section for declaration of variables *)
(* The instruction section *)
END_PROGRAM;
Any description at the end
Apart from the formal keywords and language constructs, different names,
commands etc., which are not automatically separated because of their special
format, must be separated from one another with 'Whitespaces' . This means
that there must be at least one blank space or a tab between two terms; of
course, several spaces are also allowed. Here too, the legibility of a program
increases significantly by using such text formats, but the translation remains
unaffected.
An automatic separation takes place, if characters are used, which are not
allowed in the namings. The value assignment with ':= ', which is defined later,
is a well-known example of this.
Besides, every instruction must have a semi-colon at the end ';'. Exceptions to
this are instructions, which start a frame, e.g. PROGRAM.
H. ZANDER GmbH & Co. KG • Am Gut Wolf 15 • 52070 Aachen • Germany • Tel +49 241 9105010
Fax +49 241 91050138 • [email protected] • www.zander-aachen.de
2
The programming language ST16
2.1.2
25
Functions
ST is an imperative or functional language, i.e. it offers a structuring by means
of functions. This should be used intensively; any disadvantages, e.g. because
of slow execution of the code, can be definitely ruled out.
Functions are defined, i.e. their contents are described, after the USELIB/USES
instructions, but before the main part of the program initiated with
PROGRAM. Then, the declaration of the functions used in the main part takes
place in the variable declaration section of the main part.
The definition of a function has the following syntax frame:
FUNCTION <function name> : <return value>
(* The section for declaration of variables *)
(* The instruction section *)
END_FUNCTION;
At the first glance, this frame appears identical with the frame for the main part
of the program and, to a large extent, it is identical. However, there are a few
differences, which must be observed:
● In a function the types of variables, which can be declared, are limited to
VAR_INPUT and VAR or VAR_INTERN. VAR_INPUT declares the call
parameters, VAR or VAR_INTERN includes the internally used variables.
There are no global variables, which the main part as well as the functions
can know, i.e. the function knows only those values of the main program,
which have been transferred as call parameters, and the main program
knows only the return value returned by the function.
● Within the scope of a function, values can be assigned to a variable (of class
VAR or VAR_INTERN) at several places, whereas in the main part this can
only be done at one place (Single-Assignment-Rule). As a result, algorithms
in functions can generally be formulated in a better way.
H. ZANDER GmbH & Co. KG • Am Gut Wolf 15 • 52070 Aachen • Germany • Tel +49 241 9105010
Fax +49 241 91050138 • [email protected] • www.zander-aachen.de
2
The programming language ST16
2.1.3
26
Integration of libraries
Complete functions can be integrated through libraries . For this, it is first
necessary to integrate the library via the USELIB instruction. If it does not
exist, a warning is given out. The USELIB instructions are placed before the
functions and the main program.
The USES instruction specifically defines a function from the corresponding
library. This is necessary so that the Compiler can select this special function
and integrate it in the generated code.
The supplied library standard.lib is integrated in the program by default
(without a separate USELIB instruction). The included functions (bit-shifting
functions and data type conversion functions) are described in the annex (see
section "Functions in standard.lib").
2.2
Variables and naming conventions
Internal nodes and external inputs/outputs, which shall be used within ST16,
must be given a symbolic name, with which it can be addressed within the
program. Every input/output or every node, whose name is used, must be
described in the declaration list before the application. Also, the assigned name
must be unique within the source code.
2.2.1
Naming of variables
Every assigned name (identifier) may have 20 characters at most. A variable
name may only begin with a letter; further characters can be digits, letters or
the underscore '_'; all other characters, especially full stops (dots), commas,
hyphens etc. are not allowed. Uppercase and lowercase letters are
differentiated.
2.2.2
General declaration format and variable types
The variables used in a program or a function must be declared before the use;
their scope is restricted to that part, in which they are declared (i.e. to
PROGRAM … END_PROGRAM or FUNCTION … END_FUNCTION).
H. ZANDER GmbH & Co. KG • Am Gut Wolf 15 • 52070 Aachen • Germany • Tel +49 241 9105010
Fax +49 241 91050138 • [email protected] • www.zander-aachen.de
2
The programming language ST16
27
The general format is:
[<Modifier>] <variable type> <names list> [: <data type>];
[<names list> [: <data type>];]
END_VAR;
The following specifications are allowed as variable types:
Table 2.2.1: Variable types in ST16
Class name
VAR_INPUT
VAR_OUTPUT
VAR, VAR_INTERN
VAR_ALIAS
VAR_TIMER
VAR_COUNTER
VAR_MESSAGE
VAR_ADC
VAR_DAC
Allowed in
PROGRAM
Allowed in
FUNCTION
X
X
X
X
X
X
X
X
X
X
X
2.2.2.1 Variable types for data
We can differentiate between two different meanings with regard to the
variables in ST16: There are variables for data, i.e. they are used in the
conventional sense, and variables for the peripheral functions, which are also
called peripheral-related variables. These variables generally do not merely
contain data, but also effect an additional function.
The data-related variables in detail:
The variable types VAR_INPUT, VAR_OUTPUT and VAR or
VAR_INTERN (called VAR in the 61131-3 standard) have a simple meaning:
They describe inputs, outputs and internal variables.
With the help of VAR_ALIAS (called VAR_ARRAY in EX_PRESS V4), a
group declaration is framed, which also includes a new name and a list of
already declared variables (maximum 16) of the type BIT or BOOL in square
H. ZANDER GmbH & Co. KG • Am Gut Wolf 15 • 52070 Aachen • Germany • Tel +49 241 9105010
Fax +49 241 91050138 • [email protected] • www.zander-aachen.de
2
The programming language ST16
28
brackets [ ] . A group declaration assigns a new (collective) name to a group of
already declared pins or internal variables with the data type BIT_ARRAY.
The <Modifier> in the general declaration format specifies a modification of
the variable class. The only permitted modifier so far is EXTERN, with which
the variable types VAR_INPUT and VAR_OUTPUT can be assigned. In that
case, the variables turn into so-called global variables, which are distributed all
over the network (VAR_OUTPUT) or are read from distribution packets on the
network (VAR_INPUT).
2.2.2.2 Variable types with peripheral functions
In ZX20T and ZX20AT, many (approx. 2000) timers and counters can be
defined; likewise, application-specific messages can be defined, which can then
be given out by occurrence of certain events. For ZX20AT, it is also possible to
use 8 A/D inputs as well as 4 D/A outputs.
Timers
These functionalities are administered with the help of data using peripheral
functions. This includes:
VAR_TIMER
<timer_var>; { <timer_var2>;}
END_VAR;
This declaration generates one or more timers (of the implicit data type
TIMER), for which special properties must then be determined, particularly the
duration.
Counters
VAR_COUNTER
<counter_var>; { <counter_var2>;}
END_VAR;
This declaration generates one or more counters (of the implicit data type
COUNTER), for which special properties must then be determined, particularly
the number of events to be counted.
H. ZANDER GmbH & Co. KG • Am Gut Wolf 15 • 52070 Aachen • Germany • Tel +49 241 9105010
Fax +49 241 91050138 • [email protected] • www.zander-aachen.de
2
The programming language ST16
29
Messages
A variable of the class VAR_MESSAGE can be declared when you want to
send messages to a central unit. The declaration of the variables (of the implicit
type MESSAGE) has the following format:
VAR_MESSAGE
<message_var>; { <message_var2>;};
END_VAR;
When a specific event occurs, the message is saved in the PLC at the moment
of its occurrence. Variable values that are applicable at this point of time can
also be included in this message.
At most 8 of such user-defined messages can be declared per PLC.
Analogue / Digital converter
A/D converters are only permitted in the ZX20AT. 1 A/D converter with 8
inputs is integrated in this PLC; the maximum conversion width is 16 bit and
the conversion rate is 200 kSPS (kilo Samples-per-Second) at full resolution.
The declaration of a variable of the class VAR_ADC with the implicit type
ADC (which is processed as BIT_ARRAY with Read-only functionality) takes
place via
VAR_ADC
<adc_var> [AT <ADC_In>]; { <adc_var2> [AT <ADC_In2>];};
END_VAR;
The declaration of an analogue input also includes the option of assigning a
physical input (e.g. "AT AIn_01").
Digital / Analogue converter
D/A converters are only permitted in the ZX20AT. 1 D/A converter with 4
outputs is integrated in this PLC; the maximum conversion width is 16 bit and
the conversion rate is 200 kSPS (kilo Samples-per-Second) at full resolution.
The declaration of a variable of the class VAR_DAC with the implicit type
DAC (which is processed as BIT_ARRAY with Write-only functionality) takes
place via
VAR_DAC
<dac_var> [AT <DAC_Out>]; { <dac_var2> [AT <DAC_Out2>];};
END_VAR;
H. ZANDER GmbH & Co. KG • Am Gut Wolf 15 • 52070 Aachen • Germany • Tel +49 241 9105010
Fax +49 241 91050138 • [email protected] • www.zander-aachen.de
2
The programming language ST16
30
The declaration of an analogue output also includes the option of assigning a
physical output (e.g. "AT AOut_01").
2.2.3
Data types in ST16
In EX_PRESS 5, the following data types are allowed for variables without
peripheral relationship:
● BIT (default value) and BOOL for a variable with the permissible values '0'
and '1'
● DINT for a variable with the value range -2147483648 to 2147483647
(32 bit double integer)
● INT for a variable with the value range -32768 to +32767 (16 bit integer)
● UINT and WORD for a variable with the value range 0 to +65535 (16 bit
unsigned integer)
● SINT for a variable with the value range -128 to +127 (8 bit short integer)
● USINT and BYTE for a variable with the value range 0 to +255 (8 bit
unsigned short integer)
● BIT_ARRAY(xx) for a variable as a Bit-Array with xx bits (xx between 1
and 16)
● BIT_ALIAS for a variable, in which several variables (already declared) of
type BIT (or BOOL) are combined.
Note: This data type is implicitly created while declaring the variable type
"VAR_ALIAS" and may not be additionally written into the source code.
Except for BIT_ALIAS, all variables are assigned a start value of 0, if an
explicit initialisation value is not assigned in the declaration (see 2.2.4).
The following data types are allowed for data types with peripheral
relationship:
● TIMER for declared timers, which count clock pulses
● COUNTER for declared counters, which count events
● MESSAGE for application-specific messages, for which the generating
event and the corresponding message can be defined.
● ADC for A/D converter channels (analogue input with conversion in digital
value)
● DAC for D/A converter channels (analogue output with digital source)
For these data types, which include the peripheral function, further rules are
applicable for defining their properties and for their usage in programs.
H. ZANDER GmbH & Co. KG • Am Gut Wolf 15 • 52070 Aachen • Germany • Tel +49 241 9105010
Fax +49 241 91050138 • [email protected] • www.zander-aachen.de
2
The programming language ST16
2.2.4
31
Declaration of data-related variables
As already mentioned while presenting the variable types, a differentiation
must be made between data-related and peripheral-related variables at the time
of declaration of variables.
2.2.4.1 VAR_INPUT / VAR_OUTPUT
The variables, which are directly related to connecting terminals, are declared
in the VAR_INPUT and VAR_OUTPUT classes. The corresponding format is:
VAR_INPUT
<input_var> [AT <Input_Pin>];
{ <input_var2> [AT <Input_Pin2>];}
END_VAR;
or
VAR_OUTPUT
<output_var> [AT <Output_Pin>] ;
{ <output_var2> [AT <Output_Pin2>] ;}
END_VAR;
A list of variables can be declared between VAR_INPUT and END_VAR or
VAR_OUTPUT and END_VAR, only restricted by the number of connections
available at the device. The data type is always BIT (BOOL) and for this
reason not specified. Each variable declaration is separated from the next by a
semi-colon (';').
As already mentioned in the format, every variable can optionally be assigned
to a terminal. This takes place via the following syntax
AT <terminal name>
where the following nomenclature is allowed for the names of (digital)
terminals :
ZX20T
ZX20AT
Inputs
In_01 .. In_20
In_01 .. In_12
appclk
appclk
POR
POR
POR_delayed
POR_delayed
Outputs
Out_01 .. Out_16
Out_01 .. Out_12
It is mandatory to observe the uppercase / lowercase for these specifications.
In_01 to In_12 respectively In_20 are the standard data inputs, which lead to
H. ZANDER GmbH & Co. KG • Am Gut Wolf 15 • 52070 Aachen • Germany • Tel +49 241 9105010
Fax +49 241 91050138 • [email protected] • www.zander-aachen.de
2
The programming language ST16
32
the outside of the PLC. The connections appclk (2 MHz clock input) and POR
(Power-On-Reset) as well as POR_delayed (delayed POR) are only available
within the PLC.
An example:
VAR_INPUT
Switch AT In_11; sensor;
Y AT In_01;
END_VAR;
VAR_OUTPUT
Output1 AT Out_03; Z;
END_VAR;
The input variables switch, sensor and Y as well as the output variables output1
and Z are all of the implicit type BIT. Switch, Y and output1 are assigned to
explicit connections, which are clearly marked at the PLC, whereas an
assignment to sensor and Z is made by the Compiler.
2.2.4.2 EXTERN VAR_INPUT / EXTERN VAR_OUTPUT
The declaration of external input and/or output variables takes place via:
EXTERN VAR_INPUT
<extern_input_var> [: <var_type>];
{ <extern_input_var2> [: <var_type2>];}
END_VAR;
or
EXTERN VAR_OUTPUT
<extern_output_var> [: <var_type>] ;
{ <extern_output_var2> [: <var_type2>] ;}
END_VAR;
Here too, any number of declarations can be made till the capacity limit is
reached; currently, the upper limits are 32 output bits (!) and 128 input bits (!).
If data types other than BIT are used, e.g. INT, more bits are required for the
transmission; thus, the number of bits and not the number of variables must be
restricted.
The following example shows the use of external variables in combination with
local outputs.
H. ZANDER GmbH & Co. KG • Am Gut Wolf 15 • 52070 Aachen • Germany • Tel +49 241 9105010
Fax +49 241 91050138 • [email protected] • www.zander-aachen.de
2
The programming language ST16
33
EXTERN VAR_INPUT
X1: INT;
END_VAR;
VAR_OUTPUT
Q0; Q1; Q2; Q3; Q4; Q5; Q6; Q7; Q8; Q9; Q10; Q11; Q12; Q13; Q14; Q15;
END_VAR;
VAR_ALIAS
Out[Q15, Q14, Q13, Q12, Q11, Q10, Q9, Q8, Q7, Q6, Q5, Q4, Q3, Q2, Q1, Q0];
END_VAR;
Out := X1;
The network sends an integer variable X1 to the PLC, whose value is
given to the local outputs Q0 to Q15. Since the local outputs can only be
of the type BIT, an ALIAS is specified as an auxiliary structure (see
section 2.2.4.4), which corresponds to the output and is of the type
BIT_ARRAY. An integer variable can be assigned directly to this
BIT_ARRAY.
Naturally, the specification of the connection pin will not be given for the
external variables, since these are transmitted via the network.
2.2.4.3 VAR / VAR_INTERN
Internal variables are necessary for processing algorithmic calculations; these
are not assigned to any connection or any external variable, but they are
mapped to internal data nodes of the device.
The syntax is:
VAR or VAR_INTERN
<intern_var> [: <var_type>] [:= <Init_Value>];
{ <intern_var2> [: <var_type>] [:= <Init_Value2>];}
END_VAR;
or
H. ZANDER GmbH & Co. KG • Am Gut Wolf 15 • 52070 Aachen • Germany • Tel +49 241 9105010
Fax +49 241 91050138 • [email protected] • www.zander-aachen.de
2
The programming language ST16
34
VAR or VAR_INTERN
<intern_var> {, <intern_var2>} [: <var_type>];
END_VAR;
In the first variant, a start value can be specified, which is taken over again in
case of an active reset; the syntax is
:= <Init_Value>;
where <Init_Value> must be an allowed value, i.e. it must be within the value
range of the variable type defined with <var_type>.
In the second version, a list of variable names, separated with a comma can be
declared with a common data type, however without an initialisation value. An
example:
VAR_INTERN
a, b, c: INT;
x1, x2;
END_VAR
Variables a, b and c are included in a list with the INT type (integer, 16 bit),
whereas x1 and x2 are also declared as a list with the implicit type BIT.
The following data types are allowed for internal variables:
BIT, BYTE, WORD, UINT, USINT, SINT, INT, DINT, BIT_ARRAY
2.2.4.4 VAR_ALIAS
The VAR_ALIAS variable type defines variables with the implicit type
BIT_ALIAS, which describes the combination of variables of the type BIT.
This combination can then be used as a variable of the type BIT_ARRAY or
INT, if required with a reduced value range.
The syntax is:
VAR_ALIAS
<Var_Alias_Name>[<VAR_List>];
END_VAR;
The variable list <VAR_List> includes a list of already declared variables (of
the type BIT), separated by comma. As compared with the integer values, the
sequence is such that the Most Significant Bit (msb) is to the left. A maximum
of 16 variables are allowed; the variable class of the combined variables must
H. ZANDER GmbH & Co. KG • Am Gut Wolf 15 • 52070 Aachen • Germany • Tel +49 241 9105010
Fax +49 241 91050138 • [email protected] • www.zander-aachen.de
2
The programming language ST16
35
be the same, and it must be one of the types VAR_INPUT,
VAR/VAR_INTERN, or VAR_OUTPUT.
2.2.5
Declaration / configuration of variables with
peripheral relationship
For variables with peripheral relationship, the general rule applicable is that
these are declared within special variable classes and require additional
configuration. The configuration must generally be placed only in the main
program and not in functions and is made via assignment equations, which only
may be written outside all control flow structures (IF, CASE …).
For program access outside the configuration, the variables with a peripheral
relationship have got a data type, which comes into play for read or write
access.
2.2.5.1 VAR_TIMER
A timer for the PLCs of the ZX20 family is generated with the following
declarations:
VAR_TIMER
<timer_var>;{ <timer_var2>;}
END_VAR;
An example:
VAR_TIMER
timer_ex; timer_one_shot;
END_VAR;
This declaration generates one or more timers (of the implicit data type
TIMER).
The operation of the timer can be influenced by several parameters. The
activities can be controlled with a start value, an Enable signal, also known as
the Gate signal, a Reset signal, a mode parameter that switches between
continuous and single-shot, as well as the configuration of the polarity:
● Duration of the time interval: As a standard, the timer counts with 2 MHz
from a start value down to 0. The definition of the start value takes place
with a time specification (us, ms, s, min for microseconds, milliseconds,
seconds and minutes).
The time value is directly assigned to the declared variable.
H. ZANDER GmbH & Co. KG • Am Gut Wolf 15 • 52070 Aachen • Germany • Tel +49 241 9105010
Fax +49 241 91050138 • [email protected] • www.zander-aachen.de
2
The programming language ST16
36
An example:
timer_ex := 20 us;
timer_one_shot := 500 ms;
● Timer mode: In ST16, timers can be configured for two modes for the
single-shot operations (SINGLE_SHOT, SINGLE_SHOT_SE) as well as
for two continuous modes (CONT, CONT_SE) . In the continuous modes,
the timer finally generates an oscillation signal with an oscillation period
that corresponds to the configured time value. So half of the time period this
variable shows the value 0, the other half the value 1.
The difference between the two continuous modes or between the two
modes in the single-shot operation lies exclusively in the starting behaviour.
In the CONT or SINGLE_SHOT mode, the value, which corresponds to the
configured polarity and thereby to the first half of the generated oscillation
signal, is assumed in the event of an active reset (see below). On the other
hand, in the CONT_SE or SINGLE_SHOT_SE mode, (SE: Starting Edge)
the reset value corresponds to the inverted polarity, so that an edge is
created when counting begins (since the counter assumes the configured
polarity value in the first phase of counting).
The mode is assigned via the configuration of the parameter MODE:
<timer_var>.MODE := <Conf_value>;
with the permitted configuration values CONT, CONT_SE,
SINGLE_SHOT and SINGLE_SHOT_SE.
An example:
timer_ex.MODE := CONT;
timer_one_shot.MODE := SINGLE_SHOT;
The timer_ex timer has a period of 20 µs corresponding to an oscillation
frequency of 50 kHz, whereas timer_one_shot is only activated once for 500 ms
(if not reset).
Please consider the different effects of the configured times.
● Enable-Signal (activation): A timer can be enabled always or dependent on
other signals. Counting takes place upon activation, i.e. a continuous timer
runs through its period until this period is over and then begins a new one.
On the other hand, a timer in the single-shot mode starts with activation
(and then runs through it, independent of the ENABLE signal).
An example:
timer_ex.ENABLE:= 1;
(* Means that timer_ex is always enabled *)
H. ZANDER GmbH & Co. KG • Am Gut Wolf 15 • 52070 Aachen • Germany • Tel +49 241 9105010
Fax +49 241 91050138 • [email protected] • www.zander-aachen.de
2
The programming language ST16
37
timer_one_shot.ENABLE := X_1;
(* timer_one_shot is started by the X_1 signal with
the transition from 0 to 1 and runs through
subsequently *)
This configuration means that, in the event of continuous operation of the timer,
the signal assigned to the ENABLE parameter either allows the timer to operate
further or to stop temporarily; whereas in case of a timer with SINGLE_SHOT
mode, the ENABLE signal starts it. For example, the timer_one_shot continues
its operation after starting independently of the further behaviour of X_1.
Please consider the different effects of the configured ENABLE signals.
● RESET signal: The configuration of a RESET signal assigns a constant or a
variable (Boolean) value to this parameter. If this value is '1', the timer is
reset. This means that the timer restarts after the RESET signal is set to '0'.
The syntax is:
<timer_var>.RESET := <Conf_value>;
The constants '0' and '1' as well as BIT variables are allowed as
configuration values <Conf_value>.
An example:
timer_ex.RESET := 0;
(* Means that no reset takes place *)
timer_one_shot.RESET := EVENT_2;
(* Means that a reset takes place if the value
of EVENT_2 is '1' *)
It is mandatory to define a reset signal; it can be set to '0'.
● Polarity: For continuous timers, you can decide with the polarity, with
which value the operation shall be started. The syntax is
<timer_var>.POL := HIGH | LOW;
If the polarity is high, the timer begins with the value '1', followed by '0' in
the second part of the cycle. If the same specification is used for a OneShot-configured timer, the specified polarity is given out in the active phase
(timer counts), else the other one.
Please note that for the continuous mode, you can select whether there
should be an edge in the timer value at the beginning of the first timer
period (CONT_SE) or after the first timer period (CONT).
The polarity of the timers used in the example could be configured thus:
timer_ex.POL := HIGH;
(* Start with the status High *)
H. ZANDER GmbH & Co. KG • Am Gut Wolf 15 • 52070 Aachen • Germany • Tel +49 241 9105010
Fax +49 241 91050138 • [email protected] • www.zander-aachen.de
2
The programming language ST16
38
timer_one_shot.POL := LOW;
(* timer_one_shot shows the value '0' during the run,
'1' when disabled *)
Finally, please note that the variable of the TIMER type can be used in
programs as a read-only BIT variable. E.g. it is possible to directly use the
value of a timer as a clock signal or also as a BIT value.
An example of read-only application:
VAR_OUTPUT
Pulse AT Out_11;
END_VAR;
...
Pulse := timer_one_shot;
In this example, the One-Shot-Timer declared above is given out directly
at an output.
2.2.5.2 VAR_COUNTER
Counters are identical to the timers mentioned in the previous section, the only
difference is that they are not assigned to a clock source. You can assign a
value to a counter in the same way as a timer (however without a time unit);
this is the start value. The same parameters are available, i.e. the polarity, the
ENABLE and the RESET signal as well as the MODE (CONT or CONT_SE
or SINGLE_SHOT or SINGLE_SHOT_SE). In addition to this, a clock signal
must be assigned, which continues the counting at positive edges (0 → 1). The
last assignment, only reserved for counters, is:
<Counter_var>.CLK := <bit_variable>;
An example:
VAR_COUNTER
cnt1;
END_VAR;
VAR_INPUT
X_1; X_3;
END_VAR;
cnt1.ENABLE := X_1;
cnt1.RESET := X_3;
H. ZANDER GmbH & Co. KG • Am Gut Wolf 15 • 52070 Aachen • Germany • Tel +49 241 9105010
Fax +49 241 91050138 • [email protected] • www.zander-aachen.de
2
The programming language ST16
cnt1.MODE
cnt1.POL
cnt1.CLK
cnt1
:=
:=
:=
:=
39
SINGLE_SHOT;
HIGH;
timer_ex;
50000;
In this example, the COUNTER cnt1 counts downwards from 50000 and with
the clock source from timer_ex, but only if the counting is initiated. This is done
via X_1 (at '1') as long as X_3 does not initiate a reset (also with the value '1').
2.2.5.3 VAR_ADC
The PLC ZX20AT has an analogue-to-digital converter (ADC) with a bit width
of 16 bits and a conversion rate of 200 kSPS (kilo samples per second)
corresponding to a conversion time of 5 µs. The ADC offers 8 analogue input
channels; their connecting terminals are called AIn_01 to AIn_08 in the
program.
The declaration of the ADC channels takes place with
VAR_ADC
<adc_name> [AT <analog_in>];
{<adc_name2> [AT <analog_in2>];}
END_VAR;
With this declaration all parts required for controlling the ADC channels in the
program are integrated; the corresponding code is generated automatically. If
no specifications about the terminals are given, these are implemented by the
Compiler. You can view the assignments of the connections in the I/O
assignment window.
The ADC is read out every 5 µs and the value is saved internally; it can be read
in the program under the name of the ADC (<adc_name>). For the application
in the program, this value has the data type BIT_ARRAY and can be combined
with every integer value.
If e.g. 3 ADC are declared in the program, the values are updated every 15 µs;
for 8 channels, every 40 µs. Please note for your program: You can read these
values at any point of time; however, a new value is available only after this
time interval.
The variable, which is saved and used in the program can have a limited
number of bits, as per the configuration instruction
<adc_name>.WIDTH := <constant>;
<constant> := 2, 3, …. 16.
H. ZANDER GmbH & Co. KG • Am Gut Wolf 15 • 52070 Aachen • Germany • Tel +49 241 9105010
Fax +49 241 91050138 • [email protected] • www.zander-aachen.de
2
The programming language ST16
40
In this case, the lower bits (lsb) will be cut.
An example:
VAR_ADC
AD_0 AT AIn_01; XYZ AT AIn_04;
END_VAR;
AD_0.WIDTH := 8;
XYZ.WIDTH := 12;
Here, 2 A/D converters are declared (conversion time total 10 µs, 100 kSPS per
channel). The values used in the program are 8 bit wide for AD_0 and 12 bit for
XYZ. In read-only mode AD_0 corresponds to a BIT_ARRAY(8), XYZ to a
BIT_ARRAY(12).
2.2.5.4 VAR_DAC
The PLC ZX20AT has a digital-to-analogue converter (DAC) with a bit width
of 16 bit and a conversion rate of 200 kSPS (kilo samples per second)
corresponding to a conversion time of 5 µs. The DAC offers 4 analogue output
channels; their output terminals in the program are called AOut_01 to
AOut_04.
The declaration of the DAC converter channels takes place with
VAR_DAC
<dac_name> [AT <analog_out>];
{<dac_name2> [AT <analog_out2>];}
END_VAR;
With this declaration all parts required for controlling the DAC channels in the
program are integrated; the corresponding code is generated automatically. If
no specifications about the terminals are given, these are implemented by the
Compiler. You can view the assignments of the connections in the I/O
assignment window.
Every 5 µs, the DAC automatically accepts a new digital value, which is
buffered in an internal memory. The declared variable <dac_name> must be
assigned a value, which is intermittently given out on the DAC as analogue
voltage 0..10 V. For the application in the program, <dac_name> has got the
data type BIT_ARRAY and can be combined with every integer value.
If multiple DAC channels are used, the conversion times will add up: If e.g. 3
DAC are declared in the program, the value is updated every 15 µs; for 4
channels, every 20 µs. Please for your program: You can write a value to a
H. ZANDER GmbH & Co. KG • Am Gut Wolf 15 • 52070 Aachen • Germany • Tel +49 241 9105010
Fax +49 241 91050138 • [email protected] • www.zander-aachen.de
2
The programming language ST16
41
DAC variable at any point of time; however, a new output value is available at
AOut_xx only after this time interval.
The variable, which is saved and used in the program can have a limited
number of bits, as per the configuration instruction
<dac_name>.WIDTH := <constant>;
<constant> := 2, 3, …. 16.
In this case, the lower bits (lsb) will be cut.
An example:
VAR_DAC
DA_0 AT AOut_01; DXY AT AOut_04;
END_VAR;
DA_0.WIDTH := 8;
DXY.WIDTH := 10;
Here, 2 DA converters are declared (conversion period total 10 µs). The values
used in the program are 8 bit wide for DA_0 and 10 bit for DXY. The writeonly variable DA_0 corresponds to a BIT_ARRAY(8), DXY to a
BIT_ARRAY(10).
2.2.5.5 VAR_MESSAGE
A variable of the type MESSAGE, which is declared with the declaration of the
VAR_MESSAGE class, combines a text output (message) with an event. The
text, which is given out in a user-defined format, is saved in the PLC with the
event time and can be retrieved via ZanderNet. A PLC saves the last 100
events.
VAR_MESSAGE
<message_var> <message_string>;
END_VAR;
A constant value is assigned to the <message_var> variables already in the
declaration; that is a string <message_string>. Certain formatting rules are
applicable to this string:
1. The string is enclosed in inverted commas.
H. ZANDER GmbH & Co. KG • Am Gut Wolf 15 • 52070 Aachen • Germany • Tel +49 241 9105010
Fax +49 241 91050138 • [email protected] • www.zander-aachen.de
2
The programming language ST16
42
2. The characters allowed in the string are all presentable characters with the
exception of the inverted commas (= enclosure), the percentage sign %,
which is used for a formatted number output, and the backslash '\' (see 3.).
3. A special character is '\n' (valid as one character, Newline), which is defined
for skipping to the beginning of a new line.
4. A maximum of 20 characters (without Newline) are possible per line. After
that a new line starts automatically.
Because of the interaction between 3. and 4., the specified and the automatic
line break, the creation of message texts is slightly complicated. For this
reason, the result can be viewed and assessed in the information window
'Message Preview' after a compilation.
An example of declaration and display of the message:
VAR_MESSAGE
Over31 "Part 1 has reached \nthe value 31.";
END_VAR;
Here, the message variable, Over31 is declared with the corresponding text.
This text is displayed in the message preview window in the following manner:
LCD 0:
+--------------------+
|Part 1 has reached
|the value 31.
|
+--------------------+
In the section of the program instructions within the main program, i.e. below
the declaration part, a variable of the VAR_MESSAGE type can be assigned a
Boolean expression, e.g. the logical combination of several variables etc. If this
expression assumes the value '1', then the message is generated and saved along
with the date and time in the PLC. The Boolean expression itself defines the
event; the event is triggered with the positive edge (low → high).
An example:
VAR_INTPUT
Enable, In2;
END_VAR;
PROGRAM
...
IF(
(Enable = 0)
Over31 := 1;
AND
(In2 = 1) ) THEN
H. ZANDER GmbH & Co. KG • Am Gut Wolf 15 • 52070 Aachen • Germany • Tel +49 241 9105010
Fax +49 241 91050138 • [email protected] • www.zander-aachen.de
2
The programming language ST16
43
ELSE
Over31 := 0;
END_IF;
...
END_PROGRAM
The PLC ZX20T/AT saves the last 100 events, which can then be retrieved by
a PC via ZanderNet and also saved there.
The messages are completely flexible as they have the option of giving out
variable numerical values as well. A maximum of 6 different numerical values
are possible per message, whereby the message text must include a format for
the output of the number.
The syntax for the format of the output of a number, which must be placed
within the message text (string) in the declaration, is:
1. The format specification is enclosed in the percentage sign %.....% . For
this reason, % signs were excluded as valid characters in the output text.
2. Immediately after the opening percentage sign follows the keyword
VAR_FUNC, followed by (. At the end of the format specification, i.e.
directly before the closing % sign, is the closing bracket ).
3. The actual format specification is given within the brackets for
VAR_FUNC( ) , beginning with one of the keywords
INT( )
UINT( )
FIXP( )
UFIXP( )
INT() and UINT() put out the number yet to be defined as an integer,
FIXP() and UFIXP() as a fixed-point number. The leading letter U means
unsigned, i.e. the number is interpreted here without a sign, else it will be
interpreted as signed.
4. For integers (INT, UINT), the brackets of the number format include a list
of maximum 16 binary variables, separated by comma. The bit to the left is
the one with maximum value (msb, most significant bit), the one on the
right is the one with the minimum value (lsb, least significant bit). These
bits are transformed to an integer, depending on the number format, and
given out.
For a fixed-point format, the number of digits before and after the point are
specified by corresponding integer numbers, separated by a comma, before
the list of binary signals.
H. ZANDER GmbH & Co. KG • Am Gut Wolf 15 • 52070 Aachen • Germany • Tel +49 241 9105010
Fax +49 241 91050138 • [email protected] • www.zander-aachen.de
2
The programming language ST16
44
5. The number of data values per message is limited to 6, whereas the number
of binary signals for all outputs is limited to a total of 32.
Few examples for this:
VAR_MESSAGE
Over31_low "Value Block 1: \n
%VARFUNC(UINT(Q9, Q8, Q7, Q6, Q5,
Q4, Q3, Q2))% \n(Bit 9 .. 2)";
Over15_high "Value Block 2: \n
%VARFUNC(FIXP(2, 1, Q26, Q25, Q24,
Q23, Q22, Q21, Q20, Q19, Q18))%
\n(Bit 10 .. 2)";
END_VAR;
%VARFUNC(UINT(Q9, Q8, Q7, Q6, Q5, Q4, Q3, Q2))% puts out an integer
value 0 .. 255, formed from the Q9 bits (msb) ... Q2 (lsb).
%VARFUNC(FIXP(2, 1, Q26, Q25, Q24, Q23, Q22, Q21, Q20, Q19, Q18))%
puts out a fixed-point value -25.6 .. 0.0 .. 25.5, formed from the Q26 bits (sign),
Q25 (msb) ... Q18 (lsb).
The output format resulting from the format specifications is displayed in the
message preview by the '#' character (also for the decimal point).
Thus, the second output from the example (fixed-point format) is displayed as
such:
LCD 1:
+--------------------+
|Value Block 2:
|
#####
|(Bit 10 .. 2)
+--------------------+
ST16 uses the binary number format for internal representations and the
decimal format for external outputs in the messages. The conversion takes
place according to the following rules:
1. The following applies to the UINT and UFIXP formats: The lsb of the
format specification (to the extreme right) is multiplied by 1, the next by 2,
then by 4, 8 and so on and the results are added.
a) As regards UINT, this is the decimal value to be displayed.
b) As regards UFIXP, the number of digits after the decimal point is
counted from the right, if required, also extended with zeroes, then the
decimal point is set and one more 0 is written before that, if required.
H. ZANDER GmbH & Co. KG • Am Gut Wolf 15 • 52070 Aachen • Germany • Tel +49 241 9105010
Fax +49 241 91050138 • [email protected] • www.zander-aachen.de
2
The programming language ST16
45
2. As regards the INT and FIXP formats, a differentiation must first be made
whether the msb (to the extreme left) is 0 or 1. If it is 0, the procedure under
1. is followed. If it is 1, the two's complement is first formed and then the
procedure under 1. is followed. The result is then negative.
The two's complement is formed by inverting all bits of the binary
representation (= ones complement) and then adding 1.
An example:
The binary representation is "11000000". In the UINT format, the result is 0*1 +
0*2 + 0*4 + 0*8 + 0*16 + 0*32 + 1*64 + 1*128 = 192.
From the same bit combination, the two's complement (TC) is first formed in
the INT format (since the msb has the value 1). TC(11000000) = 00111111 + 1
= 01000000 (binary). The evaluation yields a numerical value of 64, thus the
result is -64.
2.3
Properties of variables
As already shown in the declarations, the variables have properties, which can
be configured depending on the variable type and the data type. To sum it:
Specific properties can be assigned to the declared variables using
configuration instructions in the assignment part; these are extremely important
for the operation.
H. ZANDER GmbH & Co. KG • Am Gut Wolf 15 • 52070 Aachen • Germany • Tel +49 241 9105010
Fax +49 241 91050138 • [email protected] • www.zander-aachen.de
2
The programming language ST16
2.3.1
46
Properties sorted according to the variable types:
2.3.1.1 VAR_INPUT
Permitted data types:
● BIT (BOOL)
Configurable properties:
● .TDB: Time value for individual debounce time. The logical value for the
input is only accepted if the signal remains stable at least throughout the
configured time value. Permissible time units are "us", "ms" and "s".
Note: If the .TDB property is not configured for an input, debouncing does
not take place, i.e. every signal change from approx. 1µs duration is
identified and this may lead to reactions of the PLC.
● .CLK: Synchronisation with a clock signal (edge); a D-flip-flop is
connected downstream to the input. If .TDB is simultaneously used, .TDB
has priority and the Compiler displays a warning message.
● .RE: Reset signal, asynchronous reset (setting to 0 without clock edge) of
the D-flip-flop connected downstream.
2.3.1.2 VAR_OUTPUT
Permitted data types:
● BIT (BOOL)
Configurable properties:
● .CLK: Synchronisation with a clock signal (edge)
● .RE: Reset signal, asynchronous reset (set to 0 without clock edge).
2.3.1.3 EXTERN VAR_INPUT
Permitted data types:
● BIT (BOOL)
● BIT_ARRAY
● DINT, INT, SINT
● UINT, USINT
H. ZANDER GmbH & Co. KG • Am Gut Wolf 15 • 52070 Aachen • Germany • Tel +49 241 9105010
Fax +49 241 91050138 • [email protected] • www.zander-aachen.de
2
The programming language ST16
47
Configurable properties:
● .CLK: Synchronisation with a clock signal (edge)
● .RE: Reset signal, asynchronous reset (set to 0 without clock edge).
2.3.1.4 EXTERN VAR_OUTPUT
Permitted data types:
● BIT (BOOL)
● BIT_ARRAY
● DINT, INT, SINT
● UINT, USINT
Configurable properties:
● .CLK: Synchronisation with a clock signal (edge)
● .RE: Reset signal, asynchronous reset (set to 0 without clock edge).
2.3.1.5 VAR, VAR_INTERN
Permitted data types:
● BIT (BOOL)
● BIT_ARRAY
● DINT, INT, SINT
● UINT, USINT
Configurable properties:
● .CLK: Synchronisation with a clock signal (edge)
● .RE: Reset signal, asynchronous reset (set to 0 without clock edge).
2.3.1.6 VAR_ALIAS
Permitted data types:
● BIT_ARRAY (implicit)
Configurable properties:
● .CLK: Synchronisation with a clock signal (edge), if the variable type of the
original variables allows this.
● .RE: Reset signal, asynchronous reset (set to 0 without clock edge), if the
variable type of the original variables allows this.
H. ZANDER GmbH & Co. KG • Am Gut Wolf 15 • 52070 Aachen • Germany • Tel +49 241 9105010
Fax +49 241 91050138 • [email protected] • www.zander-aachen.de
2
The programming language ST16
48
2.3.1.7 VAR_TIMER
Permitted data types:
● TIMER (implicitly given); works in the application in a read-only manner
as BIT
Configurable properties:
● .ENABLE: Boolean value for enabling or disabling the timer.
● .RESET: Reset signal (Boolean value) for restarting the timer.
● .MODE: Mode of operation (mode) of the timer: Single shot
(SINGLE_SHOT), single shot with edge at the beginning
(SINGLE_SHOT_SE), continuous (CONT) or continuous with edge at the
beginning (CONT_SE)
● .POL: Value specification (HIGH/LOW) for active time period (at singleshot operation) or for the first half of a cycle (at continuous mode of
operation)
● (Value assignment): Time value for single-shot operation or cycle at the
continuous mode of operation. The timer is counted backwards from this
start value to 0. Permissible time units are "us", "ms", "s" and "min".
2.3.1.8 VAR_COUNTER
Permitted data types:
● COUNTER (implicitly given); works in the application in a read-only
manner as BIT.
Configurable properties:
● .ENABLE: Boolean value for enabling or disabling the counter.
● .RESET: Reset signal (Boolean value) for restarting the counter.
● .MODE: Mode of operation (mode) of the counter: Single shot
(SINGLE_SHOT), single shot with edge at the beginning
(SINGLE_SHOT_SE), continuous (CONT) or continuous with edge at the
beginning (CONT_SE)
● .POL: Value specification (HIGH/LOW) for active counting period (during
single-shot operation) or for first half of a counting cycle (during continuous
mode of operation)
● .CLK: Assignment of a Boolean signal, which acts as a clock signal (at the
positive edge)
H. ZANDER GmbH & Co. KG • Am Gut Wolf 15 • 52070 Aachen • Germany • Tel +49 241 9105010
Fax +49 241 91050138 • [email protected] • www.zander-aachen.de
2
The programming language ST16
49
● (Value assignment): Counting value for single-shot operation or cycle at the
continuous mode of operation. The counter is counted backwards from this
start value to 0.
2.3.1.9 VAR_ADC
Permitted data types:
● ADC (implicitly given); works in the application in a read-only manner as
BIT_ARRAY.
Configurable properties:
● .WIDTH: Integer value (maximum 16) for determining the bit width used.
2.3.1.10 VAR_DAC
Permitted data types:
● DAC (implicitly given); works in the application in a write-only manner as
BIT_ARRAY.
Configurable properties:
● .WIDTH: Integer value (maximum 16) for determining the bit width used.
2.3.1.11 VAR_MESSAGE
Permitted data types:
● MESSAGE (implicitly given); works in the application in a write-only
manner as BIT
Configurable properties:
● (None; the contents of the message, which is put out when the signal is
enabled, is already specified during the declaration.)
2.3.2
Syntax of configuration instructions
2.3.2.1 Assignment of a synchronisation (clock signal)
<var_name>.CLK := <boolean_signal>;
With this assignment, you instruct the Compiler to comprehend this variable as
a synchronous (clocked) variable (D-flip-flop) and to simultaneously specify
H. ZANDER GmbH & Co. KG • Am Gut Wolf 15 • 52070 Aachen • Germany • Tel +49 241 9105010
Fax +49 241 91050138 • [email protected] • www.zander-aachen.de
2
The programming language ST16
50
the clock signal, which controls the data transfer into the output at a positive
edge. The clock signal must be of the BIT (BOOL) type.
2.3.2.2 Assignment of a variable-specific reset signal:
<var_name>.RE := <boolean_signal>;
Clocked variables (D-flip-flops) can be set to 0 (asynchronous reset) at their
output with a reset signal, independent of the clock and the input value. This
takes place automatically at the time of activation with the POR input and can
also take place during the operation with the defined signal.
2.3.2.3 Assignment of an Enable signal to a timer or counter:
<tim_count_name>.ENABLE := <boolean_signal>;
Timers and counters can be enabled and disabled. These are assigned a
Boolean variable or constant with the ENABLE property; if the Boolean
expression is 1, the timer or counter is enabled and it decrements with positive
edges (of a clock signal or counting signal). Otherwise, it remains at the present
counting value.
2.3.2.4 Assignment of a Reset signal to a timer or counter:
<tim_count_name>.RESET := <boolean_signal>;
Apart from enabling and disabling, timers and counters can also be reset. This
means that the current counter status is reset to the configuration value (start
value) and the timer or counter continues from that point when it is enabled.
As a result, a timer / counter, which is configured as SINGLE_SHOT, will
operate again when enabled, even if it has already run before. E.g. this can be
used for time-outs after an event.
2.3.2.5 Assignment of a mode of operation to a timer or counter:
<tim_count_name>.MODE := SINGLE_SHOT | SINGLE_SHOT_SE |
CONT | CONT_SE;
Timers and counters can be used in two modes of operation, single-shot (with
repeat option via RESET) and continuous. The mode of operation, also called
mode, is configured here.
H. ZANDER GmbH & Co. KG • Am Gut Wolf 15 • 52070 Aachen • Germany • Tel +49 241 9105010
Fax +49 241 91050138 • [email protected] • www.zander-aachen.de
2
The programming language ST16
51
2.3.2.6 Assignment of a polarity to a timer or counter:
<tim_count_name>.POL := HIGH | LOW;
The polarity assigned to a timer or counter determines the status, which this
timer / counter returns at a read access after enabling. This is the definition for
the timer or counter operating in the SINGLE_SHOT mode of operation.
For a timer / counter in the CONT mode, the polarity specifies the status, with
which the counting begins. After the first half, the value switches to the other
polarity, so that the same edge (low → high when POL = HIGH) occurs at
every underflow – the timer or counter then begins again with the start value.
2.3.2.7 Assignment of a counting signal (clock) to a counter:
<counter_name>.CLK := <bit_signal_name>;
While a timer is always clocked with the internal 2 MHz clock and therefore is
configured with a time value, a counter must always be combined with a
counting signal, so that counting can take place during positive edges of this
signal.
The assigned signal must be of the BIT type. If this configuration is missing,
the Compiler puts out an error.
2.3.2.8 Assignment of a time value to a timer:
<timer_name> := <time_value>;
The assigned time value is the initial value of the timer; counting is started
from this value downwards to 0. This value, a positive integer with a time unit
specification (microseconds (us), milliseconds (ms), seconds (s) or minutes
(min)) with a maximum value of barely 18 min, is reloaded in the CONT mode
after reaching 0 or after a reset.
2.3.2.9 Assignment of a start value to the counter:
<count_name> := <pos_const31>;
The start value is the initial value of the counter; counting is started from this
value downwards to 0. This value, a positive constant with at most 31 bit
width, decimal 1 to 1800000000, is reloaded into the counter in the CONT
mode after reaching 0 or after a reset.
H. ZANDER GmbH & Co. KG • Am Gut Wolf 15 • 52070 Aachen • Germany • Tel +49 241 9105010
Fax +49 241 91050138 • [email protected] • www.zander-aachen.de
2
The programming language ST16
52
2.3.2.10 Assignment of the bit width to ADC and DAC variables:
<adc_dac_var>.WIDTH := <pos_const4>;
The AD and DA conversion internally always takes place with 16 bit width,
however, the internal application can be limited. This takes place by setting the
bit width, which must be a constant number between 1 and 16 (pos_const4).
In the ADC, the lower bits, which are not suitable in the selected format, are
rejected. The resulting value is then right-aligned and scaled, so that the new
lsb (least significant bit) corresponds to the first bit, which is not rejected.
In the DAC, the specified number of bits is copied into the D/A converter
without further scaling of the input value.
In both the cases, the sign is maintained, i.e. the values are always interpreted
as signed (bipolar) values.
2.3.3
Data types and their properties
The following table contains all data types, which are used in ST16, including
the bit width and the conversion into other data types. The automatic
conversion in the right column indicates that an assignment to or a logical
combination with the specified data types is automatically possible.
Table 2.3.1 Overview of data types
Data type
Bit
width
Read access
Write access
Automatic
conversion into
BIT
BIT_ARRAY
1
1 .. 16
BIT
BIT_ARRAY
BIT
BIT_ARRAY
BIT_ALIAS
1 .. 16
BIT_ARRAY
BIT_ARRAY
DINT
32
DINT
DINT
INT
16
INT
INT
UINT
16
UINT
UINT
BOOL
DINT, INT, UINT,
SINT, USINT, BYTE,
WORD
DINT, INT, UINT,
SINT, USINT, BYTE,
WORD
BIT_ARRAY, INT,
UINT, SINT, USINT,
BYTE, WORD
BIT_ARRAY, DINT,
UINT, SINT, USINT,
BYTE, WORD
BIT_ARRAY, DINT,
INT, SINT, USINT,
BYTE, WORD
H. ZANDER GmbH & Co. KG • Am Gut Wolf 15 • 52070 Aachen • Germany • Tel +49 241 9105010
Fax +49 241 91050138 • [email protected] • www.zander-aachen.de
2
The programming language ST16
53
Data type
Bit
width
Read access
Write access
Automatic
conversion in
SINT
8
SINT
SINT
USINT
8
USINT
USINT
BYTE
8
USINT
USINT
WORD
16
UINT
UINT
TIMER
COUNTER
ADC
1
1
1 .. 16
BIT
BIT
BIT_ARRAY
-
DAC
1 .. 16
BIT_ARRAY, DINT,
INT, UINT, USINT,
BYTE, WORD
BIT_ARRAY, DINT,
INT, UINT, SINT,
BYTE, WORD
BIT_ARRAY, DINT,
INT, UINT, SINT,
UINT, WORD
BIT_ARRAY, DINT,
INT, UINT, SINT,
UINT, BYTE
BIT, BOOL
BIT, BOOL
DINT, INT, UINT,
SINT, USINT, BYTE,
WORD
-
2.4
BIT_ARRAY
Instructions and operators
It is mandatory to consider the following general instructions:
In ST16, all the assignments in the main program (PROGRAM …
END_ PROGRAM) are parallel to each other. This also means that a variable
(on the left side of the assignment) can be assigned a value only at one place in
the main program (Single Assignment Concept), thus, a direct assignment is
only possible at one place. In case of conditional assignments (→ 2.6 Control
structures), an assignment can be made in every branch of the condition; these
are considered as one.
In functions (FUNCTION .. END_FUNCTION), however, values can be
assigned to variables on the left side at several places. If a multiple assignment
is necessary due to algorithmic problems, you can move the algorithm into a
function.
H. ZANDER GmbH & Co. KG • Am Gut Wolf 15 • 52070 Aachen • Germany • Tel +49 241 9105010
Fax +49 241 91050138 • [email protected] • www.zander-aachen.de
2
The programming language ST16
2.4.1
54
General instructions about assignments
Assignments are a copy of a value to a target. This purely means that a target
variable, which must be declared, is set to a new value. Here, certain points
must be considered:
The target variable may not be of the Input type, i.e. not declared via
VAR_INPUT ... END_VAR, VAR_ADC ... END_VAR or with VAR_ALIAS
from input variables. This limitation is applicable naturally, since the values of
all input variables are only determined by the external wiring.
The value of a variable can be assigned in two ways – by direct assignment
with an equation or within control structures (see section 2.6). The assigned
value can be an expression or a constant.
Apart from the value assignment, the point of time of this operation is
extremely important. Without further specifications in the program, it is
assumed that value assignments shall take place spontaneously. Changes in the
sources of the target variables are visible immediately, apart from gate delays
in the range of a few nano-seconds.
Another version of value assignment can be created by configuring a clock
input to a target variable. This means that changes of the source will now be
effective only by occurring of a positive clock edge (transition from LOW to
HIGH), and with this operation, the description of the controller will have a
time grid. The assignment of a clock signal takes place with the instruction
<var_name>.CLK := < boolean_signal>,
where not only the pulse is defined, but also – as mentioned – the type of
variable storage is converted to a register. (See also section 2.3.2.1)
2.4.2
Representation of constants
Constant values are represented by numbers. The permissible values depend on
the data type, to which the constants are assigned or with which they are
combined.
The numerical representation has the following general form
[<sign>] <base>#<value>
As <base>2, 10 (default) or 16 are possible, whereby the specification 10 can
be omitted. The sign <sign>, which is optional, is only allowed in combination
with decimals (base 10), permissible values are + or -.
If the base is 2 (binary or dual numbers), 0 or 1 are allowed as characters; for
decimals {0, 1, 2, 3, 4, 5, 6, 7, 8, 9}, for the base 16 (hexadecimals) {0, 1, 2, 3,
H. ZANDER GmbH & Co. KG • Am Gut Wolf 15 • 52070 Aachen • Germany • Tel +49 241 9105010
Fax +49 241 91050138 • [email protected] • www.zander-aachen.de
2
The programming language ST16
55
4, 5, 6, 7, 8, 9, A, B, C, D, E, F}. Within the value specification, individual
underscores '_' can be inserted for better legibility.
Examples for constants:
2#01010101;
2#01_01_01_01;
16#AFFE;
10#45054;
45054
-16#1234
-12345
2.4.3
(*
(*
(*
(*
(*
(*
(*
correct *)
correct, identical *)
correct *)
correct *)
correct, identical *)
Error, incorrect sign *)
correct *)
Expressions in ST16
An expression is made up of a constant, a variable or a combination between
these. The general form of an assignment is as follows:
<variable> := <constant> | <variable> | <expression>;
An expression <expression> is created by combining one or two operands with
an operation. In ST16, the following operations are allowed (arranged as per
priority):
Table 2.4.1: Operators (sorted in ascending priority)
Operator
OR
XOR
AND
=, <>
<, >, <=, >=
+, -
Meaning
Logical OR
Exclusive OR
Logical AND
Compare with equal and not equal
Compare with less than, more than, less than / equal to,
more than / equal to
Addition, subtraction
H. ZANDER GmbH & Co. KG • Am Gut Wolf 15 • 52070 Aachen • Germany • Tel +49 241 9105010
Fax +49 241 91050138 • [email protected] • www.zander-aachen.de
2
The programming language ST16
Operator
*
NOT
<fkt_name>( )
(, )
56
Meaning
Multiplication
Logical inversion
Function call
Parentheses
Please note: The resulting data type of most of the combinations is the same
type as that of the operands, provided these are of the identical type, else
adjustment rules apply. If e.g. an INT and UINT value has to be added, the
result is of the type INT, since the sign must be considered in any case.
An exception to this are logical comparisons, which (as a result) will get the
type BOOL, in ST16 identical with BIT. If the comparison is true, the result is
1 (or TRUE), else 0 (or FALSE).
2.5
Instructions in ST16
The instructions in ST16 include the following program structures:
● Assignments to variables (the variable types VAR/VAR_INTERN,
VAR_OUTPUT and EXTERN VAR_OUTPUT) with a value, which arises
from a constant, a variable or a combination of variables (see 2.4.3),
● Functions calls; these can also be written in the form of assignments to
variables (variable types VAR/VAR_INTERN, VAR_OUTPUT and
EXTERN VAR_OUTPUT)
● Conditional statements, whereby assignments and function calls are
combined with conditions (see 2.6).
The configuration instructions (see 2.3.2) have a similar syntax, but they are
not instructions in the sense of the program structure.
The syntax of an assignment to a variable is:
<dest_variable> := <constant> | <variable> | <expression>;
H. ZANDER GmbH & Co. KG • Am Gut Wolf 15 • 52070 Aachen • Germany • Tel +49 241 9105010
Fax +49 241 91050138 • [email protected] • www.zander-aachen.de
2
The programming language ST16
2.6
57
Conditional statements in ST16
A PLC algorithm generally includes branching, case differentiations etc. For
this purpose, two conditional statements are included in ST16:
IF <condition> THEN
<expression>; {<expression2>;}
{ELSIF <condition2> THEN
<expression>; {<expression2>;}}
[ELSE
<expression>; {<expression2>;}]
END_IF;
and
CASE <var_name> OF
<value_1>:
{<value_k>:}
<expression>; {<expression2>;}
{<value_2>:
{<value_m>:
<expression>; {<expression2>;}}
[ELSE
<expression>; {<expression2>;}]
END_CASE;
Both program structures are equally suitable for case distinctions or branching;
so you can decide which one to use. Generally, the CASE statement is selected
for multiple branching, whereas few conditions are encoded with IF THEN ....
IF and CASE statements can be nested in ST16 in any manner up to a depth of
10.
The statements in detail:
2.6.1
IF, ELSIF, ELSE
In the IF structure, there is at least one condition and one instruction. The
condition must result in a Boolean value (true/false or 1/0) during the
evaluation, e.g. as a result of a comparison. If the condition is true at runtime,
the following instructions are executed, not otherwise.
H. ZANDER GmbH & Co. KG • Am Gut Wolf 15 • 52070 Aachen • Germany • Tel +49 241 9105010
Fax +49 241 91050138 • [email protected] • www.zander-aachen.de
2
The programming language ST16
58
The IF with the condition can be followed by as many instructions as desired,
all of which are precisely executed if the condition is fulfilled. Please note that
the sequence of instructions is not relevant in ST16, since all instructions are
executed parallel to each other. Likewise, a variable can be assigned a value in
different branches of an IF structure, but it can be assigned a value only once
within one branch.
The list of instructions to be processed for the true value (of the condition) is
ended with END_IF, ELSIF or ELSE.
The IF statements can be extended with further ELSIF branches, which results
in a chain of queries. The ELSIF branch is subject to the same syntax as the
beginning IF branch, i.e. ELSIF <condition> THEN <expression>;. It is
inserted before the keyword END_IF .
Please note that the program does not only run through this branch when the
corresponding condition is fulfilled, but additionally only, if the previous
conditions, i.e. IF and all previously existing ELSIF conditions, are not
fulfilled. This ensures that only one branch of the conditional statement is
active at a given point of time.
All conditions, which are not available in a particular branch of the chain of
queries, can be handled by the subsequent ELSE-branch. This is also optional,
but it does not include any condition, since all the 'remaining conditions' are
summed up here.
An example:
IF (A0 > A1) THEN
E1 := A2 + A3;
ELSIF (A0 = 0) THEN
E1 := A2 - A3;
ELSE
E1 := -1;
END_IF;
In this example, the variables A0 and A1 (accepted as INT) are compared with
one another. If A0 > A1 is true, E1 is assigned the sum of A2 and A3, and so on.
However, it is important that the ELSIF branch is run only if A0 is less than or
equal to A1 and A0 has the value 0. A value pair of (0, -1) for A0 and A1 leads
to the assignment E1 := A2 + A3, although A0 has the value 0. The ELSIF
branch is enabled only if the condition of the prior IF branch puts out the value
false.
H. ZANDER GmbH & Co. KG • Am Gut Wolf 15 • 52070 Aachen • Germany • Tel +49 241 9105010
Fax +49 241 91050138 • [email protected] • www.zander-aachen.de
2
The programming language ST16
2.6.2
59
CASE instruction
The CASE instruction has identical structures, which are included in the
keywords CASE and END_CASE . The CASE is again followed by an
expression, which is evaluated and which puts out a result instantaneously at
runtime: A 0 or 1 for Boolean variables or expressions; a constant within the
value range for INT, BIT_ARRAY etc.
After the keyword OF a list of constant results, which the expression can
assume and which will lead to the subsequent actions, is separated by commas.
After the colon that follows, several actions can be defined, which are executed
at this place.
The remaining case, i.e. the description of the default case, whereby the
exceptions are specified in the CASE lists, can be specified after the keyword
ELSE .
An example of a list of constant results is seen below in a 3-bit counter counting
in the Gray-Code, which is coded in a CASE structure:
VAR
GRAY: UINT;
END_VAR;
GRAY.CLK := Timer1;
CASE GRAY OF
0: GRAY := 1;
1: GRAY := 3;
3: GRAY := 2;
2: GRAY := 6;
6: GRAY := 7;
7: GRAY := 5;
5: GRAY := 4;
4: GRAY := 0;
ELSE GRAY := 0;
END_CASE;
2.7
Functions in ST16
Functions form one of the most important elements to structure programs. They
help in partitioning the programs into easy-to-read sections, allow multiple use
H. ZANDER GmbH & Co. KG • Am Gut Wolf 15 • 52070 Aachen • Germany • Tel +49 241 9105010
Fax +49 241 91050138 • [email protected] • www.zander-aachen.de
2
The programming language ST16
60
of a code section in the program and help in creating libraries for the purpose
of reuse beyond a program.
The concept in ST16 provides functions for structuring programs and allowing
multiple use. Three actions are necessary for inserting a function into a ST16
program: Definition of the function, declaration of the function and usage of
the function.
Note: Please note that no other function can be used within the scope of a
function definition.
2.7.1
Definition of function
A function in ST16 is defined before the actual main program, i.e. completely
described. The definition has the following frame structure:
FUNCTION <function_name> <return_value>
(* The section for declaration of variables *)
(* The instruction section *)
END_FUNCTION;
The definition starts with the keyword FUNCTION and ends with
END_FUNCTION. FUNCTION defines the name of the function, a string
corresponding to the naming rules for identifiers (see section 2.2.1), and the
return value, a data type for data-related variable types.
This is followed by the declaration of the variables used. In this section, the
input variables (input parameters for a function call) are declared via
VAR_INPUT … END_VAR, whereby this sequence also determines the
sequence in the function call. As the second variable type, VAR or
VAR_INTERN is allowed; the variables declared here can be used within the
function (and only here).
In the instruction section, any instructions can be used with the exception of
function calls. As a difference to the main program, the sequence of
instructions is relevant here; multiple assignments can also be made to a
variable.
In any case, the return value must be defined here. This takes place via the
following assignment
<function_name> := <constant> | <var_name> | <expression>;
H. ZANDER GmbH & Co. KG • Am Gut Wolf 15 • 52070 Aachen • Germany • Tel +49 241 9105010
Fax +49 241 91050138 • [email protected] • www.zander-aachen.de
2
The programming language ST16
61
Example of a function:
FUNCTION count : UINT
VAR_INPUT
Counter_Value, limit: UINT;
END_VAR;
VAR_INTERN
Next_Value: UINT;
END_VAR;
IF( Counter_Value < limit ) THEN
Next_Value := Counter_Value + 1;
ELSE
Next_Value := limit;
END_IF;
count := Next_Value;
END_FUNCTION
This function increments an input value (Counter_Value) by 1, if the value is
less than the variable limit, else the Counter_Value is set to limit . The obtained
value is then returned.
The function carries out a counter with limitation.
2.7.2
Function declaration
The function declaration announces the usage of a function to the main
program (a function, which is defined outside the program). It is only made up
of the keyword FUNCTION and the name of the function used.
Example:
FUNCTION count;
This declares the function count from the previous section.
The function declaration is in the declaration part of the main program, at any
place here.
2.7.3
Use of a function in the main program
After the function is defined and declared for the program, it can be used in the
program. This is simply done by the entry of the function names with a
parameter list (corresponding number and each data type). The function always
has got a return value, which can then be assigned to a variable or used in any
other manner.
H. ZANDER GmbH & Co. KG • Am Gut Wolf 15 • 52070 Aachen • Germany • Tel +49 241 9105010
Fax +49 241 91050138 • [email protected] • www.zander-aachen.de
2
The programming language ST16
62
Example:
VAR
COUNT_SIGNAL: INT;
END_VAR;
FUNCTION count;
COUNT_SIGNAL := count( COUNT_SIGNAL, 100 );
The example makes use of the function defined in section 2.7.1 for incrementing
up to the limit value (here 100).
2.8
Additional conditions for code development in
ST16
Apart from the syntactic elements and their semantics, it is important to
observe further conditions in ST16 for a successful code development. The
reason for this is found in the executing hardware of the PLCs, for which ST16
has been optimised.
Additional conditions include four subjects, which must be observed (very
important).
Concurrency and single assignment to variables
As already described, all instructions are interpreted in the main program in
such a way that they are executed parallel to each other, independent of the
sequence in the program code. This also means that a value may be assigned to
a variable only at one place in the main program, because the assignment at
multiple places would be competitive. This concept is called “Single
Assignment”.
A variable assignment is said to be single if a conditional statement (IF, CASE)
includes only one assignment per branch, but multiple ones in several branches.
Since at most one branch is active within the scope of a conditional statement
during runtime, there is no competition here.
Violation of this Single-Assignment rule will lead to an error message of the
compiler.
On the other hand, within the scope of a function, the sequence of the
assignments is considered and executed, as they appear the program text. Thus,
the Single-Assignment rule does not apply here.
H. ZANDER GmbH & Co. KG • Am Gut Wolf 15 • 52070 Aachen • Germany • Tel +49 241 9105010
Fax +49 241 91050138 • [email protected] • www.zander-aachen.de
2
The programming language ST16
63
Complete assignment
The Single-Assignment rule restricts the assignment of values to variables to
maximum 1 per branch of a conditional statement. If the variable assignment is
not clocked, i.e. if there is no configuration for .CLK, at least one assignment
per branch must be available, so that the variable is completely defined.
The reason for this is, that a variable would have to retain its value in a branch,
where there is no explicit assignment for this variable. This is an implicit hold
condition (storage) for a variable, which is, however, not possible for variables
that are not clocked.
Violation of this completion rule will lead to an error message of the compiler.
If the variable is clocked, this rule does not apply because these variables are
actually saved until the next clock edge appears.
Independency of cycles
Another restriction arising from the concurrency of the instructions in the
program, is in the cyclic assignment of values to non-clocked variables. This
means that a variable, e.g. "a" is defined on the basis of "b", and "b" on the
basis of "a", i.e. there is a cycle in the dependency graph.
Such situations are represented in the following examples:
Direct cycle:
A := NOT A; (* for A as BIT variable *)
Cycle with several variables:
B := C;
C := NOT D; (* for B, C, D, E as BIT variable *)
D := B AND E;
Cycle in arithmetic operation
X := X+1;
(* for X as INT variable *)
In the first two cases, it is clear that this is a cycle with inversion; in the third
case too, this is the case, because the summation, an arithmetic operation, also
operates with inversions.
ST16 has got a detection feature for cyclic dependencies of non-clocked
variables, which, however, merely generates an important warning (see 3.1.2).
If you receive such a warning, you can still try to run the Fitter, because finally
the Fitter decides whether or not the program can be implemented. In any case,
follow this carefully.
Cyclic dependencies with a cycle, in which a variable is clocked, are
completely safe and can be used at any time. No warning is displayed here.
H. ZANDER GmbH & Co. KG • Am Gut Wolf 15 • 52070 Aachen • Germany • Tel +49 241 9105010
Fax +49 241 91050138 • [email protected] • www.zander-aachen.de
2
The programming language ST16
64
Functions mean "inline code"
The last guideline for the implementation of algorithms in ST16 is rather a
note. Occasionally, functions are not only written to structure a program in a
better way, but also to save program space, because a function, which is written
once, can be used multiply.
This effect of saving space is not seen in ST16, since all instructions, also all
function calls are simultaneously executed parallel to each other. To make this
possible, the Compiler must copy functions at every calling point in the
program, as if you would have written the code without a function. This is
called inline code.
However, you should use functions for structuring the program and
simultaneously to save the writing effort. This note gives just a warning against
any expectations of saving program space.
2.9
Three examples
The first example shows a kind of self-generated sequential light (Linear
Feedback Shift Register, LFSR) with a length of 15 bit. For this, the program
uses the Shift function SHL of the standard.lib library.
(* *********************************** *)
(* Linear Feedback Shift Register
*)
(* *********************************** *)
(* USES defines the specific use of SHL (shift left) *)
(* from standard.lib in the program
*)
USELIB standard.lib;
(* Not absolutely essential, since
standard.lib is default *)
USES SHL.standard.lib;
PROGRAM LFSR
PLC_NAME = "LSFR_PLC2";
PLC_TYPE = "ZX20T";
VAR_INPUT
p_on_reset AT POR;
END_VAR;
VAR
X: INT := 0; X0: INT;
H. ZANDER GmbH & Co. KG • Am Gut Wolf 15 • 52070 Aachen • Germany • Tel +49 241 9105010
Fax +49 241 91050138 • [email protected] • www.zander-aachen.de
2
The programming language ST16
END_VAR;
VAR_TIMER
timer1;
END_VAR;
VAR_OUTPUT
Q0; Q1; Q2; Q3; Q4; Q5; Q6; Q7;
Q8; Q9; Q10; Q11; Q12; Q13; Q14; Q15;
END_VAR;
VAR_ALIAS
QOut[ Q14, Q13, Q12, Q11, Q10, Q9, Q8, Q7, Q6,
Q5, Q4, Q3, Q2, Q1, Q0 ];
END_VAR;
(* This is followed by the instruction part *)
(* X is clocked with a period of 250 ms *)
X.CLK :=
timer1;
Q15.CLK :=
timer1;
H. ZANDER GmbH & Co. KG • Am Gut Wolf 15 • 52070 Aachen • Germany • Tel +49 241 9105010
Fax +49 241 91050138 • [email protected] • www.zander-aachen.de
65
2
The programming language ST16
66
(* The algorithm for the pseudo-random number
generator is described below *)
X
:= SHL( X, 1 ) + X0;
(* Shift and Feedback *)
QOut
:=
X;
Q15 := NOT Q15;
IF( QOut = 0 ) THEN
X0 := 1;
ELSIF (Q14 = 1 AND
X0 := 1;
ELSIF (Q14 = 0 AND
X0 := 1;
ELSE
X0 := 0;
END_IF;
Q7 = 0 ) THEN
Q7 = 1 ) THEN
(* Now the configuration of the timer *)
timer1.ENABLE := 1;
timer1.RESET
:= p_on_reset;
timer1.MODE
:= CONT_SE;
timer1.POL
:= HIGH;
timer1
:= 250ms;
END_PROGRAM;
Saturating increment / decrement
The following example shows the use of a function for a rather complicated
calculation. In this function, a transferred value (count_value) is
incremented or decremented, depending on whether the parameter up_down is
at 1 (= increment) or 0 (= decrement).
The increment / decrement function is executed till a first upper
(upper_limit) or lower limit (lower_limit) is reached. Starting from
this limit, the return value persists, whereby it can change in the other direction
at any point of time.
Thus, the application implements a sort of saturating increment or decrement.
H. ZANDER GmbH & Co. KG • Am Gut Wolf 15 • 52070 Aachen • Germany • Tel +49 241 9105010
Fax +49 241 91050138 • [email protected] • www.zander-aachen.de
2
The programming language ST16
67
(* *********************************** *)
(* Example for the use of functions
*)
(* *********************************** *)
FUNCTION sat_inc_dec : INT
VAR_INPUT
count_value: INT;
up_down: BIT;
upper_limit: INT;
lower_limit: INT;
END_VAR;
VAR_INTERN
Next_Value: INT;
END_VAR;
IF( up_down = 1 ) THEN
IF( count_value < upper_limit ) THEN
Next_Value := count_value + 1;
ELSE
Next_Value := count_value;
END_IF;
ELSE
IF( count_value > lower_limit ) THEN
Next_Value := count_value - 1;
ELSE
Next_Value := count_value;
END_IF;
END_IF;
sat_inc_dec := Next_Value;
(* Value assignment to function *)
END_FUNCTION;
PROGRAM Test_Case
PLC_NAME = "FUNCTION_TEST";
PLC_TYPE = "ZX20T";
VAR_INPUT
UP_NDOWN; (* Log. 1: Forward, log. 0: Backwards *)
p_on_reset AT POR; (* Power-On-Reset *)
END_VAR;
H. ZANDER GmbH & Co. KG • Am Gut Wolf 15 • 52070 Aachen • Germany • Tel +49 241 9105010
Fax +49 241 91050138 • [email protected] • www.zander-aachen.de
2
The programming language ST16
68
VAR_TIMER
timer1;
END_VAR;
VAR
TEST_INC : INT;
END_VAR;
VAR_OUTPUT
Q0 AT Out_01; Q1 AT Out_02; Q2 AT Out_03;
Q3 AT Out_04; Q4 AT Out_05; Q5 AT Out_06;
Q6 AT Out_07; Q7 AT Out_08;
END_VAR;
VAR_ALIAS
Output [Q7, Q6, Q5, Q4, Q3, Q2, Q1, Q0];
END_VAR;
FUNCTION sat_inc_dec;
(* This is followed by the instruction part *)
(* At first, it is defined that the variable TEST_INC is
clocked, and that in relation to a time-defined
clock *)
TEST_INC.RE := p_on_reset;
TEST_INC.CLK := timer1;
TEST_INC := sat_inc_dec( TEST_INC, UP_NDOWN, 62, 3 );
(* The value of TEST_INC is transferred to the outputs
Q0..Q7 *)
Output := TEST_INC;
(* This is followed by the configuration of the timer *)
timer1.ENABLE := 1;
timer1.RESET := 0;
timer1.MODE
:= CONT;
timer1.POL
:= LOW;
timer1
:= 250ms;
END_PROGRAM;
H. ZANDER GmbH & Co. KG • Am Gut Wolf 15 • 52070 Aachen • Germany • Tel +49 241 9105010
Fax +49 241 91050138 • [email protected] • www.zander-aachen.de
2
The programming language ST16
69
Identification of communication loss between two communication
partners
The following example shows a simple communication between two partner
stations (named Ernie and Bert), which also contains a loss monitoring facility.
The PLC Ernie sends a change signal (1 bit, every 200 ms with changing
value), which is received by the PLC Bert. This signal is stored twice so as to
achieve a pulse delay in the prevalent signal and in the saved signal and thereby
detect the change on the application side.
The actual failure identification is implemented as timeout. For this, a timer is
used in the SINGLE_SHOT mode, which is always reset (restarted) if the
received and saved signal do not match. If a long time has elapsed since the last
transmission, the timeout takes effect and the communication loss is detected.
However, few marginal conditions must be considered: Thus, few seconds (3 to
10 s depending upon the configuration) can pass until the booting of the PLC
(of its micro controller) and until the communication via network switches
takes place, which have to be bridged with a second timer.
Moreover, it is important to attend the communication frequency, which is
currently 4 per second (one package every 250 ms). At 200 ms stable time of a
value to be transferred and 250 ms time between 2 transmissions, it is possible
that the value is transferred, but no new value is received by the recipient; this
is interpreted as a communication loss by the recipient. As a counter-measure, a
longer timeout period is selected accordingly.
Here is the source code, first for Ernie:
PROGRAM Ernie_transmits
PLC_NAME = "ERNIE";
PLC_TYPE = "ZX20T";
(* Variable part *)
VAR_INPUT
clock AT appclk;
p_on_reset AT POR;
END_VAR;
EXTERN VAR_OUTPUT
comm_from_ernie: BIT;
END_VAR;
VAR_INTERN
change: BIT;
END_VAR;
H. ZANDER GmbH & Co. KG • Am Gut Wolf 15 • 52070 Aachen • Germany • Tel +49 241 9105010
Fax +49 241 91050138 • [email protected] • www.zander-aachen.de
2
The programming language ST16
VAR_TIMER
timer1;
END_VAR;
(* *********************************** *)
(* ***
Logic part
*** *)
(* *********************************** *)
(* Generation of the change signal *)
change.CLK := timer1;
change := NOT change;
comm_from_ernie := change;
timer1.ENABLE
timer1.POL
timer1
timer1.MODE
timer1.RESET
:=
:=
:=
:=
:=
1;
HIGH;
400 ms;
CONT;
p_on_reset;
END_PROGRAM;
Source code for Bert (recipient):
PROGRAM Bert_receives
PLC_NAME = "BERT";
PLC_TYPE = "ZX20T";
VAR_INPUT
clock AT appclk;
p_on_reset AT POR;
END_VAR;
VAR_OUTPUT
TIME_OUT;
END_VAR;
H. ZANDER GmbH & Co. KG • Am Gut Wolf 15 • 52070 Aachen • Germany • Tel +49 241 9105010
Fax +49 241 91050138 • [email protected] • www.zander-aachen.de
70
2
The programming language ST16
71
VAR_INTERN
timeout_reset: BIT := 1;
compare_safety: BIT;
compare_safety2: BIT;
END_VAR;
EXTERN VAR_INPUT
comm_from_ernie: BIT;
END_VAR;
VAR_TIMER
timeout_timer; start_timer;
END_VAR;
(* *********************************** *)
(* ***
Logic part
*** *)
(* *********************************** *)
compare_safety := NOT comm_from_ernie;
compare_safety.CLK := clock;
compare_safety2 := compare_safety;
compare_safety2.CLK := clock;
(* Generation of a reset for the timeout *)
IF( comm_from_ernie = compare_safety2 ) THEN
timeout_reset := 1;
ELSE
timeout_reset := 0;
END_IF;
(* The timeout timer is set to 1 s to be able to detect
the communication loss *)
timeout_timer.ENABLE := start_timer;
timeout_timer.POL
:= LOW;
timeout_timer
:= 1000 ms;
(* Waiting period till timeout *)
:= SINGLE_SHOT;
timeout_timer.MODE
timeout_timer.RESET := timeout_reset;
(* The timer start_timer must bridge the first time
period *)
start_timer.ENABLE
:= 1;
start_timer.POL
:= LOW;
start_timer
:= 12 s;
start_timer.MODE
:= SINGLE_SHOT_SE;
start_timer.RESET
:= 0;
H. ZANDER GmbH & Co. KG • Am Gut Wolf 15 • 52070 Aachen • Germany • Tel +49 241 9105010
Fax +49 241 91050138 • [email protected] • www.zander-aachen.de
2
The programming language ST16
(* The timeout signal: *)
TIME_OUT
:= 1;
TIME_OUT.RE := p_on_reset OR NOT start_timer;
TIME_OUT.CLK := timeout_timer;
END_PROGRAM;
H. ZANDER GmbH & Co. KG • Am Gut Wolf 15 • 52070 Aachen • Germany • Tel +49 241 9105010
Fax +49 241 91050138 • [email protected] • www.zander-aachen.de
72
3.
Error messages of the Compiler
73
3 Error messages of the Compiler
3.1
Compiler
3.1.1
Warning messages
Warning messages are displayed in the output window when the diagnostic
mode is enabled (see section 1.7.1).
W001 keyword is VAR_INPUT
W002 keyword is VAR_OUTPUT
W003 keyword is VAR_IN_OUT
W004 keyword is VAR_INTERN or VAR
W005 keyword is VAR_ALIAS
W006 keyword is VAR_MESSAGE
W007 keyword is VAR_TIMER
W008 keyword is VAR_COUNTER
W009 keyword is VAR_ADC
W010 keyword is VAR_DAC
W011 keyword is END_VAR
W012 keyword is END_FUNCTION
W021 keyword is END_IF
W022 keyword is END_CASE
When these warnings are put out, there is a write error in a keyword, which is
tolerated exceptionally. As a rule, all the keywords of the language must be
written correctly; in "compound" words such as VAR_INPUT or
END_FUNCTION, the components in ST are combined with a single
underscore. If this underscore is omitted – e.g. VARINPUT is written – then
the correct keyword is accepted and the corresponding above mentioned
warning message is given out.
W031 END_PROGRAM statement missing
There was no concluding END_PROGRAM in the source code, and hence, the
Compiler assumes that the source code ends at the end of the text.
H. ZANDER GmbH & Co. KG • Am Gut Wolf 15 • 52070 Aachen • Germany • Tel +49 241 9105010
Fax +49 241 91050138 • [email protected] • www.zander-aachen.de
3.
Error messages of the Compiler
74
W041 No PROGRAM statement found
Actually, a ST16 program must always have a PROGRAM statement, i.e., the
Compiler must be made aware of the beginning of the instructions. The only
exception is a file, which only contains functions (e.g. for libraries).
The warning is given out if the Compiler finds a FUNCTION statement, but no
PROGRAM statement. You can ignore the warning, if you intended to do so.
W051 Separating character is ,
Defined as an ALIAS variable – a variable of the type BIT_ARRAY, whereby
the individual bit values correspond to other variables –, and hence the
assignment must be in the form of a variable list. The variable names are
separated with a comma (,); however, a semi-colon (;) is used.
W052 Separating character is ;
For the declaration of variables of the same storage class (VAR_INPUT,
VAR_INTERN …) and the same data type, variables can be listed, whereby
they should be separated with a semi-colon. However, a comma is used here.
W053 Single ';' found
The Compiler has detected a blank line, which exclusively has a semi-colon.
W061 Only single underscores are allowed for separation
A rule regarding the nomenclature of variables and functions is that these can
contain letters, numbers as well as single underscores. Here, the last rule is
violated.
W081 Too many constants are given in OF-construct, rest is
omitted
You can define a series of values within a CASE structure via the line OF
<constant1, constant2, …>, for which the following rows must be executed.
The number of constants is currently restricted to 10; as this number was
exceeded, the rest of the constants were omitted.
Please reduce the number of constants by e.g. specifying two OF contructs with
the respective constants or using an IF statement.
W101 Invalid PLC type found
No or an invalid PLC type was found in the source code (statement:
PLC_TYPE = "ZX20T" etc.). The PLC type set in the device manager is used.
H. ZANDER GmbH & Co. KG • Am Gut Wolf 15 • 52070 Aachen • Germany • Tel +49 241 9105010
Fax +49 241 91050138 • [email protected] • www.zander-aachen.de
3.
Error messages of the Compiler
75
W102 PLC-type inside text and Compiler setting is inconsistent,
Compiler settings are chosen
A PLC type was found in the source code, which deviates from the type set in
the Compiler or project (device manager). The type set in the project is used.
W111 No assignment to variable <variable_name>
The variable with the name <variable_name> was declared, but never assigned
a value.
W112 Too less digits defined, output is truncated
This error message refers to the user-defined messages. Here, special
formatting strings define, how a variable value should be put out; anyway, the
Compiler has determined that not enough bit places were defined for the output
format.
W121 CRIT-condition has no effect and will be ignored
W122 OE-condition has no effect and will be ignored
These error messages are the result of the compatibility of EX_PRESS 5 with
former versions. CRIT (for a critical path) and OE (Output Enable) are
properties of outputs, which are currently not used. The Compiler puts out the
warning in order to avoid certain effects.
W141 The clock assignment to <var_name> could be an
asynchronous signal
The Compiler checks if the clock signals, where variables accept values at a
rising edge, are synchronous or asynchronous. Finally, the system has only one
synchronous source, the 2 MHz clock signal, which is provided at the defined
input pin appclk. Signals derived from there, e.g. timers, are synchronous, too,
whereas input signals, which on the other hand are not synchronised, are
asynchronous.
If you receive this message, you must pay attention to the result of the Fitter
run. The Fitter setting is such that it accepts these non-synchronised signals as a
clock; but the possibility cannot be excluded that many of these signals have a
significantly smaller clock rate in the application. If you have problems, please
contact Zander GmbH & Co KG.
W201 IP-configuration incomplete, configuration was cancelled
This warning is put out when the NTP (Network Time Protocol) or DHCP
(Dynamic Host Configuration Protocol) are defined, but the IP address of the
H. ZANDER GmbH & Co. KG • Am Gut Wolf 15 • 52070 Aachen • Germany • Tel +49 241 9105010
Fax +49 241 91050138 • [email protected] • www.zander-aachen.de
3.
Error messages of the Compiler
76
PLC is yet to be specified. In this situation, all the IP configurations are
deleted, since they are meaningless without the IP address of the PLC.
W301 Function <function_name> is defined but never used
Here, a function is defined, i.e. its interface and contents described, but never
used.
W302 Function is not declared
Here, a function that has not been declared before is used. This means that a
declaration such as 'FUNCTION …' is missing in the main part of the program.
Please complete this declaration.
W401 Too many libraries are used
Currently, the number of libraries to be integrated by the USELIB instruction
is restricted to 20; this is exceeded. Other libraries cannot be integrated; this
leads to an error when functions from this file are actually used.
Please check if you really require all the libraries. If you do, please contact
Zander GmbH & Co. KG.
W402 Library file name is too long
The library file name may not consist of more than 18 characters, together with
the ending, and no spaces.
If the library name is more than 18 characters, you must reduce it in the LIB
directory and adapt it in the source code accordingly.
W403 Library <Library name> is not readable
The library file specified by you cannot be opened for reading, because e.g. it
does not exist. The reason for this could be that you have specified an incorrect
name or an incorrect ending. The standard ending (extension) is .lib, which
can be omitted; all other endings must be specified completely in the USELIBinstruction.
Please check your specification and correct it if required. If the file is available,
it should be released for reading access.
W404 Library <Library name> is already included
This warning is put out when you make an attempt to integrate a library via the
USELIB-instruction the second time. E.g. this warning is given out when
H. ZANDER GmbH & Co. KG • Am Gut Wolf 15 • 52070 Aachen • Germany • Tel +49 241 9105010
Fax +49 241 91050138 • [email protected] • www.zander-aachen.de
3.
Error messages of the Compiler
77
USELIB standard.lib; already exists in the program file, since
standard.lib is already included by default.
You can either ignore this warning or delete the USELIB-instruction in the
program text.
W411 Library <Library name> shows an internal error
This warning means that the Compiler could not read the library correctly,
because certain formatting rules were not followed.
The reason for this could be a corrupt library file, the contents of which have
been changed. You should replace the file e.g. by re-installing it or perform a
re-compiling to the library.
W421 Function <Function name> was not found
The Compiler has got the library, but the function specified via USES was not
found.
Please check the spelling of the function and ensure if the function really exists
in the selected library.
3.1.2
Severe warnings
The term "severe warning" might look strange, since you are either expecting a
warning or an error message. However, this indicates that there is a possible
error in the detected incident. At this point, the compiler cannot precisely
determine whether the logic (several program lines can be incorporated) is
faulty or not.
In such a situation, you have to decide whether the algorithm is correct or is the
outcome of a mistake. Please check carefully. If you hand over the translated
source code to the Fitter (VHDL Compiler with placement), a Fitter error can
occur, which cannot be eliminated.
If, on the other hand, the Fitter translates the generated code without any error,
this means that the assignment was correct and you can retain the description
despite the important warning. You must then check the runtime behaviour.
The important warning messages in detail:
S001 Cyclic asynchronous assignment to <Var_Name>
Certain checks are performed between the complete compiling of the structured
text in VHDL and the generation of the VHDL code, mainly whether the
H. ZANDER GmbH & Co. KG • Am Gut Wolf 15 • 52070 Aachen • Germany • Tel +49 241 9105010
Fax +49 241 91050138 • [email protected] • www.zander-aachen.de
3.
Error messages of the Compiler
78
assignment to non-clocked variables has led to a cyclic value assignment. In
the simplest case, this takes place with the line
a := NOT a;
where a is the Boolean variable with no clock assigned (something like
a.CLK := Clock1;). More complex cycles are e.g.
a := b AND c;
b := NOT d;
d := NOT a;
or even
a := NOT b;
IF( a = 1 ) THEN
b := NOT a;
ELSE
b := a;
END_IF;
The Compiler identifies such cycles of asynchronous assignments, but does not
decide whether they are allowed or not. A cyclic assignment is allowed
precisely, if never an inverted bit is assigned to itself.
If this warning is put out, you must examine the algorithm precisely. You can
ignore the warning, but the Fitter will put out an error, if there is an inverted
assignment of a bit. In that case, you must change the code, e.g. with a clocked
(synchronous) assignment to one of the variables in the cycle.
3.1.3
Error messages
E000 Syntax errors
Here, the compiler detects a general syntax error, which is not specified further.
E001 Identifier <Identifier_Name> is a reserved keyword
Here, an attempt is made to declare a variable with an identifier, which is
identical with a reserved keyword (see list in section 5). Please select another
name for the variable.
H. ZANDER GmbH & Co. KG • Am Gut Wolf 15 • 52070 Aachen • Germany • Tel +49 241 9105010
Fax +49 241 91050138 • [email protected] • www.zander-aachen.de
3.
Error messages of the Compiler
79
E002 Identifier name is occupied or reserved keyword
Here, an attempt is made to declare a variable with an identifier, which is
already used. Please select another name for the variable.
E003 Expression to complex, abort
While describing the algorithm, the IF and CASE statements can be nested into
each other multiple times. The maximum permissible nesting depth is 20,
which was exceeded. Please try to formulate the expression using a lower
nesting depth.
E011 Neither PROGRAM nor FUNCTION statement found
This error is given out if neither a PROGRAM statement (= beginning of the
complete program) nor a FUNCTION statement (= beginning of a function,
which is also logical without PROGRAM e.g. for a library) is found in the
source code.
This error message particularly appears when an attempt is made to compile a
blank file.
E012 Program name missing or not correct
Every program, which begins with the PROGRAM statement, must have a
name, with which it can be identified. Here, no name was specified or a name
corresponding to a reserved keyword was specified. Please complete or replace
the program name.
E013 Identifier too long
The current maximum length of identifiers is 20 characters. This length has
been exceeded, please select a shorter identifier.
E014 Identifier not correct
The selected identifier is not correct; this could be due to various reasons.
Thus, only letters, digits (not the first character) and simple underscores may be
used. Certain characters or character combinations (e.g. <=) are only allowed to
be used as operators.
E015 Identifier unknown or reserved keyword
An identifier, which was not declared before was used and is, therefore,
unknown to the Compiler. Please check the source code for any write errors or
declare the identifier before use.
H. ZANDER GmbH & Co. KG • Am Gut Wolf 15 • 52070 Aachen • Germany • Tel +49 241 9105010
Fax +49 241 91050138 • [email protected] • www.zander-aachen.de
3.
Error messages of the Compiler
80
E021 ']' missing
The definition of BIT variables, which are combined to ALIAS variables, is
written in a pair of brackets []. The closing bracket is missing here.
E022 '[' missing
The definition of BIT variables, which are combined to ALIAS variables, is
written in a pair of brackets []. The opening bracket is missing here.
E023 Too many ')' found
The number of closing brackets is more than the number of opening brackets.
The compiler does not ignore this, since the parentheses affect the semantics of
the lines.
E024 ')' missing
The number of opening brackets is more than the number of closing brackets.
The compiler does not ignore this, since the parentheses affect the semantics of
the lines.
E025 ';' missing
A semi-colon at the end of a program line is missing. Please insert it.
E026 ':' missing
A colon at the end of a label is missing (e.g. within the CASE statement).
Please insert it.
E031 THEN missing
In the IF statement, the IF and ELSIF and the included condition must be
followed by THEN, like this
IF <condition> THEN
This THEN has been left out or has not been written correctly.
E032 END_IF expected
The IF statement must be concluded with an END_IF, but it was not found till
the END_PROGRAM. Please complete it.
E033 OF missing
For the CASE statement, the keyword CASE must be followed by the variable
to be evaluated and then the keyword OF, like this
H. ZANDER GmbH & Co. KG • Am Gut Wolf 15 • 52070 Aachen • Germany • Tel +49 241 9105010
Fax +49 241 91050138 • [email protected] • www.zander-aachen.de
3.
Error messages of the Compiler
81
CASE <Var_Name> OF
This OF has been left out or has not been written correctly.
E034 END_CASE expected
The CASE statement must be closed with an END_CASE. Please complete it.
E035 ELSIF without previous IF
E036 ELSE without previous IF
E037 END_IF without previous IF
The compiler has found a component of the IF statement, but the opening IF is
missing. Please check the lines before the error message.
E038 END_CASE without previous CASE
The Compiler has found an END_CASE without a previous CASE. Please
check if there is a write error or if there is a subsequent error.
E039 No label allowed here
Labels, i.e. structures, followed by a colon are only allowed for the CASE
statement.
E040 Label for CASE missing
For the CASE statement, a label, i.e. a constant must be inserted followed by a
colon.
E041 Label <Constant> for CASE is already used
In CASE/OF, you have used a constant, which has already been specified and
is thus, doubled. Please delete this value specification or integrate the
corresponding lines into the first specification of this constant.
E051 Operator expected
This is a syntax error, which is e.g. detected when two operands are one behind
the other without an operator in between.
E061 This kind of statement is unknown
The compiler has found an instruction, which it cannot interpret further. Please
correct the line according to the syntax rules.
H. ZANDER GmbH & Co. KG • Am Gut Wolf 15 • 52070 Aachen • Germany • Tel +49 241 9105010
Fax +49 241 91050138 • [email protected] • www.zander-aachen.de
3.
Error messages of the Compiler
82
E062 Unknown operator
An unknown operator was detected in an instruction. Please correct it.
E063 Unknown separating character
Generally, the semi-colon ';' is used as the separating character – exception to
this is the list of variables of the same class and the same type, where a comma
is also allowed. Here, a separating character, which may not be in this place,
was used.
E071 Assignment operator not found
In a line in the code area, which begins with a declared name of a variable, a
value must be assigned to these variables. The assignment operator := required
here was not found.
E072 Wrong assignment operator
The assignment operator := was not found, but only a colon ':'.
E073 Assignment operator is :=
At a point in the source code, where there should be clearly no comparison
(except for IF or ELSIF), a comparative sign '=' was found. This is not allowed;
please use the assigning operator ':='.
E075 Assignment to inputs is not possible
An attempt was made to assign a value to a variable defined as VAR_INPUT.
This is not allowed.
E101 Assignment or condition results in no valid or definite data
type
The instruction cannot be evaluated clearly. This is e.g. the case if a constant is
assigned to a variable, although the type is not suitable (e.g. a value > 1 to a
BIT variable).
E102 Condition does not result in a boolean expression (true,
false)
For conditions such as those in the IF statement, it is important that these can
be clearly assigned to a logical value (true or false). For example, this is the
result of a comparison of equality. However, this is not possible in the objected
line.
H. ZANDER GmbH & Co. KG • Am Gut Wolf 15 • 52070 Aachen • Germany • Tel +49 241 9105010
Fax +49 241 91050138 • [email protected] • www.zander-aachen.de
3.
Error messages of the Compiler
83
E110 Unknown variable or operator
An undeclared variable or an unknown operator was used.
E111 Variable in alias was not previously declared or is reserved
keyword
An attempt was made to use a variable as a member in an ALIAS variable,
which is either not defined or whose name corresponds to a keyword.
E112 Variable class is not allowed for alias definition
An attempt was made to combine variables of not permitted variable types
within the scope of an ALIAS declaration. Only variables of the type
VAR_INPUT, VAR/VAR_INTERN or VAR_OUTPUT as well as EXTERN
VAR_INPUT and EXTERN VAR_OUTPUT are allowed.
E113 Variables in alias belong to different classes
An attempt was made to combine variables (of the correct type BIT) from
different classes (VAR_INPUT, VAR/VAR_INTERN, VAR_OUTPUT)
within the scope of an ALIAS declaration. This is not allowed.
E114 Data type inside alias must be BIT
Only variables of the BIT type can be combined within the scope of an ALIAS
declaration.
E115 This extension is unknown
An extension (e.g. .CLK) was used, which is not known for this module
(example: .CRIT). Mostly, there is a writing error here.
E116 This extension is here not valid
Principally, a permitted extension was found, but it is not allowed here. Thus,
you cannot define a clock property (.CLK) in an IF statement or in a function.
Please select another location for the control signal instruction.
E117 Unknown data type
An unknown data type was selected; only BIT, DINT, UINT, INT, SINT,
USINT, BYTE, WORD, BIT_ARRAY and (implicit) ALIAS are allowed.
H. ZANDER GmbH & Co. KG • Am Gut Wolf 15 • 52070 Aachen • Germany • Tel +49 241 9105010
Fax +49 241 91050138 • [email protected] • www.zander-aachen.de
3.
Error messages of the Compiler
84
E118 Data type and size do not match
E.g. if you want to define more than 16 bit for BIT_ARRAY, this message will
be put out.
E119 Size of variable is not modifiable
In most of the data types, the size measured in bit cannot be modified. This is
only possible for BIT_ARRAY.
E120 Syntax error: ')' missing
A bracket in the expression was forgotten.
E121 This variable has been defined in selection_statement,
E122 This variable has been defined as a_statement
Both these error messages imply that you have already made an assignment (in
an IF or CASE statement or a direct assignment). Since ST16 is a concept of
"Single Assignment", i.e. a single-shot assignment is made to a variable, this is
not allowed.
E123 This alias variable is not writable
You have made an attempt to assign an ALIAS variable, although this is readonly. This may be the case if the variable is an input variable of a function or
e.g. if it combines variables declared in the VAR_INPUT class.
E124 This variable has been defined inside alias
E125 The use of variable <var_name> and alias differs
Here, you are using a variable, which is also combined in an ALIAS variable.
Please observe certain rules for the variable and PLC assignments:
The reading usage is arbitrary.
In the write mode, you can assign values to the individual variables as well as
to ALIAS variables. However, if you attempt to do this in an IF or CASE
statement, the assignment must always be made to the same variable (either all
to ALIAS, or all to the individual variables).
You can assign properties of variables such as .CLK or .RE either to the
ALIAS variables or to the individual variables. If you assign the value to the
ALIAS variable, an (optional) assignment of the properties must be made to the
ALIAS variable. The opposite situation – assignment to the individual
variables, properties to the ALIAS – is not allowed.
H. ZANDER GmbH & Co. KG • Am Gut Wolf 15 • 52070 Aachen • Germany • Tel +49 241 9105010
Fax +49 241 91050138 • [email protected] • www.zander-aachen.de
3.
Error messages of the Compiler
85
E126 The definition of the asynchronous variable <var_name> is
incomplete
Asynchronous variables are variables, which only accept values in a nonclocked manner (i.e. the .CLK control condition is missing). This means that,
for all situations within an IF or CASE condition, it must be defined which
value is assigned to the variables, else there would be an implicit save
condition. Thus, you must make an assignment in all branches.
This does not apply to clocked variables.
E131 E131 Variable is keyword or input
You have made an attempt to assign a value to a variable of the variable class
VAR_INPUT, which is not allowed.
E132 A clock condition was already defined for this variable
E133 An output enable condition was already defined for this
variable",
In the source code, an attempt was made to set the clock condition (assignment
of a clock for saving a variable value) or set Output Enable condition twice.
This can happen accidentally because for instance the variable is a part of an
ALIAS declaration and now apparently the clock is assigned to two different
variables (original one and ALIAS).
Please check if the variable is an ALIAS or part of an ALIAS, or if you have
assigned a clock twice to a variable.
E134 OE conditions can only be defined for outputs
An attempt was made to set an Output Enable condition for a variable or a
connection, which does not correspond to an output.
E135 A reset condition was already defined for this variable
In the source code, an attempt was made to set the reset condition twice
(resetting the variable value to 0). E.g. this can happen accidentally because the
variable is a part of an ALIAS declaration and now apparently the reset
condition is assigned to two different variables (original and ALIAS).
Please check if the variable is an ALIAS or part of an ALIAS, or if you have
assigned a reset condition twice to a variable.
H. ZANDER GmbH & Co. KG • Am Gut Wolf 15 • 52070 Aachen • Germany • Tel +49 241 9105010
Fax +49 241 91050138 • [email protected] • www.zander-aachen.de
3.
Error messages of the Compiler
86
E138 Configuration only possible outside IF or CASE
An attempt was made to specify a variable property (such as .CLK, .RE etc.)
within an IF or CASE structure.
Please write the variable property in a direct assignment.
E142 Constant not correct
This error message can have different reasons: Firstly, the constant may contain
characters not permitted (e.g. a letter, which is not usable); secondly, the value
range for the current variable may have exceeded (if e.g. a bit value is
expected, 0 or 1).
Please correct the value specification of the constant.
E143 Integer value max. 65535
This error message means that a constant > 65535 was written in the text. This
value is currently the maximum permissible value specification, depending
upon the type of variables.
Please correct the value specification of the constant.
E144 Constant value exceeds limits of the array
The data type (also Bit_Array) is explicitly checked to ensure if the constant is
permissible; it exceeds the value range.
Please correct the value specification of the constant.
E145 Constant too long
Here, the inspection of the length particularly for BIT_ARRAYs revealed that
the number of binary digits is too long.
Please correct the value specification of the constant.
E146 Constant <value> exceeds the limits
Here, an integer variable was specially inspected to ensure if the value fits
within the limits, also for negative values.
Please correct the value specification of the constant.
E147 Value <Value> of the constants is not valid
The ZanderNet address, which must have a value between 0 and 255, has been
checked here.
H. ZANDER GmbH & Co. KG • Am Gut Wolf 15 • 52070 Aachen • Germany • Tel +49 241 9105010
Fax +49 241 91050138 • [email protected] • www.zander-aachen.de
3.
Error messages of the Compiler
87
Please correct the value specification for the constants in the specification
ZN_ADR =.
E151 Too many variables in the group
While defining an ALIAS (VAR_ALIAS), the maximum number of bit
variables, which can be combined thus, was exceeded. Currently, this number
is 16.
Please reduce the number of assigned BIT variables,
E152 Assignment to group is not possible in this way
An attempt was made to assign a value to an ALIAS variable, where this is not
possible. The reasons for this could be the use of an incorrect assignment
operator or the fact that the variables are read-only.
Please correct this by paying attention to the writability of the variables.
E171 For this variable class, initialisation values are not allowed
Initialisation values are only allowed for the variable types
VAR/VAR_INTERN, VAR_OUTPUT and EXTERN VAR_OUTPUT. Here,
an attempt was made to assign an initialisation value to another variable type.
For troubleshooting, remove the initialisation (:= <Value>).
E172 The given initialisation value is not allowed
The selected initialisation value is not allowed for this data type.
Correct the initialisation to a permitted value.
E181 Assigned mask value xxx.xxx.xxx.xxx is not valid for IP
This error message is based on the Internet Protocol (IP) Version 4. Here, you
can specify a masking value, which shows the affiliation to a network.
Assignment is made to the default variable IP_MASK.
This masking value is subject to a precise format. While the IP address can be
defined freely, the masking value may only have leading ones. A mask
255.255.255.0 is allowed, but a mask such as 255.255.1.0 is not allowed.
Please use a valid masking value.
E201 Pin cannot be defined by number
An attempt is made to define a connecting terminal for an input or output in the
source code using a simple number.
H. ZANDER GmbH & Co. KG • Am Gut Wolf 15 • 52070 Aachen • Germany • Tel +49 241 9105010
Fax +49 241 91050138 • [email protected] • www.zander-aachen.de
3.
Error messages of the Compiler
88
For troubleshooting, please use the names specified for the respective PLC; for
ZX20T, these are:
In_01 to In_20
Out_01 to Out_16
and for ZX20AT:
In_01 to In_12
Out_01 to Out_12
AIn_01 to AIn_08
AOut_01 to AOut_04
E205 This pin was declared before
An attempt was made to assign an already used connecting terminal to a second
signal.
Please check to which signal you want to assign this connection. Only one
assignment is possible, whereby you can naturally use the signal multiple times
internally.
E206 Wrong pin type is chosen
This message is put out if you select a correct basic name of the connection –
e.g. In_XX or AOut_XX –, but an incorrect number (e.g. Out_310).
Please select a valid number.
E207 Wrong symbol for pin
A symbolic representation (not only a number) was selected for the connection,
but not the permitted one, i.e. AOuz_xx or also IN_xx (please pay attention to
the uppercase / lowercase of the allowed names).
Please select a corresponding valid name. Valid names are:
For ZX20T:
In_01 to In_20
Out_01 to Out_16
For ZX20AT:
In_01 to In_12
Out_01 to Out_12
AIn_01 to AIn_08
AOut_01 to AOut_04
H. ZANDER GmbH & Co. KG • Am Gut Wolf 15 • 52070 Aachen • Germany • Tel +49 241 9105010
Fax +49 241 91050138 • [email protected] • www.zander-aachen.de
3.
Error messages of the Compiler
89
E211 No more inputpins available
E212 No more outputpins available
E213 No further AD connectors available
E214 No further DA connectors available
The meaning of these error messages is simple: All connections of the
corresponding type were assigned, but one more is necessary. You can define
connections in the source code (VAR_INPUT. VAR_OUTPUT, VAR_ADC,
VAR_DAC), without giving it a concrete connection. In such a situation, the
compiler accepts this and distributes the remaining connections itself, whereby,
however, the mentioned fault occurs.
An easy troubleshooting operation is not possible here, simply because the
number of physical connections has been exceeded.
E231 No pin assignment possible for internal variables
An attempt was made to assign a connecting terminal to an internal variable
(VAR/VAR_INTERN) via AT … . This is not possible.
Please delete the assignment of the connection.
E232 No pin assignment possible for external variables
An attempt was made to assign a connecting terminal to an external variable
(EXTERN VAR_INPUT or EXTERN VAR_OUTPUT). This is not possible.
Please delete the assignment of the connection.
E233 Definition of data type only for internal or external variables
valid
The data type, e.g. INT can only be specified for external (EXTERN
VAR_INPUT or EXTERN VAR_OUTPUT) or internal variables (VAR/
VAR_INTERN); however, an attempt was made to define a data type for input,
output, timer, counter, ADC, DAC or Message variable.
Please remove the specification of the variable or data type.
E601 Too many user-defined IRQs
The number of user-defined interrupts (signal definition and interrupt text) is
restricted to 8. This number was exceeded.
Please select a less number of interrupts / messages.
H. ZANDER GmbH & Co. KG • Am Gut Wolf 15 • 52070 Aachen • Germany • Tel +49 241 9105010
Fax +49 241 91050138 • [email protected] • www.zander-aachen.de
3.
Error messages of the Compiler
90
E603 Syntax error in message-defining string
The definition of the output string, which the PLC has to create upon the
occurrence of a corresponding condition, contains a syntax error. This happens
e.g. when you create a value output and do not start it with the keyword
VARFUNC(…., but select another word instead.
Please start the definition of the value output with VARFUNC( … always.
E604 Variable inside string is not defined
While defining the output string, which the PLC has to create upon the
occurrence of a corresponding condition, you have used a variable, which is not
defined.
Please check the syntax of the message string on unknown variables.
H. ZANDER GmbH & Co. KG • Am Gut Wolf 15 • 52070 Aachen • Germany • Tel +49 241 9105010
Fax +49 241 91050138 • [email protected] • www.zander-aachen.de
3.
Error messages of the Compiler
91
E605 Too less digits defined, error
Here, more digits must be given out in the value output than the number of
variables defined, i.e. there is a discrepancy between the format of the output
and the corresponding variables.
Please ensure that the output format and number of bit variables, which make
up the value, match.
E606 Too many user-defined variables in string
An output string, which should be given out for an event, may have maximum
6 variable values (bit arrays), independent of the number of value
specifications. This number was exceeded.
Please restrict the number of variables to 6.
E611 Too many external input variables
The total sum of the bits of the external input variables (EXTERN
VAR_INPUT) for a PLC is maximum 128; this number was exceeded.
Please reduce the number of external input variables.
E612 Too many external output variables
The total sum of the bits of the external output variables (EXTERN
VAR_OUTPUT) for a PLC is maximum 32; this number was exceeded.
Please reduce the number of external output variables.
E621 Timer/Counter value too large
The maximum value that can be configured as the start value for a timer or
counter, is 30 minutes or 1800000000 events. This value was exceeded.
Please select a smaller configuration value; if your application needs longer
waiting times or counting functions, you can combine a timer and a counter
accordingly.
E622 Timer/Counter has no value
A count value must be specified for every timer or counter; this is done with
<Name> := <Value>;
where a time value (timer) or count value must be entered as value.
This specification was forgotten, please re-enter.
H. ZANDER GmbH & Co. KG • Am Gut Wolf 15 • 52070 Aachen • Germany • Tel +49 241 9105010
Fax +49 241 91050138 • [email protected] • www.zander-aachen.de
3.
Error messages of the Compiler
92
E623 Timer/Counter must have an enable signal definition
An Enable signal must be defined for the timer or counter in any case. This can
also be set to the constant '1'; in that case, the timer is started immediately.
Such an assignment to the timer/counter property .ENABLE has not been
made; please assign an ENABLE signal to the timer / counter.
E623 Timer/Counter must have a reset signal definition
A Reset signal must be defined for the timer or counter in any case. This can
also be set to the constant '0'; in that case, a reset is not defined.
Such an assignment to the timer/counter property .RESET has not been made;
please assign a RESET signal to the timer / counter.
E625 Timer/Counter must have a polarity definition
The polarity definition controls the logical state of the timer or counter value
(internal, of the type BOOL or BIT) in the active state (while counting) or at
the start of counting. For a precise description of the signal behaviour, see
section 2.2.5.1 or section 2.2.5.2.
The behaviour is specified via the polarity instruction <Name>.POL :=
HIGH|LOW; , which is missing here. Please re-enter this instruction.
E626 Mode definition for Timer/Counter is missing
An operating mode must be defined for every timer or counter (SINGLE_
SHOT, SINGLE_SHOT_SE, CONT, CONT_SE). For a precise description of
the modes, see section 2.2.5.1 or section 2.2.5.2.
This specification <Name>.MODE := … was forgotten here. Please re-enter
the instruction.
E627 Clock signal definition for Counter is missing
While the timers are connected to the internal clock signal automatically, the
clock signal has to be explicitly assigned for counters, in the form
<Name>.CLK := …
Please add this clock instruction to the source code.
E630 Value for timer/counter missing or incorrect
For the value assignment to a timer or counter, you have not specified a value
or have specified an incorrect value. Only a decimal number is allowed here, if
required with time unit (for timer).
H. ZANDER GmbH & Co. KG • Am Gut Wolf 15 • 52070 Aachen • Germany • Tel +49 241 9105010
Fax +49 241 91050138 • [email protected] • www.zander-aachen.de
3.
Error messages of the Compiler
93
Please specify a corresponding time value / count value in the assignment
<Timer/Counter> := <Value>;
for <Value>.
E631 An enable condition is already defined for this timer/counter
variable
Here, an attempt was made to assign a second ENABLE condition to a timer or
counter. However, this is only allowed once.
Please delete one of the ENABLE conditions.
E632 Enable condition are only allowed for timer or counter
Here, an attempt was made to assign a .ENABLE condition to a variable, which
neither belongs to the data type TIMER nor COUNTER. This is not possible.
Please delete or correct the ENABLE assignment.
E633 The mode condition is already defined for this timer/counter
variable
Here, an attempt was made to assign a second MODE condition to a timer or
counter. However, this is only allowed once.
Please delete one of the MODE conditions.
E634 The mode is only definable for timer/counter
Here, an attempt was made to assign a .MODE condition to a variable, which
neither belongs to the data type TIMER nor COUNTER. This is not possible.
Please delete or correct the MODE assignment.
H. ZANDER GmbH & Co. KG • Am Gut Wolf 15 • 52070 Aachen • Germany • Tel +49 241 9105010
Fax +49 241 91050138 • [email protected] • www.zander-aachen.de
3.
Error messages of the Compiler
94
E635 The polarity is already defined for this timer/counter variable
Here, an attempt was made to assign a second polarity to a timer or counter.
However, this is only allowed once.
Please delete one of the polarity assignments.
E636 Polarity may be defined only for timer/counter
Here, an attempt was made to assign a .POL condition to a variable, which
neither belongs to the data type TIMER nor COUNTER. This is not possible.
Please delete or correct the polarity assignment.
E637 CLK condition is only allowed for counter
Here, an attempt was made to assign a .CLK condition to a variable, which
does not belong to the data type COUNTER. This is not possible, not for timer
too.
Please delete or correct the .CLK assignment.
E638 A time unit is not allowed for a counter value
The value of a counter may only be specified without any time unit, since a
counter counts pulses. But, here the counter value was specified with a time
unit (either correct or incorrect), e.g. ‘us’, which has led to this error message.
Please delete the time unit behind the numerical value for correction.
E641 Debounce time is already defined.
You can define a debounce time for inputs (VAR_INPUT … END_VAR;) via
the statement <VarName>.TDB := <time_value>. Here, the debounce time was
specified twice.
This error message also appears if an ALIAS variable is assigned a debounce
time and at least one of the combined variables has already been assigned, even
if the time is the same.
Please remove this definition of the debounce time.
H. ZANDER GmbH & Co. KG • Am Gut Wolf 15 • 52070 Aachen • Germany • Tel +49 241 9105010
Fax +49 241 91050138 • [email protected] • www.zander-aachen.de
3.
Error messages of the Compiler
95
E651 AD converter is already defined.
The AD converter connection (AIn_01 .. AIn_08) was used twice.
Please select different connections for the AD converter or let the connections
be distributed by the compiler.
E652 DA converter is already defined.
The DA converter connection (AOut_01 .. AOut_04) was used twice.
Please select different connections for the DA converter or let the connections
be distributed by the compiler.
E661 Function is already defined
A function is defined by specifying its name and the return type. The error
message was generated because a second function of the same name was
generated.
Please check the function definitions and give it a unique name.
E701 Timer and counter definition only possible outside of
FUNCTION
An attempt was made within a function to declare a timer or counter
(VAR_COUNTER, VAR_TIMER). This is only allowed in the main program.
Please relocate the declaration into the main program.
E711 Too many call parameter in function
A function call (not in the definition) was specified with too many parameters.
Please check the number of parameters for the function call and correct them.
E801 Memory overflow inside internal tree structure
The compiler did not get enough memory space from the operating system.
This error occurs only if very large programs are compiled with very little
available memory.
E802 Memory limit exceeded
The compiler did not get enough memory space from the operating system.
This error occurs only if very large programs are compiled with very little
available memory.
The difference between this message and the previous one is that the memory
overflow takes place during other actions.
H. ZANDER GmbH & Co. KG • Am Gut Wolf 15 • 52070 Aachen • Germany • Tel +49 241 9105010
Fax +49 241 91050138 • [email protected] • www.zander-aachen.de
3.
Error messages of the Compiler
96
E803 Symbol table overflow
The Compiler has got an internal symbol table with 2400 entries currently. This
table size was exceeded.
Please contact Zander GmbH & Co. KG, Aachen.
E805 Error while opening file
Initially, the Compiler tries to open the source code file for reading and other
files (<sourcecodename>.err, .vhd, .mem, .pin und .scn) as writable. At least
three files could not be opened in this process.
The reason for this could be that the compiler has got no write access, e.g. the
directory or the corresponding file is blocked. Try to remove this block or
bypass it by changing the directory.
E901 Too many or severe errors in the declaration. Syntax analysis
will not continue
This is not an independent error message, but the result of previous messages.
It implies that the errors must be eliminated first, before the program can be
analysed further.
Please note that, even after correcting the specified errors, more errors may be
found in the program, since the Compiler had not been able to do a complete
analysis.
E902 Neither inputs nor outputs are declared. Syntax analysis will
not continue
The Compiler has detected that neither inputs nor outputs have been declared
and aborts further analysis.
E911 Unexpected End-of-File
The Compiler has detected an end-of-file, which has occurred in the middle of
an incorrect declaration, assignment etc.
E912 Line is too long
The maximum line length, i.e. the number of characters up to a ';' (semi-colon),
is 1024. This number was exceeded.
Please try to formulate a shorter instruction, or contact Zander GmbH & Co.
KG.
H. ZANDER GmbH & Co. KG • Am Gut Wolf 15 • 52070 Aachen • Germany • Tel +49 241 9105010
Fax +49 241 91050138 • [email protected] • www.zander-aachen.de
3.
Error messages of the Compiler
97
E921 Unknown PLC type found
A PLC type, which is not available, was selected in the PLC_TYPE = …
assignment. Please correct your entry.
E999 Unknown error
This error message implies that the Compiler has identified an error clearly, but
an explicit error message has not been assigned to it until now.
In such a case, please contact Zander GmbH & Co. KG, Aachen.
3.2
Error messages for Fitter
The Fitter, which translates the code generated by the compiler into the
machine language (binary code), generates very few warning and error
messages, which are however of great importance. Basically, these errors
should not occur if the Compiler translates correctly.
If one of the following messages occurs and it cannot be eliminated by recompiling or re-installing the system, please contact Zander GmbH & Co. KG.
The messages in detail:
W1001 Warning: No VHDL report found, possibility of error!
After the Fitter run (VHDL Compiler), the report is searched, since it contains
some information, which is evaluated. If this report is not legible, then it is
possible that the previous Fitter run has failed although the ST Compiler has
translated a code without error messages.
If this error occurs after a further run, please contact Zander GmbH & Co. KG.
W1002 Warning: No timing report found, possibility of error!
After the Fitter run (VHDL Compiler), the timing report is searched, since it
contains some information, which is evaluated. If this report is not legible, then
it is possible that the previous Fitter run has failed although the ST Compiler
has translated without error messages.
If this error occurs after a further run, please contact Zander GmbH & Co. KG.
E1001 Fitting has finished with errors!
Here, the Fitter has definitely found an error. The VHDL Compiler returns an
error code.
H. ZANDER GmbH & Co. KG • Am Gut Wolf 15 • 52070 Aachen • Germany • Tel +49 241 9105010
Fax +49 241 91050138 • [email protected] • www.zander-aachen.de
3.
Error messages of the Compiler
98
If this error occurs after a further run, please contact Zander GmbH & Co. KG.
E1002 File <file_name> containing intermediate code could not be
found, fitting is cancelled!
The ST Compiler creates a VHDL code file as an important result, which is
generated from the ST16 code. However, the Fitter could not find the
corresponding file, and hence, further translation has to be interrupted.
Please translate the ST code once again and try to run through the entire
process successfully. If the VHDL code is not available once again, although
the ST Compiler has not displayed an error, please check whether you, as the
user have write access to the working directory of your source code.
If this does not take place successfully, please contact Zander GmbH & Co.
KG.
E1003 File <file_name> could not be written, fitting is cancelled!
At the time of fitting, some files are generated e.g. binary files for
programming. The error implies that a corresponding file could not be
generated.
The reason may be that there is no write access to the directory or the
corresponding file is already present, but it cannot be overwritten by the
Compiler because of the current write access.
Please check the write access rights and change these, if required.
E1101 Syntax error within Bitfile <file_name>.
The bit file generated by the Fitter is used further for creating more files for
programming. For this, the Bitfile must be interpreted, which leads to this error
message when there is a format error.
Please try this with a complete rerun of the Compiler. If you cannot achieve
your objective despite this, please contact Zander GmbH & Co. KG.
E1201 Error while starting Fitter process, please re-install the
system
Before the Fitter operation, some important files are checked for consistency.
This resulted in an error with the corresponding error message.
You must now re-install the system and restart the translation process.
H. ZANDER GmbH & Co. KG • Am Gut Wolf 15 • 52070 Aachen • Germany • Tel +49 241 9105010
Fax +49 241 91050138 • [email protected] • www.zander-aachen.de
4
4
Functions in standard.lib
99
Functions in standard.lib
The delivered library standard.lib includes the following functions:
SHL( INT, UINT )
Complete name:
Return value:
Parameters:
Shift Left
INT
INT for the input value, which is shifted
UINT for the number of bits, by which the value is
shifted
Explanation: The function shifts the input value (1st parameter) by the number
of bits, specified in the 2nd parameter, to the left. Filled with '0' from the right,
the overflowing bits are lost (logicla Shift Left).
SHR( INT, UINT )
Complete name:
Return value:
Parameters:
Shift Right
INT
INT for the input value, which is shifted
UINT for the number of bits, by which the value is
shifted
Explanation: The function shifts the input value (1st parameter) by the number
of bits, specified in the 2nd parameter, to the right. The overflowing bits are
lost, '0' is filled from the left (logical Shift Right).
INT_TO_UINT( INT )
Complete name:
Integer to Unsigned Integer
Return value:
UINT
Parameters:
INT
Explanation: The function creates an explicit casting of an integer value (16 bit,
with sign) in an unsigned integer value (16 bit, without sign). No warnings are
given out because of potential losses of information.
INT_TO_SINT( INT )
H. ZANDER GmbH & Co. KG • Am Gut Wolf 15 • 52070 Aachen • Germany • Tel +49 (0)241 9105010
Fax +49 (0)241 91050138 • [email protected] • www.zander-aachen.de
4.
Functions in standard.lib
100
Complete name:
Integer to Short Integer
Return value:
SINT
Parameters:
INT
Explanation: The function creates an explicit casting of an integer value (16 bit,
with sign) in a short integer value (8 bit, with sign). No warnings are given out
because of potential losses of information.
INT_TO_USINT( INT )
Complete name:
Integer to Unsigned Short Integer
Return value:
USINT
Parameters:
INT
Explanation: The function creates an explicit casting of an integer value (16 bit,
with sign) in an unsigned short integer value (8 bit, without sign). No warnings
are given out because of potential losses of information.
INT_TO_DINT( INT )
Complete name:
Integer to Double Integer
Return value:
DINT
Parameters:
INT
Explanation: The function creates an explicit casting of an integer value (16 bit,
with sign) in a double integer value (32 bit, with sign). No warnings are given
out because of potential losses of information.
SINT_TO_UINT( SINT )
Complete name:
Short Integer to Unsigned Integer
Return value:
UINT
Parameters:
SINT
Explanation: The function creates an explicit casting of a short integer value (8
bit, with sign) in an unsigned integer value (16 bit, without sign). No warnings
are given out because of potential losses of information.
SINT_TO_INT( SINT )
Complete name:
Short Integer to Integer
H. ZANDER GmbH & Co. KG • Am Gut Wolf 15 • 52070 Aachen • Germany • Tel +49 241 9105010
Fax +49 241 91050138 • [email protected] • www.zander-aachen.de
4.
Functions in standard.lib
101
Return value:
INT
Parameters:
SINT
Explanation: The function creates an explicit casting of a short integer value (8
bit, with sign) in an integer value (16 bit, with sign). No warnings are given out
because of potential losses of information.
SINT_TO_USINT( SINT )
Complete name:
Short Integer to Unsigned Short Integer
Return value:
USINT
Parameters:
SINT
Explanation: The function creates an explicit casting of a short integer value (8
bit, with sign) in an unsigned short integer value (8 bit, without sign). No
warnings are given out because of potential losses of information.
SINT_TO_DINT( SINT )
Complete name:
Short Integer to Double Integer
Return value:
DINT
Parameters:
SINT
Explanation: The function creates an explicit casting of a short integer value (8
bit, with sign) in a double integer value (32 bit, with sign). No warnings are
given out because of potential losses of information.
DINT_TO_UINT( DINT )
Complete name:
Double Integer to Unsigned Integer
Return value:
UINT
Parameters:
DINT
Explanation: The function creates an explicit casting of a double integer value
(32 bit, with sign) in an unsigned integer value (16 bit, without sign). No
warnings are given out because of potential losses of information.
DINT_TO_SINT( DINT )
Complete name:
Double Integer to Short Integer
Return value:
SINT
Parameters:
DINT
H. ZANDER GmbH & Co. KG • Am Gut Wolf 15 • 52070 Aachen • Germany • Tel +49 241 9105010
Fax +49 241 91050138 • [email protected] • www.zander-aachen.de
4.
Functions in standard.lib
102
Explanation: The function creates an explicit casting of a double integer value
(32 bit, with sign) in a short integer value (8 bit, with sign). No warnings are
given out because of potential losses of information.
DINT_TO_USINT( DINT )
Complete name:
Double Integer to Unsigned Short Integer
Return value:
USINT
Parameters:
DINT
Explanation: The function creates an explicit casting of a double integer value
(32 bit, with sign) in an unsigned short integer value (8 bit, without sign). No
warnings are given out because of potential losses of information.
DINT_TO_INT( DINT )
Complete name:
Double Integer to Integer
Return value:
INT
Parameters:
DINT
Explanation: The function creates an explicit casting of a double integer value
(32 bit, with sign) in an integer value (16 bit, with sign). No warnings are given
out because of potential losses of information.
UINT_TO_INT( UINT )
Complete name:
Unsigned Integer to Integer
Return value:
INT
Parameters:
UINT
Explanation: The function creates an explicit casting of an unsigned integer
value (16 bit, without sign) in an integer value (16 bit, with sign). No warnings
are given out because of potential losses of information.
UINT_TO_SINT( UINT )
Complete name:
Unsigned Integer to Short Integer
Return value:
SINT
Parameters:
UINT
H. ZANDER GmbH & Co. KG • Am Gut Wolf 15 • 52070 Aachen • Germany • Tel +49 241 9105010
Fax +49 241 91050138 • [email protected] • www.zander-aachen.de
4.
Functions in standard.lib
103
Explanation: The function creates an explicit casting of an unsigned integer
value (16 bit, without sign) in a short integer value (8 bit, with sign). No
warnings are given out because of potential losses of information.
UINT_TO_USINT( UINT )
Complete name:
Unsigned Integer to Unsigned Short Integer
Return value:
USINT
Parameters:
UINT
Explanation: The function creates an explicit casting of an unsigned integer
value (16 bit, without sign) in an unsigned short integer value (8 bit, without
sign). No warnings are given out because of potential losses of information.
UINT_TO_DINT( UINT )
Complete name:
Unsigned Integer to Double Integer
Return value:
DINT
Parameters:
UINT
Explanation: The function creates an explicit casting of an unsigned integer
value (16 bit, without sign) in a double integer value (32 bit, with sign). No
warnings are given out because of potential losses of information.
USINT_TO_INT( USINT )
Complete name:
Unsigned Short Integer to Integer
Return value:
INT
Parameters:
USINT
Explanation: The function creates an explicit casting of an unsigned short
integer value (8 bit, without sign) in an integer value (16 bit, with sign). No
warnings are given out because of potential losses of information.
USINT_TO_SINT( USINT )
Complete name:
Unsigned Short Integer to Short Integer
Return value:
SINT
Parameters:
USINT
H. ZANDER GmbH & Co. KG • Am Gut Wolf 15 • 52070 Aachen • Germany • Tel +49 241 9105010
Fax +49 241 91050138 • [email protected] • www.zander-aachen.de
4.
Functions in standard.lib
104
Explanation: The function creates an explicit casting of an unsigned short
integer value (8 bit, without sign) in a short integer value (8 bit, with sign). No
warnings are given out because of potential losses of information.
USINT_TO_UINT( USINT )
Complete name:
Unsigned Short Integer to Unsigned Integer
Return value:
UINT
Parameters:
USINT
Explanation: The function creates an explicit casting of an unsigned short
integer value (8 bit, without sign) in an unsigned integer value (16 bit, without
sign). No warnings are given out because of potential losses of information.
USINT_TO_DINT( USINT )
Complete name:
Unsigned Short Integer to Double Integer
Return value:
DINT
Parameters:
USINT
Explanation: The function creates an explicit casting of an unsigned short
integer value (8 bit, without sign) in a double integer value (32 bit, with sign).
No warnings are given out because of potential losses of information.
H. ZANDER GmbH & Co. KG • Am Gut Wolf 15 • 52070 Aachen • Germany • Tel +49 241 9105010
Fax +49 241 91050138 • [email protected] • www.zander-aachen.de
5.
5
Keywords reserved in ST16
105
Keywords reserved in ST16
The following keywords are reserved in ST16 and may therefore, not be used
for other identifiers:
For all PLCs belonging to the ZX20 family
Program structures
#END_NOMIN
#NOMIN
AT
CASE
ELSIF
END_CASE
END_IF
END_VAR
EXTERN
FUNCTION
NOT
OF
PROGRAM
THEN
VAR
VAR_ALIAS
VAR_DAC
VAR_INPUT
VAR_MESSAGE
VAR_OUTPUT
XOR
USES
AND
ELSE
END_FUNCTION
END_PROGRAM
IF
OR
VAR_ADC
VAR_COUNTER
VAR_IN_OUT
VAR_TIMER
USELIB
Alternative methods of writing program structures
VARADC
VARARRAY
VARCOUNTER
VARDAC
VARIN_OUT
VARINOUT
VARINPUT
VARINTERN
VARMESSAGE
VAROUTPUT
VARTIMER
Data types
BIT
BOOL
INT
USINT
BIT_ALIAS
BYTE
SINT
WORD
Default system variables for configuration
DHCP_ACTIVE
FAST_BOOT
IP_ADR
IP_GATE
NTP_ACTIVE
NTP_ADR
PLC_TYPE
VAR_COMM
BIT_ARRAY
DINT
UINT
IP_ACTIVE
IP_MASK
PLC_NAME
ZN_ADR
H. ZANDER GmbH & Co. KG • Am Gut Wolf 15 • 52070 Aachen • Germany • Tel +49 241 9105010
Fax +49 241 91050138 • [email protected] • www.zander-aachen.de
5.
Keywords reserved in ST16
Default system variables for the operation
appclk
net_connect
POR
POR_delayed
TIME_SIGNAL_2M
Default system variables for the network communication
NETSIG_IN000 … NETSIG_IN127
NETSIG_OUT00 … NETSIG_OUT31
USIRQ_0 … USIRQ_7
GP_USER0 … GP_USER7
5.1
ZX20T
Default identifiers of the input and output connections
In_01 … In_20
Out_01 … Out_16
5.2
ZX20AT
Default identifiers of the input and output connections
In_01 … In_12
Out_01 … Out_12
AIn_01 … AIn_08
AOut_01 … AOut04
Internal system variables for the AD and DA converter
last_adc_value_0 … last_adc_value_7
adc_active
next_dac_value_0 … next_dac_value_3
dac_active
H. ZANDER GmbH & Co. KG • Am Gut Wolf 15 • 52070 Aachen • Germany • Tel +49 241 9105010
Fax +49 241 91050138 • [email protected] • www.zander-aachen.de
106
List of terms
107
List of terms
A
ADC ..................................... 29, 31, 40
Bit width ...................................... 41
AR_DAC
Properties ..................................... 51
Assignment 56, 58, 65, See Assignment
B
BIT ................................................... 30
BIT_ALIAS ..................................... 31
BIT_ARRAY ................................... 31
BOOL .............................................. 30
BYTE ............................................... 31
C
CASE ............................................... 61
Compiler .......................................... 12
Complete assignment ....................... 65
Connection names ............................ 32
Constants
Number format ............................. 56
CONT .............................................. 37
CONT_SE ........................................ 37
COUNTER .......................... 29, 31, 39
CLK ............................................. 39
Cyclic value assignment .................. 65
D
DAC ..................................... 30, 31, 41
Bit width ...................................... 42
data type
BIT_ARRAY ............................... 31
Data type
ADC ................................. 29, 31, 40
BIT ............................................... 30
BIT_ALIAS ................................. 31
BOOL........................................... 30
BYTE ........................................... 31
COUNTER....................... 29, 31, 39
DAC ................................. 30, 31, 41
INT ............................................... 30
MESSAGE ....................... 29, 31, 43
Properties ............................... 47, 54
SINT............................................. 30
TIMER ............................. 28, 31, 36
UINT ............................................ 30
USINT .......................................... 31
WORD ......................................... 30
Device Manager ................................. 7
E
Editor ............................................... 10
ELSE .......................................... 60, 61
ELSIF ............................................... 60
END_IF............................................ 60
Expression .............. 57, See Expression
EXTERN.................................... 28, 33
EXTERN VAR_INPUT................... 33
EXTERN VAR_OUTPUT............... 33
F
Fitter ................................................. 12
Frame structure of a program ........... 24
Function .....................See FUNCTION
FUNCTION ......................... 25, 62, 66
Call ............................................... 64
Declaration ................................... 63
Parameter ..................................... 62
Return value ................................. 63
Variables ...................................... 25
Function call .................................... 58
H. ZANDER GmbH & Co. KG • Am Gut Wolf 15 • 52070 Aachen • Germany • Tel +49 (0)241 9105010
Fax +49 (0)241 91050138 • [email protected] • www.zander-aachen.de
List of terms
108
WIDTH ........................................ 53
I
Identifier ................... 26, See Identifier
IF 59
Information window ........................ 20
Instruction ........................................ 58
INT................................................... 30
L
Library ......................... 26, See Library
standard.lib................................. 102
M
MESSAGE ........................... 29, 31, 43
Output string .......................... 43, 44
Modifier ........................... See Modifier
EXTERN...................................... 28
N
Number format................................. 56
O
OF .................................................... 61
Operators ......................................... 57
P
Programming Tool ........................... 13
Project Manager ................................. 5
Property
CLK ................................. 51, 53, 56
ENABLE...................................... 52
MODE.......................................... 52
POL .............................................. 52
RE ................................................ 51
RESET ......................................... 52
Start value .................................... 53
S
Selection instruction................... 58, 59
Single Assignment ........................... 65
SINGLE_SHOT ............................... 37
SINT ................................................ 30
ST16 ................................................. 23
ADC ....................................... 29, 31
Assignment ............................ 56, 58
Auxiliary condition ...................... 64
BIT ............................................... 30
BIT_ALIAS ................................. 31
BIT_ARRAY ............................... 31
BOOL........................................... 30
BYTE ........................................... 31
CASE ........................................... 61
Complete assignment ................... 65
COUNTER............................. 29, 31
Counting cycle of the counter ...... 39
Cyclic value assignment............... 65
DAC ....................................... 30, 31
Declaration of variables ......... 27, 31
ELSE ...................................... 60, 61
ELSIF ........................................... 60
END_FUNCTION ....................... 62
END_IF ........................................ 60
Expression .................................... 57
EXTERN ...................................... 28
EXTERN VAR_INPUT ............... 33
EXTERN VAR_OUTPUT ........... 33
Frame structure ............................ 24
FUNCTION ..................... 25, 62, 66
Function call........................... 58, 64
Function declaration ..................... 63
Identifier....................................... 26
IF 59
Instructions................................... 58
INT ............................................... 30
Library ......................................... 26
MESSAGE ............................. 29, 31
OF ................................................ 61
Operators ...................................... 57
Return value of a function ............ 63
H. ZANDER GmbH & Co. KG • Am Gut Wolf 15 • 52070 Aachen • Germany • Tel +49 241 9105010
Fax +49 241 91050138 • [email protected] • www.zander-aachen.de
List of terms
109
Selection instruction .............. 58, 59
Semantics ..................................... 64
Single Assignment ....................... 65
SINT ............................................ 30
standard.lib................................. 102
TIMER ................................... 28, 31
TIMER polarity............................ 38
TIMER-ENABLE ........................ 37
TIMER-MODE ............................ 36
TIMER-RESET ........................... 38
UINT ............................................ 30
USELIB ....................................... 26
USES ........................................... 26
USINT.......................................... 31
VAR ............................................. 34
VAR_ADC ............................ 29, 40
VAR_ALIAS ......................... 28, 35
VAR_COUNTER .................. 29, 39
VAR_DAC ............................ 30, 41
VAR_INPUT ......................... 27, 32
VAR_INTERN ...................... 27, 34
VAR_MESSAGE .................. 29, 43
VAR_OUTPUT ..................... 27, 32
VAR_TIMER ........................ 28, 36
Variable........................................ 26
Variable type ................................ 27
Whitespace ................................... 24
WIDTH .................................. 41, 42
WORD ......................................... 30
standard.lib..................................... 102
Structured text .................................. 23
T
TIMER ................................. 28, 31, 36
CONT .......................................... 37
CONT_SE .................................... 37
ENABLE...................................... 37
MODE.......................................... 36
POL .............................................. 38
RESET ......................................... 38
SINGLE_SHOT ........................... 37
Time interval ................................ 36
Toolbar............................................. 19
U
UINT ................................................ 30
USINT.............................................. 31
V
VAR
Properties ............................... 48, 49
VAR ................................................. 34
VAR_ADC................................. 29, 40
Properties ..................................... 50
WIDTH ........................................ 41
VAR_ALIAS ............................. 28, 35
Properties ..................................... 49
VAR_COUNTER ...................... 29, 39
Properties ..................................... 50
VAR_DAC................................. 30, 41
WIDTH ........................................ 42
VAR_INPUT ............................. 27, 32
EXTERN ...................................... 33
Properties ..................................... 47
VAR_INTERN ................................ 27
Properties ............................... 48, 49
VAR_INTERN ................................ 34
VAR_MESSAGE ...................... 29, 43
Properties ..................................... 51
VAR_OUTPUT ......................... 27, 32
EXTERN ...................................... 33
Properties ..................................... 48
VAR_TIMER............................. 28, 36
Properties ..................................... 49
Variable............................................ 26
Declarations ................................. 27
Variable type .................................... 27
Data-related .................................. 27
Modifier ....................................... 28
Peripheral-related ................... 28, 35
Properties ..................................... 47
VAR ............................................. 34
VAR_ADC............................. 29, 40
VAR_ALIAS ......................... 28, 35
VAR_COUNTER .................. 29, 39
VAR_DAC............................. 30, 41
H. ZANDER GmbH & Co. KG • Am Gut Wolf 15 • 52070 Aachen • Germany • Tel +49 241 9105010
Fax +49 241 91050138 • [email protected] • www.zander-aachen.de
List of terms
110
VAR_INPUT ............................... 27
VAR_INTERN ...................... 27, 34
VAR_MESSAGE .................. 29, 43
VAR_OUTPUT ........................... 27
VAR_TIMER ........................ 28, 36
W
Whitespace ....................................... 24
WIDTH ...................................... 41, 42
WORD ............................................. 30
Z
ZX20AT
ADC ............................................. 40
Connection names ........................ 32
Connection names, analogue .. 40, 42
DAC ............................................. 41
ZX20T
Connection names ........................ 32
H. ZANDER GmbH & Co. KG • Am Gut Wolf 15 • 52070 Aachen • Germany • Tel +49 241 9105010
Fax +49 241 91050138 • [email protected] • www.zander-aachen.de