1
RAM Electronics and FIare Technology thank you for choosing one
of our products; we hope that you have as much fun using The Music
Machine as we did designing and building it.
CONTENTS
About RAM:
RAM Electronics are manufacturers of a wide range of computer
peripherals. Perhaps they..are best known to you for their successful
Spectrum Turbo joystick interface? If you want to know more about
their ,other Spectrum hardware, just look out for their adverts in the
home computer press or drop them a line at the address below.
O.
CAN'T WAIT TO TRY IT, HOO? •••••.. ...•.•••••••••. •••••••••
For the experienced only!
1
1.
INTRODUCTION ••. •••••.• .•..•.••••••• .••••. .•..••....
What The Music Machine can do
2
2.
PLUGGING EVERYTHING TOGETHER
How not to get your wires crossed
5
About Fiare:
AH of the people who work for FIare used to work for Sinclair
Research, so is it any wonder that The Music Machine (which FIare
designed) is so good? Look out for future exciting products from this
team.
Connecüng The Music Machine to your
Spectrum
2.2 Plugging in The Music Machine and an
amplifiet or headphones; where to put your
microphone
2.3 Loading the software from tape
2.1
PIease remember to complete and return the guarantee card which is
enclosed with The Music Machine. Not only willdoing this help you
(see your rights as a purchaser on the card), but it will enable us to
keep you informed of additions to the range of Music Machine
software from time to time. Thank you.
Whilst we have made every effort to ensure that the contents of this
manual are accurate, we reserve the right to make hardware and
software improvements from time to time.
3.
l
¡
\
1986 RAM Electronics (Fleet) Ltd
1986 FIare Technology Ltd
iD
RAM Electronics (Fleet) Ud
Unit 16, Redfields Industrial Park,
Redfield Lane, Church Crookham,
Aldershot, Hants GU13 ORE
10
3~ 1
:('
iD
GETTING STARTED QUICKLY
How to start making sounds before reading the rest of
thismanual
P1aying the sounds, rhythms, and songs supplied
on the software cassette
3.2 Some quick experiments for making your own sounds
4.
DETAILED DESCRIPTIONS OF WHAT DOES WHAT
How to get your sounds, tunes and songs together
4.1
4.1.1
4.1.2
4.2
4.2.1
4.3
4.3.1
4.3.2
4.4
P1aying using the Spectrum keyboard
The bar editor
The tune editor
The drum machine
The rhythm editor
Recording real·life sounds
Editing captured sounds
The tw~voice synthesiser
P1aying using an external keyboard
18
4.4.1
4.4.2
4.5
4.6
4.6.1
5.
TECHNICAL SPECIFICATION OF THE
MUSIC MACHINE
Wbat you can and can't expect it to do
5.1
5.2
5.3
o.
MIOI in, out and tbrougb
Combining tunes and drums
Tbe effects bc:-x; ecbo and reverberation
Recording and replaying your compositions
Cassette and Microdrive storage
Technical Spec.
Capacity in terms of stored sounds, tunes, songs and
rbytbms
Additional notes:
CAN'T WAIT TO TRY IT, HUH?
This chapter is for those users who want to use the Music Machine
before they read the manual. Only start here ir you really know what
you are doing. Ir you are in any doubt at aH, read chapters 2 and 3
NOW. Do not hurt yourself by using an amplifier stupidly!
34
1.
Power off everywhere.
2.
Connect Music Machine to bus.
3.
Plug in amplifier or phones.
4.
Plug in microphone.
5.
Power on computer (and amp if you are using one).
6.
Load software.
7.
Select function by pressing capitalletter associated with menu
choice.
8.
Play the drum rhythm supplied by pressing 'P'.
9.
Play the song supplied by pressing 'M' then '7' then 'Q' then
'P'.
10.
Experiment, then read chapt<~r 4.
1. INTRODUCTION
We believe that The Music Machine is the most powerful and exciting Spectrum add-on ever to reach the market. If your friends have
already told you about the amazing things it can do, then skip this
section of the manual and go to Chapter 2.
Q. What is The Music Machine?
A. It is a peripheral that plugs into the back of the Sinclair ZX
Spectrum 48k, Plus, 128 and Plus-2 computers.
The machine lets you compose your own sounds, tunes, songs and
drum rhythms - even ifyou don'tknow much aboutmusic at aH. It also
lets you do special effects.
Q. What sort of things can The Music Machine do?
A. This question would be easier 10 answer if it asked what The
Machine cannot do!
.
It can do ALL of the foHowing:
The Machine can act as a two-voice synthesiser. By using the
computerkeyboard, it can play both simple notes and complex
sounds. Effects can be based on the sound of a piano or an electric
guitar or a trombone: in fact, it can be made to sound similat to any
musical instrument you care to name.
You can even make it sound like your own voice (try N-n-n-n-nineteen
for example!), or a dog barking, or a police car, or a window breaking.
Any noise that can be picked up by microphone can be played back at
different pitches by the computer.
Eight sounds are supplied on the software cassette with The
Machine and this User Manual tells you how to make others.
The machine can be used to make drum sounds. You can play up to
three drums simultaneously from a selection of eight. If you don't like
2
any of the percussion sounds supplied, you can use your own. Perhaps
you would rather replace the tom-tom with a telephone ring? Simple!
y ou can compose songs from individual bars of music. You can edit
bars on the screen, and merge them with bars from other tunes to make
new songs. You can build up a library oftunes, record and save sounds
and instruments, andrecord and save drum sounds and rhythms.
The Music Machine can be used as a digital delay box. Play music or
speak through the microphone and you will be able to alter the delay
rate (short or long echoes, for example) of the sounds as they come
through your amplifier's loudspeaker.
Ifyou have a MIDI synthesiser keyboard, you can plug this into The
Machine in order to send and receive MIDI data. This means that
your own sounds and effects can be played by The Machine by hitting
keys on the synthesiser keyboard.
Also, sounds produced by The Machine can be mixed with the
synthesiser's own voices. It is possible to send notes from The
Machine to the MIDI keyboard, (or, because several MIDI devices
can be plugged in simultaneously, sorne other MIDI peripheral).
The Machine enables songs created with the screen editor to generate
MIDI data, and will allow you to play MIDI together with your drum
rhythms. At the same time as The Machine sends songs to the
synthesiser and plays the drums, you can play accompaniments on the
keyboard..
Q. What can 1 plug into The Machine?
A. The Machine has the following connectors:
Spectrum bus connector
An audio-out phono socket for connection to your hi-fi
An earphone socket so that you can use your personal stereo
headphones
A socket into which you plug the supplied microphone for capturing
sounds
J
MIDI in, out, and through for hooking up MIDI devices such as
synthesisers or sequencers.
2. PLUGGING EVERYTHING TOGETHER
Q. What will the softwardet me do?
A. All of the things described aboye. Example bars, songs, sounds
and rhythms are supplied with the tape in program formo
Because The Music Machine can do so many things, we have
provided you with a range of sockets into which you can plug various
pieces of equipment. However, before you start sticking plugs into
sockets, you must connect The Music Machine to your Spectrum.
On the reverse side of the tape is an audio track that you can play
through a tape-recorder in order to hear what The Machine can do.
We hope to bring you other clever and sophisticated software in the
future.
If you have never used a Spectrum before, then piease read your ZX
Spectrum User Guide before going any further.
Q. Is there anything else like the Music Machine available for the
Although it is not absolutely necessary, we recornmend that you
unplug the TV and cassette leads from your Spectrum before you
start. This will make things easier for you when you assemble your
music system.
Spectrum?
A. Sorne suppliers sell peripherals that do one or two things that the
Machine does, but you can't easily use lots of their peripherals
together. And even if you could, you would have to spend about three
times as mucho
2.1 Connecting The Music Machine to your Spectrum
However, you MUST disconnect the power lead from your computer
and remove any peripherals from the bus before you start. (Did you
know that the most common way of blowing-up computers and
peripherals is by plugging and unplugging them while the power
supply is connected? Don't ruin your computer system before you 've
had a chance to use your terrific Music Machine!)
Here we go:
(a) With allleads disconnected from your Spectrum, gently push The
Music Machine onto the computer's edge connector. (If you are using
Microdrives with your Music Machine, then plug Interface 1 into the
computer before you plug in The Machine.) Look at the U ser Guide if
you aren 't sure where the edge connector is. 1t is obvious which way
up everything goes, and in any case it is impossible to connect The
Music Machine's box upside down.
(b) Plug the leads from your cassette player (not necessary with the
Spectrum Plus-2, of course) and your TV set into the computer.
4
5
(c) Finally, plug in the lead from the power supply. Note that this fits
through the hole in the Music Machine's box.
should not be difficult for you 10 get an appropriate lead from either
your local hi-ti supplier or an electrical shop.
(d) Switch on the power to the TV and then switch on the Spectrum's
power supply.
IF YOU ARE IN ANY DOUBT AT ALL ABOUT WHAT TO
DO, GET HELP FROM AN ADULT OR A SPECIALIST.
NEVER FOOL AROUND WITH ELECTRICITY AS IT CAN
KILL YOU. Remember that we cannot be held responsible for any
dangerous things that you do. Please be careful!
You should now get the standard Spectrum copyright message screen.
(Ifyou don't get this screen, switch offthe power supply, disconnect
the lead from the computer, remove The Music Machine, then try the
computer by itself. If the copyright message screen still does not
appear, then you may not have plugged everything in and switched on
properly, or the TV might need tuning-in. See your Spectrum User
Guide.)
Before you connect your hi-ti 10 The Music Machine, turn the volume
right down on the amplitier, plug the lead into a spare socket (probably
marked 'AUX' or 'Auxillary', and select the appropriate input on the
amplifier's controls. If you are using a guitar or PA amp, it should be
obvious which socket you should use - but again, don't forget 10 tum
the volume down.
You are now ready to plug other leads in.
Note again that if you want to use the Microdrives with The Music
Machine, Interface 1 should be plugged in between your computer
and The Machine. See section 4.6.1 of this manual for more about
using Microdrives.
LEVEL CONTROL
Piease remember the golden rule: ALWAYS UNPLUG THE
POWER SUPPLY LEAD BEFORE ADDING ORREMOVING
PERIPHERALS THAT USE THE EDGE CONNECTOR.
o
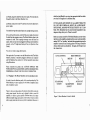
2.2 Plugging in The Music Machine and an amp/phones/mic
In order to hear the fabulous quality of the sound produced by The
Music Machine, we have supplied you with both an amplifier socket
and a headphone socket.
Figure 1 shows you the position ofthe phono socket which carries the
audio output signals. Into this can be plugged alead to your hi-fi
amplifier, or maybe a guitar amplifier. Because there are so many
different amplifier plugs and sockets on the market, we have not been
able to supply leads that will suit everybody's equipment. However, it
6
MmI THROUGH
MIDI IN
MIDI OUT
MICROPHONE
SOCKET
AUDIO OUT
SOCKET
Figure 1, Music Machine Connector details
7
If plugging The Machine in10 an amplifier is too much like hard work
right now, then why not use a pair of personal-stereo headphones?
Simply plug these into the headphone socket shown in Figure 1.
Finally, plug the supplied microphone into the small jack socket
shown in Figure 1. Make a mental note of the position of the gain
control (this is a bit like a volume control) on the top of The Music
Machine, as you will need to use this as soon as you start
experimenting with sounds.
Don't worry about the three DIN sockets (marked MIDI in, out and
through) for the time being. We'll come back to these later.
2.3 Loading the software from the tape
Almost ready now! As soon as you've loaded the program, you can
begin your music-making.
(a) Place the cassette in your player with side A uppermost.
lñffilñJñJñ.IñJ M a i rr
(IPl.9~!1
(1 t. l,I N e
(~p
[Id E
(lMidil] [!
e d i t. o í
l e
l e te
ed i
~
fU'
.
2
:3
. 4
[1 d
ti'iJl
[ILO.9d/ 5ave l]
e d i t. o (" lel
(j p i
e d i (o
5.9mp
TOM2
TOM:l.
HH Operi
1)
ecHo
IJ (1 B a ("
.- U !yo
lñJñIñJñ.fñJñJñ
M e rr u
les
5
6
7
6
an
r-!l
01]
(1 D
í U
m;:. 1'1
(1 b·:, s I e
J]
(f::. .:t ¡o¡"'P Oc ~l
HH e I.c.5e
5NARE
BASS
:S"{NTH
[~~5~ 1] [1~=T=eu=n=e=c==========~iil
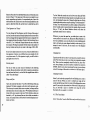
Figure 2, First screen of Main programo Main Menu
(b) Rewind the tape 10 the beginning of side A.
(c) Use the standard LOAD" "technique for 48k and Spectrum+
computers, or select the LOAD gption from the menu on the
SpectruIp. 128 and Plus-2.lfyou get stuck, read your Spectrum User
Guide!
computer is connected 10 the player, wind the tape back 10 the
beginning, adjust the cassette player volume level slightly, and try to
load the program again. See your Spectrum U ser Guide for more help,
or if you have a Spectrum 128 then use the built-in volume level
tester.)
If you see The Music Machine title screen appear on your TV, you
will know that all is well. You should wait several minutes for the main
program 10 load after which you will see the Main Menu screen shown
in Figure 2.
(If you cannot get either the title screen or the Main Menu to load, do
not despair. Many Spectrum owners use cassette players that
sometimes cause difficulties when loading programs. This doesn't, of
course, apply to Plus-2 computers.
If you do have problems, make sure that only the 'ear' socket on the
8
9
3. GElTING STARTED QUICKLY
Now that you've got everything plugged 1ogether, you probably want
to start making sounds, playing songs, and playing the drums straight
away.
(What, no sound? Perhaps you have forgotten to tum up the volume
on your amplifier, or maybe you haven't connected the leads
properly?)
~
That's what this Chapter is foro When you've tried a11 the things
described here, you· can spend a bit of time later on reading the
detailed descriptions of what The Music Machine can do in Chapter
{I P
l•.'"
1<. e
';l b
o 'S
'::111 (1 1: 11-' i t 1) (1 D
í U
ro s 11
í
d
(1
lñ1ñfñ.ITi..Jñfñ1ñJñ.lñIñ
Ba í
ed i t o
í
1]
4.
What? You've opened the manual at this page without reading
Chapter 2? That's OK ifyou already know how to connect everything
together, but you really must read the warnings about electricity in
Chapter 2 first! We don't want you 10 hurt yourself!
So you are all plugged in and the software has loaded and looks like
Figure 2? Good.
3.1 Playing the sounds, rhythms, and songs supplied
==c::I=-',,;,í==í:;e=r,,;,':::t.===s:::.",=fft:!:F='=i.:::E:===o,=·==:5,='Y,=',=N,=T:=H=====I]
[.::1
The way in which you make selectioI1s from the ttlenu screens is to
press the key on the Spectrum keyboard associated with the capital
letter shown in the panel you want to choose.
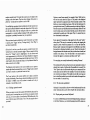
Example: If you want to play the piano, simply press 'O'. Try that
no\\'. The screen willlook like that shown in Figure 3.
Playing the piano:
To get back to the Main Menu straight away, simply press 'Q' for
Quit. Try that now. Experiment with the keys until you understand
how they work, then choose 'Quit' to retum to the Main Menu.
Select 'pianO' and the screen will change to the one you've already
seen in Figure 3. The numbers and letters shown on the screen
correspond to the notes that you can play trom the Spectrum's
keyboard.
Playing the tune:
Select 'Play' (by pressing 'P') and you will hear the tune whose name
is shown in the panel at the bottom of the screen.
10
Figure 3, The Piano Keyboard
Press sorne of the 'musical' keys. Doesn't sound much like a piano,
does it? That's because you are actually playing one of the sample
voices which makes the sound called 'Synth' every time you press a
key. We'll tell you how to make your own musical-instrument sounds
later on.
II
Changing the sound:
Before we record sorne new sound effects, let's change the sound that
the 'piano' plays. Select 'Quit', and from the Main Menu select
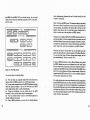
'sAmple editor' .
What you are now looking at is the waveform ofthe sound that plays
'Synth'. This is shown in Figure 4. Don't worry about this screen too
much because we'Il tell you more about it in Chapter 4. Whilst you're
here, you might as weIl press 'Play' againjust to see that you can hear
the sound from more than one screen.
Select 'Current sample' and you wiIl see that the title in the botlom
panel clears and a red flashing cursor appears to prompt you for an
input.
F
S
!
LJ'----.1.-
'17 (" .;:;
€:
.2 37
1',1 1',1
1 .1
(',
u ,- (" e: n t
;:, ,;:¡ fí, p i.. e"
B ,:!I
o:
K
;] :11
i"!
-"';¡
,~=2==·=í:=c=!r=·1=2='===========!Ii
Figure 4, The Sample Editor
12
Playing the drums:
From the Main Menu, select 'Drums'. The screen willlook like that
shown in Figure 5. If you want to hear the rhythm that we have
supplied, you must ensure that the drum channel, rather than the
music channel, is selected ón the Midi screen. To do this, 'Quit' to
the Main Menu, select 'Midi', and then key '4' to redirect the output
to the earphone and phone sockets. 'Quit' back to the Main Menu
and just select 'Play'. If you want to tap out your own rhythm, select
'Drums' then press the keys on the Spectrum's keyboard that are
shown on the screen. (To stop the rhythm playing, press BREAK.)
Echo and reverberation:
,_
1.1
Return to the Main Menu by selecting 'Quit', and then go to the
'pianO' screen. Press a few of the 'keyboard' keys on your Spectrum
and listen to the difference. 'Quit' back to the Main Menu and select
'Play' before you go on to the next exciting instalment.
Want to change the drum sound? WeIl you can either play all the eight
sounds that correspond to the keys shown in Figure 5, or you ,can
make a new sound. Because this is a bit more complicated, we'Il
describe how to do it in a momento
I
!
Type '7' and press ENTER. The bottom panel will now read '7 Bass'.
Note that this is one ofthe sample sounds listed in the big panel on the
Main Menu screen. Press 'Play' again and listen. See how easy it is to
change instruments!
The echo effect is created by a del~y that's adjustable from one
thousandth of a second to around one "'!tole second. How much you
can delay the sound depends on how many different samples you've
already got stored in your computer.
If this is the first time you have loaded the software, you will have
automatically loaded a full set of sounds from the program tape, and
you will have to make a bit of room for the echo. This is done by
deleting one or more samples. (Don't worry - they're still on the tape,
so you won'tlose them forever.) Select 'Quit' theo 'dElete'. Press 1, to
delete one sample, and when asked "Which sample?", type in '6' and
press ENTER. You have now made room for your echo.
fi'Jñlñ./'ñJñ.lñírJñJi'1JñIñ..fñ. c· ,- i_i m:· iñ:- < ,fñiñ.frlírúñIñJf'iJñ.
!l,=--_..
PI.::. ':1 il fhJ 1_1 i t 11 í¡ F' i a n O
nel ,~ 1 i {(j e d i t -::' F""í!
>
•
Jl
."
•
I
I
I
'~'<4
,
J
We mentioned earlier that you can capture your own sounds and play
them back in a sort ofmusical way through The Music Machine. Any
sound that can be picked up strongly enough by the microphone (as
long as that sound is not too long) can forro the basis ofyour worksof
arto
We will give you some simple examples of how this is done now, but
read Chapter 4 if you want sorne more detailed inforroation.
Capturing a sample
From the Main Menu, select 'sampleR'. You will see the screen
shown in Figure 6. It might look complicated, but it is really very
simple. Notice how the coloured bar resembles the recording-Ievel
display on most modero hi-fi cassette decks. Well, that's exactly what
it is - a level meter.
'11
1I6
2
!
0/-12
HH Ope:n
5
7 BA55
5HARE
4-.
HH
.~ Tüt1 i'
8
CI.OSE:
5YNTH
1ñ.1ñJñ1ñ.~..1ñfñJñfñ1ñJñ.
i1
[1 P
11
1. a
5 a m p'l. e:
y!l {tQ '_1 i t. (1 1) L
Q C!
p
í
lññi:Iñ.ii'iJñJ..IñJñ..lfifñiñ.
l.l
,
[1
t r i '3
-;1
e: ,-
1,1
Trig'3e:,-
Figure 5, The DrumMachine
illllllllllllllillllllllllllllillllllllllllllilllllllllll!II¡1II11111II!llillllllllllllll¡IIIIIIII!lllllillllll!!!!II!
'Quit' back to the Maio Menu and select 'ecHo'. Press'Play' and as
you speak into the microphone, what comes out of the amplifier is
exactly the same, but delayed! You will get even more extreme effects
ifthe volume control ofyour amplifieris turned up, because the sound
from the amplifier is then mixed in and delayed too. You can make
sorne quite startling sounds usiog this technique, but don't turn the
volume up too loud or you'll get feedback howls.
3.2 Sorne quick experiments for making your own sounds
You plugged the microphone io sorne time ago and have so far used it
to delay your voice; let's use it creatively now,
1
-36
-30
-24
(e>·;;
m p le
alJ
(1
A Lit o ro ,= tic
['1
f
~~ i
11 ril
,
-18
-12
-6
0dB
+6
=.=N='==f=li=e='=,==:5=Y='t='~::::T=H=======;¡)
(r'Fl
1] {l
Tu n e:
t1·= n u ,9 l
1]
[1
Ed i t
l'
"
1
1
lb==========,_~l
I
Figure 6, The Sampler
I
'.
!
il.I.'.,
"
ji!\
14
I
15
1
~;
f··.l.
l[
When you are using the microphone with The Machine to capture
noises Gust like a recording), the level meter of the sampler will
respond to the loudness of the noise.
So that you know which sample is your voice, select 'Name', and
when you see the red flashing cursor, type in "My voice" and press
ENTER.
Try thís. With the 'Manual' panel on the Sampler screen highlighted,
say a few words into the microphone and see how the level meter
moves from left to right. The louder you speak, the further right the
meter moves.
Select 'Play' in order to hear what you sound like inside a computer!
If you have to shout in order to get the meter to read higher than the
point marked 'Trigger', you should adjust the slider on top of The
Music Machine's case (see Figure 1 to see where this slider is
positioned). You have found the ideal position for the slider when,
as you speak into the microphone, the screen level meter just goes
into the red bar (marked OdB and aboye).
OK, when you've set the level of the slider so that the meter just goes
into the red bar when you speak, we can capture your voice. This can
be done manually or automatically, but we'll do a quick example
automatically now and explain more in Chapter 4.
So that you can experiínent with several sounds, you should delete aH
those that are currently stored in your computer. So select 'Quit', then
'dElete', and then '2'. (Remember that you can always reload the
original sounds from the tape.) 'Quit' back to the Main Menu, and
select 'sampleR' again.
Choose 'Automatic', and repeat "This is me" into the microphone.
i¡
Now that you have a new sample you can 'Quit' back to the main
menu, and play the Spectrum 'piano' keyboard to produce your new
sounds.
Note that you can alter the position of the Trigger point with respe~t
to the bar meter by moving it left and right with the cursor keys. TlllS
lets you control the level at which the automatic trigger occurs.
What other handy short sounds can you capture conveniently? How
about a snippet from the radio, or a raspqerry?
OK, that's the easy stuff done with. Now we are really going to show
you how to make the best use ofThe Music Machine. The next chapter explains how to capture and edit your own sounds, and then
build them into your own songs, tunes and rhythms.
We will show you everything that The Machine and the software can
do but, because it is so powerful, we might use words or phrases that
are new to you. Wherever possible, we will describe what we mean
so that you'll understand. Even if you've never composed any music
or rhythms before, we'll be very surprised if you still haven't after
reading the next chapter and experimenting with The Music
Machine.
As soon as the volume of your choice gets loud enough to cause the
level meter to go over half-way into the yellow bar, press 'Trigger' and
what you say will be captured automatically. What is happening is
that the volume of your voice, when sufficiently loud, will trigger The
Machine.
Until you get used to the level metér, you might have· to try capturing
your voice two or three times before you get it right. Don't worry
though, you'll quickly get the hang of it.
16
17
4. DETAILED DESCRIPTIONS OF WHAT DOES WHAT
If you want to alter the song that we have supplied, read the nex\
paragraph of tbis manual.
In this chapter, we have assumed that you have already read chapters
2 and 3, and that you are familiar with the simpler things that The
Music Macbine and its software can do. If you haven't relld these
parts ofthe manual, we recommend that you do so now. Thank you.
4.1 Playing using the Spectrum keyboard
'pianO'
On selecting 'pianO' from the MainMenu, the system behaves as a
simple monophonic (single voicé) synthesiser. Pressing any of the
appropriate keys from the keyboard screen will play the currently
selected sample (indicated in the panel at the foot of the screen).
4.1.1 The Bar Editor
Two synthesised voices may be played in parallel from within a bar or
tune. In the context ofThe Music Macbine, the difference betweel1 a
bar and a tune is as follows:Bar: tbis is a sub-set ofa tune. In other words, a tune comprisesone or
more bars. Obviously enough, you use the Bar Editor. to compose a
short piece of music..
Tune: this is a compiladon of separate bars. Once you have
composed a number ofbars, you can string them together in any order
you want, using the Tune Editor, to form your songo
If you want to change the voice that is played by the 'piano', then
simply select 'Current sample' and, when prompted by fue red
flashing cursor, enter the number of the voice you want to use and
press ENTER. Press one of the "niusicaí" keys to hear the sound.
(Note that the music channel must have been selected from the Midi
screen in arder to listen to the audio output from The Machine: see the
.
next paragraph.)
A directory ofthe available voices is shown on the Main Menu screen.
'Play'
Once you have composed a song, you can play it from more than one
screen. You will probably playthe song most afien from either the
Main Menu or the Song Editor screens, it doesn't matter which. (Note
that you can only play the displayed bars from the Tune editor.)
You must direct the music or drum output to the 'Ear' channel from
the Midi screen ifyou want to listen 10 compositions tbrough either the
earphone socket or an amplifier connected to the phono output. This is
simply done by selecting 'Midi', and keying either'4' or '7' according
to whether you want to hear drums or music.
18
ed i t o
í
{I t
!ñJnJñfñfñfñfñJñ.1ñIñ
une
Ed i t o
1
¿;I~------~--_
-
.. ------ .........
)I~--
tiro
e ,;;
:5
i I3n
I
t 1_'
,~
íil
n
e 1I
16
(In at ') í a til
!'ITe mp Ó :1.=1211]
[I=L=':J::::::1-=i=C::c==,==1]
1,1
Figure 7, The Bar Editor
19
Select the 'Bar editor' from the Main Menu and you will see the screen
shown in Figure 7. The major part of the screen is set aside for your
music composition and consists of a conventional pair of staves for
treble and bass clefs. (Each stave is set ofhorizontal parallellines; the
upper is called the treble c1ef, and the lower is called the bass clef.)
'Time Signature' and 'Tempo'
You may change the Time Signature and the Tempo of the music at
any time, but note that any bar already displayed on the screen will be
lost if you change the time signatureafter the music is composed. The
time signature dictates the number ofbeats to the bar and may have a
value of 8, 120r 16 whilst the Tempo indicates the rate at which the
bar is played. The figure associated with the tempo is the number of
beats per minute and may be any value in the range of 6010 240.
Ifyou want to plant sixteen notes on a stave, then you should select a
time signature of sixteen; you will then have one complete bar for
every sixteen notes. Or, ifthe signature is eight, you will be able to
play eight notes to the bar.
Entering music
The way in which you enter music is illustrated in the following
example. Because the software with which we supply you already has
bars and tunes built into it, we shall. edit the supplied tune which is
called "Snap the Boogie".
Sharps and flats
'Quit', then select the 'Bar editor'. You will see the first bar ofthe song
displayed. The black rectangles on the staves each represent a note.
The notes may be natural (white notes on a piano), or sharps and flats
(the black notes). Ifa note is sharp, then.a '#'~ is displayed at the top or
bot1om ofthe stave nearest to that note. Notes entered as sharps are
denoted by a '#' sign whereas flats are shown either as naturals or
sharps. An example ofthis is B-flat which is actually displayed as Asharp; see below.
20
Try this. Make the second note on the lower stave sharp by firstly
keying 's' (to alter the box showing 'natural'), moving the cursor to the
note, and pressing the space bar. Change the third note to a flat by
repeating the aboye process exceptfor pressing 'F for flat instead of's'
for sharp. y ou will notice that if you call for a sharp or a flat note that
doesn't actually exist in musical terros (for example, there is no such
thing as 'c flat'), the Music Machine software will select the
appropriate natural note or semi1one.
Whenever you press the space bar, you either plant a note at the
cursor position or you remove one. Because the Music Machine is a
two-voice synthesiser, you can only play two notes simultaneously
(that is, by having two notes aligned vertically on the staves). Ifyou
attempt to enter a third note, the one nearest to it will disappear
automatically.
Changing bars
Experiment with the bar editor by moving notes around the staves;
select 'Play' from time-to-time to see what your composition sounds
like. When you have completely ruined the first bar, select 'Bar'
and, when prompted, key in the number of another bar and press
ENTER. (Don't worry about messing up the song; you can always
reload it from tape or Mircrodrive to restore it to its former glory.
Changing the lyrics
Select 'Lyrics' and when prompted by the red flashing cursor, enter a
name for the bar. When you come to compile your song, the bar
number and the first part ofthe lyric name will be disp1ayed in a screen
panel. If you use 1yrics that remind you of the music in that particular
bar, you will find it easier to assemble your song; this will be
illustrated with an example in a moment.
4.1.2 The Tune Editor
Select 'tuNe editor' from the Main Menu and you will see the screen
21
shown in Figure 8. This editor is not nearly as complicated as the Bar
Editor. AH you need do with this screen is construct a list of numbers.
lñfñIñJñ.IñfñIñ T
1.
If you select 'Play' from the Drum editor screen, you can only play
the displayed bar and not the whole rhythm sequence (composed
from lots of bars); the whole is playable from the Tune editor.
Whether music or drums play when you select 'P' depends on which
side of the screen the cursor is displayed. Move between music and
drums using the cursor left and right keys.
The number in the 'free' panel indicates the amount ofspace you have
available for composing your tunes.
If you want to interrupt a song whilst it is playing, press 'Quit' or
BREAK.
22
e
d i
t or
lñIñJñJñJñffiIñ
t-1u 5 i e
CorlJffiS
a
As an example, we can compose a variation of the song "Snap the
Boogie" that is supplied with the software,just by re-ordering the bars
and adding the new bar that we ruined - sorry, composed - in section
4.1.1.
To change the voice, select 'Current sample' and enter the new voice
number. To edit the tune name, select 'Tune' and enter the new name.
ne
tlp 1. a '~ ~ ~QU i t.1]
Each number and name represents a bar that you have already
composed. To make a song, you simply string together bars in the
order that you want.
Drum rhythm bars are assembled in the left-hand panel, and music
bars in the right-hand one. Move the cursor right, to the music tune
editor, and then scroll through the music using the up and down cursor
keys. Overtype at the cursor position to replace a few bar numbers and
watch how a handful ofletters ofthe Iyric are displayed to remind you
of what the bars are. If you want to insert new bar numbers,just press
ENTER (bar number 1 wiH then be inserted by default) and add the
number you want.
1_1
1.
1.
a
1.
1.
1.
Standard
II3riant
Standard
Stand·3 rd
I..... ·:sriant
Standard
5t.3ndard
St·3nda id
In t ro
Part 1.
3 Part ;2
4 Part. 3
5 p.:\ r t 4
1. In t ro
1. In t ro
1. In t ro
1.
a
(,~l=1:::::=1..:::1r==í::::e=n==:t===s:-!I=ffi::f:P::::::::1.=e=8===:3=·=y·=t-=n==H=====~il
[1
f
~&~
1]
(l~1Tu=ne===~I]
Figure 8, The Tune Editor
4.2 The Drum Machine
On selecting 'Drums' from the Main Menu, you will see the screen
shown in Figure 5. Pressing the appropriate keys on the Spectrum's
keyboard will result in the sounds listed in the bottom panel of the
screen being played.
The relationship between the keys and the number of the sound is a
function of their physical positions:
Spectrum Key
2
4
E
S
Sound Number
1
3
5
7
23
Spectrum Key
Sound Number
3
2
W
A
D
4
6
Writing your own rhythms is straightforward; wherever there is a beat
planted on a horizontalline, then the sample associated with that line
will sound when the rhythm is played. There are several similarities
with the tune editor described in section 4.1.2 of this manual, and
these are as follows:
8
Note that from the Drums screen, you can only play one drum sound
at a time (but you still have eight sounds to choose from). However, it
is possible to play any three sounds from these eight at the same time
when using the drum editor to build a rhythm.
4.2.1 The Drum Rhythm Editor
When you select 'drUm editor' from the Main menu, you are confronted with the screen shown in Figure 9. The column of numbers
from 1 to 8lists the memory-resident sound samples. Ifyou load the
software from the original cassette, you will see listed the drum
sounds supplied.
1'ñ]:¡'_fT1ffi..ifuñfrJr'Jñ.
[LP '-: '~ (1 {t;:t u
r.-,~
i t
u
!fl
..:. ~
i t·:'
f
1.1
t
1]
U.
7
SA:;:':;:'
'3
.;",' t·jT H
tI
t. , f~ e
1::
1.!
l. .'::.'"
\.':'
n
- - -..._..- .. ,.--e.
,:¡ t. '.' ,- €;
-_._.
__
.~
_______
11
1,
1.1
Figure 9, The Drum Editor
24
~'~:_ E d
\_ t
---TOt'12
TOt-11
HH Open
HH el. c,.=.
3NAJ=;:E
.•.
_~
.. ~-~
. .._..._.o·____
. _ ~
As an example of how to create a drum rhythm, first select a time
signature of 16 and a slow tempo of 120 beats per minute. Insert a bass
drum line of one drum beat every fourth space, starting with the first
space, along the lineo Add a sound like a hi-hat every second and third
space. Add a tom-tom every fourth space starting with the third. Now
add sounds that take your fancy elsewhere in the bar (but don't forget
that you can only play three samples simultaneously). Now you can
change the tempo to suit your mood.
~..i'ñ!ñJñ1ñ.f1fñ.iiJTU:L
1
2
:3
4
5
iS
The tempo may be changed to any value between 60 and 240 beats
per minute. The lyrics editor enables you to describe each bar with a
meaningful name. The time signature mayhave a value of8, 12 or 16
and denotes the number ofbeats per bar. The bar number panel is used
both to create new bars and edit existing ones.
~=;~'1¡
Once you have composed several bars of different rhythms, you can
use the tune editor to string them together and play them. Ifyou have
forgotten how to use the tune editor, read section 4.1.2 aboye.
4.3 Recording reaHife sounds
Before you try the examples in this section ofthe manual, delete all of
the resident samples. ('Quit', 'dElete', select '2'.)
The microphone supplied with the Music Machine can be used for
capturing sounds from virtually any source. Both quiet and loud
sounds can be captured; you will need to adjust the level control and
maybe the distance of the microphone from the source to get the effect
that you want.
Select 'sampleR' to bring up the screen shown in Figure 6. The level
meter on this screen behaves in the same way as do bar meters on
25
modero cassette decks. The louder the sound source, the higher is the
reading on the level meter. The bar colour changes from green to
yellow at -12 dB, and from yellow to red at O dB.
y ou will find by experiment which combination of slider position (on
the top ofthe Music Machine's case) and volume level ofthe source
give the best results. Start by setting the slider to a position that
corresponds to a screen reading averaging -6 dB; speaking into the
microphone is probably the easiest way to experiment.
When you have found a suitable level, select 'Automatic', get ready
to speak, press 'Trigger' and say "Testing testing". Press 'Play' to
see what it sounds like.
(If the level is too low, you will not capture a sample beca~se ~ou
will not have set off the automatic trigger. When a sample IS bemg
taken, the "Trigger" panel is high-lighted. The bar meter must
reach approximately -6 dB before the Music Machine is triggered
although this can be adjusted using the left/right cursor keys. On the
other hand if, when you play the sample, it is very distorted then the
slider control is set too high.)
The Manual control option on this screen enables you to capture a
sample right from the moment that you press 'Trigger' and is useful if
you want to record at a particular instant in time.
The 'Loop' option on this screen enables you to playa particular
sample continuously. Once Loop is selected, anything you play from
the 'piano' or MIDI screen will continue to sound until a key is
released or note-otT data is sent.
4.3.1 Editing captured sounds
When you capture a sound, that sample will fill aH ofthe aHocate~ free
memory space. Assuming that you currently have no samples resldent
and, say, you want to capture a sound lasting 1000 miHiseconds: the.n
most ofthe free space will be taken. This is why the sample editor IS
provided.
26
Capture a sound (sorne speech, for cxample). Select 'Edit' and you
will see the screen shown in Figure 4. The peaks in the displayed
signal represent the captured sound. The horizontal sections of the
display are most probably dead space. Edit out this dead space by
moving the front cursor (F) with the cursor keys to the startofthe rise.
Play the sound to see what effect this has on the sample. Select 'B' and
move the back cursor to the end of the fall, and you wiD now have
sandwiched the useful part of the signal. Play it to ensure that you
have eliminated the dead space.
Sorne signals, if truncated at a high signallevel wi11 sound "spitty"
when played. This may be overcome by starting and stopping the
sample at points where the spectrum is at or near the base-lineo
Because rapid variations in the signallevel are difficult to spot when
the spectrum is displayed normaDy, you can 'Zoom' into the part of
the graph nearest the selected cursor (that is, either front or back) and
examine it in close-up. You will then find it very much easier to
truncate the signal at a rninumum and thus avoid "spit".
You may play your sample backwards by invoking 'Reverse'.
The positions of the front and back cursors are expressed in terms of
elapsed time in units ofmilliseconds (thousandths of a second). The
"free" figure is also in milliseconds and gives you a measure of how
much space you have left for other samples. You have in total about
one second at your disposal. This might not seem like very long, but
bear in mind that realistic drum sounds can be made with samples less
than one-tenth of a second long.
4.3.2 The two-voice syntbesiser
Although it is not possible to play two voices' simultaneously from the
'piano' keyboard, tbis can be done using the bar and tune editors.
4.4 Playing using an external keyboard
To connect a MIDI (Musical Instrument Digital Interface) keyboard
to the Music Machine, you should plug appropriate DIN cables into
27
the MInI-IN and MIDI-OUT ports ofboth devices. As you would
expect, IN on one device should be connected to OUT on the other,
and vice versa.
lñfiiTiif1..JPff.F.c¡;:¡-RJñ.ifLiFF
fñIiüi'Uñ.Jñffi..1ñJñlñiñJñJñJ M.I D I
{rpi-~l (IQU i tl.1 [1 e ~-:: ter n a 1. 1)
fñffiJiiJñ1ñJñJ e:>< ter n a '- IñIñIñIñJñlñ..IñJñiñfñfñ.
~,~le=h=a=n=A=0~11
~d r
IJ rfl 5
1] (1
[lmIJ:=:. i el]
1I
[,~I===0=:IJ [L Jo
2
:3
l] [l=====:.íl
5
11 (1
JJ
[1
4
1]
6
'b====-==~I!
t! ~:¿'!
:t(¡ l,ie.!:l r)i
Figure 10, The Midi Screen
You are now free to do several things.
(a) You may play any captured sample held in the Spectrum's
memory from the MIDI keyboard over its fuIl musical range.
(b) You may send composed tunes to the MIOI synthesiser and play
either the captured samples or any of the voices that your MIDI
device might already hold, or both simultaneously.
(c) Using the microphone, you may capture any of the MIDI
keyboard's voices and edit them using the sample editor.
(d) You may switch between voices on your MIOI keyboard to
simulate different instruments.
(e) Using a MIDI synthesiser, you may play two Music Machine
28
notes simultaneously (whereas this can't be done directly from the
computer's keyboard).
Figure 10 shows the MIOI screen. The important thing to note about
this screen is that it is actually two screens in one; the top half is for
external playing. In particular, the bottom half is relevant to what
happens when data is sent to a particular output (whether this be
drums or music sent to the ear/phono or MIOI sockets).
Note that you can define which ofthe 16 MInI channels both receive
and tramsmit data. You have complete freedom over where you send
the Music Machine's drum and musical signals. Channels A, B and C
correspond to external drums or music, intemal drums, and intemal
music respectively; each may be assigned to any MIDI channel
Note that the software will not allow you to map both drums and
music onto the earphone (or phono) outputs of The Music Machine.
You can on1y play drums OR music through these outputs, and not
both simultaneously. Piease see section 4.4.2.
To allow a MIDI synthesiser to playa Music Machine voice, select
the MIDI channel you want to use (channel zero is the 'omni' mode
that can receive from all channels), and select 'eXtemal'. If music is
mapped onto the MIOI channel in L'le lower half ofthe MInI screen
(key 5 or 6), your synthesiser will playa resident sample.1f drums are
mapped onto the MIOI channel (key 2 or 3), the complete sample set
will map onto consecutive sets of keys.
You might wish to play some pretty advanced musical compositions
(using the MIOI keyboard), store them, edit them, and play them back
latero At the moment, the software we supply takes up a great deal of
the available RAM and we just have not had the space to provide you
with these latter facilities. Piease write and let us know what you want
to do with your Music Machine and we will try to take account ofyour
needs with future developments.
29
4.4.1 MIOI in, out and through
The MIOI-IN and MIOI-OUT sockets on The Music Machine
conform to tbe MIOI standard. Tbe MIOI-THROUGH socket is
used for daisy-ehaining devices tbat conform to tbe MIOI standard.
Tbe instructions supplied witb whatever it is tbat you wish to connect
should give you more information about assigning masters and slaves.
As Tbe Music Machine conforms to the MIDI standard, you can of
course connect up to 16 Spectrums together and orchestrate them!
If you are fortunate enough to own a MIOI sequencer, you can use
this as tbe master device for controlling, say, an external keyboard, an
external drum syntb, ANO your Music Machine. Tbe world ofMIOI
is large and fairly complicated; witbout knowing what devices you are
going to plug togetber, it is very difficult for us to provide you witb
detailed instructions. Suffice to say, whatever you are plugging in
should come witb its own instruction manual to help you.
space to alot to tbe delay effect. To maximise tbe delay, you should
delete aH resident samples. The delay time is displayed in a screen
panel in millliseconds.
U sing headphones, you can faze yourselfby trying to speak coherently
into the microphone. Alternatively, witb an amplifier and speakers
connected, you will find tbat you can generate sorne pretty startling
effects as the delayed signal is regenerated via tbe speakers and
microphone. Be warned tbat at high sound levels, you can generate
feedback howls.
By experimenting witb tbe length oftbe delay, tbe microphone level
slider, and tbe amplifier output volume, you should be able to produce
a wide range of strange noises.
4.6 Recording and replaying your compositions
Loading and saving is an extremely simple affair. The options
available to you on selecting 'Load/save' are self-explanatory.
4.4.2 Combining tunes and drums
You have just read tbat it is not possible to direct drum and music
outputs to tbe headphone or phono sockets simultaneously. However,
you can use your MIOI keyboaid to play tbe music whilst The Music
Macmne plays the drum rhythm in synchronisation.
Channel selection is straightforward from the MIDI screen menu,
and you can assign any of the sixteen channels to any stream you
want.
4.5 The effects box; echo and reverberation
Echo and reverberation effects are generated via a simple variable
delay lineo You will hear markedly different effects by listening either
through your headphones or an amplifier.
The lengtb oftbe delay that you can use is dependent on the amount of
free RAM; if you have stored a number of samples, there will be less
30
y ou can save the data parts of tbe program eitber with tbe program or
separately. The advantages of tbis are tbat you can load and save
individual samples, sub-libraries of samples, individual tunes and
sub-libraries of tunes to suit your particular needs. If you would
rather, you can save aH your samples and tunes togetber witb tbe
program so that when you next load tbe software, it is ready to runo
The program is smart enough to recognise whether what it is loading is
samples or tunes, so you need not necessarily specify which. You may
use the usual Spectrum "LOAD" cornmand ifyou cannot remember
the name of what you want to load (tape only), or you can look for
specific named files.
4.6.1 Cassette and Microdrive storage
You can download the whole of the software to Microdrive cartridge
in the foHowing manner:
31
1. Retum to BASIC from the Main Menu by selecting 'basIc'.
2. Format a spare Microdrive cartridge.
3. Save the main program using the following command:
SAVE * "m" ; I ; "CODE" CODE 27000, 38536
4. To load the program from a cold start, use:
CLEAR 26999
LOAD * "m" ; I ; "CODE" CODE
Note that you cannot format a Microdrive cartridge from within the
Music Machine software so you should have a cartridge ready to
use. However, if you have forgotten to format a cartridge before
you loaded the program, you may do so by selecting 'basIc' from the
Main Menu, and you will be dropped into the BASIC interpreter
from which you can format a cartridge. To return to the program,
type
RANDOMIZE USR 27000
and press ENTER
You might wish to move all of the software from cassette to
Microdrive so that it loads and autoruns. If so, do the following:
l. Copy the main program to cartridge as explained aboye.
2. Reset your computer and rewind the tape.
3. Write and ron the following program:
10 LOAD" " SCREEN$
20 SAVE * "m" ; 1 ; "SCREEN" SCREEN$
Play the cassette player.
4. Now write and save the following program:
10 CLEAR 26999
20 LOAD * "m" ; 1 ; "SCREEN" SCREEN$
30 LOAD * "m" ; 1 ; "CODE" CODE
40 RANDOMIZE USER 2700
Save the program using
SAVE
32
* "m" ; 1 ; "ron" UNE
10
33
5. TECHNICAL SPECIFICATION OFTHE MUSIC MACHINE
If you have sorne technical knowledge and machine code programming experience, you may weH be interested in the contents of this
chapter. (On the other hand, you might not want to know anything
at aH about the technicalities of The Music Machine - in which case
you won't miss much by not reading this.)
5.1
xx 9Fhex (write only)
Date can be written to the
DAC via this port.
INTER'PT SEL
xx 5F hex (write only)
Writing 01 to this port
disables internal Spectrum
interrupts and replares the
IRQ signal from the ACIA.
Writing Orestores normality.
ACIAsatus
x 27F hex (read only)
ACIA data read
x 37F hex (read only)
ACIAcontrol
x07F hex (write only)
ACIA data write
x 17F hex (write only)
Technical Spec.
The Music Machine incorporates two Ferranti devices for digital-toanalogue (DAC) and analogue-to-digital (A to D) conversion. The
part numbers are ZN429E8 and ZN449 respectively. The circuit
also ineludes a Motorola 6850 ACIA (Asynchronous Communications Interface Adapter) for handling the MIDI channel,
two anti-alias filters (one for input and one for output), a discrete
microphone amplifier and a headphone amplifier. The elock signal
for the ACIA and the ZN449 is provided by a ceramic oscillator.
The incorning signal from the microphone amplifier is sampled to an
8-bit resolution at arate of 19.444 thousand samples per second. This
yields an analogue bandwidth of approximately 9.5 KHz which is in
fact the cutoff frequency of the filters.
AH of the devices on The Music Machine data bus are accessible to
the Spectrum within its 10 space. ACIA transactions must use
16-bit 10 instructions; the converters are accessible via 8-bit 10
instiuctions.
IOMap
ADC START
ADC READ
34
DACWRlTE
xxDF hex
Reading (or writing) to
this port will start analogue
to-digital conversion.
xx BF hex (read only) The contents of the Ato-D can be read via this
port. Note that the A-toO must have been 'started'
at least 20 uS before this
port is read.
}
See
Motorola
Data
Sheet
Sampled-data capacity
1100 ms
Clock frequency
500kHz
A-to-D conversion time
20 uS
Sampling frequency
19,444 samples per second
Sampling bandwidth
20 Hz to 9.5 KHz
Input sensitivity
2m V RMS into 50 kOhms
Headphone output
15mW RMS into 15 Ohms
Amplifier (phono) output
450 mV RMS
Signal-to··noise ratio
42 dB
35
MIDI
The only MIDI facilities provided as standard with The Music
Machine are the ability to control internal or externa! note-on or noteoff events. In most cases the action ofturning a note on or off requires
the transmission of three bytes.
Note-on event:
lOOlnnnn
NOTE-ON control byte. nnnn is a tour-bit
number corresponding to the MID1channel
number. 0000 is Channel 1, 0001 is
Channel 2, and 1111 is Channel 16, fol"
example.
Drum Pitch
In common with other drum machines, each drum has a notenumber; unfortunately, different machines use different numbers.
The Music Machine uses the following note numbers:
Middle C
= 1, c# = 2, D = 3, and so on.
If you wish to change those values to suit your drum machine, you
can POKE the following locations with the note value that you want
to send to MIDI:
Sample 1 is associated with 8187 hex, sample 2 with 8188 hex, and so
on. (8187 hex is equal to 33159 decimal.)
Oppppppp
Pitch value. 00100000 is middle C.
5.2 Musie capacity
Ovvvvvvv
Velocity value. The Music Machine can
only recognise velocity Owhich is, in etTect,
NOTE OFF or another value for note on.
There are no facilities for volume control
and so, quite reasonably, it is ignored.
RAM is consumed at the rate of one byte per sample. With a sample
rate of 19.444 kHz and about 22K of data space, approximately 1.1
seconds of continuous digitised data can be stored. The amollOt of
free RAM is indicated on most screens, and is given in units of
milliseconds.
Note-otT event:
lOOOnnnn
NOTE-OFF control byte
Oppppppp
Pitch value of the note to be turned otT.
Ovvvvvvv
After-touch velocity, ignored.
Up to eight digitised samples can be stored in RAM simultaneously.
At full capacity, the average duration of each sample is about 0.15
seconds. In practice, the digitised drum sounds consume around one
tenth of a second each, leaving a third of a second or so for usersounds. You do of course have the option of deleting the resident
samples in order 10 make use ofthe full data space. The total duration
available of around 1.1 seconds is, we believe you will find, a
surprisingly long time for most musical sounds.
A song or rhythm can comprise a sequence ofup to 255 ditTerent bars.
Because most music repeats a range of bars, the fmal song or drum
sequence can last very many minutes.
5.3 AdditionaI notes
You must use headphones whose lead is terminated with a 3.5 mm
stereo jack plug as a mono plug may short the output and you will
36
37
hear nothing. Aim to use headphones with an impedance between 8
and64 Ohms.
By aH means experiment with microphones other than the one we
supply; in general, the better the quality of the microphone, the
better the resuIts.
ZX Spectrum and Microdrive are trademarks of Amstrad
Consumer Electronics PLC and Sinclair Research Ltd.
38