1
eutaxa ٠ Electronic Keys & Reference Collections٠ User Manual
User Manual
Contents
Navigation ................ 02
Start Page ................. 05
Dichotomic Key.......... 12
Query Key ................. 24
Gallery ...................... 53
Morphology ............... 74
Ecology ..................... 84
Installation Guide....... 93
This Manual exclusively displays images from the CD Culicidae 05
1
eutaxa ٠ Electronic Keys & Reference Collections٠ User Manual
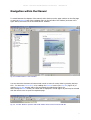
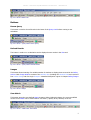
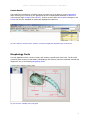
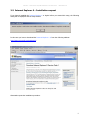
Navigation within the Manual
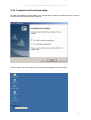
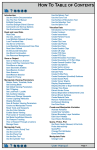
To switch between the chapters of the manual, either click on one the page numbers on the first page
or enter the Bookmarks tab of the navigation pane on the left side of the window (as shown in the
figure below) and select one of the listed titles or subtitles.
Fig. 01: Acrobat Reader 7.0: User interface
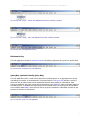
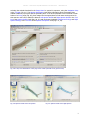
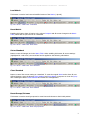
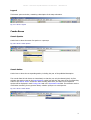
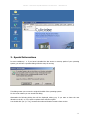
You can search the document to locate certain words or series of words, either by pressing the keys
Ctrl + F to insert the Find toolbar, or by enabling the binocular button in the tool bar (figure 02) to
open the Search PDF window and to type and search the wished term (figure 03).
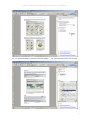
After clicking the Search button, the results will be displayed in a field (figure 04) and may be selected
with the mouse cursor to open the respective page.
Fig. 02: Tool bar: Button to open the Search PDF window and to search across the PDF file
2
eutaxa ٠ Electronic Keys & Reference Collections٠ User Manual
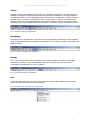
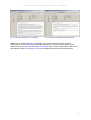
Fig. 03: Search PDF window: Selection of the term "Gallery"
Fig. 04: Search PDF window: List of results
3
eutaxa ٠ Electronic Keys & Reference Collections٠ User Manual
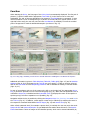
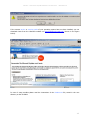
In addition the document contains a series of links, coloured in dark blue, which may be enabled in
order to open the connected page and to read the description of the highlighted term (figure 05). To
retrace your viewing path and to move back to the previous page, click on the appropriate green
button, placed at the lower margin of the interface (figure 05).
Text fragments that are not implemented as hyperlinks are displayed in a light blue colour.
Fig. 05: Hyperlinks and highlighted text; navigation buttons on lower margin of the window
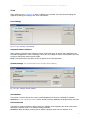
Text fragments may be copied by clicking the Select Tool button in the tool bar and marking the
wished text with the mouse cursor. Copy and paste the text into a Word document, using the
commands Ctrl + C and Ctrl + V. This method is useful for example to transfer names of authors and
publications, listed in the chapter "References".
Fig. 06: Marking and copying of text fragments
A detailed description how to navigate within the document can be queried via Help button in the tool
bar.
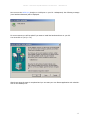
Advice to Users of Windows XP:
Images displayed in this Manual show the eutaxa software interface when using the Windows Classic
View. Choosing the Windows XP View or any other appearance setting will affect the design and the
colouration of the user interface. To get an optimal account of this software, it is recommended to
change the viewing configuration settings in the Control Panel and to switch to the Windows Classic
View. To change the appearance settings click on Start, select Control Panel and Appearance and
Themes in sequence, double-click on the menu item Display and enable "Switch to Classic View".
4
eutaxa ٠ Electronic Keys & Reference Collections٠ User Manual
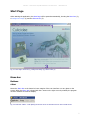
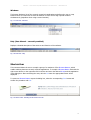
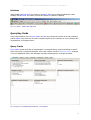
Start Page
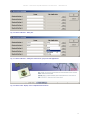
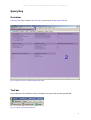
When starting the application, the Start Page will be opened automatically, showing the Menu bar (1),
a background image (2) and the Shortcut bar (3).
Fig. 01: Start Page: Menu bar (1), background image (2), Shortcut bar (3)
Menu bar
Buttons
Offset
Moves the Menu bar to the lateral or lower margins of the user interface or to any place on the
screen. When the Menu bar is closed with the x-setter on the right corner by mistake, the program
must be restarted to reset the display.
Fig. 02: Menu bar: Offset – when placing the mouse cursor on the button it turns into crossed arrows
5
eutaxa ٠ Electronic Keys & Reference Collections٠ User Manual
Fig. 03: Menu bar: Offset – moving the Menu bar
Sub-Application Icon
When opening one of the sub-applications D-Key, Q-Key, Gallery or Ecology the respective icon is
placed near the left margin of the Menu bar. Clicking on this icon opens a list of commands, which can
be used to restore, minimize, maximize or to close the sub-application.
Fig. 04: Menu bar: Sub-application icon
Application
Key to display a list of eutaxa products currently available and to allow you to open any applications
installed on the PC.
Fig. 05: Menu bar: Application
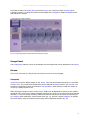
Groups
Before running one of the sub-applications (D-Key, Q-Key, Gallery, Morphology) previously click on the
Groups button and select a partition. After this selection all buttons of the sub-applications in the
Menu bar are set to active and one of them can be opened. This procedure must be repeated when
switching to another group or sub-application. All selected sub-applications remain opened until the
program is closed and can be queried over the Windows button in the Menu bar.
6
eutaxa ٠ Electronic Keys & Reference Collections٠ User Manual
Fig. 06: Menu bar: Groups – inactive sub-application keys before selecting a partition
Fig. 07: Menu bar: Groups – active sub-application keys after selecting a partition
Fig. 08: Menu bar: Sub-application buttons
Dichotomic Key
This sub-application contains a Dichotomic Key for identifying organisms up to genus or species level.
Fig. 09: Menu bar: Dichotomic Key sub-application
Query Key (optional: Family Query Key)
This sub-application offers a multi-criteria approach to identify species or to aggregate taxa, closely
resembling one another in morphological or ecological features. The Query Key includes a series of
cards with lists of features that can be individually checked when testing for concordance. After
running a calculation the query results can be transferred to the Gallery in order to compare images of
the listed species. In addition the morphological and ecological criteria of each species are tabulated
in an extensive data Matrix, where species may be grouped, compared or individually checked by the
presence or absence of data entries.
Fig. 10: Menu bar: Query Key sub-application
7
eutaxa ٠ Electronic Keys & Reference Collections٠ User Manual
Gallery
Entering the Gallery sub-application allows access to thousands of images from an extensive picture
database. Each species is documented precisely using numerous illustrations of the most important
morphological details. This sub-application allows the simultaneous arrangement of images of various
size and number. If needed, several features from a single species or identical characteristics from
different species can be arranged adjacently. This makes it possible to separate and allocate species
according to their morphological features and similarities or differences may be compiled by the user.
Fig. 11: Menu bar: Gallery sub-application
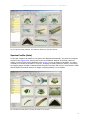
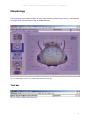
Morphology
In the Morphology sub-application, information on the morphological characteristics of the respective
group is displayed. All structures relevant to identification are recorded in a number of illustrations and
labelled in detail.
Fig. 12: Menu bar: Morphology sub-application
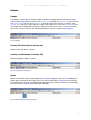
Ecology
The Ecology sub-application offers information about habitat conditions, synonyms or geographic
distributions. Contrary to other sub-applications this button is always set active and does not
necessitate the preselection of a group or partition.
Fig. 13: Menu bar: Ecology sub-application
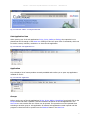
Info
This button offers information about the project and the current product, addresses of the eutaxa
email and website and a preview of other products.
Fig. 14: Menu bar: Info – Selection of the Project Info
8
eutaxa ٠ Electronic Keys & Reference Collections٠ User Manual
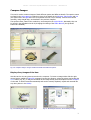
Tools
When clicking on the Tools/Settings button a dialog box is inserted; the pane allows changing the
application settings, according to the user's requirement.
User Settings
Fig. 15: Tools – Settings: User Settings
Subgenus Name is visible in
When marking a check box the subgenus names will be inserted in all species lists, displayed in the
selected sub-application. When unmarking a check box, the subgenus names will be blanked and only
the genus and species names remain visible.
Note: This function does not affect names of species of the Trichoptera Key.
System Settings (it is recommended not to change these settings!)
Fig. 16: Tools – Settings: System Settings
Set Database
This button is used to allocate the correct eutaxa database (if it has been cancelled by mistake).
Attention: Do not change this setting! When selecting a wrong database the program does not work!
Set Picture-Path
The button is used to modify the picture-path (for example when separating and storing the picture
data base in another folder or on another storage medium).
Attention: When allocating a wrong picture-path the program does not work without error!
9
eutaxa ٠ Electronic Keys & Reference Collections٠ User Manual
Windows
This button displays a list of the currently opened sub-applications and allows the user to jump
between them. It is also used to close all windows or to tile and to align opened windows
simultaneously (expedient when using a second monitor).
Fig. 17: Menu bar: Windows
Help (User Manual – currently enabled)
Displays a detailed description of the structure and function of the software.
Fig. 18: Menu bar: Help
Shortcut bar
This command allows the user to compile a group of a maximum of five Shortcut Buttons, which
enable switching between currently used sub-applications. To compile a Shortcut Button click with the
right mouse button on the respective field in the bar and enter the desired Group and sub-application
in the dialog box. After confirming the entry with the OK-setter the appropriate button will be
displayed.
To remove a Shortcut Button reopen the dialog box, select the corresponding Clear-button and
confirm the procedure with OK.
Fig. 19: Shortcut bar: Selecting the first field in the bar
10
eutaxa ٠ Electronic Keys & Reference Collections٠ User Manual
Fig. 20: Shortcut Buttons - dialog box
Fig. 21: Shortcut Buttons – dialog box: Selection of groups and sub-applications
Fig. 22: Shortcut bar: Display of the compiled Shortcut buttons
11
eutaxa ٠ Electronic Keys & Reference Collections٠ User Manual
Dichotomic Key (D-Key)
Tool bar
The configuration of the buttons and combo boxes changes, according to the type of the currently
opened card.
Fig. 01: Tool bar – configuration of buttons when using the D-Key Card
Buttons
Navigation Keys
These buttons are used to browse the pages of the D-Key Card or to switch between the images in
the Species Profile Card.
Fig. 02: Tool bar: Navigation Keys: First, Previous, Next, Last
First: Return to the first page/image
Previous: Return to the previous page/image
Next: Move to the next page/image
Last: Move to the last selected page/last image
Specification of the Navigation Keys when using the D-Key Card: Before clicking the Navigation Keys
First or Previous, the two buttons Next and Last are disabled and displayed in a grey colour. After
clicking the buttons First or Previous, each step of the viewing path will be stored in the History and
may be retraced by pressing the Next button in sequence until the last selected page is reached.
When reaching the last selected page, the History is cleared and the Next and Last buttons are set to
inactive.
Clear
Button to clear the History.
Fig. 03: Tool bar: Clear History
12
eutaxa ٠ Electronic Keys & Reference Collections٠ User Manual
Table Windows: Table left, Table right
Table Windows consist of a series of up to six images, each showing a specific feature of the
morphological character currently displayed in the respective Viewport (1) of the D-Key Card. Table
left refers to the picture shown in the left Viewport, Table right to the picture shown in the right
Viewport. These images display the range of variable features of the detail presented, in different
genera or species, which can be identified on one of the following pages.
Fig. 04: Tool bar: Table Windows: Table left, Table right
Both Table Windows can be arranged at the same time or enabled separately. They may be shifted by
moving the title bar with the mouse cursor and can easily be reset to their initial position by clicking
the Arrange Windows button.
Fig. 05: D-Key Card: Table Windows Left and Right, both arrayed at the same time
Each table consists of two tabs, labelled Table and Zoom. When selecting the Zoom tab, all images
are displayed in a bigger size and may be queried in sequence by clicking the Navigation Keys (near
the base of the tab) forward or backward. To close a table click on the x-setter or press Escape.
Note: Table Windows always produce a separate button on the taskbar.
13
eutaxa ٠ Electronic Keys & Reference Collections٠ User Manual
Fig. 06: Table Window: Table tab
Fig. 07: Table Window: Zoom tab
Attention Window
If this button is set to active, a window will be inserted, offering specific information about
identification problems or confusion of species. This window can be increased or decreased in size by
scrolling the lower margin with the mouse cursor. The size of the Viewports will automatically be
adapted. To close the Attention Window, click on the x-setter in the Title bar. The Attention Window
always produce a separate button on the taskbar.
Fig. 08: Tool bar: Attention Window button, set to active
Fig. 09: D-Key Card: Attention Window
14
eutaxa ٠ Electronic Keys & Reference Collections٠ User Manual
Images
This button allows inserting of a variable number of windows to display pictures stored in the Gallery
Archive. Each Image Window consists of the selection bar (including the selection field and a series of
four combo boxes) and of a single Viewport. To insert an image select "Group" or "Family" in the
selection field, and group, genus, species or detail in the combo box on top of the Viewport. The size
of a window can be adjusted by scrolling the margins with the mouse cursor. To close the window,
click on the x-setter in the Title bar. A detailed description is given in chapter Gallery/Images.
Fig. 10: Tool bar: Images
Fig. 11: Image Window – selecting a species name
Arrange Windows
Button to restore the size and alignment of Table Windows and Attention Windows.
Fig. 12: Tool bar: Arrange Windows
Left/Right Species Profile (in Species Profile Cards)
This button shows images of the species displayed in the left and/or right field Systematic Level of the
D-Key Card (when the species level is reached).
Fig. 13: Tool bar: Left Species Profile, Right Species Profile (Species Profile Card)
15
eutaxa ٠ Electronic Keys & Reference Collections٠ User Manual
Left/Right Species Ecology (in Species Description Cards)
This button shows information about the species displayed in the left and/or right field Systematic
Level of the D-Key Card (when the species level is reached).
Fig. 14: Tool bar: Left Species Ecology, Right Species Ecology (Species Description Card)
Combo Boxes
Search Pages
This command field is used to select a certain page of the D-Key Card. Each line consists of a page
number (Search Page) and a short summary (Search Text), indicating either the Systematic Level or a
prominent feature. The lines are sorted by the page number but may be re-grouped by a click on the
respective column header. After selecting a record the associated page will be opened.
Fig. 15: Tool bar: Search Pages – combo box expanded
Search Taxa
This command field is used to search for a certain taxonomic unit (a genus, species or species group).
After selecting a name, the associated page will be opened. The Taxa are sorted in an alphabetical
order and may be re-grouped by clicking on the label above the respective column.
Fig. 16: Tool bar: Search Taxa – combo box expanded
16
eutaxa ٠ Electronic Keys & Reference Collections٠ User Manual
Cards
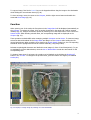
D-Key Card
This card represents the actual Dichotomic Key form and is divided into a left and right half. Each half
shows a picture, described in one of Text Fields below, that have to be compared and distinguished.
Each half displays a single Viewport (1), a row of at most four Text Fields (2), an Arrow Key (4) and a
description of the current Systematic Level (5). Each half is separated by a series of Lens Buttons (3),
arrayed in a vertical row in the central part of the card.
Fig. 17: D-Key Card: Configuration and description
Viewport
Each half displays a single Viewport, containing a picture showing a relevant morphological feature.
Both pictures can be compared to each other and are described in the appropriate Text Fields (2)
below. A maximum of four pairs of images (and appropriate Text Fields) can be viewed on each page
of the D-Key Card.
Zoom bar
All Viewports show a series of three small buttons ("z" in Fig. 18) in the left upper corner. These
buttons are used to increase or to decrease the size of an image by pressing the "+" (zoom in) or "-"
(zoom out) keys. The current degree of magnification will be displayed in the right corner of the bar.
By clicking on the central key "A" (autosize), the image is automatically adjusted to the size of the
Viewport.
17
eutaxa ٠ Electronic Keys & Reference Collections٠ User Manual
Fig. 18: Zoom bar: image automatically adjusted
Fig. 19: Zoom bar: zoomed image (at 100 %)
Magnified images can be aligned either with the scroll bars or by displacing the image with the mouse
cursor (when dragging the image, the symbol of the mouse cursor turns into a hand).
Text Fields
Each half of the card displays a vertical row of up to four Text Fields, containing a description of the
appropriate image, currently displayed in the Viewport above (1).
Morphology Window
Most of the Text Fields (2) show a variable number of dark-blue coloured detail names. When moving
the mouse cursor to these words, it turns into a hand symbol. After pressing the left mouse button, a
window will be opened (fig. 21), indicating the exact position of the marked detail. This information
shall facilitate the finding of morphological features, relevant for identification. The window can be
displaced and its size may be adjusted by scrolling the margins with the mouse curser. To close the
window, click on the x-setter in the title bar or hit Escape.
Fig. 20: Blue-coloured links
Fig. 21: Morphology Window
18
eutaxa ٠ Electronic Keys & Reference Collections٠ User Manual
Lens Buttons
Up to four Lens Buttons may be arranged in a vertical row in the middle part of the card, each
associated with a pair of Text Fields (2). When clicking one of these buttons the adjacent Text Fields
are set to active (light background colour) and the appropriate pictures are displayed in the Viewports.
Arrow Key
The green-coloured Arrow Keys in the lower part of each half move to the next page. For example,
the left Arrow Key can be clicked when there is a correspondence with those images, shown in the left
Viewport. If the species level is reached (or a further separation of species is not possible), the
respective Arrow Key is disabled and displayed in a grey colour (fig. 23).
Fig. 22: Arrow Key enabled (genus level)
Fig. 23: Arrow Key disabled (species level)
Systematic Level
This text field displays the current systematic level (including genus, subgenus or species name).
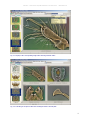
Species Profile
When the final systematic level (species level) is reached, this card shows images of the species,
displayed in the Systematic Level fields (5) on the D-Key Card. The Species Profile Card consists of an
Image Panel (1), including all pictures of the species, and a single Viewport (2). Images can be
displayed individually by selecting a specific thumbnail, or in sequence by switching the Navigation
Keys First, Next, Previous and Last in the Tool bar (Fig. 02).
Fig. 24: Species Profile Card: Configuration and description
19
eutaxa ٠ Electronic Keys & Reference Collections٠ User Manual
Species Description
This card offers information about systematic data, biology, habitat conditions, synonyms and the
distribution of those species displayed in the Systematic Level fields (5) on the D-Key Card when the
final systematic level (species level) is reached.
This card consists of three sections: the Info Panel (1), the Screen (2) and a field containing
Systematic Data (3).
Fig. 25: Species Description Card: Configuration and description
Fig. 26: Info Panel: Moving an icon
Info Panel
The panel contains a series of buttons, which can be enabled to display the desired information on the
Screen (2). The sequence of these buttons may be modified individually by selecting an icon and
dragging it to the desired position (marked by a red bar), while holding the left mouse button down
(as shown in Fig. 24).
Ecology
By clicking this button, a text field containing a description of the biology and ecology of the current
species is displayed on the Screen.
Synonyms
This button inserts a list of synonyms, authors and the years of the published description.
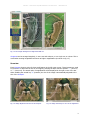
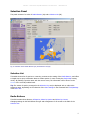
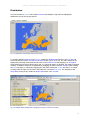
Distribution (Map)
Clicking this button inserts a map of the European continent, highlighting the distribution area of the
current species.
Systematic Data
This field displays a series of systematic data, including names, authors and the years of the published
descriptions.
20
eutaxa ٠ Electronic Keys & Reference Collections٠ User Manual
Function
When starting the D-Key, the first page of the D-Key Card is automatically displayed. The first pair of
pictures (1) will be loaded and the appropriate Text Fields (2) in the first line set to active and
highlighted. The pair of pictures described in the respective Text Fields below is compared. To view
more information on how to distinguish type A (shown on the left half) from type B (shown on the
right half of the card), the user may use the lower Lens Buttons (if available) to insert the residual
pairs of images and to read the attached description (as shown in Fig. 27).
Fig. 27: D-Key page, containing a series of four relevant characters: Enabling the Lens Buttons in sequence
Additional information is given in Table Windows (Table left, Table right) (Figs. 4-7) and in Attention
Windows (Figs. 8, 9) (if the buttons in the Tool bar are set to active), or click on the blue-coloured
links in the Text Fields to insert Morphology Windows and to facilitate the finding of relevant details
(Figs. 20, 21).
In case of concordance with one of the types on the left or on the right half, the appropriate Arrow
Key (4) should be pressed to move to the following page (Fig. 22). When the final systematic level is
reached the Arrow Key is disabled and the Systematic Level (5) displays the name of the species or
species group (if a further separation is not possible) (Fig. 23).
Navigation within the key is possible by clicking the Navigation Keys First, Previous, Next and Last in
the Tool bar (Fig. 01). In addition, certain pages or taxa may be called up by selecting the terms in
the respective command fields labelled Search Pages (Fig. 15) and Search Taxa (Fig. 16).
When a final systematic level (for example a species level) is reached, the user may enter the cards
Species Profile and Species Description to get additional information about this taxon. The Species
Profile Card shows a series of images of the identified species, which can be viewed individually by
21
eutaxa ٠ Electronic Keys & Reference Collections٠ User Manual
selecting the wished thumbnail in the Image Panel or queried in sequence, using the Navigation Keys
in the Tool bar (Fig. 01). The Species Description Card offers information about systematic data,
habitat conditions, synonyms and the spreading area. If the final systematic level is reached on both
halves of a D-Key page (Fig. 28), then images and ecological dates of both taxa can be queried. In
this case the user has to enable the buttons Left Species Profile and Right Species Profile in the Tool
bar of the Species Profile Card (Figs. 29, 30) and the buttons labelled Left Species Ecology and Right
Species Ecology in the Tool bar of the Species Description Card (Figs. 31, 32).
Fig. 28: D-Key card: Both halves of the page show a final systematic level (species level)
Fig. 29: Species Profile Card: Left species
Fig. 30: Species Profile Card: Right species
22
eutaxa ٠ Electronic Keys & Reference Collections٠ User Manual
Fig. 31: Species Description Card: Left species
Fig. 32: Species Description Card: Right species
Note: If the text field Systematic Level displays more than one species (because a further
differentiation is not possible) then images and descriptions of only one of these species can be
displayed on the Species Profile and Species Description cards. To query images and/or data of all of
these species, switch to the Gallery or Ecology sub-applications and select the wished names.
23
eutaxa ٠ Electronic Keys & Reference Collections٠ User Manual
Query Key
Overview
The Query Key form consists of the Tool bar (1) and a series of Query Key Cards (2).
Fig. 01: Query Key form: Tool bar and Query Key Cards
Tool bar
The configuration of the buttons varies, according to the type of the currently opened card.
Fig. 02: Tool bar: Query Cards, Hits Card
24
eutaxa ٠ Electronic Keys & Reference Collections٠ User Manual
Fig. 03: Tool bar: Matrix Card
Buttons
Renew Query
This button is used to clear all checks in the boxes of the Query Cards before running a new
calculation.
Fig. 04: Tool bar – Query Cards: Renew Query
Refresh Results
The button is used to run a calculation and to display the new results in the Hits card.
Fig. 05: Tool bar – Query Cards: Refresh Results
Images
This button allows inserting of a variable number of windows to display pictures stored in the Gallery
Archive. Each Image Window consists of the selection bar (including the selection field and a series of
four combo boxes) and of a single Viewport. A detailed description is given in chapter Gallery/Images.
Fig. 06: Tool bar: Images
Save Matrix
This button stores the user-defined Matrix changes. When clicking this button, the current modified
version of the Matrix can be saved under a new name (*.qkxml) in any directory of the PC.
Fig. 07: Tool bar – Matrix Card: Save Matrix
25
eutaxa ٠ Electronic Keys & Reference Collections٠ User Manual
Load Matrix
This button is used to load a stored modified version of the Matrix (*.qkxml).
Fig. 08: Tool bar – Matrix Card: Load Matrix
Reset Matrix
Enabling this button clears all entries in the column Compare and all current changes in the Matrix
Table, which had not yet been set as a standard.
Fig. 09: Tool bar – Matrix Card: Reset Matrix
Set as Standard
Button to save all changes set in the Matrix Table. When enabling this button all current settings
(highlighted in a red colour) are stored and can be applied to the following calculations.
Fig. 10: Tool bar – Matrix Card: Set as Standard
Clear Standard
Button to cancel the current setting as a standard. To reset the original Matrix and to clear all userdefined changes, press the buttons Clear Standard and Reset Matrix in sequence or close the Q-Key
after enabling the button Clear Standard and restart the sub-application.
Fig. 11: Tool bar – Matrix Card: Clear Standard
Reset Groups/Columns
This button is used to cancel groups and to reset lines and columns to their initial position.
Fig. 12: Tool bar – Matrix Card: Reset Groups/Columns
26
eutaxa ٠ Electronic Keys & Reference Collections٠ User Manual
Edit Mode
When enabling the Edit Mode, the entries in the Matrix Table can be changed individually. When
disabling the Edit Mode, the checks are fixed and cannot be replaced or deleted.
Fig. 13: Tool bar – Matrix Card: Edit Mode
Query Key Cards
These cards include a series of Query Cards, the Hits card, showing the results of the last calculation,
and the Matrix card, which can be used to compare species by the conformity or non-conformity with
morphological or ecological criteria.
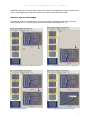
Query Cards
Query Cards contain check lists of morphological or ecological criteria, grouped according to specific
parts of the body or ecological characters. Every card contains a series of Character Panels, arranged
in rows in alphabetical order, each indicating a specific morphological or ecological character.
Fig. 14: Query Card: Morphological characters – head capsule
27
eutaxa ٠ Electronic Keys & Reference Collections٠ User Manual
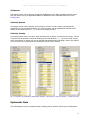
Every Character Panel includes a list of several Sub-characters, which may be selected in case of
concordance (note that only one Sub-character can be marked per field). Selected Sub-characters are
highlighted in dark-blue (fig. 16).
Fig. 15: Query Card: Character Panel (1), headline of a Character Panel (2), Sub-characters (3) and the
corresponding check boxes (4)
Fig. 16: Selection of Sub-characters in different Character fields, each highlighted in dark-blue
28
eutaxa ٠ Electronic Keys & Reference Collections٠ User Manual
For a single query, Character Panels in arbitrary number and combination can be selected on different
Query Cards.
After the desired Sub-characters have been selected, the calculation (query) can be started by
pressing the Refresh Results button. To clear all settings before starting a new query, press the
Renew Query button in the Tool bar.
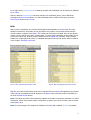
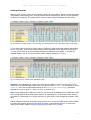
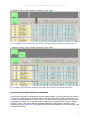
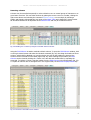
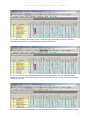
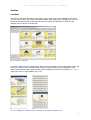
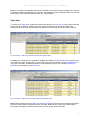
Hits
After running a calculation, the results will be displayed automatically on the Hits card. This card
displays a species list, the number of hits, pursuant to the number of concordant criteria and the
current position of species in the Matrix. The records can be sorted or grouped either by the species
names or by the values in the Hits- or Matrix-table. To group species according to the number of hits
(as shown in figure 18), drag the column header into the Grouping Line (labelled: "Drag a column
header here to group by that column"). A detailed description how to group species names is offered
in the chapter "Grouping of Records".
Fig. 17: Hits: Sorted by the number of hits
Fig. 18: Hits: Grouped by the number of hits
Tip: The list of hits and the Matrix order can be transferred to the Gallery sub-application and viewed
in the QKR tab. Pay attention that all changes of the Matrix order previously must be refreshed by a
hit of the Refresh Results button.
Note: The values in the list of hits exclusively indicate the number of congruent characters. To gather
information, which of the tested criteria correspond to a species you have to check the lists of entries
in the Matrix Card.
Note: In many images in this chapter the heading of the Hits card is labelled "Results" by mistake.
29
eutaxa ٠ Electronic Keys & Reference Collections٠ User Manual
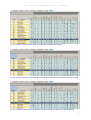
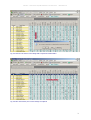
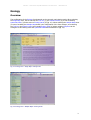
Matrix
Construction of the table
The Matrix consists of the following sections: The Matrix Table (1), the list of species = Species Name
(2), a column to select species = Compare (3), the column headers (4) and the Grouping Line (5).
Fig. 19: Matrix Card
Data in the Matrix Table (1), arranged in the horizontal row, refer to an individual species, those in
the vertical row to an individual morphological or ecological character. Each cell of the Matrix Table
contains a check box that displays the presence (marked) or absence (unmarked) of a specific
character. The names of the characters are labelled on the header of a column (4), each in form of a
brief description. When pointing at any cell of the column, the full length of the description will be
displayed in a Tool tip automatically. The names of species are listed in the column Species Name (2).
To facilitate an optical separation of adjacent columns in the Matrix Table, the vertical rows are
alternately coloured blue and white.
Browsing the table
All rows and columns of the Matrix Table (1) may be viewed when browsing the table with the scroll
arrows in the horizontal and vertical scroll bar. The column headers (4) and the first two columns
Compare (3) and Species Name (2) are fixed and not affected by scrolling the arrows.
30
eutaxa ٠ Electronic Keys & Reference Collections٠ User Manual
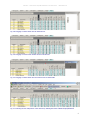
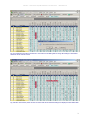
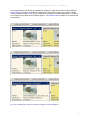
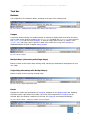
Sorting of records
Within a single column records may be sorted by clicking on the header to align the checks alternately
in ascending or descending order. That way species can be sorted by their names or by the presence
or absence of characters. The header of the currently sorted column is displayed in a blue colour.
Fig. 20: Sorting of a single column in a descending row (arranging the checks in the upper section of the table)
To sort species by the presence of more than one character, select the desired headers while holding
the Shift key down. All currently selected headers will be displayed in blue. Whenever pressing the
Shift key, these columns can be rearranged and other characters may be added. To unmark the
selected headers, click on the Species Name header (without hitting the Shift key).
Fig. 21: Sorting of two columns, both highlighted in blue
Attention: The highlighting of sorted or grouped column headers in a blue or green colour is only
visible when using the Windows Classic View. To switch from the Category View of Windows XP to the
Classic View carry out the appropriate settings in the Windows Control Panel/Display (a detailed
description is given on page 4 – "Advice to Users of Windows XP").
Note: When selecting the header of a column, a grey arrow will be displayed in the middle part of the
cell, pointing upwards when ordering the checks in an ascending row, or downwards when ordering
the checks in a descending row. Though this arrow is quiet small, it may derogate the legibility of the
label.
Tip: An effective method to accentuate sorted columns is to increase the width of the column header
by moving the margins with the mouse cursor (as shown in the following figures). To restore the
width of the header, enable the Reset Groups/Columns button in the Tool bar.
31
eutaxa ٠ Electronic Keys & Reference Collections٠ User Manual
Fig. 22: Place the mouse cursor at one of the lateral margins of the column header
Fig. 23: Drag the margin to the new position while holding the left mouse button down
Fig. 24: Release the mouse button when the desired width of the header is attained
Sort by "SpeciesName"
The Species Name column contains the names of all species, sorted alphabetically in an ascending
row. Note that the header of this column is never highlighted in blue, though the sorting of names in
an alphabetical order is always set to active (indicated by the small grey arrow on the right side,
pointing upwards, as shown in figure 24).
Tip: The list of species may be displayed with or without the subgenus name, depending on the User
Settings in the command field Tools/Settings in the Menu bar.
Sort by "Compare"
This procedure allows the alignment of species in a user-defined order. After marking the desired
check boxes in the Compare column (fig. 25), click on the header and sort the checks in a descending
row (fig. 26). The corresponding species will be arranged in sequence in the upper section of the table
and may be compared by the presence or absence of characters (fig. 27).
32
eutaxa ٠ Electronic Keys & Reference Collections٠ User Manual
Fig. 25: Selection of several species names by marking the corresponding check boxes
Fig. 26: Sorting the checks in a descending row to arrange the selected species in the upper section of the table
Fig. 27: Sorting the selected species by "Compare" and by the presence or absence of a specific character
33
eutaxa ٠ Electronic Keys & Reference Collections٠ User Manual
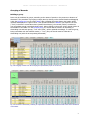
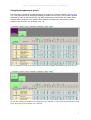
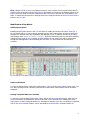
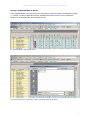
Grouping of Records
Building a group
Rows may be combined in groups, according to the names of species or the presence or absence of
characters. The procedure of grouping is simply done by clicking on the desired header and dragging
it into the Grouping Line on top of the Matrix. After releasing the mouse button the header will be
inserted and displayed in a green colour. This operation divides the Matrix in two sections: the first
("True") includes the concordant criteria (marked check boxes), the second ("False") contains the
non-concordant criteria (unmarked check boxes). When clicking on the green column header (either in
the headline of the table or in the Grouping Line), the checks will be sorted in an ascending or
descending row and both groups, "True" and "False", will be replaced accordingly. To rank the group,
being concordant with the selected criteria (= "True") first, the checks must be ordered in a
descending row (with the arrow pointing downward).
Fig. 28: Dragging a header into the Grouping Line (indicated by a pair of red arrows)
Fig. 29: Insertion of the header, resulting in a separation of marked and unmarked check boxes and a subdivision
of the Matrix
34
eutaxa ٠ Electronic Keys & Reference Collections٠ User Manual
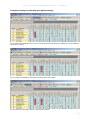
Grouping by species names
Building a species group
To build a species group, first select the corresponding check boxes in the Compare column, sort the
records in a descending row and drag the column header to the Grouping Line (fig. 28). After
releasing the mouse button the Matrix will be divided in two sections – the upper, which contains the
group of the selected species, labelled "Compare: True", and the lower, which includes the unselected
species, labelled "Compare: False" (fig. 29).
Building a new species group
To build a new species group, first cancel the existing group by dragging the Compare column header
from the Grouping Line to any point of the Matrix (shown in fig. 41) and clear all check boxes by
enabling the Reset Matrix button or restore the Matrix by pressing the Reset Groups/Columns button.
Subsequently mark the check boxes of other species names and repeat the grouping procedure.
Adding, replacing and removing species
To add, replace or remove species, select or unmark the desired check boxes in the respective
sections "True" or "False". For example, when unmarking a check box in the section "True", the
record will automatically be transferred to the section "False". Contrariwise the selection of a check
box in the section "False" results in a transfer of the record to the section "True".
When unmarking all check boxes in the section "True", all species will be removed and transferred to
the "False"-section, except for one. This record can be removed either by rearranging the columns
Compare or Species Name, or by selecting a new species in the "False"-group to replace both records.
Attention: Before marking or unmarking a check box, it may be useful to select the species name
first. Otherwise one of the adjacent species may be inserted or removed by mistake, because every
transfer causes the rearrangement of all species names in the respective section.
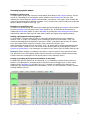
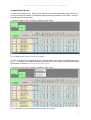
Sorting or grouping by the presence/absence of characters
In addition the group of species can be sorted (fig. 30) or subdivided, pursuant to the presence or
absence of morphological or ecological criteria. This can be done by dragging one or more column
headers into the Grouping Line (as shown in fig. 31), resulting in a splitting of the sections into
subgroups. Each subgroup indicates the conformance ("True") or non-conformance ("False") with the
selected character (fig. 32).
Fig. 30: Sorting of grouped species (green) by the presence (checks) or absence of a character (blue).
35
eutaxa ٠ Electronic Keys & Reference Collections٠ User Manual
Fig. 31: Dragging the column header of the character into the Grouping Line (marked by a pair of red arrows)
Fig. 32: Splitting of the Matrix into a main group (Compare) and a subgroup (morphological character).
Grouping by presence/absence of characters
This procedure is similar to that described in the prevailing chapter. To group species by the presence
or absence of morphological or ecological criteria, drag the header of the selected character into the
Grouping Line and divide the table in two sections: The first, including those species conforming with
the character (labelled: "True") and the second, including those species differing with the character
(labelled: "False"). Both groups may be subdivided additionally by dragging the headers of other
characters into the Grouping Line. Each subgroup indicates the conformance or non-conformance with
the selected character.
36
eutaxa ٠ Electronic Keys & Reference Collections٠ User Manual
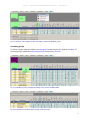
Changing the sequence of groups
The succession of groups in the table depends on the sequence of column headers in the Grouping
Line. This sequence may be changed by dragging a header in the Grouping Line to another position
(indicated by a pair of read arrows) (fig. 33). After releasing the mouse button, the header will be
inserted and the sequence of the groups will be adapted, pursuant to the new order of column
headers in the Grouping Line (as shown in fig. 34).
Fig. 33: Replacing of groups by moving the headers to the desired position (indicated by a pair of red arrows)
Fig. 34: After replacing the headers in the Grouping Line, the character (a>1/3h) has been changed into the main
group, the species group "Compare" into a subgroup
37
eutaxa ٠ Electronic Keys & Reference Collections٠ User Manual
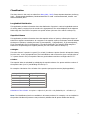
Collapse/Expand groups
In order to get a better survey, groups may be blanked out by pressing the appropriate minus-sign "-"
in front of each group headline. The following image illustrates the blanking of the "False"- section of
the main group (Compare: False).
Fig. 35: Blanked "False"-section of the group "Compare"
To restore the table and to expand the group, enable the button once again, now labelled with a plussign "+". To collapse or to expand all groups at the same time, click the right mouse button and select
the adequate command Expand Groups or Collapse Groups.
Fig. 36: Selecting the command "Collapse Groups" to blank out all groups
38
eutaxa ٠ Electronic Keys & Reference Collections٠ User Manual
Fig. 37: After all groups have been collapsed, only the headlines "True" and "False" of the main group remain
visible
Fig. 38: To expand main groups and subgroups individually, enable the appropriate plus-signs
Fig. 39: When clicking on a plus-sign, the collapsed lines will be displayed
39
eutaxa ٠ Electronic Keys & Reference Collections٠ User Manual
Fig. 40: Selection of the "Expand Groups" command to expand all collapsed groups
Cancelling groups
To cancel a group, select the header in the Grouping Line and drag it to any point of the Matrix. To
cancel all groups, enable the Reset Groups/Columns button in the Tool bar.
Fig. 41: Cancelling a group: Dragging the header to any point of the Matrix table
Fig. 42: Restoration of the Matrix after carrying out the procedure
40
eutaxa ٠ Electronic Keys & Reference Collections٠ User Manual
Displacing and removing columns
Displacing columns
Columns can be displaced by dragging the header to any position of the table headline (indicated by a
pair of red arrows). When releasing the mouse button the column will be inserted.
Fig. 43: Selecting a column header (its colour changes to black)
Fig. 44: Dragging the header to the desired position, indicated by red arrows
Fig. 45: Insertion of the column after releasing the mouse button
In addition the width of each column can be modified by placing the mouse cursor on the interstice
between two headers and dragging it to the left or to the right (as shown in figures 22-24).
Arrangement and size of the columns will be restored after clicking the Reset Groups/Columns button.
41
eutaxa ٠ Electronic Keys & Reference Collections٠ User Manual
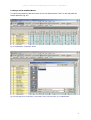
Removing columns
Columns may be cancelled temporarily in order to blank out one or several groups of characters or to
get a better overview. This can either be done by placing the mouse cursor on a header, clicking the
right mouse button and selecting the command Remove Column, or more simply by selecting a
header and dragging it downwards to any point of the Matrix Table and releasing the mouse button.
All cancelled columns will be deposited in the Field-Chooser and may be recalled from there.
Fig. 46: Blanking out a column by using the command "Remove Column"
Using the Field-Chooser is another method to blank columns. To open the Field-Chooser window, click
on the right mouse button and select the identical command (fig. 46). Now drag the headers of those
columns, which shall be blanked out, into the window. As soon as the headers are inserted, the
columns will be removed from the table (figures 48, 49). After finishing the procedure, the FieldChooser can be closed by clicking the x-setter in the title bar and recalled later by repeating the
command. To replace a column, drag the header from the Field-Chooser to its initial position (fig. 50).
To replace all columns and to arrange those in the original order, hit the Reset Groups/Columns key.
Fig. 47: Insertion of the Field-Chooser window
42
eutaxa ٠ Electronic Keys & Reference Collections٠ User Manual
Fig. 48: Dragging a column header into the Field-Chooser
Fig. 49: Dragging a second column header into the Field-Chooser
Fig. 50: Dragging a column header from the Field-Chooser to Matrix table
Fig. 51: Restoring the size and position of the columns by enabling the button "Reset Groups/Columns"
43
eutaxa ٠ Electronic Keys & Reference Collections٠ User Manual
Note: Using the Field-Chooser is a practical method to move columns from one point of the table to
another: Drag the headers into the Field-Chooser and switch the window to the desired section of the
Matrix Table. Now drag the column headers from the Field-Chooser window into the headline of the
table. To replace all columns and to arrange those in the original order hit the Reset Groups/Columns
button in the Tool bar.
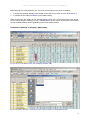
Modification of the Matrix
Modifying the Matrix
Enabling the Edit Mode button in the Tool bar allows to modify all entries in the Matrix Table (Nr. 1,
fig. 19) and to add or to remove checks, according to the user's requirement. As soon as entries are
changed, the affected boxes are highlighted and displayed in red. In addition the label of the Matrix
card changes from "Matrix" to "Matrix – Changes". All further calculations are run with these modified
settings as long as the Q-Key is opened. If these changes are not saved, they will be cleared after
closing this sub-application. When disabling the Edit Mode, no more checks can be inserted or
removed.
Fig. 52: Changes of the Matrix settings, highlighted in red; the Edit Mode button in the Tool bar is set to active
Reset of the Matrix
To clear all changes and to restore the original Matrix Table, press the Reset Matrix button in the Tool
bar. After carrying out this command, all checks are reset to their initial position and all red marks
disappear.
Setting a modified Matrix as standard
To save the current changes of the Matrix Table, click on the Set as Standard button. After carrying
out this command, all modifications are stored and will not be removed when enabling the Reset
Matrix button or after closing the Query Key. Subsequent changes, which are not saved by a repeated
click on the Set as Standard button, can be cancelled by the Reset Matrix command further on.
44
eutaxa ٠ Electronic Keys & Reference Collections٠ User Manual
Examples of saving and cancelling user-defined settings
Fig. 53: Enable the Edit Mode, insert or remove checks and save these settings by pressing the "Set as Standard"
button in the Tool bar
Fig. 54: Add new modifications, but desist from saving these new changes
Fig. 55: Click the "Reset Matrix" button to clear all new changes
45
eutaxa ٠ Electronic Keys & Reference Collections٠ User Manual
Fig. 56: After pressing the "Reset Matrix" button, all unsaved changes have been cancelled; in contrast all
modifications, stored with the "Set as Standard" command, remain present
Fig. 57: To remove the saved modifications and to restore the original Matrix table, first enable the "Clear
Standard" button and subsequently the "Reset Matrix" button. After carrying out this procedure, all user-defined
settings are cancelled
Fig. 58: After restoring the original Matrix, the label of the Matrix Card changes from "Matrix Changes" to "Matrix"
46
eutaxa ٠ Electronic Keys & Reference Collections٠ User Manual
Storing a modified Matrix on the PC
Every modified Matrix Table can be stored in any directory on the PC under a user-defined file name
("*".qkxml). To store a qkxml-file enter the command Save Matrix in the Tool bar, browse the
directory to the desired folder and memorise the file.
Fig. 59: Enabling the "Save Matrix" button
Fig. 60: Browsing the user's directory to store a modified version of the Matrix
47
eutaxa ٠ Electronic Keys & Reference Collections٠ User Manual
Loading a stored modified Matrix
To load a stored version of the Matrix click on the Load Matrix button in the Tool bar and select the
desired qkxml-file (fig. 62).
Fig. 61: Enabling the "Load Matrix" button
Fig. 62: Browsing the user's directory to select and to insert a stored version of a modified Matrix
48
eutaxa ٠ Electronic Keys & Reference Collections٠ User Manual
After selecting the stored qkxml-file, the user may choose between two ways of insertion:
1. to merge the modified settings of the loaded version with those of the currently used Matrix, or
2. to replace the currently used Matrix by the loaded version.
When choosing the first mode, all user-defined settings, those of the current and those of the stored
version will be merged, resulting in a new, extended Matrix version. When choosing the second mode,
current modified settings will be replaced by those of the loaded version.
Examples of replacing or merging a Matrix table
Fig. 63: Hit the "Load Matrix" button after modifying the Matrix table
Fig. 64: Browse the directory to select and to insert a stored version of a modified Matrix table
49
eutaxa ٠ Electronic Keys & Reference Collections٠ User Manual
Fig. 65: Click the "No"-button in the dialog field to replace the loaded Matrix
Fig. 66: After the insertion, the current settings are replaced
50
eutaxa ٠ Electronic Keys & Reference Collections٠ User Manual
Fig. 67: Repeat the procedure, but click the "Yes"-button in the dialog field to merge the settings of the loaded
and those of the current version
Fig. 68: After the insertion, both versions are fused and all user-defined settings are displayed in the Matrix table
51
eutaxa ٠ Electronic Keys & Reference Collections٠ User Manual
After loading the Matrix, it may be useful to enable the Set as Standard button in order to save the
new version and to use it for all following calculations.
Tip: Stored qkxml-files can be exported and transferred to any other PC to allow other users to load
and apply these modified settings.
Restoring the original Matrix
To restore the original Matrix and to remove all changes of a modified version that had been set as a
standard, press the Clear Standard button and the Reset Matrix button in sequence.
52
eutaxa ٠ Electronic Keys & Reference Collections٠ User Manual
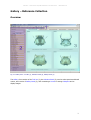
Gallery – Reference Collection
Overview
Fig. 01: Gallery form: Tool bar (1), Selection Panel (2), Gallery Cards (3)
The Gallery form consists of the Tool bar (1), the Selection Panel (2), used to select species and detail
names, and a series of Gallery Cards (3), each containing a Screen to arrange Viewports and to
display images.
53
eutaxa ٠ Electronic Keys & Reference Collections٠ User Manual
Tool bar
Buttons
Fig. 02: Tool bar: Buttons
Refresh Data
Button to insert the results (current species list of Hits card) of the last Query Key calculation into the
QKR tab.
Fig. 03: Tool bar: Refresh Data
Navigation Keys
These buttons are used to insert images automatically and to switch between the image records.
Fig. 04: Tool bar: Navigation Keys
First: Return to the first record, listed in the combo box Select Species/Details.
Previous: Return to the previous record, listed in the combo box Select Species/Details.
Next: Move forward to the next record, listed in the combo box Select Species/Details.
Last: Move forward to the last record, listed in the combo box Select Species/Details.
Clear
Clicking this button removes all images currently displayed on the Screen.
Fig. 05: Tool bar: Clear
Raster
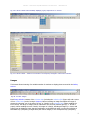
Button to change the number and configuration of Viewports displayed on the Screen. The button
opens a grid in which the number and arrangement of Viewports can be selected. The marked tiles of
the grid are highlighted and displayed in blue. After the selection is approved by a mouse click, the
Viewports are arranged accordingly.
54
eutaxa ٠ Electronic Keys & Reference Collections٠ User Manual
Fig. 06: Tool bar: Raster button enabled, displaying a grid, composed of 5 x 5 boxes.
Fig. 07: Tool bar: Raster – selection of a number of 16 Viewports, arranged in 4 lines and 4 columns.
Images
This button allows inserting of a variable number of windows to display pictures stored in the Gallery
Archive.
Fig. 08: Tool bar: Images
Each Image Window consists of the selection bar (including the selection field (figure 09) and a series
of four combo boxes) and of a single Viewport. Before inserting an image first adjust the range of
pictures by selecting one of the terms "Group" or "Family" in the selection field. When enabling the
term "Group" the range of images will be restricted to the currently selected group (f. e. larvae or
pupae). When enabling the term "Family" all images of a family, including all stages (i.e. larvae and
pupae) may be displayed. Note that this application works differently when running the Culicidae or
Simuliidae Key (comprising a single family but various stages) or the Trichoptera Key (comprising
55
eutaxa ٠ Electronic Keys & Reference Collections٠ User Manual
several families but only a single (larval) stage). To insert an image select the group, genus, species
and detail name in the boxes on top of the Viewport. Images may be selected individually or queried
in sequence by marking one of the terms and scrolling the mouse wheel until the wished term and the
corresponding image are displayed. Note that the pictures are always queued in the Logical Order.
Fig. 09: Selection field – selecting the term "Group"
Fig. 10: Image Window – selecting a species name
Analogue to the function of Gallery Cards this method allows viewing of either the same details of
different species or of different details of one species. For example when clicking on the species name
and scrolling the mouse wheel, the selected genus and detail retain unchanged and images of a
specific detail of various species can be queried in sequence. Figure 11 exemplifies the comparison of
two genera on separate Image Windows; that way pictures of all species of both genera may be
displayed in any combination and compared with each other.
Note: The species list of the Image Window contains the names of all species treated in the D-Key.
When selecting a species without any available images, the window displays a blank Viewport.
Fig. 11: Arrangement of two Image Windows to compare different genera
The size of a window can be adapted by scrolling the margins with the mouse cursor. Additionally the
Selection bar, containing the combo boxes, may be moved or even separated by placing the mouse
cursor on the vertical pointed line near the left edge of the bar.
56
eutaxa ٠ Electronic Keys & Reference Collections٠ User Manual
Attention: When opening more than one Image Windows and when separating the Selection bars,
then the windows should not be minimized and expanded, because this may cause a system crash as
the program is not able to allocate all bars to the respective windows.
Fig. 12: Selection bar – placing of the mouse cursor to move the bar
Fig. 13: Selection bar fused at the base of the window
Fig. 14: Selection bar separated
Image Windows are versatilely applicable and may even be used to array images of different groups
on one Screen or to display pictures of the Gallery in combination with other programs on the PC. For
example when working on a Word document Image Windows may be arranged at any place on the
screen and used as a template for the description of species or details. This is easily done because
Image Windows always remain visibly in the foreground, irrespective of the currently enabled
program. Note that Image Windows always produce a separate button on the task line.
Fig. 15: Image Window used as a template in a Word document
57
eutaxa ٠ Electronic Keys & Reference Collections٠ User Manual
First/Previous/Next/Last Page
If not all images can be displayed on the Screen at the same time, these buttons allow the user to
switch to the first, previous, next or last images (pages) by clicking the respective buttons First Page,
Previous Page, Next Page or Last Page. All buttons are exclusively displayed in the Tool bar when
using "Auto"-Cards.
Fig. 16: Tool bar – Auto-Card: Navigation keys "First Page" to "Last Page"
Fig. 17: Browsing the Viewports in sequence by enabling the buttons "Previous Page" and "Next Page"
Table View/Card View
Fig. 18: Tool bar: Table View
This button is exclusively shown when entering the Archive card. It allows switching between a Card
View, where images are displayed in form of thumbnails, and a Table View, where image records are
listed in a table.
58
eutaxa ٠ Electronic Keys & Reference Collections٠ User Manual
Selection Panel
The panel includes a single combo box Select Species/Details (2a), a series of Selection Tabs (2b) and
four Radio-Buttons (2c). The Selection Panel is used to select species or detail names and to display
the corresponding images in the Viewports on the Screen. The name of each image record is
composed of two partitions, a species name and a detail name. These partitions are displayed
separately, one in the combo box Select Species/Details and the other in the lists of the Selection
Tabs. To display an image on a Viewport the selection of both partitions is necessary.
Fig. 19: Selection Panel: Combo box (2a), Selection Tabs (2b), Radio-buttons (2c)
The panel width may be adapted by moving the right edge with the mouse cursor, as demonstrated in
the following figures (20 a-c).
Fig. 20 a-c: Example: Decreasing the panel width.
59
eutaxa ٠ Electronic Keys & Reference Collections٠ User Manual
Select Species/Details (Combo Box)
Depending on the type of the currently opened Gallery Card, this box contains a list of either species
or detail names. Terms listed in this box may be referred as "first order"-records, as selections or
changes affect all images currently displayed on the Screen (as shown in fig. 21). The terms may be
selected individually or queried in sequence by switching the Navigation Keys forward or backward.
The order of terms, listed in this combo box, depends on the setting of the Radio-Buttons (2c). When
entering a Gallery Card, the terms are arranged in the Logical Order (according to the presetting of
the Radio-Buttons).
Fig. 21: The selection of the detail "head dorsal" in the combo box results in the display of "head dorsal"-images
in all Viewports on the Screen.
Selection Tabs
Depending on the type of the Gallery Card, Selection Tabs contain a list of either species or detail
names. The user may choose from a series of three tabs, labelled Images, List and QKR (fig 22 a-c).
In the Images tab all image records are displayed in form of thumbnails, which facilitate the finding of
the wished picture. In the List tab all records are displayed in form of species or details names.
Description, number and arrangement of image records are identical in both tabs.
The QKR tab (= Query Key Results) contains the results of the last Query Key calculation, including a
list of species, the appendant number of hits and the range of species in the Matrix Table. Values of
the last calculation or of the order or species in the Matrix can be inserted by clicking the Refresh Data
button in the Tool bar. To arrange the species names alphabetically or according to the number of hits
or to their position in the Matrix Table, click on the header of the wished column and sort the records
in an ascending or descending row.
60
eutaxa ٠ Electronic Keys & Reference Collections٠ User Manual
Attention: First confirm every change of settings in the sub-application Query Key by a hit of the
Refresh Results button, before updating the sort order in the QKR tab via Refresh Data button.
Tip: The names of species arranged in the combo box or in the Selection Tabs can be displayed with
or without the subgenus name, depending on the selection of the User Settings in the command field
Tools/Settings in the Menu bar.
Fig. 22 a-c: Selection Tabs: Images, List and QKR (species sorted according to the order in the Matrix)
Insertion of images
Selection Tabs can be used to select and to insert images into the Viewports arranged on the Screen.
To insert an image, simply drag-and-drop by marking the selected image record with the mouse
cursor (figure 23) and dragging it into a Viewport while holding the mouse button down (figure 24).
When the target (Viewport) is reached, the mouse button must be released and the image will be
inserted and displayed immediately (figure 25). This mode of operation can not be used when working
with an "Auto"-Card, where images are inserted automatically and not manually.
61
eutaxa ٠ Electronic Keys & Reference Collections٠ User Manual
Fig. 23: Display of an image in a Gallery "Manual"-Card: Selection of the species name in the Selection Tab.
Fig. 24: Dragging the selected name to the Viewport while holding the left mouse button down.
Fig. 25: After releasing the mouse button the appropriate image will be displayed automatically.
Radio Buttons
Radio-Buttons are used to change the sequence of records, listed in the combo box Select
Species/Details. Depending on the currently enabled Gallery Card, species or details can be arranged
in an alphabetical or so-called "logical" order. In addition, the names of species may be sorted
according to the number of hits from the last Query Key calculation or according to their order in the
Matrix Table. In all Gallery Cards the buttons are preset to the Logical Order.
62
eutaxa ٠ Electronic Keys & Reference Collections٠ User Manual
Alphabetical Order
Names of species or of details in the combo box will be ranged alphabetically.
Logical Order
Names of species or details in the combo box will be arranged in a "Logical Order". The Logical Order
of details and that of species are quiet different and have to be explicated more precisely: The
sequence of detail names in a Logical Order is set in the same way as the process of preparing a
specimen, starting with a view of the habitus, proceeding with bigger, obvious structures and finally
displaying small, fine details, intricate to prepare and only visible at higher magnification. In contrast a
"logical" order of species names means to define the sequence of species according to their
phylogenetic affinity (f. e. including the subgenus names), resulting in a succession of species that
show a higher morphological conformity.
QK Order Hits
When clicking this button, the species will be arranged in a sequence, pursuant to the number of hits,
assessed in the last Query Key calculation. This sequence is always identical with the succession of
species names listed in the Selection Tab QKR (column Hits). This function is useful for the
comparison and separation of species, clustered by Query Key calculations.
QK Order Matrix
Button to arrange species in a sequence, pursuant to the current order in the Matrix. This sequence is
always identical with the succession of species names listed in the Selection Tab QKR (column Matrix).
Tip: If the image records are not automatically rearranged after choosing another sort order with a
Radio-Button, click Refresh Data in the Tool bar to sort the records according to the current setting.
Gallery Cards
Screen
The Screen is that part of a Gallery Card where Viewports and images are displayed.
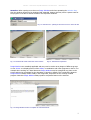
Fig. 26: Example: Arrangement of Viewports in a single vertical row
63
eutaxa ٠ Electronic Keys & Reference Collections٠ User Manual
Viewports
A Viewport is a frame where an image can be displayed. Up to 25 Viewports may be arrayed on the
Screen simultaneously. The number and configuration can be assessed with the Raster button in the
Tool bar. When opening a Gallery Card, their number is preset to four. Viewports can be arranged in
several rows and columns, but also in a single row or column. This is useful when viewing longitudinal
structures at higher magnification (fig. 26).
Zoom buttons
Each Viewport shows a series of three small buttons in the left upper corner. These buttons are used
to increase or to decrease the size of an image by pressing the "+" (zoom in) or "-" (zoom out) keys.
The current degree of magnification is displayed in the right corner of the bar. The central key, "A"
(autosize) automatically adjusts the image to the size of the Viewport.
Fig. 27: Zoom buttons
Fig. 28: Zoom buttons (image zoomed at 100% of its original size)
Fig. 29: Left image adjusted to the size of the Viewport (autosize); right image zoomed at 100 % ("+").
Magnified images can be aligned either with the scroll bars or by displacing the image with the mouse
cursor (when dragging the image, the symbol of the mouse cursor turns into a hand).
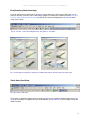
Displace, copy or clear images
To displace images from one Viewport to another, first hit the Shift key on the keypad and then drag
the image with the mouse cursor while holding the left mouse button down (as shown in figure 30).
To copy an image, first hit the Control key on the keypad and then drag the image to the desired
Viewport, while holding the mouse button down (as shown in figure 31).
To clear images, either delete all images currently displayed on the Screen, via Clear button in the
Tool bar, or cancel a single image by moving the cursor to the wished Viewport, clicking the right
mouse button and selecting the Clear Image command (as shown in figure 32).
64
eutaxa ٠ Electronic Keys & Reference Collections٠ User Manual
Fig. 30: Example: Displacing an image by dragging it from the upper to the lower Viewport
Fig. 31: Example: Making a copy by dragging the image from the upper to the lower Viewport
Fig. 32: Removing a single picture with the command "Clear Image"
65
eutaxa ٠ Electronic Keys & Reference Collections٠ User Manual
Image Information
To get information about an image (date and source of the collection, magnification values, etc.), click
the right mouse button and select the Info command to open a small Info Table. To clear the table
press the x-setter in the title bar or Escape on the keypad.
Fig. 33: Selecting the command "Info"
Fig. 34: Display of the Info table
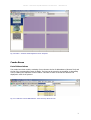
Compare Species Cards
Compare Species cards are used to arrange and to match images that show identical details of
different species. The names of details are listed in the Select Details combo box, those of species in
the Selection Tabs.
All Viewports display the detail currently shown in the Select Details combo box. The program offers
two methods for switching to another detail: First, open the Select Details combo box and select the
desired term; this command affects all Viewports on the Screen and the appropriate images are
replaced automatically. Secondly, switch between the Navigation Keys in the Tool bar to insert images
in sequence, starting with the first name in the combo box and ending with the last.
The order of detail names is adjusted by the Radio-Buttons; when entering a card the keys are preset
to the Logical Order. To change this setting, enable the respective Radio-Button.
66
eutaxa ٠ Electronic Keys & Reference Collections٠ User Manual
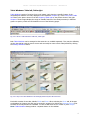
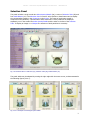
Compare Species (Manual)
When using this card, images of various species can be displayed on the Screen by selecting the
wished species name in one of the Selection Tabs and dragging it to the Viewport. Number and
combination of species and their position on the Screen can be altered more individually, according to
the user's requirements. Unlike other Gallery Cards both QK Order buttons are disabled.
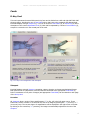
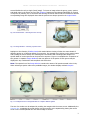
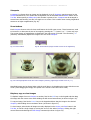
Fig. 35: Compare Species (Manual): Identical detail (head dorsal) of nine different species.
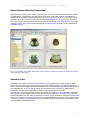
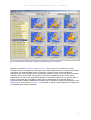
Compare Species (Auto)
In this card, images of all species are displayed automatically, each showing the same detail. The
species names in the Selection Tabs are arrayed in the Logical Order in which successively ranged
species show a higher morphological conformity. This order can be changed to the sorting of species
pursuant to Query Key calculations by enabling the respective QK Radio-Button.
Because of the large number of images, it is often not possible to display all of them on the Screen.
To view the images of all species, it is either necessary to increase the number of Viewports, by
changing the setting in the Raster grid, or to browse the images (pages) forward or backward with
the green Next Page or Previous Page buttons in the Tool bar. The latter method is more comfortable
because it allows the viewing of images in a convenient size.
Unlike "Manual"-Cards, the individual insertion of images, using drag-&-drop, is not possible.
Tip: To change the arrangement of images of species from the Logical Order to the alphabetical
order, move to the Query Key and set each species value in the Hits card to "Null" by pressing the
Renew Query button in the Tool bar. After moving back to the Gallery, click Refresh Data to sort the
list of species in the QKR tab according to the species list in the Hits card. When now enabling the
Radio-Button QK Order Hits, the images are sorted in the alphabetical order.
This application can be modified when displaying the subgenus names in the Query Key (after
carrying out the respective settings in the menu item Tools/Settings/User Settings), and blanking the
67
eutaxa ٠ Electronic Keys & Reference Collections٠ User Manual
subgenus names in the Gallery. When now enabling the QK Order Hits button, the images are sorted
alphabetically by their genus and species names. In contrary, when enabling the QK Order Matrix
button, the images are sorted by their genus, subgenus and species names (this order represents the
Logical Order in some products (Culicidae, Simuliidae)).
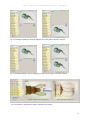
Fig. 36: Compare Species (Auto): Identical detail of nine different species.
Species Profile Cards
Species Profile cards are used to arrange and match images that show various details of the same
species. The species names are listed in the Select Species combo box, those of the details in the
Selection Tabs Images and List.
All Viewports display details of the species currently shown in the combo box. The program offers two
methods of switching to another species: First, open the combo box and select the desired name; this
command affects all Viewports on the Screen and the appropriate images are replaced automatically.
Secondly, switch between the Navigation Keys in the Tool bar in order to insert images in sequence,
starting with the first species name in the combo box and ending with the last.
The succession of species names can be adjusted with the Radio-Buttons; when entering a Compare
Species card, the keys are preset to the Logical Order. To change this setting and to rearrange the
species names in the alphabetical order or pursuant to the results of the last Query Key calculation,
enable the respective Radio-Button.
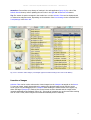
Species Profile (Manual)
In this card, images of specific details can be displayed by selecting the details name in one of the
Selection Tabs Images or List and dragging it to the Viewport. The detail and its position on the
Screen are assessed by the user; the arrangement and content of images on the Screen can be
altered more individually, according to the user's requirements.
68
eutaxa ٠ Electronic Keys & Reference Collections٠ User Manual
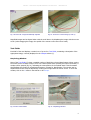
Fig. 37: Species Profile (Manual): nine different details from the same species
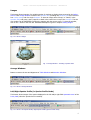
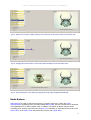
Species Profile (Auto)
In this card, images of all details of one species are displayed automatically. The pictures are always
arrayed in the Logical Order, starting with a view of the habitus. Because of the high number of
images, not all of them can be displayed on the Screen. To view all images of all details, it is either
necessary to increase the number of Viewports, changing the setting via Raster button, or browsing
the images (pages) forward or backward with the green Next Page and Previous Page buttons. Unlike
Manual-Cards, the manual insertion of images, using drag-&-drop, is not possible.
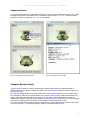
Fig. 38: Species Profile (Auto): showing all details of one species
69
eutaxa ٠ Electronic Keys & Reference Collections٠ User Manual
Compare Images
This card is used to combine images of both different species and different details. The species names
are listed in the Select Species combo box, those of the details in the Selection Tabs Images and List
(the species list in the QKR tab is set to inoperable and can only be viewed). Pictures are inserted
manually, using drag-&-drop, as described in the previous chapters.
The species names, listed in the combo box, are arranged in the Logical Order; alternately they can
be sorted in the alphabetical order by changing the setting of the Radio-Buttons (the QK Order
buttons are disabled).
Fig: 39: Compare Images: Images of different details from different species
Display of any images of the User
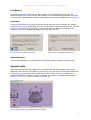
Use this card to view any pictures stored on the computer. To insert an image either click the right
mouse button, enable the Open File command, browse the directory, select the picture and enable the
Open-button (fig. 41), or drag the thumbnail of the image directly from the Explorer into the Viewport
on the card. It will be inserted automatically and can be zoomed, displaced, copied and removed like
any other picture in the Gallery.
Fig. 40: Enabling the command "Open File"
Fig. 41: Browsing the directory and selecting an image
70
eutaxa ٠ Electronic Keys & Reference Collections٠ User Manual
Archive
Card View
The Archive card shows all images of the current group, stored in the picture database. This card is
useful to offer a survey of the range of available images. Each image record is displayed in form of a
thumbnail and labelled with the file path, the names of species and detail and a check box that
indicates the correctness of the file path.
Fig. 42: Archive – Card View
To pack the extensive list of records and to blank out the thumbnails, click the right mouse button and
select the Collapse Groups command. After carrying out this procedure, only the headlines of the
image records remain visible. Single records may be expanded and viewed by clicking the Arrow Keys
in the right corner of each headline (fig. 43 b).
Fig. 43 a: Enabling the "Collapse Groups" command; 43 b: Display of a single record
71
eutaxa ٠ Electronic Keys & Reference Collections٠ User Manual
The collapsed image records can be expanded by clicking the right mouse button and selecting the
Expand Groups command. In addition the width of the columns and thereby the number of image
records, displayed on the Screen, may be adapted by switching the vertical dividing line to the left or
to the right side (as shown in the following figures). The Selection Panel is always set to inactive and
coloured grey.
Fig. 44 a-c: Modifying the width of a column by moving the vertical dividing line
72
eutaxa ٠ Electronic Keys & Reference Collections٠ User Manual
Note: If an image is not available, because the file path or the name has been changed, the record of
the defective image is highlighted in a red colour. Accordingly the picture data base has to be restored
by carrying out the respective operation with the setup program.
Table View
To switch to the Table View, enable the homonymous button in the Tool bar. In this viewing mode the
image records are listed in a table and can be sorted, according to the image description, the
correctness of the file path and the species or detail name, by clicking one of the column headers.
Fig. 45: Archive – Table View: Records sorted by the species name
In addition the records may be grouped by dragging the header into the Grouping Line, placed on top
of the table (as shown in figure 46). To cancel the group, drag the header from the Grouping Line to
any point of the table. A detailed description of this operation is given in the chapter Grouping of
Records in the description of the Query Key.
Fig. 46: Archive – Table View: Records grouped by the species name
Note: When changing from the Table View to the Card View the records will be arranged according to
the order of the sorted or grouped records in the table. Mind that the records of the table remain
sorted when changing to another viewing mode, but the groups will be cancelled.
73
eutaxa ٠ Electronic Keys & Reference Collections٠ User Manual
Morphology
The Morphology form consists of the Tool bar (1) and a series of Morphology Cards (2), each showing
an Image Panel (2a) and a Screen (2b) to display pictures.
Fig. 01: Morphology: Tool bar (1), Image Panel (2a) and Screen (2b)
Tool bar
Fig. 02: Tool bar: Buttons and combo boxes
74
eutaxa ٠ Electronic Keys & Reference Collections٠ User Manual
Buttons
Images
This button is used to open a variable number of windows to display pictures stored in the Gallery
Archive. Each Image Window consists of the selection bar (including the selection field and a series of
four combo boxes) and of a single Viewport. To insert an image select "Group" or "Family" in the
selection field, and group, genus, species or detail in the combo box on top of the Viewport. The size
of a window can be adjusted by scrolling the margins with the mouse cursor. To close the window,
click on the x-setter in the Title bar. A detailed description is given in chapter Gallery/Images.
Fig. 03: Images
Overlay Off (alternately to Overlay On)
Button to clear the label in a picture.
Overlay On (alternately to Overlay Off)
Button to display the label in a picture.
Fig. 04: Overlay Off / Overlay On
Raster
Button to assess the number and arrangement of Viewports, displayed on the Screen. Enabling this
button opens a grid where the number (up to four) and configuration of Viewports can be selected.
The marked tiles of the grid are highlighted and displayed in blue. After the selection is confirmed by
a mouse-click, the Viewports will be arranged accordingly.
Fig. 05: Raster: Selection of four Viewports
75
eutaxa ٠ Electronic Keys & Reference Collections٠ User Manual
Fig. 06: Raster - selection and arrangement of four Viewports
Combo Boxes
List of Abbreviations
The combo box shows a table, consisting of two columns: the list of abbreviations (Shortcut Text) and
the list of the corresponding names of details. The lines can be sorted in an ascending or descending
row by enabling the respective column headers. This table is useful to decode the shortcut text
displayed in most of the pictures.
Fig. 07: Combo box "List of Abbreviations": Lines sorted by "Shortcut Text"
76
eutaxa ٠ Electronic Keys & Reference Collections٠ User Manual
Search Details
The combo box includes a list of details, shown in at least one of the pictures on the Image Panel.
When selecting one of the terms, the appropriate picture is displayed automatically on the Screen
(when using a single Viewport on the Screen). If there are more than one Viewports arranged on the
Screen then only the thumbnail is marked and highlighted in dark-blue.
Fig. 08: Combo box "Search Detail": Selection of a detail to display the adequate image on the Screen
Morphology Cards
This sub-application offers a series of cards, each treating a specific part of the body. The first card
(overview) gives a survey of the habitus, subdividing it into sections, which are described in detail and
displayed in one of the following Morphology Cards.
Fig. 09: Overview: Labelling of the body parts
77
eutaxa ٠ Electronic Keys & Reference Collections٠ User Manual
Each card consists of an Image Panel (2a) and a Screen (2b), showing a single Viewport (when
entering the card). To change the number and arrangement of Viewports, enable the Raster button
and change the settings.
Fig. 10: Morphology Cards: Image Panel (2a) and Screen (2b)
Image Panel
The Image Panel contains a series of thumbnails of those images that can be displayed on the Screen.
Screen
The Screen is the part of a Morphology Card where Viewports can be arranged.
Viewports
Viewports are used to display images on the Screen. They may be arranged singularly or in a number
of two or four. The number and configuration can be changed via Raster button in the Tool bar. The
procedure is described in detail in the section Tool bar/Raster. When opening a card, the number of
Viewports is always preset to one.
When arranging a single Viewport on the Screen, images can be displayed by clicking on the wished
thumbnail in the Image Panel. When arranging more than one Viewport, the pictures must be inserted
manually. To insert an image manually, select the thumbnail with the mouse cursor and then drag it
to a Viewport while holding the mouse button down (fig. 11). When the target (Viewport) is reached,
the mouse button must be released and the image will be displayed instantly (fig. 12).
78
eutaxa ٠ Electronic Keys & Reference Collections٠ User Manual
Fig. 11: Dragging a selected thumbnail (highlighted in blue) into a Viewport
Fig. 12: Releasing the mouse button to insert the image
79
eutaxa ٠ Electronic Keys & Reference Collections٠ User Manual
Fig. 13: two images arranged in a single horizontal row
Viewports can be arranged singularly, in two rows and columns, or in a single row or column. This is
useful when viewing longitudinal structures at higher magnification (as shown in fig. 13).
Zoom bar
Each Viewport shows a series of three small buttons in the left upper corner. These buttons are used
to increase or to decrease the size of an image by pressing the keys with the symbols "+" (zoom in)
or "-" (zoom out). The actual value of magnification will be displayed in the right corner of the bar.
When enabling the central key "A" (autosize) the size of the image is automatically adjusted to the
size of the Viewport.
Fig. 14: image adjusted to the size of the Viewport
Fig. 15: image zoomed up to 75 % of its original size
80
eutaxa ٠ Electronic Keys & Reference Collections٠ User Manual
Magnified images can be aligned either with the scroll bars or by displacing the image with the mouse
cursor (when dragging the image, the symbol of the mouse cursor turns into a hand).
Displace, copy or clear images
An image can easily be moved from one Viewport to another by dragging it with the mouse cursor
while pressing the Shift key and holding the left mouse button down (figures 16, 17).
Fig. 16: Dragging the image to the lower Viewport
Fig. 17: Releasing the mouse button to insert image
Fig. 18: Copying an image
Fig. 19: Remove an image with "Clear image"
81
eutaxa ٠ Electronic Keys & Reference Collections٠ User Manual
To copy an image, first hit the Control key on the keypad and then drag the image to the destination
while holding the mouse button down (fig. 18).
To clear an image, move the cursor to the Viewport, click the right mouse button and enable the
command Clear Image (fig. 19).
Function
When opening one of the cards, the first picture in the Image Panel will be displayed automatically on
the Viewport. To replace the image, click on another thumbnail in the panel and it will be inserted
instantly (fig. 20). Images can also be queried by selecting one of the detail names in the combo box
Search Details. After selecting a detail name, the corresponding image will be displayed on the
Viewport (fig. 21).
These operation methods differ when arranging multiple Viewports on the Screen. To insert an image,
select the desired thumbnail in the Image Panel and drag it to the Viewport while holding the left
mouse button down. When searching for a detail in the Search Details combo box, the corresponding
thumbnail will be highlighted and must be inserted manually, using drag-&-drop.
Relevant morphological characters are labelled in most images (in form of brief descriptions). To get
an explanation of these abbreviations, enter the List of Abbreviations combo box and search for the
corresponding term.
To obtain a better view of an image, the overlay may be blanked out by clicking the Overlay Off
button in the Tool bar. To change to the previous view, press the button once again (now labelled
Overlay On).
Fig. 20: Display of a single image by selecting one of the thumbnails
82
eutaxa ٠ Electronic Keys & Reference Collections٠ User Manual
Fig. 21: Display of the corresponding image after selecting a detail's name
Fig. 22: Cancelling of the picture label after clicking the button "Overlay Off"
83
eutaxa ٠ Electronic Keys & Reference Collections٠ User Manual
Ecology
Overview
The configuration of the Ecology form depends on the currently used viewing mode: When selecting
the Single Map view, the form shows the Tool bar (1), the Selection Panel (2), a field containing
Systematic Data (3) and a series of Ecology Cards (4) (fig. 01). When selecting the Multiple Maps view
(in case of enabling the Multiple Maps button) the configuration of the form changes, now showing
the Tool bar, the Selection Panel and a single Ecology Card (4) where multiple Viewports can be
arranged. In this viewing mode the Systematic Data field is blanked out (fig. 02).
Fig. 01: Ecology form: "Single Map" viewing mode
Fig. 02: Ecology form: "Multiple Maps" viewing mode
84
eutaxa ٠ Electronic Keys & Reference Collections٠ User Manual
Tool bar
Buttons
The configuration of the buttons differs, according to the type of the viewing mode.
Fig. 03: Tool bar –"Multiple Maps" viewing mode: Buttons and combo boxes
Images
This button allows inserting of a variable number of windows to display pictures stored in the Gallery
Archive. Each Image Window consists of the selection bar (including the selection field and a series of
four combo boxes) and of a single Viewport. To insert an image select "Group" or "Family" in the
selection field, and group, genus, species or detail in the combo box on top of the Viewport. A
detailed description is given in chapter Gallery/Images.
Fig. 04: Tool bar: Images
Multiple Maps (alternately with Single Maps)
Button to switch to the Multiple Maps viewing mode, allowing the simultaneous arrangement of up to
nine maps.
Single Map (alternately with Multiple Maps)
Button to switch to the Single Map viewing mode.
Fig. 05: Tool bar: Single Map/Multiple Maps
Raster
Changes the number and arrangement of Viewports, displayed on the Multiple Maps card. Enabling
this button opens a grid where the number (up to nine) and configuration of Viewports can be
selected. After the selection is made by mouse-click, the Viewports are arranged accordingly.
Fig. 06: Tool bar: Raster – selecting a number of nine Viewports
85
eutaxa ٠ Electronic Keys & Reference Collections٠ User Manual
Legend
This button opens a window, containing a description of the map colouration.
Fig. 07: Tool bar: Legend
Combo Boxes
Search Species
Combo box to select the name of a species or a synonym.
Fig. 08: Tool bar: Search Species
Search Author
Combo box to select the corresponding author, including the year of the published description.
The records listed in both boxes are interrelated, so that they can only be selected jointly. by first
selecting the species name in the Search Species combo box and then the name of the corresponding
author in the Search Author combo box. After selecting both terms, the dates of the respective
species will be displayed in each Ecology Card and in the Systematic Data field. This selection mode is
useful when searching for any species names, whether synonyms or actual species.
Fig. 09: Tool bar: Search Author
86
eutaxa ٠ Electronic Keys & Reference Collections٠ User Manual
Selection Panel
The panel consists of a series of Radio-Buttons (2a) and a Selective List (2b).
Fig 10: Selection Panel: Radio-Buttons (2a) and Selective List (2b).
Selective List
This table shows a list of species or countries, pursuant to the setting of the Radio-Buttons, and offers
a simple way to query information about a certain species (in case of using the Single Map viewing
mode): By marking a species name with the mouse cursor, the information will be shown on the
Screen of the currently enabled card.
Tip: The names of species, arranged in the Selective List, may be displayed with or without the
subgenus name, depending on the selection of the User Settings in the command field Tools/Settings
in the Menu bar.
Radio-Buttons
This field contains three buttons: All Species, Select by Species and Select by Country.
Changing settings in this field affects the type and arrangement of all records in the table of the
Selective List.
87
eutaxa ٠ Electronic Keys & Reference Collections٠ User Manual
All Species
This setting inserts a list of species, arranged in alphabetical order. When selecting a species name
with the mouse cursor, the appropriate dates are displayed in the Systematic field and on every
Ecology Card.
Select by Species
This setting inserts a list of species, each including a series of country names, representing the
distribution area of the selected species. The list of countries may be expanded or blanked out by
clicking on the small buttons ('+', '-') in front of each species name.
Select by Country
This setting inserts a list of countries, each including a list of species, occurring in the country. The list
of species may be opened or closed by clicking on the small buttons ('+', '-') in front of each country
name. Information on species can only be queried and displayed when selecting a term in the species
list. The terms in the countries list are inoperable and can only be viewed.
Tool bar
Fig. 11: Selective List, modified by Radio-Button settings: a. All Species, b. Select by Species, c. Select by Country
Systematic Data
The field displays a series of systematic data, including names, authors and the years of description.
88
eutaxa ٠ Electronic Keys & Reference Collections٠ User Manual
Ecology Cards
This sub-application contains three or four types of cards, labelled Ecology, Classification, Synonyms
and Distribution. Depending on the type of the card they either display text fields, tables or Viewports.
Ecology
When selecting this card, a text field is displayed on the Screen, containing a description of the
spreading area, the ecology and habitat conditions of the selected species.
Fig. 12: Ecology Card (Single Map viewing mode)
Synonyms
This card presents a list of synonyms, the corresponding authors and the years of description.
Fig. 13: Synonyms Card (Single Map viewing mode)
89
eutaxa ٠ Electronic Keys & Reference Collections٠ User Manual
Classification
The data, shown in this card, are taken from Moog (edit., 2002): Fauna Aquatica Austriaca, Lieferung
2002. – Wasserwirtschaftskataster, Bundesministerium für Land- und Forstwirtschaft, Umwelt- und
Wasserwirtschaft, Wien.
Longitudinal Distribution
This application provides information about the distribution of species in various longitudinal sections
of running waters, ranging from the crenal to the hypopotamal. The values displayed in the adjacent
fields weigh the occurrence of a species in a specific section (the sum of the values is always 10).
Saprobic Valence
This application provides information about the saprobic valence of species, reflecting the degree of
tolerance to organic contamination. As a support to the saprobic system, the Roman numerals indicate
the degree of pollution, including the levels 0 (xenosaprobic), I (oligosaprobic), II (β-mesosaprobic),
III (α-mesosaprobic) and IV (polysaprobic). The values displayed in the adjacent fields weigh the
tolerance to a special degree of organic pollution (the sum of the values is always 10).
S-Weight:
This value shows if a species is a good (5) or a bad (1) indicator. Species found in all saprobic classes,
from the xeno- to the polysaprobic level, are bad indicators and are therefore given a weight value of
“1”. Species found in only one saprobic class are good indicators and show a weight value of “5”.
S-Index:
The Saprobic Index is calculated by multiplying the saprobic valence of a species with the number of
the saprobic class (0 to IV) and dividing the sum by 10.
For example: Calculation of the S-Index of the species Hydropsyche saxonica (Hydropsychidae)
Saprobic Class
Saprobic Valence
0
1
I
4
II
3
III
2
IV
-
Calculation of the S-Index: 01 plus 14 plus 23 plus 3x2 = 16, divided by 10 → S-Index: 1,6
Note: The Classification Card is not available in all eutaxa products. For example, it is not included in
the product Culicidae 05 (because it may exclusively indicate that all species inhabit the littoral).
90
eutaxa ٠ Electronic Keys & Reference Collections٠ User Manual
Distribution
This card contains a Screen with a single Viewport that displays a map with the highlighted
distribution area of the current species.
Fig. 14: Distribution Card (Single Map viewing mode)
To arrange multiple Viewports on the Screen, enable the Multiple Maps button in the Tool bar and
select the desired number of Viewports via Raster button (up to nine) (fig. 16). Map images can be
displayed by selecting the desired species name in the Selective List and dragging it to a Viewport
while holding the left mouse button down (fig. 15). When the button is released, the image is inserted
instantly. In addition maps can be displaced (by dragging the map to another Viewport while holding
the Shift key down) or copied (by dragging the map while holding the Control key down). To cancel
an image click the right mouse button and enable the command Clear Map). For changing to the
Single Map viewing mode, enable the Single Map button in the Tool bar.
Fig. 15: Multiple Maps viewing mode: Dragging an image record into a Viewport
91
eutaxa ٠ Electronic Keys & Reference Collections٠ User Manual
Fig. 16: Multiple Maps viewing mode: Selection and arrangement of nine Viewports
Note: In the products Culicidae 05 and Simuliidae 05, the occurrence of a species in a certain
European country is illustrated by a colouration of the whole national territory, including all peninsulas
and islands. For example habitat records of a species in Western France are documented by
highlighting the whole national territory, including the island of Corsica, though the species may never
have been found on this island. This method of outlining the spreading area can also be rather
problematic for countries with extended longitudinal or continental dimensions (e.g. Norway, Italy or
Russia). These maps give an indication of the extent of a distribution area and accordingly of
preferred climatic conditions. Additional information may be obtained by reading the description in the
Ecology Cards. In the product Trichoptera 05 the islands or regions of the European part of Russia are
well separated and marked individually.
92
eutaxa ٠ Electronic Keys & Reference Collections٠ User Manual
Eutaxa Installation Guide
1. Installation conditions
1.1 Operating Systems:
•
Microsoft Windows 98 SE
•
•
•
Microsoft Windows ME
Microsoft Windows 2000
Microsoft Windows XP
1.2 Other conditions:
•
administrator rights
•
•
Microsoft Internet Explorer 6 or higher
the last security updates from http://update.microsoft.com
Attention: Do not plug in the WIBU-Key before the setup is complete and the computer has been
restarted!
2. Installation
2.1 Start
Insert the CD-ROM and the setup will start automatically. Otherwise run Setup.exe from the root
directory of the CD-ROM.
93
eutaxa ٠ Electronic Keys & Reference Collections٠ User Manual
2.2 Microsoft .NET Framework
Microsoft .NET Framework will be installed on your PC; confirm this procedure with 'yes' (i. e. "Ja" in
the dialog box displayed below).
2.3 Microsoft .NET Framework License Agreement
Read the Microsoft .NET Framework License Agreement carefully. In case of acceptance enable the
radio button "I agree" and click on "Install".
2.4 Completion of the .NET Framework Setup
After the .NET Framework setup is completed the following dialog is displayed. Press the "OK" button.
94
eutaxa ٠ Electronic Keys & Reference Collections٠ User Manual
2.5 Internet Explorer 6 – Installation request
If you haven't installed the Internet Explorer 6 or higher before you started this setup, the following
dialog will be displayed and the setup breaks.
In this case you have to download the Internet Explorer v. 6 from the following address:
http://www.microsoft.com/windows/ie
Afterwards repeat the installation procedure.
95
eutaxa ٠ Electronic Keys & Reference Collections٠ User Manual
2.6 Installation of Eutaxa is starting
Otherwise or after you have installed the IE 6 the setup continues. Confirm the procedure with "Next".
Read the EULA (End User License Agreement) of Eutaxa carefully. In case of acceptance click on the
"Yes" button.
96
eutaxa ٠ Electronic Keys & Reference Collections٠ User Manual
Afterwards fill in the Customer Information (both User and Company Names are required),
and set (or leave) the installation directory.
97
eutaxa ٠ Electronic Keys & Reference Collections٠ User Manual
2.7 Installation of the Microsoft Desktop Engine (MSDE)
The setup installs the Microsoft Desktop Engine (MSDE), which contains the Eutaxa databases.
After this the database engine will be started.
98
eutaxa ٠ Electronic Keys & Reference Collections٠ User Manual
2.8 Copy of Eutaxa files
Now the setup displays relevant informations. Continue with a click on "Next".
Afterwards all files that are not stored on the PC will be copied.
99
eutaxa ٠ Electronic Keys & Reference Collections٠ User Manual
Then the database of the Eutaxa application will be inserted into the MSDE.
2.9 Installation of the WIBU-Key (hardware dongle)
At this point the setup starts the installation routine of the WIBU-Key. Simply follow the instructions
and use the default settings to continue and to complete the installation.
Attention: Do not plug in the WIBU-Key before the setup is complete and the computer has been
restarted!
First you will be asked to select the language of the WIBU-Key Software.
100
eutaxa ٠ Electronic Keys & Reference Collections٠ User Manual
After this you will be asked for the program parts you want to install.
It is recommended not to change these settings and to continue the procedure with "Next".
101
eutaxa ٠ Electronic Keys & Reference Collections٠ User Manual
In the following step the WIBU-Key setup displays a summary of all parts that will be installed.
Confirm with a click on "Next".
Then the WIBU-Key files are copied.
102
eutaxa ٠ Electronic Keys & Reference Collections٠ User Manual
The following dialog box allows you viewing the WIBU-Key Readme.txt file.
Finally the setup of the WIBU-Key is completed.
103
eutaxa ٠ Electronic Keys & Reference Collections٠ User Manual
2.10 Completion of the Eutaxa setup
Now the setup displays a restart dialog. It is recommended to restart the computer and not to remove
the disk until the machine has been restarted.
After the reboot you will see the icon of the new Eutaxa application on your desktop.
104
eutaxa ٠ Electronic Keys & Reference Collections٠ User Manual
Now connect the WIBU-Key dongle to a USB port on your PC. Subsequently the following message
(new hardware detected) will be displayed.
For some reasons you will be asked if you want to install the hardware driver on your PC.
You must click on 'yes' (i.e. 'Ja')
After these steps the setup is completed and you can start your new Eutaxa application with a doubleclick on the desktop icon.
105
eutaxa ٠ Electronic Keys & Reference Collections٠ User Manual
3. Special Informations
In some conditions, i. e. if you haven't installed the last service or security packs of your operating
system, you will see a question dialog while the setup is running:
This dialog wants you to enter the original CD-ROM of the operating system.
For the most reasons you can cancel this dialog.
Afterwards the following dialog box will be displayed, asking you, if you want to leave the new
libraries on the PC, or if you want to replace them with the original.
You should click 'yes' (i.e. 'Ja'), because the unknown libraries contain a later version.
106
eutaxa ٠ Electronic Keys & Reference Collections٠ User Manual
If the newest service or security packs of your operating system have not been installed, you can
download these from the Microsoft website on http://update.microsoft.com (shown in the figure
below).
In case of setup troubles please read the instructions of the Readme.txt file, stored in the root
directory on the CD-ROM.
107
eutaxa ٠ Electronic Keys & Reference Collections٠ User Manual
4. Installation of the Microsoft SQL Server
In addition with the Eutaxa software the Microsoft SQL Server has been installed on your computer.
After the setup has been finished and the computer has been restarted, the icon of the server will be
displayed in the right corner of the Windows taskbar. The server window may be opened with a
double-click on the icon. To stop the server, click on the "stop"-sign in the window. As a result the
green arrow of the icon changes into a red quadrate and the software application cannot be used,
until the server has been restarted by hitting the "start/continue"-button (mind, that the restart of the
server may last a few seconds). The server will be started automatically after every start of the
machine.
Attention: It is recommended not to change any settings of the MSSQL Server.
In case of uninstalling the Eutaxa software, the SQL Server remains on the computer and has to be
removed separately.
5. Uninstalling or repairing the Eutaxa Software
To uninstall the application, open the Start menu in the Windows taskbar, choose Control Panel,
double-click on the Add or Remove Programs icon, choose the respective application in the list of
programs, click Change/Remove and select Remove. In case of repairing the software repeat the
procedure, enable the Repair button and follow the instructions.
When uninstalling the Eutaxa software, the Microsoft SQL Server and the software of the WIBU-Key
are not affected and have to be removed separately. After uninstalling all Eutaxa products, the Eutaxa
directory has to be cancelled manually. To remove the directory, enter the Windows Explorer/Program
files, select the term "Eutaxa" and hit the "Clear"-icon in the Windows tool bar.
If there are some troubles when uninstalling a Eutaxa product, insert one of the CDs, start the setup
and run the Repair-program. After the setup has been completed, restart the machine and continue to
uninstall the software.
Software errors may be avoided by downloading the latest software-versions from the Eutaxa website
on www.eutaxa.com. Move to the chapter "Support/Downloads/Software Updates", store the latest
version of the Eutaxa.exe in any directory on your computer and start the installation with a doubleclick on the exe-file. The software will be upgraded automatically.
108