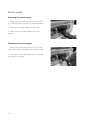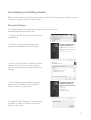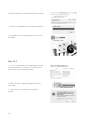
1
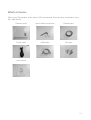
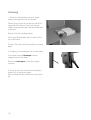
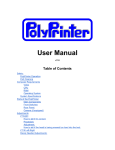
tripodmaker User manual v2 Version 1.0 2| |3 Table of Contents Welcome to Tripodmaker Introduction Specifications of the Tripodmaker 5 6 7 Get started with Tripodmaker What's in the box Unboxing Terminology 8 9 10 11 Get your Tripodmaker ready Spool holder Power supply Power switch 12 13 14 15 First use of your Tripodmaker Downloading and installing software Microsoft Windows Mac Os X Leveling the build plate Microsoft Windows Mac OS X Leveling procedure Loading and unloading filament Loading filament Unloading filament Make your first 3D print 16 17 17 18 20 20 21 23 24 24 25 27 Generate your Print file on your computer Generate files on Windows Generate files on Mac OS X and Windows with Cura 28 29 31 Maintenance of your Tripodmaker 33 Trouble shooting and easy fixes 35 Safety 37 4| Welcome to Tripodmaker _____________________________________ |5 Introduction Thank you for your purchase of Tripodmaker! This is the user manual for your Tripodmaker v2. In this manual, you will be guided through the printing process. Read this manual carefully and take the needed time to get familiar with your new product. This is a manufacturing device that requires thorough understanding. This manual is a work in progress. If for any reason something would be unclear or wrong, feel free to contact support: [email protected] 6| Specifications of the Tripodmaker Printing Print technology Layer thickness Precision Fused Deposition Modeling (FDM) Delta Robot 75 - 250 microns ±0.1 mm Filament Diameter Nozzle Diameter Print speed Traveling speed 1.75 mm 0.4 mm 20 - 150 mm/s 20 - 150 mm/s Software Provided software Printable files Supports Physical dimensions Frame dimensions Printer dimensions Repetier Host Cura Engine and Slic3r Temperature Operating temperature 15 - 32 deg. C Storage temperature 0 - 21 deg. C Operating nozzle temperature 180 - 295 deg. C 50 - 90 deg. C Operating bed temperature Electrical AC input Connectivity Stand alone printing from SD card USB Shipping dimensions X 45.0 cm Y 55.0 cm Z 110.0 cm 19 kg 21 kg .STL Windows XP and higher Mac OS X 10.6 and higher X 50.0 cm Y 51.0 cm Z 101.0 cm X 58.0 cm Y 54.0 cm Z 101.0 cm 88 - 264 V 47 - 63 Hz 5A Weight Shipping weight |7 Get started with Tripodmaker _____________________________________ 8| What's in the box Next to your Tripodmaker, which had the SD-card inserted, there are other components in the box. Here the list: Filament spool Spool holder and screws Painters tape Power cable USB cable Test print User manual |9 Unboxing 1. Place the Tripodmaker box on a stable surface with great access on all sides. Open the box from the top and you will find a spool with PLA filament, this user manual, cables, blue painters tape, filament holder and a test print. Remove the first cardboard layer. Lift up your Tripodmaker with 2 hands on the top of the frame. Caution: Do not lift the Tripodmaker on internal parts. 2. Position your Tripodmaker on a sturdy table. Uncut and remove 3 tiewraps that are strapped around the belts. Remove all blue tape to hold the magnet contacts 3. Push up the carts on their vertical slides in order to lift up the printer head. Remove all protective material from the printer left. 10 | Terminology 1. Display 2. SD-card slot 3. Push and rotate button 4. Build plate 5. Leveling screws 6. Print head or hot-end 7. Filament guide tube 8. Print head cables 9. Filament driver 10. Spool holder mounting location 11. Power Socket 12. USB Socket 13. Power switch 14. Vertical slides 15. Carts 16. Magnetic rods 17. Ball joints 18. Nozzle | 11 Get your Tripodmaker ready _____________________________________ 12 | Spool holder Attaching the spool holder 1. The spool holder is mounted with two T-nuts and two M4 x 8 bolts. 2. Mount the holder on the vertical slide near the filament driver by sliding the T-nuts in the aluminum beam. 3. Position the holder and screw on the M4 x 8 nuts firmly. By turning the bolts, the T-nut will rotate inside the aluminum beam and hook behind the profile edges. Make sure the T-nuts turn 90 degrees. Detaching the spool holder Untighten the M4 x 8 nuts. The T-nuts will align with the profile edges and you will be able to remove the spool holder. | 13 Power supply Attaching the power supply 1. Make sure your power switch is in the OFF [o] position before you plug in the power cable. 2. Connect the power cable to the printer. 3. Next, insert the power cable in the wall socket. Detaching the power supply 1. Make sure your power switch is in the OFF [o] position before detaching the power supply. 2. The cable can be detached from the socket by pulling it out gently. 14 | Power switch 1. The ON/OFF button of the Tripodmaker is located at the right side. The [I] represents ON and [o] represents OFF. Turning the Tripodmaker ON lights up the LCD screen. 2 Switching OFF of the Tripodmaker can be done at any time, however it is recommended to only turn it of when not in use. Turning the Tripodmaker OFF extinguishes the LCD screen. | 15 First use of your Tripodmaker _____________________________________ 16 | Downloading and installing software Before getting started, your Tripodmaker needs to be leveled. This requires software on your computer in order to control your print head. Microsoft Windows Go to Tripodmaker.com/downloads and get your latest version of setupRepetierHostTripodmaker.exe. 1. Unpack the .ZIP file and run the exe-file as administrator. 2. Choose your preferred language and continue the installation by pressing Next. 3. If this is your first install, overwrite the slicer settings. If not, you can uncheck boxes in order to not overwrite previously saved slicer settings. 4. After completing the installation process, press Finish by installing the serial driver in order to connect to your printer. 5. Install the USB-CDC driver. This will create the ability to create a COM-port when your printer is connected. | 17 6. Press Install in the Windows Security screen. 7. When the installation is complete, press Exit. 8. Repetier Host for Tripodmaker can now be launched. Mac Os X 1. Go to Tripodmaker.com/downloads and get your latest version of Printrun. Download and unzip the file to a desired location. 2. Right click the unpacked application and click open. 3. Click open to continue in the pop-up screen. 18 | 4. Printrun-Mac is installed. | 19 Leveling the build plate To get the print stick to the build plate, the nozzle needs to be close enough to the build plate. If the nozzle is to close, plastic might be unable to come out or the nozzle could even scratch the build platform. 1. In order to get your print to stick successfully to the print bed, blue painters tape is used to cover the print bed. Lay down parallel strips of tape to cover up your printer bed 2. You can tidy up the edges by using a cutter on the glass print bed. Microsoft Windows 1. Power up your Tripodmaker and connect it with the USB cable to your computer. 2. Open Repetier Host Tripodmaker 3. Connect your Tripodmaker by clicking the Connect button. It will turn green if successfully connected. 4. Navigating your printer head is done in the manual control tab. Press home ( ) before using any navigation buttons. The print head now moves up towards the end stops. ! Attention: Do not use the X/Y navigation as the vertical carts might crash on the end stops. 20 | 5. Screw down the build plate by rotating the screws clock wise until the lowest position is found 6. Use the predefined positions buttons (1 – 4) on the manual control tab to move the printer head quickly around to a position 10mm above the print bed. Use the Z-control to carefully lower until Z000.00, the lowest position. ! Attention: Leaving too much time between movements disables the motors and leads to loss of cart position. Re-use the home button ( ) to have a good position reference in case the carts were able to move freely. 7. Now level your build plate and by turning the set srews. Loop this procedure a few times on all of the positions 1, 2 and 3. Verify your leveling on position 4. Advice on leveling is found in the Leveling Procedure section. Mac OS X 1. Power up your Tripodmaker and connect it with the USB cable to your computer. 2. Open Printrun-Mac 3. Connect your Tripodmaker by clicking the Connect button. Make sure you have selected the correct port (you are looking for usbmodem port) and have set the correct Baudrate of 115200. | 21 4. Press the white home button ( ) before using any navigation buttons. The print head now moves up towards the end stops. ! Attention: Do not use the X/Y navigation as the vertical carts might crash on the end stops. 5. Screw down the build plate by rotating the screws clock wise. 6. Use the Z controller to move the print head down. Z000.00 should be readable on the printer controller to show that the printer head is at its lowest position. ! Attention: When the printer wasn't homed before, Z000.00 is also shown. 7. Navigate your print head around the build plate with the X/Y controller and adjust the 3 leveling screws with a size 3 allen wrench. ! Attention: Leaving too much time between movements disables the motors and leads to loss of cart position. Re-use the home button ( ) to have a good position reference in case the carts were able to move freely. Advice on leveling is found in the Leveling Procedure section. 22 | Leveling procedure You want the nozzle to be as close as the thickness of a piece of paper or less, without touching the build plate. ! To big air gap Turn the three screws counter clockwise so that the build plate comes up. ü No air gap ü No contact with the build plate You are ready to go! | 23 Loading and unloading filament Loading filament 1. Preheat your Tripodmaker by navigating with the button towards >Menu >Control >Temperature >Nozzle. Set the temperature within the use envelope of the material. ! Attention: Exceeding the allowed temperatures can ignite material in the printer head. Always be careful when changing materials. Suggested temperatures: PLA: ~205 degrees Celsius ABS: ~235 degrees Celsius 2. Lift the lever, to unlock the filament driver. 3. Straighten the filament so it can be guided easily through the extruder drive mechanism. 4. Insert the filament in the extruder. Make sure to insert the filament above the leaver and at the left side of the spring. A bit of twisting the filament will be necessary in order to get the filament in the white nylon tube. 24 | Before After 5. Feed the filament in the nylon tube. Keep track where the filament is inside the tube and feed it until you are nearly at the end of the tube. 6. An additional length of about 5 cm to 7 cm needs to be pushed inside the nozzle. This often requires some wiggling of the tube to get the filament deep enough in the hot-end. 7. As the nozzle of the hot-end is hot, you should be able to push out some plastic by feeding the filament manually. The filament color can differ from your filament spool, as a residue can be left behind from the previous (test) print. 8. Once some plastic oozed out, lock the lever in its down position. Unloading filament 1. Preheat your Tripodmaker by navigating with the button towards >Menu >Control >Temperature >Nozzle. Set the temperature within the use envelope of the material. ! Attention: Exceeding the allowed temperatures can ignite material in the printer head. Always be careful when changing materials. Check your spool for the temperature envelope of your material. Suggested temperatures are: PLA: 205 degrees Celsius ABS: 235 degrees Celsius | 25 2. Lift the lever, to unlock the filament driver. 3. Pull back the filament. 26 | Make your first 3D print If your Tripodmaker is leveled properly and the filament is loaded, you are ready for your first print! 1. Insert your SD-card in the SD-card slot 2. Navigate to the SD-Card folder by navigating with the button towards >Menu >Print from SD. 3. Select the test file. ! Attention: make sure your plate is free of objects. Your printer will home, heat up and start the print. ! Attention: During the printing process, the hot-end and print bed can get hot. Do not touch these until printing is done. 4. To remove the print, simply pull it off. To get big objects of the build plate, a putty knife might be useful. ! Attention: Prints that were just completed can be hot. | 27 Generate your Print file on your computer _____________________________________ 28 | Congratulations! You just completed the test file. Now continue on generating your own printable files. Print files are the result of a process called "slicing". There are 3 main slicer programs currently available: 1. CuraEngine 2. Slic3r 3. Kisslicer (only single nozzle available for free) Depending on the operating system you use, there is a slightly different approach. Generate files on Windows with RepetierHost RepetierHost for Tripodmaker already contains several predefined settings for multiple materials and has CuraEngine and Slic3r preinstalled. We recommend using CuraEngine to slice your files. Slic3r can be something to experiment with if results are not meeting your requirements while using CuraEngine. 1. Press Load to place an STL file in your Repetier Host for Tripodmaker. To keep things simple, we suggest printing a small test cube. You can find the test cube on the download page of Tripodmaker.com. 2. Match the settings for this print with the picture and press Slice with CuraEngine. Attention: If you don’t see the predefined settings, you didn’t properly unpacked the ZIP-file before installing. | 29 3. You will see a preview of the generated GCode and an estimation of printing time and layer count in the Preview tab. In the G-Code Editor tab, press the save button to save the file on the SD-card. 4. In the G-Code Editor tab, press the save button ( ) to save the file on the SD-card. 4. Insert the SD-Card in your Tripodmaker SDCard slot. Navigate to the print file with the button towards >Menu >Print from SD. 5. The print will start. 30 | Generate files on Mac OS X and Windows with Cura A preinstalled Repetier Host for Tripodmaker is not available for Mac OS X. Therefore, we suggest to use Cura. Cura can also be used on Windows and Unix. Go to http://software.ultimaker.com to find the latest version. 1. When first installed, you will be guided through the set-up process for your printer. Use following print screens to configure your Tripodmaker. | 31 2. If you have an optional heated bed platform, don't forget to check the heated bed box. Machine width: 300mm Machine depth: 300mm Machine height: 390mm Nozzle size: 0.4mm Heated bed - optional Bed center is (0,0,0) - Yes 3. When successfully installed, go to machine settings and check the box for the round build platform if this was not selected automatically. Check all values in this screen. 4. To get all needed settings loaded in Cura, download Cura for Tripodmaker Model File and open the INI file in Cura. 5. Open a file with the folder button ( ) and save it to the SD-card with the save button ( ). 32 | Maintenance of your Tripodmaker _____________________________________ | 33 Moving parts Keep the wheels and magnetic bearings free of dust. These black components are mad from POM and attract dust. Preventing dust to accumulate elongates their lifetime. Check your carts on wobble after a while. If the carts are loose on the track, you can tighten the eccentric nut in order to remove the cart wobble. The carts must run smooth. If you over tighten the eccentric nut, you will need to use allot of force to move the cart and it will seem you have "hick-ups" during the sliding maneuver. Nozzle and hot-end Make sure that the nozzle and hot-end are cleaned when loaded with plastic residues. To clean of the nozzle, simply heat it until the plastic gets sticky, and use a printed cube to peel of the sticky plastic. 34 | Trouble shooting and easy fixes _____________________________________ | 35 Print doesn't stick to the printer bed or detaches on certain spots. Causes: • Build plate is not leveled properly. Solution: Try to level the build plate. • Material is not sticking to the build plate. Solutions: Try to use new tape. Slow down the first layer of your print. Try to use a raft in case of thin walled prints. The print is stuck on the build plate. Solution: Use a putty knife to get the pieces from the build plate. Clogged nozzle Solution Try manually feeding the nozzle while setting temperature on 245 degrees. In case this doens't solve the problem, contact support: support @ tripodmaker.com. The filament is stuck Causes: • Filament is stuck in the nylon tube due to a blob that is retracted in the tube. Solution: Remove the tube out of its couplings and remove the filament. The tube can be removed by pushing in the couplings in the opposite direction you want to pull out the tube. • The filament is stuck in the cold zone of the nozzle Solution Contact support: support @ tripodmaker.com. The display shows Error Min Temp or Error Max Temp. Cause: A problem occurred within the electronics. Solution Contact support: support @ tripodmaker.com 36 | Safety _____________________________________ | 37 The TripodMaker is an electrical device and contains motors and hot elements. During operation of the printer, be always aware of possible hazards. Age Warning User under the age of 18 are recommended adult supervision. The printer includes small parts that can lead to choking. Burn Hazard The extruder nozzle or heated building platform might be hot during operation. Never touch these before they cooled down. This can take more than 20 minutes. Also the extruded plastic is hot and should not be touched. Electric Shock Hazard When the printer powered, touching the electronics may result in an electric shock. Make sure you disconnected the power source and power supply when opening the electronics. Wait at least one minute before opening the box to allow the power supply to discharge. Fire Hazard Keep flammable liquids and/or materials away from the printer when powered or in operation. Pinch Hazard During operation, keep fingers, hair and loose clothing away from moving parts like belts, pulleys, gears or fans. Static Charge Ground yourself before touching the printer electronics. Electrostatic charge can damage electronic components. Ground yourself by touching a grounded source. 38 | | 39 40 |