1
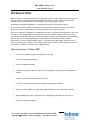
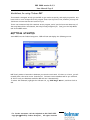
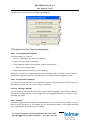
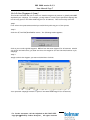
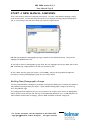
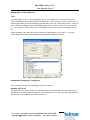
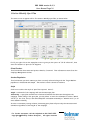
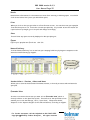
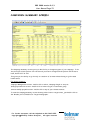
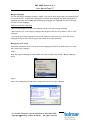
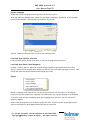
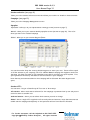
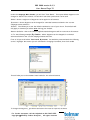
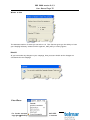
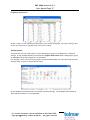
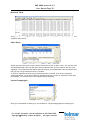
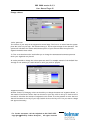
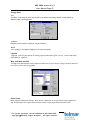
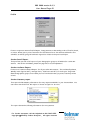
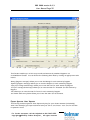
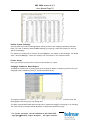
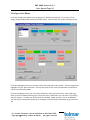
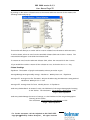
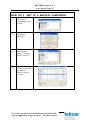
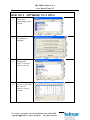
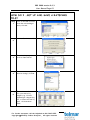
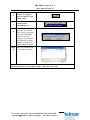
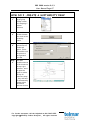
RBP 2000 version 2.0.3 User Manual Page 1 RBP 2000 Version 2.0.3 User Manual 2015 For further assistance call the Helpdesk on 020 7467 2575 Copyright 2015 By Telmar Group Inc., All rights reserved RBP 2000 version 2.0.3 User Manual Page 2 INTRODUCTION .................................................................................. 3 Main features of Telmar RBP ......................................................................................................................3 Guidelines for using Telmar RBP .................................................................................................................4 GETTING STARTED ............................................................................... 4 The options in the Start up dialog box .....................................................................................................5 START A NEW OPTIMISED CAMPAIGN ........................................................ 6 Minimum/Maximum spots booked (new) ....................................................................................................6 Set Active Daypparts (new) ........................................................................................................................7 START A NEW MANUAL CAMPAIGN ........................................................... 8 Building New Demographic Groups .............................................................................................................8 Campaign Management ................................................................................................................................ 13 Printing your Campaign ............................................................................................................................... 25 OTHER FEATURES OF RBP ...................................................................... 26 File Menu ....................................................................................................................................................... 26 Campaign Menu ............................................................................................................................................. 30 View Menu ..................................................................................................................................................... 35 Graph Menu................................................................................................................................................... 39 Report Menu ................................................................................................................................................. 42 PCA (Post Campaign Analysis) Menu ........................................................................................................ 52 J-ET Menu .................................................................................................................................................... 53 Configuration Menu ..................................................................................................................................... 54 HOW DO I …SET UP A MANUAL CAMPAIGN? ................................................ 57 HOW DO I …OPTIMISE TO 4 OTH? ........................................................... 59 HOW DO I …SAVE A STATION SELECTION? ................................................ 61 HOW DO I …SET UP AND SAVE A RATECARD FILE? ....................................... 63 HOW DO I …COPY AN EXISTING SPOTPLAN TO ANOTHER STATION? ................. 65 HOW DO I …MERGE 2 CAMPAIGNS BY DATE ................................................ 66 HOW DO I …CREATE A SUITABILITY PMAP ................................................. 67 GLOSSARY ........................................................................................ 68 OTHER CALCULATIONS ......................................................................... 70 For further assistance call the Helpdesk on 020 7467 2575 Copyright 2015 By Telmar Group Inc., All rights reserved RBP 2000 version 2.0.3 User Manual Page 3 INTRODUCTION RBP is a fully J-et compliant scheduler for planning/buying on radio. RBP allows media agencies and radio stations to plan advertising campaigns on behalf of clients, offering a broadcast schedule that can be optimised for the client’s target demographic market. Schedules can be planned manually or optimised according to client specifications. In the UK, the data is based on the Rajar surveys, which are published in quarterly “waves”. With the arrival of rolling data all the stations will be reporting each quarter. Each wave comprises a database of respondents and their one-week listening habits in the form of a diary. This enables RBP to determine whom listens to which stations and at what times. Since Wave 1 1998 there has been introduced a Rajar initiative to standardise the methodology used to calculate the listening habits of respondents on the database. Gold Standard methodology is used in Telmar’s RBP program. This data is now also Rolling, therefore every station is surveyed every Wave. This means that you must have the latest 4 Waves of data on your system for RBP to calculate correct planning data. Main features of Telmar RBP Novices are taken through the program step by step Choice of Optimised Campaign Choice of Manual Campaign Graph facility gives Audience, Age Profile, Demographic, Duplication and Composition graphs Ability to export data information into Excel Ability to choose between Target and Base demographic statistics Ability to change Base or Target Demographic Groups in order to further analysis Regional Mapping facility, illustrates your campaigns performance across the UK. Fully J-et phase 5 compliant. For further assistance call the Helpdesk on 020 7467 2575 Copyright 2015 By Telmar Group Inc., All rights reserved RBP 2000 version 2.0.3 User Manual Page 4 Guidelines for using Telmar RBP This manual is designed to help you use RBP to get results as quickly, and simply as possible. We have tried to cover all aspects of the program from a user’s point of view, however you may still find there are sections that are unclear to you. There is an extensive Help file attached to the program, and if you feel uncertain about any of the steps described in this manual, the Help file may enlighten you. Just go to the Help Menu and click on RBP Smart. GETTING STARTED Start RBP from the Telmar Integrator. RBP will load and display the following screen: RBP firstly needs to know which database you intend to work with. If there is a choice, you will normally select the most recent from the list. The most recent database will be pre-selected. If there is only one database available, RBP will use it automatically. To select the database, highlight the relevant one, e.g. 2006 Rajar Wave 1, and then click on OK. For further assistance call the Helpdesk on 020 7467 2575 Copyright 2015 By Telmar Group Inc., All rights reserved RBP 2000 version 2.0.3 User Manual Page 5 You will now be presented with the Start up dialog box: The options in the Start up dialog box Start a new optimised campaign This option asks you in turn to: Select a demographic group for the campaign Choose the stations to be included Enter Campaign details, such as Client, Product, and Duration Enter costs if appropriate Select the optimisation target for the campaign RBP then processes your requests and leaves the campaign ready for review. You can then use the Reporting Options to produce printed reports, or simply save the campaign for later. Start a new manual campaign This option is almost identical to the “optimised” option, except that you are free to enter spot lay downs as you wish once the costs (if any) are entered. Load an existing campaign You are invited to choose from the list of previously saved campaigns. Once selected, RBP will process the stations into the correct dayparts for the campaign and leave you ready to review individual spot plans. Do It Yourself This option simply leaves you back at the main RBP menu bar, free to work as you wish. You may want to choose this option if, for example, you are an experienced user, or if you want to build a set of demographic groups for later processing. For further assistance call the Helpdesk on 020 7467 2575 Copyright 2015 By Telmar Group Inc., All rights reserved RBP 2000 version 2.0.3 User Manual Page 6 START A NEW OPTIMISED CAMPAIGN When you click on Start a new Optimised Campaign at the beginning of RBP, it follows the same steps initially as a Manual Campaign. See pages 7-12. For example it starts with selecting a Demographic Group, then Station Selection, Campaign information, and CPT. It then presents you with an Optimisation Strategy Screen as below: There are a number of options available. For a brief explanation of what each of these does, you just click in the circle next to your choice, and a brief explanation will appear in the box below. You can enter a target (e.g. money) and click on OK. In this example we have inserted a budget of 10000. RBP will then create a spot plan which will maximise the audience reach for the given Demographic group. Optimisation is very easy to use as it goes directly to the next step thus prompting the user on what to do next. Once all the steps are completed the program will optimise your campaign to a number of criteria, depending on the users chosen option. Minimum/Maximum spots booked (new) You now have the option to specify the minimum or maximum spots RBP enters in the dayparts when it optimises a campaign. The default is set at 1 for the minimum number of spots and 6 for the maximum number of spots. Simply click inside the cell and enter your desired number. For further assistance call the Helpdesk on 020 7467 2575 Copyright 2015 By Telmar Group Inc., All rights reserved RBP 2000 version 2.0.3 User Manual Page 7 Set Active Daypparts (new) This feature will allow the user to select or deselect dayparts by station or globally when RBP Optimises your campaign. For example, you may want to create a quick optimised campaign but not have any spots in the 0000-0600 daypart for all stations. This can be easily achieved. Step 1 First select the optimisation method you would like by selecting one of the options. Step 2 Click the SET ACTIVE DAYPARTS button. The following window appears. Click on yes to select global dayparts. RBP will use the same dayparts for all stations. Should you choose the NO button, you must set the active dayparts for each individual station in you campaign. Step 3 Simply uncheck the daypart you want excluded then click OK. Your optimised campaign will have no spots in the 0000-0600 daypart for all stations. For further assistance call the Helpdesk on 020 7467 2575 Copyright 2015 By Telmar Group Inc., All rights reserved RBP 2000 version 2.0.3 User Manual Page 8 START A NEW MANUAL CAMPAIGN This is the second, and most frequently used option. To start a new manual campaign, simply click on this option. You will now be given the choice of using an existing Target Demographic file, or of creating a new one which suits your specific requirements. RBP will only display the demographic groups created for the selected survey. They will be displayed in alphabetical order. If you wish to select a demographic group from the list, highlight the one you want and click on OK. Alternatively, simply double click the one you want to use. If you cannot see the group you require, click on New, and you will be guided through the process of creating a demographic group for your exact needs. Building New Demographic Groups You are presented with a dialog box (as shown overleaf) that allows you to choose the subset of the population surveyed that you require. Each available demographic category is listed e.g. Sex, Social Grade, Age. The coding has been simplified for you; all you need to do is select your choice of demographic and/or product from the list, and the logic is automatically added for you, i.e. RBP will place an “OR” between items within a category, and an “AND” between different categories. For further assistance call the Helpdesk on 020 7467 2575 Copyright 2015 By Telmar Group Inc., All rights reserved RBP 2000 version 2.0.3 User Manual Page 9 Demographic Group Definition Title You must supply a title for the demographic group. This allows you to retrieve the group in future campaigns without building a new one each time. The title may be any free text, but we would suggest that you use some meaningful information for your client and yourself. A point to bear in mind when typing in your Demographic Group Title, is the fact that it is case sensitive, i.e. if you type your title in lower case, it will appear in lower case on your Demographic group list. Please remember that the title does not define your demographic, only titles it. You must define the audience within the Respondent Demographic Categories section. Respondent Demographic Categories In our example, we gave our Demographic Group the title of: WOMEN AGE 25-34 The ages are set by double clicking on both the minimum and maximum boxes and entering the desired ages. In this example minimum of 25 and maximum of 34. Once you are happy with your selection you click on OK at the bottom of the box. For further assistance call the Helpdesk on 020 7467 2575 Copyright 2015 By Telmar Group Inc., All rights reserved RBP 2000 version 2.0.3 User Manual Page 10 To select or “tick” these attributes for inclusion you will first select Sex in Respondent Demographic Category, this will give you a dialog box listing the options. To select Women, click on the circle next to women, then OK. Now you need to select Social Grade in Respondent Demographic Categories. You just click in the boxes next to the social grades you wish to include, then click OK. Once you’ve defined your audience, click OK in the Demographic Definition Screen and the demographic file will be built. Once you’ve built your demogroup, the step by step wizard will take you straight into the Station Selection screen For further assistance call the Helpdesk on 020 7467 2575 Copyright 2015 By Telmar Group Inc., All rights reserved RBP 2000 version 2.0.3 User Manual Page 11 Station Selection Sorting the List of Stations Having selected your Demographic Group, your station list will be displayed (as above). You can sort the list at any time by Waves, Hours, Reach, Reach%, Profile, Share, Region, Population Average Ratings, Average CPT, Average CPP, Sl Reach, Sl Ratings, TV Region or Location, by clicking on the column header. You can also sort by multiple selections. For example, you can sort by Reach and Profile by clicking on Reach, then press and hold down the CTRL key and click Profile. This can be done with any two column headers. For example: Profile - Stations can be sorted in order of Profile. Here the target market you have chosen, is compared to the profile of each station. RBP will then list the stations according to their compatibility with your target market. Reach - Stations can be sorted in order of Reach either Nationally or within each Region. Both the Reach in thousands and the Reach percentage for the station is displayed. Sales House – Station can be sorted by sales house prior to selection. Reach Profile – Stations can be sorted by reach profile as well as hours profile. Selecting Stations Click on stations in the list to include or exclude them from your campaign. The number of stations currently selected is always shown in the top right corner of the screen. Select, Find and Clear – lets you search for stations quickly. By entering the station name/s in the text box: “Find” will find every station with that name in the list. For further assistance call the Helpdesk on 020 7467 2575 Copyright 2015 By Telmar Group Inc., All rights reserved RBP 2000 version 2.0.3 User Manual Page 12 “Select” will automatically select every station with that name. “Clear” will clear any stations with that name. If the text box is empty then it will clear all stations. Options Reach Analysis – This will allow you to see the weekly and Solus reach of your selected stations along with the percentage of the target population those stations reach. In addition it is able to show you what additional reach any other stations you are considering, will give to your campaign. Then once you have selected the stations you want to use, you can use the Keep Stns button to automatically select them. Reach - The number of people within the target group who listen to the station within the surveyed week. Reach% - Weekly Reach divided by total of people in UK in your Target Demographic. Solus Reach - The number of people who listen to that station and no other within your selection. Solus% - percentage of Solus listeners within the target population across the UK. Load - If you have a previously saved station list, you can click on the Load…, in order to add that list to your current selection. Preferences – You are able to add or delete columns as required. Refer to page 53 for more detail. Print – A list of all or selected stations can be printed by clicking the Print button. Suitability Index The Suitability Index is an average of 3 different indices. RBP has chosen these 3 variables to reflect a qualitative aspect from quantitative data. Broadly these are; i) Average Hours: A measure of ‘Intensity’, or how much the station is a part of the target’s life ii) Target v Adult Weekly Reach: A measure of the ‘Affinity’ of the chosen station to the target’s lifestyle iii) Daily v Weekly Reach: A measure of the ‘Loyalty’ of the target to the chosen station. A Pmap will be created according to the Target you have chosen showing the most suitable stations in the top right quadrant of the map. Please see How To create a Suitability Pmap on pg. 68 for more details. For more information on Pmaps, please refer to the Pmaps manual. Include in View The view can be restricted to include only Commercial, Non Commercial, BBC, FM, AM, DAB, or Group stations as desired. Simply click on the appropriate options in Include in view. RBP will remember these next time you use the station selector. For further assistance call the Helpdesk on 020 7467 2575 Copyright 2015 By Telmar Group Inc., All rights reserved RBP 2000 version 2.0.3 User Manual Page 13 Station Web-site link By right-clicking on the station you want in the Campaign Summary screen you can instantly access their TSA map, web-site and hear the station too (if available). Once you are happy with the stations you have selected, click on OK. Campaign Management Having selected your station, you will be presented with the following screen: Agency, Client & Product Fields These are free text fields for your reference, you would enter your client’s name and their product’s name in these fields. If you are media agency using this program, the Agency field will already show your Agency’s name. Start Date This defaults to the Monday of the current week, but can be changed to any date you wish. Just click on the down pointing arrow to the right of the field and click on the date you require. Weeks Use the up and down arrows to change the duration of your campaign. Alternatively, type over the number 1 displayed with your chosen number of weeks. Auto Fill Spots Into New Weeks This gives you the option of adding spots from the last week of your campaign into any new weeks or leaving the new weeks blank. For further assistance call the Helpdesk on 020 7467 2575 Copyright 2015 By Telmar Group Inc., All rights reserved RBP 2000 version 2.0.3 User Manual Page 14 Comments This is also a free text field for your reference. The information will be stored for the next time you open up the saved campaign. This information will not print out. Planning On Checks the days that you wish spots to be placed. Optimised campaigns will not place spots in days which are not “ticked” in this section. Also, you will not be able to enter spots into a spot plan on a day that is not required. Audience Calculation This option allows you to choose how RBP will calculate impacts in all statistical summaries. Planning Mode - values each spot on the basis of the average audience within the day part into which each spot falls. Note that since RBP places spots in specific quarter hour periods, the average audience may be lower than the actual spot audience, although most stations buy and sell on the basis of average audience. PCA Mode ( Post Campaign Analysis)- values each spot on the basis of the actual audience within the daypart into which each spot falls. This would be used when buying preferred time. Script Length This list enables you to enter the different scripts that go to make up the campaign. The duration of the script to be broadcast is expressed as a number of seconds. Typically, this will be one of 10”, 20”, 30”, 40”, 50” or 60”. RBP will generate spots in proportion to the quantities specified here. Simply click the script length whose quantity you wish to change. To delete a spot duration, click on it and change the script number to zero or use the delete key. Top and Tail Spots Top and tail spots are also available for selection. To use a Top and Tail script that does not exist in the default list, click on the Add Top and Tail Script button. A top and tail spot is indicated with a ‘T’ preceding the length of the top then tail spots. A 20” top and a 10” tail will be indicated as follows: Impacts for Top and Tail spots will be doubled but Reach and Cost will not. Top and Tail script lengths in the spotplan or summary screen will be pre-fixed with a 1. For example, and 30” and 10” top and tail will be 1x13010. For further assistance call the Helpdesk on 020 7467 2575 Copyright 2015 By Telmar Group Inc., All rights reserved RBP 2000 version 2.0.3 User Manual Page 15 Advanced Campaign Management Cropping weeks – from the beginning of the campaign Deleting spots – from the beginning or the end of the campaign for all stations. Costing Method This allows you to choose how the campaign should be valued. The options available are:- Base Demo Group CPT - where each station requires a cost for buying 1000 impacts overall Target Demo Group CPT - where each station requires a cost for buying 1000 impacts in the demographic group selected for the campaign Rate Card - where the station’s rate card will be used to determine the cost of buying a spot If using a CPT costing method, you can also choose whether you want the spotplan to display: Planned – the planned CPT Calculated – the calculated CPT, if you have entered a cost factor. Headings This is useful if you would like additional text to the top of the campaign you are printing out. This could be used to make a note to a client etc. This will not appear on the screen, only on the printout. Unlock All Spots Campaign’s downloaded from J-et or imported through PCA include locked spots if the date of the spots has passed. Locked spots cannot be deleted or modified in any way. Unlocking the spots will allow you to modify the spots in the normal manor. OK Click on OK when you have finished. This will now present you with a Cost Per Thousand box. Just enter the CPT cost and click on OK. If you do not want to enter a Cost Per Thousand, then immediately click on OK. For further assistance call the Helpdesk on 020 7467 2575 Copyright 2015 By Telmar Group Inc., All rights reserved RBP 2000 version 2.0.3 User Manual Page 16 Station Weekly Spot Plan The next screen to appear will be The Station Weekly Spot Plan, as shown below: PS: If you right click on the Spotplan screen it gives you the option to “fill all cells with”, then enter the number of spots for all dayparts. Client/Product This field shows client name and product details, if entered. This information comes from the Campaign Management screen. Station/Population This field shows you which station you have currently selected along with the Target Market population in thousands and sample. The station’s reach is shown in brackets. Style Click here to select the style of Spot Plan required. One of: Single - each week of the campaign will use the same spot plan Alternating - a spot plan can hold two broadcast schedules that alternate throughout the campaign. When filling in the spot plan, you may select to enter the schedule for either "Week 1/3/5” (i.e. the first, third, fifth and subsequent odd numbered weeks) or “Week 2/4/6” (i.e. all even numbered weeks). In order to minimise printing volumes, alternating spot plans will print only the two associated schedules regardless of the length of the campaign. For further assistance call the Helpdesk on 020 7467 2575 Copyright 2015 By Telmar Group Inc., All rights reserved RBP 2000 version 2.0.3 User Manual Page 17 By Week - each week in the campaign can have a different spot plan schedule. Select the week number from the list in the heading and enter/edit the schedule as desired. Statistics are shown for the current week and the overall campaign based on the individual schedules. Printing this style of spot plan will cause each week to be printed on a separate sheet Date This is an uneditable field that shows the date of broadcast for the current weekly schedule. This field is blank if no campaign date/start date was entered in the Campaign Management screen. Scripts The Scripts selector allows you to view scripts of a specific duration. For example, you may have used both 20” and 40” scripts to plan your campaign and by using this selector you may view only the 40” or only the 20” ones. Adding Spots to a Schedule Spots can be added into a schedule manually in two ways: (1) The Spot Plan Editor Screen Firstly, the Spot Plan Editor can be used to enter a value in the required day/day part table. Any numbers entered here will create an equivalent set of spots, each with basic default values. The spots will be placed equidistant throughout the day part. For instance, if a day part is defined as 06:00 until 09:00, entering 2 spots will cause them to be placed at 07:00 and 08:00. Adding a further spot will cause all spots to be repositioned to 06:45, 07:30 and 08:15. In most cases this is accurate enough. However, it is possible to place spots directly into a daypart at a specific time. The second method allows direct placement of spots. You can do this by clicking on the Detail button (described below). A quick way to enter spots into the grid is to click and drag to highlight the dayparts you would like to put spots in and then enter the number of spots. This will fill all the highlighted cells with that number of spots. (2) Detail Button The Detail button allows you to view the currently selected daypart/day field by quarter hour. You may also add new spots or remove existing spots from this dialog box. Select the required daypart first by clicking on it in the spot plan screen. You can double click on any quarter hour to create a spot at that time. The word "Yes" appears to indicate that a spot is present. You will get a screen like the one on the right. For further assistance call the Helpdesk on 020 7467 2575 Copyright 2015 By Telmar Group Inc., All rights reserved RBP 2000 version 2.0.3 User Manual Page 18 If you click on the spot, the dialog box on the right hand side of the screen is activated, then you can alter the duration, script references and cost associated with the spot. The Detail dialog will also show Ratings, Impacts and Profile of your demo group for a particular quarter hour. To delete a spot you can either double click on the ‘yes’ or highlight the spot and select ‘delete’. For 2 spots in one quarter hour – click once on Add Spot. Locking and Fixing spots In addition to altering the duration, script references and cost associated with the spot, you can choose to lock or fix the spot. To lock or fix the spot click inside the appropriate tick box on the right hand side of the screen and click apply. Locking a spot locks the spot at a specific time. While locked, the spot cannot be moved or deleted from the plan. Fixing a spot will produce impacts for the specific quarter hour as oppose to the daypart average. Fixed spots can be overwritten or deleted. If you do not want the spot to be overwritten you should lock the spot. Statistics This section shows the weekly and campaign statistics for the currently selected station and spot plan schedule. Note: Peak impacts and peak impacts %, displays Impacts bought figures for selected daypart(s) when defined in the Daypart editor screen. See Time bands pg. 30. Copy to Allows the user to copy spotplans from one station to another. Choose what you want to copy from the left hand side of the screen, choose where you want the spots to go on the right hand side. The Options screen gives your “copy” more flexibilty, you can either replace or merge with the destinations current spotplan. You can also choose if you want to copy the daypart For further assistance call the Helpdesk on 020 7467 2575 Copyright 2015 By Telmar Group Inc., All rights reserved RBP 2000 version 2.0.3 User Manual Page 19 defintion. You can also find the facility by rightclicking on a station in the Campaign Summary screen. CPT Button You can edit or enter a Base Demo CPT for your selected station. Campaign Button Takes you back to the Campaign Management screen Rate card/Cost factors Button Each station holds a default rate card. This facility lets you up or down weight a particular daypart’s cost by a given factor. You also have the ability to enter your either ‘Cost by Spot’ or ‘Cost by Daypart’. You may create your own rate card for any station that will replace the default supplied. You can save these changes by going to the File Menu. Any changes you make to rate cards will be saved automatically with a campaign and loaded for you whenever you load the campaign. PS: By right clicking on the Ratecard Screen, you are able to enter a cost/discount for all Dayparts Costing Method Button You can choose to base your costs on your Base Demo CPT, Target Demo CPT or the Ratecard Value. Also select whether to display your Planned or Calculated CPT’s. For further assistance call the Helpdesk on 020 7467 2575 Copyright 2015 By Telmar Group Inc., All rights reserved RBP 2000 version 2.0.3 User Manual Page 20 Recalc Recalculates information for the statistics screen after entering or deleting spots. You should click on this button every time you add/delete spots. Print When you click on this you get taken to a Print Preview screen. You can then view your spotplan first and then print it out. Prints the current spot plan only. If you wish to see the results for a particular script length, go to ‘Scripts’ and change accordingly. Clear This will clear any spots currently displayed in the spot plan grid. Export Export your spotplan into Excel as a .CSV file. Natural Delivery Tick the ‘Natural Delivery’ box to see how your campaign’s delivery by daypart compares to the station’s overall listening by daypart. Station Select – Previous, Select and Next Allows you to move back and forward between stations, or directly access a selected station’s spot plan. Extended View In order to activate this section you must tick on ‘Extended View’, which is directly below it on the Spot Plan screen. This section of the Spot Plan screen enables you to view the ‘Ratings’, ‘CPT’s’, ‘Spot Costs’, ‘Composition Index’, ‘Impacts’ or the ‘Impacts bought’ of the selected station, according to daypart. For further assistance call the Helpdesk on 020 7467 2575 Copyright 2015 By Telmar Group Inc., All rights reserved RBP 2000 version 2.0.3 User Manual Page 21 Extended View 2 You will use the Extended View to help decide which are the best dayparts in which to place spots. The benefit of Extended View 2 is that you can look at two data items at the same time, e.g. Ratings and Index, to help you with your planning. Tick on the Extended View 2 option and you get box like the one below: Highlight An extra feature you can add to your Extended view are Highlights. RBP will split your Ratings, CPT, Cost, Impacts and Index into quintiles and shade them from High to Low, eg high ratings would be red, low ratings blue. You can also choose whether you want the values or background highlighted. OK Button Once you have completed your weekly spot plans for all the stations on the selected station list, click on OK. A window appears which asks, “Do you wish to rebuild the Campaign Summary Totals now?” If you wish to make further changes to your campaign, you select ‘No’. If you have completed your entries, then you select ‘Yes’ and your campaign will be rebuilt. For further assistance call the Helpdesk on 020 7467 2575 Copyright 2015 By Telmar Group Inc., All rights reserved RBP 2000 version 2.0.3 User Manual Page 22 Close This button gives you the ability to make changes to a large number of stations and navigate between them before rebuilding your campaign. This avoids wasting time by rebuilding each station after every change you make. Cancel This button is used for when you would like to view your spotplans but do not want to make changes. Pressing cancel simply takes you back to the Campaign Summary screen. For further assistance call the Helpdesk on 020 7467 2575 Copyright 2015 By Telmar Group Inc., All rights reserved RBP 2000 version 2.0.3 User Manual Page 23 CAMPAIGN SUMMARY SCREEN The Campaign Summary screen gives you the facility to change any part of your campaign. To do this, hold your mouse pointer over the section you want to change and the pointer will become a hand, double click to edit. This gives you the ability to go directly to a number of screens without having to go the main header menu. For direct access to: Campaign Management screen - double click on either, Campaign length or Scripts. Demogroup selection screen – double click on either target or base demo group. Station weekly spotplan screen – double click on any of your chosen stations. To view the campaign summary screen showing either base or target stats, just double click on the ‘Results’ part of ‘Results for Target demographic’ For further assistance call the Helpdesk on 020 7467 2575 Copyright 2015 By Telmar Group Inc., All rights reserved RBP 2000 version 2.0.3 User Manual Page 24 Right Clicking on stations in the Campaign Summary screen - Will give you the following options: - Edit Spotplan - Edit Dayparts - Links to web pages (where available) - Copy Spotplan - Copy to Clipboard - Station Detail Summary Screen Sorting Stations can be sorted by any column heading, just click on the heading. Summary Screen Export Right-Click the summary screen to see the menu. For further assistance call the Helpdesk on 020 7467 2575 Copyright 2015 By Telmar Group Inc., All rights reserved RBP 2000 version 2.0.3 User Manual Page 25 Printing your Campaign From the Summary Screen, click on File Menu, and select Print Campaign. Print Campaign Here you print out your campaign information. You can print the following: Campaign summary - With Week 1 information, Campaign totals, and a regional summary. Print Week 1 Summary – Option to turn off week 1 results in the standard summary print. Demographic Cover Sheet – Prints out how your target demogroup was defined. Spot Plans – You can filter stations and scriptlengths here. You can also choose a standard spot plan or list all spots individually in a Spot Detail list. For further assistance call the Helpdesk on 020 7467 2575 Copyright 2015 By Telmar Group Inc., All rights reserved RBP 2000 version 2.0.3 User Manual Page 26 OTHER FEATURES OF RBP File Menu Load Base Demographic (see page 8 for how to build and load demo groups) Enables you to load a Base Demographic audience of your choice. You can also change your Base Demographic group in the Campaign Summary screen. Load and Save Campaigns Load previously saved campaigns or save an existing campaign that your are currently working on. For further assistance call the Helpdesk on 020 7467 2575 Copyright 2015 By Telmar Group Inc., All rights reserved RBP 2000 version 2.0.3 User Manual Page 27 Merge Campaign You can now merge campaigns together in RBP. This can be done using either the campaign date, or by week offset. At least two campaigns are needed when merging, the Base Campaign (the campaign currently open in RBP) and the Merging Campaign (the campaign that will be merged into the current campaign) Things to know about Merging. -RBP will keep dayparts of the base campaign rather than the merging campaign. -Spots may be lost if the merging campaign has dayparts that are not present in the current campaign. -You can merge as many campaigns as you wish together either before or after your base campaign as long as the final merged product does not exceed 52 weeks. Merging by week offset. This method would be used to merge a second campaign any number of weeks before or after the original open campaign. Step 1. With the original campaign already loaded and rebuilt in RBP, select FILE > Merge Campaign Spots. Step 2. Select the campaign you would like to merge into the current open campaign For further assistance call the Helpdesk on 020 7467 2575 Copyright 2015 By Telmar Group Inc., All rights reserved RBP 2000 version 2.0.3 User Manual Page 28 Step 3. Make sure that the Merge by week offset checkbox is checked, then select 2 from the Offset dropdown menu and finally make sure the after radio button is selected as in the picture below. Click Merge then Yes to rebuild the campaign. Your campaign is now merged. Merge By Campaign Date. To merge by campaign date, repeat steps 1 and 2, then make sure that Merge by Campaign dates is selected in the Merge Type group. You will notice that in the By Date dropdown menu, the Start Date of the incoming campaign will be shown. If you leave this, RBP will use that date to merge. It may also be changed to any date you wish simply by clicking on the dropdown menu and selecting a date. Once you have decided, click merge. Print Campaign – see page 25 Load/Save CPT file RBP now has the option of saving and loading CPT (cost per thousand files). To save a CPT file, simply select your stations and manually enter CPTs for each station or one global CPT. Then select file > Save CPT file. Give the file a name and it will be saved in your user folder with the extension. CPT. The costs will be applied only to the stations you have selected. To load a CPT file, select File > Load CPT file. Select your file and click open. Remember that the costs will only apply to the stations that were present in the original campaign. For example, if a station is included in your current campaign that was not included in the original CPT file campaign, there will be no CPT associated with that station. For further assistance call the Helpdesk on 020 7467 2575 Copyright 2015 By Telmar Group Inc., All rights reserved RBP 2000 version 2.0.3 User Manual Page 29 Export Campaign Allows any current campaign to be exported as an Excel (.xls) file. With the selected campaign open, select File and Export Campaign. By default, all the available boxes will be checked. You may select or deselect as you wish. Click ok. Name and save the new .xls file to the desired folder. Load and Save Station selection Load previously saved Station selections, or save an existing station selection. Load and Save Rate Cards/Dayparts… Loading - Loads a .dpf file, which can contain changed dayparts and ratecards/cost factors. Saving - Saves the current day part definitions and any rate card costs that apply to them. This option also saves the station discounts and single spot costs. Export Allows a campaign to be exported in a variety of file formats. You can export to our Adplus program so you can analyse your campaign with other media e.g. a press campaign from Printplan. To do this, click on Export Campaign. Save your campaign as a .DAT file. The file can now be opened in Adplus. Other external programs, such as Excel can also be used. A full list of file types supported is given in the dialog box that appears when this option is selected. For further assistance call the Helpdesk on 020 7467 2575 Copyright 2015 By Telmar Group Inc., All rights reserved RBP 2000 version 2.0.3 User Manual Page 30 Maintenance Allows RBP created demographic, campaign and daypart files to be viewed and/or deleted. You can also Batch build and process Demographic files here. There is also a ‘Force Rebuild of all Files’ checkbox. If left unchecked, RBP will only rebuild the file you have recently created. When checked, all files in the list will be rebuilt. The Clear Station Cache button will clear the files in your temp folder. You can select and delete multiple files at the same time. Simply click on a file and hold the CTRL or Shift key to select several demographic files at once and click the Delete File button to delete the selected files. Campaign Menu For further assistance call the Helpdesk on 020 7467 2575 Copyright 2015 By Telmar Group Inc., All rights reserved RBP 2000 version 2.0.3 User Manual Page 31 Station selection (see page 11) Takes you to the station selection screen that allows you to select or deselect chosen stations. Campaign (see page 13) Takes you to the Campaign Management Screen Spotplan Optimised – takes you to your Optimisation Strategy screen (as seen on page 7) Manual – takes you to your Station Weekly Spotplan screen (as seen on page 16). This is for when you want to do a manual campaign Global – takes you to your Station Daypart Editor You can then either keep the existing default dayparts or enter your own. These will be copied to all the stations in your campaign, since for a Global Manual campaign the dayparts need to be the same. You then get taken to your spotplan screen where you enter your spot laydown. This spot laydown will be exactly the same for all the stations in your campaign. Note that any new stations added to this campaign will be allocated the same dayparts and spots. Station CPTs You can enter Target or Base Group CPT’s in one of three ways: All Stations - where each station selected for the campaign is presented one by one and you are invited to enter a suitable cost Selected Station - where you can select which station you wish to change Global - where a single CPT is applied to all currently selected stations. Note that new stations added into the campaign subsequently to this operation will not have this CPT allocated. For further assistance call the Helpdesk on 020 7467 2575 Copyright 2015 By Telmar Group Inc., All rights reserved RBP 2000 version 2.0.3 User Manual Page 32 Station Groups This function is useful if you would like to see the result of a group of stations within your existing selection of stations. So for example, if you have selected 6 stations in your campaign but would like to see the Cost, Frequency, Impacts etc. of just 3 of the stations within that selection, you would use this function. Sub Demographics To see summary results for as many demogroups as you like use Sub Demographics. Use the Add button to select the demogroups you want to include, then click OK to see them at the bottom of your Campaign Summary Screen. Rate Cards Please see page 19 for a full explanation. Time Bands For further assistance call the Helpdesk on 020 7467 2575 Copyright 2015 By Telmar Group Inc., All rights reserved RBP 2000 version 2.0.3 User Manual Page 33 Under the Campaign Menu Header, you will find “Time Bands”. This option allows dayparts to be changed or defined for stations. It has three sub menu options that can be used: Global - where a single set of dayparts can be applied to all stations By Station - where dayparts can be changed for individual stations included in the current campaign station selection Default - This allows you to set the default timeband to one of your choice. This default will only apply to stations you select after setting your default. Restore Defaults - where the Telmar supplied standard dayparts will be restored at all stations 1. For the following example, By Station - where dayparts can be changed for individual stations included in the current campaign station selection. First of all you would select Time bands, By Station. You would be presented with the following screen. Highlight the station you are interested in changing time bands, then click on OK. This will take you to the standard time bands for the selected station. To change the dayparts , just delete and insert the times as required, as shown: For further assistance call the Helpdesk on 020 7467 2575 Copyright 2015 By Telmar Group Inc., All rights reserved RBP 2000 version 2.0.3 User Manual Page 34 To select a daypart to be Peak, simply tick the box adjacent to the desired daypart(s). Click on OK when done. 2. For the next example, Global - where a single set of daypart can be applied to all stations. First of all you would select Time bands, Global. A screen will appear where you can enter your own time bands, as below. The name of a daypart is free text into which you can type any text. Remember to click on the boxes below the “Include?” heading so a “tick” appears. Click on OK when done. It will then present you with a dialog box, as shown below: Click on Yes. The Station Analysis will then run taking you back to the main screen. Simply click on Spot Plan, Global Manual to enter spots, globally, for your stations. For further assistance call the Helpdesk on 020 7467 2575 Copyright 2015 By Telmar Group Inc., All rights reserved RBP 2000 version 2.0.3 User Manual Page 35 Waves to Use The maximum number of waves you can select is 4. This function gives you the ability to base your campaign summary totals on either Quarter, Half yearly or Yearly figures. Rebuild If you have made any changes to your campaign, then you must rebuild so the changes are calculated into the campaign View Menu For further assistance call the Helpdesk on 020 7467 2575 Copyright 2015 By Telmar Group Inc., All rights reserved RBP 2000 version 2.0.3 User Manual Page 36 Campaign Allows you to change the screen view of a campaign. Choose either: One Week - which shows one week statistical summary information, or Whole Campaign - which shows one statistical information of the whole campaign Target or Base statistics Enables you to view the results in the Campaign Summary screen as Base statistics or as Target statistics. This function is also available by double clicking on the word “Results” in the “Results for Target Demographic” line on the Campaign Summary Screen. You can then return to Target stats in a similar way. Sales House Shows the results of your campaign by Sales House. Select ‘Sales House’ again to return to the standard view. For further assistance call the Helpdesk on 020 7467 2575 Copyright 2015 By Telmar Group Inc., All rights reserved RBP 2000 version 2.0.3 User Manual Page 37 Frequency Distribution Shows a report of the frequency distribution of the current campaign. By right clicking in this screen you can print or copy the report to Excel or Word. Station Detail This provides you with a full report of your demographic group vs. All Adults for a selected station. In the example below we have selected Capital Gold London with a demographic group of ABC1 Men 15-34, and compared it to All Adults. For example, the % conversion reach figure means that ABC1 Men are 8.9% less likely than the average adult to listen to Capital Gold London. It also displays all stations that are included in Station Groups. The example below shows all the Stations included in Tot Virgin Radio. For further assistance call the Helpdesk on 020 7467 2575 Copyright 2015 By Telmar Group Inc., All rights reserved RBP 2000 version 2.0.3 User Manual Page 38 Ratecard Times This gives you the ability to view the ratecard times all stations. These can then be copied to clipboard and printed. Solus Reach Shows you the Solus reach of your selected stations, as well as their reach. You can also find out what additional reach you will get from any stations that you may want to add onto your campaign. This helps ascertain which stations will give you no additional reach and those that will give you a large additional reach if included. To do this, highlight the stations you definitely want to include, then click on Calculate Additional button. It will then rank the remaining stations in order of Additional reach (as a percentage). For definitions of fields please see our Glossary. Current Demographic Gives you a breakdown of what your current Base or Target demographics are made up of. For further assistance call the Helpdesk on 020 7467 2575 Copyright 2015 By Telmar Group Inc., All rights reserved RBP 2000 version 2.0.3 User Manual Page 39 Graph Menu Audience Enables the audience of individual or groups of stations to be viewed as a graph, showing impacts or ratings in each hour of the day. Selection includes specifying which days of the week are to be included in the graph. Duplication Shows a bar chart of audience duplication in the currently selected stations. This graph is available once a Station Analysis phase has been completed. For further assistance call the Helpdesk on 020 7467 2575 Copyright 2015 By Telmar Group Inc., All rights reserved RBP 2000 version 2.0.3 User Manual Page 40 Share Lists the Share of Hours of the current station selection. Age Profile Shows a graph of the age profile of listeners from your Target Demographic group to a chosen station by 5 year age bands. For further assistance call the Helpdesk on 020 7467 2575 Copyright 2015 By Telmar Group Inc., All rights reserved RBP 2000 version 2.0.3 User Manual Page 41 Composition Allows you to select a demographic category and then RBP builds a profile of audience in that category, showing the percentage split within each demographic attribute. If you right click on any of the graphs and change any of the properties: View your graph as values Print your graph Copy the graph to Powerpoint and copy the values to Excel or Word. Change the axes Change the colour, font and style of the graph. For further assistance call the Helpdesk on 020 7467 2575 Copyright 2015 By Telmar Group Inc., All rights reserved RBP 2000 version 2.0.3 User Manual Page 42 Report Menu Campaign… Here you print out your campaign information. You can print the following: Campaign summary - With Week 1 information, Campaign totals, and a regional summary. Demographic Cover Sheet – prints out how your target demogroup was defined. Spot Plans – You can filter stations and scriptlengths here. You can also choose a standard spot plan or list all spots individually in a Spot Detail list. Frequency Distribution Shows a report of the frequency distribution of your current campaign. By right clicking in this screen you can also print or copy the report to Excel or Word. For further assistance call the Helpdesk on 020 7467 2575 Copyright 2015 By Telmar Group Inc., All rights reserved RBP 2000 version 2.0.3 User Manual Page 43 Station Daypart Rank This feature enables you look at each station by daypart, but with an added extra. You can sort on any of the data items available and then choose to fill the top ranking dayparts with any number of spots each. Alternatively, you can ask the system to spend a particular amount of money on the top ranking dayparts, putting one spot in each of these. Simply follow either of the two rows at the bottom of the screen. In the example shown above we have asked the system to spend £500 on the top spots. You can add or delete columns by selecting or deselecting the checkboxes to the right of the report. For further assistance call the Helpdesk on 020 7467 2575 Copyright 2015 By Telmar Group Inc., All rights reserved RBP 2000 version 2.0.3 User Manual Page 44 Daypart Impact Summary This report displays the impacts and percentage impacts for your campaign by daypart and day. Totals are displayed for weekdays and day of week. It is possible to print or export the report simply by click on the appropriate buttons. If stations in your campaign have different daypart schemes the program will ask you to choose which stations dayparts to base your report on. You can use the Choose Dayparts button to change this whilst in the report screen. For Global Manual campaigns, you must go into a spotplan screen for one of your stations before you run your report. You may notice differences between the total impacts in this report against the total impacts in the summary screen. This is due to a rounding of the figures. For further assistance call the Helpdesk on 020 7467 2575 Copyright 2015 By Telmar Group Inc., All rights reserved RBP 2000 version 2.0.3 User Manual Page 45 Map This facility enables you to view a map of your campaign’s regional performance. Text, map colours, and data can all be adjusted to your preference and when you are happy with the appearance of your map, it can be either saved as an .emf file and opened in another application or you can simply copy and paste the image. Right clicking on any text in your map will allow you to edit the text and font size. Options The options drop-down menu is where you can change the look of your map. For further assistance call the Helpdesk on 020 7467 2575 Copyright 2015 By Telmar Group Inc., All rights reserved RBP 2000 version 2.0.3 User Manual Page 46 Change colours Colour Spectrum The colours of your map can be adjusted in several ways. The first is to select how the system plots the colour on your map. The default setting is 'Plot as a percentage of the maximum' The system will calculate the lowest and maximum points of your selected data then plot each segment between those values. To 'Plot on an absolute scale' would allow you to change the minimum and maximum points at which your segments are plotted. It is also possible to change the colour spectrum used. For example instead of the default blue through to red scheme you could choose to use a grey scale or purples. Segments and Key Another feature of changing colours is the ability to change the amount of segments shown, i.e. the amount of different colours that can be seen on your map. Click on the up or down arrow to increase or decrease the amount of segments to be viewed. It is also possible to alter the text that will be shown in the key of your map. Double click on the ’key text' box you want to change and type as necessary. For further assistance call the Helpdesk on 020 7467 2575 Copyright 2015 By Telmar Group Inc., All rights reserved RBP 2000 version 2.0.3 User Manual Page 47 Change Data Plot The data in the map can show any of RBP's calculations including: Reach %, Reach(000's), Impacts, GRP's and Population. Audience Results can be viewed for Base or Target audience. Week View a map for the whole campaign or an individual week. Legends 'Legends' gives you the option of viewing region names and figures 'on top' of the illustration individually or together. Map title/Map subtitle The map title and subtitle can be edited to show text of your choice. Fonts, font size and text box colour can be also be adjusted. Draw Order Radio regions sometimes overlap, 'Draw Order' allows you to choose which region appears on top. Choose either the region with the most reach or the region with the least reach. For further assistance call the Helpdesk on 020 7467 2575 Copyright 2015 By Telmar Group Inc., All rights reserved RBP 2000 version 2.0.3 User Manual Page 48 Profile Prints or exports a Station Profile Report, listing stations in descending order of Profile, Reach, or Hours. Allows you to print from either the full station list or the stations selected in the schedule, as well as giving the station’s region as a column in the print out/export. Station Detail Report This provides you with a full report of your demographic group vs. All Adults for a selected station. Also in the View Menu, please see page 34 for a full explanation. Station Audience Report Prints out a ‘Station Audience Report’ for all your selected stations. This includes Population, Weekly reach figures and %, Average hours, Total hours and CPT, for both your Target and Base Demographics groups. First takes you to a Preview and then you print from the preview screen. Station Summary report This report holds summary information for every station available for your chosen Wave. You can either View then Print the report or choose to Export it to excel. The report shows the following information for every station: For further assistance call the Helpdesk on 020 7467 2575 Copyright 2015 By Telmar Group Inc., All rights reserved RBP 2000 version 2.0.3 User Manual Page 49 Station Number, Station Name (Waves to use), Target Reach, Target Reach %, Target, Population, Total Hours, Average Hours, Reach Conversion, Efficiency, Average Hours Conversion,Total Hours Conversion, Location and Region. View/Print This report is ranked by region, then alphabetically. Export Station By Daypart Analysis For further assistance call the Helpdesk on 020 7467 2575 Copyright 2015 By Telmar Group Inc., All rights reserved RBP 2000 version 2.0.3 User Manual Page 50 This feature enables you to look at your selected stations by standard dayparts in a Crosstabulated format. You can look at the following data items by clicking its appropriate radio button. Rating (Daypart Average): Allows you to view the Rating for each station by Daypart Impacts (Daypart Average): Allows you to view the Impact for each station by Daypart Cost (CPT costing method only): Allows you to view the Cost for each station by Daypart CPT (CPT costing method only): Allows you to view the Cost Per Thousand for each station by Daypart CPP: Allows you to view the Cost Per Point for each station by Daypart Sel. Index: Selectivity Index allows you to view the index for each station. Export Quarter Hour Impacts This facility produces Quarter Hour Impacts by day for your chosen stations (individually). Select the station(s) you require and then save your file in .csv format. Your .csv file can then be opened in excel. For further assistance call the Helpdesk on 020 7467 2575 Copyright 2015 By Telmar Group Inc., All rights reserved RBP 2000 version 2.0.3 User Manual Page 51 Define Custom Headings You may enter up to three headings which will be printed in the Campaign Summary and Spot Plans. In order to blend in with the RBP headings, you specify a title and content for each of the three headings. For instance, you may wish to include “Account Manager, Jim Smith” in the headings. You would enter “Account Manager” in the title column, and “Jim Smith” in the content column. Printer Setup Here you can specify the printer to print to and number of copies. Campaign Cumulative Reach Report This Report will allow you to view figures such as Impacts. Reach, Frequency, and Cost for your campaign either cumulative (Cum.) or by individual week (Ind). The figures will default to the target demo group. Selecting the Base radio button from the Demographic Selection group can change this. The data items shown/hidden may be selected or deselected simply by checking or un-checking the check boxes in the Data Items-By Week or Data Item Cumulative group. For further assistance call the Helpdesk on 020 7467 2575 Copyright 2015 By Telmar Group Inc., All rights reserved RBP 2000 version 2.0.3 User Manual Page 52 The data can be exported to Excel by clicking the Export button or printed by clicking the Print button. PCA (Post Campaign Analysis) Menu Exporting a Campaign To export a campaign, go to the PCA menu and click Book. The screen below is the booking screen. A campaign can be exported in two formats “.exp” or “.jcd” (J-et upload). To export a campaign in “.exp” format simply click OK and save the file. For further assistance call the Helpdesk on 020 7467 2575 Copyright 2015 By Telmar Group Inc., All rights reserved RBP 2000 version 2.0.3 User Manual Page 53 J-ET Menu From the J-ET menu you can View, Upload or Download campaigns. We have compiled a separate document explaining J-et in more detail. Further information is also available in RBP’s help file accessible from the help dropdown menu. Upload a J-ET campaign Click on Upload and then enter your details and a Jcn reference number in the booking screen. You will see the screen has two tabs – Campaign information and Station Information. When you have entered all the relevant information required, click on Upload. You will then save this campaign as a .jcd file that will be automatically sent to J-et. Download If you have any campaigns to download click on the Download button and select the relevant file. Then you will be taken to the same screen as for Bookings. Here you can check the details of your campaign. Click on Done if everything is ok. You can now use your campaign as normal in RBP. Old J-ET files in the download list can now be archived easily with the addition of the new ‘Archive’ button in the J-ET download screen. For further assistance call the Helpdesk on 020 7467 2575 Copyright 2015 By Telmar Group Inc., All rights reserved RBP 2000 version 2.0.3 User Manual Page 54 Configuration Menu From the Configuration Menu you can adjust your preference settings. To do this, click on Config from the Menu Bar and then on Preferences. This will take you to the following screen. From the Highlights field, you can select from several preset colour values. This will change the highlights of your Spot Plan menu. You may also click on the colour box and select a different colour from the Colour Menu. From the Graphing section, you can choose different colour preferences for each graph type. Once you have finished selecting your preferred colour combination, you can save it by clicking the save button. To make your preferences the default, simply save your file as ‘default.Rhl’. You can load previously saved presets by clicking on the Load button and selecting your desired file. For further assistance call the Helpdesk on 020 7467 2575 Copyright 2015 By Telmar Group Inc., All rights reserved RBP 2000 version 2.0.3 User Manual Page 55 By clicking on the Select Columns button in the Station Selection section of the window, the following window will pop-up. This window will allow you to either add or remove columns from the Station Selection menu. To add a column, select an item from the Available Columns field and click the > button. The item should now appear in the Selected Columns field. To remove an item from the Selected Columns field, select the item and click the < button. If you would like to add or remove all the columns at once, click either the >> or << key. Column Headings Population: The number of people in thousands, within a particular region. Average Ratings: Average weekly ratings. Calculation: Weekly Hours x 4 / Population Average CPT: Average Cost Per Thousand. Only works when using the Ratecard costing method. Calculation: Weekly hrs x 4 / cost Average CPP: Average Cost Per Point. Weekly hours x 4 / Population Selectivity Index Reach: In terms of reach, the likelihood of the target demographic listening to the station. The calculation: Target Reach / Base Reach x 100 Target / Base Population Selectivity index Ratings: In terms of ratings, it is the likelihood of the target demographic listening to the station. The calculation: Target Ratings / Base Ratings x 100 Target / Base Population For further assistance call the Helpdesk on 020 7467 2575 Copyright 2015 By Telmar Group Inc., All rights reserved RBP 2000 version 2.0.3 User Manual Page 56 Waves: In the UK, the data used for RBP is based on RAJAR surveys, which are published in quarterly "waves". With the arrival of rolling data all the stations report each quarter. Each wave comprises a database of respondents and their one-week listening habits in the form of a diary. A (Q) indicates that the station’s listening is recorded over a quarter, a (H) indicates that the station’s listening is recorded over half a year and a (Y) indicates that the station’s listening is recorded over a full year. Hours: Total weekly hours listed. Reach: The number of different people who are exposed to a schedule of advertisements. Reach%: The percentage of different people who are exposed to a schedule of advertisements Profile: The percentage of target hours in the base hours. Calculation: Target hours / Base hours x 100 Share: Share of listening. Calculation: Target hours / Base hours. Region: Radio region the station falls into. TV Region: TV region the station falls into. Location: Location of the radio station. For further assistance call the Helpdesk on 020 7467 2575 Copyright 2015 By Telmar Group Inc., All rights reserved RBP 2000 version 2.0.3 User Manual Page 57 HOW DO I …SET UP A MANUAL CAMPAIGN? Step 1 Click on the RBP icon and then the relevant Rajar wave, click OK. Step 2 Click on “Start a New Manual Campaign” Step 3 Click on an existing “Demographic group”, or create a new one, click OK Step 4 Select the stations you wish to use from the “Station Selection screen”, click OK For further assistance call the Helpdesk on 020 7467 2575 Copyright 2015 By Telmar Group Inc., All rights reserved RBP 2000 version 2.0.3 User Manual Page 58 Step 5 Step 6 Step 7 Step 8 Enter your Campaign information in the “Campaign Management” screen, click OK. Enter an Adult Cost per thousand in the “CPT” box, click OK. Enter the spots for each station in the “Station Weekly Spot Plan”, click OK You are then presented with a “Campaign Summary Sheet”. You now have a manual campaign! Please refer to your manual for help with printing and editing the campaign. For further assistance call the Helpdesk on 020 7467 2575 Copyright 2015 By Telmar Group Inc., All rights reserved RBP 2000 version 2.0.3 User Manual Page 59 HOW DO I …OPTIMISE TO 4 OTH? Step 1 Click on the RBP icon and then the relevant Rajar wave, click OK. Step 2 Click on “Start a New Optimised Campaign” Step 3 Click on an existing “Demographic group”, or create a new one, click OK Step 4 Select the stations you wish to use from the “Station Selection screen”, click OK For further assistance call the Helpdesk on 020 7467 2575 Copyright 2015 By Telmar Group Inc., All rights reserved RBP 2000 version 2.0.3 User Manual Page 60 Step 5 Step 6 Step 7 Enter your Campaign information in the “Campaign Management” screen, click OK. Enter your Default CPT, click OK. In the “Optimsation Strategy” screen click on “Optimise to a given OTH for each station”. RBP will now optimise your campaign. When it has finished you will be presented with a “Campaign Summary” screen. For further assistance call the Helpdesk on 020 7467 2575 Copyright 2015 By Telmar Group Inc., All rights reserved RBP 2000 version 2.0.3 User Manual Page 61 HOW DO I …SAVE A STATION SELECTION? Step 1 Click on the RBP icon and then the relevant Rajar wave, click OK. Step 2 Click on “Do It Yourself” Step 3 From the File Menu, either “Load a Demo Group” or Create a “New Demo Group”. Step 4 From the Campaign Menu click on “Station Selection”. Step Select the stations you wish to use from the “Station Selection screen”, click OK. 5 For further assistance call the Helpdesk on 020 7467 2575 Copyright 2015 By Telmar Group Inc., All rights reserved RBP 2000 version 2.0.3 User Manual Page 62 Step 6 Step 7 Now in the File Menu, click on “Save Station Selection”. Give your station selection a file name, click save. You now have a Saved Station Selection. To use this in the future go to the File menu and click on “Load Station Selection”, then select your file. For further assistance call the Helpdesk on 020 7467 2575 Copyright 2015 By Telmar Group Inc., All rights reserved RBP 2000 version 2.0.3 User Manual Page 63 HOW DO I …SET UP AND SAVE A RATECARD FILE? Step 1 Click on the RBP icon and then the relevant Rajar wave, click OK. Step 2 Click on “Do It Yourself”. Step 3 From the Campaign Menu click on “Rate Cards”. Step 4 Select the Station you want to change, click OK. Step Enter the cost factors for your station by daypart, eg. –5.0 will downweight a daypart by 5%, or enter the cost by spot. Click OK when done. 5 For further assistance call the Helpdesk on 020 7467 2575 Copyright 2015 By Telmar Group Inc., All rights reserved RBP 2000 version 2.0.3 User Manual Page 64 Step 6 Step 7 Step 8 Step 8 Now choose the next station to change or click on cancel to exit “Rate Cards”. In the File Menu click on Save Rate Cards/Dayparts”. You can now select to save ALL the stations’ rate cards or only ones that have CHANGED. Note if you select changed, you will loose the rates for all other stations if they have rates already assigned Give your changed costs a file name, click save. You now have a Saved Rate Card/Daypart File. To use this in the future go to the File menu and click on “Load Rate Cards”, then select your file. For further assistance call the Helpdesk on 020 7467 2575 Copyright 2015 By Telmar Group Inc., All rights reserved RBP 2000 version 2.0.3 User Manual Page 65 HOW DO I …COPY AN EXISTING SPOTPLAN TO ANOTHER STATION? Step 1 With 2 or more station selected, enter the spots for the first station as desired. It's OK to use different script lengths and single or by week styles. Step 2 In the spotplan screen for that station, click the Copy To button. The following screen will appear: Step 3 Select the station/s you would like the spotplan copied to by clicking in the checkboxes or by clicking select all. Step 4 Click the Copy button You will see the station/s you have copied the spots to will have the exact same spotplan as the original station For further assistance call the Helpdesk on 020 7467 2575 Copyright 2015 By Telmar Group Inc., All rights reserved RBP 2000 version 2.0.3 User Manual Page 66 HOW DO I …MERGE 2 CAMPAIGNS BY DATE Step 1 Open the Base Campaign that you will use as the base for the second campaign to be merged into Step 2 Select File > Merge Step 3 Choose the campaign that will be merged into the Current Campaign then click open. Step 4 Check the Merge by Campaign dates checkbox, then click Merge. Click Yes to rebuild the campaign and the two campaigns will now be merged. For further assistance call the Helpdesk on 020 7467 2575 Copyright 2015 By Telmar Group Inc., All rights reserved RBP 2000 version 2.0.3 User Manual Page 67 HOW DO I …CREATE A SUITABILITY PMAP Step 1 With your target group already chosen, click Campaign > Station Selection. Step 2 Select all London stations then click on the suitability button. Step 3 The Suitability Options Forum window will appear. Enter information as in the picture to the right and click OK. Step 4 The most suitable stations will be located in the top right quadrant. Since we input the option to select the top 10 stations in Step 3, they will have be automatically chosen within the station selection screen. For further assistance call the Helpdesk on 020 7467 2575 Copyright 2015 By Telmar Group Inc., All rights reserved RBP 2000 version 2.0.3 User Manual Page 68 Step 5 Select file > exit from the Pmap and you will notice that the top 10 most suitable stations have been chosen. GLOSSARY For further assistance call the Helpdesk on 020 7467 2575 Copyright 2015 By Telmar Group Inc., All rights reserved RBP 2000 version 2.0.3 User Manual Page 69 Term Reach Explanation The number of different people who are exposed to a schedule of advertisements. Impacts (Gross The total number of exposures to a schedule of advertisements. NOT a measure of the number of different people exposed to a commercial. Impressions) Radio Ratings Impacts expressed as a percentage of the population group being measured (all people or any demographic group): Impacts x 100 = Rating Population Frequency (Opportunities to Hear OTH) Gross Rating Points The average number of times the audience reached by an advertising schedule are exposed to a commercial: Gross Impressions = Frequency Reach Impacts expressed as a percentage of the population being measured. One rating point equals one per cent of the population (all people or any demographic group). Impacts x100 = GRPs Population Cost per thousand (CPT) The basic term to express Radio’s unit cost. Most frequently used to compare the cost of the 1000 impacts on different stations. It is also used to compare the cost of reaching 1000 people on the different media: Schedule Cost = Cost per thousand Impact (in 000’s) For further assistance call the Helpdesk on 020 7467 2575 Copyright 2015 By Telmar Group Inc., All rights reserved RBP 2000 version 2.0.3 User Manual Page 70 OTHER CALCULATIONS Screen Reach Analysis/Solus Reach Station Summary report Station Detail Station Audience Print profile Heading Reach Calculation Target Weekly Reach for the station Reach % Weekly Reach Total Popn for Target Demo Avg Hours Tgt hours Tgt reach Avg hours conv Tgt avg hours Base avg hrs Efficiency Base hours Tgt hours Hours Conv Tgt hours Tgt popn / Base hours Base popn x 100 Reach Conv Tgt reach Tgt popn / Base reach Base popn x 100 % Conv Reach Tgt reach Tgt popn / Base reach Base popn x 100 % Conv AvHrs Tgt hours Tgt popn / Base hours Base popn x 100 Rch Conv Tgt reach Tgt popn / Base reach Base popn x 100 Hrs Conv Tgt hours Tgt popn / Base hours Base popn Profile based on reach Target reach Base reach x 100 Profile based on hours Target hours Base hours x 100 For further assistance call the Helpdesk on 020 7467 2575 Copyright 2015 By Telmar Group Inc., All rights reserved x 100 x 100 RBP 2000 version 2.0.3 User Manual Page 71 Average Ratings Av. Ratings Average CPT Av. CPT Cost Imapacts Average CPP Av. CPP Cost Population Selectivity Index Reach Sl. Reach Selectivity index Ratings Sl. Ratings Imapacts x 100 Population Target Reach / Base Reach x 100 Target / Base Population Target Ratings / Base Ratings x 100 Target / Base Population For further assistance call the Helpdesk on 020 7467 2575 Copyright 2015 By Telmar Group Inc., All rights reserved