1
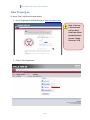
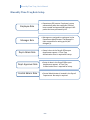
BIWEEKLY TIME TRAQ
-USER’S MANUAL
Last updated: April 2011
Created By:
Maria Elena Alaffa
Index
Biweekly Time Traq -User’s Manual
Time Traq Log on
Payroll Process Overview
1.0 Employee Role ……………………………………………….Pgs. 4- 7
1.1 Entering Time
1.2 Submitting Timesheet
2.0 Manager Role ………………………………………………..Pgs. 8-13
2.1 Setting up delegates (a must)
2.2 Reviewing Timesheets
2.2 Approving Timesheets
3.0 Department Administrator Role……………………..Pgs. 14-20
3.1 New Employee Setup
3.2 Setting up managers
3.3 Creating Adjustments
3.4 Reviewing & submitting an adloc to Dept. Approver
4.0 Department Approver Role……………………………Pgs. 21-22
4.1 Approving/Submitting an Adloc to Payroll
Time Traq role setups (Biweekly)
1
Biweekly Time Traq -User’s Manual
Time Traq Log on
To access Time Traq follow the steps below:
1. Go to Single Sign On (SSO)/HRConnect: https://sso.tamus.edu
Note: If you are
a first time user
and you don’t
know your UIN or
password, please
contact: Rachel
Flores ext. 5792
2. Click on Time Traq button.
2
Biweekly Time Traq -User’s Manual
Payroll Process Overview
1. Employee
2. Manager
3. Department
Administrator
4. Department
Approver
5. Payroll
• Fills out on-line timesheet & submits to Manager.
• Approves/rejects the timesheet.
• Oversees & reviews the entire process, notifies
Dept. Approver when ready to be submitted.
• Reviews & submits timesheets for the entire
adloc to Payroll.
• Submits Payroll to College Station .
3
Biweekly Time Traq -User’s Manual
Responsibilities:
From the
employee’s
perspective,
Time Traq is a
simple
application. The
employee’s
responsibilities
are to enter
hours worked
and submit to
their manager
for approval.
4
Biweekly Time Traq -User’s Manual
1.1 Entering Time
1. Log in to SSO (http://sso.tamus.edu) and select the Time Traq link.
2. As an employee, the first screen you'll see in Time Traq is the Employee Timesheets
screen. A sample of this screen is shown below.
3. To open your timesheet click on the
button / time sheet number.
4. Enter your time for each week and make sure to save after each week.
Week 1
Week 2
5
Biweekly Time Traq -User’s Manual
Other Actions:
•
•
•
To save the timesheet and return to the Employee Timesheets screen, click the
button.
To close the timesheet and discard any changes that have been made, click the
button.
To submit a completed Timesheet, click the
button.
1.2 Submitting Timesheet
1. Click “Submit Timesheet”.
2. In TimeTraq, you have to confirm the submission of a timesheet using the Timesheet
submission screen, as shown below. To proceed to the next view, click
Tip: If you need to
edit your timesheet
click on “Return to
Timesheet”.
6
Biweekly Time Traq -User’s Manual
3. The second section is the “Payroll Summary” screen. To proceed to the next view, click
.
4. The third and final section is the “Certification and Submission” screen. Check-off the
box that says that you verify that the hours reported are true and correct.
*Note: No comment is
required.
5. Click on
button to complete the submission process.
7
Biweekly Time Traq -User’s Manual
Responsibilities:
In Time Traq, the
manager’s
primary
responsibilities
are to: (1) ensure
that their
employees
submit true &
accurate
timesheets in a
timely manner;
and (2) to
approve
submitted
timesheets as
quickly as
possible.
8
Biweekly Time Traq -User’s Manual
2.1 Setting up delegates (a must)
Managers need to have at least one delegate, to approve timesheets in case they are unable to
do it themselves.
To add a delegate:
1. Log in to Time Traq as a “Manager”.
2. Click on “Delegates” tab.
3. Search by name (last name, first), then click “search”.
Tip: Delegates can also
be searched by UIN. To
do so, just type your
delegates UIN & hit “Add
Delegate”.
4. Click the “S” button to select the delegate from the search results box.
5. Click on “Add Delegate” button to complete the operation.
Other Actions:
• If you have a delegate you want to remove, click the Deactivate button and his/her delegate
status will be set to Inactive. Similarly, to restore an inactive manager's delegate status,
change your view to Inactive, then click Reactivate.
9
2.2
Biweekly Time Traq -User’s Manual
Reviewing Timesheets
Managers need to make sure that all employees are submitting true and accurate
timesheets, therefore reviewing each timesheet is extremely important. Below is a guide for
reviewing timesheets through the manager’s inbox.
1. Log in to Time Traq as a “Manager”.
2. Your inbox should show timesheets that have been submitted by the employees for
approval (see picture below-Bugs Bunny submitted his timesheet to his manager,
Wile Coyote).
3. To review the employee’s timesheet, simply click on the timesheet number or click
on the
button. This brings up the Timesheet Overview screen (displayed below)
which allows you to perform several editing functions i.e. approve, reject, cancel,
edit, or recall the timesheet.
Timesheet editing
functions.
10
Biweekly Time Traq -User’s Manual
2.3 Approving Timesheets
1. Log in to Time Traq as a “Manager”.
2. Your inbox should show timesheets that have been submitted by the employees for
approval (see picture below-Bugs Bunny submitted his timesheet to his manager,
Wile Coyote).
3. Click “Approve”.
2.4 Submitting timesheet for employee
If an employee has not completed his/her timesheet and cannot be reached, the
manager has two options: (1) complete the timesheet for the employee; (2) cancel the
timesheet. To submit the employee’s timesheet, follow the steps below:
1. Log in to Time Traq as a “Manager”.
2. Click on the “Employees” tab.
11
*Note: If an employee didn’t work any
hours during that pay period the manager
must cancel the timesheet.
Biweekly Time Traq -User’s Manual
3. From your list of employees: Click on the employee’s timesheet number.
4. Click on “Edit” button to open the employees’ timesheet.
5. Enter employees’ time for each week and make sure to save after each week.
Week 1
Week 2
6. Click “Submit Timesheet”.
7. In Time Traq, you have to confirm the submission of a timesheet using the Timesheet
submission screen, as shown below. To proceed to the next view, click
Tip: If you need to
edit your timesheet
click on “Return to
Timesheet”.
8.
12
Biweekly Time Traq -User’s Manual
8. The second section is the “Payroll Summary” screen. To proceed to the next view, click
.
9. The third and final section is the “Certification and Submission” screen. Check-off the
box that says that you verify that the hours reported are true and correct.
*Note: Comment is required.
Ex. “Employee is unavailable”.
10. Click on
button to complete the submission process.
13
Biweekly Time Traq -User’s Manual
Responsibilities:
In Time Traq, the
department
administrator’s
primary
responsibilities
include: (1)
ensuring that
their employees
/managers
submit or
approve
timesheets in a
timely manner;
(2) assigns
managers to
employees; (3)
creates
adjustments as
needed; and (4)
submits adloc to
Dept. Approver
for approval.
14
Biweekly Time Traq -User’s Manual
3.1 New Employee Setup
To ensure that all biweekly employees get paid in a timely manner and without any delays, Department
Administrators have the responsibility to setup all new employees in Time Traq. The following checklist
was created to assist Administrators in that process:
New Employee Biweekly Time Traq Checklist:
1. Complete & Submit New Employee Packet
(*Note: Employment Packets are now available on line on the HR website
http://falcon.tamucc.edu/~hrweb/)
2. Create EPA
*Note: Only after EPA’s have been through the approval process & item 1 has
been completed can you move on to item 3.
3. Activate Employee Pin in Time Traq
*Note: Time Traq automatically activates new positions as they are created in
BPP. This is done twice weekly on Tuesday and Thursday. If you have a new
employee and cannot wait for the automated process, use the job activation
function.
(a) Log on to Time Traq as a Dept. Admin
(b) Click on the Activation Tab at the top of the screen.
(c) Enter the employee's UIN and PIN to create a Time Traq job for the new position.
4. Create Timesheet:
(a) Click on “RP Review” tab
(b) Change Match from “All Timesheets” to “All Jobs”.
-Your new employee should now appear on your employee list.
- Click on the “Create” button.
5. Assign a Manager to New Employee
*Note: You must assign a manager otherwise your new employee will not be able
to submit his/her timesheet.
15
Biweekly Time Traq -User’s Manual
3.2 Setting up managers
One of the major responsibilities for Department Administrators is setting up and updating managers for
employees in their adloc (s).
*Note: This action can only be performed
by
someone with a Department Admin
To set up an employee’s manager:
1. Log in to Time Traq as a Department Administrator.
role and it is done by the department not
the Payroll Office.
2. Click on “RP Review” or “Employees” tab.
3. Click on the employee’s name/ job title.
4. From the Job Overview screen (see below), click on the “Manage Employee Relationships in
SSO” button located at the bottom of the screen.
16
Biweekly Time Traq -User’s Manual
5. Click on “Add Manager” link located under the “Select Employee” button.
The following box will appear:
6. The “Standard” application will always be used.
8. Type the mangers’ UIN.
7. Make sure to select the
correct pin # if the employee has
more than one position.
9. Select manager type “approval”
10. Mark the check box if this manager will be the employee’s primary manager.
11. Click on “Add” button to add manager.
12. Click on
button to return to employee’s overview screen.
17
Biweekly Time Traq -User’s Manual
3.3 Creating Adjustments
“Adjustments” (also referred to as “Prior period adjustments”) are created in order to pay
an employee for hours performed during a prior period (positive adjustment) or to correct an
employee’s pay (negative adjustment). Timesheet adjustments are easy to create, but it is
important that the settings be made correctly as they directly impact the employee’s pay.
To create an adjustment:
1. Log in to Time Traq as Department Administrators
*Note: This action can only be performed by someone with a Department Admin role.
2. Click on the “RPReview” tab.
3. Click on the employee’s timesheet number located to the left of the employee’s name.
4. Click on the “Adjustments” tab
5. Click on “Add Adjustment”.
18
Biweekly Time Traq -User’s Manual
6. This date should represent the date you are correcting/adjusting for,
not the current date. If you are adjusting for more than one day, use
the last day you are correct for. Ex. You need to adjust John’s
timesheet to add 40hrs worked from 04/06/11 thru 04/10/11. The
adjustment date world is 04/10/11.
7. Leave at “Reg. Work”
8. Always change status from “Pending” to “Done”. This
means the hours have been completed.
9. Total hours worked.
10. Comment is required (see ex. below)
Adjustment for hours worked 04/06/11 thru 04/10/11.
11. Click on “Save” to complete the adjustment.
Other Actions:
•
“Negative Adjustments”: If you need to create a negative adjustment you can do so by simply
checking off the “Back Hours Out” checkbox.
19
Biweekly Time Traq -User’s Manual
3.4 Reviewing and submitting adloc (s) to Dept. Approver
Department administrators are responsible for ensuring that their employees /managers submit
or approve timesheets in a timely manner. The Reporting Period Review (also referred to as
“RPReview”) screen is used in the process of completing this task.
Open
Approved
Submitted
Actions for reviewing an employees’ timesheet:
• An employee’s timesheet can be in any of following four statuses:
o “Open” – Timesheet has been opened by someone (manager, employee, or
dept. admin).
o “Submitted” – timesheet has been submitted.
o “Canceled” – timesheet has been canceled. Action is used when an employee
has no hours to report for the current pay period.
Note: Do not cancel timesheets for employees that have adjustments and have no hours to report on the
current pay period. When you cancel the timesheet you are also canceling the adjustments on that
timesheet. Instead, make to submit the timesheet & add a comment about why are submitting with no
o
“Approved” – timesheet has been approved by manager.
When an adloc is in such a state that it can be submitted to payroll (i.e., when all timesheets have
either been canceled/approved), the department administrators will notice a
button. Clicking this button will present
the user with a screen that allows him or her to prepare and send a message to the adloc's
department approver(s). This can be used to notify the department approver that the adloc is
ready to be submitted to payroll.
20
Biweekly Time Traq -User’s Manual
Responsibilities:
The Department
approver is quite
specialized in
that it has only a
single
responsibility in
Time Traq, which
is getting his/her
adloc (s)
submitted to
Payroll.
21
Biweekly Time Traq -User’s Manual
4.1 Approving/Submitting adloc (s) to Payroll
1. Log in as a department approver.
2. Click on “RPReview” tab.
3. When you have finished reviewing
your adloc and no corrections need
to be made, click on “Submit Adloc
To Payroll”.
Note: If there is a problem with a particular timesheet, don’t submit you adloc,
work with the dept. admin and manager to get it resolved. If an error is found after
you have submitted your adloc, contact the Biweekly Time Traq contact person in
Payroll (Rachel Flores @ 5792).
22
Biweekly Time Traq -User’s Manual
Biweekly Time Traq Role Setup
Employee Role
• Department EPA creator. Employee is setup
automatically after the employees’ EPA has
been created and approved & employee’s HR
packet has been processed by HR.
Manager Role
• Managers are assigned to employees by the
Department Administrator. The Manager is
then responsible for setting up his/her
delegate (s).
Dept. Admin Role
• Setup is done in the Payroll Office upon
department request . A Time Traq
Authorization form is required for setup.
Dept. Approver Role
• Setup is done in the Payroll Office upon
department request . A Time Traq
Authorization form is required for setup.
Central Admin. Role
• Central Administrator is located in the Payroll
Department. No setup is required.
23