1
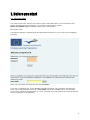
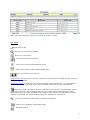
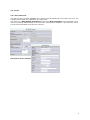
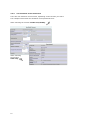
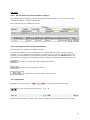
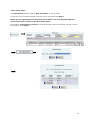
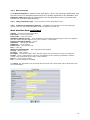
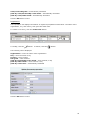
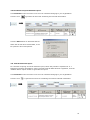
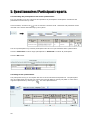
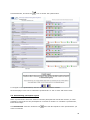
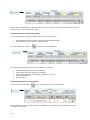
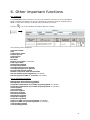
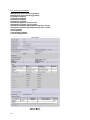
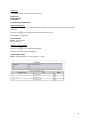
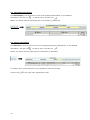
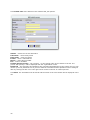
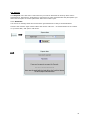
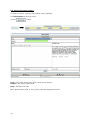
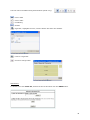
Rap4Leo
User manual
Version 9.0
INTRODUCTION
WELCOME TO RAP4LEO
4
1. BEFORE YOU START
1.1.
THE LOGON PAGE
5
2. GENERAL USE OF THE DATABASE
2.1.
2.2.
2.3.
2.4.
2.5.
THE 5 MAIN WAYS OF ENTERING DATA
ICONS
MENUS
FORMS
LISTS
6
7
8
9
11
3. REGISTERING PLACEMENTS
A STEP BY STEP GUIDE
3.1.
PASSWORD
3.2.
LOGGING ON TO THE DATABASE
3.3.
REGISTERING LEONARDO DA VINCI PLACEMENTS
PARTNERS PREVIOUSLY REGISTERED WITH THE LDV II PROGRAMME
3.4.
DUPLICATING PLACEMENTS
3.5.
12
12
12
18
18
4. REGISTERING FINANCE INFORMATION
4.1.
4.2.
4.3.
4.4.
4.5.
4.6.
REGISTERING FINANCE INFORMATION
COPY FINANCIAL INFORMATION
LLP MISSING PLACEMENT INFORMATION
SUBMIT REPORT
DOWNLOAD AND PRINT FINANCIAL REPORT
INTERIM FINANCIAL REPORT
19
24
25
26
27
28
5. QUESTIONAIRE/PARTICIPANT REPORT
5.1.
5.2.
5.3.
5.4.
5.5.
INFORM THE PARTICIPANT TO FILL IN THE REPORT
FILLING IN THE QUESTIONAIRE
UNSUBMITTING PARTICIPANT REPORTS
QUESTIONAIRE PLACEMENT LEVEL
QUESTIONAIRE CONTRACT LEVEL
6. OTHER IMPORTANT FUNCTIONS
2
28
28
29
30
30
6.1.
6.2.
6.3
6.4
6.5
6.6
CONTRACT INFORMATION
PARTICIPANT INFORMATION
PARTNER INFORMATION
EXPORTS
SEND EMAIL (MASS MAILER)
NEWS & DCOUMENTS
31
34
34
37
38
40
7. HINTS & TIPS
SOME USEFUL HINTS AND TIPS
41
3
Introduction
Welcome to Rap4Leo, the reporting database tool for Leonardo da Vinci mobility projects in the
LDV II programme and the Lifelong Learning programme (LLP).
Usage:
1.
2.
3.
Registering information about participants traveling on regular Leonardo placements
Participant report/questionnaire
Financial project reporting
The database and reporting tool has been developed exclusively for mobility contracts.
Information about both programmes (LDV II & LLP) is covered in this manual. Information marked
as (LDV II) is only valid for the Leonardo da Vinci II programme. Information marked as (LLP) is
only valid for the Lifelong Learning programme.
4
1. Before you start
1.1. The logon page
You need access to the Internet to be able to enter information about your Leonardo da Vinci
project and placements into Rap4Leo. You reach the logon page by writing
http://xx.rap4leo.org in the address field of your web browser.
xx=country code.
The Rap4Leo website is supported by Microsoft Internet Explorer 5.5 (or newer) and compatible
browsers.
Enter your username and password and click ”Connect”.
If you are a registered user of the database and have forgotten your username and password,
enter your e-mail address in the field: ”Your email” and click the SEND button. You will then
receive your username and password by e-mail, provided the e-mail address you entered matches
the one registered in the database.
5
2. General use of the database
2.1. The 5 main ways of entering data
2.1.1. White field
Click once in the field with
the left mouse button. You will see a blinking cursor to the left in the field and you can then type in
the relevant information.
2.1.2. White field with an arrow down to the right
This type of field is called a ”drop down menu”.
Click once in the field with the left mouse button,
and you will see the menu options. Use the arrow keys on your keyboard (arrow up, arrow down)
and click once with the left mouse button on the value you want to select. You can also jump
directly to a menu option by typing its first letter.
2.1.3. White field with an arrow down to the right and a white field below
This is also a” drop down menu”, but you
can select more than one menu option if
needed. Click once in the field with the left
mouse button, and you will see the menu
options. Use the arrow keys on your
keyboard (arrow up, arrow down) and click
once with the left mouse button on the value
you want to select. You can also jump
directly to a menu option by typing its first letter. Your selected option will be
displayed in the white field below. You can then continue to make more selections if needed.
If you want to remove one or more of the selected options, select the option and click ”Delete”.
2.1.4. Radio buttons
Click once with the left mouse button
in the little white circle to the left of your selection.
2.1.5. Button
Click once on the button with the left mouse button to perform the action.
NOTE: While field names in black are compulsory to fill out, field names in gray can be filled out if
needed.
2.1.6. Button: “Choose a value”
In seldom cases with a huge number of values to be displayed, the list is empty:
Click the
6
button.
Make your search and click “Select” in the “Choose a value” column.
2.2. Icons
Click here to edit
Click here to see more information
Click here to see report.
Click here to see financial report.
Click here to create interim financial report.
Click here to create a report (Administrator only)
Click the arrows to sort the lists.
[email protected] Click here to send an e-mail. Your e-mail program will open and you can write
and send your message.
Organisation name In some lists you can jump directly to the relevant form, i.e. organisations,
contact persons etc. by clicking on the name. Clickable names will look like ordinary links.
Click here to delete the data on the line to the left of the trash icon. All information directly
connected to this entry will be deleted. Make sure you really want to delete the entry before
clicking the trash icon. Some information connected to other entries in the database cannot be
deleted. For example you cannot delete a participant registered on a placement.
Click here to duplicate a placement or financial information.
Click here to unsubmitt a participant report.
Edit finance data.
7
Finance report (Excel export).
Send an automatic email.
Click here to print.
Select date
Navigation buttons in lists. Right arrow: one page forward. Left arrow: one
page backwards. You can also go directly to a specific page by typing the page number.
2.3. Menus
2.3.1. The top menu
To the top left you will see your name and the name of your organisation. It may be possible to
select another language. If you want to select one of the other available languages, click the menu
and make your selection, then click your browser’s refresh button. The database will remember the
change the next time you log on.
Click ”Log out” to end your session. Click “User privacy” to see the user privacy statement.
2.3.2. The main menu
While logged on to the database, you will always see the main menu to the left.
Logged on as a promoting organisation, the main menu will look like the example below.
View or edit information about your organisation and contact person(s).
See a list of all contracts with an option to see details about each contract.
See a list of all placements.
See a list of all participants. You can view details and make changes.
See a list of all partner organisations. You can view details and make changes.
Print lists of placements, participants etc.
News
Documents
8
2.4. Forms
2.4.1 The main form
The data you enter into the database will in some cases be distributed to more than one form. The
example below shows the registration of a placement.
The main form: New/Modify placement and sub form New participant. The information in the
sub form is stored independently of the main form, and becomes available in the main form when
you save the information and close the sub form.
Sub form in a new window.
9
2.4.2.
Two instances of the same form
There are two instances of most forms, depending on the function you select.
The example below shows two instances of the placement form:
When selecting the function Create new/modify:
When selecting
the function
View only:
10
2.5. Lists
2.5.1. An overview of all entries within a category
The example below shows an overview of all registered placements. You can view or edit the
entered information, or delete a placement.
Not all options will be available for all lists.
2.5.2. Filtering/search for specific information.
You can search for specific information in all lists.
Enter the information you are searching for, for example departure date, receiving country,
contract etc. in the appropriate search field. For example, if you want to find all placements in
Germany, write ”Germany” in the ”Receiving country” field and click the ”Search” button. All
placements in Germany will be displayed in the list. (Other placements have been filtered out).
Click here to use the filter after defining the search.
Click here to see all entries in the list.
Click here for access to more search criteria.
2.5.3. Navigation
Navigation: Use this function
to go to the next/previous page.
Click the arrows to sort the lists (A – Z, Z – A).
Shows the total number of entries, the number of pages and the number of the current page.
11
3. Registering placements
A
s t e p
b y
s t e p
g u i d e
3.1. Password
If you have a Leonardo da Vinci contract and haven’t yet received a username and password,
please contact your national Leonardo da Vinci agency.
3.2. Log on to the database
Browse to the logon page and enter the Username and Password you have received from your
Leonardo da Vinci agency. Click OK. You will be logged on to the user area for your organisation.
If you wish you can change your password:
Click My data in the main menu. Click the icon
Change the password in the displayed form.
on the line showing the contact person.
You can register more than one contact person if needed.
3.3. Registering Leonardo placements
This chapter is large and important. You will learn how to register (= enter information about) a
new placement in the database.
The first step in registering a placement is to connect a participant to the correct flow, and then
enter the relevant information about the participant. A flow consists of one or more participants
traveling to the same country. If needed you can add a new flow. (You will find more information
about this in chapter 6.1. – Contract information).
You then select your own organisation or another registered organisation, or register a new
sending organisation. The next step is to choose or register the organisation responsible for
receiving the participant. Then you have to make some general selections and enter some
information by using radio buttons, menus etc.
Click the Save button. The placement registration is completed.
See also chapter 4. Registering finance information for more information on how to fill in
finance information for each placement etc.
12
Follow these steps:
Click Placements. Click the button ”New placement” in the top menu.
Choose the correct contract number in the drop down menu and click Step 2.
NOTE: If your organisation has more than one contract, it’s very important that you
choose the correct contract in the drop down menu!
New window: Select the correct flow by clicking the little circle in the column "Choose a value"
to the left and click Step 3.
13
3.3.1. Create a new flow
If the flow you want to register a placement on is not present, click the “Create new” button.
Contract title - Shows the contract title
Sending country - select country (may not be selectable)
Receiving country - select country
Click the Save button. The flow registration is completed. Select the flow you just created.
The selected contract and flow will now be displayed in the first line of the form. Participant is
the person to be sent on the placement.
Click the New participant button to register the participant.
If the participant is already registered in the database, click Choose a value and select the
participant from the drop down menu.
14
3.3.2. New participant
Click New Participant to register a new participant. (If you are entering a participant who
has been sent on a placement previously and is already registered in the database, click
Choose a value and select the participant from the drop down menu [in general only
relevant for accompanying persons].)
3.3.3. (LLP) Participant type – select a value from the dropwdown menu
3.3.4. Is this an accompanying person? Click Yes if the participant is an accompanying
person. The form will change and fewer fields will have to be filled out.
New window: New participant
Gender - select the correct alternative
Last name - enter family name
First name - enter first name
Birthdate (dd/mm/yyyy) - enter birthdate in the format 'day/month/year. Enter two digits for
day and month and four digits for the year. Example: 19/04/1983
Person with special needs - yes/no
Address 1 - enter postal address
Address 2 - use if needed
Postal code - enter postal code
City - enter city
Subcounty/Municipality - enter subcounty/municipality
County - enter county
Country - enter country
EU region - choose EU region. Only valid EU regions for the selected country are displayed.
E-mail - enter e-mail address. Use the e-mail address of the sending organisation’s contact
person if the participant doesn’t have a mail address.
Phone - enter phone number
Fax - enter fax number if available
Click Save. The information will be saved and the name of the participant will be displayed in the
list of participants.
15
3.3.5. The sending organisation is the organisation responsible for sending out one or more
participants. In most cases, this is the same as the applicant organisation. Choose the organisation
in the list of sending organisations. If the organisation responsible for sending out the participants
is not the same as the applicant organisation, and if the organisation is not already registered in
the database, click New sending partner.
NOTE: you can only register a sending organisation from the country specified in the flow.
See also the chapter 3.4: LLP: partners previously registered in the LDV II programme.
New window: New organisation
Organisation name - enter name of organisation
Name of the organisation in EN,Fr or DE - enter name of organisation in English, French or
German
Is the organisation able to recover VAT – not in use for mobility projects
Address 1 - enter postal address
Address 2 - use if needed
Postal code - enter postal code
City - enter city
Subcounty/Municipality - enter subcounty/municipality
County - enter county
Country - enter country
EU region - choose EU region. Only EU regions valid for the selected country are displayed. *
Phone - enter phone number
Fax - enter fax number if available
Homepage - enter if available
Organisation type - choose from the drop down menu
Organisation size - choose from the drop down menu *
Organisation sector - choose from the drop down menu. Please note that the menu is organised
in groups, make sure you select the submenu. *
Description - enter if needed
*Note that the information displayed is different for the two programmes (LDV II – LLP)
16
Organisation contact person
Gender - select the correct alternative
Last name - enter family name
First name - enter first name
Phone - enter phone number
Fax - enter if available
E-mail - enter e-mail address
Department - enter department
Click Save. The information will be saved and the name of the sending partner will be displayed in
the list of organisations.
3.3.6. The receiving partner is the organisation responsible for receiving one or more
participants.
Choose the organisation in the drop down menu. When you click on one of the names in the list,
it will be displayed in the field below. Click New receiving partner if you want to register a new
organisation. If you want to remove a selected option, select the name in the field and click
Remove.
Fill in the information the same way as described under section 3.3.4 The sending organisation
NOTE: you can only register a receiving partner from the country specified in the flow.
3.3.7. Departure date (dd/mm/yyyy) Must be entered in the format 'day/month/year. Enter
two digits for the day and month and four digits for the year. Example: 19/04/2004
3.3.8. Return date (dd/mm/yyyy) Must be entered in the format 'day/month/year. Enter two
digits for the day and month and four digits for the year. F.eks.: 26/05/2004
3.3.9. Duration weeks/days Number of weeks and days are calculated by the system. Please
check the departure and return dates to make sure that you fulfill the contractual requirements.
3.3.10 (LLP) Economic sector – select a value from the dropwdown menu
3.3.11 (LLP) Field of education – select a value from the dropwdown menu
3.3.12. Certification Select a suitable value from the drop down menu.
Note: LDV II: Certification is only available for IVT, STU and WORK contracts.
LLP: Certification is only available for IVT and PLM.
3.3.13. Languages during the placement Select from the drop down menu. Multiple options
are possible and selected options will be displayed in the field below. If you want to remove a
selected option, select it in the field and click “Remove”.
LDV II: 3.3.14. Level of studies Select a suitable value from the drop down menu.
Note: Level of studies is only available for IVT, STU and WORK contracts.
LDV II: 3.3.15. Occupation Select a suitable value from the drop down menu.
Note: Occupation is only available for LAN and INS contracts.
17
LLP: 3.3.16. Occupation
Select a suitable value from the drop down menu.
3.3.17. Click Save. All information about the placement will be saved in the database.
You will find it in Placements where you can read and edit information about all the placements
you have registered.
Note: It is only possible to modify or delete a placement if the status of the contract is “Open
contract”
3.4. LLP: Partners previously registered with the LDV II programme:
The EU Commission has introduced new values for EU region, organisation size and organisation
sector for the LLP programme. If you select a partner previously registered with an LdV II
placement when regitering a placement on a contract from 2007 or newer, the database will ask
you to update these values if they are missing.
If information is missing, the “Update partner information” form will be displayed. Select the
correct values from the drop down menus and click “Save”. When done, you will be returned to the
placement registration form.
3.5. Duplicating a placement
When registering almost identical placements, the duplicate function is very useful. This is almost
always the case when registering participants in the same flow and where the main difference is
personal information about each participant.
Register a placement for the first participant in the flow as described earlier.
Find this placement in the list of placements and click the
icon. Add information about the
next participant, change any other information as appropriate, and click Save.
18
4. Registering financial information
The aim of the financial module is to register financial information for each placement/contract.
This information will be included in the financial reports (interim and final report).
4.1 Registering financial information.
Click Contracts in the left menu to see a list of contracts belonging to your organisation.
Click the icon
to register finance data.
The following will be displayed:
Contract number
Contract title
Organisation name
Note: The numbers in the granted fields are the granted budget.
Management and monitoring: From LDV grant – The amount used from the LDV grant.
(LDV II) Management and monitoring: partnership’s own funds – The amount used from
partnership’s own funds, if any.
(LDV II) Management and monitoring: other funds – The amount used from other funds, if
any.
Total – automatically calculated
Total interest generated over the duration of the project: - enter number
(LDV II) Travel and subsistence for preparation and follow-up of small projects:
Note: This field will only be visible if Small project monitoring in the contract form is selected.
The number is updated during registration of Travel and subsistence for preparation and
follow-up of small projects. See below.
Travel – *
(LDV II) Insurance - *
Subsistence - *
Preparation - *
* The fields: Travel, Insurance, Subsistence and Preparation: From LDV grant, Partnership’s own
funds, Other funds and Total are updated during registration of finance information for each
participant. See below.
(LDV II) Support to SME 1.st proposal – this field will only be visible if the Support to SME
1.st proposal in the contract form is selected. Enter number.
19
(LDV II) Travel and subsistence for preparation and follow-up of small projects:
Click the Create new button:
The following will be displayed:
Contracts – the name of the contract
Last name – enter last name
First name – enter first name
Organisation – enter the name of the organisation
Type of organisation – select type of organisation
Country – select country
Objective of the trip – select type (preparation/follow-up/other)
Duration – enter duration
Travel,
Travel,
Travel,
Travel,
From LDV grant – enter amount
Partnership’s own funds – enter amount, if any
Other funds - enter amount, if any
Total – automatically calculated
Subsistence,
Subsistence,
Subsistence,
Subsistence,
From LDV grant – enter amount
Partnership’s own funds – enter amount, if any
Other funds – enter amount, if any
Total automatically calculated
Total, From LDV grant – automatically calculated
Total, Partnership’s own funds – automatically calculated
Total, Other funds – automatically calculated
Total automatically calculated
20
Click the Ok button to save.
The list of Travel and subsistence for preparation and follow-up of small projects is now updated.
To modify, click the
icon. To delete, click the
symbol.
Placements:
The participants list displays information registered during placement registration: Participant,
receiving country and weeks. When the financial data has been registered, the list will also display
the columns Travel, Insurance, Subsistence and Preparation costs.
To update placements with financial data, click the
button.
21
The following will be displayed:
Contract title – the contract title
Contract number – the contract number
Participant–name of the participant
Travel, From LDV grant – enter amount covered by the LdV grant
(LLP) Real costs – enter amount for real travel costs if required by your NA
(LDV II) Travel, Partnership’s own funds – enter amount, if any
(LDV II) Travel, Other funds - enter amount, if any
Travel, Total – automatically calculated
(LDV
(LDV
(LDV
(LDV
II)
II)
II)
II)
Insurance,
Insurance,
Insurance,
Insurance,
From LDV grant – enter amount
Partnership’s own funds – enter amount, if any
Other funds – enter amount, if any
Total automatically calculated
Subsistence:
Note: For contracts where interim reporting is required, you must fill inn:
Paid so far: From LDV grant/(LDV II) Partnership’s own funds/(LDV II) Other funds and Total:
automatically calculated.
New payment, From LDV grant – enter amount
(LDV II) New payment, Partnership’s own funds – enter amount, if any
(LDV II) New payment, Other funds - enter amount, if any
New payment, Total – automatically calculated
If no interim report is required you must fill in:
Subsistence, From LDV grant – enter amount
(LDV II) Subsistence, Partnership’s own funds – enter amount, if any
(LDV II) Subsistence, Other funds – enter amount, if any
Subsistence, Total automatically calculated
The fields: Preparation, From LDV grant, (LDV II) Partnership’s own funds, (LDV II) Other funds
and Total are updated during the registration of preparation. See below.
22
Total, From LDV grant – automatically calculated
(LDV II) Total, Partnership’s own funds – automatically calculated
(LDV II) Total, Other funds - automatically calculated
Click the Ok button to save.
Preparation:
The Preparation list displays information of registered preparation information: The name of the
organisation, city, and country, LDV grant and total costs.
To create a new entry, click the Create new button.
To modify, click the
button. To delete, click the
button.
The following will be displayed:
Organisation – enter the name of the organisation
City – enter the name of city
Country – select country
LDV grant – enter amount
(LDV II) Partnership’s own funds – enter amount, if any
(LDV II) Other funds – enter amount, if any
(LDV II) Total costs – automatically calculated
Click the Ok button to save.
23
4.2 Copy financial information.
To avoid registering identical financial information for each placement, you can use the “copy
financial information” function.
In the placements list, click the
button to the right of the participant you want to copy.
Select the placement where you want to copy the values.
To copy all financial information to another participant, select the participant in the menu and click
the ”OK” button next to the menu.
To copy all financial information to all placements on the same flow click the ”OK” button below the
text: ”Copy these values …”
NOTE: This function should not be used if you have more than 1 flow with the same sending and
receiving country but with different durations. The financial values will probably not be the same
for all flows.
24
4.3. (LLP) Missing placement information:
The EU Commission has introduced new information to be registerd during placement registration
for the LLP programme: Participant type, Economic sector of placement and Field of education.
When you register financial information, a check will be perfomed by the database. If information
is missing, the “Register missing values” form will be displayed. Select the correct values from the
drop down menus and click “Save”. When done, you will be returned to the financial registration
form.
NOTE: It is not possible to use the “Copy fiancial data” function (chapter 4.2)
if information is missing as explained above.
25
4.4 Submit financial report.
When your financial report is completely filled in, click Submit financial report to submit it.
Click the OK button to confirm.
Note: You will not be able to modify the financial report after submission, but you can view the
information by clicking the
button,
26
4.5 Download and print financial report.
Click Contracts in the left menu to see a list of contracts belonging to your organisation.
Click the icon
to generate an Excel file containing the financial information.
Click the Save button to download the file.
When the file has been downloaded, it can
Be opened in Excel and printed.
4.6. Interim financial report.
For contracts requiring an interim financial report, follow the procedure explained in “4.1
Registering financial information”. When relevant financial data has been registered, click the
“Submit interim report” button to generate the report:
Click Contracts in the left menu to see a list of contracts belonging to your organisation.
Click the icon
to generate an Excel file containing the interim financial information.
27
5. Questionnaires/Participant reports.
5.1 Informing the participants to fill in the questionnaire.
It is not possible to see the username and password of participants. Participant’s usernames and
passwords must be sent by email.
Click Contracts, and then the
icon to send the reminder email. Username and password will be
inserted in the emails automatically by the system.
The list of participants only includes participants who have not yet submitted their questionnaire.
Click the action box to select single participants or “Select all” to select all participants.
Click the OK button.
5.2 Filling in the questionnaire.
The participant can log on to Leopass with the received username and password. The participant
can not modify data, but he/she can look at his personal data by clicking “My data” or look at the
registered placement by clicking the
icon in the placement list.
'
28
Click Placements, and then the
icon to answer the questionnaire.
To navigate in the questionnaire, use the “Previous” and “Next” buttons.
At the last page: Click “Yes” to submit the questionnaire or “No” to save and finish it later.
5.3. Unsubmitting participant reports
When a questionnaire has been answered and the participant has saved and closed it, it is still
possible to send it back to the participant for correction if needed. To unsubmit a questionnaire,
follow these steps:
Click Placements. Click the unsubmit icon
want to unsubmit.
and click OK. Repeat for each questionnaire you
29
NOTE: When unsubmitting a participant report, an email must be sent to the participant to remind
him/her to fill in the questionnaire again.
5.4 Questionnaires at placement level.
To view questionnaires and participant reports, you have 2 options:
•
•
See detailed information about a specific placement/participant.
See a summary of all reports on contract level.
Click Placements, and then the
icon to see the questionnaire.
The questionnaire/participant report is divided into 4 sections:
•
•
•
•
•
Personal information about the participant.
Information about the sending organisation.
Information about the intermediary organisation (if any).
Host organisation(s).
Questionnaire
5.5 Questionnaires at contract level.
Click Contracts and then the
icon to see the answers for all placements.
Only questionnaire answers will be displayed. NOTE: If no questionnaire is available, the report
icon will not be visible.
30
6. Other important functions
6.1. Contracts
Click Contracts in the left menu to see a list of contracts connected to your organisation.
NOTE: Contract information can only be edited by the Leonardo da Vinci national agency.
NOTE 2: Both LdV II and LLP contracts may be available in the list.
Click the
icon to see detailed information about a contract.
The following will be displayed:
Contract number
Title
Organisation name
Contact person
Target group
Start date
End date
Interim report date (if available)
Final report date
Participants applied
Participants granted
Accompanying persons applied
Accompanying persons granted
Persons with special needs?
Number of persons with special needs
LDV II: Small project monitoring (if available)
LDV II: Support to SME 1st proposal (if available)
LDV II: Financial information:
Management and monitoring applied
Management and monitoring granted
Preparation and follow-up of small projects applied (if available)
Preparation and follow-up of small projects granted (if available)
Travel applied
Travel granted
Insurance applied
Insurance granted
Subsistence applied
Subsistence granted
Preparation applied
Preparation granted
Support to SME 1.st proposal applied (if available)
Support to SME 1.st proposal granted (if available)
Total funding applied
Total funding granted
31
LLP: Financial information:
Management and monitoring applied
Management and monitoring granted
Preparation applied
Preparation granted
Subsistence applied
Subsistence granted
Subsistence applied (acc-persons)
Subsistence granted (acc-persons)
Subsistence applied (participants with spec. needs)
Subsistence granted (participants with spec. needs)
Travel applied
Travel granted
Total funding applied
Total funding granted
32
Payments:
Information about payments to the promoter.
Paid so far
New payment
Total paid
Coordinating organisation
Associated flow(s)
(A flow consists of one or more participants traveling to the same country and with the same
duration)
Click the icon
to see detailed information about each flow.
The following is displayed:
Contract title
From - from country
To - to country
Partner organisations
Click the icon
to see detailed information.
The following information is displayed:
Organisation name
Role - sending partner, receiving partner or both.
33
6.2. Participant information
Click Participant in the left menu to see a list of registered participants. To see detailed
information, click the icon
. To edit an entry, click the icon
.
NOTE: You cannot delete a participant who is connected to a placement.
6.3. Partner information
Click Partners in the left menu to see a list of registered partners/organisations. To see detailed
information, click the icon
. To edit an entry, click the icon
.
NOTE: You cannot delete a partner that is connected to a placement.
To register more contact persons for an organisation, follow these steps:
Click the icon
34
to the right of the organisation name.
35
Click Create new at the bottom of the window that just opened.
Gender - select the correct alternative
Last name - enter family name
First name - enter first name
E-mail - enter e-mail address
Phone - enter phone number
Fax - enter if available
Contact person priority - set a priority, i.e. the sorting order of the contact in the list. The
person with priority 1 will be displayed with the organisation in lists.
Password - the username and password are generated automatically by the system, but you can
choose your own password here if you like. Both the username and the password can be changed
later by clicking the edit icon to the right of the contact in the list of contact persons.
Click Save. The information will be saved and the name of the new contact will be displayed in the
list.
36
6.4. Exports
Click Exports in the left menu. Select the list you want to download in the drop down menu:
Organisations, Placements, Participants or Contracts. For lists of placements and participants you
also have the option to choose placement dates and contract year.
Click “Generate”.
You will see a message when the list has been generated and is ready to be downloaded.
Click the link with the right mouse button and choose “Save as…” to download the file to a folder
on your hard disk, and open it with Excel.
37
6.5. Send email (mass mailer)
To send an email to a group of participants, do the following:
Click Participants in the main menu.
Click the
button
From - the person sending the email (select contact person)
Subject - the subject of the email
Body - the text to be sent
Note: Email format: HTML or Text, please select the appropriate format.
38
The text can be formatted using these buttons (HTML only):
= text in bold
= text in italic
= numbering
= bullets
= hyperlink, highlights the text, click the button and enter the address.
= remove a hyperlink
= access to merge fields
Attachment
To attach a file click select file, browse for the file and then click the SEND button.
39
When the email is ok, click the ”Send” button and confirm.
NOTE: The mail will be sent to all participants in the list.
6.6. News & documents
Your National agency may occasionally publish news or upload documents. To see news and
documents, click News or Documents in the left menu.
To download a document, click the
as” to download and save the file.
40
icon with the right mouse button and choose ”Save target
7. Hints & tips
S o m e
u s e f u l
h i n t s
&
t i p s
7.1. If you register information about a placement and don’t click the Save button at the bottom
of the window, you will lose all the information that you have entered. This may happen if you are
missing information about a participant’s birthdate, education level or something similar and then
cancel the registration. In these cases we recommend that you don’t cancel registration, but follow
these steps instead:
Enter ”temporary” information in all compulsory fields, select options in all menus even if these
options may be wrong because you are missing information. After entering all compulsory
information, click the Save button at the bottom of the window to save the information as usual. If
you see a message about missing information in a field, enter any ”temporary” information, for
example two or tree letters or digits, and click Save. You can complete registration later when you
have gathered all necessary information.
7.2. Enter the participant’s e-mail address when registering placements if possible. This may
be useful if you are going to send the username and password to the participant via the database.
7.3. You can jump from field to field in all forms by using the Tab key. You can move in the
opposite direction by holding down the Shift + Tab keys. You will save your arm from excessive use
of the mouse and the work will be done faster once you have learnt the technique.
7.4. Field names in black type are compulsory to fill out, while field names in gray type may be
left empty.
7.5. Forgotten password/username? If you have forgot your username or password, do the
following: In the login page type your email address in the Your email field and click the Send
button, then the username and password will automatically be send you by email.
41