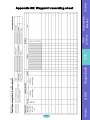
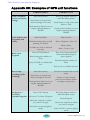
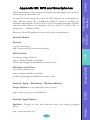
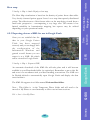
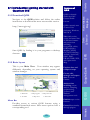
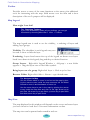
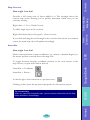
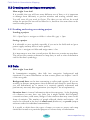
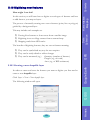
1
Field Guide to Humanitarian Mapping Second Edition, 2011 This field guide was produced by MapAction to help humanitarian organisations to make use of mapping methods using Geographic Information Systems (GIS) and related technologies. About MapAction MapAction has, since 2003, become the most experienced international NGO in using GIS and related matters in the field in sudden-onset natural disasters as well as complex emergencies. When disaster strikes a region, a MapAction team arrives quickly at the scene and creates a stream of unique maps that depict the situation as the crisis unfolds. Aid agencies rely on these maps to coordinate the relief effort. MapAction regularly gives training and guidance to staff of aid organisations at national, regional and global levels in using geospatial methods. This second edition of the Field Guide expands the content of the highly successful first edition published in 2009. For further details on MapAction, emergency maps or to make a donation please visit - www.mapaction.org, or email - [email protected]. Lime Farm Office Little Missenden Bucks HP7 0RQ UK Copyright © 2011 MapAction. Any part of this field guide may be cited, copied, adapted, translated and further distributed for non-commercial purposes without prior permission from MapAction, provided the original source is clearly stated. Field Guide to Humanitarian Mapping MapAction Second Edition, July 2011 Field Guide to Humanitarian Mapping Preface: How to use this field guide There are now many possible ways to create maps for humanitarian work, with an ever-growing range of hardware and software tools available. This can be a problem for humanitarian field workers who want to collect and share mappable data and make simple maps themselves during an emergency. This guide aims to explain a limited range of tried-and-tested methods suitable for humanitarian field work, using free or low cost tools. The main requirements are a PC, an internet connection (to download the software and data you need before you go into the field) and a little time to practice using the various tools. A GPS unit (or maybe a satellite phone with built-in GPS) is a very useful extra item, if you have one or can get access to one. Where to start The guide is written in modular chapters with the aim that you can start in different places depending on your level of prior knowledge. The guide contains tutorials on the use of two alternative mapping toolkits: Google Earth (Chapter 4) and an open source GIS software package called Quantum GIS (Chapter 5). There is also a section on using a GPS to collect data (Chapter 3). If you have time, or if you are completely new to the subject, we recommend that you read Chapter 1 first. It contains an introduction to the whole subject and explains some important terms and concepts. However, don’t be discouraged by these technicalities: it is quite possible to start using the software tools without an in-depth understanding of all the details. Google Earth in particular is very easy to use. If you want to use a GIS software package other than the Quantum GIS suite which is covered here, this guide may still be useful to you because almost all the main concepts are relevant whatever software you intend to use. Finally, if you find difficulty in understanding or using any of the content of the guide, or if you have suggestions to improve it, please email us at [email protected]. We wish you success in your humanitarian work. II www.mapaction.org This guide has been compiled from MapAction’s experience in disaster preparedness and relief operations drawn from many training sessions and disaster emergency missions; however every situation is different. We greatly value comments and suggestions, and we will do our best to answer your questions about using GIS and GPS for humanitarian mapping in the field: please email [email protected]. III Contents Humanitarian Mapping Data Collection GPS Google Earth The first edition of this field guide was published in 2009 and has been used by a broad spectrum of humanitarian and development organisations seeking practical and low cost ways to exploit geospatial methods in their work. In response to demand, MapAction is delighted to issue this second edition. Several chapters are expanded to meet users’ requests for more detail, particularly on where to find map data. Also, the Guide now gives step-by-step guidance on the use of Quantum GIS (QGIS), an open source software toolkit that has gone from strength to strength in its reliability and appropriateness for field use. QGIS This guide has been authored principally by Naomi Morris of MapAction with assistance from the MapAction team. Grateful thanks are due to the Dulverton Trust who provided funding to research and write the guide. For providing technical input and advice thanks are also due to Ramiro Galvez of UNDAC, Bhupinder Tomar of IFRC, Charlie Mason of Save the Children, Joe Kratochvil of US USAR, the Communications and Information Services Branch OCHA, Matthew Needle and Dr Richard Teeuw of the University of Portsmouth, School of Earth and Environmental Sciences, Kester Riley of Riley Trading Limited. Annex Acknowledgements Field Guide to Humanitarian Mapping Contents Preface Acknowledgements Contents II III IV Chapter 1: An Introduction to Humanitarian Mapping 1.1 Introduction to chapter 1 1.2 How are maps useful in humanitarian work? 1.3 What mapping tools can my organisation use today? 1.4 Some key concepts 1.4.1 What is ‘spatial data’? 1.4.2 How can we use and share our spatial data? 1.4.3 What kinds of spatial data may be useful in my work? 1.5 Cautions when collecting and using spatial data 1.6 Projections and datums 1.7 Data formats 1.7.1 Vector Shapefiles 1.7.2 KML and KMZ 1.7.3 Raster and image data 1.8 Data and information management 1.9 An introduction to cartography 1.10 Community-level mapping techniques 1.11 GIS software recommendations 1.12 Case Study Chapter 2: Geographic Data Collection 2.1 Introduction to chapter 2 2.1.1 Scale and geographical scope 2.1.2 Data quality 2.1.3 Conditions of use 2.1.4 File formats 2.2 Forget GIS, I just need a map 2.3 Data layers: key categories (with sources) 2.3.1 Further sources of data 2.4 Datasets and data sources 2.4.1 Obtaining downloadable MODIS data 2.4.2 Obtaining downloadable OpenStreetMap (OSM) data 2.4.3 Obtaining data from the Global Land Cover Facility 2.5 Organising your datasets 2.5.1 Structure of data folders/databases 2.5.2 File naming IV 1 2 3 5 5 5 6 7 8 9 9 10 10 11 13 15 16 19 21 21 22 23 23 24 25 31 32 40 46 47 51 51 52 www.mapaction.org Chapter 4: Google Earth for Humanitarian Mapping 4 How to use chapter 4 4.1 Introduction to chapter 4: what is Google Earth? 4.1.1 Using Google Earth 4.1.2 Viewing the Globe 4.1.3 Changing Languages 4.1.4 Important technical points to note 4.1.5 Using the navigation controls 4.1.6 Finding places and directions 4.1.7 Display tools 4.1.8 Using the overview map 4.1.9 Viewing preferences 4.1.10 Viewing a location in Google Maps V 66 67 67 69 69 70 70 71 73 73 74 74 Contents Humanitarian Mapping Data Collection GPS Google Earth 54 54 55 55 56 56 57 58 59 60 60 60 60 61 61 61 62 63 64 65 QGIS 3.1 Introduction 3.2 Before your field mission 3.3 Coordinate systems and datums 3.3.1 Coordinate systems 3.3.2 Datums 3.4 Types of data you can collect using the GPS 3.5 Suggestions on how to use GPS to collect data 3.6 Recording your data 3.7 Back at base 3.8 GPS Utility 3.8.1 Connect to GPS or GPS Utility 3.8.2 Downloading data from GPS to GPSU 3.8.3 Saving data 3.8.4 Uploading data to a GPS 3.9 GPS base maps 3.10 Final thoughts Appendix 3A: GPS checklist Appendix 3B: Waypoint recording sheet Appendix 3C: Examples of GPS unit functions Appendix 3D: GPS and Smartphones Annex Chapter 3: An Introduction to Global Positioning Systems (GPS) Field Guide to Humanitarian Mapping 4.2 Layers 4.2.1 Basic layers 4.2.2 Terrain elevation 4.3 Adding new features 4.3.1 Create and edit folders and placemarks 4.3.2 Quick guide: how to create and edit folders and placemarks 4.3.3 Advanced folders and placemarks 4.3.4 HTML 4.3.5 Basic tools: Creating a path or polygon 4.3.5 Basic tools: Measurements 4.4 Using image overlays 4.4.1 Image overlay basics 4.4.2 Advanced image overlays 4.5 GPS and Google Earth 4.5.1 Using GPS Devices with Google Earth 4.5.2 Importing GPS Data 4.5.3 Real-time GPS tracking 4.6 Saving and sharing Google Earth data 4.6.1 KML 4.6.2 Sharing ‘Places’ Information 4.6.3 Sharing data over a network 4.7 Google Earth add-ons 4.8 Saving and printing images 4.8.1 Save current view 4.8.2 Printing 4.8.3 Memory and disk cache preferences 4.9 Google Fusion Tables 4.9.1 Some basic features of Google Fusion Tables 4.9.2 Visualising your data on Google Maps 4.9.3 Exporting data as a KML for use in Google Earth Appendix 4A: Quick reference guide Appendix 4B: Entering coordinates in Google Earth Appendix 4C: Google Earth keyboard equivalent commands Appendix 4D: Useful websites for Google Earth VI 75 75 76 76 76 77 80 82 83 84 85 86 87 88 89 89 90 91 91 93 94 95 97 97 97 97 99 99 103 105 106 107 108 109 www.mapaction.org VII Contents Humanitarian Mapping Data Collection GPS Google Earth 110 111 111 111 114 114 114 115 115 116 116 117 117 118 118 118 118 118 119 119 119 120 120 120 121 121 121 122 123 125 125 126 127 127 128 QGIS 5 How to use chapter 5 5.1 Introduction: getting started with Quantum GIS 5.1.1 Download Quantum GIS 5.1.2 Basic layout 5.2 Creating and saving a new project 5.2.1 Loading and saving an existing project 5.3 Data 5.3.1 Raster data 5.3.2 Vector data 5.3.3 Adding data to your project 5.4 Navigating QGIS 5.4.1 Zoom in and out 5.4.2 Docking and undocking Views 5.4.3 Panning 5.5 Using the map legend to control the layers 5.5.1 Changing the layer name 5.5.2 Changing the drawing order 5.5.3 Removing a layer from the map 5.6 Vector properties 5.6.1 Map layer symbolisation 5.6.2 Adding a label to a layer 5.7 Selecting features 5.7.1 Select features tool 5.7.2 Select feature by querying attributes 5.7.3 Exporting a selection of features 5.8 Importing other data sources 5.8.1 Google Earth 5.8.2 Data from tables and reports 5.8.3 Data from GPS 5.9 Attribute data 5.9.1 Creating an attributes table 5.9.2 Adding new columns to your table 5.9.3 Editing your attributes table 5.9.4 More attributes table functions 5.9.5 Symbolising features on a map Annex Chapter 5: Humanitarian Mapping for Quantum GIS Field Guide to Humanitarian Mapping 5.10 Digitising new features 5.10.1 Creating a new shapefile layer 5.10.2 Using the polygon shapefile 5.10.3 Advanced tools 5.10.4 Using these tools to digitise features on a map 5.11 Georeferencing target data using QGIS 5.11.1 Identifting target data and reference data 5.11.2 Initiating and using the Georeferencer plugin 5.11.3 The georeferencing process 5.12 Creating a map to print or for export 5.12.1 Adding a legend and other editing options 5.12.2 Modifying the properties of added items 5.12.3 Recovering the closed Print Composer 5.12.4 Saving printing and exporting 128 129 130 131 133 135 135 135 136 139 140 141 141 141 Annex Annex 1: Glossary Annex 2: Useful websites 143 147 VIII www.mapaction.org The contents of this guide are intended primarily for use by humanitarian organisations in their own operations, but can also be used as a basis for training within beneficiary communities. There is great potential for communities in hazard-prone areas to use map-based methods to enhance disaster resilience and MapAction strongly advocates the use of these techniques in disaster risk reduction initiatives, these are explored later in this chapter. In this guide, we are focusing on tried and tested technologies, readily deployable by almost any organisation, with a minimum of changes to existing systems but assuming access to a computer. The technologies described are accessible at low or no cost (beyond the basic costs of computer hardware). Internet access is required pre-mission to download software and data to set up mapping systems. However, in keeping with the realities of emergency response work it is assumed that in humanitarian field operations there can be no reliance on internet connections. The contents of this guide form one part of a package of support available from MapAction to help humanitarian organisations to exploit geospatial technologies in their work, including web-based services, data and software tools. 1 Contents Humanitarian Mapping Data Collection GPS This guide is about humanitarian mapping and also about sharing and using geographical data in non-map forms. It is intended for use by aid workers in the field or at headquarters. Many of the techniques should be equally useful in development as well as humanitarian work. Google Earth Humanitarian emergencies necessitate the fast and effective use and sharing of geographical information. Sophisticated computer-based Geographical Information Systems (GIS) have been available for over a decade but humanitarian organisations at first found them problematic to deploy and use. New, more streamlined and accessible computer-based tools make mapping technologies potentially useable by agencies and NGOs at field level. There is a growing demand from humanitarian practitioners for guidance on how to use these tools in their work. QGIS 1.1 Introduction to chapter 1 Annex Chapter 1: An introduction to mapping for humanitarian operations Field Guide to Humanitarian Mapping 1.2 How are maps useful in humanitarian work? In everyday life, we may use maps mainly for navigation. In humanitarian work however, the real power of maps is as a means of communicating and sharing the complex information that is a crucial resource in emergency response. In such situations, maps become vital tools for decision making. “ Information is very directly about saving lives. If we take the wrong decisions, make the wrong choices about where we put our money and our effort because our knowledge is poor, we are condemning some of the most deserving to death or destitution.” John Holmes, UN Emergency Relief Coordinator and UnderSecretary-General for Humanitarian Affairs 2007-2010 Of all the information needed in an emergency, the ‘where’ dimension is of crucial importance: aid in the wrong place is no help at all. Humanitarian emergencies typically affect large areas and often require responding organisations to make sense of unfamiliar geographical environments. Maps become important as tools to plan and coordinate relief interventions. In the preparation of this guide, MapAction discussed the needs for mapping and spatial information with users from a range of NGOs and humanitarian agencies, as well as drawing on MapAction’s own experience in the field during emergencies. Some of the insights gained are explored here. The use of maps is not of course limited to the post-disaster response phase. Maps are a prerequisite for understanding natural hazards, and communities’ vulnerability to them. Risk assessment by communities themselves can be supported by mapping tools – including low- or no-tech methods involving little more than sketches using paper and pencil. These methods are explored a little more in section 1.8. “ In the pre-disaster context we would like to map vulnerability and develop baselines for it. The data for these baselines would include scientific hazard data and the outputs from qualitative assessments at community level.” Bhupinder Tomar, Senior Officer Disaster Preparedness, International Federation of Red Cross and Red Crescent Societies In the disaster response phase, maps can be invaluable for making sense of the emergency and for planning response, both at individual organisation level and for inter-agency coordination. There is a need for mapped information from the earliest stage of response, during the search-and-rescue (SAR) phase. SAR teams need ways to create rapid maps of their area of operations, for Urban SAR (USAR) work this may require a high level of detail. 2 www.mapaction.org landmarks and work areas with GPS coordinates, logistics resources, and medical treatment areas.” Contents “ We need maps of the affected area showing specific hazard areas, roads, key “ Both the maps and the information displayed on them are equally important. Early in the incident maps will themselves become tools for prioritising areas of most concern. Later, the situation information on the maps will gain the spotlight – but the best way to present the information is a map.” Ramiro Galvez, UNDAC team member, Haiti earthquake, 2010 1.3 What mapping tools can my organisation use today? MapAction and other specialist mapping agencies have shown the usefulness of geographical information systems in the humanitarian world. This still relies heavily on ‘conventional’ but sophisticated and powerful desktop GIS software such as the ArcGIS and MapInfo software suites. However, many humanitarian organisations do not have the resources to acquire and deploy these mainstream GIS solutions which require significant investment in money and training. 3 Data Collection GPS We can see therefore that demand for mapped information will be great once a disaster response operation is in progress. Relief actors do not just want information related to their own operations, they also need to coordinate their programmes with other organisations – possibly dozens of them. Google Earth Charlie Mason, Logistician, Save the Children UK QGIS “ In an emergency we want maps of the affected population and displacements, major routes, other actors, clinics, water points and so on. All the things you need if you are sitting hundreds of miles away, to plan and coordinate the response.” Annex In a catastrophic disaster the landscape itself may have been changed by a natural event, such as widespread flooding. Even NGOs with long-term development programmes in the affected country may need new maps that depict the changed geography in the disaster zone. They may need to plan relief programmes for areas of the country that are unfamiliar to them, and to do so alongside new actors. Humanitarian Mapping Joe Kratochivil, USAR Specialist, Fairfax County Fire and Rescue Team Field Guide to Humanitarian Mapping Fortunately, the range of alternative methods of collecting, sharing and mapping geographical information has broadened. Since its launch in 2005, Google Earth is claimed to have been downloaded hundreds of millions of times. It is a desktop data visualisation tool with world-wide map data neatly integrated into it, useable online or offline, available free of charge to anyone with a computer and internet access in order to download it. At the same time, there has been a steady growth in the number of ‘conventional’ desktop GIS packages available under free or open-source licences. Although some of these offer functionality to rival the leading commercial GIS software packages, they are not all easy to use even in a normal work environment, let alone under the pressures of a humanitarian operation. Crowds and clouds The emergence of ‘web 2.0’ − the collaborative use of online technologies − has coincided with the mass marketing of locational technologies such as GPS. Geotagging of pictures and other content and ‘mashups’ to map this data are now being used in the development and humanitarian spheres. For example, after the Haiti earthquake in January 2010, an ‘ecosystem’ of new technology platforms for information sharing sprang up, including a mobilisation of Ushahidi.com, an online mapping network that enables members of the public (assuming they have internet access) to post reports of incidents directly to the map database. This ‘crowdsourcing’ of data can generate situational reports very quickly, and although the individual reports may be unverified, the pattern of contributed data may be very useful when compared to other information. Another phenomenon with potential benefit to humanitarian mapping is the emergence of ‘cloud based computing’ in which software is server-based rather than installed on the user’s machine, and accessed over the internet. This may not be practicable in field locations, but could work well in headquarter-based situations. We can expect to see more easy-to-use GIS software being released as ’cloud based’ applications in the near future. ‘Appropriate’ technology This guide, alongside other resources available from MapAction, aims to share with the disaster response community MapAction’s experience with basic GIS tools and methods, available at minimal cost, which are judged to be ‘appropriate technology’ for use by humanitarian organisations of any size and level of resources. However, don’t assume that spatial data can only be processed using sophisticated GIS software. Maps that are perfectly fit-for-purpose can often be created using other tools including a pad of graph paper and a pencil, or even an Excel spreadsheet (for example, to ‘map’ individual blocks in a refugee camp that are laid out on a grid pattern). Consider whether ‘low/no tech’ methods could meet your needs before investing time in computer-based methods. 4 www.mapaction.org Lat 51.675 Lon -0.604 Amersham Health Centre, open Mon-Fri 0830-1700 Attributes can be any data about the specified place. So, by adding the coordinate data to an existing data set, you have created a spatial database – data that can be mapped. As Global Positioning System (GPS) devices have become cheaper, GPS receivers are being incorporated into equipment like mobile/cellular phones, and cameras. So in future we will often have opportunities to attach coordinate ‘tags’ (geotags) to data that we collect: for example geotagging photos taken during fieldwork. This is just another way of collecting spatial data that can be shared and mapped. 1.4.2 How can we use and share our spatial data? Uses of spatial data GIS is about analysis and visualisation of spatial data. Analysis. Using computer tools, you can analyse several sets of data to create new data sets. For example: combine locations of health clinics with village data to find out how far people have to walk to their nearest clinic. Visualisation. Mainly, this means creating maps using your data, and is the main type of activity described in this guide. Sharing data Humanitarian and development actions often involve multiple teams (as a minimum, your aid organisation and the beneficiary community). So, sharing of spatial data is very important. To share data you and your partners need to find a common ‘language’ to describe your data, including: Coordinate systems. Latitude/longitude is one system, but there are many more. Fortunately, they can be translated quite easily. 5 Humanitarian Mapping Contents Attributes Data Collection Coordinates GPS Spatial data records have coordinates (‘where’) and attributes (‘what’). For example: Google Earth Spatial data is any data that has a ‘where’ component that can be recorded and mapped. Examples include: A village where you are doing a needs assessment (where is it?) A safe route for trucks to deliver relief supplies (can you plot it on a map?) A district for which you have health statistics (what are its boundaries?) QGIS 1.4.1 What is ‘spatial data’? Annex 1.4 Some key concepts Field Guide to Humanitarian Mapping File formats. There are quite a few different file formats used by GIS software, including ESRI Shapefiles, KML files, geodatabases and others. These are explored further later in this chapter. Metadata. This means ‘data about the data’. It is very helpful to others if your data has metadata fields that describe the data, how and when it was collected, etc. Types of data GIS software can handle broadly, two types of spatial data formats: raster data and vector data. A map created by GIS can easily be made up of various layers of both types. Raster data is most often a ‘picture’, either of the earth’s surface (for example a satellite image) or a scan of an existing map. The coordinates of certain points such as the corners are specified, but ‘features’ (such as a road) cannot be described or attributed specifically in the database. The name raster comes from the type of scanning process used. Vector data consists of points, lines, or polygons (areas) that have specific coordinates and attributes and can be laid out as a table. For example, a road (line feature) that starts at point A, passes through point B and C, and ends at point D, and which is called ‘Station Road’ can be held in the database with those coordinate and attribute details. A vector data file can contain many point, line or polygon feature records. ESRI Shapefiles are a common way to share vector data. 1.4.3 What kinds of spatial data may be useful in my work? Spatial data comes in a wide range of types and formats. In some cases you may have only a small amount of spatial data available for the area in which you plan to work. However, in other cases there may be a wide range of potential data sources and types. It’s useful to have some idea of the actual needs for mapped information before you start gathering and inputting the data. This will help you to make a prioritised ‘shopping list’ for spatial data. Using GIS software, all maps are made by combining spatial data layers to create the desired combination of geographic information. Types of layers of particular interest in humanitarian and development work include the following: 6 www.mapaction.org These comprise satellite or aerial photography. The images must be processed and georeferenced before they can be used. Base maps These could be a scanned (raster) image of a paper map. Or, built up from a series of vector data layers – roads, rivers, settlements, etc. Administrative boundaries Vector files showing the various levels of the country’s administrative geography (provinces, districts etc) are often essential. This is because much situational information of humanitarian relevance is collected via the normal administrative apparatus of the country; to map for example, disease incidence by district it is necessary to have map data showing the district boundaries. Contents Humanitarian Mapping Remotely sensed images Data Collection Hills and valleys can be represented by a digital elevation model (DEM) which can create a contour map layer. Google Earth has a terrain model built in. A commonly used DEM for GIS work is that derived from the Shuttle Remote Topography Mission (SRTM) dataset which is freely available from NASA. GPS Terrain Typically, the most important data on operational maps will be the ‘situation’ data. This may include locations of the beneficiary population, of aid resources, and so on. This may be data you collect yourself, or obtain from partners. It should be linked to your other work data sets – assessment data, programme plans, etc. Remember that any spatially-referenced data in a suitable format can be imported into your GIS. Google Earth Human and situation data In some countries, map production or even map possession may be treated with suspicion by some groups, which may include the government. Particularly in complex (conflict related) emergencies, data collection in the field using GPS may be misconstrued as undesirable ‘intelligence gathering’. Use of satellite image data, even if publicly available, could be problematic. 7 Annex While collecting and using spatial data for positive humanitarian purposes, it is important to be aware of safety and protection issues that could arise. QGIS 1.5 Cautions when collecting and using spatial data Field Guide to Humanitarian Mapping Ensure you are aware of and allow for any such sensitivities before you start. It is a vital principle that data collected should not cause harm to anyone. Even though you are unlikely to be collecting data on individuals, be aware of the protection issues for all communities when collecting or using data. For example, producing maps showing the locations of vulnerable displaced people could inadvertently, allow them to be targeted for violence or exploitation. It may be necessary to restrict access to such data, and derived maps. 1.6 Projections and datums Because a map has to depict the multi-dimensional surface of the earth onto a two-dimensional medium (paper, or a computer screen) all maps must have a defined projection system which involves complicated geometric calculations, fortunately carried out by the computer. You may have heard about some examples of projection systems, such as ‘Mercator’ or ‘Lambert’ but there are many of them. When creating maps using GIS, the datasets have to be re-projected to match the chosen projection of the map. With conventional desktop GIS the software has add-in tools to convert data between many different projection systems. However with Google Earth all the internal map data is projected to a standard (Simple Cylindrical projection): so any map data imported to this would need to be adjusted to this projection to achieve a high level of accuracy – however, in practice this isn’t always a problem for field mapping within a small area. When using GIS software packages that can handle a range of projection systems (including the QGIS package in the tutorial in chapter 5) it is important to know a little about projections. Firstly, it is important to understand that data that has spatial references (that is the specific locations of features) may have also been projected, although this does not have to be the case. If the data has been projected, this means that mathematical formulas have been used to covert the data from a simple geographic location (latitude and longitude) to a location on a flat surface. It is very helpful to decide early in your mapping work which projection system you will use. This may depend to some extent on the projection system used for your base map data. However, it is often straightforward to convert (re-project) the data from one projection system to another using your GIS software. You will usually set up the projection system for your new map when you first 8 www.mapaction.org 1.7 Data formats There are many different data formats that you may encounter when working with GIS. Some of the most commonly encountered are as follows: 1.7.1 Vector Shapefiles As mentioned above, ESRI Shapefiles are commonly used for GIS vector data. In fact, shapefiles are used as the standard file format by many GIS software packages including free and open source toolkits such as QGIS. So it is useful to have a basic understanding of what a shapefile is composed of and how it works. A shapefile can only contain one type of vector data—it must be either points, lines or polygons, not a mixture. In a shapefile containing say 10 points representing water wells, each point is an individual feature and has a corresponding record in the file. Each feature is described by its location and may have other information tagged to it (perhaps for example the depth of the well, and the name of the nearest village). 9 Contents Humanitarian Mapping Data Collection GPS Google Earth Another question that can be confusing is: what datum has been used? The term has several meanings in mapping and is potentially a complex topic. But in simple terms it means the reference system (global or regional) that has been applied when compiling the coordinates. It is also sometimes called the spheroid. It may be surprising, but a ‘unique’ latitude/longitude fix can be interpreted as slightly different positions on the ground, depending on the datum that has been used. This is not enough to be a problem for small or medium-scale mapping – for example locating villages. However it can still cause errors of several hundreds of metres, which would of course be a problem for some mapping applications, for example in landmine surveys. Fortunately a global standard called WGS84 is now commonly used (and is always used in Google Earth). QGIS What are datums? Annex create it, using the software. Or, the software will take the projection of the first data to be added as the ‘default’ for that map. Then, any new data that is added will be ‘re-projected on the fly’ - this just means that it will be adjusted within the map without changing the base data files. Or, you can use software tools to change permanently the projections of your data, which will speed up processing later on. Field Guide to Humanitarian Mapping If you view a shapefile in Windows Explorer you will see that it is actually a collection of individual files with the same name but different file extensions. This is because the location data (the geometry) and the attributes data are held in separate files. There may be other shapefile components, notably a spatial reference file (.prj) that can contain data about the shapefile’s geographic referencing including the projection system that has been set for the file. The screenshot above shows the file components of a typical shapefile. If you share a shapefile with a colleague, make sure that you send all the components. Also, it is not recommended to edit any of the data outside of specialist GIS software tools, because you may cause inconsistencies in the data. As a general principle, only open and edit a shapefile within your GIS software package. 1.7.2 KML and KMZ Keyhole Markup Language (KML) is the file format used in Google Earth and is now an international standard recognized by the Open Geospatial Consortium (OGC). It is based on XML and is relatively easy to understand with minimal knowledge. When KML files are zipped with related content (like pictures) the format becomes KMZ. Geodatabases Although it is also a general term for spatial databases, ESRI geodatabases are a specifically-defined format used in the latest versions of some GIS software, alongside or instead of shapefiles. 1.7.3 Raster and image data While much spatial data is held in ‘vector’ formats (points, lines and polygons), images and scanned maps are managed as a ‘raster’ such as a TIFF format. However, to be usable in GIS, raster data files must have linked data to 10 www.mapaction.org For a one-off map it may be appropriate simply to import a few base map and other data files, and store them in a single folder. However, mapping projects often grow quickly and it can become difficult to keep track of data that has been edited in various ways. So, it is strongly recommended that you start with good data management principles. Come up with a logical, simple system to name your files enabling you to remember what it represents, for example date, type of data , source and the version. This will enable you to work efficiently and keep track of your data. It also helps to have a well-organised folder structure in which to store your files. Always copy and save a version of the ’raw’ data before you start to work on it. Then, if any irreversible problems arise the original data source remains intact. Metadata and standards An important concept with spatial data, mentioned earlier, is metadata. This means simply, data about the data. Important metadata fields for a spatial dataset include when the data was collected, by whom, how it is projected, and so on. Metadata may be held inside some file formats, or attached separately for others (or even supplied on paper). Finally, it is useful to know that there are several emerging standards for spatial data that enable it to be shared effectively and automatically between systems. Examples of these are Web Feature Service (WFS) and Web Mapping Service (WMS). The technicalities of these standards are beyond the scope of this guide. Contents Humanitarian Mapping Data Collection Why is it important to manage data? GPS In this section two related topics will be explored. Data management concerns the storage of your spatial data for the mapping process. Information management (IM) is the broader discipline of using data and mapping tools effectively to support decision making in a humanitarian context. An understanding of the principles of IM is very useful to make GIS work relevant and effective in achieving positive humanitarian outcomes. Google Earth 1.8 Data and information management QGIS georeference the data – that is to define its spatial coordinates in relation to the earth’s surface. There are many specific file formats used for raster data. Maps are ‘information products’ and are only as good as the data that is used to make them. The process of gathering and organising this data must therefore be a concern of the mapper. Information management (IM) is 11 Annex Information management Field Guide to Humanitarian Mapping the process of turning data into actionable information, and providing this to users. The information management process comprises four stages: Collection Collation Analysis Dissemination Some tips are provided here, from the point of view of practical and useful map production. IM stage 1: Data collection Locating places: P-codes A recurring problem in humanitarian field work is confusion over places (towns, villages) known by differing names. For example, a village may be called one name by the residents, but by an alternative name by the authorities or by people of a different ethnic or language group. Or, two villages in different districts may have the same name. A recognised postal coding system may be very helpful if it exists, but if not, then humanitarian coordination actors (for example UN OCHA) may have created a coding system typically termed ‘p-codes’ (p for ‘place’). Labeling maps with p-codes as well as place names can aid data collection and avoid confusion. The mapper may not have been responsible for data collection, still it is important where possible to ensure that data collection is well planned and rigorous. Colleagues collecting field data should be requested to ensure that GPS coordinates are included: it is amazing how often mappers are presented with lists of data identified only by place names that cannot be found on available maps (see side bar on this page about p-codes). IM stage 2: Collation Data must be organised systematically before being input to the GIS. In a busy field environment it is essential to make good arrangements for physical handling of data documents (or data sticks left for downloading, etc). Data should be annotated immediately on receipt with date/time of acquisition (or collection, if different) and contact details of the person contributing it, as a minimum. Spreadsheet tables are a common way of holding data to be mapped. Some GIS software can read data directly from spreadsheets that are linked to the map project. When the data changes, it then becomes straightforward to update maps linked to the tables. 12 www.mapaction.org It may be appropriate to indicate on the final map any cautions about the validity of the data (for example: does the absence of a value for affected population in a district on the map mean no-one was affected there, or no data has been collected there?). Contents Humanitarian Mapping Once data has been published on a finished map it will often thereby increase in apparent authority and reliability. So the mapper should take responsibility at least to assess the likely validity of the data. This will always involve judgements about the reliability and credibility of the sources. Even when requested simply to put the provided data on a map, it is important to review carefully the data to minimise the potential for errors or misrepresentation. False assumptions about the data can otherwise slip through onto map products. A common error is mistaken ‘units of measure’, for example does the data record numbers of individuals, or numbers of families? ‘Triangulation’ of several data sources can highlight apparent inconsistencies that may require checking. Data Collection IM stage 3: Analysis It is useful for mappers to think of their aim being to get relevant and timely mapped information into the hands of users: this is not achieved simply by pushing the ‘print’ button. The dissemination of each new product must be planned. In particular, map production plans must be ‘worked back’ from the time the printed map (or JPG etc) must be received by the users: and allowances built in for problems such as the time to print the required number of map copies for a meeting, and to get them over to the venue. This sounds obvious but is easily under-estimated and maps delivered too late may be of little use for decision making. Google Earth ‘Map products’ are usually the main output of the process, but there may also be other formats, for example KML files. It is essential to have a robust management system for these products, which may grow in numbers very quickly during an emergency. GPS IM stage 4: Dissemination 13 Annex Cartography is the process of turning spatial data into a visualisation of the earth’s surface – that is, a map – that communicates as clearly as possible the most relevant and important information for the map’s purpose. There are some accepted ‘rules’ and good practices of cartography, and these should always be applied selectively with your user’s needs in mind. Otherwise, the person using your map may have to work hard to make sense of the information; or worse still they may misunderstand vital information and make poor decisions based on this, potentially with negative consequences in a humanitarian operation. QGIS 1.9 An introduction to cartography Field Guide to Humanitarian Mapping Important things to consider when designing your maps Does your map have a clear purpose? Unless you have thought about what you are aiming to communicate, you may struggle to include the right information. Is the extent of the map (that is, the area that it covers) appropriate? Have you set the boundaries of the map to include important towns or landmarks as reference points for someone who does not know the area well? Do the most important features of the map stand out clearly? If it is a logistics map then the roads and airfields etc should be prominent. For thematic maps (for example health information) then less essential landscape layers could be de-emphasised or left off the map altogether. Have you simplified colours and symbols? Often, ‘less is more’ in terms of communication. Don’t use too many different symbols or styles. A humanitarian symbol set from UNGIWG is available from http://www.ungiwg.org/map_prod.htm For more information on the symbol set contact: [email protected] Have you made effective use of labels? Even if your symbols give proportionate information on relative size (for example, numbers of casualties), consider adding labels and annotations to indicate specific figures or other information. Have you added the important ‘map furniture’? This means items in the margins of the map. In almost all cases you should include at least the following: Map title describes the main theme of the map Date (and time if necessary) that the information represents Date/time that the map was created which may not be the same as above! North arrow Scale bar and/or statement of scale Legend is a list of the symbols used and what they mean Sources of data used on the map and contact details for your organisation Have you considered displaying a map grid? Some software gives options to show grid lines or border markings for various coordinate systems. Choose what will be most useful to your users (if they have their GPS receivers set to UTM, then make that the map grid). 14 www.mapaction.org You can often combine several computer and other tools to add information to basic maps: for example take a ‘screen print’ of a map created using GIS software and import it into Microsoft PowerPoint, or Adobe Photoshop, to add more graphics and annotations – or even use a marker pen! Contents Although it is a good discipline to apply all the above principles, you should not of course allow cartographic aesthetics to slow up the creation and issuing of maps that are important in an emergency. Humanitarian Mapping Final thoughts on cartography: practical map-making in the field Data collection for community-level mapping Data to be collected should be based on the analysis of potential risks, the incidence of previous disasters, and the vulnerability of the population. There are many guides on collecting data for various stages of the disaster cycle. Some organisations have their own systems and guidance. A good collection of methods for risk assessment can be found on the ProVention Consortium website: GPS Google Earth Computer-based tools are not essential for community risk mapping. At their core, maps are visual expressions of measurements. You can compile sketches, data from assessments and notes into representations of the region you are looking at using simple tools like pen and paper. In a situation with no time or resources a map drawn on paper can be enough to help to identify the most at-risk areas of a settlement, and to mark the location of valuable services such as water resources. QGIS Community-level mapping is a powerful method for disaster risk mitigation and preparedness. It is driven by input from the beneficiary participants; this benefits the plan output with a broader overview of the area, while allowing the community to be involved. Local people can, using simple maps that they have created, quickly see and analyse important patterns in the risks they face. Data Collection 1.10 Community-level mapping techniques Methodologies for vulnerability and capacity assessments (VCA) can be found on the IFRC’s website: http://www.ifrc.org/what/disasters/resources/publications.asp 15 Annex http://www.proventionconsortium.org Field Guide to Humanitarian Mapping The first step is to collect all the necessary information you have available to you, this could include: Studies and analyses of hazards, vulnerabilities and risks. Collection of information on past emergencies taking into account probability, frequency, location, magnitude and potential impact climate, topography. Number of people at risk derived from population data, population’s proximity to risk, local infrastructure, available essential services and land use zones. Geographical location is an overview of the main features of the settlement and its surroundings; fields, roads, infrastructure, rivers and land use. Define and prioritise geographic zones to assist with the development of highlighting areas at risk. Creating the community risk map When drawing your community map, try to keep the overall scale as accurate as you can, but don’t be too worried about this. If in a vehicle use the odometer (kilometre/mileage counter), if on foot keep an idea on how many steps you have taken. Start from a known geographical point and work outwards from this in a logical way, sketching in key locations first. If you want to re-use the sketch map at a later stage it is important that you use good quality paper. It may help to use graph paper as a spatial reference. For advice about map layouts, symbols etc see section 1.7. 1.11 GIS software recommendations Software that is used to create, manage, analyse and visualise geographic data is usually referred to by the general term ‘GIS software’. In risk analysis of disasters, emergency planning and response several different groups of GIS functions are required. Before any geographic analysis can take place, or maps be produced, the data needs to be collected from field assessments, maps or satellite imagery, or acquired from other data owners. Data from new sources needs to be previewed and eventually integrated with existing data. To answer specific questions, for example which organisation is working in which area, or which displaced persons camp is affected by disease outbreaks, the spatial data can be queried and analysed. However, some specific analysis tasks may need the data to be transformed and manipulated first, before any analysis can take place. The query and analysis results can finally be displayed on a map. 16 www.mapaction.org GIS analysis tools give the ability to ‘answer questions’ about the data and to create new outputs: for example to create a new map layer showing travel times to clinics based on different modes of transport. There are also some other tools that may be used to support the above basic functions: Spatial Database Management Systems (DBMS) are mainly used to store the data, but often also provide (limited) analysis and data manipulation functions themselves. WebMap servers are used to distribute maps and data over the internet. Contents Humanitarian Mapping GIS editor tools allow you to manipulate and change your spatial data. For example, to add new locations to a data set of clinics, or to change a boundary line between two districts. Data Collection GIS viewers are software packages that allow you to view the spatial data that you have, and assemble it into relevant layers – the basis for a simple map. Some free GIS packages simply allow you to view your data in various ways, but you can do little else. GPS Desktop GIS software tools can be grouped into three basic categories. These are sometimes together termed desktop GIS. Mainstream GIS software suites typically include functions and tools from all three of these groups: GIS software is not only provided by companies such as Autodesk, Bentley, and ESRI Inc but increasingly also by free and open source software (FOSS) projects. Open software projects often concentrate on a single category especially with respect to server applications (MapServer, GeoServer) and spatial DBMS (PostGIS). Free desktop GIS software projects, such as Quantum GIS, gvSIG and MapWindow have growing user communities. Such free GIS software complements the set of proprietary software instead of competing with it. Various desktop software for GIS has been tested during research for this guide to provide a comprehensive list of software available that meets the required functions. This field guide will give direction on Google Earth (chapter 4) and QGIS (chapter 5) as they have been identified as highly capable software for the functions required in humanitarian mapping. 17 QGIS Mobile GIS tools can be used for field data collection. Both appropriate software and hardware are needed. Annex Libraries and extensions provide additional analysis functions that are not part of the basic GIS software. For instance functions for network and terrain analysis, or functions to read specific data formats. Google Earth WebGIS clients are used for data display and to access analysis and query functions from Server GIS over the internet or an intranet. Field Guide to Humanitarian Mapping Alternatively however, the following software packages and resources may also be useful to your organisation. Low-cost alternative GIS software tools OS Geo Foundation. Support for custom functionality/programming www.osgeo.org/search_profile Manifold GIS. www.manifold.net Tatuk GIS. www.tatukgis.com/products/Editor/Editor.aspx Free-of-cost GIS software (but not open-source) Spring GIS. www.dpi.inpe.br/spring/index.html Developed by the Brazilian Space Agency SavGIS. www.savgis.org/es. Maintained by an official body. Spanish language software. Free and open source software OpenJUMP GIS. www.openjump.org. Smaller user community, but highly specialised on vector data editing and ease of use. Grass GIS. www.grass.itc.it. Overwhelming functionality, but difficult to use. However, QGIS can be used as an interface to Grass GIS functions. Good raster analysis for flood prediction. gvSIG. www.gvsig.gva.es/. Raster analysis functionality is added from the SEXTANTE plugin a separate project www.sextantegis.com/. ILWIS. www.ilwis.org. This was originally developed at ITC in the Netherlands has good tutorials available. MapWindow. www.mapwindow.org. Good functionality and interface. The first edition of the Fieldguide to Humanitarian Mapping has a guide to MapWindow in Chapter 4 and can be requested at [email protected]. There is a tendency for international aid organisations to use several of the GIS mentioned above for different tasks. Where the tools are free, there is of course no direct cost penalty of doing this. However it does take time to learn each software package and using multiple packages across an organisation may therefore not be very efficient. 18 www.mapaction.org Within 24 hours of the earthquake, HIN’s national staff have compiled initial reports of affected communities. HIN’s international emergencies team, arriving in the capital, uses Google Earth to locate the damage reports and to make a plan for a rapid needs assessment mission. They confer with International Red Cross and United Nations disaster assessment team members and coordinate a plan of assessment actions. The teams share their plans and intended routes as KML files which can be combined and viewed by any other Google Earth user. Assembling map data While the assessment teams are gearing up, HIN’s GIS-savvy staffers incountry and at headquarters quickly come up with a data-gathering plan to assemble appropriate base map layers that can be used both in the commercial and open-source software packages that they use. They approach a wide range of data owners both within Marginalia (including the ministries of health and agriculture, universities and aid development agencies), and beyond. At this stage a MapAction team is deployed to the emergency and contact is made with HIN’s national staff. Both organisations share their map datasets. Within hours, MapAction has obtained satellite data, analysed by UNOSAT in Geneva, that identifies the areas and settlements most likely to have been damaged by the earthquake. This is overlaid on population data and the information generated is used to adjust the assessment priorities. 19 Contents Humanitarian Mapping Data Collection GPS HIN has an ongoing community water supply programme in Marginalia. Their watsan engineers have, over the past two years, built up a dataset of bore holes with GPS coordinates. In their country office one of the team has learned the basics of a free GIS software package. She has also gathered various spatial data layers including a good rivers and streams dataset surveyed by a regional conservation institution. She has shared these datasets with HIN’s international headquarters where there is a small GIS department using ESRI ArcGIS software. Google Earth A severe earthquake has struck the developing country of Marginalia. The international NGO ‘Humanity In Need’ (HIN) is considering a disaster response programme and appeal. QGIS The following is a fictitious description of how an NGO responding to a natural disaster might effectively use spatial data in its work during the emergency phase. Annex 1.12 Case Study Field Guide to Humanitarian Mapping Case Study continued: combining data to create maps for decisionmaking HIN’s assessment team in the field sends by satellite phone the most urgent data that it has collected, including GPS coordinates of key roads into the affected area that have been blocked by landslides. On their return to base the following day, their village assessment reports are tagged with GPS waypoint numbers and the routes they used to avoid the landslips have been tracklogged. All this data is quickly downloaded onto computer and shared with other agencies, notably with MapAction which is producing overview maps of assessment activity, damage and the most urgent humanitarian needs. Due to its local sectoral expertise, HIN takes a key role in the Water Sanitation and Hygiene (WASH) Cluster. Its dataset of water boreholes is combined with other spatial data, including health data, to produce maps that identify communities lacking secure water supplies who therefore become priorities for assistance. International relief donors both within and outside Marginalia find the maps that HIN’s staff have produced during the emergency to be very important ways to assimilate and understand the humanitarian situation, and give them confidence in committing relief funding early to the most needy areas. The above „case study‟, while fictitious, gives an insight into the multiple ways in which mapping and sharing of spatial data can be used practically by any relief agency or NGO to enhance its emergency response. 20 www.mapaction.org Contents Chapter 2: Geographic data collection This section introduces key concepts to be aware of in using geographical information and in identifying useful data sources. Section 2.2 focuses on the immediate response to an emergency: the sorts of geographical information you can lay your hands on quickly, whether a simple reference map of the country or a first indication of the area hit by a disaster. In this case, a paper map or a simple graphic file (such as .jpg ) is often most effective, before delving into GIS territory. Next are GIS data sources, sections 2.3 and 2.4 are linked. Section 2.3 takes several often-used categories of data – such as administrative boundaries, gives them an overview and points to key data sources. 2.4 then gives details of how to access and use each of those data sources. The final section, 2.5, looks at managing geographical data sets. This rather ‗dry‘ topic becomes crucially important when datasets are shared between individuals and teams, when they change over time and when old data are used again for new projects. Often this realisation is not made until too late, so we have included some suggestions and examples here. Data Collection GPS Ultimately, the layers you choose and use will be determined by the requirements of your project. However, as an introduction at this stage and as a reference guide for future use, this chapter surveys a wide range of geographical information sources. Google Earth In humanitarian mapping, a scenario typically runs like this: I have some data about a project or an emergency – we‘ll call this situational data – but I need some further layers, either to provide context to a map or to undertake a geographical analysis. This chapter shows where to find such layers – termed broadly as background or base layers – and looks at the practicalities of using them. Humanitarian Mapping 2.1 Introduction to chapter 2 21 Annex The datasets referred to here provide a wide range in their level of detail. Some are suitable only for overview mapping, at scales of around 1:1,000,000, while others will work at larger scales of 1:50,000, though rarely more than that. Note that while GIS software allows a map to be displayed at almost any scale, by zooming in and out, the map will only be meaningful if it is matched by detail in its data layers. QGIS 2.1.1 Scale and geographical scope Field Guide to Humanitarian Mapping Sometimes the concept of nominal scale is used; the scale at which data were originated (such as roads traced from a 1:250,000 road map) or can meaningfully be used. This applies particularly to vector data (see section 1.4). In the case of raster (gridded) data, the resolution is the key; that is, the size of the area that each grid cell, or pixel, covers on the ground. For satellites, this varies from 8 km to 1 km for meteorological satellites, and 250 m to less than 1 metre for imaging satellites. In terms of coverage, the datasets listed are global or near-global. In most cases, the scale or resolution is fairly consistent, though some vary according to the level of mapping effort; the crowd-sourced projects OpenStreetMap and Google MapMaker are examples. In this publication, we have not attempted to list sources specific to individual countries or areas. For more local datasets, some suggested starting points are: National mapping agencies (see www.unsalb.org) and other government departments relevant to your work. NGOs working in country In addition to humanitarian NGOs, conservation organisations often have useful data holdings. UNOCHA or other locally active UN agencies. Local commercial data providers 2.1.2 Data quality A map, by virtue only of being a map, is often seen as having a certain authority about it. The same applies to map data. In both cases, the perceived authority may be spurious. Due to this, some quick data quality checks are recommended. The important aspects will vary according to your application, but as a guideline: Source. Do you know the data source(s)? How reliable is it? This doesn‘t refer only to the agency or person you received the data from, but to the origin of the data. Dates. When were the data originally generated? Over what period were, or are they valid? Might things have changed significantly? Quoted dates may be misleading, often referring to re-publications of the older datasets. Positioning. Is the coordinate system defined? Is your area of interest covered? Does it overlay with other data sets? Geography. When you view the layer, do the details look ‗right‘? – The shapes of roads and rivers for example – particularly in areas that you know on the ground. Do they match other data sets? 22 www.mapaction.org Within MapAction, we have found that data providers greatly appreciate feedback on how their products are used, especially where they have to justify their service to funders. Most data providers are also responsive to suggestions for improving their data or their website interfaces. 2.1.4 File formats Geographical data can come in a bewildering variety of file formats. There are no ‗best‘ or ‗standard‘ formats, but there are some commonly used ones. For vector data, Shapefiles (.shp) are most prevalent – this is a format used by ESRI for almost 20 years (see Section 1.6). Increasingly, XML-based formats are being used; these include KML (for Google Earth), OSM (OpenStreetMap format) and GPX (for GPS data). Raster data are mostly provided as either (i) a common graphics format such as .tif or .jpg, with associated information holding their georeferencing and coordinate system, or (ii) one of a huge number of specialist raster formats designed for different satellites, software and data types. Fortunately, most GIS software is becoming much more ‗omnivorous‘ in the formats it can import or open. The open source Quantum GIS can open all of the formats used by the data sets in this chapter. In technical terms, QGIS handles almost all of the many formats supported by GDAL and OGR - both open source code libraries. GoogleEarth is more limited; the free version 23 Contents Humanitarian Mapping Data Collection GPS Most of the data sets in this guide are available as downloads from websites at no cost. Most can be used without restriction for non-commercial purposes, though many require an acknowledgement. So, be aware of any such licensing conditions. Realistically, if you are just checking a layer for suitability, you‘re unlikely to read a licence agreement in detail. But for maps or analyses that are published – internally or externally – be sure to observe any conditions of use. Google Earth 2.1.3 Conditions of use QGIS Documentation. Look for explanations about how data were derived and for any particular disclaimers. These will help indicate any specific strengths or limitations. Annex Attributes. Do the names of the attributes fields (columns) make sense? Field names are sometimes abbreviated, ambiguous, or unspecific. For example, which year does ―population‖ refer to? Is ―cholera_cases‖ a weekly total or a cumulative total? Does ―FoodAssistanceJune2010‖ refer to individuals or households? Also, check the attribute values themselves; are they complete? Again, do they make sense? For example, do the numbers or percentages tally with what you expect? Field Guide to Humanitarian Mapping opens only a few raster and vector formats. Among the benefits of the paid-for Pro version is opening Shapefiles (.shp) and MapInfo‘s .tab files. Many free utilities exist however to convert between formats. Similarly, QGIS can be used to open a Shapefile and save it as a Google Earth .kml file, for example. 2.2 Forget GIS, I just need a map How might I use this? Before going ahead with the survey of GIS data sources, this section focuses on a particular need for geographical information when speed is of the essence. As news of a disaster unfolds, hard data are likely to be non-existent. Rather, the decisions on whether and how to respond typically depend on whatever scraps of information can immediately be found. Sources of breaking news with geographical content BBC News AlertNet www.trust.org/alertnet/news/ Global Disaster Alert and Coordination System (GDACS) www.gdacs.org Earthquakes: US Geological Survey earthquake.usgs.gov Hurricanes / tropical cyclones: NOAA Hurricane Center www.nhc.noaa.gov Websites of local newspapers and press agencies If it looks as though a response is likely, some basic geographical questions typically emerge: what is the physical setting, in terms of rivers and terrain? What is the access and transport infrastructure? Do we have any indication of the population that is potentially affected? Further quick reference mapping Online mapping services. It is worth comparing the information shown on the well known providers such as Bing, Google, OpenStreetMap (OSM) and Yahoo. At this stage, a simple print out or screen-save can be useful. A particularly useful service has been established using the OSM database. www.maposmatic.org asks you to define an area, then produces not only a PDF map but an index to the area, cross-referencing street names and place names. Being a PDF makes it particularly portable and suitable for large format printing. 24 www.mapaction.org CrisisMappers mailing list (www.crisismappers.net). The list usually carries news of emerging online mapping resources and crowd-source initiatives in response to particular emergencies. Scanned topographic maps. See Section 2.3 for sources of more detailed maps of some areas, usually available as simple graphics files for quick viewing as well as georeferenced examples. The next section returns to sources of GIS data, whether for access in an emergency or for a ‗slow time‘ mapping, research or data preparedness project. Contents Humanitarian Mapping Data Collection Dedicated rapid mapping services. ReliefWeb quickly hosts new maps produced by various agencies in response to the current emergency, as well as keeping an archive of previous maps. Also check emergency mapping agencies such as UNOSAT, Logistics Cluster and iMMAP. GPS Paper maps. Our enthusiasm for technology can make us forget that some of the best reference mapping is still in paper form. If a big map shop is not in reach then next day delivery is usually possible. Some good UK retailers, with web catalogues: Elstead Maps, The Map Shop, MapsWorldwide, and Stanfords. These are a country‘s administrative divisions, by convention numbered according to their hierarchical rank and named differently in most countries. For example, in Pakistan: country (level 0), province (level 1), district (level 2), tehsil (level 3) and union council (level 4). What might seem like rather mundane information becomes crucially important in emergency and humanitarian contexts. Most data about a situation and its humanitarian needs come from existing structures of local government, ministries, UN agencies and NGOs, all typically organized to follow the administrative structure. Hence humanitarian mapping often involves linking a table of, for example, health data with a GIS layer of each district of a region. 25 QGIS Administrative Units Annex This section takes commonly used categories, such as elevation and transport, gives an introductory overview, and lists several likely data sources. Details of each specific data source are given in the next section, 2.4. The categories used here are based on the categories in MapAction‘s system of data naming, described in detail in Section 2.5. Google Earth 2.3 Data layers: key categories Field Guide to Humanitarian Mapping To learn a country‘s administrative structure and find listings of the higher level units, the first stops are: Statoids (www.statoids.com) Wikipedia GIS data, in the form of polygons with related name attributes, for administrative levels 1 and 2 are available for all countries. Finer sub-divisions, which are often the most useful for mapping purposes, are more variable in their availability. Sources Global Administrative Unit Layers (GAUL) Second Administrative Level Boundaries (SALB) Global Administrative Areas (GADM) Elevation Elevation, or height, data are typically used for two purposes: On maps, to give a visual impression of the terrain of an area, whether by contour lines, colouring or shading. Although terrain is not always relevant, it is often used in geographical overview / orientation maps and in transport and flood maps. In analysis, for example to identify low-lying flood-prone areas; steep landslide-prone slopes; or flat zones suitable for camps and other facilities. Although topographic maps conventionally show elevation by use of contour lines, most GIS elevation data sets are in raster form. These are known as Digital Elevation (or Terrain) Models (DEM / DTM), in which each cell holds the average elevation of that grid square. For example, a DEM of Tanzania would contain cell values between 0 and 6000 metres, from sea level to the top of Kilimanjaro. One of the most used sources of DEM data is the ‗Shuttle Radar Topography Mission‘ – referred to as SRTM. Its near-global coverage has a resolution of 90 metres which makes it detailed enough for scales of up to around 1:50,000; and it is freely available. The dataset has existed for about 10 years, so many gaps and errors have been removed. Greater resolution, around 30 metres, is available from the Global Digital Elevation Model (GDEM), derived from ASTER satellite. However, for now, it is considered to be generally less accurate then SRTM. A ‗raw‘ DEM dataset can be used analytically in a GIS. However when first displayed with GIS software, it usually appears in grayscale, from black to white, indicating the height values. More natural colouring can be achieved by applying a colour ‗ramp‘, where different height ranges are shown by different colours. 26 www.mapaction.org Sources 90 metre DEM: SRTM 30 metre DEM: ASTER GDEM Shorelines: NGA Shorelines Coloured and shaded: NaturalEarth Contents Humanitarian Mapping Most GIS software has the ability to create contour lines from a DEM, at an interval specified by the user (for example, 100 metres between contours). Other measures can also be derived from DEM data, slope angle (or steepness) being one of them. If contour data are available (in vector format), then GIS can be used to create a DEM dataset by ‗interpolation‘, with a user-specified resolution. Data Collection Alternatively, NaturalEarth can be used as a quick source of ready-coloured image files; not surprisingly, these cannot be used for any analytical work, but they do look good on a map. A simple map scan (or even a digital photo of a map) can be used by itself for reference using any photo-viewing software. It can further be annotated and shared in programmes such as PowerPoint or PhotoShop. However, to overlay other data in a GIS, the image must be georegistered – that is, it must have geographical coordinates. These are usually contained in a small ancillary ‗world‘ file: a .jpg scan would have a .jgw world file, for example. Fortunately, most of the sources listed here provide scans that are already georegistered; specific notes for different data sources are given in the next section. If you have map scans or photographs that are not already georegistered, then this process can be done either using GIS software (including Quantum GIS), or, in a more approximate way, using Google Earth (see Section 4.4). 27 Google Earth QGIS Another GIS use for scanned maps is to trace (or ‗digitize‘) specific features from them to create new vector layers. For example, the locations of settlements could be manually digitized from a scan, with the settlement names added as attributes. Similarly, roads networks are often digitized. Annex These are ‗conventional‘ general-purpose maps – like Ordnance Survey maps in the UK or USGS Topographic maps in the USA – that have been scanned (i.e. in raster format) and used in a GIS. These can provide a useful ‗short-cut‘ to a detailed base map. There is no need to assemble many separate layers, nor to spend time assigning colours, symbols and labels, as the cartographic work has already been done. For this reason, however, they should only be used where such a level of detail is needed; they generally provide too much detail to be used as the background for a thematic map. GPS Map scans Field Guide to Humanitarian Mapping Sources Russian scanned topographic maps: MapStor / PoeHali University of Texas, Perry-Castañeda Library Map Collection Settlements ‗Settlements‘ refers to a wide range of places where people live, from large cities and country capitals through towns and villages to loosely-defined rural habitations. They are a feature of most maps, whether for orientation and reference – like cities and large towns on a country map – or for more detailed operational planning and navigation on a local map. Settlement datasets are also used for pin-pointing locations in humanitarian work. For example, a message comes in reporting, say, a new aid agency field office, a security incident, or an update of malaria cases, but a placename is the only clue to its location. Unless the place is already known, a geographical list of settlement locations is needed, this can be provided by GIS data (likewise, data on Administrative Units, covered earlier, are also useful for this purpose.) The result might be to map the features, or, as MapAction has found several times, to provide coordinates to field parties or helicopter pilots. Settlement data are usually in vector format, typically as points, though in some cases polygons might be used to define the extents of urban areas. Attribute data will normally contain place names, although be aware of variations in spelling and transliterations. ‗Richer‘ settlement data might also contain population and other demographic attributes. The best sources of settlement data are often national mapping agencies or other organizations already working in a country; where time allows, it is worth contacting them. However, for initial use, or in emergencies, there are several increasingly useful global sources. Sources NGA Geographic Names Server OpenStreetMap Google MapMaker Transport infrastructure One of the key data categories in humanitarian mapping. This includes roads, tracks, airfields, railway lines, sea ports, and, in some places, inland waterways. Of these, roads are the most frequently used for mapping, whether for orientation, planning, or navigation. In many countries, authoritative roads data either do not exist or are not made available. Until recently, the main source of global transport 28 www.mapaction.org There is a huge range of humanitarian applications of satellite imagery and remote sensing, including, for example, weather forecasting, agricultural productivity and disease modeling. Such work is generally undertaken by agencies with specialist capacity and by research teams. In an emergency context, one such agency is UNOSAT, which provides map products and data derived from remotely sensed data. An example is flood extent mapping: the view of flooded areas from space is often obscured by clouds, but the wavelengths used by RADAR satellites penetrate cloud cover, so, with the right data, software and processing techniques, flood maps can be rapidly produced and updated. However, this guide does not set out to cover the vast topic of using and processing satellite imagery. Instead, we focus on a few readily-available sources of imagery, which require little or no processing. The foremost of these is the increasingly ubiquitous Google Earth – Chapter 4 shows how it can be used not just to display detailed imagery, but to create, manage and share humanitarian map features. The question often arises: is it possible to use imagery from Google Earth (or Yahoo and Bing maps) in a GIS? There are several options listed below, although in each case before using them you should check your usage against the relevant terms of service – for example, the Google Maps/Google Earth APIs Terms of Service, especially 10.1.3, ‗Restrictions against Data Export or Copying‘. One option is to save a 29 Contents QGIS Satellite imagery Google Earth GPS OpenStreetMap Google MapMaker Logistics Cluster SDI-T VMAP Annex Sources Humanitarian Mapping Data attributes are particularly important in road data. The ability to distinguish between dirt tracks, seasonal roads, and all-weather highways, for example, is crucial to a map user making decisions about routings, loads, and vehicles types. Particularly in disaster situations, transport conditions are likely to change rapidly, due to earthquakes, flooding, debris, or security constraints, so for operational use a system to record and map such changes is needed. Data Collection data was the military-derived ‗VMAP Level 0‘, which was only suitable at scales of 1:500,000 or less and was becoming outdated. Recent years have seen a great improvement in transport data, mainly through ‗crowd-sourced‘ data sets. Care is still needed however; tracing the course of a road from a satellite image is relatively easy, but determining its surface, condition and suitability from the same image is not always possible. At a national level, a locally produced road map is often useful for reference and cross-checking. Field Guide to Humanitarian Mapping screenshot and georegister it in a GIS; another is to use a utility like Google Satellite Maps Downloader that saves and mosaics imagery from online mapping services such as Google‘s; and specifically for Quantum GIS, the plug-in called OpenLayers displays online maps and imagery just as any other layer, except that it can only be displayed onscreen, and not printed or exported in a map. If you are likely to make much use of high-resolution satellite imagery of a specific area, the best option could be to buy a license from a commercial provider. This may be the same or similar to imagery in Google Earth, but you will both have a license to use it and will have access to the full image resolution. One of the quickest ways to see what is available is through Google Earth: in Layers, choose More, then three providers are listed: GeoEye, Spot Image, and Digital Globe. Satellite data that is available free of cost, and generally without license restrictions, is usually of lower resolution. This however can be good for many applications, particularly those involving, for example, land use and land cover, forest cover, habitat mapping, agriculture, urban mapping and fire extents. One of the most-used sources of such imagery is Landsat, obtained worldwide by a succession of NASA satellites since 1972, and with a resolution of 30 metres (and since 1999, 15 metres for the ‗panchromatic‘, or black and white, band). The easiest sources for Landsat data are the USGS‘s Earth Explorer and the University of Maryland‘s Global Land Cover Facility. Images from the MODIS (Moderate Resolution Imaging Spectroradiometer) satellite are made available for some areas in a particularly easy-to-use format, via NASA‘s Rapid Response system. There is a trade-off: the spatial resolution is relatively low, at 250 metres, but the temporal resolution is very high, with a one day repeat time for most of the earth. Further advantages are next-day availability of images for certain ‗subset‘ regions, and provision in a simple JPG format that can be opened and viewed in GIS software, including Quantum GIS, without any processing. Typical humanitarian-related applications are seasonal changes in vegetation, monitoring of burned areas in tropical grassland and bushland, and an approximate but quick indication of flood extents. These images also make good material for training courses, being so readily downloaded and viewed, and showing interesting information. Sources Google Earth Earth Explorer Global Land Cover Facility (GLCF) MODIS Rapid Response 30 www.mapaction.org Sources Afripop (for most African countries) Gridded Population of the World (GPW) and the Global Rural-Urban Mapping Project (GRUMP) LandScan 2.3.1 Further sources of data Environmental Aspects (see also Physical) Protected areas (national parks, etc): WDPA Land cover change, fire, flooding: MODIS Rainfall: TRMM, GSMaP Land Use GLC2000 MODIS 31 Contents Humanitarian Mapping Data Collection GPS Google Earth Ideally, population data are obtained from a recent, reliable census, or projections from an earlier census. While such data generally become available from local sources during the course of a disaster response or a project, most rapid responses must make use of readily-available estimates of population, some of which are listed here. These datasets are grid-based (e.g. people per km²) and are compiled from a variety of sources; these might include census data, if available, or indirect measures of population such as the proximity to roads or the detection of light made at night. Such data can be used to give a indication of variations in population density, but are not intended to give accurate, absolute numbers nor to give specific local detail. QGIS Basic demographic data – numbers of people – are often a key factor in humanitarian work. In a disaster, a rough estimate of the number of people affected by an event can quickly be made by overlaying existing population data with the extent of the disaster. This estimate is crude, but helps to plan the size and location of initial assessments and responses. Similarly, when assessment results do become available, the actual number of people believed to be in need of assistance can be compared to the ‗baseline‘ population to determine the proportion of people affected. And in longer term humanitarian and development projects, more detailed demographic information will generally be used. Annex Population Field Guide to Humanitarian Mapping Physical (see also Environmental Aspects) MODIS Soil and geology: Soil Map Archive Rivers: HydroSHEDS Rivers: African Water Resource Database (AWRD) Points of Interest NGA GNS Google MapMaker 2.4 Datasets and data sources African Water Resource Database (AWRD) www.fao.org/fishery/collection/awrd/en A set of data and custom designed tools (programmed to run under ArcView 3) combined in a GIS aimed at facilitating responsible inland aquatic resource management with specific focus on inland fisheries and aquaculture. The site plays host to many links to other relevant organisations and websites. Surface waterbodies, watersheds, aquatic species, rivers, political boundaries, population density, soils, satellite imagery and many other physiographic and climatological data as well as a plethora of literature can be reached using both internal and external links. AfriPop www.afripop.org/ Fine resolution satellite imagery-derived settlement maps are combined with land cover maps to reallocate contemporary census-based spatial population count data. The production of the Afripop dataset uses simple and semi-automated methods with the operational application in mind. Population data for individual African nations is accessed quickly and simply by selecting a country on an overview map. The user is then directed to a raster map of that country with associated metadata and ‗blow-ups‘ of areas of interest. Download is achieved by submitting a short form. The file arrives as a .zip, with a .flt and a .hdr enclosed. ASTER GDEM wist.echo.nasa.gov Requires the user to create an account. Lengthy but incredibly detailed search to define parameters. Data must be ordered and paid for. 32 www.mapaction.org Contents Cloudmade (OSM) downloads.cloudmade.com OSM XML, Garmin map files, Osmosis country bounding polygon, Shapefiles, Navit maps, GPX POI, TomTom POI and adobe illustrator files can all be downloaded from Cloudmade. There is also a resource for downloadable mapping tools. Humanitarian Mapping A simple to use but very powerful map creator. The basemap can be defined as practically anything with the option add an indefinite number of layers. The layers can be chosen from a precompiled list in ArcGIS Online, from resources on the web or from a user-specified GIS server. The final map can be downloaded, printed or shared by ‗linking‘ it to another party. There are extensive help files to get you started using ArcGIS online. Data Collection ArcGIS Online www.arcgis.com See section 2.4.2 for detailed data downloading instructions. CGIAR (SRTM) srtm.csi.cgiar.org The Consortium for Spatial Information is responsible for developing collections of data on population, poverty, climate, soils, crops, livestock, transportation, and biodiversity and other geospatial Global Public Goods. EarthExplorer (satellite imagery) earthexplorer.usgs.gov The user can define an area and a timeframe using an augmented Google Earth interface. Available datasets can be selected from an extensive list using check boxes. Once the software has located the data specified a preview and comprehensive metadata is available for viewing before download. 33 QGIS An extensive list of data sources from many suppliers. Categories include (but not limited to): economic activity, environmental health, natural hazards, population and poverty. Method of downloading data is particular to each site respectively. Annex www.ciesin.columbia.edu Google Earth GPS CIESIN Field Guide to Humanitarian Mapping FAO GeoNetwork www.fao.org/geonetwork Can be used to find interactive maps, GIS datasets, satellite imagery, and related applications. A simple to use, navigable map viewer allows the application of layers onto a world map from a variety of web based sources. The finished product can be saved and shared even with the option to export the map as a PDF. Downloadable data can also be accessed by selecting from a list of categories for use in GIS applications. Each ‗zipped‘ package contains the files; .dbf, .prj, sbn, .sbx, .shp and .shx. Database of Global Administrative Areas (GADM) www.gadm.org/ A database of the location of the world‘s administrative boundaries. Global or national level data can be accessed. The downloads are available as Shapefille (.shp), ESRI Geodatabase (can be opened in ArcGIS—an expensive but powerful tool), RData and the Google Earth format (.kmz). Data is ten downloaded in levels, from the national border down to municipal areas. Global Administrative Unit Layers (GAUL) www.fao.org/geonetwork/srv/en/metadata.show?id=12691 See also SALB Much the same as GADM above. Administrative boundaries for the entire globe are available at 3 levels. GeoFabrik (OSM) download.geofabrik.de/osm Places, road, rail and waterway networks (amongst others) for much of the world. Available as .dbf, .prj, .shp, .shx packaged together in a .zip file. Can be viewed in a GIS software application such as QGIS—see chapter 5. Global Land Cover 2000 (GLC2000) bioval.jrc.ec.europa.eu/products/glc2000/glc2000.php Vegetation maps for much of the globe. A PDF is available for quick viewing before committing to a download, this opens in a new window of your browser. A coloured legend accompanies each map. A short form must be submitted to allow access to the download. 34 www.mapaction.org Contents A large selection of satellite imagery from a range of sensors. Including (but not limited to) Landsat, MODIS, SRTM, ASTER GDEM, Quickbird and Orbview. See section 2.4.3 for detailed downloading instructions for GLCF data. GIST gist.itos.uga.edu Humanitarian Mapping Global Land Cover Facility glcf.umiacs.umd.edu Global Map (ISCGM) www.iscgm.org Recommended alternative: Natural Earth Data Collection The Geographic Information Support Team. The user can contribute to server based maps by adding points of interest and features. Additions are verified by Google before being published. Countries available for editing are limited. Features may also be mapped without being published allowing the user to create and print personal maps. Gridded Population of the World, version 3 (GPWv3) and the Global RuralUrban Mapping Project (GRUMP) sedac.ciesin.columbia.edu/gpw/ Provides population density, settlement data, urban extents and sub national administrative boundaries for much of the world. Contents is tabulated on the download page with additional information for each country. 35 Google Earth Google MapMaker (roads, points of interest) http://www.google.com/mapmaker QGIS See Chapter 4 for Google Earth operating instructions and mapping techniques. Annex Google Earth earth.google.com As a source for high-resolution imagery that can be saved, georegistered and used in GIS, with due consideration to terms of use. GPS Global Satellite Mapping of Precipitation (GSMaP) (rainfall) http://sharaku.eorc.jaxa.jp/GSMaP_crest/ Field Guide to Humanitarian Mapping HydroSHEDS (rivers) http://hydrosheds.cr.usgs.gov/ ‗Hydrological data and maps based on SHuttle Elevation Derivatives at multiple Scales‘ Drainage basins, catchments and watershed maps derived from high resolution SRTM elevation data. Data formats include ESRI Shapefile with xml and html metadata and .prj ASCII projection file. See http://hydrosheds.cr.usgs.gov/ data.php for a detailed breakdown of available file types. King’s College London Geodata Portal www.kcl.ac.uk/geodata Collection of datasets delivered as Google Earth KML / KMZ files. Data ranges from deforestation to hydrology to climatology to biodiversity. LandScan www.ornl.gov/sci/landscan Population distribution with 1km resolution. Many applications within humanitarian mapping, such as determining potential victims to a particular disaster. Data available in ESRI grid format. Logistics Cluster (SDI-T) www.logcluster.org/tools/mapcentre/sdit The WFP Spatial Data Infrastructure for Transport . Contains data layers on roads, obstacles, aerodromes, ports, warehouses, bridges for countries of concern all over the world. Map data is available in .png. Other data such as Logistics Capacity Assessments are downloadable as PDF reports. geoportal.logcluster.org A simple and user friendly viewer that can be used to display layers constructed by SDI-T on basemaps such as SDI, OpenStreetMap and Google imagery. The map can be edited by hand within the viewer and exported as a PDF. The tool is suitable for use even by those with no GIS experience. MapAbility (VMAP) www.mapability.com/info/vmap0_index.html www.mapability.com/info/vmap1_index.html Worldwide coverage of vector-based geospatial data. It consists of geographic, attribute and textural data. VMap includes major road and rail networks, 36 www.mapaction.org See section 2.4.1 below for detailed instructions on using this site and downloading data from it. Natural Earth www.naturalearthdata.com Carefully coloured maps and overlays derived from both raster and vector sources. Can provide an eye-pleasing basemap and layers such as clean, well defined coastlines or rivers and roads as just a few examples. Datasets include Cultural: administrative regions, urban areas and infrastructure; Physical: lakes, islands, reefs and bathymetry and Raster: shaded elevation maps. These all come in small, medium or large scale. File formats include Shapefile, geoDB and Tiff. NGA Raster Roam geoengine.nga.mil Versatile ground elevation data source. Area may be selected using the mouse pointer or limits set by manual input of latitude/longitude and the pixel extent. The units of elevation and even the sun position can be specified. A raster importer can be used to convert the image to a variety of file types, some of which are accessible by even the most basic software. These include .img, .tif, .dem, .jpg, .fil and .rst among others. 37 Contents Humanitarian Mapping Data Collection Continually updated datasets of imagery acquired by a range of spaceborne sensors. GPS MODIS Rapid Response lance.nasa.gov/imagery/rapid-response Google Earth A vast resource for georeferenced topographic maps. The maps can be downloaded individually for free or in sets for a small fee. QGIS MapStor / PoeHali (Russian topographic maps scans, georeferenced) mapstor.com Annex hydrologic drainage systems, utility networks (cross-country pipelines and communication lines), major airports, elevation contours, coastlines, international boundaries and populated places. VMap 0 is based on 1:1,000,000 map scale source and VMap 1 is based on 1:250,000 map scale source. GIS software is required to make use of this data—see chapter 5, Quantum GIS. Field Guide to Humanitarian Mapping NGA Shoreline Prototype Global Shoreline Data: shoreline.noaa.gov/data/datasheets/pgs.html World Vector Shoreline: shoreline.noaa.gov/data/datasheets/wvs.html Coverage extending from 60 degrees south to 80 degrees north. Data in WGS84 coordinate system. Shorelines are seamless polyline files that can be downloaded by region. They are in ESRI shapfile format. NGA GNS (GEONet Names Server ) earth-info.nga.mil/gns/html/cntry_files.html Complete Key to attributes: www.oziexplorer3.com/namesearch/fd_cross_ref.html Source of complete files of geographic names information covering countries or geopolitical areas. The files are in a format amenable to input into geographic information systems, databases, and spreadsheets, giving end users powerful capabilities for data analysis, manipulation, and display. OpenStreetMap: see CloudMade and GeoFabrik Second Administrative Level Boundaries (SALB) www.unsalb.org See also GAUL UN project to provide second level administrative boundaries for countries worldwide. The files are downloaded as shapefiles (.shp) and (.e00) extensive metadata and a JPG preview are available for each. Soil Map Archive (includes geological maps too) eusoils.jrc.ec.europa.eu/esdb_archive/EuDASM/indexes/access.htm A collection of maps from many sources and over a large date range. Many are scanned paper maps. Content ranges from soil quality to land suitability to rivers and tributaries. Each image can be saved as a large JPG. SRTM: see CGIAR Tropical Rainfall Measuring Mission (TRMM) trmm.gsfc.nasa.gov/ The Tropical Rainfall Measuring Mission (TRMM) is a joint mission between NASA and the Japan Aerospace Exploration Agency (JAXA) designed to monitor 38 www.mapaction.org University of Texas Perry-Castañeda Library Map Collection (scanned maps) US Army Map Service Topographic Map Series: www.lib.utexas.edu/maps/ams/ Joint Operations Graphic maps (1:250,000): www.lib.utexas.edu/maps/jog/ A library of maps created by the US army. The files here are scanned maps and can be saved as JPGs. There is also a large resource of Google Earth compatible maps. Contents Humanitarian Mapping Rainfall climatology maps based on the analysis of the full TRMM dataset from 1997 to 2006. They are available in kmz format for viewing in Google Earth. Find the nearest waypoint and follow the link in the balloon to download the sub-tile which arrives as an image overlay. Data Collection www.ambiotek.com/1kmrainfall/ GPS and study tropical rainfall. Resources include: real-time 3 hourly and 7 day rainfall, global flood and landslide monitoring, hurricanes and typhoons, rain averages and anomalies and climatology among others. There are also global real-time average rainfall, rain accumulation and flood potential datasets available for Google Earth. Recommended alternative: Natural Earth See MapAbility and NGA for VMAP download sites World Database on Protected Areas (WDPA) Protectedplanet.net Google Earth VMAP 39 Annex QGIS A web based viewer displaying the world‘s national parks, wilderness areas and world heritage sites. Points of interest and diversity data can be accessed. Field Guide to Humanitarian Mapping 2.4.1 Obtaining downloadable MODIS data The URL http://lance.nasa.gov/imagery/rapid-response is one of many that can be found in the list above. Registering an account In order to begin downloading (MODIS) data from LANCE (Land Atmosphere Near real-time Capability for EOS [Earth Observing System]), a short registration form must be completed to obtain a username and password. This username and password will work across the LANCE site encompassing a range of instruments, allowing the download of data from AMSR-E, AIRS, MLS, MODIS and OMI. Note - Before beginning the registration process, ensure you have a valid and appropriate email account as further instructions and an account activation link is sent to the user by email. To create a user account: Either visit http://lance.nasa.gov/ and use the Sign Up! button at the bottom of the page, (direct link: https://users.eosdis.nasa.gov/urs/ welcome.do?appVar=LANCE). Or: Roll the mouse over DATA PRODUCTS and select MODIS from the menu bar that appears below it. In the box titled ‗Data Products‘ on the right of the screen you will notice there is a bulleted list of options under MODIS. Select Download Instructions by clicking the link. About halfway down the page that appears you will see the instruction to register together with the link; ‗EOSDIS User Registration System’ Follow the link to the registration form and fill it out. Once your details have been submitted using the button at the bottom of the form, an email will be sent to the address specified. 40 www.mapaction.org Click the LANCE Products link in the first option. There are now several approaches to obtaining MODIS data from the LANCE archives. In order to return to the Rapid Response page click the Rapid Response link seen in the text. There is a brief but informative description for each set of images together with a link to further menus from which particular imagery can be selected. Contents Humanitarian Mapping Your user account has now been activated and you may begin to download data. To return to the LANCE page; Data Collection Log in to your email inbox and click the link in the automated response from LANCE (from the email address: [email protected]). LANCE WMS is a tool for quick access to desired locations for map data. When first loaded, the world map appears. The image is by default the most recently uploaded data acquired by LANCE. GPS LANCE WMS (Web Mapping Service) Date appears above the image to the left of the screen. This allows the user to enter the date for which they require data. Either enter the date manually or use the calendar button next to the ‗Date‘ box to select desired month and day. Current Base Layer. appears above the image to the right of the screen. It informs the user of which particular image is being used for the current base layer. Click the link (the image name appearing in purple) to view information on the different spectral bands used to create the images. This is helpful for selecting the right bands in order to display desired data. Navigation. This is the cluster of 4 arrows in the top left of the image itself. These can be clicked to move the map around to display a particular portion of the image. 41 QGIS Annex The WMS tool has a number of very simple controls. These can be found onscreen as buttons. Google Earth Note - Because of this the image may appear incomplete. If this is the case, use the next most recent data. Field Guide to Humanitarian Mapping Navigation may also be achieved by Left-clicking, holding and ‗dragging‘ the image. Zoom in and out. Found directly underneath the navigation arrows. Use the + to zoom in and the – to zoom out. To zoom out to display the extent of the image, click the globe icon between + and – Zooming may also be achieved using the mouse wheel located on top of your mouse. Roll the wheel forward (away from you) to zoom in and roll it backwards (towards you) to zoom out. To quickly zoom to a desired location - Hold Shift + Left mouse button to drag a frame around the area you wish to view. The smaller the frame the further the WMS will zoom in. Applying layers and downloading the data Layers. Found as a purple button in the top-right of the image. Clicking this button will open up a menu of base layer images and an assortment of layers and other display data that can be added over it. Use the ‗Base Layer‘ radio buttons to select the image over which to lay any combination of the other data, achieved by selecting or deselecting the relevant check boxes. Overview Map. The button in the bottom right of the image will allow the user to view an overview map. This is essentially a ‗zoomed out‘ image of the current view. It allows for user orientation when viewing a closely zoomed image in the main window. Notice a scale bar appears in the bottom left of the image and the cursor position (longitude, latitude) appears in the bottom right. By clicking Permalink in the bottom right, above the Cursor position, the area you have zoomed to and the base layer and overlays selected are saved to a separate URL which can be saved and visited quickly and easily without the need to reselect the desired options. Beneath the image there are two buttons and a selector; Legend. This provides a coloured legend for the SEDAC Population Density Overlay. It allows for quick and easy understanding of the overlaid data. Click Close within the legend if it is not necessary to display it. 42 www.mapaction.org Download. Click this to begin the downloading process. Follow the instructions that appear in the prompt. Click Ok then by holding shift; drag a frame around the desired area with the Left mouse button. A dialogue box will appear with the properties of your selected download image displayed. Click Ok. Read the dialogue box carefully. If the properties of your chosen image require altering you have the opportunity to do this now. The image may be resized either by clicking the Select to Reselect a Smaller Area radio button and clicking Submit or by clicking the Select & Define a Different Image Resolution Below radio button and manually entering the pixel width and height of your image. If you are satisfied with the area you have already selected, click the Select to Download Image at Native Resolution radio button. Contents Humanitarian Mapping Data Collection Note – Only the base layer is downloadable. Unfortunately your downloaded image will not display the overlays and densities applied to it using the WMS. This can be solved by taking a screenshot of your constructed map and using it, for example, as an image overlay in Google Earth. GPS Use the selector to alter the opacity of the SEDAC Population Density Overlay. PNG Click Submit Your download should begin automatically in the normal manner. The downloaded image can be imported into Google Earth as an Image Overlay (see chapter 4), or viewed and manipulated in a GIS software package such as Quantum GIS (see Chapter 5). Download GeoTIFF file. The georeferencing information is embedded within the file itself. This information will likely include projection type, coordinates and datum values needed to specify the exact spatial reference of the image. GeoTiff files are handled by GIS software packages such as QGIS, see chapter 5. 43 QGIS GEOTIFF Annex JPG Google Earth Choose a file format by selecting one of these radio buttons: Field Guide to Humanitarian Mapping Download KMZ for Google Earth. Presents the image data in a format specifically for use with Google Earth. See - Downloading a KMZ file for use in Google Earth - below for further information. Sub sets This is an array of georectified images from across the globe. The user selects the desired area from a world map displaying which areas are available as red framed boxes or from the accompanying list of links arranged alphabetically. Once the particular subset is chosen - (some such as the FIRMS or the Antarctic subsets have additional information attached to them and in a few instances, extra sub menus from which to choose) - a catalogue of available imagery for that subset is displayed. If a choice is made in error, navigation to the previous directory can be achieved with the link in the upper left of the screen . Once the subset is selected, the user can specify the date of the image - provided it is available - and select the resolution for the particular image, the instrument by which it was taken and choose from the available colour bands. Select the image from the catalogue that is most suitable and it will open into a full size viewer. Here there are many options available to customise the output by alternating between Terra and Aqua, changing the resolution and colour bands so don‘t be too worried about trying to select the perfect combination from the previous directory. In the upper left of the screen there is a drop down menu that can be used to apply vector data layers to the image. There are several different combinations to choose from. Once your choice is made, click the Submit button. Download options There is also a list of accompanying files and download options located above and to the left of the image. Display metadata gives information about the data displayed in the image including the date it was acquired, as mentioned in chapter 1 this can be important for validating the source. 44 www.mapaction.org Downloading a KMZ file for use in Google Earth This is done on the selected subset image screen by clicking the link in the upper left corner. Note – Once link is clicked, you may need to check your browser ‗Downloads‘ folder (or equivalent) as in Google Chrome the normal download initiation notification does not appear. When download of Google Earth-compatible KMZ file is complete. Open it or select it from your browser‘s ‗Downloads‘ folder (or equivalent). Google Earth will open automatically with the data already overlaid. It is important to note that the KML overlay appears in the ‗Temporary Places‘ folder and will not be saved for future Google Earth sessions until it is moved into the ‗My Places‘ folder or saved manually using: File > Save > Save to My Places See chapter 4 for instructions on operating Google Earth. Contents Humanitarian Mapping Note – the above actions take the user to a page that cannot be returned from so it is useful to: Right click > Open In New Window on these links. Data Collection Display World File and Display Projection File contains important information about the projection of the data which is required when combining several layers to ensure they are spatially accurate relative to each other. GPS Google Earth On each subset image there is a link to ‗Usage Guidelines‘ on the upper right of the screen. Ensure you are familiar with restrictions on using and publishing imagery contained within these archives and that the correct accreditation is made. Near Real Time (Orbit Swath) Images By clicking on View Terra/Aqua Orbit Tracks at the top of the catalogue, the path of the satellite can be viewed and its position relative to the Earth‘s surface when each image was acquired. 45 Annex QGIS This is a bank of images that is continually updated. Field Guide to Humanitarian Mapping By rolling the mouse over an image in the catalogue a red frame appears over a portion of the globe to indicate the location of the image data. Once a ‗granule‘ (image) is selected it will appear in a viewing screen with a host of options in the margin to the left of the screen. Many of these options should already be familiar to you as they have been mentioned above. The image can be downloaded using the links underneath it. You will be prompted for your username and password before the file transfer can take place. Gallery These images are posted onto the website as soon as possible after they are acquired. Usually within 2.5 hours. They are displayed here because they show an event of some interest. Image from NASA/GSFC, Rapid Response. Downloading these images is simple. Select an image and click on the Pixel Size link of your choice to establish the desired resolution. The image will open in a viewer with relevant information, metadata, in the margin to the left along with downloading options. 2.4.2 Obtaining downloadable OpenStreetMap (OSM) data The URL http://downloads.cloudmade.com/ is included in the list above. This website offers many files types ready for download free of charge and users are welcome to use, reproduce and modify the available files under the condition that proper attribute is made to the OpenStreetMap community by including a link to www.openstreetmap.org on their work. Take note of the disclaimer halfway down the page stating that the maps are based on OpenStreetMap, a work in progress; so many countries have only partial or incomplete datasets. Some downloadable files are ‗zipped‘ to minimise download time. These require additional software such as WinZip or WinRAR to extract. The format of the website is very simple. The list of links in the lower portion of the website is the start of a directory tree. You can narrow your search for particular locations by selecting from each list of folders. The datasets for 46 www.mapaction.org 2.4.3 Obtaining data from the Global Land Cover Facility URL: http://glcf.umiacs.umd.edu The home page exhibits examples of imagery that can be obtained from the site along with some basic metadata for each. There are two main ways in which to obtain free downloadable data from GLCF. The first is by using the Data and Products tab which opens a library of available data types; such as ASTER, Landsat and Quickbird. Select the data source you require by clicking its button. This will take you to a page containing some metadata and citation guidelines for individual scenes (images). This is a quick and fool proof way to ensure use of the scenes is legitimate and to the provider‘s specifications. At the top of the page, under the heading ‗Data Access‘ there are the download options for the particular image set. Here can be found the alternative download method (ESDI – explained below) and in most cases a FTP library. If you are aware of what image you want and are familiar with the directory tree you can navigate to it and download it directly. For ease of navigation when using the directory pages it is advisable to open a new browser tab for each subsidiary directory. Right-click > Open link in new tab This enables the user to browse multiple datasets and not get ‗lost‘ in a directory tree. Contents Humanitarian Mapping Ensure you select a filetype that can be opened and read by the software you have available. Data Collection .osm, .ai, .img, .bin, .gpx, .ov2, .poly and .shp GPS Each ‗family‘ of datasets has the same constituent file types. Google Earth To download a particular file simply click on its associated link and the transfer will start automatically. QGIS continental and national level maps appear at the top of their respective lists but these will have little use for humanitarian mapping. This is a tool for locating desired data geographically. It can be accessed either as mentioned above, via the button in the ‗Download Data‘ box on the GLCF 47 Annex Map Search using the Earth Science Data Interface (ESDI) Field Guide to Humanitarian Mapping homepage or via the ‗Data and Products‘ button then by following the Earth Science Data Interface link at the top of the page. Note - From here you may also use the Path / Row Search and the Product Search. These are explained later. Utilising the Map Search tool Basic controls Zoom to the area of interest by clicking within the image, ensuring the Zoom button is selected. A latitude, longitude grid can be added to aid navigation. It can be found in the Map Layers tab above the viewer. To zoom the selected view centrally use the bar above the viewer To pan the map to view a different area, select the Pan button and click within the viewer. Once happy with the area within the viewer, you can click the Select window button above the viewer. This will frame the displayed area. The viewer size can be altered by using the drop down menu to the upper right of the view. There is also a button to open a help file By clicking the Reset button, the session is started over beginning. from the More advanced search options Above the viewer there are a number of tabs. Data from these tabs can be combined and are displayed together in the viewer. Date / Type. The default tab allows the user to search for data based on its date of acquisition and from a number of attributes in the scroll down list. To select or deselect from the lists, use Ctrl + Click. The ‗Update Map‘ button must be pressed after a selection is made to refresh the map and display any changes. Path / Row. Imagery is selected by entering values that relate to the satellite‘s position above the Earth‘s surface. 48 www.mapaction.org To use, simply drag the map to pan and zoom in using the slider on the left or the mouse wheel. Once your desired location is found, zoom in far enough to read the 6 digit number associated with each tile. The first 3 digits of this number are the Path and the latter 3 digits are the Row. These can then be entered into the parameter boxes on the ESDI Map Search - Path/Row tab. Don‘t forget to press the Update Map button once you have made your selection. Contents Humanitarian Mapping Lat / Long. The coordinates of a location are entered here either in decimal degrees or degrees, minutes and seconds in the format displayed under the viewer. Place. Type the name of a place into the box and press return or click the Update Map button. If several places of the same or similar name are found, a radio button list is displayed with a little further information to help you narrow your search. Click a radio button to display the desired place. An area will appear in the viewer framed in yellow, a town or city will appear as a yellow crosshair. Draw. With this tab open the icon appears above the viewer, ensure it is selected by clicking it to shade it grey. Points on the map can be clicked, each point is joined to the last. Once a selection of points has been made, further drawing options appear below the viewer. For example if you construct a shape with 3 or more points you can convert it to a polygon. QGIS Click Draw Polygon button. The polygon will then appear on the map in yellow. 49 Google Earth Annex Note - Although there is the facility to locate tiles using ESDI, the Landsat.org tool is much faster and smoother to operate. Data Collection A useful site is the Landsat.org - Path/Row Finder. This can be found at http://35.8.163.122/ortho/. GPS For example, ―WRS-2, Path 1, Row 50‖ is an area of the Lesser Antilles encompassing St Lucia and Martinique. Ascending path numbers shift the area covered westwards while ascending row numbers shift the area covered southwards. In order to cover a larger area the ‗Start Path‘ and ‗End Path‘, similarly the ‗Start Row‘ and ‗End Row‘ can be specified. Field Guide to Humanitarian Mapping Other examples are Draw Rectangle and Draw Line. Map Layers. The user can apply layers such as a Lat/Long grid and Path/ Row tile locations. Selecting your required data Once you have used the various methods to locate your area of interest it is time to establish what imagery is available. Sensory instrument types and some resolution along with preassembled products (compilations of imagery that form thematic layers) can be selected using the check boxes to the left of the screen. If you are unsure of their definitions, each one can be clicked and you are directed to an information page about the particular sensor and the data it collects or the function and make up of a product. Select one or more > Click Update Map The areas shaded red are those that contain image data defined by your selection of checkboxes. You may Select or Deselect tiles accordingly. Selected tiles are framed with a yellow border and their opacity increases slightly. Once the tiles have been selected the number of available images within the selection is displayed. For temporal data a date range can be included below the viewer. Scene properties The user can discriminate between different scene properties using the scroll menus below the view. Use Ctrl + Click to select or deselect any number in either Require or Exclude. Remember to click the Update Map button after any selection of options is made. Preview and download Provided there are available images within your search parameters you may now click the Preview and Download button directly below the viewer. The screen that follows is a table displaying each available image and a host of metadata to accompany it. The range of metadata displayed can be altered using the ‗Show/Hide columns‘ drop down menu to the right of the screen, above the table. Each image may be previewed by clicking it in the [ID] column. The preview is shown in the upper left of the screen with a summary of its metadata including the file size once the compressed file 50 www.mapaction.org Other methods of locating data The Map Search method can be used to earmark image attributes that can then be used to quickly locate an image using the FTP directory tree mentioned earlier or other available search facilities. An example would be to note the WRS - Path and Row of a scene that can be entered into the Path/ Row search via the tab at the top of the screen or navigated to in the FTP directory. Alternatively, data can be ordered to tailor specific requests. This is done by clicking the Services tab and then on the link under ‗Data Ordering Services‘. The data however is expensive. Note - On many of the GLCF pages as the site is navigated there is a ‗Quick Links‘ box on the right of the screen. This is a very quick and easy way of discovering what other data, information, software and research projects are available. It often provides alternative sources of the data currently being searched within the GLCF website. 2.5 Organising your datasets Contents Humanitarian Mapping Data Collection Once satisfied you have made the right choice of scene, click the Download button above the table to open the download screen. Click the desired link to initiate the file transfer. The download will begin in the manner normal to your browser. The file is compressed and will need to be ‗unzipped‘ before use. GPS Clicking a column head enclosed in [square brackets] will ‗flip‘ the data contained within it. Google Earth has been expanded. Clicking the preview will open a much larger image in a new tab that enables the user to assess it before downloading. A good folder structure allows you to keep data files in a structured and ordered fashion and gives a new user information about the stage of data processing on the data. 51 Annex Maintaining a good data folder minimises the risk of losing data and maximises efficient and quick data access. MapAction keeps data in a defined folder structure helping in all stages of a deployment; data preparation, incountry operations and subsequent handover of data. The folder structure is numbered to allow easy sorting and additional folders which are created take the next number available in the sequence. QGIS 2.5.1 Structure of data folders / databases Field Guide to Humanitarian Mapping An example of the folder structure used by MapAction is as follows: GIS Tasking Original Data Active Data Mapping 0_GIS_Tasking. This folder contains various tasks and could be a check list of what needs completing. 1_Original_Data. This folder contains data found originally on the area of work. A folder is created for each new data source found. 2_Active_Data. This folder contains operational datasets. This data has been assessed and thought fit for purpose. The data has been processed and renamed according to your Data Naming Convention (see file naming, below). For example a transport dataset may have been split into roads, railways, airports. 3_Mapping. This folder contains all maps whether obtained from 3rd party resources or created by you. Project files are also stored in this folder whether from Google earth, QGIS or your chosen software. 2.5.2 File naming In storing your data it is advisable to chose a symbolic name to identify the data easily both for your use in the future and when sharing data with colleagues. When naming files in MapAction a ―Data Naming Convention‖ is followed with helps to distinguish each file by its geoextent, category, theme, type and lastly its source. These are all important factors to knowing what the data is; and for what and when it can be used in your GIS. MapAction has developed over time a system that works for our operational needs. It is important that time is invested into creating a system that works for you, covering your own Geoextent. The spatial or geographical extent of the data defined as a 3 to 4 characters. This may be a country or continent but can refer to other geographies, e.g. individual admin districts, cities etc. For example for Haiti – HTI. Data Category. Any number of characters - typically four providing a broad description of the content of the data. 52 www.mapaction.org Data Type. A 2 or 3 letter code defining the geometric type of the spatial component of the layer. Valid Data Type Clauses include point (pt), line (ln), polygon (py), raster dataset (ras) and table (ta). 53 Contents Annex QGIS Google Earth GPS Data Collection Source. This describes the origin the dataset for example clusters and the corresponding lead. Humanitarian Mapping Data Theme. Any number of characters - typically three providing a more detailed description of the content of the data. Field Guide to Humanitarian Mapping Chapter 3: An introduction to Global Positioning Systems (GPS) 3.1 Introduction The information you collect during humanitarian assessments will have much greater value if others can locate it on a map. Just writing down a place name (eg of a village you visited) is dangerously imprecise: what if that village doesn‟t appear with that name on other people‟s maps? What if there are two places with the same name? If you have a Global Positioning System (GPS) receiver, you can and should use it to record the unique coordinates of the places you are referring to in reports. If you don‟t have a GPS unit, check your satellite phone; some have a GPS receiver built in and can give you your position. Increasingly Smartphones have GPS receivers, however, there are still limitations to this technology, notably battery life. For this reason a handheld GPS receiver is currently the best and most reliable tool. This chapter focuses on handheld GPS receivers but the same principles can be applied to mobile phones. Further details and considerations on the use of GPS in Smartphones can be found in Appendix 3D. Assuming you have a device equipped with GPS, this short guide is intended to help you to use the basic functions to collect data on the ground in a way that will ensure it has greater use back at base and greater value when shared with other organisations. 3.2 Before your field mission If you have a GPS receiver, make sure it works! In a new location (even after moving a few hundred kilometres) the GPS needs to be „warmed up‟. Switch it on outdoors and let it search for the satellites. This can take up to half an hour or more. After that, it will „remember‟ where it is in the world and get a satellite „fix‟ quickly when you switch it on next time. Set an appropriate coordinate system and datum – see below for an explanation. It‟s a good idea at this stage to clear the memory of any unwanted points or tracks from previous trips. Take a co-ordinate point at your base. Does it appear correct compared with any map you have? Before setting off, make sure your GPS will work correctly throughout your fieldwork. This means thinking firstly about batteries; ensure you have enough spares. Battery life can be lengthened by adjusting the GPS settings, for example by ensuring the screen backlight does not come on unless necessary. Also, there are accuracy-enhancing features (WAAS and EGNOS) that do not 54 www.mapaction.org 3.3 Coordinate systems and datums This sounds confusing, but it does not need to be! The absolute essentials to know are: Contents Humanitarian Mapping Remember that unless your GPS is the most up-to-date model with a highsensitivity antenna, it will need a clear view of the sky, place under the front or back window in the car to get a signal. Also, it won‟t work well under trees, or amongst tall buildings, or even in steep-sided valleys. You can get external antenna accessories that help with this problem. Data Collection work in most parts of the world and will drain power, so disable them via the setup menus if you can. Degrees-minutes-seconds eg N(orth) 51º 40‟ 57” W(est) 0º 39‟ 25” Decimal degrees eg lat 51.682, long -0.627 (Note - north and east are positive numbers, west and south are negative). UTM (Universal Transverse Mercator) is also widely used. It is a global system, based on a scale of metres, and has three components: The UTM zone eg 30U The X coordinate eg 0661965. This is measured across the map. The Y coordinate eg 5728316. This is measured up the map. For example, “0661965, 5728316”. The X coordinate comes before the Y. This particular notation assumes the UTM zone is already known, but it‟s not a bad idea to state this also. 55 Google Earth Latitude/longitude can be denoted in several different ways. Here are two ways of reporting the same position. It is not too important which one you use, provided you are consistent. QGIS It does not particularly matter which coordinate system your GPS is set to display, provided that you know which one you are using and note this in your report! Try to match the coordinate system to any field mapping that you are already using. Annex Coordinate systems are ways of describing a point on the earth‟s surface. The best known is latitude/longitude. Another is UTM, and there are many regional and national systems. GPS 3.3.1 Coordinate systems Field Guide to Humanitarian Mapping 3.3.2 Datums Datums are parameters within the GPS which set a known location as an origin for the coordinate system in use. We recommend that you always use WGS84, unless you are advised to do otherwise. 3.4 Types of data you can collect using the GPS There are two basic types of data that you can collect, and store within the memory of your GPS. They are waypoints (sometimes called points, or placemarks in Google Earth) and tracklogs (or tracks). Some GPS can also store paths or routes but these are less useful. Waypoints (WPs) are a record of a specific point on the ground that you have visited. On most GPS you press a Mark or Enter button, then save. The GPS then saves the coordinates at that point, and allocates a sequential number (e.g. 001) to that WP. You need to note down separately what is of interest at that waypoint (see Recording your data section 3.6). Some GPS units allow you to record a more accurate position, this is done by using the averaging function when a waypoint is marked. The averaging function takes a series points over a short period of time as it calculates its position. The most accurate way is start the averaging and then place the GPS on the ground, leave it for a period of time before stopping the averaging. The longer the averaging is left the more accurate it will be. Most GPS units can record hundreds or thousands of waypoints. They stay in the memory, even when the unit is switched off, until you delete them. Tracklogs are a record of where you have been, which can be collected automatically by the GPS as you go along. With most GPS this will only happen if tracklogging is switched on using the setup menu, although on some units, like the Garmin eTrex, tracklogging is permanently on. Tracklogs are a very good way to map the route you have travelled along. While tracklogging, you can still add specific waypoints as you go, to note particular features, settlements or landmarks along the way. The waypoints and tracks form separate datasets. Once the tracklog memory is full, some GPS units start to overwrite the earlier track. There may be various options to avoid this, such as changing the distance between tracklog points; check the setup menu or user manual if you are not sure. 56 www.mapaction.org Remember that unless your GPS is the most up-to-date model with a highsensitivity antenna, it will need a clear view of the sky, place under the front or back window in the car to get a signal. Also, it won‟t work well under trees, or amongst tall buildings, or even in steep-sided valleys. You can get external antenna accessories that help with this problem. Village-based assessments Log a WP at the centre of the village you are assessing. It may be useful to WP various other features within the village, if detailed mapping would be helpful. For a big village or town, record tracklogs along the main roads through the settlement, and gather assessment data with reference to these (eg “south of main road, to west of mosque, 150 houses partially damaged”). Flood and damage surveys You can use the GPS to capture the extent of various types of damage, eg a flood or area of collapsed buildings. Go to various positions at the boundary of the flood and take a waypoint at each. If possible, record a tracklog around the perimeter of the damage. Photographs Save WPs for locations of photographs taken, for example when recording damage to specific structures or facilities. You can then report the exact place the picture was taken. Contents Humanitarian Mapping Log a WP at the start and end of damaged road sections (for example, a flood washout). Log a WP at each village or settlement you pass through. Data Collection You may be travelling a „circular‟ route in a vehicle, for example. Consider tracklogging the whole route, if you have enough GPS memory. GPS Surveying features along a route Google Earth 3.5 Suggestions on how to use GPS to collect data If you position your GPS unit appropriately (and safely) in a light aircraft or helicopter, it will work well. It is „flight safe‟ because it does not transmit, it only receives. It is useful to have an assistant to record the assessment information as you go along. QGIS Surveys from aircraft 57 Annex For instructions on basic functions in various commonly-used GPS models see Appendix 3C. Field Guide to Humanitarian Mapping 3.6 Recording your data Remember that the GPS only records the WP numbers; you must also make a record of what these points represent (these are called the attributes). Some newer GPS receivers and other GPS-enabled devices such as handheld computers allow you to enter attribute information by keying it into the device directly when you create a waypoint. By all means experiment with these, but you may find it awkward in a field environment to mess around with tiny keypads to enter information. A paper record as shown below often proves a more practical way to capture various kinds of information. You can use a notebook to record the attributes of WPs as you go along. Just write down the WP number and what you want to record at that place. A better way is to use a purpose-designed form. At Appendix 3B is a copy of MapAction‟s blank WP form for you to reproduce and use if you wish. Here is an example showing how the form can be used. It is not essential that you use a recording sheet exactly like the one above, but whatever you do you must be able to record accurately the attributes for each waypoint you have saved with the GPS. 58 www.mapaction.org However if you have collected a lot of data, including tracklogs, you will need to download the data from your GPS onto a computer. You will need a GPS interface cable (for modern GPS units this is often simply a USB cable) and appropriate software to do this. The latest free version of Google Earth (version 6.0) includes GPS connectivity so you can save your waypoints and tracks as KML features. How to download your GPS data into Google Earth can be found in 4.5 GPS and Google Earth. Contents Humanitarian Mapping Next you will want to transfer the data from the GPS onto a computer. If there are only a few waypoints, you can simply read the coordinates for each saved waypoint off the GPS screen and input them directly into your GIS software; for example using Add > Placemark in Google Earth and then keying in the latitude and longitude readings. Data Collection When you hand over the notes or report from your assessment, make sure you also pass on the coordinate data you have collected. There are various ways to do this. If there is room on the assessment report forms, you could write in the coordinates of places visited. For high precision, make sure you write down the coordinate system and datum that the GPS was set to (eg UTM and WGS84). Discuss with whoever you are handing over the data and make sure they understand what you have just given them. GPS 3.7 Back at base Other GPS software tools available include the following. If you have appropriate PC software for your GPS, you can save your data in KML files which allow you, and others to whom you email the KML file, to view your data using Google Earth. 59 QGIS You can then save the waypoints and tracklogs and pass them on to mapping teams equipped with Geographical Information Systems (GIS). Once again, make sure you tell them the coordinate and datum used. They will also need a copy of your attribute records on paper, so they know what each waypoint represents. Annex GPS Babel. www.gpsbabel.org. This free tool interfaces with a large number of GPS types and allows conversion of many data formats. Google Earth GPS Utility. www.gpsu.co.uk. See below. Field Guide to Humanitarian Mapping 3.8 GPS Utility GPS Utility (GPSU) allows GPS data– waypoints, tracks and routes, to be transfer to and from many GPS. The free version restricts the number of waypoints and the length of tracklog that can be transferred at once. 3.8.1 Connect to GPS to GPS Utility 1. 2. 3. 4. Connect GPS to laptop, typically via a USB cable (older versions may be via a serial cable) and switch the GPS on. Start GPSU Go to GPS > Setup In the dialogue box choose the Interface Options that are correct for you specific GPS unit and click OK. 3.8.2 Downloading data from GPS to GPSU 1. 2. Next go to GPS > Connect. If connected GPSU will display a message at the bottom of the screen, e.g. CONNECTED to “GPSMap60CX Software Version 4.00” via USB. Next go to GPS > Download All. A GPS transfer dialog will displayed. Select the data type (Waypoints, Proximity Waypoints, Routes, Tracks and Current Position/ Time) and click OK. The data will then be displayed. The data can then be displayed in its raw format with GPSU by clicking any of the following buttons. The coordinate system and datum can be changed in GPSU by clicking the buttons at the top left corner. 3.8.3 Saving data To save your data simply go to File > Save as > give a file name and select a file type. GPS Utility can save in multiple formats including .txt, .gpx, .kml, .dbf and .shp. For this reason it can be a useful tool for converting from one file format to another. 60 www.mapaction.org To upload your data: 1. 2. 3. Connect GPS to laptop and connect in GPS Open the waypoints, tracklog or route file to be uploaded Next go to GPS > Upload All. A GPS transfer dialog will displayed. Select the data type (Waypoints, Proximity Waypoints, Routes, Tracks and Current Position/ Time) and OK. The data will then be transferred to your GPS. 3.9 GPS base maps Contents Humanitarian Mapping There may be occasions when you need to visit a series of locations and you are given a tracklog, to get there, and a set of waypoints. These can be uploaded to you GPS using GPSU. Data Collection 3.8.4 Uploading data to a GPS 61 Google Earth Please remember that your humanitarian assessment or other information-gathering effort may be wasted if the place you visited cannot be located again when relief assistance begins. Trying to figure out how to use a GPS once you‟re in the middle of an assessment is too late! Practice the basics as soon as you have a GPS in your hands. QGIS 3.10 Final thoughts Annex As GPS units have become more advanced the popularity of better base mapping has risen. There are now many sources of base mapping either from specialist providers, via the open source mapping, such as OpenStreetMap (OSM), or indeed your own. If the opportunity arises and your GPS is capable base mapping can be a useful tool. GPS Most GPS units come with some form of base mapping, much of which is very crude and only contains a certain amount of detail. A lot of the time this is perfectly adequate. Field Guide to Humanitarian Mapping Appendix 3A: GPS checklist The following is a checklist of things you need to do before, during and after an assessment with a GPS. Done/ Recorded Before During After □ Insert new batteries and switch GPS unit on to “warm up” and allow it to locate itself. □ Select the coordinate system. Either Decimal Degrees, Degrees Minutes Seconds, or UTM and record. □ Check the datum is WGS84 and record. □ Clear any old data off it. Load any relevant data to the assessment, including waypoints, tracklogs, routes and maps. □ Check the tracklog will record at an appropriate frequency. □ Take a waypoint of your current location and start a tracklog. □ When a waypoint is taken, record the waypoint number and decription using the waypoint recording sheet in Appendix B. □ □ Stop tracklog. □ Enter your recorded waypoint recording sheet data into a spreadsheet. □ If you are handing your GPS or data to someone else, talk to them and make sure they understand what you are giving them. Download data to a laptop using Google Earth or GPS Utility. 62 www.mapaction.org 63 Annex QGIS Google Earth GPS Data Collection Humanitarian Mapping Contents Appendix 3B: Waypoint recording sheet Field Guide to Humanitarian Mapping Appendix 3C: Examples of GPS unit functions Verify coordinate system and datum settings GARMIN MAP76 GARMIN eTrex Press Menu button Press Page button until you reach the Menu screen. Scroll down to Setup (Enter) then scroll right to Location Scroll down to Setup (Enter) then down to Units Check position format is as you require, and map datum is Check position format is as you require, and map datum is WGS84 WGS84 Erase all prior data (waypoints and tracks) Switch off GPS. Delete points: Hold down Menu button while pressing ON button. Menu> Waypoints> Delete All Confirm you wish to delete all user data. Mark a new waypoint Press ENTER button Record waypoint number on sheet Press ENTER to confirm and save Delete tracks: Menu> Tracks> Clear Press Enter button and hold down until Mark Waypoint screen appears Record waypoint number on sheet Press Enter to confirm and save Start or stop recording tracks (tracklog) Press Menu button Scroll down to Setup (Enter) then scroll right to Location Check position format is as you require, and map datum is WGS84 Navigate to a previously recorded waypoint Press NAV button Choose Go To Point> Waypoints Select the waypoint to which you want to navigate Press Enter to start navigation mode 64 The eTrex automatically records tracks. Ensure you have cleared previous saved tracks before you begin a new project. Press Page button until you reach the Menu screen Select Waypoints Choose the waypoint to which you want to navigate Select GOTO to start navigation mode www.mapaction.org It should be noted though that when the GPS function on a smartphone is being used the battery life is dramatically reduced, 5 hours is probably the maximum. Smartphones should only be used for recording waypoints and data collection when there is no alternative and you know you will be able to recharge the batteries reliably. Contents GPS in smartphones is becoming more popular and increasingly more accurate, with some good and useful tools. Humanitarian Mapping Appendix 3D: GPS and Smartphones Data Collection Below are a few GPS applications that can be used on smartphones. Android Market: Maverick. Another good app and free(!) https://market.android.com/details? id=com.mictale.gpsessentials&feature=search_result GPS Status and Toolbox. Good little utilitarian app https://market.android.com/details? id=com.eclipsim.gpsstatus2&feature=search_result Android/ Apple / Blackberry / Windows Market: Google Earth GPS Essentials. GPS A good all round app. http://www.codesector.com/maverick.php https://www.google.co.uk/latitude/b/0 Android/ Apple Market: QGIS Google Latitude. Locate individual contacts/people http://www.epicollect.net/ 65 Annex EpiCollect. Design you own data collection form. Can include geotagged photos. Field Guide to Humanitarian Mapping Chapter 4: Google Earth humanitarian mapping tutorial How to use chapter 4 Google Earth and Google Maps are widely used to explore the world’s geography. The following tutorial is specifically for exploiting Google Earth in humanitarian work. You will use a variety of functions and processes which are aimed at giving you the knowledge and resources you need to create and share useful and informative maps quickly and easily. If you are already familiar with Google Earth, use the contents panel to direct yourself to the appropriate pages. There is a field guide at the end of this chapter for quick reference. In humanitarian work you can use Google Earth to: • Obtain and display information to orientate new arrivals • Show “w ho- wha t-w he r e ” d a ta : coordination centre’s, health facilities, distribution centres, refugee camps, airfields, drop zones • Display information about infrastructure, damage and hazards • Divide up the disaster zone into search and rescue sectors, affected zones, unsafe zones and so on • Show possible evacuation routes Chapter 4: Google Earth 4.1 Introduction: what is Google Earth? 4.2 Layers 4.3 Adding New Features 4.4 Using Image Overlays 4.5 GPS and Google Earth 4.6 Saving and sharing Google Earth data 4.7 Google Earth add-ons 4.8 Saving and printing images 4.9 Google Fusion Tables Appendix 4A: Quick guide Appendix 4B: Coordinates Appendix 4C: Keyboard commands Appendix 4D: Useful websites for using Google Earth The tutorial in this chapter will give you a basic understanding of using Google Earth within disaster risk reduction and relief. We will be working with data from various locations including data from previous MapAction deployments. After completing this tutorial you will be able to portray geographical information as a digital image file suitable for display on a computer screen in Google Earth, sharing over a network or the web and as pictorial formats such as PNG, GIF or JPEGs. 66 www.mapaction.org Google Earth maps the Earth’s surface by displaying satellite images and aerial photography of varying spatial resolution; this means the distance on the ground represented by each pixel or grid cell in the image. The degree of resolution available varies between more and less economically developed regions, but most land is covered in at least 15 meters of resolution. Google Earth also has digital terrain model data collected by NASA’s Shuttle Radar Topography Mission (SRTM); this allows you to view the terrain in three dimensions. • Google Earth is a Web Map Service (WMS) client; this means it uses geographical information to create maps of spatially referenced data and adheres to international standards. • Google Earth supports managing three-dimensional geospatial data through Keyhole Markup Language (KML). • Google Earth images vary in detail according to date and location. The date of an image is shown in the status bar at the bottom of the screen. Urban area imagery tends to be of a higher resolution and is updated more frequently. You can use Google Earth online (connected to the internet) or offline, provided you carry out some basic set-up actions first. See section 4.8 for more information on this. 67 Contents Humanitarian Mapping Data Collection Google Earth is a free product which allows you to view and explore the whole of the earth’s surface, and other geographical information such as settlement names, roads and thematic information. As well as the information provided via Google themselves, it is possible to use Google Earth as a platform to view and map spatial data that you collect yourself, or obtain from partner organisations in appropriate formats. GPS 4.1.1 Using Google Earth Google Earth 4.1 Introduction: what is Google Earth? QGIS This tutorial is based on Google Earth version 6 which was released in December 2010. However most of the content will also work with earlier versions. Annex Beyond Google Earth itself, it’s useful to have a basic understanding of GIS. For a general introduction to humanitarian GIS see chapter 1 of this Field Guide. Similarly, we also refer to some GIS and remote sensing terminology for which you can find introductory information in the annex to this guide and in chapter 5, together with guidance on using the free/open source software QGIS. Field Guide to Humanitarian Mapping Minimum configurations for Google Earth downloads: Downloading Google Earth If you do not already have Google Earth installed on your computer go to the following web page: http://earth.google.com/ • • • • • Pentium 3, 500 MHz 128 MB RAM 12.7 MB free disk space Network speed: 128 Kbit/s 16MB 3D-capable graphics card • Resolution of 1024x768, 16-bit High Colour • Windows XP or Windows 2000, Windows Vista, Linux, Mac OS X For use as a browser plug-in: • Firefox, Safari 3, Internet Explorer 6 or 7 Google Earth is available in 23 languages: Select the download option and follow the online instructions. If you experience problems installing Google Earth you can directly download the latest version of Google Earth from here: PC: http://dl.google.com/earth/client/ current/GoogleEarthWin.exe Mac: http://dl.google.com/earth/client/ current/GoogleEarthMac.dmg Arabic, Chinese, Czech, Danish, Dutch, English, Finnish, French, German, Hebrew, Indonesian, Italian, Japanese, Korean, Norwegian, Polish, Portuguese, Romanian, Russian, Spanish, Swedish, Thai, Turkish. Google Earth Image providers: DigitalGlobe, Earthsat, GEBCO, GeoEye-1, GlobeExplorer, IKONOS, Pictometry, Spot Image, Terralook, ViewGL, CNES, SIO, NOAA, NGA, NASA Google Earth is available under three desktop licenses: • Google Earth (free version) • Google Earth Pro ($399 per year): this has some enhanced features, the same imagery and content as the free version • Google Earth Enterprise: for use by organizations with large quantities of geospatial data. 68 www.mapaction.org Each time you start Google Earth, the Earth appears in the main window. The area that shows the Earth is called the 3D viewer. 2 3 4 5 6 7 8 9 11 10 Data Collection 1 Contents The purpose of this first exercise is to give you an overview of the basic layout, terminology and functionality of Google Earth. Double-click on the Google Earth icon on your desktop or locate it in your programs list. The icon looks like this: Humanitarian Mapping 4.1.2 Viewing the Globe GPS 15 1. Search panel 2. Hide/Show sidebar 3. Placemark 4. Polygon 5. Path 12 6. Image Overlay 7. Measure 8. Email 9. Print 10. Google Maps 11. Navigation 12. Status Bar 13. 3D Viewer 14. Layers Panel 15. Places Panel 4.1.3 Changing Languages You can change the language displayed in Google Earth. To do this: QGIS 13 Google Earth 14 2. Under Language settings, choose the appropriate language of your choice. System Default corresponds to the language used by the operating system of your computer. 69 Annex 1. Click Tools > Options (Mac: Google Earth > Preferences) > General tab. Field Guide to Humanitarian Mapping 4.1.4 Important technical points to note before the full functionality of Google Earth is explored: Datum. Google Earth uses the WGS84 datum for its imagery base. This is important to be aware of because any data you import, for example from your GPS unit, should be set to the same datum in order to display accurately. Projection system. Google Earth uses the Simple Cylindrical projection. If you import any map data that uses a different projection system from this, Google Earth will re-project it; this may create some spatial inconsistencies. Coordinate systems. Google Earth can work with coordinates in LatitudeLongitude (degrees-minutes-seconds or decimal degrees) or Universal Transverse Mercator (UTM). This is explained in Appendix 4B of this chapter. Note - It is important to bear these in mind at all times while combining GPS data, imported imagery and other data with Google Earth in order to construct a comprehensive and spatially accurate map. This is explained in finer detail throughout this chapter. 4.1.5 Using the navigation controls To view and use the navigation controls, move the cursor over to the right corner of the 3D viewer. To hide or show the compass icon in the 3D viewer: Click View > Show Navigation The Google Earth navigation controls offer the same type of navigation action that you can achieve with mouse navigation. 1. Navigation ring to tilt the terrain toward a horizon view. 2. To move the centre point of the view down, up, right or left. 3. Use the zoom slider to zoom in or out (+ to zoom in, - to zoom out). Double-click the icons at the end of the slider to reset the zoom. 4. Click the north up button to reset the view so that north is at the top of the screen. 5. Click, hold and drag the navigation ring to rotate the view To move the 3D view in any direction, position the mouse cursor on the viewer and press the left main mouse button. The cursor icon changes from an open hand to a closed hand allowing you to drag a new part of the earth into view. 70 www.mapaction.org Contents Zooming in and out Zoom in and out using the mouse Zoom in and out using the navigation controls The navigation controls appear in the top right corner of the 3D viewer. Zoom in by clicking the zoom in button (+) Data Collection • Double-click alternate mouse button. • Scroll the mouse wheel down (toward you) a number of times. • Hold down the alternate mouse button, drag the mouse up. • Scroll the mouse wheel down (towards you) a number of times. • Zoom in by doing the opposite. • Hold down the alternate mouse button, drag the mouse down. Do this a number of times. Humanitarian Mapping Zoom out by doing one of the following: Zoom out by clicking the zoom out button (-) Tip: To stop the tilt when you zoom in click Options > Navigation > uncheck box GPS Zoom in by sliding the zoom bar In Google Earth, a placemark marks a location. Each placemark appears as a pushpin with a label. You can learn how to create these in chapter 4.3. In the Places panel (left of 3D viewer), locate the Sightseeing folder. You may need to scroll down to view this folder. Expand the Sightseeing folder by clicking +. Double-clicking on a place name zooms to it. Google Earth Zoom in using a placemark 4.1.6 Finding places and directions You can search for specific locations using the Fly To Tab in Google Earth. To do this, enter the location in the input box and click on the Search button. 71 Annex There are a lot of placenames in the Google Earth database, even for developing countries. Use the Search feature to find places you want to locate but be aware of variation in spelling. If someone gives you coordinates, for example in latitude/longitude, you can ‘fly’ straight to that point on the earth’s surface. QGIS How might I use this? Field Guide to Humanitarian Mapping Google Earth recognizes the following types of search terms, entered with or without commas: • • • • • City, country Number, street, city, state Zipcode or postal code Latitude, longitude in decimal format Latitude, longitude in degrees, minutes, seconds (DMS) format For more information on coordinate formats see Appendix B. The most recent search terms are saved in the search entry history (indicated by the small black triangle on the right of the search input). Tip: Currently, street-level searching is limited to certain countries. Try to use coordinates where possible for accuracy. To clear search results, click on the Clear button at the bottom of the search results listing. Tip: To view the Earth back from top-down press U or click on N on the navigation tool. Activity One To navigate in Google Earth you need to be able to drag, zoom, tilt and rotate the view. 1. Drag the view using the mouse or navigation controls so you are directly over the Falkland Islands. 2. Zoom in and out to see how much detail Google has for this location. 3. Tilt the view so you are looking at the Falkland Islands from a low angle. 4. Rotate the view to give a different perspective of the Falkland Islands. To find locations you can also use the Fly To Tab. 1. Type the Falkland Islands into the tab and click on Search. 2. Type in the latitude and longitude in DMS format for Port Stanley, Falkland Islands, 51 41 41 S 57 49 12 W and click on Search. 72 www.mapaction.org Contents How might I use this? You can customise your Google Earth software to suit the type of work you are doing. For example, in a relatively low-lying region you may want to change the terrain scale (elevation exaggeration) so that you can see more easily the features of the landscape where you will be working. You can set a number of other preferences to affect 3D viewer imagery, as well as how icons, labels, and other elements are displayed. Humanitarian Mapping 4.1.7 Display tools Select View > Grid. The grid appears over the earth imagery as white lines, with each latitude/ longitude degree line labeled in an axis across the centre of the 3D viewer. You can position a geographical feature in the 3D viewer and determine its basic geospatial coordinates using this grid. Setting the view size GPS Google Earth provides a special layer accessible from the View menu that displays a grid of latitude and longitude lines over the imagery in the 3D viewer. To turn on the grid: Data Collection Displaying a latitude/longitude grid Use the View Size options in under the View menu to select a number of pre-set aspect ratios designed for best playback modes or printing modes. The selected option resizes the 3D Viewer for the best display for your intended purpose. 4.1.8 Using the overview map The overview map window feature displays an additional view of the Earth with a position indicator that corresponds to the current view inside the 3D viewer. To show or hide the overview map window, do one of the following: Select View > Overview Map QGIS Select View > Full Screen Or Press F11 Google Earth To enter full-screen mode, or to return to window mode from full-screen mode either: Adjusting the overview map size and zoom ratio Adjust the slider control in the overview map options to scale the overview map from small to large. 73 Annex Select Tools > Options > 3D View (Mac: Google Earth > Preferences > 3D View) Field Guide to Humanitarian Mapping Using the settings in the Options > 3D View Tab, you can also adjust the ratio of territory displayed in the overview map window relative to that in the 3D viewer. 4.1.9 Viewing preferences To access these settings, do the following: Windows/Linux: Click Tools > Options > 3D View. Mac: Click Google Earth > Preferences > 3D View. Show lat/long By default, the display of the coordinates is in degrees, minutes, seconds. You can choose the Show Lat/Long option to display geographical coordinates in decimal degrees or Universal Transverse Mercator. Elevation units By default, the display of the elevation of the terrain beneath the pointer is displayed in feet and miles. You can choose to display elevation in meters and kilometers. FlyTo Speed This setting is the speed at which you move (fly) to a location. The setting can adjusted by going to: Tools > Options> Navigation > FlyTo Speed. 4.1.10 Viewing a location in Google Maps To display the current view in Google Maps in your web browser, do one of the following: Either: Click the map icon in the toolbar Or: Ctrl + Alt + M (Option + M on the Mac) Activity Two Zoom back into the Falkland Islands using your preferred method. Insert an Overview Map to the 3D Viewer showing the Falklands location relative to South America. Using the Pan and Zoom navigation methods note the changes in the Red Extent Window. Add a Grid to the 3D Viewer and change the coordinates to UTM and the elevation to meters. 74 www.mapaction.org Contents 4.2.1 Basic layers Layers content is created by Google or its partners. Information which appears in the Places panel, however, can be created by anyone using Google Earth or KML. Description Examples Roads Road map information for viewing area Major highways, county roads and streets Terrain 3D elevation data for the viewing region Limited to natural geographic features, eg mountains and canyons Borders Turns on all possible borders Coastlines, International boundaries, State and province boundaries. Humanitarian Mapping The Layers feature in Google Earth provides a variety of data points of geographical interest that you can select to display over your viewing area. This includes points of interest (POIs) as well as map, road and terrain. You can use this information to help plan routes, look at elevation and check border lines in your location of work. Data Collection How might I use this? GPS 4.2 Layers Turn POIs on and off by checking and unchecking it in the Layers panel. You can save any point of interest (POI) displayed in the 3D viewer to the My Places folder by Right-clicking (CTRL clicking on the Mac) on the placemark in the viewer and selecting Save to My Places from the pop-up menu. Google Earth Here are some examples of layers included with Google Earth: If you are having problems seeing your POI zoom straight in. Icons, like road data, appear at different elevations, and not all icons appear from an extended elevation. In addition, zooming in to a lower elevation often resolves the problem of icons that appear to overlap when viewed from a higher elevation. QGIS To adjust the icon size: Click Tools> Options > 3D. The icon size is set in the Labels/Icon size area. 75 Annex Tip: Layers will take longer to load with the terrain layer switched on. Field Guide to Humanitarian Mapping 4.2.2 Terrain elevation When you tilt your view you can see the 3D effect of the elevation data, and by default it is showing elevation at the same scale as the horizontal map scale. However, the effect may not be visible and you can increase the exaggeration of height by setting it to any value from 1 (the default) to 3. A useful setting is 1.5, which achieves an obvious yet natural elevation appearance. Windows and Linux: Tools > Options > 3D View. Modify the Elevation Exaggeration value. 4.2.3 Other layers of interest are: King's College London's Collection of KML databases http://www.kcl.ac.uk/schools/sspp/geography/research/emm/geodata Real-time severe weather monitoring products from WDSS-II: The Warning Decision Support System - Integrated Information http://wdssii.nssl.noaa.gov/geotiff_new/ Activity Three Zoom to Tumbledown, Canada and experiment selecting and deselecting various layers. Exaggerate the elevation to 1.5 and practice tilting the 3D Viewer. 4.3 Adding new features 4.3.1 Create and edit folders and placemarks How might I use this? You will probably want to record specific places that are important in your field work, for example locations of affected groups of people, or resources such as health clinics. A placemark is a point of interest on your map. They are like push pins and could be used to locate where key facilities are. Google Earth lets you create as many placemarks as you wish and give them appropriate symbols and labels. This means you can create and share maps of your relief activities. Left of the 3D viewer is your Places panel which is split into Temporary and permanent Places. You can organize your data in the Places panel in a way similar to how you would organise files and folders on your computer's hard drive. When you first start Google Earth, the Places panel contains an empty My Places folder to hold places that you want to save. If you are upgrading from a previous version of Google Earth, it will import your saved Places. Items located in the Places panel but not saved in the My Places folder are located in the Temporary Places folder and are unavailable in the next Google Earth session if you do not move or save them to your My Places folder. 76 www.mapaction.org Select the folder in the places panel to store placemark. The default folder is Temporary Places. Position the viewer to the location you want to put the placemark. Zoom into the best viewing level for the desired location. Creating a new placemark Click Add > Placemark or use the Toolbar menu and click the pushpin icon: The Edit Placemark window appears and a placemark icon inside a flashing yellow square. Position the cursor on the placemark and drag it to the desired location. Humanitarian Mapping Description Data Collection Task Contents 4.3.2 Quick guide: how to create and edit folders and placemarks Name. Identifiable name GPS Note - The Edit Placemark window must be open to move the placemark or set any properties. Style. Choose a colour, scale (size) and opacity for the placemark icon. View. Choose the desired location for the Placemark. Setting placemark properties Altitude. Choose the height of the Placemark as it appears over the terrain. Icon. Click the icon for the Placemark (top right corner of the dialog box) to choose an alternate image. Google Earth Description. Information about location includes use of HTML text, see section 4.3.3 for more information. Your placemark appears in the 3D viewer and as an entry in the selected folder. Select Add > Folder 77 Annex Creating a Folder Right-click on a folder in the places panel, (automatically set as the container for the new folder). QGIS Click OK to apply. Field Guide to Humanitarian Mapping Task Description Name. Identifiable name Description. General description for the folder, including the use of HTML tags to format your description and include images. Style/Colour. Available when there are icons within the new folder. Use this feature to apply label and icon styles universally across all items within the folder. Setting folder properties View. Set the date, range and tilt. Double-click on the folder it and repositions the 3D viewer to that position. Select and drag item to a new position in a list of items. Select item and drag and drop it over a folder. Reordering placemarks or folders Right-click the item (CTRL Click on the Mac), use the drop down menu to cut and paste to new location. Select item> Right-click (CTRL Click on the Mac) > Rename Renaming a placemark or folder You can enter the new name directly into the name field. Select item > Right-click (CTRL Click on the Mac) > Delete Removing a placemark or folder If you delete a folder, you also delete all its contents, including other folders and icons. Select item > Right-click (CTRL click on the Mac) > Save as Saving places data (placemarks, shapes, folders to hard drive) Folder is saved as a single file in KML format. 78 www.mapaction.org File > Open > Navigate to KML> Open Opening saved placemarks Showing and hiding places data The folder or placemark appears beneath the Temporary Places folder and the 3D viewer files to the view set for the folder or placemark. Use the show/hide features of Google Earth to quickly manage the amount of content visible in the 3D viewer. Select or deselect the check box next to an item or a whole folder. Contents Humanitarian Mapping Description Data Collection Task Select placemark > drag yellow square to the new location. Repositioning placemarks Locking a placemark to the centre of the view: GPS Dragging the placemark: Find an open area in the same region and place a symbol to locate it as a possible displaced persons location. Create a folder in Places and move the two placemarks you just created into it. 79 QGIS Find the Berg River Bridge in South Africa at 32°47'15.58"S 18° 10'8.26"E and assign a placemark. Call it “Bridge Out” and describe that the road is “impassable at this point.” Annex Activity Four Google Earth Select placemark > Right-click > properties >View tab > check centre in view box >drag the earth to desired location Field Guide to Humanitarian Mapping 4.3.3 Advanced folders and placemarks Using custom icons For single placemarks and folders of placemarks, you can select a custom image to use as an icon rather than one of the default set of icons available to all placemarks. 1. a) For single placemarks, Right-click Placemark > Properties b) For a folder of placemarks, Right-click Folder > Properties > Style, Color > Share Style 2. Select icon next to Name Field 3. Click Add Custom Icon from the icon palette. 4. Indicate a valid path or Web URL in the field next to the Icon File/URL label or click Browse to specify the file on your computer or network. If you refer to an image on the web, be sure you have entered the path to the image itself, not the web page containing the image. Editing line colour and width When your placemark data consists of lines, such as with saved directions, you can use the line properties in the Style Tab to modify the colour, width and opacity of the line in the 3D viewer. Right-click Placemark > Properties > Style, Colour Changing the view When a placemark is Doubled-clicked, Google Earth will fly to the location. The default FlyTo position is directly above the placemark, in a Northerly orientation. The FlyTo position can be defined by the user, so that the feature can be viewed from a different location, angle, range and heading. In some scenarios, you may want to give some more context to the position of the placemark relative to the ground. For example showing the position of a potential IDP camp on a hillslope relative to the position of a river. To change the view , Right-click Placemark > Properties > View Define the following settings: Latitude & Longitude. The position of the viewpoint you want to view from. Range. The area shown radiating from the specified viewpoint in metres. Heading. The direction in which to view in degrees. Tilt. The angle in which to view from. 0 is directly above, 90 is looking at the sideways. Date/Time. If the historical imagery is being used (View > Historical Imagery), a user defined timestamp (single point in time) or time span can be set. 80 www.mapaction.org 1 & 2. Clamped to ground/ Clamped to sea floor. This is the default option. Altitude for the placemark is locked to the ground/ sea floor, no height value is allowed for altitude. The placemark remains fixed to the earth, regardless of whether terrain is on or off. 3 & 4. Relative to ground / Relative to sea floor. The altitude of the placemark is relative to the actual ground/ sea floor elevation of the view. 5. Absolute. The altitude of the placemark is above sea level. You can adjust the altitude using the slider or by entering a value in meters in the Altitude field. Extend to ground. If a features altitude has been defined by the user, extend to ground draws a connecting line from the point on the ground to the placemark icon, or point in a line or polygon. Modifying folder settings Applying a description, label and advanced settings to a folder provides display characteristics that differ from settings applied to individual placemarks or to other geometry features. The name, description and view that you provide when you edit a folder applies only to that folder and not to the items it contains. Setting a view for a folder is useful when you want to create a viewing angle to encompass all the items contained by the folder. As with styles, altitude settings can apply to all items in the folder once style sharing is enabled. This includes subfolders. Altitude settings apply to all geometry within the folder. Contents Humanitarian Mapping There are five options: Data Collection Right-click Placemark > Properties > Altitude GPS The values set in the Altitude area can be used to show the feature above the surface of the earth at a user-defined altitude. Google Earth Setting altitude Tip: It is recommended if using a combination of shared styles with individual placemark modifications to first apply shared settings to the folder then modify individual items without affecting the general style settings for the other items. 81 Annex You can modify all settings for a single item to affect the display of that item only. When you change the style and altitude settings for an item in a folder, style sharing is disabled for that folder. However, styles that have been previously applied via the shared styles are preserved for other items in the folder. QGIS Modifying settings for a single item Field Guide to Humanitarian Mapping Activity Five Relocate your “Bridge Out” placemark created in Activity Four. Change the height to 7 metres relative to the ground. Change the icons to a suitable size and colour image of your choice. 4.3.4 HTML How might I use this? The description field for places and folders can contain a lot of text allowing room for sharing of detailed information. You can enhance your descriptions using fonts and other formatting, even including images using HyperText Markup Language (HTML), the predominant language for web pages. This allows you to share more information in a clearer format. HTML provides a means to describe the structure of text-based information in a document by denoting certain text as links, headings, paragraphs and lists. HTML tags are respected in Google Earth; the following table gives some examples. Attribute Code Example Bold <b>Test</b> Test Italics <i>Test</i> Test Font type <font face="times new roman">Example</font> Example Font size <font face="times new roman" size="12pt">Example</ font> Example Font colour <font face="times new roman" size="10pt" color="red">Example</font> Example Line break Example<br>Example Example Example Centre <center>Example</center> Paragraph Example<p> New paragraph</p> Example Example New paragraph Website <a href="http://www.mapaction.org">MapAction</a> MapAction Email <a href="malito:[email protected]">Contact MapAction</a> Contact MapAction (opens email) Insert image from computer <img src=”image file path”> Image displayed Insert image from website <img src=”http://image URL”> Image displayed 82 www.mapaction.org Possible IDP Location North/South (depending on chosen location) entry point impassable due to bridge collapse Contents Open the Properties for the Possible Displaced Persons location placemark created for Activity Four. Using the HTML example commands write the following information: Humanitarian Mapping Activity Six • • • • • For both shapes, begin drawing by clicking the start position of the path/ polygon in the 3D viewer Clicking along a feature will give straight lines between points. For a freehand line, click and hold the left mouse button to draw. This is particularly useful for curvy features such as a road or river. Once completed click OK. For greater accuracy zoom in closer to the feature. This can be done whilst drawing the path or polygon by pressing the plus (+) or minus (-) keys on your keyboard, in and out respectively. Editing a shape Open the properties box of the shape. The individual points of the shape will turn red and are highlighted green when the cursor (hand) hovers over it. • • • • To move a point, select the point and drag (Left-click and hold) the point to its new position. To delete a point, select point and press the delete key. To add a point, by selecting the point before and then start drawing. The description and style properties of a path or polygon are the same as those of a placemark. In the properties box (Right-click > properties). 83 GPS To create a path, either: (a) Add > Path or (b) Click To create a polygon, either: (a) Add > Polygon or (b) Click Google Earth In Google Earth you can also create path (line) and polygon features. A path might be marking a route along which displaced people are moving, or the edge of a flooded area. A polygon defines an enclosed area, such as the limits of potential IDP camp or an extent of a flooded area. QGIS How might I use this? Annex 4.3.5 Basic Tools: Creating a path or polygon Data Collection Need for assessment to check fits IDP camp criteria Field Guide to Humanitarian Mapping 4.3.6 Basic tools: Measurements Google Earth offers tools to measure the distance of between two points or along a path and its elevation profile. A quick measurement of a distance, perhaps along a winding road, is a very useful feature for field work of all kinds. Measuring between two points • • • • • Select Tools > Ruler > Line Tab or Select unit of measurement. Click on start point in 3D viewer and then end point. Distance and Heading are shown in dialog box. The line can be saved as a path, by clicking Save. Measuring a path • • • • • • Select Tools > Ruler > Path Tab or Select unit of measurement. Click on start point in 3D viewer. Continue to click points or Left-click and drag for freehand to end point. Distance and Heading are shown in dialog box. The line can be saved as a path, by clicking Save. Tip: The measurements of a path already drawn, can be found in the Measurement Tab of its properties. Right-click Path > Properties > Measurements Elevation Profile Google Earth can show the elevation profile (bottom of screen) of a path and measurements (height, gradient and distance) for any point along its route, as well as overall distance, elevation loss/ gain, max/ min slope and average slope. How to? • Right-click path > Elevation Profile • To find the measurements of a specific point move the red slider, a red arrow will point to the corresponding location in the 3D viewer. 84 www.mapaction.org Fly To 14°50'16.25"S 64°54'13.18"W and create a placemark named Field Operations Centre Locate areas of high, flat land for possible refugee camps and draw red polygons around them. Change the settings of the polygons so you can just see the ground beneath. Measure the distance via road in meters between your perspective IDP camps. Contents Humanitarian Mapping Flooding is a natural hazard which affects thousands of people every year. Bolivia has faced more severe flooding in recent years due to the effects of La Niña. Data Collection Activity Seven How might I use this? Although the basic imagery, roads and settlements layers in Google Earth may sometimes be all you need, often you will want to use other maps that you have obtained, for example a detailed local map or a map showing health statistics. The image overlay feature is a very easy but powerful way to import such maps into your Google Earth ‘world’; you just need to obtain an electronic version of the add-on map, for example by photographing it with a digital camera. File formats that can be used to create an image overlay: JPG, BMP, GIF, TIFF, TGA or PNG Google Earth 4.4 Using image overlays QGIS Tip: To label shapes on the map, add a placemark near the line or in the area to describe the feature. GPS Using the measuring tool again calculate the area accumulated for IDP camps. 85 Annex Tip: If you are having trouble importing a large image, you can reduce its size using image editing commercial software such as Adobe Photoshop or freeware such as IrfanView or GIMP. Field Guide to Humanitarian Mapping 4.4.1 Image overlay basics Image overlays provide additional information about the underlying earth imagery. They can be taken from your computer, from your network, or from a web site. It completely integrates with the terrain or shape of the land beneath if the terrain layer is turned on. 86 www.mapaction.org Tip: To determine the size in pixels of an image, display the image file in a Windows Explorer window, Right-click (CTRL click on the Mac) , and select Properties from the pop-up menu.) Change position settings Contents To edit an image overlay further, open its dialogue box, Right-click Overlay in the Places panel and select properties. Humanitarian Mapping 4.4.2 Advanced image overlays Try positioning the center of the image as a reference point first, and then use the Shift key in combination with one of the anchors to scale the image for best positioning. Tip: When using multiple image overlays on the same region, set a drawing order. Updates for time sensitive imagery The refresh tab sets the correct refresh properties for your overlay imagery. Most imagery that is updated automatically and located on a server will need refresh properties set. Select the Refresh Tab in Properties. Opening overlays emailed to you Double-click on the attachment in the email message and click the appropriate button in the confirmation box to open the attachment. If Google Earth is not running, it will first start up before loading the emailed overlay. Otherwise, it appears in the Temporary Places folder in the Places panel and the image overlay displays in the viewer. GPS 2. Fit to Screen. Resize the image to fit the current view. Google Earth 1. Manual coordinates for each corner of the image overlay. You set coordinates for each corner of the image overlay. For more on coordinates see Appendix B. Data Collection Select the Location Tab in Properties: You can open overlays posted to a web server simply by clicking on the link that references the overlay image. QGIS Opening overlays on a web server You can share overlay data with other Google Earth users by posting the overlay file to a web server that other users also have access to. 87 Annex Posting image overlays to a web server Field Guide to Humanitarian Mapping Placing Web Mapping Service (WMS) image overlays These are mapping images that are provided through a WMS over the internet. They can show you interesting information, such as weather formations and conditions, topographical maps, alternate high resolution satellite imagery. 1. Position the 3D viewer in the location where you want to place the overlay image file. Try to position the viewer so that it corresponds in viewing altitude to the overlay. Add > Image Overlay> Refresh Tab 2. Click WMS Parameters. The Web Mapping Service Parameters dialog box appears. 3. Beside WMS Service, choose an appropriate service or click Add to use a URL (website address) for a WMS. After a brief period of time, Google Earth populates the Opaque and/or Transparent Layers fields with available layers from the WMS you choose. 4. Choose the appropriate layer(s) and click Add > to add the layer(s) to the Selected Layers field. This places this information in the WMS image overlay in Google Earth. To remove a layer from the Selected Layers field, select it and click >Remove. 5. When you are finished, click OK and continue as you would with an image overlay. 4.5 GPS and Google Earth Please see Chapter 3 of this Field Guide for a more detailed introduction to using a GPS for humanitarian mapping. How might I use this? If you have been on a field assessment or have obtained data from someone who has, you can import it into Google Earth and create a map making any planning and data sharing much easier. If you are using a device that is not supported within Google Earth, you can try importing GPS data from the device to your computer using free GPS software GPSU or GPSTrackmaker. GPS devices currently supported within Google Earth: Garmin, Magellan, Wintec WBT-201 GPS Data Logger 88 www.mapaction.org When your GPS data is imported into Google Earth, it is categorised into three possible folders, depending upon the type of data. Tracks Waypoints Routes Points are automatically Waypoints are points entered Route points are those points recorded by the GPS manually by the user. For that the GPS device uses to device periodically along example, hospitals or airfields. create the routing, such as the recorded route. Eg when you instruct the device to paths, roads. "go to" a recorded point from Contents Humanitarian Mapping The Global Positioning System (GPS) is a satellite based navigation system made up of a network of 24 satellites. GPS works in any weather conditions anywhere in the world. If you have a GPS device, you can connect it to your computer and import your waypoint and track data into Google Earth. You need either a serial or USB cable to connect your GPS device to your computer. If you do not have a cable visit your manufacturers web site to purchase the correct cable for your model. Data Collection 4.5.1 Using GPS Devices with Google Earth 1. Using the cable connect the GPS to the computer and turn the GPS on. 2. On the computer screen select Tools > GPS > Import 3. Select the correct manufacturer for your device. 4. Under Import select the type of data you want. 5. Under Options select drawing preferences. Create clickable image assigns icons to the track/route points with pop-up data for them. 6. Click OK and data will commence downloading. 7. Once download is complete confirmation box will appear. Google Earth If you are using a Garmin device and a Windows computer install the driver from the CD that came with the GPS or download it from the Garmin website. QGIS 4.5.2 Importing GPS Data GPS another recorded point.. Tip: If you receive a connection error, turn the GPS device on and off and start again from step 2. 89 Annex 8. Data will be stored in the Places Panel and can be edited. Field Guide to Humanitarian Mapping Supported file extensions .gpx, .loc, .mps, .gdb, .tcx, .nmea, .log, .wpt, .plt and .pcx files can all be imported into Google Earth by: Tools > GPS > Import tab> Import from File > Import > browse to file > Open 4.5.3 Real-time GPS tracking This allows live tracking of your position in Google Earth, via a connected GPS receiver. 1. Using the cable connect the GPS to the computer and turn the GPS on. 2. On the computer screen select Tools > GPS > Realtime tab. 3. Select the correct Protocol for your device. 4. Select Track Point Import Limit determines how many position points are imported and averaged for every polling. 5. Select Polling Interval determines how often GE gets position data from your GPS. 6. Click Automatically Follow the Path and Google Earth will zoom to the current GPS location and follow it as it changes. 7. Click Start and tracking will commence. 8. Your path is saved and displayed on screen. To save permanently Right-click Route > Save as. Tip: More points - accurate but slower position update. Less points - updates position quickly but less accuracy Activity Eight If you have a GPS, collect some data from where you are located. Download the data into Google Earth. Annotate the features with a new style, colour and labels. 90 www.mapaction.org Sharing information, collaborations on tasks and coordination of activities among personnel in different organizations is an important part of successful humanitarian work. Sharing data helps to provide near real time situational awareness and collect/display assessment data for operations. With new data against old you can evaluate and monitor change in a situation and transfer knowledge within a community. 4.6.1 KML KML, or Keyhole Markup Language, is a grammar and file format for modeling and storing geographical features such as points, lines, images, polygons, and models for display in Google Earth and Google Maps. You can use KML to share places and information with other users of Google Earth and Google Maps. Contents Humanitarian Mapping How might I use this? Data Collection 4.6 Saving and sharing Google Earth data Navigate to the location of the KMZ or KML data you want to open in Google Earth. Select the file and click the Open button. The folder or Placemark appears in the Places panel and the 3D viewer flies to the view set for the folder or Placemark. GPS To open KML: File > Open (Ctrl + O in Windows/Linux, + O on the Mac) 2. Click the General tab. 3. Under KML Error Handling, choose one of the following: • Silently accept all unrecognized data. Choose this to load KML regardless of any errors • Show prompts for all errors. Choose this to show a message upon each instance of an error • Abort file load on any error. Cancels loading of a KML file when Google Earth detects an error 4. Click OK. 91 QGIS 1. Click Tools > Options > 3D View. (On the Mac, click Google Earth > Preferences > 3D View). The Options dialog box appears. Annex You can set how Google Earth reacts when it encounters erroneous KML. Google Earth Setting KML error options Field Guide to Humanitarian Mapping Saving Data Before any of your data in Google Earth can be shared with other people and organizations the data needs to be saved. You may also wish to save your work so that you may return to it a later date. There are four ways to save data in Google Earth - (1) Save to My Places, (2) Save Place as…, (3) Save My Places and (4) Save Image. Save to My Places File > Save > Save to My Places or by dragging (left click folder, hold, move and release) the folder or feature. Or Right-click placemark > Save to My Places. When any new data is added to Google Earth, the default location for it in the Places Panel is the Temporary Places Folder. If the user closes Google Earth down without saving the data is lost. If the user wishes to return to the new data at a later stage, it can be saved to the My Places Folder. When Google Earth is next opened, that data can be found in the My Places folder. Save Place as… File > Save > Save Place as… or Right-click placemark > Save Place as… This function saves the data on your hard drive as a KML or KMZ file. This file can then be shared like any other computer file. There is a choice of two files KML and KMZ, details of which were outline in section 4.6.1. A KMZ file is a zipped (compressed) KML file. Not only does this mean the file size is smaller, but any images and custom icons that have been used either as overlays or in descriptions are saved. This KMZ file can then be emailed/ shared with others. If a KML is shared or the location of a an image or custom icon changes, the link to them is broken and will not be viewable. Tip: Save as KMZ as the preferred file type Save My Places File > Save > Save My Places This will Save the My Places Folder as a KMZ to the Google Earth Folder on your hard drive. It is essentially a Backup folder. Save Image File > Save > Save Image This saves a screen shot of Google Earth as a JPG, which can then be emailed / shared . Ensure any data you want displayed is switch on (tick/ untick placemarks, lines, polygons etc. Tip: Press F11 (Full Screen) before Save Image to get maximum coverage in the JPG 92 www.mapaction.org When you email an image, a JPEG file is automatically attached to an outbound email message. When you email the view as a KMZ, a KMZ file is automatically attached to an outbound email message. Click File > Email > Email Image Or: Click on the email icon on the toolbar and choose Email Image In the Select Email Service window, choose your default email program or your Gmail account. Wait while the Google Earth software sends the data to your email application. A new email window appears with the image file. (This can take a few seconds.) The image is a JPG file of the current view in the 3D viewer. Fill in the recipient's email address and any other information in the body and send the email. Emailing ‘Places’ data Right-click on Placemark > Email When you email KMZ files that reference custom icons or image overlays from your local file system those items are included with the placemark data. For this reason, KMZ files that include imagery overlays might be larger than those containing a simple placemark. You cannot send a placemark file to a user of a Google Earth (Keyhole) client version 2.2 or lower; the file format for placemarks has changed for Google Earth versions 3.0 and higher. Send an image file instead. Tip: On a Mac, you can only email KML files through the Mail, Eudora and Entourage applications 93 Contents Humanitarian Mapping Data Collection You can email the current view of the earth shown in the Google Earth 3D viewer as an image file for people who don't have Google Earth, or a KMZ file for other users of Google Earth. GPS Emailing an image Google Earth Tip: You can share places information with other Google Earth users via the Google Earth Community BBS website. See Appendix 4. QGIS Share placemarks, shapes, and folder data with other people including both users and non-users of Google Earth. You can share your places data by emailing an image, emailing places data, sharing data over a network and creating a network link. Annex 4.6.2 Sharing ‘Places’ information Field Guide to Humanitarian Mapping Troubleshooting Email Issues If your email application does not respond to the Email View command, you may need to set the default email program. Windows: Start Menu > Control Panel > Internet Options > Programs Tab. Select the default email program that you use from the E-mail drop-down list, and click Apply. Mac: Open Mail. Click Mail > Preferences. Pick the email application you would prefer as your default email handler. 4.6.3 Sharing data over a network In addition to saving placemarks or folders to your local computer, you can also save place data to a web server or network server. Other Google Earth users who have access to the server can then use the data. Storing a placemark file on the network or on a web server means you will have better accessibility to your data, ease of distribution, automatic updates to network people with network access and a backup. As with other documents, you can create links or references to KMZ files for easy access. Saving data to a server To make your placemarks or folders available to other people via a server, you need to first save the file to the appropriate location. Network server. To save a folder or placemark to a location on your network, simply save the file in a location on your organization’s network rather than to your local file system. Web server. To save a Placemark or folder to a web server, first save the file to your local computer. Once the file is saved on your local computer as a separate KMZ file, you can use an FTP or similar utility to transfer the file to the web servers. Opening data from a network server If you are working in an organization where place data is saved to a network that you have access to, you can open that data in the same way you would open a saved KMZ file on your local computer, navigate to the network and locate the KML file. 94 www.mapaction.org Contents Type in the Name field and enter the full path of the KMZ file in the Link field, or browse to the file location if the file is located on a network. You can use a URL to reference the KMZ. The 3D viewer immediately flies to the default view for the linked data. Tip: The text you enter in this description is your description of the link only and is not viewable by anyone else linking to the KMZ file. Only you will be able to see the description you enter here unless you email your link folder to other people. 4.7 Google Earth addadd-ons Humanitarian Mapping Add > Network Link> Data Collection Creating a network link Website Reduce the number of intermediate points of an line in order to speed up the calculation GeoUtilities www.geo-news.net/ index_geof.html Enable mapping of administrative region data MEASURE Evaluation Excel to Google Earth (E2G) www.cpc.unc.edu/measure/tools/ monitoring-evaluation-systems/ geographic-information-systems Buffering algorithm, upload point, lines and polygons GeoUtilities www.geo-news.net/index_geof.html 95 Google Earth Name QGIS Task Annex Google Earth has many tools, however, to enable for further adding, editing and sharing of existing data there are many external tools that you can utilize with Google Earth. The table below is not an exhaustive but consist of tools that have been tried and tested. Look at the task to locate what you need to do, follow the link and the online instructions for each. GPS How might I use this? Field Guide to Humanitarian Mapping Task Name Website Calculate the area of the buffer GeoUtilities www.geo-news.net/index_geof.html Allow the polygon features of one layer to be overlaid on the polygon, point, or line features of another layer GeoUtilities www.geo-news.net/index_geof.html Export point, line and polygon shapefiles, with more attribute data Shp2KML shp2kml.sourceforge.net Export shapefiles to Google Earth’s KML format GPS TrackMaker www.gpstm.com Convert shapefiles in virtually any coordinate system MapWindow www.mapwindow.org Drawing grids, paths and polygons GE Path www.sgrillo.net/googleearth/ gepath.htm Create, process, and import/export KML code KMLToolbox www.zonums.com/kmltoolbox.html Building better balloons Outreach Tutorial http://earth.google.com/outreach/ tutorial_balloon.html Plot tabular data to bar graphs with geometrical shapes, colours and polygons GE-Graph www.sgrillo.net/googleearth/ gegraph.htm Cache Google Earth data GE Cacher http://bx11.110mb.com/gecacher.htm Or www.download.com/Google-EarthVoyager/3000-2648_4-10667194.html 96 www.mapaction.org Use File > Save > Save Image to save the current view as an image file to your computer's hard drive. The image is saved with all visible placemarks, borders, or other layer information visible in the 3D viewer. 4.8.2 Printing File > Print Print dialog box appears that asks you to choose one of the following: Selected Folder in My Places. This is available if you have selected any placemark or folder in the Places folder. This prints the current 3D view plus placemark information and images. Contents Humanitarian Mapping 4.8.1 Save current view Data Collection 4.8 Saving and printing images Most Recent Search Results. Most recently searched location. GPS Graphic of 3D View. Choose an appropriate resolution and then select available printers, just as you would for any document. You can use Google Earth offline without an internet connection. To do this you need to have the data ‘cached’ (saved onto your hard disk). First connect to the internet, launch Google Earth, and clear its disk cache: Tools > Options > Cache > Clear disk cache > OK Then, make sure that the borders and roads layers are switched on; zoom to the affected area and systematically ‘sweep’ it at an appropriate level of resolution. As you do this, the background imagery is cached to disk. Google Earth 4.8.3 Memory and disk cache preferences You can make a copy of the cached data on your computer and pass this to another user so that they can view and use the same regional content without having to connect to the internet. To do this, close Google Earth, then go to this location: QGIS To copy the cache Windows Vista: C:\USER\AppData\Local\Google\GoogleEarth 97 Annex C:\Documents and Settings\USER\Local Settings\Application Data\Google\GoogleEarth\ Field Guide to Humanitarian Mapping Windows 7: C:\Users\Username\AppData\LocalLow\Google\GoogleEarth Note - The AppData folder is not visible in Windows 7 Explorer but the path can be copied and pasted or typed directly into the address bar. Pressing enter/return will take the user to the desired folder location. In order to share and distribute the cached image data take copies of the files dbCache.dat and dbCache.dat.index. Google Earth also stores the My Places and Image Overlay data here as KML files. These can be copied and shared with others which allows for quick and easy reproduction of maps that have been worked on within Google Earth. Other parties can benefit from pre-prepared waypoints, paths, polygons and overlays without the tedious and time consuming task of recording the coordinates and attributes of each then inputting data manually. It is features such as this that are welcome in time-critical situations such as disaster response. By increasing your memory and disk cache size, you can improve performance. To do this, follow the steps below. 1. Click Tools > Options (Mac: Google Earth > Preferences). Click on the Cache tab. 2. Enter a value in the Memory Cache Size field. You do not need to know the actual limits of your computer's memory because Google Earth automatically limits the size according to the physical memory available on your computer. 3. Enter a value less than 2000 in the Disk Cache Size field. Disk cache is limited to 2GB. Google Earth uses this cache when you are viewing imagery offline. You can recover some disk space by deleting the disk cache. To do this: 1. Click File > Server Logout. 2. Select Tools > Options (Google Earth > Preferences on the Mac). Click on the Cache tab. 3. Click Delete Cache Files. 98 www.mapaction.org Contents You will need a Google account in order to begin creating data tables. Log in with your username and password or if you do not have one, follow onscreen instructions to create an account. There are huge benefits in Fusion Tables being hosted online by Google: • Your data can be accessed from any computer with internet access using your account log in. • Data can be shared electronically with colleagues and other organisations who may then be invited to contribute or edit tables. All controlled by you. • Customisable privacy settings meaning you can choose who can view your work and hide parts of visible tables as necessary. • Tables created by users and made public are available in a huge online catalogue. These can be browsed and viewed by anyone. • The data you input can be instantly visualised on Google Maps, Google Earth, charts and timelines with just a few mouse clicks. • Data from multiple tables can be merged. • Viewers of your data will always see the latest version. Charts and maps they have made using your tables will be updated automatically when you make improvements to your datasets. • Large online community with which to discuss data and seek advice or guidance. • There is a vast bank of data supplied by Google and its users that can be viewed and used for all manner of applications. Humanitarian Mapping Note – There is the option to Take a tour on the home page in order to familiarise yourself with some of the many features available. Data Collection To get started visit www.google.com/fusiontables/Home GPS Fusion Tables is a service provided by Google with which tabulated data can be quickly and simply visualised in Google Maps and Google Earth. Google Earth How might I use this? QGIS 4.9 Google Fusion Tables The following instructions give a very brief insight into the functionality of Google Fusion Tables. They are designed merely to provide an introduction to 99 Annex 4.9.1 Some basic features of Google Fusion Tables Field Guide to Humanitarian Mapping the vast capabilities of such an extensive and powerful tool. In order to use Google Fusion Tables effectively and to a much higher potential than this guide can describe, it is advised that you visit http://www.google.com/ fusiontables/public/tour/index.html to explore the many tutorials and help files provided by Google and the public forums concerning particular questions and techniques. Begin creating your own table When you log in for the first time you are automatically directed to the database of publically available tables created by other users. There is a list of viewing options to the left of the screen with which to filter what you see on this screen. Use the New table button at the top left of the window to begin creating your first table. Click New table > select either Import table or New empty table Import table Import table allows you to use a precompiled table of data. This can be sourced from your own computer or loaded from Google Spreadsheets (found at https://docs.google.com/#home). From this computer To upload a file from your computer either input the file path in the box or use Browse to locate it (on your hard drive). Once the file has been found click Next. Note – The supported file types are listed onscreen along with size limits for each. Comma Separated Variables (.csv), Microsoft Excel (.xls or .xlsx), OpenDocument Spreadsheet (.osd) and Keyhole Markup Language (.kml). For further help click Learn more or use the button by each file type. 100 www.mapaction.org Data can be inputted into a user friendly and familiar looking spreadsheet interface. Much like Google Fusion Tables there is a range of privacy and visibility options to help you limit who is allowed to view the data once it is saved. See http://docs.google.com Sychronising Google Fusion Tables and Google Spreadsheets Google Spreadsheets you have saved or have access to automatically appear in a list in Google Fusion Tables. Contents Humanitarian Mapping This option allows you to import data from a spreadsheet or form that has been created using Google Spreadsheets. Data Collection Google Spreadsheets You will now be asked to grant Google Fusion Tables access to your Google Account in order to synchronise the data. Note – This is only required the first time you attempt to load a Google Spreadsheet. GPS Choose required spreadsheet > Click Select. You are then asked to select your spreadsheet again (this won’t be necessary from now on). The data in your spreadsheet is now displayed onscreen. Choose the columns you wish to import into Google Fusion Tables by selecting or deselecting the checkboxes above each. Google Earth Read the onscreen information carefully and if you accept click Grant access. Adding information about your data The next screen is crucial for data handling purposes and is a welcome feature of Google Fusion Tables. QGIS Click Next Table name identifies the table within Google Fusion. Ensure you choose a logical and instantly recognisable name. 101 Annex You are asked to provide some information about your imported table. Field Guide to Humanitarian Mapping Allow export enables viewers the option to export your table into CSV format for their own use. Attribute data to adds a message to your data which is displayed when others view or use your data. You may wish to include details of your organisation here. Attribution page link provides the option to input a URL here. You may wish to display a link to your organisation’s website. Description adds any notes you wish to add that provide extra information about your data to aid easy recognition of the particular table is displaying. The default entry is the time, date and source spreadsheet of the data. Click Finish Your selected spreadsheet data is now displayed in Google Fusion Tables. New empty table Click New table > New empty table A blank table is displayed with default column names described below. Inputting data Text. Add a text label to the row for identification or to convey extra information about your data. Number. Identify each piece of data with a number for ease of data handling. Location. The coordinates of the particular piece of data which can then be used for visualisation on a map. Note – Google Fusion Tables recognises location details if entered in the correct format. This will automatically become the Location column. Degrees, minutes, seconds and decimal degrees are both recognisable formats. Date. For example the date the particular data was collected/tabulated. Note – any number of columns can be added to display whatever data is necessary to your operational needs. 102 www.mapaction.org Merging two tables Contents Hovering the cursor over a data field in the table will display this icon. Click it to add a comment to your data. This enables you to add extra information about your data that you don’t want to display in the main table. It could be notes on how the data was acquired, who acquired it, what method was used and so on, anything you deem relevant. You can leave a comment on a table, a row, a column, or the value in a particular cell. Humanitarian Mapping Adding comments to your data fields Checking the accuracy of inputted coordinates Where Google Fusion Tables recognises coordinates in a data row this symbol appears. Click it to view your data point in Google Maps. You then have the option to select from nearby points or if it is not the correct location, use the search bar to enter alternate coordinates. GPS Your new table will now be displayed. It is separate from the two constituent tables and will not overwrite the original data Google Earth 1. Enter the URL of the table you wish to merge or select it from the drop down list 2. Choose columns that will share data over the two tables 3. Check Select columns to choose columns to display in your newly merged table 4. Assign a name for your new table 5. Click Merge tables button (or cancel if you wish to reconsider) Data Collection Click Merge The data entered into your Google Fusion Table can be visualised in several different ways. Due to the nature of this field guide, the method we are most interested in is on a map. This section outlines the main features of the map visualisation tool and explains its key functions. Click Visualise > Map 103 Annex How might I use this? QGIS 4.9.2 Visualising your data on Google Maps Field Guide to Humanitarian Mapping Configure information window Click on a data point on the map to display its information window. This is the information from its row in the table. To customise the information window Click Visualise > Map > Configure info window (a link above the map viewer). On the Automatic tab you can select the columns on your table from which the information displayed in the info window is taken. On the Custom tab modify the layout and content of your info window using HTML code. For more detailed instructions click Learn more. When you are finished editing the code make sure you click Save. To discard changes click Cancel. Configure styles This lets you customise the overall look of your visualisation. Here you may choose marker icons, customise polygons and lines. Also categorise ‘buckets’ (bands) of data values and assign different icons to each. Don’t forget to click Save to implement changes. Intensity map Visualize > Intensity map Depending on the data in your columns you may be able to visualise your table as an intensity map. You can select which column of your table is used for the intensity values. Points appear on the map as a gradual colour scale with their size also indicating their magnitude. Polygons may also be defined, for example regional administrative areas, and are automatically coloured according to values assigned to them. 104 www.mapaction.org The Heat Map visualisation is based on the density of points from a data table. Very closely clustered points appear ‘hotter’ on a map than sparsely distributed points. The effectiveness of this feature relies on the map being viewed from a small scale perspective – encompassing a very large area. This means it has limited suitability in humanitarian mapping but aspects may be utilised depending on your operational needs. Contents Visualize > Map > check Display as heat map Humanitarian Mapping Heat map Data Collection 4.9.3 Exporting data as a KML for use in Google Earth GPS Once you are satisfied that the data in your Google Fusion Table ha s been ma ppe d correctly and you are happy with the configuration of the Information Windows and general overall format you can export it as a KML file which can be viewed in Google Earth. An automatic download of the KML file will take place and it will become available in your Downloads folder (or equivalent). Remember to move this file and store it in accordance with your data handling conventions. The KML can be Double-clicked to automatically open Google Earth and display the data stored within it. The KML file appears in a folder named Fusiontables folder. Google Earth Visualize > Map > Export to KML File > Save > Save My Places 105 Annex QGIS Note - This folder is in the Temporary Places folder and will need to be moved to My Places or saved manually to allow use in future sessions. Field Guide to Humanitarian Mapping Appendix 4A: Google Earth quick guide 106 www.mapaction.org Decimal Degrees (DDD) In this notation, decimal precision is set in the degree coordinate. Degrees, Minutes, and Seconds (DMS) In this notation, decimal precision is set in the seconds coordinate. Degrees, Minutes with Decimal Seconds (DMM) In this notation, decimal precision is set in the minutes coordinate. Latitude and longitude syntax is specified as follows: Contents Humanitarian Mapping For entering coordinates for placemarks, fly-to and descriptions, latitude and longitude values can be set using the following notations: Data Collection Appendix 4B: Entering coordinates in Google Earth Direction Notation (North/South, East/West) Use N, S, E, or W to indicate direction. The letter can be entered either upper or lower case or it can be placed before or after the coordinate value. GPS Numeric Values Simply separate each coordinate notation with a white space and the entry will be recognized correctly. Entering latitude-longitude pairs 107 Annex QGIS When entering latitudinal or longitudinal pairs, the first coordinate is interpreted as latitude unless you use a direction letter to clarify (E or W). Google Earth You can also use the minus sign (-) to indicate a westerly or southerly position. Field Guide to Humanitarian Mapping Appendix 4C: Google Earth keyboard equivalent commands Command Keyboard Normal Microsoft Windows menu navigation shortcuts Alt + F, E, V, T, A or H to open each menu respectively Open file Ctrl + O Save image Ctrl + Alt + S View in Google Maps Ctrl + Alt + M Print Ctrl + P Email view Ctrl + Alt + E Copy current selection Ctrl + C Cut placemark Ctrl + X Paste placemark Ctrl + V Open Find Field Ctrl + F Delete item Del Rename item Ctrl + Alt + R Zoom to selected placemark/item Enter Full screen mode F11 Show/Hide sidebar Ctrl + Alt + B Lat/lon grid Ctrl + L New placemark Ctrl + Shift + P New folder Ctrl + Shift + N New image overlay Ctrl + Shift + O New model Ctrl + Shift + M New path Ctrl + Shift + T New polygon Reset direction of view to North (after rotating) Ctrl + Shift + G Reset angle to top-down (after tilting) U 108 N www.mapaction.org Geolyzer http://geolyzer.dirkoester.de/eng/. A compact usability-lab for KML -content. It allows you to record and playback subject-activities, generate 3DHeatmaps to analyze mouse-activity on the globe and export reports. Google Earth Blog www.gearthblog.com/. For Google Earth news and updates. Google Earth Community http://bbs.keyhole.com. An online forum which is dedicated to producing Placemarks of interesting or educational perspectives. Contents Humanitarian Mapping Free Geography Tools http://freegeographytools.com/2009/using-thegoogle-earth-cache-basics. For various add-on tools for use with Google Earth. Data Collection Appendix 4D: Useful websites for Google Earth Google Outreach (US) website http://earth.google.com/outreach/. GPS Google LatLong http://google-latlong.blogspot.com/. A news and notes webpage by the Google Earth and Maps team. KML Documentation http://code.google.com/apis/kml/documentation/ . Particularly useful if you want to find further codes, also the interactive sampler is a good way of trying things and seeing the results. Northgates KML Editor http://www.northgates.ca/KMLEditor/. A useful editor. Google Earth Google Spreadsheet Mapper http://earth.google.com/outreach/ tutorial_mapper.html. Allows you to create 400 placemarks with six ready made templates. The KML Handbook: Geographic Visualization for the Web http://my.safaribooksonline.com/9780321574404. Gives examples on what things are and how to do them. 109 Annex Ogle Earth www.ogleearth.com/. A Google Earth news site charting innovative uses and political implications of Google Earth. QGIS Official Google Earth Website http://earth.google.com/. For download of software and updates. Field Guide to Humanitarian Mapping Chapter 5: Humanitarian mapping using Quantum GIS How to use Chapter 5 QGIS is a powerful Geographical Information System (GIS) software toolkit that is free to download and use. This chapter focuses on the use of QGIS for mapping in humanitarian operations. For a general introduction to GIS for humanitarian mapping see chapter 1 of this guide, and for quicker, easier mapping tools see chapter 4 which utilises Google Earth. Free and Open Source Software (FOSS) with GIS functions is widely available in many different packages. For the purposes of this guide we have used one package that has a user-friendly interface and fast access to most standard raster and vector formats. QGIS allows a user with a basic understanding of the functions of GIS and its applications to create many useful map products for work within disaster risk reduction (DRR) and relief. QGIS is a sophisticated GIS toolset. Unlike Google Earth, it does not open automatically with integrated imagery and mapping; however its functionality is considerably wider than Google Earth for managing and mapping spatial data and performing complex analyses on it. QGIS can be used in a wide range of humanitarian mapping tasks, including: Chapter 5: Humanitarian mapping using QGIS 5.1 Introduction: getting started with QGIS 5.2 Creating and saving a new project 5.3 Data 5.4 Navigating QGIS 5.5 Using the map legend to control the layers 5.6 Vector properties 5.7 Selecting features 5.8 Importing other data sources 5.9 Attribute data 5.10 Digitising new features 5.11 Georeferencing target data using QGIS 5.12 Creating a map to print or for export Obtaining and displaying information to orientate new staff arrivals. Showing ‘who-what-where’ data: coordination centres, health facilities, distribution centres, refugee camps, airfields, drop zones. Displaying information about infrastructure, damage and hazards. Dividing up the disaster zone into search and rescue sectors, affected zones, unsafe zones, possible evacuation routes. Mapping and analysing data about the affected population and their needs, and highlighting spatial gaps and overlaps in response. The purpose of this chapter is to give you an overview of the layout, terminology and functionality of QGIS. To receive further direction in using this software please utilise the online manuals and forums available in many languages at: http://download.osgeo.org/qgis/doc/manual/ 110 www.mapaction.org Start QGIS by finding it in your programs or desktop shortcut. 5.1.2 Basic layout This is your Main View. Your window may appear differently depending on your operating system and window manager. 1 2 4 3 5 6 1. Menu Bar 2. Tool Bar 3. Map Legend 4. Map View 5. Map Overview 6. Status Bar Menu Bar Provides access to various QGIS features using a standard hierarchical menu. Most menu options have a corresponding tool. 111 Explore data and compose maps. Create, edit, manage and export data in several formats. Analyse data including vector analysis, sampling, geoprocessing, geometry and database management tools. Publish maps on the Internet Extend functionality through plugins. Contents Humanitarian Mapping Data Collection View and overlay vector and raster data in different formats and projections including: PostgreSQL tables, ESRI shapefiles, MapInfo, SDTS, GeoTiff, Erdas Img., ArcInfo, Ascii Grid, JPEG, PNG, GRASS, WMS, WFS, and Open Street Map. GPS QGIS currently runs on most Unix platforms, Windows, and OS X. http://www.qgis.org/ Google Earth Navigate to the QGIS website and follow the online instructions to download the most recent stable version. QGIS is released under the GNU General Public License. QGIS 5.1.1 Download QGIS Features of QGIS Annex 5.1 Introduction: getting started with Quantum GIS Field Guide to Humanitarian Mapping Toolbar Provides access to most of the same functions as the menu, plus additional tools for interacting with the map. Hold mouse over the item and a short description of the tool’s purpose will be displayed. Map Legend How might I use this? Tip: Restoring Toolbars If you have accidentally hidden all your toolbars, you can get them back by choosing Menu Bar > View > Toolbars The map legend area is used to set the visibility, z-ordering of layers and adding layer groups. Visibility. The checkbox in each legend entry can be used to show or hide the layer. Z-ordering. Layers listed nearer the top of the legend are drawn over layers listed lower down in the legend, drag and drop to desired location. Group Layers. Right-click Legend Window > Add group > a new folder appears > drag the layers onto to the folder symbol. Bring layers out of a group. Right-click Layer > Make to top level item . Rename Folder. Right-click folder > Rename > type desired name Tip: Navigate the Map Use the mouse wheel to zoom in and out on the map by placing the mouse cursor inside the map area and roll the wheel forward to zoom in and backwards to zoom out. Use the arrow keys to pan in the map by placing the mouse cursor inside the map area and click on the right arrow key to pan East, left arrow key to pan West, up arrow key to pan North and down arrow key to pan South. Map View The map displayed in this window will depend on the vector and raster layers you have chosen to load. See 5.3 for more information on data. The map view can be panned and zoomed in and out. 112 www.mapaction.org Contents Provides a full extent view of layers added to it. The rectangle shows the current map extent allowing you to quickly determine which area you are currently viewing. Right-click > View > Check Overview. To add a single layer in the overview Right-click desired layer in Legend > Show in overview. If you click and drag the red rectangle in the overview that shows your current extent, the main map view will update accordingly. Status Bar Humanitarian Mapping How might I use this? Data Collection Map Overview Shows current position in map coordinates (e.g. meters or decimal degrees) as the mouse pointer is moved across the map view. GPS How might I use this? At the far right of the status bar is a projector icon. Clicking on this opens the projection properties for the current project. Tip: Context help When you need help on specific topic, you can access context help via the Help button available in most dialogs. 113 QGIS Status Bar > Extent - Annex Status Bar > Coordinate - Google Earth To toggle between showing coordinate position or the view extents of the map view as you pan and zoom in and out. Field Guide to Humanitarian Mapping 5.2 Creating and saving a new project How might I use this? It is possible that you will have many different sets of data, so it is important to manage them efficiently to prevent mistakes and wasting valuable time. You will store all your work in Projects. The data you use will not be stored within the project file but will be linked to it; therefore the same data can be used for many projects. 5.2.1 Loading and saving an existing project Loading a project File > Open Project > navigate to folder > select file (.qps) > Open Saving a project It is advisable to save regularly especially if you are in the field with no/poor power supply and may have to move quickly. File > Save > navigate to folder and assign name >Save It is important to note that a saved project file does not contain any map data. The project file contains references to map data, as well as other information such as the data’s symbology. 5.3 Data How might I use this? In humanitarian mapping, data falls into categories: background and situational. For more information on data sources please see chapter 1 and 2 of the user guide. Background data can be time-consuming to collect and organise. If you are working in disaster management then download and obtain as much data as you can beforehand, try to ensure it is correctly spatially referenced and perform any necessary data organisation (see chapter 1 for an explanation). Situation data is ‘current’ information about the emergency. At the beginning of a disaster you may have very little: but it might include field hospitals, evacuation centres, road status, bridges. Other situation data may come in the form of statistics. The number of people affected, deaths and injuries. All tend to be collected at the level of admin unit (district etc) or p-code (unique reference codes for individual communities). It is useful to think about the types of maps you want to create; each map should be focused on a particular purpose to ensure clarity of information. 114 www.mapaction.org Aerial photos Virtual Map of the World (VMAP) GAUL admin boundaries dataset National mapping agencies’ digitised data holdings GPS points and tracks Assessment report data 5.3.1 Raster data Raster data in GIS consists of matrices of discrete cells that represent features on, above or below the Earth’s surface. Each cell in the raster grid is the same size, and cells are usually square. Typical raster datasets include remote sensing data such as aerial photography or satellite imagery and modelled data such as an elevation matrix. In the case of true georeferenced imagery, such as true colour land photography (as might be obtained in GeoTIFF format), the data of the cells of the raster image is not accessible in the normal manner of grids, but instead it is displayed simply as an image with whatever RGB values are stored within it normally. Unlike vector data, raster data typically do not have an associated database record for each cell. 5.3.2 Vector data Many of the features available in QGIS work the same, regardless of the vector data source. 115 Analysing damage and flooding Identifying flat land for IDP camp locations Contextual Information Identifying roads and routes Classifying urban areas and settlements with population figures Base maps of districts and communities to plan assessment missions Number of people affected, casualties Programme planning maps Contents Humanitarian Mapping Satellite imagery Data Collection Situational data Topographic maps (scanned) Logistics maps Supported raster formats GPS V e c t o r - Arc/Info Binary Grid - Arc/Info ASCII Grid - GRASS Raster - GeoTIFF - JPEG - Spatial Data Transfer Standard Grids - USGS ASCII DEM Google Earth R a s t e r Examples of uses - Erdas Imagine Supported vector formats - ESRI shapefiles, MapInfo MIF (interchange format) and MapInfo TAB (native format). - PostGIS layers using the PostgreSQL data provider plugin. QGIS Sources Annex Data type Background data Field Guide to Humanitarian Mapping 5.3.3 Adding data to your project How might I use this This section will show you how to add and display data. It is useful to have an image underneath your mapped data to give it some context. To help locate important features for example rivers, roads and large areas of open space for possible camps and urban settlements. Add raster data Layer > Add Raster Layer > Navigate to file > Open Or: Click Add Raster Layer icon Add vector data Layer > Add Vector Layer > Navigate to file > Open Or: Click Add Vector Layer icon The layer will be added to your project and is visible in the Legend. Tip: Hold down the Control key and click multiple items to add many layers at one time Each vector data set will be added to the map project as a single layer. The three most common of which are represented below. Layer Polygon Description Examples Composed of solid shapes made up of interconnected vertices; anchor points about which a line turns. Large urban areas, flooded areas, no-go zones, minefields Line Composed of line segments that may be interconnected. Can have vertices. Roads, boundaries Point Individual points Small villages, clinics, camp locations 5.4 Navigate QGIS How might I use this? When working with a map it will often be necessary to zoom in to view an area in more detail, or zoom out to see a larger area. 116 www.mapaction.org To zoom in to a specific area Click and hold the left mouse button. Move the mouse to drag a rectangle around the area you wish to zoom to. Release the mouse button. If your mouse has a scroll wheel on top, it can be used to zoom in or out by rolling it forward or backwards. Zoom to Full Extent Zooming to full extent resets the map view to see every feature of every layer. Toolbar > Click Zoom to Previous or Next Extent Zooming to the most recent or next extent shown on your map view. Contents Humanitarian Mapping Move the cursor over the map and click to zoom in or out around a point. Data Collection Toolbar > Click the Zoom in or Zoom Out icon buttons GPS 5.4.1 Zoom in and out Zoom to layer extent Zooming to a layer’s extent will display an area showing every feature in the selected layer(s). Toolbar > Click Google Earth Toolbar > Click 5.4.2 Docking and undocking Views How might I use this? You may find it easier to have different windows bigger or smaller or not visible at all. To customize your information windows click and pull on the top of the window. Hold down the left mouse key and drag the window to desired location. 117 Annex QGIS Note - Right-click on desired layer in the Map Legend and specify Zoom to Layer Extent (vector data only) or Best Scale (raster and vector data). Field Guide to Humanitarian Mapping 5.4.3 Panning Panning allows the user to move the map display around to show areas outside of the current viewing area without changing the scale of the map. Click > Move cursor over map > Click and hold Left mouse button The map will move with the cursor until released. 5.5 Using the map legend to control the layers How might I use this? The Map Legend is a graphical representation of all the map layers in the current project. Each line represents a layer of data that is in the main view. You can change a layer’s symbology or the order of display for the layers. For example, a layer may be given a colouring scheme indicating varying affected population. To turn a layer on or off click the check box next to it. The image to the right tells you the type of layer and its present symbology. The layer will have a plus (+) or minus (-) sign next to it to indicate they are collapsible or expandable. 5.5.1 Changing the layer name Changing the name of a layer does not affect the underlying data, only the layer in that particular project. Right-click Layer > Rename 5.5.2 Changing the drawing order The layers are drawn from bottom up so the first layer in the legend is the top layer of the map. It important to carefully order your map layers so that important data is not obscured by layers placed on top. Click and drag a layer to the desired location. 5.5.3 Removing a layer from the map Removing a layer does not remove or delete the underlying data. Right-click Layer > Remove 118 www.mapaction.org 5.6.1 Map layer symbolisation When adding a new map layer to the user’s project, a default symbol will be automatically generated. You can reset this to your preferred symbology. Access the Layer Properties by double-clicking on the layer name in the Layers window or Right-click Layer > Properties > Style> select symbol > Apply > OK Contents Humanitarian Mapping The Layer Properties dialog for a vector layer provides information about the layer, symbology settings and labeling options. Data Collection 5.6 Vector properties Labels are an easy way to add dynamic textual labels to geometric features on the map. QGIS will extract a user-defined field from the map data to be used as the label text. GPS 5.6.2 Adding a label to a layer 119 QGIS Find a selection of vector data shapefiles for the area in which you are working: for example from a partner organization that uses GIS. Import them into Quantum GIS. Set up a series of data layers and set the symbols to create a working base map (see Chapter 1 for hints on cartography). Navigate the extents of the data and practice zooming to areas of interest. Annex Activity Google Earth Right-click Layer > Properties > Labels > check Display Labels > use drop down menu to select field > select properties > Click OK Field Guide to Humanitarian Mapping 5.7 Selecting features How might I use this? Select one or more features and their corresponding attributes for deletion, export, copying and analysis. For example, exporting relevant data on IDPs, using subtotals of values held as attributes to work out how many Non Food Items (NFIs) are still needed. 5.7.1 Select features tool Select one or more features, by clicking on them or drawing a boundary around them. Once selected, on the map, the corresponding attributes are also selected in the attribute table. Click > choose method of selection > navigate curser to map > select area Or View > Select > choose method of selection > navigate curser to map > select area Note - when selecting an area using a polygon, Right-click to finish the shape. 5.7.2 Select feature by querying attributes How might I use this? Instead of selecting features graphically on the map, this method selects features according to certain attributes. For example, to select towns over a certain population, or countries below a certain area. Right-click Layer > Open Attribute Table > Advanced Search Select the Field that contains the data you need to analyse and use the Operators to query your data. Example: in the data set shown above to find all communes with a population above 1,000: 120 www.mapaction.org Contents Double-click SumPop > Click the ">" sign > enter ‘1000’ > Click OK. You will see the selected features are highlighted on the map as well as in the attribute table. 5.7.3 Exporting a selection of features A selection of features can be used to make a new Shapefile. Select some records, using either an attribute query or by selecting on the map. Close the attribute table (if open) > Right-click Layer > Save selection as... In new dialog box Select ESRI Shapefile and enter the name of the new shapefile. Browse the location of where you want to save it. Data Collection Just view the selected items Zoom to the selected items GPS In the View menu, you then have the option to: Humanitarian Mapping All features that match the criteria are selected How Might I Use This? It is likely in the field that data will come to you in the form of reports, tables even Google Earth files. This section will explain how to import and start to use this information. 5.8.1 Google Earth If you have created some data in Google Earth, or someone has sent you a Google Earth file, you can open this directly in QGIS. QGIS 5.8 Importing other data sources Google Earth Note - If you want to view your new Shapefile, you need to add it your map. 121 Annex Add Vector Layer > choose [OGR] KML as the file type > browse to the file > Click Open > the KML file will be added to the map. Field Guide to Humanitarian Mapping To save the data as a Shapefile: Right-click Layer > Save As Choose the folder and a name for the Shapefile > Click Save 5.8.2 Data from tables and reports Data in the field regarding the humanitarian situation is often stored and supplied in simple tables, typically MS Excel files, MS Access tables or plain text files. You can save these files as CSV files for example in Excel, these files can then be imported into QGIS. Note - If the table contains coordinates, then it can be converted directly to a GIS file. Adding a CSV file Click found in the bottom left of the screen. The following window will appear. Click the Open (...) button to browse to and load the CSV file. Now enter , in the Delimiter String. Choose the correct field names for the X and Y coordinates. Click OK 122 www.mapaction.org Contents Often data is recorded using GPS units. Waypoints, paths and tracklogs are stored onto a handheld device in the field to be downloaded and manipulated back at base. Whether you collect the data yourself or are handed it by a colleague or another organization, it is important to know how to use it. This section details how to use GPS data in QGIS. Importing and using data from a GPS Loading GPS data into QGIS Import GPS data (saved in .gpx file format) into QGIS by following these instructions. Humanitarian Mapping How might I use this? Data Collection 5.8.3 Data from GPS Plugins > GPS > GPS Tools Click Browse… and locate the GPS data from where it is saved. Click Open and check or uncheck the boxes that appear according to your needs: Google Earth GPS A new window will open. Click the Load GPX file tab These are features recorded by your GPS unit depending on how it has been used to gather data. See chapter 3 for GPS operation and data collection. QGIS Waypoints, Routes and Tracks. 123 Annex Click Ok and the data file will be loaded into your QGIS viewer. Field Guide to Humanitarian Mapping Downloading data into QGIS from a GPS unit Ensure your GPS is connected to your computer with the correct data transfer cable – see chapter 3.7 for details on connecting your GPS unit to your computer and downloading data from it. Plugins > GPS > GPS Tools > Click Download from GPS tab Select the type of data, either waypoints or tracks, you wish to download. Ensure you have selected which port your GPS is plugged into - likely USB. Assign a layer name and the file name to which you want the data stored and Click Save As to establish a file path to your data folder. Click Ok and your data (waypoints or tracklogs) will begin downloading. Once the download is complete the file (saved in .gpx format) may be added to your QGIS project as a GPX data layer. Plugins > GPS > GPS tools > Load GPX file > browse to file location > Ok Using GPS data to construct a map How might I use this? GPS waypoints can be used to establish locations of particular features whereas track logs are ideal for mapping roads. For example in the instance where some transport links have been rendered impassable, perhaps by flooding or a landslide and the GPS tracks recorded portray serviceable routes along which to deliver aid or support. Several layers of data obtained using a GPS unit may be compiled to create a thematic map. As seen in 5.11 Georeferencing an image using QGIS, spatial distribution of features can be mapped. In that particular case it was the location of key buildings in a given area. Example using GPS waypoints recorded in Microsoft Excel How might I use this? It is not always possible or even necessary to download data from a GPS electronically. Sometimes data might be recorded manually by reading waypoints from your GPS display screen and inputting them to a spreadsheet. For more information refer to section 5.8.2. 124 www.mapaction.org In this fictitious example, an assessment of water supply facilities has been made for each site, categorised into Good, Moderate or Poor and recorded in the spreadsheet alongside the original GPS data. The spreadsheet data was uploaded using the Add Delimited Text Layer tool detailed in section 5.8.2. How might I use this? Attribute data is an array of information associated with each layer in your GIS project. It can include anything you wish to add such as dates, locations, assessment reports, names, survey data and so on. 5.9.1 Creating an attributes table Ensure you have a vector layer loaded into QGIS. It may be polygons, waypoints or polyline. In this example waypoints have been used to create a layer entitled Points of Interest. Right-click Layer > Open Attribute Table 125 Contents Annex 5.9 Attribute data QGIS Google Earth GPS By selecting the X and Y coordinate columns in the dialogue window, QGIS is able to map the points as a shapefile. Humanitarian Mapping The original Excel data file (saved as a .csv) contains a number for each site, the X,Y coordinates, the date and the time at which the data was recorded. Additional attributes can be added in the spreadsheet in new columns and will appear in the Attributes Table (see 5.9 Attribute Data) within QGIS. Data Collection In the following example various locations for site inspections recorded with a GPS has been overlain onto a vector shapefile depicting national boundaries of Haiti. Field Guide to Humanitarian Mapping The following window will appear: As you can see in this example there is only a Name and Description field. 5.9.2 Adding new columns to your table More columns can be added as required. Columns can contain any information (attributes) you wish to add to your data. Remember that columns containing coordinates are used by the software to map your points. To add a column ensure editing is enabled by clicking the Toggle Editing button. Click the New Column button. Enter the details for the new column as follows: Click OK. - The new column is added. 126 www.mapaction.org For example enter the name in the name field e.g. Latrine, Tent, Feeding Station. Data Collection Your attributes should look something like this: Contents Now you can start editing your layer attributes. Humanitarian Mapping 5.9.3 Editing your attributes table Unselect all. To deselect all rows click Move selection to top. Groups all rows you have selected at the top of the table which makes reading and comparing data much easier. Invert selection. Swaps all selected rows for all those not selected. Copy selected rows to clipboard. This allows you to copy and paste data in selected rows to other applications such as a word processor or to another spreadsheet. Zoom map to selected rows. Displays the corresponding points in your QGIS map viewer. Delete selected features. Removes data in selected rows from the attribute table and also removes their corresponding points on the map. Use Edit > Undo to rectify errors. 127 Google Earth Select a row in the table by clicking on the row number to the left. To select multiple rows, hold Ctrl and click row numbers as you require. QGIS 5.9.4 More attributes table functions Annex Confirm that you want to save your edits. GPS To save your edits: Right-click Layer > Toggle Editing or click Field Guide to Humanitarian Mapping Use Search and Advanced search buttons to query your data and locate specific entries. Use Show selected only and Search selected only check boxes to hide rows that you are not currently interested in. This declutters your view and makes analysing data much easier. 5.9.5 Symbolising Features on a Map Right-click Layer > Properties > Symbology tab In the Symbology settings: Choose Unique Values Choose the Name Field > Click Classify A list of the values you entered will appear: Click Apply and then OK. The features will be displayed in the different categories on the map. Experiment with the different legend types. Can you produce a legend based on graduated symbols? (hint – use the Quantity field). 128 www.mapaction.org Contents This may include such examples as: Tracing flood extents or forest areas from a satellite image Digitising rivers or village centres from a scanned map Mapping roads from GPS tracks The benefits of digitising features; they are vector features meaning: They can be symbolised any way the user requires They can be easily edited to reflect changes They can be measured (e.g.) Quantity: (number of features) Length: (e.g. of roads) Area: (e.g. of IDP settlement) 5.10.1 Creating a new shapefile layer In order to create and store the features you want to digitise you first need to create a new shapefile layer. Click Layer > New > New shapefile layer 129 Annex QGIS The following window will open: Humanitarian Mapping The process of manually creating new vector features (point, line or polygon) guided by a background layer. Data Collection In this section you will learn how to digitise several types of features and how to add them to your map as layers. GPS How might I use this? Google Earth 5.10 Digitising new features Field Guide to Humanitarian Mapping You can now make the choice of what vector type you’d like to display on the newly created layer. Choose between Point, Line and Polygon. Then assign a CRS and enter attribute column names for the layer. Then click Save As. 5.10.2 Using the polygon shapefile Example Once your shapefile layer has been created and the polygon radio button selected from the dialogue, give the layer a suitable name and save it according to your personal or your organisation’s conventions – see chapter 2.5 for establishing an organised file naming system. You are now ready to start producing polygons on your map Activate Edit mode and you will notice several buttons adjacent become illuminated. These are the drawing and editing tools. To stop editing click toggle edit and save edits. Capture Polygon. Once selected it is possible to click points on the map to form a shape. Each point is connected to the last by a line. Pressing backspace will delete the last point captured. Remember to use Right-click to complete the polygon once you are satisfied with it. Move Feature(s). Use this tool if the position of the polygon is undesirable. Left-click and drag the polygon to its new location. Node tool. If the polygon formed on the map requires adjustment, click this tool to highlight the nodes (or ‘corners’) of the polygon. These can then be selected and repositioned as necessary. The polygon may also be stretched by grabbing an edge by holding the Left Mouse Button and dragging it. Select Features. In this case polygons, once selected using deleted, cut, copied and pasted using these buttons respectively 130 can be www.mapaction.org Contents How might I use this? Each tool is described, its function explained and an example of the outcome given beneath. 131 Google Earth QGIS Add Part. Use the Select Feature button (shown above) to choose the polygon to which you wish to add the part. Ensure the Add Part tool is selected and construct the new polygon area in the desired place. Once the part is added both polygons behave as a single shape and their attributes are shared. If moved their positions will remain relative to one another. Annex Add Ring. Effectively ‘cutting a hole’ in an existing polygon. Choose which polygon to add the ring to by selecting it with the Select Feature button (shown above). It is used much the same way as the Capture Polygon tool but remember the shape created is removed from the original polygon. GPS Data Collection Simplify Feature. This tool removes nodes from a polyline or polygon to simplify its shape. Use the slider to set the tolerance and determine what extent the shape should be simplified. Humanitarian Mapping 5.10.3 Advanced tools Field Guide to Humanitarian Mapping Use and to delete a ring or a part respectively. Reshape Features. Select this button to trim polygons in order to adjust their shape. The larger area will be kept and the smaller area deleted. Don’t forget you can use Undo and Redo to rectify mistakes. Split Features. Dissect a polygon with this tool to split it in two. The two parts are then independent of one another and can positioned separately. Merge Features. Select two or more features using and click the Merge Features button to merge them. You then have the option to 132 www.mapaction.org 5.10.4 Using these tools to digitise features on a map This simple example digitisation was made by capturing an image from Google Earth (File > Save > Save Image…> [filename.png]) then importing it into QGIS as a raster layer. See 5.3.3 for details on importing data. For the purpose of this example, the features we are interested in are a settlement to the left of the image, roads, a river and the lagoon. 133 Contents Annex QGIS Google Earth As seen in this image, there are several features on the ground that may be digitised for different uses. Humanitarian Mapping Tip: Two or more layers can be used, with different colour polygons for each, to depict data such as varying suitability for IDP sites. Data Collection Note – these editing tools are used in much the same way for polylines and points. Some of the buttons are restricted as their function is not relevant as it is for polygons (Add Ring for example). GPS synchronise their attributes; either by identifying one polygon that all the others then adopt attributes or by using maximum, minimum or median attributes from those features selected. Once features are merged they behave as one and move relative to one another. Field Guide to Humanitarian Mapping Here is the Google Earth image with the digitised features traced onto it using QGIS. Pictured below are the digitised features saved as a number of shapefile layers, the Google Earth base image has been removed. This data can now be used in your project to construct a map fit for purpose. Note – In order to use data in this way, the original image from which the features were digitised needs to be georeferenced – assigned precise 134 www.mapaction.org 5.11 Georeferencing target data using QGIS This is a simplified guide on how to georeference data using QGIS. For further information consult the QGIS user guide: Help > QGIS Home Page > Documentation > Manuals > Click the “QGIS User Manual” . See section 10.8 Georeferencer plugin. Contents Humanitarian Mapping Remember each feature has its own attributes table where specific information about it is stored. Data Collection geographic coordinates to establish its position on the globe. This enables other data layers to be overlayed accurately. See section 5.11 below for detailed instructions. You will need a geographically accurate reference image, shapefile or map that is already georegistered (assigned coordinates), loaded into your QGIS viewer in order to perform the georeferencing operation. 5.11.2 Initiating and using the Georeferencer plugin Open the QGIS Georeferencer plugin: Google Earth In this example a Google Earth aerial photo image of a northern district of Port Au Prince, capital of Haiti, will be georeferenced against MapAction data. Throughout this section the target data (that which are you are about to georeference) is referred to as an ‘image’, it could also be vector paths, polygons, points and so on. The reference data in the example is a layer of spatially located buildings compiled by MapAction. GPS 5.11.1 Identifying target data and reference data File > Open Raster > locate the file and Click Open 135 Annex The window shown below will open. You add your target image by: QGIS Plugins > Georeferencer > Georeferencer Field Guide to Humanitarian Mapping Take note of recognisable features in the image that correspond with those on your reference data layer. Such features on this example might include the cluster of oblong buildings in the northeast, the three rows of cylindrical looking structures in the west and the regular, linear structure in the open area in the south east. If you need to check between windows the Georeferencer plugin window can be minimised or maximised accordingly. It can be found to the bottom left of the main QGIS window once minimised. Some operating systems allow you to clip two windows adjacent to each other which is ideal for crosschecking between target image and reference data. Note – always bear in mind the nature of your reference data. You may need to pinpoint natural features such as prominent coastal outcrops, treelines, sharp bends in rivers and so on. 5.11.3 The georeferencing process Beginning the process Click the Add Point button and click on a point on the image. The point you choose has to be either a recognisable feature or a precise location known to you, likely recorded with a GPS. Clicking a point will open this window: 136 www.mapaction.org In both the Georeferencer plugin window and the main QGIS window, use the arrow keys to pan and the mouse wheel to zoom. Points placed on the image can be moved or deleted using buttons in the tool bar. Hover the cursor over each to learn its function. Labels can be added to the points providing information about each by using: Contents Humanitarian Mapping Manipulating points and adding labels Data Collection Here you have the option to input the coordinates manually, if known. If not, click the From map canvas button. This will take you to the main QGIS map view where your reference data is. Be careful to click the same point on the referenced image as this is how the target image gains its georeference data. Notice after each point is input, it appears with various attribute data in a table below the target image. Once you have several points marked on your image make sure you save them by clicking the disk icon . It is now time to click the Start Georeferencing button to continue the process. You will now be prompted to set the Transformation Type if you haven’t already done so. A new window will appear, into which you must input some information. 137 Annex Start Georeferencing QGIS Google Earth Add as many points as is practicable, ensuring they are evenly spaced and distributed across the target image. GPS Settings > Configure Georeferencer > select options to meet your requirements. Field Guide to Humanitarian Mapping The default transformation type is Linear. Before you can proceed, you must assign the output with a name. Do this by clicking or by typing a file path directly into the address bar. Remember to use a logical and simple file naming system – see section 2.5 for guidance on effective file naming. Check the Load in QGIS box and Click OK. Completing the process Your image will now appear in your main QGIS window as a layer overlaid onto your reference data layer. To remove the labels, maximise the Georeferencer plugin window and navigate to the following: Settings > Configure Georeferencer Minimise window > Uncheck Show IDs and Show Coords > Provided your points were selected accurately and that the reference data is reliable your image should now be georeferenced for use in GIS. See image on page 139. Note – for clarity purposes the reference layer colour has been changed and the layers reordered to place the buildings over the georeferenced image. 138 www.mapaction.org Contents Humanitarian Mapping Data Collection Once you have compiled sufficient layers of data to match your needs and deliver the relevant information to the reader you can use QGIS to quickly and simply create a printable or exportable map. Once you are happy with the format and style of your map within the QGIS window it is now time to use the Print Composer. Click File > New Print Composer 139 Annex QGIS The following window will open: Google Earth 5.12 Creating a map to print or for export GPS © 2011 Google Field Guide to Humanitarian Mapping Click Add New Map found on the tool bar. By Holding the Left Mouse Button you can drag a frame in the viewer on the left of the Composer window specifying where on the paper and how much of the print out it will cover. By using this icon the content displayed within the viewer can be moved and the map can be zoomed to achieve the optimum area and resolution using the zoom controls. 5.12.1 Adding a legend and other editing options A legend can be added by clicking the Add Vector Legend button tool bar then clicking in the viewer. in the The legend can be positioned and resized as desired. Note – The legend is a direct translation of the names of the layers in your project so for the purposes of clarity ensure they have suitable names. The individual names of features or layers can be changed by clicking the Legend box, selecting the Item tab and clicking this button A scale bar is fundamental to any map. Without it, meaningless. Add one with the data is near To add an image to your map use the camera icon This could be anything from a symbol to a photograph or the logo of your organisation. Tip: You may want to highlight a Point of Interest with an image and pinpoint it on the map using the Add arrow tool Labels can convey extra information that cannot be displayed graphically Simple geometric shapes are created using To add a table of attributes 140 www.mapaction.org For example: shapes, infill, line weight, columns in a table, layer or single item colours, the option to group items or items within layers, symbology and the formatting of text can all be altered here. Items added within the Print Composer can be grouped/ungrouped to enable easy repositioning without having to alter each one individually. Added items can be locked into position by using Right-click. This prevents accidental repositioning when attempting to ‘grab’ something else. Contents Humanitarian Mapping Next to the General tab can be found the Item tab. The properties of individual items or groups of items can be modified and in many cases, in extensive detail. Data Collection 5.12.2 Modifying the properties of added items 5.12.3 Recovering the closed Print Composer If you accidentally or indeed meaningfully close the Print Composer your work can be recovered by: Click File > Print Composers > Composer * (the number of your current work) 5.12.4 Saving, printing and exporting Google Earth The Raise selected item and Align selected items buttons are used to position items you have added relative to one another. Notice the arrow indicating a drop down menu for each. GPS Use Undo/Redo much like in many other software applications to rectify any mistakes made. This simple example map depicts a fictitious scenario showing the location of several bush fires in relation to vulnerable dwellings and the available major 141 Annex The Print Composer’s ultimate role is to enable the production of an onscreen map formatted to your specifications and displayed exactly how it will appear on a print out. By using the tools described previously in this section the process is intuitive and fairly simple to grasp. Explore their functionality and practice using each in various contexts and you will soon be producing operational maps quickly and efficiently. QGIS How might I use this? Field Guide to Humanitarian Mapping access routes for emergency vehicles. It also includes information on the prevailing wind direction. The intensity and therefore inherent hazard of each blaze has been represented by the size of the icon. Printing and sharing your map When you are satisfied with the overall look of your map you have a number of options: Save as template. If you are working in one area with known constants and need to quickly update the same map with different ephemeral features or items this is an important time saving device. A template can be loaded and quickly altered or added to as required. Export As Image. The map can be saved in the file location of your choice in a number of different formats including but not limited to: JPEG, PNG, BMP, PNG and TIF. Export as PDF. The map is saved in Portable Document Format to a file path of your choice. It can be easily viewed by anyone with a PDF viewer in a user-friendly and very clear format. Export as SVG. Scalable Vector Graphics; the file data is saved as XML and can be read or modified with a large range of tools (including, for example, Notepad). The image is not subject to degradation by resizing or zooming. Print. Your created map can be printed direct from the Print Composer. The normal ‘Print’ window appears allowing you to define several options. 142 www.mapaction.org Contents Glossary Annex 1 Coordinates and coordinate systems. Numeric descriptors of a location, for example its latitude and longitude, or X/Y coordinates in a Cartesian coordinate system. Data analysis. Using computer software, the analysis of several sets of data to create new datasets. Datum. This can mean a reference height, but in GIS usually refers to a ‘geodetic model’ that is used as a framework for accurate position measurement. See also spheroid. WGS84 is commonly used as datum. Desktop GIS. Software that runs on a desktop or laptop computer; as contrasted with web-based applications and Google Earth. Digital elevation model (DEM). A computer model of the Earth’s terrain surface used in GIS. Google Earth has a built-in DEM that is based on SRTM data. ESRI geodatabase. See geodatabase. ESRI Shapefile. See shapefile. Feature. In GIS a feature is an individual spatial component of a dataset; for example a particular village (point feature), section of road (line feature), or lake (polygon feature). Field. A field is a category of data within a database file. For example, the ‘Name’ field in a database of towns. The actual data are contained in records. File format. Spatial data can be contained in a wide range of types of files. The file extension (.gpx, .shp) usually indicates the file format that has been used. Free and open source software (FOSS). Any software that can be used and/or modified without charge; as contrasted with proprietary or commercial software. Data Collection Cartography. The ‘art’ of map design: selection of the best visualisation to suit the purpose of the map. GPS Cartesian coordinate system. A system in which the coordinates of locations are given by reference to a flat grid; by contrast with angular systems such as latitude/ longitude. Google Earth Attribute data. Data about features, apart from the geometry itself. For example, the populations of settlements. QGIS ArcGIS. Suites of GIS software published by ESRI Inc. Humanitarian Mapping Admin areas. Boundaries of government-defined districts, sub-districts etc. Geometry. Refers to the ‘locations’ part of a spatial dataset, particularly of a shapefile. When editing a shape (e.g. the line of a road) you are editing the geometry. 143 Annex Geodatabase. An ESRI format for spatial data, allowing the holding of many data types in a single database, and with special functions for data management. Field Guide to Humanitarian Mapping Geotags. Spatial references added to data to allow it to be mapped. For example, adding coordinate information to the header file of a photograph. Georeferenced. Data that has been augmented to allow it to be used in a GIS. Its precise geographic location is specified. For example an aerial photo with a worldfile attached. GIS viewer. A software package that allows you to view spatial data and assemble it into a simple map; however usually without the means to edit or analyse the data. GIS editor. A software package that allows you to manipulate and change your spatial data. For example, to add new locations to a dataset of clinics, or to change a boundary line between two districts. GIS analysis. Tools give the ability to ‘answer questions’ about the data and to create new tabulated or visual outputs. Global Positioning System (GPS). The satellite-based system operated by the US Government that allows users with suitable GPS receivers to locate and record their position. GPS usage is covered in detail in chapter 3 of this guide. Google Earth. A software tool and online global spatial database available free from Google. Google Earth is covered in detail in chapter 4 of this guide. Grid type raster. See raster grids. Keyhole Markup Language (KML). This is the file format used by Google Earth and increasingly by other GIS software. It is an XML-based format. When KML files are zipped with other data (such as photos) they become KMZ files. Line feature. A feature representing a linear object, for example a segment of a road, railway or river. A line feature has a length, but no area. It may have several changes of direction at a number of vertices. MapInfo. A suite of GIS software tools from a company of the same name. Metadata. ‘Data about the data’. In GIS this means a file of information for a particular spatial dataset. It contains details of where and when it was collected, by whom, and so on. Mobile GIS. GIS tools that can be run on hand-held or other mobile devices and can be used for field data collection. Both appropriate software and hardware are needed. Open Geospatial Consortium (OGC). An international standards organisation focused on geospatial content and services, GIS data processing and data sharing. P-code. A unique reference code to identify a specific settlement that overcomes variant spellings and similar problems. P-code schemes are agreed at an inter-agency level in some humanitarian emergencies. Placemark. A term used in Google Earth and some other GIS software to describe a point feature and its associated attributes. Plug-in. A software tool that is ancillary to the main program and which can be installed by the user to give extra functions. Some GIS software packages have extensive libraries of plug-ins available. 144 www.mapaction.org Projection system. A projection system is a coordinate system that allows the data to be displayed on a flat surface such as a printed map or on a computer screen. Corrections are made by software to account for the curvature of the Earth’s surface. ProVention Consortium. An international coalition working on topics related to disaster risk reduction. Quantum GIS (QGIS). A powerful GIS software suite available for download free-ofcharge. QGIS is explored in detail in chapter 5 of this guide. Raster data. Spatial data in which the Earth’s surface is depicted by an image. This can include a scanned map. The name raster comes from the type of scanning process used. A raster image is made up of many individual cells but discrete features are not contained in the file. Contents Humanitarian Mapping Polygon feature. A feature representing an enclosed object such as a lake or a government district. The area of a polygon feature can be calculated. It will be drawn as a boundary line with several changes of direction at a number of vertices. Data Collection Point feature. A feature representing a singular object, for example a water well or the nominal centre of a village. A point feature has no dimensions so is described using a single set of coordinates. Spatial Database Management Systems (DBMS). A database system sometimes used in conjunction with GIS software: in this case the DMBS is used mainly to store the data, but often also provides (limited) analysis and data manipulation functions. SRTM. Shuttle Radar Topography Mission. A global dataset of height data acquired by the NASA Shuttle mission in Feb 2000. The dataset is freely available for GIS use. Symbology. Usually refers to the symbol set used to depict features on a map. GIS software allows the symbols to be changed depending on data variables. For example to display road segments with an attribute ‘damaged’ to a different colour. Simple cylindrical projection. A projection system used in Google Earth. Shareware. Software that is typically issued as a ‘trial version’ for free use, with fullfunctioning versions available on a proprietary or commercial licence. Google Earth Spatial data. Data that contains references to positions, usually relative to the surface of the Earth (see georeferenced). GPS Raster grid. A rectangular grid of pixels, comprising a raster data set. Spheroid. A mathematical model that describes the shape of the Earth. Datums used in GIS are based on a specific spheroid that give the ‘best fit’ to the shape of the Earth for the area to be mapped. Thematic map. A map displaying a particular type of data for a specific purpose: for example health facilities status, or emergency shelter needs. Contrast with a topographic map. 145 Annex Spatial referencing system. A definition of the locational data structure of spatial data. This may include the coordinate system, datum and projection system. QGIS Shapefile. A format for vector data sets, published by the company ESRI. Shapefiles are used widely in a number of GIS software packages. Field Guide to Humanitarian Mapping Topographic map. Also called a topo sheet. A general-purpose map that shows the landforms and terrain, but also usually physical features like roads and settlements. A topographic map may be used as a base for a thematic map. Topo sheet. See Topographic map. UTM. Universal Transverse Mercator. A global coordinate system which is widely used. It divides the Earth into UTM zones. Vector data. Spatial data comprising point, line, or polygon features. Each feature can have its own attributes which allows manipulation and analysis. Contrast with raster data which does not have individual features. Vertex (plural: vertices). A junction-point in a line or polygon feature. Vertices may be edited to change the shape or geometry of the feature. Visualisation. The creation of maps using spatial data. Vulnerability and capacity assessments (VCA). A structured field assessment methodology used in disaster risk reduction. Waypoint. A point feature recorded using a GPS receiver. If imported into Google Earth, each waypoint is interpreted as a placemark. Web Feature Service (WFS). A standard for exchanging spatial data at the level of individual features. Web Map Service (WMS). A standard for the distribution of maps over the internet. WMS allows positional data to be attached to a map object. WGS84. World Geodetic System 1984. A datum commonly used with GIS datasets and with Google Earth. Worldfile. Data added to, typically, a satellite image containing spatial referencing information. X and Y coordinates. In a Cartesian coordinate system such as UTM, the latitude and longitude descriptors are replaced by X (northings) and Y (eastings) which are metres from a fixed origin. There is sometimes also a Z coordinate, which is height (altitude or elevation). 146 www.mapaction.org ASTER PAA: LANDSAT, ASTER and IKONOS images for protected areas. (A KMZ file download for use in Google Earth). http://www.ambiotek.com/paa Digital Map Archive: global coverage maps. A zoomable viewer with simple tools allows import of data and layer management. http://dma.jrc.it/ Geo4ngo: an exchange platform of information related to the use of geographical information by humanitarian organisations. http://www.keyobs.be/geo4ngo/index.html Contents Humanitarian Mapping All In Diary: up to date humanitarian information and resources. http://www.allindiary.org/ Data Collection Useful websites Annex 2 Grass GIS: QGIS can be used as an interface to Grass GIS functions. Good raster analysis for flood prediction. http://grass.osgeo.org/ gvSIG: a free GIS software package available as a desktop application or on a mobile device. www.gvsig.gva.es/ ILWIS: open source GIS software, originally developed at ITC in the Netherlands www.ilwis.org Google Earth Global Land Cover Facility (GLCF): freely downloadable geographic data, including: Landsat, MODIS, ASTER and IUCN/UNEP Protected Areas Database. http://glcf.umiacs.umd.edu/data/ GPS GIS Development: aims to promote use of GIS in areas of development. www.gisdevelopment.net QGIS Linux operating system: preloaded with various open source GIS software. http://www.sourcepole.com/2006/11/16/gis-knoppix-en Manifold GIS: www.manifold.net 147 Annex Natural Earth Data: 1:10,000,000 vector data, global coverage. Entire coverage downloadable as one package or choose separate geographical elements based on your requirements. http://www.naturalearthdata.com/downloads/ Field Guide to Humanitarian Mapping NGA Raster Roam: US National Geospatial-Intelligence Agency: global raster datasets, including SPOT mosaic, Vector Map of the World and scanned maps. http://geoengine.nima.mil/geospatial/SW_TOOLS/NIMAMUSE/webinter/rast_roam.html OpenJUMP GIS: open source software, highly specialised on vector data editing and ease of use. www.openjump.org OS Geo Foundation: support for custom functionality/programming www.osgeo.org/search_profile ProVention Consortium: community development and disaster risk reduction. http://www.proventionconsortium.org Public Health Mapping: WHO is promoting the use of GIS to support decision-making for a wide range of infectious disease and public health programmes. http://www.who.int/gho/map_gallery/en/index.html Quantum GIS: open source GIS with user friendly interface and extensive functionality. Explored in detail in chapter 5. www.qgis.org ReliefWeb: news and satellite imagery on disasters across the globe, regularly updated. Includes several useful tools. http://reliefweb.int/home Satellite Remote Sensing: integrated CEOS European data Server http://iceds.ge.ucl.ac.uk/ Satellite Remote Sensing: Global Land Cover Facility http://glcf.umiacs.umd.edu/index.shtml SavGIS: downloadable Spanish language GIS software maintained by an official body. Free licence. www.savgis.org/es Spring GIS: GIS and remote sensing image processing system. Product of the Brazilian Space Agency. www.dpi.inpe.br/spring/index.html SRTM: Shuttle Radar Topography Mission, global 90 m digital elevation model. http://srtm.usgs.gov http://www.ambiotek.com/topoview - (KMZ file download that requires Google Earth) http://srtm.csi.cgiar.org/ Tatuk GIS: A general purpose commercially available GIS suite. Includes a standalone free-todownload GIS viewer. www.tatukgis.com/products/Editor/Editor.aspx 148 www.mapaction.org