1
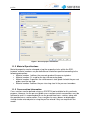
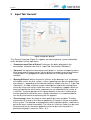
preTee version 2.10 5/2008 ABES – Advanced Bridge Engineering Systems Pty Ltd, Sydney, Australia 2008 This manual is protected by copyright laws. No part of it may be translated, copied or reproduced, in any form or by any means, without written permission from Advanced Bridge Engineering Systems Pty Ltd (ABES), Sydney, Australia. ABES reserves the right to modify or to release new editions of this manual. The manual and the program have been thoroughly checked for errors. However, ABES do not claim that either component is completely error-free. Errors and omissions will be corrected in due time after they are detected. The user of the program is solely responsible for the application of the results stemming from calculations with this software and is strongly encouraged to test the correctness of all analyses. preTee 1 General .......................................................................................................................... 4 1.1 Initial Definitions..................................................................................................... 4 1.1.1 Project Information ............................................................................................. 4 1.1.2 Material Specifications ....................................................................................... 5 1.1.3 Cross-section Information .................................................................................. 5 1.2 ABES preTee Task ................................................................................................ 6 2 Input Tab ‘General’......................................................................................................... 7 3 Input Tab ‘System’.......................................................................................................... 9 4 Input Tab ‘Continuity’.....................................................................................................11 5 Input Tab ‘Loading’........................................................................................................14 6 Input Tab ‘Construction Schedule’.................................................................................16 7 Input Tab ‘Post-Processing’...........................................................................................18 8 FAQs.............................................................................................................................19 8.1 How is the structural system set up?.....................................................................19 8.2 How are time-dependent effects accounted for? ...................................................20 8.3 How is the exact geometry of the bridge deck computed? ....................................21 8.4 How is traffic loading applied and computed? .......................................................21 8.4.1 General .............................................................................................................21 8.4.2 Specific details with regards to the AS5100.......................................................22 8.5 How is continuity modelled in splayed girder arrangements? ................................23 8.6 What conventions are used when defining load cases? ........................................24 8.6.1 Loading Actions ................................................................................................24 8.6.2 Code-Independent Loading...............................................................................24 version 2.0 3 preTee 1 General preTee is an input wizard specifically designed for girder bridges assembled from pre-cast pre-stressed girders which are placed adjacent to each other with an on-site concrete topping slab. preTee supports the input of the structural system, the load definition and the definition of a construction sequence. The structural analysis and automated design checks are performed automatically based on the provided input information and in accordance with the prescribed national code. preTee functions as an integral task within the SSD (SOFiSTiK Structural Desktop) user environment. A basic understanding of the SSD user environment will be required for the use of the preTee wizard and the application of information presented in the user manual. 1.1 Initial Definitions The following information must be defined prior to launching preTee to ensure the correct functionality: • general project information, • material specifications and • cross-section information. It is recommended that when commencing a preTee project the predefined templates are used. This is done by choosing ‘New Project from Template…’ from the File drop down menu in the SSD. By following the tabs to the pretee sub-directory, a template called pretee_as5100.sofistix (for AS5100) may be found as part of the standard installation of the preTee wizard. Once the template is selected the user will be asked to define the name of the project data base and the location of the directory where the database and all associated files will be stored. When the project is open the project tree will consist of a System Group and a preTee ABES group. Under the System group will be found the initial definitions including system information, materials and cross-sections. While the preTee ABES group contains the ABES preTee task. 1.1.1 Project Information General project information is defined in the System Information Task (Figure 1). This task is pre-set in the provided template. In this input window a number of alternative settings are possible. While it is recommended that the title of the project be adjusted to describe the project, adjustment of the other variables is not recommended as they may override assumptions made by the preTee wizard. version 2.0 4 preTee Figure 1. General project information. 1.1.2 Material Specifications Material properties can be changed using the respective tasks within the SSD, however material numbers are pre-defined and should be specified according to the following convention: • Material number 1 defines the concrete grade of the pre-cast girders. • Material number 2 is used for the top slab concrete grade. • Material number 3 specifies the reinforcement steel grade for both the pre-cast girders and the top slab. • Material number 4 defines the pre-stressing steel in the pre-cast members. 1.1.3 Cross-section Information Cross-sections can be defined using any SOFiSTiK tool available for this particular purpose. However, for the pre-cast girder cross-sections certain conventions must be adhered to and it is recommended to use the pre-defined cross-sections along with the provided cross-section editor. Cross-sections for cross-beams or diaphragms should also be entered prior to using the preTee wizard if they are required in the model. version 2.0 5 preTee 1.2 ABES preTee Task The ABES preTee task is structured into a number of input tabs. All input options are pre-defined with defaults. The tabs can be filled out in any order. Interaction of input data between different tabs is controlled automatically. When all input parameters have been defined by the user or the pre-defined values are sufficient the user selects <OK> to proceed. By pressing the <OK> button a CADINP file is generated in the background, this file may be viewed using the TEDDY option within the SSD. Users with knowledge of the CADINP language can modify this file using the TEDDY option. However, it must be stressed that this file is over-written every time preTee is terminated using <OK>. If the ‘Calculate immediately’ option is ticked, when the <OK> is selected the CADINP file is generated by preTee and executed immediately. Depending on the size of the defined girder bridge deck this may take a few moments. Automatically generated output is available immediately after calculation in the report file that can be viewed using the URSULA report viewer. This automatically generated report can be supplemented freely by using the WinGRAF and DBView post-processors. version 2.0 6 preTee 2 Input Tab ‘General’ Figure 2. Input tab ‘General’. The “General” input tab (Figure 2) supports the input of general system information and is divided in to five input areas: • ‘Commencement Date of Project’ influences the dates displayed in the construction schedule (see also: 6 - Input Tab ‘Construction Schedule’). • ‘Concrete’ the age of the concrete pre-cast girders is a means of imposing some initial creep and shrinkage values into the pre-cast members prior to construction. Also defined is the geographical region to define the shrinkage and creep variables. • ‘Bearing Stiffness’ defines the elastic stiffness of the bearings in all six degrees of freedom used in the final system – either supporting each pre-cast girder or the cross-beams – depending on the defined continuity model (see also: 4 - Input Tab ‘Continuity’). A stable structural system should be ensured when entering these values by using small values rather than zero. The temporary supports which are necessary during the construction sequence are set automatically to a value of 1.e8 kN/m. The exact position of this spring element in the cross-section plane can be specified as part of the cross-section information. It is recommended to use the physical centre of the bearing for this purpose. • ‘Pre-stressing’ allows the input of some specific pre-stressing data. The data entered for the strands in this tab are applied for all strands in all pre-cast girders of the system. The detailed strand geometry within individual girders is defined as part of the cross-section information. The value for ‘Initial loss factor’ can be used to account for losses that occur between transfer of pre-stressing and first placement of girders (see also: FAQs - 8.1). version 2.0 7 preTee • ‘Slab Parameters’ allow the input of values governing the design of the transversal behaviour of the top slab. The value for ‘Slab thickness’ may differ from the slab-thickness defined for the longitudinal cross-section in order to account for reduced two-way action of the top slab – for example due to transversal cracking (see also: FAQs - 8.1). Material number 3 is used as the reinforcement material. version 2.0 8 preTee 3 Input Tab ‘System’ Figure 3. Input tab ‘System’. The geometry of the bridge deck in the longitudinal direction is based on a reference polygon. Individual girders are usually set out in parallel to this reference polygon – except where a splayed layout is specified. A detailed description of the algorithms used to determine the deck geometry can be found in the FAQs - 8.3. The ‘System’ input tab (Figure 3) is structured into the following input areas: • ‘All Spans’ contains a schematic graphical representation of the specified deck system. The reference line and the deck boundaries are outlined. Modifications to the system are displayed immediately. A single span for detailed representation in the ‘Span xx’ can be selected. Adjustment to the span length and orientation are made in the ‘Spanning data’ table • ‘Span xx’ shows the exact girder layout of the selected span. A single girder can be selected triggering the display of some selected data for this girder and the highlighting of this girder in the ‘Cross-section’ table. The number of girders and reference line offset maybe be adjusted under the ‘System Parameters’. • ‘System Parameters’ allows the input of general parameters defining the deck layout. The location of some of the general parameters are presented in the ‘Sketch’ adjacent to the input region. The parameters with check boxes are valid for all spans if ticked or may be adjusted for individual spans if unchecked. The variable parameters are found in the ‘Spanning Data’ table, if they are greyed out they may not be modified. If one or more of these values are un-ticked the corresponding entries become unavailable for input and the corresponding values in the ‘Span Arrangement’ table become active and can be modified. This version 2.0 9 preTee functionality allows the input of complicated deck geometries (see also: FAQs 8.3). • ‘Spanning Data’ table allows the exact definition of the reference line and the arrangement of the pre-cast girders in relation to the reference line. The length and direction of each span defines the reference line, direction angles for the support lines can be given. The availability of some lines in this table depends on the status of the tick-boxes in the ‘System Parameter’ input area. These lines include values for the gaps between girders in the transversal direction, the number of girders per span and the distance between the reference line and the edge of the bridge deck. Input of splayed girders can be achieved in two ways: firstly a different longitudinal gap between girders can be defined for the beginning and end of a span resulting in a regular fan pattern; and secondly, individual values can be assigned for irregular splaying patterns as shown in Figure 4. Figure 4. Input of splayed girders. • ‘Cross-Sections’ table supports for the definition of cross-sections for each girders. A drop-down menu including a list of all available cross-sections for this purpose can be activated. Modifications for groups of girders can be made by selecting these girders while holding down the <shift> key. version 2.0 10 preTee 4 Input Tab ‘Continuity’ Four different continuity models (Figure 5 to Figure 8) are available for assignment to the individual support location in the bridge deck. As a default, continuity type 1 is pre-defined for all piers and abutments. Default settings can be set for each continuity model (type 1-4) and referenced for each pier or abutment. However, by un-checking the ‘based-on-default’ box individual inputs can be made for each pier, differing from the defaults where appropriate. For all continuity models except ‘Type 1’ additional actions are included in the construction schedule (see chapter 6 for details). The ‘Spans’ input area shows a schematic outline of the defined bridge deck. The selected continuity model is represented by a colour code for each support location in this view. At each support location – the abutments and piers – can be activated and the corresponding continuity settings are then displayed in the ‘Continuity Data’ input area. Furthermore, buttons for each continuity model are also available. By clicking on these buttons the default settings for the corresponding continuity model can be displayed and modified in the ‘Continuity Data’ input area. The following continuity models are currently implemented: Continuity ‘Type 1’ (Figure 5) is the default setting and leaves each span free to move independently from other spans. No continuity is assumed. Figure 5. Input tab ‘Continuity’ – default settings for <Type 1>. Continuity ‘Type 2’ (Figure 6) assumes longitudinal elastic action of the top slab across the pier. The stiffness of the elastic spring elements representing the link slab can be entered directly or taken from a calculator. Also see FAQs - 8.5 for details. version 2.0 11 preTee Figure 6. Input tab ‘Continuity’ – default settings for <Type 2> - and link slab <Calculator>. Continuity ‘Type 3’ (Figure 7) adds a diaphragm at the end of each span to the options also available in ‘Type 2’. The diaphragm cross-section must be defined using the usual SSD tools for cross-section definition and can be selected here. The stiffness of a link slab across the pier can be defined as in ‘Type 2’ – or can be set to zero. Figure 7. Input tab ‘Continuity’ – default settings for <Type 3>. Continuity ‘Type 4’ assumes full continuity across the pier with a cross-beam establishing the connection between neighbouring spans. For this model the bearing elements underneath each pre-cast girder are removed and bearings underneath the cross-beam are included. The number of these bearings can be entered. The positions of these bearings can be equidistant or at discrete positions defined individually for each bearing. version 2.0 12 preTee Figure 8. Input tab ‘Continuity’ – default settings for <Type 4>. By clicking on a support location in the ‘Spans’ input area the continuity model data for this particular location is displayed in the ‘Continuity Data’ input area. This data can be modified, the default settings can be applied – or replaced by individual settings for this location, or a different continuity model can be chosen for this location (Figure 9). Figure 9. Definition of a continuity model for one support location. version 2.0 13 preTee 5 Input Tab ‘Loading’ All loading conditions on the bridge deck can be specified in this tab. The self weight of all structural components is applied. The input area for ‘Traffic’ loading is codedependent. Currently input options for AS5100 (road and railway loading) are implemented. All loading specified in this tab is non-factored. Appropriate factors for various SLS and ULS load combinations are applied automatically by the system and are documented in the report file. Figure 10. Input tab ‘Loading’ – road traffic loading. The input for the loading is dependent on the type of loading being applied, the types of loading includes: ‘Superimposed Dead Load’ allows for the input for numerous types of permanent loading. The defined ‘Complete Structure UDL’ acts uniformly on the whole bridge deck. The ‘Additional Deadload/beam’ is a line load acting in the centre of gravity of each pre-cast girder and can be used to account for diaphragms. Edge girders on both sides can be defined and the ‘Additional line loads’ table can be used to define line loading in relation to the reference line. A choice between SDL (factor=2.0) and DL (factor=1.2) can be made for most of these loadings. Please note that self weight of the pre-cast girders and the in-situ concrete slab are considered automatically independently of these ‘superimposed dead loads’. ‘Temperature, Settlement, Wind’ Loading all have there own input areas. Three temperature load cases are considered, for settlement a prescribed settlement is applied to all support lines. While for the wind loading the effect on the wind on the structure with an without traffic may be considered. version 2.0 14 preTee Road ‘Traffic’ loading (Figure 10) according to AS5100 can be defined in the corresponding input area. For the traffic loading firstly the lane width is defined as the ‘Nominal lane width’. The particular loading pattern is then selected, the user may select the S1600 and/or the M1600 The HLP loading is also supported, whereby the double-lane taken by the HLP load needs to be specified in relation to the reference line. Both HLP400 and HLP320 can be specified and the axle groups can be split by ticking ‘Split loads’ as is optional according to the code. ‘Pedestrian Walks’ on both sides of the deck can be specified and loaded with a UDL. For more details on road traffic loading also see FAQs - 8.4. Specifications for railway ‘Traffic’ loading for AS5100 can be entered when the dropdown menu outlined in Figure 10 is switched to Railway as shown in (Figure 11). Axle loadings can be modified, Standard rail gauges can be selected or modified and the ‘Rail positions’ in relation to the reference line can be specified. Figure 11. Input tab ‘Loading’ – railway loading. version 2.0 15 preTee 6 Input Tab ‘Construction Schedule’ This input tab supports the definition of a construction schedule for the defined girder bridge. A list of actions for this schedule is compiled automatically. Only the day for the activation of this action needs to be specified by the user. Changes of the structural system, application of appropriate load cases and time-dependent effects between these points in time are taken into account automatically. Enter values for this column Figure 12. Input tab ‘Construction Schedule’. For every span three actions are considered: • Placement of beams - Each girder in this span acts as a simply-supported structural system with supports at the specified bearing positions. Prestressing and self-weight are applied. Internally this stage is split into two: one stage for the pre-stressing on a simply-supported system for each pre-cast member, and a second stage for the application of self-weight with all bearing restraints as defined in the ‘General’ tab active – including possible longitudinal stiffness in the bearings. • Pouring of the Onsite slab - The wet concrete of the top slab is applied as a dead load onto the girders of this span. • Establishment of the Composite system. The span is turned into a composite system of girders and top slab acting together. Temporary supports for each girder are removed. All sub-sequent actions on this span are applied on this composite system. version 2.0 16 preTee When the continuity over a support is changed it may be necessary to define some additional construction stages. These additional stages are dependent on the type of continuity and are as follows: • ‘Type 1’ - No action is necessary for continuity . • ‘Type 2’ - Activation of link slab is proposed at all piers with continuity ‘Type 2’. • ‘Type 3’ - Pour diaphragm is proposed at all piers with continuity ‘Type 3’. If a link slab is also selected in addition to the diaphragm, then a second action Activation of link slab is proposed for this pier. • ‘Type 4’ - Pour cross-beam is proposed for all piers with continuity ‘Type 4’. In this case, the temporary supports at the ends of the pre-cast girders are removed and replaced with the final supports underneath the cross-beams as specified. In a final stage all Additional dead loads are applied and creep to infinity is simulated. version 2.0 17 preTee 7 Input Tab ‘Post-Processing’ This input tab supports the definition of post-processing requests. Using the two graphic input areas ‘All spans’ and ‘Span xx’ individual girders, slabs and crosssections can be selected. By ticking the boxes in the input windows below output requests can be specified for the selected members. Figure 13. Input tab ‘Post-Processing’. ‘Create WinGraf template’ leads to the creation of a template for the graphic postprocessor WinGraf. One template file for each selected girder or slab is created which can subsequently be used for visualisation of results. ‘Show influence lines and traffic loads’ leads to the visualisation of this information in the report for each selected cross-section. This report is automatically generated during an analysis run and can be viewed using the Ursula report viewer. 'List results and design combinations' leads to a detailed output of load case results and ULS and SLS envelope results for each selected cross-section in the analysis report. These listings are especially useful when performing plausibility checks. version 2.0 18 preTee 8 FAQs 8.1 How is the structural system set up? The structural system of the bridge deck is set up automatically as a mixture of shell, beam and elastic spring elements. The top slab is composed of shell elements. The pre-cast girders, diaphragms and cross-beams are modelled with beam elements. Bearings and link slabs are modelled with spring elements. The number of elements between bearings for each longitudinal girder can be input in the ‘System Parameters’ input area of the ‘System tab’. One more element at each end of each girder is added by the system to model the distance between support locations and physical ends of the girders. Meshing of the shell elements forming the top slab corresponds to the beam elements since above each web another node is created for each structural node on the longitudinal girders (Figure 14). connected with rigid links pre-cast member centreline nodes for shell elements Figure 14. Structural nodes for one pre-cast member. When using box-type cross-sections for the pre-cast girders the shell-elements are set up to span across the box, and then across to neighbouring sections as shown in Figure 15. To link the beam elements to the slab elements rigid links are set up between the beam nodes and the slab elements in the at each beam node location. Thus in Figure 14 a rigid link exists between nodes 16-29-42 etc. This way, local bending above the box or over the flanges can be considered. The connection between shell and beam elements is established by rigid links. shell elements beam elements structural nodes centre of gravity principal axes rigid links Figure 15. Connection between beam and shell elements. version 2.0 19 preTee The top slab is modelled with orthotropic slab elements with very little stiffness in the longitudinal direction. The stiffness in the transversal direction is computed taking into account the thickness specified in the ‘General’ tab (Figure 2). Design results for the shell elements include only transversal reinforcement. Sometimes quite small and distorted elements are generated for the areas between the bearings and the actual ends of the girders. These elements can cause problems in the design process, most notably the shear design routine. In this case it is recommended to tick ‘Simplified slab mesh’ in the ‘System’ tab which eliminates these small elements at the cost of introducing a small inconsistency in the connection between girders and top slab. Cross-sections for the longitudinal girders are modelled in two parts – part 1 which is activated at the time of placement of girders (also see: 6 - Input Tab ‘Construction Schedule’) for the pre-cast part of the cross-section; and part 2 for the top slab which is activated at the time of establishment of the composite system. This implicates, that these composite longitudinal girders are responsible for all longitudinal effects. Design results for these elements include the longitudinal reinforcement in the longitudinal direction for both parts. Pre-stressing is modelled by using tendon elements running within the pre-cast girders. The exact tendon layout is defined as part of the cross-section information and is best input using the provided cross-section template editor. For each individual tendon sleeve lengths (or de-bonded lengths) can be specified. The tendon properties for all used strands can be entered in the ‘General’ tab. In the numerical model all strands with the same sleeve lengths within one pre-cast member are combined into representative tendons in order to minimise the model size. Elements are grouped together logically to enable activation for the construction stages. Foe example, all shell elements representing the top slab of a span are combined into one group, and all pre-cast members of one slab into another. 8.2 How are time-dependent effects accounted for? Time-dependent effects starting with the placement of girders are computed automatically taking into account the information entered in the ‘Construction Schedule’ tab (see also 6 - Input Tab ‘Construction Schedule’). Differential creep and shrinkage between individual parts of the cross-section is taken into account, resulting losses in the pre-stressing are also computed. The average age of the concrete of the pre-cast sections at the time of placement can be entered in the ‘General’ tab (Figure 16). This age should be viewed as a nominal age also accounting for effects during curing of the pre-cast girders etc. Engineering judgement should be used for this input. Additional losses in the pre-stressing before placement of the girders can be approximated by setting the corresponding factor, also in the ‘General’ tab (Figure 16). Again, this factor may be set to account for losses during curing of the pre-cast girders etc. version 2.0 20 preTee Creep and shrinkage according to AS5100 depends on the region where the bridge is to be constructed. This information can also be specified in the ‘General’ tab (Figure 16). Figure 16. Parameters in the ‚General’ tab influencing the computation of time-dependent effects. 8.3 How is the exact geometry of the bridge deck computed? Under construction. 8.4 How is traffic loading applied and computed? 8.4.1 General The area between the pedestrian strips (if selected) is assumed to be the area available for traffic loading. Lanes are placed taking into account the specified nominal lane width (see 5 -Input Tab ‘Loading’). If the lanes do not fit into the available space perfectly then two arrangements are considered – firstly one lane arrangement where lanes are placed as far as possible to the left, and secondly an arrangement where lanes are placed as far as possible to the right. In bridges with splayed spans the narrowest span governs the considered lane layout. For both lane arrangements – left- and right-extreme – influence lines are evaluated for all chosen load trains. Each lane is loaded with the factors specified in the selected code and all possible combinations are computed. An envelope for each selected load train is compiled with results stored in load cases – one each for leading maximum and minimum forces and co-existing results. The load case numbers for these envelopes are given for each available load train in the codespecific sections of this chapter. The individual section forces for beam and shell elements are organised as indicated in Table 1 for 600+ load cases. version 2.0 21 preTee From these envelope results a final overall traffic envelope is generated and stored under load case numbers 100+. Section forces as well as stress-results are computed for all envelopes including envelopes for individual load trains as well as the overall traffic envelope. Details on the methodology applied in the generation and evaluation of influence lines can be found in the manual for module ELLA. Table 1. Load case numbers for traffic envelopes 600+. Leading beam section force Max. axial (N) Min. axial (N) Max. shear y direction (Vy) Min. shear y direction (Vy) Max. shear z direction (Vz) Min. shear z direction (Vz) Max. torsion (MT) Min. torsion (MT) Max. bending about y (My) Min. bending about y (My) Max. bending about z (Mz) Min. bending about z (Mz) Load case Number 601 602 603 604 605 Leading shell section force Load case Number Max. bending about x (Mxx) 621 Min. bending about x (Mxx) 622 Max. bending about y (Myy) 623 607 608 609 Min. bending about y (Myy) Max bending about xy (Mxy) Min. bending about xy (Mxy) Max. shear in y (Vy) Min. shear in y (Vy) Max. shear in x (Vx) 627 628 629 610 611 Min. shear in x (Vx) Max. membrane in x (Nxx) 630 631 612 Min. membrane in x (Nxx) Max. membrane in y (Nyy) Min. membrane in y (Nyy) Max. membrane in xy (Nxy) Min. membrane in xy (Nxy) 632 633 634 635 636 606 624 625 626 8.4.2 Specific details with regards to the AS5100 Load trains for M1600, S1600 and HLP400/320 loading for road bridges, and LA300 loading for railway bridges are currently implemented. Load case numbers 600+are reserved for the M1600 or LA300 loading respectively, 700+ for the S1600 loading and 800+ for the HLP400/320 loading. For road bridges lane factors of 1.0 for the first lane, 0.8 for the second lane and 0.4 for all sub-sequent lanes are applied as required by the AS5100. All possible combinations of lane loading are iterated. For HLP400 loading the location of the loaded double-lane can be specified in the ‘Loading’ tab. The areas on each side of this double lane is loaded with half of the S1600 and M1600 loading as specified in the AS5100. The axle groups can be split into two groups of 8 axles as specified in code if required and the lane factor for the accompanying M1600 loading can be specified. version 2.0 22 preTee A simplified, yet conservative approach is implemented in order to simulate derailment loading for LA300 loading. 8.5 How is continuity modelled in splayed girder arrangements? Series of nodes are typically created on the support axes of piers where link slabs or cross-beams are defined. These nodes are situated on the projection of each precast girder onto the support axes and are rigidly connected with each other. Link slabs (continuity ‘Type 2’ and ‘Type 3’) are modelled by spring elements in the top slab level connecting the ends of the longitudinal girders with the corresponding nodes on the support axis. In places where the number and direction of girders remains the same across the pier this system results in a parallel arrangement of spring elements as shown in Figure 15a. In places where the number of girders changes across a support, or where splayed arrangements are defined, or where the longitudinal direction of the deck changes the resulting arrangement of spring elements simulating the link slab may look similar to the one shown in Figure 15b. At support locations where cross-beams (continuity ‘Type 4’) are defined the same series of nodes on the support axes are generated. Cross-beam elements connect these nodes across the width of the deck. The individual nodes are then connected rigidly with the corresponding end nodes of the longitudinal girders. (a) (b) support axis Figure 17. Spring elements modelling link slabs. version 2.0 23 preTee 8.6 What conventions are used when defining load cases? 8.6.1 Loading Actions To enable the definition of ultimate and serviceability load conditions all loads used in the SSD environment are assigned a load type. To each of these load types the favourable and the unfavourable load factors are applied according to the selected design code and the load combinations are formed accordingly. Therefore, the definition of these load types in preTee depends strongly on the selected design code. Load types and the assigned factors are pre-defined in the <design_code>.ini file in the installation directory – e.g. for AS5100 this information is stored in …/sofistik.23/as_5100.ini Each loading type which is declared a permanent loading (PERM in Table 2) is by definition a creep-active loading. Other synonyms in this column of Table 2 refer to superposition rules used for design envelopes. These synonyms are explained in the MAXIMA, AQB and SOFiLOAD manuals. The definition of the load types and associated factors for the Australian Standard AS5100 are as shown in Table 2. Table 2. Action types for AS5100 Effects Permanent Effects Dead Loads Additional Dead Loads Prestress loads Creep and Shrinkage Additional Creep Differential Effects Differential Setelment Transient Effects M1600 Traffic S1600 TRaffic HPL Traffic Pedestrian Loading Wind Loads Thermal Effects Temperature Loading Action Name Type of Loading Factors Unfavourable Favourable G_1 G_2 P C_1 C_2 PERM PERM PERM PERM PERM 1.2 2.0 1.0 1.2 1.2 0.85 0.70 1.0 1.0 1.0 f COND 1.5 0.0 L_M L_S L_H ZQ W EXEX EXEX EXEX COND COND 1.8 1.8 1.8 1.8 1.0 0.0 0.0 0.0 0.0 0.0 T COND 1.25 0.0 8.6.2 Code-Independent Loading Dead loads of the structural members are generated and applied automatically. Additional dead loads can be specified in the ‘Loading’ tab (see 5 - Input Tab ‘Loading’). Additional dead loads are grouped into one loads case for each span. Pre-stressing is also grouped into one load case for each span. version 2.0 24 preTee Temperature loading is broken into three load cases and applied to all spans and elements of the deck. These three load cases include constant temperature loading throughout the cross-section and top-hot and top-cold linear temperature distribution. Non-linear temperature distributions can be included by defining an equivalent linear gradient. Wind loading on the complete bridge deck is modelled with two load cases – one for wind loading onto the bridge deck without traffic present on the bridge, and one load case with traffic present. For the second load case a vertical offset can be input in order to define the eccentric application level of the loading. Support settlement loading is considered by generating one load case for each support point. Pedestrian loading is applied as a line load on the defined pedestrian walk ways. Envelopes are stored as load cases – one load case each for leading section forces and the co-existing forces. One such set for the maximum and one for the minimum combination. A number of intermediate load cases are created by the software automatically. These load cases are mostly not relevant for further use, but are still visible in the data base during post-processing. Load case numbers for relevant load cases are listed in Table 3. version 2.0 25 preTee Table 3. Load case numbers. Type of Load Case Additional dead load span 1 Additional dead load span 2 Additional dead load span * Pre-stressing in span 1 Pre-stressing in span 2 Pre-stressing in span * Constant temperature loading Temperature gradient - top hot Temperature gradient - top cold Wind force without traffic Wind force with traffic Settlement at support 1 Settlement at support 2 Settlement at support * Pedestrian load span 1 left Pedestrian load span 1 right Pedestrian load span 2 left Pedestrian load span 2 right Pedestrian Load on additional spans Odd - Left , Even - Right Traffic loading envelope 1 (eg. M1600 for AS5100) Traffic loading envelope 2 (eg. S1600 for AS5100) Traffic loading envelope 3 (eg. HLP for AS5100) Overall traffic loading envelope Stresses at transfer in span 1 Stresses at transfer in span 2 Stresses at transfer in span * SLS Design Envelope ULS Design Envelope Accumulated result after construction stage 5 Accumulated result after construction stage n Individual result for construction stage 5 Individual result for construction stage n version 2.0 Load Case Number 201 202 20* 501 502 50* 11 12 13 51 52 71 72 7* 251 252 253 254 25* 601… 701… 801.. 101.. 151 152 15* 1102/1103 2105/2106 4005 4000 + n 5005 5000 + n 26