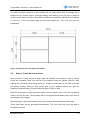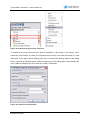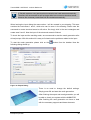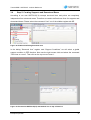
1
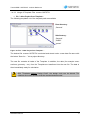
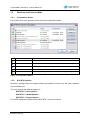
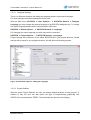
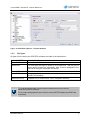
Tutorial SSD / SOFiPLUS - A Quick Reference SSD Version 2010 SOFiPLUS(-X) Version 2010 SOFiSTiK AG 2010 This manual is protected by copyright laws. No part of it may be translated, copied or reproduced, in any form or by any means, without written permission from SOFiSTiK AG. SOFiSTiK reserves the right to modify or to release new editions of this manual. The manual and the program have been thoroughly checked for errors. However, SOFiSTiK does not claim that either one is completely error free. Errors and omissions are corrected as soon as they are detected. The user of the program is solely responsible for the applications. We strongly encourage the user to test the correctness of all calculations at least by random sampling. Tutorial SSD / SOFiPLUS - A Quick Reference Contents 1 SSD Basic Features........................................................................................................1 1.1 Program Structure ..................................................................................................1 1.2 Program Version Matrix ..........................................................................................1 1.3 User Interface SSD.................................................................................................2 1.4 Basic Workflow .......................................................................................................3 1.4.1 Groups................................................................................................................3 1.4.2 Tasks ..................................................................................................................4 1.4.3 Template Files name.SOFiSTiX..........................................................................6 1.5 2 Structure and Function Mode..................................................................................9 1.5.1 Computation Status ............................................................................................9 1.5.2 SOFiSTiK Options...............................................................................................9 1.5.3 File Types .........................................................................................................11 SOFiPLUS(-X) Basic Features......................................................................................12 2.1 General Principles for System Generation ............................................................12 2.2 Mesh Generation based on Structural Elements ...................................................12 2.3 Structural Elements – General Features ...............................................................12 2.4 Additional Command for structural Areas..............................................................14 2.4.1 Wall...................................................................................................................14 2.4.2 Edit Area Edge Properties.................................................................................14 2.4.3 Boolean: Add Areas ..........................................................................................14 2.4.4 Bollean: Subtract...............................................................................................15 2.4.5 Additional Point on Area Edges.........................................................................15 2.4.6 Remove Point from Area Edge..........................................................................16 2.5 Navigation inside SOFiPLUS(-X) ..........................................................................16 2.6 Create Structural Areas with Option „Pick Point in Area“.......................................17 2.7 AutoCAD Grips for Structural Elements ................................................................17 2.8 Mesh Options for Structural Lines.........................................................................18 2.9 New Table Elements.............................................................................................19 2.10 Loads....................................................................................................................19 2.10.1 New Register Cards for Structural Elements .................................................19 2.10.2 Apply Free Loads to multiple Load cases......................................................20 2.10.3 Apply Free Loads to multiple Element Groups ..............................................20 2.10.4 Loadcase Browser ........................................................................................20 2.11 Named Selections and Groups .............................................................................21 Inhaltsverzeichnis i Tutorial SSD / SOFiPLUS - A Quick Reference 3 Example Simple Slab ....................................................................................................23 3.1 General.................................................................................................................23 3.2 Step 1: Start SSD .................................................................................................23 3.3 Step 2: Materials and Cross Section .....................................................................25 3.4 Step 3: SOFiPLUS(-X) – graphical Preprocessing ................................................27 3.5 Step 4: Create Structural Areas ............................................................................28 3.6 Step 5: Creating Supports and Downstand Beam .................................................31 3.7 Step 6: System Checks.........................................................................................33 3.8 Step 7: Create Columns in Area(2) .......................................................................33 3.9 Step 8: Check of Combinations.............................................................................34 3.10 Step 9: Linear Analysis and Superpositioning .......................................................35 3.11 Step 10: Design ....................................................................................................39 3.11.1 Design Parameters of Area Elements ...........................................................39 3.11.2 Design ULS...................................................................................................41 3.11.3 Design SLS...................................................................................................43 3.12 4 Step 11: Documentation .......................................................................................45 3.12.1 Ausgabedokument mit URUSLA ...................................................................45 3.12.2 Insert additional Graphics..............................................................................47 Additional Help / Support...............................................................................................48 4.1 Infoportal...............................................................................................................48 4.2 CADINP Samples .................................................................................................49 4.3 User Group ...........................................................................................................49 4.4 SOFiSTiK Program Manuals.................................................................................50 4.5 SOFiSTiK Support ................................................................................................50 4.5.1 Support Accessibility.........................................................................................50 4.5.2 Customer’s Obligation to Cooperate .................................................................51 4.5.3 Support Requests via SOFiSTiK Online Protal..................................................51 4.5.4 Support Requests out of SSD / TEDDY ............................................................52 4.5.5 Create a diagnostic.xml File..............................................................................53 Inhaltsverzeichnis ii Tutorial SSD / SOFiPLUS - A Quick Reference 1 1.1 SSD Basic Features Program Structure Figure 1: SOFiSTiK FEA Program Structure 1.2 Program Version Matrix The following table shows the program versions FEA and SOFiPLUs(-X) related to operating system and AutoCAD version. Tabelle 1: Program Version Matrix SSD Basic Features 1 Tutorial SSD / SOFiPLUS - A Quick Reference 1.3 User Interface SSD In order to understand the operation of the SOFiSTiK programs, the basic program structure is represented subsequently. It is imperative, that all data is stored in a central data base (SOFiSTiK Database CDB). The SOFiSTiK software has a modular structure. The SOFiSTiK Structural Desktop (SSD) controls the communication between all of the individual application programs. The SOFiSTiK Structural Desktop (SSD) represents a uniform user interface for the total range of SOFiSTiK software. The module controls pre processing, processing and post processing. The system can be entered graphically with SOFiPLUS(-X) or as parameterised text input using TEDDY. The control of the calculation and design process takes place using dialog boxes, which are accessed via the task tree. The screen is divided into three main areas. 1. task tree 2. table area 3. work area Figure 2: SOFiSTiK Structural Desktop (SSD) SSD Basic Features 2 Tutorial SSD / SOFiPLUS - A Quick Reference 1.4 Basic Workflow The SSD is task oriented. The tasks are arranged in groups (e.g. the group "System and load" contains the tasks materials, cross sections, geometry and loads). When creating a new project, the necessary groups and tasks are set by default depending on the chosen problem. The sequence of the task are very important for the project calculation. 1.4.1 Groups The computational groups are organized in a tree-structure. This structure can be changed by the user at any time, as the individual tasks can be dragged to the desired place with the mouse. The user can remove or insert additional groups at any time with associated tasks. Please use the right mous click menu inside the task tree window. This is an example of a standard group structe of a standard SSD project.: System - Model and loading Linear Analysis - Linear analysis and superpositioning Design Area Elements - Design ULS and SLS Figure 3: Navigation Window – Task Tree SSD Basic Features 3 Tutorial SSD / SOFiPLUS - A Quick Reference 1.4.2 Tasks The tasks available are accessed via the right-click-menu in the task tree. They can be inserted at any place within the tree. When you select the command “insert task” with the right mouse-button, the following dialog with all available tasks appears. Figure 4: List of all available tasks SSD Basic Features 4 Tutorial SSD / SOFiPLUS - A Quick Reference 1.4.2.1 Task Tree In the task tree the options are accessed via the right-click-menu which automatically adjusts itself to show only those available. Right click menu in the task tree The right click menu will provide relevant functions for the selected task. Examples: Process Edit à Dialog à Text-Input (<name>.DAT) Reports à Result viewer (<name>.PLB) Figure 5: Right Mouse Click – Task Tree 1.4.2.2 Table Area Database information is written in the table area. Possible categories: § Geometry § Loads § Results These results can be copied with right clicking menu into the clipboard Possible format: § Text - Format § EXCEL- Format SSD Basic Features 5 Tutorial SSD / SOFiPLUS - A Quick Reference Figure 6: Table Area 1.4.2.3 Work Area The work area displays the ANIMATOR visualisation of the system by default. The work area changes to WinPS during processing to show calculation status and the TEDDY for further text input prior to analysis. The graphical input with SOFiPLUS(-X) operates within its own separate window, making the best possible use of dual monitors. 1.4.3 Template Files name.SOFiSTiX For processing of frequently recurrent standard tasks, the Template files of the type <name>.SOFiSTiX are provided. General Templates are saved in a subdirectory of the SOFiSTiK program directory, for example in: C:\Programs\SOFiSTiK\SOFiSTiK.23\ SSD-Templates. 1.4.3.1 Adding User- defined Template directories For own Templates, the user can define further Template-directories. ⇒ SOFiSTiK à Options… à SSD-Template Path à (Find-Button ) and Add Suchen2.ico In this directory, further subdirectories can be created. These subdirectories appear as tabs and template icons (see Figure 9). There is only one level of subdirectories available. Figure 7: SOFiSTiK à User Options à SSD-Template-Path SSD Basic Features 6 Tutorial SSD / SOFiPLUS - A Quick Reference 1.4.3.2 User Defined Template Files Any file <name>.SOFiSTiK can be stored into the desired Template-Directory as Template <name>.SOFiSTiX. All current project settings can be saved as Templates Including the arrangement and sequence of the tasks. The materials and cross sections are dependent on the chosen design code. A fixed design code cannot be changed within the project. File à Save As Template Figure 8: Dialog Save Project as Template A later changing of the code is possible if the Template is stored “without design code". The existing Template directories are shown under Directories. Figure 9: File à save project as template The saved file <name>.SOFiSTiX is now available as a further Template. SSD Basic Features 7 Tutorial SSD / SOFiPLUS - A Quick Reference 1.4.3.3 Usage of Template Files <name>.SOFiSTiX ⇒ file à New Project from Template… The following templates out of the template path are available Root directory: „General“ Subdirectory: „General“ „CABD“ “pretee” Figure 10: File à New Project from Template ... The desired file <name>.SOFiSTiX is selected and stored under a new data file name with the button “Save As…” into a project directory. The new file contains all tasks of the Template. In addition, the data (for example crosssections, geometry... etc.) from the Template are transferred into the new file. The data is then immediately ready for calculation. With "Templates without Design Code”, the design code can be altered. The materials and cross sections must be checked and amended. SSD Basic Features 8 Tutorial SSD / SOFiPLUS - A Quick Reference 1.5 Structure and Function Mode 1.5.1 Computation Status Every task has its own symbol to show the actual computation status. Without computation Input is written directly into the database Green check mark No computation required Blue arrow New input data à computation required Blue cross Old data à computation required Red cross Error message à computation required Green cross Warning message à computation required (possibly) Figure 11: Computation Status 1.5.2 SOFiSTiK Options Numerous settings within the options dialog are possible of which only the most important are introduced now. The user may set the different options in: SOFiSTiK à User Options… SOFiSTiK à Global Options… SOFiSTiK à Project Options… For further explanation please see the SOFiSTiK_1.pdf user manual. SSD Basic Features 9 Tutorial SSD / SOFiPLUS - A Quick Reference 1.5.2.1 Language Settings There is a difference between the dialog box language and the input/output language. For these settings two different dialogues will be used. With the SSD menu SOFiSTiK à User Options… à SOFiSTiK General à Dialogue Language you may change the general language of all SOFiSTiK dialogues only. To change the output language please use the command form SSD menu SOFiSTiK à Global Options… à SOFiSTiK General à Language. For chanigng the output language you also may use the command SOFiSTiK à Project Options… à SOFiSTiK General à Language Project settings will be saved in a file called SOFiSTiK.def in your project directory. Global setiings will be saved in your program directory and will affect all following projects. Figure 12: SOFiSTiK: Options àDialogue Language 1.5.2.2 Project Defaults With the option Project Defaults, the user can assign default attributes of new projects. In addition to that, the user can also define the type of Preprocessing graphically with SOFiPLUS or text based with TEDDY. These attitudes are stored in the Registry. SSD Basic Features 10 Tutorial SSD / SOFiPLUS - A Quick Reference Figure 13: SOFiSTiK: Options à Project Defaults 1.5.3 File Types All type of files used by the SOFiSTiK software are listed in the table below.: Name.SOFiSTiK Central XLM- file where all information is saved. Name.DAT Control file, ASCII format Name.PLB For each task the result is saved in a file task.PLB. This file can be shown and/or printed out individually. Also it can be assigned to the total result using the command "all results". Name.CDB Central data base Name.DWG Using graphical input all information about system and loading is saved in this drawing. Name.SOFiSTiX Template- file in XLM- format: File in Template- directory. Table 2: Overview of the file- Extensions To open and recalculate a project without graphical input only the file name.SOFISTIK is sufficient. For a project with graphical input the files name.SOFiSTiK and name.DWG are necessary. SSD Basic Features 11 Tutorial SSD / SOFiPLUS - A Quick Reference 2 2.1 SOFiPLUS(-X) Basic Features General Principles for System Generation The graphical preprocessing with SOFiPLUS(-X) is based on AutoCAD or ADT. There are two general principles for system generation: Using structural elements ↔ using finite elements Using structural elements is the most common way to define the model geometry. With the structural elements you will simply model your structure as a wireframe model, which contains points, lines and areas. With the export command an automatic mesh generation will be started in the background. The classical way for system generation can be used by directly drawing the necessary finite elements in the SOFiPLUS environment. In this case you must define every element type like nodes, beams, springs, etc. directly. For further help, please see the help files in SOFiPLUS. 2.2 Mesh Generation based on Structural Elements With the basic objects area, line and point you will simply draw a wireframe model in SOFiPlUS(-X). With the „Export .dwg->.cdb…“ command the automatic mesh generation will start in the background. In a first step the mesh generator will create all necessary dependencies and intersections. Based on this additional information the final finite element mesh will be generated. The mesh can be checked with the ANIMATOR. 2.3 Structural Elements – General Features For system modelling three basic structural elements are available: area, line and point. Additional elements like walls and openings are derived from the basic elements. All elements are independent from each other. For example copying and moving elements are possible with the normal AutoCAD commands.. SOFiPLUS(-X) Basic Features 12 Tutorial SSD / SOFiPLUS - A Quick Reference The following list describes the most important properties of every basic element. Structural area (= SAR in PROG SOFiMSHC) plate, wall, shell and membrane elements walls and openings are derived from this element Structural line (= SLN in PROG SOFiMSHC) - geometric boundary for mesh generation Beam element Truss element Cable element Pile element Boundary element Linear support and/or kinematic coupling geometry: line, curve or spline geometry possible Structural Point (= SPT in PROG SOFiMSHC) - - geometric point for mesh generation support condition Column with dimension for punching design Spring element Half space pile Very important is the new feature, that the mesh generator automatically calculates the intersections. This is very helpful feature mainly in 3d system generation. Figure 14: Intersection of two structural areas in 3d environment SOFiPLUS(-X) Basic Features 13 Tutorial SSD / SOFiPLUS - A Quick Reference 2.4 Additional Command for structural Areas 2.4.1 Wall This little feature creates automatically vertical structural areas = walls based on horizontal lines. The height of this area can be defined in an edit box, which is located inside the sidebar on the left side of your desktop. (Please see also chapter 2.5) You may also use the feature „pick point in area“. In this case the boundary elements of the area will be found automatically and walls will be created. In the sidebar an additional option regarding the boundary options is available now. In this case openings will be detected automatically while creating walls. (See picture below) The value fort he wall height (see sidebar) is only a help while creating walls. 2.4.2 Edit Area Edge Properties The properties of edges are related to the arera. Nevertheless with this new command you may select several edges from different areas and change properties 2.4.3 Boolean: Add Areas Working with structural elements some useful tools are now available. In case you like to merge two areas the command „Boolean: Add“ will do this in a very simple way. The properties of the area you clock first will be used for the new merged area SOFiPLUS(-X) Basic Features 14 Tutorial SSD / SOFiPLUS - A Quick Reference 2.4.4 Boolean: Subtract On the other side it is also possible to subtract areas. 2.4.5 Additional Point on Area Edges In case it is necessary to change the geometry of an area, simply add a new point to the area edges. After creating new points on area edge new AutoCAD grips are available. Simply use this new grips to change the area geometry. SOFiPLUS(-X) Basic Features 15 Tutorial SSD / SOFiPLUS - A Quick Reference For very grip point a finite element node will be generated. Original Area 2.4.6 Add points Move grips for new geometry Remove Point from Area Edge Please use the command „Remove Point from Area Edge“ to remove points. 2.5 Navigation inside SOFiPLUS(-X) Normally you will use the SOFiPLUS(-X) toolboxes located inside the AutoCAD Menu. A new feature is our Sidebar, which contains all necessary commands Figure 15: Desktop SOFiPLUS(-X) with SIDEBAR SOFiPLUS(-X) Basic Features 16 Tutorial SSD / SOFiPLUS - A Quick Reference Inside the Sidebar you will find a register card called „Log“. In case of warnings, error messages or additional information you will find everything listed in this register card. 2.6 Create Structural Areas with Option „Pick Point in Area“ When creating an area with the option „Pick Point in Area“ additional options area availabel in the Sidebar. Using the option „Detect Boundary“ will automatically detect all openings in your area. The two options are: Single boundary Creates an area with all boundary elements Detect openings Area and openings will be created automatically 2.7 AutoCAD Grips for Structural Elements All structural elements contain the original functions of the AutoCAD grips. To change geometry simply use the grips to do so. Figure 16: Structural area with grips SOFiPLUS(-X) Basic Features 17 Tutorial SSD / SOFiPLUS - A Quick Reference 2.8 Mesh Options for Structural Lines Inside the dialog “Structural Line” register card “Beam/Cable” there are different meshing options available. Figure 17: Dialog Structural Line Mesh Automatically The mesh generator creates single elemts which are connected to the overall mesh Create Elements The mesh generator creates single elemts which are not connected to the overall mesh Create One Element without Sections This options creates one single element, which is not connected to the overall mesh. Normally used for cable elements. Create One Element with Sections This options creates one single element with beam sections, which is not connected to the overall mesh. Normally used for cable elements. Intersect With Other Elements In case this option is not selected, no intersection between elements will be used. Also start and end point of the line will be not connected to the overall mesh. For a connections an additional structural point is necessary. SOFiPLUS(-X) Basic Features 18 Tutorial SSD / SOFiPLUS - A Quick Reference 2.9 New Table Elements To define Bedding and/or constraints new table elements are available in the input dialog. All necessary input will be done in this table. Using the button to create a new line with the relevant input. In case one or more table line are marked and you use the you will get a copy of the marked lines. With the button again button you may delete the marked lines. When defining new constraints you will be able to select elements directly out of your drawing. (Please note: this function is only available when defining couplings for nodes) Figure 18: Register Card Constraints – Table of couplings 2.10 Loads 2.10.1 New Register Cards for Structural Elements All structural elements contain a new register card “Loads”. With this register card it is now possible to define and modify loads directly connected to the elements. Please create all necessary loads at first inside the loadcase manager. There is no automatic update inside the loadcase manager for all load cases defined in the element register cards. SOFiPLUS(-X) Basic Features 19 Tutorial SSD / SOFiPLUS - A Quick Reference Figure 19: Register card „Loads“ 2.10.2 Apply Free Loads to multiple Load cases Another new feature is the possibility to apply free loads to more than one load case. Simply input the load case numbers divided by an comma 2.10.3 Apply Free Loads to multiple Element Groups Using frre loads you are able to apply these loads to more than one group or element. Simply insert all group/element numbers divided by a comma. 2.10.4 Loadcase Browser With the new loadcase browser is is easily possible to navigate through all available loads and switch on/off the visibility. Changes are directly visible inside the drawing. When starting the loadcase browser, all visible loads out of the drawing are ticked in the loadcase browser. SOFiPLUS(-X) Basic Features 20 Tutorial SSD / SOFiPLUS - A Quick Reference Figure 20: Loadcase Browser 2.11 Named Selections and Groups For a better overview of your project you may use the command “Display Selection Set only”. With this command only the selected elements are visible on your screen. Now it is possible to save this selection for a later recall. With a right mouse click in your screen you can select the command “Named Selections > Save as new Selection…”. In case named selections are saved in the drawing, use the right mouse click and the command “Named Selections > Restore ‘name of selection’” to recall the selection. Please use the command “Display Selection Set only” and select the elements for your named selection before saving it. SOFiPLUS(-X) Basic Features 21 Tutorial SSD / SOFiPLUS - A Quick Reference Figure 21: screenshot with command “Named Selection” SOFiPLUS(-X) Basic Features 22 Tutorial SSD / SOFiPLUS - A Quick Reference 3 Example Simple Slab Figure 22: Drawing of simple slab with downstand beam 3.1 General This small example shows the basic workflow of the SSD and SOFiPLUS(-X) on a simple slab. After working through this example the user should be able to work on small projects, starting with the graphical system and load generation and ending up with analysis, design and documentation. For this reason there will be no detailed discussion and explanation regarding the design. A basic knowledge in using AutoCAD, TEDDY and ANIMATOR are obligatory. This tutorial For further information and help please see also chapter 4. 3.2 Step 1: Start SSD First of all start the SSD with a double click on the button. Now you will see the main desktop. To start a new project please click on the / button or go to the menu “File > New Project …”. Now the following dialog appears. Please insert a project title, the name of your database and the project directory. Example Simple Slab 23 Tutorial SSD / SOFiPLUS - A Quick Reference Figure 23: Dialog System Information For system generation we like to use SOFiPLUS(-X). Therefore please select this option in the area “Preprocessing”. Please use the default settings in this dialog and confirm with the OK button. Now the files “slab-01.cdb” for the database, “slab-01.dwg” for the SOFiPLUS(-X) drawing and “slab-01.sofistik” for project file will be generated. Example Simple Slab 24 Tutorial SSD / SOFiPLUS - A Quick Reference The selection o the design code cannot be changed after leaving the dialog. Figure 24: General view of SSD with new project As described in chapter 1.4.2.1 you will find the task tree on the right side of your screen. For completing the project you simply have to go through all tasks starting at the top of the tree. 3.3 Step 2: Materials and Cross Section As a default setting four materials are predefined. Concrete C 20/25, reinforcement steel BSt 500 SA, construction stele S 235 and masonry MZ4 I. For editing the material properties simply unse the right mouse click on any material and material dialog appears. In this dialog you may change easily the properties, for example concrete from C 20/25 up to C 30/37. Confirm the new properties with the OK button. Example Simple Slab 25 Tutorial SSD / SOFiPLUS - A Quick Reference Figure 25: Dialog Material To delete a material simply click on the material and delete it with the DEL key. Alternatively use the right mouse click and the command “delete”. For the downstand beam we need a specific cross section. To define a new material please use again the right mouse click on the task “Cross Sections” and select the command “New”. Out of the upcoming dialog select a “T-Beam section” for further input. Figure 26: List of cross section types Example Simple Slab 26 Tutorial SSD / SOFiPLUS - A Quick Reference Figure 27: Input dialog T-Beam section Inside this dialog simply define all necessary data for your cross section. For further information regarding the position of origin and the theoretical background of T-Beams please see or ASE manual, chapter 2.3.1 SOFiSTiK – T-Beam Philosophy. 3.4 Step 3: SOFiPLUS(-X) – graphical Preprocessing Now we start the graphical system generation. Open SOFiPLUS(-X) with a double click on the task “GUI for Model Creation”. We recommend preparing the basic geometry with an AutoCAD drawing. In most cases it is very helpful to make a sketch with all necessary geometric information. This sketch also shows where necessary simplifications should be used. Example Simple Slab 27 Tutorial SSD / SOFiPLUS - A Quick Reference The basic geometric structure of this example can be easily drawn with a rectangle and 2 additional lines. Please draw a rectangle starting with starting point (0,0) and a length of 20.00 m and a width of 10.00 m. Now draw a middle line to split the rectangle into two square of 10x10 m. In the left square draw an horizontal middle line. This is all you need for preparation. Figure 28: Auxiliary lines for System Generation 3.5 Step 4: Create Structural Areas Now we start to create structural areas using the auxiliary lines created in step 3. Please select the command “Area” you will find in the sidebar under the register card SE. After starting the command a new dialog shows up. At them moment there is no need to change the default settings. With the right mouse click in your drawing window you open an additional command dialog. Please select the option “POInt in Area” Now the command to create structural areas is active. Simply click in the first rectangular area on the top left side. The boundary will be recognised automatically and a new area is generated by the program. When working on ad 2d-slab system every area contains automatically two load cases. These load cases will be generated automatically. The user must only input the load or temperature values. Example Simple Slab 28 Tutorial SSD / SOFiPLUS - A Quick Reference Figure 29: Sidebar and right mouse click menu To speed up the input there are two options available in this dialog. If the option “AutoIncrement Load Cases” is ticked, the imposed load of every new area will saved in a new load case. If the option “Show Dialog Once Only” is ticked, the settings made in this dialog will be used for all following areas, without showing you this dialog again. Nevertheless the user is able to change every entry with the “modify” commands. Figure 30: Loads for Structural Area Example Simple Slab 29 Tutorial SSD / SOFiPLUS - A Quick Reference In 2d-slab systems every structural area contains two load cases automatically. Therefore we recommend to split up large slabs into numerous structural areas, because the necessary load cases will be created automatically. When leaving the input dialog the area number 1 will be created in your drawing. This area contains the load cases 1 and 2, which also can be seen in the drawing. Please note the command to create structural areas is still active. So simply click in the next rectangles and create area 2 and 3. Now the input of the structural areas is finished. To check the input and the resulting mesh, we recommend to start the mesh generation after all major steps. With this method it is easy to find and resolve problems related to the input. To start the mesh generation please click on the button from the sidebar. Now the following dialog shows up. Figure 31: Export Dialog There is no need to change the default settings. Simply press OK and start the mesh generation. After finishing the export and mesh generation you will be able to check your system with the ANIMATOR. After finishing the area generation we have to deal with the necessary supports and beam elements. Example Simple Slab 30 Tutorial SSD / SOFiPLUS - A Quick Reference 3.6 Step 5: Creating Supports and Downstand Beam According to our new SOFiPLUS(-X) concept structural lines and points are completely independent from structural areas. Therefore we need to define these lines for supports and downstand beam. Please select the command “Line” out of the sidebar register tab SE. Figure 32: Sidebar and Dialog Structural Line In the dialog “Structural Line” register card “Support Conditions” we will select a global support condition in PZZ direction. Now use the right mouse click and select the command “Pick lines or curves”. Then click on the top curve of area 1. Figure 33: Screenshot SOFiPLUS(-X) with marked line on top of Area1+2 Example Simple Slab 31 Tutorial SSD / SOFiPLUS - A Quick Reference In this case we do have two lines, which are positioned over each other. SOFiPLUS(-X) recognises this and ask the user which line to use. To see which button is related to which line simply move your cursor over the buttons and see the highlighted lines. Select the relevant line and the supports will be created immediately. Figure 34: Line Support The command is still open, therefore you go on with this procedure until all line supports are defined. Figure 35: Line Support completed Example Simple Slab 32 Tutorial SSD / SOFiPLUS - A Quick Reference Now we need to define the downstand beam along the boundary from area (1) to area (3). Please open again the dialog “Create structural lines” and go to the regiser card Beam/Cable. Please select the element type “Centric Beam”. Cross section number 1 is pre selected. Now use the right mouse click command “Pick lines or curves” and pick on the boundary line. Figure 36: Dialog Structure Line with settings for beam generation 3.7 Step 6: System Checks With the AutoCAD commands “Visual Styles” you may select a 3d realistic view style. Now you will see the slab and the downstand beam in a 3d view. Figure 37: 3d view of system Again we do have a similar command directly available over the Sidebar. With the command „Tools / 2D Wireframe view“ you may switch back in the original view.. 3.8 Step 7: Create Columns in Area(2) Inside Area (2) we like to create column supports with a diameter of 30 cm at the following coordinates (15.00 / 2.50), (15.00 / 5.00) und (15.00 / 7.50). Example Simple Slab 33 Tutorial SSD / SOFiPLUS - A Quick Reference Please select the command “Point” from the sidebar, register SE. Figure 38: Sidebar command „Point“ and Dialog Structural Point – Lower/Upper Column The column support will be defined as a lower spring support. Please define the support conditions as shown in the picture above. Also it is necessary for punching design to define a circular dimension in the register card “General”. After these settings are done, please click into the drawing window and define the columns with input of coordinates. Now the system generation is finished. Figure 39: Completed System with rigid and spring supports 3.9 Step 8: Check of Combinations Due to the selected design code the program creates the necessary combinations automatically. We recommend checking all combinations with the task “Define Combinations”. It is also possible to edit and create new combinations in this task. Example Simple Slab 34 Tutorial SSD / SOFiPLUS - A Quick Reference Figure 40: Task Superposition Manager – Combination Rules All changes will be saved in the data base when closing this task with OK button. 3.10 Step 9: Linear Analysis and Superpositioning All further steps for this project are very easy. Simply go straight forward from task to task. The SSD task tree will guide you through the complete project. Now the linear Analysis will be started. Please open the task “Linear Analysis”. Inside the register card “Groups” a selection of groups which should be used in the analysis is possible. Only the groups ticked in the table will be used for the analysis. The group selection will be used for all selected load cases. In case you like to analyse different groups for different load cases, please use multiple tasks “Linear Analysis”. The selected load cases should correspond with the group selection. In other cases it may result in program errors. Nearly all tasks contain a register “Text Output” and “Graphical Output”, which control the output. A predefined selection of graphics is available and the user can select the graphics wanted for the printout. Example Simple Slab 35 Tutorial SSD / SOFiPLUS - A Quick Reference Figure 41: Task Linear Analysis The output is organized in chapters. For every chapter the volume of text output is user defined. There are basically four settings possible: no output, normal output, full output and extensive output. The default setting is “Default output”. For further information according the output please see each program manual, chapter ECHO, or simply try the different possibilities. The default settings for the graphical output are shown in the picture below. Figure 42: Graphical Output Example Simple Slab 36 Tutorial SSD / SOFiPLUS - A Quick Reference In case you select the option “User defined” in the box “View”, you may rotate your system every position you like. This position will be used for the graphical output. Also there is the option to use additional graphics. Either import existing graphic files.gra from any directory or create new graphics directly inside the WINGRAF. For this option please click on the button. The results of your input will be used automatically in your SSD project. If all settings are correct close the dialog with the OK button. If the option “Calculate immediately” is ticket the analysis starts directly after you clicked on the OK button. On the left bottom line there is the option “Calculate immediately”. Using the default setting this option is ticked on. This option will start the analysis directly after closing the task dialog with the OK button. When starting the analysis automatically inside the SSD screen a new dialog appears in the work area. You will see the tree structure of your project with all tasks and the related program modules. For example the task “Linear Analysis” contains two programs, PROG SEPP (calculation of internal forces) and PROG WING (for graphical output). Both programs are marked for analysis with a “+” sign. Figure 43: SSD Window of Calculation Dialog You may change the view with the register cards listed on the bottom line. Example Simple Slab 37 Tutorial SSD / SOFiPLUS - A Quick Reference Figure 44: SSD ANIMATOR View with results from LC 1 After the linear analysis it is necessary to calculate the internal design forces and moments with the task “Superpositioning”. Figure 45: Task „Superposition Manager“ Using the task “Superpositioning” you may only select the predefined superpositions. In case new combinations and superposition’s are necessary or need to be changed please go back to the task ”Define Combinations”. Example Simple Slab 38 Tutorial SSD / SOFiPLUS - A Quick Reference Please use again the register cards “Text Output” and “Graphic Output” for the volume of output. Again the option “Calculate Immediately” is ticked and the calculation will start when leaving the dialog with the OK button. 3.11 Step 10: Design When starting a new project the SSD automatically creates the necessary design tasks for you. In this case of a 2d slab the tasks “Design Parameters of Area Elements”, “Design ULS - Area Elements” and “Design SLS - Area Elements” were created. 3.11.1 Design Parameters of Area Elements This task defines the design parameters for all area elements. It is possible to define different design parameters for every group of area elements. For that reason it is very important to define all necessary groups within the system generation process. Figure 46: Dialog Design Parameter – Register Common There are five different types of reinforcement possible: no design, two layers – orthogonal, two layers – non orthogonal, three layers and circular. As a default the two layered orthogonal reinforcement is set. The distance values refer all to the system axis of the reinforcement layer. To define more than one area of design parameters simply create a new line in the table “Design Parameter List” with the button NEW. The group selection is active now and you Example Simple Slab 39 Tutorial SSD / SOFiPLUS - A Quick Reference may select the groups required for the new definition. As an example a new line in the table “Design Parameter List” was created. Then we select group number 2 for a reinforcement typ “two layers – non orthogonal”. The direction for the outer reinforcement at top and bottom layer will be defined with 30°. Figure 47: Dialog Design Parameter – Register Direction This input is only an example an will not be used in the following design process. Please delete this input with the button DELETE. All other register cards contain input for the design in SLS state. Register Diameter: Necessary input for crack design. Register Minimum: Pre defined minimum reinforcement (default = 0 cm²/m²) Register Maximum: Special option for non linear analysis only Register Crack Width: Direct Input for crack width and steel stress This design parameters will be used in all following design tasks. Example Simple Slab 40 Tutorial SSD / SOFiPLUS - A Quick Reference 3.11.2 Design ULS All necessary input for the design in ULS will be done in an extra task. Additional input for normal purposes like this small example is not necessary. For a better understanding some explanations are listed in the following. Figure 48: Dialog Design ULS – Register Card General With analysing the superpositions the program creates several load cases containing all results. As shown in Figure 48 the load cases for ultimate design combination are saved in the data base. The program now refers to this load cases and pre select automatically all load cases created by the ultimate design combination. The table columns Am…results for area elements, Aa…results for support reactions and bedding stresses and Be…results for beam elements indicates which results are available from which load case number. The register card “Shear reinforcement” provides the options for punching checks and for additional shear reinforcement outside the punching areas. In this example we like to select the first option. Example Simple Slab 41 Tutorial SSD / SOFiPLUS - A Quick Reference Make Punching Check. Maximum bending reinforcement ration = 1.50 % of concreta cross swection area Maximum bending reinforcement ration = 0.20 % of concreta cross swection area outside punching areas. Figure 49: Dialog Design ULS – Register Card Shear Reinforcement To start the design ULS for beam elements simply go to the register card “Beams” and select this option with the “Yes” button. Inside the register card “Control Parameters” additional parameters may be set. For more information regarding this parameters please see the program manuals, design codes and additional technical literature. Again “Text Output” and “Graphical Output” are available. After all is set please confirm the input with the OK button. Per default setting the option “Calculate immediately” is set and the calculation starts. Now please delete the tick of this option and click the OK button. What happens now is, that the task is marked with a sign. That means all input is done, a new calculation is necessary. (see also Figure 11) It may be interesting for you to see the CADINP input file, which was created by this task. All tasks create automatically a CADINP input file in the background. You may look on this file with TEDDY. Please click with the right mouse button on the task “Design ULS” inside the task tree and select the command “Texteditor”. Now the complete input file is shown in TEDDY environment. Please click with the right mouse button on the task “Desing ULS” inside the task tree and select the command “Texteditor”. Now the complete input file is shown in an TEDDY environment inside the work area of SSD. Example Simple Slab 42 Tutorial SSD / SOFiPLUS - A Quick Reference The CADINP input file looks like that.: $ Automatically generated by Design ULS V(11.32-25) $ Attention: Changes will be overwritten if the task … +PROG BEMESS urs:12.1 $ Design ULS - area elements HEAD ULS design CTRL LCR 1 $ Reinforcement distribution number CTRL RO_V 0.20 $ Maximum reinforcement for shear … PUNC YES RO_V 1.50 LC DESI END This is one of the most important features in SSD. Besides the task oriented input you always have the possibility to use the CADINP input language. These possibilities are numerous and will not be described in detail here. Please see the general SOFiSTiK manual. Before going on with the task “Design SLS” start the calculation of the task “Design ULS”. This is very important, otherwise you will get a warning message in task “Design SLS”. You may start the calculation with the 3.11.3 button. Design SLS According to the German code DIN 1045-1 as well as for the European codes the design in serviceability limit state became very important. Using the task “Design SLS” in our example the crack design according to DIN 1045-1, chapter 11.2 is done. Select all relevant design load cases in register card “General”. Example Simple Slab 43 Tutorial SSD / SOFiPLUS - A Quick Reference Crack design will e done alternatively via tabulated values or via direct input of crack width.. Figure 50: Dialog Design SLS – Register Quad Elements The control of the crack design according to DIN 1045-1, table 20 or 21 the settings from the task “Design Parameters of Area Elements” will be used. In case the steel stresses are defined the check will be done according to table 20. The same table will be used when bar diameter and steel stress is set. The automatically created CADINP input file reads like this: $ Automatically generated by Design SLS V(11.32-25) … $ Attention: Changes will be overwritten if the task … +PROG BEMESS urs:13.1 $ Design SLS - area elements HEAD SLS design CTRL LCRI 1 $ Reinforcement distribution number as minimum CTRL LCR 2 $ Reinforcement distribution number to store … CTRL CRAC $ Design task: only service load check CRAC WK TAB $ check of diameters with tables LC PERM END For clarity reasons the tasks “Design ULS - Beams” and “Design SLS – Beams” will be added to this project. This tasks will be used for the design of the downstand beam. Please use the right mouse click in the task tree and select the command “Insert Task”. Figure 51: Right mouse click task tree + selection of tasks. Example Simple Slab 44 Tutorial SSD / SOFiPLUS - A Quick Reference The design tasks for beams are self explaining. Therefore simply add these tasks and start the calculation without any changes. Figure 52: Task "Design ULS - Beams" 3.12 Step 11: Documentation 3.12.1 Reports with URUSLA Using the SSD every task creates it’s own URUSLA report. There is of course the option to create a complete documents from all reports. For this please select the command “All reports…” out of the commands from the URUSLA button. The report opens automatically inside the URUSLA. Example Simple Slab 45 Tutorial SSD / SOFiPLUS - A Quick Reference Figure 53: Create all reports with URSULA Inside the URUSLA you have the option to add a table of contents. Please select from menu “Document” the command “Insert Table of Contents”. Figure 54: Table of Contents in URUSLA On the left side of the URUSLA windows you will find a tree structure containing all program blocks and chapters. Using the , or the sign you can open or close program blocks and single chapters. For further information regarding the use of URSULA please see the SOFiSTiK manual Chapter 9.3. Example Simple Slab 46 Tutorial SSD / SOFiPLUS - A Quick Reference 3.12.2 Insert additional Graphics Also very useful is the task “Interactive Graphic”. This task can be added on nearly every location inside the task tree of your project. A double click on this task opens WINGRAF. Inside WINGRAF you can create a series of graphics, pictures and layers, everthing you want to show in your report. We recommend to use multiple tasks “Interactive Graphic” to keep the volume of graphics usable. Figure 55: WINGRAF Picture beam reinforcement Layer1=bottom and Layer2=top Example Simple Slab 47 Tutorial SSD / SOFiPLUS - A Quick Reference 4 Additional Help / Support For a better understanding our software additional features providing help are available now. We call everything except the program manuals “teachware”. The program manuals still are the first choice to get information about the program features and background. 4.1 Infoportal The general platform of all our teachware is our web based Infoportal. You will find this Infoportal via www.sofistik.com/Infoportal . All available teachware is organised in four categories: document type, product group, subject and application. Searching for specific files you may use a filter over the four categories, or use a keyword search. Very important are our “Tutorial Movies”. In small movies we show the main features of our GUI programs, mainly for SOFiPLUS(-X), SSD and SOFiCAD. Additional Help / Support 48 Tutorial SSD / SOFiPLUS - A Quick Reference 4.2 CADINP Samples Using the classic numerical CADINP input language, a huge library of samples is available in the SOFiSTiK program directory. All samples are organised according to the main program names. To open this files please go to “TEDDY > Help > Samples…” 4.3 User Group Besides our Support Service we provide an open user group. The registry in this user group is free of charge. Members can post their experience, problems and suggestions into this user group and discuss with other users and also with SOFiSTiK people. The user group is available via www.sofistik.com/Forum . Please note: the user group does not replace the support service and there is no claim for an answer on questions posted. Additional Help / Support 49 Tutorial SSD / SOFiPLUS - A Quick Reference 4.4 SOFiSTiK Program Manuals With the newest program version 2010 all program manuals are now available in the latest version. New is, that we do have an Administration_1.pdf manual for all belongings regarding installation and hardlock. The general description of the basis program features you will find in a program manual called SOFiSTiK_1.pdf. This manual contains also information about additional help and some error search strategies. New manuals in program version 2010: Administration (everything related to installation and administration) and SOFiSTiK (everything related to the basic software features) 4.5 SOFiSTiK Support In case the above discussed strategies does not solve your problems, please contact our support via Email [email protected] . You will find the General Terms of Support Conditions on our website: http://www.sofistik.com/fileadmin/FILES/sonstiges/Terms and Conditions for Support Services_01_02_2009.pdf 4.5.1 Support Accessibility As you know, you may contact us via our SOFiSTiK Online Portal, via E-Mail, via Fax or via phone. In order to work most efficient without any interruption from incoming phone calls, you can’t contact our supporters directly. Our primary target is, to help you as soon as possible and to increase our response quality level continuously. Most support requests are very complex and can’t be solved in a short time. For that we work us into your problems and data files and contact you via E-Mail or phone call. Either we have a solution or we reproduced your problem and can start directly into a detailed discussion to find a common solution or at least a work around. Please send us an Email to [email protected] with all relevant information and data. This is the best and most efficient way to contact our support. Additional Help / Support 50 Tutorial SSD / SOFiPLUS - A Quick Reference 4.5.2 Customer’s Obligation to Cooperate In order to avoid time consuming mails and phone calls, would you please consider the following issues in your support requests. This assistance is very important for a fast and direct solution to your support request: § § § § § § § § We always need to know your customer number. For example you will find the number printed in the html-file of your last support request, or on your last maintenance invoice. We always need to know the used program versions. For example SOFiCAD-Detailing version 17.2 with AutoCAD 2008, or SOFiPLUS version 17.1 with AutoCAD 2008. Using the FEA package every analysis creates a protocol file *.prt containing all version numbers of the used programs. Please send us this file. Information about the operation system (for example Windows XP, Windows Vista 32 bit, Windows Vista 64 bit, Linux). Please note, we are not involved in your project and have no more information than what you sent to us. Therefore it is very helpful to get condensed data files and a precise problem description. Minimize your drawing or the project input data file. Delete everything which is not necessary to reproduce your problem. Please try to describe your problem as precise as possible. Under which circumstances does the problem occur? What did you do, which clicks? Example FEA: „I checked the beam element 2037, x=0.00 m in loadcase 2031. I can’t reproduce the amount of reinforcement computed by AQB (Version 13.40-23) = 12.35 cm². The result of my hand calculation gives me only 8.50 cm². Please find attached my hand_calculation.pdf. Why are the results different?“ Provide us with additional information besides your data files, describe your workflow, send us scans of your hand calculation, every additional information helps. Please send us every necessary file, so we can reproduce your problem. FEA: files *.sofistik, *.dwg, *.dat, *.prt, diagnostic.xml and if necessary *.gra and *.plb. Please zipp all files We ask kindly for your understanding, but without all relevant data, we can’t start working on your request. 4.5.3 Support Requests via SOFiSTiK Online Protal With a valid maintenance contract you have also the possibility to use our SOFiSTiK Online Portal. Using this portal you will have the following benefits: § § § § § § § submit support requests directly in our system submit support request out of the normal business hours access to FAQ-database to investigate for solutions investigate in all your support requests check the actual status of current support requests every customer has one user account with administration rights. This main user can manage his company data, address, contact persons and SOFiSTiK Online user. Support requests via SOFiSTiK Online Portal will be processed with higher priority. Additional Help / Support 51 Tutorial SSD / SOFiPLUS - A Quick Reference For all this reasons we recommend to use this portal. You will find the portal via www.sofistik.com/support on the left hand side > Links > SOFiSTiK Online (Portal). A short description is also available on this website. Access Online Portal: https://wice.sofistik.de/plugin/wp_cic/main For clarity reasons it is very important to use a new support ticket for every question. Please reply only for direct questions to the key issue. For additional questions use a new ticket even if you refer to the same project files. This is very important if you like to investigate in „old“ support requests. 4.5.4 Support Requests out of SSD / TEDDY Both SSD and TEDDY have a special function to create automatically a support request with all necessary description and attachments. Go to the menu “HELP > SOFiSTiK Hotline…”. Nevertheless we recommend to use our SOFiSTiK Online Portal Additional Help / Support 52 Tutorial SSD / SOFiPLUS - A Quick Reference Please note the checklist posted on the left hand side in the wizard. The more information we will get, including small and reduced data files, the faster we can respond to you with a solution. 4.5.5 Create a diagnostic.xml File All necessary information about installation, licences, program libraries are saved in a diagnostic.xml file. This file is very important for our supporters. To create this file goto TEDDY or SSD menu “ Help > Diagnostic”. Please save the file with the command “File > Save as Diagnostic”. This file will be created automatically if using the command „SOFiSTiK Hotline…“ described above. The diagnostic.xml file will be created automatically when using the “Support Request Wizard” described above. In spezial cases please start the program out of your program directory e.g. C:\program files\SOFiSTiK\2010\Analysis.25\diagnose.exe Additional Help / Support 53