1
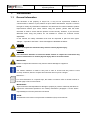
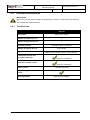
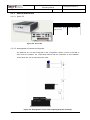
Asyview
Operating Manual
Document
Asyril_AVIEW-XXX-XX_Operating_Manual_E
Version
v1.1
Articles
AVIEW-XXX-XX--XX-XX-XX-XX
Date
19.11.2012
Asyview - Asyril SA
Operating Manual
Introduction
v1.1
© Copyright Asyril S.A.
FO 32.03.118
Table of Contents
1.
INTRODUCTION ............................................................................................................................... 5
1.1.
GENERAL INFORMATION ........................................................................................................... 5
1.2.
SAFETY INSTRUCTIONS ............................................................................................................ 6
1.2.1. General instructions ............................................................................................................. 6
1.2.2. Specific instructions.............................................................................................................. 7
2.
1.3.
W ARRANTY INFORMATION ........................................................................................................ 8
1.4.
OTHER MANUALS ...................................................................................................................... 8
DESCRIPTION .................................................................................................................................. 9
2.1.
PRODUCT OVERVIEW ................................................................................................................ 9
2.2.
GENERAL CHARACTERISTICS ................................................................................................. 11
2.2.1. Technical data ..................................................................................................................... 11
2.2.2. General dimensions ........................................................................................................... 12
2.3.
VISION PERFORMANCE LEVELS .............................................................................................. 13
2.3.1. Different types of lighting ................................................................................................... 13
2.3.2. Asycube lighting .................................................................................................................. 13
2.3.3. Control camera lighting ...................................................................................................... 14
2.3.4. Detection limit ...................................................................................................................... 16
2.4.
ELECTRICAL INTERFACES ....................................................................................................... 18
2.4.1. Vision PC ............................................................................................................................. 18
2.4.2. Connection to the Human-Machine interface (HMI) ...................................................... 19
2.4.3. Power connection ............................................................................................................... 20
2.5.
MECHANICAL INTERFACES ..................................................................................................... 20
2.5.1. Vision PC and Vision Box .................................................................................................. 20
2.6.
ACCESSORIES AND OPTIONAL MODULES ............................................................................... 21
2.6.1. Camera ................................................................................................................................ 21
2.6.2. Lens ...................................................................................................................................... 21
2.6.3. Lighting ................................................................................................................................. 21
2.6.4. Asycube ............................................................................................................................... 22
3.
TRANSPORTATION, HANDLING AND INSTALLATION ....................................................... 23
3.1.
PRODUCT PACKAGING, TRANSPORTATION AND HANDLING .................................................... 23
3.2.
UNPACKING INSTRUCTIONS .................................................................................................... 23
3.3.
INSTALLATION AND STORAGE ENVIRONMENT ......................................................................... 23
3.3.1. Installation environment ..................................................................................................... 23
3.3.2. Storage environment .......................................................................................................... 24
User manual
- Asyril SA
3/30
Asyview - Asyril SA
Operating Manual
Introduction
4.
v1.1
© Copyright Asyril S.A.
FO 32.03.118
MAINTENANCE AND REPAIR .................................................................................................... 25
4.1.
SAFETY INSTRUCTIONS .......................................................................................................... 25
4.1.1. General instructions ........................................................................................................... 25
4.2.
PERSONNEL RESPONSIBLE FOR MAINTENANCE OR REPAIR OPERATIONS ............................. 25
4.3.
MAINTENANCE ........................................................................................................................ 26
4.3.1. Maintenance schedule ....................................................................................................... 26
4.3.2. General maintenance ......................................................................................................... 26
4.4.
REPAIRS ................................................................................................................................. 27
4.5.
TECHNICAL SUPPORT............................................................................................................. 28
4.5.1. For a better service … ....................................................................................................... 28
4.5.2. Contact ................................................................................................................................. 28
REVISION TABLE ..................................................................................................................................... 29
User manual
Asyview - Asyril SA
4/30
Asyview - Asyril SA
Operating Manual
Introduction
v1.1
1.
Introduction
1.1.
General information
© Copyright Asyril S.A.
FO 32.03.118
This document is the property of Asyril S.A.; it may not be reproduced, modified or
communicated, in whole or in part, without our prior written authorisation. Asyril S.A. reserves
the right to modify any information contained in this document for reasons related to product
improvements without prior notice. Before using the product, please read this entire
document in order to ensure that the product is used correctly. However, if you encounter
difficulties when using the product, do not hesitate to contact our customer service
department.
In this manual, the safety information that must be respected is split into three types:
"Danger", "Important" and "Note". These messages are identified as follows:
DANGER!
Failure to respect this instruction may result in serious physical injury.
DANGER!
This instruction identifies an electrical hazard. Failure to respect this instruction may
result in electrocution or serious physical injury due to an electric shock.
IMPORTANT!
Failure to respect this instruction may result in serious damage to equipment.
NOTE:
The reader's attention is drawn to this point in order to ensure that the product is used
correctly. However, failure to respect this instruction does not pose a danger.
Reference …
For more information on a specific topic, the reader is invited to refer to another manual or
another page of the current manual.
IMPORTANT!
Asyril cannot be held responsible for damage to property or persons caused by the failure to
respect the instructions specified in the "Safety instructions" paragraph. It is the client's
responsibility to inform the personnel concerned.
NOTE:
All dimensions and values are expressed in millimetres (mm) in this manual.
User manual
Asyview - Asyril SA
5/30
Asyview - Asyril SA
Operating Manual
Introduction
1.2.
v1.1
© Copyright Asyril S.A.
FO 32.03.118
Safety instructions
1.2.1. General instructions
DANGER!
Check that the power supplies and other cables are disconnected from the unit before
performing any maintenance operations.
DANGER!
Only qualified personnel (trained by Asyril) are authorised to use this product.
DANGER!
Never unscrew the electric units or protective covers of the system. An electric shock
may cause serious physical injury. Only Asyril SA personnel are authorised to access
these parts for maintenance or repair purposes.
DANGER!
Never disconnect or connect the system cables without being sure that it is switched
off.
DANGER!
Modifications to the product are not permitted. Unauthorised modifications could lead
to a malfunction, fire and physical injury, etc.
DANGER!
In the event of a power outage, the product must be stopped. Failure to respect this
instruction may result in the product restarting accidentally.
DANGER!
Do not use the product in an environment in which it may come into contact with water
or oil.
1.2.1.1. Disposal
As soon as the product reaches its end of life, please dispose of it as industrial waste.
NOTE:
The product must be disposed of in accordance with the standards, regulations and laws in
force.
User manual
Asyview - Asyril SA
6/30
Asyview - Asyril SA
Operating Manual
Introduction
© Copyright Asyril S.A.
v1.1
FO 32.03.118
1.2.2. Specific instructions
1.2.2.1. Personal Protective Equipment (PPE)
For safety reasons, operators must wear the following safety equipment when using the
product:
-
Safety goggles when using the Asycube backlight without the diffuser installed. (LED
lighting equivalent to class 1 compared to lasers)
NOTE:
It is the client's responsibility to install visual signs informing of the potential dangers and to
provide the associated protective equipment.
1.2.2.2. Parties involved
The table below defines the roles of each player:
Operator
Construction
Adjuster
Engineer
Support
Dismantler
X
Transportation
X
Installation
X
Commissioning
Use
Transporter
X
X
X
Programming
X
Operation
X
Cleaning
X
X
Maintenance
X
Dismantling
X
Table 1-1: Parties involved
User manual
Asyview - Asyril SA
7/30
Asyview - Asyril SA
Operating Manual
Introduction
1.3.
v1.1
© Copyright Asyril S.A.
FO 32.03.118
Warranty information
You will find all warranty information (scope, term, etc.) under the general terms of sale.
1.4.
Other manuals
The table below provides a list of documents supplied with the product. Each of these
manuals forms an integral part of the set of documentation associated with the product.
This current manual contains a technical description of the product, its functionalities, and
provides information about the maintenance and transportation requirements of the product.
Manual title
Asyview
Reference
Description of the content
AVIEW-XXX-XX_Operating_Manual_F
THIS MANUAL
AVIEW-XXX-XX_User_Interface_Manual_F
Contains information on how
Operating
Manual
Asyview
to use the user interface for
HMI Manual
configuring recipes and
calibration.
Asyview
AVIEW-XXX-XX_Programming_Guide_F
Contains a description of
how the product works and
Programming
information on
manual
communication and using
the product in programming
Table 1-2: Other manuals
User manual
Asyview - Asyril SA
8/30
Asyview - Asyril SA
Operating Manual
Description
v1.1
2.
Description
2.1.
Product overview
© Copyright Asyril S.A.
FO 32.03.118
The Asyview is a smart vision system which can be used to automatically supply components
(Asycube) and for image acquisition and processing from several cameras.
The Asyview comprises:
(A) Vision PC
(B) One or more Vision Boxes for connecting a camera and an Asycube to the Vision PC
Depending on the specific requirements, it can be supplemented with:
(C) Camera
(D) Lens
(E) Lighting
(F) Asycube Mezzo or Forte
Figure 2-1: General diagram of the Asyview
User manual
Asyview - Asyril SA
9/30
Asyview - Asyril SA
Operating Manual
Description
v1.1
© Copyright Asyril S.A.
FO 32.03.118
Figure 2-2: Example of Vision Box distribution, cameras and Asycube
NOTE:
The operating modes are explained in the user documentation. Software and hardware can
only be configured by Asyril.
For further information on wiring the components, see chapter "2.4 Electrical interfaces".
User manual
Asyview - Asyril SA
10/30
Asyview - Asyril SA
Operating Manual
Description
2.2.
© Copyright Asyril S.A.
v1.1
FO 32.03.118
General characteristics
IMPORTANT!
Never try to use the product outside its specifications. Failure to respect these specifications
will invalidate the product warranty.
2.2.1. Technical data
Asyview
Description
Smart vision system
Number of cameras per PC
4
Number of Asycubes per PC
4
Possible pixel size
Information given in Table 2-6
Number of lighting devices
2 per camera
Type of materials detectable
Metal, jewels, ceramics, glass, semiconductors.
Component position and
orientation detection
(subject to conditions)
Detection of heads or tails
(subject to conditions)
Noise volume
Easy
configuration
< 60 dBA (Asycube)
of
a
new
recipe
Working distance
User manual
Depends on installation
Asyview - Asyril SA
11/30
Asyview - Asyril SA
Operating Manual
Description
© Copyright Asyril S.A.
v1.1
FO 32.03.118
2.2.2. General dimensions
2.2.2.1. Vision PC
Characteristic
Value
Dimensions [mm]
195 x 90 x 268
(W x H x L)
Figure 2-3: Vision PC
2.2.2.2. Arrangement of camera and Asycube
The distances H1, H2 and H3 depend on the configuration chosen in terms of the field of
vision and the resolution, the components defined and the constraints of the installation.
H1
H2
H3
These values are sent by Asyril with each order.
Figure 2-4: Arrangement of the camera-lighting-Asycube assembly.
User manual
Asyview - Asyril SA
12/30
Asyview - Asyril SA
Operating Manual
Description
2.3.
v1.1
© Copyright Asyril S.A.
FO 32.03.118
Vision performance levels
2.3.1. Different types of lighting
For each camera, one or more types of
camera
lighting can be adopted:
-
dark field
-
backlight
-
co-axial lighting
Co-Axial
(DOAL)
(DOAL or telecentric)
The
figure
opposite
shows
the
Dark field
Dark field
different types of lighting available.
object
For further information on the
Backlight
possible camera/lighting
combinations, see subsequent
chapters.
Figure 2-5: types of lighting available
2.3.2. Asycube lighting
The table below summarises the lighting combinations proposed:
Lighting
Resolution
Field of view
DOAL 150
46 x 35 mm
Asycube Mezzo
DOAL 100
DOAL 75
DOAL 50
Integrated
backlight
On request
2 MPx
52 x 67 mm
Asycube Forte
30 x 25 mm
Asycube Mezzo
5 Mpx
46 x 35 mm
Asycube Mezzo
On request
On request
52 x 67 mm
Asycube Forte
Table 2-1: Asycube lighting
User manual
Asyview - Asyril SA
13/30
Asyview - Asyril SA
Operating Manual
Description
© Copyright Asyril S.A.
v1.1
FO 32.03.118
2.3.2.1. Effect of each type of lighting
The type of lighting chosen may highlight certain specific areas of the part to be observed or
detected. The table below gives the example of a jewel bearing lit from two different angles:
backlighting or incident lighting.
Lighting
Backlighting
Incident lighting
Example of a jewel bearing lit
(backlighting or incident
lighting)
Areas of the part lit
(shown in yellow)
Actual photo
Table 2-2: Effect of types of lighting on Asycube
2.3.3. Control camera lighting
The table below summarises the lighting combinations proposed:
Lighting
Resolution
Field of view
1 Mpx
Depends on
the
application
2 Mpx
Depends on
the
application
5 Mpx
Depends on
the
application
Incident lighting
Dark field lighting
DOAL 25 or telecentric
Dark field 50
Table 2-3: Lighting on the control camera
User manual
Asyview - Asyril SA
14/30
Asyview - Asyril SA
Operating Manual
Description
© Copyright Asyril S.A.
v1.1
FO 32.03.118
2.3.3.1. Effect of each type of lighting
The type of lighting chosen may highlight certain specific areas of the part to be observed or
detected. The table below gives the example of a metal part lit from two different angles:
incident or dark field.
Type of lighting
Incident lighting
Dark field lighting
Example of part lit
(dark field or incident lighting)
Areas of the parts lit
(shown in yellow)
Actual photo
Table 2-4: Effects of types of lighting on a control camera
User manual
Asyview - Asyril SA
15/30
Asyview - Asyril SA
Operating Manual
Description
© Copyright Asyril S.A.
v1.1
FO 32.03.118
2.3.4. Detection limit
In order to define a detection limit associated with the Asyview, two situations must be
determined:
-
Either you want to locate a precise detail (for example, to check whether a part is
present on the surface of the Asycube, or to perform a quality check on the diameter
of a hole, etc.). In this case, the detail must be greater than 20 pixels in size to achieve
quarter pixel localisation accuracy.
-
Or you only want to check the presence or absence of a component without actually
locating it, in this case, a size of 10 pixels is sufficient.
Table 2-5 summarises the minimum size that a part or specific detail must have in order to be
able to locate them or detect them accurately.
Size of part
[pixels]
P < 20 px
P > 20 px
Size of detail
D < 10 px
[pixels]
P
P
P
10 px < D < 20 px
P
D > 20 px
P
Example
D
Location of part
¼ px
accuracy
¼ px accuracy
D
¼ px accuracy
D
¼ px accuracy
Detail detection
Detail
localisation
¼ px accuracy
Table 2-5: Detection limit
User manual
Asyview - Asyril SA
16/30
Asyview - Asyril SA
Operating Manual
Description
v1.1
© Copyright Asyril S.A.
FO 32.03.118
The pixel-millimetre conversion depends on the field of view as well as the resolution of the
camera. The table below provides information about pixel-micron conversions.
Size of sensor
Resolution
Field of view
Width
Length
Width
Length
Mpx
px
px
mm
mm
2
1200
1600
35
46
2
1200
1600
52
67
5
2050
2448
25
30
5
2050
2448
35
46
5
2050
2448
52
67
Minimum
size of the
detail in
pixels
px
20
10
1
20
10
1
20
10
1
20
10
1
20
10
1
Minimum
size of the
detail in
microns
µm
575
288
29
837
418
42
245
123
12
376
188
19
530
269
27
Table 2-6: Minimum size of detectable elements
User manual
Asyview - Asyril SA
17/30
Asyview - Asyril SA
Operating Manual
Description
2.4.
© Copyright Asyril S.A.
v1.1
FO 32.03.118
Electrical interfaces
Camera
GigE
Supply and synchronisation
Supply
Asycube Com
(synchronisation)
DOAL
Backlight synchronisation
PC
s
u
24 V supply
p
Supply
Communication
p
l
Figure 2-6: General overview of connections
y
For further information on wiring the components, see the Vision Box wiring diagram.
The customer provides the Vision Box 24 VDC supply. The Vision PC is delivered with its
own power supply.
The supply and communication cables can be ordered in different lengths depending on how
the machine will be integrated on the customer's premises.
NOTE:
Any Ethernet cable connecting a camera or Vision PC must be category 6.
2.4.1. Vision PC
External connection to Vision PC is authorised via a Remote Desktop connection. A second
port is assigned for communication with the machine's computer. All the other ports are
configured by Asyril for the Asycube supply systems and cameras, depending on the options
chosen. The table below shows the IP addresses for the ports to be used by the customer:
The figure below gives information on the Ethernet connection from the vision PC to the
various components:
User manual
Asyview - Asyril SA
18/30
Asyview - Asyril SA
Operating Manual
Description
v1.1
© Copyright Asyril S.A.
FO 32.03.118
Asycube camera
Control camera
Figure 2-7: Vision PC Ethernet connection
Unit
Remote Desktop
Machine PC
IP address
Subnet Mask
192.168.1.70 (to be modified according to your
255.255.255.0
network)
192.168.0.70 (can be changed)
255.255.255.0
Table 2-7: IP addresses
Specifications
Value
Voltage
24 VDC
Power
120 W Adapter
Table 2-8: Vision PC supply
2.4.2. Connection to the Human-Machine interface (HMI)
The graphical interface is installed on the Vision PC. A keyboard, mouse and screen
(supplied by the customer) are necessary for interaction and can be connected to the Vision
PC via the USB interfaces. A DVI connector is used to connect an additional screen
necessary to configure new recipes.
The screen must have the following characteristics:
Characteristic
Value
Resolution
1280 x 1024
Table 2-9: screen resolution for HMI
User manual
Asyview - Asyril SA
19/30
Asyview - Asyril SA
Operating Manual
Description
2.4.3.
v1.1
© Copyright Asyril S.A.
FO 32.03.118
Power connection
The main power supply required by the Asyview is:
Electrical characteristic
Value
Voltage
24 VDC
Current
15 A
Power
360 W
Table 2-10: supply
IMPORTANT!
-
Before the product is powered on, check that your voltage specifications correspond to
those of the product.
-
Never disconnect the power cables when the system is in operation. Always switch off
the machine before disconnecting the cables.
IMPORTANT!
Ensure that no production programme is in operation when the machine is being stopped.
2.5.
Mechanical interfaces
2.5.1. Vision PC and Vision Box
The Vision PC is fixed onto two rails, the dimensions of which are described in Figure 2-8.
The Vision Box is supplied on a DIN rail.
Figure 2-8: Dimension of Vision PC and its mounting rails
For further information, refer to the Vision Box wiring diagram.
User manual
Asyview - Asyril SA
20/30
Asyview - Asyril SA
Operating Manual
Description
v1.1
© Copyright Asyril S.A.
FO 32.03.118
The customer is responsible for assembling and integrating the Vision and Asycube
components and for wiring the various components. The quality of the images obtained
depends on the correct alignment of the cameras, lighting and Asycube. Particular care must
therefore be taken with the various media and with the settings when assembling these
components.
2.6.
Accessories and optional modules
These components are defined by Asyril according to customer requirements. Asyril is then
sent all the information relating to these components and their integration (mechanical
integration in particular). The key information on the choice of equipment and our suppliers is
provided below.
2.6.1. Camera
All the cameras which can be connected to the Asyview are SVS-Vistek cameras. Their
dimensions and mounting components are illustrated in Figure 2-9.
Figure 2-9: dimensions and mounting of cameras (4xM3)
2.6.2. Lens
Like the choice of cameras and lighting, the choice of lens depends on the specific details of
the request. We generally use Schneider-Kreuznach, Qioptic, Tamron or Schott-Moritex
lenses.
Information relating to the lenses chosen is sent once the specific details have been decided.
2.6.3. Lighting
We mainly work with Métaphase lighting systems. In addition to using the specific type and
size of lighting for your requirements, the lighting supply must be 24 VDC (max. 3A), not AC.
User manual
Asyview - Asyril SA
21/30
Asyview - Asyril SA
Operating Manual
Description
v1.1
© Copyright Asyril S.A.
FO 32.03.118
Information relating to the lighting chosen is sent once the specific details have been decided.
2.6.4. Asycube
The Asycube User Manual provides all the information relating to the Asycube's electrical and
mechanical interfaces.
2.6.4.1. Asycube Forte calibration plate
Figure 2-10: Asycube Forte calibration plate
2.6.4.2. Asycube Mezzo calibration plate
Figure 2-11: Asycube Mezzo calibration plate
For more information about the calibration procedure, refer to the user manual.
User manual
Asyview - Asyril SA
22/30
Asyview - Asyril SA
Operating Manual
Transportation, handling and installation
© Copyright Asyril S.A.
v1.1
FO 32.03.118
3.
Transportation, handling and installation
3.1.
Product packaging, transportation and handling
The product must be transported in accordance with the specifications indicated on the
package (top, bottom, fragile, etc.). In addition, the following points must be strictly respected:
IMPORTANT!
3.2.
-
Take adequate precautions during handling.
-
Do not climb on the package.
-
Never place heavy objects on the package.
-
Take particular care to avoid damaging the product during transportation.
Unpacking instructions
Before unpacking, please check the condition of the ShockWatch label. In order to ensure a
problem-free delivery, all Asyril products are dispatched with this label. This label contains an
indicator that breaks if the package is mishandled. If the content of this indicator is red at the
time of delivery:
(A) Ask the transporter to be present at the time of unpacking.
(B) Pay particular attention to the external condition of the product.
(C) If any damage is noted, do not sign the receipt and contact Asyril
immediately.
(D) In all cases, indicate the condition of the ShockWatch label on
the delivery note.
Figure 3-1: ShockWatch
NOTE:
If the products received do not match your delivery note, or are delivered in poor condition,
do not sign the receipt and contact Asyril as soon as possible.
3.3.
Installation and storage environment
3.3.1. Installation environment
The Asyview system must be used under the following conditions:
-
Work temperature: +5°C to +40°C
-
Pay particular attention to dust: the system must be used in a clean environment.
-
Avoid exposing the AFEED system to direct light radiation that is too intense. Failure to
respect this instruction may result in poor operation of the vision recognition system.
-
Humidity: from 30% to 95% max. without condensation.
User manual
Asyview - Asyril SA
23/30
Asyview - Asyril SA
Operating Manual
Transportation, handling and installation
v1.1
© Copyright Asyril S.A.
FO 32.03.118
IMPORTANT!
In cases of extreme humidity, please note that the performance of the component supply may
be impaired. In addition, for humidity levels below 30%, electrostatic forces may disrupt the
behaviour of the parts.
-
Avoid powerful electromagnetic waves, ultraviolet light or other radiation.
-
Do not use the product in an area where it may be exposed to water or oil projections.
-
ISO7 and ISO8 type cleanroom applications
IMPORTANT!
The product must not be used in a corrosive gas atmosphere. Oxidation may occur, resulting
in damage to the product.
3.3.2. Storage environment
The storage environment of the product must be similar to its operating environment.
User manual
Asyview - Asyril SA
24/30
Asyview - Asyril SA
Operating Manual
Maintenance and repair
v1.1
4.
Maintenance and repair
4.1.
Safety instructions
© Copyright Asyril S.A.
FO 32.03.118
4.1.1. General instructions
IMPORTANT!
No maintenance operation must be performed inside the product. To perform internal
maintenance operations, please contact Asyril. Failure to respect this requirement will
invalidate the warranty.
DANGER!
Never use the system when it is damaged. Check that you have resolved the problem
before restarting the machine.
DANGER!
Stop the system and disconnect it from its supply before carrying out any
maintenance operation.
DANGER!
Never pour water over the product. Spraying water over the product or cleaning it with
water may cause serious malfunctions, or cause injuries due to the associated
electrical danger.
4.2.
Personnel responsible for maintenance or repair operations
Maintenance operations must be performed by trained personnel. Three categories of
personnel are defined:
(A)
Maintenance technicians who have not undertaken the training provided by Asyril
(B)
Maintenance technicians who have undertaken the training provided by Asyril
(C)
Asyril maintenance technicians.
Ensure that the person responsible for the maintenance work performed on the product has
read and understood this manual. In all cases, the safety precautions must imperatively be
followed.
NOTE:
A report will be written for each maintenance operation performed by Asyril.
For more information about our maintenance service, please consult our After-Sales
department.
User manual
Asyview - Asyril SA
25/30
Asyview - Asyril SA
Operating Manual
Maintenance and repair
4.3.
© Copyright Asyril S.A.
v1.1
FO 32.03.118
Maintenance
NOTE:
The information given in the table below is provided purely for illustrative purposes. The
frequency at which these operations should be performed must be adapted according to
usage of the product, the operating environment, etc.
4.3.1. Maintenance schedule
The AFEED system and its accessories require little maintenance, however, simple
inspections must be performed at regular intervals in order to ensure optimal performance of
the product:
Operation
Period
Optical
Visually inspect and, if necessary, clean
parts
then recalibrate.
Asyview
Saving recipes
Personnel
Reference
Yearly
C
Contact
Asyril
Monthly
B
Refer to the
HMI doc.
Table 4-1:Periodic maintenance table
IMPORTANT!
Regardless of the type of maintenance operation, always use genuine Asyril parts.
NOTE:
For Asycube maintenance information, see the Asycube user documentation.
4.3.2. General maintenance
4.3.2.1. Cleaning the optical parts
Visually inspect the optical parts (camera, lens, lighting, etc.) and clean if necessary.
NOTE:
This maintenance operation can only be performed by an Asyril technician.
For more information, please contact Asyril customer services.
User manual
Asyview - Asyril SA
26/30
Asyview - Asyril SA
Operating Manual
Maintenance and repair
4.4.
v1.1
© Copyright Asyril S.A.
FO 32.03.118
Repairs
This section provides a non-exhaustive list of the replacement parts available for your
product. The product should be returned to the manufacturer for any repair work. In
exceptional cases, and after approval by Asyril SA, this repair work may be performed in the
client's premises by trained personnel.
IMPORTANT!
Regardless of the type of replacement operation, always use genuine Asyril parts.
Two types of parts are defined:
(A)
Parts likely to be replaced every year (wearing parts)
(B)
Parts likely to be replaced every 5 years.
Description of part
Type
Item number
OPTOCOUPLER PLC-OSP- 24DC/24DC/2
B
210 000 171
ETHERNET CONVERT/SERIAL MOXA NPORT 5150A
B
602 001 602
PC ARBOR FPC-7500-i5-520M
B
602 002 784
CAMERA 2/3'' ECO655 GIGE CCD
B
602 700 140
DOAL LIGHTING 100x100mm2 G LED 24 VDC
B
602 700 348
AC/DC SUPPLY ADAPTER KIT 120W
B
900 000 717
PLATE-FOR-02--01-01-01-01 M-008193
A
660 005 048
Table 4-2: Asyview replaceable electrotechnical parts
User manual
Asyview - Asyril SA
27/30
Asyview - Asyril SA
Operating Manual
Maintenance and repair
4.5.
v1.1
© Copyright Asyril S.A.
FO 32.03.118
Technical Support
4.5.1. For a better service …
Have you read the FAQ and the check-list and still not found an answer your questions?
Before contacting us, please note down the following information concerning your product:
-
Serial number and product key for your equipment
-
Software version(s) used
-
Error message, alarm, or visual signals displayed by the interface.
4.5.2. Contact
You can find extensive information on our website: www.asyril.ch
You can also contact our Customer Service department:
[email protected]
+41 26 653 7190
User manual
Asyview - Asyril SA
28/30
Asyview - Asyril SA
Operating Manual
Revision table
v1.1
© Copyright Asyril S.A.
FO 32.03.118
Revision table
Rev.
Date
Author
Comments
V1.0
22.08.2012
DaM
Initial version
V1.1
19.11.2012
BoB
Diagrams added
User manual
Asyview - Asyril SA
29/30
This document is the property of Asyril S.A.; it may not be reproduced, modified or
communicated, in whole or in part, without our prior written authorisation. Asyril S.A. reserves
the right to modify any information contained in this document for reasons related to product
improvements without prior notice.
Asyril SA
Z.I. le Vivier
Ch-1690 Villaz-St-Pierre
Switzerland
Tel. +41 26 653 71 90
Fax +41 26 653 71 91
[email protected]
www.asyril.ch