1
Design Notev1.0.1 User Manual
Thank You
Thank you for choosing ClientEngage Design Note. This guide will provide you
with a one-stop support document that helps you make your first steps with
ClientEngage Design Note.
This manual will guide you through the installation process and provide you with
an overview of the core functionalities of ClientEngage Design Note.
About ClientEngage Design Note
Do you design stuff for your clients? Then ClientEngage Design Note will be your best friend when
getting feedback from your clients on your designs. A simple and intuitive interface enables you to
upload your graphics to be annotated by your clients.
A link takes your clients to the graphic’s feedback-page (optionally password protected), where they
can annotate your designs by simply clicking on them and leaving their feedback. Your clients love the
cute kitten picture on the packaging you designed for them? They will click it and leave their free-word
comment alongside it.
After submitting their feedback, they will be taken to a discussion page, where you and your clients
can have an in-depth chat about your design. Got more than one design? No problem, just give them
the access code of a collection!
Moreover, administrators can access all submitted feedback and can opt-in to receive automatic
activity notifications: you will always be kept up-to-date on anything that goes on.
www.ClientEngage.com
Do you like ClientEngage Design Note? Then please rate this item on CodeCanyon.
Follow ClientEngage on CodeCanyon:
www.CodeCanyon.net/user/ClientEngage
Follow ClientEngage on Twitter:
www.twitter.com/ClientEngage
Design Notev1.0.1 User Manual
Table of Contents
1.
About ClientEngage Visitor Chat............................................................................................ 3
1.1. PHP Design Feedback Engine: Functionality Overview .................................................................. 3
2.
System Requirements ........................................................................................................... 4
3.
Updating from an Earlier Version .......................................................................................... 5
3.1. Updating Procedure ....................................................................................................................... 5
3.2. Keeping Your Custom Translation Files .......................................................................................... 5
4.
Installation ........................................................................................................................... 6
4.1.
4.2.
4.3.
4.4.
4.5.
5.
System Upload ............................................................................................................................... 6
Setting File/Directory Permissions ................................................................................................. 6
Accessing the Automatic Installation Tool ..................................................................................... 6
Installation Procedure .................................................................................................................... 8
Changes to Database Credentials ................................................................................................ 11
Using ClientEngage Design Note .......................................................................................... 12
5.1. System Configuration ................................................................................................................... 12
5.2. Using the System: Getting Client Feedback ................................................................................. 12
6.
Extending ClientEngage Design Note ................................................................................... 13
6.1. Translating ClientEngage Design Note ......................................................................................... 13
6.2. Customising the CSS Styles........................................................................................................... 13
6.3. Customising HTML-Templates ..................................................................................................... 13
7.
Helpful Resources ............................................................................................................... 14
8.
When Encountering Problems ............................................................................................. 14
9.
Feedback is Welcome ......................................................................................................... 14
10. Third Party Components: Credits ......................................................................................... 15
CakePHP ....................................................................................................................................................15
Twitter Bootstrap ........................................................................................................................................15
Metro Bootstrap .........................................................................................................................................15
Font Awesome............................................................................................................................................15
famfamfam Icons .......................................................................................................................................16
jQuery 16
ZURB JavaScript Annotation Plugin ...........................................................................................................16
CakePHP Upload Plugin ............................................................................................................................16
CakePHP Migrations Plugin .......................................................................................................................17
TinyMCE .....................................................................................................................................................17
2
Sunday, 7th March 2013
Design Notev1.0.1 User Manual
1. About ClientEngage Visitor Chat
Do you design stuff for your clients? Then ClientEngage Design Note will be your best friend when
getting feedback from your clients on your designs. A simple and intuitive interface enables you to
upload your graphics to be annotated by your clients.
A link takes your clients to the graphic’s feedback-page (optionally password protected), where they
can annotate your designs by simply clicking on them and leaving their feedback. Your clients love the
cute kitten picture on the packaging you designed for them? They will click it and leave their free-word
comment alongside it.
After submitting their feedback, they will be taken to a discussion page, where you and your clients
can have an in-depth chat about your design. Got more than one design? No problem, just give them
the access code of a collection!
Moreover, administrators can access all submitted feedback and can opt-in to receive automatic
activity notifications: you will always be kept up-to-date on anything that goes on.
With ClientEngage Design Note you will get to the heart of what your visitors/clients think.
1.1. PHP Design Feedback Engine: Functionality Overview
Fully-Featured Chat for your Website
Send your clients direct-access links to
their design-projects
Clients can use the image/design
annotation
engine
to
provide
constructive feedback for you
View feedback as “clicks” on your
designs
Secure your designs by setting access
codes
Group designs into collections if you
need feedback on different versions
Absolute Flexibility
Unlimited number of administrators
Unlimited number of collections, items,
feedbacks and discussions
Fully translatable through PO files:
comes with English and German
translations out-of-the-box
Activity Notifications
A notification system lets you know if
there are any new client interactions
Optionally receive these notifications
as emails so you never miss your
clients’ feedback
Additional Discussion & File-Sharing Feature
Start a 1-on-1 conversation with your
clients and show them you are keen on
their views
A fully-featured discussion engine for you
and your clients is included too
Your clients can share files with you
through the discussion feature
A notification system lets you know if there
are any new client interactions
Easy Integration & Use
Automated installation script – no
extensive knowledge of PHP/MySQL
necessary
Detailed handbook with installation & use
instructions
Extensible: the system is developed with
the CakePHP MVC framework and features
a clean architecture. This means that, if you
have web-development experience, the
system is easily extensible
3
Sunday, 7th March 2013
Design Notev1.0.1 User Manual
2. System Requirements
In order to be able to use ClientEngage Visitor Chat, you must fulfil the following system requirements:
Apache 2 HTTP Server
Preferably with mod_rewrite enabled
PHP with a version of greater than PHP 5.2.8
GD library for image manipulation
MySQL with a version of greater than MySQL 5 (i.e. with InnoDB support)
Preferably a subdomain/domain for use with ClientEngage Visitor Chat
Safe mode: off
Enough server-resources for the number of concurrent chatters you expect
Finally, the PHP PDO extensions have to be installed (PDO & PDO MySQL)
Furthermore, you have to ensure that the following directories, as well as their subdirectories and the
files contained therein, are writable:
Temporary Directory:
app/tmp/
Configuration Directory:
app/Config/
Upload Directory:
app/uploads/
4
Sunday, 7th March 2013
Design Notev1.0.1 User Manual
3. Updating from an Earlier Version
3.1. Updating Procedure
If this is your first time installing ClientEngage Visitor Chat, please continue reading on page 6.
If you are updating from an earlier version of ClientEngage Visitor Chat, then please follow the
following steps:
1. [Important] Create a full backup of your system-files and database
2. Upload the contents of the directory “ClientEngage UPDATE” on the server into the same
directory where you have installed ClientEngage Visitor Chat; do not use the “ClientEngage
System” directory
3. Overwrite all files and folders when prompted
4. You have to ensure that the following directories, as well as subdirectories and all files and
directories contained therein, are writable:
o Temporary Directory:
app/tmp/*
o Configuration Directory:
app/Config/*
5. Point your browser to the URL of your ClientEngage Visitor Chat installation
6. Finally, follow the on-screen instructions and perform the one-click update
7. After the installation has finished, you can remove write-permissions from the Configdirectory
In the unlikely case that the update progress was unsuccessful, please replace the whole application
directory and database with the backup you created.
Furthermore, please note that you will need to merge any custom code back into the system since the
ClientEngage Visitor Chat interface as well as codebase will be reset to the current development state.
If you wish to keep your own custom translations please refer to section 3.2.
Important: after installing the update, navigate to “Administration Settings” and configure any new
configuration settings. Even if you do not change anything, it is important that you click “Save”.
3.2. Keeping Your Custom Translation Files
Since you may have added your own custom translations of the ClientEngage Visitor Chat, or you may
have adapted the existing translation files, you need to perform the following steps so as to be able to
keep your changes:
1. Do not overwrite the Locales directory in “app/Locale” with the one in the “ClientEngage
UPDATE” directory (you can do this by deleting it from the update directory before moving
“ClientEngage UPDATE” to your server)
2. After finalising the update, simply open each of the translation files, such as
“app/Locale/deu/LC_MESSAGES/default.po” with Poedit and select “Catalog -> Update from
POT file”
3. Next, please select “app/Locale/default.pot”; you can now update any new translation strings
that were added since the last version of ClientEngage Visitor Chat
5
Sunday, 7th March 2013
Design Notev1.0.1 User Manual
4. Installation
4.1. System Upload
Upload the contents of the directory “ClientEngage System” to your webserver. You should now have
the following directory structure on your webserver:
For best results you should run ClientEngage Visitor Chat under a domain or subdomain. If you wish to
do this, then you should point (not redirect) your domain to the following directory:
SERVERDIR/app/webroot/.
If you are using an Apache server, you can accomplish this by setting the “DocumentRoot” directive to
the aforementioned directory. If you do not have access to your server’s configuration, your domain
management interface should provide you with a setting that allows you to point your
domain/subdomain to this directory.
It is recommended to run ClientEngage Visitor Chat from a domain/subdomain pointed to the webroot
directory, since this keeps all of the system’s files outside of the document root.
4.2. Setting File/Directory Permissions
You have to ensure that the following directories, as well as subdirectories and all files and
directories contained therein, are writable:
Temporary Directory:
app/tmp/*
Configuration Directory:
app/Config/*
Upload Directory:
app/uploads/*
After the installation has finished, you can remove write-permissions from the Config-directory.
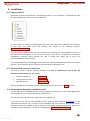
4.3. Accessing the Automatic Installation Tool
You can now access ClientEngage Visitor Chat by navigating your browser to your ClientEngage Visitor
Chat installation, such as: http://designnote.example.com
If you do not encounter any errors, please carry-on reading at 4.4.
If you see an error and are using GoDaddy as your webhost, please perform this change on your
“app/webroot/.htaccess” file. If you do not use GoDaddy and you receive an Internal Server Error,
then it is likely that your webserver (mod_rewrite) is not correctly configured. In this case, please use a
text-editor (such as Notepad++) to open the following file: app/Config/rewrite-core.php
6
Sunday, 7th March 2013
Design Notev1.0.1 User Manual
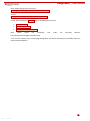
Next, please change line 16 from this:
// Configure::write('App.baseUrl', env('SCRIPT_NAME'));
To this:
Configure::write('App.baseUrl', env('SCRIPT_NAME'));
Finally, please delete the .htaccess files in the following directories:
ROOT/.htaccess
ROOT/app/.htaccess
ROOT/app/webroot/.htaccess
Now,
please
access
the
installation
http://designnote.example.com/index.php
tool
under
the
following
address:
If you use this method, your ClientEngage Design Note installation will always be available under the
aforementioned address.
7
Sunday, 7th March 2013
Design Notev1.0.1 User Manual
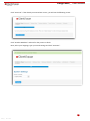
4.4. Installation Procedure
You can now access ClientEngage Visitor Chat by navigating your browser to your ClientEngage Visitor
Chat installation, such as: http://designnote.example.com
You should now see the following screen:
If your system fulfils the requirements, you can commence the installation process after reading and
accepting the end-user license agreement.
In the next screen, please enter your database details (the port is optional). It is important that you
create the database before entering your details (Collation: “utf8_unicode_ci”):
8
Sunday, 7th March 2013
Design Notev1.0.1 User Manual
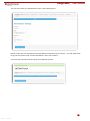
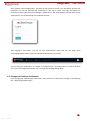
Click “Continue”. If the details you entered are correct, you will see the following screen:
Click “Initialise Database” and wait for the process to finish.
Now, select your language, type your email settings and click “Continue”:
9
Sunday, 7th March 2013
Design Notev1.0.1 User Manual
You can now create your administrative user in the following form:
Please ensure that you remember the email address and password you choose – you will need these
to log into the system. Click “Finalise Installation” when you are done”.
You have now reached the final step of the installation process:
10
Sunday, 7th March 2013
Design Notev1.0.1 User Manual
Click “Perform Final Configurations” and wait for the process to finish. If the installation process was
successful, you will be automatically redirected to your log-in screen. The login will always be
accessible at http://chat.example.com/login/. Please type in the email address and password of the
administrator you created during the installation process:
After logging-in successfully, you will see the administration panel and you can begin using
ClientEngage Design Note to gather invaluable feedback from your visitors:
The first thing you should do is to navigate to “Administration Configuration” in order to perform
any necessary configurations before you start using ClientEngage Design Note.
4.5. Changes to Database Credentials
If you change your database login information, then you have to reflect these changes in the following
file: “app/Config/database.php”.
11
Sunday, 7th March 2013
Design Notev1.0.1 User Manual
5. Using ClientEngage Design Note
5.1. System Configuration
The main system configuration contains three settings: one for your default timezone and one for
selecting the system’s interface language. If you wish to translate ClientEngage Design Note into a
different language, then please refer to section 6.1.
Moreover, you can perform your email configuration: you can choose from PHP’s own mail() function
and your own SMTP server for the system’s email delivery mechanism.
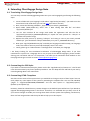
5.2. Using the System: Getting Client Feedback
To generate feedback, you first need to create a collection.
Go to “Collections” and select “Add Collection”. You can now enter a title and description. If you enter
an access code, a client who knows the code can access all items within that collection. If you select
“Enable Browsing”, clients can jump from an item back to the overview. If you select the “Enable
Browsing” function, you should only share the URL to the collection, not individual items. Otherwise
your clients have to constantly re-enter collection & item access codes.
That being said: unless you work on top-secret accounts, you don’t actually have to make use of the
access code feature.
Afterwards, you can add any number of items to the collection. Go to “Items” and select “Add Item”
and type the item’s title and description and select the image file.
You can also create an access code. Items without an access code can be viewed by anyone who
knows the URL.
Now, simply share the item’s “Annotate” URL or the “Discuss” URL – depending on what you want to
do. You can also share the URL to the item’s collection. A client who knows a collection’s access code
can access all items within that collection.
To view your feedback, simply go to “Items” and “View” the respective item. You can see a list of all
submitted feedback. Moreover, you can navigate to the respective discussion pages to talk to your
clients (however, clients will not receive activity notifications. Hence you have to ask them to regularly
come back to the discussion page).
12
Sunday, 7th March 2013
Design Notev1.0.1 User Manual
6. Extending ClientEngage Design Note
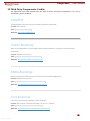
6.1. Translating ClientEngage Design Note
You can easily translate ClientEngage Design Note into your own language by performing the following
steps:
1. Create a folder with your language’s code within “app/Locale/yourcode/“; you need to use the
three-letter locale-code which you can find here (the code on the left)
2. Next, create the following subfolder: „app/Locale/yourcode/LC_MESSAGES/“
3. Open Poedit (www.poedit.net), select “File -> New catalog from POT file” and select
“app/Locale/default.pot”
4. You can now translate all the strings used within the application and safe the file as
“app/Locale/yourcode/LC_MESSAGES/default.po” repeat the same process for “cake.po” to
translate time-specific strings
5. Repeat the same process by opening “cake.pot” and saving it next to your newly created
“default.po” (you should have cake.po and default.po in your LC_MESSAGES directory)
6. Now open “app/Lib/GlobalClasses.php” and add your language around line 200, your language
code is the index of the array item and the display-name is the value
7. Finally, please go to “Administration Configuration” and select your language
I am always looking for user-contributed translations of ClientEngage Design Note. If you have
translated the system into a language that is not yet part of the default languages, please consider
sharing your translation with me. To reciprocate, I can offer you an attribution with backlink on the
item page. Please get in touch via email: [email protected]
6.2. Customising the CSS Styles
If you wish to customise the CSS styles, please use the file “app/webroot/css/custom.css”. This file will
never be overwritten by any future update procedures. You can adapt the look and feel of your site by
overriding Design Note’s own CSS classes.
6.3. Customising HTML-Templates
Are there certain areas of the system which you would like to change in terms of their layout? You can
easily adapt any visual aspect of the system by amending the template files. You can find individual
“pages” in “app/View/AREANAME/PAGENAME” and the main layouts in “app/View/Layouts/”
(default.ctp and public.ctp).
However, please be advised that any custom changes to the default layout will be lost if you decide to
upgrade ClientEngage Design Note in the future. Therefore, it is advisable that you keep a list of all
your custom changes to enable you to merge them back into the system after updating. Furthermore,
there are free merge-utilities which may be able to help you in this respect.
13
Sunday, 7th March 2013
Design Notev1.0.1 User Manual
7. Helpful Resources
If your system fulfils the minimum requirements, then you should have no problems in running
ClientEngage Design Note. However, some developers may wish to adapt ClientEngage Design Note.
There are some helpful resources that may help you accomplish this.
First and foremost, you should have good knowledge of general web development practices and, in
particular, PHP 5. You may also wish to check-out the documentation of the amazing PHP Framework
on basis of which ClientEngage Design Note is built: CakePHP.
The best place to learn about CakePHP is to visit http://www.cakephp.org and, in particular, the
documentation under http://book.cakephp.org.
Please note that, currently, ClientEngage Design Note uses CakePHP 2.3.2 – this is subject to change
with future revisions and additions to Design Note.
8. When Encountering Problems
If you encounter any problems whilst using ClientEngage Design Note, please first ensure the
following:
1.
2.
3.
4.
5.
Did you recursively set your write permissions for the respective folders that need it?
Does your system fulfil the minimum requirements?
If you receive upload-errors, what is your server settings’ max-upload and post size?
Are you using GoDaddy as your webhost? Then please follow these instructions.
If your system does fulfil the minimum requirements, then please do get in touch through the
CodeCanyon author profile (i.e. the e-mail form). You will receive a response as soon as
possible to propose a solution.
6. Furthermore, please also keep an eye on Design Note’s FAQ section on CodeCanyon – this is
where common questions will be answered over time.
9. Feedback is Welcome
Do you have any feedback, praise or a particular problem? Do you have great ideas for future
additions to ClientEngage Design Note? Then please do send these through ClientEngage’s
CodeCanyon profile or email these to [email protected]. I am always on the lookout for
clients’ input to make future offerings even better. After all – I want all my clients to be delighted with
their purchases.
14
Sunday, 7th March 2013
Design Notev1.0.1 User Manual
10. Third Party Components: Credits
This application was made possible with the help of various third party components. For a list of
attributions, please see below.
CakePHP
This application was built using the amazing CakePHP framework.
License: MIT License
Path: lib\Cake\LICENSE.txt
Website: http://www.cakephp.org
Twitter Bootstrap
Many of this application's visual aspects were made possible by using the Twitter Bootstrap
framework.
License: Apache License v2.0
Path: app\webroot\css\bootstrap\LICENSE
Website: http://twitter.github.com/bootstrap/
Metro Bootstrap
Metro Bootstrap provides the basis of the Twitter Bootstrap adaptations.
License: Apache License v2.0
Path: app\webroot\css\metro-bootstrap\LICENSE
Website: http://talkslab.github.io/metro-bootstrap/
Font Awesome
Icons are powered by the awesome Font Awesome.
License: MIT License (CSS and LESS files) | SIL OFL 1.1 (FONTS)
Path: app\webroot\css\fontawesome\LICENSE
Website: http://fortawesome.github.io/Font-Awesome/
15
Sunday, 7th March 2013
Design Notev1.0.1 User Manual
famfamfam Icons
A subset of the amazingly brilliant famfamfam icon set was included in this application.
License: Creative Commons Attribution 2.5 License
Path: app\webroot\img\icons\readme.txt
Website: http://www.famfamfam.com/
jQuery
Many aspects of the user interaction logic use jQuery.
License: MIT License
Path: app\webroot\js\jquery\MIT-LICENSE.txt
Website: http://jquery.com/
ZURB JavaScript Annotation Plugin
Annotation features were developed based on ZURB's JavaScript Annotation Plugin.
License: MIT License
Path: app\webroot\js\annotate\MIT-LICENSE.txt
Website: http://zurb.com/playground/javascript-annotation-plugin
CakePHP Upload Plugin
This application uses the Upload Plugin for CakePHP to manage the file uploading.
License: MIT License
Path: app\Plugin\Upload\README.markdown
Website: https://github.com/josegonzalez/upload/
16
Sunday, 7th March 2013
Design Notev1.0.1 User Manual
CakePHP Migrations Plugin
This application's update procedure is made possible by using the CakePHP Migrations Plugin.
License: MIT License
Path: app\Plugin\Migrations\readme.txt
Website: https://github.com/CakeDC/migrations/
TinyMCE
The fantastic TinyMCE editor was used to allow users to format comments.
License: LGPL License
Path: app\webroot\js\tiny_mce\license.txt
Website: http://www.tinymce.com/
17
Sunday, 7th March 2013


![the file [< 1 MB]](http://vs1.manualzilla.com/store/data/005663565_1-91d1e4bcdfd7b45b626a6b88ab809728-150x150.png)