1
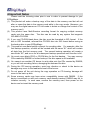
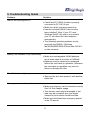
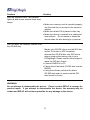
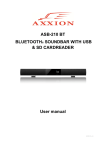
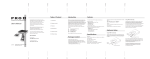
Table of Contents
1.Introduction ................................................................... P.2
1-1.Basic Configuration
1-2.Product Features
2.Product Tour .................................................................
P.3
2-1.Front Bezel
2-2.Top Bezel
2-3.Rear and Left Side
2-4.Slot Adaptor Usage
2-5.Battery Pack Box
2-6.Car Power Adaptor Kit
3. Operating Instructions ................................................
P.7
3-1.Standalone Operation
3-2.PC Link Operation
3-3.DM220 Disconnection from PC
4. Important Notes …........................................................ P.10
5. Troubleshooting Guide ...............................................
P.11
6. Technical Support ……................................................
P.13
7. Specifications ……….................................................... P.14
8. Product Application Scope ......................................... P.15
1
1. Introduction
Thank you for purchasing our EZDigiMagic DM220. EZDigiMagic enables you to
produce a backup copy of digital photos directly from your camera’s memory card into a
CD-R or CD-RW disc. One touch operation and no need for PC makes using
EZDigiMagic a snap. With EZDigiMagic’s compact size, there’s no need to worry about
not having enough capacity in your camera’s memory card when you are on the go.
EZDigiMagic can also be connected to a PC to be used as a memory card reader or as
CD burner. EZDigiMagic makes digital photography EZ.
Warning: Please be certain that all data on the memory card has been
successfully backed up onto the disc before erasing the contents of the memory
card. The manufacturer and sellers of EZDigiMagic are not responsible for any
data lost from the memory card.
1-1. Basic Configuration
Please review contents to ensure your EZDigiMagic is complete.
•
EZDigiMagic DM220 main unit
•
Quick Start
•
User’s Manual
•
1 disc-USB 2.0 device driver (for Windows 98/SE/2000 XP3, Mac OS10.x and later).
Before Install the driver, please read the Read me file in the driver.
•
1 disc-CD burner software
•
1 blank CD-R disc
•
USB 2.0 connection cable
•
CF Memory Card Slot Adaptor
•
AC Power Adaptor
•
AC Power Cord
•
(Optional) Car Power Adaptor Kit
•
(Optional) Battery Pack Box (Note: 1.2V AA Ni-MH batteries and charger are not
included)
1-2. Product Features
EZDigiMagic supports most memory cards currently on the market.
•
Stand-alone operation, no PC needed.
•
Lightweight, optional battery pack available for portability.
•
One-touch back up operation.
•
Multi-session capability allows for backing up multiple memory cards into a single
CD.
•
Can double as a memory card reader and CD burner when connected to a PC.
•
Uses high speed USB 2.0 interface for PCs.
•
No additional device driver needed under the Windows ME/XP environment.
2
2. Product Tour
2-1. Front Bezel
(1) Card Slot: You may insert
Compact Flash (CF) card or
MicroDrive card directly into
slot. All other memory cards,
Smart Media (SM), Memory
Stick (MS), Secure Digital (SD)
or, MutiMedia Card (MMC)
must be used with the slot
(Figure 1)
(Figure 1)
adaptor. (See section 2-4).
(2) CD burner eject button
(3) CD burner: Press CD burner eject button in order to release CD tray. Place blank
CD-R or CD-RW disc in tray and press the eject button again to retract the CD tray
automatically.
2-2. Top Bezel
(1) Main function Copy key: One-Touch
operation to start the back up operation.
(2) Power Indicator: The green LED will
illuminate once the power source is
connected and the power switch is in the “on”
position.
(3) OK/Write indicator: Once the memory
card is inserted and a blank CD is placed in
the burner, the OK/Write green colored LED
indicator will begin blinking; indicating
EZDigiMagic has detected both media.
Once EZDigimagic is ready to copy, the
green colored OK/Write LED will stop blinking.
The actual copy operation starts when the
green colored OK/Write LED changes to a
blinking yellow light.
After the copy
operation is successfully completed, the
indicator will change back to a green light
and the buzzer will sound a single beep
(about 2 seconds).
(Figure 2)
3
(4) Battery Low: This indicator normally will not light up. However, when the battery
voltage is low, the indicator will blink an alternating yellow/red light.
(5) Disc Full: This indicator will light up and the buzzer will sound three short beeps if
there is not enough remaining capacity on the disc for copying the data from the
memory card.
(6) Fail: This indicator will light up red if the copy operation can not be completed
successfully, and the buzzer will sound three short beeps.
2-3. Rear and Left Side
(Figure 3)
(Figure 4)
(1) Power Connector: Insert the power connector from the AC adaptor into this socket.
Plug the AC power cord into the wall AC outlet. Turn the Power Switch (3) on the
EZDigiMagic to the “ON” position.
(2) USB Port: Plug the USB 2.0 cable into this socket and connect the other end to
your PC.
(3) Power Switch: Slide the switch toward the front to the “ON” position to start the unit;
or slide the switch toward the rear to the “OFF” position to shut down the unit.
2-4.Slot Adaptor Usage
The 4-in-1-memory slot adaptor is included with the unit
(see Figure 5).
(1) When using the Smart Media card in the 4-in-1
slot adaptor, make sure the gold-finger contact for
the Smart Media card is facing up.
(2) When using MS, SD, and MMC memory cards,
the gold finger contact must be facing down.
(3) Once the memory card is inserted correctly in the
adaptor, you can then plug the adaptor into the
card slot on the DM220. (See Figure 6).
(4) Once the backup operation is completed, the
adaptor or the memory card may be removed.
4
(Figure 6)
(Figure 5)
2-5.Battery Pack Box
The battery pack box is an optional item to be purchased separately.
1. Install four AA rechargeable 1.2V
Ni-MH batteries into the battery
pack box. (Batteries and charger
are not included.) (See Figure 7).
Important Notes Regarding
Rechargeable NI-MH AA Batteries:
1. EZDigiMagic DM220 requires (4) AA
Ni-MH batteries with a minimum current
of 1800 mA. Dry cell or alkaline batteries
do not meet this requirement. Based on
current amount of mA in rechargeable
batteries, usage times are as the
followings:
1800 mA
60 min
2000 mA
70 min
(Figure 7)
2. To install battery pack, align the
five guide hooks located on the
battery pack to the back of the
DM220 unit, then snap the battery
pack into the EZDigiMagic unit.
(See the Figure 8).
2. Battery Low indicator may blink
occasionally
during
the
burning
operation. It is normal even if the battery
is fully charged.
(Figure 8)
4. Batteries may discharge if they are not
used for a period of time. Make sure
batteries are fully charged before major
usage. (The amount of discharge is
dependent on the maker and model of
the batteries, Please consult battery
manufacturer’s data).
3. If the Battery Low indicator blinks
continuously, recharge the batteries
immediately after completing the current
copy operation; otherwise, the next copy
operation may result in failure or a
damaged disc.
3. To remove the battery pack, simply
pull battery pack firmly away from the
main unit. (See the Figure 9).
5. Please follow instructions provided by
rechargeable battery manufacturers for
operation, recharging, maintenance and
disposal of the batteries.
(Figure 9)
5
2-6.Car Power Adaptor Kit
The Car Power Adaptor Kit can be purchased separately as an optional item. (See
Figure 10)
A
B
(Figure 11)
(Figure 10)
For Use:
(1) Insert the connector A of the Car Power Adaptor Kit as show on Figure 10 into
cigarette lighter outlet of the car.
(2) Insert connector B into the power connector socket on DM220 as shown on Figure
11.
(3) Follow the normal operating procedures as described in the next section.
6
3.Operating Instructions
To ensure maximum usage satisfaction and extended product life, please follow the
below operating instructions:
3-1.Standalone Operation
(1) Make sure the power source is connected correctly.
(2) Turn on the power switch. All four indicators on the top bezel will light up and the
buzzer will sound a long beep (about 2 seconds). The unit will be initialized and
reset for all functions.
(3) Once the OK green indicator is on and stops blinking, the unit enters the standby
mode. Press the CD burner eject button to eject the disc tray, load blank CD-R or
CD-RW on tray. Press the ejector button a second time to close tray.
(4) Insert CF or MicroDrive memory card directly into the card slot. All other memory
cards such as SM, SD, MS, and MMS need to be inserted into the adaptor before
inserting into DM220 card slot. (See section 2.4)
(5) Once memory card and the blank disc are in position (OK indicator is green and
steady), press the Copy key to start the copy operation. During the disc burning
process, the OK/Write indicator will blink yellow.
(6) Once the copy operation is complete, the OK indicator light will turn green and the
buzzer will sound a long beep (about 2 seconds) and the disc tray will slide out
automatically.
(7) To back up more than one memory card on the same CD, complete the back up of
one memory card, and remove the memory card. Insert the subsequent memory
card as instructed in 3-1(4) and 2-4, and repeat the back up operation.
3-2. PC Link Operation
(1) Connect the EZDigiMagic DM220 to a PC using the included USB2.0 cable.
PC Users:
If you are using Windows XP or ME, you do not need to install the USB device
driver in most cases. If you are using Windows 98/98SE/2000, please follow the
following steps to install the USB 2.0 device driver:
Close all other programs. Insert the device driver CD in your CD-ROM drive and
follow the instructions to complete the installation and restart the computer.
Note: If your PC does not have a USB 2.0 port, you need to install a USB 2.0
add-on card and device driver first.
7
(2)
(3)
(4)
(5)
(6)
(7)
MAC Users:
If you are using Mac OS, please follow the procedures below for installing the USB
2.0 device driver:
Stop all other programs. Insert the CD into the CD-ROM drive. Follow the
Instructions on the screen to complete the installation and restart the computer.
Note: If your computer does not support USB2.0 port, you will need additional
hardware installed on the computer first.
Turn on the power switch. All four indicators on the top bezel will light up and the
buzzer will sound a long beep (about 2 seconds). The unit will be initialized and
reset for all functions.
The PC will detect the presence of the new hardware and display the new device in
the desktop screen of the PC. Follow the on-screen instructions to complete the
installation. The PC will recognize the device automatically after the initial
installation.
Once the PC link is established, the Copy key on the top bezel will be de-activated
since the unit is now functioning as a card reader and CD burner.
The PC will have two new icons located in My Computer in the desktop menu:
“removable HDD” and “optical disk drive”.
“Removable HDD” functions as a card reader for retrieving the information in the
memory card. (See Section 3-2-1 for details)
“Optical disk drive”: functions as a CD burner for recording information onto CD-R
or CD-RW discs through proper CD burner software. (See Section 3-2-2 for
details).
3-2-1. Using DM220 as a Card Reader
(1) Once you have successfully installed the DM220 to a PC, a new icon “Removable
HDD” will appear in My Computer. This icon will contain the data for the memory
card.
(2) Insert memory card into the card slot (for CF and MicroDrive card only, all others
must be inserted into the slot adaptor first before inserting into the card slot in
DM220).
(3) You can then copy the data from the memory card onto other storage devices in the
computer or copy the information from the computer into the memory card by
following the file copying procedures in your operating system.
(4) During the read/write process, all four indicator lights (OK/Write, Battery Low, Disc
Full, Fail) will blink at the same time.
8
3-2-2. Using DM220 as a CD Burner
(1) Once you have successfully installed the DM220 to a PC, a new icon “Optical Disc
Drive” will appear in My Computer.
(1) The DM220 unit functions like an external CD burner. Using the CD burner software
included in your EZDigiMagic package, you can record data from your computer
onto the CD-R or CD-RW discs by following the directions in the software.
(2) During the CD burning operation, all four indicators (OK/Write, Battery Low, Disc
Full, and Fail) will blink at the same time.
3-3.DM220 Disconnection from PC
(1) Using your PC, move cursor to the
lower-right hand corner of the screen and
click on the “Unplug or Eject Hardware” icon
(as in Figure 12).
(2) Select the functions “Stop USB CD-ROM”
and “Stop USB HDD” to remove the device
driver.
(Figure 12)
(3) Once the message “device can now be safely removed from the system” appears as
in Figure 13, you may power off the EZDigiMagic DM220 and remove the USB interface
cable.
(Figure 13)
NOTE: If you do not follow the above instructions, you may see the “You have
unplugged the device without stopping it which can cause your computer to crash and
lose valuable data” message box as shown below in Figure 14.
(Figure 14)
(4) Window XP users may simply power off the DM220 unit and disconnect the cable.
9
4.Important Notes
Please read the following notes prior to use in order to prevent damage to your
EZDigiMagic.
(1) This product will make a backup copy of the data in the memory card but will not
alter or erase the data in the memory card while in the copy mode. (However, you
may use the digital camera or PC-link mode to delete or change the content of the
memory card.)
(2) This product uses Multi-Session recording format for copying multiple memory
cards onto the same disc. The disc can be read by any system that supports
ISO-9660 CD-ROM.
(3) If you use CD-R/W blank discs, the disc must be formatted to ISO format. If the
disc is UDF formatted, reformat the CD-R/W disc into ISO format before using as
the backup disc in your EZDigiMagic.
(3) This product uses data backup concept for recording data. For example, after the
first backup operation, a folder will be created with the name “01” which will contain
all data from the first memory card. The second backup operation will create a
new folder “02”, and so on for all subsequent backup operations until the disc is full.
(4) You must use a blank CD-R or CD-RW disc for the first backup. You may use any
CDs created by DM220 for further backup if the disc space is still available.
(5) You cannot use another CD burner to write data onto the CDs created by DM220;
or you will risk recording failure, damaging the data and the disc.
(6) During the CD burning operation, avoid any vibration or shock to the device as
damage may occur to the read/write head of the burner.
(7) Do not power off the unit during the copy operation or CD burning, damage will
occur to the back up disk.
(8) Some memory cards may have minor compatibility issues with DM220. If the
device is switched on with such memory card already inserted, DM220 may fail to
initialize correctly. In such case, remove the memory card, then power on the
device and re-insert the memory card.
10
5. Troubleshooting Guide
Problem
Solution
DM220 not working with PC
• Check that PC USB 2.0 cable is properly
connected to PC US 2.0 port
• Make sure both units are powered up
• Has the included USB 2.0 device driver
been installed? Note: If your PC uses
Windows Me/XP, this step is not needed,
your PC will detect the new hardware
automatically.
• The following operating systems can be
used with the DM220 - Windows
Me/XP/98/98SE/2000 XP3and Mac OS10.0
or later versions.
Battery Low Indicator lit up continuously
• Make sure rechargeable Ni-MH batteries
are at least rated at minimum of 1800mA.
• Batteries must be replaced or recharged
before the next back up operation; otherwise
the next back up operation may result in
failure or damage the disc.
Disc Full indicator lights up
• Remove the disc and replace it with another
blank disc.
Memory card cannot be read or backed up
• Make sure memory card is inserted correctly.
See 2-4 Slot Adaptor usage.
• The memory card may be damaged or the
data may be corrupted. Use your digital
camera to check and/or format the data.
• Make sure the blank disc is properly placed
in the CD burner.
11
Problem
Solution
Back up operation fails, Fail indicator
lights up and buzzer sounds three short
beeps
• Make sure memory card is inserted properly
into the card slot or secured in the card slot
adaptor
• Make sure blank CD is placed in disc tray
• Make sure device is placed on a stable and
level surface. Do not shock or shake the
device when the disc burning is in process.
Can not burn the memory content onto
the CD-RW disc
Maybe your CD-RW disc is not the ISO disc
format. If the disc is UDF formatted,
reformat the CD-R/W disc into ISO format
before using as the backup disc in your
EZDigiMagic. Please use the follow steps to
make the ISO disc format.
• Connect DM220 to a PC.
• Please Insert the blank CD-RW disc into the
DM220.
• Using the software reformat the blank
CD-RW disc again to make sure the ISO
disc format is correct.
WARNING:
Do not attempt to disassemble the device. Please contact EZPnP to arrange for
product repair. If you attempt to disassemble the device, the warranty may be
voided and EZPnP will not be responsible for any damage to the device.
12
6.Technical Support
Please Contact Technical Support
EZPnP USA:
1855 Northwestern
El Paso, TX 79912
1-800-828-6475
E-Mail: [email protected]
Or [email protected]
EZPnP Taiwan
No. 5, Lane 130, Sec.4, Hsinhai Road, Taipei 116, Taiwan
TEL: 886-2-8931-1122
FAX: 886-2-8931-1502
Http://www.ezpnp.com
Http://www.ezdigimagic.com
E-Mail:[email protected]
6-1. Limited Product Warranty
EZPnP offers one-year warranty for material and workmanship of this product under
normal usage condition. Product failure, excluding any misuse or handling damage,
after confirmation by our technical service staff will be repaired or replaced at our
discretion.
13
7.Specifications
Model
Supported disc
media
Supported
memory card
DM220
Blank CD-R / CD-RW Disc
CF [ CompactFlash™ Type I/II ] , MicroDrive™ ,
CF Adapter : SM [ Smart Media™ ] , MMC [ Multi Media Card™ ] , SD [Secure Digital™ ] ,
MS [ Memory Stick™ ]
Storage capacity 1 CD-R Disc can hold the equivalent of 10 pcs of 64MB flash memory cards
Operation method Standalone one button operation, no PC connection needed for data back up
Indicators
LED *4 [OK/Write , Battery Low , Fail, Disc Full]
Function key
1 [ Copy ] button
Audible Alert
Buzzer
PC Interface
USB 2.0 to PC and MAC
Operating System
Windows 98/98SE/ME/2000/XP, MAC OS 9.X and later
supported
AC Power
Battery Power
100-240V(50-60Hz) universal AC adapter (DC 5V, 2A)
Optional battery pack box [ for Rechargeable 1.2V AA Ni-MH Battery *4 ].
Charger are not provided.
Physical
dimensions
150Wx35Hx167L (mm) ; 150Wx35Hx190L (mm) (with battery pack)
Net weight
600g (without battery pack)
Battery and
※ EZDigiMagic is a trademark of Loyalty Founder Enterprise Co., Ltd. All other
trademarks are properties of their respective owners. The specifications of the product
are subject to change without any prior notice.
14
8.Product Application Scope
Lawful Use of Products:
This product is intended to be used solely for lawful purposes and should not be
used to copy or duplicate any disks, information, data or other media that is protected by
copyrights, trademarks, patents or other proprietary rights without the express consent
of the owner of those rights. Purchasers and users of this product agree to indemnify
and hold EZPnP harmless from and against any claims of infringement of any
proprietary rights of other from use of this product.
Disclaimer:
The operating speed and performance stated in the product literature are for
comparison with similar products only. The actual speed or time may vary depending
on the type and quality of media. We do not offer any warranty that the speed or
performance will be identical in a similar backup copying cycle.
It is user’s responsibility to make sure the data on the memory card have been
successfully backed up onto the disc before erasing the content of the memory card.
The manufacturer and sellers of this device are not responsible for any data lost from
the memory card.
15
PN:44-919003-00 V1.00
16