1
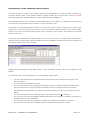
SOPHTLOGIC i
Capability Analysis
2059 SP14
User Manual
For more information:
E: [email protected]
T: 01473 255552
Content
SETTING-UP CAPABILITY ANALYSIS ....................................................................................................................................................................... 3
Introduction.................................................................................................................................................................................................................. 3
RESOURCE CAPABILITIES .................................................................................................................................................................................................. 4
Resource Capability Setup........................................................................................................................................................................................... 5
INCIDENT GROUPS ............................................................................................................................................................................................................. 7
RESPONSE CONDITIONS..................................................................................................................................................................................................... 9
SERVICE DELIVERY PROFILES......................................................................................................................................................................................... 11
MOBILISATION RESPONSE CATEGORIES ......................................................................................................................................................................... 15
RESOURCE TURNOUT SYSTEMS ...................................................................................................................................................................................... 16
Resource Turnout Pattern.......................................................................................................................................................................................... 17
RESOURCES INDEX .......................................................................................................................................................................................................... 21
Resource Status History............................................................................................................................................................................................. 22
SETTING-UP SKILLS AND ROLES ............................................................................................................................................................................. 24
SKILL GROUP TYPES ....................................................................................................................................................................................................... 24
SKILL MANAGER ............................................................................................................................................................................................................. 25
Skill Group Folder ..................................................................................................................................................................................................... 25
Skill Register Folder .................................................................................................................................................................................................. 26
SETTING UP AVAILABILITY KEYS .......................................................................................................................................................................... 28
AVAILABILITY CONSTANTS ............................................................................................................................................................................................ 28
AVAILABILITY KEYS ....................................................................................................................................................................................................... 30
Duty Rota Book .......................................................................................................................................................................................................... 32
EMPLOYMENT CONDITIONS ..................................................................................................................................................................................... 34
ADD AN EMPLOYMENT CONDITION ................................................................................................................................................................................ 34
THE FIVE LINKING CHECKS...................................................................................................................................................................................... 35
1 - Resource Turnout System linked to Resource Index ............................................................................................................................................ 35
2 – Resource Capabilities link to Skills Register ...................................................................................................................................................... 36
3 - Resource Turnout Pattern link to Service Delivery Profile ................................................................................................................................. 37
4 – Incident Types Grouped to Service Delivery Profile .......................................................................................................................................... 38
5 – Resource Capabilities is linked to Service Delivery Profile & Capability Analysis .......................................................................................... 38
CAPABILITY ANALYSIS ............................................................................................................................................................................................... 40
USING CAPABILITY ANALYSIS ........................................................................................................................................................................................ 40
CAPABILITY ANALYSIS SEARCH CRITERIA..................................................................................................................................................................... 41
Running the Capability Analysis ............................................................................................................................................................................... 41
Location Drop Down List:......................................................................................................................................................................................... 42
Duty System Drop Down List .................................................................................................................................................................................... 42
Duty Drop Down List................................................................................................................................................................................................. 42
Rota Drop Down List................................................................................................................................................................................................. 42
Group By Button ........................................................................................................................................................................................................ 43
Month and Year.......................................................................................................................................................................................................... 44
Automatic Allocation ................................................................................................................................................................................................. 46
Interpretation of the Capability Analysis Report ...................................................................................................................................................... 49
SOPHTLOGIC – COMMERCIAL IN CONFIDENCE
PAGE: 2
Setting-Up Capability Analysis
Introduction
The Capability Analysis is a reporting function which may be used to identify shortages of skills and roles required to
meet certain predefined criteria. This document is designed to give an overview of the setup requirement and
functions of the Capability Analysis and provide the user with 4 specific examples of its use.
For example the Fire and Rescue Service may have a dedicated … which has to have certain Skills and Roles… the
examples below are subject to change depending on Brigade.
Search and Rescue Team (SRT)
Skill based requirement of:
Chain Saw Operators
Co-Responders
Road Traffic Collision
Rope Rescue Operator
Rope Supervisor
Swift Water Rescue
Urban Search & Rescue
1
2
3
4
1
3
4
Role based requirement of:
1
1
Crew Manager
Watch Manager
Senior Officers Rota (SNRO)
Skill based requirement of:
2
1
1
4
Chain Saw Operator
Rope Operator
Swift Water Rescue
Urban Search & Rescue
Fire Call (FIRE)
Skill based requirement of:
EFAD Driver
135 Ladder
Pumping Capability
Command & Control
Capability
Rescue
1
1
2
1
1
Role based requirement of:
5
1
Qualified Fire-Fighter
Watch Manager
Role based requirement of:
1
2
4
2
1
Area Manager
Group Managers
Station Managers
Hazmat Officers
DIM Officer
Two Pump Station – Pump 2 (2PP2)
Skill based requirement of:
1
EFAD Driver
Role based requirement of:
1
2
Crew Manager
Qualified Fire-Fighter
A Resource Capability should be setup to mirror the Skill and Role requirements of the SRT / SNRO.
This section sets up the ‘Resource Capability Profile Element’ box within the ‘Capability Analysis’ window. You will be
able to look up the ‘Resource’ and ‘Skill Capability’ within a ‘Location’.
•
The main function of the ‘Capability Analysis’ is to report on the number of personnel over or under the weight
of attack specified within the ‘Service Delivery Profile’.
•
The report has selection criteria to enable the user to analyse different combinations of ‘Location’, ‘Duty
System’ and ‘Rota’.
•
The report also has the ability to perform an analysis of the number of personnel on specified ‘Availability keys’
and ‘Duty System Pattern Elements’ on each day within the selected month or to exclude this type of
‘Availability Key’ or ‘Duty System Pattern Element’ from the number of available personnel.
•
Returns only those skills that have not expired based upon the frequency on the ‘Skill’ and the date obtained on
the ‘Skill Profile’.
SOPHTLOGIC – COMMERCIAL IN CONFIDENCE
PAGE: 3
Resource Capabilities
Introduction
When creating the ‘Resource Capabilities’ that are required at an operational level, it is now possible to use the Duty
Rota Book as a tool for identifying which ‘Watches’ have ‘Shortages’ of particular ‘Skills’ based upon ‘Resource
Capability Profiles’ which have been setup for particular ‘Incident Response Types’.
For example a ‘Brigade’ may have a dedicated ‘Search and Rescue Team’ which have a requirement of a
•
EFAD Driver
•
Team Leader
•
First Aider
•
Minimum number of ‘Qualified Fire-fighters’
•
Senior Officers (SNRO)
•
Special Rescue Team (SRT)
This, and any number of ‘Response Profiles’, may be loaded into the MIS and assigned against a particular ‘Resource
Turnout System’.
When entering a Resources Capability element of class ‘SKILL’
(SKL) the ‘Capability Code’ should be the same as the ‘Skill
Profile Code’ visible from the…
Training > Administration > Skill Manager > Skill Register menu.
When entering a Resources Capability element of class ‘ROLE’ the
‘Capability Code’ should be the same as the First Two Characters of
the ‘Rank Code’ visible from the…
Personnel > Establishment > Personnel Configuration > Ranks
option.
The ‘Duty Rota Book’ can then be used to show, based on the ‘Appliances’ at each ‘Location’, the number of personnel
on ‘Day and Night Watches’, and the number of ‘Shortages’ of personnel with the required ‘Skills’ to meet confidence
to ride those ‘Appliances’.
SOPHTLOGIC – COMMERCIAL IN CONFIDENCE
PAGE: 4
Resource Capability Setup
These are setup as follows:
•
Global Navigator Menu
•
Click onto Incident Command button
The Incident Command is now in the menu toolbar
•
Scroll down to Configuration
•
Click onto Resource Capabilities
The Resource Capabilities window will appear
As you can see previous entries that have been entered will appear
•
Click onto the New button
•
Enter a Description of the Resource into the Description box
•
Enter a Description Code into the Capability Code box
•
Click onto the Profile Class; pick one of the options e.g Skill,
Role, Appliance…
•
Click onto the OK button
When entering a ‘Capability Code’ for a ‘Skill’, the code entered must match the ‘Skill Profile Code’ of the ‘Skill’
that will have been setup.
Those Capabilities that relate to Appliances need to be assigned to a Profile Class of ‘Appliance’.
Those Capabilities that relate to Personnel need to be assigned to a Profile Class of ‘Uniformed’,
‘Non-uniformed’ or ‘Non-service’
Those Capabilities that relate to Specific Skills must be assigned the Profile Class of ‘Skill’.
SOPHTLOGIC – COMMERCIAL IN CONFIDENCE
PAGE: 5
As you can see the ‘Di’s Resource Capabilities SKILL / ROLE’
are entered in Resource Capabilities List.
You will locate this drop down list in the Response Profile in the
Service Delivery Profile window.
Open Service Delivery Profile, then Click onto one of the options, Click
on New /Amend Select an option, click onto Add/ Amend - ‘Di’s Officer
Resource Capabilities’ & ‘Di’s Resource Capabilities’ will be in the
Response Element drop down list - As shown –
Capability Analysis window.
You can also locate ‘Di’s Officer Resource Capability’ and ‘Di’s Resource Capability’ in the ‘Resource
Capability Profile Element’ Option
SOPHTLOGIC – COMMERCIAL IN CONFIDENCE
PAGE: 6
Incident Groups
This will be were you would setup the Incident Groups drop down list in Services Delivery Profile window.
The setup as follows:
•
Global Navigator Menu
•
Click onto Incident Command
The Incident Command is now in the menu toolbar
•
Scroll down to Configuration
•
Click onto Incident Groups
The Incident Groups window will appear – as shown -
If there is nothing in the window
Click onto the Paint Brush icon
If any entries that where previously entered will appear in
the Incident Group window – as shown –
Click onto the New button
Enter the Code of the Incident Group
Enter the Description of the Code
Click onto the OK button
SOPHTLOGIC – COMMERCIAL IN CONFIDENCE
PAGE: 7
As you can see the ‘Di’s Incident Group’ has now been entered
into the Incident Groups window
To see where the Incident Group is used
Go to Service Delivery Profiles window – Click onto option –
Click onto Amend – Click onto the Incident Groups arrow.
‘Di’s Incident Groups’ will be in the drop down list.
SOPHTLOGIC – COMMERCIAL IN CONFIDENCE
PAGE: 8
Response Conditions
Response Conditions were the user would setup the ‘Incident Conditions’ drop down list in the Response Profile window
in Service Delivery Profile.
The setup as follows:
•
Global Navigator Menu
•
Click onto Incident Command
The Incident Command is now in the menu toolbar
•
Scroll down to Configuration
•
Click onto Response Conditions
The Incident Groups window will appear – as shown -
If there is nothing in the window
Click onto the ‘Paint Brush’ icon
If any entries that where previously entered will appear in the
‘Incident Group’ window – as shown –
Click onto the ‘New’ button
Enter a ‘Incident Conditions Code’
Enter the ‘Description’ of the ‘Code’
Click onto the ‘OK’ button
SOPHTLOGIC – COMMERCIAL IN CONFIDENCE
PAGE: 9
As you can see the ‘Di’s Incident Conditions’ has
now been entered into the Incident Conditions’
window
To see where the Incident Conditions’ would be used
To open Service Delivery Profile: Incident Command >
Configuration > Service Delivery Profile > Click onto option >
Click onto Amend > Click onto the Add button > Click onto
the ‘Incident Conditions’ arrow > ‘Di’s Incident Conditions’
will be in the drop down list. (pg 11)
SOPHTLOGIC – COMMERCIAL IN CONFIDENCE
PAGE: 10
Service Delivery Profiles
The next task is to create Service Delivery Profiles against which Resource Capabilities can be assigned.
The Service Delivery Profile is a mechanism of grouping the required skills and roles together into a profile. In order to
create a Service Delivery Profile for a location or incident type the user should first enter a meaningful Code and
Description and select the relevant Incident Type Group from the dropdown list.
For example the Response Element required for the Search & Rescue Team is different to that which is required to
attend a Chemical Incident.
The MIS enables any number of Resource Capability profiles to be assigned to different Service Delivery Profiles Codes.
At present these Service Delivery Profiles Codes are independent from Service Delivery Profiles maintained via the
Operational MIS module, which enables other type responses to be created, such as the:- Special Rescue Team.
The setup as follows:
•
Global Navigator Menu
•
Click onto Incident Command
The Incident Command is now in the menu toolbar
•
Scroll down to Configuration
•
Click onto Service Delivery Profiles
The Service Delivery Profiles window will appear
Click onto the New button
SOPHTLOGIC – COMMERCIAL IN CONFIDENCE
PAGE: 11
The user should then add each Resource Capability required by the Service Delivery Profile (this is labelled Response
Element). Each response element has a ‘Weight of Attack’ which is the number of each Skill or Role required by the
Service Delivery Profile. The Response Condition should be set to Generic as this has no effect on the Capability
Analysis.
A dialog box will appear
Enter a Code and Description,
Select the Relevant Incident Group from the dropdown list.
Click onto the Add Button
The Response Profile window will appear
Weight of Attack: how many Skills or Roles
is/are required
Notes to Response: free text notes field
The ‘Response Element’ is the ‘Resource Capability’
previously created select as required e.g. Swift Water
Rescue
Response Element: select from the drop
down list the relevant Resource Capability.
Notice: Resource Element drop down list was set
up in Resource Capability
The ‘Incident Condition’ should be left as the default
value of ‘Generic’ this has no effect on the ‘Capability
Analysis’.
Incident
Condition:
usually
would
be
‘Generic’ but specific condition can be selected
for detailed profiling.
Notice: Incident Condition drop down list was set up in Response Conditions
Click onto the OK button
e.g. The weight of attack for ‘Swift Water Rescue’ is ‘3’.
SOPHTLOGIC – COMMERCIAL IN CONFIDENCE
PAGE: 12
As you can see ‘Di’s Resource Capability’ has appeared within the Response Elements window.
Enter a ‘Response Element’, for every type of ‘Role’ and/or
‘Skill’ that is required to respond to the Type of Incident being
entered.
Once you have finished entering in your ‘Response Elements’
Click onto the OK button
Remember: ‘SRT – Service Delivery Profile’ code should now mirror the ‘Skill’ and ‘Role’ code
requirements of the ‘SRT’.
As you can see ‘Di’s Service Delivery Profile’ is now entered at
the bottom of the Service Delivery Profiles window
To locate ‘Di’s Service Delivery Profile’ > Go to Rotas &
Availability > Other Configuration Options > Resource
Turnout Systems > Click onto one of the options > Click onto the
Patterns button > Click on Amend > Look in Resource Capability
Profiles.
SOPHTLOGIC – COMMERCIAL IN CONFIDENCE
PAGE: 13
Service Delivery Profiles – Two Pump Station – Pump 1:
Service Delivery Profiles - Chemical Fire:
Service Delivery Profiles – Ship Fire:
Service Delivery Profiles – Fire Call:
Service Delivery Profiles and their associated Resource Capabilities must then be assigned to the Resource
Turnout System that should already have been setup via the Rotas and Availability Setup menu, if this is
not the case follow instructions on.
SOPHTLOGIC – COMMERCIAL IN CONFIDENCE
PAGE: 14
Mobilisation Response Categories
Mobilisation Response Categories is where the user would setup the ‘Response’ drop down menu within Resource
Turnout Pattern window
The setup as follows:
•
Global Navigator Menu
•
Click onto Rotas and Availability button
The Rotas and Availability is now in the menu toolbar
•
Scroll down to Other Configuration Options
•
Click onto Mobilisation Response Categories
The Mobilisation Response Categories window will appear – as shown -
If there is nothing in the window
Click onto the Paint Brush icon
If any entries that where previously entered will appear in the Mobilisation Response Categories window – as shown
above
Click onto the New button
•
Enter a Code
•
Enter the Description of the Code
•
Enter the Response Time
•
Click onto the OK button
As you can see ‘Di’s Mobilisation Response Categories’ is now
entered at the bottom of the Mobilisation Response Categories window
To locate ‘Di’s Mobilisation Response Categories’ > Go to Rotas &
Availability > Other Configuration Options > Resource Turnout
Systems > Click onto one of the options > Click onto the Patterns
button > Click on Amend > Click onto the Response button.
SOPHTLOGIC – COMMERCIAL IN CONFIDENCE
PAGE: 15
Resource Turnout Systems
The Capability exists within the system to set up a Resource that has a base Location and a Duty System which has
associated Duty System Patterns. Service Delivery Profiles are associated to a Resource and thus a Location via the
Resource Turnout System Pattern.
This provides the system with the flexibility of different profiles being active at different times of day and on different
days of the week.
For example, a Resource could be Wholetime during the day Monday to Friday, Retained during the night
Monday to Friday, and Retained during Saturday and Sunday.
Against each ‘Resource Turnout System’ one or more ‘Service Delivery Profiles’ can be selected, This means that the
‘Skill’ and ‘Role’ requirements could change over the course of the day and day of the week.
Turnout Systems are accessed via the
Click onto Rotas and Availability
Scroll down to Other Configuration options
Click onto Resource Turnout System
The Resource Turnout Systems window will appear – as shown –
To add a new Resource Turnout Pattern
Click onto the New button
The Resource Turnout Pattern window will appear
Enter a Description
Enter a Code
Click onto the OK button
The Response Profile window will appear
Highlight the one of the options
Click onto the Pattern button
SOPHTLOGIC – COMMERCIAL IN CONFIDENCE
PAGE: 16
Resource Turnout Pattern
To associate a Resource Turnout System to a Service Delivery Profile the user should either select an existing Turnout
System or create a new Turnout System; as shown above.
To create a new Turnout Pattern the user should specify the days of the week and times of day the pattern is active
and then select the Service Delivery Profiles which will be active while the resource is on this Duty System Pattern.
The user should note that it is usual to specify 24-7 availability for a resource. This type of Turnout System pattern is
shown below.
The capability exists within the system to set up a resource so that it can have different turnout patterns depending on
the time of day. For example, a ‘Resource’ could be ‘Wholetime’ during the day Monday to Friday, ‘Retained’ during
the night Monday to Friday, and ‘Retained’ during Saturday and Sunday. Against each ‘Resource Turnout System’ one
or more ‘Service Delivery Profiles’ can be selected, so that the system knows which ‘Response’ and ‘Skill’ profile is
required.
The Resource Turnout Pattern window will appear
•
Click onto the New Button
To setup a Resource Turnout Pattern
Enter a Heading into the Description
Click onto the Response button and choose one of the options
Tick the boxes of the Days needed
Enter a Times in the From and To boxes
Tick the Service Delivery Profiles Code that relates to the
Description
Click onto the OK button
To set up the ‘Response’ drop down list: Go to Rotas and Availability > Other Configuration Options >
Mobilisation Response Categories.
To set up the Resource Turnout Pattern - Service Delivery Profile box: Go to Incident Command >
Configuration > Service Delivery Profile.
SOPHTLOGIC – COMMERCIAL IN CONFIDENCE
PAGE: 17
This example indicates that any resource assigned to the Resource Turnout Pattern of ‘Wholetime SRT’ will require the
Capabilities and Skills indicated the SRT Resource Capability Profile.
These resources are available 24 hours a day, 7 days a week as
indicated by the pattern above.
•
Click onto the Close button
You should now be back in the Resource Turnout Systems window
The Resource Turnout Pattern is has now been set up and
linked to the Resource Turnout System.
•
Click onto the Close button
Your Resource Turnout System Code MUST matched the Resource Index Duty
For the ‘SKILLS’ and ‘ROLES’ to show in Capability Analysis, you will need to assign a Resource to the
Resource Turnout System/Pattern. To check a Resource has been assigned or to setup a Resource, follow
the instructions on how to check/setup ‘Resource Index’
SOPHTLOGIC – COMMERCIAL IN CONFIDENCE
PAGE: 18
Here are some more examples of different Resource Turnout Patterns
Resource Turnout Pattern –Special Rescue Team:
This example indicates that any Resource assigned to the Resource
Turnout Pattern of ‘Special Rescue Team’ will require the Capabilities and
Skills indicated the SRT Resource Capability Profile. These resources are
available 24 hours a day, 7 days a week as indicated by the pattern.
Resource Turnout Pattern –Whole Time – with One Turnout Pattern:
This example indicates that any Resource assigned to the Resource
Turnout Pattern of ‘Whole Time’ will require the Capabilities and Skills
indicated the WT Resource Capability Profile.
These resources are
available 24 hours a day, 7 days a week as indicated by the pattern.
Resource Turnout Pattern –Whole Time – with Two Turnout Patterns – Day and Night:
This example indicates that any Resource assigned to the Resource
Turnout Pattern of ‘Whole Time Day and Night shift’ will require the
Capabilities and Skills indicated the WT Resource Capability Profile. You
can also setup the pattern for a Day and a Pattern for a Night as the
example below shows
Resource Turnout Pattern – Retained Rota:
This example indicates that any Resource assigned to the Resource
Turnout Pattern of ‘Retained Rota’ will require the Capabilities and Skills
indicated the Retained Resource Capability Profile.
These resources are
available 24 hours a day, 7 days a week as indicated by the pattern.
SOPHTLOGIC – COMMERCIAL IN CONFIDENCE
PAGE: 19
Resource Turnout Pattern – SNRO Senior Officers Rota:
This example indicates that any Resource assigned to the Resource
Turnout Pattern of ‘Senior Officer Rota’ will require the Capabilities and
Skills indicated the SNRO Resource Capability Profile. These resources are
available 24 hours a day, 7 days a week as indicated by the pattern.
Resource Turnout Pattern – Day Crewing:
This example indicates that any Resource assigned to the Resource
Turnout Pattern of ‘Day Crewing’ will require the Capabilities and Skills
indicated the Day Crewing Resource Capability Profile. These resources
are available from 07.30 to 1800 hours a day, 5 days a week as
indicated by the pattern.
Resource Turnout Pattern – Retained - Weekday:
This example indicates that any Resource assigned to the Resource
Turnout Pattern of ‘Retained Weekdays’ will require the Capabilities and
Skills indicated the Retained Resource Capability Profile.
These
resources are available from 06.00 to 1800 hours a day, 5 days a week
as indicated by the pattern.
Resource Turnout Pattern – LLAR:
This example indicates that any Resource assigned to the Resource
Turnout Pattern of ‘LLAR Staffing’ will require the Capabilities and Skills
indicated the LLAR Resource Capability Profile These resources are
available 24 hours a day, 7 days a week as indicated by the pattern.
SOPHTLOGIC – COMMERCIAL IN CONFIDENCE
PAGE: 20
Resources Index
The Resources Index sets up the Resources (Appliances) that are linked to the Resources Types (Groups).
For
Capability analysis to work effectively, the ‘Duty’ e.g. WT, SRT, OFF etc… within Resource Index MUST match the
‘Code’ within Resource Turnout System.
•
Click onto Rotas and Availability
•
Choose Other Configuration Options
•
Click onto Resource Index
The Resource window will appear – as shown –
Click onto the Green Tick
Any records that have been previously entered will appear in the
Resources window.
To create a new Resource
•
Click onto Add button
Resource Details window will appear - Enter the details into the boxes
•
Call Sign – enter a code - it could be letters or numbers
•
Location – enter the name of the Brigade
•
Type – choose one of the options – this is what links the
Resource Types and Resource Index
•
Position – if you have more than one position for the same
location, enter 1,2,3 etc into the position box
•
Duty – click onto the arrow and choose one of the options
– This links the Resource ‘Duty’ to the Resource Turnout
System ‘Code’ (these must match)
•
Pager ID – if you don’t have a ID, leave blank
•
Click onto the OK button
As you can see, the ‘DI 1’ is now entered into the Resource
window and will be linked to any other record that has a ‘PMP’
Type and to a Resource Turnout which has a ‘DI RTOS’ Duty
SOPHTLOGIC – COMMERCIAL IN CONFIDENCE
PAGE: 21
Resource Status History
The Resource Status button is were you would setup or amend the Resource Status to Available (AVA), Unavailable
(UNA) or Off the Run, type of Shift Pattern, Minimum Ridership and when the Resource became Effective.
In the Resource Index window
Highlight a Resource
Click onto the ‘Status’ button
The Resource Status History window will open
Click onto New button
The ‘Resource Status’ window will appear
Fill in or amend the boxes - Enter the details into the boxes
Appliance Status – Choose one of the options – is the
Appliance - Available / Off the Run / Unavailable.
Duty System – enter the type of Shift Pattern
Effective As At – Enter the date this Resource becomes
Effective.
Status – Depending what you chosen in the Appliance
Status the Status will show AVA or UNA
Ridership Factor – Enter the max needed to Man the
Appliance
Minimum Riders – Enter the minimum needed to Man the
Appliance
When entering Resource for an Officer, it is likely that an Officer will not use any resources or riding an appliance, so
you don’t need to put anything in the Ridership Factor or the Minimum Riders boxes.
The rest of the boxes are optional
Click onto the OK button when done.
SOPHTLOGIC – COMMERCIAL IN CONFIDENCE
PAGE: 22
The information you have just entered is now in the ‘Resource Status History’ window, showing that this Resource is
Available and will be linked to the chosen Resource(s).
•
Click onto the Close button
The ‘Scale’ button is used to create a list of Equipment or Entitlement against a Location or Resource.
e.g. Di RTOS can have 2 extra ladders.
This is very rarely used. This is explained in more detail in the ‘Equipment Management’ Module
•
Click onto the Scale button
Your Resource Index Duty MUST matched the Resource Turnout System Code
SOPHTLOGIC – COMMERCIAL IN CONFIDENCE
PAGE: 23
Setting-Up Skills and Roles
Skill Group Types
When you set up a ‘Skill Group Type’ heading it will allow for multiple types of Assessment Criteria – ie National
Occupational Standards (NOS), National Vocational Qualifications (NVQ), Internal Skills such as Driving, to be.
The setup as follows:
•
Global Navigator Menu
•
Click onto Training button
The Training is now in the menu toolbar
•
Scroll down to IPDS
•
Click onto Setup
•
Click onto General Setup
The IPDS Setup window will appear
•
Click onto the Skill Group Types Folder
•
Click onto the Add button
The Skills Group Type dialog box will open
•
Enter a Code
•
Enter the Name of the Code
•
Click onto the OK button
As you can see ‘Di’s Skill Group Type’ has now been
entered into the ‘Skill Group Types’ list.
To view Skill Group Types drop down list > Go to Training >
Administration > Skill Manager > Skill Groups > Click onto an
option > Click onto Add > Click onto the ‘Type’ arrow.
SOPHTLOGIC – COMMERCIAL IN CONFIDENCE
PAGE: 24
Skill Manager
•
Within Global Navigator Menu
•
Click onto Training button
Training will now appear in your toolbar at the top of the screen
•
Click onto Training
•
Scroll down to Administration
•
Click onto Skill Manager
Skill Group Folder
The Skill Manager window will open
If you need to set up a Skill Group Heading
•
Click onto the Skill Group Folder
•
Click onto the Add button
The Skills Group dialog box will open
•
Click onto the Type arrow
•
Choose the Type of Skill Group
•
Enter a Code
•
Enter the Name of the Code
•
Click onto the OK button
As you can see ‘Di’s Skill Group Qualification’ has now been entered at the
bottom of the ‘Skill Group’ list.
You now need to set up different Skills within the Group you have just
created
SOPHTLOGIC – COMMERCIAL IN CONFIDENCE
PAGE: 25
Skill Register Folder
The Skill Register folder is where all Skills, Qualifications, NVQ’s etc are setup. When setting up the Skills the code
MUST be the same as the code of the Skills ‘SKL’ that have been set up in Resource Capabilities. Personnel must have
been assigned appropriate Skills.
Skill – can do as many skills as required i.e. if a person held the skill of a ‘Boat Operator’ and ‘Chainsaw Operator’ 1
person could cover both required skills.
Role – A role will only be counted once i.e. if there was the role of ‘Watch Manager’ and ‘Crew Manager’ 1 person
could only cover 1 role.
To set up Skills, Qualifications, NVQ’s
•
Click onto the Skill Register Folder
•
Click onto the Add button
The Skills Register window will open
•
Click onto the ‘Group’ Arrow
•
Double click onto one of the Skill ‘Group’ headings
•
Enter the ‘Name’ of the Skill
•
Enter the ‘Code’ of the Skill
If the Skill is a Driving Skill
•
Click the Driver Skill box
Make sure the relevant Skill Code is the same as the Code you want the Skill to be linked up to
in Resource Capability.
The rest of the boxes are optional to fill in
•
Click onto the OK button
SOPHTLOGIC – COMMERCIAL IN CONFIDENCE
PAGE: 26
As you can see ‘Di’s Skill’– Code – ‘DI RC’ has been
entered in the Skill Register list.
Remember: When entering a Skills into the Skill Register Folder the ‘Skill Profile Code’ should be
the same as the ‘Capability Code’ element of class ‘SKILL’ (SKL) in Resources Capability window
which is visible from the…
Incident Command > Configuration > Resource Capabilities
Special Rescue Team Dev – SRTD
EFAD Driver – EFAD
Hazmat - HAZ
SOPHTLOGIC – COMMERCIAL IN CONFIDENCE
PAGE: 27
Setting Up Availability Keys
Availability Constants
This is where you set up a breakdown for Leave, Flexi Duty, Training, Sickness, Medicals, Bank Holidays etc
•
Within Global Navigator Menu
•
Click onto Rotas and Availability button
Rotas and Availability will now appear in your toolbar at the top of the screen
•
Click onto Rotas and Availability
•
Click onto Configure Duty Systems
•
Click onto Availability Constants
The Availability Constants window will appear – as shown -
•
Click onto the Add/Edit…
Enter a Key
Enter an Internal Code
Enter a Description of what the code means
Click OK
As you can see ‘Di’s Availability Constant’ Group Heading is
now been entered into the list of ‘Availability Constants’.
SOPHTLOGIC – COMMERCIAL IN CONFIDENCE
PAGE: 28
The Key column – These are some of the letters that will display on the Duty Rota Book Squares when the Availability
Constant has been chosen against an individual.
You will find this drop down list in the Availability Key window
Click onto a heading, and then New/Amend button and it will be in
the drop down list for Status - As shown –
You will find this drop down list in the Rota Book Status window
Open Rota Book, then Click onto one of the boxes, ‘Di’s Availability
Constant’ will be in the Status drop down list - As shown –
SOPHTLOGIC – COMMERCIAL IN CONFIDENCE
PAGE: 29
Availability Keys
There are two ways to enter Availability Keys
One way is through the Availability Keys
Click onto Rotas and Availability
Click onto Configure Duty Systems
Click onto Availability Keys
The Availability Keys window will appear – as shown –
In the Availability Sub-Constants
•
Click onto the Add button
The Availability Key dialog box will appear – as shown
•
Click onto the Status Arrow
•
Choose one of the Options
As you can see the ‘Di’s Availability Constants’ is now available in the
‘Status’ drop down menu.
Also, after ‘Di’s Availability Constants’ there is a ‘(DI)’ that is the code
that you entered in the ‘Availability Constants’ window.
•
Enter an Internal Code and Key (usually the same)
•
Enter an Effective From and To Date
•
Enter an Allowance
SOPHTLOGIC – COMMERCIAL IN CONFIDENCE
PAGE: 30
The ‘Effective from’, ‘Effective to’ and ‘Allowance’ fields all relate to the ‘Leave Allowance’
facility.
For Example: If individuals are allowed a maximum of 20 days summer leave for the year 2007, then a sub group
record for ‘Summer leave’ would need to exist where the ‘Effective from’ date = 01/04/2007, the ‘Effective to’ date =
31/03/2008 and the ‘Allowance’ = 20.
The ‘Availability’ System would then prevent any entries where ‘Leave’ entered via the ‘Duty Rota Book’ or the ‘Station
Resources’ exceeded in total ‘20’ for that year.
Available/Unavailable Radio buttons - This determines whether the person will be
Available or Unavailable whilst this Availability is occurring.
There are constants
such as Training and Meetings where the person could be either Available or Unavailable – in this case you can set up
keys for each.
There are three check boxes:
Do not allow if confidence deflect – Tick this box
Include in Capability Analysis/Duty Rota Summary – Tick this box
Show Accepted/Declined – This is used for Self Rostering
The Key will show a ‘?’ until the Shift has been accepted. One the Shift has been accepted by the line manager the ‘?’
will change to ‘letters’ that was chosen for this Key
SOPHTLOGIC – COMMERCIAL IN CONFIDENCE
PAGE: 31
As you can see ‘Di Availability Keys is now available in the Availability Sub
Constants window.
The other way is….
Through the Availability Sub Constants
•
Click onto the Group Heading
•
Click onto Availability Sub Constants
•
Click onto the Show button
•
Click onto the Add button
Don’t for get to close the applications to re-set the systems data…
Duty Rota Book
To see how these ‘Keys’ work you will need to open the Duty Rota Book
•
Click onto the Rota and Availability
•
Click onto Duty Rotas
This will open the Duty Rota Book
•
SOPHTLOGIC – COMMERCIAL IN CONFIDENCE
Click onto the Location Arrow
•
Choose a Location
•
Click onto the Rota icon
•
Click onto one of the boxes
PAGE: 32
•
Click onto the Status arrow
As you can see the ‘Di’s Availability Constants’ that was set up in the
‘Availability Constants’ is now displayed in the ‘Status’ drop down list
•
Scroll down and select your Group (heading)
•
Click onto the Remarks arrow
You should have a drop down list of the ‘Availability Keys’
that you created earlier, to choose from.
•
Select one of the options
•
Select a Location, Post, Rank, Watch and Zone
Once you have completed filling in the boxes
•
Click onto the OK button
The Code that you entered in ‘Key’ in, Availability Keys, will now appear in the Duty Rota
SOPHTLOGIC – COMMERCIAL IN CONFIDENCE
PAGE: 33
Employment Conditions
The SRT work 336 hrs over an 8 week period – an employment condition needs to be created against every SRT team
member to reflect this working pattern.
To Setup ‘Employment Conditions’ for SRT
•
Click onto the ‘Personnel’ button
•
Click onto Personnel Record Card
•
Click onto Employment Conditions sub-option
An Employment Condition can be created to reflect each 8 week period or alternatively 1 employment condition can be
created which is continuously updated to reflect the current 8 week period.
Add an Employment Condition
•
Enter the ‘Effective from Date’ – the start date of the 8 week period e.g. 05/09/08
•
Enter ‘Hours per Week’ e.g. 42:00
The SRT work a 42 hour week e.g. 336/8 = 42:00
•
Enter the ‘Renewal Frequency’ – defines the number of weeks in the period e.g. 8
•
Select the required ‘Availability Profile’ – A drop down list of all ‘Availability Profiles’ previously created will
display e.g. SRT – Crew Manager
The ‘Availability Keys’ previously set as ‘Duty Keys’ will display
The ‘Contract Phase’ and ‘Start’ and ‘Finish’ dates are
automatically updated to reflect the next 8 week period e.g.
31/10/08 – 25/12/08
SOPHTLOGIC – COMMERCIAL IN CONFIDENCE
PAGE: 34
The Five Linking Checks
Before we look at ‘Capability Analysis’, let us go through the checks to make sure everything is linked
together
1 - Resource Turnout System linked to Resource Index
Let’s Open Resource Turnout System
•
Now Open Resource Index
•
Click onto Rotas and Availability
•
Scroll down to Other Configuration Options
•
Click onto Resource Index
•
Click onto the Green Tick icon
•
Check you have the correct Location linked
•
Click onto Rotas and Availability
•
Scroll down to Other Configuration Options
•
Click onto Resource Turnout Systems
Make sure the Resource Turnout System Code matches the Duty in the Resource Index
Notice the CODE - ‘Di OFF RTOS’ in ‘Resource Turnout System’ is the same as the DUTY - ‘Di OFF
RTOS’ in the ‘Resource Index’ –
…that is your link for that Resource…
SOPHTLOGIC – COMMERCIAL IN CONFIDENCE
PAGE: 35
2 – Resource Capabilities link to Skills Register
Let’s Open Resource Capabilities
•
Click onto Rotas and Availability
•
Click onto Resource Capabilities
Now Open Skill Manager
•
Click onto Training
•
Scroll down to Administration
•
Click onto Skill Manager
•
Click onto the Skill Register
Make sure the Resource Capabilities Code matches the Code in the Skill Manager folder
Notice the CODE - ‘DIRCAP’ in ‘Resource Capabilities’ is the same as the CODE - ‘DIRCAP’ in the
‘Skill Manager –
…that is your Skill link for that Resource...
SOPHTLOGIC – COMMERCIAL IN CONFIDENCE
PAGE: 36
3 - Resource Turnout Pattern link to Service Delivery Profile
Let’s Open Resource Turnout Pattern
•
Click onto Rotas and Availability
•
Scroll down to Other Configuration options
•
Click onto Resource Turnout System
•
Highlight the one of the options
•
Click onto the Pattern button
•
Highlight the Resource Pattern
•
Click onto the Amend button
Tick the Resource Capability Profile to the Description
•
Click on OK
…that is your Resource Turnout Patten link to the Service Delivery Profile...
SOPHTLOGIC – COMMERCIAL IN CONFIDENCE
PAGE: 37
4 – Incident Types Grouped to Service Delivery Profile
Let’s Open Service Delivery Profiles
•
•
Click onto Incident Command
•
Scroll down to Configuration
•
Click onto Service Delivery Profiles
•
Click and highlight the incident
•
Click onto the Amend button
Click onto the Incident Groups arrow.
‘Di’s Incident Groups’ will be in the drop down list.
5 – Resource Capabilities is linked to Service Delivery Profile & Capability
Analysis
Let’s open Resource Capabilities
•
Click onto Incident Command
•
Scroll down to Configuration
•
Click onto Resource Capabilities
SOPHTLOGIC – COMMERCIAL IN CONFIDENCE
PAGE: 38
Let’s Open Service Delivery Profiles
•
Click onto Incident Command
•
Scroll down to Configuration
•
Click onto Service Delivery Profiles
•
Click and highlight the incident
•
Click onto the Amend button
As you can see the ‘Resource Capabilities’ are in the ‘Response
Element’
Make sure you have the right Resources needed for the Response
Elements you have entered into this window is what will be shown in
the Resource Capability Profile Element box.
As you can see the ‘Resource Capabilities’ are in the ‘Resource Capability Profile Element’
Well Done ☺
Now that you have checked that everything is linked up, let’s go and re-open ‘Capability Analysis’ window and let’s
take a look in what exactly does it do
SOPHTLOGIC – COMMERCIAL IN CONFIDENCE
PAGE: 39
Capability Analysis
Using Capability Analysis
The main function of the ‘Capability Analysis’ is to identify shortages of ‘Skills’ and ‘Roles’ required to meet certain
predefined criteria. To produce a report on the number of personnel and the ‘Skills’ they obtain to determine if the
available Resource specified is over or under the ‘Weight of Attack’ within the ‘Service Delivery Profile’ for that day.
The report has selection criteria to enable you to analyse different combinations of ‘Location’, ‘Duty System’ and
‘Rota’. All lists with the exception of ‘Duty’ are dependent on ‘Base Establishment Data’.
The report also has the ability to perform an analysis of the number of personnel on specified ‘Availability Keys’ and
‘Duty System Pattern Elements’ on each day within the selected month or to exclude this type of Availability Key or
Duty System Pattern element from the number of available personnel.
Within Global Navigator Menu
•
Click onto Rotas and Availability button
Rotas and Availability will now appear in your toolbar at the top of the screen
•
Click onto Rotas and Availability
•
Click onto Capability Analysis
The Capability Analysis window will appear – as shown
If there is nothing or data missing in the Capability Tab
you will need to check your setup
It will not be possible to analyse Capability unless one of
the following criteria have been selected – Location, Duty
System, Duty or Rota and a Capability Profile must be
selected.
Let’s take a look at the Search Criteria
SOPHTLOGIC – COMMERCIAL IN CONFIDENCE
PAGE: 40
Capability Analysis Search Criteria
The data selected in the Search Criteria will be returned in the list display when the ‘Capability Analysis’ is run. When
selecting the ‘Rota’ option, the list will only load those Rota’s that are active for the month selected. Depending on
what Location or Duty System selected will dictate what will appear in the other dropdown menus and Capability tab.
For example:
Location
Duty System
Duty
Rota
Capability Tab
Special Rescue Team
Special Rescue Team (SRT)
SRT
Rider
SRT
Crew Manager
Co Responder
Chain Saw Operator
EFAD Driver
Hazmat Officer
Rope Operator
Rope Supervisor
Swift Water Rescue
Watch Manager
Senior Officer
APTC full-time
Area Manager
Incident Investigation Team
Non-Ops
PO Group
Senior Officer Group
Rider
Control
Officer
Non-Rider
APTC 17.5 hrs
AMX
AM1
IIT
Non Ops 10 day
OD
Area Manager
Dim Officer
Group Manager
Hazmat
IIT Officer
PO
Station Manager
Station
APTC Full-Time
Other Duties
Part-Time 5 days
Wholetime Shift
Retained
Non-Ops 10 day
Flexi Duty
Rider
Control
Officer
Other
Non-Rider
APTC
Blue Watch
Green Watch
Red Watch
White Watch
Retained
OD
Crew Manager
EFAD Driver
Qualified Fire-fighter
Watch Manager
Running the Capability Analysis
Before you can run Capability Analysis Pre-conditions must apply
•
Capabilities relating to an ‘Appliance’ must have a ‘Profile Class’ = Appliance
•
Capabilities relating to ‘Personnel’ must have a ‘Profile Class’ = ‘Uniformed’, ‘Non Uniformed’ or ‘Non-service’
•
Capabilities relating to a ‘Skill’ must have a ‘Profile Class’ = Skill
•
When entering a Capability Code for a skill the code entered must match the skill profile code of the skill.
This will have been set-up via Training / Administration / Skill Manager / Skill Register
•
Personnel must have been assigned appropriate skills
NOTE: Skill – can do as many skills as required i.e. if a person held the skill of a ‘Boat Operator’ and
‘Chainsaw Operator’ one person could cover both required skills.
Role – A role will only be counted once i.e. if there was the role of ‘Watch Manager’ and ‘Crew Manager’
one person could only cover one role.
It will not be possible to analyse capability unless one of the following criteria have been selected – Location, Duty
System or Rota
SOPHTLOGIC – COMMERCIAL IN CONFIDENCE
PAGE: 41
Location Drop Down List:
When selecting a ‘Location’ the ‘Duty Systems’ and ‘Rotas’ will populate the criteria in the drop down menus for that
specified Location.
If no Location is selected then the ‘Capabilities’ listed will be all those assigned to ‘Resource
Turnout Systems’. The list of ‘Resource Capabilities’ will be restricted to those currently assigned to resources based
at that Location.
•
Click onto the ‘Location’ arrow
•
Select a Location from the droop down list
If you do not enter one of the options from the ‘Duty System’, Duty or a
Rota drop down list, The Duty Pattern tab will not populate and a Error
Message will appear
Duty System Drop Down List
If a Duty System is selected then the list of Rotas in the ‘Duty Systems’ tab will be restricted to those assigned to the
Duty System. It will also restrict the ‘Duty’ list as a Duty System has only one associated ‘Duty’.
•
Click onto the Duty System arrow
•
Select a Duty System from the droop down list
Duty Drop Down List
If Duty is selected the Duty will constrain the Duty System list to those (personnel) having the selected Duty.
•
Click onto the Duty arrow
•
Select a Duty from the droop down list
Rota Drop Down List
If Rota is selected then the analysis will be performed for the specified Rota.
•
Click onto the Rota arrow
•
Select a Rota from the droop down list
SOPHTLOGIC – COMMERCIAL IN CONFIDENCE
PAGE: 42
If you select a Duty System drop down list – this will pre-populate the Duty drop down list, grey out the Duty Group
By option and enter the Rota Pattern in the Duty Pattern Tab
If you select a Duty drop down list – this will Pre-populate the Duty Pattern tab but will not grey any of the Group By
option
If you select a Rota drop down list - this will grey out the Duty System and Duty Group By option and default to
Rota. This will also pre-populate the Duty Pattern Tab
Group By Button
These radio buttons control the report grouping mechanism. The user should then select the grouping entity bearing in
mind the hierarchical relationship between Duty, Duty System and Rota. The user should note that the order of the
radio buttons reflects the hierarchical relationship between the three entities.
The subsequent rows return the shortages of the ‘Capability’ / ‘Skill’. (Relate to the capability that has been set-up
being a requirement of the resource assigned to this location).
For example if you select a ‘Rota’ then it makes no sense to group by ‘Duty System’.
The analysis can be performed for the following groups or system entities:
Duty option selected:
The Duty shows all ‘Capabilities’ selected, their Duty Rota Pattern and shortage or
surplus of personnel / skill on that day
Duty System option selected:
The Duty System shows all ‘Capabilities’ selected, their Duty Rota Pattern and
shortage or surplus of personnel / skill on that day on that day
Rota option selected:
The Rota shows all ‘Capabilities’ selected, their Duty Rota Pattern and shortage or
surplus of personnel / skill on that day on that day
SOPHTLOGIC – COMMERCIAL IN CONFIDENCE
PAGE: 43
Month and Year
This will automatically pre-populate with ‘Today’s’ month and year
If you want to change the Month or Year
•
Click onto the Month arrow
•
Change the Month
•
Click into the Year box
•
Change the Year
OR
Analyse By Resource Rota Checkbox:
The ‘Analyse by Resource
Rota’
box
Resource
Rank
/
shows
the
setup
for
that
Skill
in
the
Capability Tab
This ensures that the system analyses the allocation of shifts by skill based requirement and by the shifts required e.g.
Days and Nights. This ensure the weight of attack is analysed by shift and not purely by skill.
Transaction Status Radio Button:
These radio buttons control the status of the transactions included in the analysis. When transactions are input via the
‘Duty Rota Book’ or ‘Station Resources’ then they are automatically assigned a status of ‘Unauthorised’. This has no
effect upon the global availability figures but offers a mechanism of allocating shifts for ‘Self Rostering’ purposes. The
options for ‘Transaction Status’ are ‘All’ or Authorised, when running Capability Analysis for the Senior Officers Rota
‘All’ should be selected..
The report should normally be run with ‘All’ selected. ‘All transactions’ will be analysed regardless of status.
For Self Rostering the report should be run with the ‘Authorised’ radio button selected.
Only authorised transactions will be included in the initial analysis. If the Allocate checkbox is selected then shifts will
be allocated and automatically authorised according to certain criteria. This will be discussed in more detail in the
Automatic Allocation section of this document.
It will not be possible to analyse capability unless a capability profile element has been selected
SOPHTLOGIC – COMMERCIAL IN CONFIDENCE
PAGE: 44
Capability Tab
The user should select the resource capability elements they would like to analyse. The report will show the number
of personnel with the required ‘Skill’ or ‘Role’ over or under the combined weight of attack for each
selected element. The combined weight of attack is calculated by adding the weight of attack of like elements within
all Service Delivery Profiles active at the location being analysed. The user should recall that the Service Delivery
Profiles are linked to a location via the Resource Turnout System for Resources based at the location.
The lines in the report resulting from the analysis of the ‘Capability’ are shown in ‘Black’.
•
Select the Capability Profile elements they wish to analyse. The
selection of at least one Capability Profile element is mandatory.
The Capability will display the Skill requirements of the ‘Special Rescue
Team’ for each shift required.
E.g.
CSO – Chainsaw Operator – D 08:30 – 18:30
CSO – Chainsaw Operator – N 18:30 – 08:30
NB:
It would be usual for all shifts to be analysed at the same time, although it is possible to analyse the shifts separately
e.g. Days then Night or vice versa
•
Check the ‘Analyse’ check box for each capability that requires analysis
Duty Pattern Tab
The Duty Pattern list is built from the Duty System Pattern linked to the
Duty or Duty System selected by the user. The list will only be build when
the user selects either of these entities. Each line in the list corresponds to
a distinct pattern element. Each element will have the same Symbol, Start
Time and Hours. The list will only consist of pattern elements which are
available i.e. have a start time and hours.
The user can analyse the number of personnel who are available on any of the elements in the Duty Pattern list by
selecting the Analyse checkbox. The Capability Analysis will then provide a summary of the number of personnel
available on each selected Duty System pattern element grouped by location (If all locations are selected)
and Capability Profile element.
The lines in the report resulting from the analysis of the ‘Duty System Pattern’ are shown in ‘Indigo’.
The user can choose to exclude the pattern element from being included in the total analysis by selecting the ‘Exclude
From Total’ checkbox. This means that if a person is available on a Duty System Pattern on a particular day but the
pattern element has been excluded from the total then the person will not count towards the total number of available
personnel on that day.
•
Select the Duty Pattern elements to be analysed and excluded from the total.
SOPHTLOGIC – COMMERCIAL IN CONFIDENCE
PAGE: 45
Availability Tab
The list of Availability Keys consists of those where the Include in Capability Analysis/ Duty Rota Summary checkbox
has been selected on the Availability Key (Rotas and Availability > Configuration Options > Availability Keys).
The user can analyse the number of personnel who are on any of the listed Availability Keys by selecting the Analyse
checkbox. The Capability Analysis will then provide a summary of the number of personnel having an availability
transaction of type key grouped by location (If all locations are selected) and Capability Profile element.
The lines in the report resulting from the analysis of the ‘Availability Key’ are shown in ‘Blue’.
The user can choose to ‘Exclude’ the availability key from
being included in the total analysis by selecting the ‘Exclude
From Total’ checkbox. This means that if a person has an
availability transaction of type key on a particular day but the
key has been excluded from the total then the person will not
count towards the total number of available personnel on that
day.
(If the key is of status UNA then this obviously will not make any difference).
The user should note that the ‘Exclusion’ of an ‘Availability Key’ from the total takes precedence over the
inclusion of a ‘Duty System Pattern’ element.
•
Select the Availability Keys to be analysed and excluded from the total.
SOPHTLOGIC – COMMERCIAL IN CONFIDENCE
PAGE: 46
Automatic Allocation
Deselect the Allocate checkbox from the toolbar at the top of the window unless the system is automatically allocating
shifts to SRT.
Automatic allocation analyses the requested shift chronologically e.g. through the days of the months in the 8 week
period.
•
An individual holding 3 skills will cover 3 capability gaps.
•
An individual allocated a shift must hold the required skill profile required at the time of allocation.
Shifts are allocated based on the following criteria:
•
The SRT Team member whom has worked the least number of hours first (within the 8 week period) will be
allocated shifts first
•
The 2nd criterion within Automatic allocation applies to weightings e.g. as previously defined via ‘Station
Activity Types’. The SRT team member with the highest weighting will be allocated the shift first
NB:
No difference in weighting will be applied to an SRT team member whom holds e.g. 3 skills and a member who only
holds 1 skill
Automatic Allocation will only accept or decline shifts that have been flagged as being analysed via Capability Analysis.
SRT team members whom have marked themselves as unavailable will not be allocated a shift via Capability Analysis
•
An individual will not be automatically allocated a ‘Day’ shift following a 'Night' shift
•
An individual will not be automatically allocated a ‘Day’ shift following a '24 hr' shift
Once you have made your selections
Analysis
Click onto the Analysis icon
To automatically allocate shift to the SRT > Capability Analysis can only be run per month so for an 8 week period the
‘Capability Analysis’ will need to be run twice.
While the system is analysing the following message will display
‘Adding Totals’
Once the search is completed, the information appears the window - as shown below.
When automatic allocation is complete the report will show the number of the capability elements being analysed
above or below the weight of attack set on the Service Delivery Profile.
E.g.
1 chainsaw Operator
SOPHTLOGIC – COMMERCIAL IN CONFIDENCE
PAGE: 47
If the number is below the weight of attack then the value under is shown in red text enclosed by brackets.
Numbers above the weight of attack are shown in blue text.
If the weight of attack matches the capability requirements the square will be blank
A list display labelled ‘Resources Allocated This Session’ will display at the bottom of the window with the following
columns:
Name, Role, Location, Rota, Skills – all skills held relating to the ‘Self Rostering’ profile separated by commas,
Availability Description, Start date, Hrs balance, Activity Weighting, Comments
An overview of the report selection criteria is given below. The user should note that this is only a guide since all lists
with the exception of Duty are dependent on base establishment data.
SOPHTLOGIC – COMMERCIAL IN CONFIDENCE
PAGE: 48
Interpretation of the Capability Analysis Report
The report will show the number of the response element being analysed above or below the weight of attack set on
the Service Delivery Profile. If the number is below the weight of attack then the value under is shown in red text
enclosed by parentheses. Numbers above the weight of attack are shown in blue text.
In the example below there is a shortage of 1 Area Manager (AM) on 05 04 2008, 15 04 2008 and 25 04 2008. There
is a surplus of 3 Area managers over the required 1 on every other day in April.
The Analysis of the Duty System Pattern element CC (S 09:00 Hrs 23.98) is shown in Indigo text. The report shows
that there are 3 resources having role AM and AM in their skill profiles available working the Duty System Pattern
element CC (S 09:00 Hrs 23.98) throughout April with the exception of 05 04 2008, 15 04 2008 and 25 04 2008
where there are none.
The analysis of the Availability Key C Change of Duty to Cover is shown in blue text. The report shows that there are 4
resources having role AM and AM in their skill profile who have an availability transactions where the key has been set
to C Change of Duty to Cover on 25 04 2008.
Capability Analysis Example for Senior Officers Rota, let us go through the checks to make sure everything is linked
together
The user should click on the Analysis button to run the Capability Analysis report.
•
The user should first select the Location followed by Duty System, Rota, and Finally Duty using the notes
above as guidance.
•
The user should select the Month and Year.
•
The user should then select the grouping entity bearing in mind the hierarchical relationship between Duty,
Duty system and Rota. The group by entity should always be lower in hierarchy than the lowest entity
selected from the drop down lists. For example if you select a rota then it makes no sense to group by duty
system.
•
The user should then select the Transaction Status. This should normally be All Transactions.
•
The user should then select the Capability Profile elements they wish to analyse. The selection of at least one
•
The user should then select the Duty Pattern elements to be analysed and excluded from the total.
•
The user should then select the Availability Keys to be analysed and excluded from the total.
Capability Profile element is mandatory.
SOPHTLOGIC – COMMERCIAL IN CONFIDENCE
PAGE: 49