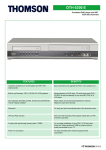
1
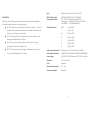
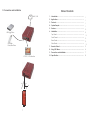
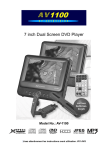
1080i Digital Photo Media HD/SD TV Player (Model: DMP2) User Manual Precaution Failure to follow the precautions described below may cause damage to Input USB drive, Memory Card (SD, MMC, MS) HD/SD Video Output Video Output Format HD(YPbPr), SD(NTSC/PAL), VGA(RGBHV) SD: NTSC/PAL (CBSV/Composite RCA) Component: SD-480i/576i, HD-720p, HD-1080i VGA/RGBHV: VGA(640x480@60Hz) Video Output level CBSV The digital media player and void the warranty. ● DO NOT open the case. Doing so will void the warranty. If you find problem with it, please return back to your retailer or seller who will 1Vp-p (75Ω) Y 1Vp-p (75Ω) assist you or provide you with solution. Pb 0.7Vp-p (75Ω) ● DO NOT use third-Party AC adapter or power cord. Doing so may damage this digital media TV Player. Pr 0.7Vp-p (75Ω) R 0.7Vp-p (75Ω) ● DO NOT bump, jar or drop contents of the products as it may G 0.7Vp-p (75Ω) damage it and result in warranty void. B 0.7Vp-p (75Ω) ● DO NOT get any liquids or beverages on the device as they may Audio output Impedance 47kΩ stereo via 2-Channel RCA Left & Right short circuit this digital media TV Player. Video Output Resolution SD-480i/576i, HD-720p60, HD-1080i60, 640x480@60Hz Power Supply 5V/2.6A DC (US/EU Standards, CE/FCC/UL Certified) Dimension 100 x 70 x 20mm Color Magenta Operation Temperature 0℃ ~ 40℃ Power Consumption 6W (max) 8 9. Connection and Installation Table of Contents SD MMC / MS USB Hard Drive or USB Flash Drive/Pen Drive LCD TV / VGA Monitor 3M 3M 7M 30゚ 7 30゚ 1. Introduction…………………………………………................................ 1 2. Application.............................…………………………………………… 1 3. Contents.............................………………………………………………. 1 4. System Require............................……………………………………….. 1 5. Features.............................……………………………………………….. 2 6. Installation............................…………………………………….……….. 2 Top Panel............................…………..………………………………….. 2 Front Panel............................…………………………………………….. 2 Rear Panel............................…………………………………….……….. 2 Side Panel............................…………………………………….……….. 3 7. Remote Control................................................................................... 3 8. Using OSD Menu.................................................................................. 4 9. Connection and Installation.............................................................. 7 10. Specification....................................................................................... 8 1. Introduction This innovative digital photo video player is a standalone digital media player with selectable high definition output and standard video outputs. Great tool for broadcasting high quality photos and movie videos on any TV, flat panel LCD monitor or digital signage panel. This versatile digital media player supports various features including a fully customizable play list and audio/video file playback in a loop from external storage like memory card or USB hard drive. Flexible and affordable way to deliver vivid digital content for in-store advertising, presentations, training and home entertainment. 2. Application ● Digital photo, video / music presentation on big-screen TV or monitor. ● Digital signage tool for advertising and public information display. ● Educational and marketing presentation for classrooms, trade shows, etc. Gaming function allows user to play games through this media Player on a HD display. Supports gaming file in . smf format (software not included. Downloadable from website). Other OSD Functions 3. Package Contents ● ● ● ● ● ● Digital media player unit Component A/V output adapter cable VGA output adapter cable with audio out Remote controller 5V/2.6A Power adaptor Operational Manual 4. System Requirements Input source including digital memory card in SD/MMC/MS card format or USB storage device with A/V output display such as monitor, LCD TV and speakers. 1 When displaying photo pictures, user can press the “USB/CARD” button from the remote control and the screen will show a tool bar for operation functions such as Pause/Play, Stop, Next, Previous, Repeat, Rotation and Zoom. 6 Video function for video quality adjustment includes Brightness, Contrast, Hue, Saturation and Sharpness. User can choose the best suited quality according to the display or setup environment. 5. Features ● ● ● ● ● ● ● ● Multimedia player for information and digital media applications. Empowers TV for accommodating plug-in of memory card and USB drive. No computer operation required. Advanced multimedia video decoder built in to deliver vivid pictures. Supports both NTSC & PAL systems for display. Selectable SD/HD video output in CV, HD Component Video or VGA style. Full-function remote control for ease of operation and presentation. Multiple video and audio file format support including AVI, MPEG1, MPEG2, Divix, JPEG, GIF, BMP, WMA and smf for game 6. Installation Clock function includes Date, Alarm, Time, and Power on/off. This is a Top Panel bonus tool for user to set up time clock and Alarm if needed. A clock icon will be displayed on the screen once setup is finished. HDPlayer D80i POWER ① ①. Power: Power On/Off the device. System function includes TV System, OSD Language, Video, Default and S/W Version. TV System – Compatible with both NTSC and PAL system PAL system support resolution: AV: 576i YPbPr: 576i OSD Language – Choice of English, German, Spanish, French, Portuguese, Italian, Polish and Dutch total of 8 different languages. Video – Select desired HD/SD video output resolution via composite video(SD), component video 720P/1080i(HD/YPbPr) and PC VGA format. Default – Reset the system back to the original default setting. S/W version – The information showing under this section is the current firmware version of this device. 5 Front Panel Rear Panel IR YPbPr/AV/RL OUT DC 5V SD / MMC / MS USB IN ① ② ③ ④ ⑤ ①. USB IN: For plug-in of USB storage device. Note: Only FAT 32 format is supported when using a USB hard drive. ②. YPbPr/AV/RL OUT: Plug-in of the 8-pin A/V output adapter cable for display on HDTV, standard TV or VGA-based monitor/projector. ③. DC 5V: For plug-in of the 5VDC power supply. ④. IR: IR receiver window for remote controller. ⑤.Memory Card Input: For plug-in of SD/MMC/MemoryStick media card. Note: Does not support MMC B+ card. 2 8. Using OSD Menu Side Panel YPbPr AV ① Please connect your source and display accordingly before powering on this media player and also make sure that you choose the right mode with the right A/V connection. After powering on this media player, the OSD operation menu will start showing on the screen as illustrated below. ①. Output Switch : Select the desired HD/SD/VGA video output format Note: -> When “AV” output mode selected, the green RCA & Stereo R/L RCAs need to be connected for getting audio output. -> For component video or VGA output, please switch to “YPbPr”. -> Green RCA jack used for composite video out in “AV” mode 7. Remote Control ①. POWER – Turn on/off the device. ②. HOME – Return to the main OSD menu. ③. AV – Press to switch to AV output mode. (When Color Bar appears on the AV mode selection, press this button will resume back to normal, AV480i or 576i). ④. PC VGA – Switch to PC VGA output mode for LCD VGA monitor or projector display. . COMPONENT – Switch to component video ⑤ output mode for HDTV display. ⑥. VIDEO – Enter into video content directory. ⑦. PHOTO – Enter into photo content directory.. ⑧. SLIDE SHOW – Enter into slide show mode. ⑨. PREV – Go backward or preview the previous photo/video/music. ⑩. NEXT – Move forward to the next photo/ video/music file in the directory. ⑪. AUDIO – Enter into audio content directory. ⑫. RETURN – Return to the previous OSD selection. ⑬. STOP – Stop playing and go back to the last OSD selection. ⑭. PLAY PAUSE – Press to pause or resume playing. ⑮. USB/CARD – Select the input source from USB drive or media card or press twice for the thumbnail preview of all content files n the directory. ⑯. VOL + – Press to turn up the volume. ⑰. VOL - – Press to turn down the volume. ⑱. ENTER – Press to confirm the selection. ⑲. – Press to move up, down, left, or right through the menu items – By pressing this arrow key twice the OSD will come up with play tool selection in the play mode screen. 3 You may use thekeys or the hot key of Video, Photo, Slide show and Audio to select the desired content for presentation or playback. you may also use the arrow keys and the enter key to start playing the desired content file(s). Clock / Data function allows user to set time to display on the screen and function the alarm accordingly. Setup function includes Photo, Video, Clock and System. Photo Effect – User can choose freely how to display the photos by different angles and sliding. Photo Frequency – Choose each photo’s display time. 4