1
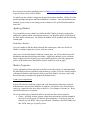
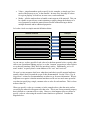
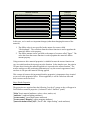
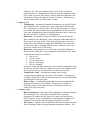
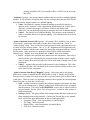
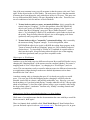
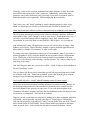
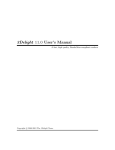
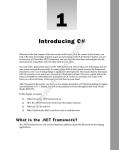
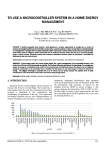
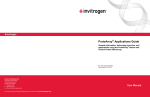
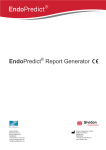
Bryce Shader Packs for DAZ Studio User Documentation Introduction Welcome to Bryce Shader Packs for DAZ Studio! You have just purchased a unique product that allows you to take some very powerful technology introduced in Bryce and put it work in your DAZ Studio projects. The shaders in this product are Renderman compatible shaders (used by the 3Delight rendering engine) that have been crafted to recreate the material & texture presets that accompany the Bryce product. All of the work has been done for you! Simply applying these shaders to the objects in your DAZ Studio scene is all that is needed to bring a "bit of Bryce" into your DAZ Studio world. One of the key factors to the success of these shaders is the ability to utilize the Bryce texture engine. This engine is behind all of the complex material effects that Bryce is capable of, and famous for, in the consumer 3D marketplace. The shaders in this product use the very same texture engine that Bryce uses when rendering its complex, rich and recognizable images. By using the Bryce texture engine to drive Renderman shaders that mimic the behavior of Bryce materials, we are able to provide you with collections of your favorite Bryce materials and textures. The shader packs have been organized in the same way that the presets are organized within the Bryce product. Depending on the specific product bundle you purchased, you may have a portion of those presets as shaders or you may have the entire preset library! An example of this grouping is shown below: Architectural Buildings Metals Christmas Balls Stones Marble Terrains Rocky1 Rocky2 Waters Calm1 Calm2 Are you ready to put your new shaders to use? Good, please move on to the next section, "Getting Started" to begin... Getting Started (READ THIS FIRST!!!) Before installing Bryce Shader Packs for DAZ Studio, it is recommended that you read this section to familiarize yourself with what to expect as you use the Bryce Shader Packs for the first time. It is very important that you follow the guidelines we offer here in order to get the most out of the included shaders. Although we have worked very hard to limit the amount of "tweaking" needed to get good results, the inherent differences between Bryce and DAZ Studio (or any other 3D application) cannot always be automatically accounted for in software alone. For most uses, simply applying the shaders to your objects is all that will be needed, but understanding how to deal with any unexpected results that you may encounter will greatly enhance your experience and results obtained with this product. First and foremost, we'd like to point out that the "Hints, Tips & Suggestions" section of this document is the very first place you should look when you encounter something that just "doesn't seem quite right." We have described a number of techniques that you can use to account for differences between Bryce and DAZ Studio that may affect your renderings while using the shaders. In most, if not all, cases you will have to do very little in order to obtain the results you were expecting or desire. Also, since we are dealing with "visual" results there really is no right or wrong. While the core goal is to render the material/texture in DAZ Studio as it appears in Bryce, ultimately it all comes down to what you like and what you don't like and how to achieve the former while avoiding the latter. The section titled "Installation" will guide you through the easy installation process. Remember, there is no need to own or install Bryce as a prerequisite to using these shaders. Everything you need will be installed! After installation, you'll want to start using your new shaders. Please visit "Applying Shaders" to learn about how the shaders can be applied to objects in DAZ Studio. You don't have to stop at using these shaders as they are provided. If you're feeling adventurous you can edit the properties of these shaders to create custom variations or to better adapt the shaders to your particular uses. Read "Shader Properties" to learn about the various properties...what they do, where they came from in Bryce, and what you can expect when changing them. Finally, the section titled "Hints, Tips & Suggestions" provides some good advice and guidance to help you get the most out of these shaders. There are many variables that impact how well they will perform in any given situation and environment. Whether you're looking to figure out why something doesn't look right or you just want some cool ideas, we hope this section will have what you are looking for! Installation Before installing any of the Bryce Shader Packs for DAZ Studio, please make sure that you have DAZ Studio 2.3.3.146 or later installed on your computer. If you do not have this version (or any other) installed, please visit http://www.daz3d.com/i/software/studio to get the latest version of DAZ Studio. To install your new shaders, simply run the provided product installers. Follow all of the installer prompts and queries until the installation is complete. Once the installation has finished, you are ready to start using your new shaders so fire up DAZ Studio and have some fun! Applying Shaders If you installed your new shaders in a folder that DAZ Studio is already configured to monitor for content (which is the default scneario), you should be able to locate them in the DAZ Studio content pane. By default, the shaders will be installed into the following content path: Studio/Bryce Shaders/... If you are unable to find the shaders through the content pane, make sure that DAZ Studio is configured properly to locate your new content. Once you've located the shaders within the content pane, you will see them listed with thumbnails and names describing each shader. Apply these shaders as you would any others, simply select the object(s) you want a shader applied to, select the appropriate surface in the Surfaces tab, then double-click the shader you wish to apply. Shader Properties A brief explanation of how materials are defined is in order to help you understand how the individual properties contribute to the material as a whole. If you are already familiar with material structure and function (in Bryce and DAZ Studio), you may want to skip this section and go straight to the property definitions below. Crash Course on Materials In most 3D software, rendering systems and scene description architectures, material definitions have at least some attributes in common. For instance, they all describe in some way a materials color, how shiny or dull it is, if it is bumpy or smooth, etc. Bryce and DAZ Studio are no exception! We can break the types of data that define a material into three main categories: • Colors – specified as three separate values that represent the relevant strength of the color’s red (R), green (G) and blue (B) components. Collectively, they are referred to as an “RGB” value or specification. Both Bryce and DAZ Studio use this “RGB” data type to specify colors. • • Values – singular numbers used to specify levels, strengths, or simply put “how much of the property to use” in the material. In most cases, the range of values for a given property is fixed but, in some cases, can be unlimited. Modes – tells the renderer how to handle certain aspects of the material. This can be valuable to special-case certain situations or simply change the behavior of a set of properties to make the material more flexible without having to define multiple materials and/or additional properties. Let’s take a look at a simple material definition below: Material Attributes Example Name – descriptor for identifying material Flat Red Diffuse Color– base color, intensity affected by light sources 255, 0, 0 Ambient Color– constant color, not affected by light sources 200, 200, 200 Diffuse Amount– strength of light source effect on diffuse color (0 to 255) 230 Ambient Amount– strength of ambient color (0 to 255) 25 Cast Shadows? – can the material’s surface cast shadows ? TRUE Receive Shadows? – can the material’s surface receive shadows? TRUE As you can see, we have specified a red color to be the base material color, a nearly white color to use for ambient lighting, and we’ve set the “Amount” properties to reflect light in a way that will simulate a fairly dull, flat (not shiny) surface. Additionally, we’ve set some “modes” to specify that we want shadows to be “cast” and “received.” We won’t go into anymore detail as to what these (and other) specific material attributes actually control; that is beyond the scope of this documentation. See the "Hints, Tips & Suggestions" section for recommendations on where to go for more information. What is important to recognize is that the material attributes can be set in a much more powerful way than just specifying a single, constant color or value for each attribute. This is where textures come in! When you specify a color as a constant, as in the example above, then the entire surface covered by the material will appear to be that color. This is true for any material property that is defined as a constant color or value. However, what happens when we choose to specify a color or value using the result of some function or operation? Consider the diagram below: Material Attributes Example Name – descriptor for identifying material Diffuse Color– base color, intensity affected by light sources Spotty Checkers color Ambient Color– constant color , not affected by light sources Diffuse Amount– strength of light source effect on diffuse color (0 to 255) Ambient Amount– strength of ambient color (0 to 255) Texture (Checkerboard) 200, 200, 200 value Texture (Spots) 25 Cast Shadows? – can the material’s surface cast shadows ? TRUE Receive Shadows? – can the material’s surface receive shadows? TRUE In this case, we've made two important changes (other than changing the name of the material): 1. The diffuse color is now specified as the output of a texture called "Checkerboard." The color data from the texture function is used to populate the material's diffuse color property. 2. The diffuse amount is now specified as the output of a texture called "Spots." The value data from the texture function is used to populate the material's diffuse amount property. Using textures to drive material properties is valuable because the texture function can vary its results based on the input given to the function. In the simplest case, the point in 3D space that is having the material applied to it is passed to the texture function. The texture can then use this positioning information to vary the texture's appearance based on where in 3D space the material is being applied. This concept of textures driving material/surface properties is important to keep in mind as you review the properties below. Where applicable, it will be called out when and how a texture can be involved. Bryce Shader Properties The properties are organized into the following "root level" groups as they will appear in DAZ Studio as material properties (“Advanced” tab of “Surfaces” panel): "Main" (basic material attributes: colors, values, modes, etc) "Ambience" (ambient lighting attributes) "[texture name]" (procedural texture attributes) "[texture name] Mapping" (object mapping attributes) "[material channel name] A|B" (“Decal” and “Alpha Scaling” mode attributes) “Main” (group) – this group, and its sub-groups, contain all of the material’s basic attributes • Color (group) o Diffuse Color – the material’s diffuse color as specified in the Bryce material as the “Diffuse” color component in the Materials Lab. If this color is driven by a texture, this property will not be visible in the Surfaces tab. Otherwise, you can adjust this property to customize the diffuse color. o Ambient Color – the material's ambient color as specified in the Bryce material as the "Ambient" color component in the Materials Lab. If this color is driven by a texture, this property will not be visible in the Surfaces tab. Otherwise, you can adjust this property to customize the ambient color. o Specular Color - the material's specular color as specified in the Bryce material as the "Specular" color component in the Materials Lab. If this color is driven by a texture, this property will not be visible in the Surfaces tab. Otherwise, you can adjust this property to customize the specular color. o Specular Exponent – the material's specular exponent color as specified in the Bryce material as the "Specular Exponent" color component in the Materials Lab. If this color is driven by a texture, this property will not be visible in the Surfaces tab. Otherwise, you can adjust this property to customize the specular exponent color. o Transmission Color – the material's transparency color as specified in the Bryce material as the "Transparent" color component in the Materials Lab. If this color is driven by a texture, this property will not be visible in the Surfaces tab. Otherwise, you can adjust this property to customize the transmission color. • Value (group) o Diffuse – the material's amount of diffuse shading as specified in the Bryce material as the "Diffusion" value component in the Materials Lab. If this value is driven by a texture, this property will not be visible in the Surfaces tab. Otherwise, you can adjust this property to customize the level of diffuse shading. o Specular - the material's amount of specular shading as specified in the Bryce material as the "Specularity" value component in the Materials Lab. If this value is driven by a texture, this property will not be visible in the Surfaces tab. Otherwise, you can adjust this property to customize the level of specular shading. o Metallicity - the material's amount of metallicity effect as specified in the Bryce material as the "Metallicity" value component in the Materials Lab. If this value is driven by a texture, this property will not be visible in the Surfaces tab. Otherwise, you can adjust this property to customize the level of metallicity. o Metal Factor - the material's control value over the metallicity effect based on how perpendicular the incident ray is to the surface being • • rendered. This value was constant in Bryce (at 0.8) and could not be adjusted by the user. Reducing this value will cause the metallicity effect to be visible over more of the object’s surface while increasing this value will push the effect to the edges of the object’s surface. This property is always constant and is never driven by a texture. Optics (group) o Transparency – the material's amount of transparency as specified in the Bryce material as the "Transparency" value component in the Materials Lab. This property is always visible. If the level of transparency is driven by a texture, this value modifies (by being ADDED to the inverse of) the value used for transparency that is calculated from the texture. Otherwise, this value specifies a constant level of transparency. o Reflectivity – the material’s amount of reflectivity as specified in the Bryce material as the “Reflection” value component in the Materials Lab. This property is always visible. If the level of reflectivity is driven by a texture, this value modifies (by being MULTIPLIED by) the value used for reflectivity that is calculated from the texture. Otherwise, this value specifies a constant level of reflectivity. o Refraction – the material's level of refraction as specified in the Bryce material as the “Refraction” value component in the Materials Lab. Some commonly used values are as follows: 1.00 for “air” 1.33 for “water” 1.52 for “light glass” 1.66 for “dense glass” 2.42 for “diamond” In general, harder and denser materials can be simulated with higher levels of refraction (which is why heavy glasses have some of the highest levels). This property is always constant and is never driven by a texture. o Transparency Value – an additional property that is used to accommodate the underlying architecture of the shaders. This property’s visibility is affected by texture involvement; however, it is not advised that you modify this value at any time. o Reflect Value – an additional property that is used to accommodate the underlying architecture of the shaders. This property’s visibility is affected by texture involvement; however, it is not advised that you modify this value at any time. Settings (group) o Blend Transparency – determines how transparency is interpreted during the rendering process. This property should be ON if you want transparency to control only the opacity of a surface and not have any effect on optics. If you are attempting to simulate physical attributes of substances such as glass, then this property should be set to OFF. o Do Caustics – controls a caustic simulation effect that attempts to account for the focusing of light as it passes through a transparent medium. This property should be ON if you want this effect, or OFF if you do not want this effect. “Ambience” (group) – this group contains attributes that are specific to ambient lighting/ shading. It was necessary to separate these out into a unique group because DAZ Studio does not natively support control over ambient lighting. • Value – the material’s amount of ambient shading as specified in the Bryce material as the “Ambient” value component in the Materials Lab. If this value is driven by a texture, this property will not be visible in the Surfaces tab. Otherwise, you can adjust this property to customize the level of ambient shading. • Value 2 – the global level of ambient shading. This property can be changed in order to customize the level of ambient lighting. It is constant and is never driven by a texture. “[name of material channel] A|B” (group) – this group will be available if one or more of a material’s components is driven by a texture that is using either the “Decal” or “Alpha Scaling” mode. There will be one of these groups for each component driven by a texture using one of these modes. The “A” or “B” designation will be appended to the group name to indicate which texture channel is driving the component with one of these special modes. Only one of the two properties below will be visible based on the channel’s type, “Layer” for a color channel and “Value2” for a value channel. • Layer – original color specified in the material for this component. This color is mixed with the color calculated by the texture function using the texture’s alpha value to control how much of each color will be used in the resulting color for this component. • Value 2 – original value specified in the material for this component. This value is multiplied by the value calculated by the texture function and the result is used as the value for this component. “[name of texture from Bryce] Mapping” (group) – this group, and its sub-groups, define how a texture is mapped into the material that is using it. Mostly, they describe how the texture's results are transformed on their way from texture space to object and/or world space. There are some very important controls in these groups, the most important likely being the very first one, overall scale! • Scale – scaling factor that is applied after all other mapping calculations are done. This can be considered as a “global” scaling factor for how this texture is mapped into the material. This can be an EXTREMELY useful value to adjust in order to get good results. See the “Hints, Tips & Suggestions” section for more on how to utilize this property. • Settings (group) – this group defines some unique modes that Bryce materials use when mapping textures into materials. Consult your favorite Bryce user manual, book or article for more information on their use and applicability. o Symmetric Tiling – same functionality as found in Bryce o Pic Tiling – internal use only o Repeat Tiling – same functionality as found in Bryce o Scale Pict – internal use only • • o No Interpolation – internal use only o Center Transforms – same functionality as found in Bryce o Decal – internal use only Mapping Mode – mode that determines the algorithm (or method) that is used when mapping the texture into the material's space. These modes function the same way as they do in Bryce. If you are unfamiliar with their functionality/uses in Bryce, describing how they work here is well beyond the scope of this documentation. Refer to the Bryce User Documentation or the "Hints, Tips & Suggestions" section for information on resources that could be helpful. The mapping modes available are as follows: o Object Space o World Space o Parametric o Parametric Scaled o World Top o Spherical o Cylindrical o Reflection o Random o Object Top o Object Front o Object Side o Object Cubic o Sinusoidal o World Front o World Side o World Cubic Object Type – type of object that most closely matches what the material/shader is being applied to. In Bryce this information was automatically available (based on the primitive type within Bryce), but DAZ Studio does not provide this information. At this time, however, ONLY the "Object Top" mapping mode is sensitive to the object type. Therefore, you can ignore this property unless that mapping mode is being used. If you are using the "Object Top" mapping mode, use this property to describe the target object as closely as you can. The object types available are as follows: o Cube o Sphere o Plane o Slab o Height Field o Sym Field o Cone o Torus o Group • o Poly Mesh o Triangle Mesh o Pyramid o Cylinder o Circle o Square o Path o Blob o Tree o Leaf Transform (group) o Rotation (group) X Rot – value used to rotate texture space input on the X-axis before handing to the texture engine for calculation. This is the same value as specified in Bryce as “Rotate X” in the Materials Lab’s Transformation Tools. Y Rot – value used to rotate texture space input on the Y-axis before handing to the texture engine for calculation. This is the same value as specified in Bryce as “Rotate Y” in the Materials Lab’s Transformation Tools. Z Rot – value used to rotate texture space input on the Z-axis before handing to the texture engine for calculation. This is the same value as specified in Bryce as “Rotate Z” in the Materials Lab’s Transformation Tools. o Scale (group) X Scale - value used to scale texture space input along the X-axis before handing to the texture engine for calculation. This is the same value as specified in Bryce as "Scale X" in the Materials Lab's Transformation Tools. Y Scale - value used to scale texture space input along the Y-axis before handing to the texture engine for calculation. This is the same value as specified in Bryce as "Scale Y" in the Materials Lab's Transformation Tools. Z Scale - value used to scale texture space input along the Z-axis before handing to the texture engine for calculation. This is the same value as specified in Bryce as "Scale Z" in the Materials Lab's Transformation Tools. o Offset (group) X - value used to offset (move) texture space input along the Xaxis before handing to the texture engine for calculation. This is the same value as specified in Bryce as "Offset X" in the Materials Lab's Transformation Tools. Y - value used to offset (move) texture space input along the Yaxis before handing to the texture engine for calculation. This is the same value as specified in Bryce as "Offset Y" in the Materials Lab's Transformation Tools. Z - value used to offset (move) texture space input along the Z-axis before handing to the texture engine for calculation. This is the same value as specified in Bryce as "Offset Z" in the Materials Lab's Transformation Tools. “[name of texture from Bryce]” (group) – this group, and its sub-groups, define all of the attributes that make up a Bryce procedural texture. The vast majority of them are extremely complicated to control in a meaningful way without having a deep understanding of the underlying math and algorithms. A couple of them, however, can be useful and are described below. • Bryce Texture (group) o Main (group) Color Map (group) - this group contains the three colors that are used "globally" by the texture. Each texture has three constituent components and one global component. Changing the global component values is the easiest way to experiment with "customizing" a texture. The three colors used by a texture are blended in numerous ways depending on the functions and blending modes defined by the texture's specifications. Try changing these color properties to quickly customize the texture's color scheme! • Main C1 - texture's first global color property • Main C2 - texture's second global color property • Main C3 - texture's third global color property Normalize Elevation - Some textures (especially those built for terrain application) blend their components using the world space Y-axis location of the points on a surface being rendered. These Y-axis values can be influenced by the scale of the objects in your scene and therefore make it hard to predict what the results will be without carefully considering object and scene sizing. The easiest way to avoid problems is to normalize elevation by setting this property to ON. This will ensure that all texture blending effects will be fully visible within the entire height of your scene. Bryce, however, does NOT normalize elevation because the scale of Bryce scenes is well known to the texture engine and rarely changes by a substantial amount. Therefore, you could also turn this property OFF and manage the scale of your objects and scene to control the results. Generally, DAZ Studio scenes are 0.41% the size of Bryce scenes. You can use that as a guide to help determine what scaling adjustments you may need to make if you choose not to normalize elevation. o Component 1 (group) Color Map (group) • Color Map (group) - this group contains the three colors that are used by this component of the texture. Each texture has three constituent components (of which this is one) and one global component. You can tweak each constituent component's properties and influence the final result of texture. Try changing the colors below to customize the texture with your own coloring scheme. Please note that not all components are used by all textures. However, "Component 1" is most commonly used. o T1 C1 – texture's first "Component 1" color property o T1 C2 – texture's second "Component 1" color property o T1 C3 – texture's third "Component 1" color property o Component 2 (group) Color Map (group) • Color Map (group) - see "Component 1" color map description above...it applies to this component as well. o T2 C1 – texture's first "Component 2" color property o T2 C2 – texture's second "Component 2" color property o T2 C3 – texture's third "Component 2" color property o Component 3 (group) Color Map (group) • Color Map (group) - see "Component 2" color map description above...it applies to this component as well. o T3 C1 – texture's first "Component 3" color property o T3 C2 – texture's second "Component 3" color property o T3 C3 – texture's third "Component 3" color property Hints, Tips & Suggestions Here are some ideas to help you get the most out of your new shaders! If you have some of your own, please share them with the community. Visit the "Bryce Shader Packs for DAZ Studio" forum on www.daz3d.com to post your ideas and see what others in the community have to say! Use scaling to deal with size and space differentials One of the most common issues you will encounter is that the texture scale won't "look right" for the object/surface in DAZ Studio. The main cause of this is that the materials & textures have been adjusted to work with objects in Bryce's 3D space. This space can be very different than DAZ Studio's 3D space depending on the scene. Therefore, here are two conditions to look for and how to deal with them: 1. Texture looks too noisy or snowy, not much definition - this is caused by the texture being too "frequent." To solve this problem, either DECREASE the object's size (scale) or LOWER the scaling factor property in the "[name of texture from Bryce] Mapping" group (see “Bryce Shader Properties” section above). Try lowering by a factor of 10, and then do a quick render to check out the results. Keep lowering either the object's size or the mapping scale factor (preferred) until you get more acceptable results. 2. Texture looks too big or "zoomed in," not natural looking - this is caused by the texture not being "frequent" enough. To solve this problem, either INCREASE the object's size (scale) or RAISE the scaling factor property in the "[name of texture from Bryce] Mapping" group (see “Bryce Shader Properties” section above). Try increasing by a factor of 10, and then do a quick render to check out the results. Keep increasing either the object's size or the mapping scale factor (preferred) until you get more acceptable results. Object space vs. World space Another way to deal with scene size differences between Bryce and DAZ Studio is to try changing the “Mapping Mode” of the textures used in a material (shader). If a texture’s mapping mode is set to “Object Space,” try changing it to “World Space” (and vice versa). This can sometimes easily account for inherent scene size differences between the two applications without having to make more detailed adjustments such as those described in the “hint” above. A modest warning: only try changing the space if it is already set to object or world space. If it set to any of the other mapping modes, changing it will likely alter the intended visual effect in a drastic, and possibly undesirable, way. However, you can’t break anything, so if you don’t mind playing “I wonder what this will do?” then go right ahead an experiment! A lot of the texture presets in Bryce were created by either using the deep texture editor’s “randomize” function or by “blindly” tweaking controls until something cool fell out Great resource for Bryce and related technology (i.e. these shaders) While most of you might assume that the documentation that came with Bryce would be the best resource, think again! There is a fantastic book available called, "Real World Bryce 4" from Peachpit Press (you can find used copies for sale on www.amazon.com). This book goes over, in great detail, many different aspects of Bryce including user interface, materials, textures, skies, etc. If you are interested in understanding how Bryce works and what all the numbers and options mean then THIS is the absolute best place to find the answers. The chapters on materials and textures alone are worth the price. If you are serious about getting the most out of these shaders, do your best to get yourself a copy of this book! Where to get more info on materials and other 3D "stuff" Here are some great online resources for learning more about 3D rendering, shaders, materials, textures, etc. Not all of this material is entirely applicable or relevant to these shaders or how they are used by DAZ Studio, but the underlying concepts (particularly of 3D material components and rendering techniques) are fairly universal. This site provides a good, basic explanation of diffuse, specular and ambient properties: http://www.mathworks.com/access/helpdesk/help/techdoc/visualize/f1-21818.html Here's a link to an entry-level explanation of how 3-D graphics work: http://computer.howstuffworks.com/3dgraphics.htm For a more technical discussion, try this article on color, illumination & shading: http://www.cs.fit.edu/~wds/classes/graphics/Illuminate/illuminate/illuminate.html Both Bryce and these Bryce Shaders for DAZ Studio use this illumination model: http://en.wikipedia.org/wiki/Phong_shading This is a self-described "layperson's guide to rendering" and provides a great overview: http://www.designer-info.com/Writing/3d_render_tutorial.htm Since Bryce is a ray tracer at heart, here is an explanation of that algorithm: http://en.wikipedia.org/wiki/Ray_tracing_(graphics) DAZ Studio uses 3Delight as its render engine, check out the "links" page: http://www.3delight.com/en/ Customize shaders by tweaking properties and saving “new” shader/material presets You can easily customize any of these shaders by simply changing their property values and saving a new shader/material preset! In fact, this can be a great way to learn more about what the properties do and how to take advantage of the control they offer. Feel free to experiment with any or all of the properties described in the "Bryce Shader Properties" section above (avoid properties that are described as "unused" or "for internal use only" as they won't have any effect). Generally, colors are the easiest to understand since their influence is fairly direct and more obvious than most of the "value" properties. Additionally, some of the other properties can be more difficult to grasp, especially if you aren't experienced with 3D material principles and, in particular, with creating/using Bryce materials. Don't worry, you can't "break" anything by simply changing property values...so go ahead, we encourage you to follow your curiosity and see where it can take you! Glass, metal and other reflective/refractive materials need environments to see them fully The tricky thing about highly reflective and refractive materials is that they need to be surrounded by other visible "things" in order to look correct. Think about is this way, if you took a crystal ball and placed in a completely empty, dark, monochromatic environment, do you really think it would look like a ball of glass? No, it would not. And, unfortunately, many 3D applications start you off with just that...an empty, often lightless void of space. Objects that have metallic or glassy materials applied must be surrounded by a suitable "environment" in order to look right. Try using a sky dome, light dome or other type of "environment" dome if your scene is sparsely populated. Or, try using the shaders on objects within a large, well populated scene. Having lots of objects in a scene creates an artificial environment of its own. However, even with large scenes, having a visually dynamic "sky" can go a long way to improving your results. And, don't forget to make sure you scene is well lit. A lack of light can also contribute to flat and "unrealistic" results. Now you know why Bryce always started the user off with a ground plane and a cloudy sky complete with a sun. Things always looked "good" right from the get go without having to worry about having nothing for an environment. Use invisible objects to “control” altitude blending results of texture engine Since some of the material/texture blending operations are sensitive to the "altitude" of the geometry being rendered, it can sometimes be desirable to have control over the perceived altitude of the geometry in your scene. If you read the description of the "Normalize Elevation" property, you know that the bounding box that encompasses your scene can be very important. Let's look at an example: Suppose you had a scene that was composed of nothing more than a triangular mesh that represented a terrain (possibly exported using Bryce's "terrain export" functionality). And onto this mesh object you applied a "snowy" terrain shader from one of the "terrain" Bryce Shader Packs for DAZ Studio. Most of those shaders use altitude to determine where to put the snow...more towards the top and less towards the bottom. In this example scene with only the terrain mesh object, the scene bounding box would just fit the terrain mesh so the normalization would result in Y = 1.0 at the very top of the terrain, and Y = 0.0 at the very bottom of the terrain. This means maximum snow at the top of the terrain and pretty much none at the bottom. But what if you didn't want full blending (maximum snow) at the top of the terrain? You can artificially increase the "height" of your scene (and bounding box extent along the Yaxis), by adding a simple primitive (cube, sphere, etc) to the scene and positioning it above the rest of the scene. The will move the maximum blending point (Y = 1.0) to a position ABOVE the top of the terrain. Consider the example below: In this case you can see that the top of the terrain is at something like Y = 0.40 within the scene bounding box. This means that the top of the terrain would now exhibit texture characteristics that the previous example would have had at around half-way up the terrain. You can also place a primitive "under" the scene to lower the minimum blending point (Y = 0.0) below the geometry in your scene. If you use this technique, make sure you set the opacity of your placeholder primitive to 0 so that it won't be visible in the scene. Knowing when to use ray traced shadows Bryce uses ray tracing as its native technique for rendering images. As a result, some effects will require that you use ray tracing in certain cases when rendering images in DAZ Studio with these shaders. In particular, if the "Blend Transparency" (see "Bryce Shader Properties" above) property is OFF for a particular material/shader, then you MUST use ray traced shadows in DAZ Studio to get correct, accurate results. This will be obvious if you see that texturing effects are not visible in shadows that are cast by objects that have (Bryce) textures applied. Using ray traced shadows will ensure that the texture effects will be properly included in the shadow calculations.