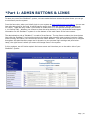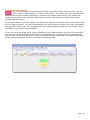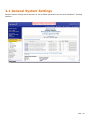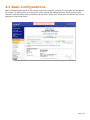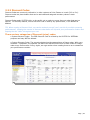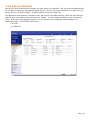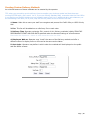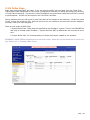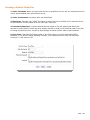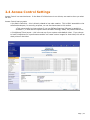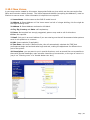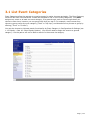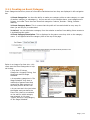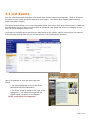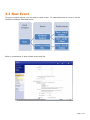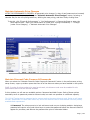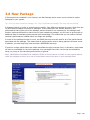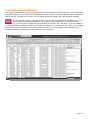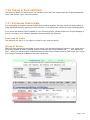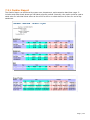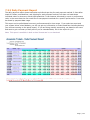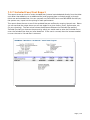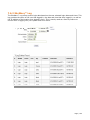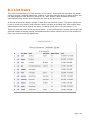
1
Revised: June 2010 Dear User, Thank you for choosing ShoWare™, powered by VisionOne Inc.! This User Manual is meant to be a tool to assist in explaining the nuances of the ShoWare™ ticketing system. The software was designed to be extremely intuitive so this manual is not suggested to be used as a guide for how you use the ShoWare™ software, but as a tool to help you if you are in need of assistance. As a client of ShoWare™, you will be trained on the system so that it fits your business needs. We will educate you on the “how-to’s” of the system while this manual will explain what exactly hitting “that button” will do. We hope that you find the information in this manual useful and that if you have any questions, you will call us – remember, your project manager is only a phone call away! ShoWare™ 6781 N. Palm Ave Ste 120 Fresno, Ca. 93704 Ph: 559.432.8000 Fx: 559.431.5082 Email: [email protected] Disclaimer: This manual is an adaptation of the 2.0 Operator Manual created by the developers of ShoWare™. The new features of this manual include a Table of Contents, public listing, how to sell tickets and helpful tips for the Operator. As improvements are made to the system, addendums will be created. Confidentiality: This manual is intended for use by client of ShoWare™. ShoWare™ does not permit the reproduction or the distribution of this document to anyone other than the client of ShoWare™ without written permission from ShoWare™. Page | 2 Table of Contents Table of Contents ............................................................................................................................................. 3 KEY .................................................................................................................................................................. 9 *Part 1: ADMIN BUTTONS & LINKS ................................................................................................................. 10 1.1 Batch Ticket Printing ................................................................................................................................. 11 Associating your Printer to ShoWare™ ............................................................................................................ 11 1.2 Box Office/Call Center Interface: How to SELL tickets ............................................................................... 12 1.2.1 Top Frame: Information Window ............................................................................................................... 13 Search Filtering Options ................................................................................................................................... 13 1.2.2 Middle Frame: Information Window .......................................................................................................... 14 Selecting Tickets – General Admission ............................................................................................................. 15 Selecting Tickets – Reserved Seating ............................................................................................................... 16 1.2.3 Bottom Frame: Basket ................................................................................................................................ 17 Basket Items ..................................................................................................................................................... 17 Begin Checkout ................................................................................................................................................ 18 Customer Information ..................................................................................................................................... 19 Delivery Option ................................................................................................................................................ 20 Delivery Information ........................................................................................................................................ 20 Billing Information ........................................................................................................................................... 22 Confirmation .................................................................................................................................................... 23 Finished! ........................................................................................................................................................... 23 1.3 GA Touchscreen ........................................................................................................................................ 24 1.4 Public Website ......................................................................................................................................... 24 1.5 Left Navigation ......................................................................................................................................... 24 Logoff ............................................................................................................................................................... 24 Change Password ............................................................................................................................................. 24 Change Printer ................................................................................................................................................. 25 *Part 2: CONFIGURATIONS & SETTINGS .......................................................................................................... 26 2.1 General System Settings ........................................................................................................................... 27 2.1.1 General Tab ................................................................................................................................................. 28 Page | 3 General ............................................................................................................................................................. 29 Email Confirmation .......................................................................................................................................... 33 Public Website Display Settings / Intl Shipping ................................................................................................ 34 Settings for Ticket Search and Selection .......................................................................................................... 35 Call Center Settings .......................................................................................................................................... 36 Settings for Shopping Basket & Checkout ........................................................................................................ 37 Ticket Printing and Fulfillment/Admin Pages ................................................................................................... 38 Save and cancel the action buttons on the bottom ......................................................................................... 39 2.1.2 Display Options ........................................................................................................................................... 39 Featured Events ............................................................................................................................................... 41 Upcoming Performances .................................................................................................................................. 42 Event Listing ..................................................................................................................................................... 42 Event Detail ...................................................................................................................................................... 43 Locations .......................................................................................................................................................... 43 Other Display Options ...................................................................................................................................... 43 2.1.3 Performance Listings ................................................................................................................................... 45 2.1.4 Order Status Display .................................................................................................................................... 46 System Names Defined .................................................................................................................................... 47 2.1.5 Ad Locations ................................................................................................................................................ 49 2.2 Basic Configurations ................................................................................................................................. 50 2.2.1 Seat Allocation Types .................................................................................................................................. 51 Creating an Allocation Type ............................................................................................................................. 52 2.2.2 Discount Codes ............................................................................................................................................ 54 There are two categories of Discount (price) codes ........................................................................................ 54 Creating a Discount Code ................................................................................................................................. 55 2.2.3 Payment Types ............................................................................................................................................ 57 Creating New Payment Types .......................................................................................................................... 58 2.2.4 Delivery Methods ........................................................................................................................................ 59 Creating Custom Delivery Methods ................................................................................................................. 60 2.2.5 Order Fees ................................................................................................................................................... 61 Creating a Custom Order Fee ........................................................................................................................... 62 2.2.6 Ticket Fees ................................................................................................................................................... 63 Types of Ticket Fees ......................................................................................................................................... 63 Creating Ticket Fees ......................................................................................................................................... 64 Page | 4 2.2.7 Banner Ads .................................................................................................................................................. 65 How to Edit Your Banner Ad Attributes ........................................................................................................... 66 2.3 Options & Classifications .......................................................................................................................... 67 2.3.1 Hold Categories ........................................................................................................................................... 68 What is a Hold? ................................................................................................................................................ 68 Creating Hold Categories ................................................................................................................................. 68 2.3.2 Patron Classifications .................................................................................................................................. 69 Creating New Classifications ............................................................................................................................ 69 2.3.3 Heard About Values .................................................................................................................................... 70 Creating Heard About Us Values ...................................................................................................................... 70 2.3.4 Departments ............................................................................................................................................... 71 Creating Departments ...................................................................................................................................... 71 2.4 Access Control Settings ............................................................................................................................. 72 2.4.1 Key Matrix Definitions… .............................................................................................................................. 73 2.4.2 Print @ Home Ticket Layout ....................................................................................................................... 74 Print@Home Example ...................................................................................................................................... 74 Changing Print@Home Ticket Layout .............................................................................................................. 75 2.5 Memberships ........................................................................................................................................... 76 2.5.1 Membership Settings .................................................................................................................................. 77 General Settings ............................................................................................................................................... 77 Admin Pages & Call Center Interface Settings ................................................................................................. 77 Public Website Settings .................................................................................................................................... 77 Membership Expiration Email .......................................................................................................................... 79 Membership Public Website Info Bar .............................................................................................................. 79 2.5.2 Membership Types ...................................................................................................................................... 81 Creating a New Membership Type .................................................................................................................. 82 2.6 Donations ................................................................................................................................................. 84 Setting Up Donations ........................................................................................................................................... 85 General Settings ............................................................................................................................................... 85 Admin Pages & Call Center Interface Settings ................................................................................................. 85 Public Website Settings .................................................................................................................................... 85 Donation Page Layout on Public Site ............................................................................................................... 85 Donation Confirmation Email .......................................................................................................................... 85 2.7 Image Management ................................................................................................................................. 87 Page | 5 2.7.1 Manage Event Images ................................................................................................................................. 88 2.7.2 Manage Banner Images .............................................................................................................................. 88 2.8 List Box Offices ......................................................................................................................................... 89 2.9 List Promoters .......................................................................................................................................... 90 2.10 Venues ................................................................................................................................................... 91 2.10.1 List Venues ................................................................................................................................................ 92 2.10.2 New Venue ................................................................................................................................................ 93 2.10.3 List Seat Maps ........................................................................................................................................... 94 2.10.4 New Seat Map ........................................................................................................................................... 95 Information Necessary to Create a New Seat Map ......................................................................................... 95 Steps to Create a New Seat Map ..................................................................................................................... 97 2.10.5 New GA Seat Map ................................................................................................................................... 107 2.10.6 Copy Seat Map ........................................................................................................................................ 109 *Part 3: EVENTS & PERFORMANCES ............................................................................................................. 111 3.1 List Event Categories .............................................................................................................................. 112 3.1.1 Creating an Event Category ....................................................................................................................... 113 3.2 List Events .............................................................................................................................................. 114 3.3 New Event .............................................................................................................................................. 115 3.3.1 Creating a New Event ................................................................................................................................ 116 General Information ...................................................................................................................................... 116 Early Booking & Passwords ............................................................................................................................ 117 Images & Categories ...................................................................................................................................... 118 Custom Event Branding & Access .................................................................................................................. 119 Linking to the Event ....................................................................................................................................... 120 3.4 List Performances/Packages ................................................................................................................... 121 3.5 New Performance ................................................................................................................................... 122 3.5.1a Required Fields ........................................................................................................................................ 122 3.5.1b Fields that Appear ................................................................................................................................... 123 Performance Status ........................................................................................................................................ 127 Ticket Layout .................................................................................................................................................. 130 Performance Pricing Setup ............................................................................................................................ 131 Maintain Automatic Price Changes ................................................................................................................ 132 Maintain Discount Code Coupons & Passwords ............................................................................................ 132 3.6 Copy Performance / Package ....................................................................................................................... 135 Page | 6 3.7 Auto Scheduler ....................................................................................................................................... 136 3.8 New Package .......................................................................................................................................... 140 *Part 4: TICKET MANAGEMENT .................................................................................................................... 141 4.1 List Holds ................................................................................................................................................ 142 4.2 List Orders .............................................................................................................................................. 143 4.3 List Tickets to Print (Mail) ....................................................................................................................... 144 4.4 List Tickets to Print (Will Call) ................................................................................................................. 145 4.5 List Tickets to Mail .................................................................................................................................. 146 *Part 5: BATCH TICKET PRINTING ................................................................................................................. 147 5.1 Printer Selection Menu ........................................................................................................................... 147 5.2 Create Batch Orders ............................................................................................................................... 148 5.3 Printed Batch Log ................................................................................................................................... 149 *Part 6: PATRONS & MEMBERS .................................................................................................................... 150 6.1 List Patrons / Members .......................................................................................................................... 151 6.2 New Patron / Member ........................................................................................................................... 152 6.3 New Donation ........................................................................................................................................ 155 *Part 7: REPORTING ..................................................................................................................................... 156 7.1 Ticket Inventory ..................................................................................................................................... 157 7.1.1 Performance Report – Detailed ................................................................................................................ 158 7.1.2 Performance Report – Summary .............................................................................................................. 160 7.1.3 Event Report ............................................................................................................................................. 161 7.1.4 Seating Manifest ....................................................................................................................................... 162 7.1.5 Delivery Report ......................................................................................................................................... 163 7.1.6 Allocation Report ...................................................................................................................................... 164 7.1.7 Tickets On Hold Report ............................................................................................................................. 165 7.1.8 Exchange Report ....................................................................................................................................... 166 7.1.9 Ticket Re‐Print Report ............................................................................................................................... 167 7.2 Fulfillment .............................................................................................................................................. 168 7.2.1 Ticket Buyer Report ................................................................................................................................... 169 7.2.2 Ticket Re‐Print Report ............................................................................................................................... 170 7.2.3 Tickets to Print (Mail) ................................................................................................................................ 170 7.2.4 Tickets to Mail ........................................................................................................................................... 170 7.2.5 Mail Order Fulfillment ............................................................................................................................... 171 7.2.6 Tickets to Print (Will Call) .......................................................................................................................... 172 Page | 7 7.2.7 & 8 Access Control Data ............................................................................................................................ 172 Download AC Codes ....................................................................................................................................... 172 Upload AC Results .......................................................................................................................................... 172 7.3 Accounting & Finance ............................................................................................................................. 173 7.3.1 Cashier Report ........................................................................................................................................... 174 7.3.2 Daily Payment Report ............................................................................................................................... 175 7.3.4 Reconciliation Report ................................................................................................................................ 176 7.3.5 Transaction Report .................................................................................................................................... 177 7.3.6 Ticket Data ................................................................................................................................................ 178 7.3.7 Included Fees/Cost Report ........................................................................................................................ 179 7.3.8 ShoWare™ LLC Ticket Fees vs. Ticket Fee Revenue .................................................................................. 180 7.3.9 ShoWare™ LLC Discount Code Group Report ........................................................................................... 181 7.4 Marketing & Sales .................................................................................................................................. 182 7.4.1 Banner Stats .............................................................................................................................................. 183 7.4.2 Commission Report ................................................................................................................................... 183 7.4.3 Access Control Report ............................................................................................................................... 184 7.4.4 Heard About Us Report ............................................................................................................................. 185 7.4.5 Redeemed Coupon Report ........................................................................................................................ 186 7.5 Patrons & Memberships ......................................................................................................................... 187 7.5.1 Patrons Per Classification .......................................................................................................................... 188 7.5.2 Patron Order Addresses ............................................................................................................................ 189 7.5.3 Patrons ...................................................................................................................................................... 190 7.5.4 Membership Reconciliation ...................................................................................................................... 191 7.5.5 Membership Transaction Summary Report .............................................................................................. 191 7.5.6 Membership Manifest ............................................................................................................................... 191 7.5.7 Membership Allocation Redemption Summary ........................................................................................ 191 7.5.8 Membership Cashier Report ..................................................................................................................... 191 7.5.9 Membership Daily Payment Report .......................................................................................................... 191 7.5.10 Donations ................................................................................................................................................ 192 7.6 System Reports ...................................................................................................................................... 193 7.6.1 Activity Report........................................................................................................................................... 194 7.6.2 ShoWare™ LLC Log .................................................................................................................................... 195 7.6.3 Payment Gateway Transaction Log ........................................................................................................... 196 Page | 8 7.7 Custom Reporting ................................................................................................................................... 197 *Part 8: ADMINISTRATION ........................................................................................................................... 198 8.1 List Users ................................................................................................................................................ 199 8.2 New Users .............................................................................................................................................. 200 8.3 List Reporting Users ................................................................................................................................ 204 8.4 New Reporting User ............................................................................................................................... 205 KEY Suggestion for Standard Operating Procedure TIP: The items highlighted in blue are tips from your project managers NOTE: All items in purple are notes and reminders to help you through the system *HTML: These sections are HTML compatible and is suggested in most cases Page | 9 *Part 1: ADMIN BUTTONS & LINKS To ease your use of the ShoWare™ system, we have made the home screen the place where you can go to most easily use the system. From the home site, when you initially login to your system at http://tickets.xxxx.com/admin, you can see how sales are going for the next 10 performances and/or how sales are going for the day (starting at 12:01am). These are only visible if you choose to make them so in the general settings (see Section 1.1.1 General Tab). Whether you choose to show the sales statistics or not, the business and support information for the ShoWare™ system is on the bottom of the main frame of the home screen. The administrative side of ShoWare™ is made of three frames. The top frame contains the Home button (just click the ShoWare™ icon) and shortcuts to the ticket sales person’s most common functions: Batch Ticket Printing, Box Office, GA Touchscreen and the Public Website. The left frame allows you to navigate throughout the administrative pages and is dynamic to your personal login settings and permission. Lastly, the right frame is where you enter and change items in the system. In this prologue, we will further explain the home screen and introduce you to the admin side of your ShoWare™ system. Page | 10 1.1 Batch Ticket Printing The Batch Ticket Printing function allows users to print ticket orders all at once rather than printing each ticket order separately. This menu offers numerous printing options including a drop down to select the printer you would like to use, the ability to select mail or will call and print those batches separately, the option to filter batches by performance code or by a date range, management and utility options, and more. To print tickets, you must have a printer installed. The developers of ShoWare™ have chosen to partner with the top ticket printer manufacturer in the industry, Boca Systems, to integrate ticket printing with sales. With this partnership, ShoWare™ is your first line support for Boca Printers including their sales and installation. Please contact your ShoWare™ Project Manager for more information on purchasing a Boca Ticket Printer. Associating your Printer to ShoWare™ Please call you project manager to walk you through installing the correct driver for your printer. After you have installed the printer, you need to associate the ShoWare™ system with this printer. To make the ticketing system and the printer talk to each other, you need to click “Change Printer” from the left frame of the administrative screen. When you click this, a pop-up will try to appear. You must allow pop-ups for this site; click “allow pop-ups from this site.” If you now look to the top of your admin screen, you will see that a message appears just below the address toolbar/just above the ShoWare™ icon. Right click on this tool bar and Install the ‘Active X’ component. This Active X component for Internet Explorer is what makes the system completely functional and why we state that you must use Internet Explorer to fully utilize the ShoWare™ Ticketing System. If you have any questions, please contact your Project Manager at [email protected] or 559.432.8000. For more information on Batch Ticket Printing, please see Section 4: Batch Ticket Printing of this manual where each printing option is explained in detail. TIP: We strongly suggest that you also add your ticketing site to your trusted sites in Internet Explorer Options Page | 11 1.2 Box Office/Call Center Interface: How to SELL tickets As you saw in the introduction to the Administrative Screen, in the top frame there are a series of shortcuts on the top right. To sell tickets, you need to click “Box Office” and the Box Office/Call Center Interface will open so that you can sell tickets. The Box Office/Call Center Interface is the screen where all the box office functions are put together for the box office/call center attendant, empowering the employees to access, find, and complete tickets sales, holds, and donations (if enabled). Like the administrative section of your ticketing site, the Call Center Interface consists of three frames: top frame for searching, middle frame for displaying information, bottom frame for your basket and completing transactions. All three of these frames are always present but may be minimal in height depending on what functions you are currently completing. Page | 12 1.2.1 Top Frame: Information Window Search Filtering Options For ease of use, there are buttons that can help you speed up the selling of tickets. A performance can be selected by utilizing the specific Performance Code or by utilizing the Event Drop-down box where the users can find all the performances available for sale under that specific event. Performance(s) can also be found by utilizing Keyword, Date range, Venue and Category. Search: green button on left of top/search frame; once you select the criteria for the performance you click this button to pull up all performance that match Clear Form: throughout the ShoWare™ system there are ‘clear’ buttons or ‘reset’ button that allow you to quickly clear out and rest the search criteria Today’s Performances: clicking this button will show you all performances available for the remainder of the day; if you have a series of shows on any particular day or if you are running a box office the night of a show, this is the easiest button to hit to sell tickets Patron/Member Lookup: if you need to find orders or information based on a patron or member, use the Patron Lookup to find the patron and you can then click to list all of their order or edit their information directly from this window Order Lookup: order searches are probably the most used function after selling the tickets and contain all the information for an order including transaction IDs patron information, shipping and most importantly details on the tickets selected including the pricing, fees and seating; for more information on the order screen and information, see Ticket Management > List Orders (section 3.2 in this manual) Note: depending on the width of your screen, you may or may not see the following buttons easily; to find them, use the scroll bar on the right side of the navigation frame to scroll down. Hold Lookup: hold searches, like orders, can be completed both through the admin screens as well as through the Call Center Interface; for more information on the order screen and information, see Ticket Management > List Holds (section 3.1 in this manual) New Donation: if your system has the Donations & Memberships Module enabled, then you will have the ability to process donations through the Call Center in addition to when the Patron Account is created; the settings for donations can be edited by the site administrator – further details on this can be found in General Settings > Donations (section 1.6 of the manual) Page | 13 1.2.2 Middle Frame: Information Window Performances that are valid in the system will display in the main information window (middle frame). If there is only one performance that matches the criteria, the screen immediately below is skipped and you can continue onto the next step. Otherwise, you will click the reserve tickets button to select tickets for the performance of your patron’s desire. TIP: to help you through the ticket purchasing process, you can always look to “follow the traffic signals” for guidance o Look for the Green button to take you to the next step o Yellow buttons are suggested to be used with caution as using these buttons mean that not all information on the patron is collected o Red are to be used to clear a form or cancel the current process Page | 14 Selecting Tickets – General Admission Based on how the seat map for the performance was created, there may or may not be a Quick Pick option. If available for the seat map, selecting “add to basket” from quick pick will put the “best available” seats at the listed price (use the drop down to select a different price) according to the map creator into the basket and those tickets will be priced at the default price for that section. Selection of tickets can also be made individually from the specific seating areas. As you can see below, this seat map only has one section, GA, with 120 seats available and a default price of $65. There are two discount codes available for this section and you can purchase 1 or more of either or both at this time. If you have grouped discount codes due to the large number in your system, you can “Filter Discount Codes By” using the group listing dropdown. After you select the number of tickets you desire, click “add to basket” Page | 15 Selecting Tickets – Reserved Seating Just like with a GA Seat Map, based on how the seat map for the performance was created, there may or may not be a QuickPick option. If available for the seat map, this will get you the “best available” seats at the listed price (use the drop down to select a different price) according to the map creator and they will be priced at the default price for that section. The difference for Reserved Seat Maps is that when you pick individual seats for the patron, you are literally picking the specific seats from specific rows for the chosen section. Below is an image of what this looks like. You would first select the selection by clicking “select seats.” Then when the pane refreshes, select seats simply click the boxed to enable the selection (mark them with a check) and click the green button, “add to basket.” As you can see in the second image below, there is an “i” that you can click for more information on what the colored boxes mean. As these allocations and color coding are chosen by the site administrator, it is different from system to system but the “i” (information) will explain the coding. Page | 16 1.2.3 Bottom Frame: Basket As soon as tickets are selected and the “add to basket” button is pressed, the basket portion of the screen will take you to the actual shopping basket and the checkout process can begin. This entire process takes place in the bottom most frame of the Call Center Interface. Basket Items The initial checkout screen is your home or “Basket” for the system. Listed are the events that you have selected to sell to the patron including the performance name, performance code, venue and start date & time. Below the performance information are the line items for the checkout. Each line represents one ticket. The ticket details listed include the seat location, discount code, price, excluded fees and line item total. The expiration listed is how long the tickets will remain in the basket. The expiration is set-up on a performance basis; details on ticket expiration can be found in Section 2.5.1b part 16: Ticket Reserve Time. Discount Codes may be edited by selecting the Change for the line item or Mass Apply Discount buttons, if available, for that performance. Tickets can also be added to or removed from the basket as necessary. Appropriate checkboxes are provided if there is a need to WAIVE any EXCLUDED, ORDER, or DELIVERY fees. The summations tell you exactly how much money is being collected for each item including the ticket face value. To remove an individual line item, check (enable) the box to the right of that item and click the “remove” button. The page will refresh with this item removed. Page | 17 Begin Checkout Basket Options: as you can see, these buttons are red to show that this is a serious decision and follows the traffic light coding • ABORT ORDER - removes all items from the basket and remove patron or member selected for call center • DELETE BASKET - removes all items from the basket but if a patron is selected, the patron affiliation will continue for this order Member Options: if you have the Membership Module selected, then your members, based on their level of membership, may be entitled to special discounts. Their account will unlock the discounts available to them and only allow that quantity to be enabled. To search for the patron you can use the magnifying glass or if you print cards, this would be a number you would want added to the membership card for easy reference. Once entered, you can click change to the line item and select the MEMBERAL discount code for their price break on the tickets. Anonymous/Walk-Up Checkout: (if enabled for the user) the sales person is able to proceed with the general "walk up" sales based on Payment Methods enabled for the performance. The FINISH ORDER BUTTON will complete the order and send the print job to the printer. A convenient field is given to assist in calculating change if a Cash payment method is selected. If credit card is chosen as the payment method, that screen will appear and you can either swipe the card through a USB device hooked to your computer or manually enter the data. Patron contact information is not collected through anonymous checkout. This button is yellow for this reason as you will not have any information to contact the patron; we recommend only using this the day of your event as hopefully you know at that time that the performance will not be canceled. Otherwise you can later search by the order number printed on the tickets or the person’s credit card number if they paid by that method. Call Center Checkout: screens will guide operators through steps that will allow the creation of a new patron or assignment to an existing patron in the system for the order. If you are selling advance tickets, this is the selection you should use. Hold Tickets: The New Hold and Add to Hold buttons are also provided in the Box Office Interface Screens. Holds or addition of tickets to existing Holds are made in the same fashion as completing an Order. NO PAYMENT is received for Holds because they are not considered sales. A Hold though MAY BE CONVERTED into an Order (sale) at the operators discretion. Holds effectively remove an amount of tickets from capacity with the easy ability to convert these to an order before or after the performance occurs. Page | 18 Customer Information The first step required is associating the tickets in the basket with a patron account. You can either select an existing patron or create a new account. The system checks for duplicate email addresses but no other contact information is checked so we suggest always asking (and maybe even checking) if the patron has purchased tickets before so that you can keep your system clean without creating duplicate patrons. On the public website, the email address is considered the login for the account and the user must provide this to create an account. An email is automatically sent by the system to confirm the order to the patron. They can later check on this order by logging into your ticketing system through the “My Account” link on the header of your public ticketing website. As you can see in the image below, as you complete the Call Center Checkout, the top of the screen tells you what step you are currently on and which you have completed. Those in green are completed, the yellow is your current step and those in red text are steps still to be completed. You must follow through the progression completely when you choose this checkout method. Page | 19 Delivery Option After the patron is selected, the patron then chooses the method for delivery of their tickets. In the performance below, only one Delivery Method is enabled (Print@Home). This is also the portion where, if enabled, the customer is asked how they “Heard About Us.” You can add additional information to be displayed here (and on this step on the public website checkout); see General Setting > Delivery, section 1.1.1 part 9, for more information on this. Delivery Option “Heard About Us” Delivery Information The delivery information is then confirmed. If you are shipping to an address, the address populates and you can change this by clicking the “edit” button. It can be different than the patron address. If the patron selected print@home, their email address is confirmed during this step as you can see below; the email address for ticket delivery can also be changed here and does not have to match the patron information. Page | 20 E-mail Confirmation Page | 21 Billing Information It is vital for you to have billing data for your patron consistent to that of their credit card company for security reasons. The matching of the zip code can significantly assist when disputing chargeback claims. To check on the address matching, the system can be enabled to verify the Zip Code for you. In this case, the credit card will not be processed if the zip code provided in the billing information does not match that on record with their credit card company. In each order that is paid by credit card, there is a “Credit Card Transaction and Refund Transaction History.” To see this, scroll down in the order detail and you will get all the information on the credit card transaction (see Ticket Management > List Orders; section 4.2 of this manual). The system will always check for zip code and street address matching but will not reject the order to have the zip code matching be set as a requirement. You can either edit the patron account by clicking “edit this address” or you can create a new address for the account specific for billing by selecting the “add new address” button. After the address is approved or adjusted, you enter in the payment information. Like the Anonymous Checkout Option, you can swipe a credit card at this point or manually enter in the card information. You can also choose a Box Office Payment Method at this stage; clearly the Credit Card Zip Code check will not be performed if a Box Office Payment Method is chosen. Another security feature is available on the website and call center – you can request the credit card security code. This feature is used in the industry to make sure that the card is actually in the possession of the person who is making the purchase and also assists in chargeback disputes. Click here to “Add New Address” Click here to edit an existing address Page | 22 Confirmation The confirmation is the final stage before the order is completed. On this screen all information that you inputted through the previous steps are displayed. As a part of your standard operating procedures, whatever disclaimers that the patron must agree to should be repeated at this point including things like “No Refunds or Exchanges” and/or “Event happens rain or shine.” On the public website portion of this step, the patron must click a box stating that they agree to the Terms and Conditions of the Site and acknowledge the Privacy Statement. You can edit either of these in the General Settings (see section 1.1). Click the “Place Customer Order” button to complete the transaction and place the order. Finished! You have just completed an order. An email will be automatically sent to the patron’s email and the final page below will be displayed. The patron on the public website also sees a similar page; only upon the seeing the 6-digit order number is the order completed. Unlike using the Anonymous Checkout, the tickets will not automatically print; you can print out the tickets by hitting “Print the Order.” Click “Continue” to process the next order. 6-Digit Confirmation Number Page | 23 1.3 GA Touchscreen This is a custom development project for any system. If you are a high-volume (or have consistent highvolume) days and you are a GA venue, this is a project that you might want to consider investing in for your box office. If you would like to see a touchscreen interface demonstration, contact your Project Manager for more details. 1.4 Public Website To see what the public is seeing at any time, the shortcut button of “Public Website” appears on the home screen on the top frame of the administrative site. Clicking this shortcut will open a new window with your public ticketing site so ‘you can see what they see.’ 1.5 Left Navigation The left navigation bar of the administrative site is used to select whatever module and menus you desire. Each system user account may look different depending on what you are allowing that user to do in the system. Only Site Admins will look exactly like the images in this manual. All other users will have scaled down versions. Logoff No user should leave their station logged in. For accounting and general security reasons, when a user is leaving their station, they should logoff from the ticketing site. We strongly encourage you to make this a part of your standard operating procedures. Remember that logins are tracked as well as order and hold modifications with the user id so each must be unique and should be secure. Change Password Unlike Windows, there is no way to make users reset their password after a certain number of days. Changing passwords every so often is generally a good idea for security protocol. The user can have control over this is you enable it for their user account. The site admin can also change the password for any user when they login (see Part 7: User Administration for more information on system user accounts) Page | 24 Changing Your Ticket Printer As you may use your account on multiple terminals, one of the first steps upon login should be to choose an appropriate printer for the terminal. When you select change printer, the following information populates in the bottom right frame. The printers populated are all those installed and active on your computer. To select the proper printer for the ticketing system, click “choose” next to the printer name. You can then click “Print Calibration Ticket” to test your printer setting. Most adjustments are made on the printer itself but contact your Project Manager if you need to make adjustments to your Ticket Layout based on your ticket stock. Page | 25 *Part 2: CONFIGURATIONS & SETTINGS Under Configuration & Settings, users can set up the building blocks of the ShoWare™ ticketing platform. Most information located in this part of the system is considered a place holder and is necessary to be able to proceed with the creation of components listed further down in the system. A hierarchy is established that keeps the user on a linear path towards stating to the system what is on sale and how the sale is going to proceed. While Part 2: Configurations & Setting is lengthy and detailed, understand that is done during your initial site set-up/training and can used as a reference if you want to change something in the site (which should not happen often). Part 3: Events & Performances is where you will spend most of your time once your system set up is complete. The entire configuration is going to be done within these two menus. All further sections are for administrative functions: how you find your orders, fulfill your tickets, print your tickets, get your reports, handle your patrons and members, et cetera. Page | 26 2.1 General System Settings General System Settings allow the users to set up Global parameters for the whole ShoWare™ ticketing platform. Page | 27 2.1.1 General Tab This area allows the system administrator to create general information for the system as a whole; these items cannot be changed on a per-event or per-performance level unless specified in the following notations. Page | 28 General See Images following the text for screen shots of locations to fill in the following data. 1. Ticket System Name: This is the name that is going to appear at the top of your browser and on the authentication screen. This also can be used as a place holder; I will show you what a place holder is further down on your site. 2. Privacy Policy Email: This is a "Place Holder" in Privacy Policy Text (see below). This is your Contact Email Address for Patrons that have questions or concerns regarding your privacy policy. 3. Password Reminder Email: This is an email that patrons who have an account receive when they have forgotten their password. Clicking on the “forgot password” link will tell the system to send the patron an e-mail with their password reminder. 4. Ticketsystem Phone # (Call Center): Under every performance there is a performance status option where you can limit the sale of tickets to “phone call only”. If a patron needs information about a particular sale or they want to purchase a ticket on the Public Web site, there will be a telephone icon. When they click on the icon, the Ticket System Phone # appears in a pop up window for them. 5. Home Page Site Info: This block of information shows up on your public web site in the lower left corner, it displays your business information. This should contain your Mailing Address, All Phone Numbers, Box Office hours etc. Content must be entered in HTML Format. This block of code will expand to accommodate as much info as needed. Page | 29 6&7. Privacy Policy & Terms of Use: The privacy policy and your terms of use are located in these 2 fields. It appears on every page at the bottom of the screen and on 2 popup windows. This is where you put in your policies and the terms of use for your site. *HTML compatible and suggested Note: The system comes with a default Privacy Policy & Disclaimer. The text located in these 2 windows is a template that we have created, through our research on the web and in conjunction with our corporate lawyer. You can utilize them in their entirety or you can highlight, copy, and cut them out and then input your own privacy policies. *DISCLAIMER – We are not liable for statements in the Privacy Policy, Terms of Use or how you follow the listed statements with your standard operating procedure; use those listed at your own risk. Page | 30 8. New Patron Account Welcome Text (Public website only): This text comes up when a new patron creates their account. This is a nice way to personalize their experience. Text can say something like Thank you for creating an account, Check back often for special offers, or anything else you want to input in there. *HTML compatible 9. Delivery Method Selection Intro (Checkout): This message comes up at check out to provide your patrons with any important messages they need to know regarding your shipment methods. For example, most shipping providers will not ship to a P.O. Box. That is the default message we provide you with. *HTML compatible and suggested a. ADDRESS VERIFICATION: When people create their standard address through their patron profile, they might use a P.O. Box or an address other than their billing address. The banks will not issue a credit card to a P.O. Box; they require the billing address to be a street address. When you have address verification services set up in ShoWare™, your payment gateway will cause the transaction to fail because the shipping and billing address do not match. b. DEFAULT MESSAGE: You can use this standard message so your patron will be sure not to use a P.O. Box. In case you have changed it, the default text and html code so that it appears in RED on your site is: • <font color=”red”>We cannot ship to P.O. Boxes</font><br> • Some people change it to say “Please use your billing address as your standard address because we check for credit card verification.” c. ADDITIONAL STANDARD TEXT: We put this in here as a page fill to remind you that you need to input some information that your patrons need to know. We have also added that we need a photo ID and the credit card used to purchase the tickets for patrons picking their tickets up at the box office. In case you have changed this text, the default phrasing is below: • You must bring a photo ID and the credit card used to purchase these tickets. • Why? In the Ticket Buyer Report (see Reporting) you will find the order # for the person, the last 4 digits of the credit card and the name of the person. You can expand this message or alter it as you see fit so that your patrons know what they need to do when the reach the point where they select the delivery method and right before they enter the payment screen again Page | 31 10. Confirmation Screen Message (Checkout): This box is for you to input information to reinforce policies or to state certain facts to your employees and/or patrons. a. This message appears on both the check out page in the box office interface and the checkout screen on the public site. It appears next to the check box that says, “Yes, I have read and understood the terms and conditions of the site.” This is something that has been traditionally used in the past to reinforce policies that your merchant services might require. b. Some clients and merchant processors need to see “No Exchanges AND No Refunds” or “Please check our website at www.___.com for the latest update on anything that may affect your tickets, like weather, construction, and events happening around town.” 11. Refer to a "Subscription Package": How do you refer to subscriptions? a. Examples Subscriptions are a series of tickets, some people call them subscriptions, mini plans, base ball teams call them season tickets b. Here you have the ability to give it the name that you choose for your installation. Always in singular the “s” for the plural will be added by the system. 12. Hover: If you have reserved seating seat maps and image maps you might be blocking off certain seats, you might be making sections unavailable for purchase, sections might be depleted, or there might not be any more inventory left in those sections (AKA Sold Out). Some accounts want those to appear as sold out some want them to appear as NA or Not Available, so we have given you a field here to choose how you want it to display when there are no more tickets available in a section on a Reserved Seat Map (see Venues > New Seat Map). Page | 32 Email Confirmation See Images following the text for screen shots of locations to fill in the following data. 13. Email Confirmation Settings: With every purchase the patron receives a confirmation email. You can type whatever you like here. Remember, this is a system wide setting, so the information shouldn’t be performance specific. 14. Confirmation Email Name: This is a place holder that can be an email from wherever you want it to originate from. Example, V-1 Ticketing Services, ABC Customer Services, XYZ Ticket Verification 15. Confirmation Email Address: This is another place holder. Here it says [email protected], but it should be a local email address/alias for your company like [email protected] 16. Confirmation Email Phone #: Your contact number will also be in the email for your patrons to be able to contact you with any questions or with anything to do with the order by phone. 17. Confirmation Email Fax: Again, this will also appear so your patrons can contact you. 18. Confirmation Email Message: This will appear right below the header and order # of that confirmation email. • The system generates information containing the billing information, shipping information, seats/reservation and day of purchase. • The system will allocate as much space as you need in here to input whatever information you want. For instance, “Thank you for purchasing from_________. Come back and look us up at www.yourcompany.com for future offers and updates. We appreciate your business.” Page | 33 Public Website Display Settings / Intl Shipping See Images following the text for screen shots of locations to fill in the following data. ShoWare™ is an international company; we have installations in Canada, South America, the Middle East and Europe. 19. Allow International Mailing on Public Site… If your business requires the shipment of tickets to international address, you can choose to permit international mailing on your public web site. The country’s currency symbol, the abbreviation, the name, the date format the time from the 12 hour am. • You do not need to change any of the other Country, Currency Symbol, Currency Abbreviation or Currency Name. • If you choose, you can change to one of the other date format of change to a 24-hour clock (Military Time) Page | 34 Settings for Ticket Search and Selection See Images following the text for screen shots of locations to fill in the following data. These settings affect the public user on the website, your “Online Patrons,” only. 20. Browse by location: This is a feature that allows you to display information on the home page. If you have more than one venue/location where events happen, you will be able to show them on your public web site by choosing a city. This will filter the events and performances based on that specific venue. You can also choose to show only venues/location with upcoming performances or all of your locations independent of whether they have valid performances or not. • To remove the “Locations” section of the left side bar all together, see Display Options > Locations. 21. Jump into Section Detail on Public Site, if Seat Map has only a single Section: The system can be configured to go directly into the section detail that has the only available inventory; this reduces the number of clicks your patrons make if there is only one section from which to choose tickets. 22. Prohibit Gaps (Reserved Seating): This is to reduce the occurrence of orphan (single) seats. Customers will be required to order contiguous blocks of seats. 23. System Password Use Enabled & Access Password: One of 3 that can be configured in the system this is the first one and is on a global level. This password will grant access to protected events and performances if system password use is enabled. The password will work in addition to the event which is the second level or performance which is the third level of passwords. Page | 35 Call Center Settings See Images following the text for screen shots of locations to fill in the following data. 24. Call Center Settings: (when these options are selected) It will expand Discount Code Selection in Call Center for GA Sections by Default and it will Expand Price Categories and Allocations in Call Center for Reserved Sections by Default. a. Expand Discount Code Selection in Call Center for GA Sections by Default: For your GA sections we have the ability to expand the discount code selection on your box office interface. So if you have a GA section with 15 different discount codes, with this option you will be able to see all available discount codes allowed for the particular performance listed. At which point you will be able to set a quantity and proceed with check out. This applies for both the box office and call center interface. b. Expand Price Categories and Allocations in Call Center for Reserved Sections by Default: This is one of our latest features! When you choose to expand price categories and allocations in the call center for reserved sections you will see an information block with all of the pricing and allocations. This enables better viewing of price category seat availability, so you can navigate if there are allocations or holds without having to go back and forth to different screens. You can just go directly into a particular section and deal with those specific allocations. Page | 36 Settings for Shopping Basket & Checkout See Images following the text for screen shots of locations to fill in the following data. 25. Max Tickets per Basket: Here you can choose the maximum amount of tickets a ticket buyer will be allowed to purchase per basket. • We guarantee the system for 100 tickets or under in a basket. The developers can change it to exceed 100 if you need, but you understand that the software developer, VisionOne, Inc., will only guarantee up to 100. If there are any problems with tickets and time outs then we would have to charge time and materials to trouble shoot the errors. • This particular max ticket pertains to how many per basket up to those 100 tickets you will allow globally for your people in the box office interface AND your customers online to be able to input in their basket. You also have a setting like this under every performance; this limit takes precedence over the performance when the performance is left at “0” – otherwise, the performance limit will set the per-order basket limit. 26. Show Available Delivery Options in Basket: Under basic configurations you are able to configure your own delivery methods. The patron can choose from the available delivery method. We have created pages that come up in the purchasing process. For the patron using the public web site, the page comes up after they have chosen their seats and logged in and for purchases. Going through the call center a page comes up right after the patrons name is entered. 27. Minimum Age of a person to be allowed to create an online Account in this system: Many venues have certain age limits and this is where we input that age. It shows during the patron creation screens. The patron has to click a button agreeing that they are of age to purchase tickets and to enter the premises. 28. Renew ticket reservations on the public website during check out: During check out you have a set amount of time that tickets can sit in transition before the system times out and the tickets in transition either have to be purchased and that ticket will go into a sold status or those tickets will be purged and returned back into the inventory where they can be selected and sold. Right before the system times out a pop up will appear saying “one or more tickets in your basket are getting ready to expire.” Here they will be able to renew the amount of time that the tickets will be kept in the basket so they can proceed comfortably with their check out. It is up to you whether you allow this or not. 29. Questionnaire during Checkout (Heard About Us): This section allows the Site Admin to track marketing efforts and identify the source of ticket purchasers. Enabling this will display the questionnaire on both the public and call center checkouts; you will input the data fields in Section 2.3.3: Creating Heard About Us Values. Page | 37 Ticket Printing and Fulfillment/Admin Pages See Images following the text for screen shots of locations to fill in the following data. 30. Settings for Ticket Printing and Fulfillment: These settings will only affect the administrative users of the system a. Will Call Pick up Settings: This gives you the option to either have the patrons pick up all tickets in their order at the 1st performance that they are attending or pick up tickets for a particular performance at each performance separately if there are multiple performances in their order. This only affects “Mixed-Basket Systems.” b. Number of Receipts to Print (Physical Ticket Printing): Many requests have come in for the option to print receipts with the tickets or never print tickets. Clients have also asked that a receipt print for the client and another for the box office. Here you have the option for none, the standard of 1 or 2 receipts to be printed from the system. Remember that we are setting the global settings here so this pertains to the whole application. i. These are ticketed receipts that are printed along with the tickets for the will call tickets. ii. If you choose 1 receipt there will actually be 2 things printed in addition to the actual tickets: the signature card which has the person’s name & address if the order is to be mailed and then one copy of the receipt. 31. Settings for Admin Pages: (when selected) will display the upcoming performances and today's sales on the welcoming screen of the ShoWare™ Admin pages. a. Show Upcoming Performance Stats (Admin Homepage): When any user logs in, you have the option to show them the current sales figures, including a graph, for the next 10 performance. This gives them a quick glance of what is happening next in ticket sales. b. Show Today Sales Performances (Admin Homepage): Again, when the user logs into the administrative site, you can give them a glance at every upcoming performance that has sold tickets “today.” Note: “Today” is classified as 12pm PST to 11:59pm PST as the server is housed in California and the back end data is always in PST time. Please contact your project manager if you do not understand how to convert your current time to PST. Page | 38 Ticket Provider Fees/VisionOne Only Sections See Images following the text for screen shots of locations to fill in the following data. 32. Ticketing Provider Fee: This is used for internal reporting purposes only. Keep the values of what you are paying ShoWare so you can compare to the billing or appropriate reports under reporting (FOR YOUR INTERNAL PURPOSES ONLY). 33. VisionOne Only: These settings that can be changed ONLY by the developers of ShoWare™, VisionOne. In here we have the credit card information and other sensitive system information. Save and cancel the action buttons on the bottom Be sure to save everything you have changed. You will receive a warning reminding you that this is a live site and your actions will affect the live site in 1 to 2 seconds. Any customers online at the time will be affected by the changes you made but it will not interrupt their purchasing of tickets from you. Anytime you change anything in ShoWare™, you will need to SAVE or CANCEL. Do not use the back buttons to navigate and remember that if you don’t hit save, and click back, your work will be lost and you will need to start over from the previously saved settings. As a means of saving space, the VisionOne Only section of the General Settings have been condensed in the image below. You can see the full data on your General Setting and ask your project manager about any of the data. Page | 39 2.1.2 Display Options This is the second option when you enter into the General System Settings in the Configurations & Settings Module. These options configure your internal (Admin) view and external (Public) display of your ShoWare™ ticketing platform. These values are set to default values but may be changed by the administrator. You should use your development site to decide how you would like your system set-up. This section may be something that you decide not to tackle until you have set some events and performances up so you can see how your changes affect the look of the ticketing site. Page | 40 Featured Events If an event is not featured, it will not show up on your ticketing home page. It will still show up in the category it is assigned, but not on the main landing page. 1. Show Events Featured: choose to show featured events or upcoming events on your system. 2. Max # of featured events: how many events you would like to show on your public web site home page? 3. Number of Featured Events per Page: How many you would like to appear on each page? NOTE: If max per page exceeds max # of upcoming performances you will see a paging system at the bottom that says 1, 2, 3, last 4. Featured Event Sorting: how you would like the events sorted for the online patrons? • By Priority: this will give you a space on the event creation page where you can enter 1 – 999 to have them appear in whatever order you determine upon creation or at anytime while the event is active • By Performance Start Time: the system will place the featured events in chronological order. Under the event screen will be an NA (not available) to show you that you are sorting by performance date • Alphanumeric: you can also choose to do an alphanumeric so it will sort 0 to 9 and then A to Z. 5. Show events that are active for online sales only: this will eliminate the need to prioritize events that have no upcoming performances and is a tool to keep the site lean and clean for the public. However, if you would like to announce an event before it goes on sale or keep it up after all the performances have had Online Sales end, you can unselect this and performances will remain on the site until the last performance for the event has ended. Page | 41 Upcoming Performances 6. Show Upcoming Performances: Do you want to display upcoming Performances on the home page of the public web site? Many people who have a few main events with multiple performances choose to only display events. 7. Max # of Upcoming Performances: maximum number of upcoming performances to display 8. Number of Upcoming Performances per Page*: How many of those you want to see per page. *Option also applies to Search Results (Keyword and Date) NOTE: If max per page exceeds max # of upcoming performances you will see paging system at the bottom that says 1, 2, 3, last Event Listing This is when you choose a category and can see the events that you have selected and are active in that category. 9. Number of Events per Page: how many events would you like showing up per page under each category? • NOTE: If max per page exceeds max # of upcoming performances you will see paging system at the bottom that says 1,2,3, last 10. Event Display Style: maximum number of upcoming performances to display • List (Name Only) – this will display the event and looks similar to a performance listing • Detailed (Name, Image and Description) – this would look like your featured events, only under each category 11. Event Sorting: Like the featured events, you can choose how events are sorted • By Performance Start Date • Alphanumeric Page | 42 Event Detail 12. Number of Performances that Trigger Calendar Display: For example, you have a tour that runs for 3 months on Friday, Saturday and Sunday or a play that runs 5 days a week for 5 weeks - using a calendar display is a great way to simplify how the customers find the performance on the date they can attend your event. • When you have a number of performances that are equal to or exceed the number you select, a calendar is displayed under the event and the patron can click on the date they want to attend 13. Number of Performances per Event (Per Page): Again, a way to try to streamline the way the customers find the date they want to attend. A long page with listing your next 60 performances might be cumbersome for your customers to scroll through or it could be exactly what you are looking for – the choice is yours! 14. Number of Upcoming Performances per Page*: How many of those you want to see per page. *Option also applies to Search Results (Keyword and Date) • NOTE: If max per page exceeds max # of upcoming performances you will see paging system at the bottom that says 1,2,3, last Locations This option is only displayed if you have selected it to appear on the left side bar under the General Settings (see Part 20 – Browse by Location). 15. Show Locations (Venues, City/State): If you are holding events at various locations in different cities, this tool for your online patrons to sort by the city. • Leaving this unchecked will leave the “Locations” section off of your left navigation bar on your ticketing site. • View Venue Listing is a link that will also be present under the option to browse by city. This link provides complete address information including a ‘Map It’ function through Expedia so your patrons to get directions! 16. Number of Venues per Page: This affects the number of venues listed per page in the View Venue Listing page 17. Number of Performances per Venue (per Page): When the patron chooses a City online, this will decide how many events per City are listed per page. If the maximum per page is exceeded with the number of performance for that City, a paging system is displayed so the patrons can navigate. Other Display Options 18. Checking any of the below boxes will enable that search function in the left navigation bar. All, none, or whatever you choose in between can be enabled – this is your site! • Show Search Box • Show Event Categories: You will define categories under Basic Configurations • Show Calendar: Any date that has a performance will be featured in the calendar along with a link where the patron can click and see what is happening on that date. • Show General Information: You input the general information under the General Settings > General > #5 – Home Page Site Info. Page | 43 • Show Link to Reporting: The reporting function is for promoters to log in and track only sales you have permitted them to see. For information on how to set up Promoter Logins, see Reporting Users. Remember to hit SAVE if you have made any changes and want to keep them! Page | 44 2.1.3 Performance Listings Definition of what to display in the Performance Listings depending on the System (Internal) Status and manually set Status for a Performance. All the values are defaulted for NORMAL operation of the system and should not be changed without consulting ShoWare™. WARNING: If there is a need to change settings and options from these menus, please consult your Project Manager. Page | 45 2.1.4 Order Status Display Orders that are made through the public web pages and the Box office interface have various INTERNAL statuses. These statuses determine if the order needs to be PRINTED, MAILED, SHIPPED etc. Every action performed in an order gets tracked and the ORDER DETAIL HEADER is updated accordingly. For the purpose of avoiding patron confusion and the prevention of invoking questions from the patrons as they check their orders through their Online Account management, you may display messages that are pertinent to your Patrons. For example: Although there is an INTERNAL need to see that a Mail order is Processing because it is not printed yet, or not shipped yet, the patrons online checking the order can be shown the COMPLETED message; if they see “processing” they may think that their transaction has not gone through and that their ticket order is not completed. Ask your Project Manager for further information if you are interested in changing the status name on the public website. Page | 46 System Names Defined The status as defined below also applies to holds. 1. ORDER STATUS a. Pending: only valid in a split payment system – in this case the order has been completed but the order has not been paid in full b. Processing: you have received all the money but the tickets have not been printed c. Printed: tickets have been printed; this will be the final stage, unless canceled, for Will Call orders d. Shipped: tickets have been printed, put in the mail and the mail flags have been enabled for the order e. Canceled: the order has been completely canceled. 2. ITEM STATUS a. Unpaid: this is only valid in a split payment system where the order has been processed but money has not yet been received b. Paid: this is a valid ticket and you have the money for it c. Accounted: an order has been processed and has been classified as “Accounts Receivable,” so payment has not been collected; this is only valid in a split payment system d. Canceled: this is a ticket in a hold that has been canceled e. Canceled not Refunded: if you are using Authorize.net, this is the status your tickets will remain at since refunds cannot be processed through the system. You will need to manually refund the order and may want this to show to the public as “Canceled and Refunded” to prevent customer confusion f. Canceled and Refunded: you have completed all steps to cancel and refund the ticket through ShoWare™ Remember to hit SAVE if you have made any changes and want to keep them! Page | 47 Page | 48 2.1.5 Ad Locations The ShoWare™ template can accommodate Banner ads. Locations determined during the "Look and Feel" designing phase of the project are enumerated here. Please consult your Project Manager for appropriate specification of the number and placement of those locations during the designing phase of the project. New ad locations or the change of a Location Code require changes to the Public Site and must be done by the ShoWare™ Developers; a customization fee may apply to any changes. This customization may cost money so it is strongly encouraged that you determine the sites and finalize everything before approving the style of your ShoWare™ site. Page | 49 2.2 Basic Configurations Basic Settings/Configurations for the system control the inventory and how it is processed and handled by the system. It takes control of "blocking off" seats in Reserved Seating sections, Discount/Price codes, Payment Types Accepted, Delivery Methods you will offer, Order Fees, Ticket fees, and Banner Ads can be specified in menus that follow. Page | 50 2.2.1 Seat Allocation Types What are seat allocations? A seat allocation blocks off the seats to all users except those you allow to edit the Events & Performances. They are only used in Reserved Seat Maps; if you are not using a Reserved Seat Map, you can ignore this section. There are two types of Seat Allocation. • System Seat Allocation Types: These are already predetermined by ShoWare™. These are types that are being used by the SYSTEM. These types many not be deleted, but their attributes (color of the seats & the label that is shown on the web) can be altered. • Custom Seat Allocation Types: An unlimited amount of these types can be created by you and other operators of the ShoWare™ platform. Seat allocation types are always either the SYSTEM or the operator classifying the "state" of an individual seat in reserved seating sections of maps utilized in the system and assigned to performances. Simply put, this is a way to "block off" seats that will NOT be available for sale for SYSTEM reasons or custom needs. Operators can select the color by which those "blocked off" seats will appear during display. Another special feature of these Allocation types is HOW they display to your patrons online. This is a way to "mask" the purpose and classification of WHY these seats are "blocked off". For example, you may have an allotment always held for VIPS; internally you want to see them but you may want the public to see these as “Sold Out” so they don’t question these seats showing as unavailable. TIP: As the customers see the color of the seats, you may want to choose the color that choose to “SOLD OUT” as the color for any other section that the public will see as “Sold Out.” Page | 51 Creating an Allocation Type There are three parts of an allocation type. 1. Name: This is the name that will be seen by users on the administrative end. 2. Color: Pick colors that will help your box office see that these seats are allocated; in other words, if you are using all blues for your seats, you might want to use orange, yellow and pink for allocations. You may also want to keep these similar to the ‘sold’ color as the patrons on the public website will see that these seats are blocked off. 3. Website Name: If you create a new type and do not select one of the predetermined options, the system assumes that you would like to display the name you assigned the type. It will be automatically populated to the list after you hit save. Remember that this is the Name that the public sees! Page | 52 This is what the system can look like when you have a large number of allocations created. Page | 53 2.2.2 Discount Codes Discount Codes are commonly referred to in other systems as Price Classes or Levels (PCs or PLs). Discount codes are place holders that can be activated and assigned monetary values in each performance. Discount Codes apply SYSTEM-wide, so be careful not to make too many discount codes that are too specific. For security reasons, once a Discount Code is used by any performance, it can NEVER be deleted. TIP: When creating a Discount Code, use caution and ask yourself, can I use this for multiple upcoming performances? Keeping the number of discount codes down will help with your performance creation and keeping the site “clean” throughout your use! There are two categories of Discount (price) codes • System Discount Codes: The REG Discount Code is utilized by the SYSTEM for INTERNAL purposes and may NOT be deleted. • Custom Discount Codes: The operators determine the nomenclature of these codes. With every ShoWare™ installation, the operator can define an UNLIMITED amount of these codes for usage under every Performance Pricing. Again, we urge caution when creating these so as to streamline your performance creation. Page | 54 Creating a Discount Code Custom Discount Code ATTRIBUTES: Every Discount code has attributes associated with it. An operator can determine: 1. Discount Code Designation: Mainly a short form of how it is denoted throughout the system. That value appears on Confirmations of orders and Order Detail screens; an abbreviation 8 characters or less. Ex: “CHILD” 2. Name: Usually the "longer" designation of that particular Discount code for more intuitive interpretation of the above stated code; a descriptive phrase. Ex: “Child – 12 & Under” 3. Group: Groups are mainly used in Casino installations and those systems with large amounts of discount codes in use by performances at the same time. Discount Code Groups should generally not be used unless you have an excessive amount of discount codes enabled for one performance. For example, if you have 20-30 discount codes available for one performance, you may choose to simplify by grouping them rather than having them all listed at once. 4. Sort Order: This is for those who use GA seat maps. GA Seat Maps are buckets and you probably want your patrons to easily access the most common bucket. If REG or ADULT is your most commonly bought discount type, then give it a sort order of 1, with maybe CHILD or SENIOR 2 and 3. 5. Permission Required: When option selected, only Site Admin’s and Selected Users are allowed to use this Discount Code. Note: This Discount Code can still be enabled for the Public Website. If invoked, an appropriate link will be displayed that will allow the operator to select appropriate uses that will be able to view and finalize a sale of a ticket under that code. ONLY specified users will be allowed to make use of that code through the Call Center still. 6. Force Will Call: Operators maintain the ability to FORCE a whole order INDEPENDENT of the available Shipping methods for a performance to WILL CALL for verification of discounted tickets that may have been purchased under a specific and "flagged" code. Shipping as a Delivery Option will be disabled if Tickets with this Discount Code are purchased, except if the Discount Code is the Default Discount Code for a Price Category (Performance Pricing) or Performance is set up to allow Delivery via Mail only. 7. DO NOT Print Tickets: If this option is selected any ticket purchased under the specific code will NOT be printed by the system. Note: Existing Orders and Holds will not be affected by a change of this setting. 8. Members Only: Those selling memberships through the site (ex: pay $250 for and become a Historical Pioneer so you receive $2 every adult ticket) can make a MEMBERS only code which can only be accessed when the member logs into the site through the account they purchased their membership. 9. Enabled: By default this option is set to ON. Discount code becomes unavailable for Performance Pricing if option is deselected. The discount code remains active for Performances where this Discount Code is enabled and performance is still ACTIVE during sale. This is the only way you have to archive old/useless discount codes. NOTE: ShoWare™ retains ALL financial transactions even if the order is Cancelled and Refunded. If an order exists in the system under a specific discount code, that code MAY NOT be deleted from the ShoWare™ system. Page | 55 Page | 56 2.2.3 Payment Types Unlimited Payment Types can be created by the operators. All Payment types, Cash, Check, etc can be defined under this menu option. Notice that the CREDIT CARD payment type is a SYSTEM option and MAY NOT be deleted or altered. NOTE: If you plan to change your merchant processor or payment gateway (PayFlow Pro or Authorize.net), contact your Project Manager so they can be sure the transition is smooth and your site has minimal to zero downtime for the change. Page | 57 Creating New Payment Types 1. Name: Specified by operators 2. Comp: if checked, the payment type indicates that no money will be received. The Payment and Reconciliation Report will exclude these Payment Types under the appropriate system set up. 3. Permission Required: If selected, a link will appear after method is saved. Operators may select from the appropriate list of users who can utilize that method. ONLY specified users and Site Admin's will have access to that payment method. NOTE: As with if there is a sale the system particular Method, that NOT be discount code, posted under according to a Payment method MAY deleted. Page | 58 2.2.4 Delivery Methods How do you plan on delivering the tickets you have sold to your patrons? Will you ship via Standard Mail? Do you plan on offering a high speed shipping option? Will you only put the tickets in the mail if you can get an online or eDelivery receipt? All these options are at your finger tips. You determine which delivery methods to offer, but as with most Basic Settings, there are some Delivery Methods that are predetermined and cannot be deleted. You can change the delivery time required for these. When setting up the performances, you can select to have shipping method available on a performance level. The SYSTEM options are: • Will Call • Print@Home Page | 59 Creating Custom Delivery Methods An unlimited amount of these methods can be created by the operator. TIP: when you are setting up the delivery time to consider your business model and that these are running SYSTEM-wide, year-round. As in, if you are offering Standard Mail, remember that the Post Office is not working on Federal Holidays so you probably want to add 1 to 2 additional days onto whatever you are estimating it will take you to print, ship and for the postal service to deliver the mail. 1. Name: Make this a name your staff can recognize and process like FedEx 2Day or USPS Priority Mail 2. Fee: This fee will be added on as a Delivery Fee to each order 3. Delivery Time: Operator maintains FULL control of ALL Delivery methods’ validity FROM THE PERFORMANCE START AND END DATE specified under the General Settings of a Performance. Remember the tip above – better to allow extra time than too little! 4. Display on Web as: Operator may "mask" the name of the Delivery method and offer a different name for display online or this can be the same as the Name 5. Sort Order: Operator may define in which order the methods will be displayed on the public and Box Office screens. Page | 60 2.2.5 Order Fees Order fees are applied ONCE per order; if you are looking to add a cost per head, then use Ticket Fees. Typical Order Fees charged are for Call Center (charging the customer for calling and using your services) or Credit Card Processing. This amount is used throughout the system and cannot be turned off in events or performances. All fees can be waived in the Call Center Interface. During checkout there are two types of order fees that will be charged to the customer – Order Fee (name of your choice) and a Delivery Fee. Both can be set to $0; the customer will see both lines with whatever monetary value you have assigned it. There are two types of Order Fees. • System Order Fees: These fees are specified by the ShoWare™ system. There is one ONLINE Fee that may be utilized under ShoWare™. System fees MAY NOT be deleted but the cost can be set to zero. • Custom Order Fees: An unlimited amount of these fees can be created by the operator. REMINDER: ORDER FEES are applied once to the entire order; these can only be waived on an event level (see Section 3.3.1: Creating a New Event) Page | 61 Creating a Custom Order Fee 1. Order Fee Name: Name of a particular fee can be specified; this can tell you internally how the money was allocated upon performance set-up. 2. Order Fee Amount: monetary value can be defined. 3. Display as: Operator can "mask" the name by which that fee is offered; this is what will show to the customer in their basket as a line item upon check out. 4. Permission Required: if option selected and fee saved, a link will appear that allows the operator to select specific users who may employ this fee on orders; this could be used if you plan to charge a specific amount, say $3 for an exchange of tickets (either seats or performance). 5. Sort Order: Specifies the Display Order of the Order Fees in the Call Center/Box Office Interface; if you do not charge anything normally, you probably want to have one that has a priority of ‘1’ and value of ‘$0.’ Page | 62 2.2.6 Ticket Fees Ticket Fees are LINE ITEM fees. They are applied to EVERY TICKET selected in a basket through the public pages or the Box Office interface; this is a per-head cost, traditionally referred to as a surcharge. As we mentioned with Order Fees, any fee can be waived through the Call Center interface. There is a maximum of 3 Excluded Fees and 3 Included Fees in the system. These columns will appear during the performance creation and in reports as you have it listed. TIP: Be sure to set these up in the proper order the first time, as these are system wide. If you prefer to have Tax excluded and then a Surcharge, change the first line to reflect this. All reports pull based on the system name/column. So the report will pull whatever name you currently have in the first column for reports and then the second column, and so forth (see Reconciliation Report). If you decide to switch these columns later while using the site, the report heading will reflect the changes as will the performances, so your reports will have the data in the correct columns but your headers will not match and you will not find it easy to understand backup data. Types of Ticket Fees There are two categories of Ticket Fees and they act differently in the system and in reporting! • Excluded Ticket Fees: Excluded fees are visible in the Shopping Cart and are charged to the Patron. Common external fees are Convenience Fee (Surcharge) and/or FMF (Facility& Maintenance Fee). • Convenience Fee or a Surcharge (Service Charge) of some sort is standard in the ticketing business so one is already created. You can change the name to match your business model but it cannot be deleted • Included Ticket Fees/Costs: Included Fees/Cost are not visible during the Order Process and can be used for Internal Reporting only (such as tracking of costs, ShoWare™ Fees vs. Your Fee etc, or tracking tax if you want to show a final price to your customers). Page | 63 Creating Ticket Fees You do not change screens during the Ticketing Fee changes so remember to hit SAVE. 1. Name: Operator specifies full name for the fee. 2. Abbreviation: Operator can provide a "shortened form" name for the fee for display in menus and online. REMINDER: There is one Excluded SYSTEM FEE and it is always ACTIVE. You can set the value to zero if you do not wish to charge any fees. Operator can define and employ remaining fees from both categories. TIP: Monetary value to these fees is applied under Pricing and Availability of Performance creation screens. Page | 64 2.2.7 Banner Ads In conjunction with the Banner Ad Locations, operators maintain the images and attributes of the banners that are enabled for the system. Page | 65 How to Edit Your Banner Ad Attributes Remember that some settings for Banner Ads are controlled by the system developers and need to be setup during the “Look and Feel” phase of developing your system. If you request changes, customization to your system may be needed and a cost may be associated. To edit your Banner Ad Attributes, go to Configurations and Settings Æ Basic Configurations Æ Banner Ads. Page | 66 2.3 Options & Classifications Options and Classifications affect how the patrons are managed as well as your other users. The data managed by O&C is: • 1.3.1 Hold Categories • 1.3.2 Patron Classifications • 1.3.3 Heard About Values • 1.3.4 Departments Page | 67 2.3.1 Hold Categories What is a Hold? Holds allow you to put away an allotment of tickets that may go on sale at a later time or that you are planning to sell to a particular group/patron. A general rule could be use allocations for permanently blocking off seats or blocking off seats consistently in a seat map you will use to create multiple performances. Unlike allocations, holds can be used on general admission maps and the system assumes that a hold will be converted to an order at some point in time. You can set an expiration for holds. Hold categories are ways to categorize the holds you will be creating. You can put seats on hold by assigning them to a specific patron already in the system or you can assign the hold to a hold category. Before you create a hold and assign it to a category, the category must be created in this module. You can also assign permissions to the hold categories so that only select box office users can create holds and place them in the category. Some examples of hold categories are VIP Holds, Venue Holds, Promoter Holds, Fan Clubs, and Band Holds. Creating Hold Categories 1. Hold Category Name: this would be generic like Fan Club, Label Buy, VIP Hold; if you want to be specific to a company or purchasers; you would create a patron account (see Patron Management) and then assign the hold to the patron. 2. Permission Required: certain holds, like VIP Hold or Employee may be something you want to restrict to management; enabling this will only allow Site Admin's and users you, the operator, select to access these holds. All administration users will be able to view the holds. Page | 68 2.3.2 Patron Classifications In this menu option, an operator can specify an unlimited number of classifications that can later be assigned to a particular patron. Multiple classifications per patron profile can be assigned. Classifications have numerous uses in terms of tracking patrons. For example, you could use classifications to “tag” subscribers, donors, groups, VIPs, members, etc. You can then use the report “Patrons per Classification” (located under Patrons & Membership Reports) to download contact information for patrons in a specific classification. Think mass mailing/email regarding a group sales opportunity or a discounted ticket offer for VIPs or Subscribers. Where is patron classifications used? Creating New Classifications 1. Name: This is the only attribute for Patron Classifications. This is only seen on the administrative side, so name it so it is meaningful to you and your business. Page | 69 2.3.3 Heard About Values An unlimited number of values can be created, assigned, and offered in an "online" questionnaire form within the checkout pages. You turn this questionnaire on or off in the General Settings (see 1.1.1 #29). Remember: the Heard About Us Values are sorting Alphanumerically. Creating Heard About Us Values 1. Value: this is the name (what you want to customer to be able to choose) and the only attribute of Heard About Us. Remember to SAVE and then CANCEL to return to the list. TIP: If you enter a name, hit SAVE and then enter a new name and hit SAVE, you are saving over the same spot – not creating a new one! Page | 70 2.3.4 Departments ShoWare™ users that are defined in the system can be classified per department. An unlimited number of departments can be created. One department classification per ShoWare™ USER profile can be assigned. Creating Departments Like Patrons and Heard About Us, departments are simple, with only one attribute. 1. Name: This is for internal use only, so set-up the departments how you choose. You are not required to select a department when setting up an ADMIN USER so you can leave this whole section if you don’t care to departmentalize your staff/fellow users. Page | 71 2.4 Access Control Settings Access Control is a restricted area. In the idea of full disclosure to our clients, we want to show you what we see! Access Control has two parts: • Key Matrix Definition – this is directly related to bar code creation. This is ONLY accessible to the software developers; for security purposes, no one else has access to this section • This may actually be three options if you use SkiData Scanning Software in parallel to ShoWare™; in that case the options would be Basic Settings, Gates, Key Matrix Definitions • Print@Home Ticket Layout – this is the set-up of your system-wide default ticket. If you choose to have Print@Home for a performance and do not create custom images for that ticket, this will be what prints on the ticket Page | 72 2.4.1 Key Matrix Definitions… There are three Access Control configurations for the ShoWare™ ticketing platform. 1. Simple Access Control Model: Print@home bar-coded tickets are possible with this model. Print@home is considered a delivery method. Therefore, ticket sales have to end early enough prior to the show to allow time to enable the Print@home delivery method. The reason is to give the operators enough time to download the orders into the scanners and take the scanners to the appropriate gate (for information and price quotes, please contact ShoWare™ support). After the list of orders is loaded into the handheld scanners there is no other communication with the scanners or to the orders put through the system. • This works best for a single access gate where 1 or 2 scanners will be used or if the venue is Reserved Seating with an usher, so you can easily tell fraud if you don’t scan the tickets as two people cannot sit in the exact same seat 2. SkiData Access Control Model: ShoWare™ is a SkiData compatible system. Third party software, SkiData, can be integrated with the ShoWare™ ticketing application. ShoWare™ has a generic integrated SkiData ready template model. Due to the nature of the SkiData platform, the extensive capabilities of ShoWare™ and SkiData, and the diverse topology of every location, a custom implementation is REQUIRED for every ShoWare™/SkiData implementation (for information and price quotes, please contact ShoWare™ support). • SkiData is requires a significant investment and suggested for those that are looking for high security along with the ability to restrict barcodes to a specific entry gate (think arena or stadium). • A ShoWare™/SkiData implementation is in real time with the bar codes being constantly checked and new bar codes that are sold at the gate being constantly downloaded to the scanners. 3. ShoWare™ Access Control Model: The developers of ShoWare™ met the request of their customers for a middle-tier scanning system. SWAC allows for real-time scanning and barcode generation, but does not allow you to restrict entrance of patrons to a specific gate. This is recommended to most of our clients at this time. Depending on the model implemented, the options of this menu will adjust dynamically to allow configuration for either model. This configuration is part of the project’s Go Live process. Project Managers consult with customers to assign appropriate menu options and model. Page | 73 2.4.2 Print @ Home Ticket Layout Print@Home tickets are not only a delivery method, but a marketing tool for you. They also contain valuable information for your patrons. Print@Home Example Below is an image of a Print@Home ticket to help you understand the layout and what you can change – only those marked with the text can be changed! During the performance set-up we will show you from where the rest of the data is pulled. The Print@Home ticket is a template and cannot be changed. Ticket Header 647 x 80pxls Lower Left Footer 320 x 80pxls Lower Right Footer 320 x 80pxls Disclaimer Page | 74 Changing Print@Home Ticket Layout Again, only the images and text can be changed and should only be changed under the guidance of your Project Manager. 1. Report Type: DO NOT CHANGE THIS! This tells the system that this is the generic template and should be used for all performances where a specific header has not been designated. 2. Disclaimer Text: This is not HTML compatable. Below is an example (as well as the default) in the system. The disclaimer on the back of your ticket and this disclaimer could, and maybe should, be the same. 3. Name: DO NOT CHANGE ANY OF THE NAMES! The system uses the names created here by the developers to pull this data correctly 4. File: You can link to a file anywhere on the web for this, including images you upload under the Image Management Section. Any images that are too large will be centered and the excess will be cut off; stick to the pixels requirement listed in the example above (Section 2.4.2: Print@Home Example). Page | 75 2.5 Memberships A Membership is a way of “belonging” to an organization through a donation of money. Memberships generally come with perks, the most common of which is access to discounted ticket prices. Membership pricing is determined by the MEMAL System Discount Code. Keep in mind that memberships can be purchased completely independent of ticket sales. Think of a member as a donor who is given special privileges over a selected period of time (i.e. the membership requires a yearly “donation” renewal). NOTE: There is currently only one level of Membership pricing per Performance. That is to say MEMAL can only be defined once per performance. Page | 76 2.5.1 Membership Settings General Settings 1. Allow Multiple Memberships per Patron: When enabled, this option allows a patron to purchase multiple memberships. If this option is disabled, a patron may only have one membership associated with his account. Admin Pages & Call Center Interface Settings 2. Allow Membership Purchase during Patron Creation: When enabled, this option allows A Call Center/Box Office user to purchase a membership when they are creating an account for a walk-up/call-in patron Public Website Settings 3. Allow Membership Purchase: This option determines whether or not memberships are available for purchase on the ShoWare™ website. 4. Allow Membership Purchase during Patron Creation: When enabled, this option allows the patron to purchase a membership when they are creating their ShoWare™ account for the first time. If this option is disabled, memberships can be purchased only via the membership links displayed on the ShoWare™ website. NOTE: Dependant on Allow Membership Purchase option (See #3) 5. Allow Renewal: When enabled, this option allows patrons to renew a membership that has expired. 6. Show Membership Info and Options in 'My Account' Section: When enabled, this option allows Patrons to see membership options when viewing their account information 7. Show Membership Infobar: This option determines whether or not to display the membership information bar on the website. The Information bar contains links for purchasing and viewing membership information 8. Member Discount(s) avail. Msg.: A Membership advertisement message shown to NonMembers and Anonymous Users in Performance and Section Details if Memberships are available. 9. Member Discounts How-to-get Msg. (Reserved): A Membership advertisement message shown to patrons with memberships in the Reserved Section Detail and Performance Detail. The message explains to customer how to select Discount from the Shopping Cart. Page | 77 Page | 78 Membership Expiration Email If #13 below is enabled, HTML is supported in the Membership Expiration Email. 10. Subject: The text entered in this field will appear as the subject in the Membership Expiration Email that is sent to patrons whose memberships have expired. 11. From Email Address: The text entered in this field will appear as the “from” email account in the Membership Expiration Email that is sent to patrons whose memberships have expired without renewal. 12. Message: The text entered in this field will appear as the message body email in the Membership Expiration Email that is sent to patrons whose memberships have expired. 13. Email in HTML Format: If enabled, this option allows you to enter HTML code in the Membership Expiration Email. Membership Public Website Info Bar HTML is supported in all parts of the Public Website Membership Info Bar 14. Info Bar Anonymous User: The message entered here will be displayed in the Membership information box for all Anonymous Users visiting the ShoWare™ Website. HTML is supported 15. Info Bar Non-Member (but active Patron): The message entered here will be displayed in the Membership information box for all Authenticated Users who do not have a membership. HTML is supported 16. Info Bar Member with Multiple Memberships: The message entered here will be displayed in the Membership information box for all Authenticated Users visiting the ShoWare™ Website who have multiple memberships. HTML is supported 17. Info Bar Active Member with Single Membership: The message entered here will be displayed in the Membership information box for all Authenticated Users visiting the ShoWare™ Website who have a single membership. HTML is supported 18. Info Bar Expired Member with Single Membership: The message entered here will be displayed in the Membership information box for all Authenticated Users visiting the ShoWare™ Website who have an expired single membership. HTML is supported Page | 79 Page | 80 2.5.2 Membership Types As explained above, Memberships allow for you to have “investors” in your attraction/venue. Patrons can purchase a Membership Level (or several if you choose to allow it; see Membership Settings). In this section you set up the benefits of being a member including the price and the number of tickets the member can purchased, when logged in, at the MEMAL discount price. Page | 81 Creating a New Membership Type 1. Name: The text entered here appears as the Membership Name on the Website 2. Call Center/Box Office • Short Description: The Short Description is used to describe the membership where the long description is not warranted, e.g. listings • Long Description: The Long Description is used to describe the membership in detail. 3. Price: This is the dollar amount a Patron will pay to purchase the membership. 4. Number of Allocations: The Number of Allocations is the number of tickets a patron with this membership can purchase at the Membership Price (see ShoWare™ Memberships Overview) 5. Membership can be purchased Online: This option determines whether or not this Membership can be purchased Online. 6. Membership can be Renewed Online: This option determines whether or not this Membership can be Renewed Online. 7. Send Member an Email when Membership Expired: This option determines whether or not to send the expiration email when a Membership expires. (See Membership Expiration Email) 8. Auto-Enroll New Patrons into this Membership: This option determines whether or not new patrons are automatically given this membership. • Please note the following: • New Patrons will not be charged the Membership Fee when auto-enrolled, but existing Patrons will have the option to Buy this Membership. • "Membership can be purchased Online" (see above), disables Auto-Enrollment for new Patrons created on the Web, but not for Patrons Created via the Admin Pages/Call Center Interface • Purchased Memberships during Patron Creation take precedence over Auto-Enrolled Memberships, IF the System is set to disallow multiple Memberships. • Auto-Enrollment is still triggered if the User purchases a different Membership during Patron Creation, causing the creation of TWO active Memberships for the Patron. • Membership Types set to "Auto-Enroll" are not available as selection during Patron Creation. • Membership Types set to "Auto-Enroll" will not be renewed automatically. 9. Membership Duration: Set the duration in months; like an annual membership, put in 12. Note: Changing the Membership Duration for the Membership Type will NOT affect the currently active Memberships of this Membership Type. Only NEW Memberships and Membership Renewals will be affected. 10. Status: Sets the Membership status to one of the following • Active: Membership can be Purchased and Renewed. • Expired: Existing Memberships remain Active, but cannot be purchased or renewed anymore. • Inactive: Existing Memberships will be immediately expired (irreversible!) Page | 82 Page | 83 2.6 Donations At this point, the system only allows you to designate one charity to receive donations. You could tell the patrons that the donations are split equally between a number, but it would then be your responsibility to track the donations. Page | 84 Setting Up Donations General Settings 1. User Defined Donations: In the general settings of the donations module operators have the opportunity to set min and max amounts of donations level (0 signifies No max or min values). You also select what you would like the selection for User Defined Donations to be (Other is most commonly used) 2. Preset Donation Amounts: There are six predetermined levels of donation amounts that can be specified through the ShoWare™ system (0 signifies no set value thus that slot of donation will be excluded from showing on the public and internal pages). Admin Pages & Call Center Interface Settings 3. Allow Donations During Patron Creation: if checkbox is selected the system will display and allow donations to be made during the patron creation pages. Public Website Settings 4. Allow Donations: General setting to allow donation to be submitted in the system. 5. Allow Donations during Patron Creation: if checked it will allow donations to be made during the patron creation profile. Note: Requires "Allow Donations" (must enable #4) Donation Page Layout on Public Site Appropriate fields are provided to allow operator to display messages during the donation process. All fields are HTML capable. 6. Screen Text 1 (before Donation Amount Selection) 7. Screen Text 2 (after Donation Amount Selection) 8. Donation Detailed Information (Pop-Up from Donation Screen) 9. Donation Confirmation (After Donation was made) Donation Confirmation Email Fields in this section will allow the operators to personalize the confirmation email to the donation made by the patrons. 10. Subject: Subject of the email sent to the donor 11. From Email Address: Email address where the confirmation email is going to originate from. 12. Message: text field to allow personalized message to donor 13. Email in HTML Format?: if enabled message Code must be HTML to allow structures and formatting. SAVE and CANCEL are the action buttons on the bottom. Page | 85 Page | 86 2.7 Image Management Under this menu option, operators can manage the image files associated with Events and Banner Ad Images. Only .gif and .jpg files are permitted to be uploaded. An intuitive interface is provided to BROWSE the local computer's hard drive and find the location of the image. Once the image file is selected, the START UPLOAD button will upload the image on the ShoWare™ platform and make it available for selection through the appropriate drop down menu selections. An option is provided to OVERWRITE images with the same name. This is used most often when you are using an image throughout the site and want to change it in all locations; in other words, this is a way to consistently update an image across the site. Every image uploaded in the system will appear in the list of that screen. Every image name is provided as a link and if invoked, an image preview will appear on the right side of the same screen. If you right click on the image when it appears on the right side, you can get the image properties including the full web address for the image and the size. A checkbox is provided next to every image file in the list for DELETION. Page | 87 2.7.1 Manage Event Images Event images accompany text description for display on the public pages. These are associated with Events and Performances but can also house images for tickets headers. 2.7.2 Manage Banner Images Banner Ad images are the images operators wish to utilize in conjunction with Banner Ads defined on previous menu options. Page | 88 2.8 List Box Offices Each ticketing system installation will most likely have just one box office. The setup of multiple box offices is possible, if required. Information for each box office includes the following: Name, Address, Phone, Fax, Email, URL and Description. This information is used primarily for internal information purposes. After you click “Data Management” “Box Offices”, you will be brought to the screen in which you can create or edit existing box offices. You can create as many box offices as you wish by clicking “Create New Box Office“ and you can edit your existing box offices by clicking “Edit“. When creating a new box office, you simply fill in the appropriate name, address, etc. and then click “Save" to save your work. For your convenience, there is a sort function below the "Create New Box Office" button that allows you to sort your box offices if you have too many. Page | 89 2.9 List Promoters Unlimited promoters can be defined in this section of the ShoWare™ system. Information for each promoter can be entered and later edited, much like in the already covered List Box Office section. You can create a promoter by clicking “Create New Promoter”, or you can edit an existing promoter by clicking “Edit” next to the promoter you want to modify. For your convenience, there is a sort function below the "Create New Promoter" button that allows you to sort your promoters if you have too many. If your organization is the only promoter for your venue, then only one promoter will need to be created. However, if you have other promoters that will be promoting events at your venue, you will want to create the appropriate promoter before you create the event. This will enable you to give this promoter access to specific reports, and more importantly, to only the reports for the events that he or she promotes. Page | 90 2.10 Venues Unlimited venues can be defined in this section of the ShoWare™ system. Information for each venue can be entered and later edited, much like in the Box Office and Promoters sections. It is important to note the time zone of the venue, as this will trigger what time zone calculations will need to be made so that the start times are correct in the system. Please make sure the address of the venue is correct and that all information is entered completely because a “map it” link is automatically generated on the public site with this information. In addition to being able to edit the information of the venue, you can also see the available seat maps for that venue and quickly create a seat map for a specific venue by clicking the “Seat Maps” or the “New Seat Map” buttons. If you would like to test the “map it” link after you create your venue, simply click the link underneath your venue and a new window will pop-up, showing you the location and address of the venue. The customer will also be able to quickly get driving directions by using this link. Page | 91 2.10.1 List Venues A listing of the venues existing in the system will be provided in this screen. Create New Venue button is displayed at the top of this screen. Edit button for every venue is provided. We will discuss this again in events but several parts of the system work in a hierarchical fashion. Think of the Venue as the palm of your hand and the Seat Maps as your fingertips. Just as you shouldn’t have fingers without the palm, you can’t have a seat map for a venue that doesn’t exist. You can have an unlimited number of venues, each with an unlimited number of seat maps. Seat maps quick link will give operators fast access to the Seat maps menu option where all the seat maps defined for the venue are defined. New Seat map quick link will give operators quick access to the Seat map creation screens under a particular venue. Page | 92 2.10.2 New Venue A new venue can be created by this screen. Appropriate fields are given which are the same as the Box Office and Promoter creation screens. The Venue Name and Address (everything but Address 2) must be filled out to save a venue. Other information is helpful but not required. 1. Venue Name: List the name as the PUBLIC would know it 2. Address 1: Street Address or if the Venue name is a hall of a larger building, this line might be the larger building name. 3. Address 2: Street Address continued or left blank. 4. City, Zip, Country and State: self-explanatory. 5. Phone: Not required but strongly suggested; patrons may need to call for directions. 6. Fax: Not required. 7. Email: Only put in an email address if you are entering one that will be answered when patrons email it with questions or concerns. 8. URL: Venue website (if applicable) 9. Time Zone: the venue is defined under; this will automatically calculate the TIME that performances begin and end and sales begin and end, making the adjustment for different time part of the system. 10. Description: you may want to put in special directions, such as second floor not accessible to those with physical handicaps, main entrance closed due to construction, or the type of venue it is (say it is a “listening room” or a “double-decker tour bus”) Page | 93 2.10.3 List Seat Maps A drop down selection of all the venues defined in the system is provided for the operators. After a venue is selected, a complete list of all the seat maps created under that venue will be listed. Page | 94 2.10.4 New Seat Map Operators enter the New Seat map creation screens. If you have a GA venue with one inventory to pull from (one section), use the New GA Seat Map Tool (see 1.10.5 New GA Seat Map). There will be numerous links to remind you to use the simplified tool to meet your needs. For the operator’s convenience, a list is provided at the beginning of the process. The information listed is gathered by the operators and we strongly suggest that this is done BEFORE you begin creating the Seat Map. The Process is divided into multiple steps and you can leave at any point after Step 1; the last step you completed is where the map remains until you come back to it. Information Necessary to Create a New Seat Map • Image of the seating uploaded (you would upload this into Event Images) • Images for all Sections uploaded (if you want to do a virtual view to the stage) • Venue Name (you should have already created the venue in the system) • Section Names • Number of Seats per Section* • Number of Rows per Section* • Number of Seats in the longest Row per Section* • Reserved or General Admission per Section • Number of different Price Categories • Colors for Price Categories • Seat Numbers *Below is a sample seating chart image and how you should think about creating the sections. These following steps will follow this seat map from start to finish. For this portion, explaining the starred sections above, we will only be focusing on the area highlighted in blue. The blue highlighted section, Section D, could technically be split into two geographic locations (sections) or kept whole. For training, we will think of this section as one geographic location. Page | 95 We are trying to answer 4 questions for each section: Number of Seats, Reserved or General Admission, Number of Rows, (Length of) Longest Row. • Q1: Number of Seats – by counting on the image, there are 42 seats. • Q2: Reserved or General Admission – clearly, this is a reserved seating venue. • Q3: Number of Rows – as you can see on the image, there are 3 rows. • Q4: Longest Row – Since we are treating this as one geographic location, showing the aisle is going to be important to the patrons so you will want to add 1 seat to the longest row; we will show you how to block this off as training continues. The longest row will be 18 boxes You can think of or you may even want to draw out your sections on graph paper. Below is how this section will look sketched on graph paper. We will now create this map in the system and you will see us work with Section D throughout. Page | 96 Steps to Create a New Seat Map FIRST STEP • Select Venue: This must be entered in your system already. • Name Seat Map: Remember that you may have different versions/settings for the place you are planning for so try to make the name meaningful. You will only see the Map Name when you are creating performances. • Describe: This is for internal use only and may be helpful if you ever want to create a copy of the seat map in the future and tweak a few things. SECOND STEP: Define the number of Price Categories used in the Seat Map. TIP: You may want to charge more for different rows or areas of the room. When you are creating a performance, you will not go into each section and price the seats, but rather assign the prices to the Price Category which the system matches to all the seats you have assigned to that category. •For the purposes of training, we will create two Price Codes, assuming that the first row is better seats and will therefore be at the higher price level Page | 97 THIRD STEP: Designate the Price category Names and Colors. Click the pick color link to see the colors activated by the system. If you have multiple Price Codes, you should designate different colors. You will see in the following steps how this is relevant. FOURTH STEP: Define the number of Sections used in the Seat Map. A section is defined as GEOGRAPHIC LOCATION. Below you can see a layout of how I plan to section out the map and the screen shot with “4” filled in, ready to CONTINUE to the next step. Page | 98 FIFTH STEP: Define the Seating Parameters for each Section. This is where you begin to see your prep work paying off. As we promised above, we will focus on Section D, but as you will see, you fill out the information for as many sections as you specified in the fourth step. Page | 99 SIXTH STEP: Section Status List for Seat Map Set-up. Additional Steps for Reserved Seating Sections – you will need to follow the steps below for every section you created with reserved seats. • 6.1 "Cut Out" non-seats for a section: these are those fillers that you eliminated on your graph paper sketch – again, we are only showing you the steps for Section D. TIP: The link provided for a “mistake” during the Section definition is there in case you didn’t put in enough rows, had too long or short of a Longest Row or if you miscounted the number of seats. Page | 100 • 6.2 Assign Seat Numbering for a Section. There are a few important things to note about the Seat Numbering Tool. I have already hit the auto-numbering button in the images below. The default for all sections start at row A, seat 1. Only the “Seats (Row Designation + Seat Number)” is saved when you hit continue. If you left space for a center aisle/walkway and it is assigned a column (see column 9 in the second image below), you will probably want to disable (uncheck) the box right below the word “Helper Tool” that says Incl. Non-Seats in Auto Numbering; this will tell the system to ignore the blank space when numbering. The system default is having this enabled. In a normal hall, there are no two rows with the same numbers, but the image doesn’t designate rows and each section has a 101, 201, 301, etc. To help the ushers, we have designated to repeat the Section Name (A, B, C, or D) instead of the row letter which would traditionally be the Prefix. Start is generally the lowest number of the row Interv. is for the count interval; as you can see on the map, the seats are numbered in increments of “1” Checking the Reverse boxes if the numbering goes from right to left instead of left to right. Î means that the row will fill as the information you have to the left of the arrows. If you instead choose ==>, all rows will be filled according the information to the left. If you have a special numbered seat, define it in the white area on the right. Remember – only the information on the right is saved when you hit, “Continue.” Be sure to scroll across to check that the auto-numbering is as you desired. Page | 101 • Select Price Categories for a Section. 6.3 • 6.4 Assign Price Categories to Seats in a Section. If you only have one price category, it will skip to a screen similar to the second image below where there are no boxes to check; you just click continue. Page | 102 As you can see in the image immediately below, the seats you assigned to FRNT ROW are blocked out and the system has automatically assigned PC2 to all other seats. • 6.5 Define Aisle Seats to a Section. You may notice that since step 6.2, when you hover over a box (seat), the seat number pops up so you can be sure you are assigning/allocating the correct seats. From the original map image, you can see the center aisle and aisles on all the corners; this allows you to define these seats o your customers. Page | 103 • 6.6 Select Seat Allocation Types for a Section. During this step, those allocations you created earlier will be used. Again, common allocations are Not Available, Handicap Accessible, etc. You can select all or no Allocation Types to assign to a reserved seating section. If you do not enable any allocations, a pop-up will remind you that you have skipped allocating seats and you will not complete step 6.7 • 6.7 Assign Seat Allocation Types to Seats in a Section. Just like when you selected aisle seats or selected which seats will be in the first Price Category, you will assign seats to allocations you have active in the section. You will go through as many screens for this step as allocations you have activated for the section. The words and color of the allocation you are currently working with are those words underlined in the phrase Assign Not Available Seat Allocation Type for the Section: Section D. Page | 104 • Repeat for each section. When you are done, the screen will look like it does below with the status of each section being “completed.” Now click CONTINUE and complete Step 7 to finish your map. LAST STEP: Select Image of full Seating Chart and define Section Coordinates. You will need Java for this last step. If you do not have java or are not sure if you have the latest version, follow this link: http://www.java.com/en/download/installed.jsp. If your image looks like the one below, you need to contact your project manager… Page | 105 CONGRATULATIONS – Your Seat Map is Complete and you can now create a performance with this map. Page | 106 2.10.5 New GA Seat Map A quick way for operators to define a General Admission Seat map with one section and one pricing category if provided. Page | 107 1. Venue: choose from the drop down list 2. Map Name: give the map a name that is meaningful to you 3. Map Description: you might want to list the capacity here if you didn’t in the map name 4. Price Category Name: you can call this anything you like; common names are PC1 and GA 5. Section Name: the name and the real name will most likely be the same for this map 6. Section Real Name: this is what is printed on the tickets. Common abbreviations are GA or Gen Admin 7. Number of Seats: this is the capacity of the area; there does not have to be a physical number of seats present 8. Section Image: if you feel like putting in a picture that gives a view of the stage Page | 108 2.10.6 Copy Seat Map An intuitive interface is provided to operators, enabling them to Copy an already created seat map in the system. This method is utilized to create different iterations of a Template seat map that may contain multiple pricing categories and other settings, without altering the initial template of that source map. SAVE and CANCEL are the action buttons on the bottom. Page | 109 Page | 110 *Part 3: EVENTS & PERFORMANCES Events & Performances is one of the most important modules in the Admin menu - Operators are given the tools to put their shows on sale for the public or internal sales. Additional tools are provided including the Auto-Scheduler, propagates a "master" performance over a period of time, and the Copy Performance Function, allows the operator to copy information from a previously built performance on a single performance basis changing details so the new performance is accurate. The New Package tool is also provided (if enabled in your ShoWare™ system) to give you FIXED SUBSCRIPTIONS capabilities through the ShoWare™ platform. Page | 111 3.1 List Event Categories Event Categories allow the operator to organize events for easier browser navigation. The Event Category structure can have unlimited levels. Events are assigned to one or more Event Categories. You must assign every event to at least one event category, so a general topic such as Events might be all you choose to enter here; however you can group them how you see fit. For example, music venues may choose to group events by music category (“Rock” or “Hip Hop”) and Attractions may choose to group by offering (“Tours” or “Cruises”). You can also choose to eliminate search functionality by Event Category in Configurations & Settings (see 1.1.2 Display > Part 18: Other Display Options). You will still need to assign the event to a general category – but the patron will not be able to search for the events via category. Page | 112 3.1.1 Creating an Event Category Event Categories have four pieces of information that determine how they are displayed in left navigation bar. 1. Event Categories: You have the ability to make your category either a main category or a part of another category (a subcategory). As you can see on the example above, most categories are Primary, but under Tours there are three sub-categories: Indoors, Outside – Riding, Outside – Walking. 2. Event Category Name: This is a name that the public will see and should be very easy for them (as well as you) to understand. 3. Active?: You can eliminate a category from the website as well as from adding future events to it by disabling this option. 4. Event Category Description: This is displayed to the patron once they click on the category name. It will appear below the category title on the top of the page. Below is an image of a client site – this client uses the Event Categories to help sell tickets: • They have 3 Primary Categories: Annapolis Dining, Just Announces and On Stage Schedule. • As secondary categories in “On Stage Schedule” they have a multitude of genres listed that covered the wide-spectrum of acts that perform at their hall • As you can see in the just below the header and just above the Event Title, there is an indicator on the web for which category was selected, in this case “Fusion” which is a sub-category of “On Stage Schedule” Page | 113 3.2 List Events Just like with Venues and Seat Maps, you cannot have Events without Performances. Think of Events as the palms of your hands and Performances as your fingers. You cannot have fingers (performances) without the palm (events). The events section allows you to enter information about your event, such as a brief summary of what you are offering as well as a picture, custom HTML & passwords, and assign the event to a category for use with the Event Category Search Tool. List Events is a helpful tool to see what you have active in the system, and for some clients is a shortcut to the scrolling through lists (as you will see with the “List Performances” function). Here is an example of how one client lists their events: • The area highlighted in blue is the Event Name and the Event Description. • The Event Image is loaded to the right of the description – you select the image and the system loads it properly on the website *HTML compatible and suggested Page | 114 3.3 New Event To get your system started, you will need to create events. To understand what an event is, use the hierarchical example described below: Below is a screenshot of what a blank event looks like. Page | 115 3.3.1 Creating a New Event General Information Name: this appears in bold on the website and contains a link to the performances associated with it; the name should be the brief title of your event Search Keywords: put as many keywords into this area as you like. The system will already be searching the Description and Name when it searches, so this would be additional information above and beyond those areas Description: this area is traditionally used to give more information about the event such as length, price, subtitle and what to expect. *HTML enabled Priority (if featured): if you chose to manually assign priority to your featured event instead of autosorting alphanumerically or by date of next performance, you can manually prioritize your events here; if you chose one of the other options, this area will read “n/a” (See 1.1.2 Display Options > Featured Events Sorting) Active: if you would like for this event to no longer appear in any searches or drop downs on the administrative end, you would select “No”; it is automatically set to “Yes” so you can access it in the system Waive Online Order Fee: this is related to the per order online fee that comes predetermined in the system; it is the only fee that you can waive on an event basis (see 1.2.5 Order Fees) Page | 116 Early Booking & Passwords Early Booking enabled for Members?: You can enable early booking for anyone who has purchased any level of membership; as this cannot be restricted by membership level, this should be the most basic benefit of membership Early Booking starts: This sets the time the early booking begins before the performance would normally go on sale; for events that sell out quickly, this is a great benefit to your members Access Restrictions: You can limit an event indefinitely by enabling one of the Access Restrictions. All patrons will be able to see the event, but only those who are Members that are logged in, have passwords, or both will be able to get to the performance to purchase tickets if you enable this. Access Password: If password access is selected as a restriction, this password will be enabled for all performances associated with this Event. Page | 117 Images & Categories Image 1: the only Image enabled for the system; will be shown to the right of the Event Description (or if your site has a non-standard layout, this image will appear as designated) Image 2: ignore unless you have had this section customized Available Categories >> or << Categories assigned to this Event: you must choose at least one category in order to continue; this is done by selecting it in Available Categories and choosing “>>” to move it to Categories assigned to this Event. You can assign as many categories as pertain to your event as long as the minimum of one is met. Page | 118 Custom Event Branding & Access Thanks to newer versions of ShoWare™, you now have the ability to customize the look of the ticketing website on an Event Level. Hide Event from Public Listing: used to create a private link that is only reachable when you send it out to a list or place it on a private website; this event will not be able to be found by searching keywords on the ticketing site either – only by sending out the direct link for the event will the public be able to view the event Require UserName/Password: this requires the user name and password you have designated below to be used to access the Event Use Custom HTML: if this is enabled, the HTML you enter for the body, Header and Footer will be used; otherwise those boxes are ignored Hide Browse/Search Controls: if you are looking for someone to be sent to the site, specifically to this event, and not have the ability to navigate to other portions of the site, use this to hide the entire Left Navigation Bar User Name & Password: only used if you choose to enable it with “Require UserName/Password”; you might find this helpful if you need to submit the event for proofing – but “Hide Event from Public Listing” could also be used for this purpose HTML Body: so you are aware, event/Performance Names and links will not follow the text color you choose Header HTML & Footer HTML: Link to an image you would like to use for true event branding; if you customize social networking sites like MySpace, similar code can be used here to create the headers and footers Page | 119 Linking to the Event After you hit save, the screen will refresh with text at the top of the editing frame saying “Event was updated successfully.” Once that appears, you can scroll to the bottom of the event and see the URLs. The Name of the Event appears for your reference. The 1st link Takes the user to the “My Account” Section of ShoWare™ – this is a constant link and will work for any event. The 2nd link Takes the user to his/her Shopping Cart – again, this is a constant link and will work for any event. The 3rd link Takes the user to the Event Detail Page which is what you just customized. Event Link gives you text of the hyperlink that is easy to highlight and copy; you are not able to edit this link (you cannot change the web address) Preview gives you a tool to check what your customization/event looks like without creating a performance Don’t forget to hit “save” after you get the Event to look as you choose! Page | 120 3.4 List Performances/Packages The “List Performance/Packages” menu allows the operators to search and use filtering options to find Performances and Packages. Of special interest is the “Include past Performances” checkbox that will allow the operators to filter and find performances that have already expired (happened). Search and Reset Search Form are provided as action buttons on the bottom. Create New Performance & Incomplete Performance/Packages quick links are also provided at the bottom of the screen. Note: A Performance has multiple configuration steps. If a step is completed, but the final step of Performance configuration is not reached, that Performance goes into an ‘Incomplete’ status. The “Incomplete Performances/Packages” button functionality will assist operators in locating those performances and proceed with the set up from that point. Page | 121 3.5 New Performance The “New Performance” menu enables the operators to enter the performance creation screens. Here you will define the details of the performance including the event to which it is related, the venue where it is held or departs from, dates, times, ticket text, pricing, etc. 3.5.1a Required Fields The first four elements that appear on the screen after you select “New Performance” are: 1. Box Office: A complete list of the box offices defined in the system during Configuration & Settings for the Operators selection. Make sure to select the Box Office that will serve as the “main” source of ticket sales for the performance you are creating; this is normally the venue box office. 2. Promoters: A complete list of the promoters defined in the system during Configuration & Settings for the Operators selection. Here you would select the person or organization that is responsible for promoting the event. 3. Events: A complete list of Events previously defined in the system during New Event creation screens will populate this drop down. Select the event that you would like your performance to be associated with. If you have not created the event for the performance, you will need to go back and create the event now. 4. Venue: A complete list of Venues defined in the system during Configuration & Settings for the Operators selection. The venue you select will determine what seat maps will be available for your performance as well as the location information that will be posted on your website, so make sure to select the correct venue. Page | 122 3.5.1b Fields that Appear After you have chosen the required information, the screen will refresh automatically and populate with new fields necessary for continuing the performance creation process. These additional fields will allow you to define your performance date and time, sales start/end dates and times, available delivery methods, and other various details of your performance. 5. Seating Chart: Based on the Venue selected, all the available seating maps will appear. Select the seat map that is most appropriate for the performance you are creating. If you are creating a performance with a general admission map, once the performance is completed you will be able to increase or decrease each GA pricing level capacity. 6. Performance Name: Text field for the stating the performance name. This can be different or the same as the Event name; if the name is exactly the same as the event name, only one line will appear in the performance listing – otherwise the event name will appear before the performance name. Below is an example of the performance listing for a ticketing site: Page | 123 7. Performance Code: A unique code/identifier must be assigned to each performance. This code is utilized during search and filtering and also in Reports under Reporting section. Note: Leave no spaces between the characters of that field. Make sure to use a code that will allow you to easily identify the performance. Generally this is done by including the date of the performance in the code. For more information on Performance Codes and seeing how they are used elsewhere in the system, check out the section on the Auto-Scheduler in 2.7, Step 6. 8. Performance Start & End Date, Performance Start & End Time: This is where the user selects the dates and times that the performance will actually occur. Time zones appear in parenthesis and are linked to the time zone the venue has been defined under. Tip: Once the performance end date and time has expired, system users will no longer be able to sell tickets for that performance; only Holds will be able to be completed and orders may be canceled. Choose your end date and time wisely. 9. Sales Start & End Date, Sales Start & End Time: Here the system user will select the dates and times that the sale of tickets on the public website will occur. Time zones appear in parenthesis and are linked to the time zone the venue has been defined under. Note: Sales for the performance is not restricted by these dates and times through the Box Office interface, this setting only affects the public website. Page | 124 10. Delivery Methods: The System Delivery Methods (Mail or Will Call) and the Custom Delivery Methods (operator created under Settings & Configurations) are listed in this part of the screen. Users will select which combination of methods they would like to make available and also enable which methods will apply to that specific performance. **. Access Gates: ONLY FOR SKIDATA ENABLED SYSTEMS; the operators will choose which Gates the tickets will be validated from. Page | 125 11. Featured Event: If selected, the EVENT will appear as featured on the public pages. To limit or increase the number of featured events listed or to change the number listed per page, see instructions in Section 1.1.2 Display Options > Featured Events. Tip: this is the most common reason an operator cannot see their event on their ticketing site – be sure to have this enabled whenever you want to feature this event 12. Max. Tickets per Basket (0 = unlimited): Operators can determine the max amount of tickets that can be selected for purchase per basket. 13. Access Restrictions options: The performance will be open for sale on the public website according to the level selected. “No Restriction” opens sale to anyone, “Members only” will allow only patrons who have memberships and have logged into their accounts to purchase tickets, and “Password Only” will only allow patrons to purchase tickets who enter the password you have selected. 14. Access Password: If the above option involves a password selection, the password may be specified in the text field. Page | 126 Performance Status Performance Status determines the level of visibility in the system and on the website for a performance. It also serves as a method of manually changing the availability of a performance. Note: Select "On Sale" and the System will take over for you, any other selected status will make the performance unavailable on the public site. 15. There are 6 Performance Status options: a. Available Soon: Performance/Event will appear on public pages, but will NEVER GO ON SALE at the predetermined date and time from fields above. b. Do Not Show Public: Performance/Event will never appear on public pages. c. On Sale: is the ONLY status code that will put a performance on sale appropriately and AUTOMATICALLY at the predetermined date and time from the fields above. Until that time in the future is reached, the performance will display on public pages with ‘Available Soon’ text and a line below that image with the Sale Start Date and Time for the patron’s knowledge. d. Phone Call Only: Performance/Event will display on public pages with a telephone icon that can be clicked and also a "layer" appearing if cursor hovers over it, displaying the system's assigned phone number for ticket sales. e. Sale Stopped: For any reason operators determine the sale on the public pages will be stopped immediately and ALL baskets that have tickets currently in transition will be purged. f. Sold Out: Manually, but also automatically, when inventory under a performance is exhausted then the Sold Out icon will appear on the public pages. While the sale of the performance date and time is still valid, then the performance/event will still display on the public pages. Page | 127 Fields (continued) 16. Ticket Reserve Time: Time period that patrons may keep tickets in transition (selected in a basket, but not completed the sale yet). After time has elapsed and no sale has been posted, tickets will return to the general inventory of the performance; this prevents people adding tickets to their basket, closing their window and having the tickets held in transition for long periods of time. 15 minutes or greater is strongly recommended as the minimum for Ticket Reserve Time so that your slowest patrons can complete their purchase successfully 17. Image 1 & 2 fields: As we saw with events, a performance also has two image fields that are both fully functional, but only Image field 1 will display on the public pages. Image field 2 is included for future developments. 18. Search Keywords: As with events there can be keywords associated with a performance that will be utilized by the search function on the public pages and internal keyword search fields. 19. Use Event Description & Description fields: A description field is available that is different from the event description. The user can choose to utilize the same description as the event by selecting the checkbox, or they can leave the box unchecked and fill in a new secondary description. This is the description that appears when ticket buyers click on the “See Description” link on the website or the “Performance Name.” Page | 128 20. Info Box Text (Shown in Performance Detail): Text field can be utilized to showcase information during checkout/seat selection pages. This information also appears on the print@home ticket. This section is NOT html compatible. Note: only the first 5 lines of information will show on the print@home ticket (aka what you can see in the box – if you have to scroll for the info, it will not be seen) 21. Alert Qty & Alert Email fields: There can be an alert level (numeric value) for inventory specified per performance. If the available seat inventory of the performance drops below that level then an alert is triggered to the email address specified. 0 = No Alert. 22. Do not Print Tickets: If the checkbox is selected, no tickets will be printed for tickets of that performance. This applies to the “Print Order” option on individual orders as well as Batch Ticket Printing. 23. Ticket Price Printing: According to your selection, amounts shown on the actual ticket will just be the “Face Value,” the line item total (“Face Value + Excluded Fees”) or another amount that you can enter. No order fees will print on the tickets themselves – only on the receipt. 24. Print a separate Ticket for each Day of the Performance (only for Multi Day Performances): This option is available for MULTI-DAY performances ONLY (performance start date and end date, span consecutive days). If the option is selected, during the printing phase there will be a ticket produced for EACH day that the performance is spanning. The same text will print on each ticket but this could be useful if you collect tickets at the gate and your event spans a weekend – each person would receive 1 ticket per day of the event. Page | 129 Ticket Layout The ticket layout is where you will determine the text and font styles for tickets printed at the box office (either for shipping or will call). The ticket printing template configuration can vary from system to system, but for the purposes of this manual we will discuss the standard ticket template. At this time, you cannot change the formatting of the pring@home tickets. Note: See your Project Manager if you have questions regarding your template configuration. The system provides a print preview of the ticket by clicking on the “Open Live ticket preview” button provided on the screen. This preview shows the user in real time how their ticket will look with the text and styles they have selected (Preview requires the ShoWare™ Printing ActiveX Control). The system also provides users with the ability to print an image on top of the physical ticket stock. The watermark image is monochromatic and can be uploaded in the system via the Image Management module. Test this image before you print a large quantity of tickets so you can be sure the image fading does not interfere with the actual ticket text. As you can see below, there are 8 ticket lines that can be utilized to print information on the physical ticket stub. Users have the ability to control font style used, font size, and attributes of the text on every ticket line. For ticket lines utilizing larger font sizes, more space needs to be consumed on the ticket line, so less character space is available. Tip: If you will be using Auto Scheduler, please keep in mind that you will need to decide which line will be reserved for the performance date. When you have completed the ticket text, click “CONTINUE.” Page | 130 Performance Pricing Setup The next step in setting up your performance is defining your ticket pricing. This includes determining the value of excluded and included fees as well as the ”Face Value” of the tickets. The appearance of your pricing screen will have more or less pricing categories based on what you selected during the previous step. Keep in mind that all necessary discount codes will need to be created (under Configurations and Settings Æ Basic Configurations Æ Discount Codes) before entering the performance pricing screen. 1. Each price category will be displayed with a “Configure” button on the screen and every price category will need to be defined with at least one discount code in order to complete the performance set up. 2. Every price category must have at least one discount code defined as ENABLED so that Box Office users may utilize it, AVAILABLE ON THE WEB so that patrons on public pages may utilize it, and DEFAULT so the system knows which price to select first. Any other number of Discount codes may be defined thereafter. 3. Based on the set up and activation of EXCLUDED and INCLUDED FEES in your system, fee fields will appear on this screen for value placement. This is where you would define your convenience charges, tax, processing fees, etc.Coupon codes and discount code passwords are created and maintained under “Manage Discount Code Passwords & Coupons.” This feature will be discussed in more detail in the next section. 4. Once all price categories have been defined appropriately, the system will allow operators to proceed and COMPLETE the performance creation. Page | 131 Maintain Automatic Price Changes AFTER THE PEFORMANCE IS CREATED, an automatic price change (i.e. day of performance price increase) can be implemented by simply clicking the “Maintain Automatic Price Changes” button, selecting a calendar day for the new pricing take over, defining the new pricing, and then finally clicking Save. To do this, click “Events & Performances” > “List Performances” > Choose the Event or enter the Performance Code… when your Performance is visible click “Pricing & Availability” > “Change” (under ‘Price Category’) > “Maintain Automatic Price Changes” Maintain Discount Code Coupons & Passwords When you select the “Maintain Discount Code Coupons & Passwords” button in the performance pricing setup screen, a pop-up window opens that lists all of the discount codes you have enabled in the system. RULE: In order for these codes to be used on the web, the discount code must be enabled for the performance and must also be web-enabled. In this window you will see two available options: Password and Add Coupon. Both of these options essentially serve to password protect a discount code, but each one operates in a different capacity. Tip: DO NOT assign both a password and a coupon code to the same discount code. Doing so will cause the two “passwords” to cancel each other out, and if the discount code is web-enabled it will be publicly available and unprotected. 1. Password: The sole purpose is to lock a discount code on your ticketing website. Assigning a password will require every web ticket buyer to enter that password before the discount code will appear for purchase, and without the password the price is otherwise hidden. Page | 132 Assigning a password will NOT lock or hide the discount code in the call center (box office) and therefore should not be used as a method of setting discount code user permissions. Discount code permissions can be set under Configurations and Settings Æ Basic Configurations Æ Discount Codes. There is no method for tracking discount code passwords; they are not recommended for use in promotional offers. Page | 133 2. Add Coupon: The “Add Coupon” feature is an excellent tool for use in promotional offers. It allows the system user to create a code that serves as a password for the discount code, but offers several benefits that the simple password function does not. a. Coupons require the system user to assign an “Issuer,” or a source, for the coupon code. This issuer can be used as a method of tracking the coupon code for marketing purposes. You can find this tracking information by pulling the “Redeemed Coupon Report” (Reports Æ Marketing and Sales Æ Redeemed Coupon Report). b. The software allows for multiple coupon codes to be assigned to one issuer, as well as multiple issuers to be assigned to one discount code. c. Each coupon code is required to have an expiration date. The coupon code will expire at 11:59 pm on the date you choose. Once the coupon code expires, the discount code it is assigned to will no longer be available for web purchase. The discount code can once again become available on the web if the coupon code is removed or the expiration date is extended. Page | 134 3.6 Copy Performance / Package The copy performance/package module allows system users to copy information from a previously created performance for use in a new performance set up. This tool can only be utilized if the new performance uses the same venue and set map as the performance being copied. System users can copy a specific performance by typing the unique performance code given to that performance, or they may elect to find an Event (that is Active) and view all performances under that Event in order to select which one to copy. Once a performance is selected, the new performance screen will be pre-populated with the copied performance information, and with minimal editing operators can simply replicate or replace this information for the new performance. For additional information regarding performance set up see section 2.5 New Performance. Page | 135 3.7 Auto Scheduler The Auto Scheduler is a tool that allows the system user to propagate (copy in mass) a "master" performance over long periods of time. Although the copy performance function acts in a similar manner, it only allows the user to copy a performance once each time the tool is used. Auto Scheduler allows the user to copy a performance multiple times (generally up to 500 performances at a time) each time the tool is used. The steps for auto scheduler are outlined below. 1. Select a Performance The auto scheduler can copy a single performance over a range of dates. It cannot be used for Packages. Performances scheduled by Auto Scheduler will have the same name, time, ticket pricing, seat map*, venue, and descriptive information as the performance you select. The "master" performance can be selected by its specific Performance code or by Event just like the Copy Performance functionality. *Seat map structure and allocations are used for all performances. 2. Set a Recurring Schedule At the top of the screen the user can view the general settings of the performance to be propagated. It is recommended that you verify that all information is correct before moving forward. Performance date range selectors (and calendar icons) are provided for use in choosing the first and last date that the performance needs to be propagated. The user must then also select which days of the week the performance will be available as well as whether or not those performances occur weekly or biweekly. Do not be concerned about possible unavailable days or dates; you will have an opportunity later in the process to “Blackout” dates. Page | 136 3. Set the Sales Start/Stop Options Next the user must determine when online sales will begin and end for the performances being created. Auto scheduled performances can use the sales start and stop information from the selected performance, or the user can define a custom set of days and times. The “Use Current Sales Start/Stop Time & Offsets” option will chose times based on the offset time and date of the performance and is generally the option most often selected. 4. Select Blackout Dates A full calendar showing the period of time the operator specified in step 1 is displayed on the screen, and the user may select any blackout dates. Blackout dates are dates that the performance propagation is not necessary (i.e. holidays, special event days, schedule exceptions, etc.). Each check box on the calendar represents an auto scheduled performance, and checking the appropriate box on the display will mark the selected date as a blackout date. Page | 137 5. Time/Date Printing Options For your printed tickets, you will need to select the location on the ticket stock (which line) you would like the Performance Date/Time to appear as well as how you would like the Date/Time formatted. Keep in mind that the date and time will print on your tickets in the same font, size, and style of the performance you are copying. 6. Performance Code Definition Each and every performance in the system is REQUIRED to have a unique performance code. This code is used to identify the performance in various areas of the system. A prefix and suffix option is provided to help customize these codes, you must fill in at least one of these options, but you are not required to use both. Generally the prefix would be an abbreviation of the event/performance name, and the suffix might serve to represent the time of performance if you have multiple performances occurring on the same day. Example: Prefix = mytest (event name), Suffix = A (afternoon), Performance Date 12/31/2005. Performance Code = mytest12312005A Page | 138 7. Review & Create As a final step the user is giving a listing of all the performances to be created. Make sure to thoroughly review those performances before you move forward. You will see the button to CREATE Performances at the bottom of the screen. Once the user clicks this button they receive a pop-up asking if they are certain that they would like to move forward. Remember, it is very easy to click yes and create your performances, but if you made a mistake during the auto scheduler process and move forward anyway, you will have to update or delete those performances individually. Review, review, review! Page | 139 3.8 New Package If Subscriptions are enabled in your System, the New Package option menu can be utilized to create Packages for your system. Tip: Once you have created a package, the “Copy Performance/Package” tool may also be utilized. A Package creation is similar to a performance creation. One difference between the two is that there are no sales start/end dates and times for packages. These parameters are already defined by the performances that will be part of the package, and are therefore not necessary for the package itself. Another important difference is that once you have created the package, you will have to go through an additional step of associating performances with the package. This means that you will need to have all necessary performances created before you begin the package. In order for the package function to work, the SAME seat map must be used for all of the performances associated with the package. This means that all performances must be taking place at the same venue. In addition, the seat map being used must be a RESERVED seat map. If seats for a single performance are made unavailable through purchase, hold, or allocation, those seats will also be unavailable for the entire package. Also, packages have their own pricing and availability setup, so pricing of the individual performances is ignored. Note: INDIVIDUAL EXCHANGES OR CANCELLATIONS of tickets cannot be made for select performances under the package structure; any and all cancellations need to be done on a per package basis. Page | 140 *Part 4: TICKET MANAGEMENT The ticket management menu offers a comprehensive list of ticket holds, orders, and fulfillment options. Through this menu you can view and manipulate orders and holds without having to enter the Box Office Interface. Note: The list holds and list orders features are also available through the Box Office Interface. Page | 141 4.1 List Holds Under the List Holds menu, users are given numerous filtering options to search for holds in the ticketing system. Note: When we refer to holds, we are referring to a block of tickets that have been reserved under a specific patron account or a hold category. These are tickets that have not yet been purchased. Holds are created through the Box Office Interface. This is done by adding the tickets you would like to hold to your shopping cart, applying the appropriate discounts and fees, and then clicking the “Create New Hold” button in the lower right hand corner. You will then be given options to assign a hold expiration date (should you choose to do so) and to either assign a patron account or hold category to the hold. Holds can then be turned into paid orders or can be cancelled and returned back into the inventory of their performance. Page | 142 4.2 List Orders Under the List Orders menu, users are given numerous filtering options to search for orders in the ticketing system. Note: Orders refer to tickets that have been purchased. Page | 143 4.3 List Tickets to Print (Mail) This feature shows the user a comprehensive list of unprinted tickets that are associated with mail delivery options. There are no filters for this list; it simply shows the user the total number unprinted “mail” tickets for ALL active events in the system. Orders that have already been printed will not be included in those totals. Page | 144 4.4 List Tickets to Print (Will Call) This feature shows the user a comprehensive list of unprinted tickets that are associated with the will call delivery option. This list can be filtered by number of days (i.e. only list quantities for performances within the next 10 days), and will show the total quantity of unprinted will call tickets for all events and performances within the day range the user selects. Orders that have already been printed will not be included in those totals. Page | 145 4.5 List Tickets to Mail In order to accommodate organizations that have third party fulfillment of ticket orders and also as a method of keeping record of who was responsible for mailing any particular set of tickets, the system offers the option to go through orders and “flag” tickets as mailed. This can be done by going into an order, checking the mail flag check boxes next to each ticket, and clicking “Update Mail Flags.” This menu, List Tickets to Mail, shows the user a comprehensive list of PRINTED tickets associated with a mail delivery option that have not been “flagged” as mailed. It lists total quantity of un-mailed tickets per performance, and also offers the “Get Orders to Update Mailed Flags” button, which will populate the list of all of the orders that have not been updated. Page | 146 *Part 5: BATCH TICKET PRINTING The Batch Ticket Printing function allows users to print ticket orders all at once rather than printing each ticket order separately. This menu offers numerous printing options including a drop down to select the printer you would like to use, the ability to select mail or will call and print those batches separately, the option to filter batches by performance code or by a date range, management and utility options, and more. Note: Requires the ShoWare™ Printing ActiveX Control; see Section 1.1: Associating Your Printer to learn about installing the printer and the Active X Control. 5.1 Printer Selection Menu Allows the user to select the printer they would like to use for the batch ticket printing. This function allows the user to override the system default printer. When a printer is selected it will appear above the printer menu along with the status of the printer selected. Page | 147 5.2 Create Batch Orders 1. Mail: In order to batch print orders to be mailed, the system user should click on “Mail” (this button looks like a header). This submenu allows you to choose criteria of orders to print and then mail; criteria include Performance Code, Performance Date and Order Date. The Package Filter can be used to include orders with packages, exclude orders with packages, or select only orders with packages when compiling the batch. The “include reprints option” determines if printed tickets will be included in the batch. Generally the user would leave this box unchecked to NOT include previously printed tickets. 2. Will Call: In order to batch print will call order, system users click on “Will Call.” This submenu allows the user to select orders to print from the following criteria: Performance Code and Performance Date. The “include reprints option” determines if printed tickets will be included in the batch. Generally the user would leave this box unchecked to NOT include previously printed tickets. 3. Batch Management: Allows a user to search for created batches by Batch Number, Created Date Range, Recently Created Batches, or Batches containing a specific Order Number. Batches listed in the result can be loaded into the Batch Print Validation screen to be cleared from the Batch Printing Queue, resume printing, or reprint the entire batch. Clicking on a batch in the results will open the detailed view of the batch. 4. Utility: Clicking “Utility” allows you to create a custom batch by entering specific order numbers in a delimitated list. 5. Batch Queue: The Batch Queue displays the batch the user is currently working with. Just below the queue there is also a listing of recent activity, a printing queue, an option to review your batch, and an option to remove batches form the queue. a. Batch Activity – displays all of the details of the last batch print activity as well as the current status of that batch. b. Printing Queue – displays the number of orders in the batch, the number of orders already printed in the batch, the number of remaining orders to print in the batch, and the number of orders in the batch printing queue c. Review Batch - Loads the Batch into the Batch Printing validation screen so that user can verify all information is correct before proceeding with printing d. Purge Batch from Queue – removes spooled jobs that are currently in the batch printing queue and marks the order(s) as failed; only a user with reprint permission can print orders after they have been spooled and marked as failed. e. Batch Printing Progress Window – this appears once the system user has selected to print a batch and this window MUST remain open with printing the batch. It will automatically close when the last order is printed and confirmed. The Batch Printing Progress Window monitors the Windows print queue, displays the current progress of the printing and the current order that is being processed or printed, allows the user to pause the printing, detects errors while printing and confirms the print status of an order. f. Batch Printing Validation Screen - This screen displays the print status of all orders in a batch. Orders that have printed from this batch will be in the Printed list, orders that have spooled from this batch and have not been confirmed will be in the queue list, and orders that have not printed from this batch will be in the Not Printed list. The Export List buttons provide a comma separated list of the order numbers. The OK and FAIL buttons are used to clear the Batch Print Queue by manually confirming the printed status of an order. Orders that are manually confirmed OK will be moved to the Printed list. Orders that Page | 148 are manually confirmed FAIL will be moved to the Not Printed list and require reprint permissions to print that specific order. 5.3 Printed Batch Log The Printer Batch Log displays the current batch status of batches printed within the last 24 hours. Batch Number, Batch status, date printed, user printed, number of orders, and number of orders printed are all displayed. The user can view the details of this batch by clicking on it. Batch Detail Window When the user selects a batch listed in the printed batch log, a pop-up window opens that displays the order selection used to compile the batch, order count and list of order numbers sorted by order number, orders printed count and list sorted by print date and time, orders not printed count and list of orders, orders failed count and list of orders, orders spooled count and list sorted by spooled date and time, orders alert count and list of orders sorted by order number, and the orders in a CSV format for export. Page | 149 *Part 6: PATRONS & MEMBERS In the Patrons & Members menu, system users have the ability to view and edit previously created patron accounts in the system as well as members that have purchased some level of membership (if the membership module is enabled in your system). New patron accounts can also be created from this menu, and if the user has donations enabled in their system, then new donations can be entered here as well. Page | 150 6.1 List Patrons / Members The List Patrons/Members menu functions similarly to the List Holds and List Orders menus in that it offers you numerous options for filtering your Patron/Member search, and also displays the results in the same kind format. From the search results list you can view and edit existing patron or member accounts. There is a distinction between patrons and members. • A patron is a customer/client of your organization that has a profile saved in the ticketing system. All customer activity (orders, holds, etc.) would be associated with and saved under that profile. • A member is patron (new or previously existing) who has purchased some level of membership offered by the operators of the ticketing system. In essence, membership is simply another customer activity associated with the patron account. There is no such thing as a member without a patron account. Page | 151 6.2 New Patron / Member Under this menu, new patron accounts can be created. Below we will walk you through the steps of creating a patron account. Patron Type - There are two different categories of Patrons/Members. • Call Center User: These are patrons that prefer to call in or come in to visit the physical box office or establishment and purchase their tickets. They may not have a valid email account or web access. If this option is selected then the number of required fields on the screen is reduced. • Web User Patron: These patrons traditionally create their own account online. They must provide a valid email address and supply a password (along with a password reminder). 1. Email – In the default Terms of Use, it is stated that all patrons will be contacted by email in the event of a change to their reservation (performance time, event date, etc); this is the easiest form for contacting your patrons so it is highly suggested that you gather this information. 2. Company – If the account is associated with a business, then you would enter the company name in this field. 3. First, Middle Initial, and Last Name – starred (“*”) fields are required to identify the patron. 4. Address Lines 1 & 2 accommodate the patron’s physical mailing addresses. Keep in mind that the address specified here is by default set as their primary delivery, billing, and payment address. Once the profile is created additional addresses (shipping, work, etc.) can be added. 5. City, Country, State and Zip Code – a continuation of the address fields. 6. Primary Phone Number is a required field to offer both system users and patrons an immediate method of communication. We cannot stress enough the importance of collecting a contact phone number, as this information will be vital in the event of a cancelled performance, event or location change, or credit card issue. 6. Fax, cell phone, and work phone fields are also provided for use as seen fit by users and patrons alike. 7. Patron Classifications - Available patron classifications are visible at the bottom of the screen for selection. These classifications are created under Configuration & Settings Æ Options & Classifications menus. Patron classifications are useful for tracking groups, subscribers, VIPs, patrons solicited through special acquisition, etc. 8. Comment to Add to new Patron Record - A comment field is provided for important patron information such as special seating requests, special exceptions, customer issues, etc. The only place you see this comment field is if you look at the patron account so keep this in mind. 9. Purchase Membership – If memberships are enabled in your system, then all available membership levels will be listed here with an option for purchase during the patron account creation process. 10. Make a Donation – If donations are enabled in your system, then the Make a Donation is provided so that a patron can easily include a donation during the patron account creation process. 11. Payment information – This field is intended to accept payment information for any memberships or donations purchased during the account set up. Ticket order charges are done separately through the order process. Page | 152 Page | 153 Page | 154 6.3 New Donation Using “New Donation” allows the system user to enter new donations through the admin site. The user will select the proper donation amount, fill in the donor contact information (similar to the information required for patron account), collect payment information, and choose whether or not to have a confirmation e-mail for the donation sent to the patron. You can enter a Patron # or use the “look up” button to search for an existing patron. When you enter the information into the system through this donation module, a patron account will NOT be created. Page | 155 *Part 7: REPORTING The ShoWare™ system includes a multitude of reports that address needs of the box office (Ticket Inventory, Fulfillment, Patrons), Accounting (Accounting & Finances), Marketing (Marketing & Sales), Patron Development & Retention (Patrons & Memberships), etc. All reports are divided into categories based on their functionality and purpose. Custom reporting is also available at an additional cost; speak to your Project Manager to receive a quote. A mock-up and specific information regarding your custom report is required to receive an accurate quote. Available reports vary based on your system set-up: standard or split-payments. The system user (at initial system setup) can choose between the standard (one payment method per order) model or a split payment/accounts receivable model. As the majority of clients use the standard system, we will focus on those reports in this manual. Page | 156 7.1 Ticket Inventory Ticket Inventory reports are the reports that show any data relevant to tickets sales. This includes numbers of tickets sold, money brought in through ticket sales, which seats are sold and to whom, what delivery methods were chosen, which seats have been made unavailable for public sale, etc. The image below shows a full listing of all of the ticket inventory reports available. The following sections explore each report in further detail. Page | 157 7.1.1 Performance Report – Detailed The Detailed Performance Report is the most commonly used ticket inventory report, and is equivalent to what other ticketing systems may call an ‘Audit’ or ‘Sales Report.’ You can see in the image below that there are many parameters available for the report. You can pull the report based on event or on the performance code (or leave those fields blank to create a comprehensive report); you can also base the report on specific sales and performance date ranges. The sales date range pulls data based on date of purchase and will only include sales data from orders place within that date range. Without including a performance date range using sales date range will include ALL performances. Performance date range pulls data based solely on date of performance, so it will pull data that includes ALL sales placed on any date, but only for performances that occur in the selected date range. Additionally, filters are provided to expand or shrink the report as the user sees fit. Several boxes are enabled by default; these are the filters most commonly used for the report. The user can choose to have tickets sold online and tickets sold through the Box Office Interface listed separately or together. The user can choose to: • have ticket prices listed • have any tickets paid for with a comp payment show in the report as a $0 value • include a column that shows sales for that day • show a table that outlines all unsold tickets • have the hold table give a more detailed listing • have any package sales show in the report as the single performance ticket price rather than the package rate Page | 158 After all the desired parameters and filters have been selected, you click “Get Report” and a new window will open with the report information. As you can see in the image below, all of the parameters and filters specified are summarized at the top of the report. In addition, you will see the event name, performance date, venue, and performance code. The report breaks down ticket sales by discount code, and gives you the total number of tickets sold for each discount code as well as the total amount of money collected; for holds, it tells you the total amount of potential money involved with the hold. Page | 159 7.1.2 Performance Report – Summary The Summary Performance Report is very similar to the Detailed Performance Report. It offers the same kinds of parameters and filters, but instead of giving the user a specific sales breakdown, it gives a one line summary of ticket sales. The columns included in the one line summary are based on the filters selected, and the report will list a separate line for each performance included. Page | 160 7.1.3 Event Report The Event Report gives the system user a detailed look at tickets sales for each event (rather than for each performance like the performance reports do). As with the other reports, the amount of information shown depends on the parameters and filters selected. Generally speaking the report gives ticket sales totals for each price category and discount code of an event. The main reason to use the Event Report rather than the Detailed Performance Report is that ONLY the Event Report shows a column for each excluded fee and tells you how much was charge per enabled discount code for that event. The line totals in the Event Report include the face value of the tickets sold along with all the excluded fee revenue collected. Page | 161 7.1.4 Seating Manifest The Seating Manifest is pulled strictly based on performance, not event nor performance or date range. You either need to know the performance code or you can click on the magnifying glass to search for the performance using key words or the title of the performance. It gives the system user a detailed listing of all seats purchased for a performance, who purchased those seats, and what kind of ticket they purchased for each seat. It also shows the order number and price category. Note: This report is available in both an html format and a .csv download. TIP: Anytime you see a Microsoft Excel icon, click the icon to download the .csv version of the report instead of the html version. Page | 162 7.1.5 Delivery Report The delivery report can be pulled based on event, performance code, sales date range, and performance date range. It simply tells you how many tickets were sold and delivered for each delivery method enabled in the system. It breaks down the information further by separating the delivery based on purchase method as well – this filtering cannot be removed from the report without customization. Page | 163 7.1.6 Allocation Report The allocation report gives the total number of seats allocated per allocation type for each performance (based on the selected parameters). This report can be filtered by event, performance code, or performance date range. This report would generally only apply to performances that are using a reserved seat map. See section 1.2.1 for more information about seat allocations. Page | 164 7.1.7 Tickets On Hold Report The Tickets On Hold Report gives the user a comprehensive list of ticket holds in the system that are “Not Completed.” A “Completed” Hold has had all tickets either processed through to an order or the tickets have been canceled. This report can be filtered by event, performance code, performance date range, hold category, hold created date range, and hold expiration date range. In addition, the filtered results can be sorted in a number of ways, including alphabetically by event, chronologically by performance, alphabetically by hold category, or chronologically by the hold creation or expiration date. Page | 165 7.1.8 Exchange Report The exchange report can be filtered by user and transaction date. It shows the details of all exchanges including name of customer, payment method, exchanged seats, and the exchange of money. You can choose the date of the transaction or the system user that initiated the transfer; you can also choose all users and all time. Page | 166 7.1.9 Ticket Re-Print Report The ticket Re-Print Report generates a detailed list of tickets that have been reprinted. Filtering criteria include event, performance code, print date, performance date range, and whether or not the tickets were a part of a hold or an order when printed. The report includes seat information, print date, user, order number, item status, and print status. Page | 167 7.2 Fulfillment Fulfillment reporting provides system users with all the information they need to follow through on ticket delivery. The image below displays the list of available fulfillment reports as seen when you click “Fulfillment.” Examples of all reports are on the following pages. Page | 168 7.2.1 Ticket Buyer Report The ticket buyer report outputs all ticket buyers for a single performance. The report is pulled based on performance code, and includes the Patron’s Name, Order Number, the Last 4 Digits of the Credit Card used for the ticket purchase, Number of Tickets Purchased, Per Ticket Cost, and either the Seat Location. This report can be used at the venue to validate will call customers or to verify a ticket purchase if a customer has lost their tickets. All will call orders are marked with a "W" after the order number. Note: This report is available in both an html format and a .csv (excel) download. Page | 169 7.2.2 Ticket Re-Print Report This is the same Ticket Re-Print Report listed under Ticket Inventory. A link to the report has also been made available under Fulfillment Reports for the convenience of the user. See section 6.1.9 for more information regarding this report. 7.2.3 Tickets to Print (Mail) This report is exactly the same as the List Tickets to Print (Mail) option under the Ticket Management menu. See section 3.3 for more information. 7.2.4 Tickets to Mail This report is exactly the same as the List Tickets to Mail option under the Ticket Management menu. See section 3.5 for more information. Page | 170 7.2.5 Mail Order Fulfillment This report is pulled based on performance code and is returned to the user as an excel (.csv) download. It lists ticket buyers for a single performance whose tickets need to be mailed. Will Call and Print@Home orders are NOT included in the report, nor are orders whose mail flags have been properly updated. As you can see from the screenshot below, this site did not update any mail flags as a part of their standard operating procedures. This report is extremely helpful for detailed order information if you are missing a particular ticket because the printer “ate” the paper. It is also helpful if you are interested in making a mailer for all ticket purchasers for a particular show. Again, if you update the mail flags for these, then you will not be able to pull all of this information so please make your standard operating procedures that work best for your company. Page | 171 7.2.6 Tickets to Print (Will Call) This report is exactly the same as the List Tickets to Print (Will Call) option under the Ticket Management menu. See section 3.4 for more information. 7.2.7 & 8 Access Control Data This only applies to systems that have single access control enabled. The user would use these reports to either download codes for scanning to their scanners, or to upload scan results into their ticketing system. If you would like Access Control enabled for your ticketing system, please contact your Project Manager to turn this on and go over software installation and equipment requirements. Download AC Codes The output of this link is a .csv report to upload to your scanning device. Upload AC Results After you have scanned all the tickets for your event, you can then upload the results of your scans which will directly update all orders involved, adding a comment that ticket with barcode ____ was scanned for entry. When you upload a batch of barcodes from Simple Access Control scanning (the output file), below is an image of what text is added to the order information. Page | 172 7.3 Accounting & Finance The Accounting & Finance reports provide all of the data necessary to settle daily box office operations as well as assist with larger accounting needs such as invoicing or credit card batching. Different users and companies use different reports to match their accounting needs – find the one that works best for you and your needs. The following are examples of these reports. Page | 173 7.3.1 Cashier Report The Cashier Report can be filtered by system user, department, and transaction date/time range. It includes total dollar break downs per individual payment method. Generally, this report would be used to settle sales for individual ticket sellers at the end of a shift or to obtain data on all users for end of day settlement. Page | 174 7.3.2 Daily Payment Report The daily payment report shows total sales and refunds per day for each payment method. It lists dollar totals for tickets, excluded fees, and shipping for each payment method, but does not break down individual orders or show any actual ticket quantities. It can however be sorted by event or performance code, in the event that the user would like to see payment methods for a specific performance. It can also be sorted by payment date range. This report can be pulled based on event, performance and/or time range. If you select an event and your system allows mixed baskets, you will not get any information on order based fees including delivery (see red text warning on the actual report). If you are doing monthly accounting, not based on an event and want to get a summary of daily activity on an extended basis, this is the report for you! Note: This report is available in both an html format and a .csv download. Page | 175 7.3.4 Reconciliation Report The reconciliation report is a comprehensive report that shows both sales and refunds on an event or performance level. It can also be filtered by payment type or transaction date range. The report includes break downs per individual payment method for ticket sales, excluded fees, order fees, and shipping fees. Unlike the Daily Payment Report, you can only see a PER DATE transaction if you choose a particular date. However, if your batches for your credit card processor are for sometime other than midnight PST, this is the report you should use. Note: This report is available in both an html format and a .csv download. Page | 176 7.3.5 Transaction Report Generally used as a tool in settling credit card transactions, the transaction report lists every system transaction in detail (performance, customer name, payment method, transaction total, etc.) made within the date range and time that you specify. If you need to do a transaction by transaction analysis of your accounting timeline, this is the report you can use to compare them. Your input is strictly based - your output file will be in chronological order. Image Note: The green dashed line signifies a discontinuity in the report data – the actual report for this date had pages worth of transaction data. Page | 177 7.3.6 Ticket Data The Ticket Data report offers comprehensive ticket order information based on a specific event or performance in the form of .csv download. On this report you will have a large amount of data returned. Below is the listing of all the data returned in the output (excel) file. Each line of the data returned corresponds to one ticket. Order ID Billing Zip Code Order Date Billing Country Order Status Billing Phone Quantity Billing Fax Price Billing Cell Phone Real Area Name Billing Work Phone Seat Number Billing Email Seat Category Name Credit Card Last 4 Digits Pricing Code Shipping Company Item Status Shipping First Name Box Office Shipping Middle Initial Organizer (a.k.a. Promoter) Shipping Last Name Venue Shipping Address 1 Event Shipping Address 2 Performance Name Shipping City Performance Date Shipping State Performance Time Shipping Zip Code Billing Company (patron info begins) Shipping Country Billing First Name Shipping Phone Billing Middle Initial Shipping Fax Billing Last Name Shipping Cell Phone Billing Address 1 Shipping Work Phone Billing Address 2 Shipping Email Billing City Type of Delivery Billing State Page | 178 7.3.7 Included Fees/Cost Report This report serves as a tool to review included fees (internal costs deducted directly from the ticket cost rather than added on as an additional fee) and compare them to funds brought in through ticket cost and excluded fees. You can compare one EXCLUDED fee to one INCLUDED fee that you, the system user, inputs into the pricing for each performance. This report allows the user to see if the excluded fees are sufficiently covering internal cost. Below you can see that the output shows you all cost totals for a given Venue, Event, Performance, etc (to your choosing). The last column shows the difference between the Excluded Fee and the Included Fee that you chose as the percent by which you would need to raise the Excluded Fee to cover the Included Cost that you have identified. If the cost is covered, then the increase needed to cover the cost is 0% and that is returned. Page | 179 7.3.8 Ticket Fees vs. Ticket Fee Revenue Similar to the Included Fees/Cost Report, the ShoWare™ Fees vs. Ticket Fee Revenue report helps the organization to compare the fees they are paying out for system use to the amount of revenue brought in through an excluded fee your choose. This report outputs the NET REVENUE made with Excluded Fees after considering ShoWare™ Fees. You input the numbers for the fees based on your contact; the fees inputted for the report below are for easy math examples of the report. Page | 180 7.3.9 Discount Code Group Report This report is designed for systems that make use of the Group option for their discount codes; grouping of discount codes is generally only useful in systems that use numerous discount codes. This report offers data within a specific date range for each group; it can also tell you how often a discount is used for your records. Page | 181 7.4 Marketing & Sales The system provides several very useful marketing reports that are designed to help track the effectiveness of various types of marketing campaigns and sales records. Should the system user choose to do so, they can check the statistics for their heard about us survey, commission information, access control statistics, and coupon use. Page | 182 7.4.1 Banner Stats The Banner Stats Report is currently unavailable. Banners Ads, however, can be used in the system for cross-promotion, advertisements and sponsorship opportunities. (See Section 2.2.7: Banner Ads for more information) 7.4.2 Commission Report If your business has a commission structure in place for users, this report will calculate earned commission per user account. You will need to have the User commission set-up before anything is calculated; commission can be based on a percentage of the face value of the ticket, a per ticket amount or a per order amount as you designate. It can be different for each user. This report can be filtered by event, performance code, sales date range and performance date range. The user also has the option of grouping the results by user, event and user, or performance and user. Note: If sales are made in an Event/Performance prior to setting a commission structure, the commission will be calculated retroactively for all sales under that Event/Performance, unless a time period is selected. The Report includes cancelled tickets. Page | 183 7.4.3 Access Control Report If simple access control is enabled in your system, then you can use this report to view access control results for a single performance. This is a great way to understand attendance records for your events if you are scanning at the gate. Page | 184 7.4.4 Heard About Us Report This report serves as an excellent marketing tool by allowing system users to track the effectiveness of their campaigns. As you read about in Section 1.3.3 Heard About Values, your system administrators can define values for a checkout survey (required on the web if enabled) that asks the customer how they heard about the organization/event. This is great for tracking newspaper ads, radio spots, mail and e-mail campaigns, etc. The "Heard About Us Report" shows statistics on which value patrons selected during checkout for each performance. The report can be filtered by event, performance code, performance date range, OR the user can check the “Cumulative” box to view Heard about Us activity for all performances past and present in the entire system. Page | 185 7.4.5 Redeemed Coupon Report If coupon codes are being used in your system (see Section 2.5.4 for more information on coupons), then the user may use this report to track coupon activity. Tracking coupon activity is very useful if coupons are being used for promotional offers; the marketing team can then track the response to and effectiveness of those offers. The report can be filtered by sales date range, performance date range, and the coupon issuer, and once generated the report will show the performance the coupon was used on, the coupon code, the quantity of tickets purchased and the price of the tickets at the promotional coupon rate. Page | 186 7.5 Patrons & Memberships The patrons and memberships section contains all of the tools necessary to keep in contact with your patrons and also to manage your memberships from member names to membership accounting. As you can see below, the majority of the reports generated in this section are .csv files. This is done so that you can easily manipulate the data with your spreadsheet program or upload the data to another program such as an email campaign management service. Page | 187 7.5.1 Patrons Per Classification If your organization uses patron classifications to track patron attributes such as group, subscriber, etc., then this report is an excellent tool for targeting those specific attributes/audiences. Classifications are assigned manually by your box office staff so please remember that this is a manual step that your system administrator needs to make part of your standard operating procedures if you want to use this report. This report will provide all patron contact information for any patrons assigned to the classification selected. The user can then use the information for mail or email campaigns, courtesy phone calls, or even as a method of keeping patrons up to date about event/performance changes that apply to that specific classification (i.e. subscribers). This report outputs the following data: • Company • First Name • Middle Initial • Last Name • Address 1 • Address 2 • City • State • Zip Code • Country • Phone • Fax • Cell Phone • Work Phone • Email Page | 188 7.5.2 Patron Order Addresses This report pulls patron order address information based on event, performance code, or sales date range. The output file contains the following information: Order ID Credit Card Last 4 Digits Order Date Shipping Company Order Status Shipping First Name Billing Company Shipping Middle Initial Billing First Name Shipping Last Name Billing Middle Initial Shipping Address 1 Billing Last Name Shipping Address 2 Billing Address 1 Shipping City Billing Address 2 Shipping State Billing City Shipping Zip Code Billing State Shipping Country Billing Zip Code Shipping Phone Billing Country Shipping Fax Billing Phone Shipping Cell Phone Billing Fax Shipping Work Phone Billing Cell Phone Shipping Email Billing Work Phone Type of Delivery Billing Email Page | 189 7.5.3 Patrons Just like the Patron Order Address Report, the filtering of your patrons can be by Events, Performance Codes or Sales Date Range. The largest difference is that this report allows you to choose your output file to return less data. The output can be set-up in any of the configurations listed below. Page | 190 7.5.4 Membership Reconciliation This report provides a listing of payment types and amounts related to the purchase of membership occurring within the transaction date specified. 7.5.5 Membership Transaction Summary Report This report is similar to the membership reconciliation, except that it lists those payment transactions by membership level 7.5.6 Membership Manifest This report is a listing of member names, email address, membership status, and patron number according to membership level. This would generally be useful for verifying memberships while hosting special member events. 7.5.7 Membership Allocation Redemption Summary This report gives a summary of tickets purchased under the MEMAL (members only) discount code based on sales date range, event, or performance code. 7.5.8 Membership Cashier Report This report is similar to the standard Cashier Report, except that it only includes information on membership purchases. 7.5.9 Membership Daily Payment Report This report is similar to the standard Daily Payment Report, except that it only includes information on membership purchases and no orders. Page | 191 7.5.10 Donations This feature allows the user to search for donations made through both the public website and the admin/box office interfaces. It allows the user to search by donor name, donation amount, donation date, payment method, and user. Once all necessary criteria are selected and the user clicks search, the system generates a detailed list of donations that match the requested criteria. You can click any of the names to get more information on that particular donor. This is more of a search file than an output report. No download is available at this time. Page | 192 7.6 System Reports System Reports offer users the ability to look at backend system data that would otherwise not be visible in other areas of the system. This includes system and user activity as well as a log of all payment gateway requests. Page | 193 7.6.1 Activity Report This report gives the user general statistics for order activity that occurred within the specified date range. It offers number of tickets and dollar amount for each order status (paid, unpaid, accounted, canceled, canceled and not refunded, canceled and refunded) and also offers a summary of new patron account and new order creations that have occurred. No fees (excluded, included, order or delivery) are included in this report. Page | 194 7.6.2 ShoWare™ Log The ShoWare™ Log offers system login data based on the user selected login dates and times. This log provides the name of the user that logged in, the date and time that they logged in, as well as the IP address of the location they logged in from. This is mostly used as a security feature to monitor who is logging into your system and from where. Page | 195 7.6.3 Payment Gateway Transaction Log This is a log of all transaction requests made to the Payment Gateway Service Provider (PayFlow Pro, Authorize.net, etc.). Only Site Administrators have access to this Log. Based on the transaction date/times and transaction types selected, the system will give you a detailed listing of transactions with information including transaction date & time, transaction type, response time, amount of transaction, result, order number, and the user who placed the transaction. Page | 196 7.7 Custom Reporting The ShoWare™ Ticketing System offers a multitude of reporting options, but in the event the system user discovers that there is a special reporting need not addressed by the system, ShoWare™ offers the ability to create customized reports. To request a quote for a Custom Online Report or Report Download contact your Project Manager or ShoWare™ LLC Sales Representative: 443.951.0340 or info@ShoWare™.com. Page | 197 *Part 8: ADMINISTRATION The administration area of the site is where user accounts are created, and site permissions for those accounts are set. System Users are categorized in two distinct groups: 1. Authorized Users that can access the Administration site of the ticketing application. These users have the ability to login to the system through your /admin URL. Keep in mind that the site administrator chooses which site modules these users have access to. For example, your created users could be classified as site admin's, they could only be given access to reporting or to the Box Office Interface, etc. In addition, Departments can be created to further classify these users (i.e. Box Office, Accounting, Marketing, etc.). 2. Reporting Users: These are users (commonly promoters or third parties) that only need to be granted access to basic reports and not other system functions. This category of users CANNOT access the Administration site, rather they login through the reporting URL (that URL is provided and varies according to the URL of the customer site). Page | 198 8.1 List Users This menu is a complete list of user accounts in the system. It will show the username, the actual name of the user, assigned department, whether or not they have the ability to reprint tickets, and the date range their user account is active for. An “edit” button is also provided so that site administrators may edit the permissions for any user at any given time. At the top of the screen there is a large “Create New User Account” button. This button allows you to set up a new user account, and functions exactly the same as the New User menu option under Administration. We will go through the steps of creating a new user in the next section (7.2). There is a total user count at the top of the screen. In the event that your system has enough user accounts created to warrant sorting, the department drop down menu at the top of the screen will filter user account results by department. Page | 199 8.2 New Users From this menu new user accounts can be created. New user accounts can also be created through the “Create New User Account” button on the List Users screens. Both tools function the exact same way. Below we will take you through the step by step creation of a new system user. 1. Department: You may classify a user by department, but it is not required. The drop down menu will provide you with all the departments created in the system. (Create Departments by going to Configurations & Settings Æ Options & Classifications Æ Departments). 2. First, Last name: Names fields are provided to identify the user. These fields are REQUIRED. 3. Title, Comments: These fields are provided to further identify the user and are not required. 4. User Name: This is the name the user will need to login to the system. We recommend making it name that will allow you to easily identify the user. 5. Password, Verify Password: This is the password that the user will need (along with their username) to login to the system. 6. Allow Change Password: This determines whether or not the user has the ability to change the password on their user account. Leaving this box unchecked will mean that a site admin will have to change their password for them when necessary. 7. Valid From and To Dates: These dates determine how long the user account will remain active. Expiration dates are generally only set for seasonal employment or special access exceptions. Page | 200 8. Commission: These fields are provided to define a commission base (if needed) for users who are selling tickets. Commission base can be set as a percentage per ticket, dollar amount per ticket, or dollar amount per order. Note: Since every User has a unique authentication set of Login and Password, the system automatically attaches a User with the orders that they create. The commission basis can be set retroactively on the system. 9. Default Order Fee (Call Center): For systems that make use of order fees, this drop down assigns a default order fee to orders being created by that user. This is great if you have separate fees (and separate employees) for your box office, call center, outlets, etc. This fee can be removed or changed before an order is completed. 10. Call Center Checkout Options: This feature allows the site admin to determine if a ticket seller using the call center window will be able to see the Anonymous Checkout option, the Call Center Checkout option, or both. A site admin may want a box office employee to only have access to anonymous checkout and may want a call center employee to only have access to the call center checkout. Note: ADMINs see both by default even if only one is specified. 11. Cash Drawer: If your box office uses cash drawers, then here is where you would enable cash drawer ability for a user, as well as determine port and drawer open character. Page | 201 12. Status Codes: The settings assigned here determine a user’s ability to view performances based on the various performance status codes (see section 2.5.1 for a review of performance status codes). Giving the user full access means they can view all performances assigned to that performance status, restricted Access means that they will be able to view the performances, but only during the sales start and stop dates, and no access means that performances assigned to that status will not be at all visible to the user. These restrictions apply to the both the Box Office Interface and the Administration site. 13. Printing Options: Site admin may disallow ticket printing for a user, allow a user to have the ability to reprint ticket orders, and can choose whether or not the user sees the full name of the ticket printer. Page | 202 14. Available Security Groups: This part of the new user set up is crucial, as it determines the user’s ability to function within the system. 15. Site Admin - UNRESTRICTED access is given to users assigned to the Site Admin permission. If a User is defined under Site Admin there is NO need to include the remaining explicit permissions. • Access Control Management - If access control is enabled in your system, then access control management gives users the ability to enter the various access control menus. • Accounts Receivable – If your system is a split payment system (most systems are NOT), then this group gives the user the ability to create orders with the accounts receivable payment option. • Advertising Manager – Allows user to access all menus related to banner ads • Call Center – Allows the user to access the Box Office Interface • Data Management – Gives the user the ability to view and create box offices, promoters, and venues under the Configurations & Settings menu (DOES NOT give the user the ability to edit or create seat maps) • Donations – If donations are active in your system then this option gives the user the ability to process donations as well as access all menus related to donations. • Event & Performance Management – Gives the user the ability to create and edit Events & Performances. • GA Touch Screen Interface – If your system uses a touch screen interface, this enables that feature for that user. • Hold Management – Allows the user to view, create and edit holds in the system. • Image Management – Allows the user to upload images to the system. • Member Restrictions Overwrite – Allows the user to bypass membership restrictions in the system. • Memberships – If memberships are enabled in the system, this gives the user the ability to process memberships and access all associated menus and reports. • Order Management – Gives the user the ability to search for, view, and edit orders in the system. • Patron Management – Gives the user the ability to search for, view, and edit patron accounts in the system. • Reports – Gives the user access to the Reporting module in the administration menu. • Seat Exchange Permission – Allows the user to make ticket exchanges. Users who are not given this permission will not have the ability to exchange tickets. • Seat Map Management – Allows the user to create and edit seat maps. • Split Payments – If your system is a split payment system (most are NOT), this will allow the user to accept split payments. • Ticket Printing – This determines whether or not the user has the ability to print tickets. This is related to hard tickets and ticket printers, and does not affect the ability to print a Print@Home ticket from an email confirmation. Page | 203 8.3 List Reporting Users All reporting users are listed using this menu. These users either follow a link directly to the reporting site, provided by you to them: http://tickets.xxxx.com/reporting. You can choose to have the “Promoter Login” link is below the left side bar on the public website. The link for reporting users is a completely different site than the administration site. The Reporting Users group is a separate group from the USERS that appear on the administration side, and reporting users have their own set of access permissions for the reporting site. A “Create New Reporting User Account” button appears at the top of the screen for your convenience. This button functions exactly the same as the New Reporting User menu option under administration. The listing shows only the username and the valid date range for the account; it has an “edit” available so that the site admin can change reporting user settings at any given time. Page | 204 8.4 New Reporting User Creating a New Reporting User to similar to creating a standard system user, but it requires the completion of fewer fields. We will take you through the step by step process of creating a new reporting user. 1. User Name: Name used to login to the reporting site 2. Password, Verify Password: Password that is used along with the user name to login to the reporting site 3. Name: Required to identify the user 4. Comments: Used to further identify the user if necessary. 5. Valid From/To Dates: Sets expiration for the login. This feature would be used most frequently with promoters or third parties who are hosting onetime events. 6. Cashier Report: The Cashier Report may or may not be something you want to have your promoter use. If you enable it, you will need to enable which users for which they can pull the report. Page | 205 7. Report Check Boxes are provided to determine which reports will be available to the Reporting User: 8. Allow Performance Report gives access to performance reports. • Allow Ticket Buyer Report gives access to Ticket Buyer Report. • Allow Download: These check boxes will allow the Reporting User to download, depending on the option selected, a combination of information about Patrons. Please consider the potential outcome of allowing third parties to download your patron contact information before enabling these options. 9. Click SAVE and then new options will need to be enabled for your promoter/client to pull the reports from the reporting site like you want to enable for them. Page | 206 10. Once the screen for the initial information on the Reporting User has been saved, the screen is going to refresh and new fields will appear below the action buttons. These fields allow you to set access permissions for the reporting user. If you do not set these permissions, the user will not be able to access ANY data through the reporting site. • Venues, Promoters, Events, Performances: Adding permissions to any of these options will determine what level of access the reporting user has. For example, if you give the user venue level permission/access, then that user is going to be able to access the specified reports for all events and performances taking place at that venue. The most common given level of access is the Promoter access, which allows the user to see only events and performances designated under the specified promoter. Page | 207 If you have any concerns, corrections or questions, contact your ShoWare Project Manager: [email protected] Mon – Fri: 8:00am – 5:00pm PST 559.432.8000 Toll Free 866.215.1026 After-Hours Emergency Support 888.779.8663 Page | 208