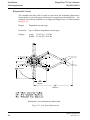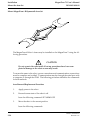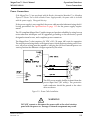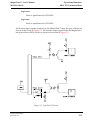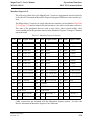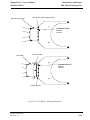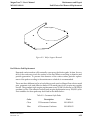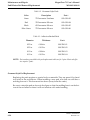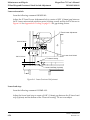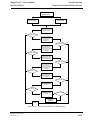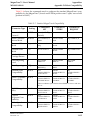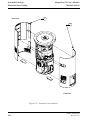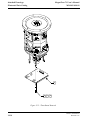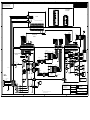
1
Brooks Automation
MagnaTran™ 7.1
User’s Manual
View our inventory
MN-003-1600-00
Revision 2.2
MagnaTran 7.1 User’s Manual
MN-003-1600-00
Serial Number: ______________
Serial Number indicates date of construction of the MagnaTran™ 7.1. The first two characters are the year,
next two characters are the month, remaining characters are a unique identifier. If there is no Serial Number
recorded above this manual should be considered “generic” and not associated with a specific robot.
Information provided within this document is subject to change without notice, and although believed to be
accurate, Brooks Automation assumes no responsibility for any errors, omissions, or inaccuracies.
If you have any questions or comments about this manual, please complete the Reader’s Comment Form provided at the back of this manual and return it to the Technical Publications Dept. at Brooks Automation.
MagnaTran, BiSymmetrik, Leapfrog, Marathon, Marathon Express, Atmospheric Express, PASIV, and Time
Optimal Trajectory are trademarks of Brooks Automation.
All other trademarks are properties of their respective owners.
© Brooks Automation 1998, All Rights Reserved. The information included in this manual is Brooks Proprietary
Information and is provided for the use of Brooks’ customers only and cannot be used for distribution, reproduction, or sale without the express written permission of Brooks Automation. This information may be incorporated into the user’s documentation, however any changes made by the user to this information is the
responsibility of the user.
Author: B. Varnum
Brooks Automation
15 Elizabeth Drive
Chelmsford, MA. 01824
Phone (978) 262-2400
Fax
(978) 262-2500
P/N MN-003-1600-00
June 26, 1998
October 30, 1998
September 14, 1999
May 17, 2001
Revision 1.0
Revision 2.0
Revision 2.1
Revision 2.2
Initial Release per EC# 13293.
Released per EC# 13841.
Released per EC# 15660.
Released per EC# 19565.
This manual is available in the following formats; Standard Printed, Cleanroom Printed, and CD.
Printed in the U.S.A.
Brooks Automation
MagnaTran 7.1 User’s Manual
MN-003-1600-00
Contents
Contents
Figures . . . . . . . . . . . . . . . . . . . . . . . . . . . . . . . . . . . . . . . . . . . . . . . . . . . . . . . . . . . . . . . . . . xv
Tables . . . . . . . . . . . . . . . . . . . . . . . . . . . . . . . . . . . . . . . . . . . . . . . . . . . . . . . . . . . . . . . . . xvii
Changes . . . . . . . . . . . . . . . . . . . . . . . . . . . . . . . . . . . . . . . . . . . . . . . . . . . . . . . . . . . . . . . . xxi
Introduction
MagnaTran 7 Robot Overview. . . . . . . . . . . . . . . . . . . . . . . . . . . . . . . . . . . . . . . . . . .1-2
Special Features . . . . . . . . . . . . . . . . . . . . . . . . . . . . . . . . . . . . . . . . . . . . . . . . .1-3
Operation Overview . . . . . . . . . . . . . . . . . . . . . . . . . . . . . . . . . . . . . . . . . . . . . . . . . . .1-4
Documentation Overview . . . . . . . . . . . . . . . . . . . . . . . . . . . . . . . . . . . . . . . . . . . . . .1-5
Supplementary and Related Documentation . . . . . . . . . . . . . . . . . . . . . . . . . . . . . .1-6
Manual Notation . . . . . . . . . . . . . . . . . . . . . . . . . . . . . . . . . . . . . . . . . . . . . . . . . . . . . .1-7
Hardware Notation . . . . . . . . . . . . . . . . . . . . . . . . . . . . . . . . . . . . . . . . . . . . . .1-7
Software Notation . . . . . . . . . . . . . . . . . . . . . . . . . . . . . . . . . . . . . . . . . . . . . . .1-8
Document and Drawing Numbering . . . . . . . . . . . . . . . . . . . . . . . . . . . . . . .1-9
Notes, Cautions, Warnings, and Pictograms . . . . . . . . . . . . . . . . . . . . . . . . .1-10
Manual Usage . . . . . . . . . . . . . . . . . . . . . . . . . . . . . . . . . . . . . . . . . . . . . . . . . . . . . . . . .1-11
Specifications . . . . . . . . . . . . . . . . . . . . . . . . . . . . . . . . . . . . . . . . . . . . . . . . . . . . . . . . .1-12
Robot Drive . . . . . . . . . . . . . . . . . . . . . . . . . . . . . . . . . . . . . . . . . . . . . . . . . . . . .1-12
Standard Arms . . . . . . . . . . . . . . . . . . . . . . . . . . . . . . . . . . . . . . . . . . . . . . . . . .1-15
Company Overview . . . . . . . . . . . . . . . . . . . . . . . . . . . . . . . . . . . . . . . . . . . . . . . . . . .1-17
Quality Policy . . . . . . . . . . . . . . . . . . . . . . . . . . . . . . . . . . . . . . . . . . . . . . . . . . .1-17
Vision Statement . . . . . . . . . . . . . . . . . . . . . . . . . . . . . . . . . . . . . . . . . . . . . . . .1-17
Business Profile . . . . . . . . . . . . . . . . . . . . . . . . . . . . . . . . . . . . . . . . . . . . . . . . .1-17
Brooks Automation
Revision 2.2
i
Contents
MagnaTran 7.1 User’s Manual
MN-003-1600-00
Safety
Safety Considerations . . . . . . . . . . . . . . . . . . . . . . . . . . . . . . . . . . . . . . . . . . . . . . . . . .2-2
Personnel Safety Guidelines. . . . . . . . . . . . . . . . . . . . . . . . . . . . . . . . . . . . . . .2-2
Equipment Safety Guidelines. . . . . . . . . . . . . . . . . . . . . . . . . . . . . . . . . . . . . .2-3
Disconnect Devices and Interlocks . . . . . . . . . . . . . . . . . . . . . . . . . . . . . . . . . . . . . . .2-5
Disconnect Devices . . . . . . . . . . . . . . . . . . . . . . . . . . . . . . . . . . . . . . . . . . . . . .2-5
Interlocks . . . . . . . . . . . . . . . . . . . . . . . . . . . . . . . . . . . . . . . . . . . . . . . . . . . . . . .2-5
Mechanical Hazards . . . . . . . . . . . . . . . . . . . . . . . . . . . . . . . . . . . . . . . . . . . . . . . . . . .2-6
Electrical Hazards . . . . . . . . . . . . . . . . . . . . . . . . . . . . . . . . . . . . . . . . . . . . . . . . . . . . .2-7
Electrical Hazard Classifications . . . . . . . . . . . . . . . . . . . . . . . . . . . . . . . . . . .2-8
Laser Hazards . . . . . . . . . . . . . . . . . . . . . . . . . . . . . . . . . . . . . . . . . . . . . . . . . . . . . . . .2-9
Gas Hazards . . . . . . . . . . . . . . . . . . . . . . . . . . . . . . . . . . . . . . . . . . . . . . . . . . . . . . . . . .2-10
Chemical Hazards . . . . . . . . . . . . . . . . . . . . . . . . . . . . . . . . . . . . . . . . . . . . . . . . . . . . .2-11
Thermal Hazards . . . . . . . . . . . . . . . . . . . . . . . . . . . . . . . . . . . . . . . . . . . . . . . . . . . . . .2-12
Vacuum Hazards . . . . . . . . . . . . . . . . . . . . . . . . . . . . . . . . . . . . . . . . . . . . . . . . . . . . . .2-13
Fire and Explosion Hazards . . . . . . . . . . . . . . . . . . . . . . . . . . . . . . . . . . . . . . . . . . . . .2-14
Environmental Hazards . . . . . . . . . . . . . . . . . . . . . . . . . . . . . . . . . . . . . . . . . . . . . . . .2-15
Noise Emission . . . . . . . . . . . . . . . . . . . . . . . . . . . . . . . . . . . . . . . . . . . . . . . . . .2-15
Vibration . . . . . . . . . . . . . . . . . . . . . . . . . . . . . . . . . . . . . . . . . . . . . . . . . . . . . . .2-15
Matrix of Emergency and Corrective Response Actions . . . . . . . . . . . . . . . . . . . . .2-16
Material Safety Information . . . . . . . . . . . . . . . . . . . . . . . . . . . . . . . . . . . . . . . . . . . . .2-17
Helium Safety Information. . . . . . . . . . . . . . . . . . . . . . . . . . . . . . . . . . . . . . . .2-18
Isopropyl Alcohol Safety Information . . . . . . . . . . . . . . . . . . . . . . . . . . . . . .2-19
Nitrogen Safety Information . . . . . . . . . . . . . . . . . . . . . . . . . . . . . . . . . . . . . .2-20
Krytox ® (DuPont) Safety Information. . . . . . . . . . . . . . . . . . . . . . . . . . . . . .2-21
Installation
Site Requirements . . . . . . . . . . . . . . . . . . . . . . . . . . . . . . . . . . . . . . . . . . . . . . . . . . . . .3-2
Space . . . . . . . . . . . . . . . . . . . . . . . . . . . . . . . . . . . . . . . . . . . . . . . . . . . . . . . . . .3-2
Environmental Requirements . . . . . . . . . . . . . . . . . . . . . . . . . . . . . . . . . . . . .3-5
Electrical . . . . . . . . . . . . . . . . . . . . . . . . . . . . . . . . . . . . . . . . . . . . . . . . . . . . . . .3-5
Communications . . . . . . . . . . . . . . . . . . . . . . . . . . . . . . . . . . . . . . . . . . . . . . . .3-5
Unpacking and Inspection . . . . . . . . . . . . . . . . . . . . . . . . . . . . . . . . . . . . . . . . . . . . . .3-6
Unpacking Instructions. . . . . . . . . . . . . . . . . . . . . . . . . . . . . . . . . . . . . . . . . . .3-7
Installation Procedure . . . . . . . . . . . . . . . . . . . . . . . . . . . . . . . . . . . . . . . . . . . . . . . . . .3-8
Prepare Surface for Mounting . . . . . . . . . . . . . . . . . . . . . . . . . . . . . . . . . . . . .3-8
ii
Brooks Automation
Revision 2.2
MagnaTran 7.1 User’s Manual
MN-003-1600-00
Contents
Robot Installation. . . . . . . . . . . . . . . . . . . . . . . . . . . . . . . . . . . . . . . . . . . . . . . .3-10
Facilities Connections . . . . . . . . . . . . . . . . . . . . . . . . . . . . . . . . . . . . . . . . . . . .3-10
Electrical Connections . . . . . . . . . . . . . . . . . . . . . . . . . . . . . . . . . . . . . . . . . . . .3-10
Communication Connections. . . . . . . . . . . . . . . . . . . . . . . . . . . . . . . . . . . . . .3-14
Control/Display Module . . . . . . . . . . . . . . . . . . . . . . . . . . . . . . . . . . . . . . . . .3-17
Software Installation . . . . . . . . . . . . . . . . . . . . . . . . . . . . . . . . . . . . . . . . . . . . .3-19
Check-out . . . . . . . . . . . . . . . . . . . . . . . . . . . . . . . . . . . . . . . . . . . . . . . . . . . . . . . . . . . .3-20
Mechanical Checks . . . . . . . . . . . . . . . . . . . . . . . . . . . . . . . . . . . . . . . . . . . . . .3-20
Facility Checks . . . . . . . . . . . . . . . . . . . . . . . . . . . . . . . . . . . . . . . . . . . . . . . . . .3-20
Initial Power-up Sequence . . . . . . . . . . . . . . . . . . . . . . . . . . . . . . . . . . . . . . . . . . . . . .3-21
Configuration Compatibility . . . . . . . . . . . . . . . . . . . . . . . . . . . . . . . . . . . . . . . . . . . .3-22
Mount the Arm Set . . . . . . . . . . . . . . . . . . . . . . . . . . . . . . . . . . . . . . . . . . . . . . . . . . . .3-23
Mount the MagnaTran 7 Leapfrog Arm Set. . . . . . . . . . . . . . . . . . . . . . . . . .3-24
Mount the MagnaTran 7.1 BiSymmetrik Arm Set/Hub Style . . . . . . . . . .3-29
Mount MagnaTran 6 BiSymmetrik Arm Set . . . . . . . . . . . . . . . . . . . . . . . . .3-34
Mount the MagnaTran 6 Frogleg Arm Set . . . . . . . . . . . . . . . . . . . . . . . . . . .3-38
Mount the MagnaTran 7 BiSymmetrik Arm Set/Cone Style . . . . . . . . . . .3-42
Install End Effector . . . . . . . . . . . . . . . . . . . . . . . . . . . . . . . . . . . . . . . . . . . . . . . . . . . .3-47
Alignment and Calibration. . . . . . . . . . . . . . . . . . . . . . . . . . . . . . . . . . . . . . . . . . . . . .3-48
Subsystems
Mechanical System . . . . . . . . . . . . . . . . . . . . . . . . . . . . . . . . . . . . . . . . . . . . . . . . . . . .4-2
Subsystems . . . . . . . . . . . . . . . . . . . . . . . . . . . . . . . . . . . . . . . . . . . . . . . . . . . . .4-2
Protective Covers . . . . . . . . . . . . . . . . . . . . . . . . . . . . . . . . . . . . . . . . . . . . . . . .4-3
Frame Assembly. . . . . . . . . . . . . . . . . . . . . . . . . . . . . . . . . . . . . . . . . . . . . . . . .4-4
T1/T2 Drive Assembly . . . . . . . . . . . . . . . . . . . . . . . . . . . . . . . . . . . . . . . . . . .4-5
Z Axis Drive Assembly . . . . . . . . . . . . . . . . . . . . . . . . . . . . . . . . . . . . . . . . . . .4-7
Robot Arms . . . . . . . . . . . . . . . . . . . . . . . . . . . . . . . . . . . . . . . . . . . . . . . . . . . .4-9
Electrical System . . . . . . . . . . . . . . . . . . . . . . . . . . . . . . . . . . . . . . . . . . . . . . . . . . . . . .4-11
PC104 CPU (Supervisor) Board . . . . . . . . . . . . . . . . . . . . . . . . . . . . . . . . . . . .4-11
Personality (Motion Control Computer) Board . . . . . . . . . . . . . . . . . . . . . .4-11
T1/T2 Axis Driver Board and Z Axis Driver Board . . . . . . . . . . . . . . . . . . .4-11
I/O (Interface) Board. . . . . . . . . . . . . . . . . . . . . . . . . . . . . . . . . . . . . . . . . . . . .4-12
Power Pak . . . . . . . . . . . . . . . . . . . . . . . . . . . . . . . . . . . . . . . . . . . . . . . . . . . . . .4-15
Power Supply . . . . . . . . . . . . . . . . . . . . . . . . . . . . . . . . . . . . . . . . . . . . . . . . . . .4-15
Software. . . . . . . . . . . . . . . . . . . . . . . . . . . . . . . . . . . . . . . . . . . . . . . . . . . . . . . . . . . . . .4-16
Control/Display Module . . . . . . . . . . . . . . . . . . . . . . . . . . . . . . . . . . . . . . . . . . . . . . .4-17
Functional Block Diagram . . . . . . . . . . . . . . . . . . . . . . . . . . . . . . . . . . . . . . . .4-18
Brooks Automation
Revision 2.2
iii
Contents
MagnaTran 7.1 User’s Manual
MN-003-1600-00
Operational Interfaces
Interface Overview . . . . . . . . . . . . . . . . . . . . . . . . . . . . . . . . . . . . . . . . . . . . . . . . . . . .5-2
Power Connections . . . . . . . . . . . . . . . . . . . . . . . . . . . . . . . . . . . . . . . . . . . . . . . . . . . .5-3
Serial Communication SIO1 . . . . . . . . . . . . . . . . . . . . . . . . . . . . . . . . . . . . . . . . . . . . .5-5
Switch Settings . . . . . . . . . . . . . . . . . . . . . . . . . . . . . . . . . . . . . . . . . . . . . . . . . .5-7
Serial Communication SIO2 . . . . . . . . . . . . . . . . . . . . . . . . . . . . . . . . . . . . . . . . . . . . .5-8
MISC I/O Communications . . . . . . . . . . . . . . . . . . . . . . . . . . . . . . . . . . . . . . . . . . . . .5-9
High Side I/O . . . . . . . . . . . . . . . . . . . . . . . . . . . . . . . . . . . . . . . . . . . . . . . . . . .5-10
Low Side I/O . . . . . . . . . . . . . . . . . . . . . . . . . . . . . . . . . . . . . . . . . . . . . . . . . . .5-12
High Side/Low Side Interfaces . . . . . . . . . . . . . . . . . . . . . . . . . . . . . . . . . . . .5-14
Safety Interlock. . . . . . . . . . . . . . . . . . . . . . . . . . . . . . . . . . . . . . . . . . . . . . . . . .5-17
Retract Pin . . . . . . . . . . . . . . . . . . . . . . . . . . . . . . . . . . . . . . . . . . . . . . . . . . . . . .5-18
Marathon Express I/O . . . . . . . . . . . . . . . . . . . . . . . . . . . . . . . . . . . . . . . . . . .5-19
Control/Display Module . . . . . . . . . . . . . . . . . . . . . . . . . . . . . . . . . . . . . . . . . . . . . . .5-20
Emergency Stop CDM. . . . . . . . . . . . . . . . . . . . . . . . . . . . . . . . . . . . . . . . . . . .5-20
Optional CDM . . . . . . . . . . . . . . . . . . . . . . . . . . . . . . . . . . . . . . . . . . . . . . . . . .5-21
Operation
MagnaTran 7.1 Wafer Handling Robot Overview . . . . . . . . . . . . . . . . . . . . . . . . . .6-2
Arm Description. . . . . . . . . . . . . . . . . . . . . . . . . . . . . . . . . . . . . . . . . . . . . . . . .6-2
MagnaTran 7.1 Application Number . . . . . . . . . . . . . . . . . . . . . . . . . . . . . . . . . . . . .6-8
Theory of Operation . . . . . . . . . . . . . . . . . . . . . . . . . . . . . . . . . . . . . . . . . . . . . . . . . . .6-9
Single Arm Motion . . . . . . . . . . . . . . . . . . . . . . . . . . . . . . . . . . . . . . . . . . . . . .6-10
Dual Arm Motion. . . . . . . . . . . . . . . . . . . . . . . . . . . . . . . . . . . . . . . . . . . . . . . .6-10
Motion Control . . . . . . . . . . . . . . . . . . . . . . . . . . . . . . . . . . . . . . . . . . . . . . . . . .6-13
Speed . . . . . . . . . . . . . . . . . . . . . . . . . . . . . . . . . . . . . . . . . . . . . . . . . . . . . . . . . .6-13
Hardware Memory Structure. . . . . . . . . . . . . . . . . . . . . . . . . . . . . . . . . . . . . .6-16
Station Coordinate System . . . . . . . . . . . . . . . . . . . . . . . . . . . . . . . . . . . . . . . .6-17
Factory Set HOME Position . . . . . . . . . . . . . . . . . . . . . . . . . . . . . . . . . . . . . . .6-19
HOME Operation. . . . . . . . . . . . . . . . . . . . . . . . . . . . . . . . . . . . . . . . . . . . . . . .6-20
Controls and Indicators. . . . . . . . . . . . . . . . . . . . . . . . . . . . . . . . . . . . . . . . . . . . . . . . .6-21
Overview . . . . . . . . . . . . . . . . . . . . . . . . . . . . . . . . . . . . . . . . . . . . . . . . . . . . . . .6-21
Controls . . . . . . . . . . . . . . . . . . . . . . . . . . . . . . . . . . . . . . . . . . . . . . . . . . . . . . . .6-21
Indicators. . . . . . . . . . . . . . . . . . . . . . . . . . . . . . . . . . . . . . . . . . . . . . . . . . . . . . .6-21
Operational Interlocks. . . . . . . . . . . . . . . . . . . . . . . . . . . . . . . . . . . . . . . . . . . . . . . . . .6-23
Identification. . . . . . . . . . . . . . . . . . . . . . . . . . . . . . . . . . . . . . . . . . . . . . . . . . . .6-23
Creating the Operational Interlocks . . . . . . . . . . . . . . . . . . . . . . . . . . . . . . . .6-26
Related Commands . . . . . . . . . . . . . . . . . . . . . . . . . . . . . . . . . . . . . . . . . . . . . .6-26
Pass Through Feature . . . . . . . . . . . . . . . . . . . . . . . . . . . . . . . . . . . . . . . . . . . .6-26
iv
Brooks Automation
Revision 2.2
MagnaTran 7.1 User’s Manual
MN-003-1600-00
Contents
Special Notes on RETRACT_PIN . . . . . . . . . . . . . . . . . . . . . . . . . . . . . . . . . .6-26
Special Notes on the PowerPak . . . . . . . . . . . . . . . . . . . . . . . . . . . . . . . . . . . .6-27
Mapping the Interlocks . . . . . . . . . . . . . . . . . . . . . . . . . . . . . . . . . . . . . . . . . . .6-29
Wafer Presence Sensors-Extend and Retract . . . . . . . . . . . . . . . . . . . . . . . . . . . . . . .6-32
Overview . . . . . . . . . . . . . . . . . . . . . . . . . . . . . . . . . . . . . . . . . . . . . . . . . . . . . . .6-32
Wafer PICK . . . . . . . . . . . . . . . . . . . . . . . . . . . . . . . . . . . . . . . . . . . . . . . . . . . . .6-33
Wafer PLACE . . . . . . . . . . . . . . . . . . . . . . . . . . . . . . . . . . . . . . . . . . . . . . . . . . .6-36
Servo Position Recording . . . . . . . . . . . . . . . . . . . . . . . . . . . . . . . . . . . . . . . . .6-37
Sensor Interface Specifications. . . . . . . . . . . . . . . . . . . . . . . . . . . . . . . . . . . . .6-37
Ex/Re Sensor Commands. . . . . . . . . . . . . . . . . . . . . . . . . . . . . . . . . . . . . . . . .6-37
Wafer Presence Sensors- Radial Motion. . . . . . . . . . . . . . . . . . . . . . . . . . . . . . . . . . .6-38
R_MT Wafer Sensing Technique . . . . . . . . . . . . . . . . . . . . . . . . . . . . . . . . . . .6-38
R_MT Placement Criteria . . . . . . . . . . . . . . . . . . . . . . . . . . . . . . . . . . . . . . . . .6-38
R_MT Commands . . . . . . . . . . . . . . . . . . . . . . . . . . . . . . . . . . . . . . . . . . . . . . .6-39
Radial Motion Setup Procedure. . . . . . . . . . . . . . . . . . . . . . . . . . . . . . . . . . . .6-41
Off Center PICK and PLACE Feature . . . . . . . . . . . . . . . . . . . . . . . . . . . . . . . . . . . . .6-42
Discrete I/O Control (DIO) . . . . . . . . . . . . . . . . . . . . . . . . . . . . . . . . . . . . . . . . . . . . .6-45
DIO Control System. . . . . . . . . . . . . . . . . . . . . . . . . . . . . . . . . . . . . . . . . . . . . .6-45
DIO Control Programming. . . . . . . . . . . . . . . . . . . . . . . . . . . . . . . . . . . . . . . .6-45
Initial DIO Configuration Procedure . . . . . . . . . . . . . . . . . . . . . . . . . . . . . . .6-45
DIO Fault Conditions . . . . . . . . . . . . . . . . . . . . . . . . . . . . . . . . . . . . . . . . . . . .6-45
DIO Start-up . . . . . . . . . . . . . . . . . . . . . . . . . . . . . . . . . . . . . . . . . . . . . . . . . . . .6-46
DIO Signal Definitions . . . . . . . . . . . . . . . . . . . . . . . . . . . . . . . . . . . . . . . . . . .6-46
Enable DIO Initialization Sequence. . . . . . . . . . . . . . . . . . . . . . . . . . . . . . . . .6-56
Robot Motion DIO Inhibition. . . . . . . . . . . . . . . . . . . . . . . . . . . . . . . . . . . . . .6-56
PASIV™ Safety Feature Operation . . . . . . . . . . . . . . . . . . . . . . . . . . . . . . . . . . . . . . .6-58
The Workspace Overview . . . . . . . . . . . . . . . . . . . . . . . . . . . . . . . . . . . . . . . .6-58
Creating Workspaces. . . . . . . . . . . . . . . . . . . . . . . . . . . . . . . . . . . . . . . . . . . . .6-59
Reserved Workspace Names . . . . . . . . . . . . . . . . . . . . . . . . . . . . . . . . . . . . . .6-60
Defining Tmin and Tmax . . . . . . . . . . . . . . . . . . . . . . . . . . . . . . . . . . . . . . . . .6-62
Assigning an Interlock to a Workspace . . . . . . . . . . . . . . . . . . . . . . . . . . . . .6-62
PASIV™ commands . . . . . . . . . . . . . . . . . . . . . . . . . . . . . . . . . . . . . . . . . . . . .6-62
Control/Display Module (CDM) Operation . . . . . . . . . . . . . . . . . . . . . . . . . . . . . . .6-63
Power Control . . . . . . . . . . . . . . . . . . . . . . . . . . . . . . . . . . . . . . . . . . . . . . . . . .6-63
Control Modes . . . . . . . . . . . . . . . . . . . . . . . . . . . . . . . . . . . . . . . . . . . . . . . . . .6-66
Key Descriptions . . . . . . . . . . . . . . . . . . . . . . . . . . . . . . . . . . . . . . . . . . . . . . . .6-67
Left Column Keys . . . . . . . . . . . . . . . . . . . . . . . . . . . . . . . . . . . . . . . . . . . . . . .6-69
Axis Parameter Selection Keys. . . . . . . . . . . . . . . . . . . . . . . . . . . . . . . . . . . . .6-78
Moving in the Menu Tree . . . . . . . . . . . . . . . . . . . . . . . . . . . . . . . . . . . . . . . . .6-80
Entering Data Values. . . . . . . . . . . . . . . . . . . . . . . . . . . . . . . . . . . . . . . . . . . . .6-80
Setting Up Stations. . . . . . . . . . . . . . . . . . . . . . . . . . . . . . . . . . . . . . . . . . . . . . .6-81
Example of Teaching a Station with the CDM: . . . . . . . . . . . . . . . . . . . . . . .6-82
Brooks Automation
Revision 2.2
v
Contents
MagnaTran 7.1 User’s Manual
MN-003-1600-00
PowerPak Power Fault Manager . . . . . . . . . . . . . . . . . . . . . . . . . . . . . . . . . . . . . . . . .6-84
Operation . . . . . . . . . . . . . . . . . . . . . . . . . . . . . . . . . . . . . . . . . . . . . . . . . . . . . .6-84
Controls and Indicators. . . . . . . . . . . . . . . . . . . . . . . . . . . . . . . . . . . . . . . . . . .6-85
Operational Interlocks. . . . . . . . . . . . . . . . . . . . . . . . . . . . . . . . . . . . . . . . . . . .6-86
Start-up . . . . . . . . . . . . . . . . . . . . . . . . . . . . . . . . . . . . . . . . . . . . . . . . . . . . . . . . . . . . . .6-87
Operational Check-out . . . . . . . . . . . . . . . . . . . . . . . . . . . . . . . . . . . . . . . . . . .6-87
Normal Running . . . . . . . . . . . . . . . . . . . . . . . . . . . . . . . . . . . . . . . . . . . . . . . . . . . . . .6-88
A Sample Session . . . . . . . . . . . . . . . . . . . . . . . . . . . . . . . . . . . . . . . . . . . . . . . .6-88
Emergency Conditions . . . . . . . . . . . . . . . . . . . . . . . . . . . . . . . . . . . . . . . . . . . . . . . . .6-89
Issuing a HALT Command in Background Mode . . . . . . . . . . . . . . . . . . . .6-89
Issuing an Emergency Off (EMO) . . . . . . . . . . . . . . . . . . . . . . . . . . . . . . . . . .6-89
Issuing an EMER_STOP in DIO Mode . . . . . . . . . . . . . . . . . . . . . . . . . . . . . .6-89
Issuing a STOP in CDM Mode . . . . . . . . . . . . . . . . . . . . . . . . . . . . . . . . . . . . .6-89
Issuing an EMERGENCY STOP on the CDM Mode . . . . . . . . . . . . . . . . . .6-90
Shut-down. . . . . . . . . . . . . . . . . . . . . . . . . . . . . . . . . . . . . . . . . . . . . . . . . . . . . . . . . . . .6-91
Alignment and Calibration
Robot Alignment . . . . . . . . . . . . . . . . . . . . . . . . . . . . . . . . . . . . . . . . . . . . . . . . . . . . . .7-2
Required Tools and Test Equipment. . . . . . . . . . . . . . . . . . . . . . . . . . . . . . . .7-2
Alignment Strategy . . . . . . . . . . . . . . . . . . . . . . . . . . . . . . . . . . . . . . . . . . . . . .7-3
Alignment Procedure . . . . . . . . . . . . . . . . . . . . . . . . . . . . . . . . . . . . . . . . . . . .7-4
Verifying Flatness of Robot’s End Effector . . . . . . . . . . . . . . . . . . . . . . . . . . . . . . . .7-5
Adjusting the Robot’s End Effector. . . . . . . . . . . . . . . . . . . . . . . . . . . . . . . . . . . . . . .7-7
Setting the Robot to the Wafer Transport Plane . . . . . . . . . . . . . . . . . . . . . . . . . . . .7-13
Setting the Transfer and Process Modules’ T and R Coordinates . . . . . . . . . . . . .7-16
Teaching Arm B of the Dual Arm Sets . . . . . . . . . . . . . . . . . . . . . . . . . . . . . . . . . . . .7-18
Teach Arm B Procedure I . . . . . . . . . . . . . . . . . . . . . . . . . . . . . . . . . . . . . . . . .7-18
Teach Arm B Procedure II . . . . . . . . . . . . . . . . . . . . . . . . . . . . . . . . . . . . . . . .7-19
Final Checkout . . . . . . . . . . . . . . . . . . . . . . . . . . . . . . . . . . . . . . . . . . . . . . . . . . . . . . . .7-20
Verify Proper PICK and PLACE of Wafer . . . . . . . . . . . . . . . . . . . . . . . . . . .7-20
Command Reference
Description . . . . . . . . . . . . . . . . . . . . . . . . . . . . . . . . . . . . . . . . . . . . . . . . . . . . . . . . . . .8-2
Robot Operation. . . . . . . . . . . . . . . . . . . . . . . . . . . . . . . . . . . . . . . . . . . . . . . . .8-2
Command Flows . . . . . . . . . . . . . . . . . . . . . . . . . . . . . . . . . . . . . . . . . . . . . . . .8-2
Operating Modes . . . . . . . . . . . . . . . . . . . . . . . . . . . . . . . . . . . . . . . . . . . . . . . .8-4
vi
Brooks Automation
Revision 2.2
MagnaTran 7.1 User’s Manual
MN-003-1600-00
Contents
Command and Response Structure. . . . . . . . . . . . . . . . . . . . . . . . . . . . . . . . . . . . . . .8-6
Response Types and Syntax . . . . . . . . . . . . . . . . . . . . . . . . . . . . . . . . . . . . . . .8-9
Command and Response Compatibility . . . . . . . . . . . . . . . . . . . . . . . . . . . .8-11
Command Quick Reference Tables . . . . . . . . . . . . . . . . . . . . . . . . . . . . . . . . . . . . . . .8-13
Command Reference . . . . . . . . . . . . . . . . . . . . . . . . . . . . . . . . . . . . . . . . . . . . . . . . . . .8-22
Check Load . . . . . . . . . . . . . . . . . . . . . . . . . . . . . . . . . . . . . . . . . . . . . . . . . . . . .8-23
Configure Robot Application. . . . . . . . . . . . . . . . . . . . . . . . . . . . . . . . . . . . . .8-25
Create Workspace . . . . . . . . . . . . . . . . . . . . . . . . . . . . . . . . . . . . . . . . . . . . . . .8-26
DIO Start . . . . . . . . . . . . . . . . . . . . . . . . . . . . . . . . . . . . . . . . . . . . . . . . . . . . . . .8-27
DIO Stop . . . . . . . . . . . . . . . . . . . . . . . . . . . . . . . . . . . . . . . . . . . . . . . . . . . . . . .8-28
EEPROM Reset . . . . . . . . . . . . . . . . . . . . . . . . . . . . . . . . . . . . . . . . . . . . . . . . . .8-29
Find Encoder. . . . . . . . . . . . . . . . . . . . . . . . . . . . . . . . . . . . . . . . . . . . . . . . . . . .8-30
Find Phase . . . . . . . . . . . . . . . . . . . . . . . . . . . . . . . . . . . . . . . . . . . . . . . . . . . . . .8-31
Find Zero . . . . . . . . . . . . . . . . . . . . . . . . . . . . . . . . . . . . . . . . . . . . . . . . . . . . . . .8-32
Go To . . . . . . . . . . . . . . . . . . . . . . . . . . . . . . . . . . . . . . . . . . . . . . . . . . . . . . . . . .8-33
Go To Station with Offset . . . . . . . . . . . . . . . . . . . . . . . . . . . . . . . . . . . . . . . . .8-36
Halt. . . . . . . . . . . . . . . . . . . . . . . . . . . . . . . . . . . . . . . . . . . . . . . . . . . . . . . . . . . .8-39
Hllo. . . . . . . . . . . . . . . . . . . . . . . . . . . . . . . . . . . . . . . . . . . . . . . . . . . . . . . . . . . .8-40
Home . . . . . . . . . . . . . . . . . . . . . . . . . . . . . . . . . . . . . . . . . . . . . . . . . . . . . . . . . .8-41
Life Test . . . . . . . . . . . . . . . . . . . . . . . . . . . . . . . . . . . . . . . . . . . . . . . . . . . . . . . .8-43
Map . . . . . . . . . . . . . . . . . . . . . . . . . . . . . . . . . . . . . . . . . . . . . . . . . . . . . . . . . . .8-44
Map Pass Through . . . . . . . . . . . . . . . . . . . . . . . . . . . . . . . . . . . . . . . . . . . . . . .8-49
Mount . . . . . . . . . . . . . . . . . . . . . . . . . . . . . . . . . . . . . . . . . . . . . . . . . . . . . . . . .8-51
Move . . . . . . . . . . . . . . . . . . . . . . . . . . . . . . . . . . . . . . . . . . . . . . . . . . . . . . . . . .8-52
Pick . . . . . . . . . . . . . . . . . . . . . . . . . . . . . . . . . . . . . . . . . . . . . . . . . . . . . . . . . . . .8-54
Pick with an Offset. . . . . . . . . . . . . . . . . . . . . . . . . . . . . . . . . . . . . . . . . . . . . . .8-56
Place . . . . . . . . . . . . . . . . . . . . . . . . . . . . . . . . . . . . . . . . . . . . . . . . . . . . . . . . . . .8-59
Place with an Offset . . . . . . . . . . . . . . . . . . . . . . . . . . . . . . . . . . . . . . . . . . . . . .8-61
Reference . . . . . . . . . . . . . . . . . . . . . . . . . . . . . . . . . . . . . . . . . . . . . . . . . . . . . . .8-64
Release . . . . . . . . . . . . . . . . . . . . . . . . . . . . . . . . . . . . . . . . . . . . . . . . . . . . . . . . .8-65
Remove IO. . . . . . . . . . . . . . . . . . . . . . . . . . . . . . . . . . . . . . . . . . . . . . . . . . . . . .8-66
Remove Station. . . . . . . . . . . . . . . . . . . . . . . . . . . . . . . . . . . . . . . . . . . . . . . . . .8-67
Remove Workspace . . . . . . . . . . . . . . . . . . . . . . . . . . . . . . . . . . . . . . . . . . . . . .8-68
Request Background . . . . . . . . . . . . . . . . . . . . . . . . . . . . . . . . . . . . . . . . . . . . .8-69
Request Capture. . . . . . . . . . . . . . . . . . . . . . . . . . . . . . . . . . . . . . . . . . . . . . . . .8-70
Request Communication. . . . . . . . . . . . . . . . . . . . . . . . . . . . . . . . . . . . . . . . . .8-71
Request Configuration . . . . . . . . . . . . . . . . . . . . . . . . . . . . . . . . . . . . . . . . . . .8-74
Request DIO Output . . . . . . . . . . . . . . . . . . . . . . . . . . . . . . . . . . . . . . . . . . . . .8-75
Request History . . . . . . . . . . . . . . . . . . . . . . . . . . . . . . . . . . . . . . . . . . . . . . . . .8-76
Request Home Position Z-Axis . . . . . . . . . . . . . . . . . . . . . . . . . . . . . . . . . . . .8-79
Request Interlock . . . . . . . . . . . . . . . . . . . . . . . . . . . . . . . . . . . . . . . . . . . . . . . .8-80
Request I/O Echo. . . . . . . . . . . . . . . . . . . . . . . . . . . . . . . . . . . . . . . . . . . . . . . .8-81
Request I/O Map . . . . . . . . . . . . . . . . . . . . . . . . . . . . . . . . . . . . . . . . . . . . . . . .8-82
Request I/O State. . . . . . . . . . . . . . . . . . . . . . . . . . . . . . . . . . . . . . . . . . . . . . . .8-84
Request Load . . . . . . . . . . . . . . . . . . . . . . . . . . . . . . . . . . . . . . . . . . . . . . . . . . .8-86
Brooks Automation
Revision 2.2
vii
Contents
MagnaTran 7.1 User’s Manual
MN-003-1600-00
Request Load Mode . . . . . . . . . . . . . . . . . . . . . . . . . . . . . . . . . . . . . . . . . . . . . .8-88
Request Mount . . . . . . . . . . . . . . . . . . . . . . . . . . . . . . . . . . . . . . . . . . . . . . . . . .8-89
Request Position Absolute . . . . . . . . . . . . . . . . . . . . . . . . . . . . . . . . . . . . . . . .8-90
Request Position Destination . . . . . . . . . . . . . . . . . . . . . . . . . . . . . . . . . . . . . .8-92
Request Position Station . . . . . . . . . . . . . . . . . . . . . . . . . . . . . . . . . . . . . . . . . .8-94
Request Position Target . . . . . . . . . . . . . . . . . . . . . . . . . . . . . . . . . . . . . . . . . .8-96
Request Radial Motion Sense . . . . . . . . . . . . . . . . . . . . . . . . . . . . . . . . . . . . . .8-98
Request Reference . . . . . . . . . . . . . . . . . . . . . . . . . . . . . . . . . . . . . . . . . . . . . . .8-100
Request Retract 2 Value . . . . . . . . . . . . . . . . . . . . . . . . . . . . . . . . . . . . . . . . . .8-101
Request Revision . . . . . . . . . . . . . . . . . . . . . . . . . . . . . . . . . . . . . . . . . . . . . . . .8-102
Request Robot Application. . . . . . . . . . . . . . . . . . . . . . . . . . . . . . . . . . . . . . . .8-103
Request Station . . . . . . . . . . . . . . . . . . . . . . . . . . . . . . . . . . . . . . . . . . . . . . . . . .8-104
Request Station Option . . . . . . . . . . . . . . . . . . . . . . . . . . . . . . . . . . . . . . . . . . .8-106
Request Station Sensor . . . . . . . . . . . . . . . . . . . . . . . . . . . . . . . . . . . . . . . . . . .8-108
Request Sync Phase . . . . . . . . . . . . . . . . . . . . . . . . . . . . . . . . . . . . . . . . . . . . . .8-110
Request Sync Zero . . . . . . . . . . . . . . . . . . . . . . . . . . . . . . . . . . . . . . . . . . . . . . .8-111
Request Version . . . . . . . . . . . . . . . . . . . . . . . . . . . . . . . . . . . . . . . . . . . . . . . . .8-112
Request Warning CDM Status . . . . . . . . . . . . . . . . . . . . . . . . . . . . . . . . . . . . .8-113
Request Who. . . . . . . . . . . . . . . . . . . . . . . . . . . . . . . . . . . . . . . . . . . . . . . . . . . .8-114
Request Workspace . . . . . . . . . . . . . . . . . . . . . . . . . . . . . . . . . . . . . . . . . . . . . .8-115
Request Workspace AutoCreate . . . . . . . . . . . . . . . . . . . . . . . . . . . . . . . . . . .8-116
Request Workspace Mode . . . . . . . . . . . . . . . . . . . . . . . . . . . . . . . . . . . . . . . .8-117
Reset . . . . . . . . . . . . . . . . . . . . . . . . . . . . . . . . . . . . . . . . . . . . . . . . . . . . . . . . . . .8-118
Set Arms . . . . . . . . . . . . . . . . . . . . . . . . . . . . . . . . . . . . . . . . . . . . . . . . . . . . . . .8-119
Set Capture . . . . . . . . . . . . . . . . . . . . . . . . . . . . . . . . . . . . . . . . . . . . . . . . . . . . .8-120
Set Communication . . . . . . . . . . . . . . . . . . . . . . . . . . . . . . . . . . . . . . . . . . . . . .8-121
Set DIO Output. . . . . . . . . . . . . . . . . . . . . . . . . . . . . . . . . . . . . . . . . . . . . . . . . .8-125
Set High Speed . . . . . . . . . . . . . . . . . . . . . . . . . . . . . . . . . . . . . . . . . . . . . . . . . .8-126
Set Home Position Z-Axis. . . . . . . . . . . . . . . . . . . . . . . . . . . . . . . . . . . . . . . . .8-127
Set Interlock . . . . . . . . . . . . . . . . . . . . . . . . . . . . . . . . . . . . . . . . . . . . . . . . . . . .8-128
Set I/O Echo . . . . . . . . . . . . . . . . . . . . . . . . . . . . . . . . . . . . . . . . . . . . . . . . . . . .8-129
Set I/O State . . . . . . . . . . . . . . . . . . . . . . . . . . . . . . . . . . . . . . . . . . . . . . . . . . . .8-130
Set Load . . . . . . . . . . . . . . . . . . . . . . . . . . . . . . . . . . . . . . . . . . . . . . . . . . . . . . . .8-132
Set Load Mode . . . . . . . . . . . . . . . . . . . . . . . . . . . . . . . . . . . . . . . . . . . . . . . . . .8-134
Set Low Speed . . . . . . . . . . . . . . . . . . . . . . . . . . . . . . . . . . . . . . . . . . . . . . . . . .8-135
Set Medium Speed . . . . . . . . . . . . . . . . . . . . . . . . . . . . . . . . . . . . . . . . . . . . . . .8-136
Set Mount . . . . . . . . . . . . . . . . . . . . . . . . . . . . . . . . . . . . . . . . . . . . . . . . . . . . . .8-137
Set Radial Motion Sense . . . . . . . . . . . . . . . . . . . . . . . . . . . . . . . . . . . . . . . . . .8-138
Set Retract 2 Value . . . . . . . . . . . . . . . . . . . . . . . . . . . . . . . . . . . . . . . . . . . . . . .8-139
Set Station . . . . . . . . . . . . . . . . . . . . . . . . . . . . . . . . . . . . . . . . . . . . . . . . . . . . . .8-140
Set Station Option . . . . . . . . . . . . . . . . . . . . . . . . . . . . . . . . . . . . . . . . . . . . . . .8-142
Set Station Option VIA Point . . . . . . . . . . . . . . . . . . . . . . . . . . . . . . . . . . . . . .8-145
Set Station Sensor . . . . . . . . . . . . . . . . . . . . . . . . . . . . . . . . . . . . . . . . . . . . . . . .8-147
Set Sync Phase . . . . . . . . . . . . . . . . . . . . . . . . . . . . . . . . . . . . . . . . . . . . . . . . . .8-149
Set Sync Zero . . . . . . . . . . . . . . . . . . . . . . . . . . . . . . . . . . . . . . . . . . . . . . . . . . .8-150
Set Teach Speed . . . . . . . . . . . . . . . . . . . . . . . . . . . . . . . . . . . . . . . . . . . . . . . . .8-151
viii
Brooks Automation
Revision 2.2
MagnaTran 7.1 User’s Manual
MN-003-1600-00
Contents
Set Warning CDM Status . . . . . . . . . . . . . . . . . . . . . . . . . . . . . . . . . . . . . . . . .8-152
Set Workspace . . . . . . . . . . . . . . . . . . . . . . . . . . . . . . . . . . . . . . . . . . . . . . . . . .8-153
Set Workspace AutoCreate. . . . . . . . . . . . . . . . . . . . . . . . . . . . . . . . . . . . . . . .8-154
Set Workspace Mode . . . . . . . . . . . . . . . . . . . . . . . . . . . . . . . . . . . . . . . . . . . . .8-155
Set Z-Brake . . . . . . . . . . . . . . . . . . . . . . . . . . . . . . . . . . . . . . . . . . . . . . . . . . . . .8-156
Store Communication . . . . . . . . . . . . . . . . . . . . . . . . . . . . . . . . . . . . . . . . . . . .8-157
Store DIO Output. . . . . . . . . . . . . . . . . . . . . . . . . . . . . . . . . . . . . . . . . . . . . . . .8-159
Store Home Position Z-Axis . . . . . . . . . . . . . . . . . . . . . . . . . . . . . . . . . . . . . . .8-160
Store I/O Echo . . . . . . . . . . . . . . . . . . . . . . . . . . . . . . . . . . . . . . . . . . . . . . . . . .8-161
Store Load Mode . . . . . . . . . . . . . . . . . . . . . . . . . . . . . . . . . . . . . . . . . . . . . . . .8-162
Store Radial Motion Sense . . . . . . . . . . . . . . . . . . . . . . . . . . . . . . . . . . . . . . . .8-163
Store Retract 2 Value . . . . . . . . . . . . . . . . . . . . . . . . . . . . . . . . . . . . . . . . . . . . .8-164
Store Station . . . . . . . . . . . . . . . . . . . . . . . . . . . . . . . . . . . . . . . . . . . . . . . . . . . .8-165
Store Station Option . . . . . . . . . . . . . . . . . . . . . . . . . . . . . . . . . . . . . . . . . . . . .8-167
Store Station Sensor . . . . . . . . . . . . . . . . . . . . . . . . . . . . . . . . . . . . . . . . . . . . . .8-169
Store Sync Phase. . . . . . . . . . . . . . . . . . . . . . . . . . . . . . . . . . . . . . . . . . . . . . . . .8-170
Store Sync Zero. . . . . . . . . . . . . . . . . . . . . . . . . . . . . . . . . . . . . . . . . . . . . . . . . .8-171
Store Warning CDM Status . . . . . . . . . . . . . . . . . . . . . . . . . . . . . . . . . . . . . . .8-172
Store Workspace. . . . . . . . . . . . . . . . . . . . . . . . . . . . . . . . . . . . . . . . . . . . . . . . .8-173
Store Workspace AutoCreate . . . . . . . . . . . . . . . . . . . . . . . . . . . . . . . . . . . . . .8-174
Store Workspace Mode . . . . . . . . . . . . . . . . . . . . . . . . . . . . . . . . . . . . . . . . . . .8-175
Transfer . . . . . . . . . . . . . . . . . . . . . . . . . . . . . . . . . . . . . . . . . . . . . . . . . . . . . . . .8-176
Transfer with an Offset . . . . . . . . . . . . . . . . . . . . . . . . . . . . . . . . . . . . . . . . . . .8-177
Error Code Reference . . . . . . . . . . . . . . . . . . . . . . . . . . . . . . . . . . . . . . . . . . . . . . . . . .8-179
Error listings for the MagnaTran 7 Robot . . . . . . . . . . . . . . . . . . . . . . . . . . .8-179
Success Codes . . . . . . . . . . . . . . . . . . . . . . . . . . . . . . . . . . . . . . . . . . . . . . . . . . .8-179
Station Errors . . . . . . . . . . . . . . . . . . . . . . . . . . . . . . . . . . . . . . . . . . . . . . . . . . .8-179
User I/O - Command Parser Errors . . . . . . . . . . . . . . . . . . . . . . . . . . . . . . . .8-179
Station Setup Errors. . . . . . . . . . . . . . . . . . . . . . . . . . . . . . . . . . . . . . . . . . . . . .8-180
Robot Internal Errors. . . . . . . . . . . . . . . . . . . . . . . . . . . . . . . . . . . . . . . . . . . . .8-181
Dispatcher/Communications Errors . . . . . . . . . . . . . . . . . . . . . . . . . . . . . . .8-181
Robot Wafer Sensor Errors . . . . . . . . . . . . . . . . . . . . . . . . . . . . . . . . . . . . . . . .8-182
Configuration Errors . . . . . . . . . . . . . . . . . . . . . . . . . . . . . . . . . . . . . . . . . . . . .8-184
Monitor Errors . . . . . . . . . . . . . . . . . . . . . . . . . . . . . . . . . . . . . . . . . . . . . . . . . .8-185
I/O Mapping Errors . . . . . . . . . . . . . . . . . . . . . . . . . . . . . . . . . . . . . . . . . . . . .8-185
Inclusion Zones (Workspace) Errors. . . . . . . . . . . . . . . . . . . . . . . . . . . . . . . .8-186
Motion Command Task Errors . . . . . . . . . . . . . . . . . . . . . . . . . . . . . . . . . . . .8-187
Real Time Clock Errors . . . . . . . . . . . . . . . . . . . . . . . . . . . . . . . . . . . . . . . . . . .8-187
CDM Related Errors . . . . . . . . . . . . . . . . . . . . . . . . . . . . . . . . . . . . . . . . . . . . .8-187
Comm Port Driver . . . . . . . . . . . . . . . . . . . . . . . . . . . . . . . . . . . . . . . . . . . . . . .8-188
System Task (Kernel) Related Errors . . . . . . . . . . . . . . . . . . . . . . . . . . . . . . .8-188
Non-Volatile Memory Errors . . . . . . . . . . . . . . . . . . . . . . . . . . . . . . . . . . . . . .8-188
Mail System Related Errors . . . . . . . . . . . . . . . . . . . . . . . . . . . . . . . . . . . . . . .8-188
Monitor Trace Error Codes. . . . . . . . . . . . . . . . . . . . . . . . . . . . . . . . . . . . . . . .8-188
System Initialization and Error Log Errors . . . . . . . . . . . . . . . . . . . . . . . . . .8-189
Brooks Automation
Revision 2.2
ix
Contents
MagnaTran 7.1 User’s Manual
MN-003-1600-00
Robot Motion Control Processor Errors . . . . . . . . . . . . . . . . . . . . . . . . . . . . .8-189
Maintenance and Repair
Preventive Maintenance Schedule. . . . . . . . . . . . . . . . . . . . . . . . . . . . . . . . . . . . . . . .9-2
Schedule . . . . . . . . . . . . . . . . . . . . . . . . . . . . . . . . . . . . . . . . . . . . . . . . . . . . . . .9-2
Parts . . . . . . . . . . . . . . . . . . . . . . . . . . . . . . . . . . . . . . . . . . . . . . . . . . . . . . . . . . .9-3
Data Log . . . . . . . . . . . . . . . . . . . . . . . . . . . . . . . . . . . . . . . . . . . . . . . . . . . . . . . . . . . . .9-4
Ball Screw Inspection. . . . . . . . . . . . . . . . . . . . . . . . . . . . . . . . . . . . . . . . . . . . . . . . . . .9-6
Encoder and Motor Coil Cables Inspection . . . . . . . . . . . . . . . . . . . . . . . . . . . . . . . .9-8
Cover Inspection . . . . . . . . . . . . . . . . . . . . . . . . . . . . . . . . . . . . . . . . . . . . . . . . . . . . . .9-9
Wrist Band Inspection . . . . . . . . . . . . . . . . . . . . . . . . . . . . . . . . . . . . . . . . . . . . . . . . . .9-10
Pads on End Effectors Inspection . . . . . . . . . . . . . . . . . . . . . . . . . . . . . . . . . . . . . . . .9-11
Connection Inspection. . . . . . . . . . . . . . . . . . . . . . . . . . . . . . . . . . . . . . . . . . . . . . . . . .9-12
Robot Cleaning Procedure . . . . . . . . . . . . . . . . . . . . . . . . . . . . . . . . . . . . . . . . . . . . . .9-13
End Effector Pad Cleaning Procedure . . . . . . . . . . . . . . . . . . . . . . . . . . . . . . . . . . . .9-15
O-Ring Removal/Replacement/Cleaning . . . . . . . . . . . . . . . . . . . . . . . . . . . . . . . . .9-17
End Effector Alignment . . . . . . . . . . . . . . . . . . . . . . . . . . . . . . . . . . . . . . . . . . . . . . . .9-20
Power Pak Maintenance . . . . . . . . . . . . . . . . . . . . . . . . . . . . . . . . . . . . . . . . . . . . . . . .9-21
Repair Philosophy . . . . . . . . . . . . . . . . . . . . . . . . . . . . . . . . . . . . . . . . . . . . . . . . . . . . .9-22
Facilitated Field Repair . . . . . . . . . . . . . . . . . . . . . . . . . . . . . . . . . . . . . . . . . . .9-22
Depot Field Repair . . . . . . . . . . . . . . . . . . . . . . . . . . . . . . . . . . . . . . . . . . . . . . .9-23
Priority Parts Service . . . . . . . . . . . . . . . . . . . . . . . . . . . . . . . . . . . . . . . . . . . . .9-23
Brooks Factory Repair Services . . . . . . . . . . . . . . . . . . . . . . . . . . . . . . . . . . . .9-23
Repair Procedures . . . . . . . . . . . . . . . . . . . . . . . . . . . . . . . . . . . . . . . . . . . . . . . . . . . . .9-24
Robot Removal/Replacement . . . . . . . . . . . . . . . . . . . . . . . . . . . . . . . . . . . . .9-25
Arm Removal/Replacement . . . . . . . . . . . . . . . . . . . . . . . . . . . . . . . . . . . . . .9-27
End Effector Replacement . . . . . . . . . . . . . . . . . . . . . . . . . . . . . . . . . . . . . . . .9-29
End Effector Pad Removal/Replacement . . . . . . . . . . . . . . . . . . . . . . . . . . .9-32
Robot Calibration Procedure . . . . . . . . . . . . . . . . . . . . . . . . . . . . . . . . . . . . . .9-36
Personality Board Replacement. . . . . . . . . . . . . . . . . . . . . . . . . . . . . . . . . . . .9-37
Wrist Band Adjustment. . . . . . . . . . . . . . . . . . . . . . . . . . . . . . . . . . . . . . . . . . .9-39
T1/T2 Axis Driver Board Replacement . . . . . . . . . . . . . . . . . . . . . . . . . . . . .9-41
Z-Driver Board Replacement . . . . . . . . . . . . . . . . . . . . . . . . . . . . . . . . . . . . . .9-43
Z Encoder Replacement . . . . . . . . . . . . . . . . . . . . . . . . . . . . . . . . . . . . . . . . . .9-45
I/O Board Replacement . . . . . . . . . . . . . . . . . . . . . . . . . . . . . . . . . . . . . . . . . .9-48
Z Home Flag Sensor Board Replacement Procedure . . . . . . . . . . . . . . . . . .9-50
Z Hard Stop and Overtravel Limit Switch Adjustment . . . . . . . . . . . . . . . .9-53
x
Brooks Automation
Revision 2.2
MagnaTran 7.1 User’s Manual
MN-003-1600-00
Contents
Fuse Replacement . . . . . . . . . . . . . . . . . . . . . . . . . . . . . . . . . . . . . . . . . . . . . . .9-56
PC 104 CPU Board Replacement . . . . . . . . . . . . . . . . . . . . . . . . . . . . . . . . . . .9-58
Power Pak Replacement . . . . . . . . . . . . . . . . . . . . . . . . . . . . . . . . . . . . . . . . . .9-63
Encoder Setup. . . . . . . . . . . . . . . . . . . . . . . . . . . . . . . . . . . . . . . . . . . . . . . . . . .9-66
Motor Electrical Phase Calibration . . . . . . . . . . . . . . . . . . . . . . . . . . . . . . . . .9-69
Restore the Home Position to the Factory Settings. . . . . . . . . . . . . . . . . . . .9-71
Reset the Home Position to the User Preference . . . . . . . . . . . . . . . . . . . . . .9-73
Reset Stations When the Home Position is Reset . . . . . . . . . . . . . . . . . . . . .9-75
Resetting Mount Position . . . . . . . . . . . . . . . . . . . . . . . . . . . . . . . . . . . . . . . . .9-76
Uploading and Downloading Station Values . . . . . . . . . . . . . . . . . . . . . . . .9-77
Control/Display Module Resetting . . . . . . . . . . . . . . . . . . . . . . . . . . . . . . . .9-81
Firmware Upgrade . . . . . . . . . . . . . . . . . . . . . . . . . . . . . . . . . . . . . . . . . . . . . .9-83
Troubleshooting
Troubleshooting Overview. . . . . . . . . . . . . . . . . . . . . . . . . . . . . . . . . . . . . . . . . . . . .10-2
Communication Related Issues . . . . . . . . . . . . . . . . . . . . . . . . . . . . . . . . . . . . . . . . .10-4
Power Related Issues. . . . . . . . . . . . . . . . . . . . . . . . . . . . . . . . . . . . . . . . . . . . . . . . . .10-6
Radial Motion Related Issues. . . . . . . . . . . . . . . . . . . . . . . . . . . . . . . . . . . . . . . . . . .10-8
Theta Motion Related Issues . . . . . . . . . . . . . . . . . . . . . . . . . . . . . . . . . . . . . . . . . . .10-10
Z Motion Related Issues . . . . . . . . . . . . . . . . . . . . . . . . . . . . . . . . . . . . . . . . . . . . . . .10-12
Find Phase Related Issues. . . . . . . . . . . . . . . . . . . . . . . . . . . . . . . . . . . . . . . . . . . . . .10-15
Home Z Axis Related Issues. . . . . . . . . . . . . . . . . . . . . . . . . . . . . . . . . . . . . . . . . . . .10-18
Operational Interlock Related Issues . . . . . . . . . . . . . . . . . . . . . . . . . . . . . . . . . . . .10-20
Repeatability Related Issues. . . . . . . . . . . . . . . . . . . . . . . . . . . . . . . . . . . . . . . . . . . .10-22
Power Pak Related Issues . . . . . . . . . . . . . . . . . . . . . . . . . . . . . . . . . . . . . . . . . . . . . .10-24
Station Value/Orientation Related Issues . . . . . . . . . . . . . . . . . . . . . . . . . . . . . . . .10-26
Z Brake Binding Test . . . . . . . . . . . . . . . . . . . . . . . . . . . . . . . . . . . . . . . . . . . . . . . . . .10-27
Determine if the Z Axis is Configured Properly Via Software . . . . . . . . . . . . . .10-29
Z Binding Test Using the Trace Command . . . . . . . . . . . . . . . . . . . . . . . . . . . . . . .10-30
Main Power Grounding Scheme Requirements . . . . . . . . . . . . . . . . . . . . . . . . . . .10-32
Position Repeatability Test . . . . . . . . . . . . . . . . . . . . . . . . . . . . . . . . . . . . . . . . . . . . .10-33
Verifying “Arm State” of Magnatran 7. . . . . . . . . . . . . . . . . . . . . . . . . . . . . . . . . . .10-34
Verifying Robot Calibration Parameters . . . . . . . . . . . . . . . . . . . . . . . . . . . . . . . . .10-35
Checking for FET Short Circuits on the Theta Driver Board. . . . . . . . . . . . . . . . .10-36
Brooks Automation
Revision 2.2
xi
Contents
MagnaTran 7.1 User’s Manual
MN-003-1600-00
Checking for FET Short Circuits on the Z Driver Board . . . . . . . . . . . . . . . . . . . .10-37
Appendices
Appendix A: Factory Default Settings . . . . . . . . . . . . . . . . . . . . . . . . . . . . . . . . . . .11-2
Appendix B: Tooling. . . . . . . . . . . . . . . . . . . . . . . . . . . . . . . . . . . . . . . . . . . . . . . . . .11-3
Appendix C: Torque Settings . . . . . . . . . . . . . . . . . . . . . . . . . . . . . . . . . . . . . . . . . .11-4
Appendix D: Robot Compatibility . . . . . . . . . . . . . . . . . . . . . . . . . . . . . . . . . . . . . .11-5
Command Comparison. . . . . . . . . . . . . . . . . . . . . . . . . . . . . . . . . . . . . . . . . .11-6
Error Code Comparison . . . . . . . . . . . . . . . . . . . . . . . . . . . . . . . . . . . . . . . . .11-11
Configuration Compatibility Commands . . . . . . . . . . . . . . . . . . . . . . . . . .11-13
Appendix E: User Setting Tables . . . . . . . . . . . . . . . . . . . . . . . . . . . . . . . . . . . . . . .11-17
Appendix F: Relay I/O Option . . . . . . . . . . . . . . . . . . . . . . . . . . . . . . . . . . . . . . . . .11-24
Attached Drawings
Illustrated Parts Catalog . . . . . . . . . . . . . . . . . . . . . . . . . . . . . . . . . . . . . . . . . . . . . . .12-2
List of Attachments . . . . . . . . . . . . . . . . . . . . . . . . . . . . . . . . . . . . . . . . . . . . . . . . . . .12-18
Wiring Diagrams . . . . . . . . . . . . . . . . . . . . . . . . . . . . . . . . . . . . . . . . . . . . . . .12-18
Glossary . . . . . . . . . . . . . . . . . . . . . . . . . . . . . . . . . . . . . . . . . . . . . . . . . . . . . . . . . . . . . . . . . G-1
Index . . . . . . . . . . . . . . . . . . . . . . . . . . . . . . . . . . . . . . . . . . . . . . . . . . . . . . . . . . . . . . . . . . . . . I-1
Reader’s Comments
xii
Brooks Automation
Revision 2.2
MagnaTran 7.1 User’s Manual
MN-003-1600-00
Figures
Figure Title
Page
2-1
Locations of Hazardous Points on the MagnaTran 7 . . . . . . . . . . . . . . . . . .2-4
3-1
3-2
3-3
3-4
3-5
3-6
3-7
3-8
3-9
Space Requirements. . . . . . . . . . . . . . . . . . . . . . . . . . . . . . . . . . . . . . . . . . . . . .3-3
Arm Space Requirements . . . . . . . . . . . . . . . . . . . . . . . . . . . . . . . . . . . . . . . . .3-4
Top Mount Details . . . . . . . . . . . . . . . . . . . . . . . . . . . . . . . . . . . . . . . . . . . . . . .3-9
Power Connections . . . . . . . . . . . . . . . . . . . . . . . . . . . . . . . . . . . . . . . . . . . . . .3-11
Power Connection Location . . . . . . . . . . . . . . . . . . . . . . . . . . . . . . . . . . . . . . .3-13
Serial Connection Locations . . . . . . . . . . . . . . . . . . . . . . . . . . . . . . . . . . . . . . .3-15
CDM Connection Location . . . . . . . . . . . . . . . . . . . . . . . . . . . . . . . . . . . . . . . .3-17
DIO Connection Locations . . . . . . . . . . . . . . . . . . . . . . . . . . . . . . . . . . . . . . . .3-18
MagnaTran 7 MOUNT Position. . . . . . . . . . . . . . . . . . . . . . . . . . . . . . . . . . . .3-46
4-1
4-2
4-3
4-4
4-5
4-6
4-7
Protective Covers . . . . . . . . . . . . . . . . . . . . . . . . . . . . . . . . . . . . . . . . . . . . . . . .4-3
T1/T2 Drive assembly. . . . . . . . . . . . . . . . . . . . . . . . . . . . . . . . . . . . . . . . . . . .4-6
Z-Drive assembly . . . . . . . . . . . . . . . . . . . . . . . . . . . . . . . . . . . . . . . . . . . . . . . .4-8
MagnaTran 7 Arm Set Types . . . . . . . . . . . . . . . . . . . . . . . . . . . . . . . . . . . . . .4-10
Printed Circuit Board Locations . . . . . . . . . . . . . . . . . . . . . . . . . . . . . . . . . . .4-14
Power Pak Sub-System . . . . . . . . . . . . . . . . . . . . . . . . . . . . . . . . . . . . . . . . . . .4-15
CDM Command Flow Chart . . . . . . . . . . . . . . . . . . . . . . . . . . . . . . . . . . . . . .4-19
5-1
5-2
5-3
5-4
5-5
5-6
5-7
Robot Interface Panel. . . . . . . . . . . . . . . . . . . . . . . . . . . . . . . . . . . . . . . . . . . . .5-2
Power Cable Installation. . . . . . . . . . . . . . . . . . . . . . . . . . . . . . . . . . . . . . . . . .5-3
Power Connector Pin-Out. . . . . . . . . . . . . . . . . . . . . . . . . . . . . . . . . . . . . . . . .5-4
High Side I/O Circuit . . . . . . . . . . . . . . . . . . . . . . . . . . . . . . . . . . . . . . . . . . . .5-11
Low Side I/O Circuit. . . . . . . . . . . . . . . . . . . . . . . . . . . . . . . . . . . . . . . . . . . . .5-13
I/O 24V Power Interface. . . . . . . . . . . . . . . . . . . . . . . . . . . . . . . . . . . . . . . . . .5-14
Safety Interlocks . . . . . . . . . . . . . . . . . . . . . . . . . . . . . . . . . . . . . . . . . . . . . . . . .5-17
6-1
6-2
6-3
6-4
6-5
MagnaTran 7 Single Arm . . . . . . . . . . . . . . . . . . . . . . . . . . . . . . . . . . . . . . . . .6-3
MagnaTran 7 Dual Arm . . . . . . . . . . . . . . . . . . . . . . . . . . . . . . . . . . . . . . . . . .6-5
MagnaTran 7 Leapfrog Arm . . . . . . . . . . . . . . . . . . . . . . . . . . . . . . . . . . . . . .6-7
MagnaTran 7 Z Axis VCE Parameters . . . . . . . . . . . . . . . . . . . . . . . . . . . . . .6-10
MagnaTran 7 Coordinate System, Dual Arm . . . . . . . . . . . . . . . . . . . . . . . .6-12
Brooks Automation
Revision 2.2
xiii
Figures
xiv
MagnaTran 7.1 User’s Manual
MN-003-1600-00
6-6
6-7
6-8
6-9
6-10
6-11
6-12
6-13
6-14
Example of Station Coordinate Numbering . . . . . . . . . . . . . . . . . . . . . . . . .6-18
Factory Set HOME Position . . . . . . . . . . . . . . . . . . . . . . . . . . . . . . . . . . . . . . .6-19
MagnaTran 7 Indicators . . . . . . . . . . . . . . . . . . . . . . . . . . . . . . . . . . . . . . . . . .6-22
Typical REtract and EXtend Sensor Locations . . . . . . . . . . . . . . . . . . . . . . .6-33
Pre-Extend and Successful Action Flowchart . . . . . . . . . . . . . . . . . . . . . . . .6-35
Off-Center PICK and PLACE . . . . . . . . . . . . . . . . . . . . . . . . . . . . . . . . . . . . . .6-43
Control/Display Module with Emergency Stop. . . . . . . . . . . . . . . . . . . . . .6-65
PowerPak Timing Diagram . . . . . . . . . . . . . . . . . . . . . . . . . . . . . . . . . . . . . . .6-84
PowerPak Controls and Indicators . . . . . . . . . . . . . . . . . . . . . . . . . . . . . . . . .6-86
7-1
7-2
7-3
7-4
Locating the Dial Indicator . . . . . . . . . . . . . . . . . . . . . . . . . . . . . . . . . . . . . . . .7-8
End Effector Measurement Locations-Two Types Shown. . . . . . . . . . . . . .7-10
Positioning the End Effector in the Module. . . . . . . . . . . . . . . . . . . . . . . . . .7-14
Positioning the End Effector to Set BTO. . . . . . . . . . . . . . . . . . . . . . . . . . . . .7-14
8-1
8-2
MagnaTran 7 Command Structure . . . . . . . . . . . . . . . . . . . . . . . . . . . . . . . . .8-7
Safety/Push Operation . . . . . . . . . . . . . . . . . . . . . . . . . . . . . . . . . . . . . . . . . . .8-143
9-1
9-2
9-3
9-4
9-5
9-6
9-7
End Effector Mounting Hardware . . . . . . . . . . . . . . . . . . . . . . . . . . . . . . . . .9-31
Wafer Support Removal . . . . . . . . . . . . . . . . . . . . . . . . . . . . . . . . . . . . . . . . . .9-33
End Effector Pad Grommet Style. . . . . . . . . . . . . . . . . . . . . . . . . . . . . . . . . . .9-35
Arm Assembly Side View. . . . . . . . . . . . . . . . . . . . . . . . . . . . . . . . . . . . . . . . .9-40
Arm Assembly Top View . . . . . . . . . . . . . . . . . . . . . . . . . . . . . . . . . . . . . . . . .9-40
Lower Overtravel Adjustment. . . . . . . . . . . . . . . . . . . . . . . . . . . . . . . . . . . . .9-54
Upper Overtravel Adjustment . . . . . . . . . . . . . . . . . . . . . . . . . . . . . . . . . . . . .9-55
10-1
10-2
10-3
10-4
10-5
10-6
10-7
10-8
10-9
10-10
10-11
Communication Troubleshooting . . . . . . . . . . . . . . . . . . . . . . . . . . . . . . . . .10-5
Power Troubleshooting. . . . . . . . . . . . . . . . . . . . . . . . . . . . . . . . . . . . . . . . . .10-7
Radial Motion Troubleshooting. . . . . . . . . . . . . . . . . . . . . . . . . . . . . . . . . . .10-9
Theta Motion Troubleshooting . . . . . . . . . . . . . . . . . . . . . . . . . . . . . . . . . . .10-11
Z Motion Troubleshooting . . . . . . . . . . . . . . . . . . . . . . . . . . . . . . . . . . . . . . .10-14
Find Phase/Theta Drive Troubleshooting . . . . . . . . . . . . . . . . . . . . . . . . . .10-16
Find Phase/Z Drive Troubleshooting. . . . . . . . . . . . . . . . . . . . . . . . . . . . . .10-17
Z Home Axis Troubleshooting . . . . . . . . . . . . . . . . . . . . . . . . . . . . . . . . . . .10-19
Operational Interlock Troubleshooting . . . . . . . . . . . . . . . . . . . . . . . . . . . .10-21
Repeatability Related Troubleshooting . . . . . . . . . . . . . . . . . . . . . . . . . . . .10-23
Power Pak Troubleshooting . . . . . . . . . . . . . . . . . . . . . . . . . . . . . . . . . . . . . .10-25
11-1
11-2
Relay Interface . . . . . . . . . . . . . . . . . . . . . . . . . . . . . . . . . . . . . . . . . . . . . . . . .11-24
Relay I/O Circuit . . . . . . . . . . . . . . . . . . . . . . . . . . . . . . . . . . . . . . . . . . . . . . .11-27
12-1
12-2
12-3
12-4
12-5
Battery Pack Installation . . . . . . . . . . . . . . . . . . . . . . . . . . . . . . . . . . . . . . . . .12-2
Protective Cover Removal . . . . . . . . . . . . . . . . . . . . . . . . . . . . . . . . . . . . . . .12-4
Limit Switches . . . . . . . . . . . . . . . . . . . . . . . . . . . . . . . . . . . . . . . . . . . . . . . . .12-6
Lower Cover Mount, I/O Board Removal . . . . . . . . . . . . . . . . . . . . . . . . . .12-8
Theta Board Removal . . . . . . . . . . . . . . . . . . . . . . . . . . . . . . . . . . . . . . . . . . .12-10
Brooks Automation
Revision 2.2
MagnaTran 7.1 User’s Manual
MN-003-1600-00
12-6
12-7
12-8
Figures
Personality/PC104 Board Removal . . . . . . . . . . . . . . . . . . . . . . . . . . . . . . .12-12
Z-Driver Board Removal . . . . . . . . . . . . . . . . . . . . . . . . . . . . . . . . . . . . . . . .12-14
Radial Axis Board Removal . . . . . . . . . . . . . . . . . . . . . . . . . . . . . . . . . . . . . .12-16
Brooks Automation
Revision 2.2
xv
Figures
MagnaTran 7.1 User’s Manual
MN-003-1600-00
This Page Intentionally Left Blank
xvi
Brooks Automation
Revision 2.2
MagnaTran 7.1 User’s Manual
MN-003-1600-00
Tables
Table
Title
Page
1-1
Standard MagnaTran 7 Models . . . . . . . . . . . . . . . . . . . . . . . . . . . . . . . . . . . .1-2
2-1
2-2
2-3
Electrical Hazard Classifications . . . . . . . . . . . . . . . . . . . . . . . . . . . . . . . . . . .2-8
Emergency Action Matrix. . . . . . . . . . . . . . . . . . . . . . . . . . . . . . . . . . . . . . . . .2-16
Material Safety Information . . . . . . . . . . . . . . . . . . . . . . . . . . . . . . . . . . . . . . .2-17
3-1
3-2
Packing Checklist Reference. . . . . . . . . . . . . . . . . . . . . . . . . . . . . . . . . . . . . . .3-6
Arm Set Mounting Kits . . . . . . . . . . . . . . . . . . . . . . . . . . . . . . . . . . . . . . . . . . .3-23
5-1
5-2
5-3
5-4
5-5
5-6
5-7
5-8
5-9
5-10
5-11
Power Connector ITT Pin Assignments . . . . . . . . . . . . . . . . . . . . . . . . . . . . .5-4
RS-232/RS-422 Protocol . . . . . . . . . . . . . . . . . . . . . . . . . . . . . . . . . . . . . . . . . .5-6
RS-232 and RS-422 Connector Pin Assignments S101 . . . . . . . . . . . . . . . . .5-6
Switch Settings . . . . . . . . . . . . . . . . . . . . . . . . . . . . . . . . . . . . . . . . . . . . . . . . . .5-7
RS-232 Pin Assignments SI02 . . . . . . . . . . . . . . . . . . . . . . . . . . . . . . . . . . . . . .5-8
Discrete I/O Communications. . . . . . . . . . . . . . . . . . . . . . . . . . . . . . . . . . . . .5-9
High Side/Low Side I/O Assignments . . . . . . . . . . . . . . . . . . . . . . . . . . . . .5-16
Marathon Express Connector. . . . . . . . . . . . . . . . . . . . . . . . . . . . . . . . . . . . . .5-19
CDM RS-232 Protocol . . . . . . . . . . . . . . . . . . . . . . . . . . . . . . . . . . . . . . . . . . . .5-20
Emergency STOP CDM Connector Pin Assignments . . . . . . . . . . . . . . . . .5-20
CDM Connector Pin Assignments . . . . . . . . . . . . . . . . . . . . . . . . . . . . . . . . .5-21
6-1
6-2
6-3
6-4
6-5
6-6
6-7
6-8
6-9
6-10
6-11
6-12
Arm Speeds. . . . . . . . . . . . . . . . . . . . . . . . . . . . . . . . . . . . . . . . . . . . . . . . . . . . .6-14
Arm Speed Script File . . . . . . . . . . . . . . . . . . . . . . . . . . . . . . . . . . . . . . . . . . . .6-15
Station Parameters . . . . . . . . . . . . . . . . . . . . . . . . . . . . . . . . . . . . . . . . . . . . . . .6-16
Indicator Functions . . . . . . . . . . . . . . . . . . . . . . . . . . . . . . . . . . . . . . . . . . . . . .6-22
Operational Interlocks. . . . . . . . . . . . . . . . . . . . . . . . . . . . . . . . . . . . . . . . . . . .6-24
Slot Valve Interlock States . . . . . . . . . . . . . . . . . . . . . . . . . . . . . . . . . . . . . . . .6-30
GOTO with MAT Option Scenarios . . . . . . . . . . . . . . . . . . . . . . . . . . . . . . . .6-39
DIO Drive Enable. . . . . . . . . . . . . . . . . . . . . . . . . . . . . . . . . . . . . . . . . . . . . . . .6-47
DIO Reset Error . . . . . . . . . . . . . . . . . . . . . . . . . . . . . . . . . . . . . . . . . . . . . . . . .6-47
DIO MOVE . . . . . . . . . . . . . . . . . . . . . . . . . . . . . . . . . . . . . . . . . . . . . . . . . . . . .6-47
DIO Move Type . . . . . . . . . . . . . . . . . . . . . . . . . . . . . . . . . . . . . . . . . . . . . . . . .6-48
DIO Arm . . . . . . . . . . . . . . . . . . . . . . . . . . . . . . . . . . . . . . . . . . . . . . . . . . . . . . .6-48
Brooks Automation
Revision 2.2
xvii
Tables
xviii
MagnaTran 7.1 User’s Manual
MN-003-1600-00
6-13
6-14
6-15
6-16
6-17
6-18
6-19
6-20
6-21
6-22
6-23
6-24
6-25
6-26
6-27
6-28
6-29
6-30
6-31
6-32
6-33
6-34
DIO Station Selection. . . . . . . . . . . . . . . . . . . . . . . . . . . . . . . . . . . . . . . . . . . . .6-49
DIO R POSITION . . . . . . . . . . . . . . . . . . . . . . . . . . . . . . . . . . . . . . . . . . . . . . . .6-50
DIO Z POSITION . . . . . . . . . . . . . . . . . . . . . . . . . . . . . . . . . . . . . . . . . . . . . . . .6-50
DIO Acceleration Arm A . . . . . . . . . . . . . . . . . . . . . . . . . . . . . . . . . . . . . . . . .6-51
DIO Acceleration Arm B . . . . . . . . . . . . . . . . . . . . . . . . . . . . . . . . . . . . . . . . . .6-51
DIO Servo Control . . . . . . . . . . . . . . . . . . . . . . . . . . . . . . . . . . . . . . . . . . . . . . .6-52
DIO Control . . . . . . . . . . . . . . . . . . . . . . . . . . . . . . . . . . . . . . . . . . . . . . . . . . . .6-52
DIO Error Report . . . . . . . . . . . . . . . . . . . . . . . . . . . . . . . . . . . . . . . . . . . . . . . .6-52
Error Codes . . . . . . . . . . . . . . . . . . . . . . . . . . . . . . . . . . . . . . . . . . . . . . . . . . . . .6-53
DIO Referenced Status . . . . . . . . . . . . . . . . . . . . . . . . . . . . . . . . . . . . . . . . . . .6-53
DIO Command Status . . . . . . . . . . . . . . . . . . . . . . . . . . . . . . . . . . . . . . . . . . . .6-54
DIO Arm in use . . . . . . . . . . . . . . . . . . . . . . . . . . . . . . . . . . . . . . . . . . . . . . . . .6-54
DIO Arm at Station . . . . . . . . . . . . . . . . . . . . . . . . . . . . . . . . . . . . . . . . . . . . . .6-54
R Position Status. . . . . . . . . . . . . . . . . . . . . . . . . . . . . . . . . . . . . . . . . . . . . . . . .6-55
Z Position Status. . . . . . . . . . . . . . . . . . . . . . . . . . . . . . . . . . . . . . . . . . . . . . . . .6-55
Reserved Workspace Names . . . . . . . . . . . . . . . . . . . . . . . . . . . . . . . . . . . . . .6-61
Major Control Keys . . . . . . . . . . . . . . . . . . . . . . . . . . . . . . . . . . . . . . . . . . . . . .6-67
Left Column (Major Function) Keys . . . . . . . . . . . . . . . . . . . . . . . . . . . . . . . .6-68
Axis Parameter Selection Keys. . . . . . . . . . . . . . . . . . . . . . . . . . . . . . . . . . . . .6-68
Data Entry/Axis Control Keys . . . . . . . . . . . . . . . . . . . . . . . . . . . . . . . . . . . .6-68
PowerPak Controls and Indicators . . . . . . . . . . . . . . . . . . . . . . . . . . . . . . . . .6-85
Sample Session - Software Control . . . . . . . . . . . . . . . . . . . . . . . . . . . . . . . . .6-88
7-1
Arm B Teaching Procedure . . . . . . . . . . . . . . . . . . . . . . . . . . . . . . . . . . . . . . .7-18
8-1
8-2
8-3
8-4
8-5
8-6
8-7
8-8
8-9
8-10
8-11
8-12
Action Commands . . . . . . . . . . . . . . . . . . . . . . . . . . . . . . . . . . . . . . . . . . . . . . .8-13
DIO Control Commands. . . . . . . . . . . . . . . . . . . . . . . . . . . . . . . . . . . . . . . . . .8-14
Operational Interlock Commands. . . . . . . . . . . . . . . . . . . . . . . . . . . . . . . . . .8-14
Compound Move (VIA) Commands . . . . . . . . . . . . . . . . . . . . . . . . . . . . . . .8-15
Request Commands. . . . . . . . . . . . . . . . . . . . . . . . . . . . . . . . . . . . . . . . . . . . . .8-16
Set Commands . . . . . . . . . . . . . . . . . . . . . . . . . . . . . . . . . . . . . . . . . . . . . . . . . .8-17
Store Commands . . . . . . . . . . . . . . . . . . . . . . . . . . . . . . . . . . . . . . . . . . . . . . . .8-17
Workspace Commands . . . . . . . . . . . . . . . . . . . . . . . . . . . . . . . . . . . . . . . . . . .8-18
Radial Motion Sensor (R_MT) Commands . . . . . . . . . . . . . . . . . . . . . . . . . .8-19
Compatibility Commands . . . . . . . . . . . . . . . . . . . . . . . . . . . . . . . . . . . . . . . .8-19
Setup Commands. . . . . . . . . . . . . . . . . . . . . . . . . . . . . . . . . . . . . . . . . . . . . . . .8-20
System states recorded on motion errors . . . . . . . . . . . . . . . . . . . . . . . . . . . .8-78
9-1
9-2
9-3
9-4
9-5
9-6
Preventive Maintenance Schedule. . . . . . . . . . . . . . . . . . . . . . . . . . . . . . . . . .9-2
Grommet Style Pads . . . . . . . . . . . . . . . . . . . . . . . . . . . . . . . . . . . . . . . . . . . . .9-33
Adhesive Backed Pads . . . . . . . . . . . . . . . . . . . . . . . . . . . . . . . . . . . . . . . . . . .9-34
Band Size . . . . . . . . . . . . . . . . . . . . . . . . . . . . . . . . . . . . . . . . . . . . . . . . . . . . . . .9-39
Theta Board Fuse Functions . . . . . . . . . . . . . . . . . . . . . . . . . . . . . . . . . . . . . . .9-57
Resident Files . . . . . . . . . . . . . . . . . . . . . . . . . . . . . . . . . . . . . . . . . . . . . . . . . . .9-83
10-1
Symptoms of Observed Errors Types . . . . . . . . . . . . . . . . . . . . . . . . . . . . . .10-2
Brooks Automation
Revision 2.2
MagnaTran 7.1 User’s Manual
MN-003-1600-00
Tables
11-1
11-2
11-3
11-4
11-5
11-6
11-7
11-8
11-9
11-10
11-11
11-12
11-13
11-14
11-15
11-16
11-17
11-18
11-19
11-20
11-21
11-22
RS-232/RS-422 Protocol . . . . . . . . . . . . . . . . . . . . . . . . . . . . . . . . . . . . . . . . .11-2
Tools and Fixtures . . . . . . . . . . . . . . . . . . . . . . . . . . . . . . . . . . . . . . . . . . . . . .11-3
Command Comparison. . . . . . . . . . . . . . . . . . . . . . . . . . . . . . . . . . . . . . . . . .11-6
Error Code Comparison MT5/VT5. . . . . . . . . . . . . . . . . . . . . . . . . . . . . . . .11-11
Error Code Comparison Mag 6/60 . . . . . . . . . . . . . . . . . . . . . . . . . . . . . . . .11-12
Standard VT5/MT5 Compatibility . . . . . . . . . . . . . . . . . . . . . . . . . . . . . . . .11-13
Standard MagnaTran 6 Compatibility . . . . . . . . . . . . . . . . . . . . . . . . . . . . .11-15
Robot Configuration . . . . . . . . . . . . . . . . . . . . . . . . . . . . . . . . . . . . . . . . . . . .11-17
Current HOME Settings . . . . . . . . . . . . . . . . . . . . . . . . . . . . . . . . . . . . . . . . .11-18
User Setting Sync Zero Home Position. . . . . . . . . . . . . . . . . . . . . . . . . . . . .11-18
Encoder Values. . . . . . . . . . . . . . . . . . . . . . . . . . . . . . . . . . . . . . . . . . . . . . . . .11-18
Phase Values . . . . . . . . . . . . . . . . . . . . . . . . . . . . . . . . . . . . . . . . . . . . . . . . . . .11-18
Push and Safety Values for Station . . . . . . . . . . . . . . . . . . . . . . . . . . . . . . . .11-19
Station Assignments . . . . . . . . . . . . . . . . . . . . . . . . . . . . . . . . . . . . . . . . . . . .11-20
Operational Interlocks MISC I/O Connector . . . . . . . . . . . . . . . . . . . . . . .11-21
Standard Brooks RS-422 Interface . . . . . . . . . . . . . . . . . . . . . . . . . . . . . . . . .11-25
Optional RS-422 Interface . . . . . . . . . . . . . . . . . . . . . . . . . . . . . . . . . . . . . . . .11-25
User Specific Communication Switch Settings . . . . . . . . . . . . . . . . . . . . . .11-26
RS-422 Setup Summary. . . . . . . . . . . . . . . . . . . . . . . . . . . . . . . . . . . . . . . . . .11-26
Relay I/O Input J1 Connectors . . . . . . . . . . . . . . . . . . . . . . . . . . . . . . . . . . .11-28
Relay I/O Output J7 Connectors . . . . . . . . . . . . . . . . . . . . . . . . . . . . . . . . . .11-29
Power Pak Inputs J6. . . . . . . . . . . . . . . . . . . . . . . . . . . . . . . . . . . . . . . . . . . . .11-30
12-1
12-2
12-3
12-4
12-5
12-6
12-7
12-8
Battery Pack Installation Parts List . . . . . . . . . . . . . . . . . . . . . . . . . . . . . . . .12-3
Protective Cover Parts List . . . . . . . . . . . . . . . . . . . . . . . . . . . . . . . . . . . . . . .12-5
Limit Switch Parts List . . . . . . . . . . . . . . . . . . . . . . . . . . . . . . . . . . . . . . . . . .12-7
Lower Cover Mount, I/O Board Parts List . . . . . . . . . . . . . . . . . . . . . . . . .12-9
Theta Board Parts List . . . . . . . . . . . . . . . . . . . . . . . . . . . . . . . . . . . . . . . . . . .12-11
Personality/PC104 Board Parts List . . . . . . . . . . . . . . . . . . . . . . . . . . . . . . .12-13
Z-Driver Board Parts List . . . . . . . . . . . . . . . . . . . . . . . . . . . . . . . . . . . . . . . .12-15
Radial Axis Board Parts List. . . . . . . . . . . . . . . . . . . . . . . . . . . . . . . . . . . . . .12-17
Brooks Automation
Revision 2.2
xix
Tables
MagnaTran 7.1 User’s Manual
MN-003-1600-00
This Page Intentionally Left Blank
xx
Brooks Automation
Revision 2.2
MagnaTran 7.1 User’s Manual
MN-003-1600-00
Changes
Overview
Changes may be made to this manual to ensure that it will continue to provide the
most complete documentation possible for the Brooks Automation MagnaTran™ 7
wafer transfer robot. This section provides a brief description of each change.
The following table lists the various revisions made to this manual as of the most
recent major revision. The date, revision, and the chapters affected are indicated from
left to right. The dagger (†) indicates which chapters were changed.
Rev. 1.0
Initial release, no changes have been made.
Rev. 2.0
Incorporated latest firmware revisions; updated procedures.
Rev. 2.1
Incorporated latest firmware revisions: add RQ HISTORY, delete RQ EVENT
RECORDS, add error codes 221, 551, 802, 803, 804; Add PowerPak to Preventative Maintenance; Change Special Notes on PowerPak Chapter 6; Add OCP
features; updated STNSENSOR procedures; expanded Compatibility section;
add SIO2 connections.
Rev. 2.2
Chapter 6: Miscellaneous I/O bit SVLV_SEN was removed; DIO table 6-8 2nd
column is LOW, table 6-21 Option A and B reversed; Home sequence changed
to RTZ; pictograms added for safety compliance.
Brooks Automation
Revision 2.2
xxi
Changes
MagnaTran 7.1 User’s Manual
MN-003-1600-00
This Page Intentionally Left Blank
xxii
Brooks Automation
Revision 2.2
MagnaTran 7.1 User’s Manual
MN-003-1600-00
1
Introduction
Overview
This Introduction provides a brief overview of Brooks Automation MagnaTran™ 7,
highlighting its features, operation, and specifications. Additionally, the chapter
organization and a description of each chapter’s contents is presented, notation conventions are explained, and a reference copy of the standard Brooks Automation Warranty is provided.
Chapter Contents
MagnaTran 7 Robot Overview. . . . . . . . . . . . . . . . . . . . . . . . . . . . . . . . . . . . . . . . . . .1-2
Operation Overview . . . . . . . . . . . . . . . . . . . . . . . . . . . . . . . . . . . . . . . . . . . . .1-4
Documentation Overview . . . . . . . . . . . . . . . . . . . . . . . . . . . . . . . . . . . . . . . . . . . . . .1-5
Supplementary and Related Documentation . . . . . . . . . . . . . . . . . . . . . . . . . . . . . .1-6
Manual Notation . . . . . . . . . . . . . . . . . . . . . . . . . . . . . . . . . . . . . . . . . . . . . . . . . . . . . .1-7
Hardware Notation . . . . . . . . . . . . . . . . . . . . . . . . . . . . . . . . . . . . . . . . . . . . . .1-7
Software Notation . . . . . . . . . . . . . . . . . . . . . . . . . . . . . . . . . . . . . . . . . . . . . . .1-8
Manual Usage . . . . . . . . . . . . . . . . . . . . . . . . . . . . . . . . . . . . . . . . . . . . . . . . . . . . . . . . .1-11
Specifications . . . . . . . . . . . . . . . . . . . . . . . . . . . . . . . . . . . . . . . . . . . . . . . . . . . . . . . . .1-12
Company Overview . . . . . . . . . . . . . . . . . . . . . . . . . . . . . . . . . . . . . . . . . . . . . . . . . . .1-17
Brooks Automation
Revision 2.2
1-1
Introduction
MagnaTran 7 Robot Overview
MagnaTran 7.1 User’s Manual
MN-003-1600-00
MagnaTran 7 Robot Overview
The Brooks Automation MagnaTran™ 7 wafer transfer robot is designed for production environments requiring minimum vibration, minimum particle contamination,
and high throughput with high reliability performance in an ultra high vacuum environment.
The MagnaTran 7 is a compact, cylindrical, ergonomically designed robot utilizing a
concentrically mounted drive assembly with integral, DSP based control electronics.
Continuous rotation capability, no dynamic seals, drive belts or moving cables in
effective operation.
The MagnaTran 7 wafer transfer robot is designed for applications where a maximum
reach of 1050 mm from the center line of the robot to the center line of the wafer is
required. Wafer sizes from 100mm to 300mm may be handled.
This robot is supplied with either the Brooks Automation Single Pan Arm Set, the patented BiSymmetrik™ Dual Pan Arm Set, or the patented Leapfrog™ same-side Dual
Arm Set. The Single Pan Arm Set has Brooks Automation patented Frogleg arm
assembly with a single end effector providing high reliability and throughput. The
BiSymmetrik arm set has two arms addressing opposite directions and offering very
high throughput. The Leap Frog has the unique, dual end effector arm configuration,
one above the other, addressing the same direction and supplying maximum
throughput.
The MagnaTran 7 Frogleg robot and the BiSymmetrik robot may be 2 axis (Radial and
Rotational) or 3 axis (Radial, Rotational and Vertical).
Table 1-1: Standard MagnaTran 7 Models
Module
1-2
Standard Arm
Axis Options
MagnaTran™ 7F
Frogleg™ Arm Assembly
2 Axis
or
3 Axis
MagnaTran™ 7B
BiSymmetrik™ Arm Set
2 Axis
or
3 Axis
MagnaTran™ 7X
Leapfrog™ Arm Set
3 Axis
Brooks Automation
Revision 2.2
MagnaTran 7.1 User’s Manual
MN-003-1600-00
Introduction
MagnaTran 7 Robot Overview
The MagnaTran 7 is made up of several functional subsystems designed for ease of
use, maintenance, and repair. These subsystems are modular in design to allow ease
of maintenance and to minimize Mean Time To Repair (MTTR). The individual modules that make up the robot are described in Chapter 4: Subsystems.
Special Features
The Brooks Automation MagnaTran 7™ provides the latest Brooks advancements in
robot technology. Special features of the MagnaTran 7 include:
•
Brooks Automation patented Time Optimal Trajectory™ motion control
allows very high operating speeds with passive wafer support.
•
Special commands simplifying robot installation and setup.
•
MagnaTran 7 PASIV™ safety feature provides user programmable access
zones, limiting travel of the robot arm to user programmed zones.
•
Software diagnostic functions improving Brooks Automation serviceability.
•
Advanced firmware for local or remote monitoring and diagnostics.
•
Operational interlocks providing equipment and wafer safety.
•
Safe recovery from power failure with optional uninterrupted power supply.
•
High reliability coupled with Brooks Automation Global Serviceability.
Brooks Automation
Revision 2.2
1-3
Introduction
Operation Overview
MagnaTran 7.1 User’s Manual
MN-003-1600-00
Operation Overview
The MagnaTran 7™ robot may be operated in either of two ways: directly by the host
controller or through the use of the hand-held Control/Display Module (CDM).
When being operated by a remote controller such as a CTC, the robot will respond to
the software commands it receives through the serial communications link. When
being operated by the CDM, the robot responds directly to the commands entered
manually on the CDM.
A typical sequence of events for the MagnaTran 7 Robot with the Z Axis option using
remote control through the serial communications link might be as follows:
•
Command MOVE R ABS 575500 T ABS 97000 Z ABS 21000 ARM A sent to
robot.
•
Robot moves Arm ‘A’ to specified location.
•
Ready string _RDY returned by robot.
•
Command RQ POS ABS A ALL sent to robot.
•
Response POS ABS A 575500 97000 21000 returned by robot.
A typical sequence of events for the MagnaTran 7 Robot without the Z Axis option
using direct control through the Control/Display Module might be as follows:
1-4
•
Command ‘Move’ selected.
•
Arm ‘A’ Selected
•
‘Location’ selected
•
‘T Axis’ selected and 97o entered
•
Robot moves to specified location.
•
‘R Axis’ selected and 575.5 entered
•
Robot moves to specified location.
•
Command ‘Info’ selected.
•
Arm ‘A’ Selected
•
‘Location’ selected
•
Response R 575500 T 97000 displayed.
Brooks Automation
Revision 2.2
MagnaTran 7.1 User’s Manual
MN-003-1600-00
Introduction
Documentation Overview
Documentation Overview
The documentation provided with the MagnaTran 7 Robot consists of this manual,
which provides a complete documentation package for selection, installation, operation, maintenance, and repair.
Changes:
An overview of the changes to this manual since its initial release.
Chapter 1: Introduction: An overview of the robot and its various subsystems.
Chapter 2: Safety: Safety concerns and requirements for the robot.
Chapter 3: Installation: Site preparation, unpacking, and installation information for the
robot. This chapter includes all set-up procedures, including initial check-out
and alignment.
Chapter 4: Subsystems: Detailed information on the various subsystems of the robot.
Chapter 5: Operational Interfaces: Detailed information on the interfaces to the robot.
Chapter 6: Operation: Operating procedures for the robot including an overview of all controls and indicators.
Chapter 7: Alignment and Calibration: All standard adjustments and calibrations required
for proper operation of the robot.
Chapter 8: Command Reference: The software control features for the robot and provides a
complete Command Reference and Error Reference.
Chapter 9: Maintenance and Repair: Maintenance schedules and procedures and basic
repair procedures for the standard maintenance of the robot.
Chapter 10: Troubleshooting: Troubleshooting guidelines for the robot.
Chapter 11: Appendices: Additional information about the robot in several separate appendices.
Chapter 12: Attached Drawings: Drawings, Schematics, and BOMs supplied with the
robot/Illustrated Parts Catalog (IPC).
Glossary:
Definitions of terms used within this manual.
Index:
Cross-reference to this manual organized by subject.
Brooks Automation
Revision 2.2
1-5
Introduction
Supplementary and Related Documentation
MagnaTran 7.1 User’s Manual
MN-003-1600-00
Supplementary and Related Documentation
This User’s Manual provides documentation for operation and maintenance of the
Brooks Automation MagnaTran 7. While this document covers specific information
and adjustments for the robot, there may be information in other manuals which
affect the settings or operating mode of the robot.
This is especially true for robots supplied as part of a complete system. The robot is
set to system specifications and acceptance tested with the Integrated Cluster Tool at
Brooks Automation. Before adjusting or changing settings on a MagnaTran 7, consult
the following documentation:
Cluster Tool User’s Manual
Transport Module or Cluster Tool Controller User’s Manual
Cluster Tool Wiring Diagrams
The MagnaTran 7 Robot User’s Manual may refer the reader to these documents for
additional information.
NOTE: All documents cited shall be the latest publication.
1-6
Brooks Automation
Revision 2.2
MagnaTran 7.1 User’s Manual
MN-003-1600-00
Introduction
Manual Notation
Manual Notation
This manual uses a standard notation system to provide consistent descriptions of all
items and functions associated with all Brooks Automation devices. These standards
include; hardware notation, software notation, document numbering, and descriptive
warnings. These notation standards identify tasks to be performed by the user during
a service, installation, or operation procedure, or as a specific input to the robot.
Hardware Notation
The hardware notation system includes identification of dimensioning conventions
and naming conventions. This notation system is used when describing hardware to
simplify descriptions of user actions and robot responses. The notation system
includes the following typographical and presentation conventions.
Dimensions
Dimensions are shown in metric and English units, with the metric dimension
first and the English dimension in parentheses. This order of presentation is
used because metric dimensions are a more universal dimensioning standard:
this order is not meant to imply that the metric dimension should be considered the primary dimension.
Ex.
175.0 mm (6.89 in)
79.38 mm (3.125 in)
NOTE: Drawings and sketches contained within this manual are not drawn to
scale.
Naming Conventions
All hardware names follow industry standard naming conventions. These
naming conventions include all electrical cabling and identification of mounting hardware.
Ex.
J15 = Jack (female side of connection)
P3 = Plug (male side of connection)
Ex.
SST = Stainless Steel
SHCS = Socket Head Cap Screw
Brooks Automation
Revision 2.2
1-7
Introduction
Manual Notation
MagnaTran 7.1 User’s Manual
MN-003-1600-00
Software Notation
The software notation system includes identification of key strokes, naming conventions, input requirements, and system responses. The responses can be physical
actions performed by the robot or responses from the robot’s internal firmware. This
notation system is used when describing software communications to simplify
descriptions of user actions or input and robot responses. The notation system
includes the following typographical and presentation conventions.
Keystrokes
Keystrokes of specific keys are identified by text in carets “< >”.
Ex.
Press <Enter>
Press the Enter or Return key on the keyboard.
A<Space>B
Press the A key, then the spacebar, then the B key.
<Ctrl-C>
Press and hold the Control key, then press the C key.
System Responses
All system responses are described with text in italics.
Ex.
The system will prompt for input.
Entering Information
Information (data) can be specified for entry in several ways.
Specific Entries
Text in capital letters defines the exact text required as an input to the
system.
Ex.
MAP
The system requires MAP be entered exactly as
shown.
Italicized text defines the name of the variable required as an input to
the system. Enter the value for that variable.
Ex.
GOTO stn
Type GOTO exactly as shown and then enter the
station number: GOTO 1.
Text in parenthesis “( )” separated by a vertical line “|” defines a set of
1-8
Brooks Automation
Revision 2.2
MagnaTran 7.1 User’s Manual
MN-003-1600-00
Introduction
Manual Notation
options, one of which is required as an input to the system. Do not type
the parenthesis or the vertical line.
Ex.
(EX|RE)
Type only the desired option exactly as shown.
Optional Entries
Text in brackets “[ ]” defines an optional input to the system. All text
within the brackets must be entered exactly as shown, do not type the
brackets.
Ex.
[PRINT]
Type PRINT if the print option is desired. Do not
type the brackets.
Italicized text in brackets “[ ]” defines the name of an optional variable
used as an input to the system. Enter the value for that variable.
Ex.
[print]
Type the name of the item to be printed if the print
option is desired. Do not type the brackets.
Text in parenthesis “( )” separated by a vertical line “|” within brackets
“[ ]” defines a set of optional inputs to the system. Do not type the
brackets, parenthesis, or the vertical line.
Ex.
[(EX|RE)]
Type only the desired option exactly as shown. Do
not type the brackets, parenthesis, or the vertical
line.
Document and Drawing Numbering
The Document and Drawing Numbering system used by Brooks Automation is structured to allow easy identification of any item. The format is shown below:
XX-XXX-XXXX-XX
The first two digits are optional and define the document type. The next three digits
are the commodity code, which indicates the commodity type of the part. The next
four digits are the part number, which uniquely identifies the document. The last two
digits are the dash variation number, which identifies variations of the basic item.
The revision of the document is identified separately.
Brooks Automation
Revision 2.2
1-9
Introduction
Manual Notation
MagnaTran 7.1 User’s Manual
MN-003-1600-00
Notes, Cautions, Warnings, and Pictograms
Notes, cautions, and warnings used within this manual have very specific meanings
and formats. A description of the meanings of these terms is provided below.
NOTE: A note provides additional or explanatory information.
CAUTION
A caution notes actions or situations where equipment damage could
result if the proper precautions are not taken. The type of warning
symbol used indicates the type of hazard: electrical or general.
WARNING
A warning points out actions or situations where personal injury
could result if the proper precautions are not taken. The type of warning symbol used indicates the type of hazard: electrical, laser radiation, or general.
DANGER
A danger notice emphasizes actions or situations where severe personal injury or death could result if the proper precautions are not
taken. The type of warning symbol used indicates the type of hazard:
electrical or general.
Ergonomic Hazard- Failure to take the
proper precautions before lifting could
HEAVY LIFTING result in personal injury.
Moving Parts Present- Do not operate the robot
PINCH POINT without the protective covers in place or personal injury could result in the squeezing or
compression of fingers or hands between moving parts.
Electrical Hazard- Hazardous voltage. Follow lockout/tagout
procedures.
FLAMMABLE MATERIAL
Figure 1-1: Notes, Cautions, and Warnings
1-10
Brooks Automation
Revision 2.2
MagnaTran 7.1 User’s Manual
MN-003-1600-00
Introduction
Manual Usage
Manual Usage
This manual is designed to be used as an Engineering, Maintenance, and Operator’s
reference.
General information relating to all functions of the MagnaTran 7 is provided in:
Chapter 2: Safety
Chapter 4: Subsystems.
Engineering information is provided in:
Chapter 3: Installation
Chapter 5: Operational Interfaces
Chapter 8: Command Reference
Chapter 11: Appendices
Chapter 12: Attached Drawings.
Maintenance information is provided in:
Chapter 3: Installation
Chapter 5: Operational Interfaces
Chapter 7: Alignment and Calibration
Chapter 9: Maintenance and Repair
Chapter 10: Troubleshooting
Chapter 12: Attached Drawings.
Operational information is provided in:
Chapter 5: Operational Interfaces
Chapter 6: Operation.
Brooks Automation
Revision 2.2
1-11
Introduction
Specifications
MagnaTran 7.1 User’s Manual
MN-003-1600-00
Specifications
The Brooks Automation MagnaTran 7 is a high reliability robot. The specifications for
the robot and its subsystems are detailed below.
Robot Drive
Operating Specifications:
R (Radial) Axis
Range:
Dependant upon arm set being used.
See Brooks Automation Specification Sheets or Brooks Automation Installation
Drawings (802) for model dimensions.
Repeatability:
±0.05 mm (3σ)
T(θ) (Rotational) Axis
Range:
Repeatability:
Infinite rotation
±0.003° (3σ)
Z (Vertical) Axis (3 Axis models only)
Range:
Repeatability:
35 mm or 25 mm
±0.05 mm (3σ)
Placement Repeatability
0.1mm TIR (in horizontal plane, at appropriate speeds)
Temperature Range
Maximum Operating: 50°C
Maximum Exposure, drive: 80°C
Maximum Exposure, mounting flange: 120°C
Exposed Materials
Aluminum, Stainless Steel, AM350 (bellows)
1-12
Brooks Automation
Revision 2.2
MagnaTran 7.1 User’s Manual
MN-003-1600-00
Introduction
Specifications
Leak Rate
< 1 x 10⁻⁹ std. cc/sec He
Base Vacuum
< 5 x 10⁻⁹ Torr (potential)
Mechanical Specifications
Weight of Drive (without arms)
2 Axis 21 kg (46.5 lbs)
3 Axis 29.5 kg. (65 lbs.)
Mounting
Top Mount Flange (Brooks Automation MultiTran™ 5 MTR 5 compatible)
Electrical Specifications
Input Power
24 volts DC ±10%, 20 amps, 480 watts
NOTE: Current usage is dependent upon the robot’s application. Contact Brooks
Automation Engineering for requirements.
Communications Specifications
RS-422/RS-232 for control interface or remote linked service terminal (SIO1)
Dedicated RS-232 port for hand held control module (CDM)
Additional RS-232 port for operation of peripheral devices (SIO2)
Discrete I/O for wafer sensing and safety interlocks (MISC I/O)
Discrete I/O for parallel I/O control, Open Collector (MISC I/O)
Brooks Automation
Revision 2.2
1-13
Introduction
Specifications
MagnaTran 7.1 User’s Manual
MN-003-1600-00
Accessories
Hand-held Control/Display Module (CDM) for control, teaching, and troubleshooting
Power Fault Management (Power Pak) battery backup
Arm Mount Fixture
Custom designed End Effectors
1-14
Brooks Automation
Revision 2.2
MagnaTran 7.1 User’s Manual
MN-003-1600-00
Introduction
Specifications
Standard Arms
Operating Specifications:
Load Capacity (in addition to end effector mass)
1.0 kg (2.2 lbs.) each end effector
High Capacity option, 4.6 kg (10.0 lbs.) for Single Frogleg™ and BiSymmetrik™ arms.
Wafer Sizes
100mm, 125mm, 150mm, 200mm, 300mm
(SEMI standard compatible end effectors are available for each size)
Extension Limit
1050 mm (armset dependent)
Exposed Materials
Aluminum, Stainless Steel, Quartz, Kalrez, Viton, Teflon
Temperature Range
Maximum Operating: 120 °C
Maximum Exposure: 120°C
Wafer Transfer Time
Single Frogleg™ Arm with typical PICK and PLACE sequence, 735mm
extension, 180° rotation, 0.4 second Z motion for 200mm wafer size:
5.8 seconds typical at 0.3g acceleration limit
8.4 seconds typical at 0.1g acceleration limit
BiSymmetrik™ with typical PICK and PLACE sequence, 735mm extension, 180° rotation, 0.4 second Z motion for 200mm wafer size:
5.3 seconds typical at 0.3g acceleration limit
7.8 seconds typical at 0.1g acceleration limit
Brooks Automation
Revision 2.2
1-15
Introduction
Specifications
MagnaTran 7.1 User’s Manual
MN-003-1600-00
Leapfrog™ with typical wafer exchange sequence, 740mm extension, no
rotation for 200mm wafer size:
3.8 seconds typical at 0.3g acceleration limit
5.6 seconds typical at 0.1g acceleration limit
Mechanical Specifications
Weight
Single Frogleg™ Arm 3 - 7 kg (6 - 16 lbs.)
BiSymmetrik™ Arm 4 - 9 kg (9 - 20 lbs.)
Leapfrog™ Arm 4 - 9 kg (9 - 20 lbs.)
Mounting
Bolts directly to the MagnaTran 7 drive shafts.
1-16
Brooks Automation
Revision 2.2
MagnaTran 7.1 User’s Manual
MN-003-1600-00
Introduction
Company Overview
Company Overview
Brooks Automation is ISO 9001 Certified.
Quality Policy
It is Brooks Automation’s policy to provide only value rich solutions to all of our Customers. Our Quality System is founded on the premise that each individual is totally
committed to meeting the needs and expectations of our Customers. In support of
our Company’s mission, we believe that the pursuit of quality requires a culture characterized by understanding, dedication, personal initiative, teamwork, and mutual
respect.
Vision Statement
We are the recognized global leader in automation excellence … we have the best people, the best practices, and the best products.
Business Profile
Brooks Automation, Inc. is an independent supplier of substrate material handling
robots, modules, software controls, and fully integrated cluster tool platforms to
semiconductor, flat panel display, and data storage manufacturers worldwide.
Founded in 1978, the Company has distinguished itself as a technology and market
leader, particularly in the demanding cluster-tool vacuum-processing environment.
By working with and focusing on increasing the productivity of our customers’
device fabrication equipment, we’ve been able to set and constantly upgrade industry
substrate material handling, thermal conditioning, and software controls standards.
In addition to corporate facilities in Chelmsford, Massachusetts, Brooks Automation
maintains a software technology center in Richmond, British Columbia as well as
sales and service offices located in the United States, Europe, Japan, Korea, and Taiwan.
Brooks Automation
Revision 2.2
1-17
Introduction
Company Overview
MagnaTran 7.1 User’s Manual
MN-003-1600-00
This Page Intentionally Left Blank
1-18
Brooks Automation
Revision 2.2
MagnaTran 7.1 User’s Manual
MN-003-1600-00
2
Safety
Overview
This chapter describes safety guidelines for the Brooks Automation MagnaTran™ 7
Robot. All personnel involved in the operation or maintenance of the robot should be
familiar with the safety precautions outlined in this chapter. If any additional safetyrelated upgrades or newly identified hazards associated with the robot are identified,
the Technical Support group will notify users with a Technical Support Bulletin.
NOTE: These safety recommendations are basic guidelines. If the facility where the robot
is installed has additional safety guidelines they should be followed as well, along
with the applicable national and international safety codes.
Chapter Contents
Safety Considerations . . . . . . . . . . . . . . . . . . . . . . . . . . . . . . . . . . . . . . . . . . . . . . . . . .2-2
Personnel Safety Guidelines. . . . . . . . . . . . . . . . . . . . . . . . . . . . . . . . . . . . . . .2-2
Equipment Safety Guidelines. . . . . . . . . . . . . . . . . . . . . . . . . . . . . . . . . . . . . .2-3
Disconnect Devices and Interlocks . . . . . . . . . . . . . . . . . . . . . . . . . . . . . . . . . . . . . . .2-5
Lockout/Tagout . . . . . . . . . . . . . . . . . . . . . . . . . . . . . . . . . . . . . . . . . . . . . . . . .2-5
Mechanical Hazards . . . . . . . . . . . . . . . . . . . . . . . . . . . . . . . . . . . . . . . . . . . . . . . . . . .2-6
Electrical Hazards . . . . . . . . . . . . . . . . . . . . . . . . . . . . . . . . . . . . . . . . . . . . . . . . . . . . .2-7
Electrical Hazard Classifications . . . . . . . . . . . . . . . . . . . . . . . . . . . . . . . . . . .2-8
Laser Hazards. . . . . . . . . . . . . . . . . . . . . . . . . . . . . . . . . . . . . . . . . . . . . . . . . . . . . . . . .2-9
Gas Hazards . . . . . . . . . . . . . . . . . . . . . . . . . . . . . . . . . . . . . . . . . . . . . . . . . . . . . . . . . .2-10
Chemical Hazards . . . . . . . . . . . . . . . . . . . . . . . . . . . . . . . . . . . . . . . . . . . . . . . . . . . . .2-11
Thermal Hazards . . . . . . . . . . . . . . . . . . . . . . . . . . . . . . . . . . . . . . . . . . . . . . . . . . . . . .2-12
Vacuum Hazards . . . . . . . . . . . . . . . . . . . . . . . . . . . . . . . . . . . . . . . . . . . . . . . . . . . . . .2-13
Fire and Explosion Hazards . . . . . . . . . . . . . . . . . . . . . . . . . . . . . . . . . . . . . . . . . . . . .2-14
Environmental Hazards . . . . . . . . . . . . . . . . . . . . . . . . . . . . . . . . . . . . . . . . . . . . . . . .2-15
Matrix of Emergency and Corrective Response Actions . . . . . . . . . . . . . . . . . . . . .2-16
Material Safety Information . . . . . . . . . . . . . . . . . . . . . . . . . . . . . . . . . . . . . . . . . . . . .2-17
Brooks Automation
Revision 2.2
2-1
Safety
Safety Considerations
MagnaTran 7.1 User’s Manual
MN-003-1600-00
Safety Considerations
Personnel Safety Guidelines
The MagnaTran 7 may provide several direct safety hazards to personnel if not properly installed or operated.
2-2
•
Persons operating and servicing the MagnaTran 7 should be properly trained.
•
Possible injury can result from the automatic operation of the robot.
•
Know the location of the following:
•
Fire extinguisher
•
First Aid Station
•
Emergency eyewash and/or shower
•
Emergency exit
•
Be aware of sharp edges while working around the location of the robot.
•
The following safety equipment should be donned prior to operating or servicing the robot:
•
Eye protection
•
Safety Shoes
•
Hard Hat
•
Observe the facility guidelines pertaining to loose clothing while working
around the robot.
•
Perform a complete review of the Material Safety Data Sheets (MSDS) for each
material used with the product. These individual sheets are provided by the
supplier.
•
It may be recommended that the use of hazardous materials, such as cleaning
fluids, be used during routine maintenance procedures. Perform a complete
review of the Safety Information Sheet provided at the end of this chapter for
each recommended substance.
•
Ergonomic hazards may exist with certain operations pertaining to the robot.
Brooks Automation
Revision 2.2
MagnaTran 7.1 User’s Manual
MN-003-1600-00
Safety
Safety Considerations
Equipment Safety Guidelines
The MagnaTran 7 user is accountable for the following safety concepts:
•
If hazardous materials are to be present, users must take responsibility to
observe the proper safety precautions and insure that the material used is compatible with those from which the robot is fabricated.
•
The user shall determine if the MagnaTran 7 will be employed in an earthquake environment and rectify equipment installation accordingly.
CAUTION
The robot is not provided with an Emergency Off circuit (EMO)
device. The user is accountable for the EMO circuit.
DANGER
Potential danger exists to operators in the path of the robot arms.
Two motors are directly coupled to each of the two upper arm segments. Each motor has a potential maximum torque capability of
9Nm. In normal operation, the motors are limited by the power circuitry and firmware to a lesser torque. However, if the servo system
fails, the maximum torque could be applied momentarily. At either
of these torque limits, significant power levels are present that could
cause serious personal injury or equipment damage.
Brooks Automation has designed the control system to be robust and
safe and to prevent uncontrolled robot movements in any situation.
However, the potential hazard of out-of-control motions should be
taken very seriously - particularity the potential of injuries or death to
human operators in the path of the robot arms.
Brooks Automation recommends physical barriers to prevent human
access to the robot path during all powered operations.
The following safety considerations are provided to aid in the placement and use of
the MagnaTran 7 robot.
•
Do not place the MagnaTran 7 robot’s power or communications cables where
they could cause a safety hazard.
Brooks Automation
Revision 2.2
2-3
Safety
Safety Considerations
MagnaTran 7.1 User’s Manual
MN-003-1600-00
•
Do not place the MagnaTran 7 robot in a location where it may be subject to
physical damage.
•
Ensure that all power connections to the MagnaTran 7 robot are properly
grounded.
•
Ensure that the MagnaTran 7 robot receives proper air flow for cooling.
•
Do not remove any Warning, Hazard, or Equipment Identification labels.
•
Always operate the robot with the protective covers in place.
CAUTION
Use of the MagnaTran 7 robot for any purpose other than as a wafer
transfer robot is not recommended and may cause damage to the robot
or the equipment it is connected to.
Mechanical Hazard
Pinch Points
z-axis
800 lbs of force
extend/retract
Automatic Movement Hazard
Moving Mechanism Travel Limits
Vacuum Hazard
Gas Leak/Seal Area
Removing
Protective Covers
exposes
Electrical Shock
Hazard
Figure 2-1: Locations of Hazardous Points on the MagnaTran 7
2-4
Brooks Automation
Revision 2.2
MagnaTran 7.1 User’s Manual
MN-003-1600-00
Safety
Disconnect Devices and Interlocks
Disconnect Devices and Interlocks
Disconnect Devices
The facility is responsible for the robot’s main disconnect device ensuring it complies
with the correct electric codes.
Personnel servicing this equipment are responsible for the status of the robot’s main
disconnect device as specified on the facilities’ lockout/tagout procedure.
Lockout/Tagout
The MagnaTran 7 utilizes an electrical power supply. Use of lockout/tagout
procedures for the power supply when servicing the MagnaTran 7 is recommended by Brooks to ensure the safety of personnel servicing this robot.
Interlocks
WARNING
The MagnaTran 7 does not provide any personal safety or obstruction
interlocks as a stand-alone unit.
However, safety interlocking capabilities exist for user safety. See Safety Interlock on
page 5-17 for instructions on connecting the robot motion emergency off safety interlock.
Operational interlocking capabilities exist through the discrete I/O. The flexibility of
the interlocks is left up to the user to set up and manage. See Operational Interlocks
on page 6-23 in Chapter 6 for instructions on setting up the interlocks. Also see the
Brooks Automation Marathon Express™ Cluster Tool Integration Platform User’s
Manual for additional interlocks if purchased with the Brooks System of components.
Brooks Automation
Revision 2.2
2-5
Safety
Mechanical Hazards
MagnaTran 7.1 User’s Manual
MN-003-1600-00
Mechanical Hazards
The Brooks Automation MagnaTran 7 robot is a complex electromechanical device.
Only persons with the proper training should attempt to service or operate the robot.
All power to the robot must be disconnected as outlined in the facilities’ lockout/
tagout procedure before servicing, or injury may result from the automatic operation
of the equipment. The proper precautions for operating and servicing remotely controlled electro-mechanical equipment must be observed. These precautions include
wearing safety glasses and any other precautions specified within the facility where
the robot is being used.
DANGER
Moving mechanisms have no obstruction sensors and can cause serious personal injury or death.
Whenever power is applied to the robot the possibility of automatic
movement of the robot arms exists, which could result in personal
injury.
HEAVY LIFTING
Ergonomic Hazard - The MagnaTran 7 Drive weighs 29.5 kg (65 lbs.) 3 axis or
21 kg (46.5 lbs.) 2 axis. Failure to take the proper precautions before moving
it could result in personal injury.
PINCH POINT
Moving Parts Present- Do not operate the robot without the protective covers
in place or personal injury could result in the squeezing or compression of
fingers or hands between moving parts.
2-6
Brooks Automation
Revision 2.2
MagnaTran 7.1 User’s Manual
MN-003-1600-00
Safety
Electrical Hazards
Electrical Hazards
The proper precautions for operating and servicing electrical equipment must be
observed. These precautions include following facility lockout/tagout procedures,
and any other specified action within the facility where the robot is being used.
The MagnaTran 7 is a hazardous low voltage device. Power Supplies converting facility power may be operating at higher levels of AC in close proximity of the product.
DANGER
Maximum power consumption for the MagnaTran 7 is +24 VDC at 20
Amps and 480 Watts. Improper handling of the power source or connecting devices may induce electrical shock or burn resulting in serious injury or death or cause an equipment fire.
The proper precautions for operating and servicing electrical equipment must be
observed. These precautions include following facility lockout/tagout procedures,
and any other specified action within the facility where the MagnaTran 7 robot is
being used.
HIGH VOLTAGE
Electrical Hazard: Power exceeds 240 VA. Turn off power before servicing.
Improper electrical connection or connection to an improper electrical supply can result in electrical shock, burns, fire, and damage to the equipment.
Always provide the robot with the proper electrical codes compliant connections.
WARNING
All power to the robot must be disconnected per the facilities’ lockout/tagout procedure before servicing to prevent the risk of electrical
burn or shock.
Brooks Automation
Revision 2.2
2-7
Safety
Electrical Hazards
MagnaTran 7.1 User’s Manual
MN-003-1600-00
Lockout/Tagout
Use of lockout/tagout procedures when servicing the robot is recommended
by Brooks to ensure the safety of personnel servicing this product.
See Power Connections on page 5-3 for power supply connections.
Electrical Hazard Classifications
The following table describes electrical hazard classifications as per SEMI S2-0200.
Brooks Automation has designed the robot to require minimum need to conduct testing or maintenance on subsystems that may be energized. Calibrations and adjustments are performed with the power on and live circuits covered. No equipment
should ever be repaired or replaced with the power on.
The following are the four types of electrical hazards:
Table 2-1: Electrical Hazard Classifications
Classification
2-8
Description
Type 1
Equipment if fully de-energized.
Type 2
Equipment is energized. Energized circuits are covered or insulated.
Type 3
Equipment is energized. Energized circuits are exposed and inadvertent contact with uninsulated energized parts is possible.
Potential exposures are no greater than 30 volts RMS, 42.2 volts
peak; 60 volts DC or 240 volt-amps in dry locations.
Type 4
Equipment is energized. Energized circuits are exposed and
inadvertent contact with uninsulated energized parts is possible.
Potential exposures are greater than 30 volts RMS, 42.4 volts peak,
60 volts DC, or 240 volt-amps in dry locations.
Brooks Automation
Revision 2.2
MagnaTran 7.1 User’s Manual
MN-003-1600-00
Safety
Laser Hazards
Laser Hazards
The MagnaTran 7 does not use laser light during operation. However, low level laser
light may be used and located in other devices within close proximity of the robot.
Other Brooks products containing these laser emitters produce low power visible red
light. Be aware of the lasers maximum power output and wavelength. This information is found in the Brooks equipment User’s Manual in the safety section. Under normal operation, no hazardous levels of laser radiation emanate from the chamber. The
beam is safe for brief viewing, but can cause damage to the eyes if viewed directly for
long periods.
The proper precautions for operating and servicing lasers must be observed. Any
precautions specified within the facility where the robot is being used must also be
observed.
WARNING
Do not look directly at the laser beam for extended periods of time, or
permanent eye damage may result.
The following describes laser classifications, general safety issues and laser handling
precautions. Laser diodes have three properties that distinguish them from standard
light emitting diodes. First, they can produce much brighter beams of light (by a factor of 1000 or more). Second, the beam from a laser can be very narrow (where the
spot of light is almost the same size whether projected a few inches or many feet).
Third, laser light is a very pure color with a single wavelength, which makes the spot
look speckled and shimmery.
National and international standards classify low power laser systems into the following classes:
Class I:Very low power (4 x 10 -7 Watt) -- safe for continuous viewing.
Class II:Low power visible lasers (4 x 10 -6) Watt -- safe for 15 minutes of continuous
viewing.
Class III:Low power visible lasers only (1 x 10 -3 Watt) -- safe for brief viewing: do not
stare into the beam.
Brooks Automation
Revision 2.2
2-9
Safety
Gas Hazards
MagnaTran 7.1 User’s Manual
MN-003-1600-00
Gas Hazards
The MagnaTran 7 robot does not make use of any compressed gases.
However, it may be recommended that Nitrogen gas be used for cleaning sections of
the robot assembly to blow out any accumulated particles during routine maintenance procedures.
The equipment where the Brooks Automation MagnaTran 7 is installed may use
Nitrogen gas for venting when installed in a system. Ensure all gases used are vented
as specified by the facilities local environmental regulations.
WARNING
Whenever any gases are vented, the facilities’ environmental procedures must be followed regarding the storage, handling, and disposal
of gases.
When handling compressed gases such as Nitrogen, eye protection should be worn.
Whenever any gas is used during service of the MagnaTran 7 robot, the facilities’ standard precautions for use of that gas must be employed.
DANGER
Harmful gases may reside in the system the MagnaTran 7 robot is
installed in. Under certain circumstances, some gases can leave a
flammable or poisonous residue, refer to the Facilities’ Material
Safety Data Sheets (MSDS) for these gases and follow the facilities’
standard precautions prior to performing any routine maintenance.
Exposure to Nitrogen gas may cause dizziness or suffocation.
Personal protective equipment such as gloves, eye wear, respirators,
self-contained breathing apparatus, etc. may also be required.
2-10
Brooks Automation
Revision 2.2
MagnaTran 7.1 User’s Manual
MN-003-1600-00
Safety
Chemical Hazards
Chemical Hazards
The MagnaTran 7 robot does not make use of any hazardous chemicals. However, it
may be recommended that Isopropyl alcohol be used for cleaning sections of the
product during routine maintenance procedures.
DANGER
Some chemicals may leave a flammable or toxic residue.
Robot arms and all surfaces inside the vacuum environment could
have very hazardous contamination as a result of exposure to process
gases.
Decontamination certification should be obtained prior to performing a repair on or near these surfaces.
Personal protective equipment such as gloves, eye wear, respirators,
self-contained breathing apparatus, etc. may also be required.
When a chemical is used during servicing the robot, the standard precautions for use
of that chemical must be observed. These safeguards include sufficient ventilation,
proper disposal of excess chemical and wipes and any other precautions specified for
use of hazardous chemicals within the facility where the robot is being used.
WARNING
Whenever any cleaning fluid is used during service of the robot, the
facilities’ environmental procedures must be followed regarding the
storage, handling, and disposal of this fluid along with any affected
apparatus.
The robot may be used in a high temperature environment. Allow the
robot to completely cool before performing maintenance involving
volatile chemicals.
Brooks Automation
Revision 2.2
2-11
Safety
Thermal Hazards
MagnaTran 7.1 User’s Manual
MN-003-1600-00
Thermal Hazards
The MagnaTran 7 does not use thermal heat during operation. However, heating elements may exist on the chamber or in one of the attached components. Be aware of
these areas during servicing of the robot.
DANGER
Heating elements could cause burns when in contact with skin.
Allow time for them to cool before servicing the robot. This includes
the elements found in Hot Cathode Ion Gauges and chamber heaters.
WARNING
The robot may be used in a high temperature environment. Allow the
system chamber and robot to completely cool before performing
maintenance involving volatile chemicals.
2-12
Brooks Automation
Revision 2.2
MagnaTran 7.1 User’s Manual
MN-003-1600-00
Safety
Vacuum Hazards
Vacuum Hazards
The MagnaTran 7 robot is designed for use in high vacuum applications.
WARNING
Whenever any vacuum pump exhaust is vented, the facilities’ environmental procedures must be followed regarding the venting of
gases.
The standard vacuum safety measures for the application in which the robot is being
used should be applied.
DANGER
Implosion may result from equipment damage. It is essential that a
complete inspection of the equipment be performed prior to use.
WARNING
Opening an unequalized slot valve may result in severe damage to the
equipment.
CAUTION
The Brooks MagnaTran 7 is designed specifically for high vacuum
environments and has no overpressure protection. Internal pressures
must never exceed normal atmospheric pressure. It is the user’s
responsibility to provide overpressure protection in the equipment
where the robot is installed.
Brooks Automation
Revision 2.2
2-13
Safety
Fire and Explosion Hazards
MagnaTran 7.1 User’s Manual
MN-003-1600-00
Fire and Explosion Hazards
The MagnaTran 7 provides no direct fire or explosion hazard. However, the use of
Isopropyl alcohol or other flammable solvents around the robot while power is
applied does present the possibility of fire or explosion. Cleaning fluids may leave a
flammable residue. If they are being used during servicing the robot, the proper precautions for use of that fluid must be observed.
CAUTION
Whenever any cleaning fluid is used during service of the MagnaTran
7 robot, all power to the robot should be disconnected and the standard precautions for use of that fluid must be employed.
WARNING
Never use isopropyl alcohol to clean hot parts due to the risk of fire or
explosion. Allow the robot to completely cool before performing
maintenance involving flammable cleaning fluids.
WARNING
Maximum power consumption for the MagnaTran 7 is +24 VDC at 20
Amps (480 Watts). Improper handling of the power source or connecting devices may cause electric arching, creating a fire hazard.
2-14
Brooks Automation
Revision 2.2
MagnaTran 7.1 User’s Manual
MN-003-1600-00
Safety
Environmental Hazards
Environmental Hazards
Noise Emission
The MagnaTran 7 provides no direct noise hazard during operation. When operating
normally the robot produces a noise level that is less than 70 db.
Vibration
The MagnaTran 7 provides no direct vibration hazard during operation. Any vibrations produced during normal operation are minimal and cause no hazardous conditions.
Brooks Automation
Revision 2.2
2-15
Safety
Matrix of Emergency and Corrective Response Actions
MagnaTran 7.1 User’s Manual
MN-003-1600-00
Matrix of Emergency and Corrective Response Actions
The following matrix provides emergency and corrective actions for safety issues that
may arise regarding the MagnaTran 7 only. Emergency and corrective actions
required for the equipment the robot is installed in should be provided with that
equipment.
Table 2-2: Emergency Action Matrix
Emergency
Corrective Response
Electric Shock
Disconnect from power source.
Fire
Use a non-conductive fire extinguisher (Class C).
Mechanical Pinch
Perform one of the following:
• Press EMO button (user accountable circuit)
• Issue a HALT command
• Turn off power from source
• Press Emergency Stop button on
CDM
Then either free the pinched object
or physically push the arms in
reverse direction to free the
pinched object.
2-16
Brooks Automation
Revision 2.2
MagnaTran 7.1 User’s Manual
MN-003-1600-00
Safety
Material Safety Information
Material Safety Information
Hazardous materials may be present during the operation of the MagnaTran 7 or during maintenance.
Hazardous material distributors provide a Material Safety Data Sheet (MSDS) for all
materials they supply. These sheets provide crucial information pertaining to the
hazardous material used in your equipment.
The facility where the product is to be used is responsible for the maintenance and
distribution of each MSDS. Ensure there is a copy in each workplace for all hazardous
materials involved.
The following hazardous materials may be recommended for use with the robot. The
following material safety information is provided as a guideline for proper conduct
when working with hazardous materials and corrective action if exposed to them.
Brooks recommends that MSDS sheets for these materials be obtained from the materials’ supplier.
Table 2-3: Material Safety Information
Material
MSDS Title
MSDS ID
Page Number
Helium
Helium, compressed
1046
2-19
Isopropyl alcohol
Isopropyl alcohol
1219
2-19
Nitrogen
Nitrogen, compressed
1066
2-20
High Vacuum
Grease
Krytox® (DuPont)
DU002667
(Corporate Number)
2-21
Brooks Automation
Revision 2.2
2-17
Safety
Material Safety Information
MagnaTran 7.1 User’s Manual
MN-003-1600-00
Helium Safety Information
Hazard
2-18
Emergency Action
Fire
• The cylinder may explode in a fire.
• Fire may cause irritating gases.
• Small fires may be put out with a CO2 or dry
chemical type extinguisher.
• Large fires may be extinguished with water
spray, fog or foam.
• Move the container from fire area if this can be
performed without risk.
• Stay away from the ends of the tanks.
• Withdraw immediately in case of rising sound
from the venting safety device or any discoloration of the tank due to fire.
Leak
• Vapors may cause dizziness or suffocation.
• Isolate area and deny access to unnecessary persons.
• Stay upwind and avoid low areas.
• Stop leak if possible using a self contained breathing apparatus (SCBA).
Inhalation
• Move victim to fresh air and call emergency medical care. If victim is not breathing perform artificial respiration.
Skin Contact
• Contact with liquid may cause frostbite. If contact occurs, treat for frostbite.
Brooks Automation
Revision 2.2
MagnaTran 7.1 User’s Manual
MN-003-1600-00
Safety
Material Safety Information
Isopropyl Alcohol Safety Information
Hazard
Emergency Action
Fire
• Flammable/combustible material; may be ignited
by heat, sparks or flames.
• Vapors may travel to a source of ignition and
flash back.
• Container may explode in heat of fire.
• Fire may produce irritating or poisonous gases.
• Small fires may be put out with a CO2 or dry
chemical type extinguisher.
• Large fires may be extinguished with water
spray, fog or foam.
• Move the container from fire area if this can be
performed without risk.
Leak
• Shut off ignition sources. No flames or smoking
in hazard area.
• Stop leak if possible.
• For small spills, take up with sand or other noncombustible absorbent material and dispose of
properly.
Inhalation
• May be poisonous if inhaled.
• Vapors may cause dizziness or suffocation.
• Move victim to fresh air and call emergency medical care. If victim is not breathing perform artificial respiration.
Skin Contact
• May be poisonous if absorbed through the skin.
• Contact may irritate or burn skin and eyes.
• In case of contact with eyes, flush eyes with running water for at least 15 minutes.
• In case of contact with skin, wash skin with soap
and water. Remove and isolate clothing and
shoes at the site.
Brooks Automation
Revision 2.2
2-19
Safety
Material Safety Information
MagnaTran 7.1 User’s Manual
MN-003-1600-00
Nitrogen Safety Information
Hazard
2-20
Emergency Action
Fire
• The cylinder may explode in a fire.
• Fire may cause irritating gases.
• Small fires may be put out with a CO2 or dry
chemical type extinguisher.
• Large fires may be extinguished with water
spray, fog or foam.
• Move the container from fire area if this can be
performed without risk.
• Stay away from the ends of the tanks.
• Withdraw immediately in case of rising sound
from the venting safety device or any discoloration of the tank due to fire.
Leak
• Vapors may cause dizziness or suffocation.
• Isolate area and deny access to unnecessary persons.
• Stay upwind and avoid low areas.
• Stop leak if possible using a self contained breathing apparatus (SCBA).
Inhalation
• Move victim to fresh air and call emergency medical care. If victim is not breathing perform artificial respiration.
Skin Contact
• Contact with liquid may cause frostbite. If contact occurs, treat for frostbite.
Brooks Automation
Revision 2.2
MagnaTran 7.1 User’s Manual
MN-003-1600-00
Safety
Material Safety Information
Krytox ® (DuPont) Safety Information
Hazard
Emergency Action
Fire
• Non-combustible material.
• Decomposition at flame temperature may form
toxic Fluorine compounds.
• Small fires may be put out with a CO2 or dry
chemical type extinguisher.
• Large fires may be extinguished with water
spray, fog, or foam.
Inhalation
• Move victim to fresh air. If victim is not breathing perform artificial respiration.
Skin Contact
• Flush skin with water after contact. Wash contaminated clothing before reuse.
Eye Contact
• Immediately flush eyes with plenty of water for
at least 15 minutes. Call a physician.
Brooks Automation
Revision 2.2
2-21
Safety
Material Safety Information
MagnaTran 7.1 User’s Manual
MN-003-1600-00
This Page Intentionally Left Blank
2-22
Brooks Automation
Revision 2.2
MagnaTran 7.1 User’s Manual
MN-003-1600-00
3
Installation
Overview
This chapter provides complete installation procedures for the Brooks Automation
MagnaTran 7 Robot including; facility requirements, unpacking, set-up, and checkout.
Chapter Contents
Site Requirements . . . . . . . . . . . . . . . . . . . . . . . . . . . . . . . . . . . . . . . . . . . . . . . . . . . . .3-2
Unpacking and Inspection . . . . . . . . . . . . . . . . . . . . . . . . . . . . . . . . . . . . . . . . . . . . . .3-6
Installation Procedure . . . . . . . . . . . . . . . . . . . . . . . . . . . . . . . . . . . . . . . . . . . . . . . . . .3-8
Check-out . . . . . . . . . . . . . . . . . . . . . . . . . . . . . . . . . . . . . . . . . . . . . . . . . . . . . . . . . . . .3-20
Initial Power-up Sequence . . . . . . . . . . . . . . . . . . . . . . . . . . . . . . . . . . . . . . . . . . . . . .3-21
Configuration Compatibility . . . . . . . . . . . . . . . . . . . . . . . . . . . . . . . . . . . . . . . . . . . .3-22
Mount the Arm Set . . . . . . . . . . . . . . . . . . . . . . . . . . . . . . . . . . . . . . . . . . . . . . . . . . . .3-23
Install End Effector . . . . . . . . . . . . . . . . . . . . . . . . . . . . . . . . . . . . . . . . . . . . . . . . . . . .3-47
Alignment and Calibration. . . . . . . . . . . . . . . . . . . . . . . . . . . . . . . . . . . . . . . . . . . . . .3-48
Brooks Automation
Revision 2.2
3-1
Installation
Site Requirements
MagnaTran 7.1 User’s Manual
MN-003-1600-00
Site Requirements
Before the MagnaTran 7 Robot may be installed, the site where the robot will be
located must be properly prepared. This preparation includes ensuring that the
proper facilities including electrical and communications connections are available
and are properly prepared for the robot.
Space
The chamber where the MagnaTran 7 Robot will be installed must meet the minimum
space requirements specified in Figure 3-1 to ensure proper clearance for operation
and servicing of the robot.
CAUTION
All drawings within this manual are generic and may not reflect specific builds of the robot. To obtain a complete and current set of drawings and documents contact Brooks Customer Support.
3-2
Brooks Automation
Revision 2.2
MagnaTran 7.1 User’s Manual
MN-003-1600-00
Installation
Site Requirements
Robot Drive:
The area under the chamber the robot will be mounted in must provide the
minimum dimensions shown below to provide proper clearance for cooling
and service. Examples of 2-Axis and 3-Axis clearance requirements and the
center of gravity are shown in Figure 3-1.
Height:
53.34 cm /21.00 inches to allow for cable service
Diameter:
35.56 cm / 14.00 inches to allow for service access
Weight:
29.5 kg (65 lbs.) 3 axis or 21 kg (46.5 lbs.) 2 axis
Figure 3-1: Space Requirements
Brooks Automation
Revision 2.2
3-3
Installation
Site Requirements
MagnaTran 7.1 User’s Manual
MN-003-1600-00
BiSymmetrik™ Arms:
The chamber the arms will be used in must meet the minimum dimensions
shown below to provide proper clearance for operation and installation. An
example of necessary clearance for a single arm MagnaTran 7 is demonstrated
in Figure 3-2.
Height:
Dependent on arm type.
Extension:
Up to 1050mm, dependent on arm type.
Weight:
single
double
3.2-4.5 kg / 7-10 lbs
4.5-5.4 kg /10-12 lbs
435mm
322mm
1050mm
BiSymmetrik™ Arms transporting a 300mm wafer.
Figure 3-2: Arm Space Requirements
3-4
Brooks Automation
Revision 2.2
MagnaTran 7.1 User’s Manual
MN-003-1600-00
Installation
Site Requirements
Environmental Requirements
The site for the MagnaTran 7 Robot must meet the environmental requirements specified below to ensure proper operation of the robot.
Maximum Exposure to drive: 80°C
Maximum Exposure to Arm and end effectors: 120°C
Humidity: 50% to 80% (relative, non-condensing)
Altitude: The robot will operate in altitudes up to 1000 meters above sea level.
Lighting: No special lighting is required to operate the MagnaTran 7 which normally
is partially enclosed in a vacuum environment chamber. Standard lighting
provided in the cleanroom environment where the robot is installed is sufficient for proper operation and maintenance.
Electrical
The MagnaTran 7 robot requires a single electrical power connection as specified
below. The source should be line-isolated. Refer to Figure 5-2 on page 5-3.
Two Axis Robot:
+24 VDC at 20 Amps
Three Axis Robot:
+24 VDC at 20 Amps
NOTE: The current usage is dependent on the robot’s application.
Refer to Power Connections on page 5-3 for complete specifications of the power connections.
Service to the robot should have the appropriate fuse or circuit breaker rating. These
current requirements are maximum values: 20 amps. The actual current drawn will
depend upon the use of the robot. An external Emergency Off circuit should be
installed with EMO switch close to the robot and easily accessible.
Communications
The robot requires a single RS-232 or RS-422 communication connection if operating
in serial mode or connection to MISC I/O if operating the robot in discrete I/O mode
(DIO). Refer to Chapter 5: Operational Interfaces for complete specifications of the communications requirements.
Brooks Automation
Revision 2.2
3-5
Installation
Unpacking and Inspection
MagnaTran 7.1 User’s Manual
MN-003-1600-00
Unpacking and Inspection
The MagnaTran 7 robot is shipped in separate packages which are individually sealed
to maintain cleanroom conformance. These packages are: the robot Drive, the Arms,
the CDM and the Installation Kit, which includes the QR, this manual, cables, etc.
Unpack the crate carefully; inspect and verify its contents against the checklist provided on the front page of the QR. Report any damage immediately to the shipper
and to Brooks Automation.
The following table is for reference only.
Table 3-1: Packing Checklist Reference
Package
3-6
Contents
Robot
1. Robot Drive Body
Arm Assembly
1. Arms
2. Arm Mounting Fixture(s)
3. End Effector (1 or 2 depending on arm type)
Power Pak
1. Power Pak unit
2. Interconnect cable
CDM
1. Control Display Module (CDM) (optional)
2. CDM cable
Operating
Package
1.
2.
3.
4.
5.
6.
Power Supply
1. Power supply
2. Power supply cable
Installation Kit
1.
2.
3.
4.
User’s Manual
Serial Cable
O-Ring
Mounting Hardware
Power Cable
I/O cable
Robot lifting ring
Mounting Hardware for Arms
Eyebolts
Copy of QR (Certificate of Performance Testing)
Brooks Automation
Revision 2.2
MagnaTran 7.1 User’s Manual
MN-003-1600-00
Installation
Unpacking and Inspection
Unpacking Instructions
1.
Remove the cover of each shipping crate. Unpack, inspect and verify contents
against the QR.
NOTE: Save the shipping crate for possible future use. If the robot is returned to
Brooks for service or shipped to another location, the original shipping crate
must be used.
The QR is a permanent record of the MagnaTran 7 as it was manufactured by
Brooks Automation. In addition to providing information about serial number,
model number, etc., it also provides critical data. Make copies of the form and
keep a copy close to the robot. Should maintenance be required, data from the
QR will be needed.
HEAVY LIFTING
Ergonomic Hazard - The MagnaTran 7 Drive weighs 29.5 kg (65 lbs.) 3 axis or
21 kg (46.5 lbs.) 2 axis. Failure to take the proper precautions before moving
it could result in personal injury.
2.
Move the robot to its final location.
NOTE: The MagnaTran 7 was assembled and bagged in plastic in a cleanroom
environment. To ensure the cleanliness of the robot, only remove the bag in
a cleanroom environment.
3.
Remove the bag from the robot and carefully inspect the robot for signs of
damage that may have occurred during shipping.
Brooks Automation
Revision 2.2
3-7
Installation
Installation Procedure
MagnaTran 7.1 User’s Manual
MN-003-1600-00
Installation Procedure
The MagnaTran 7 Robot is supplied in either the two axis configuration or it is available in a three axis configuration. The following procedures provide the information
required to install either configuration of the robot.
The MagnaTran 7 robot is supplied in a top mount configuration allowing the robot
body to be lowered into the chamber where it will be used. Once in place in the chamber, the mounting flange is bolted into place from the bottom side of the chamber and
the arms are lowered into the chamber and attached to the robot.
Prepare Surface for Mounting
Refer to Figure 3-3 for detailed dimensions and finish specifications for top mounting
the robot.
Inspect the location, cut, and finish of the appropriate clearance hole, seal
flange, and mounting and alignment holes in the chamber to accept the robot.
NOTE: Both the two-axis robot and the three-axis configurations of the MagnaTran
7 robot require the same chamber preparations.
3-8
1.
Ensure that all clearance holes, mounting holes, and alignment holes are
the proper size, burr free, and are properly located.
2.
Ensure that all surfaces are properly finished per notes in Figure 3-3.
3.
Ensure that all mounting surfaces and seal surfaces on both the robot
and the chamber are clean by following the Robot Cleaning Procedure
on page 9-13.
4.
Ensure that all seals are properly installed.
Brooks Automation
Revision 2.2
MagnaTran 7.1 User’s Manual
MN-003-1600-00
Installation
Installation Procedure
10.000
Figure 3-3: Top Mount Details
Brooks Automation
Revision 2.2
3-9
Installation
Installation Procedure
MagnaTran 7.1 User’s Manual
MN-003-1600-00
Robot Installation
HEAVY LIFTING
Ergonomic Hazard - The MagnaTran 7 Drive weighs 29.5 kg (65 lbs.) 3 axis or
21 kg (46.5 lbs.) 2 axis. Failure to take the proper precautions before moving
it could result in personal injury.
Safety glasses should be worn at all times when installing the robot.
1.
Prepare to lower the robot into the chamber by using a crane and the M8 eyebolts secured to the top of the flange.
If the robot has the PowerPak installed, it may be temporarily removed. See
Power Pak Replacement on page 9-63 for instructions on how to remove and
replace the pak.
2.
Lower the robot into the chamber slowly and ensure that all alignment pins are
properly located before fully seating the robot into the chamber.
3.
Insert and tighten all mounting bolts until the lock washers are fully seated,
then tighten the bolts an additional 1/4 turn.
Facilities Connections
The MagnaTran 7 robot requires electrical power and communications connections.
The following procedures provide the information required to make all facilities connections to the robot.
The power supply should be tested and the connection to 24V power and ground
should be connected and tested prior to connecting to the robot.
Electrical Connections
The MagnaTran 7 robot operates from a single voltage power source.
1.
Locate the power supply for the robot such that the 24V power cable can be
cleanly routed from the robot to the power supply.
See Power Connections on page 5-3 for pin out of the power connector and
3-10
Brooks Automation
Revision 2.2
MagnaTran 7.1 User’s Manual
MN-003-1600-00
Installation
Installation Procedure
proper grounding of the power supply and robot.
CAUTION
Do not connect the robot power supply to facility power until ALL
connections have been made. Facility power will be connected on Initial Power-up Sequence on page 3-21.
Power Connection with Power Pak
Power Connection without Power Pak
Figure 3-4: Power Connections
2.
Follow the appropriate instructions for routing the power connection depend-
Brooks Automation
Revision 2.2
3-11
Installation
Installation Procedure
MagnaTran 7.1 User’s Manual
MN-003-1600-00
ing on the use of the Brooks Automation Power Pak as described below:
POWER PAK: Install the Power Pak using the procedure Power Pak Replacement on page 9-63. Connect the power cable to the connector labeled POWER
IN on the Power Pak. Connect the short cable shipped with the Power Pak from
the Pak connector POWER OUT to the robot POWER connector on the front
panel of the robot as shown in Figure 3-4. For the location of the POWER connector on the robot, see Figure 3-5.
WITHOUT POWER PAK: Connect the power cable to the connector labeled
POWER located on the front panel of the robot as shown in Figure 3-4. For the
location of the POWER connector on the robot, see Figure 3-5.
CAUTION
Never connect or disconnect the robot’s power cable with power on as
damage to internal components may result.
3-12
Brooks Automation
Revision 2.2
MagnaTran 7.1 User’s Manual
MN-003-1600-00
Installation
Installation Procedure
Power Connection
Figure 3-5: Power Connection Location
NOTE: Cable length from power supply to robot must not be longer than the power
supply is capable of supporting to ensure proper operation of the robot.
Brooks Automation
Revision 2.2
3-13
Installation
Installation Procedure
MagnaTran 7.1 User’s Manual
MN-003-1600-00
Communication Connections
The MagnaTran 7 offers several methods of communication and operator interaction.
3-14
•
Serial Control: The MagnaTran 7 robot is capable of RS-232 or RS-422 communications with the host controller or with peripheral devices.
•
Control/Display Module: The MagnaTran 7 has a Control/Display Module
(CDM) allowing monitoring of robot functions and user control through RS232.
•
Discrete I/O Communication: In addition, the robot is capable of communications with discrete I/O devices using open collector type inputs and outputs
for interlocks or DIO Control of the robot.
Brooks Automation
Revision 2.2
MagnaTran 7.1 User’s Manual
MN-003-1600-00
Installation
Installation Procedure
Serial Communication
All communications for operation of the MagnaTran 7 robot by an external
controller may be accomplished using a standard RS-232 or RS-422 serial communications link. Connect the cable for serial communications to the connector
on the front I/O panel as shown in Figure 3-5.
Host Communication
1.
Connect the serial communications cable to the robot at SIO1.
2.
Route and connect the serial communications cable to the unit that will
be controlling the robot.
Serial I/O 1
RS-232/RS-422
Host Communication
Serial I/O 2
RS-232
Peripheral Communication
Figure 3-6: Serial Connection Locations
Peripheral Communication
1.
Brooks Automation
Revision 2.2
Connect the peripheral serial communications cable to the robot at
3-15
Installation
Installation Procedure
MagnaTran 7.1 User’s Manual
MN-003-1600-00
SIO2.
2.
3-16
Route and connect the peripheral communications cable to the peripheral unit.
Brooks Automation
Revision 2.2
MagnaTran 7.1 User’s Manual
MN-003-1600-00
Installation
Installation Procedure
Control/Display Module
Connect the CDM cable to the robot for local control of robot operations to the
connector labeled “CDM” on the front I/O panel as shown in Figure 3-7.
1.
Locate the CDM at an accessible location, typically on the side of the
chamber where the robot is installed.
2.
Connect the CDM communications cable to the robot.
CAUTION
If using the metal shelled connector, shut off power before plugging
or unplugging the connector at the robot end; the metal shell may
short out the robot reset drive if removed when power is on. If CDM
must be removed with the power on, unplug at the CDM end.
CDM Connection Location
Figure 3-7: CDM Connection Location
Brooks Automation
Revision 2.2
3-17
Installation
Installation Procedure
MagnaTran 7.1 User’s Manual
MN-003-1600-00
Discrete I/O Communication (DIO)
All discrete I/O connections are made to the 50 pin connector (MISC I/O)
located on the front I/O panel of the robot as indicated in Figure 3-8.
1.
Route the discrete I/O communications cable from the units that will be
monitored or controlled by the robot.
2.
Connect the discrete I/O communications cable to the robot.
Discrete I/O Communication
Connection Location
Figure 3-8: DIO Connection Locations
3-18
Brooks Automation
Revision 2.2
MagnaTran 7.1 User’s Manual
MN-003-1600-00
Installation
Installation Procedure
Software Installation
The MagnaTran 7 robot requires no software installation as all robot control software
is pre-loaded.
Upgrades to the software can be downloaded through the serial port or the parallel
port. See Firmware Upgrade on page 9-83.
Brooks Automation
Revision 2.2
3-19
Installation
Check-out
MagnaTran 7.1 User’s Manual
MN-003-1600-00
Check-out
Before the robot is started for the first time, or after servicing the robot, it is necessary
to verify that all systems of the robot are operating properly.
NOTE: This verification of the robot’s systems does not include any switch or configuration settings.
Mechanical Checks
•
Ensure that the robot is properly mounted and that the mounting is properly
sealed (perform chamber leak test if required).
•
Ensure that the arms are properly mounted and that there are no obstructions
to their movement.
•
Verify that the power cable is routed in a safe place and away from travel area.
•
Verify the shipping/mounting fixture (red) has been removed from the armset.
•
Inspect all cables for restricted bend radius or excessive tension.
•
Verify all protective covers are in place.
•
Check connector securing screws to ensure good continuity.
Facility Checks
3-20
•
Ensure that the power supply being used is capable of delivering the specified
voltage and current at the connection to the robot.
•
Verify vacuum pressure is correct.
•
Ensure that all connections have been made as specified in this chapter.
Brooks Automation
Revision 2.2
MagnaTran 7.1 User’s Manual
MN-003-1600-00
Installation
Initial Power-up Sequence
Initial Power-up Sequence
After the MagnaTran 7 robot has been installed and configured, it should be powered
up and all connections should be checked out before proceeding any further with the
installation process.
CAUTION
Do not attempt to operate the MagnaTran 7 robot until all installation
procedures described in this chapter have been completed.
1.
Check to ensure that all of the installation procedures previously described in
this chapter have been completed.
2.
Check to ensure that robot has been properly configured as described in the
previous sections of this chapter.
3.
Plug in the robot’s power supply to the facility’s electrical services. Refer to the
power supply instructions for correct termination.
4.
Following the manufacturers directions, turn on the power supply or throw
the breaker switch on the Brooks Automation power supply.
5.
Initialization sequence performs correctly:
1.
The MagnaTran 7 has a 15 to 20 second delay to the power up prompt.
The robot has a microprocessor similar to that in a computer and takes
this time to initialize before it has to handle an action command.
2.
The power supply and robot cooling fans will make an audible sound.
3.
The +24 VDC light on the robot interface panel will be lit.
On the Brooks Automation power supply, the POWER ON light on the
front panel will be lit.
6.
If the initialization sequence executes without error, then the MagnaTran 7
robot has been properly installed and is ready for final set-up.
7.
Establish serial communication with the robot.
1.
Brooks Automation
Revision 2.2
The TX and RX LED’s will flash as communications are sent and
received.
3-21
Installation
Configuration Compatibility
MagnaTran 7.1 User’s Manual
MN-003-1600-00
Configuration Compatibility
The MagnaTran 7 is compatible with the Brooks Automation VT5/MT5 or MagnaTran 6 robots. The robot configuration compatibility is set at the factory according to
user specifications.
Configuration Compatibility allows the MagnaTran 7 to communicate in the same
manner as the VT5/MT5 or MagnaTran 6 robot.
NOTE: This procedure must be performed before installing the arm set.
See the Configuration Compatibility Commands on page 11-13 on establishing and
verifying the appropriate protocol.
3-22
Brooks Automation
Revision 2.2
MagnaTran 7.1 User’s Manual
MN-003-1600-00
Installation
Mount the Arm Set
Mount the Arm Set
Use the proper procedure for mounting the arm set to the robot. Arm sets from
Brooks Automation MagnaTran 6 robots are able to be mounted on the MagnaTran 7
robot drive.
Table 3-2: Arm Set Mounting Kits
Arm Set
Mounting Kit*
Procedure
Leapfrog
Arm Set
Leapfrog Kit
Mounting kit supplied
with the arm set
Mount the MagnaTran 7 Leapfrog Arm
Set on page 3-24
Hub-style
Mag 7.1
BiSymmetrik
Arm Set
Mag 7 Kit
Mounting kit supplied
with the robot drive
Mount the MagnaTran 7.1 BiSymmetrik
Arm Set/Hub Style
on page 3-29
MagnaTran 6
BiSymmetrik
Arm Set
Mag 6 Kit
Mounting kit supplied
with the robot drive
Mount MagnaTran 6
BiSymmetrik Arm
Set on page 3-34
MagnaTran 6
Frogleg
Arm Set
Mag 6 Kit
Mounting kit supplied
with the robot drive
Mount the MagnaTran 6 Frogleg Arm
Set on page 3-38
Non-hub Cone
Style Mag 7
BiSymmetrik
Arm Set
Mag 7 Kit
Mounting kit supplied
with the robot drive
Mount the MagnaTran 7 BiSymmetrik
Arm Set/Cone Style
on page 3-42
*These Mounting Kits are installed at Brooks Automation before shipment.
Brooks Automation
Revision 2.2
3-23
Installation
Mount the Arm Set
MagnaTran 7.1 User’s Manual
MN-003-1600-00
Mount the MagnaTran 7 Leapfrog Arm Set
CAUTION
Do not operate the robot until all set-up procedures have been completed as damage to the robot or arms may result.
The mount position of the robot is preset at the factory. The purpose of the mount
position is to provide the operation clearance from the bottom of the transport chamber when installing or removing the armset. By definition, the robot’s mount position
has the radial and theta axes at the Home position coordinates and the Z axis is at a
height of 10mm (10000 counts).
To mount the arms to the robot, power connections and communications connections
must be complete and verified. Communication may be through the serial port with
a computer or through the CDM. The following procedure identifies the commands
for both methods.
Required Tools
M3 6 inch T-Handle Allen Wrench
Mount/Serial Communication
1.
3-24
Apply power to the robot.
Brooks Automation
Revision 2.2
MagnaTran 7.1 User’s Manual
MN-003-1600-00
2.
Installation
Mount the Arm Set
Ensure the arm state of the robot is off.
Issue the following command: SET ARMS OFF
3.
Move the robot to the mount position.
Issue the following command: MOUNT
4.
A T2 adapter must be in place. This adapter is usually factory installed. If, however, one is not installed on the T2 shaft, use the following procedure for installation.
Install adapter to T2. Torque screws (3 places) as per Appendix C: Torque Settings on page 11-4.
5.
Install the arms on the robot.
For the following procedure, the alignment fixture must be installed on the
arm set.
Inspect the under side of the arm set and verify the mounting hardware is protruding at 4 places. If not, work the screws until they protrude.
Position the arms so that, when looking down on the robot, the I/O panel
located on the robot drive is facing you and the end effectors would be facing
to your right.
Using the alignment fixture, place the arms on the T1/T2 shafts, positioning
the locating pins of the outer shaft into the arm set. Seat onto the T1 shaft. The
arm set must be fully seated.
6.
Secure the arms to the T1 shaft (outer shaft).
Using the M3 wrench, fit the wrench into the 3 thruway holes and tighten the
mounting hardware.
7.
Secure the arms to the T2 shaft (inner shaft).
Using the M3 wrench, fit the wrench into the 2 thruway holes and tighten the
mounting hardware.
8.
Torque all five screws to 18 inch-lbs.
9.
Remove the alignment fixture by loosening it’s hardware.
Brooks Automation
Revision 2.2
3-25
Installation
Mount the Arm Set
MagnaTran 7.1 User’s Manual
MN-003-1600-00
NOTE: Save the fixtures for possible future use. If the robot is returned to Brooks
for service or shipped to another location, the original fixture must be used.
Also, keep the fixture close to the robot. Additional procedures will require
the use of this fixture.
10.
Set the arm state of the robot to on.
Issue the following command: SET ARMS ON
11.
Re-engage the servos.
Issue the following command: HOME R
During the HOME action, check for vibration.
After the arms are in the HOME position, check the alignment. The upper arm
should be in line with the lower arm. This can be verified by observing that the
plane of the wrist plates are parallel relative to each other.
If vibration is observed or the alignment is off, perform the procedure again.
12.
Check the alignment of the arm and the position of home by entering the following command:
HOME ALL
If the home position is not where desired, use the procedure Reset the Home
Position to the User Preference on page 9-73.
Mount/CDM
1.
Ensure the arm state of the robot is off.
Enter the following path: SETUP/CONFIG ROBOT/ARM STATE/ARE THE
ARMS CURRENTLY ON?/NO
2.
Move the robot to the mount position.
Enter the following path: SETUP/CONFIG ROBOT/ARM MOUNT/ARE
THE ARMS CURRENTLY ON?/NO
When the robot is in the mount position, the 2 locating pins of the robot outer
shaft should be oriented as indicated in Figure 3-9.
3-26
Brooks Automation
Revision 2.2
MagnaTran 7.1 User’s Manual
MN-003-1600-00
3.
Installation
Mount the Arm Set
Disengage the robot servos.
Enter the following path: SETUP/CONFIG ROBOT/SET SERVOS OFF
4.
Install adapter to T2 (if not factory installed).
5.
Install the arms on the robot.
For the following procedure, the alignment fixture must be installed on the
arm set.
Inspect the under side of the arm set and verify the mounting hardware is protruding at 4 places. If not, work the screws until they protrude.
Position the arms so that, when looking down on the robot, the I/O panel
located on the robot drive is facing you and the end effectors would be facing
to your right.
Using the alignment fixture, place the arms on the T1/T2 shafts, positioning
the locating pins of the outer shaft into the arm set. Seat onto the T1 shaft. The
arm set must be fully seated.
6.
Secure the arms to the T1 shaft (outer shaft).
Using the M3 wrench, fit the wrench into the 3 thruway holes and tighten the
mounting hardware.
7.
Secure the arms to the T2 shaft (inner shaft).
Using the M3 wrench, fit the wrench into the 2 thruway holes and tighten the
mounting hardware.
8.
Torque all five screws to 18 inch-lbs.
9.
Remove the alignment fixture by loosening it’s hardware.
NOTE: Save the fixtures for possible future use. If the robot is returned to Brooks
for service or shipped to another location, the original fixture must be used.
Also, keep the fixture close to the robot. Additional procedures will require
the use of this fixture.
10.
Set the arm state of the robot to on.
Brooks Automation
Revision 2.2
3-27
Installation
Mount the Arm Set
MagnaTran 7.1 User’s Manual
MN-003-1600-00
Enter the following path: SETUP/CONFIG ROBOT/ARM STATE/ARE THE
ARMS CURRENTLY ON?/YES
11.
Re-engage the servos.
Issue the following command: HOME R
During the HOME action, check for vibration.
After the arms are in the HOME position, check the alignment. The upper arm
should be in line with the lower arm. This can be verified by observing that the
plane of the wrist plates are parallel relative to each other.
If vibration is observed or the alignment is off, perform the procedure again.
12.
Check the alignment of the arm and the position of home by entering the following command:
HOME ALL
If the home position is not where desired, use the procedure Reset the Home
Position to the User Preference on page 9-73.
3-28
Brooks Automation
Revision 2.2
MagnaTran 7.1 User’s Manual
MN-003-1600-00
Installation
Mount the Arm Set
Mount the MagnaTran 7.1 BiSymmetrik Arm Set/Hub Style
CAUTION
Do not operate the robot until all set-up procedures have been completed as damage to the robot or arms may result.
The mount position of the robot is preset at the factory. The purpose of the mount
position is to provide the operation clearance from the bottom of the transport chamber when installing or removing the armset. By definition, the robot’s mount position
has the radial and theta axes at the Home position coordinates and the Z axis is at a
height of 10mm or 10000 counts (other custom configurations for the mount position may
exist).
To mount the arms to the robot, power connections and communications connections
must be complete and verified. Communication may be through the serial port with
a computer or through the CDM. The following procedure identifies the commands
for both methods.
Required Tools
•
M3 6 inch T-Handle Allen Wrench
•
Torque Wrench with M3 Allen Key Extension
Brooks Automation
Revision 2.2
3-29
Installation
Mount the Arm Set
MagnaTran 7.1 User’s Manual
MN-003-1600-00
Mount/Serial Communication
1.
Apply power to the robot.
2.
Ensure the arm state of the robot is off.
Issue the following command: SET ARMS OFF
3.
Install adapter to T2 (if provided with arm or if not already mounted to the T2
shaft).
4.
Move the robot to the mount position.
Issue the following command: MOUNT
5.
Set the servos off: SET SERVOS OFF
6.
Install the arms on the robot.
For the following procedure, the alignment fixture must be installed on the
arm set.
Inspect the under side of the arm set and verify the mounting hardware is protruding at 6 places. If not, work the screws until they protrude.
Position the arms so that, when looking down on the robot, the I/O panel is
facing you and arm A is to your right. See Figure 6-7 on page 6-19.
Using the alignment fixture, place the arms on the T1/T2 shafts, positioning
the locating pins of the outer shaft into the arm set. Seat onto the T1 shaft. The
arm set must be fully seated.
7.
Secure the arms to the T1 shaft (outer shaft).
Using the M3 wrench, fit the wrench into the 4 thruway holes and tighten the
mounting hardware.
8.
Secure the arms to the T2 shaft (inner shaft).
Using the M3 wrench, fit the wrench into the 2 thruway holes and tighten the
mounting hardware.
9.
3-30
Torque all 6 screws to 18 inch-lbs.
Brooks Automation
Revision 2.2
MagnaTran 7.1 User’s Manual
MN-003-1600-00
10.
Installation
Mount the Arm Set
Remove the alignment fixture by loosening it’s hardware.
NOTE: Save the fixtures for possible future use. If the robot is returned to Brooks
for service or shipped to another location, the original fixture must be used.
Also, keep the fixture close to the robot. Additional procedures will require
the use of this fixture.
11.
Set the arm state of the robot to on.
Issue the following command: SET ARMS ON
12.
Re-engage the servos.
Issue the following command: HOME R
During the HOME action, check for vibration.
After the arms are in the HOME position, check the alignment. The upper arm
should be in line with the lower arm. This can be verified by observing that the
plane of the wrist plates are parallel relative to each other.
If vibration is observed or the alignment is off, perform the procedure again.
13.
Check the alignment of the arm and the position of home by entering the following command:
HOME ALL
If the home position is not where desired, use the procedure Reset the Home
Position to the User Preference on page 9-73.
Mount/CDM
1.
Apply power to the robot.
2.
Ensure the arm state of the robot is off.
Enter the following path: SETUP/CONFIG ROBOT/ARM STATE/ARE THE
ARMS CURRENTLY ON?/NO
3.
Move the robot to the mount position.
Enter the following path: SETUP/CONFIG ROBOT/ARM MOUNT/ARE
THE ARMS CURRENTLY ON?/NO
Brooks Automation
Revision 2.2
3-31
Installation
Mount the Arm Set
MagnaTran 7.1 User’s Manual
MN-003-1600-00
When the robot is in the mount position, the 2 locating pins of the robot outer
shaft should be oriented as indicated in Figure 3-9.
4.
Disengage the robot servos.
Enter the following path: SETUP/CONFIG ROBOT/SET SERVOS OFF
5.
Install adapter to T2 (if not factory installed).
6.
Install the arms on the robot.
For the following procedure, the alignment fixture must be installed on the
arm set.
Inspect the under side of the arm set and verify the mounting hardware is protruding at 6 places. If not, work the screws until they protrude.
Position the arms so that, when looking down on the robot, the I/O panel is
facing you and arm A is to your right. See Figure 6-7 on page 6-19.
Using the alignment fixture, place the arms on the T1/T2 shafts, positioning
the locating pins of the outer shaft into the arm set. Seat onto the T1 shaft. The
arm set must be fully seated.
7.
Secure the arms to the T1 shaft (outer shaft).
Using the M3 wrench, fit the wrench into the 4 thruway holes and tighten the
mounting hardware.
8.
Secure the arms to the T2 shaft (inner shaft).
Using the M3 wrench, fit the wrench into the 2 thruway holes and tighten the
mounting hardware.
9.
Torque all 6 screws to 18 inch-lbs.
10.
Remove the alignment fixture by loosening it’s hardware.
NOTE: Save the fixtures for possible future use. If the robot is returned to Brooks
for service or shipped to another location, the original fixture must be used.
Also, keep the fixture close to the robot. Additional procedures will require
the use of this fixture.
3-32
Brooks Automation
Revision 2.2
MagnaTran 7.1 User’s Manual
MN-003-1600-00
11.
Installation
Mount the Arm Set
Set the arm state of the robot to on.
Enter the following path: SETUP/CONFIG ROBOT/ARM STATE/ARE THE
ARMS CURRENTLY ON?/YES
12.
Re-engage the servos.
Issue the following command: HOME R
During the HOME action, check for vibration.
After the arms are in the HOME position, check the alignment. The upper arm
should be in line with the lower arm. This can be verified by observing that the
plane of the wrist plates are parallel relative to each other.
If vibration is observed or the alignment is off, perform the procedure again.
13.
Check the alignment of the arm and the position of home by entering the following command:
HOME ALL
If the home position is not where desired, use the procedure Reset the Home
Position to the User Preference on page 9-73.
Brooks Automation
Revision 2.2
3-33
Installation
Mount the Arm Set
MagnaTran 7.1 User’s Manual
MN-003-1600-00
Mount MagnaTran 6 BiSymmetrik Arm Set
The MagnaTran 6 Robot’s Arms may be installed on the MagnaTran 7 using the following procedure.
CAUTION
Do not operate the robot until all set-up procedures have been completed as damage to the robot or arms may result.
To mount the arms to the robot, power connections and communications connections
must be complete and verified. Communication may be through the serial port with
a computer or through the CDM. The following procedure identifies the commands
for both methods.
Arm Removal/Replacement Procedure
1.
Apply power to the robot.
2.
Ensure the arm state of the robot is off.
Issue the following command: SET ARMS OFF
3.
Move the robot to the mount position.
Issue the following commands:
3-34
Brooks Automation
Revision 2.2
MagnaTran 7.1 User’s Manual
MN-003-1600-00
Installation
Mount the Arm Set
MOUNT
SET SERVOS OFF
4.
Install the arms on the robot.
For the following procedure, the alignment fixture must be installed on the
arm set.
Verify the T1 adapter, wave spring and T2 adapter are in place (factory
installed).
Align the pins located on the T1 and T2 drive shafts so they line up with the
pattern on the underside of the arms. Position the arms (with the arm Mounting/Storage bracket attached) onto the drive spindle in the center of the robot;
ensure that the locating pins for both T1 and T2 are fully seated into the arm.
5.
Tighten the M4 mounting bolts for the T1 and T2 axes until the lock washer is
fully seated, then torque 25 inch-pounds.
6.
Remove the alignment fixture by loosening it’s hardware.
NOTE: Save the fixtures for possible future use. If the robot is returned to Brooks
for service or shipped to another location, the original fixture must be used.
Also, keep the fixture close to the robot. Additional procedures will require
the use of this fixture.
7.
Set the arm state of the robot to on.
Issue the following command: SET ARMS ON
8.
Re-engage the servos.
Issue the following command: HOME R
During the HOME action, check for vibration.
After the arms are in the HOME position, check the alignment. The upper arm
should be in line with the lower arm. This can be verified by observing that the
plane of the wrist plates are parallel relative to each other.
If vibration is observed or the alignment is off, perform the procedure again.
9.
Check the alignment of the arm and the position of home by entering the following command:
Brooks Automation
Revision 2.2
3-35
Installation
Mount the Arm Set
MagnaTran 7.1 User’s Manual
MN-003-1600-00
HOME ALL
If the home position is not where desired, use the procedure Reset the Home
Position to the User Preference on page 9-73.
Mount/CDM
1.
Ensure the arm state of the robot is off.
Enter the following path: SETUP/CONFIG ROBOT/ARM STATE/ARE THE
ARMS CURRENTLY ON?/NO
2.
Move the robot to the mount position.
Enter the following path: SETUP/CONFIG ROBOT/ARM MOUNT/ARE
THE ARMS CURRENTLY ON?/NO
When the robot is in the mount position, the 2 locating pins of the robot outer
shaft should be oriented as indicated in Figure 3-9.
3.
Disengage the robot servos.
Enter the following path: SETUP/CONFIG ROBOT/SET SERVOS OFF
4.
Install adapter to T2 (if not factory installed).
5.
For the following procedure, the alignment fixture must be installed on the
arm set.
Verify the T1 adapter, wave spring and T2 adapter are in place (factory
installed).
Align the pins located on the T1 and T2 drive shafts so they line up with the
pattern on the underside of the arms. Position the arms (with the arm Mounting/Storage bracket attached) onto the drive spindle in the center of the robot;
ensure that the locating pins for both T1 and T2 are fully seated into the arm.
6.
Tighten the M4 mounting bolts for the T1 and T2 axes until the lock washer is
fully seated, then torque 25 inch-pounds.
7.
Remove the alignment fixture by loosening it’s hardware.
NOTE: Save the fixtures for possible future use. If the robot is returned to Brooks
for service or shipped to another location, the original fixture must be used.
Also, keep the fixture close to the robot. Additional procedures will require
3-36
Brooks Automation
Revision 2.2
MagnaTran 7.1 User’s Manual
MN-003-1600-00
Installation
Mount the Arm Set
the use of this fixture.
8.
Set the arm state of the robot to on.
Enter the following path: SETUP/CONFIG ROBOT/ARM STATE/ARE THE
ARMS CURRENTLY ON?/YES
9.
Re-engage the servos.
Issue the following command: HOME R
During the HOME action, check for vibration.
After the arms are in the HOME position, check the alignment. The upper arm
should be in line with the lower arm. This can be verified by observing that the
plane of the wrist plates are parallel relative to each other.
If vibration is observed or the alignment is off, perform the procedure again.
10.
Check the alignment of the arm and the position of home by entering the following command:
HOME ALL
If the home position is not where desired, use the procedure Reset the Home
Position to the User Preference on page 9-73.
Brooks Automation
Revision 2.2
3-37
Installation
Mount the Arm Set
MagnaTran 7.1 User’s Manual
MN-003-1600-00
Mount the MagnaTran 6 Frogleg Arm Set
CAUTION
Do not operate the robot until all set-up procedures have been completed as damage to the robot or arms may result.
The mount position of the robot is preset at the factory. The purpose of the mount
position is to provide the operation clearance from the bottom of the transport chamber when installing or removing the armset. By definition, the robot’s mount position
has the radial and theta axes at the Home position coordinates and the Z axis is at a
height of 10mm (10000 counts).
To mount the arms to the robot, power connections and communications connections
must be complete and verified. Communication may be through the serial port with
a computer or through the CDM. The following procedure identifies the commands
for both methods.
Mount/Serial Communication
1.
Install the arm mount fixture.
2.
Ensure the arm state of the robot is off.
Issue the following command: SET ARMS OFF
3.
3-38
Move the robot to the mount position.
Brooks Automation
Revision 2.2
MagnaTran 7.1 User’s Manual
MN-003-1600-00
Installation
Mount the Arm Set
Issue the following command: MOUNT
When the robot is in the mount position, the 4 locating pins of the robot shafts
should be oriented as indicated in Figure 3-9.
4.
Disengage the robot servos.
Issue the following command: SET SERVOS OFF
5.
Verify M6 Arm to M7 Drive adapters are installed (T1 adapter, wave washer,
and T2 adapter).
6.
Install the arms on the robot.
For the following procedure, the red arm mounting fixture must be installed on
the arm set.
CAUTION
The mounting fixture is an installation fixture. It does not provide
precise alignment for the Radial Home. If the arms are being
changed, Brooks Automation recommends reteaching the robot all
stations.
Using the red arm mounting fixture, place the arms on the T1/T2 shafts, positioning the 4 locating pins of the shafts into the arm set. Slightly loosen the
black knobs of the mounting fixture and seat onto shafts. The arm set must be
fully seated.
7.
Secure the arms to the T2 shaft (inner shaft) using six M4 x 20 SHCS and six
lockwashers. Secure the arms to the T1 shaft (outer shaft) using six M4 x 25
SHCS and lockwashers. Torque all using Appendix C: Torque Settings on page
11-4.
8.
Remove the red arm mounting fixture.
NOTE: Save the mounting fixture for possible future use. If the robot is returned to
Brooks for service or shipped to another location, the original mounting fixture must be used. Also, keep the fixture close to the robot. Additional procedures will require the use of this fixture.
9.
Set the arm state of the robot to on.
Brooks Automation
Revision 2.2
3-39
Installation
Mount the Arm Set
MagnaTran 7.1 User’s Manual
MN-003-1600-00
Issue the following command: SET ARMS ON
10.
Re-engage the servos.
Issue the following command: HOME R
During the HOME action, check for vibration.
After the arms are in the HOME position, check the alignment. The upper arms
should be 180° apart. This can be verified by observing the wrist plates relative
to the center of the robot.
If vibration is observed or the alignment is off, the radial home must be reset.
Follow the procedure Reset the Home Position to the User Preference on page
9-73.
Mount/CDM
1.
Ensure the arm state of the robot is off.
Enter the following path: SETUP/CONFIG ROBOT/ARM STATE/ARE THE
ARMS CURRENTLY ON?/NO
2.
Move the robot to the mount position.
Enter the following path: SETUP/CONFIG ROBOT/ARM MOUNT/ARE
THE ARMS CURRENTLY ON?/NO
When the robot is in the mount position, the 4 locating pins of the robot shafts
should be oriented as indicated in Figure 3-9.
3.
Disengage the robot servos.
Enter the following path: SETUP/CONFIG ROBOT/SET SERVOS OFF
4.
Install the arms on the robot.
For the following procedure, the red arm mounting fixture must be installed on
the arm set.
CAUTION
The mounting fixture is an installation fixture. It does not provide
precise alignment for the Radial Home. If the arms are being
3-40
Brooks Automation
Revision 2.2
MagnaTran 7.1 User’s Manual
MN-003-1600-00
Installation
Mount the Arm Set
changed, Brooks Automation recommends reteaching the robot all
stations.
Using the red arm mounting fixture, place the arms on the T1/T2 shafts, positioning the 4 locating pins of the shafts into the arm set. Slightly loosen the
black knobs of the mounting fixture and seat onto shafts. The arm set must be
fully seated.
5.
Secure the arms to the T2 shaft (inner shaft) using one 5mm SHCS and lockwasher. Secure the arms to the T1 shaft (outer shaft) using two 5mm SHCS and
lockwashers. Torque all three screws to 75-88 inch-pounds.
6.
Remove the red arm mounting fixture.
NOTE: Save the mounting fixture for possible future use. If the robot is returned to
Brooks for service or shipped to another location, the original mounting fixture must be used. Also, keep the fixture close to the robot. Additional procedures will require the use of this fixture.
7.
Set the arm state of the robot to on.
Enter the following path: SETUP/CONFIG ROBOT/ARM STATE/ARE THE
ARMS CURRENTLY ON?/YES
8.
Re-engage the servos.
Issue the following command: HOME R
During the HOME action, check for vibration.
After the arms are in the HOME position, check the alignment. The upper arms
should be 180° apart. This can be verified by observing the wrist plates relative
to the center of the robot.
If vibration is observed or the alignment is off, the radial home must be reset.
Follow the procedure Reset the Home Position to the User Preference on page
9-73.
Brooks Automation
Revision 2.2
3-41
Installation
Mount the Arm Set
MagnaTran 7.1 User’s Manual
MN-003-1600-00
Mount the MagnaTran 7 BiSymmetrik Arm Set/Cone Style
CAUTION
Do not operate the robot until all set-up procedures have been completed as damage to the robot or arms may result.
The mount position of the robot is preset at the factory. The purpose of the mount
position is to provide the operation clearance from the bottom of the transport chamber when installing or removing the armset. By definition, the robot’s mount position
has the radial and theta axes at the Home position coordinates and the Z axis is at a
height of 10mm (10000 counts).
To mount the arms to the robot, power connections and communications connections
must be complete and verified. Communication may be through the serial port with
a computer or through the CDM. The following procedure identifies the commands
for both methods.
Mount/Serial Communication
1.
Ensure the arm state of the robot is off.
Issue the following command: SET ARMS OFF
2.
3-42
Move the robot to the mount position.
Brooks Automation
Revision 2.2
MagnaTran 7.1 User’s Manual
MN-003-1600-00
Installation
Mount the Arm Set
Issue the following command: MOUNT
When the robot is in the mount position, the 4 locating pins of the robot shafts
should be oriented as indicated in Figure 3-9.
3.
Disengage the robot servos.
Issue the following command: SET SERVOS OFF
4.
Install the arms on the robot.
For the following procedure, the red arm mounting fixture must be installed on
the arm set.
Using the red arm mounting fixture, place the arms on the T1/T2 shafts, positioning the 4 locating pins of the shafts into the arm set. Slightly loosen the
black knobs of the mounting fixture and seat onto shafts. The arm set must be
fully seated.
Ensure that the arms remain symmetrical about the mounting fixture during
installation.
5.
Secure the arms to the T2 shaft (inner shaft) using one 5mm SHCS and lockwasher. Secure the arms to the T1 shaft (outer shaft) using two 5mm SHCS and
lockwashers. Torque all three screws to 75-88 inch-pounds.
6.
Remove the red arm mounting fixture.
NOTE: Save the mounting fixture for possible future use. If the robot is returned to
Brooks for service or shipped to another location, the original mounting fixture must be used. Also, keep the fixture close to the robot. Additional procedures will require the use of this fixture.
7.
Set the arm state of the robot to on.
Issue the following command: SET ARMS ON
8.
Re-engage the servos.
Issue the following command: HOME R
During the HOME action, check for vibration.
After the arms are in the HOME position, check the alignment. The upper arms
should be 180° apart. This can be verified by observing the wrist plates relative
Brooks Automation
Revision 2.2
3-43
Installation
Mount the Arm Set
MagnaTran 7.1 User’s Manual
MN-003-1600-00
to the center of the robot.
If vibration is observed or the alignment is off, the radial home must be reset.
Follow the procedure Reset the Home Position to the User Preference on page
9-73.
Mount/CDM
1.
Ensure the arm state of the robot is off.
Enter the following path: SETUP/CONFIG ROBOT/ARM STATE/ARE THE
ARMS CURRENTLY ON?/NO
2.
Move the robot to the mount position.
Enter the following path: SETUP/CONFIG ROBOT/ARM MOUNT/ARE
THE ARMS CURRENTLY ON?/NO
When the robot is in the mount position, the 4 locating pins of the robot shafts
should be oriented as indicated in Figure 3-9.
3.
Disengage the robot servos.
Enter the following path: SETUP/CONFIG ROBOT/SET SERVOS OFF
4.
Install the arms on the robot.
For the following procedure, the red arm mounting fixture must be installed on
the arm set.
Using the red arm mounting fixture, place the arms on the T1/T2 shafts, positioning the 4 locating pins of the shafts into the arm set. Slightly loosen the
black knobs of the mounting fixture and seat onto shafts. The arm set must be
fully seated.
Ensure that the arms remain symmetrical about the mounting fixture during
installation.
3-44
5.
Secure the arms to the T2 shaft (inner shaft) using one 5mm SHCS and lockwasher. Secure the arms to the T1 shaft (outer shaft) using two 5mm SHCS and
lockwashers. Torque all three screws to 75-88 inch-pounds.
6.
Remove the red arm mounting fixture.
Brooks Automation
Revision 2.2
MagnaTran 7.1 User’s Manual
MN-003-1600-00
Installation
Mount the Arm Set
NOTE: Save the mounting fixture for possible future use. If the robot is returned to
Brooks for service or shipped to another location, the original mounting fixture must be used. Also, keep the fixture close to the robot. Additional procedures will require the use of this fixture.
7.
Set the arm state of the robot to on.
Enter the following path: SETUP/CONFIG ROBOT/ARM STATE/ARE THE
ARMS CURRENTLY ON?/YES
8.
Re-engage the servos.
Issue the following command: HOME R
During the HOME action, check for vibration.
After the arms are in the HOME position, check the alignment. The upper arms
should be 180° apart. This can be verified by observing the wrist plates relative
to the center of the robot.
If vibration is observed or the alignment is off, the radial home must be reset.
Follow the procedure Reset Stations When the Home Position is Reset on page
9-75.
Brooks Automation
Revision 2.2
3-45
Installation
Mount the Arm Set
MagnaTran 7.1 User’s Manual
MN-003-1600-00
T2 PIN
T1 PINS
Figure 3-9: MagnaTran 7 MOUNT Position
3-46
Brooks Automation
Revision 2.2
MagnaTran 7.1 User’s Manual
MN-003-1600-00
Installation
Install End Effector
Install End Effector
1.
Verify flatness using the procedure Verifying Flatness of Robot’s End Effector
on page 7-5.
2.
Install the end effector using the procedure End Effector Replacement on page
9-29.
Brooks Automation
Revision 2.2
3-47
Installation
Alignment and Calibration
MagnaTran 7.1 User’s Manual
MN-003-1600-00
Alignment and Calibration
The Brooks Automation MagnaTran 7 robot must be aligned with the system that it
will be operating within to prevent misplacement of the wafers or collision of the end
effector or wafers with other parts of the system.
NOTE: Even a small misalignment can interfere with proper system operation and may
cause wafer breakage.
The user must perform a complete alignment as part of installing the robot in a system. Additionally, proper alignment should be verified after servicing the robot. Refer
to Chapter 7: Alignment and Calibration for the required alignment procedure.
CAUTION
Do not attempt to operate the robot until it has been properly aligned.
Chapter 7: Alignment and Calibration must be read and understood
prior to commanding robot motion.
3-48
Brooks Automation
Revision 2.2
MagnaTran 7.1 User’s Manual
MN-003-1600-00
4
Subsystems
Overview
This chapter provides a review of all major subsystems within the Brooks Automation
MagnaTran 7 Robot. The robot’s design creates a set of major field replaceable modules with all module repair being done in-house by Brooks. These field replaceable
modules include the mechanical system, the electrical system, and the hand-held
Control Display Module (CDM).
Chapter Contents
Mechanical System . . . . . . . . . . . . . . . . . . . . . . . . . . . . . . . . . . . . . . . . . . . . . . . . . . . .4-2
Subsystems . . . . . . . . . . . . . . . . . . . . . . . . . . . . . . . . . . . . . . . . . . . . . . . . . . . . .4-2
Protective Covers . . . . . . . . . . . . . . . . . . . . . . . . . . . . . . . . . . . . . . . . . . . . . . . .4-3
Frame Assembly. . . . . . . . . . . . . . . . . . . . . . . . . . . . . . . . . . . . . . . . . . . . . . . . .4-4
T1/T2 Drive Assembly . . . . . . . . . . . . . . . . . . . . . . . . . . . . . . . . . . . . . . . . . . .4-5
Z Axis Drive Assembly . . . . . . . . . . . . . . . . . . . . . . . . . . . . . . . . . . . . . . . . . . .4-7
Robot Arms . . . . . . . . . . . . . . . . . . . . . . . . . . . . . . . . . . . . . . . . . . . . . . . . . . . . .4-9
Electrical System . . . . . . . . . . . . . . . . . . . . . . . . . . . . . . . . . . . . . . . . . . . . . . . . . . . . . .4-11
PC104 CPU (Supervisor) Board . . . . . . . . . . . . . . . . . . . . . . . . . . . . . . . . . . . .4-11
Personality (Motion Control Computer) Board . . . . . . . . . . . . . . . . . . . . . .4-11
T1/T2 Axis Driver Board and Z Axis Driver Board . . . . . . . . . . . . . . . . . . .4-11
I/O (Interface) Board. . . . . . . . . . . . . . . . . . . . . . . . . . . . . . . . . . . . . . . . . . . . .4-12
Power Pak . . . . . . . . . . . . . . . . . . . . . . . . . . . . . . . . . . . . . . . . . . . . . . . . . . . . . .4-15
Power Supply . . . . . . . . . . . . . . . . . . . . . . . . . . . . . . . . . . . . . . . . . . . . . . . . . . .4-15
Software. . . . . . . . . . . . . . . . . . . . . . . . . . . . . . . . . . . . . . . . . . . . . . . . . . . . . . . . . . . . . .4-16
Control/Display Module . . . . . . . . . . . . . . . . . . . . . . . . . . . . . . . . . . . . . . . . . . . . . . .4-17
Functional Block Diagram . . . . . . . . . . . . . . . . . . . . . . . . . . . . . . . . . . . . . . . .4-18
Brooks Automation
Revision 2.2
4-1
Subsystems
Mechanical System
MagnaTran 7.1 User’s Manual
MN-003-1600-00
Mechanical System
The design of the MagnaTran 7 robot is such that the robot’s drive mechanism and
control electronics are completely isolated from the vacuum envelope without the use
of any rotary seals. The statically sealed metal bellows within the robot allows vertical movement of the arms while maintaining the vacuum environment in the chamber. The mechanical design and operation of the MagnaTran 7 robot uses a minimum
number of moving parts to ensure minimal maintenance requirements.
Subsystems
The MagnaTran 7 is made up of several functional subsystems designed for ease of
use, maintenance, and repair. These subsystems are modular in design to allow ease
of maintenance and to minimize Mean Time To Repair (MTTR).
The mechanical system for the robot breaks down into several basic subsystems.
These subsystems are:
4-2
•
Protective Covers
•
Frame Assembly
•
T1/T2 Drive Assembly
•
Z Axis Drive Assembly
•
Robot Arms
Brooks Automation
Revision 2.2
MagnaTran 7.1 User’s Manual
MN-003-1600-00
Subsystems
Mechanical System
Protective Covers
There are two protective housing covers encircling the full length of the robot body.
The covers are secured to each other using four captive screws. This allows quick
removal and easy access to the subsystems within.
The covers surrounding the robot body were designed to provide protection to the
moving mechanisms and electronics of the robot and to provide optimal cooling by
directing the air flow over the subsystems within. A cooling fan resides in the bottom
section of the robot. Air is directed through the robot, by the fan and vent holes in the
protective covers, to provide efficient cooling.
NOTE: Since proper air flow for cooling is dependant upon the covers being in place, the
robot should never be operated without the covers.
Screw locations
4 places
Figure 4-1: Protective Covers
Brooks Automation
Revision 2.2
4-3
Subsystems
Mechanical System
MagnaTran 7.1 User’s Manual
MN-003-1600-00
Frame Assembly
The frame assembly supports the Z-axis carriage and linear slides which attach to the
side of the T1/T2 drive assembly allowing for movement in the Z-axis. The frame
assembly also provides the mounting support for the fan, the Z drive motor housing,
and the electronics PCBs located in the lower section on each side and under the
robot.
The robot’s Mounting Flange serves as the top of the robot’s frame and cover, and
provides the seal between the robot and the transfer chamber. The bottom surface of
the Mounting Flange also provides the seal surface for the bellows.
4-4
Brooks Automation
Revision 2.2
MagnaTran 7.1 User’s Manual
MN-003-1600-00
Subsystems
Mechanical System
T1/T2 Drive Assembly
The T1/T2 drive assembly is located at the top of the robot’s body, directly below the
bellows. This assembly consists of two main drive units. Each unit consists of three
elements: the drive motor, the drive shafts, and the rotary position encoder.
The drive motor is a direct drive motor with an external drive shaft extending into the
vacuum chamber without the need for rotary seals.
The T1 drive shaft is hollow and extends directly into the vacuum chamber. The T2
drive shaft runs through the hollow T1 shaft and also extends into the vacuum chamber. The arms are concentrically mounted to these shafts. The rotational (theta) and
radial (extend) position of the arms is dependant upon the motion of the T1/T2 drive
shafts. When both shafts turn in the same direction, theta movement is performed.
When the shafts turn in opposite directions, radial movement occurs.
The rotational positions of the T1/T2 drive shafts is determined by a highly accurate
optical position encoder system located within the body of each drive. Two circuit
boards are located on each motor drive unit. These boards amplify and filter the raw
encoder signals. Since there are no mechanical or electrical connections to the T1/T2
drive shafts, unlimited rotation of the arms is allowed.
The robot incorporates motor overcurrent protection into the T1/T2 servo controllers.
When an overcurrent situation is detected, the corresponding servo is shut-off and an
error message is generated. This protection is a safety feature designed to prevent
blown fuses due to excessive load; i.e. the robot arm is obstructed during a regular
move or jog motion.
NOTE: The T1 and T2 Drive Subsystems are an integrated unit. They cannot be separated
by the user.
Brooks Automation
Revision 2.2
4-5
Subsystems
Mechanical System
T2
Inner Shaft/Bottom Motor
MagnaTran 7.1 User’s Manual
MN-003-1600-00
T1
Outer Shaft/Top Motor
Buffer Board
Bellows
T1 Drive
T2 Drive
Figure 4-2: T1/T2 Drive assembly
4-6
Brooks Automation
Revision 2.2
MagnaTran 7.1 User’s Manual
MN-003-1600-00
Subsystems
Mechanical System
Z Axis Drive Assembly
The Z axis drive is coupled beneath the T1/T2 drive assembly. A mechanical bellows
located between the mounting flange and the top of the drive assembly isolates the
vacuum allowing the Z axis drive to move the T1/T2 drive along the Z axis.
The Z axis drive consists of a brushless DC servo motor and ball screw system that
moves the T1/T2 drive assembly along a vertical plane causing the arm set to move
up and down. Control electronics coupled with the rotary encoder allow precision
movement in the Z axis. A fail-safe brake freeze the movement of the drive when
power is removed. The Z axis drive is attached and located below the T1/T2 drive
assembly and is surrounded by the printed circuit boards.
The Z-axis drive assembly and related components which pertain to Z axis movement
of the arm set are listed below:
•
•
•
•
•
•
•
•
Z-axis drive carriage (part of frame)
Z-axis linear slides (part of frame)
ball screw
fail-safe break
direct drive D.C. motor
two Z-axis over travel sensors (part of frame)
Z-home flag (part of frame)
Hall Effect sensor
The frame of the robot has a carriage and rails. The motor driven ball screw is
mounted to the bottom of the T1/T2 drive assembly.
Brooks Automation
Revision 2.2
4-7
Subsystems
Mechanical System
MagnaTran 7.1 User’s Manual
MN-003-1600-00
Ball (Lead) Screw
Ball Screw nut
Motor
Fail-Safe
Brake
Encoder
Figure 4-3: Z-Drive assembly
The robot incorporates motor overcurrent protection into the Z servo controller.
When an overcurrent situation is detected, the corresponding servo is shut-off and an
error message is generated. This protection is a safety feature designed to prevent
blown fuses due to excessive load; i.e. the robot arm is obstructed during a regular
move or jog move.
4-8
Brooks Automation
Revision 2.2
MagnaTran 7.1 User’s Manual
MN-003-1600-00
Subsystems
Mechanical System
Robot Arms
The arms supplied with the MagnaTran 7 are designed for a vacuum environment for
100mm to 300mm wafers. Various arm sizes, end effectors and configurations are
available.
Arm sets follow the basic design of the Brooks Automation “frog-leg” arms and provide a maximum extension of 1050 mm from the center-line of the robot to the centerline of the wafer being handled. Patented arm styles are available in either the Single
Pan Arm Set, the BiSymmetrik™ Dual Pan Arm Set, or the Leap Frog™ same-side
Dual Arm Set. Figure 4-4 displays the various arm configurations available.
Arm sets are controlled in the R and T axes by the T1 and T2 drives. The vertical
motion is controlled by the Z axis drive.
Arm motion in the T axis (rotation) is provided by synchronous rotational movement
of the T1 and T2 drives in the same direction. Due to the unique design of these drives
there is no limit to the rotational movement of the arm. Arm motion in the R axis
(radial extension) is also provided by the T1 and T2 drives. However, R motion is
accomplished by rotating these drives in opposite directions causing the arms to
extend or retract depending upon the direction of rotation.
The MagnaTran 7 robot arms are actuated by two direct drive servo motors with independent coaxial shafts providing full two axis movement of theta (unlimited arm
rotation) and radial (extend and retract ) motion. Z (vertical) axis motion of the arm
set is accomplished by raising and lowering the drive motor assembly using a direct
drive servo motor. The unique design of the robot enables the drive shafts to interface
with the arms, without the use of rotary seals, and allows unlimited motion in the T
(rotational) axis.
Brooks Automation
Revision 2.2
4-9
Subsystems
Mechanical System
MagnaTran 7.1 User’s Manual
MN-003-1600-00
Leapfrog Same-Side Dual Arm Set
BiSymmetrik Dual Pan Arm Set
Frogleg Single Pan Arm Set
Figure 4-4: MagnaTran 7 Arm Set Types
4-10
Brooks Automation
Revision 2.2
MagnaTran 7.1 User’s Manual
MN-003-1600-00
Subsystems
Electrical System
Electrical System
The MagnaTran 7™ electrical system complies with all CE specifications, RFI, EMI,
ESD and SEMI S2-93. The board set includes communications, motion control, power
control, and discrete I/O monitoring and control. Additionally, the electrical system
provides all external connections for the robot including power and I/O.
The robot is comprised of five major circuit boards as follows:
•
PC104 CPU (Supervisor Board)
•
Personality Board (Motion Control Computer)
•
T1/T2 Axis Driver Board
•
Z Axis Driver Board (optional)
•
I/O (Interface) Board
PC104 CPU (Supervisor) Board
The Supervisor (SUP) board is a 33 or 44MHz 386X based PC104 processor module.
This embedded computer supports Brooks Automation robot specific application
software. Upgrades to the firmware are performed through the interface board serial
port onto a FLASH memory disk. The Supervisor board’s primary function is user
interface and general control. The Supervisor board is mounted and interfaced
directly to the MCC.
Personality (Motion Control Computer) Board
The Motion Control Computer (MCC) board, a 60MHz DSP based motion control
computer, governs the motion of the robot arms and provides access to time sensitive
I/O functions; such as wafer sensing. The SUP board provides command information
to the MCC and the MCC provides status and error information to the SUP board.
T1/T2 Axis Driver Board and Z Axis Driver Board
The T1/T2 Axis Driver Board (and Z-Axis Driver Board if equipped) provides power
to the drive motors. Main power is supplied to the T1/T2 board which distributes
this power to the T and Z drive circuitry. This board also provides logic and encoder
power to the rest of the system. The T board has three glass fuses that provide special
protection for power distribution.
Brooks Automation
Revision 2.2
4-11
Subsystems
Electrical System
MagnaTran 7.1 User’s Manual
MN-003-1600-00
I/O (Interface) Board
The MagnaTran™ 7 I/O board provides optically isolated serial port access, I/O
access, status indicators, and some special function access. The board has a face plate
with the appropriate labeling for user access.
The Interface Board is connected to the Personality Board via a 48 pin DIN connector
which provides address, databus, and control lines.
Three types of Interface boards may be purchased with the MagnaTran 7: high side,
low side and Brooks Automation Marathon Express.
High Side Interface Board
The high side interface provides general purpose digital Input and Output
functions for use when high side sourcing logic is required. The discrete I/O
interface is accessed by a 50 pin D-subminiature connector on the face plate.
This connector provides 22 high side inputs and 20 high side outputs.
See Figure 5-4 for a diagram of the high side circuit.
Low Side Interface Board
A low side switching board is available using active low signals instead of the
CE compliant standard active high. See Chapter 12: Attached Drawings for the
pin out of the connector and refer to MISC I/O Communications on page 5-9
and Discrete I/O Control (DIO) on page 6-45 for references on setup and
descriptions of commands.
Connection of external devices to the MagnaTran 7 Robot for monitoring and
control through discrete I/O lines is done through the 50 pin connector located
on the I/O panel of the robot. The Low Side interface requires the input to be
grounded to the switch state.
See Figure 5-5 for a diagram of the low side circuit.
Marathon Express High Side Interface Board
The custom designed Interface for the Marathon Express Cluster Tool provides
access to the serial communication ports through the same connector as the
digital I/O portion. This connection from the robot is taken to an I/O distribution hub where signals are separated.
The discreet I/O interface is accessed by a 50 pin D-subminiature connector on
4-12
Brooks Automation
Revision 2.2
MagnaTran 7.1 User’s Manual
MN-003-1600-00
Subsystems
Electrical System
the face plate. This connector provides 20 optically isolated high side inputs
and 20 optically isolated high side outputs designed to operate at +24VDC
nominal. The 24 VDC operation is provided through the system.
The high side board has the following connectors:
POWER: Main Power Connector, on the face plate but not actually on the I/O
board
CDM: Dedicated Control Display Module (CDM) port
SIO1: Main Serial Communications port, RS-232 or selectable RS-422
SIO2: Secondary RS-232 port
MISC IO: Discrete I/O Port
The high side board has the following indicators:
24V: Power on indicator
TX: SIO1 transmit, green indicator
RX: SIO1 receive, green indicator
The high side interface is designed to operate at +24VDC. This power may be supplied through the connector by the user. When supplied externally, full optical isolation is achieved. Optionally, the user may use the I/O interface without supplying
power. The I/O board will automatically switch to internal power. Isolation will then
be defeated.
Nominal current requirements for each input is 2mA each. Output current is nominal
200mA per pin.
The I/O board is also offered as a low side switching interface. See Appendix F: Relay
I/O Option on page 11-24 for a description of the low side board.
Brooks Automation
Revision 2.2
4-13
Subsystems
Electrical System
MagnaTran 7.1 User’s Manual
MN-003-1600-00
Personality Board
I/O Board
PC104 CPU Board
T1/T2 Axis Driver Board
Z Axis Driver Board
LEFT
FR
ON
T
T
H
G
RI
REA
R
Figure 4-5: Printed Circuit Board Locations
4-14
Brooks Automation
Revision 2.2
MagnaTran 7.1 User’s Manual
MN-003-1600-00
Subsystems
Electrical System
Power Pak
The Brooks Automation Power Pak is a battery back-up power source for the MagnaTran 7 robot. This compact power fault manager mounts directly on the side of the
robot drive and connects between the robot’s DC power supply and the MagnaTran
7. One cable carries all DC power, ground and interface signals to the MagnaTran 7.
The Brooks Automation Power Pak provides a safe recovery of the robot arms within
two seconds after power loss. The Power Pak also provides immediate removal of
power to the robot after EMO actuation. When the primary power is returned, the
robot will power up in its normal condition.
The Power Pak has a 2.5 year life and a built-in charging circuit.
Figure 4-6: Power Pak Sub-System
Power Supply
The robot’s power supply provides +24 VDC ±10% at a current rating of approximately 20 amps.
A power converter in the robot delivers all internally required operating voltages
throughout the control system. The actual current drawn by the robot will vary and
depends upon the specific function the robot is performing.
Brooks Automation
Revision 2.2
4-15
Subsystems
Software
MagnaTran 7.1 User’s Manual
MN-003-1600-00
Software
The software supplied with the MagnaTran 7 robot is in the form of internal control
programs that reside on the PC/104 CPU board as flash memory. The user interface
to this software is through either the Serial Communications Port using the software
commands described in Chapter 8: Command Reference, or through the Control/Display Module described in the next section.
4-16
Brooks Automation
Revision 2.2
MagnaTran 7.1 User’s Manual
MN-003-1600-00
Subsystems
Control/Display Module
Control/Display Module
The Control/Display Module (CDM), shown in Figure 6-12, is a separate pendanttype unit that plugs into the robot. The CDM is capable of performing two main functions when connected to the MagnaTran 7 robot.
The first function allows monitoring of the robot’s performance and location
while it is being controlled by the Cluster Tool Controller through the use of
the INFO menus.
The second function allows direct local control of the robot. Robot speed is not
greater than 10 inches per second. It can be used to set up, test, and generally
gain familiarity with the robot. The CDM is used to teach the robot the various
stations that the robot will be servicing. Additionally, it may be used to test
robot operations and to manually cycle the robot.
The CDM has a four-line, 80-character display and 30 dedicated keys laid out in a
color-coded pattern with similar functions grouped together. Additionally the CDM
provides a retractable hanger, which allows it to be stored on the side of the machine
the robot is mounted in. For convenience, a brief overview of the instruction set and
the motion parameters is located on the back of the CDM for reference.
The CDM connects to the robot. See Control/Display Module on page 3-17 for connection and Control/Display Module on page 5-20 for the operational interface. A full
operational description on operating the CDM can be found in Control/Display Module (CDM) Operation on page 6-63.
WARNING
There are no safety interlocks available when using the CDM to control movement of the robot. The user is directly responsible for ensuring that conditions are correct for safe operation of the robot. Visually
inspect for obstructions and do not allow access to persons in the arm
motion areas.
CAUTION
The CDM is a delicate electronic instrument. Mishandling of the
CDM may damage it or cause it to malfunction.
NOTE: While the CDM is in control of the robot, the Cluster Tool Controller is able to
request status information from the robot through the use of the “RQ” commands.
However, it is not able to control the robot until the CDM is turned off which relin-
Brooks Automation
Revision 2.2
4-17
Subsystems
Control/Display Module
MagnaTran 7.1 User’s Manual
MN-003-1600-00
quishes control of the robot.
The CDM will display any error messages generated by the robot.
The CDM provides access to a multi-level functional command structure, as shown in
the simplified command-flow chart in Figure 4-7. The screen will display menus, in
descending order, that prompt the user for choices and data entries.
The choice and data entry menus list and identify the options available and prompt
the user for a choice from among the options offered. For example, (Y/N) indicates
that the user should choose the “Yes” key or the “No” key. Some menus present multiple choices, such as L, S, P or 1,2,3,4, which indicates that the user should choose
from among the keys labeled “Lower”, “Slot”, “Pitch” or “1”, “2”, “3”, “4” as appropriate. In all cases the choices will refer to dedicated keys; there is never any need
spell out commands.
Functional Block Diagram
The command-flow chart shown in Figure 4-7 provides an overview of the operational structure of the CDM and the command sequences available. Note that only the
major selection options presented by the CDM are shown in the flow chart. For a
detailed description of each function available through the CDM, refer to the command descriptions in the section Control/Display Module (CDM) Operation on page
6-63.
4-18
Brooks Automation
Revision 2.2
MagnaTran 7.1 User’s Manual
MN-003-1600-00
Subsystems
Control/Display Module
Figure 4-7: CDM Command Flow Chart
Brooks Automation
Revision 2.2
4-19
Subsystems
Control/Display Module
MagnaTran 7.1 User’s Manual
MN-003-1600-00
This Page Intentionally Left Blank
4-20
Brooks Automation
Revision 2.2
MagnaTran 7.1 User’s Manual
MN-003-1600-00
5
Operational Interfaces
Overview
This chapter provides a detailed description of all operational interfaces to the Brooks
Automation MagnaTran 7 Robot. These interfaces provide communications to the
robot from the external controller and allow the robot to monitor and control external
devices such as wafer sensors and slot valves.
Chapter Contents
Power Connections . . . . . . . . . . . . . . . . . . . . . . . . . . . . . . . . . . . . . . . . . . . . . . . . . . . .5-3
Serial Communication SIO1 . . . . . . . . . . . . . . . . . . . . . . . . . . . . . . . . . . . . . . . . . . . . .5-5
Serial Communication SIO2 . . . . . . . . . . . . . . . . . . . . . . . . . . . . . . . . . . . . . . . . . . . . .5-8
MISC I/O Communications . . . . . . . . . . . . . . . . . . . . . . . . . . . . . . . . . . . . . . . . . . . . .5-9
Control/Display Module . . . . . . . . . . . . . . . . . . . . . . . . . . . . . . . . . . . . . . . . . . . . . . .5-20
Brooks Automation
Revision 2.2
5-1
Operational Interfaces
Interface Overview
MagnaTran 7.1 User’s Manual
MN-003-1600-00
Interface Overview
All operational interfaces to the MagnaTran 7 robot are connected to the robot Interface Panel as shown in Figure 5-1. The chapter provides instructions for fabricating
these interfaces. For installation of these interfaces, refer to Installation Procedure on
page 3-8.
Interface Panel
Figure 5-1: Robot Interface Panel
5-2
Brooks Automation
Revision 2.2
MagnaTran 7.1 User’s Manual
MN-003-1600-00
Operational Interfaces
Power Connections
Power Connections
If the MagnaTran 7.1 was purchased with the Brooks Automation Marathon™ or Marathon
Express™ Cluster Tool or with a Brooks Power Supply module, the power cable is included
with the power supply. Disregard this step.
If the power supply is user supplied, the power cable must be fabricated using the following procedures. See Specifications on page 1-12 for the power supply requirements.
The CE compliant MagnaTran 7 applies improved product reliability by using known
noise reduction techniques such as upgraded grounding on the electronics, special
designed external covers, and compliant power connectors.
The MagnaTran 7 robot requires +24 VDC ±10%, 20 amps, 480 watts for operation.
The actual power being drawn will depend upon which motors are being used. However, all power wiring must be capable of carrying the full load. Internal power converters produce the different voltages required by the robot.
The 24V power supply shall be isolated from the
power input lines (AC utility). The protective
earth conductor should be passed to the robot
drive as shown.
Figure 5-2: Power Cable Installation
WARNING
DO NOT connect or disconnect the power cable at the robot interface
panel with the power on. Damage to internal components may result.
Brooks Automation
Revision 2.2
5-3
Operational Interfaces
Power Connections
MagnaTran 7.1 User’s Manual
MN-003-1600-00
The power connection used is an
ITT Cannon DBM9W4PK87 connector on the robot and the mating ITT
Cannon DAME7W2SA197 connector, DBM9W45A109 shell,
DM53744-6 contacts on the power
cable. The pin-out for the power
cable is provided in Table 5-1.
A1
A2
A3
3
4
5
1
2
A4
Figure 5-3: Power Connector Pin-Out
Table 5-1: Power Connector ITT Pin Assignments
Pin ID
Purpose
Function
A1
no connection
A2
Earth Ground
Connected to Earth GND at Power
Supply.
Internal Earth GND to robot frame
chassis bolt
A3
+24V RET
Connected to Earth GND at Power
Supply and RET post on power supply.
A4
+24V
20 Amps
1
no connection
2
no connection
3
no connection
4
no connection
5
no connection
*PowerPak defeat jumper
* If the robot is configured for the PowerPak, but the PowerPak has been removed,
pins 1, 2, and 5 must be jumpered together to defeat the battery interlocks.
5-4
Brooks Automation
Revision 2.2
MagnaTran 7.1 User’s Manual
MN-003-1600-00
Operational Interfaces
Serial Communication SIO1
Serial Communication SIO1
Serial communication between the robot and a Host Controller is accomplished by
connecting the robot, via a 3 or 4 wire serial communications cable at port SIO1, to a
serial I/O port on the Host Controller.
Serial communications allows the Host Controller to communicate with the robot
using the commands detailed in Chapter 8: Command Reference. The characters in each
command are converted to sets of binary bits (1’s and 0’s) and the bits for each character are transmitted down the wire in “single-file”. No additional control or “handshaking” wires are used. The Baud Rate (see Table 5-2) indicates the speed of the
connection in bits-per-second.
Serial port SIO1 is optically isolated. Serial and logic commons are tied together with
a resistive connection between the two grounds thereby preventing a charge building
up on the wires and causing a permanent failure. This isolation may be defeated by
removing the 1.2K resistor. See Wiring Diagram in Chapter 12: Attached Drawings.
In situations where the Command Display Module and the Host Controller are
unavailable, a personal computer running a serial communications application may
be connected to the robot’s serial communication port using the same cable and commands to communicate with the robot as the Host Controller.
The connection to the MagnaTran 7 Robot from the external controller uses selectable
RS-232 or RS-422 serial communications. The MagnaTran 7 robot is initially set to RS232. The configuration for the robot’s serial communications protocol for all serial
connectors is described in Table 5-2.
Brooks Automation
Revision 2.2
5-5
Operational Interfaces
Serial Communication SIO1
MagnaTran 7.1 User’s Manual
MN-003-1600-00
Table 5-2: RS-232/RS-422 Protocol
Port Configuration
RS-232 or RS-422
Baud Rate
9600
Data Bits
8
Parity
None
Stop Bits
1
Optional Parameters
Handshake
No
RTS/CTS
No
XON/XOFF
No
There are three serial communication ports labeled SIO1 and SIO2 and one hand held
Control Display Module port labeled CDM.
The main serial communications cable for Host Control and PC Control uses a standard 9-pin male “D” connector at the end that plugs into the robot in the connector
labeled “SIO1”. The pin-out for this cable is provided in Table 5-3. Note that pins not
identified with a signal name are to be left unconnected.
Table 5-3: RS-232 and RS-422 Connector Pin Assignments S101
Pin ID
RS 232 Signal Name
RS 422 Signal Name
2
TX
RX-
3
RX
RX+
GND
TX-
1
4
5
6
7
8
TX+
9
5-6
Brooks Automation
Revision 2.2
MagnaTran 7.1 User’s Manual
MN-003-1600-00
Operational Interfaces
Serial Communication SIO1
Switch Settings
Serial communications options are set using SW1 on the Personality Board. Access to
these switches is obtained by removing the robot protective covers. See Chapter 12
for the location of the Personality Board. The robot is shipped in RS-232 mode.
Table 5-4: Switch Settings
Brooks Automation
Revision 2.2
Switch Setting
Communication Mode
UP
RS-232
DOWN
RS-422
5-7
Operational Interfaces
Serial Communication SIO2
MagnaTran 7.1 User’s Manual
MN-003-1600-00
Serial Communication SIO2
This port may be used to control peripheral devices such as an Aligner through the
serial communications port.
The following cable is needed:
Male to male 9-pin Null Modem Serial I/O cable.
Table 5-5: RS-232 Pin Assignments SI02
Pin ID
Signal Name
1
2
TX
3
RX
4
5
GND
6
7
8
9
5-8
Brooks Automation
Revision 2.2
MagnaTran 7.1 User’s Manual
MN-003-1600-00
Operational Interfaces
MISC I/O Communications
MISC I/O Communications
Discrete I/O provides monitoring and control of external device functions using individual I/O pins for each function with no additional control, or “handshaking” lines.
Inputs and outputs are specifically assigned and cannot be changed.
The MagnaTran 7 robot offers four types of discrete communication: high side, low
side, relay and an exclusive type for Brooks Automation Marathon Express users.
Each type of I/O board is explained in the following:
Table 5-6: Discrete I/O Communications
I/O Board
Interface Procedure
High-Side
High Side I/O on page 5-10
High Side/Low Side Interfaces on page 5-14
Low-Side
Low Side I/O on page 5-12
High Side/Low Side Interfaces on page 5-14
Relay
Appendix F: Relay I/O Option on page 11-24
Marathon Express
Marathon Express I/O on page 5-19
Brooks Automation
Revision 2.2
5-9
Operational Interfaces
MISC I/O Communications
MagnaTran 7.1 User’s Manual
MN-003-1600-00
High Side I/O
The high side switching board is CE Compliant.
Connection of external devices to the MagnaTran 7 Robot for monitoring and control
through discrete I/O lines is done through the 50 pin connector located on the I/O
panel of the robot. There are 22 inputs and 20 output lines.
Inputs accept +24V with a nominal current draw of 2mA each. Outputs are buffered
and protected against output faults using intelligent high side drivers. If an output
fault is detected, the outputs of the affected device turn off and a red indicators on the
face plate will light. A fault message is sent to the host controller. Additionally, the
outputs will be disabled at power up. The outputs must be enabled and thereby clear
the fault.
I/O external and internal power is discussed in MISC I/O Power on page 5-14.
The signals are logic levels, defined as follows:
High Side Logical Inputs
Compatible with any open collector driver (refer to the Input Circuit in Figure 5-4)
that can satisfy the following requirements:
Logic-zero:
-0.3 to +0.6 V DC; driver must sink 2 mA
Open-circuit
Logic-one:
+24V ±20%
High Side Logical Outputs
High side driver using UDN2987A (refer to the Output Circuit in Figure 5-4) and user
connects load from output pin to ground within the following requirements:
5-10
Brooks Automation
Revision 2.2
MagnaTran 7.1 User’s Manual
MN-003-1600-00
Operational Interfaces
MISC I/O Communications
Logic-zero:
Refer to specification for UDN2987A
Logic-one:
Refer to specification for UDN2987A
All discrete input signals connected to the MagnaTran 7 must be open collector as
shown in the circuit in Figure 5-4. All discrete output signals from the MagnaTran 7
are open collector NPN circuits.
Figure 5-4: High Side I/O Circuit
Brooks Automation
Revision 2.2
5-11
Operational Interfaces
MISC I/O Communications
MagnaTran 7.1 User’s Manual
MN-003-1600-00
Low Side I/O
The Low Side interface requires the input to be grounded to the switch state.
A low side switching board is available using active low signals instead of the CE
compliant standard active high. See Chapter 12: Attached Drawings for the pin out of
the connector and refer to MISC I/O Communications on page 5-9 and Discrete I/O
Control (DIO) on page 6-45 for references on setup and descriptions of commands.
Connection of external devices to the MagnaTran 7 Robot for monitoring and control
through discrete I/O lines is done through the 50 pin connector located on the I/O
panel of the robot. There are 22 DIO IN and 20 DIO OUT lines.
I/O external and internal power is discussed in MISC I/O Power on page 5-14.
NOTE: An LED turned ON is ‘0” (LOW), and an LED turned OFF is ‘1’ (HIGH). This
is because the output is also ACTIVE LOW.
The signals are logic levels, defined as follows:
Low Side Logical Inputs
Compatible with any open collector driver (refer to the Input Circuit in Figure 5-5)
that can satisfy the following requirements:
Logic-zero:
-0.3 to +0.6 V DC; driver must sink 2 mA
Logic-one:
Open-circuit
+24V ±20%
Low Side Logical Outputs
Low side driver using ULN2803 (refer to the Output Circuit in Figure 5-5) and user
connects load from output pin to +24V within the following requirements:
5-12
Brooks Automation
Revision 2.2
MagnaTran 7.1 User’s Manual
MN-003-1600-00
Operational Interfaces
MISC I/O Communications
Logic-zero:
Refer to specification for ULN2803
Logic-one:
Refer to specification for ULN2803
All discrete input signals connected to the MagnaTran 7 must be open collector as
shown in the circuit in Figure 5-5. All discrete output signals from the MagnaTran 7
are open collector NPN circuits as shown in the circuit in Figure 5-5.
Figure 5-5: Low Side I/O Circuit
Brooks Automation
Revision 2.2
5-13
Operational Interfaces
MISC I/O Communications
MagnaTran 7.1 User’s Manual
MN-003-1600-00
High Side/Low Side Interfaces
The following interfaces are the same for the High Side and the Low Side I/O boards.
MISC I/O Power
The high side board and the low side board interface is designed to operate at
+24VDC nominal. The 24 VDC operation may be provided by the user or internally by
the robot. When provided by the user, the inputs are optically isolated. If user power
is not supplied, the board automatically switches to on-board power. With on-board
power, however, the ground isolation is defeated. See Figure 5-6 for wiring the external or internal power. Also see 3-Options Shown Wiring Diagram in Chapter 12.
Minimum Wiring
Configuration
Typical Wiring
Configuration
OPTIONAL USER-SUPPLIED
I/O POWER W/FULL ISOLATION
ROBOT POWER INTERFACE
Figure 5-6: I/O 24V Power Interface
NOTE: All power and grounds within a connector are internally jumpered together. Output circuits require that 24V power be applied.
The input and output pins provide for either user supplied power which guarantees
5-14
Brooks Automation
Revision 2.2
MagnaTran 7.1 User’s Manual
MN-003-1600-00
Operational Interfaces
MISC I/O Communications
total isolation of the MagnaTran 7 supplied power or internal supplied power.
•
For user supplied power, place +24V on pin 25 and 24V RTN on pin 27.
•
For MagnaTran 7 supplied power, jump pin 30 to pin 25 and jump pin 29 to pin
27.
Power is fuse protected by a 1.1A self-resetting polyfuse. A power status indicator
green LED is located on the face plate labeled 24V.
High Side/Low Side Discrete I/O Assignments Table
The discrete I/O communications cable uses a standard 50-pin female “D” connector
at the end that plugs into the robot at the connectors labeled MISC I/O. The pin-out
for these cables are provided in Table 5-7.
DIO Control
Table 5-7 lists the factory programmed DIO commands and their associated
pin assignments for the MISC I/O connector located at P2 of the Interface
board. For a complete description of how each command will function and to
enter DIO operation, see section Discrete I/O Control (DIO) on page 6-45.
DIO Monitoring
Outputs 0-19 (pins 31 trough 50) shown in Table 5-7 can be monitored when in
serial communication mode. See Set DIO Output on page 8-125.
Operational Interlocks
Table 5-7 shows the MISC I/O 50 pin connector that contains 22 input pins
(pins 1-22, I/O designation 0-21), 20 output pins (pins 31-50, I/O designation
0-19), and 6 power pins (pins 25-30 individually designated). These inputs and
outputs are user programmable to assigned Operational Interlocks as
described in Operational Interlocks on page 6-23.
Brooks Automation
Revision 2.2
5-15
Operational Interfaces
MISC I/O Communications
MagnaTran 7.1 User’s Manual
MN-003-1600-00
Table 5-7: High Side/Low Side I/O Assignments
Pin
Operational
Interlock
DIO Control
Pin
Operational
Interlock
DIO Control
1
EXT_IN0 (input 1)
ACC PAN B
26
+PWR_ISOL
2
EXT_IN1 (input 2)
ACC PAN A
27
+PWR RET
3
EXT_IN2 (input 3)
Z POSITION
28
+PWR RET
4
EXT_IN3 (input 4)
R POSITION
29
+24V RET
5
EXT_IN4 (input 5)
STN BIT 0
30
+24VDC
6
EXT_IN5 (input 6)
STN BIT 1
31
DRV_OUT0 (output 1)
Z POS BIT 0
7
EXT_IN6 (input 7)
STN BIT 2
32
DRV_OUT1 (output 2)
Z POS BIT 1
8
EXT_IN7 (input 8)
STN BIT 3
33
DRV_OUT2 (output 3)
R POS BIT 0
9
EXT_IN8 (input 9)
STN BIT 4
34
DRV_OUT3 (output 4)
R POS BIT 1
10
EXT_IN9 (input 10)
ARM
35
DRV_OUT4
RETRACT_PIN (output 5)
STN BIT 0
11
EXT_IN10 (input 11)
MOVE BIT 0
36
DRV_OUT5 (output 6)
STN BIT 1
12
EXT_IN11 (input 12)
MOVE BIT 1
37
DRV_OUT6 (output 7)
STN BIT 2
13
EXT_IN12 (input 13)
MOVE
38
DRV_OUT7 (output 8)
STN BIT 3
14
EXT_IN13 (input 14)
RESET
ERROR
39
DRV_OUT8 (output 9)
STN BIT 4
15
EXT_IN14 (input 15)
ENABLE
40
DRV_OUT9 (output 10)
AT STATION
16
EXT_IN15 (input 16)
41
DRV_OUT10 (output 11)
ARM IN USE
17
EXT_IN16 (input 17)
42
DRV_OUT11 (output 12)
COMMANDS
18
EXT_IN17 (input 18)
43
DRV_OUT12 (output 13)
REFF STAT
19
EXT_IN18 (input 19)
44
DRV_OUT13 (output 14)
ERROR BIT 0
20
EXT_IN19 (input 20)
45
DRV_OUT14 (output 15)
ERROR BIT 1
21
EXT_IN20 (input 21)
46
DRV_OUT15 (output 16)
ERROR BIT 2
22
EXT_IN21 (input 22)
47
DRV_OUT16 (output 17)
ERROR
23
Safety
Interlock
48
DRV_OUT17 (output 18)
DISC CONTR
24
Safety
Interlock
49
DRV_OUT18 (output 19)
SERVO
CONTR
25
+PWR_ISOL
50
DRV_OUT19 (output 20)
5-16
(spare)
(spare)
Brooks Automation
Revision 2.2
MagnaTran 7.1 User’s Manual
MN-003-1600-00
Operational Interfaces
MISC I/O Communications
Safety Interlock
This feature provides an industry SEMI standard Safety Interlock for robot motion.
For example, when the cluster tool’s transport chamber lid is opened, robot motion
will stop and no other motion of the robot can be commanded.
Safety Interlocks may be connected to the MISC I/O at pins 23 and 24. These pins are
hardware connected to the safety interlock circuit. See Figure 5-7 for the wiring configuration. Also see the Wiring Diagram in Chapter 12 for the typical external connections.
Minimum Wiring
Configuration
Typical Wiring
Configuration
Figure 5-7: Safety Interlocks
The Safety Interlock feature provides a motor enable interlock to disable all the robot
motors (R, T, and Z axis motors) for desired applications. More specifically, pins #23
and #24 of the MISC I/O port must be electrically connected in order for the robot
motors to receive power. If the electrical connection between these two pins is
opened, the following will occur:
1.
Robot motors will not receive power and robot motion will automatically stop.
2.
The robot will generate an error message, “ERR 10029 : Error, Emergency Off Circuit Is Active”.
3.
The robot encoders will remain referenced.
Power to the robot motors will be re-established when the electrical connection
between pins # 23 and # 24 of the MISC I/O port is re-established. Since the robot
Brooks Automation
Revision 2.2
5-17
Operational Interfaces
MISC I/O Communications
MagnaTran 7.1 User’s Manual
MN-003-1600-00
encoders remain referenced, the next motion command can be issued to the robot
WITHOUT the need to HOME (reference) the robot.
Bypassing the Safety Motor Enable Interlock Feature
Brooks Automation highly recommends using the Safety Interlock. However,
for those users who choose not to comply with these industry safety standards,
Brooks has provided an optional Motor Enable Interlock Bypass Jumper (see
Appendix B: Tooling on page 11-3). Any of the following methods can be used
to bypass this feature:
NOTE: Brooks Automation ships all Magnatran 7.1 robots with this bypass jumper
plugged into the MISC I/O port of the robot.
1.
Install the Brooks Automation supplied Motor Enable Interlock Bypass
Jumper into the MISC I/O port of the robot.
2.
If the Operational Interlocks will be used (see Operational Interlocks on
page 6-23), discard the Motor Enable Interlock Bypass Jumper.
To bypass the Motor Enable Interlock feature, modify the Operational
Interlock Cable so as to jumper pins # 23 and #24 of the MISC I/O port.
Retract Pin
The Retract Pin interlock may be factory taught to the MISC I/O at pin 35. See Special
Notes on RETRACT_PIN on page 6-26.
5-18
Brooks Automation
Revision 2.2
MagnaTran 7.1 User’s Manual
MN-003-1600-00
Operational Interfaces
MISC I/O Communications
Marathon Express I/O
The following table shows the MagnaTran 7 connector assignments used exclusively
in the Brooks Automation Marathon Express Integrated Platform wafer transfer system.
The MagnaTran 7 connector is a high side discrete interface (as described in High Side
I/O on page 5-10) and includes the serial interface to the robot on the same connector.
The state of the peripheral devices such as slot valves, robot extend enable, robot
retract enable and wafer presence sensor in the Marathon Express Transport Chamber
are monitored.
Table 5-8: Marathon Express Connector
Pin
com
Signal Name
Pin
com
Signal Name
Pin
com
Signal Name
1
DIO
AL.RE-EN
18
DIO
SS.AL
34
DIO
AL.RNE
2
DIO
BL.RE-EN
19
DIO
SS.BL
35
DIO
BL.RNE
3
DIO
P1-RE-EN
20
DIO
SS.P1
36
DIO
P1.RNE
4
DIO
P2.RE-EN
21
DIO
SS.P2
37
DIO
P2.RNE
5
DIO
P3.RE-EN
22
DIO
SS.P3
38
DIO
P3.RNE
6
DIO
P4.RE-EN
23
DIO
SS.P4
39
DIO
P4.RNE
7
DIO
P5.RE-EN
24
DIO
SS.P5
40
DIO
P5.RNE
8
DIO
P6.RE-EN
25
DIO
SS.P6
41
DIO
P6.RNE
9
DIO
SV.AL-OPND
26
DIO
SV.P1-OPND
42
DIO
SV.BL-OPND
10
DIO
SV.P2-OPND
27
DIO
SV.P4-OPND
43
DIO
SV.P3-OPND
11
DIO
SV.P5-OPND
28
DIO
PP.CS-OPND
44
DIO
SV.P6-OPND
12
DIO
CS.RNE
29
DIO
PP.CS-CLSD
45
DIO
RNE
13
DIO
30
+24VDC
46
14
DIO
31
+24VDC
47
15
+24V RTN
32
+24V RTN
48
16
SER
RSGND.M7
33
SER
49
SER
TXD.RB/T-
17
SER
RTS.RB/R-
50
SER
CTS.RB/R+
RXD.RB/T+
Cable connections are included with the Marathon Express system. See also, the
Brooks Automation Marathon Express User’s Manual.
Brooks Automation
Revision 2.2
5-19
Operational Interfaces
Control/Display Module
MagnaTran 7.1 User’s Manual
MN-003-1600-00
Control/Display Module
The connection to the MagnaTran 7 Robot from the Control/Display Module (CDM)
uses standard factory-made RS-232 serial communications. The configuration for the
robot’s CDM communications protocol is described in Table 5-9.
Table 5-9: CDM RS-232 Protocol
Port Configuration
RS-232
Baud Rate
9600
Data Bits
8
Parity
None
Stop Bits
1
The standard module CDM allows complete control of all robot functions. The standard module CDM has an Emergency Stop button which will turn off the servos to the
robot. See Control/Display Module (CDM) Operation on page 6-63 for instructions
on using the CDM.
Emergency Stop CDM
The CDM communications cable to the Emergency Stop CDM is attached to the pendant with an 8-pin “modular” connector which plugs into the robot. The pin-out for
both ends of this factory-made cable are provided in Table 5-11. Note that pins not
identified with a signal name are to be left unconnected.
Table 5-10: Emergency STOP CDM Connector Pin Assignments
Robot End
Pin ID
1
Signal Name
Vcc
2
3
5-20
4
TX
5
RX
6
GND
7
STOP
8
+24V DC
Brooks Automation
Revision 2.2
MagnaTran 7.1 User’s Manual
MN-003-1600-00
Operational Interfaces
Control/Display Module
Optional CDM
The optional CDM does not have an Emergency Stop button. The communications
cable uses a standard 9-pin female “D” connector at the end which plugs into the
robot at the connector labeled “CDM” and a 6-pin “modular” connector at the end
that plugs into the CDM. The pin-outs for both ends of this cable are provided in
Table 5-11. Note that pins not identified with a signal name are to be left unconnected.
Table 5-11: CDM Connector Pin Assignments
Robot End
Pin ID
Signal Name
CDM End
Pin ID
1
Vcc
1
2
TXD
2
3
RXD
3
4
5
6
GND
Signal Name
Vcc
4
TXD
5
RXD
6
GND
7
8
9
Brooks Automation
Revision 2.2
5-21
Operational Interfaces
Control/Display Module
MagnaTran 7.1 User’s Manual
MN-003-1600-00
This Page Intentionally Left Blank
5-22
Brooks Automation
Revision 2.2
MagnaTran 7.1 User’s Manual
MN-003-1600-00
6
Operation
Overview
This chapter provides complete operation directions for the Brooks Automation MagnaTran 7 Robot. The operation of the robot is covered for both normal conditions and
emergency conditions.
Chapter Contents
MagnaTran 7.1 Wafer Handling Robot Overview . . . . . . . . . . . . . . . . . . . . . . . . . .6-2
MagnaTran 7.1 Application Number . . . . . . . . . . . . . . . . . . . . . . . . . . . . . . . . . . . . .6-8
Theory of Operation . . . . . . . . . . . . . . . . . . . . . . . . . . . . . . . . . . . . . . . . . . . . . . . . . . .6-9
Controls and Indicators. . . . . . . . . . . . . . . . . . . . . . . . . . . . . . . . . . . . . . . . . . . . . . . . .6-21
Operational Interlocks. . . . . . . . . . . . . . . . . . . . . . . . . . . . . . . . . . . . . . . . . . . . . . . . . .6-23
Wafer Presence Sensors-Extend and Retract . . . . . . . . . . . . . . . . . . . . . . . . . . . . . . .6-32
Wafer Presence Sensors- Radial Motion. . . . . . . . . . . . . . . . . . . . . . . . . . . . . . . . . . .6-38
Off Center PICK and PLACE Feature . . . . . . . . . . . . . . . . . . . . . . . . . . . . . . . . . . . . .6-42
Discrete I/O Control (DIO) . . . . . . . . . . . . . . . . . . . . . . . . . . . . . . . . . . . . . . . . . . . . .6-45
PASIV™ Safety Feature Operation . . . . . . . . . . . . . . . . . . . . . . . . . . . . . . . . . . . . . . .6-58
Control/Display Module (CDM) Operation . . . . . . . . . . . . . . . . . . . . . . . . . . . . . . .6-63
PowerPak Power Fault Manager . . . . . . . . . . . . . . . . . . . . . . . . . . . . . . . . . . . . . . . . .6-84
Start-up . . . . . . . . . . . . . . . . . . . . . . . . . . . . . . . . . . . . . . . . . . . . . . . . . . . . . . . . . . . . . .6-87
Normal Running . . . . . . . . . . . . . . . . . . . . . . . . . . . . . . . . . . . . . . . . . . . . . . . . . . . . . .6-88
Emergency Conditions . . . . . . . . . . . . . . . . . . . . . . . . . . . . . . . . . . . . . . . . . . . . . . . . .6-89
Shut-down. . . . . . . . . . . . . . . . . . . . . . . . . . . . . . . . . . . . . . . . . . . . . . . . . . . . . . . . . . . .6-91
Brooks Automation
Revision 2.2
6-1
Operation
MagnaTran 7.1 Wafer Handling Robot Overview
MagnaTran 7.1 User’s Manual
MN-003-1600-00
MagnaTran 7.1 Wafer Handling Robot Overview
The MagnaTran 7 robot is a vacuum-compatible, central wafer handling robot that
can service up to 16 stations per arm along a 360o circular path with superior vibration-free motion. If desired, it is possible to configure the robot for multiple stations
with the same station coordinates. The two main axes of motion, Radial (R) and Rotational (T), are transmitted into the vacuum region through direct drive D.C. motors,
which uses no rotary seals. The drive and control mechanisms for all three axes are
completely outside the vacuum envelope. The Brooks Automation proprietary single
DSP controller performs Time Optimal Trajectories™ delivering the maximum
throughput possible. This mechanical design allows the robot to move in the rotational axis for an unlimited distance providing enhanced throughput. All three axes
are fully controllable through the robot’s software allowing the robot to position the
wafer located on the end effector anywhere within its reach. Advanced high level
features provide control and monitoring of the devices and collision avoidance.
The MagnaTran 7 robot provides control for either a single arm or dual semi-independent arms through a single concentric shoulder-shaft mechanism. The shoulder-shaft
mechanism provides the drive to the left and right arm mechanisms on both the single
and dual arms. The single arm, referred to as “Arm A”, and the dual arms, referred
to as “Arm A” and “Arm B,” are configured in software for full motion in three axes:
Radial (R), Rotational (T), and, optionally, Vertical (Z).
Arm Description
The MagnaTran 7 robot may be equipped with either the Brooks Automation pantented Single End Effector Arm Set, the BiSymmetrik™ Dual End Effector Arm Set, or
the Leapfrog™ Dual End Effector Arm Set.
Single Pan Arm Set
On all three axis of motion [radial (R), rotational (T for Theta), and the optional
vertical (Z)], both the left and right upper arm segments are driven simultaneously and with the same velocity. The rotary motion of the independent
drive shafts is coordinated by the Personality Board and profiled to provide
smooth motion to the arms as the end effector is accelerated from or brought to
rest.
While the maximum radial extension is dependent on the geometry of the arm
specified by the user, the MagnaTran 7 may be supplied with a Single End
Effector Arm Set that meets the specification of a 1050 mm reach from the center-line of the robot to the center-line of the wafer. This version of the arm
accommodates loads of up to 1.0kg (2.2lbs) on the end effector. The actual
extension and retraction positions of the arm is software-selectable.
6-2
Brooks Automation
Revision 2.2
MagnaTran 7.1 User’s Manual
MN-003-1600-00
Operation
MagnaTran 7.1 Wafer Handling Robot Overview
Wafer Center
Forearm
Shoulder
End Effector
Wrist
Upper Arm
Elbow
Forearm “A”
Figure 6-1: MagnaTran 7 Single Arm
Brooks Automation
Revision 2.2
6-3
Operation
MagnaTran 7.1 Wafer Handling Robot Overview
MagnaTran 7.1 User’s Manual
MN-003-1600-00
BiSymmetrik™ Dual Pan Arm Set
On all three axis of motion [radial (R), rotational (T for Theta), and the optional
vertical (Z)], the left and right sides of the arm set for both arm ‘A’ and arm ‘B’
are driven simultaneously moving both end effectors as required. For vertical
(Z) and Rotational (T) motion, the arms move at the same time and with the
same velocities and accelerations.
For radial motion, the arms are driven simultaneously by the shoulder shafts,
one always extending while the other retracts. Due to the kinematics of the
arm, the linear motion profile of the ‘A’ and ‘B’ arms will differ as the arms
move from Arm A fully extended to Arm B fully extended with the inactive
arm remaining in the retract position while the active arm extends or retracts.
The rotary motion of the independent drive shafts is coordinated by the Personality Board and profiled to provide smooth motion to the arms as the end
effector is accelerated from or brought to rest. The software produces a motion
profile at the T1 and T2 drive shafts that will obey the motion constraints for
arm A and B defined by the user.
While the maximum radial extension is dependent on the geometry of the arm
specified by the user, the MagnaTran 7 is typically supplied with a BiSymmetrik arm that meets the specification of a 1050 mm reach from the center-line
of the robot to the center-line of the wafer. This version of the arm accommodates a load of up to 1.0kg (2.2lbs) on each end effector. The actual extension
and retraction positions of the arms are software selectable.
6-4
Brooks Automation
Revision 2.2
MagnaTran 7.1 User’s Manual
MN-003-1600-00
Operation
MagnaTran 7.1 Wafer Handling Robot Overview
Wafer Center
Wrist
Forearm “B”
Forearm “A”
Upper Arm
End Effector
Elbow
Shoulder
Upper Arm
Figure 6-2: MagnaTran 7 Dual Arm
Brooks Automation
Revision 2.2
6-5
Operation
MagnaTran 7.1 Wafer Handling Robot Overview
MagnaTran 7.1 User’s Manual
MN-003-1600-00
Leapfrog™ Same-Side Dual Arm Set
On all three axis of motion [radial (R), rotational (T for Theta), and vertical (Z)],
the left and right sides of the arm set for both arm ‘A’ and arm ‘B’ are driven
simultaneously moving both end effectors as required. For vertical (Z) and
Rotational (T) motion, the arms move at the same time and with the same
velocities and accelerations.
For radial motion, the arms are driven simultaneously by the shoulder shafts,
one always extending while the other retracts slightly. Due to the kinematics
of the arm, the linear motion profile of the ‘A’ and ‘B’ arms will differ as the
arms move from Arm A fully extended to Arm B fully extended with the inactive arm remaining in the retract position while the active arm extends or
retracts. End effectors are spaced approximately 10 to 16mm apart, depending
on application and calibrated at the factory.
The rotary motion of the independent drive shafts is coordinated by the Personality Board and profiled to provide smooth motion to the arms as the end
effector is accelerated from or brought to rest. The software produces a motion
profile at the T1 and T2 drive shafts that will obey the motion constraints for
arm A and B defined by the user.
While the maximum radial extension is dependent on the geometry of the arm
specified by the user, the MagnaTran 7 is typically supplied with a Leapfrog
arm that meets the specification of a 1050 mm reach from the center-line of the
robot to the center-line of the wafer. This version of the arm accommodates a
load of up to 1.0kg (2.2lbs) on each end effector. The actual extension and
retraction positions of the arms are software selectable.
6-6
Brooks Automation
Revision 2.2
MagnaTran 7.1 User’s Manual
MN-003-1600-00
Operation
MagnaTran 7.1 Wafer Handling Robot Overview
End Effector
Forearm
Wrist
Upper Arm
Elbow
Shoulder
ARM A
ARM B
Figure 6-3: MagnaTran 7 Leapfrog Arm
Brooks Automation
Revision 2.2
6-7
Operation
MagnaTran 7.1 Application Number
MagnaTran 7.1 User’s Manual
MN-003-1600-00
MagnaTran 7.1 Application Number
Whether arms are single ended, BiSymmetrik, or Leapfrog, geometries vary considerably in
length, weight, and location of the wafer. To ensure Time Optimal Trajectories work properly,
Brooks Automation assigns an APPLICATION NUMBER to each robot. The Application
Number also maps radial displacement in micro-limits. Record the part number of the arm set
supplied and the Application Number (on the QR document supplied with the robot) in
Appendix E: User Setting Tables. Should robot memory be lost, these numbers will be required
to return to normal operation.
6-8
Brooks Automation
Revision 2.2
MagnaTran 7.1 User’s Manual
MN-003-1600-00
Operation
Theory of Operation
Theory of Operation
The MagnaTran 7 Robot provides control for either a single arm or dual semi-independent arms through a single concentric shoulder-shaft mechanism. The shouldershaft mechanism provides the drive to the left and right arm mechanisms on both the
single and dual arms. The single arm, referred to as “Arm A”, and the dual arms,
referred to as “Arm A” and “Arm B,” are configured in software for full motion in
three axes: Radial (R), Rotational (T), and, Vertical (Z).
NOTE: The major difference between the single and dual arms is the addition of “Arm B”
for the dual arm.
The station coordinate system provides a convenient shorthand for identifying specific locations for the robot to move to or from. Each station is identified by its Theta
position, its Radial position (amount of arm extension), and its Z position (vertical distance from Home). By identifying the stations in this manner it is only necessary to
provide the robot with the station number instead of the complete coordinate set each
time a command is issued to the robot.
When the Z Axis is being used, there are a number of user definable parameters that
must be provided for proper operation. The Base Transfer Offset (BTO) provides the
distance from the robot’s Home position to the systems Wafer Transfer Plane (WTP).
The Lower parameter provides the distance from the WTP that the robot must move
down to deposit a wafer, which also defines the height that the robot must enter a
module to pick up a wafer.
The Slot parameter is used to define the number of slots in a station (the default is
one) and to specify the slot the robot’s operation will be performed on (if none is specified the default is assumed). The Pitch parameter is used to define the distance
between slots. When using the Slot and Pitch parameters, the total number of slots
may not exceed the vertical distance that the robot is capable of traveling.
Brooks Automation
Revision 2.2
6-9
Operation
Theory of Operation
MagnaTran 7.1 User’s Manual
MN-003-1600-00
Slot #2
Slot #1
Wafer Transport Plane (WTP)
bottom surface of Wafer
Center-Line
Lower
Base Transfer Offset (BTO)
Robot Home (Z Axis)
Figure 6-4: MagnaTran 7 Z Axis VCE Parameters
Single Arm Motion
The software-set velocities and accelerations for radial motion apply only to the velocity and acceleration applied to the shoulder shaft rotation. The rotary motion of the
shaft is profiled to accomplish smooth motion as the arm is accelerated from or
brought to rest.
The speeds for arm motion are based upon the robot’s “knowledge” of wafer presence
on the end effector. Wafer presence is determined in several ways; wafer presence
will be assumed after a PICK, wafer presence will be assumed after power-up, and
wafer absence will be assumed after a PLACE. Note that the SET LOAD command
can be used by an operator to specify the presence or absence of a wafer on the end
effector.
Dual Arm Motion
On all three axes of the MagnaTran 7, the ‘A’ and ‘B’ arms are driven simultaneously.
For Theta (T) motion and for the vertical (Z) motion, therefore, the arms move at the
same time and with the same velocities and accelerations. For radial motion, however, the situation is more complex.
6-10
Brooks Automation
Revision 2.2
MagnaTran 7.1 User’s Manual
MN-003-1600-00
Operation
Theory of Operation
Although the arms are driven simultaneously by the shoulder shafts, one always
extending while the other will stay at the retracted position, the linear motion profile
of the two arms will differ as the arms move from “Arm A” fully extended to “Arm
B” fully extended.
The software-set velocities and accelerations for radial motion apply only to the velocity and acceleration applied to the shoulder shaft rotation. The speeds for arm motion
are based upon the robot’s “knowledge” of wafer presence on the end effectors.
Wafer presence on each end effector is determined in several ways; wafer presence
will be assumed after a PICK, wafer presence will be assumed after power-up, and
wafer absence will be assumed after a PLACE.
The rotary motion of the shaft is profiled to accomplish smooth motion as the arms are
accelerated from or brought to rest.
The software-set profile always applies to both arms; the profile of one arm cannot be
set to a different value than that of the other arm since they are coupled at the shoulder shaft.
The fact that the linear motion profiles of the two arms differs at various points along
the path of motion is strictly a result of the kinematics of the BiSymmetrik arm structure.
Example: When both arms are at the retracted position, the linear velocity is the
same. As one arm extends from the retracted to the extended position, however, the
other remains nearly stationary near the retracted position.
When Arm A extends, Arm B retracts, and, because the arms are semi-independent
and the stations are independent, sending Arm A to Station 1, for example, does not
send Arm B to either Station 1 or the station directly opposite Station 1.
NOTE: The SET LOAD command can be used by an operator to specify the presence or
absence of a wafer on each end effector.
The actual speed of the arms in all three axes is determined by both the Pan ‘A’ and
Pan ‘B’ parameters. Full speed will only be achieved if both pans are empty. Arm
A is the default. When any software command is issued, if no arm is specified, the
robot assumes Arm A, and the action is performed using Arm A or information is
returned, set, or stored for Arm A.
Brooks Automation
Revision 2.2
6-11
Operation
Theory of Operation
MagnaTran 7.1 User’s Manual
MN-003-1600-00
Figure 6-5: MagnaTran 7 Coordinate System, Dual Arm
6-12
Brooks Automation
Revision 2.2
MagnaTran 7.1 User’s Manual
MN-003-1600-00
Operation
Theory of Operation
Motion Control
The design and operation of the MagnaTran 7 robot uses a minimum of moving parts
to ensure minimal maintenance requirements. The T1 and T2 drives are concentrically mounted to the drive shafts in the vacuum environment eliminating the need for
rotary seals. Since there are no mechanical or electrical connections to the T1 and T2
drive shafts, unlimited rotation of the arms is allowed. The optional Z Axis Drive is
coupled to the T1/T2 drive assembly.
The MagnaTran 7 Robot uses three digitally encoded servo systems (T1-Axis Encoder,
T2-Axis Encoder and Z-Axis Encoder) which are controlled by the DSP microprocessor on the Personality PCB, to govern the motion of the robot’s arm(s). The servo systems for the T1 and T2 drives utilize directly mounted disk encoders in each drive
unit.
Position monitoring circuits in all three servo loops signal an out-of-tolerance motion
profile, disabling the servos and setting a latched fault condition. This error is usually
caused by physical obstruction of the arm motion of greater than 4° and will stop the
servos and report a hard tracking error. Small bumps to the robot will cause it to settle
back into position without excessive vibration or overshoot.
The MagnaTran 7 robot uses the Brooks patented “Time Optimal Trajectory™”
motion control algorithms to determine all robot motion. The speed of the robot is
determined by “wafer tracking” as described below.
Speed
The MagnaTran 7 is a servo controlled robot where the maximum speeds are determined by a combination of torque limit, maximum acceleration limits, and jerk limits
(3rd time derivative of distance). These limits are factory set in the firmware.
To ensure optimal performance and efficient motion sequences, the actual arm
motions occur at three different speeds. Additionally, when the system references
itself during a Home sequence, the motion is a special slow Homing Speed to insure
maximum positional accuracy.
•
The slowest speed (usually somewhat faster than Homing speed), the “with
wafer” or Low Speed, is used for wafer transfer motions.
•
The Medium Speed is used for motions that occur when the active arm is
empty and the inactive arm is occupied (dual arms only).
•
The fastest speed, the “without wafer” or High Speed, is used for motions that
occur when no wafer is on the End Effector.
Brooks Automation
Revision 2.2
6-13
Operation
Theory of Operation
MagnaTran 7.1 User’s Manual
MN-003-1600-00
Table 6-1: Arm Speeds
Single Arm
Speeds
Dual Arm
Speeds
HIGH Speed
HIGH Speed
LOW Speed
MEDIUM Speed
MEDIUM Speed
LOW Speed
To set speed control,
2-Axis = SET LOAD
3-Axis = PICK, PLACE
High Speed motions occur during the automatic wafer transfer sequences, PICK and
PLACE, only at points in the sequence when no wafer is on the end effector(s).
Since the robot has no direct wafer sensing ability, it keeps track of the PICK and
PLACE history for the arms. When the robot is first powered on it assumes that the
pan, or both pans of a BiSymmetrik or Leapfrog arm, are occupied and will not move
at high speed until a PLACE has been performed on both pans. Additionally, if an
arm has performed a PICK operation, the robot assumes that the pan is occupied until
it performs a PLACE operation.
Issue SET LOAD ON to indicate a wafer is on the End Effector and all subsequent
moves will be at low acceleration. Issue SET LOAD OFF to allow all subsequent
moves to be at high acceleration. The syntax for a move is GOTO N 1 R EX to extend
the arm to station 1 and GOTO N 2 R EX to extend the arm to station 2. A command
script example follows:
6-14
Brooks Automation
Revision 2.2
MagnaTran 7.1 User’s Manual
MN-003-1600-00
Operation
Theory of Operation
Table 6-2: Arm Speed Script File
Command
Action
User Module
GOTO N 1
Rotates to station 1.
GOTO N 1 R EX
Extend arm.
SET LOAD ON
Set slow speed.
GOTO N 2 R EX
Retract, rotate to station 2, and
extend arm.
SET LOAD OFF
Set fast speed.
GOTO N 2 R RE
Retract arm.
Process wafer
GOTO N 2 R EX
Extend arm.
Replace wafer
SET LOAD ON
Set slow speed.
GOTO N 1 R EX
Retract arm, rotate to station 1,
and extend arm.
Brooks Automation
Revision 2.2
Place wafer on End
Effector
Remove wafer
Remove wafer
6-15
Operation
Theory of Operation
MagnaTran 7.1 User’s Manual
MN-003-1600-00
Hardware Memory Structure
The internally mounted control boards feature both volatile and non-volatile memory
consisting of random access memory (RAM), and a disk-on-chip (DOC). The disk-onchip holds the control program, version, build date, a complete library of application
specific parameters, an event log, and a factory-loaded set of working parameters.
The default application specific parameters are listed in Chapter 8 with each specific
command setting and on the QR. The arm parameters have been set for the arm
geometry ordered and the robot has been optimized for the specific application.
The user must set-up the robot for the specific user configuration by storing the actual
station parameter to non-volatile memory on the disk-on-chip. Every time the robot is
started or reset, the values of all parameters stored in non-volatile memory are loaded
into RAM for active use by the controller. Using non-volatile memory, the robot is
able to store a unique set of station parameters described in Table 6-3, for each of the
sixteen possible stations. The STORE command must be used to load the parameters
into non-volatile memory on the disk-on-chip.
NOTE: Any or all of these values can differ from station to station.
Table 6-3: Station Parameters
Station Storable Parameters
R
The full radial extension in increments of 0.001
mm.
T
The rotational position, Theta, in increments of
0.001 degrees over a range of 360o.
BTO
The Z axis location, in microns, of the Wafer
Transfer Plane, which is also the Up position of
the robot arm in Station 1.
LOWER
The distance in microns below the Wafer Transfer Plane at which the Down position of the
robot arm is located.
NSLOTS
The number of slots at that station.
PITCH
6-16
Description
The uniform distance, in microns, between the
slots.
Brooks Automation
Revision 2.2
MagnaTran 7.1 User’s Manual
MN-003-1600-00
Operation
Theory of Operation
Station Coordinate System
The station coordinate system provides a convenient shorthand for identifying specific locations for the robot to move to or from. Each station is identified by its Theta
position (angle from Home), its Radial position (amount of arm extension), and
optionally its Z position (vertical distance from Home) and Lower. By identifying the
stations in this manner, it is only necessary to provide the robot with the station number instead of the complete coordinate set each time a command is issued to the robot.
The shorthand system assigns a coordinate location for T, R, Z up and Z down.
Station numbers are assigned to the robot that represent the modules connected to the
system where the MagnaTran 7 robot is installed. All station assignments are dependent upon the specific system configuration. Assigning a station number for each
module connected to the system allows that module to be referenced by station number instead of by coordinates. This allows a convenient shorthand for directing all
robot motion and ensures that all wafer movement to and from the stations remains
consistent.
In the example shown in Figure 6-6, numbering of stations is done in a clockwise
direction starting with the Cassette Module located on the right when looking at the
system from the front. Note that it is possible for a specific facet of the system the
MagnaTran 7 is installed in to have more that one station associated with it if an intermodule unit is connected between the main module and the system chamber. If there
are any intermodule stations they are numbered on a second clockwise circuit of the
system chamber.
Brooks Automation
Revision 2.2
6-17
Operation
Theory of Operation
MagnaTran 7.1 User’s Manual
MN-003-1600-00
Station 4
Station 5
Station 6
Station 3
Station 7
Station 8
Station 2
Station 1
Figure 6-6: Example of Station Coordinate Numbering
The R (radial extension), T (rotational), and the Z (vertical) axis values for each end
effector at each station should be recorded for each type of wafer that will be used
with the system.
NOTE: The R value, and possibly the other values, may change for different size wafers.
Tables are provided in Appendix E: User Setting Tables for recording station values.
6-18
Brooks Automation
Revision 2.2
MagnaTran 7.1 User’s Manual
MN-003-1600-00
Operation
Theory of Operation
Factory Set HOME Position
The HOME position is set by Brooks Automation. The HOME position is the absolute
reference system for the robot. The Brooks HOME position for the standard drive orients the robot arms 90° counter-clockwise from the interface panel as shown in Figure
6-7. Two alignment pins located on the flange (used for the alignment of the robot in
a Transport Chamber) are in the same orientation to the I/O Panel.
Pan B
Pan A
Alignment Pins
I/O Panel
Figure 6-7: Factory Set HOME Position
CAUTION
Other HOME positions may be configured at the factory for custom
applications.
Brooks Automation
Revision 2.2
6-19
Operation
Theory of Operation
MagnaTran 7.1 User’s Manual
MN-003-1600-00
The flange may also be configured 180° out of this standard location without parts
change. This may be done to allow user access to the I/O Panel. The location of Pan
B in this configuration is 270° counter-clockwise from the I/O Panel (90° counterclockwise from the mounting flange alignment pins). This change will affect the
Theta Home position location. The Theta Home reference location can be re-configured but this may not be necessary since the Theta axis has unlimited rotation.
HOME Operation
Homing the robot references all axes. The HOME command performs multiple absolute position pattern acquisitions in order to reliably establish the initial position of
each axis. The absolute reference system for each axis of the robot is established by
moving as much as 10mm (1/2”) the robot forward/backward repeatedly (pinging),
centered about the initial starting position unit the HOME command is either successfully completed or an error is generated. The sequence to determine its location is
described below.
NOTE: HOME ALL will safely home the robot from any location providing the sequence of
each axis can be performed in order. If a collision hazard exists, HOME each axis
separately.
The sequence for a multi-axis HOME performs an integrated sequence in the following order:
R axis (homes toward retract position)
T axis (homes counterclockwise)
Z axis (homes downward, only on robot’s with the Z-Axis option)
In all cases, the robot will move the shortest distance required to reach the home position. If a HOME command is entered and the robot is already at the HOME position,
no motion will occur.
See Home on page 8-41 for a description on the use of the HOME command.
6-20
Brooks Automation
Revision 2.2
MagnaTran 7.1 User’s Manual
MN-003-1600-00
Operation
Controls and Indicators
Controls and Indicators
Overview
The MagnaTran 7 Robot is designed to be installed in multi-station transport modules
and remotely controlled and monitored by either a host controller or through the
Control/Display Module. Therefore, very few user accessible controls or indicators
are needed. Those controls and indicators available are only expected to be used during testing of the robot prior to installation in a system or during service.
Depending on the I/O board type provided, the Interface Panel will be different. Figure 6-8
shows the I/O Panel for a High Side I/O board. Others look similar.
Controls
All settings are controlled by the command set. No user controls are accessible on the
robot.
Indicators
All user visible indicators are located on the front panel of the robot. See Table 6-4 for
indicator functions.
Brooks Automation
Revision 2.2
6-21
Operation
Controls and Indicators
MagnaTran 7.1 User’s Manual
MN-003-1600-00
Communication
Receive
Send
24V Indicator
Figure 6-8: MagnaTran 7 Indicators
Table 6-4: Indicator Functions
6-22
Indicator
Function
24V
Indicates 24VDC power is being supplied to the
robot (power on).
TX
Indicates the robot is replying to the host port
SIO1.
RX
Indicates the robot is receiving communications
from the host port SIO1.
Brooks Automation
Revision 2.2
MagnaTran 7.1 User’s Manual
MN-003-1600-00
Operation
Operational Interlocks
Operational Interlocks
The MagnaTran 7 robot is provided with optional operational interlocks to ensure the
safety of the robot. These interlocks are provided as part of the discrete communications option and must be set up by the user.
Identification
Interlocks are divided into three command groups: command types related to Sensors
at a station, I/O State OUTPUTS and Miscellaneous. These interlocks are detailed in
Table 6-5. A maximum number of 170 interlocks is accepted. This allows for the possibility of using each I/O type available at each station, as well as all generic DIO
options.
A station mapped or assigned an I/O without assigning the pan will always default
to arm A. On a dual arm, arm B will not be mapped unless arm B is specifically
mapped.
Brooks Automation
Revision 2.2
6-23
Operation
Operational Interlocks
MagnaTran 7.1 User’s Manual
MN-003-1600-00
Table 6-5: Operational Interlocks
Command Type
Bit1
I/O2
I/O State
Station Sensors
WAF_SEN
SINGLE
INPUT
BLOCKED/
NOT_BLOCKED
VLV_SEN
SINGLE
INPUT
CLOSED/NOT_CLOSED
SBIT_SVLV_SEN
SINGLE
INPUT
OPEN/CLOSED
RETRACT_SEN
SINGLE
OUTPUT
RETRACTED
NOT_RETRACTED
EX_ENABLE
SINGLE
INPUT
ENABLED/DISABLED
I/O State OUTPUTS
SVLV_CTRL
DOUBLE
OUTPUT
null/OPEN/ CLOSED/null
DISCRETE_OUT
SINGLE
OUTPUT
ACTIVE3
INACTIVE
NUMERIC_OUT
MULTIPLE
OUTPUT
numeric string
RETRACT_PIN
SINGLE
OUTPUT
IN/ OUT
Miscellaneous Interlocks
DISCRETE_IN
SINGLE
INPUT
ACTIVE3/
INACTIVE
NUMERIC_IN
MULTIPLE
INPUT
numeric string
EMER_STOP
SINGLE
INPUT
ENABLED/
DISABLED
POWER_IND
SINGLE
OUTPUT
ON/
OFF
UPS_BATTERY_SEN
SINGLE
INPUT
NORMAL/
LOW
MOTION_IND
SINGLE
OUTPUT
ON/
OFF
1.
2.
3.
6-24
DOUBLE: Requires 2 consecutive bits to be defined; MULTIPLE: requires multiples
consecutive bits to be specified.
INPUT: Host controller provides status to the robot (read); OUTPUT: robot provides
status to the host controller (sent).
ACTIVE: input (or output) pin is assigned to active state; INACTIVE: input (or output)
pin is assigned to inactive state.
Brooks Automation
Revision 2.2
MagnaTran 7.1 User’s Manual
MN-003-1600-00
Operation
Operational Interlocks
Description
Station Sensors
WAF_SEN: Individual monitoring of wafer sensors inputs.
VLV_SEN: Allows monitoring of the poppet valve when robot is extending. If poppet valve is not closed,
an error message will occur and the robot will stop.
SBIT_SVLV_SEN: Allows monitoring of the slot valve when robot is extending. If slot valve is closed, an
error message will occur and the robot will stop. A fault response will be given.
RETRACT_SEN: Individual sensor monitoring of robot retract.
EX_ENABLE: Individual process module sensor allowing robot to extend.
I/O State OUTPUTS
SVLV_CTRL: Open and close slot valves using serial operational software commands (as opposed to logic
control i.e. robot actions).
Null indicates bit state is undefined.
DISCRETE_OUT: Individual OUTPUT monitoring of interlocking devices i.e. vacuum gauges.
NUMERIC_OUT: Allows monitoring of sensors as a group. Binary number converted to decimal and
presented on multiple consecutive OUTPUT channels.
RETRACT_PIN: Allows configured slot values to close only when the robot is in the retracted state. HI or
LOW characteristic dependent.1
Miscellaneous Interlocks
DISCRETE_IN: Individual INPUT monitoring of interlocking devices i.e. vacuum gauges.
NUMERIC_IN: Allows monitoring of sensors as a group. Binary number converted to decimal and presented on multiple consecutive INPUT channels.
EMER_STOP: Emergency Stop sends the HALT command to the robot. If activated, the signal must be
cleared before executing next move command. Intended for use with a user supplied EMO button.
POWER_IND: Will be on as long as robot is powered up. Output will be HI or LOW.
UPS_BATTERY_SEN: NORMAL when battery signal remains high, LOW when signal from the UPS battery goes low. When signal is LOW, no robot motion is permitted. A warning will be generated upon
robot power up only if the UPS battery is detected low.
MOTION_IND: Will be on as long as the robot arms are in motion. Output will be HI or LOW.
1.
CAUTION The RETRACT_PIN is controlled by the robot motion controller and should not be
set by the user.
Brooks Automation
Revision 2.2
6-25
Operation
Operational Interlocks
MagnaTran 7.1 User’s Manual
MN-003-1600-00
Creating the Operational Interlocks
Creating the Operational Interlocks is a two step process. The first step maps an
assigned name to a specific pin on the discreet I/O connector and defines its behavior.
If the interlock is related to a sensor, a second step will assign the mapped I/O to a
specific station.
Related Commands
Each group of command types shown in Table 6-5 has Setup, Request, and Store commands related to that particular group:
Sensor: Set Station Option
Request Station Option on page 8-106
Store Station Option on page 8-167
I/O State OUTPUTS: Set I/O State on page 8-130
All types: Map on page 8-44
Remove IO on page 8-66
Request I/O State on page 8-84
Request I/O Map on page 8-82
Pass Through Feature
An added feature of the I/O is to pass information from valves, etc. through the robot.
These I/O channels are mapped or assigned as discussed in this section and also have
the option of changing the polarity of the output bit. See Map Pass Through on page
8-49 for the command string. Pass through items are updated every 1 mSec.
Special Notes on RETRACT_PIN
The RETRACT-PIN is a different type of operational interface in that it is controlled
by the robot motion controller. This interlock is set up at the factory on pin 35. If an
output pin is mapped as a RETRACT_PIN then it will go active whenever the robot
arm is referenced and retracted. When the robot is not referenced, an extend condition will occur to prevent slot valve closure in case the arms are extended when first
powered on. Upon power up, the default status is NOT-RETRACTED, after HOME
R, status is RETRACTED.
The robot is considered extended when it extends a distance of 5% of its total extension from home position. For example, if a robot’s total extension is 50mm from
home, then the RETRACT_PIN considers the arm extended when it has move 2.5mm
from home position (50mm x 5% = 2.5mm).
6-26
Brooks Automation
Revision 2.2
MagnaTran 7.1 User’s Manual
MN-003-1600-00
Operation
Operational Interlocks
This interface can be removed by following the command Remove IO on page 8-66. It
can also be moved to another output pin by following the procedure Mapping the
Interlocks on page 6-29.
Special Notes on the PowerPak
The PowerPak provides a controlled stop of the robot (see PowerPak Power Fault
Manager on page 6-84). Two signals may be sent to the robot:
AC_FAIL_UPS: The robot comes to a controlled stop as quickly as possible
regardless of the position of the robot arm after receiving the signal.
BATT_LO_UPS: Monitors the status of the battery backup power in the PowerPak. An error signal is sent when battery voltage is less than +23.5VDC.
To map the interlocks, the type of I/O board for the MagnaTran 7 robot must be
known:
High Side I/O Board example:
MAP AC_FAIL_UPS EMER_STOP LOW TO DIGITAL_IN 0X800000
MAP BATT_LO_UPS UPS_BATTERY_SEN LOW TO DIGITAL_IN 0X400000
(IN23 = 0x800000) AC_FAIL_UPS
(IN22 = 0x400000) BATT_LO_UPS
Low Side I/O Board example:
MAP AC_FAIL_UPS EMER_STOP LOW TO DIGITAL_IN 0X400000
MAP BATT_LO_UPS UPS_BATTERY_SEN LOW TO DIGITAL_IN 0X800000
(IN22 = 0x400000) AC_FAIL_UPS
(IN23 = 0x800000) BATT_LO_UPS
Relay I/O Board (Appendix F: Relay I/O Option on page 11-24) example:
MAP AC_FAIL_UPS EMER_STOP LOW TO DIGITAL_IN 0X1000
MAP BATT_LO_UPS UPS_BATTERY_SEN LOW TO DIGITAL_IN 0X20000
Marathon Express MX I/O Board example:
MAP AC_FAIL_UPS EMER_STOP LOW TO DIGITAL_IN 0X20000000
Brooks Automation
Revision 2.2
6-27
Operation
Operational Interlocks
MagnaTran 7.1 User’s Manual
MN-003-1600-00
MAP BATT_LO_UPS UPS_BATTERY_SEN LOW TO DIGITAL_IN 0X10000000
(IN29 = 0x20000000) AC_FAIL_UPS
(IN28 = 0x10000000) BATT_LO_UPS
To remove the interlock:
REMOVE IO AC_FAIL_UPS
REMOVE IO BATT_LO_UPS
6-28
Brooks Automation
Revision 2.2
MagnaTran 7.1 User’s Manual
MN-003-1600-00
Operation
Operational Interlocks
Mapping the Interlocks
The following example demonstrates single pin addressing.
Input designation 1 (EXT_IN1) = DIGITAL_IN 0x (pin #2) = DIGITAL_IN 0x2.
Input designation 23 (EXT_IN23) = DIGITAL_IN 0x (pin #24) = DIGITAL_IN
0x800000.
Output designation 0 (DRV_OUT0) = DIGITAL_OUT 0x (pin #31) = DIGITAL_OUT
0x1.
Output designation 19 (DRV_OUT19) = DIGITAL_OUT 0x (pin # 50) =
DIGITAL_OUT 0x80000.
The following example demonstrates multiple pin addressing.
Input designation 14-21 = NUMERIC_IN 0x (pin #15-22) = NUMERIC_IN 0x3fc000
where 3 = 2 + 1
f = 15 = 8 + 4 + 2 + 1
c = 12 = 8 + 4
0 = empty block
0 = empty block
0 = empty block
In the following example, if a slot valve is closed, the robot will not attempt to
extend at a station.
The following is assumed:
1.
•
The slot valve sensor at Station 2 will have the assigned name
STN_2_SLOT.
•
Slot valve sensor is a switch which is closed when the valve is open. The
switch is wired between a EXT_IN0 pin 1 and GND (pin 29).
Establish serial communication.
NOTE: DIO mode and CDM mode do not support the mapping functionality.
Brooks Automation
Revision 2.2
6-29
Operation
Operational Interlocks
MagnaTran 7.1 User’s Manual
MN-003-1600-00
Map the command
2.
Enter the following command:
MAP STN_2_SLOT SBIT_SVLV_SEN LOW TO DIGITAL_IN 0X3
Refer to Map on page 8-44 for a complete description of command usage.
3.
To verify that the signal is present at the assigned digital input, issue the following command:
RQ IO STATE STN_2_SLOT
Refer to Request I/O State on page 8-84 for a complete description of command
usage.
The following truth table illustrates the possible sensor states.
Table 6-6: Slot Valve Interlock States
Slot Valve State
Switch
OPEN
ACTIVE (low)
CLOSED
INACTIVE (high)
Setting the Station Option
4.
Enter the following command:
SET STN 2 OPTION SBIT_SVLV_SEN STN_2_SLOT
This will assign the created mapped name of STN_2_SLOT to Station 2.
Now the robot will not extend at Station 2 if the sensors report that the slot
valve is closed and error 710 will be reported.
See Error Code Reference I/O Mapping Errors on page 8-185 for a list of Interlock
Error Codes.
5.
Store the new interlock sensor with the following command:
STORE STN 2 OPTION SBIT_SVLV_SEN STN_2_SLOT
6-30
Brooks Automation
Revision 2.2
MagnaTran 7.1 User’s Manual
MN-003-1600-00
Operation
Operational Interlocks
See Store Station Option on page 8-167 for a complete description of command
usage.
In this example, a retract wafer present sensor located in the transfer chamber is set
to report the status of a specific arm.
The following is assumed:
•
1.
The wafer present sensor is a laser detector which is on when a wafer is
not detected and is off when a wafer obstructs the beam. The wafer
present sensor is wired between a EXT_IN1 pin 2 and GND (pin 29).
This is digital in bit 1.
Establish serial communication.
NOTE: DIO mode does not support the sensor setting functionality.
Setting the Station Sensor
2.
Enter the following command:
SET STNSENSOR 1 A TYPE RE ACT LO SEN 2
This creates a mapped name of STN01ASENSOR and assigns it to Station 1. In
this example, SEN is set to input # 2 (EXT_IN1/pin 2) as shown in Table 5-7.
Now, if the sensor reports that a wafer is present, the robot will not perform a
PICK at Station 1 and an error will be reported.
See Error Code Reference Robot Wafer Sensor Errors on page 8-182 for a list of
Interlock Error Codes.
3.
Store the new interlock sensor with the following command:
STORE STNSENSOR 1 ARM A TYPE ACT SEN
See Store Station Sensor on page 8-169 for a complete description of command
usage.
Brooks Automation
Revision 2.2
6-31
Operation
Wafer Presence Sensors-Extend and Retract
MagnaTran 7.1 User’s Manual
MN-003-1600-00
Wafer Presence Sensors-Extend and Retract
Overview
The MagnaTran 7 robot provides an optically isolated interface for discrete external
sensors. The firmware of the robot will accept sensor inputs and use them to verify:
•
wafer status
•
determine the success of any wafer transfer operations
•
collect servo position data for all three axes of the robot
NOTE: Each sensor is configured for use with a specific arm. Any wafer handling performed with a different arm will be ignored by that sensor.
In addition to the wafer present data provided by the sensor interface, the position of
the robot's radial (R), rotational (T), and vertical (Z) motion servos may be recorded
when the state of any specified sensor changes. Once this positional data is recorded
it may be reviewed at any time by issuing the appropriate software command.
The Multiple Sensor Interface accepts inputs from discrete external sensors, providing
full optical isolation of all signals and multiplexing of data for use by the robot. The
Multiple Sensor Interface has been designed to monitor wafer handling, servo data
collection, and signal buffering.
High speed parallel I/O enables direct interfacing to substrate sensors and other
modules such as slot valves. Real time information enables position referencing by
leading and trailing edge sensing of moving components. Dynamic sensing in user
specified radial positions enable independent wafer sensing on Leapfrog arms. Wafer
presence may be referenced in macro sequences for safety.
6-32
Brooks Automation
Revision 2.2
MagnaTran 7.1 User’s Manual
MN-003-1600-00
Operation
Wafer Presence Sensors-Extend and Retract
EXtend Sensor
Location
REtract Sensor
Location
Figure 6-9: Typical REtract and EXtend Sensor Locations
Wafer PICK
During a wafer PICK operation, the robot will retract (if required) and move T and Z
to the specified station. The robot will then perform a Pre-Extend Test.
Pre-Extend test
If the station has a sensor, and it is configured for use with the active arm, it
will check the sensor configuration at that station for the sensor type and then
read the sensor status. A flowchart of the Pre-Extend Test is shown in Figure 610.
Brooks Automation
Revision 2.2
6-33
Operation
Wafer Presence Sensors-Extend and Retract
MagnaTran 7.1 User’s Manual
MN-003-1600-00
Sensor Configuration
EXtend type sensor: Sensor state should be "ON" indicating that there is a
wafer at the station.
REtract type sensor: Sensor state should be "OFF" indicating that there is no
wafer on the end effector.
If the robot does not receive the appropriate signal from the sensor, an error
message will be generated and the PICK operation will be stopped. If the robot
does receive the appropriate signal from the sensor, the PICK operation will
proceed.
After the PICK operation is complete, the robot will perform a Successful Action Test.
Successful Action Test
If the station has a sensor, and it is configured for use with the active arm, the
robot will check the sensor configuration at that station for the sensor type and
then read the sensor status. A flowchart of the Successful Action Test is shown
in Figure 6-10.
EXtend type sensor: Sensor state should have changed to "OFF".
REtract type sensor: Sensor state should have changed to "ON".
If the robot does not receive the appropriate signal from the sensor, an error
message will be generated and the PICK operation is considered to have failed.
NOTE: If the Successful Action Test fails, all robot motion will have been completed.
There is no need to clear the error before issuing another command.
6-34
Brooks Automation
Revision 2.2
MagnaTran 7.1 User’s Manual
MN-003-1600-00
Operation
Wafer Presence Sensors-Extend and Retract
Robot retracts if necessary
Robot moves to
Station T and Z
Perform PICK
without check
NO
Proceed
Pre-Extend Test
Does the Station
Have a Wafer
Presence Sensor?
YES
Proceed
NO
Is Sensor configured
for active arm?
YES
EXtend Sensor
REtract Sensor
Check Sensor Type
ON
Read Sensor
State
OFF
Error Message
Generated
ON
Read Sensor
State
OFF
PICK operation
Stopped
PICK
Complete
Indicates Wafer
at Station
PICK Proceeds
Indicates NO Wafer
is on End Effector
PICK Proceeds
Successful Action Test
Proceed
NO
Does the Station
Have a Wafer
Presence Sensor?
YES
Proceed
NO
Is Sensor configured
for active arm?
YES
EXtend Sensor
REtract Sensor
Check Sensor Type
OFF
Read Sensor
State
ON
Error Message
Generated
OFF
Read Sensor
State
ON
Pick Operation
Considered Failed
Indicates NO Wafer
at Station
Operations
Proceed
Indicates Wafer
is on End Effector
Figure 6-10: Pre-Extend and Successful Action Flowchart
Brooks Automation
Revision 2.2
6-35
Operation
Wafer Presence Sensors-Extend and Retract
MagnaTran 7.1 User’s Manual
MN-003-1600-00
Wafer PLACE
During a wafer PLACE operation, the robot will retract if required and move T and Z
to the specified station and then perform a Pre-Extend Test.
Pre-Extend Test
The robot will then perform a Pre-Extend Test. This test determines if the station has a sensor and if it is configured for use with the active arm. It will check
the sensor configuration at that station for the sensor type and then read the
sensor status. A flowchart of the Pre-Extend Test is shown in Figure 6-10.
Sensor Configuration
EXtend type sensor: Sensor state should be OFF indicating that there is no
wafer at the station coordinates where this wafer is to be
placed.
REtract type sensor: Sensor state should be ON indicating that there is a
wafer on the end effector at the station coordinates ready
to be placed.
If the robot does not receive the appropriate signal from the sensor, an error
message will be generated and the PLACE operation will be stopped.
If the robot receives the appropriate signal from the sensor, the PLACE operation will proceed by performing a Successful Action Test.
Successful Action Test
After the PLACE operation is complete, the robot will perform a Successful
Action Test. If the station has a sensor, and it is configured for use with the
active arm, the robot will check the sensor configuration at that station for the
sensor type and then read the sensor status. A flowchart of the Successful
Action Test is shown in Figure 6-10.
EXtend type sensor: Sensor state should have changed to ON.
REtract type sensor: Sensor state should have changed to OFF.
If the robot does not receive the appropriate signal from the sensor, an error
message will be generated and the PLACE operation is considered to have
failed.
6-36
Brooks Automation
Revision 2.2
MagnaTran 7.1 User’s Manual
MN-003-1600-00
Operation
Wafer Presence Sensors-Extend and Retract
NOTE: If the Successful Action Test fails, all robot motion will have been completed.
There is no need to clear the error before issuing another command.
Servo Position Recording
During any operation the robot performs, the position of the servos for all three axis
may be recorded at a specific sensor location. Each time the specified sensor makes a
state transition from either a high to a low or from a low to high, the servo position
data and the type of sensor transition will be recorded for a maximum of ten transitions.
NOTE: The sensor's configuration does not affect the triggering of servo data collection
and all servo position and transition data is stored in a table that may be read at any
time.
Only one sensor may be configured to collect servo position data at a time.
Enabling another sensor will clear all existing data from the Servo Position Table.
Sensor Interface Specifications
The robot is designed to accept inputs from any sensor that provides an open collector
current sink. The sensor must be capable of meeting the requirements described in
MISC I/O Communications on page 5-9. The robot provides power and ground for all
sensors, refer to the connector pin-outs provided in Chapter 5: Operational Interfaces
for more information.
Ex/Re Sensor Commands
The following commands are used to create, define and verify the Extend/Retract
Sensors:
Set Station Sensor on page 8-147
Request Station Sensor on page 8-108
Go To on page 8-33
Set Interlock on page 8-128
Request Interlock on page 8-80
Brooks Automation
Revision 2.2
6-37
Operation
Wafer Presence Sensors- Radial Motion
MagnaTran 7.1 User’s Manual
MN-003-1600-00
Wafer Presence Sensors- Radial Motion
Radial Motion Sensors detect wafer presence on the specified arm while the arm is
traveling in radial (R axis) motion. The R_MT sensor will verify the success of any
wafer transfer operation (PICK/PLACE/GOTO/XFER).
The Radial Motion Sensor (R_MT) feature was designed to determine the load on the
end effector of the Brooks Automation Leapfrog arm set. Because of the “same-side”
design of the Leapfrog, it is not possible to determine which arm has a wafer on the
end effector when the arms are retracted.
However, the R_MT sensors may be used in any application where the sensors are
placed outside of the normal robot retract position.
R_MT Wafer Sensing Technique
The R_MT type wafer presence sensors work with the PICK, PLACE, XFER, and
GOTO (with MAT option) commands only. During MOVE operations, no wafer sensor are active. During these operations, all motions will follow the speed and acceleration profiles according to the arm load status in the robot memory map. The speed
and acceleration that the robot moves during the PICK, PLACE, XFER, and GOTO
operations is dependent on the load status of the end effector as discussed in Speed on
page 6-13.
R_MT Placement Criteria
The placement of the wafer sensor with respect to the robot retract position determines the success of the sensing technique.
The best position for the R_MT wafer sensor is as close as possible to the wafer outer
edge while the arm is retracted. With this criteria, the robot can check the sensor to
determine if an operation has failed early in the beginning of the motion where the
robot has not reached it’s maximum velocity, acceleration, or inertia.
If the above scenario is not possible, as in the case of Leapfrog same-side arms, the
sensor can be placed underneath the wafer at the retracted position. In this scenario,
the wafer sensors are validated during the T-axis part of the motion to a station. The
sensor should be placed as close as possible to the outer edge of the wafer while in the
retract position and in the same T coordinates as the station. If the sensor has to be offset from the station T coordinates, then the offset must be specified in the station
setup.
6-38
Brooks Automation
Revision 2.2
MagnaTran 7.1 User’s Manual
MN-003-1600-00
Operation
Wafer Presence Sensors- Radial Motion
R_MT Commands
The following commands are used to create, define and verify the Radial Motion Sensors:
Check Load on page 8-23
Store Station Sensor on page 8-169
Request Station Sensor on page 8-108
Set Radial Motion Sense on page 8-138
Store Radial Motion Sense on page 8-163
Request Radial Motion Sense on page 8-98
Go To on page 8-33
Set Interlock on page 8-128
Request Interlock on page 8-80
The CHECK LOAD operation checks the status of any mapped Extend Enable,
Poppet Valve, or Slot Valve Sensor at each station where it finds a Radial
Motion Sensor. If any valve sensors are blocked, that station will be considered
“Not Available for Check Load” and will cycle to the next station. The CHECK
LOAD command may be used to set the robot arm state to the correct load status on power-up or after a failure.
The following commands use R_MT sensing:
Pick on page 8-54
Place on page 8-59
Go To on page 8-33
Transfer on page 8-176
R_MT wafer sensing is available with the GOTO commands only when using
the MAT option. When the MAT option is specified during an Extend or
Retract motion, the robot monitors the R_MT wafer sensor to determine if the
load matches that of the MAT option. If the load status and the expected load
status do not match, an error will be generated. See Table 6-7 for the possible
scenarios of the GOTO command with MAT option.
Table 6-7: GOTO with MAT Option Scenarios
Command
If a wafer is detected,
GOTO R EX MAT OFF
GOTO operation is
aborted (soft stop)1 and
an error is reported
Brooks Automation
Revision 2.2
If a wafer is NOT
detected,
GOTO operation is completed
6-39
Operation
Wafer Presence Sensors- Radial Motion
MagnaTran 7.1 User’s Manual
MN-003-1600-00
Table 6-7: GOTO with MAT Option Scenarios
If a wafer is NOT
detected,
Command
If a wafer is detected,
GOTO R EX MAT ON
GOTO operation is completed
GOTO operation is
aborted (soft stop) and
an error is reported
GOTO R RE MAT OFF
an error is generated
GOTO operation is completed
GOTO R EX MAT ON
GOTO operation is completed
an error is generated
1.
Because of the possible high arm speed and high inertia, the arm may not be able
to stop without going into the station completely or partially during a soft stop.
Hence for motions carried out at high speed, a collision may not be avoided.
During a PICK operation, the R_MT wafer sensor will be active during the
extend and the retract at the specified station. In a PICK operation, the robot
arm will first be retracted in the R direction if required. Then the robot arm will
move in the T and Z directions to the specified station. Once at the specified T
and Z coordinates for the station, the arm will extend into the station. During
the extend motion, the robot monitors the R_MT wafer sensor to determine if a
wafer is on the end effector. If the robot detects a wafer, the PICK will be
aborted and an error code will be generated. If the robot does not detect a
wafer during the extend motion, the PICK will proceed. After the robot
extends into the station, performs the pick operation, and the arm is retracted,
the PICK operation is completed. During the retract motion, the robot will
monitor the R_MT sensor to determine if a wafer is present and the PICK operation was successful. If successful, the robot memory map is updated to LOAD
ON. If the robot does not detect a wafer on the retract motion, an error is generated and the PICK is considered a failure.
During a PLACE operation, the R_MT wafer sensor will be active during the
extend and the retract at the specified station. In a PLACE operation, the robot
arm will first be retracted in the R direction if required. Then the robot arm will
move in the T and Z directions to the specified station. Once at the specified T
and Z coordinates for the station, the arm will extend into the station. During
the extend motion, the robot monitors the R_MT wafer sensor to determine if a
wafer is on the end effector. If the robot does not detect a wafer, the PLACE
will be aborted and an error code will be generated. If the robot detects a wafer
during the extend motion, the PLACE will proceed. After the robot extends
into the station, performs the place operation, and the arm is retracted, the
PLACE operation is completed. During the retract motion, the robot will monitor the R_MT sensor to determine if a wafer is not present and the PLACE
operation was successful. If successful, the robot memory map is updated to
6-40
Brooks Automation
Revision 2.2
MagnaTran 7.1 User’s Manual
MN-003-1600-00
Operation
Wafer Presence Sensors- Radial Motion
LOAD OFF. If the robot detects a wafer on the retract motion, an error is generated and the PLACE is considered a failure.
The XFER command is a combination of the PICK and PLACE operations.
Robot sensing behaves as described above for PICK and PLACE.
Wafer presence sensors are not active during any MOVE type commands.
Radial Motion Setup Procedure
1.
Setup the Radial Motion Sensor (R_MT) sensing parameters:
SET R_MT SENSE LIMITS OUTER xxxxx INNER xxxxx
STORE R_MT SENSE LIMITS OUTER INNER
SET R_MT WAFER SIZE xxxxxx
STORE R_MT WAFER SIZE
2.
Connect the wafer sensors for each station to the MagnaTran 7 MISC I/O connection. See MISC I/O Communications on page 5-9.
3.
Teach each station to the robot using serial commands or CDM.
See Set Station on page 8-140 for serial and Setting Up Stations on page 6-81 for
CDM.
Store the station parameters.
4.
Assign a Radial Motion Station Sensor for each arm to each station.
See Set Station Sensor on page 8-147 for serial and SET WAFER SENSOR on
page 6-75 for the CDM.
Store the R_MT sensor parameters.
5.
Once all station sensors have been defined, verify that each is functioning correctly. This can be done by toggling each sensor and requesting its state.
RQ STNSENSOR station ARM arm STATE
6.
Perform a CHECK LOAD to initialize the arm load status in memory.
See Check Load on page 8-23.
Brooks Automation
Revision 2.2
6-41
Operation
Off Center PICK and PLACE Feature
MagnaTran 7.1 User’s Manual
MN-003-1600-00
Off Center PICK and PLACE Feature
The Time Optimal Path Off Center PICK and PLACE (OCP) feature allows the robot
to execute compound move trajectories which are not limited to pure radial moves.
•
Eliminates Traverser requirement
•
Simultaneous rotation and extension
•
combination of straight lines and curves
•
works with all Brooks MagnaTran robots and arm sets
•
Allows PICK and PLACE to cassettes and pods off the radial axis without
interference
•
Utilizes Time Optimal Path™ trajectories
•
Utilizes BAI command structures
•
Minimizes unnecessary acceleration and deceleration experienced with
sequential moves
•
Computational efficient implementation using pre-defined Optimal Trajectory
segments where a single constraint is active
Figure 6-11 shows that the end effector first moves through an intermediate (VIA)
point on the way to its final destination.
6-42
Brooks Automation
Revision 2.2
MagnaTran 7.1 User’s Manual
MN-003-1600-00
Operation
Off Center PICK and PLACE Feature
Final Destination
VIA Point
Figure 6-11: Off-Center PICK
and PLACE
To set-up the OCP feature, two positions must be defined:
1.
Set the station values
2.
Set the VIA value: a location radially outward from the station to which the
robot will travel in a straight path in order to remove a wafer without interference.
The travel path of the arm is adjusted for optimal travel in relation to the origin and
destination of these two taught positions. This travel path is followed for both PICK
and PLACE functions.
Set the Station Values
1.
Teach the robot the station using the CDM
OR use the command Set Station on page 8-140
2.
and Store the values
Brooks Automation
Revision 2.2
6-43
Operation
Off Center PICK and PLACE Feature
MagnaTran 7.1 User’s Manual
MN-003-1600-00
Set the VIA Values
1.
Set the servos to OFF
SET SERVOS OFF
2.
Manually move the end effector to the desired VIA point location
3.
Request the current absolute location
RQ POS ABS ALL
4.
Set the VIA point
See Set Station Option VIA Point on page 8-145
and Store Station Option on page 8-167.
6-44
Brooks Automation
Revision 2.2
MagnaTran 7.1 User’s Manual
MN-003-1600-00
Operation
Discrete I/O Control (DIO)
Discrete I/O Control (DIO)
Discrete Control through the robot's 50-pin discrete I/O port provides all the control
functions necessary to operate the robot in a system. Although serial control provides
a more comprehensive command set, DIO control is also useful in changing configuration or troubleshooting the robot.
DIO Control System
The robot has been designed for interface with a discrete I/O control unit for automatic sequencing. Suitable devices include: computers with parallel I/O interface
ports, programmable logic controllers, and discrete logic devices.
DIO Control Programming
The DIO interface functions in a command/acknowledge format. Whenever possible
the output signals should be checked for the appropriate acknowledgment signal
before initiating the next command. For example, if a MOVE command has been
asserted (PI 0-21 Pin-25 LOW), check for the COMMAND STATUS\ response (PO 021 Pin-24 LOW) before proceeding.
Initial DIO Configuration Procedure
Before operating the robot, the values for the station parameters must be set. The
robot offers independent, software-selectable parameters for all stations. These station parameters may be set through either the serial port or the robot's Control/Display Module (CDM).
For serial control, see Chapter 5 for connections and Chapter 8 for commands.
For CDM control, see Chapter 4 for command flow and Chapter 6 for operation.
DIO Fault Conditions
A motion error on any of the three servos will trigger a latched, clearable fault condition. Common causes of obstruction during extension include a closed valve,
improper station configuration, or improper sequencing. Take all possible precautions to avoid obstruction of the arm during rotation, since damage to the arm or the
robot mechanism may result. Permanent damage to the robot is unlikely, but the
wafer should be checked for damage after any motion error has occurred.
Brooks Automation
Revision 2.2
6-45
Operation
Discrete I/O Control (DIO)
MagnaTran 7.1 User’s Manual
MN-003-1600-00
DIO Start-up
To use the DIO control feature of the robot, a DIO START command (refer to DIO
Start on page 8-27) must be executed from the serial communications link or through
the CDM. A four second delay during power-up drives all outputs low and renders
the DIO function as not available.
To end the use of the DIO control feature, a DIO STOP command (refer to DIO Stop
on page 8-28) must be executed from the serial communications link or through the
CDM.
If power is shut off after DIO mode is started, in order to restart DIO mode, a DIO
STOP and then a DIO START must be issued through the serial interface or CDM to
restart the discreet interface.
DIO Signal Definitions
The actual signal definitions of DIO control depends on the I/O board type in the
robot (HIGH side or LOW side) and how the robot logic mapping was configured
(active HIGH or active LOW).
A HIGH SIDE I/O BOARD with ACTIVE HIGH will behave the same as a
LOW SIDE I/O BOARD with ACTIVE LOW.
A HIGH SIDE I/O BOARD with ACTIVE LOW will behave the same as a LOW
SIDE I/O BOARD with ACTIVE HIGH.
The following signal definitions will be discussed as two options:
OPTION A: HIGH side board with active HIGH
or LOW side board with active LOW
OPTION B: HIGH side board with active LOW
or LOW side board with active HIGH
6-46
Brooks Automation
Revision 2.2
MagnaTran 7.1 User’s Manual
MN-003-1600-00
Operation
Discrete I/O Control (DIO)
DIO Input Signals
DRIVE ENABLE
Enables the robot to respond to input commands.
Table 6-8: DIO Drive Enable
DRIVE ENABLE HIGH
DRIVE ENABLE LOW
OPTION A
Motors are DISABLED
Motors are ENABLED
OPTION B
Motors are ENABLED
Motors are DISABLED
RESET ERR
Resets any error conditions provided that the cause of the error condition has been cleared. The signal must be held for a minimum of 100ms
to be valid.
Table 6-9: DIO Reset Error
Rising Edge of Signal
Falling Edge of Signal
OPTION A
Not applicable
Error is CLEARED
OPTION B
Error is CLEARED
Not applicable
MOVE
Causes the robot to move as specified by the MOVE TYPE command.
The signal must be held for the duration of the move or a minimum of
100ms to be valid.
If this signal changes state before the move is completed, the move will
be aborted, the robot will be brought to a controlled stop, and the
motors will remain on. If this signal changes state after the move is completed the robot will stay at its current position.
Table 6-10: DIO MOVE
Rising Edge of Signal
Brooks Automation
Revision 2.2
Falling Edge of Signal
OPTION A
Not applicable
MOVE begins
OPTION B
MOVE begins
Not applicable
6-47
Operation
Discrete I/O Control (DIO)
MagnaTran 7.1 User’s Manual
MN-003-1600-00
MOVE TYPE (0-1)
Defines the type of move to be executed when the MOVE line is brought
low.
Table 6-11: DIO Move Type
Move Type
OPTION A
OPTION B
Bit 1
Bit 0
SYNC and HOME
1
1
GOTO
1
0
PICK
0
1
PLACE
0
0
SYNC and HOME
0
0
GOTO
0
1
PICK
1
0
PLACE
1
1
ARM
Specifies the arm to be used when the MOVE command is issued.
Table 6-12: DIO Arm
LOW
HIGH
OPTION A
Arm B is used
Arm A is used
OPTION B
Arm A is used
Arm B is used
STATION NUMBER (0-4)
Specifies the station to be accessed by the robot during a MOVE.
6-48
Brooks Automation
Revision 2.2
MagnaTran 7.1 User’s Manual
MN-003-1600-00
Operation
Discrete I/O Control (DIO)
Table 6-13: DIO Station Selection
Brooks Automation
Revision 2.2
Station #
OPTION A
Station #
OPTION B
Bit 4
Bit 3
Bit 2
Bit 1
Bit 0
32
1
0
0
0
0
0
31
2
0
0
0
0
1
30
3
0
0
0
1
0
29
4
0
0
0
1
1
28
5
0
0
1
0
0
27
6
0
0
1
0
1
26
7
0
0
1
1
0
25
8
0
0
1
1
1
24
9
0
1
0
0
0
23
10
0
1
0
0
1
22
11
0
1
0
1
0
21
12
0
1
0
1
1
20
13
0
1
1
0
0
19
14
0
1
1
0
1
18
15
0
1
1
1
0
17
16
0
1
1
1
1
16
17
1
0
0
0
0
15
18
1
0
0
0
1
14
19
1
0
0
1
0
13
20
1
0
0
1
1
12
21
1
0
1
0
0
11
22
1
0
1
0
1
10
23
1
0
1
1
0
9
24
1
0
1
1
1
8
25
1
1
0
0
0
7
26
1
1
0
0
1
6
27
1
1
0
1
0
5
28
1
1
0
1
1
4
29
1
1
1
0
0
3
30
1
1
1
0
1
2
31
1
1
1
1
0
1
32
1
1
1
1
1
6-49
Operation
Discrete I/O Control (DIO)
MagnaTran 7.1 User’s Manual
MN-003-1600-00
R POSITION
Used in MOVE Type GOTO. The arm will extend or retract at the specified station.
NOTE: The EXTEND position is defined using the CDM or the serial interface.
The RETRACT position is usually the factory set retract position.
Table 6-14: DIO R POSITION
LOW
HIGH
OPTION A
GOTO EXTEND
GOTO RETRACT
OPTION B
GOTO RETRACT
GOTO EXTEND
Z POSITION
Used in MOVE Type GOTO. The arm will move up or down in the Z
axis at the specified station. Z motion is performed at the RETRACT
position if radial motion is also specified. Any Z motion may be performed if the arm is already EXTENDED at the station.
NOTE: Up and down positions are defined using the CDM or the serial
interface.
Table 6-15: DIO Z POSITION
LOW
6-50
HIGH
OPTION A
GOTO UP
GOTO DOWN
OPTION B
GOTO DOWN
GOTO UP
Brooks Automation
Revision 2.2
MagnaTran 7.1 User’s Manual
MN-003-1600-00
Operation
Discrete I/O Control (DIO)
ACCELERATION ARM A
Changes the arm ‘A’ speed. Arm motions may have two speeds.
Slow: velocities and accelerations safe for wafer transport
Fast: higher velocities and accelerations when no wafer is on
the end effector.
NOTE: The actual speed of the arms is determined by both the End Effector
‘A’ and End Effector ‘B’ parameters. Full speed will only be
achieved if both end effectors are empty.
Table 6-16: DIO Acceleration Arm A
LOW
HIGH
OPTION A
HIGH speed
LOW speed
OPTION B
LOW speed
HIGH speed
ACCELERATION AT ARM B
Changes the arm ‘B’ speed. Arm motions may have two speeds.
Slow: velocities and accelerations safe for wafer transport
Fast: higher velocities and accelerations when no wafer is on
the end effector.
NOTE: The actual speed of the arms is determined by both the End Effector
‘A’ and End Effector ‘B’ parameters. Full speed will only be
achieved if both end effectors are empty.
Table 6-17: DIO Acceleration Arm B
LOW
Brooks Automation
Revision 2.2
HIGH
OPTION A
HIGH speed
LOW speed
OPTION B
LOW speed
HIGH speed
6-51
Operation
Discrete I/O Control (DIO)
MagnaTran 7.1 User’s Manual
MN-003-1600-00
DIO Output Signals
POWERED
Indicates the robot servos are turned on or not.
Table 6-18: DIO Servo Control
LOW
HIGH
OPTION A
Servos ON
Servos OFF
OPTION B
Servos OFF
Servos ON
DISCRETE CONTROL
Indicates the robot is in DIO control or not.
Table 6-19: DIO Control
LOW
HIGH
OPTION A
DIO control
other control
OPTION B
other control
DIO control
ERROR
Indicates there is a current error condition (see ERROR NUMBER
below).
Table 6-20: DIO Error Report
LOW
6-52
HIGH
OPTION A
No error
ERROR
OPTION B
ERROR
No error
Brooks Automation
Revision 2.2
MagnaTran 7.1 User’s Manual
MN-003-1600-00
Operation
Discrete I/O Control (DIO)
ERROR NUMBER (0-2)
Indicates the error that has occurred.
Table 6-21: Error Codes
Error Condition
OPTION A
OPTION B
Bit 2
Bit 1
Bit 0
No Error
1
1
1
Robot commanded to move
before being “homed”
1
1
0
“Home” sync failed
1
0
1
Motion error
1
0
0
wafer not detected
0
1
1
wafer detected
0
1
0
Valve interlock error
0
0
1
Other errors
0
0
0
No Error
0
0
0
Robot commanded to move
before being “homed”
0
0
1
“Home” sync failed
0
1
0
Motion error
0
1
1
wafer not detected
1
0
0
wafer detected
1
0
1
Valve interlock error
1
1
0
Other errors
1
1
1
REFERENCED STATUS
Indicates the robot is referenced.
Table 6-22: DIO Referenced Status
LOW
Brooks Automation
Revision 2.2
HIGH
OPTION A
Referenced
Not referenced
OPTION B
Not referenced
Referenced
6-53
Operation
Discrete I/O Control (DIO)
MagnaTran 7.1 User’s Manual
MN-003-1600-00
COMMAND STATUS
Indicates if the robot is moving or stopped.
Table 6-23: DIO Command Status
LOW
HIGH
OPTION A
Stopped
Moving
OPTION B
Moving
Stopped
ARM IN USE
Indicates robot arm is in use.
Table 6-24: DIO Arm in use
LOW
HIGH
OPTION A
ARM B in use
ARM A in use
OPTION B
ARM A in use
ARM B in use
AT STATION
Indicates the robot is at the specified station or not.
Table 6-25: DIO Arm at Station
LOW
HIGH
OPTION A
Robot at Station
Robot not at Station
OPTION B
Robot not at Station
Robot at Station
TARGET STATION
Specifies the station to be accessed by the robot during a move. Refer to
Table 6-13 for the station assignments.
6-54
Brooks Automation
Revision 2.2
MagnaTran 7.1 User’s Manual
MN-003-1600-00
Operation
Discrete I/O Control (DIO)
R POSITION STATUS
Indicates the current position of the arm in the R (radial) axis.
Table 6-26: R Position Status
Position
OPTION A
OPTION B
Bit 1
Bit 0
Not at EXTEND or RETRACT
position
1
1
At the RETRACT position
1
0
At the EXTEND position of the
current station
0
1
not used
0
0
Not at EXTEND or RETRACT
position
0
0
At the RETRACT position
0
1
At the EXTEND position of the
current station
1
0
not used
1
1
Z POSITION STATUS
Indicates the current position of the arm in the Z (vertical) axis.
Table 6-27: Z Position Status
Position
OPTION A
OPTION B
Brooks Automation
Revision 2.2
Bit 1
Bit 0
Not at UP or DOWN position
1
1
At the DOWN position of current
station
1
0
At the UP position of the current
station
0
1
not used
0
0
Not at UP or DOWN position
0
0
At the DOWN position of current
station
0
1
At the UP position of the current
station
1
0
not used
1
1
6-55
Operation
Discrete I/O Control (DIO)
MagnaTran 7.1 User’s Manual
MN-003-1600-00
To change a robot to Active Low, use the following serial commands:
REMOVE IO DIO_IN
MAP DIO_IN NUMERIC_IN LOW TO DIGITAL_IN 0x7fffffff
REMOVE IO DIO_OUT
MAP DIO_OUT NUMERIC_OUT LOW TO DIGITAL_OUT 0x7ffff
To change a robot to Active High, use the following serial commands:
REMOVE IO DIO_IN
REMOVE IO DIO_OUT
RESET
To check the current state of the robot:
RQ IO MAP ALL
Enable DIO Initialization Sequence
Upon start up, a particular initialization sequence must be followed to enable the servos and reference all axes. When the incremental encoders used in the robot are powered, they are not referenced in absolute space. Therefore, part of the initialization
sequence includes moving the robot’s arm to a known HOME position on each axis
and resetting the corresponding encoder. This references the encoders in absolute
space. The initialization sequence is the same for all robots even though they have different style arms. The sequence is described below:
1.
Assert DRIVE ENABLE
2.
Set MOVE Type to HOME
3.
Assert MOVE
Arm moves to Radial (R) Home
Arm moves to Vertical (Z) Home
Arm moves to Rotational (T) Home
Robot asserts HOME STATUS and COMMAND STATUS signals
Robot Motion DIO Inhibition
The motion of the robot can be halted or inhibited to ensure the safety of the robot
and/or wafers in several ways as follows:
1.
6-56
In DIO mode, any motion can be halted by dis-asserting the MOVE command
bit. This action will halt any motion with profiled velocity. While this profiled
Brooks Automation
Revision 2.2
MagnaTran 7.1 User’s Manual
MN-003-1600-00
Operation
Discrete I/O Control (DIO)
velocity does not allow the robot to stop immediately, it minimizes deceleration and consequently reduces the possibility of wafer motion relative to the
end effector and of subsequent wafer damage.
2.
If a fault or error condition occurs, and any axis becomes un-referenced, normal motion is not resumed following re-assertion of the DRIVE ENABLE bit.
The robot must be re-referenced according to the Enable DIO Initialization
Sequence in the previous section.
3.
If CDM control is released to DIO control while the robot arm is not fully
retracted, then the robot proceeds in a safe sequence to the position defined by
the current DIO inputs. However, Brooks Automation does not recommend
that the CDM control be released while in non-station coordinate mode, such
as JOG or ABS. This could result in a fault or error condition under certain circumstances. Instead, Brooks recommends placing the robot into station coordinate mode by selecting the MOVE function before releasing the CDM.
Brooks Automation
Revision 2.2
6-57
Operation
PASIV™ Safety Feature Operation
MagnaTran 7.1 User’s Manual
MN-003-1600-00
PASIV™ Safety Feature Operation
The MagnaTran 7’s PASIV™ safety feature limits travel of the robot arm to user programmed access zones or “workspaces”.
To ensure the safety of high value wafers and equipment, safety zones are created
preventing access to defined zones thereby preventing collisions. These zones are
contained in a transferable data file which can be used to minimize down time during
service.
The Workspace Overview
A workspace is defined as a three dimensional volume of space around the robot’s
home position in which the robot is allowed to access. Attempting to send the robot
to any space outside of the PASIV™ environment will cause an error message.
The PASIV™ feature is an optional mode that must be enabled by the user. By
default, the robot will not operate in the workspace mode.
Once the workspace feature is enabled, one pre-defined workspace will exist called
the home workspace. This workspace defines the safe travel area around the robot
home position. The user then defines the workspaces around the robot’s total movement to each work station. This workspace may be created by one of two methods:
the user may define the desired workspace by manually entering desired values or
the workspace may be automatically around the taught work stations.‘
A workspace is defined by eleven parameters:
6-58
1.
Name: A maximum 20-character, alphanumeric name unique to the
workspace.
2.
State: Specifies whether the workspace is active or inactive.
3.
Interlock: A maximum 20-character, alphanumeric name of a defined
slot valve type mapped input signal.
4.
Arm: Associates an arm to the workspace; may be A, B, or both.
5.
Station: Indicated which station, if any, is associated with the workspace.
6.
Rmin: The minimum radial axis limit for the workspace.
7.
Tmin: The minimum theta axis limit for the workspace.
Brooks Automation
Revision 2.2
MagnaTran 7.1 User’s Manual
MN-003-1600-00
Operation
PASIV™ Safety Feature Operation
8.
Zmin: The minimum Z axis limit for the workspace.
9.
Rmax: The maximum radial axis limit for the workspace.
10.
Tmax: The maximum theta axis limit for the workspace.
11.
Zmax: The maximum Z axis limit for the workspace.
HOME Workspace
The “home workspace” is a pre-defined volume of space enclosing the robot around
the home position. Within this workspace, the robot is limited to an extend length
equal to its retract value for the radial axis, a vertical lift height equal to the maximum
Z axis height, and no rotational limit for the theta axis. The home workspace is automatically created by the firmware and may be different in volume from robot to robot
since robots vary in arm sizes. The home workspace can not be changed or deleted.
If the home workspace is the only workspace in existence, the robot will only be permitted to home and move about its home volume.
Other Workspaces
Moving from workspace to workspace can be achieved only if the workspace are adjacent or overlapping. Although a workspace may be adjacent or overlapping, movement between one and the other may still be prohibited if the the point of crossing is
not common for both workspaces. Movement between disjointed workspaces is
always prohibited.
The only exception to this is when stations are being taught from the CDM interface.
Since workspaces may not yet be defined for station because the coordinated for the
station are unknown, movement of the robot from the learn station menus on the
CDM will permit movement into the yet to be defined workspaces.
Creating Workspaces
Creating workspaces can be achieved one of two ways: manual create or auto-create.
Manual Create
Creating workspaces manually is always available to the user. The manual
creation of a workspace requires the use of several commands. The first command is CREATE WSPACE which requires a unique workspace name as part
of the command. Once a workspace has been created, the default values associated with all the remaining ten parameters is as follows:
Brooks Automation
Revision 2.2
6-59
Operation
PASIV™ Safety Feature Operation
MagnaTran 7.1 User’s Manual
MN-003-1600-00
STATE: INACTIVE
Interlock: NONE
Arm: NONE
Station: 0 (indicating no stations associated with this workspace)
Rmin: 0 microns
Tmin: 0 millidegrees
Zmin: 0 microns
Rmax: 0 microns
Tmax: 0 millidegrees
Zmax: 0 microns
The user can now change the default parameters with the SET WSPACE command. Again the name of the newly created workspace must be a part of the
command. This command only updates the volatile memory of the workspace
definition. To store the workspace definition to nonvolatile memory, the user
must use the STORE WSPACE command which also requires the workspace
name as part of the command. When changing the radial and Z axis parameters, their respectively minimum values must be equal to or less than their
respective maximum values. For the theta axis, the minimum can be greater
than the maximum.
Auto-Create
To take advantage of workspace auto-create, the mode must be turned on. The
SET WSPACE AUTO-CREATE command is used to turn the auto-create on or
off. In auto-create mode, a workspace is automatically created for a station
when the station is defined.
Station Definitions in Auto-Create
Serial Interface: If stations are set up using the serial interface, a volatile memory copy of the workspace will be created for the SET STN command. The STORE STN command must be issued to create a
nonvolatile memory copy of the workspace; or the STORE WSPACE
with the workspace name as part of the command.
CDM Interface: Defining station from the CDM interface will automatically create a volatile memory and nonvolatile memory copy of the
workspace definition.
Reserved Workspace Names
Once a station had been defined and a workspace has been automatically created, the
name associated with the workspace definition is dependent on the station and arm
being defined.
6-60
Brooks Automation
Revision 2.2
MagnaTran 7.1 User’s Manual
MN-003-1600-00
Operation
PASIV™ Safety Feature Operation
The following names are reserved names and cannot be used by the user with the
CREATE WSPACE command.
Table 6-28: Reserved Workspace Names
Station and Arm
Workspace
Name
Station and Arm
Workspace
Name
Station 1, Arm A
STN01A
Station 1, Arm B
STN01B
Station 2, Arm A
STN02A
Station 2, Arm B
STN02B
Station 3, Arm A
STN03A
Station 3, Arm B
STN03B
Station 4, Arm A
STN04A
Station 4, Arm B
STN04B
Station 5, Arm A
STN05A
Station 5, Arm B
STN05B
Station 6, Arm A
STN06A
Station 6, Arm B
STN06B
Station 7, Arm A
STN07A
Station 7, Arm B
STN07B
Station 8, Arm A
STN08A
Station 8, Arm B
STN08B
Station 9, Arm A
STN09A
Station 9, Arm B
STN09B
Station 10, Arm A
STN10A
Station 10, Arm B
STN10B
Station 11, Arm A
STN11A
Station 11, Arm B
STN11B
Station 12, Arm A
STN12A
Station 12, Arm B
STN12B
Station 13, Arm A
STN13A
Station 13, Arm B
STN13B
Station 14, Arm A
STN14A
Station 14, Arm B
STN14B
Station 15, Arm A
STN15A
Station 15, Arm B
STN15B
Station 16, Arm A
STN16A
Station 16, Arm B
STN16B
The values associated with the remaining ten workspace definition parameters are as
follows:
STATE: ACTIVE
Interlock: Same as STATION OPTION SBIT_SVLV_SEN.
Arm: Same as station arm.
Station: Station number
Rmin: Robot retract value
Tmin: Station T value
Zmin: Station Z value, Station lower value
Rmax: Station R value
Brooks Automation
Revision 2.2
6-61
Operation
PASIV™ Safety Feature Operation
MagnaTran 7.1 User’s Manual
MN-003-1600-00
Tmax: Station T value
Zmax: For slots < 2 = Station Z value; For slots > 1 = Station Z value +
(pitch (slots - 1))
Defining Tmin and Tmax
Tmin can be set to a value less than, equal to, or greater than Tmax. The robot will
consider the area starting from Tmin and rotating clockwise to Tmax as the valid theta
workspace. By this definition, workspaces starting from Tmax and rotating clockwise
to Tmin, or starting from Tmin and rotating counterclockwise to Tmax are outside of
the workspace.
Assigning an Interlock to a Workspace
To define an interlock to a workspace, the corresponding input signal must already be
mapped. The mapped input signal must be of wither SVLV_SEN or SBIT_SVLV_SEN
type. Refer to Operational Interlocks on page 6-23 for the description and operation of
the MAP command.
Once an interlock as been defined to a workspace, then the ability to access that workspace is dependent on the state of the interlock. If the interlock signal indicates that
the slot valve is closed, then the workspace is considered inactive and movement into
it is prohibited. If the interlock signal indicates that the slot valve is open, then access
into the workspace is permitted.
PASIV™ commands
The following commands are used to create, define and verify the PASIV™ workspaces:
Create Workspace on page 8-26
Remove Workspace on page 8-68
Request Workspace Mode on page 8-117
Request Workspace AutoCreate on page 8-116
Set Workspace on page 8-153
Set Workspace AutoCreate on page 8-154
Set Workspace Mode on page 8-155
Store Workspace on page 8-173
Store Workspace AutoCreate on page 8-174
Store Workspace Mode on page 8-175
6-62
Brooks Automation
Revision 2.2
MagnaTran 7.1 User’s Manual
MN-003-1600-00
Operation
Control/Display Module (CDM) Operation
Control/Display Module (CDM) Operation
The CDM may be plugged into or removed from the robot at any time.
All major functions available through the robot’s control software are available
through the CDM.
The CDM is designed to be easy to use and self explanatory.
Power Control
On/Off (CDM Mode)
When the CDM is turned on, it will identify itself to the user with the following
message:
BROOKS AUTOMATION
Next, it prompts for selection of the control mode to allow control and monitoring of the robot.
When the CDM is turned off, it relinquishes control of the robot to the host controller.
NOTE: The CDM does not relinquish control of the robot until it is turned off.
Unplugging the CDM while it is turned on will not return control of the
robot to the host controller.
The CDM will run an internal check upon power-up to determine if the
robot is in DIO control mode.
Emergency Stop (Standard)
The CDM Emergency Stop (EMS) button is located on the top of the CDM as
shown in Figure 6-12. To initiate an Emergency Stop, press down on the button.
The CDM Emergency Stop button will halt any robot motion currently in
progress and release servo control of the robot arms. An “Error, Emergency
Stop circuit is Active”, error 10029, will be displayed on the CDM (if the CDM
is turned on) and on the serial controller. All arm position data and arm referencing will remain.
Brooks Automation
Revision 2.2
6-63
Operation
Control/Display Module (CDM) Operation
MagnaTran 7.1 User’s Manual
MN-003-1600-00
DANGER
The Emergency Stop button will remove power to the motors. It does
NOT remove DC power to the robot. Electrical hazards still exist
when the Emergency Stop circuit is active.
NOTE: The CDM does not need to be in control of the robot for the Emergency Stop
button to work; nor does it have to be on. The CDM needs only to be
plugged into the robot to allow access to the E-STOP function.
CAUTION
The CDM Emergency Stop button will release the servos. If the robot
was in motion when the Emergency Stop button was pressed, inertial
motion will continue and risk of collision exists.
Plugging the CDM into the robot with the Emergency Stop button
pressed will cause the robot to perform an Emergency Stop.
While the Emergency Stop Circuit is active, the encoders remain powered. This
allows the arms to be physically moved but remain referenced. The current arm position will be updated on the CDM. When control of the robot is regained, the robot is
able to recover from floating, inertia and physical movement without having to home.
The robot will first retract, then plot out the new motion.
To re-establish the interlock, pull the Emergency Stop button out. To regain control of
the robot, press ESC. The robot will remind the user that the current condition is in
the Emergency Stop mode by reporting the error message. The arms will remain
without servo power until a motion command is entered.
6-64
Brooks Automation
Revision 2.2
MagnaTran 7.1 User’s Manual
MN-003-1600-00
Operation
Control/Display Module (CDM) Operation
Figure 6-12: Control/Display Module with Emergency Stop
No Emergency Stop Button (optional)
An optional CDM is obtainable without the EMS button. This CDM will not
meet SEMI S2-93 safety standards.
STOP Key
The STOP key stops any action in progress as fast as possible based upon the
wafer presence status of each arm. After a stop, the MagnaTran 7 robot
remains referenced allowing it to execute any additional commands.
NOTE: STOP and Emergency Off are the only commands the MagnaTran 7 will
respond to when it is in the midst of carrying out a command. The robot
will ignore all other keys, including the Off key, unless it has finished the
Brooks Automation
Revision 2.2
6-65
Operation
Control/Display Module (CDM) Operation
MagnaTran 7.1 User’s Manual
MN-003-1600-00
previous command.
Control Modes
The CDM has two operating modes: a Control mode and a Monitor mode.
After briefly displaying the power on message the CDM will display the “Mode Selection Prompt” for selection of an operating mode with the following message:
GET CONTROL
FOR THE CDM
(YES) (NO)
CDM Control Mode
Selecting “YES” will enable “Control Mode” providing access to all control and
monitoring functions on the CDM and will restrict the host controller to monitoring functions only.
If “Control Mode” has been entered, select the desired control or monitoring
function from the left-most keys on the CDM.
WARNING
There are no safety interlocks available when using the CDM to control movement of the robot. The user is directly responsible for ensuring that conditions are correct for safe operation of the robot. Visually
inspect for obstructions and do not allow access to persons in the arm
motion areas.
Monitor Mode
Selecting “NO” will enable “Monitor Mode” providing access to the CDM’s
“INFO” function only and does not restrict the host controller.
If “Monitor Mode” has been selected, select the “INFO” key to use the CDM’s
monitoring functions.
NOTE: Attempting to access any function other than “INFO” after selecting
“Monitor Mode” will cause the “Mode Selection Prompt” to be re-displayed.
6-66
Brooks Automation
Revision 2.2
MagnaTran 7.1 User’s Manual
MN-003-1600-00
Operation
Control/Display Module (CDM) Operation
Once the operating mode has been selected, the CDM will prompt for selection of a
function with the following message:
CHOOSE FUNCTION FROM
LEFT COLUMN KEYS
Key Descriptions
Once the operating mode has been established, the CDM will prompt for additional
selections or input. The CDM provides access to a multi-level functional command
structure, as shown in the simplified command-flow chart in Figure 4-7. The screen
will display menus, in descending order, that prompt the user for choices and data
entries.
The menus list and identify the options available and prompt the user for a choice
from among the options offered. For example, (Y/N) indicates that the user should
choose the “Yes” key or the “No” key. Some menus present multiple choices, such as
L, S, P or 1,2,3,4, which indicates that the user should choose from among the keys
labeled “Lower”, “Slot”, “Pitch” or “1”, “2”, “3”, “4” as appropriate. In all cases the
choices will refer to dedicated keys; there is never any need to spell out commands.
Figure 4-7 shows a functional block diagram of the CDM controls. The following
tables list the keys provided on the CDM and are intended to be a quick lookup reference only. For a full description of these keys, including examples and details on their
use, see the individual key descriptions that follow these tables.
Table 6-29: Major Control Keys
Key
Description
Page #
On/Off
On-Off key turns the CDM on or off
6-63
Quit
Quit key returns CDM display to Main Menu.
6-80
STOP
Stop key stops all robot actions immediately.
6-65
Escape
Escape key moves CDM display back one menu.
6-80
Backspace
Backspace key allows entered characters to be deleted.
6-80
Brooks Automation
Revision 2.2
6-67
Operation
Control/Display Module (CDM) Operation
MagnaTran 7.1 User’s Manual
MN-003-1600-00
Table 6-30: Left Column (Major Function) Keys
Key
Description
Page #
Home
Home key selects the Home Menu.
6-69
Move
Move key selects the Move Menu.
6-70
Wafer Xfer
Wafer Xfer key selects the Wafer Transfer Menu.
6-72
Setup
Setup key selects the Setup Menu.
6-73
Info
Info key selects the Information Menu.
6-77
Self Test
Self Test key selects the Self Test Menu.
6-79
Table 6-31: Axis Parameter Selection Keys
Key
Description
Page #
R
R axis key specifies the R axis for data entry or query.
6-78
T
T axis key specifies the T axis for data entry or query.
6-78
Z/BTO
Z axis key specifies the Z axis for data entry or query,
this key is also used to specify BTO for data entry or
query.
6-78
Lower
Lower key is used to specify the Lower value for a specific station for data entry or query.
6-79
Slot
Slot key is used to specify the Slot number for a specific
station for data entry or query.
6-79
Pitch
Pitch key is used to specify the Pitch between slots for a
specific station for data entry or query.
6-79
All
All key is used to specify ALL values for data entry or
query.
6-79
Table 6-32: Data Entry/Axis Control Keys
Key
6-68
Description
Page #
1
Enters “1”
6-80
2/Down
Enters “2”, also used to Jog “Down”
6-80
Brooks Automation
Revision 2.2
MagnaTran 7.1 User’s Manual
MN-003-1600-00
Operation
Control/Display Module (CDM) Operation
Table 6-32: Data Entry/Axis Control Keys
Key
Description
Page #
3/No
Enters “3”, also used to respond “No” to prompts
6-80
4/Retract
Enters “4”, also used to Jog “Retract”
6-80
5
Enters “5”
6-80
6/Extend
Enters “6”, also used to Jog “Extend”
6-80
7/
Enters “7”, also used to Jog “Counter Clockwise”
6-80
8/Up
Enters “8”, also used to Jog “Up”
6-80
9/
Enters “9”, also used to Jog “Clockwise”
6-80
0/-
Enters “0”, also used to set value to a Negative number
6-80
.
Enters ”.”
6-80
CR/Yes
Used to indicate numerical entry is complete, also used
to respond “Yes” to prompts
6-80
Left Column Keys
The Main Menu prompts the user to press any function key from the left column of
the keyboard, shown in Figure 6-12. These left column keys select the top-level functions:
Home:
Moves arms to the Home (reference) position along the specified axis and
resets the coordinate system for that axis. Home is also capable of performing
an interlocked 3-Axis Home. When “HOME” is selected the CDM will request
the selection of an axis with the following message:
HOME AXIS ?
(ALL) (R) (T) (Z)
Once an axis is selected the robot will immediately start homing that axis. If
“ALL” is selected the robot will home “R” first, then “T”, and finally “Z”.
If an error is encountered during HOME, the error will be displayed on the
screen. Pressing a CDM key will display the previous screen or a “wait for
Brooks Automation
Revision 2.2
6-69
Operation
Control/Display Module (CDM) Operation
MagnaTran 7.1 User’s Manual
MN-003-1600-00
motion to complete” screen will appear. This ensures that the CDM will process one command at a time.
CAUTION
There is no interlocking provided on a single axis HOME. Check to
ensure that the Arm is retracted before issuing a HOME T or HOME Z
command. Using the HOME ALL command insures interlocking and
is the safest command to use.
Move:
Allows the user direct control of the robot. There are three movement options
available; Move to Station, Move to Specified Location, and Jog. When
“MOVE” is selected the CDM will request selection of the arm to be moved
with the following message:
MOVE ?
(1) ARM A
(2) ARM B
Press either “1” or “2” on the numeric keypad to select the arm to be moved.
Once the arm to be moved is selected the CDM will request selection of the
move type, described below, with the following prompt:
MOVE ARM _ ?
(1) TO STATION
(2) TO LOCATION
(3) JOG
NOTE: In the preceding display presented on the CDM the “_” indicates that the
CDM will display the selected arm and station.
Press either “1”, “2”, or “3” on the numeric keypad to select the desired move
type. Refer to the following descriptions for a definition of each move type.
Station Mode: enables moving the robot in Station Coordinates, which are
defined as; R - Extended or Retracted, T - defined for a particular station number, Z - Up or Down. Once Station Mode is selected the CDM will request the
station number, then will request confirmation of movement before executing.
6-70
Brooks Automation
Revision 2.2
MagnaTran 7.1 User’s Manual
MN-003-1600-00
Operation
Control/Display Module (CDM) Operation
TO STATION:
MOVE TO
STN 1
enter STN#<CR>
NOTE: Move always goes to Slot # 1 of the specified station. However, Wafer Xfer
does support access to multiple slots at a multi-slotted station.
Location Mode: enables moving the robot in Absolute Coordinates (relative to
the Home position) defined as a location determined by the specified numerical values for R, T, and Z. Once Location Mode is selected the CDM will
request the axis to be moved and the coordinate for that axis with the following
prompt:
(R)
(T)
(Z)
LOCATE AXIS ?
R=_ _ _ _ _0
T=_ _ _ _ _0
Z=_ _ _ _ _0
NOTE: In the preceding display presented on the CDM the “_” indicates that the
CDM will display the value for each setting.
Press either “R”, “T”, or “Z” on the axis section of the keypad to select the
desired axis and then enter the desired location for that axis. Once all axes are
specified as desired press <CR> to initiate the move.
Jog Mode: enables moving the robot incrementally from its current location
using the keys labeled Extend or Retract (R motion), Up or Down (Z motion),
and the Circular Arrow keys (T motion). Although Jog mode allows moving
with the arm extended, such motion is more likely to result in inadvertent collision with the chamber or access port walls; the Module will suggest that the
user retract the arms before moving in T or Z. Once Jog Mode is selected the
CDM will display the following prompt:
JOG
(RET) (EXT) R= _ _ _ _ _ _
(CW) (CCW) T= _ _ _ _ _ _
(UP) (DN)
Z= _ _ _ _ _ _
JOG UNREFERENCED Z
Brooks Automation
Revision 2.2
6-71
Operation
Control/Display Module (CDM) Operation
MagnaTran 7.1 User’s Manual
MN-003-1600-00
To insure that the arm can move from difficult positions, Jog mode allows the
user to move the arm even if it has lost its referencing. Since the location of an
unreferenced arm is undefined, motion beyond the allowed limits is possible,
conceivably resulting in impact with the Z axis mechanical stops, top and bottom, or the chamber interior. The module warns the user that the user is operating in an unreferenced mode.
Wafer Xfer:
Allows the user to execute a wafer transfer to or from a specified station. There
are two transfer options available; “PICK” and “PLACE”. When “Wafer Xfer”
is selected the CDM will request selection of the arm to be used with the following message:
TRANSFER USING
WHICH ARM
(1) ARM A
(2) ARM B
Press either “1” or “2” on the numeric keypad to select the arm to be used.
Once the arm to be used is selected the CDM will request selection of the station, with the following prompt:
TRANSFER WITH ARM _
STATION _
(enter STN# <CR>)
NOTE: In the preceding display presented on the CDM the “_” indicates that the
CDM will display the selected arm and station.
Enter the number of the station to be involved in the transfer using the numeric
keypad and press the <CR> key. Once the station is selected the CDM will
request selection of the transfer type, described below, with the following
prompt:
WITH ARM _
(1) PERFORM PICK
(2) PERFORM PLACE
NOTE: In the preceding display presented on the CDM the “_” indicates that the
6-72
Brooks Automation
Revision 2.2
MagnaTran 7.1 User’s Manual
MN-003-1600-00
Operation
Control/Display Module (CDM) Operation
CDM will display the selected arm.
Press either “1” or “2” on the numeric keypad to initiate the desired transfer
type. Refer to the descriptions below for a definition of each transfer type.
Pick: moves the specified arm to the specified station and slot, extends at the
“lower” height, raises the arm to pick a wafer, and retracts the arm at the
“BTO” height.
Place: moves the specified arm to the specified station and slot, extends at the
“BTO” height, lowers the arm to place a wafer, and retracts the arm at the
“lower” height.
NOTE: Refer to Table 6-1: Arm Speeds on page 6-14 Chapter 8: Command Referencefor a discussion of robot movement speeds, which are based on the
robot’s tracking the “Pick” and “Place” history for each arm.
Setup:
Allows the user to set up both the CDM and the robot for operation. There are
six setup options available. These options are displayed in the following message when the “Setup” function key is depressed on the CDM:
SET UP ?
(1) CDM SPEED
(2) STATIONS
(3) CONFIG ROBOT
(4) ENABLE DIO
(5) Z AXIS STATE
Make an option selection from (1) to (6) on the numeric keypad to select the
device to be setup. Once the device is selected, the CDM will request selection
of setup functions for that device. Refer to the appropriate sections below for
descriptions of each device’s set up.
CDM SPEED
This option is not available for this robot.
STATIONS
Enables the user to Store, in EEPROM, the parameters for 16 stations per
arm. Each station has its own Extend position (R), Theta position (T),
Base Transfer Offset (BTO), Lower position, Number of Slots, and Pitch.
Brooks Automation
Revision 2.2
6-73
Operation
Control/Display Module (CDM) Operation
MagnaTran 7.1 User’s Manual
MN-003-1600-00
Additionally the sensors for each station may be selected and configured. The CDM provides two methods of setting these parameters,
Learn mode and Assign mode. These modes and the detailed use of
Setup - Station is discussed later in this section under Setting Up Stations.
When STATIONS is selected the CDM will request selection of the type of
setup with the following message:
SETUP STN _ ARM _
(1) ASSIGN LOCATION
(2) LEARN R, T, BTO
(3) LEARN LOWER>
(4) SET WAFER SENSOR>
(5) SET SLOT VLV SEN
(6) ARM RETRACT SEN>
(7) ARM EXTEND ENABLE
(8) SET VLV SEN>
NOTE: In the preceding display presented on the CDM the “_” indicates that the
CDM will display the selected station and arm and the “>” indicates that
pressing the <CR> key will cause the next menu selection to be displayed.
Not all of the menu is visible at one time. Press YES to display the rest of
the menu.
Press “1” through “8” on the numeric keypad to select the type of setup
desired. Once the item to be setup is selected the CDM will request selection of
setup functions for that device. Refer to the appropriate sections below for
descriptions of each device’s set up.
ASSIGN LOCATION
enables the user to directly assign the parameters for the previously
specified station. This command is useful when the station parameters
are already known.
LEARN R, T, BTO
Enables the user to teach the location for the previously specified station
using the “Jog” function or using the “Hand Locate” function. Hand
Locate allows the user to position the robot’s end effector by hand in
both the R and T axes and then store that location.
6-74
Brooks Automation
Revision 2.2
MagnaTran 7.1 User’s Manual
MN-003-1600-00
Operation
Control/Display Module (CDM) Operation
LEARN LOWER
Enables the user to teach the lower value for the previously specified
station using the “Jog” function.
SET WAFER SENSOR
Enter the type of wafer sensor.
NOTE: The sensors must be configured using the MAP command before
they can be assigned using the CDM
SET RETRACT WAFER SENSOR
Enables the user to configure the wafer sensor in the retract position at the specified station. The CDM will display the list of previously configured Retract Sensors to the user for selection.
SET EXTEND WAFER SENSOR
Enables the user to configure the wafer sensor in the extend position at the specified station. The CDM will display the list of previously configured Extend Sensors to the user for selection.
SET RADIAL MOTION SENSOR
Enables the Radial Motion Sensor (R_MT) feature used to determine the load on the pan of the Leapfrog arm set.
SET SLOT VLV SEN
Enables the user to configure the slot valve sensor at the specified station. The CDM will display the list of previously configured Slot Valve
Sensors to the user for selection.
NOTE: The sensors must be configured using the MAP command before
they can be assigned using the CDM
ARM RETRACT SEN
Enables the user to configure the arm retract sensor at the specified station. The CDM will display the list of previously configured sensors to
the user for selection.
Brooks Automation
Revision 2.2
6-75
Operation
Control/Display Module (CDM) Operation
MagnaTran 7.1 User’s Manual
MN-003-1600-00
NOTE: The sensors must be configured using the MAP command before
they can be assigned using the CDM
ARM EXTEND ENABLE
Enables the user to configure the arm extend sensor at the specified station. The CDM will display the list of previously configured sensors to
the user for selection.
NOTE: The sensors must be configured using the MAP command before
they can be assigned using the CDM
SET VLV SEN
Enables the user to configure the valve sensor at the specified station.
The CDM will display the list of previously configured sensors to the
user for selection.
NOTE: The sensors must be configured using the MAP command before
they can be assigned using the CDM
CONFIG ROBOT
Enables the user to configure the robot. Currently there are two choices:
Application (not available at this time) and Speed setting. Speed setting
allows the user to set the acceleration and speed for (R), (T), and (Z) for
both wafer and pan. (This option is not available for this robot).
Config Robot ?
(1) APPLICATION
(2) SPEED SETTING
(3) COMM SETTING>
(4) ARM MOUNT
(5) ARM STATE
(7) SET SERVOS OFF>
ENABLE DIO
The MagnaTran 7 robot may be controlled and monitored using discrete
I/O lines instead of using the serial communications link. This command disables all serial control functions and enables Discrete I/O control.
6-76
Brooks Automation
Revision 2.2
MagnaTran 7.1 User’s Manual
MN-003-1600-00
Operation
Control/Display Module (CDM) Operation
A programmed 4 second delay follows the DIO START command while
internal functions ensure proper power-up. Outputs are driven low for
this period.
Z AXIS STATE
This command is not supported.
INFO
Allows the user to request operating and status information about both the
CDM and the robot. There are three options available; “CDM SPEED”, “STATIONS”, and “LOCATION”. When “Info” is selected the CDM will request
selection of the type of information required with the following message:
INFO ?
(1) CDM SPEED
(2) STATIONS
(3) LOCATION
Press either “1”, “2”, or “3” on the numeric keypad to select the type of information desired. Once the information request is specified the CDM will either
display the associated information or request selection of additional parameters. Refer to the appropriate sections below for descriptions of each type of
information.
CDM SPEED
Displays the currently configured baud rate for the CDM.
STATIONS
Displays robot position information and sensor set up for the specified
station and arm. The CDM will present all station variables with the following display:
STN _ ARM _ Loc
(R) = _ _ _ _ _ _ _
(T) =
______
(BTO) = _ _ _ _ _
(L) =
_____
(S) =
__
(P) =
_____
(0) SAFE= _ _ _ _ _
(1) PUSH= _ _ _ _ _
Brooks Automation
Revision 2.2
>
>
6-77
Operation
Control/Display Module (CDM) Operation
MagnaTran 7.1 User’s Manual
MN-003-1600-00
RE SENSOR ASSIGNED
NOT PRESENT
OBJECT NOT DETECTED >
EX SENSOR ASSIGNED
NOT PRESENT
OBJECT NOT DETECTED >
NOTE: In the preceding display, the “_” indicates that the CDM will display the
selected station, arm, and value for each setting and the “>” indicates that
pressing the <CR> key will cause the next display selection to be displayed.
LOCATION
Displays robot position information for the selected axis and arm.
Axis Parameter Selection Keys
The MagnaTran 7 robot has motion capabilities in three axes; R (Radial), T (Rotational), and Z (Vertical). These motion parameters are grouped in the second column
on the CDM key pad.
R
R is the absolute radial extension of the center of the wafer relative to the center
of the robot. Note that due to the nature of the Brooks “frog leg” arm it is not
possible to set R = 0.
T
T is the absolute rotational position of the robot relative to the Home position.
Z Associated Parameters
Z/BTO
Z is the absolute vertical position relative to Home (the lowest position). The
Base Transfer Offset (BTO) is defined as the distance between the Home position and the Wafer Transfer Plane (WTP). The WTP is defined by the bottom
surface of the wafer during wafer transport (for a multi-slotted station, during
transport to the first slot). In the UP position, therefore, the upper surface of
the robot’s end effector is coincident with the Wafer Transfer Plane.
6-78
Brooks Automation
Revision 2.2
MagnaTran 7.1 User’s Manual
MN-003-1600-00
Operation
Control/Display Module (CDM) Operation
Lower
The distance between the Up position (defined as coincident with the wafer
Transfer Plane) and the Down position of the robot end effector. Used to set the
distance of the end effector below the WTP. Used after placing a wafer in a slot
or before picking up a wafer in a slot.
Slot
The Slot key has two different meanings depending on the context in which it
is used. When used as a position parameter for a multi-slotted station, it stands
for the Slot number, that is the vertical location in station coordinates. When
used as a description parameter in a multi-slotted station, it means the total
number of slots assigned to that station.
Pitch
For a multi-slotted station, the distance between the slots (assumed to be a uniform spacing). This parameter does not apply to single slot stations.
All
The All key allows the operator to set all the available variables using an automatic sequence that prompts for the values of all the parameters, one by one.
SELF TEST
LIFE TEST
Allows the user to initiate a life test routine with continuous display of
the cycle count on the CDM while in progress.
NOTE: Stations 1 and 2 must be defined before executing a life test. Slot valves
must be opened.
PICK STN 1 ARM A
PLACE STN 1 ARM B
PICK STN 2 ARM B
PLACE STN 2 ARM A
Brooks Automation
Revision 2.2
6-79
Operation
Control/Display Module (CDM) Operation
MagnaTran 7.1 User’s Manual
MN-003-1600-00
Moving in the Menu Tree
Making choices moves the user down the menu tree shown in Figure 4-7. Completing
an action will typically leave the user at the same function. Two keys are useful in
moving back up the tree:
Escape
Moves back one level.
Quit
Moves back to the Main Menu.
Entering Data Values
Keypad
Some menus require that the user enter numerical data using the keypad in the
lower right part of the CDM key pad. In all cases, the menu first appears with
the current values of the variables showing on the screen. To select a specific
variable press the key indicated in parenthesis to the left of that variable. To
keep the original value, press <CR>. To change the value (the current value
will disappear when the new value is entered), type in the desired numbers
using the keypad. To enter a negative number press the -\+ key, which toggles
between a plus or a minus sign in the digit preceding the decimal (a negative
value is allowed only for Theta (T)). When the value is correct, press <CR> to
save the entry.
Units:
Theta in decimal millidegrees
R and all Z parameters in micrometers
Slot, Stn# are integers (1 - 99)
The legal limits for all the parameters appear in the Appendix under Ranges
and Units for Robot Parameters.
Backspace
To correct a mistake entering an axis value, use the Backspace key.
6-80
Brooks Automation
Revision 2.2
MagnaTran 7.1 User’s Manual
MN-003-1600-00
Operation
Control/Display Module (CDM) Operation
Setting Up Stations
Setting up the stations involves assigning a station number to a particular device to be
serviced by the robot and specifying its unique values for Base Transfer Offset (BTO),
Theta position (T), Extended position (R), and Lower position. If the device has multiple slots, the operator must also establish the number of slots and the pitch between
slots.
Once the physical parameters are defined for a station, the sensors associated with
that station may be specified. Sensors may be specified at the extend and retract positions and may be specified as being either active high or active low.
The user sets station parameters using the Setup function. There are six setup functions available; “ASSIGN LOCATION”, “LEARN R, T, BTO”, “LEARN LOWER”,
“SET RE WAF SEN”, “SET EX WAF SEN”, “SET SLOT VLV SEN”. Once the arm and
station have been specified the CDM will request selection of the parameters to be set
up with the following message:
SETUP STN _ ARM _
(1) ASSIGN LOCATION
(2) LEARN R, T, BTO
(3) LEARN LOWER>
(4) SET WAFER SENSOR>
(5) SET SLOT VLV SEN
(6) ARM RETRACT SEN>
(7) ARM EXTEND ENABLE
(8) SET VLV SEN>
NOTE: In the preceding display presented on the CDM the “_” indicates that the
CDM will display the selected station and arm and the “>” indicates that
pressing the <CR> key will cause the next set of menu selections to be displayed.
Using Assign mode
If the actual coordinate values of the station parameters are known, the operator can use the Assign option to enter those values directly. The operator can
enter and automatically save, or change, one or more of the variables presented
by the CDM on the following display:
SET UP STN _ ARM _
(R)
_______
(T)
______
(BTO)
_____ >
(L)
_____
Brooks Automation
Revision 2.2
6-81
Operation
Control/Display Module (CDM) Operation
MagnaTran 7.1 User’s Manual
MN-003-1600-00
(S)
__
(P)
_____ >
(0) SAFE= _ _ _ _ _
(1) PUSH= _ _ _ _ _
>
NOTE: In the preceding display presented on the CDM the “_” indicates that the
CDM will display the selected station, arm, and value for each setting and
the “>” indicates that pressing the <CR> key will cause the next set of
menu selections to be displayed.
The ASSIGN mode will set and store value in one step.
Using Learn mode
If the values of the station parameters are not known, the operator can use the
Learn option to move the robot arm into position and then Store that position
value in EEPROM.
NOTE: The radically different motion profiles followed in Learn mode compared to any
other motion may result in the a slight variation between the actual location of the
position learned and the same position attained via a different motion command.
Therefore, the operator should issue a Move-Station command to the position just
learned and adjust it, if necessary, using Assign.
Pitch and Number of Slots cannot be learned - they must be Assigned.
Using Wafer Sensor Setup
The operator can enter one or more of the variables or, by pressing All, can
have the CDM prompt for each of the required values. The operator can enter
the number of the Wafer Sensor to be associated with a station. The location of
the sensor (extend or retract) is then specified. Finally, the active state (high or
low) for the sensor is specified.
Example of Teaching a Station with the CDM:
Suppose the operator knows that Station #3 is located at about 270° but wishes to
adjust it visually. The operator would first select Setup, and indicate Station # 3. The
operator would then choose Learn, then T, then Go To. If an approximate location,
such as 270°, is entered the robot arm would physically rotate to 270°. The operator
can then select Jog, which causes the arm to move in small increments by pressing the
circular arrow keys for rotational motion. Holding the key down causes continual
6-82
Brooks Automation
Revision 2.2
MagnaTran 7.1 User’s Manual
MN-003-1600-00
Operation
Control/Display Module (CDM) Operation
motion until it is released; the actual position of the arm is displayed as it moves.
When the operator has adjusted the arm to the desired position, the Store option
should be selected to indicate that the value should be stored as the value of Theta for
Station #3. Pressing Store returns to the previous menu, giving the operator the
opportunity to establish another variable.
The operator might then select R to set the Extended position of the arm. The operator
can then select Jog and hold down the Extend or Retract key until the arm is extended
to the proper distance, then press Store, which would Store that value of R as the
extended position for Station # 3 and return to the previous menu.
Suppose the values of the other station parameters are already known. The operator
might then press Escape to return to the previous menu, where Assign can be selected
and the remaining parameters for Station #3 can be entered directly. Finally, pressing
Quit will end the station setting session and return to the Main Menu.
At this point, the operator should issue a Move-Station command to the station just
set to check that the values Learned are correct. The operator should then use SetupStation-Assign to make any required minor adjustments, and again check the position
using a Move-Station command.
Brooks Automation
Revision 2.2
6-83
Operation
PowerPak Power Fault Manager
MagnaTran 7.1 User’s Manual
MN-003-1600-00
PowerPak Power Fault Manager
The Brooks Automation MagnaTran 7 PowerPak provides power allowing a controlled shutdown of the robot during loss of +24V power.
The PowerPak does not require any hardware to replace. The PowerPak mounts
directly to the MagnaTran 7 drive while access to the robot I/O panel remains.
Operation
Upon loss of primary power, the PowerPak will supply a maximum of 20A for 2 seconds and signal the robot to start a controlled shutdown. After two seconds, the PowerPak removes battery power from the robot. The following timing sequence is
initiated in these instances:
•
When +24VDC power is less than +22VDC, the Power Pack is switched on.
•
When +24VDC power is less than +22VDC and lasts more that 50mS, the
Power Pack is switched on and AC_FAIL_UPS is asserted.
•
When +24VDC power is less than +22VDC and lasts more that 2 seconds, the
Power Pack is switched on, AC_FAIL_UPS is asserted and at the end of 2 seconds, power is removed from the robot.
Figure 6-13: PowerPak Timing Diagram
6-84
Brooks Automation
Revision 2.2
MagnaTran 7.1 User’s Manual
MN-003-1600-00
Operation
PowerPak Power Fault Manager
The battery voltage is +24V nominal. Battery life is 2.5 years.
The PowerPak operates as follows:
•
Loss of power to the PowerPak (i.e. power supply failure): controlled shutdown of the robot is executed and AC_FAIL signal is sent to the host. Power
removed after 2 seconds. Normal power-up sequence of the robot when power
is reapplied. No motion of the robot will occur until the robot is issued the
proper commands.
•
Battery voltage is less than 23.5VDC: controlled shutdown of the robot is executed and BATT_LO signal is sent to the host. Normal power-up sequence of
the robot when power is reapplied. No motion of the robot will occur until the
robot is issued the proper commands.
Controls and Indicators
All controls and indicators are located on the user interface panel as shown in Figure
6-14.
Table 6-33: PowerPak Controls and Indicators
Control/Indicator
Function
Power Switch
Circuit Breaker/LED
Switches power on/off and indicates power on
Batt Lo
Lights when battery power is less than 23.5VDC
WARNING
Energy Source- Do not remove the protective covers. There are no
user-serviceable parts in the PowerPak.
Brooks Automation
Revision 2.2
6-85
Operation
PowerPak Power Fault Manager
MagnaTran 7.1 User’s Manual
MN-003-1600-00
POWER Switch/Circuit Breaker
Fuse Holder
Battery Low Indicator
The PowerPak contains sealed, lead
acid batteries. Dispose of or recycle
in accordance with federal, state,
and local requirements.
Figure 6-14: PowerPak Controls and Indicators
Operational Interlocks
Two operational interlock signals are provided by the PowerPak and sent to the robot:
BATT_LO_UPS: Monitors the status of the battery backup power in the PowerPak.
Active LO when battery voltage drops below 23.5VDC and an error signal is sent.
AC_FAIL_UPS: Active LO when the conditions described in Operation above are
encountered. The robot comes to a controlled stop as quickly as possible regardless of
the position of the robot arm after receiving the signal.
To implement the operational interlocks, see Operational Interlocks on page 6-23.
To remove or replace the PowerPak, see Power Pak Replacement on page 9-63.
6-86
Brooks Automation
Revision 2.2
MagnaTran 7.1 User’s Manual
MN-003-1600-00
Operation
Start-up
Start-up
The MagnaTran 7 robot is started by applying power. Once this is done, the robot is
ready to operate. If the host controller is in control of the robot, it will accept commands through the RS-232 serial port or the discreet I/O ports. If the CDM has been
turned on, the robot will accept commands from the keypad entries.
CAUTION
All switch settings, communication connections, and power connections should be made before power is applied.
NOTE: Once power is applied, the robot will enter a “start-up” state, which assumes that
wafers are present on the end effectors. The speed of all arm motions are governed
by this start-up state until the robot is either commanded to “place” the wafers or
(3-Axis) instructed that the end effectors are empty using the “LOAD” command
(2-Axis).
Power should be applied by a person trained in the proper use of the MagnaTran
robot.
Operational Check-out
Verify CDM can be turned on. See Control/Display Module (CDM) Operation on
page 6-63.
Verify Serial I/O port is functional. See Serial Communication SIO1 on page 5-5 and
Set Communication on page 8-121.
If operating in parallel mode, verify discreet I/O ports are functional. See MISC I/O
Communications on page 5-9 and DIO Start on page 8-27.
Brooks Automation
Revision 2.2
6-87
Operation
Normal Running
MagnaTran 7.1 User’s Manual
MN-003-1600-00
Normal Running
The exact usage of the MagnaTran 7 robot must be determined by the user. The following information is provided as a reference for most standard applications.
A Sample Session
The following is a sample exchange between the robot and a host controller. The following sequence was copied from an actual robot session. The MagnaTran 7 was connected to a PC running a terminal emulator program. All commands sent to the
product are terminated with an <Enter> character. Detailed explanations of all the
commands and responses shown in the sample session can be found in Chapter 8:
Command Reference.
Table 6-34: Sample Session - Software Control
Host Controller
Command
Robot
Response
HOME ALL
_RDY
RQ LOAD A
Controller instructs robot to reference itself to “home position” in all
axes.
Controller requests wafer tracking
status for arm ‘A’.
LOAD A ON
PLACE 1 A
Robot responds that arm ‘A’ is currently assumed to have a wafer on
it.
_RDY
Controller instructs robot to place
wafer at Station 1.
_RDY
Controller requests wafer tracking
status for arm ‘A’.
RQ LOAD A
LOAD A OFF
PICK 2 A
Robot responds that arm ‘A’ is currently assumed to have no wafer
on it.
_RDY
Controller instructs robot to pick a
wafer from Station 2.
_RDY
Controller requests wafer tracking
status for arm ‘A’.
RQ LOAD A
LOAD A ON
6-88
Description
Robot responds that arm ‘A’ is currently assumed to have a wafer on
it.
Brooks Automation
Revision 2.2
MagnaTran 7.1 User’s Manual
MN-003-1600-00
Operation
Emergency Conditions
Emergency Conditions
Issuing a HALT Command in Background Mode
The HALT command causes the robot to immediately stop any action in progress.
The HALT command will cause the following effects:
•
a controlled stop
•
Z-Axis brake is applied
•
Encoder referencing is maintained
See also the command Halt on page 8-39.
Issuing an Emergency Off (EMO)
CAUTION
The robot is not provided with an Emergency Off (EMO) device. The
user is accountable for the EMO circuit.
Issuing an EMER_STOP in DIO Mode
If communicating the with the robot in DIO mode, activating the EMER_STOP pin
will immediately cause the following effects:
•
a controlled stop
•
Z-Axis brake is applied
•
Encoder referencing is maintained
This pin may be connected to a user supplied EMO button.
See also Operational Interlocks on page 6-23.
Issuing a STOP in CDM Mode
If communicating the with the robot in CDM mode, pressing the STOP key will immediately cause the following effects:
Brooks Automation
Revision 2.2
6-89
Operation
Emergency Conditions
•
a controlled stop
•
referencing is maintained
MagnaTran 7.1 User’s Manual
MN-003-1600-00
See also CDM STOP Key on page 6-65.
Issuing an EMERGENCY STOP on the CDM Mode
During any mode of communication, if the CDM is plugged in, the Emergency Stop
button is effective. Pressing the button will immediately cause the following effects:
•
servos will be turned off
•
referencing is maintained
See also CDM Emergency Stop (Standard) on page 6-63.
6-90
Brooks Automation
Revision 2.2
MagnaTran 7.1 User’s Manual
MN-003-1600-00
Operation
Shut-down
Shut-down
The robot requires no special shut-down procedures. Once use of the robot is complete, power can be removed.
•
Ensure that the robot has completed all transfer operations and that there are
no wafers left on the end effectors.
•
If the host controller is to be shut off, the robot should be shut-down first.
•
SET commands only load parameter values into RAM. These values will be
reset to default values if power is removed. If permanent storage of values is
desired, STORE values using appropriate commands before shut-down.
Brooks Automation
Revision 2.2
6-91
Operation
Shut-down
MagnaTran 7.1 User’s Manual
MN-003-1600-00
This Page Intentionally Left Blank
6-92
Brooks Automation
Revision 2.2
MagnaTran 7.1 User’s Manual
MN-003-1600-00
7
Alignment and Calibration
Overview
This chapter provides complete alignment and teaching directions for the Brooks
Automation MagnaTran 7 robot.
PINCH POINT
HEAVY LIFTING
ELECTRICAL HAZARD
Crush points, pinch points, mechanical hazards, electrical hazards, shock
hazards exist on the MagnaTran 7 robot. The procedures in this chapter
should only be performed by qualified persons. Read and understand
Chapter 2: Safety before performing any procedure.
Chapter Contents
Robot Alignment . . . . . . . . . . . . . . . . . . . . . . . . . . . . . . . . . . . . . . . . . . . . . . . . . . . . . .7-2
Verifying Flatness of Robot’s End Effector . . . . . . . . . . . . . . . . . . . . . . . . . . . . . . . .7-5
Adjusting the Robot’s End Effector. . . . . . . . . . . . . . . . . . . . . . . . . . . . . . . . . . . . . . .7-7
Setting the Robot to the Wafer Transport Plane . . . . . . . . . . . . . . . . . . . . . . . . . . . .7-13
Setting the Transfer and Process Modules’ T and R Coordinates . . . . . . . . . . . . .7-16
Teaching Arm B of the Dual Arm Sets . . . . . . . . . . . . . . . . . . . . . . . . . . . . . . . . . . . .7-18
Final Checkout . . . . . . . . . . . . . . . . . . . . . . . . . . . . . . . . . . . . . . . . . . . . . . . . . . . . . . . .7-20
Brooks Automation
Revision 2.2
7-1
Alignment and Calibration
Robot Alignment
MagnaTran 7.1 User’s Manual
MN-003-1600-00
Robot Alignment
The Brooks Automation MagnaTran 7 Robot must be aligned with the system that it
will be operating in to prevent misplacement of the wafers or collision of the robot
with other parts of the system. Note that even a small misalignment can interfere
with proper system operation.
The user must perform the following alignment procedure as part of installing the
robot in a system, during routine maintenance, whenever the robot’s arms or end
effectors require replacement, or when one of the system modules requires replacement. Brooks Automation recommends an alignment check under the following circumstances:
•
A complete alignment when the MagnaTran 7 robot is first set up at the user’s
site.
•
A complete check at all stations when the robot’s end effector, the robot’s arms,
or the robot is replaced.
•
A complete check of the robot if it was involved when an Emergency Off
(EMO) occurs.
•
A partial alignment at the appropriate station(s) whenever any component,
such as a cassette elevator, the degass module, or a robot is replaced.
•
A partial check at the problem station when a wafer transfer error occurs.
•
A complete check of the robot if it was involved in a collision.
Required Tools and Test Equipment
Performing the alignment procedure requires the following tools and materials:
7-2
•
A set of Allen wrenches in inch sizes
•
A set of Allen wrenches in metric sizes
•
The MagnaTran 7 Robot User’s Manual
•
The robot’s Control/Display Module (CDM)
•
One wafer of the size for which the system is being set up
•
Granite surface block
Brooks Automation
Revision 2.2
MagnaTran 7.1 User’s Manual
MN-003-1600-00
Alignment and Calibration
Robot Alignment
•
Dial indicator and base as shown in Figure 7-1
•
A 6-in. steel ruler graduated in hundredth inches
•
The User’s Manual(s) for any devices the robot will interface with
•
Eye Protection
Alignment Strategy
A complete and accurate alignment ensures that no part of the robot or of any wafer
contacts any of the systems interior parts, and that no sliding motions occur between
a wafer and any support surfaces. Completing the alignment in the following order
is critical to the final performance of the robot. These adjustments will be made using
the using robot’s Control/Display Module (CDM) and the required controls for any
devices the robot will interface with.
1.
Verify the flatness of the robot’s end effectors.
2.
Adjust the robot’s end effector for planar motion.
3.
Set the robot to the Wafer Transport Plane (WTP).
4.
Set the T and R coordinates for each station, which represents the system’s process and transfer modules. If the robot is equipped with the Z axis drive, teach
the Z axis coordinates for each station.
5.
If required, teach arm ‘B’ of the robot all stations.
6.
Final system check-out
NOTE: Brooks Automation strongly recommends that the user become thoroughly familiar
with the operation of the robot’s CDM before attempting the alignment procedure
as this remote control is used extensively during robot alignment.
CAUTION
There are no safety interlocks available while using the robot’s CDM.
The user is responsible for any damage to the MagnaTran 7 robot or
their system as a result of using the CDM incorrectly.
Brooks Automation
Revision 2.2
7-3
Alignment and Calibration
Robot Alignment
MagnaTran 7.1 User’s Manual
MN-003-1600-00
Alignment Procedure
This section describes the procedure for preparing the Brooks Automation MagnaTran 7 Robot for alignment.
Prior to beginning the alignment procedure, verify the following:
•
Read and understand Chapter 2: Safety before beginning this procedure.
•
Read the alignment procedure thoroughly.
•
Become familiar with all attached subsystems, including the CDM, and the
Command Set.
•
Verify that the entire system is level.
•
Ensure the system is at room temperature and at atmospheric pressure.
NOTE: Ensure that the system the robot is installed in is level before starting the alignment
procedure. To ensure accuracy and repeatability do not “home” the robot during
the alignment procedure.
It is crucial that the alignment is performed in the given sequence for maximum operating performance of the robot.
7-4
1.
Power up and initialize the MagnaTran 7 robot.
2.
Power up and initialize all devices the robot will interface with.
3.
Follow the remaining alignment procedures provided in this chapter in the
order presented.
Brooks Automation
Revision 2.2
MagnaTran 7.1 User’s Manual
MN-003-1600-00
Alignment and Calibration
Verifying Flatness of Robot’s End Effector
Verifying Flatness of Robot’s End Effector
The end effector(s) must be flat to ensure proper support of the wafers being handled
by the robot.
This procedure checks for the top surfaces of the wafer supports on the end effector to
be within 0.076 mm (0.003 in) of each other and that no part of the end effector rises
above the lowest wafer support.
This procedure must be performed during initial setup if the end effector is suspected
of damage during shipment and at any time that the robot’s arms or end effector(s)
are damaged, removed and replaced, or changed while in the system. It is also recommended that this procedure be performed every 90 days as a preventive maintenance
practice.
NOTE: To successfully align the robot and to obtain consistent and precise handling of
wafers, the limits and tolerances stated in this verification procedure must be met.
Required Tools and Test Equipment
•
Granite surface block
•
Height gauge
Limits and Tolerances
Maximum deviation between supports 0.076 mm (0.003 in).
No point on the end effector’s surface will be higher than the lowest support.
Adjustment/Calibration Strategy
This procedure uses the granite surface block as a reference point to determine the
height of each wafer support on the end effector and to ensure that no part of the end
effector rises above the wafer supports.
Measurement Procedure
1.
Remove the end effector from the robot arms and place the end effector on a
granite surface block with the wafer supports facing up.
2.
Using the height gauge, measure the height of each wafer support.
Brooks Automation
Revision 2.2
7-5
Alignment and Calibration
Verifying Flatness of Robot’s End Effector
7-6
MagnaTran 7.1 User’s Manual
MN-003-1600-00
3.
Verify that all supports are within 0.076 mm (0.003 in) of each other. Replace
any supports that are out of specification using the procedure provided in End
Effector Pad Removal/Replacement on page 9-32.
4.
Once all wafer supports are within specification, measure the height of the top
surface of the end effector to ensure that no portion of it exceeds the height of
the lowest wafer support.
Brooks Automation
Revision 2.2
MagnaTran 7.1 User’s Manual
MN-003-1600-00
Alignment and Calibration
Adjusting the Robot’s End Effector
Adjusting the Robot’s End Effector
The end effector of the robot must be adjusted for planar motion within the wafer
delivery zone of any transfer or process module. This adjustment procedure must be
performed at either a transfer or a process module’s wafer delivery zone that gives
complete access to the robot’s end effector (typically at full extension of the arm).
This procedure must be performed during initial setup and at any time that the
robot’s arms or end effector(s) are damaged, removed and replaced, or changed. It is
also recommended to perform this procedure every 90 days as a preventative maintenance procedure.
NOTE: This procedure assumes that the end effector is properly located in the arm, is flat,
and that the top surfaces of the wafer support pads are within 0.076 mm (0.003 in)
of each other.
Required Tools and Test Equipment
•
A set of Allen wrenches in metric sizes
•
The robot’s Control/Display Module (CDM)
•
Dial indicator and base as shown in Figure 7-1 (refer to Appendix B: Tooling on
page 11-3)
Limits and Tolerances
The end effector’s runout specification is dependent on the size of the wafer to be
transported. The Total Indicator Runout (TIR) of the end effector is to be 0.001” maximum for each inch of wafer diameter. Therefore, for an end effector that is transporting an eight inch diameter wafer, the end effector’s TIR is 0.008” maximum.
The end effector’s TIR is the sum of it’s dip and twist.
Interaction of Adjustments
Any adjustment of the end effectors Adjustment Screws or Mounting Screws to correct a problem in one axis may affect another axis.
Adjustment Strategy
This procedure uses the bottom surface of a transfer or process module as a reference
point to determine planar movement within the wafer delivery zone on the module.
Brooks Automation
Revision 2.2
7-7
Alignment and Calibration
Adjusting the Robot’s End Effector
MagnaTran 7.1 User’s Manual
MN-003-1600-00
This procedure assumes that the wafer delivery zones of all modules is at approximately the same radial extension of the robot’s arms.
The arm should be extended while measuring the end effector runout.
Adjustment Procedure
1.
Set an indicator base on the inside bottom of the module chamber being used,
i.e. Vacuum Cassette Elevator, Process Module, as shown in Figure 7-1.
NOTE: To ensure the accuracy of all measurements, once the indicator base is set up it
should not be moved.
Dial Gauge
Module/Loadlock Chamber
Access Slot
End Effector
Figure 7-1: Locating the Dial Indicator
7-8
2.
Using the CDM, jog the robot’s end effector into the module and rest the tip of
the dial indicator on the end effector to measure “dip” where indicated in Figure 7-2, being careful not to deflect the end effector.
3.
Jog the robot’s arm in and out (radial direction) of the module while watching
the reading on the dial indicator. The “dip” is measured in two places. The
Brooks Automation
Revision 2.2
MagnaTran 7.1 User’s Manual
MN-003-1600-00
Alignment and Calibration
Adjusting the Robot’s End Effector
total “dip” is the sum of the “dip” measurements. Record the measurement.
For example: If the end effector’s right fork has a total dip of -0.004 inches and
the left for has a total dip of +0.002 inches, then the total dip runout is 0.006 TIR.
If the end effector’s right fork has a total dip of -0.004 inches and the left fork
has a total dip if -0.002 inches, then the total dip runout is 0.004 TIR.
4.
Position the tip of the dial indicator on the end effector to measure “twist”
where indicated in Figure 7-2, being careful not to deflect the end effector.
5.
Jog the robot’s arm right and left (theta motion) in the module while watching
the reading on the dial indicator. Record the measurement.
6.
Add the total “dip” and “twist” runout of the end effector. If the total is less
than the allowable TIR as indicated in Limits and Tolerances above, then the end
effector levelness is within specification. If the total runout is more than the
allowable TIR, then the end effector levelness must be adjusted as indicated in
the next steps.
Brooks Automation
Revision 2.2
7-9
Alignment and Calibration
Adjusting the Robot’s End Effector
MagnaTran 7.1 User’s Manual
MN-003-1600-00
Measure “Dip” Here
Measure “Twist” Here
Mounting Screws
4 places
Adjusting Screws
3 places
Measure “Dip” Here
Twist Securing Screws
5mm SHCS/2 places
Measure “Dip” Here
Measure “Twist” Here
Twist Adjusting Screws
Set screws/2 places
Dip Adjusting Screw
Set screw
Dip Securing Screw
Torque 20-23 in./lbs.
Measure “Dip” Here
Figure 7-2: End Effector Measurement Locations-Two Types Shown
7-10
Brooks Automation
Revision 2.2
MagnaTran 7.1 User’s Manual
MN-003-1600-00
Alignment and Calibration
Adjusting the Robot’s End Effector
CAUTION
When moving the robots’ arm to make the following measurements do not allow the arm or end effector to hit or contact the
sides of the slots
7.
If adjustments are necessary, select the appropriate type of wrist plate supplied
with the MagnaTran 7 and follow the procedure below:
TOP VIEW:
1.
The 3 set screws act as adjusting screws in the robot arm’s wrist
plate, shown in Figure 7-2, and allow leveling of the end effector.
If the dip of the end effector is low, raise it by tightening the set
screws. If the dip of the end effector is high, lower it by backing
off the set screws. If the twist is not level, loosen or tighten the
outside set screws and use the middle screw as a pivot point. If
necessary, loosen the 4 end effector mounting screws before
making the adjustment. Be sure to tighten the mounting screws
after making any adjustments.
BOTTOM VIEW shown in Figure 7-2
Twist Adjustment
1.
Loosen the twist securing screws
2.
Back out the twist adjusting screws until the end effector mounting plate bottoms out against the wrist plate
3.
Tighten the twist securing screws until lock washers make contact, but do not compress
4.
Begin leveling by tightening the twist adjustment screw on the
side of the end effector that needs to be raised. If one side is
raised too much, do not loosen the twist adjustment screw. To
compensate, tighten the opposite twist adjustment screw.
5.
Tighten the twist securing screws completely.
6.
Check adjustment with gauge and adjust if necessary.
Dip Adjustment
Brooks Automation
Revision 2.2
7-11
Alignment and Calibration
Adjusting the Robot’s End Effector
8.
MagnaTran 7.1 User’s Manual
MN-003-1600-00
1.
Loosen the dip securing screw.
2.
To raise the dip of the end effector, tighten the dip adjustment set
screw. To lower the dip of the end effector, loosen the dip adjustment set screw.
3.
Tighten the dip securing screw and torque to 20-23 in./lbs.
4.
Check adjustment with gauge and adjust if necessary.
Repeat the above procedure for the other end effector on a BiSymmetrik Arm
set or a Leapfrog Arm set.
NOTE: The height of end effector B may be different than A. This can be compensated by a Z adjustment in the station settings of the robot at each station.
It is important to follow leveling procedures as depicted in arm A to ensure
that both end effectors are co-planer.
7-12
Brooks Automation
Revision 2.2
MagnaTran 7.1 User’s Manual
MN-003-1600-00
Alignment and Calibration
Setting the Robot to the Wafer Transport Plane
Setting the Robot to the Wafer Transport Plane
A robot controller parameter, called the Base Transfer Offset (BTO), determines the
height of the robot’s Wafer Transport Plane (WTP) for each station. The BTO is the
vertical distance from the robot’s home position to its UP, or wafer transport, position.
NOTE: This procedure must be performed during initial setup and at any time that the
robot’s arms or end effector(s) are damaged, removed and replaced, or changed.
Required Tools and Test Equipment
•
A 6-in. steel ruler graduated in millimeters and hundredth inches
•
The robot’s Control/Display Module (CDM)
•
Expendable wafer
WARNING
Breaking wafers may produce flying shards of glass. When using
wafers in a set up or test procedure, protective eye wear should be
worn at all times to guard against possible eye injuries.
Adjustment/Calibration Strategy
This procedure uses the floor (i.e. bottom surface) of a module access slot as a reference point for determining the BTO to the WTP. The WTP is typically located .374
inches (9.5mm) above the slot center line.
Adjustment Procedure
Teach the robot the appropriate Base Transfer Offset value using the CDM as follows:
1.
Move robot End Effector A to the appropriate module station number.
2.
Move the Z axis to the UP position.
3.
Jog the (radial) R axis outward until the end effector is located inside the module access slot, as shown in Figure 7-3.
Brooks Automation
Revision 2.2
7-13
Alignment and Calibration
Setting the Robot to the Wafer Transport Plane
MagnaTran 7.1 User’s Manual
MN-003-1600-00
Module Access Slot
End Effector
Wafer
Module Chamber
Figure 7-3: Positioning the End Effector in the Module
4.
Set the height of the end effector above the access slot floor using a ruler, or a
gauge block made for the appropriate vertical height, as shown in Figure 7-4.
Access Slot
9.5 mm
wafer
Slot Center Line
End Effector
Figure 7-4: Positioning the End Effector to Set BTO
7-14
Brooks Automation
Revision 2.2
MagnaTran 7.1 User’s Manual
MN-003-1600-00
5.
Alignment and Calibration
Setting the Robot to the Wafer Transport Plane
If a gauge block is being used, place a wafer on the end effector and sight along
the bottom of the wafer. The bottom of the wafer should almost touch the top
of the gauge block when resting on the end effector. Moving the gauge block
should not cause the wafer to move.
If the BTO value needs adjustment, use the setup function from the CDM to jog
to the appropriate height, and store the BTO value.
NOTE: Be sure to store the robot’s BTO value. Also, write down the BTO value as
displayed on the CDM for future reference in Appendix E.
6.
Use the “INFO” function on the CDM to verify that the BTO value has been
saved.
7.
Remove the wafer (and, if required, the gauge block), and retract the robot’s
arm.
8.
Assign a value to LWR (lower) that will allow the end effector to clear the
wafer after placing it in the module. Note that this calculated value for the lift/
lower (Z) move for the end effector should be as small as possible to avoid
excessive Z axis travel, while ensuring a proper hand-off.
Brooks Automation
Revision 2.2
7-15
Alignment and Calibration
MagnaTran 7.1 User’s Manual
Setting the Transfer and Process Modules’ T and R Coordinates
MN-003-1600-00
Setting the Transfer and Process Modules’ T and R Coordinates
This procedure is used to teach the robot the exact rotational axis (T) and radial axis
(R) coordinates of each transfer and process module. It includes rotating and extending the robot arm until its end effector is positioned over the center of the module’s
wafer platform, and then storing this position in the robot controller’s memory.
NOTE: This procedure must be performed during initial setup, and at any time that the
robot’s arms or end effector(s) are removed and replaced.
CAUTION
Transfer and process modules may have specific wafer placement
requirements. Refer to the appropriate User’s Manuals while performing this procedure.
Required Tools and Test Equipment
•
The robot’s Control/Display Module (CDM)
•
Expendable wafer
WARNING
Breaking wafers may produce flying shards of glass. When using
wafers in a set up or test procedure, protective eye wear should be
worn at all times to guard against possible eye injuries.
Adjustment/Calibration Strategy
This procedure sets the R and T position for arm ‘A’ based upon the required position
for a wafer on the end effector in each module.
Adjustment Procedure
7-16
1.
Place a wafer on the end effector in the position required.
2.
Using the CDM, move the robot to the initial module T axis position using the
MOVE command.
Brooks Automation
Revision 2.2
MagnaTran 7.1 User’s Manual
Alignment and Calibration
MN-003-1600-00
Setting the Transfer and Process Modules’ T and R Coordinates
3.
Using the CDM, put the robot into learn mode so that it can be taught the coordinates for the module.
4.
Using the CDM, extend the robot’s end effector until it approaches the center
of the module’s wafer platform. This may be performed using the JOG feature
or the hand locate feature.
5.
Visually check the end effector’s T (rotational) position to determine whether a
wafer properly centered on the end effector will be centered on the platform. If
not, use the CDM to jog or hand locate the end effector until it is centered on
the platform.
6.
Using the CDM, slowly extend the robot arm in the R (radial) direction until a
wafer properly centered on the end effector will be centered on the platform.
7.
Once the end effector is properly located, use the CDM to store the R (radial)
and T (rotational) axis locations for this station.
NOTE: Be sure to store the robot position for the R and T axes. Also record and save
the R and T axes locations as displayed on the CDM in Appendix E: User
Setting Tables.
8.
Retract the robot’s arms.
9.
Verify the stations are properly taught by perform PICK and PLACE commands.
10.
Remove the wafer from the robots end effector.
Brooks Automation
Revision 2.2
7-17
Alignment and Calibration
Teaching Arm B of the Dual Arm Sets
MagnaTran 7.1 User’s Manual
MN-003-1600-00
Teaching Arm B of the Dual Arm Sets
Once the robot’s R, T, and Z axes have been set up for all stations (transfer and process
modules) for arm A, it is necessary to teach all stations for arm B.
NOTE: This procedure must be performed during initial setup and at any time that the
robot’s arms or end effector(s) are damaged, removed and replaced, or changed.
Required Tools and Test Equipment
•
The robot’s Control/Display Module (CDM)
Adjustment/Calibration Strategy
This procedure sets the R, T, and Z axes for arm B by calculating their positions based
upon the values obtained for arm A. Brooks Automation MagnaTran 6 and MTR/
VTR5 users can employ the same teaching techniques used on these previous robots
while using one of the compatibility modes (see Configuration Compatibility Commands on page 11-13).
Table 7-1: Arm B Teaching Procedure
Robot mode
Teaching Procedure
MagnaTran 7 standard commands
Teach Arm B Procedure I
MagnaTran 7 using MTR/VTR5 compatibility, dual
coordinate system
Teach Arm B Procedure I
MagnaTran 7 using MagnaTran 6 compatibility,
singe coordinate system
Teach Arm B Procedure II
Teach Arm B Procedure I
1.
Set the R, Z, and LOWER position for each station to the same values used for
the arm A.
2.
Verify all stations for pan B by repeating the alignment procedures for pan B
using the station definitions just entered from pan A as a starting point.
•
7-18
Calculate new theta positions for pan B by adding 180° to the Theta values obtained for pan A if the Theta value is < 180°.
Brooks Automation
Revision 2.2
MagnaTran 7.1 User’s Manual
MN-003-1600-00
Alignment and Calibration
Teaching Arm B of the Dual Arm Sets
•
Calculate new theta positions for pan B by subtracting 180° from the
Theta values obtained for pan A if the Theta value is > 180°.
•
Set the T position for each station for arm B to the calculated Theta position.
3.
Adjust R, T, Z, and LOWER values for arm B by verifying the position of each
station for arm B, as required.
4.
Store all values.
Teach Arm B Procedure II
1.
Set the R, T, Z, and LOWER values for each station to the same values used for
arm A.
2.
Adjust R, T, Z, and LOWER values for arm B by verifying the position of each
station for arm B, as required.
3.
Store all values.
Brooks Automation
Revision 2.2
7-19
Alignment and Calibration
Final Checkout
MagnaTran 7.1 User’s Manual
MN-003-1600-00
Final Checkout
Verify Proper PICK and PLACE of Wafer
Once the robot’s R, T, and Z axes have been set up for all transfer and process modules
it is necessary to verify proper transfer of wafers to and from all modules within the
system the robot is installed in.
NOTE: This procedure must be performed during initial setup and at any time that the
robot’s arms or end effector(s) are damaged, removed and replaced, or changed.
Required Tools and Test Equipment
•
The robot’s Control/Display Module (CDM)
•
Expendable wafer
WARNING
Breaking wafers may produce flying shards of glass. When using
wafers in a set up or test procedure, protective eye wear should be
worn at all times to guard against possible eye injuries.
Adjustment/Calibration Strategy
This procedure verifies proper operation of wafer transfer between all modules by
observing system operation during wafer transfers.
Adjustment Procedure
1.
Using the robot’s CDM, PICK the wafers from one module and PLACE them
into another module. During the PICK and PLACE procedures, observe the
system to verify proper operation. Repeat the procedure to transfer the wafers
back to their original location.
NOTE: If the module is a Cassette Elevator or a multi-slotted module the wafers
should be “picked” and “placed” in all slots.
2.
7-20
Repeat the procedure for each module in the system.
Brooks Automation
Revision 2.2
MagnaTran 7.1 User’s Manual
MN-003-1600-00
3.
Alignment and Calibration
Final Checkout
Repeat the procedure for arm ‘B’.
The system manual may have additional alignment procedures related to the robot
such as using an aligner to verify offsets and allow a better teach of the robot.
Brooks Automation
Revision 2.2
7-21
Alignment and Calibration
Final Checkout
MagnaTran 7.1 User’s Manual
MN-003-1600-00
This Page Intentionally Left Blank
7-22
Brooks Automation
Revision 2.2
MagnaTran 7.1 User’s Manual
MN-003-1600-00
8
Command Reference
Firmware Release 2.24
Overview
This chapter provides an overview of the control software for the Brooks Automation
MagnaTran 7 Robot. Software control of the robot provides a broad range of command options, including a number of sophisticated integrated command sequences.
The robot’s control software also allows monitoring and control of external devices by
the robot. Communications between the MagnaTran 7 Robot and the host controller
is accomplished using standard RS-232 serial communications protocols from the
controller to access all robot software commands.
Chapter Contents
Description . . . . . . . . . . . . . . . . . . . . . . . . . . . . . . . . . . . . . . . . . . . . . . . . . . . . . . . . . . .8-2
Command and Response Structure. . . . . . . . . . . . . . . . . . . . . . . . . . . . . . . . . . . . . . .8-6
Command Quick Reference Tables . . . . . . . . . . . . . . . . . . . . . . . . . . . . . . . . . . . . . . .8-13
Command Reference . . . . . . . . . . . . . . . . . . . . . . . . . . . . . . . . . . . . . . . . . . . . . . . . . . .8-22
Error Code Reference . . . . . . . . . . . . . . . . . . . . . . . . . . . . . . . . . . . . . . . . . . . . . . . . . .8-179
Brooks Automation
Revision 2.2
8-1
Command Reference
Description
MagnaTran 7.1 User’s Manual
MN-003-1600-00
Description
The Brooks Automation MagnaTran 7 provides a command set that allows complete
control of all robot functions. These commands provide a broad range of command
options, including a number of sophisticated integrated command sequences.
This chapter provides the control software communications between the host controller and the MagnaTran 7. The normal, and more flexible, method of communications
uses standard serial communications protocols from the host controller to access
robot software commands. The other method of communications uses discrete I/O
ports to provide direct control of the standard robot functions and is described in Discrete I/O Control (DIO) on page 6-45.
Robot Operation
The MagnaTran 7 2-Axis robot is controlled in the R (Radial) axis and the T (Rotational) axis of movement to allow wafer transfer to modules. Additionally, the 3-Axis
robot provides Z (Vertical) axis movement to allow pick and place operations.
Command Flows
The basic MagnaTran 7 software command sequence consists of an interplay between
Commands from the Host Controller to the robot and Responses from the robot to the
Host over the serial communications line. Software communications may be configured in one of three modes of interaction, Sequential, Background and Background
Plus. In Sequential Mode, the software commands and responses occur one at a time.
In the Background Modes, certain types of commands may proceed in the “background” while other types of commands may be processed in the “foreground”.
Sequential Mode
In sequential mode, the MagnaTran 7 executes the command completely
before returning a READY signal indicating that the robot is ready for another
command. This mode allows execution of only one command at a time. A typical sequence of communications in Sequential Mode appears below.
8-2
•
The Host sends a command string to the robot.
•
The robot responds with information if the command was a Request, or
with an Error string if the command is incorrect or an error occurs during processing.
•
The robot sends a READY string to the Host, regardless of whether an
error has occurred.
Brooks Automation
Revision 2.2
MagnaTran 7.1 User’s Manual
MN-003-1600-00
Command Reference
Description
NOTE: In Sequential Mode, the Host should not attempt to send another command
string until it receives the READY string from the robot.
Background Mode
In Background mode, for certain commands, the MagnaTran 7 will return a
READY string immediately after it has received the command and typically
before the command has been completed. This command task is then placed in
the “background” and other “foreground” commands may be executed
sequentially while the background command is in progress.
Only certain commands have been assigned to the “background” and “foreground” categories. All Action commands can be placed in the “background”;
all Request commands and the HALT command can be executed in the “foreground” while a command is executing in the “background”. A typical
sequence of communications in Background Mode appears below.
•
Host sends an Action (motion) command to the robot.
•
The robot sends a READY signal immediately, while beginning the
requested action.
•
Host requests information.
•
Robot returns information.
•
Robot completes background action.
•
Host requests operational status.
•
Robot sends message that the Action operation has been completed,
including an error code if an error occurred during the operation.
NOTE: Background tasks do not stack. If the Host Controller sends a second background command before the first background command is complete, the
robot will send an error message.
While a command is in background, foreground commands are handled in a
normal, sequential manner. To determine when the background command is
complete, use the RQ BG command. This command returns the busy status of
the background command (Y|N) and (if RDY) any errors that may have
occurred.
Brooks Automation
Revision 2.2
8-3
Command Reference
Description
MagnaTran 7.1 User’s Manual
MN-003-1600-00
Background Plus Mode
The Background Plus mode works exactly like the background mode except
for one addition; when the action command is done, the prompt _BKGRDY is
returned. If an error occurred during the background action command, then a
_BKGERR response with the error number or error string (depending on
packet or monitor mode) is returned along with the prompt _BKGRDY on the
next line. Thus the robot does not need to be polled with RQ BG to determine
if an action has been completed. A CDM warning will be displayed as _ERR
instead of _BKGERR.
e.g.
_BKGRDY
goto n 1
_RDY
_BKGERR #### (if an error occurs)
_BKGRDY (when the action completes)
Operating Modes
The MagnaTran 7 provides two modes for serial communications with the robot.
There is a “user friendly” mode referred to as “Monitor Mode” and a “computer
friendly” mode referred to as “Packet Mode”. Sequential or background operation
can be selected when using either communications mode.
Monitor Mode
Monitor mode is a “user friendly” communications mode. All responses from
the MagnaTran 7 are descriptive and easy to understand. This mode is best
used when a person is communicating with the robot through a terminal. A
typical sequence of communications in Monitor Mode appears below.
:RQ COMM ALL
COMM
M/B --------------- MON
FLOW ------------- BKG
LF------------------- -ON
ECHO---------------ON
CHECKSUM------XXXXXXXX
DREP REQ
ERROR LEVEL----X
BAUD RATE_____XXXXXX
8-4
Brooks Automation
Revision 2.2
MagnaTran 7.1 User’s Manual
MN-003-1600-00
Command Reference
Description
Errors are reported as complete error messages and status messages.
Packet Mode
Packet mode is a computer based communications mode. All responses from
the MagnaTran 7 are short with minimal descriptive information provided.
This mode is best used when a host controller is communicating with the robot.
A typical sequence of communications in Packet Mode appears below.
_RDY
RQ COMM ALL
COMM PKT BKG
_RDY
Errors are reported as codes without associated messages.
NOTE: All command responses shown in this manual are the Packet Mode
responses.
Brooks Automation
Revision 2.2
8-5
Command Reference
Command and Response Structure
MagnaTran 7.1 User’s Manual
MN-003-1600-00
Command and Response Structure
A software command to the robot consists of a string of ASCII characters (letters or
numbers) which are subdivided into “fields”. A software response from the robot
consists of a string of ASCII characters (letters and numbers) which are also subdivided into “fields”. These fields are for commands, variables, and data, which indicate the type of command, specify a variable name, or contain data.
•
Command Fields consist of the name of the command and the logical branch
of the command (if required).
•
Data Fields consist of the data required by a variable or the data being
returned for a variable.
•
Variable Fields consist of a variable name used to specify a specific item for the
command.
In the following command example the “SET” is the command, the “STN” is the logical branch, the “T” is a variable, and the “4” and “270000” are the data fields.
SET STN 4 T 270000
In the following response example the “STN” is a variable indicating the type of
response and the type of data following, the “ARM” is also a variable indicating the
type of data following, and the “4”, “A”, and “270000” are the data fields.
STN 4 ARM A 270000
The robot’s commands have a multi-level, tree-like structure. Each level may have
data fields and/or a logical branch to a lower level. This approach to the command
structure allows great flexibility in designating commands, and unlimited ability to
add commands in the future as customer needs arise. Adding a new branch to the
tree can provide a whole new category of control or information retrieval.
The example of a typical command tree shown in Figure 8-1 provides the tree for the
RQ POS (Request Position) command. In the example the RQ POS is the command,
the ABS, STN, and TRG are the logical branches of the command, and ARM, R, T,
SLOT, and Z are the variables that may be specified by the command. Note that this
command (POS) is just one of the logical branches of the request (RQ) command type.
8-6
Brooks Automation
Revision 2.2
MagnaTran 7.1 User’s Manual
MN-003-1600-00
Command Reference
Command and Response Structure
RQ
POS
ABS
STN
TRG
ARM
ARM
ARM
R
R
R
T
T
T
Z
SLOT
Z
ALL
Z
ALL
ALL
Figure 8-1: MagnaTran 7 Command Structure
Command Types and Syntax
The robot accepts five types of software command transmissions from the host controller: Action commands, Set Commands, Store commands, Request commands, and
I/O commands. Each of these command types serves a different purpose. A list of
the available commands, organized by type, appears in the Quick Reference Tables in
this chapter.
Command Types
•
Action Commands move or otherwise act upon some physical robot
component.
•
I/O Commands define the I/O structure and save and request I/O values for the robot’s I/O.
•
Request Commands request the operational status or the value of an
operational parameter.
•
Set Commands save an operational parameter to RAM. Parameters
saved to RAM will not be restored after a power interruption.
Brooks Automation
Revision 2.2
8-7
Command Reference
Command and Response Structure
•
MagnaTran 7.1 User’s Manual
MN-003-1600-00
Store Commands transfer the value of an operational parameter from
RAM to non-volatile memory. Parameters saved to non-volatile memory will be restored after a power interruption.
Software commands consist of a series of ASCII fields. The number of characters in each field is flexible. Therefore, a space (ASCII 32, indicated in the following example by < >) is required to indicate the end of one field and the
beginning of the next. A carriage return (ASCII 13, indicated in the following
example by <Return>) is required to indicate the end of the command. The
commands are not case sensitive; the robot accepts either upper or lower case.
NOTE: Spaces and carriage returns will not be indicated within the command reference. The use of a space will be implied by a separation between fields and
a carriage return is implied at the end of every string.
Example :
PICK < > 1 < > SLOT < > 2 < > ARM < > B <Return>
This command instructs the MagnaTran 7 robot to pick a wafer from
station 1 (CM1), slot number 2 using arm ‘B’. If the arm is not specified,
the robot will use Arm ‘A’ as the default arm. Note that the example just
given shows all spaces as “< >” and the carriage return as “<Return>”,
all remaining examples within this manual will show all spaces as “ “
with a carriage return implied at the end of the command.
The number and order of the variables and data-fields within a command is
optional. However, most commands do require at least one data field be used
or an error message will be generated. If the “ALL” specifier is used the order
of the variables must be the order presented in the command description.
Command Syntax
The command syntax is flexible with minimal formatting conventions. In all
cases the Command Field must come first, variables with their associated data
may be placed in any order, however Brooks Automation recommends that the
variable order presented in this manual for each command be maintained for
consistency and clarity. Examples of the various formats a command may take
are illustrated by the examples below. Note that in all instances the robot will
interpret the command the same.
Standard form, standard order (both variables)
PICK 1 SLOT 4 ARM A
8-8
Brooks Automation
Revision 2.2
MagnaTran 7.1 User’s Manual
MN-003-1600-00
Command Reference
Command and Response Structure
Only 1 variable
PICK 1 SLOT 4
Non-standard order
PICK 1 ARM A SLOT 4
Response Types and Syntax
The robot returns three types of signals to the host controller: Data, Error signals, and
Ready signals. All commands sent to the robot will be acknowledged with a “Ready
Response” appropriate to the current operating mode. If the command was a
“Request Command” the response to that request, as described in the command reference, will be provided before the “Ready Response”. If a command of any type creates an error condition an “Error Response” will be provided before the “Ready
Response”. If a “Request Command” creates an error condition only the “Error
Response” and “Ready Response” will be returned.
Response Types
•
Request Response are responses that return information requested by
the host controller.
•
Error Response are responses that indicate an error has occurred and
indicate what the error was.
•
Ready Response are responses that indicate that the robot is ready to
receive another command.
Software responses consist of a series of ASCII fields. The number of characters in each field is flexible. Therefore, a space (ASCII 32, indicated in the following example by < >) is required to indicate the end of one field and the
beginning of the next. A carriage return (ASCII 13, indicated in the following
example by <Return>) is used to indicate the end of the response. The
responses are always upper case.
NOTE: Spaces and carriage returns will not be indicated within the command reference. The use of a space will be implied by a separation between fields and
a carriage return is implied at the end of every string.
Brooks Automation
Revision 2.2
8-9
Command Reference
Command and Response Structure
MagnaTran 7.1 User’s Manual
MN-003-1600-00
Example :
RQ < > POS < > ABS < > ARM < > A < > R < > T <Return>
POS < > ABS < > ARM < > A < > 185000 < > 1340530 < > <Return>
The command instructs the MagnaTran 7 robot to return the absolute
position of the ‘A’ arm for the R and T axes. The response shows the
type of response, the arm the data is being provided for, and the data
requested. If the arm is not specified, the robot will use Arm ‘A’ as the
default arm. Note that the example just given shows all spaces as “< >”
and the carriage return as “<Return>”, all remaining examples within
this manual will show all spaces as “ “ with a carriage return implied at
the end of the command.
The number and order of the data-fields within a response is variable and the
response will follow the order provided in the command. If the “ALL” specifier was used the order of the variables being returned will be the order presented in the command description.
Response Syntax
The syntax for a response varies depending upon the type of response being
generated, however in all cases the robot will issue a carriage return after the
response.
Request Response
The response to a Request Command mirrors the format of the Request.
The command illustrated below shows several requests for the Communication parameters and the format of the response that will be generated. The response shown below indicates that it is in response to a RQ
COMM command, the Command Mode is “Packet”, and the Operating
Mode is “Background” in both cases.
Request
RQ COMM M/B FLOW
RQ COMM ALL
Response
COMM PKT BKG
8-10
COMM PKT BKG
Brooks Automation
Revision 2.2
MagnaTran 7.1 User’s Manual
MN-003-1600-00
Command Reference
Command and Response Structure
Error Response
Errors fall into two categories; Command Specific Errors, and Generic
or Multi-Command Errors. In either case, return codes for all errors are
unique. A complete listing of the error codes appears at the end of this
chapter. If an error occurs during either command processing or operation, the robot sends an error signal to the host controller followed by a
carriage return. The response shown below indicates that the response
is a Packet Mode error response (_ERR), and the error (0002).
_ERR 0002
Ready Responses
Regardless of whether an error has occurred, the robot returns a Ready
string at the time the command is acknowledged. The response shown
below indicates that the response is a Packet Mode ready response.
_RDY
Command and Response Compatibility
The following guidelines have been established by Brooks Automation to ensure
compatibility between customer software programs and future revisions of the MagnaTran 7 Robot’s command and response structure.
1.
Old command mnemonics and data fields will not be deleted.
New functions may be added to the command tree by providing additional
options on any mnemonic level. Customer controller software should not,
therefore, interpret unknown mnemonics as errors.
New variables may be added to existing commands. When using ALL in a
REQUEST command, the software will return the increased number of variables. Customer controller software should not, therefore, interpret extra
returned variables as errors.
2.
The list of error codes may be extended.
New error messages may be added as support for existing commands or to
support new commands. Customer controller software should not, therefore,
Brooks Automation
Revision 2.2
8-11
Command Reference
Command and Response Structure
MagnaTran 7.1 User’s Manual
MN-003-1600-00
interpret unknown error messages as errors.
NOTE: Brooks Automation may implement different command structures in newer generations of a particular robot type. Therefore, commands that work with a MagnaTran™ 6, VacuTran™ 5, MultiTran™ 5 may not work, or may function differently,
with a MagnaTran™ 7.
8-12
Brooks Automation
Revision 2.2
MagnaTran 7.1 User’s Manual
MN-003-1600-00
Command Reference
Command Quick Reference Tables
Command Quick Reference Tables
The following tables list the Standard Commands available for use with the MagnaTran 7 Robot and are intended to be a quick lookup reference only. For a full description of these commands, including examples and details on the use and syntax of each
command, see the individual command descriptions that follow these tables.
Table 8-1: Action Commands
Command
Description
Page #
GOTO
Moves arm to a location in “station” coordinates
8-33
GOTO offset
Moves arm to a location in “station” coordinate with an offset
8-36
HALT
Immediately aborts all robot motions; available only in Background mode
8-39
HLLO
Non-intrusion command requesting
response HELLO
8-40
HOME
Returns robot to its “home” position
8-41
LFTST
Performs a continuously cycling life test on
the robot’s systems
8-43
MOUNT
Causes the robot to move to the “mount new
arms” position
8-51
MOVE
Moves arm along one or more discrete axes
in “physical” coordinates
8-52
PICK
Performs PICK operation at specified station, arm must be specified
8-54
PICK offset
Performs PICK operation with an offset
8-56
PLACE
Performs PLACE operation at specified station, arm must be specified
8-59
PLACE offset
Performs PLACE operation with an offset
8-61
REF
References the specified axis
8-64
RELEASE
Releases servo control of the robot
8-65
Brooks Automation
Revision 2.2
8-13
Command Reference
Command Quick Reference Tables
MagnaTran 7.1 User’s Manual
MN-003-1600-00
Table 8-1: Action Commands
Command
Description
Page #
RESET
Performs a software reset of the robot’s firmware
8-118
XFER
Transfers wafers from one station to another
8-176
XFER offset
Transfers wafers from one station to another
with an offset
8-177
Table 8-2: DIO Control Commands
Command
Description
Page #
DIO START
Turns on discrete I/O control
8-27
DIO STOP
Turns off discrete I/O control
8-28
RQ DIO OUTPUT
Returns the current output mode
8-75
SET DIO OUTPUT
Allows output function in serial mode
8-125
STORE DIO OUTPUT
Stores the current output mode
8-159
Table 8-3: Operational Interlock Commands
Command
8-14
Description
Page #
MAP
Allows a name and use to be specified for
discrete I/O points.
8-44
MAP
PASSTHROUGH
Allows information to pass-through the
robot
8-49
REMOVE IO
Deletes an assigned I/O
8-66
RQ INTLCK
Reports the state of interlocking
8-80
RQ IO MAP
Returns the current I/O map
8-82
RQ IO STATE
Returns the current status for the specified
I/O
8-84
Brooks Automation
Revision 2.2
MagnaTran 7.1 User’s Manual
MN-003-1600-00
Command Reference
Command Quick Reference Tables
Table 8-3: Operational Interlock Commands
Command
Description
Page #
RQ R_MT SENSE
Requests Radial Motion Sensor information
8-98
RQ STN OPTION
Returns the station option parameters
8-106
RQ STNSENSOR
Returns the station sensor parameters
8-108
SET INTLCK
Enables or disables interlocking
8-128
SET IO STATE
Sets the current status for the specified I/O
8-130
SET R_MT SENSE
Sets the sensor window limits and wafer size
of the Radial Motion Sensor
8-138
SET STN OPTION
Sets the optional station related parameters
8-142
SET STNSENSOR
Define the setup for the specified sensor
including; station assignment, usage type,
and active state
8-147
STORE R_MT SENSE
Saves the Radial Motion Sensor information
8-163
STORE STN OPTION
Saves the various station option parameters
8-167
STORE STNSENSOR
Stores the current sensor information
8-169
Table 8-4: Compound Move (VIA) Commands
Command
Description
Page #
SET STN OPTION VIA
Sets the compound move command operational parameters
8-145
RQ STN OPTION VIA
Requests the compound move command
operational parameters
8-106
STORE STN OPTION VIA
Stores the compound move command operational parameters
8-167
Brooks Automation
Revision 2.2
8-15
Command Reference
Command Quick Reference Tables
MagnaTran 7.1 User’s Manual
MN-003-1600-00
Table 8-5: Request Commands
Command
8-16
Description
Page #
RQ BG
Returns the status of background tasks
8-69
RQ CPTR
Displays the data in the Servo Position
Table.
8-70
RQ COMM
Returns the current status of the serial communications modes
8-71
RQ CONFIG
Returns the current configuration number
8-74
RQ IO ECHO
Returns the current status of the serial communications echo option
8-81
RQ HISTORY
Returns the history of events
8-76
RQ LOAD
Returns the load condition of the specified
arm
8-86
RQ LOAD MODE
Returns the current load mode
8-88
RQ POS ABS
Returns the actual position of the robot’s
arm in absolute coordinates
8-90
RQ POS DST
Returns the destination of the current action
command
8-92
RQ POS STN
Returns the actual position of the robot’s
arm in station coordinates
8-94
RQ POS TRG
Returns the target position of the robot’s
arm in absolute coordinates (the target is the
location to which the arm has been sent)
8-96
RQ REF
Returns if axis is referenced
8-100
RQ RTRCT2
Returns the second retract value
8-101
RQ ROBOT APPLIC
Returns the current configuration number
8-103
RQ RVSN
Returns the software revision number
8-102
RQ STN
Returns the station configuration parameters
8-104
RQ VERSION
Returns the software version number
8-112
Brooks Automation
Revision 2.2
MagnaTran 7.1 User’s Manual
MN-003-1600-00
Command Reference
Command Quick Reference Tables
Table 8-5: Request Commands
Command
Description
Page #
RQ WARN CDM
Returns the CDM warning feature state
8-113
RQ WHO
Returns BROOKS AUTOMATION Revision
8-114
Table 8-6: Set Commands
Command
Description
Page #
SET CPTR
Sets a capture sensor on|off
8-120
SET COMM
Sets various communication parameters
8-121
SET HISPD
Sets the force high speed option on
8-126
SET IO ECHO
Sets the serial communications echo option
8-129
SET LOAD
Sets the load condition for the specified arm
8-132
SET LOAD MODE
Sets the state of the load mode
8-134
SET LOSPD
Sets the force low-speed option on
8-135
SET MESPD
Sets the force medium-speed option on
8-136
SET RTRCT2
Sets the second retract value
8-139
SET STN
Sets the various station related parameters
8-140
SET TEACH
Sets the robot to CDM teach speed
8-151
SET WARN CDM
Sets the state of the CDM warning feature
8-152
Table 8-7: Store Commands
Command
Description
Page #
STORE COMM
Stores the serial communications mode
8-157
STORE IO ECHO
Stores the serial communications echo
option
8-161
Brooks Automation
Revision 2.2
8-17
Command Reference
Command Quick Reference Tables
MagnaTran 7.1 User’s Manual
MN-003-1600-00
Table 8-7: Store Commands
Command
Description
Page #
STORE LOAD MODE
Stores the current load mode
8-162
STORE RTRCT 2
Stores the current value set
8-164
STORE STN
Saves the various station related parameters
8-165
STORE WARN CDM
Stores the current warning feature state of
the CDM
8-172
Table 8-8: Workspace Commands
Command
8-18
Description
Page #
CREATE WSPACE
Creates a new Workspace
8-26
REMOVE WSPACE
Removes a Workspace
8-68
RQ WSPACE
Returns current setting of specified Workspace
8-115
RQ WSPACE MODE
Returns the Workspace state
8-117
RQ WSPACE AUTOCREATE
Returns state of automatically created Workspaces
8-116
SET WSPACE
Sets the automatically created Workspace
parameters
8-153
SET WSPACE AUTOCREATE
Creates a Workspace around the home position
8-154
SET WSPACE MODE
Turns the Workspace mode on or off
8-155
STORE WSPACE
Stores the current Workspace parameters
8-173
STORE WSPACE
AUTOCREATE
Stores the current automatically created
parameters
8-174
STORE WSPACE
MODE
Stores the current Workspace mode
8-175
Brooks Automation
Revision 2.2
MagnaTran 7.1 User’s Manual
MN-003-1600-00
Command Reference
Command Quick Reference Tables
Table 8-9: Radial Motion Sensor (R_MT) Commands
Command
Description
Page #
CHECK LOAD
Checks for wafer presence
8-23
RQ R_MT SENSE
LIMITS
Requests the sensor window limits of the
Radial Motion Sensor
8-98
SET R_MT SENSE
LIMITS
Sets the sensor window limits of the Radial
Motion Sensor
8-138
STORE R_MT SENSE
LIMITS
Saves the sensor window limits of the Radial
Motion Sensor
8-163
GOTO MAT
Moves arm to a location in “station” coordinates
8-33
RQ STNSENSOR
Returns the station sensor parameters
8-108
SET STNSENSOR
Define the setup for the specified sensor
including; station assignment, usage type,
and active state
8-147
STORE STNSENSOR
Stores the current sensor information
8-169
SET INTLCK
Enables or disables interlocking
8-128
Table 8-10: Compatibility Commands
Command
Description
Page #
SET
COMPATIBILITY
Allows backward compatibility of
command usage for the MagnaTran 6 or the VacuTran/MultiTran 5
Appendix D: Robot
Compatibility
RQ
COMPATIBILITY
Requests the current compatibility
mode
Appendix D: Robot
Compatibility
STORE
COMPATIBILITY
Stores the current compatibility
mode
Appendix D: Robot
Compatibility
Brooks Automation
Revision 2.2
8-19
Command Reference
Command Quick Reference Tables
MagnaTran 7.1 User’s Manual
MN-003-1600-00
CAUTION
The MagnaTran 7 is setup at the factory according to user specifications. The following commands are not used in the normal setup or
the normal operation of the robot. Brooks Automation recommends
contacting Brooks Technical Support before using these commands.
Table 8-11: Setup Commands
Command
8-20
Description
Page #
CONFIG ROBOT
APPLIC
Loads application specific information
8-25
EEPROM RESET
Resets, or changes various robot parameters
to defaults and clears the database checksum
error
8-29
FIND ENCODER
Collects amplitude data for T1 and T2 position encoders
8-30
FIND PHASE
Performs a Find Phase on individual or all
linkages
8-31
FIND ZERO
Changes the zero or Home reference for the
Theta and/or Z axis
8-32
RQ HOME POS Z
Requests the Z axis Home position
8-79
RQ MOUNT
Returns the setting for the height to which
the arm moves in response to the MOUNT
command
8-89
RQ SYNC PHASE
Requests the Sync Phase for the T1, T2 and Z
motors
8-110
RQ SYNC ZERO
Requests the zero or Home reference for the
Theta and Z axes
8-108
SET ARMS
Changes the robot configuration to “shaft 7”
or original values
8-119
SET HOME POS Z
Changes the Z axis Home position
8-127
Brooks Automation
Revision 2.2
MagnaTran 7.1 User’s Manual
MN-003-1600-00
Command Reference
Command Quick Reference Tables
Table 8-11: Setup Commands
Command
Description
Page #
SET MOUNT
Sets the height to which the arm moves in
response to the MOUNT command
8-137
SET SYNC PHASE
Sets the Sync Phase for the T1, T2 and Z
motors
8-149
SET SYNC ZERO
Sets the zero or Home reference for the
Theta and Z axes
8-150
SET ZBRAKE
Controls the brake for the Z drive
8-156
STORE HOME POS Z
Stores the Z axis home position
8-160
STORE SYNC PHASE
Stores the Sync Phase for the T1, T2 and Z
motors
8-170
STORE SYNC ZERO
Stores the home reference for T and Z
8-171
Brooks Automation
Revision 2.2
8-21
Command Reference
Command Reference
MagnaTran 7.1 User’s Manual
MN-003-1600-00
Command Reference
This command reference provides a detailed description of each command supported
by the MagnaTran 7 robot. All commands within this reference are listed in alphabetical order. The following information is provided for each command where appropriate:
Purpose:
Provides a brief description of the command.
Format:
Shows the format of the command to the robot including the names of
any arguments required by the command.
Response:
Shows the standard response from the robot to REQUEST commands
detailed in the Format section.
Arguments: Provides a description of each argument listed in the command syntax.
Description: Provides an in-depth description of the command and its features.
Examples:
8-22
Provides samples of the command’s usage.
Brooks Automation
Revision 2.2
MagnaTran 7.1 User’s Manual
MN-003-1600-00
Command Reference
Check Load
Check Load
This command is for the Radial Motion Sensors only.
Purpose
Updates the arm load status to the correct state.
Format
CHECK LOAD [station] [arm] [INTLCK [ALL [DIS|ENB]]|
[EX_ENABLE [DIS|ENB]] [SBIT_SVLV_SEN[DIS|ENB]]
[VLV_SEN [DIS|ENB]]]
Arguments
station:
The number of the station from which to pick. Range: 1-16.
arm:
The arm (A or B) which will perform the pick.
Leaving the arm unspecified results in CHECK LOAD checking both
pans.
Description
This command is available only when at least one station has been set up with an
R_MT Wafer Presence Sensor. This command is used on single and dual arm sets.
CHECK LOAD will find a station that has an R_MT type wafer sensor assigned. The
robot will extend each arm to the load sensing position to determine if there is a load
present on each arm. The edge of the wafer is checked, rather than the center of the
wafer to minimize the length of the extension. Based on the sensor information, the
robot will update it’s arm load status memory map.
This command will cause the robot to query all assigned radial motion sensors and
position the pan over a sensor to determine if a wafer is present.
Use the RQ LOAD command to request the results of the query.
The CHECK LOAD command first tries to find stations for arm A, or the specified
arm, that have wafer sensors mapped. If a station was specified, it will only check that
station. At each station where it finds a wafer sensor, it will check to see if the extend
enable, slot valve, and/or poppet valves are clear. The INTLCK option is used to
Firmware Version V2.12
Brooks Automation
Revision 2.2
8-23
Command Reference
Check Load
MagnaTran 7.1 User’s Manual
MN-003-1600-00
either turn off interlock checking completely (ALL) or allows the user to turn off
checking of the interlocks individually. For example, if the VCE’s are turn off, then
the extend enable signal will not be present, so the EX (extend enable sensor) interlock
may be disabled for CHECK LOAD to avoid errors. If the robot cannot find any stations with a wafer sensor mapped, the command will fail and report an error stating
that no station with R_MT sensors could be found. Otherwise, if no R_MT wafer sensor equipped stations succeeded due to sensor errors, the reason the last station was
rejected is reported.
If no arm was specified, or the search for arm A is successful, for a dual pan arm set,
arm B’s stations are checked using the same procedure. If both arms successfully find
stations which have valid sensor readings, then the robot will carry out the CHECK
LOAD command.
If an error is received by the user after trying a CHECK LOAD command, and the error is
addressing a problem with the slot valve, poppet, or extend enable sensors, it is important to
remember that the error is only relevant to the last station that had a wafer sensor mapped.
See Also: Wafer Presence Sensors- Radial Motion on page 6-38
Examples
The following command updates the load status:
CHECK LOAD
Examples
The following command checks the load at station 1 and ignores interlocks:
CHECK LOAD 1 INTLCK ALL DIS
The following command checks the load at the first valid station and ignores the
extend enable interlocks:
CHECK LOAD INTLCK EX_ENABLE DIS
The following command checks the load on arm A only at the first valid station and
all interlocks are observed:
CHECK LOAD A
8-24
Brooks Automation
Revision 2.2
MagnaTran 7.1 User’s Manual
MN-003-1600-00
Command Reference
Configure Robot Application
Configure Robot Application
Purpose
Loads application specific information from the firmware into the robot for use during normal operations for a specific robot.
CAUTION
This command is NOT used in the normal operation of the robot. Call
Brooks Automation Technical Support for instructions on the correct
use of this command.
Format
CONFIG ROBOT APPLIC application_number
Arguments
application_number: Specific number for the robot.
Description
tolerance
for servos
Mag 7
3-axis
arm code
speed code
servo code
Application Number: f42 - s41 - m40 - 40 - 73
This command resets, or changes, various robot parameters.
NOTE: This command is sometimes used when installing a new version of firmware or
replacing specific hardware. All instructions for this command are not included in
this manual.
See also:
MagnaTran 7.1 Application Number on page 6-8
Firmware Upgrade on page 9-83
Brooks Automation
Revision 2.2
8-25
Command Reference
Create Workspace
MagnaTran 7.1 User’s Manual
MN-003-1600-00
Create Workspace
Purpose
Creates a new work space.
Format
CREATE WSPACE name
Arguments
name: Specifies the alphanumeric, 20 character name of the new work space.
Description
This command is used to create a new work space.
See Also:
PASIV™ Safety Feature Operation on page 6-58
The following names are reserved for the robot and may not be used
with this command:
HOME_WORK_SPACE
8-26
ALL
STN11A
STN06B
STN01A
STN12A
STN07B
STN02A
STN13A
STN08B
STN03A
STN14A
STN09B
STN04A
STN15A
STN10B
STN05A
STN16A
STN11B
STN06A
STN01B
STN12B
STN07A
STN02B
STN13B
STN08A
STN03B
STN14B
STN09A
STN04B
STN15B
STN10A
STN05B
STN16B
Brooks Automation
Revision 2.2
MagnaTran 7.1 User’s Manual
MN-003-1600-00
Command Reference
DIO Start
DIO Start
Purpose
Turns on the Discrete I/O (DIO) control interface of the robot.
Format
DIO START
Description
The MagnaTran 7 robot may be controlled and monitored using discrete I/O lines
instead of using the serial communications link. This command disables all serial
control functions and enables Discrete I/O control.
A programmed 4 second delay follows the DIO START command while internal functions ensure proper power-up. Outputs are driven low for this period.
See Also:
DIO Stop on page 8-28
MISC I/O Communications on page 5-9
Discrete I/O Control (DIO) on page 6-45
Example
The following example turns on the Discrete I/O control function.
DIO START
Brooks Automation
Revision 2.2
8-27
Command Reference
DIO Stop
MagnaTran 7.1 User’s Manual
MN-003-1600-00
DIO Stop
Purpose
Turns off Discrete I/O (DIO) control interface of robot.
Format
DIO STOP
Description
The MagnaTran 7 robot may be controlled and monitored using discrete I/O lines
instead of using the serial communications link. This command enables all serial control functions and disables Discrete I/O control.
See Also:
DIO START
Example
The following example turns off the Discrete I/O control function.
DIO STOP
8-28
Brooks Automation
Revision 2.2
MagnaTran 7.1 User’s Manual
MN-003-1600-00
Command Reference
EEPROM Reset
EEPROM Reset
Purpose
Re-initializes the database.
CAUTION
This command is NOT used in the normal operation of the robot. Call
Brooks Automation Technical Support for instructions on the correct
use of this command.
Format
EEPROM RESET
Description
This command resets, or changes, various robot parameters and clears the database
checksum error.
All user-defined and mapped I/O will NOT be removed.
NOTE: This command is sometimes used when installing a new version of firmware or
replacing specific hardware. All instructions for this command are not included in
this manual.
Brooks Automation
Revision 2.2
8-29
Command Reference
Find Encoder
MagnaTran 7.1 User’s Manual
MN-003-1600-00
Find Encoder
Purpose
Finds the encoder amplitude for T1 and T2 position encoders.
CAUTION
This command is NOT used in the normal operation of the robot. Call
Brooks Automation Technical Support for instructions on the correct
use of this command.
Format
FIND ENCODER (T1| T2) (MAN| AUTO)
Arguments
T1:
Theta 1 axis to be changed
T2:
Theta 2 axis to be changed
MAN:
Manual data gathering
AUTO:
Automatic data gathering
Description
Collects the minimum and maximum data for the T1 or T2 motors.
In manual mode: the user must manually turn the motor axis
In automatic mode: the robot will automatically turn the specified motor
NOTE: The minimum Z value is found using a home flag.
CAUTION
Once these positions are changed, all stations must be retaught.
See Also:
8-30
Encoder Setup on page 9-66 for instructions on the use of this command.
Brooks Automation
Revision 2.2
MagnaTran 7.1 User’s Manual
MN-003-1600-00
Command Reference
Find Phase
Find Phase
Purpose
Performs a Find Phase on individual or all linkages.
CAUTION
This command is NOT used in the normal operation of the robot. Call
Brooks Automation Technical Support for instructions on the correct
use of this command.
Format
FIND PHASE [ALL] [R|T|Z]
Arguments
ALL:
Performs FIND PHASE on all linkages.
R|T|Z:
Performs FIND PHASE on individual linkages.
Description
This command may be aborted via <CTRL><C> at the user keyboard.
DANGER
This command is NOT used in the normal operation of the robot. See
Motor Electrical Phase Calibration on page 9-69 for instructions on
this command.
Brooks Automation
Revision 2.2
8-31
Command Reference
Find Zero
MagnaTran 7.1 User’s Manual
MN-003-1600-00
Find Zero
Purpose
Changes the zero or Home reference for the Theta Axis.
CAUTION
This command is NOT used in the normal operation of the robot. Call
Brooks Automation Technical Support for instructions on the correct
use of this command.
Format
FIND ZERO position
Arguments
position:
The axis to be changed.
T: Theta axis
Description
The MagnaTran 7 robot Home position may be changed from the factory settings to
accommodate the users requirements.
NOTE: The minimum Z value is established with a mechanical adjustment of the home
flag. See Z Hard Stop and Overtravel Limit Switch Adjustment on page 9-53 for
setting the Z value.
CAUTION
Once these positions are changed, all stations must be retaught.
See Also:
8-32
Reset the Home Position to the User Preference on page 9-73 for instructions on the proper use of this command.
Brooks Automation
Revision 2.2
MagnaTran 7.1 User’s Manual
MN-003-1600-00
Command Reference
Go To
Go To
Purpose
Moves to a specified station-referenced location. This command performs all interlocking necessary to maintain safe wafer handling.
Format
GOTO ([[N] station] [R (EX|RE)] [Z (UP|DN)] [SLOT num]) [MAT (ON|OFF)]
[[ARM] arm]
Arguments
station:
Specifies station number.
Range: 1-16.
The “N” identifier is optional.
R (EX|RE): Specifies radial position of arm:
EX = extended
RE = retracted.
Z (UP|DN): Specifies vertical deployment of arm:
UP = up
DN = down.
SLOT num : Indicates the slot to which the arm should move. Use a value of 1 (or 0)
for a non-slotted station; 1 to n for a slotted station, where n = the number of slots previously set for the particular station.
MAT:
Indicates the expected material status during active wafer hand-off.
This MAT option is only valid for R_MT type sensors.
For sensor types other than R_MT, if the MAT command is used, the
error “Active option is not supported with RE|EX type sensors” is displayed.
ON = Material is present on the end effector
OFF = Material in not present on the end effector
ARM arm:
Brooks Automation
Revision 2.2
Indicates the arm that should move. Use a value of A (the default) or B.
If no arm is specified, Arm A will move. The “ARM” identifier is
optional.
8-33
Command Reference
Go To
MagnaTran 7.1 User’s Manual
MN-003-1600-00
NOTE: At least one of the optional arguments N, R, Z, or Slot must be specified or the robot
will return an error message.
Description
Any or all of the data-fields may be specified on a single command line. If the arm is
not already at a station, N must be specified as part of the command. Otherwise, a
“not at station” error will occur. All motions will follow the speed and acceleration
profile appropriate for the currently defined load.
NOTE: The LOAD command may be used to define the load status of the robot’s arms
before executing the GOTO command.
The software applies the following limit checks:
•
Theta position between the minimum and maximum allowed (0o and 360o)
•
Z position between the minimum and maximum allowed, based on the arm
geometry
•
R position between the minimum and maximum allowed, based on the arm
geometry
For multi-axis moves, the following sequence of checks and motions occur in the
order given for the currently defined load:
•
If “N” is specified (station # ), or if “SLOT” is specified, or if “R RE” (retract) is
specified, the arm will retract if it is not already retracted.
•
The rotation axis (variable N) and the Z axis (variables SLOT and Z) will move
to their target locations simultaneously. If N is specified and SLOT is not, the
slot is assumed to be # 1. If N is specified and Z is not, the position is assumed
to be Down.
•
The arm will extend if so commanded. If no arm is specified, ARM A will
extend. This means that unless the arm is explicitly commanded to extend as
part of a GOTO command that specifies a Station or Slot number, it will remain
in the retracted position. This is true even if the arm is already at the specified
Station or Slot number.
See Also:
8-34
MOVE, PICK, PLACE, SET STNSENSOR
Wafer Presence Sensors- Radial Motion on page 6-38
Brooks Automation
Revision 2.2
MagnaTran 7.1 User’s Manual
MN-003-1600-00
Command Reference
Go To
Examples
In the following example arm ‘A’ is currently extended in station # 5, slot # 2 and in the
down position. The arm will move to the up position without retracting.
NOTE: Since no arm-descriptor is provided in the example the robot will move the default
arm, Arm A.
GOTO Z UP
In the following example arm ‘A’ is currently retracted. The robot will move arm ‘A’
to station 5.
GOTO N 5 ARM A
In the following example material is expected during active material hand-off for station 1.
GOTO N 1 R EX MAT ON
Brooks Automation
Revision 2.2
8-35
Command Reference
Go To Station with Offset
MagnaTran 7.1 User’s Manual
MN-003-1600-00
Go To Station with Offset
Purpose
Moves to an offset specified station-referenced location. This command performs all
interlocking necessary to maintain safe wafer handling.
Format
GOTO ([[N] stn] [R (EX|RE)] [RO r_offset] [TO t_offset] [Z (UP|DN)] [SLOT num])
[[ARM] arm]
Arguments
N stn:
Specifies station number. Range: 1-16. The “N” identifier is optional.
R (EX|RE): Specifies radial position of arm:
EX = extended
RE = retracted.
RO r_offset: Specifies the positive or negative offset from the extend/retract location
for that station.
TO t_offset: Specifies the positive or negative offset from the theta location for that
station.
Z (UP|DN): Specifies vertical deployment of arm:
UP = up
DN = down.
SLOT num : Indicates the slot to which the arm should move. Use a value of 1 (or 0)
for a non-slotted station; 1 to n for a slotted station, where n = the number of slots previously set for the particular station.
ARM arm:
Indicates the arm that should move. Use a value of A (the default) or B.
If no arm is specified, Arm A will move. The “ARM” identifier is
optional.
NOTE: At least one of the optional arguments N, R, Z, or Slot must be specified or the robot
will return an error message.
8-36
Brooks Automation
Revision 2.2
MagnaTran 7.1 User’s Manual
MN-003-1600-00
Command Reference
Go To Station with Offset
Description
Any or all of the data-fields may be specified on a single command line. If the arm is
not already at a station, N must be specified as part of the command. Otherwise, a
“not at station” error will occur. All motions will follow the speed and acceleration
profile appropriate for the currently defined load.
NOTE: The LOAD command may be used to define the load status of the robot’s arms
before executing the GOTO command.
The software applies the following limit checks:
•
Theta position between the minimum and maximum allowed (0o and 360o)
•
Z position between the minimum and maximum allowed, based on the arm
geometry
•
R position between the minimum and maximum allowed, based on the arm
geometry
For multi-axis moves, the following sequence of checks and motions occur in the
order given for the currently defined load:
•
If “N” is specified (station # ), or if “SLOT” is specified, or if “R RE” (retract) is
specified, the arm will retract if it is not already retracted.
•
The rotation axis (variable N) and the Z axis (variables SLOT and Z) will move
to their target locations simultaneously. If N is specified and SLOT is not, the
slot is assumed to be #1. If N is specified and Z is not, the position is assumed
to be Down.
•
The arm will extend if so commanded. If no arm is specified, ARM A will
extend. This means that unless the arm is explicitly commanded to extend as
part of a GOTO command that specifies a Station or Slot number, it will remain
in the retracted position. This is true even if the arm is already at the specified
Station or Slot number.
See Also:
MOVE, PICK, PLACE, RQ POS DST
Examples
In the following example arm ‘A’ is currently extended in station # 5, slot # 2 and in the
down position. The arm will move to the up position without retracting.
Brooks Automation
Revision 2.2
8-37
Command Reference
Go To Station with Offset
MagnaTran 7.1 User’s Manual
MN-003-1600-00
NOTE: Since no arm-descriptor is provided in the example the robot will move the default
arm, Arm A.
GOTO Z UP
In the following example arm ‘A’ is currently retracted. The robot will move arm ‘A’
to station 5.
GOTO N 5 ARM A
8-38
Brooks Automation
Revision 2.2
MagnaTran 7.1 User’s Manual
MN-003-1600-00
Command Reference
Halt
Halt
CAUTION
While no damage to the robot will occur due to a HALT command, the
HALT command may result in abrupt motions, and may cause the
misalignment of a wafer that is on the end effector.
Purpose
Available when the robot is in Background Mode only, this command immediately
halts all robot motion operations.
Format
HALT
Description
A controlled stop is applied to halt all robot motion while minimizing wafer movement on the end effector and the Z axis brake applied. Referencing is maintained after
a HALT; all axes that were referenced before the HALT will still be referenced after
the HALT. A “ready” response will be returned when the halt action is complete.
NOTE: To stop the robot, enter <CTRL> <C> on the user keyboard.
Example
The following example stops all current movement. The arms may be moved manually in the R and T axes.
HALT
Brooks Automation
Revision 2.2
8-39
Command Reference
Hllo
MagnaTran 7.1 User’s Manual
MN-003-1600-00
Hllo
Purpose
Used as a non-intrusive command to determine if a robot is responding to communications.
Format
HLLO
Description
Performs no operation; may be used as a non-intrusive command for determining if
the robot is responding. No errors are returned.
Examples
HLLO
Response:
Hello or “:” prompt
8-40
Brooks Automation
Revision 2.2
MagnaTran 7.1 User’s Manual
MN-003-1600-00
Command Reference
Home
Home
Purpose
Establishes the absolute reference system for the robot.
Format
HOME [ALL] [R] [T] [Z]
Arguments
ALL:
Performs an integrated “home” sequence
R:
Specifies homing in the R axis
Z:
Specifies homing in the Z axis
T:
Specifies homing in the T axis
NOTE: At least one argument must be specified. If the ALL argument is specified no other
argument name may be specified.
Description
The HOME command performs multiple absolute position pattern acquisitions in
order to reliably establish the initial position of each axis. The absolute reference system for each axis of the robot is established by moving as much as 10mm (1/2”) the
robot forward/backward repeatedly (pinging), centered about the initial starting
position unit the HOME command is either successfully completed or an error is generated. The sequence to determine its location is described below.
Sequence for multi-axis Homes:
R axis (homes toward retract position)
Z axis (homes downward, only on robot’s with the Z-Axis option)
T axis (homes counterclockwise)
If a HOME command is entered and the robot is already at the HOME position, no
motion will occur.
Brooks Automation
Revision 2.2
8-41
Command Reference
Home
MagnaTran 7.1 User’s Manual
MN-003-1600-00
CAUTION
The inter-axis interlocks used during HOME ALL are not active during individual axis HOME operations. The robot will respond to a
HOME Z or HOME T command even if the arm is extended. The user
should verify that the arm is retracted before attempting to HOME on
T or Z.
NOTE: To stop the robot from pinging and abort the HOME command, enter <CTRL>
<C> on the user keyboard.
Examples
The following example homes the arm’s R Axis by moving the arm to the “home” reference position.
HOME R
In the following example arm ‘A’ is currently extended and in the down position. The
robot will retract the arm and home the R axis. If the Z Axis option is present the robot
will lower the arms and home Z. The robot will then rotate the arms clockwise or
counterclockwise, whichever is the shortest distance, and home the T axis.
HOME ALL
8-42
Brooks Automation
Revision 2.2
MagnaTran 7.1 User’s Manual
MN-003-1600-00
Command Reference
Life Test
Life Test
Purpose
Performs a continuously cycling life test on the robot’s systems.
Format
LFTST
Description
This test is used to exercise all mechanical systems within the MagnaTran 7 robot.
The life test performs continuous PICKS and PLACES between Station 1 and Station
2.
NOTE: Stations 1 and 2 must be defined before executing a life test. Slot valves must be
opened.
PICK STN 1 ARM A
PLACE STN 1 ARM B
PICK STN 2 ARM B
PLACE STN 2 ARM A
To prepare for the test, place a wafer at station 1, station 2 and arm B.
Example
The following example starts the predefined life test sequence.
LFTST
Brooks Automation
Revision 2.2
8-43
Command Reference
Map
MagnaTran 7.1 User’s Manual
MN-003-1600-00
Map
Purpose
The MAP command allows the flexibility to create interlocks and assign a name to
physical I/O. This command also assigns the use of the I/O and defines the specific
characteristics of the I/O.
Sensors must be configured using the MAP command before they can be assigned
using the CDM.
Format
MAP [name] [type] [characteristic] TO [io_name] [io_num]
Arguments
name:
Specifies the user reference name to be assigned to the specified
I/O (20 characters maximum).
type:
Specifies the type of I/O by its specific function. Command
Types of I/O interlocks and a description of each are listed in
Table 6-5 on page 6-24.
characteristic:
The characteristic defines the active state of the I/O device being
assigned as defined by the type of argument. To allow flexibility,
the user may define the characteristic as active HI or active LOW
depending on the hardware functionality.
io_name:
Specifies the physical name of the I/O device being mapped or
assigned. The I/O devices available to the robot are;
DIGITAL_IN
DIGITAL_OUT
io_num:
8-44
Specifies the I/O channels being mapped or assigned. This variable is an eight digit (maximum) hex number of the form
0x12345678 representing the specific I/O channel(s). See the
examples that follow for assistance in designating the io_num.
Note that leading zeros may be dropped from this number.
Brooks Automation
Revision 2.2
MagnaTran 7.1 User’s Manual
MN-003-1600-00
Command Reference
Map
Description
This command is used to assign an internal reference name, type or use, and if
required a characteristic to physical I/O. Referring to the I/O by its reference name
automatically references the I/O by its type, therefore defining the nature of the reference.
For I/O types defined as active high:
•
Setting that I/O to the ACTIVE state will cause the signal to go HI.
•
Setting that I/O to the INACTIVE state will cause the signal to go LOW.
•
Reading that I/O when the signal is HI will cause an ACTIVE response
•
Reading that I/O when the signal is LOW will cause an INACTIVE response.
For I/O types defined as active low:
•
Setting that I/O to the ACTIVE state will cause the signal to go LOW.
•
Setting that I/O to the INACTIVE state will cause the signal to go HI.
•
Reading that I/O when the signal is LOW will cause an ACTIVE response
•
Reading that I/O when the signal is HI will cause an INACTIVE response.
NOTE: The actual terms used by the I/O instead of “ACTIVE” and “INACTIVE” are
defined by the I/O type and are specified in the descriptions that reference the I/O.
For example, OPEN or NOT_OPEN; RETRACTED or NOT_RETRACTED.
The I/O types are defined as performing specific functions with the settings and
responses defined by those functions.
NOTE: When defining the NUMERIC I/O type, the I/O channels being specified
must be consecutive and the low order channel must be the least significant
bit.
It is possible to define a specific I/O channel using multiple MAP commands where
the function of that I/O is defined differently in the different MAP commands. This
allows an I/O channel to be referenced in different ways depending upon the function being performed.
For example; it may be convenient to identify the Wafer Sensors as both
Brooks Automation
Revision 2.2
8-45
Command Reference
Map
MagnaTran 7.1 User’s Manual
MN-003-1600-00
WAF_SEN and as NUMERIC allowing individual monitoring of the sensors
(using RQ IO STATE WAF_SEN) and monitoring of the sensors as a group
(using RQ IO NUMERIC).
See Also:
REMOVE IO, SET STN OPTION.
To request the current settings, see Request I/O Map on page 8-82.
To request the current status, see Request I/O State on page 8-84.
Tables are provided in Appendix E: User Setting Tables on page 11-17
displaying all connector pins and supplying space for the user to enter
assigned interlocks.
The same connectors used in Operational Interlocks are also used in the
DIO Operational Interface. Although the same pin may be used for
either DIO or Interlocks, refer to MISC I/O Communications on page 59 for tables displaying the factory assigned DIO bits. Many pins on the
connectors are not used. It may be recommended to use unused pins for
interlocking.
See Discrete I/O Control (DIO) on page 6-45 for a step by step example
of how to assign interlocks.
Examples
The following examples provide an overview of the usage of I/O types and how to
assign the bits. In each example provided, the Least Significant Bit is considered to be
Bit-0. The hex numbering scheme is:
0, 1, 2, 3, 4, 5, 6, 7, 8, 9, A (10), B (11), C (12), D (13), E (14), F (15)
Example 1 MAP Command
MAP P_GAUGE_1 DISCRETE_IN HI TO DIGITAL_IN 0X8
This example command maps the name P_GAUGE_1 as a DISCRETE_IN
input, Active HI to I/O DIGITAL_IN # 3 represented by hex # 8. The input is
wired to connector MISC I/O EXT_IN3 pin #4. The io_num (0X8) is determined by the example in the figure below.
8-46
Brooks Automation
Revision 2.2
MagnaTran 7.1 User’s Manual
MN-003-1600-00
SUP PI/O
Command Reference
Map
16-23
SUP PI/O 8-15
SUP PI/O 0-7
23
22
21
20
19
18
17
16
15
14
13
12
11
10
9
8
7
6
5
4
3
2
1
0
0
0
0
0
0
0
0
0
0
0
0
0
0
0
0
0
0
0
0
0
1
0
0
0
8
4
2
1
8
4
2
1
8
4
2
1
8
4
2
1
8
4
2
1
8
4
2
1
0
0
0
0
I/O #
MASK
Bit Weight
HEX #
8
0
Example 2 MAP Command
MAP STN_1_WFR WAF_SEN HI TO DIGITAL_IN 0X40
This example command maps STN_1_WFR as a WAF_SEN input, Active HI to
I/O DIGITAL_IN # 6 represented by hex #40. The input is wired to connector
MISC I/O EXT_IN6 pin #7. The io_num (0X40) is determined by the example
in the figure below.
SUP PI/O
16-23
SUP PI/O 8-15
SUP PI/O 0-7
23
22
21
20
19
18
17
16
15
14
13
12
11
10
0
0
0
0
0
0
0
0
0
0
0
0
0
8
4
2
1
8
4
2
1
8
4
2
1
8
0
0
9
8
7
6
5
4
3
2
1
0
0
0
0
0
1
0
0
0
0
0
0
4
2
1
8
4
2
1
8
4
2
1
0
4
0
I/O #
MASK
Bit Weight
HEX #
0
Example 3 MAP Command
MAP STN_1_SLOT SBIT_SVLV_SEN TO DIGITAL_IN 0X3
This example command maps STN_1_SLOT as a SBIT_SVLV_SEN input, to I/
O DIGITAL_IN #0 and # 1 represented by hex #3. The input is wired to connector MISC I/O EXT_IN0 and EXT_IN1 pins 1 and 2. The io_num (0X3) is determined by the example in the figure below.
SUP PI/O
16-23
SUP PI/O 8-15
SUP PI/O 0-7
23
22
21
20
19
18
17
16
15
14
13
12
11
10
0
0
0
0
0
0
0
0
0
0
0
0
0
8
4
2
1
8
4
2
1
8
4
2
1
8
0
Brooks Automation
Revision 2.2
0
0
9
8
0
0
0
4
2
1
0
7
6
0 0
8
4
0
5
4
3
2
1
0
0
0
0
0
1
1
2
1
8
4
2
1
3
I/O #
MASK
Bit Weight
HEX #
8-47
Command Reference
Map
MagnaTran 7.1 User’s Manual
MN-003-1600-00
Example 4 MAP Command
MAP PRESSURE NUMERIC_IN TO DIGITAL_IN 0XF00
This example command maps PRESSURE as a NUMERIC_IN input, to I/O
DIGITAL_IN lines #11, # 10, #9, and #8 represented by hex # F00. The input is
wired to connector MISC I/O EXT_IN8, EXT_IN9, EXT_IN10, and EXT_IN11
pins 9, 10, 11, and 2. The io_num (0XF00) is determined by the example in the
figure below.
SUP PI/O
23
0
8
22
21
0
0
4
2
0
8-48
20
0
1
16-23
19
0
8
18
0
4
SUP PI/O 8-15
17
0
2
0
16
0
1
15
0
8
14
0
13
0
4
2
0
SUP PI/O 0-7
12
11
10
0
1
1
1
8
4
9
8
1
1
2
F
1
7
6
0
0
8
5
0
4
2
0
4
3
2
1
0
0
0
0
0
0
1
8
4
2
0
1
I/O #
MASK
Bit W eight
HEX #
Brooks Automation
Revision 2.2
MagnaTran 7.1 User’s Manual
MN-003-1600-00
Command Reference
Map Pass Through
Map Pass Through
Purpose
The MAP PASSTHROUGH command allows the flexibility to send information
through the robot. This command also assigns the the specific characteristics of the I/
O.
Format
MAP name PASSTHROUGH DIGITAL_IN [io_num_in] (TO| NOT)
DIGITAL_OUT[io_num_out]
Arguments
name:
Specifies the user reference name to be assigned to the specified
I/O (20 characters maximum).
io_num:
Specifies the I/O channels being mapped or assigned. This variable is an eight digit (maximum) hex number of the form
0x12345678 representing the specific I/O channel(s). See the
examples in the Map command for assistance in designating the
io_num. Note that leading zeros may be dropped from this number.
TO:
Assigns the same polarity of the input bit to the output bit.
NOT:
Assigns the opposite polarity of the input bit to the output bit.
Description
This command is used to pass information through the robot from valves, etc.
The I/O types are defined as performing specific functions with the settings and
responses defined by those functions. Pass Through items are updated every 1mSec.
Examples
Same polarity:
MAP DIG_1 PASSTHROUGH TO DIGITAL_IN 0X40 TO DIGITAL_OUT 0X30
In this same polarity example, the input which is high, is passed through the
robot and output as high.
Brooks Automation
Revision 2.2
8-49
Command Reference
Map Pass Through
MagnaTran 7.1 User’s Manual
MN-003-1600-00
Opposite polarity:
MAP DIG_1 PASSTHROUGH NOT DIGITAL_IN 0X40 TO DIGITAL_OUT
0X30
In this opposite polarity example, the input which is high, is passed through
the robot and output as low.
8-50
Brooks Automation
Revision 2.2
MagnaTran 7.1 User’s Manual
MN-003-1600-00
Command Reference
Mount
Mount
Purpose
Causes the robot to move to the “mount new arms” position, which is defined as an R
axis shaft angle of 90°, and a Z position as established by the SET MOUNT Z command.
Format
MOUNT
Arguments
None
Description
The actual executed sequence is:
•
Home R axis
•
Home T axis
•
Home Z axis
Move (slow speed) along Z to the vertical mount position as established by the SET
MOUNT command. The default setting for SET MOUNT is 10.000 mm above the
Home position.
Brooks Automation
Revision 2.2
8-51
Command Reference
Move
MagnaTran 7.1 User’s Manual
MN-003-1600-00
Move
Purpose
Moves one or more axes to a specified location in “physical” coordinates. If more than
one axis is specified, the move is one axis at a time.
CAUTION
MOVE is not interlocked. Simultaneous three-axis moves are
allowed, which could result in physical contact between the robot’s
arms and the chamber.
Format
MOVE [R|T|Z] [ABS|REL] value [[ARM] arm]
Arguments
R|T|Z:
Specifies the axis to be moved.
NOTE: In single axis moves, at least one argument must be specified.
ABS|REL:
Specifies the reference method to be used. The options are:
ABS: use absolute location
REL: use relative distance from previously commanded position
NOTE: One argument must be specified.
value:
Specifies the distance or location to which to move in integer value:
For the REL move-type, the amount is a relative distance
For ABS it is an absolute position). The range for R motion
depends on the geometry of the arms.
arm:
8-52
Specifies which arm will move; the “ARM” identifier is optional.
A
Arm A
B
Arm B
Brooks Automation
Revision 2.2
MagnaTran 7.1 User’s Manual
MN-003-1600-00
Command Reference
Move
NOTE: At least one argument must be specified.
Description
MOVE is a “primitive” motion command: regardless of the axes being moved, no
interlocking is in force. This means that the arm will move both rotationally and vertically while in the extended position. Take great care when using MOVE to avoid
impact against the chamber or valve walls.
NOTE: The LOAD command may be used to define the load status of the robot’s arms
before executing the MOVE command.
•
The REL and ABS move-types require that the axis be homed. This is the normal mode of operation and is recommended for safe, reliable motion.
•
All motions will follow the speed and acceleration profile appropriate for the
currently defined load.
CAUTION
Due to the nature of the MOVE command, only single axis moves
should be performed.
See Also:
GOTO, PICK, PLACE, LOAD
Examples
In the following example arm ‘A’ is currently extended in station # 5, slot # 2 and in the
down position. The robot will extend the ‘A’ arm .100 mm (.004 in).
MOVE R REL 100
In the following example arm ‘A’ is currently extended in station # 5, slot # 2 and in the
down position. The robot will move the ‘A’ arm to the R axis coordinate 13.500 mm
(.531 in).
MOVE R ABS 13500
Brooks Automation
Revision 2.2
8-53
Command Reference
Pick
MagnaTran 7.1 User’s Manual
MN-003-1600-00
Pick
Purpose
Causes the 3-Axis robot arm to pick a wafer from a specified station and slot number.
Format
PICK station [SLOT slot] [[ARM] arm]
Arguments
station:
The number of the station from which to pick. Range: 1-16.
SLOT slot:
The number of the slot from which to pick. At a multi-slot station, the
slot number must be specified only to target a slot number other than
one.
ARM arm:
The arm (A or B) which will perform the pick. The default is Arm A.
The arm descriptor must be specified only to pick with Arm B. The
“ARM” identifier is optional.
Description
The speed and acceleration at which the robot moves during a PICK operation is
dependent on the status of the pans: with or without wafers. In any case the robot
always moves at “with wafer” (slow) speed and acceleration for all three axes, when
there is a wafer on one of the arms. If both arms are empty, the robot uses high speed
for all three axes. If a PICK failure occurs, all motions will be performed at “with
wafer” speed until a successful material hand-off has been accomplished.
NOTE: The PICK command is meant to be used with robots that have the Z-Axis option
installed. If using a 2-axis robot, this command may also be used for PICK and
PLACE commands but no Z-Axis motion will occur. No error will be issued.
During a PICK operation, the MagnaTran 7 robot executes the following sequence of
moves.
8-54
•
Retracts the arm using a speed and acceleration profile appropriate for the currently defined load.
•
Simultaneously moves downward and rotates to the Down position at the Station and Slot number specified using a speed and acceleration profile appropri-
Brooks Automation
Revision 2.2
MagnaTran 7.1 User’s Manual
MN-003-1600-00
Command Reference
Pick
ate for the currently defined load.
•
Extends the arm using a speed and acceleration profile appropriate for the currently defined load to the R position for the station.
•
Moves to the Up position using a speed and acceleration profile appropriate
for the currently defined load and picks up a wafer.
•
Defines the arm executing the PICK as being “loaded”.
•
Retracts the arm using a speed and acceleration profile appropriate for the currently defined load.
For a discussion of speed and acceleration profiles for the MagnaTran 7 robot, see
Motion Control on page 6-13.
NOTE: The operator can force a uniform high speed throughout the PICK operation by first
invoking the SET HISPD command. The set speed remains in effect only until the
completion of the action command following the set speed command.
CAUTION
Setting the HISPD command prior to a PICK command will cause all
motion during the PICK command to be to be executed at high speed,
which may cause wafers to slip or break.
See Also:
GOTO, MOVE, PLACE, RQ POS DST
Wafer Presence Sensors- Radial Motion on page 6-38
Example
In the following example arm ‘A’ is currently extended in station # 5, slot # 2 and in the
down position. The robot will retract the arm, rotate to station # 2, extend the arm,
raise the arm (picking up the wafer), and retract the arm.
NOTE: Since the slot and arm are not specified the robot will default to slot # 1 and arm ‘A’.
PICK 2
Brooks Automation
Revision 2.2
8-55
Command Reference
Pick with an Offset
MagnaTran 7.1 User’s Manual
MN-003-1600-00
Pick with an Offset
Purpose
Causes the 3-axis arm to pick a wafer from a specified station and slot number with a
specified offset.
Format
PICK station [SLOT slot] [[ARM] arm] [STRT (NR|R1|R2)] [ENRT (NR|R1|R2)] [RO
r_offset] [TO t_offset]
Arguments
station:
The number of the station from which to pick. Range: 1-16.
slot:
The number of the slot from which to pick. At a multi-slot station, the
slot number must be specified only to target a slot number other than
one.
arm:
The arm (A or B) which will perform the pick. The default is Arm A.
The arm descriptor must be specified only to pick with Arm B. The
“ARM” identifier is optional.
STRT :
Start retract location
NR: No retract
R1: Normal retract
R2: Second retract location
default = R1
ENRT :
End retract location
NR: No retract
R1: Normal retract
R2: Second retract location
default = R1
RO r_offset: Specifies the positive or negative offset from the extend/retract location
for that station. Maximum allowable R offset: ±4000 microns.
TO t_offset: Specifies the positive or negative offset from the theta location for that
station. Maximum allowable T offset: ±2000 microns.
8-56
Brooks Automation
Revision 2.2
MagnaTran 7.1 User’s Manual
MN-003-1600-00
Command Reference
Pick with an Offset
Description
The speed and acceleration at which the robot moves during a PICK operation is
dependent on the status of the pans: with or without wafers. The robot always moves
at “with wafer” (slow) speed and acceleration for all three axes, when there is a wafer
on the active arm. If the active arm is empty and the inactive arm contains a wafer,
the robot moves at medium speed for the R axis, but slow speed for T and Z. If both
arms are empty, the robot uses high speed for all three axes. If a PICK failure occurs,
all motions will be performed at “with wafer” speed until a successful material handoff has been accomplished.
NOTE: The PICK command is meant to be used with robots that have the Z-Axis option
installed. If using a 2-axis robot, this command may also be used for PICK and
PLACE commands but no Z-Axis motion will occur. No error will be issued.
During a PICK operation, the MagnaTran 7 robot executes the following sequence of
moves.
•
Retracts the arm using a speed and acceleration profile appropriate for the currently defined load.
•
Simultaneously moves downward and rotates to the Down position at the Station and Slot number specified using a speed and acceleration profile appropriate for the currently defined load.
•
Extends the arm using a speed and acceleration profile appropriate for the currently defined load to the R position for the station.
•
Moves to the Up position using a speed and acceleration profile appropriate
for the currently defined load picking up a wafer.
•
Defines the arm executing the PICK as being “loaded”.
•
Retracts the arm using a speed and acceleration profile appropriate for the currently defined load.
For a discussion of speed and acceleration profiles for the MagnaTran 7 robot, see
Motion Control on page 6-13.
NOTE: The operator can force a uniform high speed throughout the PICK operation by first
invoking the SET HISPD command. The set speed remains in effect only until the
completion of the action command following the set speed command.
Brooks Automation
Revision 2.2
8-57
Command Reference
Pick with an Offset
MagnaTran 7.1 User’s Manual
MN-003-1600-00
CAUTION
Setting the HISPD command prior to a PICK command will cause all
motion during the PICK command to be to be executed at high speed,
which may cause wafers to slip or break.
See Also:
8-58
GOTO, MOVE, PLACE, SET RETRACT2
Brooks Automation
Revision 2.2
MagnaTran 7.1 User’s Manual
MN-003-1600-00
Command Reference
Place
Place
Purpose
Causes the 3-Axis robot arm to place a wafer at a specified station and (optionally) slot
number.
Format
PLACE station [SLOT slot] [[ARM] arm]
Arguments
station:
The number of the station to which to place. Range: 1-16.
SLOT slot : The number of the slot to which to place, if this station has been established as a multi-slot station. At a multi-slot station, the slot number
must be specified only to target a slot number other than one.
ARM arm:
The arm (A or B) which will perform the pick. The default is Arm A.
The arm descriptor must be specified only to pick with Arm B. The
“ARM” identifier is optional.
Description
The speed and acceleration at which the robot moves during a PLACE operation is
dependent on the status of the pans: with or without wafers. The robot always moves
at “with wafer” (slow) speed and acceleration for all three axes, when there is a wafer
on the active arm. If the active arm is empty and the inactive arm contains a wafer,
the robot moves at medium speed for the R axis, but slow speed for T and Z. If both
arms are empty, the robot uses high speed for all three axes. If a PLACE failure
occurs, all motions will be performed at “with wafer” speed until a successful material hand-off has been accomplished.
NOTE: The PLACE command is meant to be used with robots that have the Z-Axis option
installed. If using a 2-axis robot, this command may also be used for PICK and
PLACE commands but no Z-Axis motion will occur. No error will be issued.
During a PLACE operation, the MagnaTran 7 robot executes the following sequence
of moves:
•
Retracts the arm using a speed and acceleration profile appropriate for the currently defined load.
Brooks Automation
Revision 2.2
8-59
Command Reference
Place
MagnaTran 7.1 User’s Manual
MN-003-1600-00
•
Simultaneously moves upward and rotates to the Up position at the Station
and Slot number specified using a speed and acceleration profile appropriate
for the currently defined load.
•
Extends the arm using a speed and acceleration profile appropriate for the currently defined load to the R position for the station minus the “Safety” distance. See Set Station Option on page 8-142 for setting the safety option.
•
Moves to the Down position using a speed and acceleration profile appropriate
for the currently defined load depositing the wafer.
•
Extends the arm using “with wafer” speed and acceleration profile to the R
position for the station plus the “Push” distance. See Set Station Option on
page 8-142 for setting the push option.
•
Defines the arm executing the PLACE as being “unloaded”.
•
Retracts the arm using a speed and acceleration profile appropriate for the currently defined load.
For a discussion of speed and acceleration profiles for the MagnaTran 7 robot, see
Motion Control on page 6-13.
NOTE: The operator can force a uniform high speed throughout the PLACE operation by
first invoking the SET HISPD command. The set speed remains in effect only until
the completion of the action command following the set speed command.
CAUTION
Setting the HISPD command prior to a PLACE command will cause
all motion during the PLACE command to be to be executed at high
speed, which may cause wafers to slip or break.
See Also:
GOTO, MOVE, PICK, RQ POS DST
Example
In the following example arm ‘A’ is currently extended in station # 2, slot # 1 and in the
up position. The robot will retract the arm, rotate to station #5, extend the arm, lower
the arm (placing the wafer), push the wafer into registration, and retract the arm.
NOTE: Since the slot and arm are not specified the robot will default to slot # 1 and arm ‘A’.
PLACE 5
8-60
Brooks Automation
Revision 2.2
MagnaTran 7.1 User’s Manual
MN-003-1600-00
Command Reference
Place with an Offset
Place with an Offset
Purpose
Causes the 3-axis robot arm to place a wafer at a specified station and slot number
with an offset.
Format
PLACE station [SLOT slot] [[ARM] arm] [STRT (NR|R1|R2)] [ENRT (NR|R1|R2)]
[RO r_offset] [TO t_offset]
Arguments
station:
The number of the station to which to place. Range: 1-16.
SLOT slot : The number of the slot to which to place, if this station has been established as a multi-slot station. At a multi-slot station, the slot number
must be specified only to target a slot number other than one.
ARM arm:
The arm (A or B) which will perform the pick. The default is Arm A.
The arm descriptor must be specified only to pick with Arm B. The
“ARM” identifier is optional.
STRT :
Start retract location
NR: No retract
R1: Normal retract
R2: Second retract location
default = R1
ENRT :
End retract location.
NR: No retract
R1: Normal retract
R2: Second retract location
default = R1
RO r_offset: Specifies the positive or negative offset from the extend/retract location
for that station. Maximum allowable R offset: ±4000 microns.
TO t_offset: Specifies the positive or negative offset from the theta location for that
station. Maximum allowable T offset: ±2000 microns.
Brooks Automation
Revision 2.2
8-61
Command Reference
Place with an Offset
MagnaTran 7.1 User’s Manual
MN-003-1600-00
Description
The speed and acceleration at which the robot moves during a PICK operation is
dependent on the status of the pans: with or without wafers. The robot always moves
at “with wafer” (slow) speed and acceleration for all three axes, when there is a wafer
on the active arm. If the active arm is empty and the inactive arm contains a wafer,
the robot moves at medium speed for the R axis, but slow speed for T and Z. If both
arms are empty, the robot uses high speed for all three axes. If a PLACE failure
occurs, all motions will be performed at “with wafer” speed until a successful material hand-off has been accomplished.
NOTE: The PLACE command is meant to be used with robots that have the Z-Axis option
installed. If using a 2-axis robot, this command may also be used for PICK and
PLACE commands but no Z-Axis motion will occur. No error will be issued.
During a PLACE operation, the MagnaTran 7 robot executes the following sequence
of moves:
•
Retracts the arm using a speed and acceleration profile appropriate for the currently defined load.
•
Simultaneously moves upward and rotates to the Up position at the Station
and Slot number specified using a speed and acceleration profile appropriate
for the currently defined load.
•
Extends the arm using a speed and acceleration profile appropriate for the currently defined load to the R position for the station minus the “Safety” distance. See Set Station Option on page 8-142 for setting the safety option.
•
Moves to the Down position using a speed and acceleration profile appropriate
for the currently defined load depositing the wafer.
•
Extends the arm using “with wafer” speed and acceleration profile to the R
position for the station plus the “Push” distance. See Set Station Option on
page 8-142 for setting the push option.
•
Defines the arm executing the PLACE as being “unloaded”.
•
Retracts the arm using a speed and acceleration profile appropriate for the currently defined load.
For a discussion of speed and acceleration profiles for the MagnaTran 7 robot, see
Motion Control on page 6-13.
NOTE: The operator can force a uniform high speed throughout the PLACE operation by
8-62
Brooks Automation
Revision 2.2
MagnaTran 7.1 User’s Manual
MN-003-1600-00
Command Reference
Place with an Offset
first invoking the SET HISPD command. The set speed remains in effect only until
the completion of the action command following the set speed command.
CAUTION
Setting the HISPD command prior to a PLACE command will cause
all motion during the PLACE command to be to be executed at high
speed, which may cause wafers to slip or break.
See Also:
Brooks Automation
Revision 2.2
GOTO, MOVE, PICK, SET RETRACT2
8-63
Command Reference
Reference
MagnaTran 7.1 User’s Manual
MN-003-1600-00
Reference
Purpose
References the specified axis.
Format
REF [R|T]
Arguments
R:
Field size: 1 character
Radial Axis
T:
Field size: 1 character
Theta Axis
Description:
The robot reference function will reference the robot at the current position and then
hold the arm at that position.
Example:
REF R
8-64
Brooks Automation
Revision 2.2
MagnaTran 7.1 User’s Manual
MN-003-1600-00
Command Reference
Release
Release
Purpose
Releases servo control of the robot.
Format
RELEASE
Description
The RELEASE command will perform a controlled stop of any motion in progress,
turn the servos off, and remain referenced.
A background ready response will be returned.
Brooks Automation
Revision 2.2
8-65
Command Reference
Remove IO
MagnaTran 7.1 User’s Manual
MN-003-1600-00
Remove IO
Purpose
Removes the specified I/O name from the current map of all named I/O.
Format
REMOVE IO io_name
Arguments
io_name:
Field size: 20 (max)
The name assigned to physical I/O using the MAP command.
Description
This command is used to remove a previously defined I/O name (defined using the
MAP command) from the I/O map. Removing a name from the I/O map frees that
name for redefinition.
If an I/O was defined for a station sensor or a station option, first remove it at the station, then REMOVE I/O.
See Also:
MAP, RQ IO MAP
Example
The following example removes the name P_GAUGE_1 from the I/O map.
REMOVE IO P_GAUGE_1
8-66
Brooks Automation
Revision 2.2
MagnaTran 7.1 User’s Manual
MN-003-1600-00
Command Reference
Remove Station
Remove Station
Purpose
Removes the previously defined stations.
Format
REMOVE STN (ALL| station)
Arguments
station:
The number assigned to the physical station
Description
This command is used to remove a previously defined station and it’s values defined
using the SET STN command. All station values will be set to zero. Removing the station number frees that number for redefinition.
See Also:
Set Station on page 8-140
Example
The following example removes station 11 and it’s station values.
REMOVE STN 11
Brooks Automation
Revision 2.2
8-67
Command Reference
Remove Workspace
MagnaTran 7.1 User’s Manual
MN-003-1600-00
Remove Workspace
Purpose
Removes a work space.
Format
REMOVE WSPACE name
Arguments
name: Removes a specific defined work space.
Description
This command is used to remove all or specific work spaces previously defined.
See Also:
8-68
Create Workspace on page 8-26
Brooks Automation
Revision 2.2
MagnaTran 7.1 User’s Manual
MN-003-1600-00
Command Reference
Request Background
Request Background
Purpose
This command is used to check the status of background tasks. Note that this command will also clear any current errors.
Format
RQ BG
Response
BG status error
Arguments
status:
Background task status.
N
Y
error:
- Specifies that there are no active background tasks.
- Specifies that there is an active background task.
Current error number, will display “0000” if there is no error.
See Error Code Reference on page 8-179.
NOTE: Errors are automatically cleared when the next Action/Set Command is issued.
Description
The current status of any background task may be determined by polling the robot.
Continuous polling will allow the user to determine when the next background task
may be loaded.
NOTE: This command also displays and clears any active errors.
Examples
The following example requests the background task execution status and the current
error status. The status is returned as “no active background tasks” and “no errors”.
RQ BG
BG N 0000
Brooks Automation
Revision 2.2
8-69
Command Reference
Request Capture
MagnaTran 7.1 User’s Manual
MN-003-1600-00
Request Capture
Purpose
Displays the data in the Servo Position Table.
Format
RQ CPTR sensor
Description
The RQ CPTR command will list all valid entries, up to the maximum of ten, in the
Servo Position Table if there are any entries. If there are no entries, the RQ CPTR command will indicate that the capture function has not been triggered.
All servo positions are recorded in microns or millidegrees. The state the sensor transitions to is recorded after the servo positions.
Examples
RQ CPTR 1
CPTR R 0036379 T 0090232 Z 1234 H
CPTR R 0036458 T 0090325 Z 1256 H
CPTR R 0036567 T 0090343 Z 1245 H
RQ CPTR 3
CPTR NOT TRIGGERED
8-70
Brooks Automation
Revision 2.2
MagnaTran 7.1 User’s Manual
MN-003-1600-00
Command Reference
Request Communication
Request Communication
Purpose
This command is used to display the serial communications and command execution
modes.
Format
RQ COMM [([M/B|FLOW|LF|ECHO|CHECKSUM|DREP|ERROR
LEVEL|BAUD RATE)]
Response
COMM mode flow linefeed echo chksum data_rep errorlevel baudrate
Arguments
ALL:
Reports all options in the order presented in the command format.
mode:
Reports the serial I/O communications mode.
MON Monitor mode (: )
PKT Packet mode (_RDY)
flow:
Reports the command execution type.
SEQ Sequential mode
BKG Background mode
BKG+ Background Plus mode
linefeed:
Reports the linefeed state.
ON
OFF
echo:
Reports the echo state.
ON
OFF
checksum:
Echo enabled
Echo disabled
Reports the checksum option state.
ON
Brooks Automation
Revision 2.2
Linefeed enabled
Linefeed disabled
Checksum enabled
8-71
Command Reference
Request Communication
MagnaTran 7.1 User’s Manual
MN-003-1600-00
OFF
data_rep:
Checksum disabled
Reports the data reporting flag. This command in supplied for VT5 compatibility only. See Appendix D: Robot Compatibility on page 11-5.
AUT Automatic mode
REQ Request mode
errorlevel:
Reports the error reporting level.
1 - 5 Automatic mode
baudrate:
Reports the baud rate.
9600 Serial communication
19200 LonWorks
NOTE: At least one argument must be specified. If the ALL argument is specified no other
argument name may be specified.
Description
Requests the specified I/O configuration in RAM.
NOTE: Request commands display the current value stored in RAM.
See Also:
SET COMM, STORE COMM
Examples
The following example requests the current serial I/O communications mode. The
status is returned as “Monitor Mode”.
RQ COMM M/B
COMM MON
The following example requests the current command execution mode. The current
status is returned as “Background”.
RQ COMM FLOW
COMM BKG
8-72
Brooks Automation
Revision 2.2
MagnaTran 7.1 User’s Manual
MN-003-1600-00
Command Reference
Request Communication
The following example requests the serial I/O communications mode and the command execution mode using the selected specifiers. The status is returned as the following: M/B = Monitor Mode, FLOW = Background, LF = on, ECHO = on.
RQ COMM M/B FLOW LF ECHO
Response:
COMM MON BKG ON ON
Brooks Automation
Revision 2.2
8-73
Command Reference
Request Configuration
MagnaTran 7.1 User’s Manual
MN-003-1600-00
Request Configuration
Purpose
Requests the application number of the robot.
Format
RQ CONFIG
Response
application_number
Arguments
application_number: The Brooks Automation customized application number.
Description
tolerance
for servos
Mag 7
3-axis
arm code
speed code
servo code
Application Number: f42 - s41 - m40 - 40 - 73
Example:
Command:
RQ CONFIG
Response:
f42-s41-m40-40-73
See Also:
8-74
Configure Robot Application on page 8-25
Brooks Automation
Revision 2.2
MagnaTran 7.1 User’s Manual
MN-003-1600-00
Command Reference
Request DIO Output
Request DIO Output
Purpose
Requests the current mode set for the Discrete I/O (DIO) output monitoring function.
Format
RQ DIO OUTPUT
Response
DIO OUTPUT [Y|N]
Arguments
YES:
DIO Output has been enabled.
NO:
DIO Output has been disabled.
Description
This function requests the current mode set for the enabling or disabling of the Discrete I/O Output while the serial I/O is in control of the robot.
See Also:
Set DIO Output on page 8-125
Example
The following example requests the current Discrete I/O Output function mode and
the response reports enabled.
Command:
RQ DIO OUTPUT
Response:
DIO OUTPUT YES
Brooks Automation
Revision 2.2
8-75
Command Reference
Request History
MagnaTran 7.1 User’s Manual
MN-003-1600-00
Request History
Purpose
Requests the history of events performed by the robot.
Format
RQ HISTORY (CMD|ERR|TOT) [#records]
Response
Commands:
CMD: date command accepted, time command accepted, command received
Errors:
First line: ERR: date, time, command being executed at time of error
Second line: System state to indicate where failure occurred
Third line: Error number, description of error
Forth line: Cycle count, position of each axis at time error occurred
Total Errors for each axis:
TOT: date of last error, time of last error, axis letter, total number of errors
Arguments
CMD:
non-action commands (SET and STORE)
ERR:
errors
TOT:
total number of motion errors for each axis
# records: number of records to be displayed
Description
Information requests are treated independently to allow for a maximum amount of
information for each type.
The argument for number of records to be displayed is optional. If no value is
entered, all available records will be displayed. If a “1” is entered, only the last logged
8-76
Brooks Automation
Revision 2.2
MagnaTran 7.1 User’s Manual
MN-003-1600-00
Command Reference
Request History
(most recent) record to be displayed.
If both CMD and ERR are selected, they will be sent concomitant by date. Latest information is transmitted last. If TOT is selected, these totals will be transmitted after any
CMD and ERR information. Order TOT information by axis is fixed (not based on
date of last error for given axis). If number of records is not specified, all available
records will be displayed.
Example
The following example requests all available history information.
Command:
RQ HISTORY CMD ERR TOT
Response:
CMD: 10/17/1998 00:20 set sync zero t1 -2.956904 t2 -2.588184 z 0.000000
ERR: 10/17/1998 00:29 place 2
Z MOVING TO STN 2 R RE T TO0 Z UP SLOT 1 ARM A
10009 Hard tracking error, Z motor
217015
R 371204 T 179972 Z 759
CMD: 10/17/1998 00:30 store servo all
ERR: 10/17/1998 00:31 pick 1
R MOVING TO STN 1 R EX T TO0 Z DN SLOT 1 ARM A
10009 Hard tracking error, T2 motor
217019
R 464114 T 91173 Z 59
ERR: 10/17/1998 00:40 xfer 1 2
T MOVING TO STN 2 R RE T TO0 Z UP SLOT 1 ARM A
10009 Hard tracking error, T2 motor
217026
R 374223 T 140896 Z 4940
ERR: 10/17/1998 00:42 move t rel 24464
T MOVING TO STN N R NAS T NAS Z NAS SLOT N ARM A
10009 Hard tracking error, T1 motor
217028
R 368097 T 241115 Z 0
ERR: 10/17/1998 00:44 goto n 1 r ex z dn slot 3
R MOVING TO STN 1 R EX T TO0 Z DN SLOT 3 ARM A
10009 Hard tracking error, T2 motor
217028
R 408986 T 91947 Z 12676
ERR: 10/17/1998 00:48 command syntax error
NON ACTION COMMAND
305 Unknown command.
217031
R 371124 T 0
Z0
TOT: 10/17/1998 00:44 R 5
TOT: 10/17/1998 00:47 T 5
TOT: 10/17/1998 00:30 Z 5
Brooks Automation
Revision 2.2
8-77
Command Reference
Request History
See Also:
MagnaTran 7.1 User’s Manual
MN-003-1600-00
Table 8-12 for abbreviation information
Table 8-12: System states recorded on motion errors
System State
Abbreviation
System State
Abbreviation
LOG_NO_AXIS_ERR
N
T AXIS
LOG_R_AXIS_ERR
R
NOT_AT_STATION
NAS
LOG_T_AXIS_ERR
T
ARM
ARM
LOG_Z_AXIS_ERR
Z
SENSOR
SNS
LOG_X_AXIS_ERR
X
TO0
TO0
TZ
TO1
TO1
TO2
TO2
LOG_TZ_AXIS_ERR
STN
NOT_AT_STATION
N
X AXIS
station num, e.g.
1
NOT_AT_STATION
R AXIS
NOT_AT_STATION
NAS
LEFT
LT
RIGHT
RT
NAS
RETRACTED
RE
SLOT
EXTENDED
EX
NOT_AT_STATION
N
R_SAFETY
SAF
slot num 1
1
R_PUSH
PSH
slot num 12
12
RETRACT_2
RE2
R_MAP
MAP
Z AXIS
NOT_AT_STATION
NAS
Z_DOWN
DN
Z_UP
UP
Z_MAP_STRT
MPS
Z_MAP_END
MPE
8-78
ARM
ARM_B
B
ARM_A
A
Brooks Automation
Revision 2.2
MagnaTran 7.1 User’s Manual
MN-003-1600-00
Command Reference
Request Home Position Z-Axis
Request Home Position Z-Axis
Purpose
Requests the Z-Axis Home position.
Format
RQ HOME POS Z
Response
value
Arguments
Absolute position value in microns.
value:
Range: 0 to 35000 microns.
Description
The Z-Axis HOME position can be requested through a command line entry.
See Also:
HOME, SET HOME POS Z, STORE HOME POS Z
Example
To request the Z-Axis HOME:
RQ HOME POS Z
The reply is 17500mm:
17500
Brooks Automation
Revision 2.2
8-79
Command Reference
Request Interlock
MagnaTran 7.1 User’s Manual
MN-003-1600-00
Request Interlock
Purpose
Reports the state of the interlock.
Format
RQ [INTER| INTLCK] [ALL] [WAF_SEN| TZ]
Response
state mode
Arguments
state:
Y = Wafer Sensing is Enabled
N = Wafer Sensing is Disabled
mode:
ON = Robot will execute all T moves before Z moves
OFF = Robot will execute T and Z move simultaneously
Description
This command requests the current setting for interlocking capabilities.
See Also:
SET INTLCK
Example
To request the state of the wafer sensor interlocks:
RQ INTLCK WAF_SEN
8-80
Brooks Automation
Revision 2.2
MagnaTran 7.1 User’s Manual
MN-003-1600-00
Command Reference
Request I/O Echo
Request I/O Echo
Purpose
This command is used to display the serial communications echo option.
Format
RQ IO ECHO
Response
In Monitor Mode: ECHO STATUS [Y|N]
In Packet Mode: IO [Y|N]
Arguments
status:
Displays the current status of the I/O Echo option.
Y
N
Specifies the echo option is on (all commands echoed)
Specifies the echo option is off (no commands echoed)
Description
The I/O echo option is used to request full or half duplex communications. If the terminal, or terminal emulator, displays double characters for all user entered text IO
ECHO should be set off. If the terminal, or terminal emulator, displays no characters
for all user entered text IO ECHO should be set on.
NOTE: Request commands display the current value stored in RAM.
See Also:
SET IO ECHO, STORE IO ECHO
Examples
The following example returns the current setting of the I/O Echo option.
RQ IO ECHO
Response:
Monitor Mode: Echo Status [Y|N]
Packet Mode: IO [Y|N]
Brooks Automation
Revision 2.2
8-81
Command Reference
Request I/O Map
MagnaTran 7.1 User’s Manual
MN-003-1600-00
Request I/O Map
Purpose
Returns the current map of all named I/O Interlocks.
Format
RQ IO MAP [ALL] [name]
Response
IO MAP name type characteristic io_name io_num
Arguments
ALL:
Specifies all defined I/O points.
name:
The I/O name assigned to the specified I/O (20 characters maximum).
type:
The type of the I/O.
characteristic:
Specifies the I/O characteristic as defined by the type argument
(I/O Type). To allow flexibility, characteristics may be active HI
or active LOW depending on the hardware functionality. Refer
to Table 6-5.
io_name:
Specifies the physical name of the I/O device assigned. The I/O
devices available to the robot are; DIGITAL_IN, DIGITAL_OUT,
or MCC_IN.
io_num:
Specifies the I/O channels assigned. This variable is an eight
digit hex number of the form 0x12345678 representing the specific I/O channel(s).
NOTE: At least one argument must be specified.
Description
This command is used to display the current I/O map. The definition of a specific
named I/O may be displayed by referencing that I/O name or all I/O names defined
using the MAP command may be listed along with their definition by using the ALL
8-82
Brooks Automation
Revision 2.2
MagnaTran 7.1 User’s Manual
MN-003-1600-00
Command Reference
Request I/O Map
specifier.
NOTE: Request commands display the current value stored in RAM.
See Also:
MAP, REMOVE IO
Examples
The following example requests the current definition for all specified I/O. The robot
returns the current map of all named I/O including the definition of each I/O name.
Command:
RQ IO MAP ALL
Response:
IO MAP P_GAUGE_1 DISCRETE_IN HI DIGITAL_IN 0x00000004
IO MAP STN_1_WFR WAF_SEN HI DIGITAL_IN 0x00000040
IO MAP STN_1_SLOT SBIT_SVLV_SEN DIGITAL_IN 0x00000003
IO MAP PRESSURE NUMERIC_IN DIGITAL_IN 0x00000F00
The following example requests the current definition for a specific I/O point. The
robot returns the current map of the I/O point named P_GAUGE_1.
Command:
RQ IO MAP P_GAUGE_1
Response:
IO MAP P_GAUGE_1 DISCRETE_IN HI DIGITAL_IN 0x00000004
Brooks Automation
Revision 2.2
8-83
Command Reference
Request I/O State
MagnaTran 7.1 User’s Manual
MN-003-1600-00
Request I/O State
Purpose
Returns the current status for the specified I/O Interlocks for all outputs and inputs.
Format
RQ IO STATE [io_name]
Response
IO STATE io_name io_state
Arguments
io_name:
Field size: 20 (max)
The name assigned to physical I/O using the MAP command.
io_state:
Field size: 20 (max)
The status of the I/O referenced by the io_name. Note that the I/O state
returned will be defined by the type of I/O being referenced.
See Table 6-5 for responses to each I/O state and descriptions of each
response.
NOTE: At least one argument must be specified.
Description
This command is used to monitor the current status of physical I/O by referencing the
I/O names defined using the MAP command.
The response from issuing this command is defined by the I/O command type being
referenced, refer to Table 6-5 for a list of Operation Interlock I/O types, their RQ I/O
STATE responses, and a description of the responses.
NOTE: Using the ALL variable will cause a list of all I/O names and their states to be generated following the response format shown above.
Request commands display the current value stored in RAM.
See Also:
8-84
SET IO STATE, MAP
Brooks Automation
Revision 2.2
MagnaTran 7.1 User’s Manual
MN-003-1600-00
Command Reference
Request I/O State
Examples
The following examples provide an overview of the responses for the different types
of I/O. Note that the current arm status of the robot does not apply to this command.
The following example returns the current status of the I/O defined by P_GAUGE_1
(set using the MAP command), which in this case is a pressure sensor, indicating that
there is a high pressure condition.
RQ IO STATE P_GAUGE_1
IO STATE P_GAUGE_1 ACTIVE
The following example returns the current status of the I/O defined by STN_1_WFR
(set using the MAP command), which in this case is a wafer sensor, indicating that
there is a wafer present.
RQ IO STATE STN_1_WFR
IO STATE STN_1_WFR BLOCKED
The following example returns the current status of the I/O defined by STN_1_WFR
(set using the MAP command), which in this case is a slot valve, indicating that the
valve is open.
RQ IO STATE STN_1_SLT
IO STATE STN_1_SLT OPEN
The following example returns the current status of the I/O defined by PRESSURE
(set using the MAP command), which in this case is a pressure sensor, indicating that
the pressure is 14.
RQ IO STATE PRESSURE
IO STATE PRESSURE 14
The following example returns the current status of all named I/O.
RQ IO STATE ALL
IO STATE P_GAUGE_1 ACTIVE
IO STATE STN_1_WFR BLOCKED
IO STATE STN_1_SLT OPEN
IO STATE PRESSURE 14
Brooks Automation
Revision 2.2
8-85
Command Reference
Request Load
MagnaTran 7.1 User’s Manual
MN-003-1600-00
Request Load
Purpose
Requests the load status of the specified arm.
Format
RQ LOAD [[ARM] arm]
Response
LOAD [arm] status
Arguments
arm:
The arm (A or B) for which parameters are being set; the default arm is
A. The “ARM” identifier is optional.
status:
Provides the load status for the specified arm.
ON = Arm has a load on the specified end effector
OFF = Arm does not have a load on the specified end effector
? = UNKNOWN Arm cannot determine of a load is present.
Description
The UNKNOWN status is only available if the LOAD MODE has been set to TRI.
When the active status is UNKNOWN, the robot will move at “with wafer” slow
speed.
When LOAD MODE is set to TRI, at power-up the robot arm loads are set to
UNKNOWN. The robot will continue to assume the load is UNKNOWN until either
a PICK, PLACE, CHECK LOAD or SET LOAD ON|OFF command is executed.
This command is used to determine the current load status of the robot’s arm(s). Note
that at power-up, the robot’s arm(s) are assumed to be loaded. The robot will continue to assume the arm(s) are loaded until either a PLACE or a SET LOAD OFF command is executed.
NOTE: Request commands display the current value stored in RAM.
See Also:
8-86
SET LOAD
Brooks Automation
Revision 2.2
MagnaTran 7.1 User’s Manual
MN-003-1600-00
Command Reference
Request Load
Example
In the following example arm ‘A’ is currently extended in station # 5, slot # 2 and in the
down position. The robot responds that it currently assumes that a wafer is on arm
‘A’.
RQ LOAD A
LOAD A ON
RQ LOAD ARM A
LOAD A ON
Brooks Automation
Revision 2.2
8-87
Command Reference
Request Load Mode
MagnaTran 7.1 User’s Manual
MN-003-1600-00
Request Load Mode
Purpose
Requests the load mode.
Format
RQ LOAD MODE
Response
type
Argument
Requests the load mode type.
BI = Two state mode
TRI = Three state mode
type:
Description
This command requests the mode for reporting the load status of the arm. The load
status is used to determine the speed of all motion commands.
If the SET LOAD MODE has been set for BI: ON or OFF will be the responses
to the RQ LOAD command.
If the SET LOAD MODE has been set for TRI: ON, OFF or (?) will be the
responses to the RQ LOAD command.
See Also:
RQ LOAD, SET LOAD, STORE LOAD MODE, SET LOAD MODE
Example
RQ LOAD MODE
8-88
Brooks Automation
Revision 2.2
MagnaTran 7.1 User’s Manual
MN-003-1600-00
Command Reference
Request Mount
Request Mount
Purpose
Returns the setting for the height to which the arm moves in response to the MOUNT
command.
Format
RQ MOUNT [Z]
Response
MOUNT [mount-height]
Arguments
mount-height: Field size: 6 characters
The vertical (Z) height to which the arm moves, relative to the Home position,
when it receives the MOUNT command prior to mounting or dismounting the
arm.
Description
The mount height cannot exceed the vertical position limit set by the SET LIM Z MAX
command. The default for the vertical limit is the actual mechanical limit indicated in
the robot specifications.
See also: SET MOUNT
Example:
Command:
: RQ MOUNT Z
Response:
Z Mount height : 10000
Brooks Automation
Revision 2.2
8-89
Command Reference
Request Position Absolute
MagnaTran 7.1 User’s Manual
MN-003-1600-00
Request Position Absolute
Purpose
Returns, for the specified axis, the actual position of the pan in absolute coordinates
for the specified arm.
Format
RQ POS ABS [[ARM]arm] [R] [T] [Z]
or
RQ POS ABS [[ARM]arm] ALL
Response
POS ABS [r-location] [t-location] [z-location]
or
POS ABS r-location t-location z-location
Arguments
ALL:
Specifies R, T, and Z in the order presented in the command format.
ARM arm:
Field size: 1
The arm for which the pan location is being measured. If unspecified,
the response will be for the default arm, Arm A.
The “ARM” identifier is optional.
r-location:
Response field size: 7
The current R axis location of the robot arm in microns (m) (.001 mm).
t-location:
Response field size: 6
The current T axis location of the robot arm in 0.001 degrees.
z-location:
Response field size: 6
The current Z axis location of the arm in microns (m) (.001 mm).
NOTE: At least one argument must be specified. If the ALL argument is specified no other
argument name may be specified.
8-90
Brooks Automation
Revision 2.2
MagnaTran 7.1 User’s Manual
MN-003-1600-00
Command Reference
Request Position Absolute
Description
The numbers given represent the actual physical location of the end effector in absolute coordinates. This position may differ slightly from the position to which the
robot was commanded (see RQ POS TRG to request the target position).
The number and order of the data-fields returned will reflect the number and order of
the Request. Use of ALL implies that the return data-values will appear in the standard order (ARM, R, T, Z).
See Also:
RQ POS TRG
Example
In the following example arm ‘A’ is currently extended in station # 5, slot # 2 and in the
down position. The robot returns the current position of the ‘A’ arm in absolute coordinates.
RQ POS ABS A ALL
POS ABS 0224312 000000 000000
Brooks Automation
Revision 2.2
8-91
Command Reference
Request Position Destination
MagnaTran 7.1 User’s Manual
MN-003-1600-00
Request Position Destination
Purpose
Returns the destination position for the current stage of the action command.
Format
RQ POS DST [[ARM]arm] [R] [T] [Z]
or
RQ POS DST [[ARM]arm] ALL
Response
POS DST [[ARM] arm] [r-destination] [t-destination] [z-destination]
or
POS DST [[ARM] arm] r-destination t-destination z-destination
Arguments
ALL:
Specifies R, T, and Z in the order presented in the command format.
ARM arm:
Field size: 1
The arm for which the end effector DESTINATION is being requested.
If unspecified, the response will be for the default arm, Arm A. The
“ARM” identifier is optional.
r-destination: Response field size: 7
The current R axis DESTINATION of the robot arm in microns (m) (.001
mm).
t-destination: Response field size: 6
The current T axis DESTINATION of the robot arm in 0.001 degrees.
z-destination: Response field size: 6
The current Z axis DESTINATION of the arm in microns (m) (.001 mm).
NOTE: At least one argument must be specified. If the ALL argument is specified no other
argument name may be specified.
8-92
Brooks Automation
Revision 2.2
MagnaTran 7.1 User’s Manual
MN-003-1600-00
Command Reference
Request Position Destination
Description
The numbers given represent the physical destination location of the pan for the current particular motion. The destination location will depend on where the arm is in
the move cycle.
If the request is made after an abort or the robot is standing still, the last move destination will be displayed.
The number and order of the data-fields returned will reflect the number and order of
the Request. Use of ALL implies that the return data-values will appear in the standard order (ARM, R, T, Z).
See Also:
RQ POS ABS
Example
In the following example arm ‘A’ is currently extended in station # 5, slot # 2 and in the
down position. The robot returns the current position of the ‘A’ arm in absolute coordinates.
RQ POS DST ALL
POS DST 175003 181007 21032
Brooks Automation
Revision 2.2
8-93
Command Reference
Request Position Station
MagnaTran 7.1 User’s Manual
MN-003-1600-00
Request Position Station
Purpose
Returns the current position of the pan in “station” coordinates.
Format
RQ POS STN [[ARM]arm] [R] [T] [SLOT] [Z]
or
RQ POS STN [[ARM]arm] ALL
Response
POS STN [ex/re-location] [station] [slot] [up/dn-location]
or
POS STN ex/re-location station slot up/dn-location
Arguments
ALL:
Specifies R, T, SLOT, and Z in the order presented in the command format.
ARM arm:
Field size: 1
The location of the specified arm or Arm A. If unspecified, the response
will be for the default arm, Arm A. The “ARM” identifier is optional.
ex/re-location: Response field size: 2
The location of the arm on the R axis (extended or retracted). The return
values are:
EX (for extended)
RE (for retracted)
-- (robot is not at a station)
8-94
station:
Response field size: 2
The current station number being addressed. The return value will be 0
if no station is addressed.
slot:
Response field size: 4
Brooks Automation
Revision 2.2
MagnaTran 7.1 User’s Manual
MN-003-1600-00
Command Reference
Request Position Station
The current slot number of the arm. The return value will be 1 for a for
a station with no slots specified, 0 if the robot is not at a station.
up/dn-location: Response field size: 2
The up or the down position of the arm. The returned values indicate:
UP (for up)
DN (for down)
-- (not at a station)
NOTE: At least one argument must be specified. If the ALL argument is specified no other
argument name may be specified.
Description
If the robot has been commanded by a station-oriented command such as PICK,
PLACE, or GOTO the position for the specified axis for the specified arm is returned.
The number and order of the data fields returned will reflect the number and order of
the Request. Use of ALL implies that the return data-values will appear in the standard order (ARM, R, T, SLOT, Z).
To position the arm in Station Coordinates, use the GOTO command with the Station
Number specified.
See Also:
RQ POS ABS, RQ POS TRG, RQ STN, SET STN, STORE STN
Example
In the following example arm ‘A’ is currently extended in station # 5, slot # 2 and in the
down position. The robot returns the current position of the ‘A’ arm in station coordinates.
RQ POS STN ARM A ALL
POS STN ARM A EX 5 2 DN
Brooks Automation
Revision 2.2
8-95
Command Reference
Request Position Target
MagnaTran 7.1 User’s Manual
MN-003-1600-00
Request Position Target
Purpose
Returns, for the specified axis, the position in absolute coordinates to which the robot
arm has been commanded.
Format
RQ POS TRG [[ARM]arm] [R] [T] [Z]
or
RQ POS TRG [[ARM]arm] ALL
Response
POS TRG [[ARM]arm] [r-location] [t-location] [z-location]
or
POS TRG [[ARM]arm] r-location t-location z-location
Arguments
8-96
ALL:
Specifies R, T, and Z in the order presented in the command format.
ARM arm:
Field size: 1
The arm that has been commanded to move to the specified location. If
unspecified, information will be returned for the default arm, Arm A.
The “ARM” identifier is optional.
r-location:
Response field size: 7
The target R axis location of the robot arm in microns (m) or “------” if
unreferenced.
t-location:
Response field size: 6
The target T axis location of the robot arm in 0.001 degrees or “------” if
unreferenced.
z-location:
Response field size: 6
The target Z axis location of the arm in microns (m) or “------” if unreferenced.
Brooks Automation
Revision 2.2
MagnaTran 7.1 User’s Manual
MN-003-1600-00
Command Reference
Request Position Target
NOTE: At least one argument must be specified. If the ALL argument is specified no other
argument name may be specified.
Description
The numbers given represent the physical location of the end effector in absolute
coordinates to which the robot was commanded. The position to which the robot
actually moves may vary slightly from the position to which the robot was commanded (see RQ POS ABS to request the actual position).
The number and order of the data-fields returned will reflect the number and order of
the Request. Use of ALL implies that the return data-values will appear in the standard order (ARM, R, T, Z).
See Also:
RQ POS ABS, RQ POS STN
Example
In the following example arm ‘A’ is currently extended in station # 5, slot # 2 and in the
down position. The robot returns the position the ‘A’ arm was commanded to go to
in absolute coordinates. Note that this position may vary from the actual position of
the robot.
RQ POS TRG ARM A ALL
POS TRG ARM A 175000 181000 21000
Brooks Automation
Revision 2.2
8-97
Command Reference
Request Radial Motion Sense
MagnaTran 7.1 User’s Manual
MN-003-1600-00
Request Radial Motion Sense
Purpose
Requests the size of the sensing window for Radial Motion sensors.
Format
RQ R_MT SENSE [LIMITS(INNER|OUTER)] [WAFER SIZE]
Response
invalue outervalue size
Arguments
INNER invalue:
Length from the edge of the wafer to the start of the wafer sensing window in microns.
OUTER outervalue: Length of the wafer sensing window in microns.
WAFER SIZE size: Wafer size in microns:
200000 for 200mm wafers
300000 for 300mm wafers
Description
Displays the current settings for the Radial Motion detection sensing limits. These
values along with the position where the R_MT type sensor is located in the chamber
determine the sensing window.
Examples
To request the inner and outer limits of the Radial Motion sensor:
RQ R_MT SENSE LIMITS INNER OUTER WAFER SIZE
Response:
In Monitor Mode:
R_MT SENSE:
INNER - - - - - - - 10000 OUTER - - - - - - - -20000
WAFER SIZE - - - - - -300000
8-98
Brooks Automation
Revision 2.2
MagnaTran 7.1 User’s Manual
MN-003-1600-00
Command Reference
Request Radial Motion Sense
In Packet Mode:
R_MT SENSE INNER 10000 OUTER 20000 WAFER SIZE 300000
See Also:
Brooks Automation
Revision 2.2
Set Radial Motion Sense on page 8-138
8-99
Command Reference
Request Reference
MagnaTran 7.1 User’s Manual
MN-003-1600-00
Request Reference
Purpose
Returns the referenced status of the specified axis.
Format
RQ REF [R| T| Z]
or
RQ ALL
Response
REF [r-reference-status] [t-reference-status] [z-reference-status]
or
REF r-reference-status t-reference-status z-reference-status
Arguments
r-reference-status: Field size: 1 character
Y (referenced)
N (unreferenced)
t-reference-status: Field size: 1 character
Y (referenced)
N (unreferenced)
z-reference-status: Field size: 1 character
Y (referenced)
N (unreferenced)
Example:
Command:
RQ REF ALL
Response:
Radial : N
Theta : N
Z
8-100
:N
Brooks Automation
Revision 2.2
MagnaTran 7.1 User’s Manual
MN-003-1600-00
Command Reference
Request Retract 2 Value
Request Retract 2 Value
Purpose
Requests the second retract value (R2) for the Pick and Place with an Offset commands.
Format
RQ RTRCT2
Response
RTRCT2 value
Arguments
value:
Second retract location value in microns.
Description
This command requests the value of the second retract location when using the Pick
with an Offset and Place with an Offset commands.
Brooks Automation
Revision 2.2
8-101
Command Reference
Request Revision
MagnaTran 7.1 User’s Manual
MN-003-1600-00
Request Revision
Purpose
Returns the current Brooks part number and software revision number.
Format
RQ RVSN
Response
RVSN version date
Arguments
version :
The Brook Automation software version number.
date:
The revision date of the software.
Example:
Command:
RQ RVSN
Response:
date - 11992
Rev. - 4.44
Indicates that the date of the firmware revision is 11992 and the version number is 4.44.
8-102
Brooks Automation
Revision 2.2
MagnaTran 7.1 User’s Manual
MN-003-1600-00
Command Reference
Request Robot Application
Request Robot Application
This command is for VT5 compatibility only. Mag 7 (Mag 6 compatibility) users see Request
Configuration on page 8-74.
Purpose
Returns the application number of the robot.
Format
RQ ROBOT APPLIC
Response
application_number
Arguments
application_number: The Brooks Automation customized application number.
Description
tolerance
for servos
mag 7
3-axis
arm code
speed code
servo code
Application Number: f42 - s41 - m40 - 40 - 73
Example:
Command:
RQ ROBOT APPLIC
Response:
f42-s41-m40-40-73
Brooks Automation
Revision 2.2
8-103
Command Reference
Request Station
MagnaTran 7.1 User’s Manual
MN-003-1600-00
Request Station
Purpose
Requests, for the specified variable, the absolute coordinate values of the various station-related parameters.
Format
RQ STN station [[ARM]arm] ([R] [T] [Z] [LOWER] [NSLOTS] [PITCH])
or
RQ STN station [[ARM]arm] ALL
Response
STN station [r-location] [t-location] [bto] [lower] [n-slots] [pitch]
or
STN station r-location t-location bto lower n-slots pitch
Arguments
8-104
ALL:
Specifies R, T, Z, LOWER, NSLOTS, and PITCH in the order presented
in the command format.
station:
Field size: 4
The number of the station for which parameters are being requested.
ARM arm:
Field size: 1
the arm (A or B) for which parameters are being requested; if unspecified, the information will be returned for the default arm, Arm A. The
“ARM” identifier is optional.
r-location:
Response field size: 7
The station's radial extend position in microns.
t-location:
Response field size: 6
The station's rotational axis position in units of 0.001 degrees.
bto:
Response field size: 6
The z-axis position of the Wafer Transfer Plane in microns. For a station
Brooks Automation
Revision 2.2
MagnaTran 7.1 User’s Manual
MN-003-1600-00
Command Reference
Request Station
with a cassette, the Wafer Transfer Plane is at the center of the first slot.
lower:
Response field size: 6
The distance in microns below the Transfer Plane that becomes the
down position location.
n-slots:
Response field size: 4
The number of slots in the cassette. A value of 0 or 1 indicates a non-cassette (single slot) type station.
pitch:
Response field size: 6
The pitch in microns between slots.
NOTE: At least one argument must be specified. If the ALL argument is specified no other
argument name may be specified.
Description
Requests, for the specified variable, the absolute coordinate values of the various station-related parameters. Displays the parameters for the requested station. ALL
applies only to the data fields after station-number, which will be returned in standard order: ARM, R, T, Z, LOWER, NSLOTS, PITCH.
NOTE: Request commands display the current value stored in RAM.
See Also:
SET STN, STORE STN
Example
In the following example arm ‘A’ is currently extended in station # 5, slot # 2 and in the
down position. The robot returns the absolute position definition of station 5 for the
‘A’ arm.
RQ STN 5 A ALL
STN 0001 A 0675000 180000 032500 005000 0001 000000
Brooks Automation
Revision 2.2
8-105
Command Reference
Request Station Option
MagnaTran 7.1 User’s Manual
MN-003-1600-00
Request Station Option
Purpose
Requests, for the specified variable, the status of the various station-related parameters.
Format
RQ STN station [[ARM]arm] OPTION
[SBIT_SVLV_SEN|RETRACT_SEN|WAF_SEN (EX|RE)|EX_ENABLE|VLV_SEN]
RQ STN station [[ARM]arm] OPTION (SAFETY|PUSH)
RQ STN station [[ARM]arm] OPTION VIA (POST|POSR)
Response
STN station OPTION sensor name state
or
STN station OPTION (SAFETY # |PUSH # )
or
STN station ARM arm OPTION VIA POST value POSR value
Arguments
8-106
station:
Field size: 4
The number of the station for which parameters are being requested.
ARM arm:
Field size: 1
The arm (A or B) for which parameters are being requested; if unspecified, the information will be returned for the default arm, Arm A. The
“ARM” identifier is optional.
sensor:
The sensor type for which parameters are being requested.
See Table 6-5 for station sensor command types (i.e. WAF_SEN,
SVLV_SEN, etc.)
name:
Response field size: 20 (max)
The name of the sensor at the specified location. If there is no sensor at
the specified location “NONE” will be returned.
state:
The current state of the specified sensor
BLOCKED = Wafer blocking the sensor
Brooks Automation
Revision 2.2
MagnaTran 7.1 User’s Manual
MN-003-1600-00
CLEAR
Command Reference
Request Station Option
= The sensor is not being blocked
(SAFETY # |PUSH #): Response field size: 6
Specifies the distance in microns the end effector may move within the
zone of a Process Module.
SAFETY # = The distance the end effector will stop short of a
station’s R position during a “PLACE”.
PUSH # = The distance the end effector may push the wafer
past a station’s R position during a “PLACE”.
POST:
The theta coordinate of the VIA point in milli-digress.
POSR:
The radial coordinate of the VIA point in microns.
Description
This command requests the optional station-related parameters.
NOTE: Request commands display the current value stored in RAM.
See Also:
Set Station Option on page 8-142
Set Station Option VIA Point on page 8-145
Store Station Option on page 8-167
Example
In the following example arm ‘A’ is currently extended in station # 3, slot # 2 and in the
down position. The robot returns the current configuration and status of the Station
5 Wafer Sensor at the Extend position. Since the wafer sensor has not been configured
“NONE” is returned.
RQ STN 5 A OPTION WAF_SEN EX
Brooks Automation
Revision 2.2
8-107
Command Reference
Request Station Sensor
MagnaTran 7.1 User’s Manual
MN-003-1600-00
Request Station Sensor
Purpose
Displays the current parameters or the current state of the specified wafer presence
sensor.
Format
RQ STNSENSOR station [ARM arm] [TYPE] [ACT] [SEN] [POS]
Optional Parameters
Arguments
station :
The robot station number being configured for use with wafer sensors.
arm:
The arm that is active for this sensor.
A - Arm A
B - Arm B
Arm A is the default.
Responses
TYPE:
The sensor's usage during PICK and PLACE commands:
NONE - sensor not referenced
EX - Extend: sensor referenced during PLACE
RE - Retract: sensor referenced during PICK
R_MT - Referenced motion: sensor referenced when robot arm is
in motion (requires R coordinates)
ACT:
The sensor's active state:
HI - signal present when wafer present
LO - signal absent when wafer present
SEN:
The sensor I/O bit number in which the sensor is connected.
STATE:
The current state of the sensor:
ON - current state matches configured state
8-108
Brooks Automation
Revision 2.2
MagnaTran 7.1 User’s Manual
MN-003-1600-00
Command Reference
Request Station Sensor
OFF - current state does not match configured state
POS:
The sensor’s R and T coordinates in the chamber determined by the sensor location. This option is available only if the TYPE is set to R_MT.
Description
The RQ STNSENSOR command is used to determine the current parameters of a
specified sensor and to read the current state of the specified sensor.
If the specified station does not have a sensor configured the optional parameters will
return the following values:
TYPE - NONE
ACT - HI
SEN - 1
STATE - NONE
Examples
In the following example, the sensor requested has not been associated.
RQ STNSENSOR 1 ARM A TYPE ACT SEN STATE
STN 01 ARM A TYPE NONE ACT HI SEN-1 STATE NONE
Brooks Automation
Revision 2.2
8-109
Command Reference
Request Sync Phase
MagnaTran 7.1 User’s Manual
MN-003-1600-00
Request Sync Phase
Purpose
Requests the Sync Phase for the T1, T2 and Z motors.
CAUTION
This command is NOT used in the normal operation of the robot. Call
Brooks Automation Technical Support for instructions on the correct
use of this command.
Format
RQ SYNC PHASE [ALL|( T1|T2|Z)]
Response
t1value t2value zvalue
Arguments
t1value:
The calculated average T1 value
t2value:
The calculated average T2 value
zvalue:
The calculated average Z value
Description
This command is used to request the current value of the motors.
DANGER
This command is NOT used in the normal operation of the robot. See
Motor Electrical Phase Calibration on page 9-69 and PC 104 CPU
Board Replacement on page 9-58 for instructions on this command.
8-110
Brooks Automation
Revision 2.2
MagnaTran 7.1 User’s Manual
MN-003-1600-00
Command Reference
Request Sync Zero
Request Sync Zero
Purpose
Requests the zero or Home reference for the theta and Z-axes.
Format
RQ SYNC ZERO (T1|T2|Z)
Arguments
position:
The axis to be requested.
T1: Theta axis outer shaft
T2: Theta axis inner shaft
Z: Z-Axis
Description
The MagnaTran 7 robot Home position encoder counts may be requested and
recorded for reference in Appendix E: User Setting Tables on page 11-17.
See Also:
Brooks Automation
Revision 2.2
See Restore the Home Position to the Factory Settings on page 9-71 for
instructions on the proper use of this command.
8-111
Command Reference
Request Version
MagnaTran 7.1 User’s Manual
MN-003-1600-00
Request Version
Purpose
Requests the version and date.
Format
RQ VERSION
Response
version date
Arguments
version:
vv.vv
date:
mm/dd/yy
Description
This command is supplied for backward compatibility.
8-112
Brooks Automation
Revision 2.2
MagnaTran 7.1 User’s Manual
MN-003-1600-00
Command Reference
Request Warning CDM Status
Request Warning CDM Status
Purpose
To request the warning feature status of the CDM.
Format
RQ WARN CDM
Response
WARN CDM status
Arguments
status:
The status of the CDM warning feature
Y - enabled
N - disabled.
Description
This command is used to request the CDM warning feature status. If the feature is
enabled, the host will receive an unsolicited error message “CDM IS IN CONTROL”
when the CDM is turned on.
Brooks Automation
Revision 2.2
8-113
Command Reference
Request Who
MagnaTran 7.1 User’s Manual
MN-003-1600-00
Request Who
Purpose
To request “who” the robot is by it’s firmware version number.
Format
RQ WHO
Response
BROOKS AUTOMATION V_version
Arguments
version:
The installed firmware version.
Description
This command is used to request the current version of the firmware installed in the
robot.
8-114
Brooks Automation
Revision 2.2
MagnaTran 7.1 User’s Manual
MN-003-1600-00
Command Reference
Request Workspace
Request Workspace
Purpose
This command is used to request the current setting of the specified work space
parameter(s) for either the specified work space name or all defined work spaces.
Format
RQ WSPACE name [ALL|(STATE|INTLCK|ARM|STN|RMIN|RMAX|TMIN|
TMAX|ZMIN|ZMAX)]
Response
name state intlck arm stn rmin rmax tmin tmax zmin zmax
Arguments
name:
Specifies the work space name
state:
ACTIVE or INACTIVE
intlck:
Name of a mapped SVLV_SEN or SBIT_SVLV_SEN type input
arm:
A, B, or BOTH
stn:
1 - 16
rmin:
Robot retract value to robot maximum extension value in microns
rmax:
Robot retract value to robot maximum extension value in microns
tmin:
0 - 360000 (microns)
tmax:
0 - 360000 (microns)
zmin:
0 to robot maximum Z vertical height in microns
zmax:
0 to robot maximum Z vertical height in microns
Description
Indicates the current setting of the specified work space parameter(s) for the
requested name or for all defined work spaces.
See Also:
Brooks Automation
Revision 2.2
Set Workspace on page 8-153
Store Workspace on page 8-173
8-115
Command Reference
Request Workspace AutoCreate
MagnaTran 7.1 User’s Manual
MN-003-1600-00
Request Workspace AutoCreate
Purpose
Requests the current status of the automatically created work space mode.
Format
RQ WSPACE AUTOCREATE
Response
WSPACE AUTOCREATE (ON|OFF)
Arguments
(ON|OFF): Specifies the mode of AUTOCREATE operation on or off.
Description
This command is used to requests the automatically created work space mode of
operation on or off.
See Also: Store Communication on page 8-157
Store Workspace AutoCreate on page 8-174
8-116
Brooks Automation
Revision 2.2
MagnaTran 7.1 User’s Manual
MN-003-1600-00
Command Reference
Request Workspace Mode
Request Workspace Mode
Purpose
This command is used to request the current setting of the work space mode of operation.
Format
RQ WSPACE MODE
Response
WSPACE (ON|OFF)
Arguments
(ON|OFF): Specifies the mode of operation on or off.
Description
Indicates the current setting of the work space mode.
See Also:
Brooks Automation
Revision 2.2
Set Workspace Mode on page 8-155
Store Workspace AutoCreate on page 8-174
8-117
Command Reference
Reset
MagnaTran 7.1 User’s Manual
MN-003-1600-00
Reset
Purpose:
This command is used to perform a software reset of the robots’s firmware.
Format:
RESET
Description:
Performs a software reset of the robot’s firmware that is functionally equivalent to
turning the power off and then back on. All parameters stored in RAM will be
replaced by the values stored in non-volatile memory. After approximately 30 seconds, a “ready” response is returned when reset as complete.
Example:
The following example resets the MagnaTran 7 and loads the user’s default settings
stored in non-volatile memory for all parameters.
RESET
8-118
Brooks Automation
Revision 2.2
MagnaTran 7.1 User’s Manual
MN-003-1600-00
Command Reference
Set Arms
Set Arms
Purpose
Changes the robot armset configuration.
Format
SET ARMS (ON|OFF)
Arguments
ON: Sets robot armset configuration to original values.
OFF: Sets the state to “shaft7” or “shaft7z”.
Description
This command is used in mounting the robot arms.
See Also:
Brooks Automation
Revision 2.2
Mount the Arm Set on page 3-23
Request Configuration on page 8-74
8-119
Command Reference
Set Capture
MagnaTran 7.1 User’s Manual
MN-003-1600-00
Set Capture
Purpose
Enables or disables servo position high speed polling capturing triggered by
the specified sensor.
Format
SET CPTR sensor (ON|OFF)
Arguments
sensor :
The number of the sensor
ON|OFF:
The required action for the command
Description
The SET CPTR command will enable or disable capturing of servo position
data for the specified sensor. When a SET CPTR ON command is issued, the
Servo Position Table is cleared to accept new data. A maximum of ten entries
may be made into the Servo Position Table. Attempting to store additional
data will cause that data to be lost.
All servo positions are recorded in microns or millidegrees. The state the sensor transitions to is recorded after the servo positions.
NOTE: Only one sensor may be enabled at a time. Issuing multiple SET CPTR commands
will result in only the last sensor being active for capture.
Examples
SET CPTR 4 ON
SET CPTR 7 OFF
NOTE: The capture trigger may be enabled if any servo is unreferenced; however, if any
servos become unreferenced before or during a capture operation, the capture trigger will be disabled.
8-120
Brooks Automation
Revision 2.2
MagnaTran 7.1 User’s Manual
MN-003-1600-00
Command Reference
Set Communication
Set Communication
Purpose
This command is used to set the serial communications and command execution
modes.
Format
SET COMM [ALL] [M/B mode] [FLOW flow] [LF linefeed] [ECHO echo] [CHECKSUM
checksum] [ERRLVL level] [DREP data_rep]
Arguments
mode:
Specifies the serial I/O communications mode.
MON Monitor mode (: )
PKT Packet mode (_RDY)
flow:
Specifies the command execution type.
SEQ Sequential mode
BKG Background mode
BKG+ Background Plus mode
linefeed:
Specifies the linefeed state.
ON
OFF
ECHO:
Specifies the ECHO state.
ON
OFF
checksum:
Echo enabled
Echo disabled
Specifies the checksum option state.
ON
OFF
data_rep:
Linefeed enabled
Linefeed disabled
Checksum enabled
Checksum disabled
Specifies the data reporting flag in VT5 compatibility format only. See
Appendix D: Robot Compatibility on page 11-5.
AUT Automatic mode
Brooks Automation
Revision 2.2
8-121
Command Reference
Set Communication
MagnaTran 7.1 User’s Manual
MN-003-1600-00
REQ Request mode
NOTE: At least one argument must be specified. If the ALL argument is specified no other
argument name may be specified.
Description
Sets the specified serial I/O configuration in RAM only. A description of both the
communications modes available and the command execution modes available are
provided below. Refer to Operating Modes on page 8-4 for an in-depth discussion of
these modes.
Mode
Monitor mode is a “user friendly” communications mode. All responses from
the robot are descriptive and easy to understand. This mode is best used when
a person is communicating with the robot through a terminal and is recognized
by the “:” prompt.
Packet mode is a computer based communications mode. All responses from
the robot are short with minimal descriptive information provided. This mode
is best used when a host controller is communicating with the robot and is recognized by the “_RDY” prompt.
Flow
In sequential mode, the robot executes the command completely before returning a READY signal indicating that the robot is ready for another command.
This mode allows execution of only one command at a time. Error codes are
reported if in Packet mode and error messages are reported if in Monitor
mode.
In Background mode, for certain commands, the robot will return a READY
string immediately after it has received the command and typically before the
command has been completed. This command task is then placed in the “background” and other “foreground” commands may be executed sequentially
while the background command is in progress. Only syntax errors and busy
errors will be displayed automatically. Using the RQ BG command will display any other errors.
The Background Plus mode works exactly like the background mode except
for one addition. When the action command is done, the prompt _BKGRDY is
returned. If an error occurred during the background action command, then a
_BKGERR response with the error number or error string (depending on
8-122
Brooks Automation
Revision 2.2
MagnaTran 7.1 User’s Manual
MN-003-1600-00
Command Reference
Set Communication
packet or monitor mode) is returned along with the prompt _BKGRDY on the
next line. Thus the robot does not need to be polled with RQ BG to determine
if an action has been completed. A CDM warning will be displayed as _ERR
instead of _BKGERR.
Linefeed
Specifies the linefeed execution mode as enabled or disabled. Linefeed mode
is set to disabled by default.
Checksum
The checksum option sets the communications to checksum each received
command. The checksum is calculated for each character of the command
string. There should be no space between the last character of the command
string and the checksum value. The response similarly is supplied with a
checksum. The checksum algorithm starts with a zero value and adds the
ASCII value of each character of the string to be checked. During the summation process, any overflow over 255 is ignored.
To turn off the checksum, the proper checksum must be supplied (e6) in lowercase as shown in the following example:
SET COMM CHECKSUM offe6
Data Reporting (VT5 format only)
Automatic data reporting applies to the robot’s movement in the station coordinates. In AUT mode, the the robot will automatically report the statio position for each PICK, PLACE or XFER command. The condition for the auto
response generation is a change in the state of the robot arm location (in terms
of station coordinates) during the commands.
The AUT response returns a string consisting of 14 characters (including
spaces) on every change in state of the robot arm location in terms of station
coordinates as follows:
EX|RE stn ssss slot UP|DN
where,
EX|RE= EX (Extend) or RE (Retract)
stn= decimal station number
ssss= slot number
Brooks Automation
Revision 2.2
8-123
Command Reference
Set Communication
MagnaTran 7.1 User’s Manual
MN-003-1600-00
UP|DN= Z location
NOTE: Set commands only store the specified setting in RAM. Resetting the robot will
cause the original setting to be loaded from non-volatile memory. See the corresponding STORE command to save permanently save parameters.
See Also:
RQ COMM, STORE COMM
Examples
The following example sets the serial I/O communications mode in RAM to Monitor.
SET COMM M/B MON
The following example sets the command execution mode in RAM to Background.
SET COMM FLOW BKG
The following example sets both the communications mode to Monitor and the command execution mode to Background.
SET COMM M/B MON FLOW BKG
The following example sets both the serial I/O communications mode and the command execution mode using the ALL specifier.
SET COMM ALL MON BKG
The following example displays the Automatic Data Reporting string after a PICK 1 is
performed:
PICK 1
RE 01 0001 DN
EX 01 0001 DN
EX 01 0001 UP
RE 01 0001 UP
8-124
Brooks Automation
Revision 2.2
MagnaTran 7.1 User’s Manual
MN-003-1600-00
Command Reference
Set DIO Output
Set DIO Output
Purpose
Turns on the Discrete I/O (DIO) output monitoring function while in serial mode.
Format
SET DIO OUTPUT [Y|N]
Arguments
Y:
Enables DIO Output.
N:
Disables DIO Output.
Description
The MagnaTran 7 robot may be controlled and monitored using discrete I/O lines
instead of using the serial communications link. In normal operation, the serial control is disabled when the Discrete I/O control is on. This function allows enabling or
disabling of the Discrete I/O Output while the serial I/O is in control of the robot.
See Also:
Request DIO Output on page 8-75
Store DIO Output on page 8-159
High Side/Low Side I/O Assignments on page 5-16
Example
The following example turns on the Discrete I/O Output function.
SET DIO OUTPUT Y
Brooks Automation
Revision 2.2
8-125
Command Reference
Set High Speed
MagnaTran 7.1 User’s Manual
MN-003-1600-00
Set High Speed
Purpose
Sets the force hi-speed option on.
Format
SET HISPD [Y/N]
Arguments
Y forces the next motion (complex or primitive) to operate at the “without wafer” (high) speed.
(Y/N):
N forces the next motion (complex of primitive) to operate at the normal
speed for that command.
Description
This command is only provided to provide backwards compatibility with other
Brooks Automation robots and should be avoided. The preferred method of controlling the robot’s speed is to use the SET LOAD command.
NOTE: HISPD is always set to No at power-up.
NOTE: Set commands only store the specified setting in RAM. Resetting the robot will
cause the original setting to be loaded from non-volatile memory.
See Also:
RQ LOAD, SET LOAD
Example
In the following example arm ‘A’ is currently extended in station # 5, slot # 2 and in the
down position. The robot will execute the next motion command at high speed. The
HISPD option will return to NO after execution of the next command.
SET HISPD Y
8-126
Brooks Automation
Revision 2.2
MagnaTran 7.1 User’s Manual
MN-003-1600-00
Command Reference
Set Home Position Z-Axis
Set Home Position Z-Axis
Purpose
Changes the Z-Axis Home position.
Format
SET HOME POS Z value
Arguments
Absolute position value in microns.
value:
Range: 0 to 35000 microns.
Description
The Z-Axis HOME position can be changed through a command line entry.
NOTE: Set commands only store the specified setting in RAM. Resetting the robot will
cause the original setting to be loaded from non-volatile memory.
See Also:
HOME, RQ HOME POS Z, STORE HOME POS Z
Example
To set the Z-Axis HOME to 17500 microns:
SET HOME POS Z 17500
Brooks Automation
Revision 2.2
8-127
Command Reference
Set Interlock
MagnaTran 7.1 User’s Manual
MN-003-1600-00
Set Interlock
Purpose
Sets the state of specific interlocking capabilities.
Format
SET [INTER | INTLCK [WAF_SEN (Y|N)] [TZ ON| OFF)]
Arguments
[Y|N]:
Y = Enables Wafer Sensing
N = Disables Wafer Sensing
[ON|OFF]: ON = The robot will execute all T moves before performing Z moves
OFF = The robot will execute all T and Z moves simultaneously
Description
Wafer Sensing: Three types of wafer sensing is available: EXtend sensor, REtract sensor and R_MT Radial Motion sensor. Each of these sensors is explained in PASIV™
Safety Feature Operation on page 6-58. The normal operating mode is wafer sensing
enabled. Disabling the wafer sensor interlocking will allow the robot to ignore any
type of wafer sensors during action commands. This sensing interlock should be disabled for testing purposes only.
NOTE: This command cannot be stored.
T and Z moving: In normal operation, all T and Z moves are performed simultaneously.
See Also:
RQ INTLCK
Example
To ignore the wafer sensors during testing:
SET INTLCK WAF_SEN N
8-128
Brooks Automation
Revision 2.2
MagnaTran 7.1 User’s Manual
MN-003-1600-00
Command Reference
Set I/O Echo
Set I/O Echo
Purpose
This command is used to set the serial communications echo option.
Format
SET IO ECHO status
Arguments
status:
Specifies the I/O echo option status.
Y
N
Sets the communications echo option on (full duplex)
Sets the communications echo option off (half duplex)
Description
The I/O echo option is used to set full or half duplex communications. If the terminal,
or terminal emulator, displays double characters for all user entered text IO ECHO
should be set off. If the terminal, or terminal emulator, displays no characters for all
user entered text IO ECHO should be set on.
NOTE: Set commands only store the specified setting in RAM. Resetting the robot will
cause the original setting to be loaded from non-volatile memory.
See Also:
RQ IO ECHO, STORE IO ECHO
Examples
The following example sets the communications mode in RAM to full duplex.
SET IO ECHO Y
The following example sets the communications mode in RAM to half duplex.
SET IO ECHO N
Brooks Automation
Revision 2.2
8-129
Command Reference
Set I/O State
MagnaTran 7.1 User’s Manual
MN-003-1600-00
Set I/O State
Purpose
Sets the current status for the specified I/O Interlocks.
Format
SET IO STATE io_name setting
Arguments
io_name:
The name assigned to physical I/O using the MAP command.
setting:
The output value for the I/O referenced by the io_name. Note that the
output set will be defined by the type of I/O being referenced. See I/O
State Outputs in Table 6-5.
Description
This command is used to set the physical I/O by referencing the I/O names defined
using the MAP command. The values used when issuing this command are defined
by the I/O type being referenced, their settings, and a description of the settings.
This command is available for trouble-shooting or testing purposes allowing the user
to toggle output bits for verification or to operate devices through the commands
interface.
NOTE: No in_type I/O state can be set.
See Also:
RQ IO STATE, MAP, SET STN OPTION
Example
The following examples provide an overview of the settings for the different types of
I/O. Note that the current arm status of the robot does not apply to this command.
The current status of the I/O defined by PUMP_CTRL (set using the MAP command),
which in this case is a DISCRETE_OUT, is set to ACTIVE.
SET IO STATE PUMP_CTRL ACTIVE
8-130
Brooks Automation
Revision 2.2
MagnaTran 7.1 User’s Manual
MN-003-1600-00
Command Reference
Set I/O State
The current status of the I/O defined by SLT_1_DRV (set using the MAP command),
which in this case is a SVLV_CTRL, is set to CLOSE.
SET IO STATE SLT_1_DRV CLOSE
The current status of the I/O defined by STN_4_WAFR_SEN (set using the MAP command), which in this case is a NUMERIC_OUT, is set to 13 indicating that wafer sensors 1, 3, and 4 are not blocked by a wafer.
SET IO STATE STN_4_WAFR_SEN 13
Brooks Automation
Revision 2.2
8-131
Command Reference
Set Load
MagnaTran 7.1 User’s Manual
MN-003-1600-00
Set Load
Purpose
To set the load status for the specified arm.
Format
SET LOAD [[ARM] arm] status
Arguments
ARM arm:
The arm (A or B) for which parameters are being set; the default arm is
A.
The “ARM” identifier is optional.
status:
Sets the load status for the specified arm.
ON = Arm has a load on the specified end effector
OFF = Arm does not have a load on the specified end effector; all
moves will be at high speed
? (UNKNOWN) = Unsure of load status
default = ON
Description
This command sets the load status for the arm. The load status is used to determine
the speed of all motion commands.
The UNKNOWN status option is only available if the LOAD MODE is set to TRI.
Note that at power-up, the robot’s arm(s) are assumed to be loaded. The robot will
continue to assume the arm(s) are loaded until either a PLACE or a SET LOAD OFF
command is executed. Once the arm(s) are defined as empty, the robot will continue
to assume they are empty until a PICK or a SET LOAD ON command is executed.
The UNKNOWN option is for Brooks Automation Marathon Express users only. Setting the load to (?) will cause the robot to move at slow speed until it passes a radial
motion sensor and can determine the true status of the end effector.
NOTE: This is a dynamic command and cannot be stored.
8-132
Brooks Automation
Revision 2.2
MagnaTran 7.1 User’s Manual
MN-003-1600-00
See Also:
Command Reference
Set Load
RQ LOAD
Example
The robot software will assume that arm ‘A’ is carrying a wafer during all subsequent
motion command until either the load is turned OFF or a PLACE is performed.
SET LOAD ARM A ON
The robot software will assume that arm ‘A’ is not carrying a wafer during all subsequent motion command until either the load is turned ON or a PICK is performed.
SET LOAD ARM A OFF
Brooks Automation
Revision 2.2
8-133
Command Reference
Set Load Mode
MagnaTran 7.1 User’s Manual
MN-003-1600-00
Set Load Mode
Purpose
To set the load mode for the specified arm.
Format
SET LOAD MODE [BI|TRI]
Arguments
MODE:
Sets the load mode type.
BI = Two state mode
TRI = Three state mode
Description
This command sets the mode for reporting the load status of the arm. The load status
is used to determine the speed of all motion commands.
The two state mode will report load status as ON or OFF. The command WAF_SEN
is not required after homing. The default on power up is ON.
The three state mode will report load status as ON, OFF or ? (UNKNOWN). The
CHECK LOAD command or the SET LOAD command must be executed after homing.
NOTE: Set commands only store the specified setting in RAM. Resetting the robot will
cause the original setting to be loaded from non-volatile memory.
See Also:
RQ LOAD, SET LOAD, STORE LOAD MODE, RQ LOAD MODE,
CHECK LOAD
Example
SET LOAD MODE TRI
8-134
Brooks Automation
Revision 2.2
MagnaTran 7.1 User’s Manual
MN-003-1600-00
Command Reference
Set Low Speed
Set Low Speed
Purpose
Sets the force low-speed option on.
Format
SET LOSPD speed
Arguments
Y forces the next motion (complex or primitive) to operate at the “with
wafer” (low) speed.
speed:
N forces the next motion (complex of primitive) to operate at the normal
speed for that command.
Description
Since the wafer is held in position on the end effector only by friction, high speed
motion is likely to cause misalignment of the wafer relative to the end effector. To
prevent this, the only allowed high speed motions are as follows:
The “without wafer” velocity and acceleration will be used only during the initial motions in a PICK and the final motions in a PLACE, and is selected by the
robot based on the PICK/PLACE history of both arms.
The SET LOSPD command allows the operator to ensure that the arm will move at
low speed throughout an entire command such as PICK or PLACE.
To ensure the safest operation, slower forced speed commands will overwrite faster
forced speed options, but faster forced speed commands will not overwrite slower
forced speed commands. To turn off any of the forced speed options use the N argument.
NOTE: This option cannot be stored in non-volatile memory since it toggles back to N after
the subsequent action command. LOSPD is always set to N at power-up.
Brooks Automation
Revision 2.2
8-135
Command Reference
Set Medium Speed
MagnaTran 7.1 User’s Manual
MN-003-1600-00
Set Medium Speed
Purpose
Forces medium-speed option on.
Format
SET MESPD speed
Arguments
speed:
Y forces the next motion (complex or primitive) for the inactive arm to
operate at medium speed.
N forces the next motion (complex of primitive) to operate at the normal
speed for that command.
Description
Since the wafer is held in position on the pan only by friction, high speed motion is
likely to cause misalignment of the wafer relative to the pan. To prevent this, the only
allowed high speed motions are as follows: for the single arm, the "without wafer"
velocity and acceleration will be used only during the initial motions in a PICK and
the final motions in a PLACE, for the multi-arm, the speed selected by the robot is
based on the PICK/PLACE history of both arms. The SET MESPD command allows
the operator to ensure that the arm will move at medium speed throughout an entire
command such as PICK or PLACE.
To ensure the safest operation, slower forced speed commands will overwrite faster
forced speed options, but faster forced speed commands will not overwrite slower
forced speed commands. To turn off any of the forced speed options use the N argument.
NOTE: This option cannot be stored in non-volatile memory since it toggles back to N after
the subsequent action command. MESPD is always set to No at power-up.
8-136
Brooks Automation
Revision 2.2
MagnaTran 7.1 User’s Manual
MN-003-1600-00
Command Reference
Set Mount
Set Mount
Purpose
Sets the position to which the arm moves in response to the MOUNT command; currently only the vertical position is selectable.
Format
SET MOUNT Z height
Arguments
height:
The vertical (Z) height to which the arm moves, relative to the Home
position, when it receives the MOUNT command prior to mounting or
dismounting the arm.
Description
The mount height cannot exceed the vertical position limit set by the SET LIM Z MAX
command. The default for the vertical limit is the actual mechanical limit indicated in
the robot specifications.
See also: R MOUNT
NOTE: Set commands only store the specified setting in RAM. Resetting the robot will
cause the original setting to be loaded from non-volatile memory.
Brooks Automation
Revision 2.2
8-137
Command Reference
Set Radial Motion Sense
MagnaTran 7.1 User’s Manual
MN-003-1600-00
Set Radial Motion Sense
Purpose
Sets the size of the sensing window for Radial Motion sensors.
Format
SET R_MT SENSE [LIMITS (INNER invalue |OUTER outervalue)] [WAFER SIZE size]
Arguments
invalue:
Length measured from the edge of the wafer to the start of the wafer
sensing window in microns .
outervalue: Length of the wafer sensing window in microns.
size:
Enter the wafer size in microns:
200000 for 200mm wafers
300000 for 300mm wafers
Description
The Sense Limits along with the position where the R_MT type sensor is located in the
chamber determine the sensing window. The sensing window must be at least 20mm.
Therefore the outervalue must be greater than 20mm.
Examples
SET R_MT SENSE LIMITS INNER 10000 OUTER 20000 WAFER SIZE 200000
See Also:
8-138
Request Radial Motion Sense on page 8-98
Store Radial Motion Sense on page 8-163
Brooks Automation
Revision 2.2
MagnaTran 7.1 User’s Manual
MN-003-1600-00
Command Reference
Set Retract 2 Value
Set Retract 2 Value
Purpose
To set the second retract value (R2) for the Pick and Place with an Offset commands.
Format
SET RTRCT2 value
Arguments
value:
Sets the second retract location value in microns.
Description
This command sets the value of the second retract location when using the Pick with
an Offset and Place with an Offset commands.
NOTE: Set commands only store the specified setting in RAM. Resetting the robot will
cause the original setting to be loaded from non-volatile memory.
Brooks Automation
Revision 2.2
8-139
Command Reference
Set Station
MagnaTran 7.1 User’s Manual
MN-003-1600-00
Set Station
Purpose
Sets, for the specified station, the absolute coordinate values of the various stationrelated parameters.
Format
SET STN station [[ARM]arm] ([R r-loc] [T t-loc] [Z bto] [LOWER lower] [NSLOTS slots]
[PITCH pitch])
or
SET STN station [[ARM]arm] ALL r-loc t-loc bto lower slots pitch
Arguments
ALL:
Specifies r-loc, t-loc, bto, lower, slots, and pitch in the order presented in
the command format.
station:
The number of the station for which parameters are being specified.
Range: 1 - 16.
arm:
The arm (A or B) for which parameters are being set; the default arm is
A.
r-loc:
The station’s radial extend location in microns.
t-loc:
The station’s rotational axis location in units of 0.001 degrees.
bto:
The Z axis location in microns, relative to Home, of the System Transfer
Plane. For a multi-slotted station, the System Transfer Plane is half a
wafer thickness below the center of the first slot.
lower:
The distance in microns below the System Transfer Plane that becomes
the down position location.
slot:
The number of slots in the cassette. A value of 0 or 1 indicates a non-cassette type station.
pitch:
The pitch in microns between slots.
NOTE: At least one argument must be specified. If the ALL argument is specified no other
8-140
Brooks Automation
Revision 2.2
MagnaTran 7.1 User’s Manual
MN-003-1600-00
Command Reference
Set Station
argument name may be specified.
Description
All stations being used must be set for both Arm A and Arm B. For a station at a given
physical location, the T parameter for Arm B may be different from the T parameter
for Arm A.
The specified values for Base Transfer Offset (BTO), Pitch, and Number of Slots are
legality checked according to the following formula:
BTO + (NSLOTS - 1) PITCH < maximum allowed vertical travel
This command requires the station number and one or more data fields. ALL applies
only to the data fields after station-number and arm-descriptor. When using ALL, be
sure to specify the variables in the standard order: ARM, R, T, Z, LOWER, NSLOTS,
PITCH.
NOTE: Set commands only store the specified setting in RAM. Resetting the robot will
cause the original setting to be loaded from non-volatile memory.
CAUTION
If station coordinates are set using the SET STN or STORE STN commands they should be verified before performing any wafer transfers
to ensure accurate station definition.
See Also:
RQ STN, STORE STN
Example
If the absolute coordinates of the station are known, using the ALL option provides a
quick method of setting up a station:
The following command sets station 4 parameters for arm ‘A’ to; the arm extended to
46843 microns (46 mm), the angular station position at 270o, the BTO (Wafer Transfer
Plane) to 200 microns above the Home position, and the down position to 0 (200
microns below the Wafer Transfer Plane). The last two numbers indicate that it is an
unslotted station (only one slot) and, therefore, that the pitch is zero.
SET STN 4 A ALL 46843 27000 200 200 1 0
NOTE: The default factory setting for all stations is T = Z = 0, R = the Retracted position.
Brooks Automation
Revision 2.2
8-141
Command Reference
Set Station Option
MagnaTran 7.1 User’s Manual
MN-003-1600-00
Set Station Option
Purpose
Sets the various optional station-related parameters.
Format
SET STN station [[ARM]arm] OPTION [SAFETY value|PUSH value]
or
SET STN station [[ARM]arm] OPTION [SBIT_SVLV_SEN name|RETRACT_SEN
name|EX_ENABLE name|VLV_SEN name|NONE name]
or
SET STN station [[ARM]arm] OPTION [WAF_SEN (EX name|RE name)]
NOTE: The preferred method for setting EX and RE wafer sensors is with the single step
command Set Station Sensor on page 8-147. The SET STN OPTION command on
this page requires two steps.
Arguments
station:
The number of the station for which parameters are being specified.
Range: 1 - 16.
ARM arm:
The arm (A or B) for which parameters are being set; the default arm is
A. The “ARM” identifier is optional.
SAFETY value : Specifies the distance in microns the end effector may move within
the zone of a Process Module as shown in Figure 8-2.
SAFETY # = The distance the end effector will stop short of a station’s R position during a “PLACE”.
PUSH value : Specifies the distance in microns the end effector may move within the
zone of a Process Module as shown in Figure 8-2.
PUSH # = The distance the end effector may push the substrate
past a station’s R position during a “PLACE”. The distance value
is equal to or less than the station value radial distance plus the
push value distance. The push value cannot be negative. A
8-142
Brooks Automation
Revision 2.2
MagnaTran 7.1 User’s Manual
MN-003-1600-00
Command Reference
Set Station Option
check for push distance value is included to insure the push distance is within the maximum radial distance.
Push
Safety
Station “R” Value
Robot
Figure 8-2: Safety/Push Operation
SBIT_SVLV_SEN name : Specifies the name of the slot valve sensor at the specified
station using a single bit.
RETRACT_SEN name : Specifies the name of the retract sensor at the specified station.
EX_ENABLE name : Specifies the name of the extend sensor at the specified station.
This command is designed for the Extend type sensor used in the Marathon Express only.
VLV_SEN name : Specifies the name of the valve closed sensor at the specified station.
NONE name : Eliminates an already defined sensor.
WAF_SEN : Specifies the location and name of the wafer sensor at the specified station.
EX name = Sensor at the extended position (in the Process Module)
RE name = Sensor at the retracted position (in the Transport Chamber)
name:
In all cases, name specifies the existing name of the sensor assigned previously using the command Map on page 8-44.
Description
The SET STN OPTION command requires the station number and a variable to assign
the related operation to a specific station. Two types of assignments are allowed with
this command:
Brooks Automation
Revision 2.2
8-143
Command Reference
Set Station Option
MagnaTran 7.1 User’s Manual
MN-003-1600-00
1.
This command is used to set the amount that the substrate may be moved on
the end effector during a PICK or PLACE operation at the specified station.
2.
This command is used to define the location and operation of all sensors linked
to the robot and used in the system where the robot is installed.
NOTE: Set commands only store the specified setting in RAM. Resetting the robot will
cause the original setting to be loaded from non-volatile memory.
See Also:
Operational Interlocks on page 6-23 for a complete description of how to
setup this command and examples,
Request Station Option on page 8-106
Store Station Option on page 8-167
Example
Both commands below are identical and set the station options at station #4 for arm
‘A’ for sensor number 17 in the extended position to active high.
or
SET STN 4 ARM A OPTION WAF_SEN EX STN_4_WAFR_SEN
SET STN 4 A OPTION WAF_SEN EX STN_4_WAFR_SEN
The next command sets the station option at station #4 for arm ‘A’ for a .25 mm (.001
in) movement short of the station during a PLACE command was issued.
SET STN 4 ARM A OPTION SAFETY 250
8-144
Brooks Automation
Revision 2.2
MagnaTran 7.1 User’s Manual
MN-003-1600-00
Command Reference
Set Station Option VIA Point
Set Station Option VIA Point
Purpose
Sets, for the specified station, the VIA point for Off-Center PICK and PLACE functions. The VIA is defined as the point which the end effector moves go through to perform a Compound Move (curved move).
Format
SET STN station [[ARM]arm] OPTION VIA [POST|POSR] value
Arguments
station:
Station number
Range 1 - 25
arm:
Arm descriptor
Range A, B
Default: A
The arm descriptor must be specified only to pick with Arm B.
The “ARM” identifier is optional.
POST value :
The theta coordinate of the VIA point in millidegrees.
POSR value :
The radial coordinate of the VIA point in microns.
A non-zero value for POSR causes Compound Moves to occur
for the designated station.
Setting this value to zero causes only straight moves to occur for
the designated station.
NOTE: At least one argument must be specified. If the ALL argument is specified no other
argument name may be specified.
Description
This command is used with additional stations setting to perform compound moves
rather that traditional pure radial moves by introducing a VIA point. This point acts
as a calculation from which the end effector must go through before entering a station.
Firmware Version V1.01
Brooks Automation
Revision 2.2
8-145
Command Reference
Set Station Option VIA Point
MagnaTran 7.1 User’s Manual
MN-003-1600-00
To perform straight, non-compound moves to a specified station, set the value of
POSR to zero for that station. The value for POST will be remembered by the robot,
but will not be used unless the POSR value is set to non-zero again.
See also:
Off Center PICK and PLACE Feature on page 6-42
Request Station Option on page 8-106
Store Station Option on page 8-167
NOTE: Set commands only store the specified setting in RAM. Resetting the robot will
cause the original setting to be loaded from non-volatile memory.
CAUTION
If station coordinates are set using the SET STN or SET STN OPTION
VIA commands, they should be verified before performing any wafer
transfers to ensure accurate station definition.
8-146
Brooks Automation
Revision 2.2
MagnaTran 7.1 User’s Manual
MN-003-1600-00
Command Reference
Set Station Sensor
Set Station Sensor
Purpose
Defines the setup for the specified sensor in one step. Setup includes: station assignment, usage type, active state and the sensor coordinates in the chamber.
Format
SET STNSENSOR station [ARM arm] [TYPE type] [ACT state] [SEN sensor] [POS (R
r_coord | T t_coord)]
Arguments
station :
The robot station number being configured for use with wafer sensors.
arm:
The arm that is active for this sensor.
A - Arm A
B - Arm B
Arm A is the default.
type:
The sensor's usage during PICK and PLACE commands:
NONE - sensor not referenced
EX - Extend: sensor referenced during PLACE
RE - Retract: sensor referenced during PICK
R_MT - Referenced motion: sensor referenced when robot arm is
in motion (requires R and T coordinates)
state:
The sensor's active state:
HI - signal present when wafer present
LO - signal absent when wafer present
sensor:
The sensor I/O bit number in which the sensor is connected.
r_coord:
The sensor’s R coordinate in the chamber determined by the radial location in microns. For R_MT sensors only.
t_coord:
The sensor’s T coordinate in the chamber determined by the offset from
the station’s T value location in microns. For R_MT sensors only.
Brooks Automation
Revision 2.2
8-147
Command Reference
Set Station Sensor
MagnaTran 7.1 User’s Manual
MN-003-1600-00
Description
The SET STNSENSOR command is used to assign a sensor to a specific robot station
and configure the sensor for operation. The sensor must be fully configured if it will
be used for wafer detection or for triggering servo position data collection.
The sensor number corresponds to I/O input. For example, number 1 corresponds to
I/O input 1, sensor number 2 corresponds to I/O input 2, etc.
The referenced Radial Motion sensor (R_MT) requires POS R coordinates (r_coord)
and POS T coordinates (t_coord). If sensor type is R_MT and the coordinates are not
defined or are defined as zero, an error will be returned. See Set Radial Motion Sense
on page 8-138.
The SET STNSENSOR command automatically creates a new I/O in the robot I/O
map. The new I/O will name will appear as SET station arm STNSENSOR where station is the tow digit station number and arm is the arm letter.
To “un-set” a wafer sensor, enter the following command:
SET STNSENSOR TYPE NONE
Notes:
•
If the sensor type is R_MT and r_coord is not defined, an error is reported.
•
If the sensor type is R_MT and t_coord is not defined, the t_coord is set to zero
and no offset for that station is assumed.
•
If the sensor type is not R_MT, then the r_coord and t_coord options are not
available.
See also:
Operational Interlocks on page 6-23 for a complete description of how
to setup this command with examples
Request Station Sensor on page 8-108
Store Station Sensor on page 8-169
Examples
In the following command, the automatic I/O name will be set as: STN03BSENSOR.
SET STNSENSOR 3 ARM B TYPE R_MT ACT LO SEN 17 POS R 700000 POS T 10000
8-148
Brooks Automation
Revision 2.2
MagnaTran 7.1 User’s Manual
MN-003-1600-00
Command Reference
Set Sync Phase
Set Sync Phase
Purpose
Sets the Sync Phase for the T1, T2 and Z motors.
CAUTION
This command is NOT used in the normal operation of the robot. Call
Brooks Automation Technical Support for instructions on the correct
use of this command.
Format
SET SYNC PHASE [ALL] t1value t2value zvalue
or
SET SYNC PHASE [T1 t1value |T2 t2value|Z zvalue]
Arguments
t1value:
The calculated average T1 value
t2value:
The calculated average T2 value
zvalue:
The calculated average Z value
Description
This command is used to enter the average calculated value from the FIND PHASE
command.
DANGER
This command is NOT used in the normal operation of the robot. See
Motor Electrical Phase Calibration on page 9-69 and PC 104 CPU
Board Replacement on page 9-58 for instructions on this command.
Brooks Automation
Revision 2.2
8-149
Command Reference
Set Sync Zero
MagnaTran 7.1 User’s Manual
MN-003-1600-00
Set Sync Zero
Purpose
Sets the zero or Home reference for the theta and Z-axes.
Format
SET SYNC ZERO position
Arguments
position:
The axis to be set:
T1: Theta axis outer shaft
T2: Theta axis inner shaft
Z: Z-Axis
ALL: T1, T2, Z
Description
CAUTION
The SET SYNC ZERO command is NOT used in the normal operation
of the robot. Stored values may be lost if used improperly.
The MagnaTran 7 robot Home position encoder counts can be reset.
See Also:
8-150
See Restore the Home Position to the Factory Settings on page 9-71 for
instructions on the proper use of this command.
Brooks Automation
Revision 2.2
MagnaTran 7.1 User’s Manual
MN-003-1600-00
Command Reference
Set Teach Speed
Set Teach Speed
Purpose
To set the robot to teach speed mode.
Format
SET TEACH mode
Arguments
mode:
Sets the speed of the robot to the CDM jog speed.
ON: Jog speed
OFF: Normal speeds
Description
This command will set the robot into the teach speed mode. The robot arm will move
at CDM jog speeds for all three axis. Using the off option will revert the robot to the
previously set speeds.
Brooks Automation
Revision 2.2
8-151
Command Reference
Set Warning CDM Status
MagnaTran 7.1 User’s Manual
MN-003-1600-00
Set Warning CDM Status
Purpose
To enable the warning feature of the CDM.
Format
SET WARN CDM status
Arguments
status:
Sets the status of the CDM warning feature
ON - enabled
OFF - disabled.
Description
This command is used to turn the CDM warning feature on or off.
If the feature is enabled, the host will receive an unsolicited error message “CDM has
control of the robot” when the CDM is turned on. Additionally, when the CDM is
turned on or off, warning messages “CDM has been turned on” and “CDM has been
turned off” will be displayed appropriately.
8-152
Brooks Automation
Revision 2.2
MagnaTran 7.1 User’s Manual
MN-003-1600-00
Command Reference
Set Workspace
Set Workspace
Purpose
This command is used to create work space parameters.
Format
SET WSPACE name [STATE state|INTLCK intlck|ARM arm|STN stn|RMIN
rmin|RMAX rmax|TMIN tmin|TMAX tmax|ZMIN zmin|ZMAX zmax]
Arguments
name:
Specifies the work space name
state:
ACTIVE or INACTIVE
intlck:
Name of a mapped SVLV_SEN or SBIT_SVLV_SEN type input
arm:
A, B, or BOTH
stn:
1 - 16
rmin:
Robot retract value to robot minimum retract value in microns
rmax:
Robot retract value to robot maximum extension value in microns
tmin:
0 - 360000 (microns)
tmax:
0 - 360000 (microns)
zmin:
0 to robot minimum Z vertical height in microns
zmax:
0 to robot maximum Z vertical height in microns
Description
Sets the specified work space parameter or parameters for the specified work space
name.
See Also:
Brooks Automation
Revision 2.2
Store Workspace on page 8-173
8-153
Command Reference
Set Workspace AutoCreate
MagnaTran 7.1 User’s Manual
MN-003-1600-00
Set Workspace AutoCreate
Purpose
This command is used to turn the automatically created work space mode of operation on or off.
Format
SET WSPACE AUTOCREATE (ON|OFF)
Arguments
(ON|OFF): Specifies the mode of AUTOCREATE operation on or off.
Description
Creates a work space around the robot home position.
See Also:
8-154
PASIV™ Safety Feature Operation on page 6-58
Brooks Automation
Revision 2.2
MagnaTran 7.1 User’s Manual
MN-003-1600-00
Command Reference
Set Workspace Mode
Set Workspace Mode
Purpose
This command is used to turn the work space mode of operation on or off.
Format
SET WSPACE MODE (ON|OFF)
Arguments
(ON|OFF): Specifies the mode of operation on or off.
Description
Turns the safe Workspace area off or on.
See Also:
Brooks Automation
Revision 2.2
PASIV™ Safety Feature Operation on page 6-58
8-155
Command Reference
Set Z-Brake
MagnaTran 7.1 User’s Manual
MN-003-1600-00
Set Z-Brake
Purpose
Controls the brake for the Z drive.
CAUTION
This command is NOT used in the normal operation of the robot. Call
Brooks Automation Technical Support for instructions on the correct
use of this command.
Format
SET ZBRAKE state
Arguments
state:
ON: Activates the Z drive brake
OFF: Releases the Z drive brake
Description
This command is used for troubleshooting and maintenance purposes only. With the
Z brake OFF, manual movement of the of the Z axis is permitted.
See Also:
8-156
See Restore the Home Position to the Factory Settings on page 9-71 for
instructions on the proper use of this command.
Brooks Automation
Revision 2.2
MagnaTran 7.1 User’s Manual
MN-003-1600-00
Command Reference
Store Communication
Store Communication
Purpose
This command is used to store the current setting of the serial communications and
command execution modes.
Format
STORE COMM [M/B|FLOW|LF|ECHO|CHECKSUM|ERRLVL|DREP]
Arguments
M/B:
Stores the serial I/O communications mode.
FLOW:
Stores the command execution mode.
LF:
Stores the linefeed mode.
CHECKSUM: Stores the checksum.
DREP:
Stores the data reporting mode.
NOTE: At least one argument must be specified.
Description
Stores the current I/O configuration in non-volatile memory. A description of both
the communications modes available and the command execution modes available
are provided below. Refer to Operating Modes on page 8-4 for an in-depth discussion
of these modes.
NOTE:Store commands store the current setting in RAM to non-volatile memory. Resetting the robot will cause the new setting to be loaded from non-volatile memory.
See Also:
RQ COMM, SET COMM
Examples
The following example stores the current serial I/O communications mode in nonvolatile memory.
Brooks Automation
Revision 2.2
8-157
Command Reference
Store Communication
MagnaTran 7.1 User’s Manual
MN-003-1600-00
STORE COMM M/B
The following example stores the current command execution mode in non-volatile
memory.
STORE COMM FLOW
8-158
Brooks Automation
Revision 2.2
MagnaTran 7.1 User’s Manual
MN-003-1600-00
Command Reference
Store DIO Output
Store DIO Output
Purpose
Stores the current mode of Discrete I/O (DIO) output monitoring function.
Format
STORE DIO OUTPUT
Description
Stores the current function that allows enabling or disabling of the Discrete I/O Output while the serial I/O is in control of the robot.
See Also:
Set DIO Output on page 8-125
Request DIO Output on page 8-75
Example
The following example stores the Discrete I/O Output function.
STORE DIO OUTPUT
Brooks Automation
Revision 2.2
8-159
Command Reference
Store Home Position Z-Axis
MagnaTran 7.1 User’s Manual
MN-003-1600-00
Store Home Position Z-Axis
Purpose
Stores the Z-Axis Home position.
Format
STORE HOME POS Z
Description
The Z-Axis HOME position can be stored through a command line entry.
NOTE:Store commands store the current setting in RAM to non-volatile memory. Resetting the robot will cause the new setting to be loaded from non-volatile memory.
See Also:
HOME, RQ HOME POS Z, SET HOME POS Z
Example
To store the Z-Axis HOME which is currently set at 17500 microns:
STORE HOME POS Z
8-160
Brooks Automation
Revision 2.2
MagnaTran 7.1 User’s Manual
MN-003-1600-00
Command Reference
Store I/O Echo
Store I/O Echo
Purpose
This command is used to store the current settings of the serial communications echo
option.
Format
STORE IO ECHO
Description
The I/O echo option is used to set full or half duplex communications. If the terminal,
or terminal emulator, displays double characters for all user entered text IO ECHO
should be set off. If the terminal, or terminal emulator, displays no characters for all
user entered text IO ECHO should be set on.
NOTE:Store commands store the current setting in RAM to non-volatile memory. Resetting the robot will cause the new setting to be loaded from non-volatile memory.
See Also:
RQ IO ECHO, SET IO ECHO
Examples
The following example stores the current communications mode in non-volatile
memory.
STORE IO ECHO
Brooks Automation
Revision 2.2
8-161
Command Reference
Store Load Mode
MagnaTran 7.1 User’s Manual
MN-003-1600-00
Store Load Mode
Purpose
Stores the load mode.
Format
STORE LOAD MODE
Description
This command stores the mode for reporting the load status of the arm. The load status is used to determine the speed of all motion commands.
NOTE:Store commands store the current setting in RAM to non-volatile memory. Resetting the robot will cause the new setting to be loaded from non-volatile memory.
See Also:
RQ LOAD, SET LOAD, SET LOAD MODE, RQ LOAD MODE
Example
STORE LOAD MODE
8-162
Brooks Automation
Revision 2.2
MagnaTran 7.1 User’s Manual
MN-003-1600-00
Command Reference
Store Radial Motion Sense
Store Radial Motion Sense
Purpose
Stores the size of the sensing window for Radial Motion sensors.
Format
STORE R_MT SENSE [LIMITS (INNER|OUTER)] [ WAFER SIZE]
Description
Stores the current settings for the Radial Motion detection sensing limits. These values along with the position where the R_MT type sensor is located in the chamber
determine the sensing window.
Examples
To stores the inner and outer limits of the Radial Motion sensor:
STORE R_MT SENSE LIMITS INNER OUTER
See Also:
Brooks Automation
Revision 2.2
See Set Radial Motion Sense on page 8-138 for instructions on the defining the Radial Motion Sensor limits and Set Station Sensor on page 8-147
for instructions on the defining the Radial Motion Sensor location.
8-163
Command Reference
Store Retract 2 Value
MagnaTran 7.1 User’s Manual
MN-003-1600-00
Store Retract 2 Value
Purpose
To store the second retract value (R2) for the Pick and Place with an Offset commands.
Format
STORE RTRCT2
Description
This command stores the value of the second retract location when using the Pick
with an Offset and Place with an Offset commands.
NOTE: Store commands store the current setting in RAM to non-volatile memory. Resetting the robot will cause the new setting to be loaded from non-volatile memory.
8-164
Brooks Automation
Revision 2.2
MagnaTran 7.1 User’s Manual
MN-003-1600-00
Command Reference
Store Station
Store Station
Purpose
Transfers from RAM to non-volatile memory the values of the various station-related
parameters.
Format
STORE STN station [[ARM]arm] [R] [T] [Z] [LOWER] [NSLOTS] [PITCH]
or
STORE STN station [[ARM]arm] ALL
Arguments
ALL:
Specifies all station variables for the indicated station.
station:
the number of the station for which parameters are being specified.
ARM arm:
the arm (A or B) for which parameters are being stored
R:
the station's radial extend location in microns (m).
T:
the station's rotational axis location in 0.001 degrees.
Z:
the z-axis location of the Wafer Transfer Plane. For a station with a cassette, the Wafer Transfer Plane is a half wafer thickness below the center
the center of the first slot.
LOWER:
the distance in microns below the transfer plane that becomes the down
position location.
NSLOTS:
the number of slots assigned to this station.
PITCH:
the pitch in microns between slots.
NOTE: At least one argument must be specified. If the ALL argument is specified no other
argument name may be specified.
Brooks Automation
Revision 2.2
8-165
Command Reference
Store Station
MagnaTran 7.1 User’s Manual
MN-003-1600-00
Description
The STORE command operates in the same manner as the SET command, except that
no data values for variables are specified. The values residing in volatile memory are
used, that is the values from reset or power-up, or the values subsequently SET.
The STORE STN command requires the station number and one or more variable
names. ALL applies only to the variable names after the station number.
NOTE: Store commands store the current setting in RAM to non-volatile memory. Resetting the robot will cause the new setting to be loaded from non-volatile memory.
CAUTION
If station coordinates are set using the SET STN or STORE STN commands they should be verified before performing any wafer transfers
to ensure accurate station definition.
See Also:
RQ STN, SET STN
Example
If the station parameters have already been set using the ALL option provides a quick
method of storing a station:
The following command stores the station 4 parameters identifying each parameter to
be stored.
STORE STN 4 ARM A R T Z LOWER N SLOTS PITCH
The following command stores the previously set values for arm ‘A’ at station 5 using
the ALL specifier.
STORE STN 5 A ALL
8-166
Brooks Automation
Revision 2.2
MagnaTran 7.1 User’s Manual
MN-003-1600-00
Command Reference
Store Station Option
Store Station Option
Purpose
Transfers from RAM to non-volatile memory the values of the various optional station-related parameters.
Format
STORE STN station [[ARM]arm] OPTION
[SBIT_SVLV_SEN|RETRACT_SEN|[WAF_SEN (RE|EX|R_MT)] | EX_ENABLE
|VLV_SEN]
or
STORE STN station [[ARM]arm] OPTION SAFETY|PUSH
or
STORE STN station [[ARM]arm] OPTION VIA (POST|POSR)
or
STORE STN station (arm) OPTION ALL
Arguments
station:
The number of the station for which parameters are being specified.
Range: 1 - 16.
ARM arm:
The arm (A or B) for which parameters are being set; the default arm is
A. The “ARM” identifier is optional.
Description
The STORE STN OPTION command requires the station number and all variables.
This command is used to store the location and operation of all wafer sensors used in
the system the robot is installed in. This command can also be used to store the
amount that the wafer may be moved on the end effector during a PICK or PLACE
operation at the specified station.
NOTE: Store commands store the current setting in RAM to non-volatile memory. Resetting the robot will cause the new setting to be loaded from non-volatile memory.
Brooks Automation
Revision 2.2
8-167
Command Reference
Store Station Option
See Also:
MagnaTran 7.1 User’s Manual
MN-003-1600-00
Set Station Option on page 8-142
Set Station Option VIA Point on page 8-145
Request Station Option on page 8-106
Example
Both following commands are identical and store the station options at station # 4 for
arm ‘A’ for sensor number 17 in the extended position to active high.
or
STORE STN 4 ARM A OPTION WAF_SEN EX STN_4_WAFR_SEN
STORE STN 4 A OPTION WAF_SEN EX STN_4_WAFR_SEN
The following command stores the station option at station #4 for arm ‘A’ for the previously defined safety value.
STORE STN 4 ARM A OPTION SAFETY
The following command stores all station options at station #4 for arm ‘A’.
STORE STN 4 OPTION ALL
The following command stores all station options at station #4 for arm ‘B’.
STORE STN 4 B OPTION ALL
8-168
Brooks Automation
Revision 2.2
MagnaTran 7.1 User’s Manual
MN-003-1600-00
Command Reference
Store Station Sensor
Store Station Sensor
Purpose
Stores the setup for the specified sensor including; station assignment, usage type,
active state and the sensor coordinates in the chamber.
Format
STORE STNSENSOR station [ARM arm] [TYPE] [ACT] [SEN] [POS (R | T)]
Arguments
station :
The robot station number being configured for use with wafer sensors.
arm:
The arm that is active for this sensor.
A - Arm A
B - Arm B
Arm A is the default.
Description
Stores the previously defined setup for the specifed sensor including station assignment, usage type, active state and the sensor coordinates in the chamber to the robot’s
non-volatile memory.
The STORE STNSENSOR command is used to save a sensor to a specific robot station
and for a specific operation. Before storing the sensor data, the sensor must be fully
configured if it will be used for wafer detection or for triggering servo position data
collection.
By specifying specific parameters, only those parameters will be updated.
If the sensor is a referenced motion sensor, R must be stored, otherwise an error will
be issued.
NOTE: Store commands store the current setting in RAM to non-volatile memory. Resetting the robot will cause the new setting to be loaded from non-volatile memory.
Example
STORE STNSENSOR 3 ARM B TYPE ACT SEN
Brooks Automation
Revision 2.2
8-169
Command Reference
Store Sync Phase
MagnaTran 7.1 User’s Manual
MN-003-1600-00
Store Sync Phase
Purpose
Stores the Sync Phase for the T1, T2 and Z motors.
CAUTION
This command is NOT used in the normal operation of the robot. Call
Brooks Automation Technical Support for instructions on the correct
use of this command.
Format
STORE SYNC PHASE [ALL|( T1|T2|Z)]
Arguments
ALL:
Stores all values
T1:
The T1 value
T2:
The T2 value
Z:
The Z value
Description
This command is used to store the current value of the motors.
DANGER
This command is NOT used in the normal operation of the robot. See
Motor Electrical Phase Calibration on page 9-69 and PC 104 CPU
Board Replacement on page 9-58 for instructions on this command.
8-170
Brooks Automation
Revision 2.2
MagnaTran 7.1 User’s Manual
MN-003-1600-00
Command Reference
Store Sync Zero
Store Sync Zero
Purpose
Stores the zero or Home reference for the theta and Z-axes.
Format
STORE SYNC ZERO position
Arguments
position:
The axis to be stored.
T1: Theta axis outer shaft
T2: Theta axis inner shaft
Z: Z-Axis
ALL: T1, T2, Z
Description
The MagnaTran 7 robot Home position encoder counts may be stored in the non-volatile memory.
NOTE: Store commands store the current setting in RAM to non-volatile memory. Resetting the robot will cause the new setting to be loaded from non-volatile memory.
See Also:
Brooks Automation
Revision 2.2
Restore the Home Position to the Factory Settings on page 9-71 for
instructions on the proper use of this command.
8-171
Command Reference
Store Warning CDM Status
MagnaTran 7.1 User’s Manual
MN-003-1600-00
Store Warning CDM Status
Purpose
To store the current setting for the warning feature of the CDM.
Format
STORE WARN CDM
Description
This command is used to store the current CDM warning feature status. If the feature
is enabled, the host will receive an unsolicited error message “CDM IS IN CONTROL” when the CDM is turned on.
NOTE: Store commands store the current setting in RAM to non-volatile memory. Resetting the robot will cause the new setting to be loaded from non-volatile memory.
8-172
Brooks Automation
Revision 2.2
MagnaTran 7.1 User’s Manual
MN-003-1600-00
Command Reference
Store Workspace
Store Workspace
Purpose
This command is used to store the current parameters of the specified work space
name.
Format
STORE WSPACE name [ALL|STATE|INTLCK|ARM|STN|RMIN|RMAX |TMIN
|TMAX|ZMIN|ZMAX]
Arguments
name:
Specifies the work space name
Description
Stores the current setting of the specified work space parameter or parameters for
either the specified work space name or all defined work spaces.
NOTE: Store commands store the current setting in RAM to non-volatile memory. Resetting the robot will cause the new setting to be loaded from non-volatile memory.
See Also:
Brooks Automation
Revision 2.2
Store Communication on page 8-157
8-173
Command Reference
Store Workspace AutoCreate
MagnaTran 7.1 User’s Manual
MN-003-1600-00
Store Workspace AutoCreate
Purpose
Stores the current status of the automatically created work space mode.
Format
STORE WSPACE AUTOCREATE
Description
This command is used to store the automatically created work spaces.
NOTE: Store commands store the current setting in RAM to non-volatile memory. Resetting the robot will cause the new setting to be loaded from non-volatile memory.
See Also: Store Communication on page 8-157
8-174
Brooks Automation
Revision 2.2
MagnaTran 7.1 User’s Manual
MN-003-1600-00
Command Reference
Store Workspace Mode
Store Workspace Mode
Purpose
Stores to nonvolatile memory the current setting of the work space mode.
Format
STORE WSPACE MODE
Description
NOTE:Store commands store the current setting in RAM to non-volatile memory. Resetting the robot will cause the new setting to be loaded from non-volatile memory.
See Also: Set Workspace Mode on page 8-155
Brooks Automation
Revision 2.2
8-175
Command Reference
Transfer
MagnaTran 7.1 User’s Manual
MN-003-1600-00
Transfer
Purpose
Transfers a wafer from one specified station to another specified station.
Format
XFER [[ARM]arm] station-a station-b
Arguments
ARM arm:
The arm (A or B) which will perform the transfer. The default is Arm A.
The arm descriptor must be specified only to pick with Arm B. The
“ARM” identifier is optional.
station-a:
Station number for pick operation
station-b:
Station number for place operation.
Description
This function picks the wafer from one station and places it to another station. Use
slot 1 of multi-slot stations.
NOTE: The XFER command is meant to be used with robots that have the Z-Axis option
installed. Using the XFER command with 2-Axis robots will result in an error
being generated.
See Also:
GOTO, MOVE, PICK, PLACE, RQ POS DST
Example
In the following example arm ‘A’ (default) is currently extended in station # 5, slot #2
and in the down position.
The robot will retract the arm, rotate to station # 1, extend the arm, raise the arm (picking up the wafer), retract the arm, rotate to station # 6, extend the arm, lower the arm
(placing the wafer), and retract the arm.
XFER 1 6
8-176
Brooks Automation
Revision 2.2
MagnaTran 7.1 User’s Manual
MN-003-1600-00
Command Reference
Transfer with an Offset
Transfer with an Offset
Purpose
Transfers a wafer from one specified station to another specified station with an offset.
Format
XFER [[ARM]arm] station-a station-b [STRT (NR|R1|R2)] [ENRT (NR|R1|R2)]
[PKRO r_offset] [PKTO t_offset] [PLRO r_offset] [PLTO t_offset] [Z (UP|DN)] [SLOT
num])
Arguments
ARM arm:
The arm (A or B) which will perform the transfer. The default is Arm A.
The arm descriptor must be specified only to pick with Arm B. The
“ARM” identifier is optional.
station-a:
Station number for pick operation
station-b:
Station number for place operation.
STRT :
Start retract location
NR: No retract
R1: Normal retract
R2: Second retract location
default = R1
ENRT :
End retract location.
NR: No retract
R1: Normal retract
R2: Second retract location
default = R1
PKRO r_offset: Pick radial offset specifies the positive or negative offset from the
extend/retract location for that station.
PLRO r_offset: Place radial offset specifies the positive or negative offset from the
extend/retract location for that station.
PKTO t_offset: Pick theta offset specifies the positive or negative offset from the
Brooks Automation
Revision 2.2
8-177
Command Reference
Transfer with an Offset
MagnaTran 7.1 User’s Manual
MN-003-1600-00
theta location for that station.
PLTO t_offset: Place theta offset specifies the positive or negative offset from the
theta location for that station.
Description
This function picks the wafer from one station and places it to another station with
offset values for R and T.
NOTE: The XFER command is meant to be used with robots that have the Z-Axis option
installed. Using the XFER command with 2-Axis robots will result in an error
being generated.
See Also:
GOTO, MOVE, PICK, PLACE
Example
In the following example, the pick station and the place station are the same:
XFER 1 1 ENRT NR PLTO xxx PLRO xxx
When the ENRT NR option is specified in the above example, the retract is removed.
NOTE: Since no arm-descriptor is provided in the example the robot will move the default
arm, Arm A.
8-178
Brooks Automation
Revision 2.2
MagnaTran 7.1 User’s Manual
MN-003-1600-00
Command Reference
Error Code Reference
Error Code Reference
The MagnaTran 7 Robot will generate error messages in the form of a hexadecimal
number when a problem with a software command is encountered. The following
table lists all Error Codes in numeric order, which also provides a grouping of error
codes by error type.
NOTE: This list contains error messages that may be generated by the robot in all configurations. It is possible that a specific configuration of the robot will never generate
some of these error messages.
In PKT mode, the error codes will appear as numbers; in MON mode, the error codes
will appear as messages.
Additional troubleshooting procedures are located in Chapter 10.
Error listings for the MagnaTran 7 Robot
NOTE: Previous users of the MagnaTran 6 and the MultiTran/VacuTran 5 robots: refer to
Appendix D: Robot Compatibility for obsoleted and equivalent codes.
Success Codes
Error 1:
Command failed.
This is a generic command that requires the operator to have a knowledge of the events leading
to the failure. For example, the operator must know if the robot failed during a theta motion, or
during Z homing, or other. Normally, the last command issued to the robot will provide this
information. Next, the operator is to refer to the appropriate failure mode in Symptoms of
Observed Errors Types on page 10-2.
Station Errors
Error 210:
Not at Station.
Station based command issued while robot was not at a station (ex. GOTO R EX). Verify that
the command used is designed to go to a station. These commands include GOTO/PICK/
PLACE/XFER/LFTST. Select an appropriate station number (1 - 16).
Error 220:
Radial axis not at retract position.
Robot must be retracted prior to executing desired move.
Error 221:
Invalid arm selection (ex. selecting Arm B on a single arm type)
Verify that arm A is being selected for single arm robot. Arm B is available for dual arm.
Error 233:
Extend to station not enabled.
Error 234:
Valve not closed.
User I/O - Command Parser Errors
Error 301:
Brooks Automation
Revision 2.2
Mnemonic already used.
8-179
Command Reference
Error Code Reference
MagnaTran 7.1 User’s Manual
MN-003-1600-00
Part of a command has been duplicated (ex. GOTO N 1 N 2). This command argument must
be unique. Input a different command argument.
Error 305:
Unrecognized command; expecting a mnemonic.
An optional parameter where at least one parameter is required is missing. Enter a valid command string. Reference the Chapter 8: Command Reference for the correct command syntax.
Error 306:
Value out of range
Enter a value within range for the desired function.
Error 309:
Command not supported.
Enter the command EEPROM RESET.
Error 350:
Parser error, bad node in parse tree.
Error 351:
Parser error, stack overflow.
Error 352:
Parse error, no memory available.
Error 353:
Unexpected mail to UIO task
Error# 390:
Checksum is invalid.
Station Setup Errors
Error 402:
Bad slot number.
Error 405:
Bad Lower Position.
The entered Lower value yields an invalid value when subtracted from the station’s BTO (ex.
BTO = 17.502, Lower = 18.000).
Error 406:
Bad Pitch.
The entered Pitch value yields an invalid value when multiplied by the number of slots.
Error 407:
Bad T Position.
Invalid Theta value (T > 360 ° or T < 0°). Enter a theta position within the range of 0 to 360000,
where 360000 represents 360 degrees. Robot theta positions are represented in millidegrees.
Thus, 1 degree of robot travel equals 1000 units.
Error 408:
Bad R value.
Value is either too small or too large for the arm to reach or an attempt was made to drive arm
past its limits. Enter a radial position within the range of the radial home position and the maximum extension of the armset. The radial home position and maximum extension will vary
pending the size of the armset. Robot radial positions are represented in microns. Thus, 1 mm
of robot travel equals 1000 units.
Error 409:
Bad Z value.
Value is either too small or too large for the arm to reach or an attempt was made to drive arm
past its limits. Enter a Z position within the range of 0 to the maximum Z height. Maximum Z
heights vary pending robot model. In most cases, the maximum Z height is 25mm or 35mm.
Robot Z positions are represented in microns. Thus, 1 mm of robot travel equals 1000 units.
If the maximum Z height is unknown, issue the command: RQ ARMS ALL. The maximum Z
height is indicated in the line “total z travel---”. The response is in meters. An example of the
last 7 lines of the robot response list are shown below:
Pan B ctr of mass, Y coordinate -Pan B pad offset --------------------total z travel -------------------------mass seen by the z motor in kg ---
8-180
Brooks Automation
Revision 2.2
MagnaTran 7.1 User’s Manual
MN-003-1600-00
Command Reference
Error Code Reference
Z motor spring constant ----------Extension arm Angle --------------Retract arm Angle ------------------Error 414:
Push value must be Positive.
Error 415:
Station R+PUSH value is Invalid.
Error 416:
Station not initialized.
Error 417:
Offset too large.
Error 418:
Bad retract position.
Invalid RTRCT2.
Robot Internal Errors
Error 508:
Wafer sensor not defined.
Error 509:
No Z axis on robot.
Error 527:
MCC communication error.
Error 528:
MCC Queue Full.
Error 550:
Station parameter out of range.
Error 551:
Servo parameter out of range.
Error 552:
Sensor out of range.
Error 554:
Cannot resume due to unsuccessful HALT.
Error 555:
Cannot resume because robot not HALTED.
Error 557:
Robot did not respond.
Error 558:
Robot unknown.
Dispatcher/Communications Errors
Error 602:
Command sequencer busy.
Wait for the robot to complete its last operation. If the error persists, reset the robot by issuing
the RESET command or toggling power.
Error 603:
Command halted.
A HALT command was issued to stop robot motion. The robot remains referenced.
Error 604:
CDM in control of the robot.
The command issued requires control of the robot. Turn off the CDM prior to continuing.
Error 605:
Digital I/O in control of robot.
To release digital I/O control of robot, enter the command DIO STOP. Refer to DIO Stop on
page 8-28 for additional information.
Error 606:
Serial I/O in control of robot.
To initiate digital I/O control of robot, enter the command DIO START.
Refer to DIO Start on page 8-27 for additional information.
Error 607:
MCC processor not alive.
Verify that no FETs of the theta driver board have shorted-out. For each FET, apply an ohmmeter between pins 1 and 3 to verify resistivity. If a FET has shorted-out, replace theta driver
Brooks Automation
Revision 2.2
8-181
Command Reference
Error Code Reference
MagnaTran 7.1 User’s Manual
MN-003-1600-00
board. If FETs are not shorted, replace PC104 Card. Refer to PC 104 CPU Board Replacement
on page 9-58.
Error 608:
Robot halting.
A “halt” command has been issued to the robot which stops robot motion. If the robot is operating in the compatibility mode: COMPATIBILITY HALT VT5, then the robot must be homed
prior to its next move. If the robot is operating in the compatibility mode: COMPATIBILITY
HALT MAG6, then the robot will remain referenced and is ready for the next move.
Error 610:
Emergency stop on.
The EMER_STOP interlock for the robot has been activated.
•
Refer to Operational Interlocks on page 6-23.
•
The PowerPak accessory has been programmed using the EMER_STOP interlock
function but the PowerPak is not properly connected to the robot. Check PowerPak
cables for proper connection and continuity.
•
Verify that a robot emergency off (EMO) button has been activated and deactivate as
appropriate.
•
Check host controller software.
•
Refer to Operational Interlock Related Issues on page 10-20.
Error 611:
Warning, CDM has been turned on.
Error 612:
Warning, CDM has been turned off.
Error 613:
UPS Battery is low.
The UPS_BATTERY_SEN interlock for the robot has been activated.
•
Refer to PowerPak Power Fault Manager on page 6-84 for correct operation. The PowerPak accessory is programmed using the UPS_BATTERY_SEN interlock function,
and the internal PowerPak battery voltage is less than 23.5 volts. Recharge or replace
PowerPak as appropriate.
•
Check host controller software.
•
Refer to Operational Interlock Related Issues on page 10-20.
Error 652:
Unable to create command dispatcher.
Error 653:
Unexpected mail received by dispatcher.
Error 654:
Unknown command.
Error 655:
Bad parameter passed to dispatcher.
Error 656:
Command processing has finished.
Robot Wafer Sensor Errors
Error 700:
Wafer detected.
Error 701:
No Wafer detected.
Error 705:
Wafer missing
Ensure wafer is present in VCE or process module prior to issuing PICK/PLACE/GOTO/
XFER command.
8-182
Brooks Automation
Revision 2.2
MagnaTran 7.1 User’s Manual
MN-003-1600-00
Command Reference
Error Code Reference
Check host controller software.
Refer to Operational Interlock Related Issues on page 10-20.
Error 706:
Wafer sensed
Ensure slot in VCE or process module is empty prior to issuing PICK/PLACE/GOTO/XFER
command.
Check host controller software.
Refer to Operational Interlock Related Issues on page 10-20.
Error 710:
Slot valve closed prior PICK/PLACE/GOTO/XFER
Ensure slot valve is open prior to issuing PICK/PLACE/GOTO/XFER command.
Check slot valve for proper operation.
Check host controller software.
Refer to Operational Interlock Related Issues on page 10-20.
Error 711:
Slot valve not open.
Ensure slot valve is open prior to issuing PICK/PLACE/GOTO/XFER command.
Check slot valve for proper operation.
Check host controller software.
Refer to Operational Interlock Related Issues on page 10-20.
Error 715:
Possible material on arm.
Error 721:
Pick failed.
Ensure wafer sensors are operating properly.
Ensure slot valve is operating properly.
Ensure slot valve is open prior to issuing PICK/PLACE/GOTO/XFER command.
Check host controller software.
Refer to Operational Interlock Related Issues on page 10-20.
Error 722:
Placed failed.
Ensure wafer sensors are operating properly.
Ensure slot valve is open prior to issuing PICK/PLACE/GOTO/XFER command.
Check host controller software.
Refer to Operational Interlock Related Issues on page 10-20.
Error 730:
RE wafer sensor error prior to PLACE: No Wafer Sensed.
Error 731:
RE wafer sensor error after a PLACE: Wafer Sensed.
Error 732:
EX wafer sensor error prior to a PLACE: Wafer Sensed.
Error 733:
EX wafer sensor error after a PLACE: No Wafer Sensed.
Error 734:
R_MT wafer sensor error on a PLACE: No Wafer Sensed during EXtend.
Brooks Automation
Revision 2.2
8-183
Command Reference
Error Code Reference
MagnaTran 7.1 User’s Manual
MN-003-1600-00
Error 735:
R_MT wafer sensor failure.
Error 736:
R_MT wafer sensor error on a PLACE: Wafer Sensed during REtract.
Error 738:
Active option in GOTO supported for R_MT wafer sensor only.
Error 739:
R_MT wafer sensor error: Wafer Sensed on MAT_OFF move.
Error 740:
RE wafer sensor error prior to a PICK: Wafer Sensed.
Error 741:
RE wafer sensor error after a PICK: No Wafer Sensed.
Error 742:
EX wafer sensor error prior to a PICK: No Wafer Sensed.
Error 743:
EX wafer sensor error after a PICK: Wafer Sensed.
Error 744:
R_MT wafer sensor error on a PICK: Wafer Sensed during EXtend.
Error 745:
R_MT wafer sensor error on a PICK: No Wafer Sensed during REtract.
Error 749:
R_MT wafer sensor error: No Wafer Sensed on MAT_ON move.
Error 750:
No station with R_MT wafer sensor found for Arm A.
Error 751:
No station with R_MT wafer sensor found for Arm B.
Configuration Errors
Error 800:
Bad configuration name.
Verify robot application number is valid. Refer to robot Quality Report (QR) that is shipped
with the robot.
Error 801:
Database checksum error.
Issue an EEPROM RESET command. See EEPROM Reset on page 8-29 for command usage.
Error 802:
Arm not configured.
Error 803:
Servo not configured.
Error 804:
Motor not configured.
Error 805:
Illegal configuration for this command.
Error 810:
Cannot open Master configuration file.
Error 811: Cannot read from Master configuration file.
8-184
Error 812:
Cannot open Object data file.
Error 813:
Cannot read Object data file.
Error 814:
Cannot open Object master file.
Error 815:
Cannot read Object master file.
Error 816:
Cannot open Current configuration file.
Error 817:
Cannot read from Current configuration file.
Error 818:
Cannot write to Current Configuration file.
Error 819:
Object checksum error.
Error 820:
Could not send generic object to MCC
Brooks Automation
Revision 2.2
MagnaTran 7.1 User’s Manual
MN-003-1600-00
Error 821:
Object not found.
Error 822:
Object not valid for current configuration.
Error 823:
Bad group type.
Error 824:
Bad group name.
Error 825:
Group not found.
Error 826:
Group not valid for current configuration.
Error 827:
Configuration message to MCC timed out.
Error 850:
End of database found.
Error 851:
Unable to read from database.
Error 852:
Unable to write to database.
Error 853:
Bad database handle found.
Error 854:
Database full.
Error 855:
Database not initialized.
Error 857:
Configuration files have different stamps.
Error 860:
Bad parameter passes to memory system.
Error 861:
No memory available for memory system.
Error 862:
Partition currently in use.
Command Reference
Error Code Reference
Monitor Errors
Error 950:
Unexpected mail received by monitor.
Error 951:
No monitor resources available.
Error 952:
Unknown monitor event type.
Error 953:
Monitor event canceled.
Error 954:
Event time-out occurred.
Error 955:
Monitored event occurred.
Error 956:
Bad monitor function received.
I/O Mapping Errors
Error 1001:
Unknown I/O State type.
Check host controller software for proper I/O state type. Refer to Operational Interlocks on page
6-23 for available types.
Error 1002:
Unknown I/O name.
Choose a correct I/O name. A list of existing I/O names can be obtained by issuing the command RQ IO MAP ALL.
Error 1003:
I/O name already in use.
If appropriate, delete existing I/O name using the REMOVE IO command. Choose a different
I/O name. See Remove IO on page 8-66 for command usage.
Brooks Automation
Revision 2.2
8-185
Command Reference
Error Code Reference
MagnaTran 7.1 User’s Manual
MN-003-1600-00
Error 1004:
I/O system out of memory.
Error 1005:
Name reserved by I/O system.
Error 1006:
Illegal number of bits for I/O type.
Assign the proper number of bits for the I/O type specified. Refer to Operational Interlocks on
page 6-23.
Error 1007:
Unknown I/O block name.
Error 1008:
Bad I/O bitmask.
Error 1009:
Unknown I/O type.
Error 1010:
I/O type mismatch.
Error 1011:
Incorrect I/O channel specified.
Error 1012:
Bad I/O handle.
Error 1013:
Unknown I/O state.
Check host controller software for proper I/O state. Refer to Operational Interlocks on page 623 for available types.
Error 1014:
I/O is write only.
An attempt was made to write to an output.
Error 1015:
I/O is read only.
An attempt was made to read from an input.
Inclusion Zones (Workspace) Errors
8-186
Error 1100:
Current position not within work space.
Error 1101:
Destination position not within work space.
Error 1102:
Work spaces do not overlap.
Error 1103:
Work space interlock occurred.
Error 1104:
No more work spaces available.
Error 1105:
The work space volume must be specified.
Error 1106:
Radial maximum is less than radial minimum.
Error 1108:
Z maximum is less than Z minimum.
Error 1109:
Radial minimum is greater than stored radial max.
Error 1110:
Radial maximum is less than stored radial min.
Error 1113:
Z minimum is greater than stored Z maximum.
Error 1114:
Z maximum is less than stored Z minimum.
Error 1115:
Work space name does not exist.
Error 1118:
Invalid station number.
Error 1119:
Reserved work space name used.
Brooks Automation
Revision 2.2
MagnaTran 7.1 User’s Manual
MN-003-1600-00
Command Reference
Error Code Reference
Motion Command Task Errors
Error 1300:
Bad mail message received by MCC.
Error 1302:
Command halted.
Error 1307:
MCC Queue Full.
Error 1308:
Could not calculate MCC command ID.
Error 1309:
Dual Ported RAM lock fail.
Error 1310:
Unable to send to MCC.
Error 1311:
Error opening MCC code.
Error 1312:
Error reading MCC code.
Error 1313:
MCC task can't access DP RAM.
Error 1314:
MCC DP RAM memory size is too small.
Real Time Clock Errors
Error 1600:
Bad date format.
Enter the date using a two digit number to represent the month, day, and year. Separate the
month, day, and year using the “/” character. For example, February 28, 1998 would be entered
by issuing the command: SET DATE 02/28/98.
Error 1601:
Bad time format
Enter the time using a two digit number to represent the hour, minute, and second. Separate
the hour, minute, and second using the “:” character. For example, thirty minutes past noon
would be entered by issuing the command: SET TIME 12:30:00.
Error 1602:
Year out of range.
Enter the year using a two digit number in the range of 00 through 99.
Error 1603:
Month out of range.
Enter the month using a two digit number in the range of 01 through 12.
Error 1604:
Day out of range.
Enter the day using a two digit number in the range of 01 through 31.
Error 1605:
Hour out of range.
Enter the hour using a two digit number in the range of 01 through 23.
Error 1606:
Minute out of range.
Enter the minute using a two digit number in the range of 01 through 59.
Error 1607:
Second out of range.
Enter the second using a two digit number in the range of 01 through 59.
CDM Related Errors
Error 1800:
CDM already initialized.
Error 1801:
CDM escape key entered.
Error 1802:
CDM quit key entered.
Error 1803:
CDM bad parameter.
Brooks Automation
Revision 2.2
8-187
Command Reference
Error Code Reference
Error 1804:
CDM move aborted.
Error 1805:
CDM Has Control of Robot.
MagnaTran 7.1 User’s Manual
MN-003-1600-00
Comm Port Driver
Error 1900:
Unknown serial port.
Error 1901:
Unable to open serial port.
Error 1902:
Unable to close serial port.
Error 1903:
Can't allocate serial port semaphore.
Error 1904:
Serial port overflow.
Error 1905:
Serial port empty.
Error 1910:
Secondary Serial Port mode.
Error 1911:
Secondary Serial Port is busy.
Error 1912:
Secondary Serial Port response timeout.
Error 1920:
No serial communication with remote MCC.
System Task (Kernel) Related Errors
Error 2000:
No memory available for multi-tasker.
Error 2001:
Multi-tasking kernel error.
Error 2002:
Bad parameter passed to multi-tasker.
Error 2003:
Timeout occurred.
Error 2004:
Illegal task block requested.
Error 2005:
No resources available.
Non-Volatile Memory Errors
Error 2100:
Unable to read from NonVolatile RAM.
Error 2101:
Unable to write to NonVolatile RAM.
Error 2102:
NonVolatile RAM overflow.
Mail System Related Errors
Error 2200:
No memory available for mail system.
Error 2202:
Error initializing mail system.
Error 2203:
Unknown task ID passed to mail system.
Monitor Trace Error Codes
8-188
Error 3000:
Trace currently running.
Error 3001:
Trace variable already set.
Error 3002:
Trace variable not set.
Brooks Automation
Revision 2.2
MagnaTran 7.1 User’s Manual
MN-003-1600-00
Error 3003:
Bad trace variable name.
Error 3004:
Bad trace trigger name.
Error 3005:
No trace variables set.
Error 3011:
Bad trace period.
Command Reference
Error Code Reference
System Initialization and Error Log Errors
Error 4001:
Serial number not set.
Error 4002:
System not configured.
Error 4003:
System already born.
Error 4004:
Operator name not set.
Error 4005:
Message log bad record.
Error 4006:
Message log not found.
Error 4007:
Message log write error.
Error 4008:
Message log seek error.
Error 4009:
Message log read error.
Error 4010:
Checksum error in message log.
Error 4011:
Beginning of message log encountered.
Error 4012:
Error log not initialized.
Robot Motion Control Processor Errors
Error 10000:
Default debug message from the MCC.
Error 10001:
Sync error, motor moving or encoder noisy.
Error 10002:
MCC board memory allocation error.
Error 10003:
MCC board unexpected event error.
Error 10004:
MCC board, bad command state.
Error 10005:
MCC Board Sync error, can't move motor.
Error 10006:
MCC encoder VABS adjusted (small).
Error 10007:
Warning, unable to obtain position.
Error 10008:
MCC unable to hold position.
Error 10009:
MCC hard tracking error.
Verify that robot arm state is correct (arms on or arms off).
Verify robot application number is correct.
Check for physical obstruction. Remove or adjust physical obstruction to prevent interference.
While attempting theta or radial motion, verify that all 3 phase LEDs of the T1 motor (DS 1,
DS 2, DS3) and all 3 phase LEDs of the T2 motor (DS2, DS 4, DS6) are illuminated on the
theta driver board.
Brooks Automation
Revision 2.2
8-189
Command Reference
Error Code Reference
MagnaTran 7.1 User’s Manual
MN-003-1600-00
While attempting Z motion, verify that all 3 phase LEDs of the Z motor (DS1, DS2, DS3) are
illuminated on the Z driver board.
Verify armset mounting bolts are torqued to 75-88 in-lbs.
Verify armset is installed correctly. Refer to Mount the Arm Set on page 3-23.
Verify that no FETs of the theta driver board have shorted-out. For each FET, apply an ohmmeter between pins 1 and 3 to verify resistivity. If a FET has shorted-out, replace theta driver
board.
Verify that the T1/T2 encoder values and T1/T2/Z sync phase values match those of the robot’s
Quality Report (QR). The QR is shipped with the robot or can be requested from Brooks Technical Support. Issue the commands RQ ENCODER T1 ALL, RQ ENCODER T2 ALL, and
RQ SYNC PHASE ALL for the values stored in the robot.
For additional troubleshooting steps, refer to Radial Motion Related Issues on page 10-8, Theta
Motion Related Issues on page 10-10, or Z Motion Related Issues on page 10-12.
Error 10010:
MCC soft tracking error.
Error 10011:
Error, motor is already moving.
Error 10012:
Error, motor is not configured.
Error 10013:
Error, motor is not referenced.
Home the robot by issuing the command HOME ALL.
Error 10014:
Error, motor is already referencing.
Error 10015:
Error, motor is currently moving.
Error 10016:
Error, unable to calculate trajectory.
Error 10017:
Illegal number of polls calculated.
Error 10018:
Unable to calculate absolute position.
Error 10019:
Error, Encoder off by many sectors.
Error 10020:
Error, Encoder failed multiple times.
Check if failure location is repeatable. Record position of failure.
For Z encoder failure:
Verify Z encoder is secured to leadscrew via two 4-40 SHCS and Loctite.
Verify Z encoder is tightly secured to robot chassis via three M3 SHCS.
Replace Z encoder. Refer to Z Encoder Replacement on page 9-45.
Call Brooks Technical Support.
For T1 or T2 encoder failures:
Record which encoder (T1 or T2) failure occurred.
Error 10021:
Error, Board Power Failure (Blown Fuse?).
Check if fuse is blown by inspecting fuses or if respective LED is not illuminated. Refer to Fuse
Replacement on page 9-56. Replace fuse as needed.
Check if robot cables and/or board set have a good ground to the chassis.
8-190
Brooks Automation
Revision 2.2
MagnaTran 7.1 User’s Manual
MN-003-1600-00
Command Reference
Error Code Reference
Verify that power to robot is 24 ±2 VDC.
Inspect robot power cable for proper connection and continuity.
Check all FET’s for short circuits. See Checking for FET Short Circuits on the Theta Driver
Board on page 10-36.
Error 10022:
Error, Z axis overtravel limit reached.
Reissue motion command.
Inspect appropriate Z overtravel limit switch for possible obstruction resulting in switch activation.
Adjust the Z axis overtravel limit switch. Refer to Z Hard Stop and Overtravel Limit Switch
Adjustment on page 9-53.
Move robot so that Z overtravel limit switch is not activated. Manually toggle switch to verify
operation. If switch does not toggle, replace Z axis overtravel limit switch.
Replace Z driver board. Refer to Z-Driver Board Replacement on page 9-43.
Error 10023:
Arm actual position impossible, check sync zero.
Determine the sync zero values presently stored in the robot by issuing the command RQ
SYNC ZERO ALL. Record the values.
All robot stations must be retaught after completing the next step: Redefine the home position
to the desired location. Refer to the Restore the Home Position to the Factory Settings on page
9-71.
Error 10024:
Error, MCC watchdog timed out.
Error 10025:
Error, defective R_MT type wafer sensor.
Verify that the radial and theta positions taught for the R_MT type wafer sensor are accurate.
Check host controller software.
Refer to Operational Interlock Related Issues on page 10-20.
Error 10026:
Error, arm load not what expected.
Verify robot application number is correct by issuing the command RQ CONFIG. The correct
application number can be obtained from the Quality Report (QR) that shipped with the robot
or by contacting Brooks Technical Support.
Remove wafer and repeat robot move. If the robot armset moves properly, the wafer is too large
for the robot application number servos.
Error 10028:
Error, obstruction encounter for axis.
Inspect for physical obstruction.
Reteach the station to ensure the end effector is not scraping a surface, particularly VCE cassette slots.
Inspect the Z-Driver board. If the part number is 002-4234-01, then verify that a resistor has
been placed on the back of the board. Request TSB-259 from Brooks Automation Technical Support.
Error 10029:
Error, Emergency Stop circuit is active.
Verify that one of the following Motor Interlock Bypass mechanisms is in place:
Motor Interlock Bypass Jumper Block located at designation J7 on the I/O board part
Brooks Automation
Revision 2.2
8-191
Command Reference
Error Code Reference
MagnaTran 7.1 User’s Manual
MN-003-1600-00
number 002-3758-01.
MISC I/O connector pins 23 and 24.
8-192
Error 10030:
Error, excessive current detected.
Error 10031:
Warning: Z Home Sensor position moved.
Error 10032:
MCC MAP failed.
Error 10034:
Error, encoder min/max value out of range.
Error 10035:
Error, bad sync phase offset value.
Error 10036:
Error, robot links are not yet defined.
Brooks Automation
Revision 2.2
MagnaTran 7.1 User’s Manual
MN-003-1600-00
9
Maintenance and Repair
Overview
This chapter provides complete maintenance schedules and procedures for the
Brooks Automation MagnaTran 7 Robot. The first section of this chapter provides
preventive maintenance schedules and procedures. The second section of this chapter provides repair procedures for subsystem repair and replacement.
Brooks Automation offers training for troubleshooting and repair of the MagnaTran 7. Only qualified, properly trained persons should perform any maintenance or
repair procedures.
PINCH POINT
HEAVY LIFTING
ELECTRICAL HAZARD
Crush points, pinch points, mechanical hazards, electrical hazards, shock
hazards exist on the MagnaTran 7 robot. The procedures in this chapter
should only be performed by qualified persons. Read and understand
Chapter 2: Safety before performing any procedure.
Chapter Contents
Preventive Maintenance Schedule. . . . . . . . . . . . . . . . . . . . . . . . . . . . . . . . . . . . . . . .9-2
Repair Philosophy . . . . . . . . . . . . . . . . . . . . . . . . . . . . . . . . . . . . . . . . . . . . . . . . . . . . .9-22
Repair Procedures . . . . . . . . . . . . . . . . . . . . . . . . . . . . . . . . . . . . . . . . . . . . . . . . . . . . .9-24
Brooks Automation
Revision 2.2
9-1
Maintenance and Repair
Preventive Maintenance Schedule
MagnaTran 7.1 User’s Manual
MN-003-1600-00
Preventive Maintenance Schedule
This section provides the schedule and procedures for routine preventive maintenance of the MagnaTran 7 Robot to reduce unscheduled down-time. It is recommended that the preventive maintenance procedures and schedule provided in this
section be followed to extend the operating life of the Magna Tran 7 and to minimize
unscheduled down-time. If additional procedures are required they will be supplied
along with their maintenance schedules by Brooks Automation.
Before beginning any procedures in this chapter, read and understand Chapter 2:
Safety.
NOTE: The following Preventive Maintenance Schedule is based on a certified clean, dry
environment. The user should adjust the Preventative Maintenance Schedule to
account for any deviations from this environment.
Schedule
Table 9-1 is provided as a quick reference listing all maintenance procedures, the page
number of the procedure, and the frequency for performing the procedure.
Table 9-1: Preventive Maintenance Schedule
Procedure
9-2
Page #
Frequency
Data Log
9-4
3 months
Ball Screw Inspection
9-6
3 months
Encoder and Motor Coil Cables Inspection
9-8
3 months
Cover Inspection
9-9
3 months
Wrist Band Inspection
9-10
3 months
Pads on End Effectors Inspection
9-11
3 months
Connection Inspection
9-12
3 months
Robot Cleaning Procedure
9-13
As required
End Effector Pad Cleaning Procedure
9-15
As required
O-Ring Removal/Replacement/Cleaning
9-17
As required
Brooks Automation
Revision 2.2
MagnaTran 7.1 User’s Manual
MN-003-1600-00
Maintenance and Repair
Preventive Maintenance Schedule
Table 9-1: Preventive Maintenance Schedule
Procedure
Page #
Frequency
End Effector Alignment
9-20
3 months
Power Pak Maintenance
9-21
3 years
or when it is indicating
a LOW battery
Parts
Brooks Automation can provide all parts required for Preventive Maintenance. For a
list of parts required for preventive maintenance contact Brooks Automation Customer Support. To obtain additional information about parts for preventive maintenance contact your local Brooks sales representative, or call Brooks Automation
Customer Support at 1-978-262-2900.
Required Tools
•
PC with a serial terminal program, with log file capture capabilities
•
Serial or Null Modem cable (See Appendix B: Tooling on page 11-3)
•
Medium Phillips Head and regular screw drivers
•
Metric set of Allen Wrenches
•
Flashlight
•
Foam swabs and/or lint free cleanroom wipes
Brooks Automation
Revision 2.2
9-3
Maintenance and Repair
Data Log
MagnaTran 7.1 User’s Manual
MN-003-1600-00
Data Log
In order to accurately track the usage of the robot, several internal counters and logs
should be downloaded for analysis. This data will aid in diagnosing problems that
may occur during future PM sessions.
Required Tools
•
PC with a serial terminal program, with log file capture capabilities
•
Serial or Null Modem cable (See Appendix B: Tooling on page 11-3)
NOTE: Follow these steps to setup for Steps 1 through 5 to follow:
•Attach a PC to the robot with the serial I/O cable.
•Open a terminal software program and verify communication with the robot with
the command HLLO.
•Setup the communication protocol with the command SET COMM FLOW SEQ
M/B MON LF ON and the command SET IO ECHO Y.
•Open a log file to save the responses from the robot; name the file with the last four
digits of the Brooks serial number and the date. For example, if the robot serial
number is 9801-2323, and the date of the PM is 1/30/98, the file should be named
“23230198” with the file extension “.TXT” or “.CAP”.
1.
Birth Certificate Information:
Issue the command RQ BIRTH CERT, which will display the Birth Certificate
information and download it to the log file.
The capture file should remain opened until the following information (Steps 2
through 5) is logged to the file.
2.
Date and Time of PM:
With the log file from Step 1 still open, issue the commands RQ DATE and RQ
TIME to download the time and date to the log file.
3.
Cycle Counter:
With the log file from Step 1 still open, issue the command RQ CYCLE
COUNTER to download the present cycle counter value of the robot to the log
9-4
Brooks Automation
Revision 2.2
MagnaTran 7.1 User’s Manual
MN-003-1600-00
Maintenance and Repair
Data Log
file.
4.
History:
With the log file from Step 1 still open, issue the command RQ HISTORY CMD
(see Request History on page 8-76) to download the content to the log file.
5.
Firmware Revision:
With the log file from Step 1 still open, issue the command RQ VERSION to
download the firmware revision of the robot to the log file.
Close the log file.
Verify that all the information displayed in Steps 1 through 5 is stored within
the log file by viewing the file in a document editing program.
Brooks Automation
Revision 2.2
9-5
Maintenance and Repair
Ball Screw Inspection
MagnaTran 7.1 User’s Manual
MN-003-1600-00
Ball Screw Inspection
The Ball Screw of the Z Drive Assembly is designed for long life and high reliability.
It is important to verify the operation and alignment of the Ball Screw periodically so
that it will operate efficiently.
Required Tools
•
PC with a serial terminal program, with log file capture capabilities
•
Serial or Null Modem cable (See Appendix B: Tooling on page 11-3)
•
Medium Phillips Head and regular screw drivers
•
Metric set of Allen Wrenches
•
Flashlight
•
Foam swabs and/or lint free cleanroom wipes
Follow these procedures to inspect the Ball Screw:
9-6
1.
Attach a PC to the robot with the Serial I/O cable.
2.
Open a terminal software program, and verify communication with the robot
with the command HLLO.
3.
Setup the communication protocol with the command SET COMM FLOW SEQ
M/B MON LF ON ERRLVL 5 and the command SET IO ECHO Y.
4.
Home the robot with the command HOME ALL.
5.
Move the robot to its maximum Z position with the command MOVE Z ABS
35000 (for 25mm robots, use the command MOVE Z ABS 25000). During this
movement, check for errors reported by the robot, and for any noise that may
be generated by the robot.
6.
Release the brake for the Z Drive with the command ZBRAKE OFF, and note if
the arms drop in the Z direction.
Brooks Automation
Revision 2.2
MagnaTran 7.1 User’s Manual
MN-003-1600-00
Maintenance and Repair
Ball Screw Inspection
WARNING
The robot will free-fall in the Z direction. Ensure that personnel and
physical obstructions are clear of the robot’s armset and internal theta
motor housing.
Press down on the arms and note if there is any increase in friction. To stop
the robot during its free fall, issue the command HOME Z. Do not press the arms
down so that the arms strike the bottom of the chamber; however, the over travel
sensor will engage before the arms strike the chamber. If the lower over travel
sensor is tripped, the command HOME Z will reset the Z Axis.
7.
Again move the robot to its maximum Z position with the command MOVE Z
ABS 35000 (for 25mm robots, use the command MOVE Z ABS 25000).
8.
Once the maximum Z position is reached, remove power from the robot.
9.
Disconnect the Power Cable, Serial I/O Cable, CDM Cable, and Power Pak (if
applicable) from the robot.
10.
Unscrew the bolts (x4) and remove the front and back covers from the robot.
11.
Inspect the Ball Screw for any excessive wear along the length of the screw’s
surface; especially scratches or deep scrapes. The Ball Screw is visible between
the Theta drive and Z drive mounting plate.
12.
Inspect the color and amount of grease on the Ball Screw. Use a swab to
remove a small amount of the grease. The grease should be a golden to dark
brown color, and no contaminates or particles should be present in the sample
taken from the screw. There should be at least a light coating of grease on the
screw.
If any of the above inspection points report a discrepancy, call Brooks Automation
Customer Support.
Brooks Automation
Revision 2.2
9-7
Maintenance and Repair
Encoder and Motor Coil Cables Inspection
MagnaTran 7.1 User’s Manual
MN-003-1600-00
Encoder and Motor Coil Cables Inspection
The Encoder and Motor Coil cables are the only moving cables within the MagnaTran
7 robot. It is important to verify that these cables do not come in contact with the
inside surface of the covers or any other stationary point in the system. This can be
done by inspecting for signs of wear or pinching along the cables and their clamps.
Required Tools
•
none
Follow these procedures to inspect the Encoder and Motor Coil cables and clamps:
1.
With the covers removed, look for wear and signs of pinching along the length
of the Encoder and Motor Coil cables. For the Encoder cable (white), inspect
from the Encoder Buffer Boards down to the Coil cable shelf. For the Motor
cables (black, 2 places), inspect from the Theta Motor cable bracket down to the
Coil cable shelf.
2.
Inspect inside the coiled portion of the three cables for wear and signs of pinching.
3.
Inspect the areas of the coils near the black clamps; these clamps attach the Coil
cables to the underside of the Theta Drive and to the Coil cable shelf.
4.
Inspect the white clamps that attach the Coil cables to the side of the Theta
Drives; look for signs of wear, and check that the screws attaching them to the
Theta Drives are secure.
If any of the above inspection points report a discrepancy, call Brooks Automation
Customer Support.
9-8
Brooks Automation
Revision 2.2
MagnaTran 7.1 User’s Manual
MN-003-1600-00
Maintenance and Repair
Cover Inspection
Cover Inspection
The covers can sometimes become damaged during installation or removal. The
inside of the covers can also come in contact with moving parts of the Theta Drive,
which can cause black Nickel-paint particles to deposit on the Theta Drive or on the Z
Drive Mounting Plate.
Required Tools
•
none
Follow these procedures to inspect the covers:
1.
Inspect the outside of the covers for cracks or damage.
2.
Turn power to the robot off. Remove the Power Cable, Serial I/O Cable, CDM
Cable, and Power Pak (if applicable).
3.
Remove covers.
4.
Inspect the inside surface of the covers for scratches or patches of missing black
paint.
5.
Inspect the drive for signs of black particles (generated from the covers) in the
vicinity of the Theta Drives and Z Drive Mounting Plate.
If any of the above inspection points report a discrepancy, call Brooks Automation
Customer Support.
6.
Reinstall the covers onto the robot. Do not reinstall damaged covers.
7.
Reattach the Power Cable, Serial I/O Cable, CDM Cable, and Power Pak (if
applicable).
8.
Apply power to the robot.
9.
Home the robot through the CDM.
Brooks Automation
Revision 2.2
9-9
Maintenance and Repair
Wrist Band Inspection
MagnaTran 7.1 User’s Manual
MN-003-1600-00
Wrist Band Inspection
The Wrist Bands of the arms can become damaged or misaligned from impacts or
crashes. These situations can weaken the strength of the bands and cause motion
errors during operation.
Required Tools
•
none
Follow these procedures to inspect the Wrist Bands:
1.
Extend the robot into a load lock or process module, so that the End Effector is
readily available.
2.
Inspect the surface and ends of the Wrist Bands for nicks, scratches, creases, or
tears.
3.
Inspect the alignment of the bands against the forearms; they should be aligned
with and equally spaced from the edges of each forearm.
To adjust the wrist band, see Wrist Band Adjustment on page 9-39.
9-10
Brooks Automation
Revision 2.2
MagnaTran 7.1 User’s Manual
MN-003-1600-00
Maintenance and Repair
Pads on End Effectors Inspection
Pads on End Effectors Inspection
Over time, repeated wafer transfers will wear away the surface of the pad, and
decrease its friction. It is necessary to inspect these pads to prevent wafer slippage
and loss of repeatability.
Required Tools
•
none
Follow these procedures to inspect the Pads of the End Effectors:
1.
Extend the end effector into the load lock or process module.
2.
Visually inspect the surface of the pads for excessive wear or damage.
If any of the above inspection points report a discrepancy, refer to End Effector Pad
Removal/Replacement on page 9-32 for the procedure for replacing Kalrez or Adhesive backed pads.
Brooks Automation
Revision 2.2
9-11
Maintenance and Repair
Connection Inspection
MagnaTran 7.1 User’s Manual
MN-003-1600-00
Connection Inspection
Inspect all connections to the robot, PowerPak and power supply. Plugs should be
fully seated and mating hardware tight. Any locking devices should be in place.
Required Tools
•
9-12
none
Brooks Automation
Revision 2.2
MagnaTran 7.1 User’s Manual
MN-003-1600-00
Maintenance and Repair
Robot Cleaning Procedure
Robot Cleaning Procedure
Occasionally the MagnaTran 7 will need to be cleaned. This could be done as a part
of normal servicing or to remove contaminates deposited on it from the process or
other sources.
Required Tools
•
Isopropyl Alcohol (100%)
•
DI Water
•
Cleanroom Wipes
Cleaning Procedure
DANGER
The MagnaTran 7 may be used in an environment where hazardous
materials are present, and surfaces may be contaminated by those
materials. Refer to the facility’s Material Safety Data Sheets for those
materials to determine proper handling.
1.
Remove any hazardous materials from the MagnaTran 7’s surfaces following
the facility’s procedures for those materials.
2.
Clean all exposed surfaces using cleanroom wipes moistened with isopropyl
alcohol.
CAUTION
Wipe must be moistened only; squeezing the wipe should not cause
any isopropyl alcohol to drip.
Do not allow alcohol to come in contact with bearings, seals, etc.
3.
Once all contaminates have been removed, use cleanroom wipes moistened
with DI water to remove any residues.
Brooks Automation
Revision 2.2
9-13
Maintenance and Repair
Robot Cleaning Procedure
MagnaTran 7.1 User’s Manual
MN-003-1600-00
CAUTION
Wipe must be moistened only; squeezing the wipe should not cause
any water to drip.
Do not allow water to come in contact with bearings, seals, etc.
4.
9-14
Once all residues have been removed, use dry cleanroom wipes to dry all surfaces.
Brooks Automation
Revision 2.2
MagnaTran 7.1 User’s Manual
MN-003-1600-00
Maintenance and Repair
End Effector Pad Cleaning Procedure
End Effector Pad Cleaning Procedure
Collection of debris and other contaminants on the End Effector pad surface may
cause wafer slippage. For optimum robot and system performance, pads should be
cleaned as a part of normal servicing or to remove contaminates deposited on it from
the process or other sources.
Cleaning procedures depend on the type of pads; Kal-rez®, Stainless Steel, or Quartz.
Required Tools
•
Kal-rez® pads: use de-ionized water
Stainless Steel pads: use Isopropyl Alcohol
Quartz pads: use Isopropyl Alcohol
•
Lint-free, clean room Wipes
•
Clean room gloves
Cleaning Kal-rez® Procedure
DANGER
The MagnaTran 7 may be used in an environment where hazardous
materials are present, and surfaces may be contaminated by those
materials. Refer to the facility’s Material Safety Data Sheets for those
materials to determine proper handling.
1.
Dampen a cleanroom wipe with de-ionized water.
CAUTION
Wipe must be moistened only; squeezing the wipe should not cause
any water to drip.
Do not allow water to come in contact with bearings, seals, etc.
2.
Clean the entire end effector, paying special attention to the Kal-rez® pads. Do
not apply excessive pressure or force to the pads while cleaning. Excessive
force may dislodge or bend the end effector.
Brooks Automation
Revision 2.2
9-15
Maintenance and Repair
End Effector Pad Cleaning Procedure
3.
MagnaTran 7.1 User’s Manual
MN-003-1600-00
Once all residues have been removed, use dry cleanroom wipes to dry all surfaces.
Cleaning Stainless Steel or Quartz Pads Procedure
DANGER
The MagnaTran 7 may be used in an environment where hazardous
materials are present, and surfaces may be contaminated by those
materials. Refer to the facility’s Material Safety Data Sheets for those
materials to determine proper handling.
1.
Dampen a cleanroom wipe with Isopropyl.
CAUTION
Wipe must be moistened only; squeezing the wipe should not cause
any alcohol to drip.
Do not allow alcohol to come in contact with bearings, seals, etc.
9-16
2.
Clean the entire end effector, paying special attention to the pads. Do not
apply excessive pressure or force to the pads while cleaning. Excessive force
may bend the end effector.
3.
Once all residues have been removed, use dry cleanroom wipes to dry all surfaces.
Brooks Automation
Revision 2.2
MagnaTran 7.1 User’s Manual
MN-003-1600-00
Maintenance and Repair
O-Ring Removal/Replacement/Cleaning
O-Ring Removal/Replacement/Cleaning
All o-rings should be inspected periodically to ensure proper operation. Occasionally
o-rings will need to be cleaned (if contaminated with particulates) or replaced (if damaged).
CAUTION
To maintain the extreme cleanliness achieved at the factory, wear
gloves when handling any of the MagnaTran 7 components that will
enter the vacuum environment.
Required Tools
•
Brass or plastic pick
•
Isopropyl Alcohol (100%)
•
DI Water
•
Krytox LVP Vacuum Grease
Procedure Strategy
The o-ring replacement procedure requires removal of the existing o-ring, inspection
of the seal area, repair of the seal area if necessary, inspection of the o-ring, and
replacement of the o-ring if necessary.
Removal Procedure
1.
Using the pick, pry the old o-ring out of the o-ring groove starting at the plunge
hole. Once a section of the o-ring is free of the groove, gently remove the rest
of the o-ring by hand, being careful not to damage or scratch the o-ring or the
seal area.
CAUTION
Use only a tool made of brass, plastic, or similar soft material.
The o-ring groove is aluminum and EXTREMELY sensitive to
ANY small scratches left in the surface.
Brooks Automation
Revision 2.2
9-17
Maintenance and Repair
O-Ring Removal/Replacement/Cleaning
MagnaTran 7.1 User’s Manual
MN-003-1600-00
Replacement/Cleaning Procedure
1.
Clean the o-ring seal surface and the o-ring groove with isopropyl alcohol,
refer to Robot Cleaning Procedure on page 9-13.
2.
Clean the o-ring with DI water prior to installation in the system.
CAUTION
Clean the o-ring by wiping down with DI water only. Do not use
alcohol or other solvents as they may cause the o-ring to become brittle.
3.
Lightly lubricate the o-ring using Krytox LVP grease (there should be no
“lumps” of grease on the o-ring).
4.
Install the o-ring in the groove provided. The o-ring groove is a dove-tail slot
with the narrow portion of the slot at the top. The o-ring has to be compressed
in order for it to be placed into the groove.
NOTE: Do not allow the o-ring to twist during installation.
The easiest method for placing the o-ring in the groove is:
9-18
1.
Insert a small portion of the O-ring into the groove at opposite ends of
the ring.
2.
Insert a small portion of the o-ring into the groove at 90° from the points
above.
3.
Press the o-ring into the groove evenly in each 90° segment. Do not
stretch the o-ring to prevent excessive looping as the balance of the o-
Brooks Automation
Revision 2.2
MagnaTran 7.1 User’s Manual
MN-003-1600-00
Maintenance and Repair
O-Ring Removal/Replacement/Cleaning
ring is inserted.
5.
In applications where the exposed surface of the o-ring will be exposed to
atmosphere after installation (doors, lids, etc.) the exposed surface of the o-ring
must be wiped down with DI water to remove any traces of the vacuum grease.
Brooks Automation
Revision 2.2
9-19
Maintenance and Repair
End Effector Alignment
MagnaTran 7.1 User’s Manual
MN-003-1600-00
End Effector Alignment
Perform the following procedures to check the end effector:
9-20
1.
Verifying Flatness of Robot’s End Effector on page 7-5 and
2.
Adjusting the Robot’s End Effector on page 7-7.
Brooks Automation
Revision 2.2
MagnaTran 7.1 User’s Manual
MN-003-1600-00
Maintenance and Repair
Power Pak Maintenance
Power Pak Maintenance
Replace the Power Pak using the following procedure:
Power Pak Replacement on page 9-63.
Brooks Automation
Revision 2.2
9-21
Maintenance and Repair
Repair Philosophy
MagnaTran 7.1 User’s Manual
MN-003-1600-00
Repair Philosophy
If a MagnaTran 7 malfunctions, refer to Chapter 10: Troubleshooting in this manual for
diagnostic procedures. If these procedures are not adequate to determine the source
of the problem, refer to the MagnaTran 7 operational descriptions in Chapter 4: Subsystems for in-depth descriptions of the various subsystems of the robot. Once the
failed unit or part has been identified it can be removed from the MagnaTran 7. Refer
to the Repair Procedures section in this chapter for basic removal/replacement procedures.
A number of alternatives are available for obtaining replacement FRUs, IRCs, and
other parts to repair the MagnaTran 7. The following replacement parts options are
available for the MagnaTran 7:
•
Facilitated Field Repair (using Field Replaceable Units)
•
Depot Field Repair (using Individual Component Level Parts)
•
Brooks’ Priority Parts Service (PPS)
•
Preventive Maintenance (PM) Parts
•
Brooks’ Factory Repair Services
•
Finally, if MagnaTran 7 downtime is not critical, individual replacement parts
can be ordered from Brooks Customer Support (978) 262-2900, as required.
The difference between each of these approaches is how much time, on average, is
required to diagnose and repair the MagnaTran 7. A description of each option follows.
Facilitated Field Repair
The Facilitated Field Repair approach offers the fastest way to fix a hardware problem
in the field through the use of Field Replaceable Units (FRUs). The Field Replaceable
Units are designed to enable a trained technician to remove and replace the FRU. The
FRUs are designed to keep MTTR and, therefore, MagnaTran 7 downtime to a minimum.
A series of FRUs has been identified for the MagnaTran 7 to reduce Mean Time To
Repair (MTTR) and to simplify repair procedures in the field. Some of these FRUs
may comprise a complete assembly, such as the Electronics Enclosure for the MagnaTran 7.
NOTE: Maintenance training classes on how to trouble-shoot and repair a MagnaTran 7
9-22
Brooks Automation
Revision 2.2
MagnaTran 7.1 User’s Manual
MN-003-1600-00
Maintenance and Repair
Repair Philosophy
to an FRU level are available from Brooks Automation at the Chelmsford, Ma. facility. Contact Brooks Automation for information about these classes.
Depot Field Repair
The next fastest way to repair a MagnaTran 7 is the Depot Field Repair approach. This
option assumes that the MagnaTran 7 or a specific FRU can be removed from the system in which it is installed and repaired to an Individual Component Level (ICL) at
the user’s repair facility. Parts are available to enable the FRUs to be repaired to an
Individual Component Level (ICL) in the field by a trained technician.
NOTE: Maintenance training classes on how to trouble-shoot and repair a MagnaTran 7
to the “Depot Field Repair” level are available from Brooks Automation at the
Chelmsford, Ma. facility. Contact Brooks Automation for information about these
classes.
Priority Parts Service
The next fastest approach is to obtain the appropriate FRU through Brooks Automation’s Priority Part Service (PPS). PPS provides overnight shipment of parts directly
from Brooks Chelmsford, Ma. facility.
Brooks Factory Repair Services
The fourth alternative assumes that the failed FRU can be removed from the MagnaTran 7. Once the failed FRU has been removed it can be returned to Brooks for diagnosis and factory repair.
Two alternatives are available for factory repair:
•
The Expedited Repair Services provides a typical one-week repair turnaround
for repair of the failed FRU from receipt of the FRU at Brooks Automation.
•
The Standard Repair Service provides a typical four-week repair turnaround
for repair of the failed FRU from receipt of the FRU at Brooks Automation.
Brooks Automation
Revision 2.2
9-23
Maintenance and Repair
Repair Procedures
MagnaTran 7.1 User’s Manual
MN-003-1600-00
Repair Procedures
The following set of repair/replacement procedures will provide the information
required for standard user servicing of the Brooks Automation MagnaTran 7 Robot.
If additional procedures are required during the performance of any procedure they
will be specified.
Procedure Title
9-24
Page #
Robot Removal/Replacement
9-25
Arm Removal/Replacement
9-27
End Effector Replacement
9-29
End Effector Pad Removal/Replacement
9-32
Robot Calibration Procedure
9-36
Personality Board Replacement
9-37
Wrist Band Adjustment
9-39
T1/T2 Axis Driver Board Replacement
9-41
Z-Driver Board Replacement
9-43
Z Encoder Replacement
9-45
I/O Board Replacement
9-48
Z Home Flag Sensor Board Replacement Procedure
9-50
Z Hard Stop and Overtravel Limit Switch Adjustment
9-53
Fuse Replacement
9-56
PC 104 CPU Board Replacement
9-58
Power Pak Replacement
9-63
Encoder Setup
9-66
Motor Electrical Phase Calibration
9-69
Restore the Home Position to the Factory Settings
9-71
Reset the Home Position to the User Preference
9-73
Reset Stations When the Home Position is Reset
9-75
Resetting Mount Position
9-76
Uploading and Downloading Station Values
9-77
Control/Display Module Resetting
9-81
Firmware Upgrade
9-83
Brooks Automation
Revision 2.2
MagnaTran 7.1 User’s Manual
MN-003-1600-00
Maintenance and Repair
Robot Removal/Replacement
Robot Removal/Replacement
The MagnaTran 7 Robot may be easily removed for servicing. This allows complete
access to all robot subsystems without having to work within the confined spaces of
the system.
NOTE: It is not necessary to remove the robot to perform any repair procedures.
Required Tools
Performing the Robot Removal/Replacement procedure requires the following tools:
•
A set of Allen wrenches in metric sizes
•
Adjustable lift or hoist (depending upon robot mounting style)
Removal/Replacement Procedure
1.
If this procedure is being used to replace a MagnaTran 7 with a MagnaTran 7
robot in the same cluster tool, all station values from the old robot can be easily
loaded into the new robot. See Uploading and Downloading Station Values on
page 9-77 for this procedure.
WARNING
When equipment is off and power is secured per facilities lockout/
tagout procedure, the unit is classified as a Type 1 hazard category.
See Chapter 2: Safety Table 2-1.
2.
Disconnect the power and communications connections to the robot.
DANGER
All power to the unit must be disconnected per the facilities’ lockout/
tagout procedure before servicing to prevent the risk of electrical
shock.
3.
Remove the arms from the robot as described in the following procedure.
Brooks Automation
Revision 2.2
9-25
Maintenance and Repair
Robot Removal/Replacement
MagnaTran 7.1 User’s Manual
MN-003-1600-00
Top Mount
1.
Attach the lifting eye-bolts to the robot’s mounting collar.
2.
Attach a hoist to the lifting bolts.
HEAVY LIFTING
Ergonomic Hazard - The MagnaTran 7 Drive weighs 29.5 kg (65 lbs.) 3
axis or 21 kg (46.5 lbs.) 2 axis. Failure to take the proper precautions
before moving it could result in personal injury.
3.
Unscrew the twelve captive M6 mounting bolts from the chamber, do
not remove the mounting bolts from the robot’s mounting collar, and
raise the robot body.
To install the MagnaTran 7 robot, reverse the preceding steps. Be sure that the alignment pins are properly aligned before seating and bolting the robot’s mounting collar.
Tighten all mounting bolts until the lock washers are fully seated, then tighten the
bolts an additional 1/4 turn.
9-26
Brooks Automation
Revision 2.2
MagnaTran 7.1 User’s Manual
MN-003-1600-00
Maintenance and Repair
Arm Removal/Replacement
Arm Removal/Replacement
The MagnaTran 7 arms may be removed for servicing or replacement with a different
style arm and re-taught all stations. If the arms are being replaced with the same
type of arm set that was removed, no re-homing or re-teaching is required.
Required Tools and Materials
Performing the Arm Removal/Replacement procedure requires the following tools:
•
A set of Allen wrenches in metric sizes
•
Red Arm Mounting Bracket
Removal/Replacement Procedure
WARNING
When equipment is energized, live circuits covered, and work performed remotely, the robot is at a Type 2 hazard category. See Electrical Hazards on page 2-7.
WARNING
Failure to ensure that the robot is not under remote control could
result in automatic operation of the robot resulting in personal injury.
1.
Ensure the arm state of the robot is on.
Serial: Issue the following command: SET ARMS ON
CDM: Use the following path: SETUP/CONFIG ROBOT/ARM STATE/ARE
THE ARMS CURRENTLY ON?/YES
2.
Move the robot to the mount position.
Serial: Issue the following command: MOUNT
CDM: Use the following path: SETUP/CONFIG ROBOT/ARM MOUNT/
ARE THE ARMS CURRENTLY ON?/YES
3.
Disengage the robot servos.
Brooks Automation
Revision 2.2
9-27
Maintenance and Repair
Arm Removal/Replacement
MagnaTran 7.1 User’s Manual
MN-003-1600-00
Serial: Issue the following command: SET SERVOS OFF
CDM: Use the following path: SETUP/CONFIG ROBOT/SET SERVOS OFF
4.
Install the arm mounting fixture.
5.
Loosen the T1 (outer shaft) screws. Loosen the T2 (inner shaft) screws. If these
screws do not readily unbolt, provide a small amount of play to the arms by
slightly loosening the two black knobs of the arm mounting fixture.
Mag 7.1 LeapFrog arms: T1 has 3 screws/T2 has 2 screws.
Mag 7.1 BiSymmetrik arms: T1 has 4 screws/T2 has 2 screws.
Mag 6 arms: remove M4 SHCS 12 places.
6.
Using the mounting fixture, remove the arms from the robot T1/T2 shafts. To
avoid possible damage to the arm set, do not lift on the arms.
7.
Set the arm state to off.
Serial: Issue the following command: SET ARMS OFF.
CDM: Use the following path: SETUP/CONFIG ROBOT/ARM STATE/ARE
THE ARMS CURRENTLY ON?/NO.
8.
Re-engage the servos.
Serial: Issue the following command: HOME ALL.
CDM: Use the following path: HOME/ALL.
To install the arms, use the Mount Arm procedures in Chapter 3: Installation for installation of the appropriate arm set.
9-28
Brooks Automation
Revision 2.2
MagnaTran 7.1 User’s Manual
MN-003-1600-00
Maintenance and Repair
End Effector Replacement
End Effector Replacement
This procedure indicates the proper method for installing and adjusting the end effector on the robot arms.
Required Tools
Performing the end effector replacement procedure requires the following tools:
•
A set of Allen wrenches in metric sizes
Replacement Procedure
WARNING
When equipment is energized, live circuits covered, and work performed remotely, the robot is at a Type 2 hazard category. See Electrical Hazards on page 2-7.
WARNING
Failure to ensure that the robot is not under remote control could
result in automatic operation of the robot resulting in personal injury.
Removal
1.
Loosen, but do not remove, the 4 in-line flathead screws used to secure the end
effector in the robot wrist. Do not loosen the end effector adjustment hardware
unless necessary.
2.
Slide the end effector out of the mounting plate.
Replacement
1.
Carefully slide the end effector between the mounting plate and clamping
plate. Refer to Figure 9-1 shows both types of End Effector Installation available with the MagnaTran 7.
NOTE: Do not disturb the flatness of the end effector during installation. Ensure that the
end effector is centered and fully seated against the wrist mounting plate.
Brooks Automation
Revision 2.2
9-29
Maintenance and Repair
End Effector Replacement
9-30
MagnaTran 7.1 User’s Manual
MN-003-1600-00
2.
While holding the end effector in place, tighten the 4 in-line flathead screws,
starting with the 2 inside screws. (Do not tighten the single flathead screw; it
is for adjustment only).
3.
Verify the levelness of the end effector following the procedure Adjusting the
Robot’s End Effector on page 7-7.
Brooks Automation
Revision 2.2
MagnaTran 7.1 User’s Manual
MN-003-1600-00
Wrist Mounting Plate
Maintenance and Repair
End Effector Replacement
Pan Mounting Plate (bottom side)
Installation Screws,
flathead,
4 places
Wrist Plate
Mounting Plate
Installation Screws,
flathead,
4 places
Clamping Plate
Figure 9-1: End Effector Mounting Hardware
Brooks Automation
Revision 2.2
9-31
Maintenance and Repair
End Effector Pad Removal/Replacement
MagnaTran 7.1 User’s Manual
MN-003-1600-00
End Effector Pad Removal/Replacement
The wafer supports may need to be replaced if they show significant wear or if they
are damaged. Depending upon the application the MagnaTran 7 Robot is being used
in the End Effector may use either grommet style or adhesive backed wafer supports.
This procedure provides directions for replacing both types of supports.
Required Tools
Performing the Wafer Support Removal/Replacement procedure requires the following tools:
•
A set of Allen wrenches in metric sizes
•
A Philips head screw driver.
Removal/Replacement Procedure
WARNING
When equipment is energized, live circuits covered, and work performed remotely, the robot is at a Type 2 hazard category. See Electrical Hazards on page 2-7.
WARNING
Failure to ensure that the robot is not under remote control could
result in automatic operation of the robot resulting in personal injury.
Refer to Figure 9-2 and follow the directions below for the appropriate type of end
effector Pad being replaced.
9-32
Brooks Automation
Revision 2.2
MagnaTran 7.1 User’s Manual
MN-003-1600-00
Maintenance and Repair
End Effector Pad Removal/Replacement
Wafer Support
Figure 9-2: Wafer Support Removal
End Effector Pad Replacement
Repeated wafer transfers will eventually wear away the friction pads. In time, the surface of the wafer may touch the surface of the End Effector resulting in abrasion and
particle generation. To prevent this abrasion of the wafer surface periodic replacement of the pads according to the maintenance schedule is recommended.
There are three different styles of end effector pads used on MagnaTran robots: metal
pins, grommet style, and adhesive backed. The metal pins do not require any regular
service. The grommet style require replacement every 50,000 (if silicone) or 100,000 (if
urethane) cycles. The adhesive backed pads require replacement every 100,000 cycles.
Part numbers for these pads may be found in the tables below:
Table 9-2: Grommet Style Pads
Color
Brooks Automation
Revision 2.2
Description
Part #
Clear
55 Durometer Urethane
001-0929-01
Blue
65 Durometer Urethane
001-0929-02
9-33
Maintenance and Repair
End Effector Pad Removal/Replacement
MagnaTran 7.1 User’s Manual
MN-003-1600-00
Table 9-2: Grommet Style Pads
Color
Description
Green
Part #
75 Durometer Urethane
001-0929-03
Red
55 Durometer Silicone
001-0929-04
Black
65 Durometer Silicone
001-0929-05
Blue-Green
75 Durometer Silicone
001-0929-06
Table 9-3: Adhesive Backed Pads
Diameter
Thickness
Part #
0.25 in.
0.006 in.
000-5281-01
0.25 in.
0.012 in.
000-5281-02
0.13 in.
0.006 in.
000-5281-03
0.13 in.
0.012 in.
000-5281-04
NOTE: Part numbers provided in the pad replacement tables are for 1 piece. Most end effectors require 3 pads.
Grommet Style Pad Replacement
Replacing the pads requires no special tools or materials. They are press fit by hand
into holes in the end effector. When installing a new pad, note that one side has a
molding burr on it. This burr must face down (away from the wafer).
Be sure to orient the pad as shown in the figure so that the molding burr is on the bottom of the end effector where it will not interfere with wafer handling.
9-34
Brooks Automation
Revision 2.2
MagnaTran 7.1 User’s Manual
MN-003-1600-00
Maintenance and Repair
End Effector Pad Removal/Replacement
Figure 9-3: End Effector Pad Grommet Style
Adhesive Backed Pad Replacement
The adhesive backed pads may be pulled from the end effector, and the metal surface
cleaned with ethanol or isopropyl alcohol. Carefully remove the backing from the
new pads and install in the same location on the end effector.
Brooks Automation
Revision 2.2
9-35
Maintenance and Repair
Robot Calibration Procedure
MagnaTran 7.1 User’s Manual
MN-003-1600-00
Robot Calibration Procedure
All calibration on the robot is performed at Brooks Automation by trained personnel.
The following procedure is used to calibrate the MagnaTran 7 on Brooks Technical
Support recommendation only.
CAUTION
The following commands are NOT used in the initial set up or the normal operation of the robot. These commands are used in repair operation only.
Brooks Automation recommends contacting Brooks Technical
Support before beginning this procedure.
Required Tools and Test Equipment
Performing this procedure does not require any tools.
Setup Strategy
This procedure will calibrate the robot. All current values will be reset.
Read all procedures before beginning.
Calibration Procedure
WARNING
When equipment is energized, live circuits covered, and work performed remotely, the robot is at a Type 2 hazard category. See Electrical Hazards on page 2-7.
Perform the following procedures in the presented order:
9-36
1.
Encoder Setup on page 9-66
2.
Motor Electrical Phase Calibration on page 9-69
3.
Reset the Home Position to the User Preference on page 9-73
4.
Z Hard Stop and Overtravel Limit Switch Adjustment on page 9-53
5.
Resetting Mount Position on page 9-76
Brooks Automation
Revision 2.2
MagnaTran 7.1 User’s Manual
MN-003-1600-00
Maintenance and Repair
Personality Board Replacement
Personality Board Replacement
NOTE: It is not necessary to remove the robot to perform this repair procedure.
Required Tools
Performing the Personality board replacement procedure requires the following
tools:
•
Medium flat head screwdriver
•
M3 hex wrench
Removal Procedure
WARNING
When equipment is off and power is secured per facilities lockout/
tagout procedure, the unit is classified as a Type 1 hazard category.
See Chapter 2: Safety Table 2-1.
1.
Turn off power to the robot and disconnect the power and communications
connections to the robot.
DANGER
All power to the unit must be disconnected per the facilities’ lockout/
tagout procedure before servicing to prevent the risk of electrical
shock.
2.
Remove the protective covers as shown in Figure 12-2.
CAUTION
Observe proper ESD precautions when handling any electronic
device.
3.
Remove the Lower Cover Mount Assembly.
Loosen the lower captive screws of the I/O board. Loosen the three upper cap-
Brooks Automation
Revision 2.2
9-37
Maintenance and Repair
Personality Board Replacement
MagnaTran 7.1 User’s Manual
MN-003-1600-00
tive screws of the Lower Cover Mount Assembly. See Figure 12-4. Gently allow
the Lower Cover Mount Assembly to drop down.
4.
Disconnect the following cables from the Personality printed circuit board:
T1 encoder (J1), T2 encoder (J2), Z encoder (J4), (J3) not used.
5.
Remove 4 M3 x 14mm SHCS with M3 split and flat washer that secure the
board (4 places). See Figure 12-7.
6.
Unplug the T1, T2 Driver board, the I/O board, and the Z Driver board from
the Personality board.
7.
The PC 104 CPU Board is connected to the Personality Board. Remove the PC
104 Board by removing the 4-40 nut, lock and flat (4 places) and then gently lifting the board off of the header pins.
Replacement Procedure
1.
Connect the PC 104 Board to the new Personality Board. Replace the nuts,
locks and flats (4 places).
Important: The PC104 Card contains all the operating parameters of the robot such as
station teach values, encoder values, home position, etc. Thus, by using the original
PC104 Card, all this information will be retained in the robot.
9-38
2.
Verify Switch 1 (S1) is in the same position as replaced board; up for RS-232 or
down for RS-422.
3.
Plug into the circuit boards:
T1, T2 Axis Driver Board (J3) to Personality Board (P2)
Z Axis Driver Board (P1) to Personality Board (J7)
I/O Board to Personality Board (P3)
4.
Replace the screws, locks and flats.
5.
Connect the cables. Route the Z axis encoder cable under the circuit board.
6.
Replace the Lower Cover Mount Assembly.
7.
Install the robot protective covers.
8.
Connect all cables to the robot.
9.
Apply power to the robot.
This completes the Personality Board replacement procedure.
Brooks Automation
Revision 2.2
MagnaTran 7.1 User’s Manual
MN-003-1600-00
Maintenance and Repair
Wrist Band Adjustment
Wrist Band Adjustment
TOOLS:
•
Small Phillips head screwdriver.
•
Force gauge (.5 in/lbs. resolution)
•
Dial Caliper or small 6” scale (1/16” resolution)
PROCEDURE:
1.
Measure the wrist band thickness as shown in Figure 9-4. Use a small scale or
dial caliper to determine the proper specification from Band Size Table.
CAUTION
While measuring the wrist bands, use caution so as not to nick or
scratch the wrist bands.
Table 9-4: Band Size
Band Size
Brooks Automation
Revision 2.2
Specification
1/8”
1.5-3.0 in/lbs.
3/16”
3.0-4.5 in/lbs.
1/4”
3.5-5.0 in/lbs.
9-39
Maintenance and Repair
Wrist Band Adjustment
MagnaTran 7.1 User’s Manual
MN-003-1600-00
Figure 9-4: Arm Assembly Side View
2.
Apply the plunger extension of the force gauge onto the tab located next to the
spring loaded screw as shown in Figure 9-5. As soon as the tab moves slightly
inward observe the force gauge reading.
If the force gauge reads less than specified in Table 9-4, adjust the spring
loaded screw clockwise 1/8 to 1/4 turn at a time. Repeat step 2 of this procedure.
If the force gauge reads greater than specified amount adjust the spring loaded screw
counter clock-wise 1/8 to 1/4 turns at a time. Repeat step 2 of this procedure.
Force Gauge
Figure 9-5: Arm Assembly Top View
9-40
Brooks Automation
Revision 2.2
MagnaTran 7.1 User’s Manual
MN-003-1600-00
Maintenance and Repair
T1/T2 Axis Driver Board Replacement
T1/T2 Axis Driver Board Replacement
NOTE: It is not necessary to remove the robot to perform this repair procedure.
Required Tools
Performing the T1/T2 board replacement procedure requires the following tools:
•
Medium flat head screwdriver
•
M3 hex wrench
Removal Procedure
WARNING
When equipment is off and power is secured per facilities lockout/
tagout procedure, the unit is classified as a Type 1 hazard category.
See Chapter 2: Safety Table 2-1.
1.
Turn off the robot and disconnect the power and communications connections
to the robot.
DANGER
All power to the unit must be disconnected per the facilities’ lockout/
tagout procedure before servicing to prevent the risk of electrical
shock.
2.
Remove the protective covers as shown in Figure 12-2.
CAUTION
Observe proper ESD precautions when handling any electronic
device.
3.
Remove the Lower Cover Mount Assembly.
Loosen the lower captive screw of the I/O board. Loosen the three upper cap-
Brooks Automation
Revision 2.2
9-41
Maintenance and Repair
T1/T2 Axis Driver Board Replacement
MagnaTran 7.1 User’s Manual
MN-003-1600-00
tive screws of the Lower Cover Mount Assembly. See Figure 12-4. Gently allow
the Lower Cover Mount Assembly to drop down.
4.
Disconnect the following cables from the T1/T2 printed circuit board: fan (P1),
T1 motor (P5), T2 motor (P6), +24V IN (P3), and Z Axis Driver Board (P4).
5.
Remove the M3 x 14mm SHCS with M3 flat and lock washer (4 places) that
mount the T1/T2 driver board to the bottom of the PCB Mounting Bracket. See
Figure 12-4.
6.
Disconnect the T1/T2 driver board from the Personality board.
Replacement Procedure
1.
Connect the T1/T2 Board to the Personality Board (P2).
2.
Install the T1/T2 Board using the M3 SHCS with locks and flats (4 places).
3.
Connect the cables.
4.
Replace the Lower Cover Mount Assembly.
5.
Install the robot protective covers.
6.
Connect the robot power cable and communication cables.
7.
Apply power to the robot.
This completes the T1/T2 Axis Driver Board replacement procedure.
9-42
Brooks Automation
Revision 2.2
MagnaTran 7.1 User’s Manual
MN-003-1600-00
Maintenance and Repair
Z-Driver Board Replacement
Z-Driver Board Replacement
NOTE: It is not necessary to remove the robot to perform this repair procedure.
Required Tools
Performing the Z-Driver Board replacement procedure requires the following tools:
•
Medium flat head screwdriver
•
M3 hex wrench
Removal Procedure
WARNING
When equipment is off and power is secured per facilities lockout/
tagout procedure, the unit is classified as a Type 1 hazard category.
See Chapter 2: Safety Table 2-1.
1.
Turn off power to the robot and disconnect the power and communications
connections to the robot.
DANGER
All power to the unit must be disconnected per the facilities’ lockout/
tagout procedure before servicing to prevent the risk of electrical
shock.
2.
Remove the protective covers as shown in Figure 12-2.
CAUTION
Observe proper ESD precautions when handling any electronic
device.
3.
Remove the Lower Cover Mount Assembly.
Loosen the lower captive screw of the I/O board. Loosen the three upper cap-
Brooks Automation
Revision 2.2
9-43
Maintenance and Repair
Z-Driver Board Replacement
MagnaTran 7.1 User’s Manual
MN-003-1600-00
tive screws of the Lower Cover Mount Assembly. See Figure 12-4. Gently allow
the Lower Cover Mount Assembly to drop down.
4.
Disconnect the following cables from the Z-Driver printed circuit board: Z axis
motor drive (J4), Z axis motor Hall effects (P4), Z axis brake (J3), upper limit
switch (P2), lower limit switch (P3), Z home (P5) and T1, T2 board (J2).
5.
Loosen the captured screws (2 places) that mount the Z driver board on the
right side. Loosen the M3 hardware on the left side (2 places) and slide out the
Z-Driver board. See Figure 12-7.
6.
Disconnect the Z-Driver board from the Personality board.
Replacement Procedure
1.
Connect the Z-Driver Board (P1) to the Personality Board (J7).
2.
Slide the Z-Driver Board under the loosened hardware.
3.
Install the Z-Driver Board by securing all hardware (4 places).
4.
Connect the cables. Route the coil cable and Z drive cable around the circuit
board and all other cables over the circuit board between the circuit board and
Z Mounting Plate.
5.
Replace the Lower Cover Mount Assembly.
6.
Install the robot protective covers.
7.
Connect the robot power cable and communication cables.
8.
Apply power to the robot.
This completes the Z-Driver Board replacement procedure.
9-44
Brooks Automation
Revision 2.2
MagnaTran 7.1 User’s Manual
MN-003-1600-00
Maintenance and Repair
Z Encoder Replacement
Z Encoder Replacement
NOTE: It is not necessary to remove the robot to perform this repair procedure.
Required Tools
Performing the Z Board replacement procedure requires the following tools:
•
Medium phillips head screwdriver
•
Small flat head screwdriver
•
M3 hex wrench
•
Small Phillips head screwdriver
•
4-40 (3/32”) hex wrench
•
Loctite, removable strength, # 242
Removal Procedure
WARNING
When equipment is off and power is secured per facilities lockout/
tagout procedure, the unit is classified as a Type 1 hazard category.
See Chapter 2: Safety Table 2-1.
1.
Turn off power to the robot and disconnect the power and communications
connections to the robot.
DANGER
All power to the unit must be disconnected per the facilities’ lockout/
tagout procedure before servicing to prevent the risk of electrical
shock.
2.
Remove the protective covers as shown in Figure 12-2.
Brooks Automation
Revision 2.2
9-45
Maintenance and Repair
Z Encoder Replacement
MagnaTran 7.1 User’s Manual
MN-003-1600-00
CAUTION
Observe proper ESD precautions when handling any electronic
device.
3.
Reconnect robot power cable and CDM cable.
Power up robot.
4.
Using the CDM, jog the robot in Z direction so that the 4-40 x 3/16” SHCS (qty
2) that secure the Z encoder assembly collar to the Z leadscrew shaft are accessible. Brooks recommends positioning these 2 screws opposite the personality
PCB for best accessibility.
5.
Power down robot.
Disconnect robot power cable and cdm cable.
6.
Remove the theta driver PCB:
Disconnect the following cables from the theta driver PCB: fan (J1), I/O power
(J2-PWR), T1 motion (P1), T2 motion (P2), Z power (P4).
Remove the 4-M3 SHCS that mount theta driver PCB.
Disconnect theta driver PCB from the personality PCB.
7.
Disconnect the Z encoder cable from the personality PCB (J4).
Disconnect the Z encoder cable ground lead from the robot chassis.
8.
Remove the 4-40 x 3/16” SHCS (qty 2) that secure the Z encoder collar to the Z
leadscrew shaft.
Note: these 2 SHCS are secured with removable strength Loctite.
9-46
9.
Remove the Z encoder from its mounting flange by removing 3-M3 SHCS.
10.
Inspect the new Z encoder assembly. Ensure that the sheet metal mounting
flexure (has 3 large slots) does NOT sit on the center ring that protrudes from
the Z encoder housing. If it does, loosen 3 small black phillips head screws and
re-center the sheet metal mounting flexure around the center ring of the Z
encoder housing.
Brooks Automation
Revision 2.2
MagnaTran 7.1 User’s Manual
MN-003-1600-00
Maintenance and Repair
Z Encoder Replacement
11.
Secure the new Z encoder to the mounting flange using 3-M3 x 8mm SHCS, M3
lock washers, and M3 flat washers. Ensure Z encoder wires are facing the Z
driver PCB. Ensure that the screw holes (qty 2) located on the Z encoder collar
are positioned at the flats of the Z leadscrew shaft.
12.
Secure the Z encoder collar to the Z leadscrew shaft by installing and tightening 4-40 x 3/16” SHCS (qty 2) with 1 drop of removable strength Loctite #242.
13.
Connect the Z encoder cable to the personality PCB (J4).
Connect the ground lead to the robot chassis.
14.
Reinstall the Theta driver PCB using 4-M3 SHCS, M3 lock washers, and M3 flat
washers.
Reconnect the following cables: fan (J1), I/O power (J2-PWR), T1 motion (P1),
T2 motion (P2), Z power (P4).
15.
Reinstall the robot body covers.
16.
Reconnect the robot power cable, serial communication cable, CDM cable, and
dio cable as necessary.
17.
Power up robot.
18.
The Sync Phase of the Z drive must be re-calibrated. Follow the procedure
Motor Electrical Phase Calibration on page 9-69.
Brooks Automation
Revision 2.2
9-47
Maintenance and Repair
I/O Board Replacement
MagnaTran 7.1 User’s Manual
MN-003-1600-00
I/O Board Replacement
NOTE: It is not necessary to remove the robot to perform this repair procedure.
Required Tools
Performing the I/O board replacement procedure requires the following tools:
•
Medium flat head screwdriver
•
M3 hex wrench
Removal Procedure
WARNING
When equipment is off and power is secured per facilities lockout/
tagout procedure, the unit is classified as a Type 1 hazard category.
See Chapter 2: Safety Table 2-1.
1.
Turn off power and disconnect the power and communications connections to
the robot.
DANGER
All power to the unit must be disconnected per the facilities’ lockout/
tagout procedure before servicing to prevent the risk of electrical
shock.
2.
Remove the protective covers as shown in Figure 12-2.
CAUTION
Observe proper ESD precautions when handling any electronic
device.
3.
9-48
Loosen the thumbscrews (2 places) that mount the I/O board and panel cover
assembly to the Z Mounting Plate. See Figure 12-4.
Brooks Automation
Revision 2.2
MagnaTran 7.1 User’s Manual
MN-003-1600-00
Maintenance and Repair
I/O Board Replacement
4.
Disconnect the I/O board from the Personality Board.
5.
Remove the grounding lug from the chassis.
Replacement Procedure
1.
Plug in the I/O Board to the Personality Board (P3).
2.
Plug in J6 connector on the back of the board.
3.
Install the I/O board using the thumbscrews (2 places).
4.
Connect the cables from the Theta board to J4.
5.
Install the ground lug.
6.
Install the robot protective covers.
7.
Connect the robot power cable and serial communications cables.
8.
Apply power to the robot.
This completes the I/O Board replacement procedure.
Brooks Automation
Revision 2.2
9-49
Maintenance and Repair
Z Home Flag Sensor Board Replacement Procedure
MagnaTran 7.1 User’s Manual
MN-003-1600-00
Z Home Flag Sensor Board Replacement Procedure
NOTE: It is not necessary to remove the robot to perform this repair procedure.
Required Tools
Performing the I/O board replacement procedure requires the following tools:
•
Medium phillips head screwdriver
•
Small flat head screwdriver
•
M3 hex wrench
•
0.062” shims or feeler gauge (qty 2)
•
0.024” feeler gauge
•
0.040” feeler gauge
Removal Procedure
1.
Issue the command: HOME R T.
2.
Issue the command: SET SERVOS OFF.
3.
Install the arm mounting fixture to the armset, ensuring that the arms are symmetrical about the arm mounting fixture.
4.
Place two 0.062” shims between the uppermost plane of the robot top flange
and the armset forearms. Issue the commands: ZBRAKE OFF.
5.
Manually press the arm set down slowly (avoiding impact) so that the forearms touch the shims, effectively creating a 0.062” gap between the robot top
flange and the forearm.
WARNING
When equipment is off and power is secured per facilities lockout/
tagout procedure, the unit is classified as a Type 1 hazard category.
See Chapter 2: Safety Table 2-1.
9-50
Brooks Automation
Revision 2.2
MagnaTran 7.1 User’s Manual
MN-003-1600-00
6.
Maintenance and Repair
Z Home Flag Sensor Board Replacement Procedure
Turn off power and disconnect the power and communications connections to
the robot.
DANGER
All power to the unit must be disconnected per the facilities’ lockout/
tagout procedure before servicing to prevent the risk of electrical
shock.
7.
Remove the protective covers as shown in Figure 12-2.
CAUTION
Observe proper ESD precautions when handling any electronic
device.
8.
Disconnect the single cable to the Z home sensor PCB (P14).
9.
Remove the Z home sensor PCB by removing the 2-M3 SHCS.
10.
Loosely install the new z home sensor PCB using 2-M3 SHCS, M3 lock washers, and M3 flat washers.
11.
Connect the single cable to the z home sensor PCB (P14).
12.
Ensure that the robot power cable and cdm cable are connected to the robot.
13.
Power up the robot. Caution: the arm mounting fixture is installed...Do NOT
move the arms.
14.
Manually position the Z home sensor PCB side to side, ensuring that the Z
home flag runs through the center of the black sensor. Manually position the
Z home sensor PCB up and down until its red LED (+CR3) JUST turns on.
Carefully tighten the Z home sensor PCB...ensuring that the PCB does not
move during tightening. Note that both the Z home sensor PCB and the Z
home flag are slotted for adjustment.
15.
Remove the 0.062” shims from under the armset forearms. If necessary, issue
the following commands: SET SERVOS OFF and ZBRAKE OFF to release both
the servos and zbrake so that the operator can manually lift the T1/T2 motor
housing assembly to remove the shims.
Brooks Automation
Revision 2.2
9-51
Maintenance and Repair
Z Home Flag Sensor Board Replacement Procedure
MagnaTran 7.1 User’s Manual
MN-003-1600-00
WARNING
Warning: Do not lift the robot upward by the armset. Armset damage
will occur. Only lift the T1/T2 motor housing assembly from below.
16.
Remove the arm mounting fixture from the armset and issue the following
command: HOME ALL. Verify that the distance between the uppermost plane
of the robot top flange and the armset forearms is 0.062”. If not, repeat the procedure.
NOTE: IMPORTANT: The following robot settings are dependent upon a properly set
home position:
•
With the robot in the home position, use gap feeler gauges to verify that the following dimensions have been maintained:
0.024” (0.6mm) between the Z lower microswitch and the z lower microswitch
flag.
0.040” (1.0 mm) between the Z lower hard stops (qty 2) and the bottom of the
robot T1/T2 motor assembly.
If these dimensions are not correct, see Z Hard Stop and Overtravel Limit
Switch Adjustment on page 9-53.
•
Move the arms to the maximum Z height by issuing the command:
MOVE Z ABS [position value], where [position value] is in microns (meters x
10-6). The maximum Z height may vary pending user’s needs. To determine
the maximum Z travel of the robot by issuing the command: RQ ARMS ALL.
The maximum Z travel for the robot will be provided in the miscellaneous arm
data in the following example format: “total z travel........0.035000”. Dimensions are given in meters.
•
With the robot in the maximum Z position, use either shims or gap feeler
gauges to verify the following dimensions have been maintained:
0.024” (0.6mm) between the Z upper microswitch and the z upper microswitch
flag.
0.040” (1.0 mm) between the Z upper hard stops (qty 2) and the top of the robot
T1/T2 motor assembly.
If these dimensions are not correct, see Z Hard Stop and Overtravel Limit
Switch Adjustment on page 9-53.
Procedure complete.
9-52
Brooks Automation
Revision 2.2
MagnaTran 7.1 User’s Manual
MN-003-1600-00
Maintenance and Repair
Z Hard Stop and Overtravel Limit Switch Adjustment
Z Hard Stop and Overtravel Limit Switch Adjustment
The following procedure is used when the Z Home position is reset. This procedure
adjusts the Z hard stops and the Z microswitch to the new Z Home position.
NOTE: It is not necessary to remove the robot to perform this repair procedure.
1.
Turn off power to the robot and disconnect the power and communications
connections to the robot.
2.
Remove the protective covers as shown in Figure 12-2.
CAUTION
Observe proper ESD precautions when handling any electronic
device.
3.
Reconnect robot power cable and CDM or serial communications cable.
Power up robot.
4.
Establish communications with the robot with the CDM or serial port.
WARNING
When equipment is energized and live circuits are uncovered, the
robot is at a Type 3 hazard category. See Electrical Hazards on page 27.
Brooks Automation
Revision 2.2
9-53
Maintenance and Repair
Z Hard Stop and Overtravel Limit Switch Adjustment
MagnaTran 7.1 User’s Manual
MN-003-1600-00
Lower microswitch:
Issue the following command: HOME ALL.
Adjust the Z Travel Lower Adjustment bolt to create a 0.024” (0.6mm) gap between
the Z Lower microswitch activation point (clicking sound) and the bolt as shown in
Figure 9-6. See Appendix B: Tooling on page 11-3 for gap setting fixture.
Z Travel Lower Adjustment
.024 in/0.6mm
Lower Limit Switch
.040 in/1.0mm
T2 Motor Housing
Lower Hard Stop (2 places)
Figure 9-6: Lower Overtravel Adjustment
Lower hard stop:
Issue the following command: HOME ALL.
Adjust the lower hard stop to create a 0.040” (1.0mm) gap between the Z lower hard
stop (2 places) and the bottom of the T2 motor housing. Do not over-adjust.
9-54
Brooks Automation
Revision 2.2
MagnaTran 7.1 User’s Manual
MN-003-1600-00
Maintenance and Repair
Z Hard Stop and Overtravel Limit Switch Adjustment
Upper microswitch
Move the robot to its maximum Z up position.
Adjust the Z Travel Upper Adjustment bolt to create a 0.024” (0.6mm) gap between
the Z Upper microswitch activation point (clicking sound) and the bolt as shown in
Figure 9-7. See Appendix B: Tooling on page 11-3 for gap setting fixture.
Upper Hard Stop
(2 places)
.040 in/1.0mm
T1 Motor Housing
.024 in/0.6mm
Upper Limit Switch
Z Travel Upper Adjustment
Figure 9-7: Upper Overtravel Adjustment
Upper hard stop:
Move the robot to its maximum Z up position.
Adjust the upper hard stop to create a 0.040” (1.0mm) gap between the Z upper hard
stop (2 places) and the top of the T1 motor housing.
Brooks Automation
Revision 2.2
9-55
Maintenance and Repair
Fuse Replacement
MagnaTran 7.1 User’s Manual
MN-003-1600-00
Fuse Replacement
NOTE: It is not necessary to remove the robot to perform this repair procedure.
Required Tools
Performing the fuse replacement procedure requires the following tools:
•
Medium phillips head screwdriver
•
Medium flat head screwdriver
•
M3 hex wrench
Removal Procedure
WARNING
When equipment is off and power is secured per facilities lockout/
tagout procedure, the unit is classified as a Type 1 hazard category.
See Chapter 2: Safety Table 2-1.
1.
Turn off power and disconnect the power and communications connections to
the robot.
DANGER
All power to the unit must be disconnected per the facilities’ lockout/
tagout procedure before servicing to prevent the risk of electrical
shock.
2.
Remove the protective covers as shown in Figure 12-2.
CAUTION
Observe proper ESD precautions when handling any electronic
device.
3.
9-56
Remove the Lower Cover Mount Assembly.
Brooks Automation
Revision 2.2
MagnaTran 7.1 User’s Manual
MN-003-1600-00
Maintenance and Repair
Fuse Replacement
Loosen the lower captive screw of the I/O board. Loosen the three upper captive screws of the Lower Cover Mount Assembly. See Figure 12-4. Gently allow
the Lower Cover Mount Assembly to drop down.
4.
Visually inspect each of the fuses located on the Theta driver board. Reference
the table below for the board designations of the fuses.
5.
Replace any blown fuses. Reference the table below for the fuse amperage and
Brooks part number.
NOTE: If a fuse cannot be identified as operational or blown by visual inspection, red
LED’s are located on the theta driver board that illuminate only when their respective fuses are operational. Reference the table below for the locations of the red
LED’s. If necessary, reconnect robot power and visually inspect the red LED’s for
illumination.
6.
Visually inspect the entire robot board set, frame, and interconnecting cables
for any short circuits. That is, a circuit board shorting against a frame member,
a screw shorting against a circuit board, a frayed or broken cable, etc.
7.
Reinstall the Lower Cover Mount Assembly.
8.
Reinstall the two robot covers via the four captive screws.
9.
Connect all power and communication cables from the robot I/O face plate.
10.
Turn on robot power.
The following table indicates the function, part number, location, and amperage of the
3 replaceable fuses on the Magnatran 7 robot. A red LED is linked to each fuse. When
a fuse blows, the respective red LED will not illuminate.
Table 9-5: Theta Board Fuse Functions
Main
Function
Board
Designation
LED
Designation
Main Power
(CPU)
F3
DS7
5 Amps
430-0003-10
T1 Motor
F4
DS8
10 Amps
430-0003-09
T2 Motor
F6
DS10
10 Amps
430-0003-09
Z Motor
F5
DS9
10 Amps
430-0003-09
Brooks Automation
Revision 2.2
Amperage
Brooks Part
Number
9-57
Maintenance and Repair
PC 104 CPU Board Replacement
MagnaTran 7.1 User’s Manual
MN-003-1600-00
PC 104 CPU Board Replacement
NOTE: It is not necessary to remove the robot to perform this repair procedure.
Required Tools and Test Equipment
•
7/32” nut driver
•
Laptop computer with ProComm or equivalent
•
Small flat head screwdriver
•
Medium phillips head screwdriver
Removal Procedure
1.
Connect the laptop to the robot via the serial communications port.
2.
Retrieve present calibration parameters, firmware version, and configuration
number by opening a log file and entering the following commands:
RQ CONFIG (ensure the robot is set to ARMS ON for armset configuration
data as opposed to SHAFT7Z configuration data)
RQ ENCODER T1 ALL
RQ ENCODER T2 ALL
RQ SYNC PHASE ALL
RQ SYNC ZERO ALL
RQ IO MAP ALL
RQ COMM ALL
RQ COMPATIBILITY ALL
RQ MOUNT (for reference only; this procedure will redefine the MOUNT
position)
RQ BIRTH
RQ VERSION
3.
For every robot station taught on the system, retrieve the station coordinates
and station options using either the CDM or serial communication. For serial
communication, enter the following command for each station:
RQ STN station ARM arm ALL
RQ STN station ARM arm OPTION ALL
RQ STNSENSOR station ARM arm ALL
9-58
Brooks Automation
Revision 2.2
MagnaTran 7.1 User’s Manual
MN-003-1600-00
Maintenance and Repair
PC 104 CPU Board Replacement
NOTE: Exerciser software for the MT5/VT5 is not compatible with the MagnaTran
7.1.
4.
Turn off the power to the robot and disconnect power and communication
cables.
WARNING
When equipment is off and power is secured per facilities lockout/
tagout procedure, the unit is classified as a Type 1 hazard category.
See Chapter 2: Safety Table 2-1.
5.
Remove the protective covers as shown in Figure 12-2.
CAUTION
Observe proper ESD precautions when handling any electronic
device.
6.
Carefully disconnect the PC 104 board from the Personality Board by removing
the 4-40 nuts and split and flat washers (2 places) and gently pulling the PC 104
board off. Use caution not to bend the long pins of the header connectors. See
Figure 12-7.
RECYCLE
The PC 104 board contains a Lithium battery. Dispose of the battery in
accordance with federal, state, and local requirements.
Replacement Procedure
1.
Carefully plug the new PC 104 Board to the 50 pin header connector of the Personality Board.
Replace and tighten the 4-40 nuts, split and flat washers to the PC 104 standoffs.
2.
Install the robot body covers and connect power and communications cables.
Brooks Automation
Revision 2.2
9-59
Maintenance and Repair
PC 104 CPU Board Replacement
MagnaTran 7.1 User’s Manual
MN-003-1600-00
3.
Power up the robot.
4.
Enter the correct robot application number using the following commands:
EEPROM RESET (this will clear the EEPROM, thus ensuring that the robot will
be configured reliably).
CONFIG ROBOT APPLIC application_number
5.
Enter the calibration parameters (requested in step 2) via the serial communication using the following commands.
Encoder and Sync Phase Parameters:
SET ENCODER T1 ALL -sinmin sinmax -cosmin cosmax
STORE ENCODER T1 ALL
SET ENCODER T2 ALL -sinmin sinmax -cosmin cosmax
STORE ENCODER T2 ALL
SET SYNC PHASE ALL t1 t2 z
STORE SYNC PHASE ALL
Home Position Parameters:
SET SYNC ZERO ALL t1 t2 z
STORE SYNC ZERO ALL
Operational Interlock Parameters
MAP [name] [type] [characteristic] TO [io_name] [io_num]
Communication Parameters:
SET COMM M/B (MON | PKT)
SET COMM FLOW (SEQ | BKG | BKG+)
SET COMM LF (ON | OFF)
SET COMM ECHO (ON | OFF)
SET COMM CHECKSUM (ON | OFF)a6
SET COMM DREP (AUT | REQ)
STORE COMM ALL
Compatibility Parameters
SET COMPATIBILITY COORDT (MAG6 |VT5)
SET COMPATIBILITY ECHO (MAG6 |VT5)
9-60
Brooks Automation
Revision 2.2
MagnaTran 7.1 User’s Manual
MN-003-1600-00
Maintenance and Repair
PC 104 CPU Board Replacement
SET COMPATIBILTY HALT (MAG6 |VT5)
SET COMPATIBILTY CPTR (MAG6 |VT5)
SET COMPATIBILTY SPEED (MAG6 |VT5)
STORE COMPATIBILTY ALL
6.
Define the MOUNT position coordinates by issuing the following commands:
HOME ALL
MOVE Z ABS 10000
FIND MOUNT (wait for prompt “:” to be returned)
STORE MOUNT
7.
Enter the Birth Certificate data by issuing the following commands:
SET SERIAL NUMBER xxxx-yyyy
SET OPERATOR NAME aaaa bbb
SET DOB mm-dd-yy
SET BIRTH CONFIG xx-xx-xx-xx-xx-xx
GIVE BIRTH
8.
Enter and store the station coordinates using either the CDM or serial communication.
SET STN station ARM arm R [loc] T [loc] Z [bto] LOWER [#] NSLOTS [# ]
PITCH[#]
STORE STN station ARM arm ALL
9.
Enter and store the station options using either the CDM or serial communication. For serial communication, enter the following commands for each station:
SET STN station ARM arm OPTION [SAFETY value | PUSH value |
SBIT_SVLV_SEN name | RETRACT_SEN name | WAF_SEN (EX name| RE
name)]
STORE STN station ARM arm OPTION ALL
10.
Ensure that the new PC 104 board has the correct firmware version.
RQ VERSION
If not, download the desired firmware version following the procedure Firmware Upgrade on page 9-83.
11.
Enter and store the station sensor information from step 3.
Brooks Automation
Revision 2.2
9-61
Maintenance and Repair
PC 104 CPU Board Replacement
MagnaTran 7.1 User’s Manual
MN-003-1600-00
SET STNSENSOR station ARM arm TYPE type ACT act SEN sensor POS R
r_value POS T t_value
STORE STNSENSOR sensor ARM arm ALL
This completes the PC 104 CPU Board replacement procedure.
9-62
Brooks Automation
Revision 2.2
MagnaTran 7.1 User’s Manual
MN-003-1600-00
Maintenance and Repair
Power Pak Replacement
Power Pak Replacement
The Power Pak was designed to be replaced quickly and without setup. The Power
Pak has no user-replaceable components inside.
Required Tools and Test Equipment
•
No tools are required to replace the Power Pak
•
Small screwdriver is required to remove and replace the cables
•
Initial installation requires a set of Allen wrenches in metric sizes
Removal Procedure
WARNING
When equipment is off and power is secured per facilities lockout/
tagout procedure, the unit is classified as a Type 1 hazard category.
See Chapter 2: Safety Table 2-1.
1.
Turn of the power supply to the robot and unplug the power and communication connections.
DANGER
All power to the unit must be disconnected per the facilities’ lockout/
tagout procedure before servicing to prevent the risk of electrical
shock.
2.
Two fasteners hold the Power Pak to the robot. These fasteners are located
below the MagnaTran 7.
Pull the Power Pak to align the fasteners to the holes of the Power Pak. See Figure 12-1.
3.
Tip the Power Pak down slightly to clear the fasteners and pull the Pak away
from the robot.
Brooks Automation
Revision 2.2
9-63
Maintenance and Repair
Power Pak Replacement
MagnaTran 7.1 User’s Manual
MN-003-1600-00
Replacement Procedure
1.
To replace or install a Power Pak on a MagnaTran 7 robot, first locate the two
fasteners on the bottom of the robot and hold the Pak so that the fasteners are
aligned with the holes on the Pak. Slide the opposite end of the Pak over the
locating pin in the bottom of the robot. Refer to Figure 12-1 for Battery Pak
Installation drawing.
2.
With the pin supporting the back of the Power Pak, push up the Pak to the
robot and align the two fasteners to the corresponding holes in the robot.
Slide the Power Pak to secure the fasteners.
3.
Plug in the power connector from the robot power supply to the Power Pak.
Plug in the cable from the Power Pak to the robot power connector.
RECYCLE
The PowerPak contains sealed, lead acid batteries. Dispose of or recycle in
accordance with federal, state, and local requirements.
Initial Installation
If installing a Power Pak on a MagnaTran 7 that did not previously have a Power Pak,
some minor changes must be performed first.
1.
Turn off power to the robot.
2.
Disconnect all cables to the robot.
3.
Remove the robot covers.
Replace the internal power cable from the interface panel to the T1/T2 board
with a power and communications cable from the interface panel to the T1/T2
board and the I/O board.
Replace the covers.
9-64
4.
Install plastic fasteners and clamp bar to bottom plate of MagnaTran 7.
5.
Install Power Pak as described above in Replacement Procedure. Verify that the
switch is in the off position (0).
Brooks Automation
Revision 2.2
MagnaTran 7.1 User’s Manual
MN-003-1600-00
6.
Maintenance and Repair
Power Pak Replacement
Install power cables.
Install power cable from +24V OUT of Power Pak to +24V IN or the robot interface panel.
Install power cable from the +24VDC power supply to the +24V IN of the
Power Pak. Power supply must be off while making connections.
7.
Turn on the power supply.
8.
Turn on the Power Pak power switch.
The power to the robot is now controlled by the Power Pak. When the power
switch is turned off, there is a 2 second delay before power is removed from the
robot.
Brooks Automation
Revision 2.2
9-65
Maintenance and Repair
Encoder Setup
MagnaTran 7.1 User’s Manual
MN-003-1600-00
Encoder Setup
The following procedure is used to find the encoder amplitudes for all position encoders in the MagnaTran 7.
CAUTION
The following commands are NOT used in the initial set up or the normal operation of the robot. These commands are used in repair operation only. Brooks Automation recommends contacting Brooks
Technical Support before beginning this procedure.
Required Tools and Test Equipment
Performing this procedure does not require any tools.
Setup Strategy
This procedure will find the encoder values and report them to the operator. Three
runs of each procedure are performed and then the average value will be set.
Read the entire procedure before beginning.
Find T1 Encoder Value
CAUTION
The following commands are NOT used in the initial set up or the normal operation of the robot. These commands are used in repair operations only. Brooks Automation recommends contacting Brooks
Technical Support before beginning this procedure.
1.
Power up the robot and establish serial communications.
2.
Enter the following command to begin collecting values:
FIND ENCODER T1
3.
Rotate the T1 motor shaft (the outer shaft) slowly.
Rotate the shaft and attempt to complete one full revolution within 30 seconds.
9-66
Brooks Automation
Revision 2.2
MagnaTran 7.1 User’s Manual
MN-003-1600-00
Maintenance and Repair
Encoder Setup
After 30 seconds have expired, the robot will return a RDY prompt.
4.
Enter the following command to request the values:
RQ ENCODER T1 ALL
An example of the response is as follows:
ENCODER T1
SINE MIN: -1340
SINE MAX: 1400
COSINE MIN: -1256
COSINE MAX: 1328
The values should be between 1500 and 1950 for MagnaTran 7.1 robots.
Record the values for future calculations.
5.
Perform the steps 1-4 three times. Take the average of all three responses and
input the average values using the following command:
SET ENCODER T1 ALL -sinmin sinmax -cosmin cosmax
6.
Store the values using the following command:
STORE ENCODER T1 ALL
Find T2 Encoder Value
CAUTION
The following commands are NOT used in the initial set up or the normal operation of the robot. These commands are used in repair operations only. Brooks Automation recommends contacting Brooks
Technical Support before beginning this procedure.
1.
Power up the robot and establish serial communications.
2.
Enter the following command to begin collecting values:
FIND ENCODER T2
3.
Rotate the T2 motor shaft (the inner shaft) slowly.
Rotate the shaft and attempt to complete one full revolution within 30 seconds.
Brooks Automation
Revision 2.2
9-67
Maintenance and Repair
Encoder Setup
MagnaTran 7.1 User’s Manual
MN-003-1600-00
After 30 seconds have expired, the robot will return a RDY prompt.
4.
Enter the following command to request the values:
RQ ENCODER T2 ALL
An example of the response is as follows:
ENCODER T2
SINE MIN: -1425
SINE MAX: 1348
COSINE MIN: -1286
COSINE MAX: 1254
The values should be between 1500 and 1950 for MagnaTran 7.1 robots.
Record the values for future calculations.
5.
Perform the steps 2-4 three times. Take the average of all three responses and
input the average values using the following command:
SET ENCODER T2 ALL -sinmin sinmax -cosmin cosmax
6.
Store the values using the following command:
STORE ENCODER T2 ALL
9-68
Brooks Automation
Revision 2.2
MagnaTran 7.1 User’s Manual
MN-003-1600-00
Maintenance and Repair
Motor Electrical Phase Calibration
Motor Electrical Phase Calibration
The following procedure is used to find the phase angles for the T1 and T2 motors.
CAUTION
The following commands are NOT used in the initial set up or the normal operation of the robot. These commands are used in repair operation only. Brooks Automation recommends contacting Brooks
Technical Support before beginning this procedure.
Required Tools and Test Equipment
Performing this procedure does not require any tools.
Setup Strategy
This procedure will move the Z drive upwards and then the T1 and T2 shafts simultaneously in the counterclockwise (CCW) direction for one revolution and report the
sync phase values.
Read the entire procedure before beginning.
CAUTION
The robot arms MUST be removed before issuing the FIND PHASE
command.
Procedure
WARNING
When equipment is energized, live circuits covered, and work performed remotely, the robot is at a Type 2 hazard category. See Electrical Hazards on page 2-7.
1.
Power up the robot and establish serial communications.
2.
Enter the following command to begin collecting values:
Brooks Automation
Revision 2.2
9-69
Maintenance and Repair
Motor Electrical Phase Calibration
MagnaTran 7.1 User’s Manual
MN-003-1600-00
FIND PHASE ALL
The Z drive will move to the home position, then up 10mm and begin pulsing.
When the Z drive is complete, the Z brake will click on. Then the T1/T2 shafts
will start rotating, first in the clockwise direction (CW) in order to reference
each other, then in the CCW direction. Both shafts should move together and
at the same speed and for approximately one full revolution.
It is also possible to use the FIND PHASE T or FIND PHASE Z to find the individual axis phase values.
NOTE: To stop the robot from continuing through the stepping portions of the
FIND PHASE, enter <CTRL> <C> at the user keyboard.
3.
Request the values by entering the following command:
RQ SYNC PHASE ALL
An example of the response:
SYNC PHASE
T1........-0.280613
T2........-0.184195
Z.........-0.846788
4.
Record the values.
5.
Repeat steps 2-4 three or more times. Verify that the each of the values are
within +/- 0.001 units for T1 or T2 and +/- 0.002 units for Z of each other to
demonstrate repeatability.
6.
Calculate the average of all readings.
7.
Input the averages with the following command:
SET SYNC PHASE ALL t1value t2value zvalue
8.
Store the values with the following command:
STORE SYNC PHASE ALL
9-70
Brooks Automation
Revision 2.2
MagnaTran 7.1 User’s Manual
MN-003-1600-00
Maintenance and Repair
Restore the Home Position to the Factory Settings
Restore the Home Position to the Factory Settings
It is possible to restore the home position as it was set when the robot was first powered up. The values for the SYNC ZERO (the home positions) found on the QR that
accompanied the robot can be stored to restore the original home position. This
allows the home position to be restored after any problem. It is important that if the
home position has been changed from the original location set before shipment, that
the values for SYNC ZERO are recorded for future reference.
NOTE: Each robot has unique values for the SYNC ZERO that can only be used with that
particular robot. Be sure to check the values for the encoders (T1, T2, and Z), as
well as SYNC PHASE of the robot, with the values recorded on the QR to be sure
that the values entered for the SYNC ZERO are viable. If the values do not coincide, then the home position must be found again.
This procedure will allow the user to enter the values of the QR to the desired factory
default settings home position and store the values.
WARNING
When equipment is energized, live circuits covered, and work performed remotely, the robot is at a Type 2 hazard category. See Electrical Hazards on page 2-7.
1.
Install the mounting fixture to the armset. Visually verify that the wrist plates
are equal distance from the center and parallel with each other.
2.
Locate the QR. An attached sheet will contain a series of parameter values
(encoder, sync phase, etc.) that will be used to restore the original home position.
If the QR cannot be located, call Brooks Automation Customer Support
3.
Enter the following command:
SET SYNC ZERO ALL t1 t2 z
The sync zero t1, t2, and z values are entered as: (-)0.xxxxxx
4.
Store the values:
STORE SYNC ZERO ALL
Brooks Automation
Revision 2.2
9-71
Maintenance and Repair
Restore the Home Position to the Factory Settings
5.
MagnaTran 7.1 User’s Manual
MN-003-1600-00
Request the Sync Zero values:
RQ SYNC ZERO ALL
An example of the response is as follows:
SYNC ZERO
T1..........-7.646136
T2..........-4.162485
Z............0.106358
Verify that the values match the QR.
6.
Cycle power.
7.
Request the Sync Zero values and verify they are correct.
8.
Home the robot and verify the home location is accessible.
NOTE: To stop the robot from pinging and abort the HOME command, enter
<CTRL> <C> on the user keyboard or issue the HALT command.
See also Reset Stations When the Home Position is Reset on page 9-75 and Restore the
Home Position to the Factory Settings on page 9-71.
9-72
Brooks Automation
Revision 2.2
MagnaTran 7.1 User’s Manual
MN-003-1600-00
Maintenance and Repair
Reset the Home Position to the User Preference
Reset the Home Position to the User Preference
This procedure will allow the user to hand locate the arms to the desired home position and store the new values. This procedure is used in two circumstances: when the
user prefers to establish the HOME position in a location other than the factory set
position and when the robot arms are not exactly aligned after an arm set is replaced.
WARNING
When equipment is energized, live circuits covered, and work performed remotely, the robot is at a Type 2 hazard category. See Electrical Hazards on page 2-7.
1.
Install the mounting fixture to the armset.
Observe the wrist plates. Visually verify that the wrist plates are equal distance from the center and parallel with each other.
2.
Enter the following command:
FIND ZERO T
3.
Move the arms so that the robot’s end effector Pan A points in the direction that
will be defined as zero.
Position the arms within 20 seconds. The arms must be moved by at least
15 °. Hold the arms in the HOME position until the RDY (:) prompt appears.
4.
Request the Sync Zero values:
RQ SYNC ZERO ALL
An example of the response is as follows:
SYNC ZERO
T1..........-7.646136
T2..........-4.162485
Z............0.106358
5.
Store the values:
STORE SYNC ZERO ALL
6.
To set the Z axis home position for the MagnaTran 7, place two 0.062” shims
Brooks Automation
Revision 2.2
9-73
Maintenance and Repair
Reset the Home Position to the User Preference
MagnaTran 7.1 User’s Manual
MN-003-1600-00
under each forearm of the armset. Make sure that the Z lower hard stops are
very low before pressing down on the armset. Press the arm set down slowly
(avoiding impact) so that the forearms touch the shims, creating a 0.062” gap
between the flange and forearm. Loosen and manually locate the Z home flag
(located to the right of the I/O board on the the T2 motor housing) so that the
red LED of the Z home flag PCB goes on.
Remove the shims.
9-74
7.
Set the Z hard stop and adjust the microswitch using the procedure Z Hard
Stop and Overtravel Limit Switch Adjustment on page 9-53.
8.
After this procedure has been performed, the Resetting Mount Position on
page 9-76 procedure MUST be performed.
Brooks Automation
Revision 2.2
MagnaTran 7.1 User’s Manual
MN-003-1600-00
Maintenance and Repair
Reset Stations When the Home Position is Reset
Reset Stations When the Home Position is Reset
If the values for SYNC ZERO are not available, and the home position must be found
again, a quick shortcut can be used to reset the stations for the robot:
WARNING
When equipment is energized, live circuits covered, and work performed remotely, the robot is at a Type 2 hazard category. See Electrical Hazards on page 2-7.
1.
Reset the home position, where Pan A is located 180° opposite the power connector, and record the values for SYNC ZERO.
2.
Record the values for all the stations (R, T, Z, LOWER, SLOTS, PITCH).
3.
Setup station 1 and record the new values for this station. Setup station 1 for
arm “B” also (if applicable).
4.
Compare the change in the values from the old values to the new values. This
change will be most likely be in the T axis, and possibly in the Z axis as well.
5.
Manually set the values for the other stations through the CDM with the same
change found in station 1.
6.
Double check the accuracy of these changes with the other stations and adjust
as necessary.
7.
Store the station values.
Brooks Automation
Revision 2.2
9-75
Maintenance and Repair
Resetting Mount Position
MagnaTran 7.1 User’s Manual
MN-003-1600-00
Resetting Mount Position
The following procedure allows the mount Z position to be redefined.
WARNING
When equipment is energized, live circuits covered, and work performed remotely, the robot is at a Type 2 hazard category. See Electrical Hazards on page 2-7.
1.
Enter the following command to home the Z axis:
HOME ALL
2.
Enter the following command to move in the absolute Z direction 10mm (this
example distance may vary by user):
MOVE Z ABS 10000
3.
Request the current position and verify the value:
RQ POS ABS ALL
4.
Issue the following command:
FIND MOUNT
The mount command will now be set to the present position of the arms, all
three axes: R, T, Z.
5.
Request the new mount values:
RQ MOUNT
6.
Store the values:
STORE MOUNT
9-76
Brooks Automation
Revision 2.2
MagnaTran 7.1 User’s Manual
MN-003-1600-00
Maintenance and Repair
Uploading and Downloading Station Values
Uploading and Downloading Station Values
The following procedure may be used to copy station values from a robot and, after
replacing the robot, load these station values into the new robot.
Required Tooling:
•
CDM
or
•
Computer with a terminal emulator program
•
Computer serial cable
It is easiest to upload and download the robot station values using a CDM. Following
are the procedures using a CDM.
Uploading Station Values using the CDM:
1.
Using the CDM, request the station values and the station value options for station # 1 by using the following CDM path:
INFO\STATIONS\SELECT ARM\SELECT STATION
2.
Record the station values and station value options for station # 1. Appendix E:
User Setting Tables provides blank tables to record the information.
3.
Repeat Step #1 and Step #2 for all the robot stations taught in the cluster tool.
Downloading Station Values Using a CDM:
1.
The station values and station options obtained in the previous section can be
input into the desired robot using the following CDM path:
SETUP\STATIONS\SELECT ARM\SELECT STATION\ASSIGN STATION
LOCATION
The station values are automatically STORED in the robot when using the
ASSIGN STATION LOCATION function of the CDM.
2.
Repeat Step #1 for all the robot stations taught in the cluster tool.
Brooks Automation
Revision 2.2
9-77
Maintenance and Repair
Uploading and Downloading Station Values
MagnaTran 7.1 User’s Manual
MN-003-1600-00
Uploading Station Values Using a Computer:
If a CDM is not available to upload and download station values, then a computer
with a terminal emulator program may be used. The following procedures upload
and download station values using a computer:
1.
Ensure the computer has a terminal emulator program. Establish serial communication between the computer and serial port # 1 of the robot. Reference
the Magnatran 7 User’s Manual, Operational Interfaces Section for additional
information on establishing serial communication. The communication settings for the Magnatran 7 robot are:
Port Configuration RS-232 or RS-422
Handshake No
Baud Rate 9600
Parity Bits None
Data Bits 8
Stop Bits 1
Parity None
RTS/CTS No
XON/XOFF No
2.
When serial communication is established, the robot will respond with one of
the following prompts, pending the robot communication settings.
Robot Communication Prompt
“:” (Monitor Mode)
“_RDY” (Packet Mode)
Monitor mode is a “user friendly” communications mode. All responses from
the robot are descriptive and easy to understand. Therefore, it is recommended, but not necessary, to set the robot communication settings to Monitor
Mode using the following command. Do NOT store this change to the communication setting.
SET COMM M/B MON
3.
Request the station values and the station value options for station #1 by issuing the following commands to the robot:
RQ STN station ARM A ALL
RQ STN station ARM A OPTION ALL
9-78
Brooks Automation
Revision 2.2
MagnaTran 7.1 User’s Manual
MN-003-1600-00
4.
Maintenance and Repair
Uploading and Downloading Station Values
If the robot has dual arms, then issue the following commands for arm B:
RQ STN station ARM B ALL
RQ STN station ARM B OPTION ALL
5.
Record all the station values and station value options for station # 1. Appendix
E: User Setting Tables provides blank tables to record the information.
6.
Repeat Step #3 through Step # 5 for all the robot stations taught in the cluster
tool.
7.
To return to the original communication setting, reset the robot by issuing the
RESET command. The robot will take approximately 25 to 30 seconds to reset.
RESET
Downloading Station Values Using a Computer:
1.
The station values and station options obtained in the previous section can be
input into the desired robot using the following commands:
SET STN station ARM A R r_loc T t_loc Z bto LOWER lower NSLOTS slots
PITCH pitch
SET STN station ARM A OPTION SAFETY value PUSH value
2.
If the robot has dual arms, then issue the following commands for arm B:
SET STN station ARM B R r_loc T t_loc Z bto LOWER lower NSLOTS slots
PITCH pitch
SET STN station ARM B OPTION SAFETY value PUSH value
3.
Store the station values and station options that were inputted in Step #1 by
issuing the following commands:
STORE STN (station #) ARM A ALL
STORE STN (station #) ARM A OPTION SAFETY
STORE STN (station # ) ARM A OPTION PUSH
4.
If the robot has dual arms, then issue the following commands for arm B:
Brooks Automation
Revision 2.2
9-79
Maintenance and Repair
Uploading and Downloading Station Values
MagnaTran 7.1 User’s Manual
MN-003-1600-00
STORE STN (station #) ARM B ALL
STORE STN (station #) ARM A OPTION SAFETY
STORE STN (station # ) ARM A OPTION PUSH
5.
9-80
Repeat Step #1 through Step # 4 for all the robot stations taught in the cluster
tool.
Brooks Automation
Revision 2.2
MagnaTran 7.1 User’s Manual
MN-003-1600-00
Maintenance and Repair
Control/Display Module Resetting
Control/Display Module Resetting
Control Display Modules may occasionally experience problems with their internal
memory. These problems are typically due to the CDM’s factory configured parameters in memory becoming corrupt. CDM’s which have had factory configured parameters corrupted may not operate at all, may display random characters, or may be
missing characters on the screen.
Any CDM that displays these symptoms may be easily reset. Resetting the CDM’s
internal memory is a two step process. First all existing, and possibly corrupted,
parameters must be cleared and then the Brooks factory settings must be reloaded.
Cleaning the Memory:
1.
With the CDM connected, turn on power to the robot.
2.
Disconnect the telephone style connector at the CDM base.
3.
Hold down the Self Test, Pitch, and Home keys at the same time while plugging in the connector at the bottom of the unit (an assistant may be needed to
perform this step). The following warning appears on the display:
“LOAD DEFAULT DATA! ARE YOU SURE?”
4.
Press the HOME key to clear the memory. After a self test, the CDM will display a small blinking square in the upper left corner.
Resetting Brooks Automation Factory Parameters:
1.
Simultaneously press SELF TEST and PITCH. The screen will display a small
symbol consisting of a C and a T close together, blinking.
2.
Press the decimal point key. The screen will then display labels above three
keys on the keyboard with an arrow pointing to its corresponding key. These
labels indicate that the function of these keys is altered during this procedure.
The labels and keys are;
“NEXT” over the “HOME” key
The “NEXT” function changes the value of the setting currently displayed on
the screen.
“ESC” over the “STOP” key
The “ESC” function is not used in this procedure.
Brooks Automation
Revision 2.2
9-81
Maintenance and Repair
Control/Display Module Resetting
MagnaTran 7.1 User’s Manual
MN-003-1600-00
“SAVE” over the “ON/OFF” key
The “SAVE” function stores the new value of a setting and proceeds to the next
one.
3.
The screen should also indicate that the current communication speed is 9600
baud. Press the “NEXT” key until “9600 baud” is displayed and press the
“SAVE” key.
4.
The screen now should display the communications parity. Press “NEXT” (if
necessary) until “Even” is displayed and
5.
Press “SAVE”.
6.
The screen now should display the character format.
Press “NEXT” (if necessary) until “80 characters” is displayed and
7.
Press “SAVE”.
8.
The three key labels should now disappear and the screen will display only a
blinking cursor in the upper left corner.
9.
The CDM is now fully reset.
RESET THE ROBOT:
9-82
1.
Press the reset button on the robot (or turn the power off and on), and wait 30
seconds.
2.
Press the “OFF/ON” key on the CDM keypad and confirm proper operation.
Brooks Automation
Revision 2.2
MagnaTran 7.1 User’s Manual
MN-003-1600-00
Maintenance and Repair
Firmware Upgrade
Firmware Upgrade
Brooks Automation provides upgrades for the MagnaTran 70/77 firmware which can
be downloaded on-line. The upgraded firmware will contain all of the latest commands, new revisions, version label and build dated embedded in the software.
Tools
•
Personal Computer (PC), user provided
•
Serial Cable (see Serial Communication SIO1 on page 5-5)
Remote Software Update Procedure
Call Brooks Automation Technical Support for access to downloading the firmware
upgrade and additional instructions on setting up the PC, the robot and transmissions.
The following procedure explains the correct usage of REMOTE.EXE to perform the
software update. Section ‘File Lists’ lists the files that should reside on the Disk-OnChip storage device on the robot for each software release version. The second section
lists the procedure for performing the software update.
File Lists
The file names in italics are created and managed by the robot. The file
ERR_LOG.BIN underlined in the V2.1x and V2.2x columns is resident on the robot
only if it was upgraded from V2.1x or earlier. Files that you might see that should be
deleted are A1.BAT, C1.SYS, H1.SYS and R1.EXE - these are created during the auto
download process, and then later deleted, unless an error occurs.
Table 9-6: Resident Files
V2.0x and earlier
V2.1x and later
V2.2x and later
AUTOEXEC.BAT
AUTOEXEC.BAT
AUTOEXEC.BAT
CONFIG.SYS
CONFIG.SYS
CONFIG.SYS
HIMEM.SYS
HIMEM.SYS
HIMEM.SYS
COMMAND.COM
COMMAND.COM
COMMAND.COM
SIM.VGA
SIM.VGA
SIM.VGA
Brooks Automation
Revision 2.2
9-83
Maintenance and Repair
Firmware Upgrade
MagnaTran 7.1 User’s Manual
MN-003-1600-00
Table 9-6: Resident Files
V2.0x and earlier
V2.1x and later
V2.2x and later
PARSERV.EXE
PARSERV.EXE
PARSERV.EXE
STD.TRP
STD.TRP
STD.TRP
REMOTE.EXE
REMOTE.EXE
REMOTE.EXE
MAG7.EXE
MAG7.EXE
MAG7.EXE
MAG7_MCC.OUT
MAG7_MCC.OUT
MAG7_MCC.OUT
NVRAM.BIN
OBJ_MAST.BIN
OBJ_MAST.BIN
ERR_LOG.BIN
OBJ_DATA.BIN
OBJ_DATA.BIN
MAST_CFG.BIN
MAST_CFG.BIN
NVRAM.BIN
NVRAM.BIN
STRNGLOG.BIN
STRNGLOG.BIN
ERRORLOG.BIN
ERRORLOG.BIN
ERR_LOG.BIN
CUR_CNFG.BIN
ERR_LOG.BIN
CAUTION
Prior to either upgrading or downgrading using the below procedures, it is advisable to back up all the files on the robot. This can be
accomplished by using the REMOTE.EXE utility, and copying all
robot files, one-by-one, to a temporary directory with the following
command:
COPY RC:\filename filename
Instructions for upgrading/downgrading software versions using any version prior to
V2.2#
The following procedures use the REMOTE.EXE file transfer utility. When upgrading
or downgrading, and at least one of the versions is prior to V2.20, REMOTE -U should
not be initially used. REMOTE (no options) is used until otherwise stated.
9-84
Brooks Automation
Revision 2.2
MagnaTran 7.1 User’s Manual
MN-003-1600-00
Maintenance and Repair
Firmware Upgrade
Upgrading to V2.2# from a previous (pre-V2.2) version
1.
Using the aforementioned file lists, ensure that there are no extra files on the
robot. Files on the robot can be displayed by typing the following command:
DIR RC:\*.*
2.
If there are extra files present, delete them one-by-one using the following command:
DEL RC:\filename
3.
Delete the MAG7_MCC.OUT file as follows:
DEL RC:\MAG7_MCC.OUT
4.
Ensure that the latest version of REMOTE.EXE is loaded onto the robot as follows:
COPY REMOTE.EXE RC:\R1.EXE
COPY RC:\R1.EXE RC:\REMOTE.EXE
DEL RC:\R1.EXE
5.
Power-cycle the robot, and begin the standard upgrade procedure using
REMOTE -U from the host.
Downgrading from V2.2# to a previous (pre-V2.2) version
1.
Ensure that the host PC is using the latest version of REMOTE.EXE (i.e., the
version on the robot, not the version associated with the software version that
is being downgraded to). If necessary, retrieve it from the robot using the following command:
COPY RC:\REMOTE.EXE REMOTE.EXE
2.
Using the aforementioned file lists, ensure that there are no extra files on the
robot. Files on the robot can be displayed by typing the following command:
DIR RC:\*.*
3.
If there are extra files present, delete them one-by-one using the following command:
Brooks Automation
Revision 2.2
9-85
Maintenance and Repair
Firmware Upgrade
MagnaTran 7.1 User’s Manual
MN-003-1600-00
DEL RC:\filename
4.
Delete the three main .bin configuration files (unused prior to V2.2) as follows:
DEL RC:\OBJ_MAST.BIN
DEL RC:\OBJ_DATA.BIN
DEL RC:\MAST_CFG.BIN
5.
Delete the MAG7_MCC.OUT file as follows:
DEL RC:\MAG7_MCC.OUT
6.
Begin the standard upgrade procedure, using REMOTE to transfer files oneby-one from the host to the robot. Do not use the -U option when downgrading.
Initial booting of the robot with the new software.
1.
When upgrading or downgrading between software versions, where one is
prior to V2.20, two errors may be reported - “Database Checksum Error”, and
“Cannot open Current Configuration File” error. In any case, after an upgrade
or downgrade, the correct procedure to commission the robot is as follows:
a) Execute an EEPROM RESET
b) When the robot comes back with a prompt, configure the application of the
robot again - i.e. CONFIG ROBOT APPLIC F##-...
c) Reset the robot using the RESET command, or power cycle.
d) When the robot comes back with a prompt, it is ready for service.
NOTE: Some previously stored information may need to be re-entered depending upon the
age of the previous software version.
9-86
Brooks Automation
Revision 2.2
MagnaTran 7.1 User’s Manual
MN-003-1600-00
10
Troubleshooting
Overview
Troubleshooting problems that might occur with the Brooks Automation MagnaTran
7 Robot is a two step process. The first step is the initial troubleshooting of the robot,
which is used to determine the specific area where the problem exists. The second
step is to is to isolate the problem within the specific area identified during the initial
troubleshooting.
Contents
Troubleshooting Overview. . . . . . . . . . . . . . . . . . . . . . . . . . . . . . . . . . . . . . . . . . . . .10-2
Brooks Automation
Revision 2.2
10-1
Troubleshooting
Troubleshooting Overview
MagnaTran 7.1 User’s Manual
MN-003-1600-00
Troubleshooting Overview
Depending on the error type, three troubleshooting options are described:
1.
Troubleshooting Specific Error Codes: Failures that generate an error code
identified by a number. For example, the robot generates an error such as,
“ERR 10009: Hard tracking error, T1 motor”. These types of failures are listed
in the following section: Error Code Reference on page 8-179.
2.
Troubleshooting Observed Symptoms: Failures that are observed by the
operator but do not generate an error code identified by a number. The specific
symptoms for each failure type can be categorized. These types of failures are
listed in the following section:
Table 10-1: Symptoms of Observed Errors Types
Observed Symptoms
10-2
Page Number
Communication
• No response from robot using PC.
• No response from robot using CDM.
See Communication
Related Issues on
page 10-4.
Power
• 24 volt LED not illuminated.
• Failure for robot to operate.
• No communication using PC or CDM.
See Power Related
Issues on page 10-6.
Radial Motion
• Armset has jerky motion.
• Armset oscillates.
• Armset overshoots taught position.
• Armset sways from side to side during motion.
• Robot is unable to move in the R direction.
See Radial Motion
Related Issues on
page 10-8.
Theta Motion
• Armset has jerky motion.
• Armset oscillates.
• Armset overshoots taught position.
• Armset sways from side to side during motion.
• Robot is unable to move in the T direction.
See Theta Motion
Related Issues on
page 10-10.
Z Motion
• Armset has jerky motion.
• Armset oscillates.
• Armset overshoots taught position.
• Robot is unable to move in the Z direction.
• Robot hits Z hard stops during operation in Z.
• Robot hits Z hard stops during homing in Z.
See Z Motion Related
Issues on page 10-12.
Brooks Automation
Revision 2.2
MagnaTran 7.1 User’s Manual
MN-003-1600-00
Troubleshooting
Troubleshooting Overview
Table 10-1: Symptoms of Observed Errors Types
Observed Symptoms
3.
Page Number
Find Phase
• “Command Failed” error occurs.
• T1/T2 shafts do not move together while pinging in theta direction.
See Find Phase
Related Issues on
page 10-15.
Home Z Axis
• “Command Failed” error occurs.
See Home Z Axis
Related Issues on
page 10-18
Operational Interlock
• Operational Interlock is not functional.
• Operational Interlock state is not valid.
See Operational
Interlock Related
Issues on page 10-20.
Station Orientation
• Arm B moves 180 degrees from desired theta
station value.
See Station Value/
Orientation Related
Issues on page 10-26.
Repeatability
• Wafer is not placed to same position repeatedly.
See Repeatability
Related Issues on
page 10-22.
Power Pak
• Arms “drift” after halted by Power Pak when
main robot power is turned off.
See Power Pak
Related Issues on
page 10-24.
Troubleshooting commands: the Magnatran 7 has three commands that provide additional information from the robot that is useful in troubleshooting.
These commands are:
RQ HISTORY (see page 8-76) - this command displays the errors and nonaction commands executed by the robot.
SET ERRLVL 5 - this command sets the robot’s error level response to a range
of 1 through 5, where 1 yields the least number of error messages and 5 yields
the maximum number of error messages. The Brooks default error level is 2.
For maximum wafer throughput, the error level MUST be set at “2” after troubleshooting by using the command SET ERRLVL 2 and STORE ERRLVL.
SET COMM SEQ or SET COMM BKG+ - The Magnatran 7 must either be in the
“sequential” or “background+” communication flow setting to generate error
code messages. The Magnatran 7 will not generate error code messages when
operating in the “background” communication flow setting. The robot MUST
be returned to the original communication flow setting after troubleshooting .
Refer to the Magnatran 7 User’s Manual, Command Reference Section for additional communication setting information.
Brooks Automation
Revision 2.2
10-3
Troubleshooting
Communication Related Issues
MagnaTran 7.1 User’s Manual
MN-003-1600-00
Communication Related Issues
Symptoms:
No response from robot using personal computer. That is, the robot does not
display either a “:” or “_RDY” response.
OR
No response from robot using CDM. That is, the CDM display screen remains
blank when turned on.
Troubleshooting Process:
Verify personal computer communication settings are 9600, N, 8, 1.
Verify personal computer is setup for its correct communication port.
CDM is turned on while attempting to communicate to robot through personal computer.
Check CDM and/or personal computer cables for proper connection and continuity.
Malfunctioning CDM.
Verify robot’s communication settings are properly set and stored per requirements
of system host controller software by issuing the command RQ COMM ALL.
Verify RS232/RS422 switch, SW1 on the robot personality board is set properly:
Up = RS232, Down = RS422.
Verify that robot is properly grounded. Refer to Power Connections on page 5-3.
Verify the Personality Board has the correct UART installed at designation U40. The
UART must have the letters “BC” stencilled on its surface. UART’s with the letter “A”
are incorrect.
Disk-on-Chip of PC104 Card has failed. Replace robot PC104 Card. Refer to PC 104
CPU Board Replacement on page 9-58.
DC to DC converter of theta driver board has failed. Replace robot theta driver board.
Refer to T1/T2 Axis Driver Board Replacement on page 9-41.
Call Brooks Technical Support.
10-4
Brooks Automation
Revision 2.2
MagnaTran 7.1 User’s Manual
MN-003-1600-00
Troubleshooting
Communication Related Issues
Communication Related
Issues
No Response
Through Serial I/O
Connection
No Response
Through CDM
Verify the communication
software's settings to be:
9600, N, 8, 1
Check for proper connection
between robot and CDM
YES
Was Issue Resolved?
YES
Was Issue Resolved?
NO
NO
Verfiy that the CDM is turned
off
Check for proper grounding
and power connection with
robot
YES
Was Issue Resolved?
YES
NO
Was Issue Resolved?
NO
Verify proper serial
connection between the robot
and host PC (i.e. correct
comm port is selected on
host PC terminal software,
serial cable is functional, etc.)
DONE
The CDM must be
reprogrammed
YES
Was Issue Resolved?
YES
Was Issue Resolved?
NO
NO
Verify that the RS232/RS422
switch (SW1) on the
Personality PCB is set
correctly:
UP: RS232; DOWN: RS422
Verfiy that the robot was
configured to the proper
communication settings to
communicate with the
controlling software
NO
Was Issue Resolved?
The I/O PCB had failed
Replace board
YES
YES
Was Issue Resolved?
NO
YES
Was Issue Resolved?
NO
Check for proper grounding
and power connection with
robot
Was Issue Resolved?
YES
NO
NO
The Disk-on-Chip of the PC/
104 Card has failed.
Inpect UART at U40 on
Personality Board
CALL BROOKS
TECHNICAL
SUPPORT
YES
YES
YES
Was Issue Resolved?
NO
The DC/DC Converter of the
Theta Driver PCB has failed.
Was Issue Resolved?
NO
Figure 10-1: Communication Troubleshooting
Brooks Automation
Revision 2.2
10-5
Troubleshooting
Power Related Issues
MagnaTran 7.1 User’s Manual
MN-003-1600-00
Power Related Issues
Symptoms:
24 volt LED not illuminated (located on robot I/O board)
Failure for robot to operate
No communication using personal computer or CDM
Troubleshooting Process:
Check facilities power to power supply.
Verify power supply rating is 24 volt, 30 amperes.
Verify voltage output at power supply is 24 ±2 volts.
Verify voltage at robot power connector is 24 ±2 volts. Refer to Power Connections on
page 5-3 for power connector pin-outs.
Check power cables for proper connection and continuity.
Replace robot I/O board. Refer to I/O Board Replacement on page 9-48.
Call Brooks Technical Support.
10-6
Brooks Automation
Revision 2.2
MagnaTran 7.1 User’s Manual
MN-003-1600-00
Troubleshooting
Power Related Issues
Power Related Issues
No communication
through serial
connection or CDM
24 Volt LED on the I/O
PCB not illuminated
Robot will not operate
Verify connection between
the Internal Power Cable and
the Theta Driver PCB
NO
Check that the robot is
properly grounded
Was Issue Resolved?
YES
Was Issue Resolved?
YES
NO
Verify connection between
the I/O and Personality PCB's
Was Issue Resolved?
YES
DONE
NO
The Disk-on-Chip of the PC/104
Card has failed.
Was Issue Resolved?
YES
NO
The DC/DC Converter of the
Theta Driver PCB has failed.
Was Issue Resolved?
NO
YES
CALL BROOKS
TECHNICAL
SUPPORT
Figure 10-2: Power Troubleshooting
Brooks Automation
Revision 2.2
10-7
Troubleshooting
Radial Motion Related Issues
MagnaTran 7.1 User’s Manual
MN-003-1600-00
Radial Motion Related Issues
Symptom: Robot is able to move in the radial direction, but any of the following armset
motion characteristics are observed: Armset has jerky motion, Armset oscillates, Armset overshoots taught position, Armset sways from side to side during motion.
Troubleshooting Process: Verify robot application number is correct.
Check for physical obstruction. Remove or adjust physical obstruction to prevent
interference.
Verify that motion is repeatable. Refer to Position Repeatability Test on page 10-33.
Verify system alignment has been taught properly. Refer to Chapter 7: Alignment and
Calibration.
Verify end effector is level and not hitting or scraping any objects. Refer to Chapter 7:
Alignment and Calibration.
Verify armset mounting bolts are torqued to 75-88 in-lbs.
Verify armset is installed correctly. Refer to Mount the Arm Set on page 3-23.
Verify armset wrist band tension is adjusted properly. Refer to Wrist Band Inspection
on page 9-10.
Inspect armset wrist bearings for missing ball-bearings.
Inspect armset elbow bearings for missing ball-bearings.
Inspect armset wrist bearings and elbow bearings for excessive wear.
Verify wave-washer is located between the robot T2 shaft and the T2 arm mounting
flange for arms with a bearing installed between the T1 and T2 shafts.
Replace theta driver board. Refer to T1/T2 Axis Driver Board Replacement on page 941.
Call Brooks Automation Technical Support.
Symptom: Robot is unable to move in the radial direction and generates the following
error: Error 10009 - MCC hard tracking error
Troubleshooting Process: Refer to Communication Related Issues on page 10-4.
Symptoms: Arm looses reference and servo position on extension.
Troubleshooting Process: Check EMO switches. Check pins 23 and 24 of I/O connector. Verify the arm speed when error occurred. Attempt to duplicate the failure
under the same conditions. If error occurred at high speed, replace the T1/T2 Axis
Driver Board; if error occurred at medium or low speed, call Brooks Automation
Technical Support.
10-8
Brooks Automation
Revision 2.2
MagnaTran 7.1 User’s Manual
MN-003-1600-00
Troubleshooting
Radial Motion Related Issues
Radial Motion Related
Issues
Armset has jerky
motion, or vibrates
during motion
Armset sways from
side-to-side during
motion
Armset overshoots a
taught position
Armset oscillates
when halted
Verify that the configuration
of the robot is correct
YES
Was Issue Resolved?
NO
Verify that the configuration
of the robot is correct
Look for, and adjust or
remove, any physical
obstruction that may interfere
with the robot's movement
Was Issue Resolved?
YES
NO
YES
Was Issue Resolved?
NO
Verify if the motion is
repeatable
NO
Verify that the system
alignment was taught
properly
Verify that the armset
mounting bolts are torqued to
75-88 in-lbs.
Was Issue Resolved?
YES
DONE
YES
Was Issue Resolved?
Was Issue Resolved?
NO
NO
Verify that the end effectors
are level and not scraping
any objects
NO
Verify that the Encoder and
Sync Phase values are
consistant with the robot QR
Verify that armset was
installed properly
Was Issue Resolved?
YES
Was Issue Resolved?
YES
YES
NO
Inspect the elbow bearings for
excessive wear or rough motion
Verify that the wave washer
between the T2 arm adapter and
the bearing installed between
the T1 and T2 shafts is present
Was Issue Resolved?
NO
YES
Was Issue Resolved?
YES
Inspect the wrist bearings for
excessive wear or rough motion
NO
Verify that the wrist band
tension is adjusted properly
NO
Was Issue Resolved?
Was Issue Resolved?
YES
YES
DONE
NO
YES
The Theta Driver PCB has failed
Was Issue Resolved?
NO
CALL BROOKS
TECHNICAL
SUPPORT
Figure 10-3: Radial Motion Troubleshooting
Brooks Automation
Revision 2.2
10-9
Troubleshooting
Theta Motion Related Issues
MagnaTran 7.1 User’s Manual
MN-003-1600-00
Theta Motion Related Issues
Symptoms:
Robot is able to move in the theta direction, but any of the following armset
motion characteristics are observed: Armset has jerky motion, Armset oscillates, Armset overshoots taught position.
Troubleshooting Process:
Verify robot application number is correct.
Verify that motion is repeatable. Refer to Position Repeatability Test on page 10-33.
Check for physical obstruction. Remove or adjust physical obstruction to prevent
interference.
Verify system alignment has been taught properly. Refer to Chapter 7: Alignment and
Calibration.
Verify armset mounting bolts are torqued to 75-88 in-lbs.
Verify armset is installed correctly. Refer to Mount the Arm Set on page 3-23.
Inspect armset wrist bearings for missing ball-bearings.
Inspect armset elbow bearings for missing ball-bearings.
Verify wave-washer is located between the robot T2 shaft and the T2 arm mounting
flange.
Replace theta driver board. Refer to T1/T2 Axis Driver Board Replacement on page 941.
Call Brooks Technical Support.
Symptoms:
Robot is unable to move in the theta direction and generates the following
error: Error 10009 - MCC hard tracking error
Troubleshooting Process:
Refer to Communication Related Issues on page 10-4.
10-10
Brooks Automation
Revision 2.2
MagnaTran 7.1 User’s Manual
MN-003-1600-00
Troubleshooting
Theta Motion Related Issues
Theta Motion Related
Issues
Armset has jerky
motion, or vibrates
during motion
Armset sways from
side-to-side during
motion
Armset overshoots a
taught position
Armset oscillates
when halted
Verify that the application
number of the robot is correct
Verify that the application
number of the robot is correct
YES
Was Issue Resolved?
NO
Look for, and adjust or
remove, any physical
obstruction that may interfere
with the robot's movement
YES
Was Issue Resolved?
NO
Verify that the armset
mounting bolts are torqued to
75-88 in-lbs.
YES
Was Issue Resolved?
NO
Verify if the motion is
repeatable
DONE
Was Issue Resolved?
YES
Was Issue Resolved?
Verify that the system
alignment was taught
properly
NO
YES
NO
Verify that armset was
installed properly
YES
Was Issue Resolved?
NO
Verify that the Encoder
andSync Phase values are
consistant with the robot QR
Was Issue Resolved?
YES
NO
Inspect the elbow bearings for
excessive wear or rough motion
Verify that the wave washer
between the T2 arm adapter and
the bearing installed between
the T1 and T2 shafts is present
NO
Was Issue Resolved?
YES
Was Issue Resolved?
Verify that the wrist band
tension is adjusted properly
Inspect the wrist bearings for
excessive wear or rough motion
NO
NO
Was Issue Resolved?
Was Issue Resolved?
YES
YES
YES
DONE
NO
YES
The Theta Driver PCB has failed
Was Issue Resolved?
NO
CALL BROOKS
TECHNICAL
SUPPORT
Figure 10-4: Theta Motion Troubleshooting
Brooks Automation
Revision 2.2
10-11
Troubleshooting
Z Motion Related Issues
MagnaTran 7.1 User’s Manual
MN-003-1600-00
Z Motion Related Issues
Symptoms:
Robot is able to move in the Z direction, but any of the following armset motion
characteristics are observed:
Armset has jerky motion, OR
Armset oscillates, OR
Armset overshoots taught position.
Troubleshooting Process:
Verify robot application number is correct.
Check for physical obstruction. Remove or adjust physical obstruction to prevent
interference.
Verify that motion is repeatable. Refer to Position Repeatability Test on page 10-33.
Verify system alignment has been taught properly. Refer to Chapter 7: Alignment and
Calibration.
Verify end effector is level and not hitting or scraping any objects. Refer to Chapter 7:
Alignment and Calibration.
Check for Z-axis binding by performing Z Binding Test Using the Trace Command on
page 10-30.
Check for Z brake binding by performing Z Brake Binding Test on page 10-27.
Verify armset mounting bolts are torqued to 75-88 in-lbs.
Verify armset is installed correctly. Refer to Chapter 9: Maintenance and Repair.
Verify Z encoder is properly tightened to the Z leadscrew shaft. Refer to Z Encoder
Replacement on page 9-45.
10-12
Brooks Automation
Revision 2.2
MagnaTran 7.1 User’s Manual
MN-003-1600-00
Troubleshooting
Z Motion Related Issues
Symptoms:
Robot is unable to move in the Z direction and generates the following error:
Error 10009 - MCC hard tracking error
Troubleshooting Process:
Refer to Communication Related Issues on page 10-4.
Symptoms:
Robot is unable to move in the Z direction.
Troubleshooting Process:
Determine if the Z axis is configured. Refer to Determine if the Z Axis is Configured
Properly Via Software on page 10-29.
Verify the application number is correct. Reference the robot QR or contact Brooks
Technical Support for the correct robot application number.
Symptoms
Robot hits Z hard stops during operation in the Z Axis OR
Robot hits Z hard stops during homing in the Z Axis.
Troubleshooting Process:
Verify the operation of the overtravel limit switches. When actuated, the robot
will generate an Error # 10022: Error, Bottom overtravel reached for Z axis.
Verify that the Z hard stops and overtravel limit switches are adjusted correctly. Refer to Z Hard Stop and Overtravel Limit Switch Adjustment on page
9-53.
Reenter the application number of the robot by issuing the command:
CONFIG ROBOT APPLIC [configuration number]
Brooks Automation
Revision 2.2
10-13
Troubleshooting
Z Motion Related Issues
MagnaTran 7.1 User’s Manual
MN-003-1600-00
Z Motion Related Issues
Armset has jerky
motion, or vibrates
during motion
Armset
overshoots a
taught position
Armset sways from
side-to-side during
motion
Armset oscillates
when halted
Verify that the application
number of the robot is correct
Robot Hits Z Hard
Stops During
Operation
Verify that the application
number of the robot is correct
Robot Hits Z Hard
Stops During
Homing
Verify that the application
number of the robot is correct
DONE
YES
Was Issue Resolved?
NO
Look for, and adjust or
remove, any physical
obstruction that may
interferewith the robot's
movement
Was Issue Resolved?
YES
YES
Was Issue Resolved?
NO
NO
YES
Was Issue Resolved?
NO
Verify if the motion is
repeatable
NO
Verify that the system
alignment was taught
properly
Was Issue Resolved?
YES
YES
Was Issue Resolved?
Was Issue Resolved?
Was Issue Resolved?
YES
YES
Was Issue Resolved?
NO
NO
Verify that the Z hard stops,
home flag, and limit switches
are set correctly
Verify that armset was
installed properly
NO
Verify that the end effectors
are level and not scraping
any objects
NO
Verify that the Encoder and
Sync Phase values are
consistant with the robot QR
Was Issue Resolved?
YES
Verify the operation of the
over travel limit switches by
manually tripping the
switches when the robot is
referneced (receive
error#10022)
Verify that the armset
mounting bolts are torqued to
75-88 in-lbs.
YES
YES
NO
Was Issue Resolved?
NO
Reenter the robot
application number
Inspect the elbow bearings for
excessive wear or rough motion
Inspect the wrist bearings for
excessive wear or rough motion
Verify that the wrist band
tension is adjusted properly
Was Issue Resolved?
NO
Was Issue Resolved?
YES
NO
NO
Was Issue Resolved?
YES
NO
YES
Was Issue Resolved?
YES
DONE
YES
The Z Driver PCB has failed
Was Issue Resolved?
NO
CALL BROOKS
TECHNICAL
SUPPORT
Figure 10-5: Z Motion Troubleshooting
10-14
Brooks Automation
Revision 2.2
MagnaTran 7.1 User’s Manual
MN-003-1600-00
Troubleshooting
Find Phase Related Issues
Find Phase Related Issues
Symptoms:
A “Command Failed Error” occurs while traveling in the Z direction.
Troubleshooting Process:
Inspect lower Z travel microswitch for proper adjustment and operation. Refer to Z
Hard Stop and Overtravel Limit Switch Adjustment on page 9-53.
Refer to Communication Related Issues on page 10-4 (Error 10009: Z Axis Hard Tracking Error).
Symptoms:
T1/T2 shafts do not move together while pinging in theta direction.
Troubleshooting Process:
Inspect robot shafts for a physical obstruction in the theta direction.
Replace theta driver board. Refer to T1/T2 Axis Driver Board Replacement on page 941.
Symptoms:
The Z drive does not move when commands are issued.
Troubleshooting Process:
Perform Z Brake Binding Test on page 10-27.
If the brake does not disengage:
•
check connection to Z-Driver board
•
User 24V supply to verify brake disengages when power is applied. If
the brake disengages, replace the Z-Driver board. If the brake does not
disengage, replace the Z-brake.
Call Brooks Technical Support.
Brooks Automation
Revision 2.2
10-15
Troubleshooting
Find Phase Related Issues
MagnaTran 7.1 User’s Manual
MN-003-1600-00
Find Phase Related
Issues, Theta Drive
Command Failed
Error While Finding
Phase for Theta Drive
Hard Tracking Error
While Finding Phase
for Theta Drive
T1/T2 Shafts Do Not
Move Together, or
Pauses During Pinging
Verify that all cabling from
the Theta Motors and
Encoders are connected
properly and have proper
continuity
YES
Was Issue Resolved?
YES
Verfiy that all six phase LED's
(DS1 through DS6) are lit on
the Theta Driver PCB
NO
NO
Are the LED's lit?
The Personality PCB has failed
DONE
Check the Theta Driver PCB
for a shorted FET
Replace the Theta Driver PCB
YES
Issue the command:
RDMCC 0x0
YES
Was Issue Resolved?
NO
Is Threre A
Shorted FET?
Did the robot respond?
NO
The PC/104 Card has failed
NO
Verify that the arms have
been removed from the robot
YES
YES
Was Issue Resolved?
NO
Verify that the DC/DC
Converter on the Theta Driver
PCB is not shorted/Call
Remove the arms and repeat the
Find Phase command
YES
Were the arms
installed?
NO
NO
Turn the T1 and T2 Shafts by
hand; look for rough
movement
Is the DC/DC
Converter Shorted?
YES
The DC/DC Converter of the
Theta Driver PCB has failed
Is there rough
movement?
YES
DONE
NO
CALL BROOKS
TECHNICAL
SUPPORT
Figure 10-6: Find Phase/Theta Drive Troubleshooting
10-16
Brooks Automation
Revision 2.2
MagnaTran 7.1 User’s Manual
MN-003-1600-00
Troubleshooting
Find Phase Related Issues
Find Phase Issues,
Z Drive
Command Failed
Error While Finding
Phase for Z Drive
Hard Tracking Error
While Finding Phase
for Z Drive
Verify that cabling from the Z
Motor, Encoder, and Brake
are connected properly and
have proper continuity
YES
Was Issue Resolved?
Verfiy that all three phase
LED's (DS1, DS2, and DS3)
are lit on the Z Driver PCB
NO
YES
NO
Are the LED's lit?
The Personality PCB has failed
DONE
Check the Z Driver PCB for a
shorted FET
Replace the Z Driver PCB
YES
Issue the command:
RDMCC 0x0
YES
Was Issue Resolved?
NO
Is Threre A
Shorted FET?
Did the robot respond?
NO
The PC/104 Card has failed
NO
Perform a Z Brake Binding Test to
determine if there is excessive friction
in the Z Drive
YES
YES
Was Issue Resolved?
NO
Verify that the DC/DC
Converter on the Theta Driver
PCB is not shorted
Is There Excessive
Frition Present?
NO
YES
NO
Is the DC/DC
Converter Shorted?
YES
The DC/DC Converter of the
Theta Driver PCB has failed
DONE
CALL BROOKS
TECHNICAL
SUPPORT
Figure 10-7: Find Phase/Z Drive Troubleshooting
Brooks Automation
Revision 2.2
10-17
Troubleshooting
Home Z Axis Related Issues
MagnaTran 7.1 User’s Manual
MN-003-1600-00
Home Z Axis Related Issues
Symptoms:
Command Failed” error while homing Z axis.
Troubleshooting Process:
Ensure cable (002-2196-01) is plugged into both Z home flag sensor board (001-195703, designation P14) and Z driver board (002-1655-01, designation P5). Check cable
for proper continuity.
Verify red LED of Z home flag sensor board (designation U2) illuminates when the Z
home flag sensor (designation U1) is blocked. If not, replace Z home flag sensor board.
Refer to Z Home Flag Sensor Board Replacement Procedure on page 9-50.
Verify home flag trips the Z home flag sensor at proper home gap (0.062”). Refer to Z
Home Flag Sensor Board Replacement Procedure on page 9-50.
Replace Personality Board. Refer to Personality Board Replacement on page 9-37.
Call Brooks Technical Support.
10-18
Brooks Automation
Revision 2.2
MagnaTran 7.1 User’s Manual
MN-003-1600-00
Troubleshooting
Home Z Axis Related Issues
Z Home Axis Related
Issues
Command Failed Error
While Homing the Z Axis
Was There Any
Movement in the Z Axis
When the Command Was
Issued?
YES
NO
Verify connection of the cable
between the Z Home Sensor PCB
and the Z Driver PCB
Verify connection of the Z Motor,
the Z Brake, and the Z Encoder with
the Z Driver PCB
YES
Verify that the LED's (designated
DS1, DS2, and DS3) on the Z Driver
PCB are lit after homing in Z Axis
Was Issue Resolved?
NO
Was Issue Resolved?
YES
NO
Verify that the red light
(designated U2) of the Z Home
Sensor PCB illuminates when
the sensor (designated U1) is
blocked.
DONE
Are the LED's Lit?
NO
Verify the connection of the power
cable between the Z Driver PCB and
theTheta Driver PCB
YES
The Z Home Sensor PCB has failed
NO
Did the Light Illuminate?
The Z Driver PCB has failed
NO
Was Issue Resolved?
YES
YES
YES
Was Issue Resolved?
NO
Verify that the Z Home Flag trips
the Z Home Flag Sensor when
the robot is homed
Was Issue Resolved?
YES
NO
Reset the Z Home Flag, Limit
Switches, and Hard Stops
YES
YES
Did the Sensor Trip?
NO
The Personality PCB has failed
Was Issue Resolved?
NO
CALL BROOKS
TECHNICAL
SUPPORT
DONE
Figure 10-8: Z Home Axis Troubleshooting
Brooks Automation
Revision 2.2
10-19
Troubleshooting
Operational Interlock Related Issues
MagnaTran 7.1 User’s Manual
MN-003-1600-00
Operational Interlock Related Issues
Operational Interlocks pertain to all robot interlocks that are active through the Miscellaneous I/O connector of the robot. These include wafer sensors, slot valve sensors,
retract arm sensor, emergency stop function, etc. Refer Operational Interlocks on page
6-23.
Symptoms:
Operational Interlock is not functional.
or Operational Interlock state is not valid.
Troubleshooting Process:
Verify that the appropriate operational interlock has been properly set and stored in
the robot via the MAP command by issuing the command RQ IO MAP ALL. If necessary, properly set and store the operational interlock per the host controller requirements by issuing the MAP command. Refer to Map on page 8-44.
Verify that the operational interlock is set to the appropriate “active state” (hi or lo)
per the host controller requirements.
Verify that the operational interlock is set to the appropriate pin of the Miscellaneous
I/O connector per the host controller requirements.
Verify that the operational interlock state will toggle by issuing the RQ IO STATE
ALL command while physically changing the operational interlock state. For example, if using the WAF_SEN operational interlock, issue the RQ IO STATE ALL command while physically blocking and not blocking the appropriate wafer sensor.
For slot valves, check that slot valve is functional. For wafer sensors and retract sensors, check wafer sensor sensitivity adjustments. For emergency off (EMO) buttons,
check that button is functional.
Check wafer sensor cables for proper connection and continuity.
Verify that power is supplied to Miscellaneous I/O via external power source or MagnaTran 7 robot. For external supplied power, place +24V on pin 25 and 24V RTN on
pin 27. For MagnaTran 7 supplied power, jump pin 25 to pin 30 and jump pin 27 to pin
29. Refer to MISC I/O Communications on page 5-9.
Verify that all fiber optic cable is fully seated at all connections.
Call Brooks Technical Support.
10-20
Brooks Automation
Revision 2.2
MagnaTran 7.1 User’s Manual
MN-003-1600-00
Troubleshooting
Operational Interlock Related Issues
Operational Interlock
Related Issues
Operational Interlock
is Not Functional
Operational Interlock
State is Invalid
Verify that the interlock has
been properly set and stored
via the MAP command
YES
Was Issue Resolved?
NO
Verify that the interlock is set
to the proper "active state"
(hi or lo) according to the
host controller's
requirements
Was Issue Resolved?
Verify that the interlock is set
to the corresponding pin of
the Miscellaneous I/O
connector according to the
host controller's
requirements
YES
NO
Was Issue Resolved?
NO
Verify that the interlock's
state will toggle using RQ IO
STATE ALL while physically
changing the interlock's state
Was Issue Resolved?
Verify that the interlocked
items are operational (i.e. slot
valves can open, wafer
sensor sensitivity is within
spec, EMO buttons are
operational)
YES
YES
NO
Was Issue Resolved?
NO
Verify that power is supplied
to the Miscellaneous I/O
either externally or via
jumpers on the Miscellaneous
I/O connector
Was Issue Resolved?
Check the wafer sensor
cables for proper connection
and continuity
YES
YES
YES
NO
Was Issue Resolved?
NO
Verify that all fiber optic cable
is fully seated at all
connections
CALL BROOKS
TECHNICAL
SUPPORT
Was Issue Resolved?
YES
NO
DONE
Figure 10-9: Operational Interlock Troubleshooting
Brooks Automation
Revision 2.2
10-21
Troubleshooting
Repeatability Related Issues
MagnaTran 7.1 User’s Manual
MN-003-1600-00
Repeatability Related Issues
Symptoms:
Wafer is not placed to same position repeatedly.
Troubleshooting Process:
Inspect for physical obstruction interfering with robot arms and wafer placement.
Verify process module and its wafer pins are level.
Verify robot wrist bands are adjusted properly.
Inspect robot wrist bearings and elbow bearings for excessive wear.
Verify that robot encoder values are repeatable to the desired station. Refer to Position
Repeatability Test on page 10-33.
Reference Radial Motion Related Issues on page 10-8 and Theta Motion Related Issues
on page 10-10.
10-22
Brooks Automation
Revision 2.2
MagnaTran 7.1 User’s Manual
MN-003-1600-00
Troubleshooting
Repeatability Related Issues
Repeatability Related
Issues
Wafer is Not Placed
To The Same Place
Repeatedly
Inspect for any physical obstructions that could
interfere with the robot arms and wafer
placement
YES
Was Issue Resolved?
NO
Verify that the process module and its wafer
pins are level
YES
Was Issue Resolved?
NO
Verify that the robot's end effector is level and
the pads do not show excessive wear
YES
Was Issue Resolved?
NO
Verify that the wrist bands are aligned properly
DONE
YES
Was Issue Resolved?
NO
Inspect the robot wrist bearings and elbow
bearings for excessive wear
YES
Was Issue Resolved?
NO
Verify that the Encoder and Sync Phase values
are consistant with the robot QR
YES
Was Issue Resolved?
NO
CALL BROOKS
TECHNICAL
SUPPORT
Figure 10-10: Repeatability Related Troubleshooting
Brooks Automation
Revision 2.2
10-23
Troubleshooting
Power Pak Related Issues
MagnaTran 7.1 User’s Manual
MN-003-1600-00
Power Pak Related Issues
Symptoms:
Arms “drift” after halted by Power Pak when main robot power is turned off.
Troubleshooting Process:
Verify robot compatibility command is set for a Mag6 halt configuration by
issuing the command RQ COMPATIBILITY ALL. If not, set and store the correct compatibility by issuing the commands: SET COMPATIBILITY HALT
MAG6 and STORE COMPATIBILITY HALT MAG6.
Verify that the Power Pak interlocks have been properly set by issuing the
command RQ IO MAP ALL. If not, the Power Supply interlocks can be set and
stored using the MAP command. Refer to Map on page 8-44.
For additional troubleshooting steps, refer to Operational Interlock Related
Issues on page 10-20.
10-24
Brooks Automation
Revision 2.2
MagnaTran 7.1 User’s Manual
MN-003-1600-00
Troubleshooting
Power Pak Related Issues
PowerPak Related
Issues
Arms "Drift" After the
Robot is Halted By
The Power Supply
After a Loss of Power
Verify that the robot's HALT
compatibility is set correctly
with the command RQ
COMPATIBILITY ALL
VT5
What is the HALT
Compatibility Set To?
MAG6
The robot will deservo the
Theta and Z Motors, and
engage the Z Brake after the
HALT command has been
issued
The robot will remain servoed
in all axes after the HALT
command has been issued
Change the HALT
compatibility with the
command SET
COMPATIBILITY HALT MAG6,
and store it with the
command STORE
COMPATIBILITY ALL
Verify that the Power Pak's
interlocks have been set
properly with the command
RQ IO MAP ALL
Was Issue Resolved?
NO
NO
Was Issue Resolved?
YES
YES
CALL BROOKS
TECHNICAL
SUPPORT
DONE
Figure 10-11: Power Pak Troubleshooting
Brooks Automation
Revision 2.2
10-25
Troubleshooting
Station Value/Orientation Related Issues
MagnaTran 7.1 User’s Manual
MN-003-1600-00
Station Value/Orientation Related Issues
Symptom:
Arm B moves 180 degrees from desired theta station value.
Troubleshooting Process:
Verify station values are correct.
Verify correct coordinate system is being used by issuing the command RQ COMPATIBILITY ALL. Change coordinate system accordingly by issuing the commands
SET COMPATIBILITY COORDT [VT5 or Mag6] and STORE COMPATIBILITY ALL.
Refer to the Appendix D: Robot Compatibility on page 11-5 for additional information
on the compatibility command.
10-26
Brooks Automation
Revision 2.2
MagnaTran 7.1 User’s Manual
MN-003-1600-00
Troubleshooting
Z Brake Binding Test
Z Brake Binding Test
TOOLS:
Laptop computer with Procomm or equivalent
PROCEDURE:
This procedure determines if the Z brake is inhibiting the Z leadscrew motion.
1.
Connect laptop to robot via serial communications port.
2.
Ensure the robot is referenced by issuing the command: HOME ALL.
3.
Move the robot upward to the maximum Z height by issuing the following
command:
MOVE Z ABS 25000
NOTE: Note: the maximum Z height is normally 25 mm or 35 mm, pending the
user application. The units of measure for the following command are
micrometers (25 mm = 25000 units).
4.
Turn the servos off by issuing the following command:
SET SERVOS OFF
5.
Place a thin, protective cloth between the robot armset and the transfer chamber to prevent scratching them in Step #6.
6.
Turn the Z brake off by issuing the following command:
ZBRAKE OFF
WARNING
The robot will free-fall in the Z direction. Ensure that personnel and
physical obstructions are clear of the robot’s armset and internal theta
motor housing.
The robot should move smoothly downward in the Z direction due to gravity.
Allow the robot to fall freely in the Z direction until it stops on its own.
Brooks Automation
Revision 2.2
10-27
Troubleshooting
Z Brake Binding Test
MagnaTran 7.1 User’s Manual
MN-003-1600-00
7.
After the robot has finished free-falling in the Z direction, measure the distance
between the bottom of the robot armset and the top of the transfer chamber.
Record the measurement value.
8.
If the distance measured is less than 4 mm, then the Z brake is not binding. If
the distance is greater than 4 mm, call Brooks Technical Support.
9.
Reference the robot by issuing the command: HOME ALL.
Procedure is complete.
10-28
Brooks Automation
Revision 2.2
MagnaTran 7.1 User’s Manual
Troubleshooting
MN-003-1600-00
Determine if the Z Axis is Configured Properly Via Software
Determine if the Z Axis is Configured Properly Via Software
TOOLS:
Laptop computer with Procomm or equivalent
PROCEDURE:
1.
Connect laptop to robot via serial communications port.
2.
Determine if the Mag7 is currently configured for Z axis operation by issuing
the following command.
RQ ARMS ALL
The robot will respond with a large list of arm settings. An example of the last
7 lines on this robot response list are shown below:
Pan B ctr of mass, Y coordinate -Pan B pad offset ---------------------total z travel --------------------------mass seen by the z motor in kg --Z motor spring constant -----------Extension arm Angle ----------------Retract arm Angle -------------------The Z axis is configured if the robot response includes the line “total z travel --”. This line will always be the 5th line from the bottom of the robot response.
The Z axis is NOT configured if the robot response does NOT include the line
“total z travel ---”.
3.
If the Z axis configuration is not correct, contact Brooks Technical Support for
the correct application number. The application number is entered into the
robot by issuing the following command:
CONFIG ROBOT APPLIC [application number]
Procedure is complete.
Brooks Automation
Revision 2.2
10-29
Troubleshooting
Z Binding Test Using the Trace Command
MagnaTran 7.1 User’s Manual
MN-003-1600-00
Z Binding Test Using the Trace Command
TOOLS:
Laptop computer with Procomm or equivalent
PROCEDURE:
This procedure uses the diagnostic command TRACE to determine the Z motor
torque required to move the robot in the Z axis. The trace command results provide
the duty cycle percentage of the Z motor during a given move. This duty cycle percentage must be less than 75%.
1.
Connect laptop to robot via serial communications port.
2.
Ensure the robot is in the home position by issuing the command: HOME ALL.
3.
Enter the appropriate trace settings by issuing the following commands:
TRACE CLEAR
TRACE ADD ZACTTRQ
TRACE TRIGGER TRJSTART
TRACE PERIOD 5
TRACE START
NOTE: Note: the TRACE function will initiate immediately following the robot’s
next movement.
4.
Move the robot upward to the maximum Z height by issuing the following
command:
MOVE Z ABS 25000
NOTE: Note: the maximum Z height is normally 25 mm or 35 mm, pending the
user application. The units of measure for the following command are
micrometers (25 mm = 25000 units).
5.
Stop the TRACE function by issuing the following command:
TRACE STOP
6.
Request the trace function results by issuing the command:
TRACE DNLD 200
10-30
Brooks Automation
Revision 2.2
MagnaTran 7.1 User’s Manual
MN-003-1600-00
Troubleshooting
Z Binding Test Using the Trace Command
The robot will provide 200 lines of duty cycle percentage data. An example of
this data is shown below:
trace dnld 200
zTrq
0.586605
0.585223
0.585713
0.585382
0.586448
0.585883
0.585537
0.585722
0.585630
0.585806
7.
Verify that the maximum value is less than 0.750000 (which is less than 75% of
the Z motor duty cycle). If any number is greater than 0.750000, then call
Brooks Technical Support.
8.
Reinstate the trace function by issuing the following command. Note the trace
command settings from Step # 3 will be retained in the robot until the TRACE
CLEAR command is issued.
START TRACE
9.
Move the robot downward to the minimum Z height by issuing the following
command. The minimum Z height is 0 mm. The units of measure for the following command are micrometers (0 mm = 0 units).
MOVE Z ABS 0
10.
Stop the TRACE function by issuing the following command:
TRACE STOP
11.
Request the trace function results by issuing the command:
TRACE DNLD 200
12.
The robot will provide 200 lines of duty cycle percentage data.
13.
Calculate and record the average of the duty cycle percentage data for downward motion. Verify that all numbers are less than 0.750000 (which is less than
75% of the Z motor duty cycle) and similar to the average value calculated in
Step # 7. If either of these conditions is not met, then call Brooks Technical Support.
Procedure is complete.
Brooks Automation
Revision 2.2
10-31
Troubleshooting
Main Power Grounding Scheme Requirements
MagnaTran 7.1 User’s Manual
MN-003-1600-00
Main Power Grounding Scheme Requirements
10-32
1.
Ensure that the robot’s 24 volt power supply is unplugged and turn power
OFF.
2.
Connect the P3 connector of the MagnaTran 7 power cable (002-2198-01) to the
input power connector of the robot .
3.
Secure the +24 volt power lead (red) of the MagnaTran 7 power cable to the +24
volt DC terminal of the power supply. Reference Figure 1.
4.
Secure the +24 volt return lead (black), earth ground lead (green), and the logic
ground lead (white) of the MagnaTran 7 power cable to the 24 volt return terminal of the power supply. Reference Figure 1.
5.
Ensure that the 24 volt return terminal of the power supply is connected to the
power supply’s chassis ground. Reference Figure 1.
6.
Plug the robot’s 24 volt DC power supply in and turn power ON.
Brooks Automation
Revision 2.2
MagnaTran 7.1 User’s Manual
MN-003-1600-00
Troubleshooting
Position Repeatability Test
Position Repeatability Test
TOOLS:
Laptop computer with Procomm or equivalent
PROCEDURE:
This procedure determines if the robot is repeatable to its encoder position.
1.
Connect laptop to robot via serial communications port.
2.
Move the robot to a desired station by issuing the command:
GOTO N [station number]
3.
Extend the robot into the desired station by issuing the command:
GOTO R EX
WARNING
Warning: Ensure that the slot valve is open and any physical obstructions are removed prior to extending the robot armset.
4.
Request the present absolute position of the robot’s encoders by issuing the
command:
RQ POS ABS ALL
Record the position values.
5.
Move the robot to another location.
6.
Move the robot back to the position in Step # 3.
7.
Request the present absolute position of the robot’s encoders by issuing the
command:
RQ POS ABS ALL
Record the encoder values.
8.
Repeat Steps #5 through #7 a minimum of ten times.
9.
Verify that the encoder positions are repeatable to within 20 units for all axes.
If not, call Brooks Technical Support.
Procedure is complete.
Brooks Automation
Revision 2.2
10-33
Troubleshooting
Verifying “Arm State” of Magnatran 7
MagnaTran 7.1 User’s Manual
MN-003-1600-00
Verifying “Arm State” of Magnatran 7
The “arm state” of the Magnatran 7 robot indicates whether the armset is “installed”
or “not installed” on the robot drive. If the armset is “installed” on the robot and the
arm state is set to “on”, then the servo control table per the user specific application
number controls robot motion. If the armset is “not installed” on the robot and the
arm state is set to “off”, then the servo control table identified as either “shaft7z” or
“shaft7” controls robot motion. The differences in the servo control tables is governed
by the mass of the robot armset. If the incorrect “arm state” is entered in the robot, a
hard tracking error will occur due to the significant difference in mass. The “arm
state” of the robot can be set via both serial communication or the CDM.
1.
To request the arm state via serial communication, issue the following commands:
RQ CONFIG - this command will provide the application number presently
entered in the robot.
If the application number is “shaft7z” or “shaft7”, then the arm state is “OFF”.
If the application number is a specific user application number, then the arm
state is “ON”. An example of a user specific application number is: F65-K42S43-1-73
2.
To set the arm state via serial communication, issue the following commands:
SET ARMS ON - this command will set and automatically store the arm state
to “ON”. The robot will default to the user specific application number previously stored in the robot. If, however, the default remains “shaft7z” or
“shaft7”, re-enter the configuration number from the QR.
SET ARMS OFF - this command will set and automatically store the arm state
to “OFF”. The robot will default to either the “shaft7z” or “shaft7” configuration number.
3.
To request, set, and store the arm state via the CDM, refer to the CDM flow
chart on Figure 4-7 on page 4-19. Follow the CDM path:
SETUP / CONFIG ROBOT / ARM STATE
10-34
Brooks Automation
Revision 2.2
MagnaTran 7.1 User’s Manual
MN-003-1600-00
Troubleshooting
Verifying Robot Calibration Parameters
Verifying Robot Calibration Parameters
The following procedure can be used to verify that the robot calibration parameters
are the same as when the robot was shipped from the Brooks factory.
TOOLS:
•
Laptop computer
•
Robot Quality Report (QR)
PROCEDURE:
1.
Establish serial communication between the laptop and the robot.
2.
Request the encoder T1 and encoder T2 calibration parameters presently
stored in the robot by issuing the following commands:
RQ ENCODER T1 ALL
RQ ENCODER T2 ALL
The robot will respond with four values for each encoder request.
3.
Compare the encoder T1 and encoder T2 values with those located on the last
page of the robot Quality Report (QR). Verify that all the encoder values are
identical.
4.
Request the synchronization phase calibration parameters presently stored in
the robot by issuing the following commands:
RQ SYNC PHASE ALL
The robot will respond with 3 values.
5.
Compare the synchronization phase values with those located on the last page
of the robot Quality Report (QR). Verify that all the encoder values are identical.
If any of the above calibration parameters do not match those of the QR, call Brooks
Technical Support.
Brooks Automation
Revision 2.2
10-35
Troubleshooting
MagnaTran 7.1 User’s Manual
Checking for FET Short Circuits on the Theta Driver Board
MN-003-1600-00
Checking for FET Short Circuits on the Theta Driver Board
TOOLS:
•
Ohmmeter
•
Medium phillips head screwdriver
•
Medium flat head screwdriver
•
M3 hex wrench
PROCEDURE:
1.
Turn off the power to the robot.
2.
Disconnect all power and communication cables from the robot I/O face plate.
3.
Remove the two robot covers via the four captive screws.
4.
Remove the Lower Cover Mount Assembly.
Loosen the lower captive screw of the I/O board. Loosen the three upper captive screws of the Lower Cover Mount Assembly. See Figure 12-4. Gently allow
the Lower Cover Mount Assembly to drop down.
5.
Locate the theta driver board. Locate the FET designated Q1 and measure its
resistance by applying an ohmmeter across pin # 1 and pin #3 of the FET.
Record the resistance in ohms.
6.
Repeat Step #5 for the FETs designated Q2 through Q24 on the theta driver
board. For each FET, record the resistance in ohms.
7.
If any FET ohms out at less than 1k ohms, then the FET has a short circuit and
the theta driver board must be replaced. Refer to T1/T2 Axis Driver Board
Replacement on page 9-41.
8.
If no FETs are short circuited, then continue to Step #9.
9.
Reinstall the base plate using four captive screws.
10.
Reinstall the base plate using four captive screws.
11.
Reinstall the two robot covers using four captive screws.
12.
Reconnect all power and communication cables to the robot I/O face plate.
13.
Turn robot power on.
Procedure is complete.
10-36
Brooks Automation
Revision 2.2
MagnaTran 7.1 User’s Manual
MN-003-1600-00
Troubleshooting
Checking for FET Short Circuits on the Z Driver Board
Checking for FET Short Circuits on the Z Driver Board
TOOLS:
•
Ohmmeter
•
Medium phillips head screwdriver
•
Medium flat head screwdriver
•
M3 hex wrench
PROCEDURE:
1.
Turn off the power to the robot.
2.
Disconnect all power and communication cables from the robot I/O face plate.
3.
Remove the two robot covers via the four captive screws.
4.
Remove the Lower Cover Mount Assembly.
Loosen the lower captive screw of the I/O board. Loosen the three upper captive screws of the Lower Cover Mount Assembly. See Figure 12-4. Gently allow
the Lower Cover Mount Assembly to drop down.
5.
Locate the Z driver board. Locate the FET designated Q1 and measure its resistance by applying an ohmmeter across pin # 1 and pin #3 of the FET. Record
the resistance in ohms.
6.
Repeat Step # 5 for the FETs designated Q1 through Q12 on the Z driver board.
For each FET, record the resistance in ohms.
7.
If any FET ohms out at less than 1k ohms, then the FET has a short circuit and
the Z driver board must be replaced. Refer to Z Driver Board Replacement on
page 55.
8.
If no FETs are short circuited, then continue to Step #9.
9.
Reinstall the base plate using four captive screws.
10.
Reinstall the base plate using four captive screws.
11.
Reinstall the two robot covers using four captive screws.
12.
Reconnect all power and communication cables to the robot I/O face plate.
13.
Turn robot power on.
Procedure is complete.
Brooks Automation
Revision 2.2
10-37
Troubleshooting
Checking for FET Short Circuits on the Z Driver Board
MagnaTran 7.1 User’s Manual
MN-003-1600-00
This Page Intentionally Left Blank
10-38
Brooks Automation
Revision 2.2
MagnaTran 7.1 User’s Manual
MN-003-1600-00
11
Appendices
Overview
The following appendices are included to provide the user with a single location for
specific information related to the MagnaTran 7 Robot.
Contents
Appendix A: Factory Default Settings . . . . . . . . . . . . . . . . . . . . . . . . . . . . . . . . . . .11-2
Appendix B: Tooling . . . . . . . . . . . . . . . . . . . . . . . . . . . . . . . . . . . . . . . . . . . . . . . . . .11-3
Appendix C: Torque Settings . . . . . . . . . . . . . . . . . . . . . . . . . . . . . . . . . . . . . . . . . . .11-4
Appendix D: Robot Compatibility . . . . . . . . . . . . . . . . . . . . . . . . . . . . . . . . . . . . . .11-5
Appendix E: User Setting Tables . . . . . . . . . . . . . . . . . . . . . . . . . . . . . . . . . . . . . . . .11-17
Appendix F: Relay I/O Option . . . . . . . . . . . . . . . . . . . . . . . . . . . . . . . . . . . . . . . . .11-24
Brooks Automation
Revision 2.2
11-1
Appendices
Appendix A: Factory Default Settings
MagnaTran 7.1 User’s Manual
MN-003-1600-00
Appendix A: Factory Default Settings
Default Robot Settings
The Quality Report shipped with the robot contains a list of all the factory default setting. Refer to the QR to reset to the default.
Serial Communications Default Settings
Table 11-1: RS-232/RS-422 Protocol
Port Configuration
RS-232 or RS-422
Handshake
No
Baud Rate
9600
Parity Bits
None
Data Bits
8
Stop Bits
1
Parity
None
RTS/CTS
No
XON/XOFF
No
Pin Assignments RS-422
See Serial Communication SIO1 on page 5-5.
If using the Relay I/O board, see Appendix F: Relay I/O Option on page 11-24.
11-2
Brooks Automation
Revision 2.2
MagnaTran 7.1 User’s Manual
MN-003-1600-00
Appendices
Appendix B: Tooling
Appendix B: Tooling
The following special tools and fixtures are supplied with the MagnaTran 7 Robot for
use during transport and maintenance.
Table 11-2: Tools and Fixtures
Part Number
Description
Dependent on
arm set
Arm Mounting/Shipping Bracket
001-1865-01
Serial or Null Modem Cable
000-1262-01
Dial Indicator with base as shown in Figure 7-1
002-4576-01
Gap setting fixture as used in Z Hard Stop and Overtravel Limit Switch Adjustment on page 9-53
002-5791-01
Motor Enable Interlock Bypass Jumper (optional)
Brooks Automation
Revision 2.2
11-3
Appendices
Appendix C: Torque Settings
MagnaTran 7.1 User’s Manual
MN-003-1600-00
Appendix C: Torque Settings
There are no user serviceable bolts requiring tightening to specific torque settings. All
user serviceable bolts use lock washers and should be tightened until the lock washers
are fully seated, then tighten the bolts an additional 1/4 turn.
Table 1: American UNC Thread Tightening Torque
Socket Head Cap Screw
Flat Head Screw
Button Head Screw
Newton
Meters
Inch
Pounds
Newton
Meters
Inch
Pounds
Newton
Meters
Inch
Pounds
2-56
.847
7.5
.722
6.4
.722
6.4
4-40
1.801
16.0
1.073
9.5
.790
7.0
6-32
3.387
30.0
2.145
19.0
1.411
12.5
8-32
6.201
55.0
3.387
30.0
2.597
23.0
10-24
8.919
79.0
7.339
65.0
5.081
45.0
Newton
Meters
Foot
Pounds
Newton
Meters
Foot
Pounds
Newton
Meters
Foot
Pounds
Size
Size
1/4-20
22.587
16.67
15.808
11.67
11.856
8.75
5/16-18
46.860
34.58
27.664
20.42
21.454
15.83
3/8-16
83.558
61.67
44.038
32.50
33.875
25.00
7/16-14
134.371
99.17
65.492
48.33
---
---
1/2/13
203.250
150.00
132.122
97.50
127.031
93.75
5/8-11
383.917
283.33
225.833
166.67
211.719
156.25
3/4-10
677.500
500.00
259.708
191.67
---
---
Table 2: Metric Coarse Thread Tightening Torque
Socket Head Cap Screw
Metric
Size
2 x 0.4
Flat Head Screw
Button Head Screw
Newton
Meters
Inch
Pounds
Newton
Meters
Inch
Pounds
Newton
Meters
Inch
Pounds
.690
6.1
---
---
---
---
2.5 x 0.45
1.425
12.6
---
---
---
---
3 x 0.5
2.475
21.9
1.125
10.0
.938
8.3
4 x 0.7
5.850
51.8
2.550
22.6
2.175
19.3
5 x 0.8
12.000
106.2
5.175
45.8
4.425
39.2
Newton
Meters
Foot
Pounds
Newton
Meters
Foot
Pounds
Metric
Size
Newton
Meters
Foot
Pounds
6 x 1.0
20.250
14.94
9.000
6.64
7.500
5.54
8 x 1.25
48.750
35.98
21.000
15.50
18.000
13.28
10 x 1.5
97.500
71.96
42.000
31.000
36.000
26.57
12 x 1.75
165.000
121.77
74.250
54.80
63.000
46.49
16 x 2.0
412.500
304.43
184.500
136.16
155.250
114.57
11-4
Brooks Automation
Revision 2.2
MagnaTran 7.1 User’s Manual
MN-003-1600-00
Appendices
Appendix D: Robot Compatibility
Appendix D: Robot Compatibility
The following information is for users replacing a MultiTran 5/VacuTran 5, or MagnaTran 6 with the Brooks Automation MagnaTran 7 Series robot.
•
Table 11-3 compares the commands used to operate the MagnaTran 6 and
MT5/VT5 to the MagnaTran 7 robot and notes any behavioral differences.
•
Table 11-4 and Table 11-5 compare the error code differences of the MagnaTran
6 and MT5/VT5 to the MagnaTran 7 robot.
•
Table 11-6 and Table 11-6 list the Compatibility Commands used to setup the
MagnaTran 7 robot to use the communication protocol of the MagnaTran 6 or
the MT5/VT5.
Brooks Automation
Revision 2.2
11-5
Appendices
Appendix D: Robot Compatibility
MagnaTran 7.1 User’s Manual
MN-003-1600-00
Command Comparison
Table 11-3: Command Comparison
COMMAND
MAG6
DIO START
DIO STOP
MAG7
M6/7 are same
M6/7 are same
FIND PHASE
VT5/MT5
N/A
M6/7 are same
N/A
must enter options
must enter options
“ARM” optional
“ARM” is a must.
Wafer speed is
used regardless of
load status.
GOTO
“ARM” optional
HALT
VT5/Mag 6/Mag 7 command structure is the same.
In VT5 mode, the robot comes to a control stop and the armset servos disengage (armset is free moving).
In Mag 6 mode, the robot comes to a control stop and the arm
set servos remain engaged (armset is under servo control).
Hllo
HOME
N/A
V5/M6/7 are same
M6/7 are same
M6/7 are same
N/A
MOVE
“ARM” optional
“ARM” optional
“ARM” is a must.
Wafer speed is
used regardless of
load status.
PICK
“ARM” optional
SLOT number
starts with one
“ARM” optional
SLOT number
starts with one
“ARM” is a must
SLOT number
starts with zero
see pick
see pick
Initial motions of
PLACE will be
performed at
“with wafer”
speed
M6/7 are same
M6/7 are same
N/A
PLACE
REMOVE IO
11-6
Returns ready
string only
V5/M6/7 are same
LFTST
MAP
Returns “Hello”
string
Brooks Automation
Revision 2.2
MagnaTran 7.1 User’s Manual
MN-003-1600-00
Appendices
Appendix D: Robot Compatibility
Table 11-3: Command Comparison
COMMAND
MAG6
RESET
M6/7 are same
Returns: “Brooks
Automation”
RQ BG
V5/M6/7 are same
RQ COMM
[DREP] is not supported, but with a
new option [LF]
RQ CPTR
MAG7
VT5/MT5
M6/7 are same
Returns: “Brooks
Automation”
V5 returns different string
[DREP] is not supported, but with a
new option [LF]
Has [DREP]
option
VT5/Mag 6/Mag 7 command format is the same but the
return formats are different.
In Monitor Mode and Packet Mode, RQ CPTR response is:
VT5: CPTR R 1234567 T 1234567 Z 1234567 L
Mag 6: R 1234567 T 1234567 Z 1234567 L
RQ IO ECHO
VT5/Mag 6/Mag 7 command format is the same but the
return formats are different.
In Monitor Mode, RQ IO ECHO response is:
VT5: Echo status : Y
Mag6: IO ECHO Y
In both VT5 and Mag 6 mode, the response to
RQ COMM ECHO is:
COMM
ECHO - - - - - - - - - -ON
In Packet Mode, RQ IO ECHO response is:
VT5: IO Y
Mag 6: IO ECHO Y
In both VT5 and Mag 6 mode, the response to
RQ COMM ECHO is:
COMM ON
RQ IO MAP
M6/7 are same
M6/7 are same
N/A
RQ IO STATE
M6/7 are same
M6/7 are same
N/A
RQ LOAD
M6/7 are same
M6/7 are same
N/A
Brooks Automation
Revision 2.2
11-7
Appendices
Appendix D: Robot Compatibility
MagnaTran 7.1 User’s Manual
MN-003-1600-00
Table 11-3: Command Comparison
COMMAND
MAG6
MAG7
VT5/MT5
RQ POS ABS
M6/7 are same
“ARM” is
optional.
Always returns in
RTZ order.
M6/7 are same
“ARM” is
optional.
Always returns in
RTZ order.
No “ARM” should
be used. The
return does not
include “ARM”
string either.
Returns RTZ in
order requested.
Monitor Mode response to RQ POS ABS ALL:
VT5:
Radial : xxxxxx
Theta : xxxxxx
Z :
xxxxx
MAG6:
POS ABS
RADIAL ----xxxxxx
THETA -----xxxxxx
Z -------------xxxxxx
Packet Mode response to RQ POS ABS ALL
VT5 and MAG6:
POS ABS xxxxxx xxxxxx xxxxxx
11-8
RQ POS STN
M6/7 are
same“ARM” is
optional
M6/7 are
same“ARM” is
optional
No “ARM” should
be used.
RQ POS STR
M6/7 are
same“ARM” is
optional
M6/7 are
same“ARM” is
optional
No “ARM” should
be used. The
return does not
include “ARM”
string either.
RQ STN
M6/7 are
same“ARM” is
optional
M6/7 are
same“ARM” is
optional
No “ARM” should
be used. The
return does not
include “ARM”
string either.
RQ STN OPTION
M6/7 are same
M6/7 are same
N/A
RQ STNSENSOR
M6/7 are
same“ARM” is
optional
M6/7 are
same“ARM” is
optional
“ARM” is a must.
Response is different.
Brooks Automation
Revision 2.2
MagnaTran 7.1 User’s Manual
MN-003-1600-00
Appendices
Appendix D: Robot Compatibility
Table 11-3: Command Comparison
COMMAND
MAG6
MAG7
VT5/MT5
In Monitor Mode, the response is:
VT5: STN 01 ARM A TYPE RE ACT LO SEN 01 STATE OFF
MAG6: STN 1 ARM A
TYPE-------RE
ACT--------LO
SEN--------1
STATE-----OFF
In Packet Mode, the response is:
VT5: STN 01 ARM A TYPE RE ACT HI SEN 01 STATE OFF
MAG6: STN 1 ARM A TYPE RE ACT HI SEN 1 STATE OFF
SET COMM
[DREP] is supported; also a new
option [LF]
[DREP] is supported; also a new
option [LF]
Has [DREP
[AUT|REQ]
option
SET HISPD
V5/M6/7 are
same
V5/M6/7 are
same
V5/M6/7 are
same
SET LOSPD
V5/M6/7 are
same
V5/M6/7 are
same
V5/M6/7 are
same
SET IO ECHO
V5/M6/7 are
same
V5/M6/7 are
same
V5/M6/7 are
same
SET IO STATE
M6/7 are same
M6/7 are same
N/A
SET LOAD
M6/7 are same
M6/7 are same
N/A
SET STN
M6/7 are
same“ARM” is
optional
M6/7 are
same“ARM” is
optional
No “ARM” should
be used.
SET STN OPTION
M6/7 are same
M6/7 are same
N/A
SET STNSENSOR
M6/7 are
same“ARM” is
optional. The error
codes are different from that in
VT5
M6/7 are
same“ARM” is
optional. The error
codes are different from that in
VT5
“ARM” is a must
STORE COMM
[DREP] is not supported, but with a
new option [LF]
[DREP] is not supported, but with a
new option [LF]
Has [DREP
[AUT|REQ]
option
Brooks Automation
Revision 2.2
11-9
Appendices
Appendix D: Robot Compatibility
MagnaTran 7.1 User’s Manual
MN-003-1600-00
Table 11-3: Command Comparison
COMMAND
MAG6
MAG7
V5/M6/7 are
same
V5/M6/7 are
same
V5/M6/7 are
same
STORE STN
M6/7 are
same“ARM” is
optional
M6/7 are
same“ARM” is
optional
No “ARM” should
be used.
STORE STN
OPTION
M6/7 are same
M6/7 are same
N/A
STORE STNSENSOR
M6/7 are
same“ARM” is
optional
M6/7 are
same“ARM” is
optional
“ARM” is a must
XFER
M6/7 are
same“ARM” is
optional
M6/7 are
same“ARM” is
optional
“ARM” is a must
STORE IO ECHO
11-10
VT5/MT5
Brooks Automation
Revision 2.2
MagnaTran 7.1 User’s Manual
MN-003-1600-00
Appendices
Appendix D: Robot Compatibility
Error Code Comparison
Table 11-4 compares the error code differences of the MT5/VT5 to the MagnaTran 7.
Table 11-4: Error Code Comparison MT5/VT5
Error No.
Existing MT5/VT5 Error Code
Error No.
Mag 7/70/77 Error Code
411
Interlock Calc Overflow
408
Bad R Position
412
Invalid Arm Locate
No equiv.
413
Invalid Wafer Size
No equiv.
501
Internal Error
No equiv.
502
ESC CDM Error
No equiv.
503
Void Error
No equiv.
602
Command Overrun
650
Busy
707
Pick Fail
721
Pick Failed
708
Place Fail
722
Place Failed
709
Interlock Calc Overflow
No equiv.
710
Interlock Violation
Brooks Automation
Revision 2.2
Slot valve closed prior to
PICK/PLACE/GOTO/
XFER
11-11
Appendices
Appendix D: Robot Compatibility
MagnaTran 7.1 User’s Manual
MN-003-1600-00
Table 11-5 compares the error code differences of the MagnaTran 6 to the MagnaTran
7.
Table 11-5: Error Code Comparison Mag 6/60
Error No.
11-12
Existing Mag 6/60 Error Code
Error No.
Mag 7/70/77 Error Code
411
Station Not Initialized
416
Station Not Initialized
412
Offset Too Large
417
Offset Too Large
413
Invalid RTRCT2
418
Invalid RTRCT2
501
MCC COMM Error
527
MCC COMM Error
502
MCC Queue
528
MCC Queue
503
MCC No ID
529
MCC No ID
707
Not used
No equiv.
708
Pick Failed
721
Pick Failed
709
Place Failed
722
Place Failed
Brooks Automation
Revision 2.2
MagnaTran 7.1 User’s Manual
MN-003-1600-00
Appendices
Appendix D: Robot Compatibility
Configuration Compatibility Commands
The following commands may be used to ensure the communication protocol of the
MagnaTran 7 to be the same as the MT5/VT5 (Arm A and B Theta positions for a
given station are 180° apart/servos freewheel at HALT).
Table 11-6 shows the commands used to configure the standard VT5/MT5 compatibility for the MagnaTran 7.
Table 11-6: Standard VT5/MT5 Compatibility
Parameter Type
Setting
Command to
SET
Command to
STORE
Command to
REQUEST
Communications
Protocol
RS-232
none (with Dip
Switch)
none
none
Serial Communications Mode
Monitor
SET COMM M/B
MON
STORE COMM
M/B
RQ COMM M/B
Command Flow
Mode
Sequential
SET COMM FLOW
SEQ
STORE COMM
FLOW
RQ COMM FLOW
Terminal Echo
Mode
ON
SET IO ECHO Y
STORE COMM
ECHO
RQ COMM ECHO
Linefeed After
Carriage Return
ON
SET COMM LF ON
STORE COMM LF
RQ COMM LF
Error Reporting
Level
2
SET COMM
ERRLVL 2
STORE COMM
ERRLVL
RQ COMM
ERRLVL
Data Reporting
REQ
SET COMM
DREP REQ
STORE COMM
DREP
RQ COMM DREP
Terminal Echo
Compatibility
VT5
SET
COMPATIBILITY
ECHO VT5
STORE
COMPATIBILITY
ECHO
RQ
COMPATIBILITY
ECHO
Theta Coordinate
Compatibility
VT5
SET
COMPATIBILITY
COORDT VT5
STORE
COMPATIBILITY
COORDT
RQ
COMPATIBILITY
COORDT
Theta coordinate system defines theta HOME for Arm A as 0°/
Arm B as 180°.
HALT Compatibility
Brooks Automation
Revision 2.2
VT5
SET
COMPATIBILITY
HALT VT5
STORE
COMPATIBILITY
HALT
RQ
COMPATIBILITY
HALT
11-13
Appendices
Appendix D: Robot Compatibility
MagnaTran 7.1 User’s Manual
MN-003-1600-00
Table 11-6: Standard VT5/MT5 Compatibility
Parameter Type
Setting
Command to
SET
Command to
STORE
Command to
REQUEST
Capture
Response Compatibility
VT5
SET
COMPATIBILITY
CPTR VT5
STORE
COMPATIBILITY
CPTR
RQ
COMPATIBILITY
CPTR
Wafer Speed
Compatibility
VT5
SET
COMPATIBILITY
SPEED VT5
STORE
COMPATIBILITY
SPEED
RQ
COMPATIBILITY
SPEED
Sets the speed for MOVE and GOTO action commands to be compatible with VT5; action is performed at wafer speed, and pan
speed is used for PICK and PLACE only
Response Compatibility
VT5
SET
COMPATIBILITY
RESP VT5
STORE
COMPATIBILITY
RESP
RQ
COMPATIBILITY
RESP
Sets the Response to RQ CPTR, RQ POS ABS ALL, and RQ
STNSENSOR commands to be compatible with VT5
Checksum Mode
OFF
SET COMM
CHECKSUM
OFFA6
STORE COMM
CHECKSUM
RQ COMM
CHECKSUM
*The ALL option is also available for each of the COMPATIBILITY commands. For
example, to request all of the settings: RQ COMPATIBILITY ALL or to store all settings: STORE COMPATIBILITY ALL or to set all: SET COMPATIBILITY ALL VT5.
11-14
Brooks Automation
Revision 2.2
MagnaTran 7.1 User’s Manual
MN-003-1600-00
Appendices
Appendix D: Robot Compatibility
Table 11-6 shows the commands used to configure the standard MagnaTran 6 compatibility for the MagnaTran 7 (Arm A and B Theta positions are 0° apart/servos hold
position at HALT).
Table 11-7: Standard MagnaTran 6 Compatibility
Parameter Type
Setting
Command to
SET
Command to
STORE
Command to
REQUEST
Communications
Protocol
RS-232
none (with Dip
Switch)
none
none
Serial Communications Mode
Monitor
SET COMM M/B
MON
STORE COMM
M/B
RQ COMM M/B
Command Flow
Mode
Sequential
SET COMM FLOW
SEQ
STORE COMM
FLOW
RQ COMM FLOW
Terminal Echo
Mode
ON
SET IO ECHO Y
STORE COMM
ECHO
RQ COMM ECHO
Linefeed After
Carriage Return
ON
SET COMM LF ON
STORE COMM LF
RQ COMM LF
Error Reporting
Level
2
SET COMM
ERRLVL 2
STORE COMM
ERRLVL
RQ COMM
ERRLVL
Data Reporting
REQ
SET COMM
DREP REQ
STORE COMM
DREP
RQ COMM DREP
Terminal Echo
Compatibility
MAG6
SET
COMPATIBILITY
ECHO MAG6
STORE
COMPATIBILITY
ECHO
RQ
COMPATIBILITY
ECHO
Theta Coordinate
Compatibility
MAG6
SET
COMPATIBILITY
COORDT MAG6
STORE
COMPATIBILITY
COORDT
RQ
COMPATIBILITY
COORDT
Theta coordinate system defines theta HOME for Arm A and Arm
B as 0°.
HALT Compatibility
MAG6
SET
COMPATIBILITY
HALT MAG6
STORE
COMPATIBILITY
HALT
RQ
COMPATIBILITY
HALT
Capture
Response Compatibility
MAG6
SET
COMPATIBILITY
CPTR MAG6
STORE
COMPATIBILITY
CPTR
RQ
COMPATIBILITY
CPTR
Wafer Speed
Compatibility
MAG6
SET
COMPATIBILITY
SPEED MAG6
STORE
COMPATIBILITY
SPEED
RQ
COMPATIBILITY
SPEED
Brooks Automation
Revision 2.2
11-15
Appendices
Appendix D: Robot Compatibility
MagnaTran 7.1 User’s Manual
MN-003-1600-00
Table 11-7: Standard MagnaTran 6 Compatibility
Parameter Type
Setting
Command to
SET
Command to
STORE
Command to
REQUEST
Sets the speed for MOVE and GOTO action commands to be compatible with MAG6; pan speed is always used when LOAD is OFF
Response Compatibility
MAG6
SET
COMPATIBILITY
RESP MAG6
STORE
COMPATIBILITY
RESP
RQ
COMPATIBILITY
RESP
Sets the Response to RQ CPTR, RQ POS ABS ALL, and RQ
STNSENSOR commands to be compatible with MAG6
Checksum Mode
OFF
SET COMM
CHECKSUM
OFFA6
STORE COMM
CHECKSUM
RQ COMM
CHECKSUM
*The ALL option is also available for each of the COMPATIBILITY commands. For
example, to request all of the settings: RQ COMPATIBILITY ALL or to store all settings: STORE COMPATIBILITY ALL or to set all: SET COMPATIBILITY ALL MAG6.
11-16
Brooks Automation
Revision 2.2
MagnaTran 7.1 User’s Manual
MN-003-1600-00
Appendices
Appendix E: User Setting Tables
Appendix E: User Setting Tables
The Brooks Automation MagnaTran 7 is customized at the factory to the users specified parameters. Accompanying the robot is a Brooks Automation Quality Report
(QR) which lists all the factory assigned parameters.
In the occurrence that the user re-configures the robot, the new parameters should be
recorded below in the event that a failure occurs and robot parameters must be
restored.
Wafer Size:
___ 100mm
___ 125mm
___ 150mm
___ 200mm
___ 300mm
___ other
Version Number ________________________
Table 11-8: Robot Configuration
CONFIG
Configuration Value
APPLIC
ARM
SERVO
SPEED
WINDOW
MOTOR T1
MOTOR T2
MOTOR Z
NAME
Brooks Automation
Revision 2.2
11-17
Appendices
Appendix E: User Setting Tables
MagnaTran 7.1 User’s Manual
MN-003-1600-00
Table 11-9: Current HOME Settings
DATE
Z-Axis
Table 11-10: User Setting Sync Zero Home Position
DATE
SYNC ZERO T1
SYNC ZERO T2
SYNC
ZERO Z
Table 11-11: Encoder Values
DATE
ENCODER 1
ENCODER 2
ENCODER 3
Table 11-12: Phase Values
DATE
11-18
PHASE T1
PHASE T2
Brooks Automation
Revision 2.2
MagnaTran 7.1 User’s Manual
MN-003-1600-00
Appendices
Appendix E: User Setting Tables
Table 11-13: Push and Safety Values for Station
DATE
Brooks Automation
Revision 2.2
STATION
R
PUSH
SAFETY
11-19
Appendices
Appendix E: User Setting Tables
MagnaTran 7.1 User’s Manual
MN-003-1600-00
Table 11-14: Station Assignments
STN
DATE
Station Name
Arm
R
Extend/
Retract
millimeters
1
2
3
4
5
6
7
8
9
10
11
12
13
14
15
16
11-20
T
Theta
3-Axis
BTO
degrees
millimeters
3-Axis
LOWER
millimeters
A
B
A
B
A
B
A
B
A
B
A
B
A
B
A
B
A
B
A
B
A
B
A
B
A
B
A
B
A
B
A
B
Brooks Automation
Revision 2.2
MagnaTran 7.1 User’s Manual
MN-003-1600-00
Appendices
Appendix E: User Setting Tables
Table 11-15: Operational Interlocks MISC I/O Connector
Pin ID
Function
Signal Name
Pin ID
Function
1
EXT_IN0
26
+PWR_ISOL
2
EXT_IN1
27
+PWR RET
3
EXT_IN2
28
+PWR RET
4
EXT_IN3
29
+24V RET
5
EXT_IN4
30
+24VDC
6
EXT_IN5
31
DRV_OUT0
7
EXT_IN6
32
DRV_OUT1
8
EXT_IN7
33
DRV_OUT2
9
EXT_IN8
34
DRV_OUT3
10
EXT_IN9
35
DRV_OUT4
11
EXT_IN10
36
DRV_OUT5
12
EXT_IN11
37
DRV_OUT6
13
EXT_IN12
38
DRV_OUT7
14
EXT_IN13
39
DRV_OUT8
15
EXT_IN14
40
DRV_OUT9
16
EXT_IN15
41
DRV_OUT10
17
EXT_IN16
42
DRV_OUT11
18
EXT_IN17
43
DRV_OUT12
19
EXT_IN18
44
DRV_OUT13
20
EXT_IN19
45
DRV_OUT14
21
EXT_IN20
46
DRV_OUT15
22
EXT_IN21
47
DRV_OUT16
23
EXT_IN22
48
DRV_OUT17
24
EXT_IN23
49
DRV_OUT18
25
+PWR_ISOL
50
DRV_OUT19
Brooks Automation
Revision 2.2
Signal Name
11-21
Appendices
Appendix E: User Setting Tables
MagnaTran 7.1 User’s Manual
MN-003-1600-00
Additional Information:
_____________________________________________________________________
_____________________________________________________________________
_____________________________________________________________________
_____________________________________________________________________
_____________________________________________________________________
_____________________________________________________________________
_____________________________________________________________________
_____________________________________________________________________
_____________________________________________________________________
_____________________________________________________________________
_____________________________________________________________________
_____________________________________________________________________
_____________________________________________________________________
_____________________________________________________________________
_____________________________________________________________________
_____________________________________________________________________
_____________________________________________________________________
_____________________________________________________________________
_____________________________________________________________________
_____________________________________________________________________
_____________________________________________________________________
11-22
Brooks Automation
Revision 2.2
MagnaTran 7.1 User’s Manual
MN-003-1600-00
Appendices
Appendix E: User Setting Tables
Additional Information:
_____________________________________________________________________
_____________________________________________________________________
_____________________________________________________________________
_____________________________________________________________________
_____________________________________________________________________
_____________________________________________________________________
_____________________________________________________________________
_____________________________________________________________________
_____________________________________________________________________
_____________________________________________________________________
_____________________________________________________________________
_____________________________________________________________________
_____________________________________________________________________
_____________________________________________________________________
_____________________________________________________________________
_____________________________________________________________________
_____________________________________________________________________
_____________________________________________________________________
_____________________________________________________________________
_____________________________________________________________________
_____________________________________________________________________
Brooks Automation
Revision 2.2
11-23
Appendices
Appendix F: Relay I/O Option
MagnaTran 7.1 User’s Manual
MN-003-1600-00
Appendix F: Relay I/O Option
The following information is for user specific options.
This procedure identifies the communication interface settings for the Relay I/O
board. The interface settings are used to switch between RS-232 and either of two
possible RS-422 communication settings. This procedure identifies the switch locations and positions on the MagnaTran 7.1 robot Relay I/O board set that provide
either RS-232 or RS-422 communication to the robot.
Figure 11-1: Relay Interface
RS-232/422 Board Switch Settings
There are two blue slide switches that determine RS-232 or RS-422 communication.
One is located on the personality board, left side (next to left edge of PC104 card). The
personality board switch selects RS-232 when in the up position, RS-422 when in the
down position.
11-24
Brooks Automation
Revision 2.2
MagnaTran 7.1 User’s Manual
MN-003-1600-00
Appendices
Appendix F: Relay I/O Option
The second switch is located on the I/O board, right side next to the personality board
connector. When the personality switch is up (RS-232), the I/O board switch must
also be up. When the personality switch is down (RS-422), the I/O board switch
selects two different connector pin-outs as described below.
RS-422 Pin-outs
With the personality switch down (RS-422), and I/O board switch up, the following table shows the RS-422 connector pinout selected. This is the standard
Brooks interface.
Table 11-16: Standard Brooks RS-422 Interface
Pin
Function
2
RX-
3
RX+
5
TX-
8
TX+
With the personality switch down (RS-422), and I/O board switch down, the
following table shows the RS-422 connector pinout selected.
Table 11-17: Optional RS-422 Interface
Brooks Automation
Revision 2.2
Pin
Function
2
TX-
3
RX+
7
TX-
8
RX-
5
GND
11-25
Appendices
Appendix F: Relay I/O Option
MagnaTran 7.1 User’s Manual
MN-003-1600-00
The board options are set up in the following manner:
Table 11-18: User Specific Communication Switch Settings
Switch
Position
Function
Personality
Board
Selects operation for Serial I/O
UP • RS-232 (if running RS-232, then Relay I/O
DOWN
Board switch must be set to UP)
• RS-422
Relay
I/O Board
Selects operation for Serial I/O
UP • RS-422 (Brooks standard pin-out)
DOWN • RS-422 (Relay I/O pin-out)
Table 11-19: RS-422 Setup Summary
11-26
Personality Board
Relay I/O Board
Pin
UP
UP
RS232
UP
DOWN
NOT ALLOWED
DOWN
UP
Table 11-16
DOWN
DOWN
Table 11-17
Brooks Automation
Revision 2.2
MagnaTran 7.1 User’s Manual
MN-003-1600-00
Appendices
Appendix F: Relay I/O Option
Figure 11-2: Relay I/O Circuit
This section provides the functions and hexadecimal representations for both the
inputs and outputs of the Relay I/O board (002-4212-01). These inputs and outputs
can be used for either of the following two aspects of the robot:
1) To utilize various robot operational interlocks.
2) To operate the robot under Digital I/O (DIO) control.
Reference Discrete I/O Control (DIO) on page 6-45 for additional information pertaining to both operational interlocks and DIO control.
The J1 connector of the Relay I/O board contains the INPUT pins for the robot. The
pin-outs, functions, and hexadecimal representations for the J1 connector are presented in the following table:
Brooks Automation
Revision 2.2
11-27
Appendices
Appendix F: Relay I/O Option
MagnaTran 7.1 User’s Manual
MN-003-1600-00
Table 11-20: Relay I/O Input J1 Connectors
Discrete I/O Inputs
J1
11-28
Generic Function
Relay I/O Operational
Interlock Name
Hex
Address
1
INPUT 0
MTR_EMO
0x01
2
INPUT 1
DIR1_EXT_INHIBIT
0x02
3
INPUT 2
DIR2_EXT_INHIBIT
0x04
4
INPUT 3
DIR3_EXT_INHIBIT
0x08
5
INPUT 4
DIR4_EXT_INHIBIT
0x10
6
INPUT 5
DIR5_EXT_INHIBIT
0x20
7
INPUT 6
DIR6_EXT_INHIBIT
0x40
8
INPUT 7
DIR7_EXT_INHIBIT
0x80
9
INPUT 8
DIR8_EXT_INHIBIT
0x100
10
INPUT 9
DIR9_EXT_INHIBIT
0x200
11
INPUT 10
AC_FAIL
0x400
12
INPUT 11
13
no connection
14
+24 V (robot)
15
+24 V (robot)
16
+24 V (robot)
17
+24 V (robot)
18
+24 V (robot)
19
+24 V (robot)
20
+24 V (robot)
21
+24 V (robot)
22
+24 V (robot)
23
+24 V (robot)
24
+24 V (robot)
25
no connection
0x800
Brooks Automation
Revision 2.2
MagnaTran 7.1 User’s Manual
MN-003-1600-00
Appendices
Appendix F: Relay I/O Option
The J7 connector of the Relay I/O board (002-4212-01) contains the OUTPUT pins for
the robot. The pin-outs, functions, and hexadecimal representations for the J7 connector are presented in the following table:
Table 11-21: Relay I/O Output J7 Connectors
Discrete I/O Outputs
J7
Generic Function
Relay I/O Operational
Interlock Name
Hex
Address
1
OUTPUT 0
DIR2_GV_CLS_INHBT
0x01
2
OUTPUT 1
DIR4_GV_CLS_INHBT
0x02
3
OUTPUT 2
DIR6_GV_CLS_INHBT
0x04
4
OUTPUT 3
DIR8_GV_CLS_INHBT
0x08
5
OUTPUT 4
POWER_DOWN
0x10
6
OUTPUT 10
BATTERY_LOW
0x400
7
OUTPUT 11
8
+24 V (host)
9
OUTPUT 5
DIR3_GV_CLS_INHBT
0x20
10
OUTPUT 6
DIR5_GV_CLS_INHBT
0x40
11
OUTPUT 7
DIR7_GV_CLS_INHBT
0x80
12
OUTPUT 8
DIR9_GV_CLS_INHBT
0x100
13
OUTPUT 9
DIR1_GV_CLS_INHBT
0x200
14
OUTPUT 12
0x1000
15
OUTPUT 13
0x2000
Brooks Automation
Revision 2.2
0x800
11-29
Appendices
Appendix F: Relay I/O Option
MagnaTran 7.1 User’s Manual
MN-003-1600-00
The PowerPak (002-4037-02), a robot accessory, communicates to the robot through
pins located in the main 24 volt power cable of the robot. These pins are internally
linked to the Relay I/O board at the J6 connector. The J6 connector is internal to the
robot. The pin-outs, functions, and hexadecimal representations for the J6 connector
are presented in the following table:
Table 11-22: Power Pak Inputs J6
Pin
Generic Function
Hex Address
1
+24 V (robot)
1
AC_FAIL
0x1000
3
BATT_LOW
0X2000
4
5
11-30
Return
Brooks Automation
Revision 2.2
MagnaTran 7.1 User’s Manual
MN-003-1600-00
12
Attached Drawings
Overview
This section provides an Illustrated Parts Catalog (IPC) and lists any additional documents provided with the robot. These documents are provided to allow service personnel to identify specific parts within the product. All additional documents are
found at the end of the manual.
CAUTION
All drawings and other related documents provided with this manual
are generic and may not reflect specific builds of the robot. Refer to the
QR shipped with the robot and the Purchase Order for the exact part
number; or to obtain a complete and current set of drawings and documents, contact Brooks Customer Support.
Contents
Illustrated Parts Catalog . . . . . . . . . . . . . . . . . . . . . . . . . . . . . . . . . . . . . . . . . . . . . . .12-2
Battery Pack Installation . . . . . . . . . . . . . . . . . . . . . . . . . . . . . . . . . . . . . . . . .12-2
Protective Cover Removal . . . . . . . . . . . . . . . . . . . . . . . . . . . . . . . . . . . . . . .12-4
Limit Switches . . . . . . . . . . . . . . . . . . . . . . . . . . . . . . . . . . . . . . . . . . . . . . . . .12-6
Lower Cover Mount, I/O Board Removal . . . . . . . . . . . . . . . . . . . . . . . . . .12-8
Theta Board Removal . . . . . . . . . . . . . . . . . . . . . . . . . . . . . . . . . . . . . . . . . . .12-10
Personality/PC104 Board Removal . . . . . . . . . . . . . . . . . . . . . . . . . . . . . . .12-12
Z-Driver Board Removal . . . . . . . . . . . . . . . . . . . . . . . . . . . . . . . . . . . . . . . .12-14
Radial Axis Board Removal . . . . . . . . . . . . . . . . . . . . . . . . . . . . . . . . . . . . . .12-16
List of Attachments . . . . . . . . . . . . . . . . . . . . . . . . . . . . . . . . . . . . . . . . . . . . . . . . . . .12-18
Brooks Automation
Revision 2.2
12-1
Attached Drawings
Illustrated Parts Catalog
MagnaTran 7.1 User’s Manual
MN-003-1600-00
Illustrated Parts Catalog
2
1
Figure 12-1: Battery Pack Installation
12-2
Brooks Automation
Revision 2.2
MagnaTran 7.1 User’s Manual
MN-003-1600-00
Attached Drawings
Illustrated Parts Catalog
Table 12-1: Battery Pack Installation Parts List
Item
No.
Part Number
Description
Qty.
1
002-4913-02
MagnaTran 7.1 Standard Drive
1
2
002-4037-02
Power Fault Manager Module Assembly
1
Brooks Automation
Revision 2.2
12-3
Attached Drawings
Illustrated Parts Catalog
Rear View
MagnaTran 7.1 User’s Manual
MN-003-1600-00
1
2
Front View
Figure 12-2: Protective Cover Removal
12-4
Brooks Automation
Revision 2.2
MagnaTran 7.1 User’s Manual
MN-003-1600-00
Attached Drawings
Illustrated Parts Catalog
Table 12-2: Protective Cover Parts List
Item
No.
Part Number
Description
Qty.
1
002-2312-03
REAR COVER
1
2
002-2313-03
FRONT COVER
1
Brooks Automation
Revision 2.2
12-5
Attached Drawings
Illustrated Parts Catalog
MagnaTran 7.1 User’s Manual
MN-003-1600-00
9
7
10
11
2
12
4
8
5
4
6
5
10
6
11
4
9
1
12
13
5
14
6
3
2
4
5
6
Figure 12-3: Limit Switches
12-6
Brooks Automation
Revision 2.2
MagnaTran 7.1 User’s Manual
MN-003-1600-00
Attached Drawings
Illustrated Parts Catalog
Table 12-3: Limit Switch Parts List
Item
No.
Part Number
Description
Qty.
1
002-2194-01
Upper Limit Switch Assembly (roller switch with cable)
1
2
002-2976-01
Limit Switch Mounting Bracket
2
3
002-2195-01
Lower Limit Switch Assembly (roller switch with cable)
1
4
802-4010-10
Screw, PHS, M2 x 10mm, slotted, SST
8
5
802-0000-10
Washer, M2 Lock, SST
8
6
802-0000-00
Washer, M2 Flat, SST
8
7
002-2977-02
Top Z Travel Adjustment Bracket
1
8
002-2977-01
Bottom Z Travel Adjustment Bracket
1
9
805-8025-A0
Screw, M5 x .08 x 25mm hex
2
10
803-5008-00
Screw, SHCS, M3 x 8mm, SST
4
11
803-0000-10
Washer, M3 Lock, SST
4
12
803-0000-00
Washer, M3, Flat, SST
4
13
780-0022-04
Bumper, Self-stick, PVC Black, Cyl, 09H x .5d
4
14
808-1216-30
Screw, SFHS, M8 x 16mm
4
Brooks Automation
Revision 2.2
12-7
Attached Drawings
Illustrated Parts Catalog
MagnaTran 7.1 User’s Manual
MN-003-1600-00
2
1
3
Figure 12-4: Lower Cover Mount, I/O Board Removal
12-8
Brooks Automation
Revision 2.2
MagnaTran 7.1 User’s Manual
MN-003-1600-00
Attached Drawings
Illustrated Parts Catalog
Table 12-4: Lower Cover Mount, I/O Board Parts List
Item
No.
Part Number
Description
Qty.
1
002-2411-02
LOWER COVER MOUNT ASSEMBLY
1
2
002-4674-02
002-4674-05
002-4674-06
002-4674-07
Marathon Express™ I/O BOARD
RELAY I/O BOARD
LOW SIDE I/O BOARD
HIGH SIDE I/O BOARD
1
3
002-5781-01
Bottom Cover Shield
1
Brooks Automation
Revision 2.2
12-9
Attached Drawings
Illustrated Parts Catalog
MagnaTran 7.1 User’s Manual
MN-003-1600-00
3
4
5
6
Figure 12-5: Theta Board Removal
12-10
Brooks Automation
Revision 2.2
MagnaTran 7.1 User’s Manual
MN-003-1600-00
Attached Drawings
Illustrated Parts Catalog
Table 12-5: Theta Board Parts List
Item
No.
Part Number
Description
Qty.
3
002-3754-01
T1/T2 Board Assembly
1
4
803-5014-00
SCREW, SHCS, M3.0 X 14mm LG, SST
4
5
803-0000-10
WASHER, M3 SPLIT LOCK, SST
4
6
803-0000-00
WASHER, M3 FLAT, SST
4
Brooks Automation
Revision 2.2
12-11
Attached Drawings
Illustrated Parts Catalog
MagnaTran 7.1 User’s Manual
MN-003-1600-00
5
6
2
7
3
8
4
9
Figure 12-6: Personality/PC104 Board Removal
12-12
Brooks Automation
Revision 2.2
MagnaTran 7.1 User’s Manual
MN-003-1600-00
Attached Drawings
Illustrated Parts Catalog
Table 12-6: Personality/PC104 Board Parts List
Item
No.
Part Number
Description
Qty.
2
803-5014-00
SCREW, SHCS, M3.0 X 14mm LG, SST
4
3
803-0000-10
WASHER, M3 SPLIT LOCK, ST
4
4
803-0000-00
WASHER, M3 FLAT, SST
4
5
002-3752-01
Personality Board Assembly
1
6
170-0027-03
CPU, PC/104 Module Board Assembly, 33/40 MHz, 386sx
1
7
904-4000-90
# 4-40 HEX NUT, SST
4
8
904-0000-10
WASHER, # 4 SPLIT LOCK, SST
4
9
904-0000-00
WASHER, #4 FLAT, SST
4
Brooks Automation
Revision 2.2
12-13
Attached Drawings
Illustrated Parts Catalog
MagnaTran 7.1 User’s Manual
MN-003-1600-00
1
2
3
4
Figure 12-7: Z-Driver Board Removal
12-14
Brooks Automation
Revision 2.2
MagnaTran 7.1 User’s Manual
MN-003-1600-00
Attached Drawings
Illustrated Parts Catalog
Table 12-7: Z-Driver Board Parts List
Item
No.
Part Number
Description
Qty.
1
002-4234-XX
Z-Driver Board Assembly, 24/48V, Type 1
1
2
803-5014-00
SCREW, SHCS, M3.0 X 14mm LG, SST
2
3
803-0000-10
WASHER, M3 SPLIT LOCK, ST
2
4
803-0000-00
WASHER, M3 FLAT, SST
2
Brooks Automation
Revision 2.2
12-15
Attached Drawings
Illustrated Parts Catalog
MagnaTran 7.1 User’s Manual
MN-003-1600-00
1
4
3
2
2
3
5
4
Figure 12-8: Radial Axis Board Removal
12-16
Brooks Automation
Revision 2.2
MagnaTran 7.1 User’s Manual
MN-003-1600-00
Attached Drawings
Illustrated Parts Catalog
Table 12-8: Radial Axis Board Parts List
Item
No.
Part Number
Description
Qty.
1
001-1957-03
Radial Axis (HOME) Sensor Board
1
2
803-5008-00
SCREW, SHCS, M3.0 X 8mm LG, SST
4
3
803-0000-10
WASHER, M3 SPLIT LOCK, ST
4
4
803-0000-00
WASHER, M3 FLAT, SST
4
5
002-1799-01
FLAG, Z HOME
1
Brooks Automation
Revision 2.2
12-17
Attached Drawings
List of Attachments
MagnaTran 7.1 User’s Manual
MN-003-1600-00
List of Attachments
Wiring Diagrams
WD-003-1600-00 Wiring Diagram, Mag 7.11
SD-002-3756-01 High Side I/O Board
SD-002-3758-01 Low Side I/O Board
SD-002-7394-01 Marathon Express I/O Board
End effectors and arms are specialized. Call Brooks Automation Customer Support
for drawings and part numbers. If this robot was purchased as part of a Brooks
Automation Marathon or Marathon Express™, see system User’s Manual for customized robot drawings and parts lists.
12-18
Brooks Automation
Revision 2.2
1
2
3
4
REV
NOTICE : PROPRIETARY INFO RMATION
1
THIS DOCUMENT AND THE INFORMATION ENCLOSED HERE IN
IS CON FIDENTIAL AND PROPRIETARY TO BROOKS AUTOMATION,
INC. IT MAY NOT BE REPRODUCED IN WHOLE OR IN PART,
OR DISCLOSED TO ANY THIRD PARTY, OR USED WITHO UT
THE PRIOR WRITTEN CONSENT OF BROOKS AUTOMATION, INC.
DATE
DESCRIPTION
INITIAL REL PER EC 12542
BY
3/16/98
A RELEASE PER EC 13276
6/21/98
B
8/31/99
RELEASE PER EC 15563
APP
MJV
BW
MV
RS
MJV
PC104-A
A
IO-P3
J3
5
4
3
2
1
5
4
3
2
1
AC_FAIL_UPS (HALT)
BATT_LOW_UPS
I/O BOARD
+24V FROM I/O
IO-P2
J2
3
2
1
3
2
1
+24V_ROBOT
NOTE:
SEE SHEET 2 FOR I/O BOARD CONFIGURATION.
A01
A02
A03
A04
A05
A06
A07
A08
A09
A10
A11
A12
A13
A14
A15
A16
A17
A18
A19
A20
A21
A22
A23
A24
A25
A26
A27
A28
A29
A30
A31
A32
GND
IOCHCHK
RESETDRV
D7
+5V
D6
IRQ9
D5
-5V
D4
DRQ2
D3
-12V
D2
ENDXFR
D1
+12V
D0
(KEY)
IOCHRDY
SMEMW
EN
SMEMR
A19
IOW
A18
IOR
A17
DACK3
A16
DRQ3
A15
DACK1
A14
A13
DRQ1
A12
REFRESH
BCLK
A11
IRQ7
A10
A9
IRQ6
IRQ5
A8
A7
IRQ4
IRQ3
A6
DACK2
A5
A4
TC
BALE
A3
A2
+5V
OSC
A1
A0
GND
GND
GND
PC104 CPU BOARD
ASSY 170-0027-03
A
PC104-B
C00
C01
C02
C03
C04
C05
C06
C07
C08
C09
C10
C11
C12
C13
C14
C15
C16
C17
C18
C19
D00
D01
D02
D03
D04
D05
D06
D07
D08
D09
D10
D11
D12
D13
D14
D15
D16
D17
D18
D19
GND
GND
SBHE MEMCS16
LA23
IOCS16
LA22
IRQ10
LA21
IRQ11
IRQ12
LA20
LA19
IRQ15
LA18
IRQ14
LA17
DACK0
MEMR
DRQ0
MEMW DACK5
D8
DRQ5
D9
DACK6
D10
DRQ6
D11
DACK7
D12
DRQ7
D13
+5V
D14
MASTER
D15
GND
(KEY)
GND
ESQ-132-14-G-D
ESQ-120-14-G-D
PC104-A CONNECTOR
PC104-B CONNECTOR
A1
A2
A3
A4
A5
A6
A7
A8
A9
A10
A11
A12
A13
A14
A15
A16
B1
B2
B3
B4
B5
B6
B7
B8
B9
B10
B11
B12
B13
B14
B15
B16
C1
C2
C3
C4
C5
C6
C7
C8
C9
C10
C11
C12
C13
C14
C15
C16
A1
A2
A3
A4
A5
A6
A7
A8
A9
A10
A11
A12
A13
A14
A15
A16
B1
B2
B3
B4
B5
B6
B7
B8
B9
B10
B11
B12
B13
B14
B15
B16
C1
C2
C3
C4
C5
C6
C7
C8
C9
C10
C11
C12
C13
C14
C15
C16
ASSY #002-4854-01
B01
B02
B03
B04
B05
B06
B07
B08
B09
B10
B11
B12
B13
B14
B15
B16
B17
B18
B19
B20
B21
B22
B23
B24
B25
B26
B27
B28
B29
B30
B31
B32
P3
LUG
24V=EN
INTERLOCK OK\
ZPH1_MAG
ZPH2_MAG
ZPH3_MAG
ZPH1_DIR
ZPH2_DIR
ZPH3_DIR
ZBRK_N
OT_TOP_N
OT_BOT_N
ZSNSR1
ZSNSR2
ZSNSR3
ZHOME
ZDIS_N
PERSONALITY BOARD
T1PH1MAG
T1PH2MAG
T1PH3MAG
T2PH1MAG
T2PH2MAG
T2PH3MAG
B
002-3752-01
T1PH1DIR
T1PH2DIR
T1PH3DIR
T2PH1DIR
T2PH2DIR
T2PH3DIR
INDEX+
INDEX-5V
GND
T1IX\
T1COS\
T1COS
T1SIN\
T1SIN
VCCA
VCC
24V=EN
VCCA
T2SIN
T2SIN\
T2COS
T2COS\
T1IX\
GND
-5V
INDEXINDEX+
VCCA
J4
8
7
6
5
4
3
2
1
ZPHASE_CP
ZPHASE_CN
ZPHASE_BP
ZPHASE_BN
ZPHASE_AP
ZPHASE_AN
P4
BLK
BRN
GRY
YEL
BLU
ORG
GRN
RED
8
7
6
5
4
3
2
1
B
24V=ENABLE
RECOVER_N
CPU_GND
CPU_+5V
Z24VOFF_N
100-348-xxx
J7
P2
A1
A2
A3
A4
A5
A6
A7
A8
A9
A10
A11
A12
A13
A14
A15
A16
B1
B2
B3
B4
B5
B6
B7
B8
B9
B10
B11
B12
B13
B14
B15
B16
C1
C2
C3
C4
C5
C6
C7
C8
C9
C10
C11
C12
C13
C14
C15
C16
1
2
3
4
5
6
7
8
9
10
11
1
2
3
4
5
6
7
8
9
10
11
1
2
3
4
5
6
7
8
9
10
A1
A2
A3
A4
A5
A6
A7
A8
A9
A10
A11
A12
A13
A14
A15
A16
B1
B2
B3
B4
B5
B6
B7
B8
B9
B10
B11
B12
B13
B14
B15
B16
C1
C2
C3
C4
C5
C6
C7
C8
C9
C10
C11
C12
C13
C14
C15
C16
A1
A2
A3
A4
A5
A6
A7
A8
A9
A10
A11
A12
A13
A14
A15
A16
B1
B2
B3
B4
B5
B6
B7
B8
B9
B10
B11
B12
B13
B14
B15
B16
C1
C2
C3
C4
C5
C6
C7
C8
C9
C10
C11
C12
C13
C14
C15
C16
J2
1
2
3
4
5
6
7
8
9
10
A1
A2
A3
A4
A5
A6
A7
A8
A9
A10
A11
A12
A13
A14
A15
A16
B1
B2
B3
B4
B5
B6
B7
B8
B9
B10
B11
B12
B13
B14
B15
B16
C1
C2
C3
C4
C5
C6
C7
C8
C9
C10
C11
C12
C13
C14
C15
C16
J1
P1
J4
T1 AXIS ENCODER
ASSY 360-0010-11, REF: SD-360-0010-15
24V=EN
T1, T2 AXIS DRIVER BOARD
002-3754-01
EMITTER
LOGIC
COM
T24VOFF1_N
T24VOFF2_N
Z24VOFF_N
AMP
\6 ISO
\6 ISO
DETECTOR
ASSY
002-2200-01
VCC
J1-T1
24/5V
DCDC
ISOLATED
C
T1PH1MP
T1PH1MN
T1PH2MP
T1PH2MN
T1PH3MP
T1PH3MN
P5
12V
+24V
IO POWER
T-J2
1
2
\6
DISABLE
F2
RXE075
T-P2
100
1
2
T1 MTR
DRVR
L1
PWR
COM
TO IO BOARD
12V
\6
DISABLE
K1
8
10
3
7
5
T2 MTR
DRVR
+ 12
1
6
J5
1
2
3
4
5
6
7
8
1
2
3
4
5
6
7
8
J6
P6
1
2
3
4
5
6
7
8
1
2
3
4
5
6
7
8
RED
BLU
BLK
ORG
WHT
GRN
T1PH1MP
T1PH1MN
T1PH2MP
T1PH2MN
T1PH3MP
T1PH3MN
1
2
3
4
5
6
5
4
3
2
1
D
A1
A2
A3
A4
SHIELD
J4
+24VZ
J2-T1
1
2
3
4
5
6
7
8
9
10
11
ORG
BLU
YEL
BRN
WHT/BLK
GRY/BLK
BLK
RED
DRAIN
BLK/WHT
ORG/WHT
RED
BLU
BLK
BRN
WHT
VIO
1
2
3
4
5
6
T1 _A+
T1_AT1_B+
T1_BT1_C+
T1_C_
PHASE_AN
PHASE_AP
PHASE_BN
PHASE_BP
PHASE_CN
PHASE_CP
+12V
ISOLATION
AND LOGIC
/6
MOTOR DRIVE
SNS1 (A)
SNS2 (B)
SNS3 (C)
+5V
CPU_GND
CPU_+5V
+24VZ
CABLE ASSY 002-2204-01
T1 MOTOR
RXE075
+24V
BRK
24V=ENABLE
ASSY 002-2203-01
12V
1
2
3
4
5
6
P4
J4
1
2
3
4
5
1
2
3
4
5
J3
1
2
P3
1
2
GRN
BLK
YEL
RED
BLU
WHT
Z AXIS MOTOR
ASSY 002-2140-01
BRN
ORG
YEL
RED
BLK
HALL EFFECT
SWITCHES
RED
WHT
Z AXIS BRAKE
ASSY 002-2141-01
C
K1
8
T2 ENCODER
ASSY360-0010-11, REF: SD-360-0010-15
EMITTER
T2PH1MP
T2PH1MN
T2PH2MP
AMP
T2PH2MN
T2PH3MP
T2PH3MN
DETECTOR
ASSY
002-2201-01
RED
BLU
BLK
ORG
WHT
GRN
1
2
3
4
5
6
VCCA
T2SIN
T2SIN\
T2COS
T2COS\
T1IX\
GND
-5V
CASE GND
INDEXINDEX+
VO
7
5
DRIVE
10
3
UPPER LIMIT SWITCH
1
6
T2 ENCODER
NC
J2-T2
1
2
3
4
5
6
7
8
9
10
11
1
2
3
4
5
6
7
8
9
10
11
RED/BLK
ORG/BLK
BLU/BLK
YEL/BLK
RED/WHT
GRN/WHT
GRN
WHT
ASSY 002-2194-01
+ 12
COM
P2
T2PH1MP
T2PH1MN
T2PH3MP
T2PH3MN
T2PH2MP
T2PH2MN
P4
1
2
3
4
5
6
DISABLE
F2
INPUT
POWER
+5V
-
P2
1
2
J2
1
2
P3
J3
1
2
3
1
2
3
S1
RED
BLK
SW SPDT
+12V
VI
VO
MOTOR DISABLE
INTERLOCK
SEE NOTE 1
LOWER LIMIT SWITCH
NC
COM
S2
RED
BLK
SW SPDT
ASSY 002-2195-01
YEL/WHT
BLU/WHT
+5V
P2
1
2
3
4
5
6
RED
BLU
BLK
BRN
WHT
VIO
T2_A+
T2_AT2_B+
T2_BT2_C+
T2_C-
T2 MOTOR
Z MOTION CHASSIS
ASSY 002-2203-01
SIG
GND
Z AXIS DRIVER BOARD
002-4234-01
P5
J5
1
2
3
4
1
2
3
4
J14
RED
WHT
BLK
1
2
3
4
Z HOME
P14
1
2
3
4
ASSY 002-2196-01
001-1957-03
CHASSIS
+24VZ
+12V
5
4
3
2
1
VCCA
T2SIN
T2SIN\
T2COS
T2COS\
T1IX\
GND
-5V
CASE GND
INDEXINDEX+
T1 ENCODER
VI
MOTOR DISABLE
INTERLOCK
SEE NOTE 1
EXTERNAL
POWER
CONNECTION
P2
1
2
3
4
5
6
7
8
9
10
11
Z AXIS ENCODER
ASSY 002-2142-01
P1
J2-T2
IO-P1
P1
P2
100-348-xxx
ASSY 002-4950-01
T-J3
POWER_24V
5
4
3
2
1
BATT_LOW_UPS
AC_FAIL_UPS
9
8
7
6
9
8
7
6
5
4
3
2
1
A1
A2
A3
A4
VI
P3
5
4
3
2
1
A1
A2
A3
A4
VO
P4
T-J4
P2
J2
1
2
3
1
2
3
1
2
3
1
2
3
ASSY 002-2197-02
COM
5
4
3
2
1
RED
UPDATED6/25/98
UPDATED REF DES FOR REV A
RELEASE
FAN
BLK
+24V
9
8
7
6
D
+24V_FAN
+24VT1
F2
10A
T1 PWR
+24VT2
F3
LOGIC
COM
10A
F1
RXE075
P1
J1
1
2
1
2
31600-00.SCH
FAN ASSY WITH
CABLE
#002-2202-01
UNLESS OTHERWISE SPECIFIED:
RESISTORS ARE 1/4W VALUES I N OHMS
RESISTOR TOLER ANCES 5%
CAPACITOR VALUES IN uFARADS
CAPACITOR TOLERA NCES 10%
T2 PWR
+24VZ
8 AWG
GRN/YEL
F4
10A
DRAWN BY
MJV
CHECKED BY
MJV
APROVED BY
DATE
BROOKS AUTOMATION,
15 ELIZABETH
INC CHELMSFORD,
DRIVE
MA
10/14/97
DATE
10/21/97
01824-4185
DWG TITLE
WIRING DIAGRAM
MAGNATRAN 7.1
DATE
Z PWR
+24VP
LUG TO FRAME
POWER
COM
F1
3A
D
1. REF C-SIZE DWG #WD-002-5648-01 FOR DETAILS ON
THE MOTOR DISABLE INTERLOCK
POWER DISTRIBUTION
1
SIZE
NOTES:
CPU PWR
2
DWG NO.
REV
WD-003-1600-00
B
SHEET
3
4
1
OF
2
8
7
6
5
4
3
2
1
REV
NOTICE : PROPRIETARY INFO RMATION
DATE
DESCRIPTION
BY
APP
SEE SHEET 1 FOR REVISION HISTORY
THIS DOCUMENT AND THE INFORMATION ENCLOSED HERE IN
IS CON FIDENTIAL AND PROPRIETARY TO BROOKS AUTOMATION,
INC. IT MAY NOT BE REPRODUCED IN WHOLE OR IN PART,
OR DISCLOSED TO ANY THIRD PARTY, OR USED WITHO UT
THE PRIOR WRITTEN CONSENT OF BROOKS AUTOMATION, INC.
1
2
3
4
5
P3
P2
D
MISC. I/O
MINIMUM WIRING CONFIGURATION
BYPASS INTERLOCK
1
2
3
4
5
6
7
8
9
10
11
12
13
14
15
16
17
18
19
20
21
22
23
24
25
26
27
28
29
30
31
32
33
34
35
36
37
38
39
40
41
42
43
44
45
46
47
48
49
50
1
2
3
4
5
6
7
8
9
10
11
12
13
14
15
16
17
18
19
20
21
22
23
24
25
26
27
28
29
30
31
32
33
34
35
36
37
38
39
40
41
42
43
44
45
46
47
48
49
50
MISC. I/O
TYPICAL WIRING CONFIGURATION
POSSIBLE SAFETY SWITCHES
OPTIONAL USER SUPPLIED
I/O POWER WITH FULL
ISOATION TO 200V, MUST BE
24V. WARNING! DO NOT
EXCEED MAXIMUM RATINGS
EXT_IN0
EXT_IN1
EXT_IN2
EXT_IN3
EXT_IN4
EXT_IN5
EXT_IN6
EXT_IN7
EXT_IN8
EXT_IN9
EXT_IN10
EXT_IN11
EXT_IN12
EXT_IN13
EXT_IN14
EXT_IN15
EXT_IN16
EXT_IN17
EXT_IN18
EXT_IN19
EXT_IN20
EXT_IN21
1
2
3
4
5
6
7
8
9
10
11
12
13
14
15
16
17
18
19
20
21
22
23
24
25
26
27
28
29
30
31
32
33
34
35
36
37
38
39
40
41
42
43
44
45
46
47
48
49
50
INPUT TO CPU
TYPICAL
INPUT
CIRCUIT
+24V_ISO
BATT_LOW_UPS
AC_FAIL_UPS
10K
ASSY# 002-4674-06
24V=ENABLE
U1A
TBD
+VCC +24VDC
ROBOT
COM
MAG 7.1 LOW SIDE I/O BOARD
TXB_232
RXB_232
PCBD #002-3758-01
BYPASS
JUMPER
STOP1
1 2
J1
1
2
3
4
5
6
7
8
CDM
SAFETY
SWITCH
D
+24V
ROBOT
0.5A
MAX
BOARD ID = 0001
J2
VCC
1
6
2
7
3
8
4
9
5
J7
IOPORT_A0
IOPORT_A1
IOPORT_A2
IOPORT_A3
IOPORT_A4
IOPORT_A5
IOPORT_A6
IOPORT_A7
IOPORT_D0
IOPORT_D1
IOPORT_D2
IOPORT_D3
IOPORT_D4
IOPORT_D5
IOPORT_D6
IOPORT_D7
IOSEL0
IOSEL1
IOSEL2
+24V_USER
24VRTN_USER
+24V
DRV_OUT0
DRV_OUT1
DRV_OUT2
DRV_OUT3
DRV_OUT4
DRV_OUT5
DRV_OUT6
DRV_OUT7
DRV_OUT8
DRV_OUT9
DRV_OUT10
DRV_OUT11
DRV_OUT12
DRV_OUT13
DRV_OUT14
DRV_OUT15
DRV_OUT16
DRV_OUT17
DRV_OUT18
DRV_OUT19
DB50 MALE
J1
1
2
3
4
5
6
7
8
ROBOT
COM
VCC
TYPICAL
OUTPUT
CIRCUIT
A1
B1
C1
A2
B2
C2
A3
B3
C3
A4
B4
C4
A5
B5
C5
A6
B6
C6
A7
B7
C7
A8
B8
C8
24V=ENABLE
U1A
120
OUTPUT FROM CPU
TX232_422RXN
RX232_422RXP
422TXN
SIO1
J3
TXA_DRIVEN
RXA_DRIVEN
RXD_RAW
TXD_RAW
1
6
2
7
3
8
4
9
5
TXA_232
RXA_232
SIO2
SIO
TO
PERSONALITY
BOARD
SIO
ULN2803A
MCC_RDMCC_WRIOINTERUPT
TX232_422RXN
RX232_422RXP
422TXP
422TXN
TXB_232
RXB_232
TXC_232
RXC_232
A9
B9
C9
A10
B10
C10
A11
B11
C11
A12
B12
C12
A13
B13
C13
A14
B14
C14
A15
B15
C15
A16
B16
C16
MAG 7.1 LOW SIDE I/O BOARD
1
2
3
4
5
TYPICAL EXTERNAL CONNECTIONS
P2
C
MISC. I/O
MINIMUM WIRING CONFIGURATION
BYPASS INTERLOCK
B
1
2
3
4
5
6
7
8
9
10
11
12
13
14
15
16
17
18
19
20
21
22
23
24
25
26
27
28
29
30
31
32
33
34
35
36
37
38
39
40
41
42
43
44
45
46
47
48
49
50
1
2
3
4
5
6
7
8
9
10
11
12
13
14
15
16
17
18
19
20
21
22
23
24
25
26
27
28
29
30
31
32
33
34
35
36
37
38
39
40
41
42
43
44
45
46
47
48
49
50
MISC. I/O
TYPICAL WIRING CONFIGURATION
POSSIBLE SAFETY SWITCHES
OPTIONAL USER SUPPLIED
I/O POWER WITH FULL
ISOATION TO 200V, MUST BE
24V. WARNING! DO NOT
EXCEED MAXIMUM RATINGS
EXT_IN0
EXT_IN1
EXT_IN2
EXT_IN3
EXT_IN4
EXT_IN5
EXT_IN6
EXT_IN7
EXT_IN8
EXT_IN9
EXT_IN10
EXT_IN11
EXT_IN12
EXT_IN13
EXT_IN14
EXT_IN15
EXT_IN16
EXT_IN17
EXT_IN18
EXT_IN19
EXT_IN20
EXT_IN21
1
2
3
4
5
6
7
8
9
10
11
12
13
14
15
16
17
18
19
20
21
22
23
24
25
26
27
28
29
30
31
32
33
34
35
36
37
38
39
40
41
42
43
44
45
46
47
48
49
50
INPUT TO CPU
TYPICAL
INPUT
CIRCUIT
C
+24V_ISO
BATT_LOW_UPS
AC_FAIL_UPS
24V=ENABLE
10K
U1A
TBD
+VCC +24VDC
ROBOT
COM
MAG 7.1 HIGH SIDE I/O BOARD
BYPASS
TXB_232
RXB_232
002-3756-01
JUMPER
STOP1
1 2
J1
J1
1
2
3
4
5
6
7
8
1
2
3
4
5
6
7
8
CDM
SAFETY
SWITCH
+24V
ROBOT
0.5A
MAX
BOARD ID = 0002
J2
VCC
1
6
2
7
3
8
4
9
5
P1
IOPORT_A0
IOPORT_A1
IOPORT_A2
IOPORT_A3
IOPORT_A4
IOPORT_A5
IOPORT_A6
IOPORT_A7
IOPORT_D0
IOPORT_D1
IOPORT_D2
IOPORT_D3
IOPORT_D4
IOPORT_D5
IOPORT_D6
IOPORT_D7
IOSEL0
IOSEL1
IOSEL2
+24V_USER
+24VRTN_USER
+24V
DRV_OUT0
DRV_OUT1
DRV_OUT2
DRV_OUT3
DRV_OUT4
DRV_OUT5
DRV_OUT6
DRV_OUT7
DRV_OUT8
DRV_OUT9
DRV_OUT10
DRV_OUT11
DRV_OUT12
DRV_OUT13
DRV_OUT14
DRV_OUT15
DRV_OUT16
DRV_OUT17
DRV_OUT18
DRV_OUT19
ROBOT
COM
VCC TYPICAL
OUTPUT
CIRCUIT
A1
B1
C1
A2
B2
C2
A3
B3
C3
A4
B4
C4
A5
B5
C5
A6
B6
C6
A7
B7
C7
A8
B8
C8
24V=ENABLE
U1A
TBD
120
OUTPUT FROM CPU
TX232_422RXN
RX232_422RXP
422TXN
SIO1
J3
TXA_DRIVEN
RXA_DRIVEN
RXD_RAW
TXD_RAW
1
6
2
7
3
8
4
9
5
TXA_232
RXA_232
SIO2
SIO
TO
PERSONALITY
BOARD
UDN2987A
SIO
DB50 MALE
MCC_RDMCC_WRIOINTERUPT
TX232_422RXN
RX232_422RXP
422TXP
422TXN
TXB_232
RXB_232
TXC_232
RXC_232
A9
B9
C9
A10
B10
C10
A11
B11
C11
A12
B12
C12
A13
B13
C13
A14
B14
C14
A15
B15
C15
A16
B16
C16
B
TYPICAL EXTERNAL CONNECTIONS
MAG 7.1 HIGH SIDE I/O BOARD
+24V_ISO
BATT_LOW_UPS
AC_FAIL_UPS
+24V
J1
DISCRETE.
I/O INPUTS
1
14
2
15
3
16
4
17
5
18
6
19
7
20
8
21
9
22
10
23
11
24
12
25
13
MTR_EMO
MTR_EMO_SRC
DIR1_EXT_INHIBIT
DIR1_EXT_INHIBIT_SRC
DIR2_EXT_INHIBIT
DIR2_EXT_INHIBIT_SRC
DIR3_EXT_INHIBIT
DIR3_EXT_INHIBIT_SRC
DIR4_EXT_INHIBIT
DIR4_EXT_INHIBIT_SRC
DIR5_EXT_INHIBIT
DIR5_EXT_INHIBIT_SRC
DIR6_EXT_INHIBIT
DIR6_EXT_INHIBIT_SRC
DIR7_EXT_INHIBIT
DIR7_EXT_INHIBIT_SRC
DIR8_EXT_INHIBIT
DIR8_EXT_INHIBIT_SRC
DIR9_EXT_INHIBIT
DIR9_EXT_INHIBIT_SRC
AC_FAIL
AC_FAIL_SRC
SPARE
ROBOT
0.5A
MAX
J7
DISCRETE.
I/O
OUTPUTS
1
9
2
10
3
11
4
12
5
13
6
14
7
15
8
DIR2_GV_CLS_INHIBIT
DIR3_GV_CLS_INHIBIT
DIR4_GV_CLS_INHIBIT
DIR5_GV_CLS_INHIBIT
DIR6_GV_CLS_INHIBIT
DIR7_GV_CLS_INHIBIT
DIR8_GV_CLS_INHIBIT
DIR9_GV_CLS_INHIBIT
POWER_DOWN
DIR1_GV_CLS_INHIBIT
SPARE_1
SPARE_3
SPARE_2
SPARE_4
RELAY COMMON
J6
+VCC +24VDC
ROBOT
COM
TYPICAL
INPUT
CIRCUIT
10K
MAG 7.1 RELAY I/O BOARD
002-4212-01
INPUT TO CPU
TXB_232
RXB_232
STOP1
U1A
TBD
BOARD ID = 0003
+24V
P1
ROBOT
COM
IOPORT_A0
IOPORT_A1
IOPORT_A2
IOPORT_A3
IOPORT_A4
IOPORT_A5
IOPORT_A6
IOPORT_A7
IOPORT_D0
IOPORT_D1
IOPORT_D2
IOPORT_D3
IOPORT_D4
IOPORT_D5
IOPORT_D6
IOPORT_D7
IOSEL0
IOSEL1
IOSEL2
TYPICAL
OUTPUT
CIRCUITS
K1
OUTPUT FROM CPU
K-n
24V=ENABLE
OUTPUT FROM CPU
ROBOT
COM
DB15_F
SIO
A1
B1
C1
A2
B2
C2
A3
B3
C3
A4
B4
C4
A5
B5
C5
A6
B6
C6
A7
B7
C7
A8
B8
C8
MCC_RDMCC_WRIOINTERUPT
TX232_422RXN
RX232_422RXP
422TXP
422TXN
TXB_232
RXB_232
TXC_232
RXC_232
A9
B9
C9
A10
B10
C10
A11
B11
C11
A12
B12
C12
A13
B13
C13
A14
B14
C14
A15
B15
C15
A16
B16
C16
TXA_DRIVEN
RXA_DRIVEN
RXD_RAW
TXD_RAW
J1
J1
1
2
3
4
5
6
7
8
1
2
3
4
5
6
7
8
CDM
J2
VCC
ROBOT
DB25_F
A
1
2
3
4
5
J6
TX232_422RXN
RX232_422RXP
422TXN
1
6
2
7
3
8
4
9
5
SIO1
A
J3
TXA_232
RXA_232
1
6
2
7
3
8
4
9
5
UNLESS OTHERWISE SPECIFIED:
RESISTORS ARE 1/4W VALUES I N OHMS
RESISTOR TOLE RANCES 5%
CAPACITOR VALUES IN uFARADS
CAPACITOR TOLER ANCES 10%
SIO2
DRAWN BY
MJV
CHECKED BY
MJV
APROVED BY
SIO
TO
PERSONALITY
BOARD
DATE
BROOKS AUTOMATION,
15 ELIZABETH
INC CHELMSFORD,
DRIVE
MA
10/14/97
DATE
10/21/97
01824-4185
DWG TITLE
WIRING DIAGRAM MAG7.1;
3 -OPTIONS SHOWN
DATE
SIZE
D
DWG NO.
MAG 7.1 RELAY I/O BOARD
8
7
SHEET
6
5
4
3
2
REV
WD-003-1600-00
1
2
OF
2
B
present
1
2
3
4
MR
VCC
NC
NC
NC
RESET
GND RESET
8
7
6
5
VCC
RESET
IN_P[0..23]
IOPORT_D0
IOPORT_D1
IOPORT_D2
IOPORT_D3
IOPORT_D4
IOPORT_D5
IOPORT_D6
IOPORT_D7
U31B
A1
A2
A3
A4
19
IOPORT_D0
IOPORT_D1
IOPORT_D2
IOPORT_D3
9
7
5
3
Y1
Y2
Y3
Y4
G
IOPORT_A0
IOPORT_A1
74ALS240
4
38
37
36
35
33
32
31
30
6
40
10
9
39
7
D0
D1
D2
D3
D4
D5
D6
D7
PA0
PA1
PA2
PA3
PA4
PA5
PA6
PA7
RD
WR
A0
A1
RESET
CS
PB0
PB1
PB2
PB3
PB4
PB5
PB6
PB7
PC0
PC1
PC2
PC3
PC4
PC5
PC6
PC7
IOPORT_D[0..7]
IOPORT_A[0..7]
5
4
3
2
44
43
42
41
IN_P0
IN_P1
IN_P2
IN_P3
IN_P4
IN_P5
IN_P6
IN_P7
IN_P0
IN_P1
IN_P8
IN_P9
IN_P10
IN_P11
IN_P12
IN_P13
IN_P14
IN_P15
16
17
18
19
15
14
13
11
IN_P16
IN_P17
IN_P18
IN_P19
IN_P20
IN_P21
IN_P22
IN_P23
8
7
6
5
IN_P3
8
7
6
5
IN_P4
IN_P5
8
7
6
5
IOPORT_A0
IOPORT_A1
IOPORT_A2
IOPORT_A3
IOPORT_A4
IOPORT_A5
IOPORT_A6
IOPORT_A7
IOPORT_D0
IOPORT_D1
IOPORT_D2
IOPORT_D3
IOPORT_D4
IOPORT_D5
IOPORT_D6
IOPORT_D7
IOSEL0
IOSEL1
IOSEL2
A1
B1
C1
A2
B2
C2
A3
B3
C3
A4
B4
C4
A5
B5
C5
A6
B6
C6
A7
B7
C7
A8
B8
C8
(low disables FETs )
16
MCC_RDMCC_WRIOINTERUPT
TX232_422R
XN
RX232_422RXP
422TXP
422TXN
TXB_232
RXB_232
T X C _ 232
RXC_232
DISABLE_LOGIC(status to MCC )
TXA_DRIVEN
RXA_DRIVEN
RXD_RAW
TXD_RAW
A9
B9
C9
A10
B10
C10
A11
B11
C11
A12
B12
C12
A13
B13
C13
A14
B14
C14
A15
B15
C15
A16
B16
C16
IN_P7
1
2
3
4
5
6
7
8
9
10
11
12
13
14
15
RN1
4.7KNET
1
2
3
4
5
6
7
8
9
10
11
12
13
14
15
16
VCC
RN2
100-348-033
SIO
3
RXA_DRIVENTXA_DRIVENVCC
4.7KNET
1
2
3
4
5
6
7
8
9
10
11
12
13
14
15
16
J1
R5
1k
R6
1k
1
2
3
4
5
6
7
8
DS2U
SIO1 TX
2
2
DS1U
SIO1 RX
VCC
DS1
RV1
RV2
DS2
CDM
RN3
NC
EMO Switch
RJ8
flat spot
cathode
+24V_ROBOT
IN_P15
IN_P16
IN_P17
IN_P18
IN_P19
IN_P20
IN_P21
IN_P22
IN_P23
OPUP15
OPUP16
OPUP17
OPUP18
OPUP19
OPUP20
IN_P8
IN_P9
IN_P10
IN_P11
IN_P13
IN_ISO0
1
2
3
4
IN_ISO2
IN_ISO0
IN_ISO1
IN_ISO2
IN_ISO3
IN_ISO4
IN_ISO5
IN_ISO6
IN_ISO7
IN_ISO1
Collector1
Emitter1
Collector2
Emitter2
Anode1
Cathode1
Anode2
Cathode2
Collector1
Emitter1
Collector2
Emitter2
Anode1
Cathode1
Anode2
Cathode2
8
7
6
5
Collector1
Emitter1
Collector2
Emitter2
8
7
6
5
Collector1
Emitter1
Collector2
Emitter2
8
7
6
5
Collector1
Emitter1
Collector2
Emitter2
9
10
11
12
13
14
15
16
8
7
6
5
4
3
2
1
IN0
IN1
IN2
IN3
IN4
IN5
IN6
IN7
8
7
6
5
OPUP[0..20]
IN_P14
IN_P15
OPUP0
OPUP1
OPUP2
OPUP3
OPUP4
OPUP5
OPUP6
OPUP7
OPUP8
OPUP9
OPUP10
OPUP11
OPUP12
OPUP13
OPUP14
IN_P17
IN_P18
IN_P19
1
2
3
4
IN_ISO4
1
2
3
4
IN_ISO6
1
2
3
4
IN_ISO8
IN_ISO5
1
2
3
4
5
6
7
8
16
15
14
13
12
11
10
9
IN8
IN9
IN10
IN11
IN12
IN13
IN14
IN15
IN_ISO16
IN_ISO17
IN_ISO18
IN_ISO19
IN_ISO20
IN_ISO21
IN_ISO22
IN_ISO23
1
2
3
4
5
6
7
8
16
15
14
13
12
11
10
9
IN16
IN17
IN18
IN19
IN20
IN21
IN22
IN23
C1
D29
1N4004
DEMZ9SNA197
DF2E-DC24V
2880 ohm
Vpickup(max) = 16.8 V
RV3
RV4
IOPORT_A0
IOPORT_A1
6
40
10
9
39
7
2
C8
10uF
SIO
2
D0
D1
D2
D3
D4
D5
D6
D7
PA0
PA1
PA2
PA3
PA4
PA5
PA6
PA7
8
7
6
5
8
7
6
5
8
7
6
5
8
7
6
5
RD
WR
A0
A1
RESET
CS
PB0
PB1
PB2
PB3
PB4
PB5
PB6
PB7
J3
1
6
2
7
3
8
4
9
5
RV5
RV6
IN_ISO7
Anode1
Cathode1
Anode2
Cathode2
PC0
PC1
PC2
PC3
PC4
PC5
PC6
PC7
SIO2
20
21
22
24
25
26
27
28
OUT_P8
OUT_P9
OUT_P10
OUT_P11
OUT_P12
OUT_P13
OUT_P14
OUT_P15
OUT_P0
OPUP1
OUT_P1
IN_ISO9
1
2
3
4
OPUP2
OPUP3
OUT_P3
1
2
3
4
OPUP4
OUT_P4
OPUP5
OUT_P16
OUT_P17
OUT_P18
OUT_P19
OUT_P5
1
2
3
4
OPUP6
OUT_P6
OPUP7
OUT_P7
Anode1
Cathode1
Anode2
Cathode2
1
2
3
4
IN_ISO10
OPUP8
1
2
3
4
OUT_P9
1
2
3
4
OPUP10
OUT_P10
OPUP11
OUT_P11
1
2
3
4
OPUP9
SIO
Collector1
Emitter1
Collector2
Emitter2
Anode1
Cathode1
Anode2
Cathode2
1
2
3
4
IN_ISO12
R92
INDUCTOR
R4
4.7k
J5
1
TXA_DRIVENRXA_DRIVEN-
B U T T O N_TXRX
G
2N7002
Q2
1
D2
1N5232
C7
0.1uF_tant
K1 DF2E-DC24V
8
Collector1
Emitter1
Collector2
Emitter2
10
3
12 +
1
-
Anode1
Cathode1
Anode2
Cathode2
1
2
3
4
IN_ISO14
1
2
3
4
IN_ISO16
+24V_CUST
7
5
+24V_ROBOT
+24V_CUST
6
IN_ISO15
CUST
CUST
Collector1
Emitter1
Collector2
Emitter2
3
Anode1
Cathode1
Anode2
Cathode2
IN[0..21]
IN_ISO17
P2
IN0
IN1
IN2
IN3
IN4
IN5
IN6
IN7
IN8
IN9
IN10
IN11
IN12
IN13
IN14
IN15
IN16
IN17
IN18
IN19
IN20
IN21
Collector1
Emitter1
Collector2
Emitter2
Anode1
Cathode1
Anode2
Cathode2
1
2
3
4
IN_ISO18
1
2
3
4
IN_ISO20
IN_ISO19
Collector1
Emitter1
Collector2
Emitter2
Anode1
Cathode1
Anode2
Cathode2
+12V_ISO
IN_ISO21
J7
R7
2k
Collector1
Emitter1
Collector2
Emitter2
Anode1
Cathode1
Anode2
Cathode2
1
2
3
4
1
2
Anode1
Cathode1
Anode2
Cathode2
IN_ISO22
IN_ISO23
DISABLE
INTRLOCK_SRC
DS4
RED
+24V_CUST
8
7
6
5
OUT_ISO1
Anode1
Cathode1
Anode2
Cathode2
Collector1
Emitter1
Collector2
Emitter2
8
7
6
5
RN7
1
2
3
4
5
6
7
8
9
10
11
12
13
14
15
OUT_ISO2
OUT_ISO3
Anode1
Cathode1
Anode2
Cathode2
Collector1
Emitter1
Collector2
Emitter2
8
7
6
5
OUT_ISO4
OUT_ISO5
Anode1
Cathode1
Anode2
Cathode2
Anode1
Cathode1
Anode2
Cathode2
Anode1
Cathode1
Anode2
Cathode2
OUT_ISO0
OUT_ISO1
OUT_ISO2
OUT_ISO3
OUT_ISO4
OUT_ISO5
OUT_ISO6
OUT_ISO7
OUT_ISO8
OUT_ISO9
OUT_ISO10
OUT_ISO11
OUT_ISO12
OUT_ISO13
OUT_ISO14
12KNET
Collector1
Emitter1
Collector2
Emitter2
8
7
6
5
16
RN8
1
2
3
4
5
6
7
8
9
10
11
12
13
14
15
OUT_ISO6
OUT_ISO7
Collector1
Emitter1
Collector2
Emitter2
8
7
6
5
OUT_ISO8
OUT_ISO9
Collector1
Emitter1
Collector2
Emitter2
8
7
6
5
OUT_ISO15
OUT_ISO16
OUT_ISO17
OUT_ISO18
OUT_ISO19
Fused at source
OUT_ISO0
OUT_ISO1
OUT_ISO2
OUT_ISO3
OUT_ISO4
OUT_ISO5
OUT_ISO6
OUT_ISO7
1
2
3
4
5
6
7
8
9
10
Anode1
Cathode1
Anode2
Cathode2
I1
O1
I2
O2
I3
O3
I4
O4
I5
O5
I6
O6
I7
O7
I8
O8
FAULT GND
OE/R
VS
20
19
18
17
16
15
14
13
12
11
+24V_ROBOT
OUT0
OUT1
OUT2
OUT3
OUT4
OUT5
OUT6
OUT7
CUST
ULN2987
U26
OUT_ISO8
OUT_ISO9
OUT_ISO10
OUT_ISO11
OUT_ISO12
OUT_ISO13
OUT_ISO14
OUT_ISO15
1
2
3
4
5
6
7
8
9
10
OUT_ISO16
OUT_ISO17
OUT_ISO18
OUT_ISO19
1
2
3
4
5
6
7
8
9
10
I1
O1
I2
O2
I3
O3
I4
O4
I5
O5
I6
O6
I7
O7
I8
O8
FAULT GND
OE/R
VS
20
19
18
17
16
15
14
13
12
11
OUT8
OUT9
OUT10
OUT11
OUT12
OUT13
OUT14
OUT15
20
19
18
17
16
15
14
13
12
11
OUT16
OUT17
OUT18
OUT19
OPUP14
OUT_P14
OPUP15
OUT_P15
iBUTTON
1
2
3
4
Anode1
Cathode1
Anode2
Cathode2
OUT0
OUT1
OUT2
OUT3
OUT4
OUT5
OUT6
OUT7
OUT8
OUT9
OUT10
OUT11
OUT12
OUT13
OUT14
OUT15
OUT16
OUT17
OUT18
OUT19
input0
input1
input2
input3
input4
input5
input6
input7
input8
input9
input10
input11
input12
input13
input14
input15
input16
input17
input18
input19
input21
input22
Optional Customer Supplied +2 4V
I/O Power For Full Isolati on
+24V_CUST
+24V_RTN_CUST
output0
output1
output2
output3
output4
output5
output6
output7
output8
output9
output10
output11
output12
output13
output14
output15
output16
output17
output18
output19
2
DDMZ50PNK87
ULN2987
U30
12KNET
OUT_ISO10
OUT_ISO11
SMD100
U21
OUT_ISO0
16
F1
1.1A @20C
1
OUT_ISO[0..19]
Collector1
Emitter1
Collector2
Emitter2
Interlock
Defeat
1
2
3
4
5
6
7
8
9
10
11
12
13
14
15
16
17
18
19
20
21
22
23
24
25
26
27
28
29
30
31
32
33
34
35
36
37
38
39
40
41
42
43
44
45
46
47
48
49
50
RSET_FAULT
I1
O1
I2
O2
I3
O3
I4
O4
I5
O5
I6
O6
I7
O7
I8
O8
FAULT GND
OE/R
VS
OUT[0..19]
+24V_ROBOT
J4
R2
1
2
3
FROM THETA
BOARD
+24V_ISO
ULN2987
4.7k
DS3
GILWAY# E35
+24VDC PWR
Collector1
Emitter1
Collector2
Emitter2
8
7
6
5
OUT_ISO12
OUT_ISO13
J6
1
2
3
4
5
UPS Status
Collector1
Emitter1
Collector2
Emitter2
8
7
6
5
OUT_ISO14
BATT_LOW_UPS
AC_FAIL_UPS
INTRLOCK_SRC
+24V_ROBOTIN22
IN23
OUT_ISO15
1
74ALS240
U7
+24V_ISO
MOCD217
U32
70543-0001
1
1
1
2
3
4
1
2
3
18
16
14
12
3
OUT
1
3
Y1
Y2
Y3
Y4
OPUP12
OUT_P12
OPUP13
OUT_P13
Q1
2N7002
2
A1
A2
A3
A4
IN
120OHM
See note 1
MOCD217
U29
2
4
6
8
1
IN_ISO13
MOCD217
U28
VCC
TXDTXA_DRIVEN
RXA_DRIVEN
4
IN_ISO11
MOCD217
U27
OUT_P8
U31A
C5
0.01uF
78L12
L4
C6
MOCD217
U25
8255PLCC
R3
4.7k
C4
0.01uF
+12V_ISO
10uF_tant 35V
MOCD217
U24
DEMZ9SNA197
RXD-
MV
1N4004
2
D1
1
SIO
MOCD217
U23
OUT_P2
16
17
18
19
15
14
13
11
C3
0.01uF
+24V_ISO
10k
U20
OPUP0
OUT_P0
OUT_P1
OUT_P2
OUT_P3
OUT_P4
OUT_P5
OUT_P6
OUT_P7
J R
BW
RN6
Anode1
Cathode1
Anode2
Cathode2
2
8
7
6
5
OUT_P[0..19]
5
4
3
2
44
43
42
41
J R
JR
10k
+12V_ISO
38
37
36
35
33
32
31
30
C2
0.01uF
10uF_tant 10V
MOCD217
IOPORT_D0
IOPORT_D1
IOPORT_D2
IOPORT_D3
IOPORT_D4
IOPORT_D5
IOPORT_D6
IOPORT_D7
JR
08/31/98
RN5
IN_ISO8
IN_ISO9
IN_ISO10
IN_ISO11
IN_ISO12
IN_ISO13
IN_ISO14
IN_ISO15
OUT_FAULT
1
422TXN
02/16/98
VCC
MOCD217
U14
IN_P23
20 Outputs to Worl d
U22
J R
05/07/99
MOCD217
U13
IN_P22
SIO1
APP
JR
MOCD217
U12
IN_P16
J2
RX232_422RXP
422TXP
BY
01/16/98
10k
IN_ISO3
MOCD217
U15
TX232_422RXN
PER EC 13657
REVISE PER EC 15 018
MOCD217
U11
CDM_PRESEN T
INTRLOCK_SR C
CDM Not Present EMO BYPA SS
K15
+24V_ROBOT
8
INTRLOCK_SRC 10
3
7
12 +
5
1
6
REVISE
DATE
MOCD217
U10
IN_P12
IN_P21
1
6
2
7
3
8
4
9
5
D
MOCD217
U9
4.7KNET
1
1
1
2
3
4
MOCD217
U8
IN_P0
IN_P1
IN_P2
IN_P3
IN_P4
IN_P5
IN_P6
IN_P7
IN_P8
IN_P9
IN_P10
IN_P11
IN_P12
IN_P13
IN_P14
IN_P20
Intrlock_src is als o
EMO_CDM
when CDM is presen t
DESCRIPTION
REVISE PER EC 12041
REVISE PER EC 12353
RN4
MOCD217
U6
IN_P6
General purpose I/O po rt
(GPIO)
VCC
Anode1
Cathode1
Anode2
Cathode2
MOCD217
U5
8255PLCC
P1
Collector1
Emitter1
Collector2
Emitter2
MOCD217
U4
IN_P2
20
21
22
24
25
26
27
28
IN_ISO[0..23]
U3
U2
Board ID set to 000 2
REV
B
C
D1
24 Inputs to Robo t
MAX701CSA
11
13
15
17
E
U1
R1 4.7k
VCC
D
2
Notes:
1. I/O uses internal power when no jumpers present or no customer power
I/O uses customer power when present providing full isol
ation
C
GND
B
2
A
MOCD217
U33
2
2
D3
1N5242
2
1
OPUP16
OUT_P16
OPUP17
OUT_P17
1
2
3
4
OPUP18
OUT_P18
OPUP19
OUT_P19
1
2
3
4
Anode1
Cathode1
Anode2
Cathode2
Collector1
Emitter1
Collector2
Emitter2
8
7
6
5
OUT_ISO16
1
OUT_ISO17
MOCD217
U34
R8
Anode1
Cathode1
Anode2
Cathode2
Collector1
Emitter1
Collector2
Emitter2
8
7
6
5
OUT_ISO18
OPUP20
4.7k
DIS_LOG
1
2
3
4
Anode1
Cathode1
Anode2
Cathode2
RESISTORS ARE 1/4W VALUESNI OHMS
R E S I S T O R T O L ERANCES 5%
C A P A C I T O R V A L U E SIN uFARADS
CAPACITOR TOLER
A NCES 10%
OUT_ISO19
MOCD217
U35
4.7k
R9
UNLESS OTHERWISE SPECIFIE
D:
VCC
R93
4.7k
Collector1
Emitter1
Collector2
Emitter2
8
7
6
5
DRAWN BY
DATE
CHECKED BY
DATE
APROVED BY
DATE
BROOKS AUTOMATION,
15 ELIZABETH
INC CHELMSFORD,
DRIVE
MA
01824-4185
DWG TITLE
SCHEMATIC,MAG 7 HIGH SIDE
I/0 INTERFACE ELECTRONICS
DISABLE_LOGIC-
SIZE
DWG NO.
MOCD217
SHEET
A
B
C
D
E
REV
SD-002-3756-01
D1
1
OF
1
A
B
C
D
E
REV
D
MR
VCC
NC
NC
NC
RESET
GND RESET
8
7
6
5
VCC
RESET
INPUP[0..21]
24 Inputs to Robo t
IN[0..21]
IN_P[0..23]
U3
U2
Board ID set to 000 1
U31B
Y1
Y2
Y3
Y4
IOPORT_D0
IOPORT_D1
IOPORT_D2
IOPORT_D3
9
7
5
3
IOPORT_D0
IOPORT_D1
IOPORT_D2
IOPORT_D3
IOPORT_D4
IOPORT_D5
IOPORT_D6
IOPORT_D7
38
37
36
35
33
32
31
30
IOPORT_A0
IOPORT_A1
6
40
10
9
39
7
G
74ALS240
D0
D1
D2
D3
D4
D5
D6
D7
PA0
PA1
PA2
PA3
PA4
PA5
PA6
PA7
RD
WR
A0
A1
RESET
CS
PB0
PB1
PB2
PB3
PB4
PB5
PB6
PB7
PC0
PC1
PC2
PC3
PC4
PC5
PC6
PC7
IOPORT_D[0..7]
IOPORT_A[0..7]
5
4
3
2
44
43
42
41
IN_P0
IN_P1
IN_P2
IN_P3
IN_P4
IN_P5
IN_P6
IN_P7
20
21
22
24
25
26
27
28
IN_P8
IN_P9
IN_P10
IN_P11
IN_P12
IN_P13
IN_P14
IN_P15
16
17
18
19
15
14
13
11
IN_P16
IN_P17
IN_P18
IN_P19
IN_P20
IN_P21
IN_P22
IN_P23
IN_P0
IN_P1
16
+24V_ISO
RN4
IOPORT_A0
IOPORT_A1
IOPORT_A2
IOPORT_A3
IOPORT_A4
IOPORT_A5
IOPORT_A6
IOPORT_A7
IOPORT_D0
IOPORT_D1
IOPORT_D2
IOPORT_D3
IOPORT_D4
IOPORT_D5
IOPORT_D6
IOPORT_D7
IOSEL0
IOSEL1
IOSEL2
A1
B1
C1
A2
B2
C2
A3
B3
C3
A4
B4
C4
A5
B5
C5
A6
B6
C6
A7
B7
C7
A8
B8
C8
DISABLE MOTORS (+24V )
+24V Present = enable d
16
MCC_RDMCC_WRIOINTERUPT
TX232_422R
XN
RX232_422RXP
422TXP
422TXN
TXB_232
RXB_232
T X C _ 232
RXC_232
DISABLE_LOGIC(status to MCC )
TXA_DRIVEN
RXA_DRIVEN
RXD_RAW
TXD_RAW
A9
B9
C9
A10
B10
C10
A11
B11
C11
A12
B12
C12
A13
B13
C13
A14
B14
C14
A15
B15
C15
A16
B16
C16
RN1
16
RN2
VCC
100-348-033
3
SIO
1
2
3
4
5
6
7
8
9
10
11
12
13
14
15
IN_P0
IN_P1
IN_P2
IN_P3
IN_P4
IN_P5
IN_P6
IN_P7
IN_P8
IN_P9
IN_P10
IN_P11
IN_P12
IN_P13
IN_P14
1
2
3
4
5
6
7
8
9
10
11
12
13
14
15
IN_P15
IN_P16
IN_P17
IN_P18
IN_P19
IN_P20
IN_P21
IN_P22
IN_P23
OPUP15
OPUP16
OPUP17
OPUP18
OPUP19
OPUP20
IN_P2
IN_P3
IN_P5
16
IN_P6
RN5
INPUP15
INPUP16
INPUP17
INPUP18
INPUP19
INPUP20
INPUP21
1
2
3
4
5
6
7
8
9
10
11
12
13
14
15
IN_P7
IN_P9
8
7
6
5
8
7
6
5
8
7
6
5
8
7
6
5
IN_P10
10KNET
IN_P11
8
7
6
5
IN_P12
IN_P13
8
7
6
5
DS2
flat spot
cathode
RV1
RV2
IN_P14
IN_P15
IN_P18
IN_P19
NC
16
VCC
EMO Switch
RN3
1
2
3
4
5
6
7
8
9
10
11
12
13
14
15
1
1
RJ8
4.7KNET
+24V_ROBOT
CDM_PRESENT
INTRLOCK_SRC
J2
1
6
2
7
3
8
4
9
5
1
CDM Not Present EMO BYPAS S
K15
TX232_422RX N
+24V_ROBOT
8
INTRLOCK_SRC 10
RX232_422RX P
422TXP
3
7
CDM_PRESENT12 +
5
1
422TXN
6
C8
D29
DF2E-DC24V
1N4004
2880 ohm
10uF
Vpickup(max) = 16.8 V
RV3 RV4
2
DEMZ9SNA197
1
6
2
7
3
8
4
9
5
8
7
6
5
8
7
6
5
IOPORT_D0
IOPORT_D1
IOPORT_D2
IOPORT_D3
IOPORT_D4
IOPORT_D5
IOPORT_D6
IOPORT_D7
38
37
36
35
33
32
31
30
IOPORT_A0
IOPORT_A1
6
40
10
9
39
7
D0
D1
D2
D3
D4
D5
D6
D7
PA0
PA1
PA2
PA3
PA4
PA5
PA6
PA7
RD
WR
A0
A1
RESET
CS
PB0
PB1
PB2
PB3
PB4
PB5
PB6
PB7
PC0
PC1
PC2
PC3
PC4
PC5
PC6
PC7
SIO2
5
4
3
2
44
43
42
41
OUTB_P0
OUTB_P1
OUTB_P2
OUTB_P3
OUTB_P4
OUTB_P5
OUTB_P6
OUTB_P7
20
21
22
24
25
26
27
28
OUTB_P8
OUTB_P9
OUTB_P10
OUTB_P11
OUTB_P12
OUTB_P13
OUTB_P14
OUTB_P15
16
17
18
19
15
14
13
11
OUTB_P16
OUTB_P17
OUTB_P18
OUTB_P19
OUTB_P20
2
4
6
8
11
13
15
17
1
19
OUTB_P8
OUTB_P9
OUTB_P10
OUTB_P11
OUTB_P12
OUTB_P13
OUTB_P14
OUTB_P15
2
4
6
8
11
13
15
17
1
19
RXD-
3
R3
4.7k
1A1
1A2
1A3
1A4
2A1
2A2
2A3
2A4
Anode1
Cathode1
Anode2
Cathode2
C2
0.01uF
2
4
6
8
11
13
15
17
R4
4.7k
8
7
6
5
IN_P22
IN_P23
8
7
6
5
OUT_P1
OUT_P2
OPUP3
OUT_P3
1G
2G
1A1
1A2
1A3
1A4
2A1
2A2
2A3
2A4
1Y1
1Y2
1Y3
1Y4
2Y1
2Y2
2Y3
2Y4
18
16
14
12
9
7
5
3
OPUP4
OUT_P8
OUT_P9
OUT_P10
OUT_P11
OUT_P12
OUT_P13
OUT_P14
OUT_P15
OUT_P4
OPUP5
OUT_P5
Collector1
Emitter1
Collector2
Emitter2
R92
Anode1
Cathode1
Anode2
Cathode2
1
2
3
4
INPUP6
1
2
3
4
INPUP8
INDUCTOR
IN6
120OHM
+24V_ISO
Collector1
Emitter1
Collector2
Emitter2
+12V_ISO
INPUP7
IN7
Collector1
Emitter1
Collector2
Emitter2
OPUP6
OUT_P6
1G
2G
OPUP7
OUT_P7
1A1
1A2
1A3
1A4
2A1
2A2
2A3
2A4
1Y1
1Y2
1Y3
1Y4
2Y1
2Y2
2Y3
2Y4
18
16
14
12
9
7
5
3
OUT_P16
OUT_P17
OUT_P18
OUT_P19
LM340AT-12.0
1
Anode1
Cathode1
Anode2
Cathode2
1
2
3
4
1
2
3
4
1
2
3
4
OPUP8
R10
1
DS4
OUT_P9
1
2
3
4
OPUP10
OUT_P10
OPUP11
OUT_P11
1
2
3
4
OUT_P8
2
VCC
OPUP9
IO ENABLED
1.1k
Anode1
Cathode1
Anode2
Cathode2
OPUP12
OUT_P12
OPUP13
OUT_P13
1
2
3
4
10uF_tant
1
2
3
4
INPUP10
1
2
3
4
INPUP12
1
HEADER 2
OPUP14
OUT_P14
OPUP15
OUT_P15
D26
1N5232
1
2
3
4
2
2
2
3
U7
C7
0.1uF_tant
IN10
INPUP11
IN11
Collector1
Emitter1
Collector2
Emitter2
Anode1
Cathode1
Anode2
Cathode2
See note 1
IN12
INPUP13
K1 DF2E-DC24V
8
IN13
Collector1
Emitter1
Collector2
Emitter2
10
3
12 +
1
-
+24V_ISO
Anode1
Cathode1
Anode2
Cathode2
1
2
3
4
INPUP14
1
2
3
4
INPUP16
+24V_CUST
IN14
+24V_ROBOT
7
5
+24V_CUST
6
INPUP15
IN15
CUST
CUST
3
Collector1
Emitter1
Collector2
Emitter2
Anode1
Cathode1
Anode2
Cathode2
IN16
INPUP17
P2
IN17
Collector1
Emitter1
Collector2
Emitter2
Anode1
Cathode1
Anode2
Cathode2
1
2
3
4
INPUP18
IN0
IN1
IN2
IN3
IN4
IN5
IN6
IN7
IN8
IN9
IN10
IN11
IN12
IN13
IN14
IN15
IN16
IN17
IN18
IN19
IN20
IN21
1
2
3
4
INPUP20
IN18
INPUP19
IN19
Collector1
Emitter1
Collector2
Emitter2
Anode1
Cathode1
Anode2
Cathode2
IN20
INPUP21
IN21
J7
Collector1
Emitter1
Collector2
Emitter2
Anode1
Cathode1
Anode2
Cathode2
Anode1
Cathode1
Anode2
Cathode2
Anode1
Cathode1
Anode2
Cathode2
Anode1
Cathode1
Anode2
Cathode2
Anode1
Cathode1
Anode2
Cathode2
Anode1
Cathode1
Anode2
Cathode2
Anode1
Cathode1
Anode2
Cathode2
AC_FAIL_ISO
1
2
3
4
R7
BATT_LOW_IS
O R8
1.1k
Anode1
Cathode1
Anode2
Cathode2
Collector1
Emitter1
Collector2
Emitter2
8
7
6
5
Anode1
Cathode1
Anode2
Cathode2
1
2
3
4
5
6
7
8
9
10
11
12
13
14
15
16
17
18
19
20
21
22
23
24
25
26
27
28
29
30
31
32
33
34
35
36
37
38
39
40
41
42
43
44
45
46
47
48
49
50
1.1k
INTRLOCK_SRC
1.1A @20C
SMD100
+24V_CUST
+12V_ISO
Collector1
Emitter1
Collector2
Emitter2
8
7
6
5
Collector1
Emitter1
Collector2
Emitter2
8
7
6
5
Collector1
Emitter1
Collector2
Emitter2
8
7
6
5
Collector1
Emitter1
Collector2
Emitter2
8
7
6
5
Collector1
Emitter1
Collector2
Emitter2
Collector1
Emitter1
Collector2
Emitter2
8
7
6
5
U21
OUT_ISO0
OUT_ISO1
OUT_ISO2
OUT_ISO3
OUT_ISO4
OUT_ISO5
OUT_ISO6
OUT_ISO7
OUT_ISO0
OUT_ISO1
16
RN6
1
2
3
4
5
6
7
8
9
10
11
12
13
14
15
OUT_ISO2
OUT_ISO3
OUT_ISO4
OUT_ISO5
OUT_ISO0
OUT_ISO1
OUT_ISO2
OUT_ISO3
OUT_ISO4
OUT_ISO5
OUT_ISO6
OUT_ISO7
OUT_ISO8
OUT_ISO9
OUT_ISO10
OUT_ISO11
OUT_ISO12
OUT_ISO13
OUT_ISO14
4.7KNET
OUT_ISO6
OUT_ISO7
16
8
7
6
5
CUST
OUT_ISO[0..19]
RN7
1
2
3
4
5
6
7
8
9
10
11
12
13
14
15
OUT_ISO8
OUT_ISO9
OUT_ISO10
OUT_ISO15
OUT_ISO16
OUT_ISO17
OUT_ISO18
OUT_ISO19
1
2
3
4
5
6
7
8
9
I1
I2
I3
I4
I5
I6
I7
I8
GND
O1
O2
O3
O4
O5
O6
O7
O8
COM
18
17
16
15
14
13
12
11
10
Fused at sourc e
+24V_ROBOT
OUT0
OUT1
OUT2
OUT3
OUT4
OUT5
OUT6
OUT7
OUT8
OUT9
OUT10
OUT11
OUT12
OUT13
OUT14
OUT15
OUT16
OUT17
OUT18
OUT19
ULN2803A
Optional Customer Supplied +2 4V
I/O Power For Full Isolati on
+24V_CUS T
+24V_RTN_CUS T
2
HEADER 50
U26
OUT_ISO8
OUT_ISO9
OUT_ISO10
OUT_ISO11
OUT_ISO12
OUT_ISO13
OUT_ISO14
OUT_ISO15
1
2
3
4
5
6
7
8
9
I1
I2
I3
I4
I5
I6
I7
I8
GND
O1
O2
O3
O4
O5
O6
O7
O8
COM
18
17
16
15
14
13
12
11
10
+24V_ISO
ULN2803A
+24V_ROBOT
J4
R2
1
2
3
FROM THETA
BOARD
OUT_ISO11
4.7KNET
1.1k
DS3
GILWAY# E35
+24VDC PWR
U30
Collector1
Emitter1
Collector2
Emitter2
8
7
6
5
OUT_ISO16
OUT_ISO17
OUT_ISO18
OUT_ISO19
OUT_ISO12
OUT_ISO13
Collector1
Emitter1
Collector2
Emitter2
8
7
6
5
OUT_ISO14
1
2
3
4
5
6
7
8
9
I1
I2
I3
I4
I5
I6
I7
I8
GND
O1
O2
O3
O4
O5
O6
O7
O8
COM
18
17
16
15
14
13
12
11
10
J6
1
2
3
4
5
ULN2803A
OUT_ISO15
BATT_LOW_U
PS+24V_ISO
AC_FAIL_UPS
INTRLOCK_SRC
UPS
MOCD217
U33
U38
1
2
3
4
Anode1
Cathode1
Anode2
Cathode2
Interlock
Defeat
1
2
MOCD217
U32
4.7k
4.7k
R9
OUT
C6
IN9
MOCD217
U28
R93
R11
IN
IN8
INPUP9
MOCD217
U27
1G
2G
iBUTTON
DISABLE
1N4004
2
D9
1
SIO
MOCD217
U25
1
D27
1N5242
1
2
3
4
3
2
2N7002
1
DISABLE_LOGICOPUP16
OUT_P16
OPUP17
OUT_P17
4.7k
1
2
3
4
Anode1
Cathode1
Anode2
Cathode2
1
Collector1
Emitter1
Collector2
Emitter2
8
7
6
5
OUT_ISO16
OUT_ISO17
UNLESS OTHERWISE SPECIFIE
D:
MOCD217
MOCD217
U34
OPUP18
OUT_P18
OPUP19
OUT_P19
1
2
3
4
Anode1
Cathode1
Anode2
Cathode2
Collector1
Emitter1
Collector2
Emitter2
8
7
6
5
RESISTORS ARE 1/4W VALUESNI OHMS
R E S I S T O R T O L ERANCES 5%
C A P A C I T O R V A L U E SIN uFARADS
CAPACITOR TOLER
A NCES 10%
OUT_ISO18
OUT_ISO19
DRAWN BY
Jeff Richelsop h
DATE
BROOKS AUTOMATION,
15 ELIZABETH
INC CHELMSFORD,
DRIVE
MA
2/12/98
CHECKED BY
DATE
APROVED BY
DATE
01824-4185
DWG TITLE
MAG 7 LOW SIDE INPUT/OUTPUT
INTERFACE ELECTRONICS
MOCD217
SIZE
DWG NO.
REV
SD-002-3758-01
D
SHEET
A
B
4
L4
MOCD217
U24
VCC
1
2
C5
0.01uF
IN5
MOCD217
U23
OPUP2
J5
Q2
74ALS240
OPUP1
OUT_P0
OUT_P1
OUT_P2
OUT_P3
OUT_P4
OUT_P5
OUT_P6
OUT_P7
Q1
B U T T O N_TXRX
C4
0.01uF
IN4
MOCD217
U29
TXA_DRIVENRXA_DRIVEN-
G
18
16
14
12
9
7
5
3
74ALS244
1
C3
0.01uF
INPUP5
MOCD217
U15
OUT_P0
1Y1
1Y2
1Y3
1Y4
2Y1
2Y2
2Y3
2Y4
2N7002
U31A
1
IN_P21
74ALS244
U37
DEMZ9SNA197
1
19
1
IN_P20
74ALS244
U36
VCC
18
16
14
12
Collector1
Emitter1
Collector2
Emitter2
U20
U35
OUTB_P0
OUTB_P1
OUTB_P2
OUTB_P3
OUTB_P4
OUTB_P5
OUTB_P6
OUTB_P7
SIO
Y1
Y2
Y3
Y4
OPUP0
OPUP1
OPUP2
OPUP3
OPUP4
OPUP5
OPUP6
OPUP7
OPUP8
OPUP9
OPUP10
OPUP11
OPUP12
OPUP13
OPUP14
OPUP0
OUTB_P16
OUTB_P17
OUTB_P18
OUTB_P19
A1
A2
A3
A4
8
7
6
5
OUT_P[0..19]
8255PLCC
2
4
6
8
C1
MOCD217
U14
20 Outputs to Worl d
U22
J3
TXDTXA_DRIVEN
RXA_DRIVEN
INPUP4
10uF_tant
IN3
MOCD217
OUTB_P[0..19]
SIO1
2
RV6
1
2
3
4
IN2
INPUP3
F1
SIO
RV5
INPUP2
MOCD217
U12
CDM
Intrlock_src is als o
EMO_CDM
when CDM is presen t
1
2
3
4
MOCD217
U13
1
2
3
4
5
6
7
8
2
2
DS1
Anode1
Cathode1
Anode2
Cathode2
MOCD217
U11
OPUP[0..19]
J1
DS2U
SIO1 TX
Collector1
Emitter1
Collector2
Emitter2
MOCD217
U10
R6
1.1k
DS1U
VCC
MOCD217
U9
IN_P17
SIO1 RX
IN1
MOCD217
U8
IN_P8
IN_P16
VCC
IN0
INPUP1
MOCD217
U5
IN_P4
RXA_DRIVENTXA_DRIVEN-
R5
1.1k
Anode1
Cathode1
Anode2
Cathode2
INPUP0
MOCD217
U6
General purpose I/O po rt
(GPIO)
VCC
Collector1
Emitter1
Collector2
Emitter2
1
2
3
4
MOCD217
U4
10KNET
8255PLCC
P1
INPUP0
INPUP1
INPUP2
INPUP3
INPUP4
INPUP5
INPUP6
INPUP7
INPUP8
INPUP9
INPUP10
INPUP11
INPUP12
INPUP13
INPUP14
1
2
3
4
5
6
7
8
9
10
11
12
13
14
15
8
7
6
5
1
19
4
A1
A2
A3
A4
JR
2
1
2
3
4
MAX701CSA
11
13
15
17
APP
JR
U1
R1 4.7k
VCC
GND
present
BY
08/30/98
REVISE PER EC 13657
2
Notes:
1. I/O uses internal power when no jumpers present or no customer power
I/O uses customer power when present providing full isol
ation
DATE
DESCRIPTION
C
D
E
1
OF
1
B
C
D
E
IN_ISO[0..30]
U6
M_RESET_
1
2
3
4
8
7
6
5
VCC
MR
NC
NC
RESET
NC
GND RESET
VCC
6
40
10
9
39
7
IOPORT_A0
IOPORT_A1
RESET
MAX701CSA
24 Inputs to Robo t
D0
D1
D2
D3
D4
D5
D6
D7
PA0
PA1
PA2
PA3
PA4
PA5
PA6
PA7
RD
WR
A0
A1
RESET
CS
PB0
PB1
PB2
PB3
PB4
PB5
PB6
PB7
Board ID set to 000 0
U9A
ID_PUP
2
4
6
8
4
A1
A2
A3
A4
1
IOPORT_D0
IOPORT_D1
IOPORT_D2
IOPORT_D3
18
16
14
12
Y1
Y2
Y3
Y4
PC0
PC1
PC2
PC3
PC4
PC5
PC6
PC7
G
5
4
3
2
44
43
42
41
20
21
22
24
25
26
27
28
16
17
18
19
15
14
13
11
IN_P0
IN_P1
IN_P2
IN_P3
IN_P4
IN_P5
IN_P6
IN_P7
AL.RE-EN
BL.RE-EN
P1.RE-EN
P2.RE-EN
P3.RE-EN
P4.RE-EN
P5.RE-EN
P6.RE-EN
IN_P8
IN_P9
IN_P10
IN_P11
IN_P12
IN_P13
IN_P14
IN_P15
8
IN_P1
7
6
16
VCC
RN4
1
2
3
4
5
6
7
8
9
10
11
12
13
14
15
4.7KNET
IOPORT_D[0..7]
IOPORT_A[0..7]
General purpose I/O po rt
(GPIO)
P1
IOPORT_A0
IOPORT_A1
IOPORT_A2
IOPORT_A3
IOPORT_A4
IOPORT_A5
IOPORT_A6
IOPORT_A7
IOPORT_D0
IOPORT_D1
IOPORT_D2
IOPORT_D3
IOPORT_D4
IOPORT_D5
IOPORT_D6
IOPORT_D7
IOSEL0
IOSEL1
IOSEL2
A1
B1
C1
A2
B2
C2
A3
B3
C3
A4
B4
C4
A5
B5
C5
A6
B6
C6
A7
B7
C7
A8
B8
C8
DISABLE
MCC_RDMCC_WRIOINTERUPT
A9
B9
C9
A10
B10
C10
A11
B11
C11
A12
B12
C12
A13
B13
C13
A14
B14
C14
A15
B15
C15
A16
B16
C16
TXM7
RXM7
16
RN6
1
2
3
4
5
6
7
8
9
10
11
12
13
14
15
4.7KNET
TXB_232
RXB_232
T X C _ 232
RXC_232
(status to MCC )
DISABLE_LOGIC-
TXA_DRIVEN
RXA_DRIVEN
RXD_RAW
TXD_RAW
VCC
1
2
3
IN_ISO0
IN_ISO1
IN_P8
8
IN_P9
7
6
4
IN_P2
8
IN_P3
7
6
U4
U3
5
MOCD217
1
IN_ISO8
2
3
IN_ISO9
4
9
10
11
12
13
14
15
16
8
7
6
5
4
3
2
1
IN0
IN1
IN2
IN3
IN4
IN5
IN6
IN7
16
15
14
13
12
11
10
9
IN8
IN9
IN10
IN11
IN12
IN13
IN14
IN15
16
15
14
13
12
11
10
9
IN16
IN17
IN18
IN19
IN20
IN21
IN22
IN23
16
15
14
13
12
11
10
9
IN24
IN25
IN26
IN27
IN28
IN29
IN30
A
Initial Release
B
RELEASE PER EC 15281
1
IN_ISO2
IN_P10
8
IN_ISO3
IN_P11
7
6
5
IN_ISO4
IN_P12
8
IN_ISO5
IN_P13
7
6
IN_P14
8
1
IN_ISO14
IN_P15
7
6
2
3
IN_ISO15
5
4
4
U5
1
SS.AL
SS.BL
SS.P1
SS.P2
SS.P3
SS.P4
SS.P5
SS.P6
8
IN_P5
7
6
U7
4
IN_P0
IN_P1
IN_P2
IN_P3
IN_P4
IN_P5
IN_P6
IN_P7
IN_P8
IN_P9
IN_P10
IN_P11
IN_P12
IN_P13
IN_P14
8
1
IN_P7
7
6
2
3
IN_ISO7
5
4
MOCD217
8
IN_P17
7
6
U12
JR
JR
8
IN_ISO17
IN_P25
7
6
1
IN_ISO18
IN_P26
8
IN_ISO19
IN_P27
4
8
IN_P19
7
6
2
3
5
4
IN_P20
8
IN_P21
7
6
U17
VCC
10k
RN3
U13
1
2
3
IN_ISO16
IN_ISO17
IN_ISO18
IN_ISO19
IN_ISO20
IN_ISO21
IN_ISO22
IN_ISO23
1
2
3
4
5
6
7
8
IN_ISO24
IN_ISO25
IN_ISO26
IN_ISO27
IN_ISO28
IN_ISO29
IN_ISO30
1
2
3
4
5
6
7
8
4
10uF_tant
C1
C2
0.01uF
C3
0.01uF
C4
0.01uF
C5
0.01uF
10k
IN_ISO24
4
U16
+24V_ISO
RN5
IN_ISO25
MOCD217
IN_P18
1
IN_ISO26
7
6
2
3
IN_ISO27
5
4
MOCD217
IN_P15
IN_P16
IN_P17
IN_P18
IN_P19
IN_P20
IN_P21
IN_P22
IN_P23
IN_P24
IN_P25
IN_P26
IN_P27
IN_P28
IN_P29
IN_ISO13
4
U11
5
MOCD217
U15
IN_ISO12
2
3
1
2
3
4
5
6
7
8
MOCD217
IN_ISO16
IN_P24
1
2
3
5
1
MOCD217
IN_ISO6
IN_P16
IN_ISO11
4
U8
5
MOCD217
IN_P6
U10
IN_ISO8
IN_ISO9
IN_ISO10
IN_ISO11
IN_ISO12
IN_ISO13
IN_ISO14
IN_ISO15
+12V_ISO
D1
1
1N4004
2
LM340AT-12.0
1
IN
3
OUT
C7
10k
10uF
U14
C6
0.1uF
MOCD217
1
2
3
IN_ISO20
IN_ISO21
IN_P28
8
IN_P29
7
6
U18
1
IN_ISO28
2
3
IN_ISO29
SERVICE
5
4
5
MOCD217
4
2
VCC
MOCD217
R3
IN_P22
8
IN_P23
7
6
U19
1
IN_ISO22
IN_P30
8
2
3
IN_ISO23
IN_P31
7
6
4
U20
5
1
IN_ISO30
2
3
IN_ISO31
RED
1 DS2
R4
2
2k
OUT_FAULT
4
1
1k
J1
DS1
YELLOW
1
6
2
7
3
8
4
9
5
TXM7
S1
1
+12V_ISO
2
3
MOCD217
RXM7
SIO SERVICE
DB9_RX
4
4.7k
5
IN_P30
C8
6
4.7k
C9
C10
100pF 100pF 100pF
GT21MV3KE
DEMZ9SNA197
RV1
IN_P31
100-348-033
07/01/99
APP
10k
IN_ISO10
MOCD217
1
2
3
5
2
3
5
MOCD217
IN_P4
MOCD217
R6
BY
MOCD217
2
3
5
R5
DATE
RN2
8255PLCC
74ALS240
U2
5
SV.AL-OPND
SV.BL-OPND
SV.P1-OPND
SV.P2-OPND
SV.P3-OPND
SV.P4-OPND
SV.P5-OPND
SV.P6-OPND
IN_P16
IN_P17
IN_P18
IN_P19
IN_P20
IN_P21
IN_P22
IN_P23
IN_P0
IN_ISO0
IN_ISO1
IN_ISO2
IN_ISO3
IN_ISO4
IN_ISO5
IN_ISO6
IN_ISO7
GND
38
37
36
35
33
32
31
30
DESCRIPTION
2
U1
IOPORT_D0
IOPORT_D1
IOPORT_D2
IOPORT_D3
IOPORT_D4
IOPORT_D5
IOPORT_D6
IOPORT_D7
REV
RN1
IN_P[0..31]
10 SHIELD
11
SHI ELD
A
SIO
SIO
3
3
SIO
IN[0..30]
TXA_DRIVENRXA_DRIVENP2
C11
C12
100pF 100pF 100pF
VCC
DS4
flat spot
cathode
RV2
RV3
C15
C16
C17
1
1
C14
CDM
NC
EMO Switch
9
10
DS3
FOR
REFERENCE
ONLY
J2
1
2
3
4
5
6
7
8
DS2U
SIO1 TX
2
2
DS1U
SIO1 RX
IN0
IN1
IN2
IN3
IN4
IN5
IN6
IN7
IN8
IN11
IN14
O U T0
IN26
IN27
C13
RJ8_SHIELDED
R8
1k
SHIELD
SHIELD
R7
1k
1
2
3
4
5
6
7
8
9
10
11
12
13
14
15
16
17
18
19
20
21
22
23
24
25
26
27
28
29
30
31
32
33
34
35
36
37
38
39
40
41
42
43
44
45
46
47
48
49
50
100pF 100pF 100pF 100pF
*
Do not install R9 or R1
in this revision
IN30R9
IN16
IN17
IN18
IN19
IN20
IN21
IN22
IN23
IN10
IN13
IN24
IN25
0
SIO
INTRLOCK_SRC
VCC
Intrlock_src is als o
EMO_CDM
when CDM is presen t
16
RN7
4.7KNET
2 Inputs from Worl d
U2111 Outputs to Worl d
+24V_ROBOT
38
37
36
35
33
32
31
30
6
40
10
9
39
7
2
1
IOPORT_D0
IOPORT_D1
IOPORT_D2
IOPORT_D3
IOPORT_D4
IOPORT_D5
IOPORT_D6
IOPORT_D7
IOPORT_A0
IOPORT_A1
2
D0
D1
D2
D3
D4
D5
D6
D7
PA0
PA1
PA2
PA3
PA4
PA5
PA6
PA7
RD
WR
A0
A1
RESET
CS
PB0
PB1
PB2
PB3
PB4
PB5
PB6
PB7
J3
1
6
2
7
3
8
4
9
5
PC0
PC1
PC2
PC3
PC4
PC5
PC6
PC7
SIO2
5
4
3
2
44
43
42
41
IN_P24
IN_P25
IN_P26
IN_P27
IN_P28
IN_P29
IN_P31
IN_P30
20
21
22
24
25
26
27
28
OUT_P0
OUT_P1
OUT_P2
OUT_P3
OUT_P4
OUT_P5
OUT_P6
OUT_P7
CS.RNE
AL.RNE
BL.RNE
P1.RNE
P2.RNE
P3.RNE
P4.RNE
P5.RNE
16
17
18
19
15
14
13
11
OUT_P8
OUT_P9
OUT_P10
OUT_P11
OUT_P12
OUT_P13
OUT_P14
P6.RNE
RNE
SPARE.OUT1
SPARE.OUT2
SPARE.OUT3
PP.CS_OPND
PP.CS_CLSD
SPARE_IN1
SPARE_IN2
BATT_LOW_UPS
AC_FAIL_UPS
OUTPUT FAULT
OPUP0
OPUP1
OPUP2
OPUP3
OPUP4
OPUP5
OPUP6
OPUP7
OPUP8
OPUP9
OPUP10
OPUP11
OPUP12
OPUP13
OPUP14
F1 FUSE
TXM7
RV4
SIO
+12V_ISO
C19
C20
C21
100pF 100pF 100pF
1
OPUP1
2
3
OUT_P1
U22
8
U23
OUT_ISO0
OUT_ISO1
OUT_ISO2
OUT_ISO3
OUT_ISO4
OUT_ISO5
OUT_ISO6
OUT_ISO7
7
6
4
5
MOCD217
OUTPUT ENABLE/RESET
SPARE.OUT4
OPUP2
1
OPUP3
2
3
OUT_P2
10 SHIELD
11
SHIELD
RV6
OPUP0
OUT_P0
8255PLCC
RV5
O U T1
O U T2
O U T3
O U T4
O U T5
O U T6
O U T7
O U T8
IN9
IN12
IN15
O U T9
O U T 11
O U T 12
O U T 10
DB50_RX
R10 0 ohm
OUT_P[0..14]
SPARE_IN3
OUT_P3
U24
8
7
6
4
RSET_FAULT
1
2
3
4
5
6
7
8
9
10
5
I1
O1
I2
O2
I3
O3
I4
O4
I5
O5
I6
O6
I7
O7
I8
O8
FAULT GND
OE/R
VS
20
19
18
17
16
15
14
13
12
11
O U T0
O U T1
O U T2
O U T3
O U T4
O U T5
O U T6
O U T7
1
OPUP5
2
3
U25
OUT_P5
BYPASS
7
6
4
U26
OUT_ISO8
OUT_ISO9
OUT_ISO10
OUT_ISO11
OUT_ISO12
OUT_ISO14
5
MOCD217
OPUP6
1
OPUP7
2
3
U27
8
RXD-
A1
A2
A3
A4
9
7
5
3
J7
TXA_DRIVENRXA_DRIVEN-
B U T T ON_TXRX
1
2
19
Y1
Y2
Y3
Y4
G
Q2
1
2
74ALS240
iBUTTON
5
OPUP9
2
3
D3
1N5232
1
VCC
16
RN9
2
4.7KNET
2
U28
1
2
3
4
5
6
7
8
9
10
11
12
13
14
15
M_RESET_
ID_PUP
IN_P30
IN_P31
B U T T O N_TXRX
BUTT_PUP
DISABLE_LOGIC-
OPUP10
1
2
3
OUT_P11
4
RN8
12KNET
5
U29
1
OUT_P12
OPUP14
2
3
OUT_P14
4
2
OUT_P13
DS5
GILWAY# E35
FROM THETA
BOARD
R15 4.7k
20
19
18
17
16
15
14
13
12
11
C22
1
2
MOTION INTERLOC K
C23
100pF 100pF
OUT[0..12]
+24V_ISO
FOR
REFERENCE
ONLY
RELAY
+24V_ISO
J8
1
2
3
4
5
UPS
BATT_LOW_UPS
AC_FAIL_UPS
INTRLOCK_SRC
C24
C25
IN28
IN29
C26
C27
100pF 100pF 100pF 100pF
5
U30
1
8
7
6
UNLESS OTHERWISE SPECIFIED
:
5
RESISTORS ARE 1/4W VALUESNI OHMS
R E S I S T O R T O L E RANCES 5%
C A P A C I T O R V A L U E SIN uFARADS
CAPACITOR TOLERN
A CES 10%
1
U31
8
7
6
4
+12V_ISO
DISABLE_LOGIC-
DATE
DRAWN BY
BROOKS AUTOMATION, INC
3/1/99
CHECKED BY
DATE
APROVED BY
DATE
15 ELIZABETH DR
IVE
CHELMSFORD, MA 01824-4185
DWG TITLE
SCHEMATIC, PCB, I/O, MAG 7, MX
5
MOCD217
1
R16
4.7k
SIZE
DWG NO.
FILE
B
SPARE.OUT4
7
6
2
3
DISABLE
+24VDC PWR
A
RX232 = TX-MX
8
MOCD217
OPUP13
4.7k
2
MOCD217
OPUP12
R13
1
2
3
(OUTPUT)
AL.RNE
(OUTPUT)
BL.RNE
(OUTPUT)
P1.RNE
(OUTPUT)
P2.RNE
(OUTPUT)
P3.RNE
(OUTPUT)
P4.RNE
(OUTPUT)
P5.RNE
(OUTPUT)
P6.RNE
SV.BL-OPND (INPUT)
(INPUT)
SV.P3-OPND
SV.P6-OPND (INPUT)
(OUTPUT)
RNE
SPARE.OUT2 (OUTPUT)
SPARE.OUT3 (OUTPUT)
SPARE.OUT1 (OUTPUT)
J5
+24V
+24V_ROBOT
J6
I1
O1
I2
O2
I3
O3
I4
O4
I5
O5
I6
O6
I7
O7
I8
O8
FAULT GND
OE/R
VS
7
6
4
OUT_P10
OPUP11
1
2
3
4
5
6
7
8
9
10
OUT8
OUT9
OUT10
OUT11
OUT12
OUT14
ULN2987
8
MOCD217
2
1
1
OUT_P9
70543-0001
2N7002
1
D4
1N5242
OPUP8
OUT_P8
1
11
13
15
17
4
MOCD217
3
TXDTXA_DRIVEN
RXA_DRIVEN
OUT_P7
Q1
2N7002
TX232 = RX-MX
INTRLOCK_SRC
DISABLE
1
2
Interlock
Defeat
16
3
BUTT_PUP
7
6
15
14
13
12
11
10
9
8
7
6
5
4
3
2
1
OUT_P6
+24V_EXTERNA L
+24V_EXTERNA L
+24V_RTN_EXTERNA L
J4
8
SIO
OUT_P4
SPARE_IN3
(INPUT)
SS.AL
(INPUT)
SS.BL
(INPUT)
SS.P1
(INPUT)
SS.P2
(INPUT)
SS.P3
(INPUT)
SS.P4
(INPUT)
SS.P5
(INPUT)
SS.P6
SV.P1-OPND (INPUT)
SV.P4-OPND (INPUT)
PP.CS_OPND (INPUT)
PP.CS_CLSD (INPUT)
ULN2987
MOCD217
OPUP4
*
+24V_RTN_EXTERNA L
232GND
DDMZ50PNK87
DEMZ9SNA197
U9B
*
+24V_ISO
OPUP[0..14]
CDM Not Present EMO BYPA SS
K1
8
10
3
7
CDM_PRESENT
12 +
5
1
6
C18 D2
1N4004
DF2E-DC24V
2880 ohm
10uF
Vpickup(max) = 16.8 V
1
2
3
4
5
6
7
8
9
10
11
12
13
14
15
0 ohm
(INPUT)
AL.RE-EN
(INPUT)
BL.RE-EN
(INPUT)
P1.RE-EN
(INPUT)
P2.RE-EN
(INPUT)
P3.RE-EN
(INPUT)
P4.RE-EN
(INPUT)
P5.RE-EN
(INPUT)
P6.RE-EN
SV.AL-OPND (INPUT)
SV.P2-OPND (INPUT)
SV.P5-OPND (INPUT)
(OUTPUT)
CS.RNE
SPARE_IN1
SPARE_IN2
C
D
SHEET
E
REV
SD-002-7394-01
B
1
OF
1
MagnaTran 7.1 User’s Manual
MN-003-1600-00
Glossary
This Glossary provides a list of common terms and acronyms used in this document
and their definitions.
Abort Command:
A command to the product which causes any action in progress to halt,
and resets any error condition. The product is left unreferenced after an
abort command.
Absolute Coordinates: The distance from Home (the reference position) in millimeters or
degrees as appropriate.
For a robot this is the location of the arm along the three axes, R (radial),
T (rotational) and Z (vertical).
For an elevator this is the location of the platform along Z (vertical), and
depending upon the options installed along R (radial).
Action Commands: All commands that cause the product to execute physical actions.
Aligner:
A device used to ensure the proper centering and alignment of a wafer.
Mechanical contact aligners use pins or other fixtures to ensure proper
wafer position by mechanically moving a wafer placed into them. Noncontact aligners scan the wafer and pass information regarding the
wafer’s position to the host controller, which then directs the system
wafer handler on how to pick up the wafer to ensure that it will be properly positioned.
ASCII:
American Standard Code for Information Interchange. An assignment
of alphanumeric characters to 8-bit data byte values. Used by many
communication protocols, including RS-232, which is used to control
the VCE 5.
Assign Commands: All commands that both set a parameter in RAM and EEPROM.
Atmosphere:
The average pressure exerted on the earth’s surface.
Backing Pump:
The mechanical pump used to discharge gases at atmospheric pressure
Brooks Automation
Revision 2.2
G-1
Glossary
MagnaTran 7.1 User’s Manual
MN-003-1600-00
from a turbo pump or other pump.
Bakeout:
The degassing process by which a vacuum system is heated during the
pump down process.
Base Transfer Offset: A dimension used by robots, it is the distance between Z Axis Home
and the Substrate Transfer Plane.
Batch Transfer Arm: A robotic arm designed with a set of multi-level end effectors (or
“tines”) used for transporting entire batches of substrates into and out
of an elevator.
Bellows:
A flexible tube that can expand and contract lengthwise while withstanding pressure radially.
BOLTS:
Box Opener, Loader and Tool-interface Standards. Refers to SEMI E15.1
standard interface for 300mm substrates.
BTA:
See Batch Transfer Arm.
BTO:
See Base Transfer Offset.
BiSymmetrik:
Brooks Automation’s patented dual end effector frog leg arm system.
Cassette Elevator: See Elevator.
Cassette Present Sensor: A sensor that detects the presence of a cassette in an elevator.
Cassette Type Offset: The distance downward from the Home position the elevator platform must move a particular type of cassette to position the bottommost wafer slot (slot #1) for transport.
Category:
In the context of the product, within a record type, a category is used to
identify a specific command.
CDM:
See Control/Display Module.
Command Response: A transmission from the product to the host controller.
Control/Display Module: A small hand-held local controller for the robot. It provides
access to all robot functions required for setup and testing of the robot.
Convectron Gauge: A thermal conductivity vacuum gauge that is gas dependant (i.e., the
gauge must be calibrated for the type of gas being used). These gauges
are used to measure vacuum to 1 millitorr.
G-2
Brooks Automation
Revision 2.2
MagnaTran 7.1 User’s Manual
MN-003-1600-00
Glossary
Cooler:
A device used to cool wafers placed into it. This is typically done after
processing in a “hot” process to prevent damage to the wafer cassette.
CPS:
See Cassette Present Sensor.
Crossover:
The pressure point in a vacuum system when the rough vacuum is
switched to high vacuum.
Cryopump:
Mechanical vacuum pump used to achieve High Vacuum.
CTC:
Cluster Tool Controller.
CTO:
See Cassette Type Offset.
D1:
A SEMI standard dimension: the distance from a cassette's base to the
centerline of slot #1.
Degas:
A device used to heat wafers placed into it. This is typically done before
processing to “boil off” any contaminants or to pre-heat the wafer to
minimize processing time.
Device ID:
An optional identification code in an product transmission which serves
to distinguish the product from other devices connected to the same
host. This number is only used when the product is using RS-485 communications.
DI Water:
De-ionized water.
Discrete I/O:
Discrete I/O provides monitoring and control of external device functions using individual I/O pins for each function with no additional
control, or “handshaking”, lines. Typically, if a pin is being used for an
input to the product it is not used as an output also.
Dog Clamp:
A metal bar with a bolt through one side and a gripping shape on the
other side. These are used to attach modules to process chambers.
Dual Pan Arm Set: The Brooks Automation BiSymmetrik “frog leg” arm set with two end
effectors.
EEPROM:
Electrically Erasable Programmable Read Only Memory. The EEPROM
is the device which stores product configuration information after a
store command is issued. The EEPROM retains its memory during
power off periods.
Elbow:
The joint on the robot’s arms between the inner and outer arm members.
Brooks Automation
Revision 2.2
G-3
Glossary
MagnaTran 7.1 User’s Manual
MN-003-1600-00
Elevator:
A device used to vertically position a wafer cassette. This is typically
done to position cassette slots at a specific location for wafer transport.
End Effector:
The mechanical device at the end of the robot’s arm that supports the
substrate during transport, see Pan.
EPROM:
Erasable Programmable Read Only Memory. The EPROM is a device
which is used to store the product’s software. The EPROM retains its
memory during power off periods. See PROM.
Extend:
Movement outward. For a robot, this is movement of the robot’s arm
outward (away from the robot’s body). For an elevator, this is movement of the platform arm outward (away from the elevator’s body).
Facet:
The area on a Transport Module where Process Modules, or other types
of modules, can be connected for access by the central wafer handler.
Find Bias:
The distance that the elevator platform must move upward to place a
substrate in the substrate present sensor beam for detection.
Flag:
A piece of opaque material that interrupts the beam in an optical sensor
when a moving mechanism reaches a defined point in its travel.
Flag Sensor:
An electronic device which emits an optical beam from one side of a
notch to a detector on the other side of the notch. When a mechanical
flag interrupts the beam, the position of a mechanism is known.
Foreline:
The exhaust line of a vacuum pump in a vacuum system.
Frog Leg:
Brooks Automation’s patented robot arm system.
FOUP:
Front Opening Unified Pods. Refers to front-opening pods designed to
carry 300mm wafers.
FRU:
Field-Replaceable Unit.
Full Step Mode:
An elevator mode in which when commanded to move one step, the
platform will increment by a distance equal to the pitch (distance
between cassette slots).
Gate Valve:
See Slot Valve.
High Speed:
Usually the highest speed; the speed at which the robot moves when no
substrate is on the end effector.
High Vacuum:
Pressure ranges from about 10-4 Torr to 10-8 Torr.
G-4
Brooks Automation
Revision 2.2
MagnaTran 7.1 User’s Manual
MN-003-1600-00
Glossary
High Vacuum Pump: Vacuum pump used to achieve High Vacuum. See also Cryopump.
Home:
The reference position at which the encoders are reset.
For a robot, this position is considered to be 0o for T, Home for R
(slightly past the retract position for a single end effector robot and
equivalent to the mount position for a dual end effector robot), and completely down for Z.
For an elevator, this is the position of the platform when it activates the
home sensor. This position is near the top of the elevator's travel. The
cassette offsets and all product operations, including moves, steps, and
partial steps, are referenced to the Home position.
Homing Speed:
Usually the slowest speed; the speed at which the product approaches
Home position during a HOME command.
Host Controller:
The user-owned controller that controls the entire system, including the
product.
ICL:
Individual Component Level.
Ion Gauge:
A thermal conductivity vacuum gauge. These gauges are used to measure high vacuum. There are two types of ion gauges: hot cathode and
cold cathode.
Illustrated Parts Catalog: A series of illustrations that shows the locations of parts and subsystems within the component and identifies their part numbers.
InCooler:
In-line cool module designed to be installed in a Cluster Tool between
the Transport Module and another module. See Cooler.
InLigner:
In-line aligner module designed to be installed in a Cluster Tool
between the Transport Module and another module. See Aligner.
IPC:
See Illustrated Parts Catalog.
IRC:
Individual Replaceable Component.
Isolation Valve:
A large diameter valve used to isolate the vacuum chamber from the
pumps.
Jog:
Move incrementally.
Leadscrew:
A precision screw used to move a mechanism.
Brooks Automation
Revision 2.2
G-5
Glossary
MagnaTran 7.1 User’s Manual
MN-003-1600-00
Leak Rate:
Measurement of mass flow through an orifice in torr-liters per second.
Leapfrog:
Brooks Automation’s patented same-side dual end effector robot arm
system.
LED:
Light Emitting Diode. LEDs are used to indicate the presence of voltages on the control circuit board, monitor serial communication transmissions, and detect substrate presence in cassette slots or slide-out
from the cassette.
Lift:
Movement upwards. For the robot, this is movement of the arm to the
Up position. For the elevator this is movement of the platform to the Up
position.
Linear Rail:
A precision rail used to provide support and direction to a moving
mechanism.
Load Lock:
See Elevator.
Load Port Module: Factory interface tool meeting SEMI factory interfacing requirements
for open cassettes, SMIF pods, or FOUPs delivered manually or via factory automated handling systems.
Low Speed:
Usually slightly faster than Homing speed; the speed at which the robot
moves when a substrate is on the end effector. For dual end effector
robots, the speed at which the robot moves along the T or Z axis when a
substrate is present on either or both end effectors, or along the R axis
when a substrate is present on the active arm.
Lower:
Movement downwards. For the robot, this is movement of the arm to
the Down position. For the elevator this is movement of the platform to
the Down position.
LPM:
See Load Port Module.
m (microns):
0.001 mm.
Medium Speed:
Only dual end effector robots radial motions have a medium speed
option. The speed at which the dual end effector robot performs radial
motions when the active arm’s end effector has no substrate, but the
inactive arm’s end effector has a substrate.
MTR:
Multi end effector Transport Robot. See Robot.
G-6
Brooks Automation
Revision 2.2
MagnaTran 7.1 User’s Manual
MN-003-1600-00
Glossary
MTTR:
Mean Time To Repair.
Pan:
See End Effector.
Parallel I/O:
Parallel I/O allows a Host Controller to communicate with the product
using the commands detailed in Chapter 5. The characters in each command are converted to sets of binary bits (1s and 0s) and the bits for each
character are transmitted down a set of wires as a set (one wire per bit).
Additional wires are used for control, or “handshaking”, to direct the
transfer of data. Typically, Parallel I/O is bidirectional, that is the wires
carry data in both directions.
Partial Step Mode: A mode that requires two steps to move the complete pitch distance. In
partial step mode, each slot is divided into an up and down position.
The distance between the up and down positions is called the partial
step size.
Partial Step Size:
The distance between the up and down positions of a slot.
Physical Coordinates: The location along the spatial axes (R, T, and Z as appropriate).
PM:
See Process Module.
Poppet:
The cool chamber cover, designed to raise and lower the wafer.
Post Position:
The position the wafer is placed in after processing.
PPS:
Priority Parts Service.
Process Module:
A user supplied module for processing wafers attached to the Transport
Module.
PROM:
Programmable Read Only Memory. The PROM is a device which is
used to store the product’s software. The PROM retains its memory during power off periods. See EPROM.
PSS:
See Partial Step Size.
R Axis:
The axis of radial movement. For a robot it is the “in and out” of the
robot’s arms. For an elevator it is the rotation or “in and out” of the platform.
Radial Movement: Linear movement of the robot’s arm in and out of a station.
RAM:
Brooks Automation
Revision 2.2
Random Access Memory. Parameters set with set commands are stored
in RAM until transferred to the EEPROM with a corresponding store
G-7
Glossary
MagnaTran 7.1 User’s Manual
MN-003-1600-00
command. Parameters stored in RAM are erased when power is
removed.
Ready String:
In the Serial Mode, the string of ASCII characters the product sends
when it is ready for the next command.
Record Type:
A single character field in an product transmission which identifies it as
either action (A), set (S), store (P), request (R), response (X), or a system
abort (E) command.
Request Commands: A software command, used in serial communications with the product, that requests information from the product.
Reticle:
Glass plate that contains the patterns to be reproduced on the wafer.
Retract:
Movement inward. For a robot, this is movement of the robot’s arm
inward (towards from the robot’s body). For an elevator, this is movement of the platform arm inward (towards from the elevator’s body).
Rough Vacuum:
Pressure ranges from atmosphere to 10-3 Torr.
Rough Vacuum Pump: A mechanical vacuum pump used to provide the initial evacuation
of a chamber.
Robot:
A device used to move wafers between various stations. Within a Transport Module the robot moves wafers between the modules connected to
the facets.
Rotational Movement: Circular movement of the robot’s arm between the various stations.
RS-232:
A serial communications protocol for communications between two
devices. This protocol uses one wire for transmitting, one wire for
receiving, and a common ground in a shielded cable.
RS-422:
A serial communications protocol for communications between two
devices. This protocol uses two “twisted pair” wires; one for transmitting and one for receiving.
RS-485:
A serial communications protocol for communications between multiple devices. This protocol uses one “twisted pair” wire for both transmitting and receiving. All devices using this protocol must have an
“address” to ensure that information is sent to the right device.
SCARA:
Selectively Compliant Articulated Robot Arm.
SEMI:
Semiconductor Equipment and Materials International.
G-8
Brooks Automation
Revision 2.2
MagnaTran 7.1 User’s Manual
MN-003-1600-00
Glossary
SEMI/MESC:
SEMI Modular Equipment Standards Committee.
Serial I/O:
Serial I/O allows a Host Controller to communicate with the product
using the commands detailed in Chapter 5. The characters in each command are converted to sets of binary bits (1s and 0s) and the bits for each
character are transmitted down a wire in “single-file”. Typically no
additional control, or “handshaking”, wires are used.
Servo:
The control loop that governs the motions of the drive motors.
Set Command:
A command which sets a parameter in RAM. In general, set commands
can have their status requested with corresponding request commands,
and can have their values stored to the EEPROM with corresponding
store commands.
Shoulder:
On the robot arm, the joint located at the drive shaft.
Single Pan Arm Set: The Brooks Automation “frog leg” arm set with one end effector.
Slit Valve:
See Slot Valve.
Slot:
One of the positions on the inside of a substrate cassette that holds substrates. Usually, substrate cassettes have 25 slots.
Slot #0:
The slot number of the home position. See Home.
Slot Valve:
The valve located at a Transport Module facet that isolates the TM from
the module connected to the facet.
SLPM:
Standard Liters Per Minute. 28 SLPM equals 1 CFM.
SMIF:
Standard Mechanical Interface Facility. Refers to sealed environment
containers for transporting wafers.
SPS:
See Substrate Present Sensor.
SSO:
See Substrate Slide Out Sensor.
Standard Order:
The default order in which parameters are listed when using the ALL
option. The specific standard order is shown in the reference entry for
each command that supports the ALL option.
Station:
The robot’s identification of a specific set of R, T, and Z coordinates.
Station Coordinates: The location of the robot’s arm relative to station parameters, that is
Theta = Station Number, R = Extended or Retracted, and Z = Up or
Brooks Automation
Revision 2.2
G-9
Glossary
MagnaTran 7.1 User’s Manual
MN-003-1600-00
Down and Slot #.
Store Command:
A software command, used in serial communications with the product,
that stores a selectable parameter to the EEPROM.
STP:
See Substrate Transport Plane.
Subcategory:
In the context of the product, a subcategory is a variable parameter in a
transmission to or from the product. Subcategories often describe a
position to be acted upon, or a variable to be set.
Substrate:
A thin quartz glass sheet used for producing Liquid Crystal Displays.
Can also refer to a silicon wafer. See Wafer.
Substrate Present Sensor: An optical sensor that senses substrate presence. See Wafer
Present Sensor.
Substrate Slide Out Sensor: An optical sensor that senses when any substrate is out of a
cassette slot. See Wafer Slide Out Detector.
Substrate Transport Plane: The plane coincident with the bottom surface of the substrate as
the substrate is being transported. See Wafer Transport Plane.
T Axis:
The axis of rotational movement of the robot’s arms.
T1 Drive:
The lower drive subsystem on a MagnaTran robot, which transmits its
power to the arms through the inner drive shaft. Operating with the T2
Drive this axis drives the arms in both the Rotational (T) and Radial (R)
axes.
T2 Drive:
The upper drive subsystem on a MagnaTran robot, which transmits its
power to the arms through the outer drive shaft. Operating with the T1
Drive this axis drives the arms in both the Rotational (T) and Radial (R)
axes.
TM:
See Transport Module.
Torr:
Pressure measurement.
Transport Module: The central hub of a Cluster Tool. Typically a large horizontal chamber
with a centrally located wafer handler. All wafer handling and Process
modules are attached to the external facets of the chamber.
Top Reference Flag: See Flag.
Ultra High Vacuum: Pressure ranges from about 10-8 Torr to less than 10-14 Torr.
G-10
Brooks Automation
Revision 2.2
MagnaTran 7.1 User’s Manual
MN-003-1600-00
Glossary
Universal Cassette Locator: An elevator platform mounted device that facilitates positioning 3-inch through 150 mm cassettes.
Vacuum Gauge:
A gauge used to measure the vacuum within a chamber. See Convectron
Gauge and Ion Gauge.
Vacuum Pump:
Mechanical pump used to remove gases in an enclosed chamber. Types
of pumps: roughing pump, high vacuum pump, ultrahigh vacuum
pump.
VCE:
Vacuum Cassette Elevator. See Elevator.
Vent Valve:
Valve used to let atmospheric air or other gas into a vacuum system.
VTR:
Vacuum Transport Robot. See Robot.
Wafer:
A thin silicon disk used for producing semiconductors. See Substrate.
Wafer Present Sensor: An optical sensor that senses wafer presence. See Substrate Present
Sensor.
Wafer Slide Out Detector: An optical sensor that senses when any wafer is out of a cassette
slot. See Substrate Slide Out Sensor.
Wafer Transport Plane: The plane in which wafers are transported horizontally by a system's transport arm. The plane is established by the surface of the transport arm end effector which supports the wafer. If the robot is capable
of vertical motion, the “up” position of the end effector is the wafer
transport position. In the VCE, the wafer transport plane is usually
established at approximately one-half wafer thickness below the centerline of the first slot. See Substrate Transport Plane.
“with substrate” speed and acceleration: See Low Speed.
“without substrate” speed and acceleration: See High Speed.
WPS:
See Wafer Present Sensor.
Wrist:
On the robot arm, the joint (two bearings) located at the attachment to
the end effector.
WSO:
See Wafer Slide Out Detector.
WTP:
See Wafer Transport Plane.
Z Axis:
The axis of vertical motion. For a robot it is the “up and down” of the
Brooks Automation
Revision 2.2
G-11
Glossary
MagnaTran 7.1 User’s Manual
MN-003-1600-00
robot’s arms. For an elevator it is the “up and down” of the platform.
G-12
Brooks Automation
Revision 2.2
MagnaTran 7.1 User’s Manual
MN-003-1600-00
Index
Numerics
24V Indicator 6-22
A
AC_FAIL 6-85
Accessories 1-14
Action Commands 8-7
Alignment 3-48
Application Number 6-8
Arm Removal 9-27
Arms 4-9
description 6-2
installation 3-23
load capacity 1-15
weight 1-16
B
Background Mode 8-3
Background Plus Mode 8-4
BATT_LO 6-85
BiSymmetrik Arm Set 3-23 , 6-4
Brooks Factory Repair Services 9-23
Buffer Board Replacement 9-41
C
Calibration Procedure 9-36
Cautions 1-10
CDM Connector 5-20 , 5-21
Center of Gravity 3-3
CHECK LOAD 8-23
Cleaning
end effectors 9-15
general 9-13
vacuum seals 9-17
Command
Brooks Automation
Revision 2.2
fields 8-6
flow 8-2
syntax 8-8
Communications
options 3-14
specifications 1-13
CONFIG ROBOT APPLIC 8-25
Configuration Compatibility 3-22
Configuration Errors 8-184
Configuration Number.See Application
Number
Control/Display Module
connecting 5-20
description 4-17
Emergency Stop 6-63
installation 3-17
Controls 6-21
CREATE WSPACE 8-26
D
Data Bits 5-6
Data Fields 8-6
Default Settings 11-2
Depot Field Repair 9-23
Dial Indicator 11-3
Dimensions 1-7 , 1-9
DIO Assignments 5-15
DIO Control 3-18 , 5-15
DIO Monitoring 5-15
DIO START 8-27 , 8-75
DIO STOP 6-46 , 8-28
Discrete I/O Communications 5-9
Discrete I/O Connection 3-18
DISCRETE_IN 6-24
DISCRETE_OUT 6-24
Dispatcher/Communications Errors 8-181
I-1
Index
Documentation
related 1-6
Drive
specifications 1-12
weight 1-13
Dual Arm Motion 6-10
Dynamic Sensing 6-32
E
EEPROM RESET 8-29
Electrical
See Power
specifications 1-13
Electrical Hazard Classifications 2-8
EMER_STOP 6-24
Emergency Action Matrix 2-16
Emergency Conditions 6-89
Emergency Machine Off (EMO) 2-3 , 6-25 ,
6-89
EMERGENCY STOP (CDM) 6-90
Emergency Stop CDM 5-20
Emergency Stop. See Control/Display Module
EMO 5-17 , 6-89
EMS. See Emergency Stop
Encoder Setup 9-48
End Effector Adjustment 7-7
End Effector Pad Replacement 9-32
End Effector Replacement 9-29
English Dimension 1-7
Environmental 3-5
Ergonomic Hazard 2-6 , 3-7 , 3-10 , 9-26
Error Codes 8-179
Error Response 8-9 , 8-11
EX_ENABLE 6-24
Extension Limit 1-15
F
Facilitated Field Repair 9-22
Facilities Connections 3-10
Facility Checks 3-20
Factory Default Settings 11-2
FIND ENCODER 8-30
FIND PHASE 8-31
FIND ZERO 8-32
I-2
MagnaTran 7.1 User’s Manual
MN-003-1600-00
Firmware Upgrade 9-83
FLASH memory 4-11 , 4-16
G
GOTO 8-33
GOTO Station with Offset 8-36
H
HALT 6-89 , 8-39
Handshake 5-6
Hardware Notation 1-8
Hazard Points 2-4
High Side Interface Board 4-12
High Side Logical Inputs 5-10
High Speed 6-13
HLLO 8-40
HOME 8-41
operation 6-20
position 6-19
Work Space 6-59
Housing. See Protective Covers
I
I/O Board
description 4-12
replacing 9-48
I/O Commands 8-7
I/O Errors 8-179
I/O State 6-24 , 6-25
Indicators 6-21
Installation 3-8
Interface Board. See I/O Board
Interlocks 2-5 , 6-23
Internal Errors 8-181
Internal Power 5-14
IO ECHO 8-81
IO MAP 8-82 , 8-82
L
Leak Rate, specification 1-13
Leapfrog Arm Set
installing 3-23
operation 6-6
LFTST 8-43
Brooks Automation
Revision 2.2
MagnaTran 7.1 User’s Manual
MN-003-1600-00
Lockout/Tagout 2-5
Logical Inputs 5-10
Logical Outputs 5-10
Low Side Interface Board 4-12
Low Side Logical Inputs 5-12
Low Side Logical Outputs 5-12
Low Speed 6-13
M
MagnaTran 6
compatibility 11-5
installing arms 3-23
MagnaTran 7
accessories 1-14
features 1-3
overview 1-2
specifications 1-12
types of 1-2
Maintenance Schedule 9-2
MAP 6-26 , 8-44
MAP PASSTHROUGH 8-49
Mapping Errors 8-185
Mapping the Interlocks 6-29
Marathon Express 5-19
Marathon Express High Side Interface Board
4-12
Marathon Express I/O 5-19
Material Safety Information 2-17
MCC 4-11
MCC Errors 8-187
Mechanical Specification 1-13
Medium Speed 6-13
Metric Dimension 1-7
MISC I/O Power 5-14
Monitor Errors 8-185
Monitor Mode 8-4
Motion Control 6-13
Motion Control Computer Board 4-11
MOTION_IND 6-24
Motor Electrical Phase Calibration 9-69 , 969
MOUNT 8-51
MOUNT position 3-46
Mount the Arm Set 3-23
Mount Z Position 9-76
MOVE 8-52
Brooks Automation
Revision 2.2
Index
MT5. See MultiTran 5/VacuTran 5
MultiTran 5/VacuTran 5
compatibility 11-5 , 11-5
N
Naming Conventions 1-7
Noise Emission 2-15
Notes 1-10
NUMERIC_IN 6-24
NUMERIC_OUT 6-24
O
OCP. See Off Center PICK/PLACE
Off Center PICK/PLACE 6-42
Operational Check-out 6-87
Operational Interlocks 5-15 , 6-23
creating 6-26
type 6-24
O-Ring Replacement 9-17
P
P97. See Marathon Express
Packet Mode 8-5
Parity 5-6
Parking 6-91
PASIV 6-58
PC 104 CPU Board Replacement 9-58
PC104 4-11
Personality Board
description 4-11
replacing 9-37
troubleshooting 11-26
PICK 8-54
PICK offset 8-56
Pictograms 1-10
Pinch Points 2-4
PLACE 8-59
PLACE offset 8-61
POS ABS 8-90
POS STN 8-94
Power Connection 3-13 , 5-4
Power Pak 6-27
description 4-15
installing 3-12
operating 6-84
I-3
Index
replacing 9-63
Power Requirements 5-3
Power Supply 4-15
POWER_IND 6-24
Priority Parts Service 9-23
Protective Covers 4-3
Q
QR 3-7
R
R (Radial) Axis 1-12
Radial Motion 6-12
Ready Response 8-9 , 8-11
Real Time Clock Errors 8-187
REF 8-64
Relay I/O Board 11-26
Relay I/O Circuit 11-27
RELEASE 8-65
REMOVE IO 6-26 , 8-66
REMOVE STN 8-67
REMOVE WSPACE 8-68
Repeatability 1-12
Request Commands 8-7
Request I/O Map 6-26
Request I/O State 6-26
Request Response 8-9
RESET 8-118
Reset Stations 9-75
Resetting Home Position 9-71
to user preference 9-73
Resetting Mount Position 9-76
Response Syntax 8-9
Retract Pin 5-18 , 6-26
RETRACT_PIN 6-24 , 6-25 , 6-26
RETRACT_SEN 6-24
Robot Arms 4-9
Robot Removal/Replacement 9-25
RQ BG 8-69
RQ COMM 8-71
RQ CONFIG 8-74
RQ CPTR 8-70
RQ DIO OUTPUT 8-75
RQ HISTORY 8-76
RQ HOME POS Z 8-79
I-4
MagnaTran 7.1 User’s Manual
MN-003-1600-00
RQ INTLCK 8-80
RQ IO ECHO 8-81
RQ IO MAP 8-82
RQ IO STATE 8-84
RQ LOAD 8-86
RQ LOAD MODE 8-88
RQ POS ABS 8-90
RQ POS DST 8-92
RQ POS STN 8-94
RQ POS TRG 8-96
RQ R_MT SENSE 8-98
RQ ROBOT APPLIC 8-103
RQ RTRCT2 8-101
RQ STN 8-104
RQ STN OPTION 8-106
RQ STNSENSOR 8-108
RQ SYNC PHASE 8-110
RQ SYNC ZERO 8-111
RQ VERSION 8-112
RQ WARN CDM 8-113
RQ WHO 8-114
RQ WSPACE 8-115
RQ WSPACE AUTOCREATE 8-116
RQ WSPACE MODE 8-117
RS-232 Connector 5-6 , 5-8
RS-422 Connector 5-6
RTS/CTS 5-6
RX Indicator 6-22
S
Safety Guidelines 2-2 , 2-3
Safety Interlock 5-17 , 5-17
SBIT_SVLV_SEN 6-24
Sequential Mode 8-2
Serial Communication 3-15
Serial SIO1 5-5
SET ARMS 8-119
SET COMM 8-121
Set Commands 8-7
SET CPTR 8-120
SET DIO OUTPUT 8-125
SET HISPD 8-126
SET HOME POS Z 8-127
Set I/O State 6-26
SET INTLCK 8-128
SET IO ECHO 8-129
Brooks Automation
Revision 2.2
MagnaTran 7.1 User’s Manual
MN-003-1600-00
SET IO STATE 8-130
SET LOAD 8-132
SET LOAD MODE 8-134
SET LOSPD 8-135
SET MESPD 8-136
SET R_MT SENSE LIMITS 8-138
SET RTRCT2 8-139
SET STATION OPTION VIA 8-145
SET STN 8-140 , 8-140
SET STN OPTION 8-142
operating 6-26
SET STNSENSOR 8-147
SET SYNC PHASE 8-149
SET SYNC ZERO 8-150 , 8-156
SET TEACH 8-151
SET WARN CDM 8-152
SET WSPACE 8-153
SET WSPACE AUTOCREATE 8-154
SET WSPACE MODE 8-155
SET ZBRAKE 8-156
Setting the Station Option 6-30
Setting the Station Sensor 6-31
Shut-down 6-91
Single Arm Motion 6-10
Single Pan Arm Set 6-2
SIO1 6-22
Site Requirements 3-2
Slot Valve Interlock States 6-30
Software Installation 3-19
Software Notation 1-8
Specifications 1-12
Speed 6-13
Standard CDM Connection 5-20 , 5-20
Station Coordinate System 6-17
Station errors 8-179
Station Sensors 6-24 , 6-25
Station Setup Errors 8-180
Stop Bits 5-6
STORE COMM 8-157
Store Commands 8-8
STORE DIO OUTPUT 8-159
STORE HOME POS Z 8-160
STORE IO ECHO 8-161
STORE LOAD MODE 8-162
STORE R_MT SENSE LIMITS 8-163
STORE RTRCT2 8-164
Brooks Automation
Revision 2.2
Index
STORE STN 8-165
STORE STN OPTION 8-167
STORE STNSENSOR 8-169
STORE SYNC PHASE 8-170
STORE SYNC ZERO 8-171
STORE WARN CDM 8-172
STORE WSPACE 8-173
STORE WSPACE AUTOCREATE 8-174
STORE WSPACE MODE 8-175
Success codes 8-179
SUP 4-11
Supervisor Board 4-11
SVLV_CTRL 6-24
Switch Settings 11-2
T
T (Rotational) Axis 1-12
T1/T2 Axis Driver Board
description 4-11
operation 4-5
replacing 9-41
T1/T2 Buffer Board Adjustment 9-43 , 9-45
T2 Drive Subsystem Removal 9-29 , 9-32
Temperature
maximum exposure, arms 1-15
maximum exposure, drive 1-12
maximum operating 1-12
Theta Motion 6-12
Time Optimal Trajectory 1-3 , 6-13
Torque Settings 11-4
Transfer Time Specification 1-15
TX Indicator 6-22
U
Unpacking Instructions 3-7
UPS_BATTERY_SEN 6-24
User Setting Tables 11-17
V
VacuTran. See MultiTran 5/VacuTran 5
Vacuum
hazards 2-13
specifications 1-13
Variable Fields 8-6
Vibration 2-15
I-5
Index
MagnaTran 7.1 User’s Manual
MN-003-1600-00
VLV_SEN 6-24
VT5. See MultiTran 5/VacuTran 5
W
WAF_SEN 6-24
Wafer Sensor Errors 8-182
Wafer Transport Plane 7-13
Warnings 1-10
Workspace 6-58
Workspace Errors 8-186
WTP. See Wafer Transport Plane
X
XFER 8-176
XFER offset 8-177
XON/XOFF 5-6
Z
Z (Vertical) Axis 1-12
Z Axis Drive 4-7
Z Axis Driver Board
description 4-11
replacing 9-43
Z Axis Driver Board Replacement 9-45
Z Axis Subsystem Removal 9-29 , 9-32
Z Encoder Replacement 9-37
Z Motion 6-12
I-6
Brooks Automation
Revision 2.2
MagnaTran 7.1 User’s Manual
MN-003-1600-00
Reader’s Comments
Reader’s Comments
Brooks Automation, Inc. attempts to provide documentation that meets the needs of
our customers. We continually strive to upgrade the quality of our documentation
and would appreciate your help. Please use this form to report any documentation
errors or to make suggestions for improvement. Mail, or fax, completed copies of this
form to the Technical Publications Manager at the address on the other side. Your
comments and suggestions are always welcome.
All comments and suggestions become the property of Brooks Automation, Inc.
Brooks Automation may use and distribute any of the information provided in any
way it deems appropriate.
Please specify by Page any errors you have found.
_________________________________________________________________________________
_________________________________________________________________________________
_________________________________________________________________________________
_________________________________________________________________________________
_________________________________________________________________________________
Please suggest any topics or information that is not covered.
_________________________________________________________________________________
_________________________________________________________________________________
_________________________________________________________________________________
_________________________________________________________________________________
_________________________________________________________________________________
Brooks Automation
Revision 2.2
Reader’s Comments
MagnaTran 7.1 User’s Manual
MN-003-1600-00
Additional comments
_________________________________________________________________________________
_________________________________________________________________________________
_________________________________________________________________________________
_________________________________________________________________________________
_________________________________________________________________________________
_________________________________________________________________________________
_________________________________________________________________________________
_________________________________________________________________________________
_________________________________________________________________________________
_________________________________________________________________________________
_________________________________________________________________________________
Name
__________________________________________________________
Title
__________________________________________________________
Company __________________________________________________________
Address
__________________________________________________________
City
____________________________ State _______ Zip ____________
Country
____________________________
Phone
____________________________ Fax__________________________
Brooks Automation, Inc.
15 Elizabeth Drive
Chelmsford, MA 01824
Phone: (978) 262-2400
Fax
(978) 262-2500
Brooks Automation
Revision 2.2