1
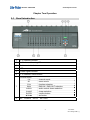
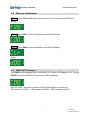
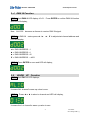
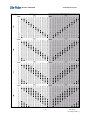
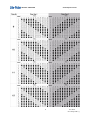
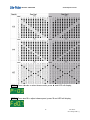
ISO 9001 CERTIFIED
www.liteputer.com.tw
AX-1205
12 Channel DMX Dimmer
【User Manual】
Lite-Puter Enterprise Co., Ltd.
Website:www.liteputer.com.tw
Email:[email protected]
Lite-Puter
AX-1205[CUM-C]
ISO 9001 CERTIFIED
www.liteputer.com.tw
INDEX
CHAPTER ONE INTRODUCTION.................................................................................................................... 1
1-1 FEATURE ...................................................................................................................................... 1
1-2 SPECIFICATION ............................................................................................................................. 1
CHAPTER TWO OPERATION .......................................................................................................................... 2
2-1 PANEL INTRODUCTION ................................................................................................................... 2
2-2 MEMORY INITIALIZATION ................................................................................................................ 3
2-3 DMX OUT FUNCTION ................................................................................................................... 3
2- 4 DMX IN FUNCTION ...................................................................................................................... 4
2-5
WARM UP FUNCTION ............................................................................................................. 4
2-6 CHANNEL DIMMING/NON-DIMMMING MODE SETTING ......................................................................... 5
2-7 CHANNEL DIMMING VALUE CHECK ................................................................................................. 5
2-8 DOT ON SCREEN INTRODUCTION ................................................................................................... 6
2-9 CHANNEL MODE............................................................................................................................ 7
2-10 SCENE MODE ............................................................................................................................. 7
2-11 SCENE SAVE AND RECALL............................................................................................................ 7
2-12 CHANNEL CHASE ........................................................................................................................ 8
2-12-1.
Channel Chase without Fade-in /Fade-out ................................................................................... 8
2-12-2.Channel Chase with Fade-in /Fade-out ....................................................................................... 13
2-12-3.Audio Control Chase .................................................................................................................... 13
2-12-4. Back scene setting in channel chase............................................................................................... 13
2-13 SCENE CHASE ............................................................................................................................14
2-13-1. Scene Chase without Fade-in/Fade-out.......................................................................................... 14
2-13-2. Scene Chase with Fade-in/Fade-out............................................................................................... 14
2-13-3. Audio Control Chase ...................................................................................................................... 14
2-13-4. Back Scene Setting in Scene Chase ................................................................................................ 15
Lite-Puter
AX-1205[CUM-C]
ISO 9001 CERTIFIED
www.liteputer.com.tw
Chapter One Introduction
1-1
Feature
● An integrated console with dimmer pack which can shift between DMX OUT and
DMX IN.
● Channel warm up function.
● Channel dimming or non-dimming setting.
● DOT lights on screen display signal status.
● 12 channels, 5A per channel total 60A.
● Can save and recall 12 scenes.
● Channel and scene chase function.
1-2
Specification
● Power Supply:3φ4W, AC 90-240V, 50/60Hz
● Protocol:DMX-512
● Signal Output Channel:12 channels
● Signal Connector:XLR 5 PIN
● Dimension:672(W)×100(H)×250(D)m m
● Weight: 7.2 kg
1
Lite-Puter
AX-1205 [CUM-C]
ISO 9001 CERTIFIED
www.liteputer.com.tw
Chapter Two Operation
2-1
Panel Introduction
1
1-12 channel indicator
2
1-12 channel dimming VR
3
Audio control indicator
4
LED screen
5
Chase signal indicator
6
1-12 channel FLASH button
Function button
CH
SC
FCN
7
DMX
AUDIO
CHASE
ENTER
▲▼◄►
8
channel mode
scene mode
function selection
DMX IN / DMX OUT selection
audio control chase selection
chase selection
confirm button
aid button
AC POWER INPUT 90─240V
2
Lite-Puter
AX-1205[CUM-C]
ISO 9001 CERTIFIED
2-2
www.liteputer.com.tw
Memory Initialization
STEP-1 Press CH and SC at the same time to turn on the device and LED will
display,
STEP-2 Press FNC to cancel initialization and LED will dislay,
STEP-3 Press DMX to start initialization and LED will display,
Then
2-3
DMX OUT Function
Hold DMX to shift between DMX IN and DMX OUT.When LED displays C.0.0.1, press
ENTER to confirm DMX OUT function and LED will display,
Now AX-1205 becomes a console to send DMX signal out to dimmer.
VR1 stands for CH001,VR2 stands for CH002 ····VR12 stands for CH012.
3
Lite-Puter
AX-1205[CUM-C]
ISO 9001 CERTIFIED
2- 4
www.liteputer.com.tw
DMX IN Function
STEP-1 Hold DMX till LED display d.0.0.1.Press ENTER to confirm DMX IN function
and LED will display,
Now AX-1205
becomes a dimmer to receive DMX IN signal.
STEP-2 In DMX IN status,press ◄,►,▲,▼ to adjust start channel address and
LED will display,
◄ = DMX ADDRESS –1
► = DMX ADDRESS +1
▲ = DMX ADDRESS +12
▼ = DMX ADDRESS → d001
STEP-3 Press ENTER to save and LED will display,
2-5
WARM UP Function
STEP-1 Hold FNC till LED displays,
It means ALL channel’s warm up value is zero.
STEP-2
Press ◄ or ► to select a channel and LED will display,
It means the 1 st channel’s warm up value is zero.
4
Lite-Puter
AX-1205[CUM-C]
ISO 9001 CERTIFIED
www.liteputer.com.tw
STEP-3 Press ▲ or ▼ to adjust warm up value (range from 0%-9%)and LED will
display,
Now the 1st channel’s warm up value is 3%.
2-6 Channel Dimming/Non-dimmming Mode Setting
STEP-1 Hold FNC till LED displays,
It means that all channels are set as dimming mode (AL stands for all channel; d
stands for dimming).
STEP-2 Press ◄ or ► to select a channel and LED will display,
It means that the 1 st channel is set as dimming mode.
STEP-3 Press ▲ and LED displays,
Now the 1 st channel is set as non-dimming mode( S stands for switch=non
dimming).
If a channel set as non-dimming mode, when the dimming value higher than
50%, it will switch on at 100%; when the dimming value lower than 20%, it will
switch off.
2-7
Channel Dimming Value Check
STEP-1 Hold FNC till LED display,
5
Lite-Puter
AX-1205[CUM-C]
ISO 9001 CERTIFIED
www.liteputer.com.tw
It means the 1 st channel’s dimming value is zero.
AX-1205 has atuo channel ouput monitor function. (Enter this function, AX-1205 will
automatically display the channel’s dimming value if it changes) .
STEP-2 If the 2 nd channel’s dimming value changes, the LED will automatically
display the value.
STEP-3 If you want to check certain channel’s dimming value, press ◄ or ► select
channel No. For example, select channel 3 and LED will display,
Now, the auto monitor function turn off.
2-8
DOT on Screen Introduction
When the 1 st DOT on LED screen blinks, it means DMX signal is inputting.
←→
When the 2 nd DOT on LED screen is on, it means synchronous signal 1 fails.
Now CH1, CH2, CH3 and CH4 will turn off.
When the 3 rd DOT on LED screen is on, it means synchronous signal 2 fails.
Now CH5, CH6, CH7 and CH8 will turn off.
6
Lite-Puter
AX-1205[CUM-C]
ISO 9001 CERTIFIED
www.liteputer.com.tw
When the 4 th DOT on LED screen is on, it means synchronous signal 3 fails.
Now CH9, CH10, CH11 and CH12 will turn off.
Notice: Synchronous signal 1 control CH1, CH2, CH3 and CH4
Synchronous signal 2 control CH5, CH6, CH7 and CH8
Synchronous signal 3 control CH9, CH10, CH11 and CH12
2-9
Channel Mode
Press CH and LED will display,
Press ENTER to enter channel mode and then automatically go back to your current
setting.
In channel mode, use VR to adjust corresponding channel’s dimming value and
MASTER VR to adjust all channel’s dimming value.
In channel mode, the chase mode will be channel chase.
2-10
Scene Mode
Press SC and LED will display,
Press ENTER to enter scene mode and then automatically go back to your current
setting.
In scene mode, use VR to adjust corresponding scene’s dimming value.(VR1 stands
for scene 1, VR2 stands for scene 2……VR12 stands for scene 12.) Use Master VR
to adjust all scene’s dimming value.
In scene mode, the chase mode will be scene chase.
2-11
Scene Save and Recall
Scene save: At DMX IN or DMX OUT function, adjust the VR to change channels’
dimming value, hold ENTER and then press the 1-12 button below VR1 ~ 12 to save
current dimming value to the scene.
7
Lite-Puter
AX-1205[CUM-C]
ISO 9001 CERTIFIED
www.liteputer.com.tw
For example,
Hold ENTER and press button 1, the current dimming value will save to scene 1 and
LED will display,
Scene recall:In scene mode, push VR1 ~ 12 or press 1 ~ 12 to recall the scene.
2-12
2-12-1.
Channel Chase
Channel Chase without Fade-in /Fade-out
STEP-1 In channel mode, press CHASE to enter channel chase mode and LED will
display,
P stands for chase, 02 stands for chase mode No. (AX-1205 has 15 build-in channel
chase modes, each of which has two opposite types. Please check the graph as
below,
● means turn on ◯ means turn off
8
Lite-Puter
AX-1205[CUM-C]
ISO 9001 CERTIFIED
www.liteputer.com.tw
9
Lite-Puter
AX-1205[CUM-C]
ISO 9001 CERTIFIED
www.liteputer.com.tw
10
Lite-Puter
AX-1205[CUM-C]
ISO 9001 CERTIFIED
www.liteputer.com.tw
11
Lite-Puter
AX-1205[CUM-C]
ISO 9001 CERTIFIED
www.liteputer.com.tw
STEP-2 Press ◄ or ► to select chase mode, press ► and LED will display,
STEP-3 Press ▲or▼ to adjust chase speed, press ▼ and LED will display,
12
Lite-Puter
AX-1205[CUM-C]
ISO 9001 CERTIFIED
www.liteputer.com.tw
※ Chaser speed tables
Fd 0.1
Fd 0.2
Fd 0.3
Fd 0.4
Fd 0.5
Fd 0.6
Fd 0.7
Fd 0.8
Fd 0.9
Fd 01
0.1
0.2
0.3
0.4
0.5
0.6
0.7
0.8
0.9
1
second
second
second
second
second
second
second
second
second
second
Fd 02
Fd 03
Fd 04
Fd 05
Fd 06
Fd 07
Fd 08
Fd 09
Fd 10
Fd 20
2
3
4
5
6
7
8
9
10
20
second
second
second
second
second
second
second
second
second
second
Fd 30
Fd 40
Fd 50
Fd 60
30
40
50
60
second
second
second
second
STEP-4 In channel mode, press ENTER to shift between two opposite types.
2-12-2.Channel Chase with Fade-in /Fade-out
Press CHASE to shift between channel chase mode with Fade-in/ Fade-out and
channel chase mode without Fade-in/ Fade-out. The speed setting please refers to
2-12-1 step3.
2-12-3.Audio Control Chase
STEP-1 Press AUDIO and LED display,
Audio indicator will blink according to audio control’s frenquence.
2-12-4. Back scene setting in channel chase
When it runs channel chase, you can use VR1 ~ VR12 to recall a scene as the back
scene. The dimming value of the channels in the back scene depends on the value of
VR.
MASTER VR controls the dimming value of all the channels in chase.
13
Lite-Puter
AX-1205[CUM-C]
ISO 9001 CERTIFIED
www.liteputer.com.tw
2-13 Scene Chase
Scene Chase has 3 modes; scene chase without fade-in/fade-out, scene chase with
fade-in/fade-out and audio control chase. Scene chase has 8 build-in chasers.
2-13-1. Scene Chase without Fade-in/Fade-out.
STEP-1 In scene mode, press CHASE to enter scene chase without FADE ON /
FADE OFF, and LED will display,
It means scene corresponding to VR 1 will run the chase and scenes corresponding
to VR2-VR12 can be used as back scene.
STEP-2 Press ◄ or ► to change chase mode.
It means scenes corresponding to VR 1 and VR2 will run the chase and scenes
corresponding to VR3 to VR 12 be used as back scene.
STEP-3 Press ▲ or ▼ to adjust chase speed. The speed setting please refers to
2-12-1 step3.
2-13-2. Scene Chase with Fade-in/Fade-out
Press CHASE to shift between scene chase mode with Fade-in/ Fade-out and scene
chase mode without Fade-in/ Fade-out.
2-13-3. Audio Control Chase
STEP-1 In scene mode, press AUDIO to enter audio control chase and LED will
display,
14
Lite-Puter
AX-1205[CUM-C]
ISO 9001 CERTIFIED
www.liteputer.com.tw
Audio indicator light will blink according to audio’s frenquence.
2-13-4. Back Scene Setting in Scene Chase
When it runs scene chase, you can use VR1 ~ VR12 to recall a scene as the back
scene.
15
Lite-Puter
AX-1205[CUM-C]


![DX-404 4 CH DMX Dimmer Pack [User Manual] Lite Puter](http://vs1.manualzilla.com/store/data/005637566_1-c679e36593f10ff673dd448c7922fea2-150x150.png)