1
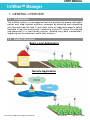
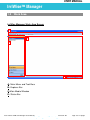
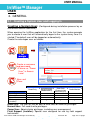
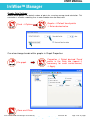
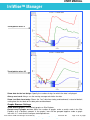
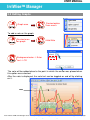
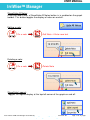
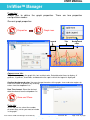
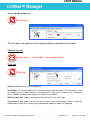
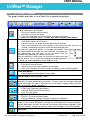
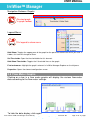
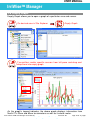
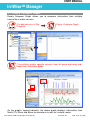
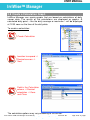
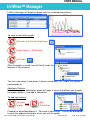
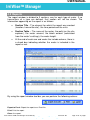
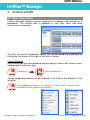
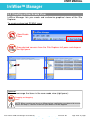
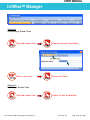
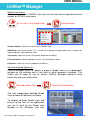
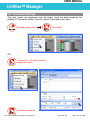
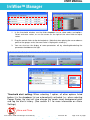
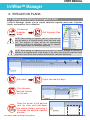
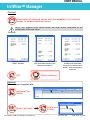
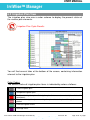
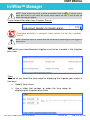
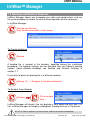
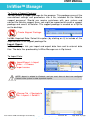
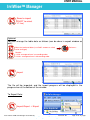
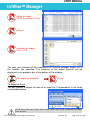
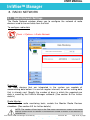
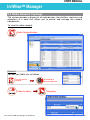
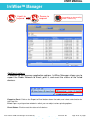
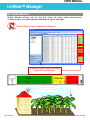
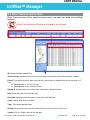
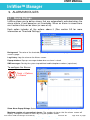
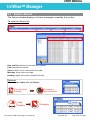
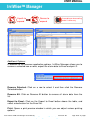
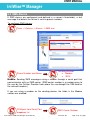
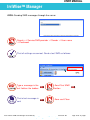
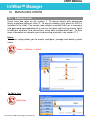
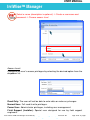
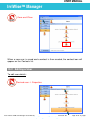
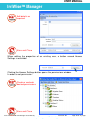
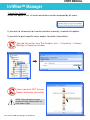
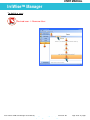
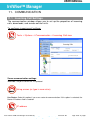
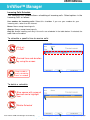
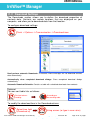
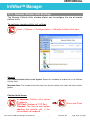
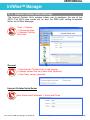
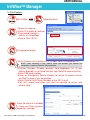
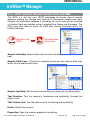
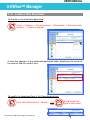
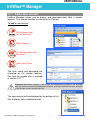
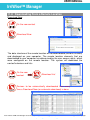
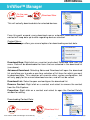
USER MANUAL
IrriWiseTM Manager
TM
Doc. Name: IrriWise
Manager User Manual
Revision: 02
Crop Management Technologies
Page: 1 of 71 pages
USER MANUAL
IrriWiseTM Manager
Table of Contents
1. GENERAL OVERVIEW ...............................................................................4
1.1
1.2
1.3
Introduction............................................................................ 4
System Structure................................................................... 4
Work Area ............................................................................. 5
USER .................................................................................................................6
2. GENERAL ...................................................................................................6
2.1
2.2
Creating a System User and Logging In ............................... 6
Properties and Settings......................................................... 9
3. GRAPHS ...................................................................................................11
3.1
3.2
3.3
3.4
3.5
3.6
3.7
3.8
General................................................................................ 11
Graph Settings .................................................................... 12
Editing Graphs..................................................................... 16
The Graph Toolbar .............................................................. 20
Flow Meter Graphs.............................................................. 21
Empty Graph ....................................................................... 22
Empty Compare Graph ....................................................... 23
Create a Calculation Graph................................................. 24
4. REPORTS .................................................................................................26
4.1
4.2
4.3
General................................................................................ 26
Settings ............................................................................... 26
Reports................................................................................ 27
5. SCADA VIEWS..........................................................................................28
5.1
5.2
5.3
Real Time Status................................................................. 28
Creating a New Scada View ............................................... 29
Threshold Settings .............................................................. 32
6. IRRIGATION PLANS.................................................................................34
6.1
6.2
Making and Editing an Irrigation Plan ................................. 34
Irrigation Plan View ............................................................. 36
TM
Doc. Name: IrriWise
Manager User Manual
Revision: 02
Crop Management Technologies
Page: 2 of 71 pages
USER MANUAL
IrriWiseTM Manager
ADMINISTRATOR ...........................................................................................38
7. BACKUP AND RESTORE.........................................................................38
7.1
7.2
Backup and Restore Settings.............................................. 38
Backup and Restore Features ............................................ 39
8. RADIO NETWORK....................................................................................43
8.1
8.2
8.3
8.4
Radio Network Settings....................................................... 43
Radio Network Topology..................................................... 44
Radio Monitor ...................................................................... 46
Raw Transmissions Data .................................................... 47
9. ALARM MODULES ...................................................................................48
9.1
9.2
9.3
Alarm Settings ..................................................................... 48
System Alarms .................................................................... 49
SMS Alarms ........................................................................ 51
10. MANAGING USERS..................................................................................53
10.1 Adding a User...................................................................... 53
10.2 Editing a User...................................................................... 55
11. COMMUNICATION ...................................................................................59
11.1
11.2
11.3
11.4
11.5
11.6
11.7
11.8
Incoming Call Settings ........................................................ 59
Download Settings .............................................................. 61
Remote Cellular Unit Settings ............................................. 62
Internet Cellular Units Settings............................................ 63
iRCU (Internet Remote Cellular Unit) and SMS.................. 65
Create a New Download ..................................................... 66
Add a New Contact ............................................................. 68
Downloading From a Remote Location............................... 69
TM
Doc. Name: IrriWise
Manager User Manual
Revision: 02
Crop Management Technologies
Page: 3 of 71 pages
USER MANUAL
IrriWiseTM Manager
1. GENERAL OVERVIEW
1.1 Introduction
The IrriWise system is a management tool that provides the grower with better
control over crop irrigation and farm resources by collecting and interpreting
real time data from the field. It uses state of the art radio technology to collect
field data in real time and transfer it wirelessly to your PC, where it is analyzed
and presented in a user-friendly manner, allowing easy data interpretation,
improving real-time decisions and history analysis.
1.2 System Structure
Basic Local Application
Crop Management Technologies
Remote Application
TM
Doc. Name: IrriWise
Manager User Manual
Revision: 02
Crop Management Technologies
Page: 4 of 71 pages
USER MANUAL
IrriWiseTM Manager
1.3 Work Area
IrriWise Manager Work Area Screen
A
C
B
Crop Management Technologies
D
A- Main Menu and Tool Bars
B- Explorer Bar
C-Main Media Window
D- Status Bar
TM
Doc. Name: IrriWise
Manager User Manual
Revision: 02
Crop Management Technologies
Page: 5 of 71 pages
USER MANUAL
IrriWiseTM Manager
USER
2. GENERAL
2.1 Creating a System User and Logging In
Creating a System User: (Configured during installation process by an
authorized Netafim technician)
When opening the IrriWise application for the first time, the system prompts
you to create a user that will automatically logon to the system every time it is
started. The default user will be logged on automatically.
Create the auto-logon user as follows:
Create a username
and password:
Farmer as "Power
User" in Access
Level
Save and
Close
User
Read-Only
Normal User
Power User
Field support
(Installer)
Read-Only
Access Level
Raw Data
(Transmission
Data Analysis)
Save Changes
(Modifications)
Radio Monitor
Read Only- The user will not be able to enter data or make any changes
Normal User- Full read & write privileges
Power User- Administrator privileges, including user management
Field Support (Installer)- Special user designed for use by field support
technicians.
TM
Doc. Name: IrriWise
Manager User Manual
Revision: 02
Crop Management Technologies
Page: 6 of 71 pages
USER MANUAL
IrriWiseTM Manager
Logging in:
Generally, when the IrriWise Manager application is opened, the default
system user is logged into the system automatically. However, there are some
cases in which a login procedure is required:
A default user is not defined
Logging in as a different user
Logging in as a guest
Logging in Without a Default User:
If, for some reason, a default user was not defined, a login procedure is
required. This login procedure allows the system to recognize the user and
load their own personal profile. It also denies access to unauthorized users.
To log into IrriWise Manager, perform the following step:
**
If the identification is incorrect, a Login Failed message appears.
Caps Lock and Num Lock
keys and try again
**For your convenience, Caps Lock and Num Lock indicators appear at the
bottom right corner of the IrriWise Login window. If the problem persists,
contact the IrriWise support personnel
TM
Doc. Name: IrriWise
Manager User Manual
Revision: 02
Crop Management Technologies
Page: 7 of 71 pages
USER MANUAL
IrriWiseTM Manager
Logging in as a Different User:
To log into the system as a new user:
In IrriWise Manager-
File
Log as...
OR
Logging in as a Guest:
To log into the system as a guest:
In IrriWise Manager-
File
Log as Guest
Username and
password Login
TM
Doc. Name: IrriWise
Manager User Manual
Revision: 02
Crop Management Technologies
Page: 8 of 71 pages
USER MANUAL
IrriWiseTM Manager
2.2 Properties and Settings
The system settings should be configured by the system administrator after
the first activation of the application.
General Settings:
In the Tools menuOptions
General
Startup
Run IrriWise when Windows starts- Starts IrriWise automatically when Window starts up.
Start IrriWise minimized- Starts IrriWise in a minimized window.
Minimize To Tray- If selected, the IrriWise window will be minimized to an icon in the system tray
instead of the taskbar.
Auto Logon User- The selected user will be logged on automatically (use the dropdown list to
select the desired user).
Local IrriWise CSV Files
Local IrriWise Grapher CSV files are Comma Separated Values (CSV) files, which hold the data
and configuration of the Grapher application. They could also be used to export data to other
applications. In IrriWise Manager 2.6 this option is disabled by default.
Selecting this option will also enable the CSV file-type dropdown list. Please select the desired
CSV type and the folder in which to store the CSV files. Either leave the default folder that is
already selected, or click on the BROWSE button to select a different folder. Specify the number
of days for which the CSV files will be kept. The files will be deleted automatically after the
specified period to save disk space.
TM
Doc. Name: IrriWise
Manager User Manual
Revision: 02
Crop Management Technologies
Page: 9 of 71 pages
USER MANUAL
IrriWiseTM Manager
Logging and Debug
Log Level- Specify the level at which system events are logged (to be used according to service
personnel request, when trying to analyze and solve problems).
*** Please note that the higher the log level, the more disk space will be consumed by the log files
(up to 5MB).
The available options are as follows
Log debug information
Log informative information
Log warn information
Log error information
Log fatal error information only
Don’t log anything
Language and Templates:
The IrriWise application supports several languages and various weight and
measuring units.
To configure the Language and Templates options:
Tools
Options
Language and Templates
Desired weight and measurement units
(Metric or Imperial)
Desired language for the system interface
TM
Doc. Name: IrriWise
Manager User Manual
Revision: 02
Crop Management Technologies
Page: 10 of 71 pages
USER MANUAL
IrriWiseTM Manager
3. GRAPHS
3.1 General
IrriWise Manager lets you display graphs of both single elements, as well as
combined graphs of several elements in a unit. It also offers various tools to
control the graphs display.
To display graphs:
On a unit or
element
Show Graph
The displayed graph will include the information of the sub units and elements
included in this unit. For example, if you display a graph of an irrigation block,
it will show all its transmitters their respective sensors. To view the relevant
data setup of a specific graph line, click on the appropriate unit in the graph'
s
legend.
TM
Doc. Name: IrriWise
Manager User Manual
Revision: 02
Crop Management Technologies
Page: 11 of 71 pages
USER MANUAL
IrriWiseTM Manager
3.2 Graph Settings
These are the global settings for viewing graphs in the IrriWise Manager. This
window allows you to configure various graph parameters such as how many
days of data to view, default line width etc...
Graphs Appearance Settings
Default line width- Specify the graphs line width (in pixels).
Tools
TM
Doc. Name: IrriWise
Graphs Default line width
Set desired width
Options
Manager User Manual
Revision: 02
Crop Management Technologies
Page: 12 of 71 pages
USER MANUAL
IrriWiseTM Manager
Can also change line widths within graphs in Graph Properties:
Properties Select desired Series
width (repeat if necessary for each
series/sensor) Apply
On graph
Save and
Close
Series width: 3
TM
Doc. Name: IrriWise
Series width: 1
Manager User Manual
Revision: 02
Crop Management Technologies
Page: 13 of 71 pages
USER MANUAL
IrriWiseTM Manager
Graphs Data Settings
Default trend points- The default number of points for a moving average trend calculation. This
calculation is used for smoothing lines in order to better view the data trend
Tools
Graphs Default trend points
Enter desired value
Options
Can also change trends within graphs in Graph Properties:
Properties
Select desired Trend
points in the Data tab (repeat if
necessary for each series/sensor)
Apply
On graph
Save and Close
TM
Doc. Name: IrriWise
Manager User Manual
Revision: 02
Crop Management Technologies
Page: 14 of 71 pages
USER MANUAL
IrriWiseTM Manager
Trend points value: 4
Trend points value: 25
Show data for the last # days- Specify the number of days for which the data is displayed
Always use trend- Always use the moving average calculation for data.
Show Last Data from today- Shows the "last" data from today and backward, instead of default
setting from the last date of last data point and backward.
Graphs Browser Settings
Show default graphs- Show default graphs on Site Explorer
Group every # graphs on tree- When the number of graphs under a certain node in the Site
Explorer (e.g. a location) exceeds X, the graphs'icons will be grouped together under a graph
icon with a +/- mark that will collapse and expand them.
TM
Doc. Name: IrriWise
Manager User Manual
Revision: 02
Crop Management Technologies
Page: 15 of 71 pages
USER MANUAL
IrriWiseTM Manager
3.3 Editing Graphs
Desired option
from menu
Graph area
To add a note on the graph:
Desired area
on graph
Add Note
Background color
text OK
Enter
16:27/8.55
The note will be added close to the point in which the cursor was placed when
this option was selected.
After the note is displayed, the note text can be toggled on and off by clicking
on it.
Note
TM
Doc. Name: IrriWise
Manager User Manual
Revision: 02
Crop Management Technologies
Page: 16 of 71 pages
USER MANUAL
IrriWiseTM Manager
Show/Hide All Notes:
Once you add a note, a Show/Hide All Notes button in is enabled on the graph
toolbar. This button toggles the display of notes on and off.
Editing a note:
Edit Note
On a note
Enter new text
Deleting a note:
Delete Note
On a note
Show/Hide Legend:
Toggles the legend display at the top-left corner of the graph on and off.
TM
Doc. Name: IrriWise
Manager User Manual
Revision: 02
Crop Management Technologies
Page: 17 of 71 pages
USER MANUAL
IrriWiseTM Manager
Properties:
Allows you to define the graph properties. There are two properties
configuration modes:
General graph properties:
Properties
Graph icon
Legend
Title
Background
color
Appearance tab:
Title- You can change the graph title, font and font color. Select/deselect items to display; X
gridlines, Y gridlines, thresholds, and determine the spot in which the legend is displayed.
Gradient background color- You can change the colors of the graphs inner and outer regions to
either eve colors or gradients by selecting
colors from the dropdown lists.
Date Time format- Select the desired
date time format from the dropdown list.
Save and Close
Data tab:
In this tab you can select the number
of recent days, which you want to include
in the graph.
TM
Doc. Name: IrriWise
Manager User Manual
Revision: 02
Crop Management Technologies
Page: 18 of 71 pages
USER MANUAL
IrriWiseTM Manager
Sensor graph properties:
Sensor icon
This will open the specific sensor graph properties configuration window.
Appearance tab:
Series color
series width
series display text
Data tab:
Data tab
Show on chart- Show or hide the graph line
Trend Data- The number of points for a moving average trend calculation. This calculation is used
for smoothing lines in order to better see the data trend. If you select Trend data, the Trend points
field is enabled, allowing you to specify the number of trend points.
Show on right axis- Toggles the display of the vertical axis from left to right.
Use custom Y-axis scale-
TM
Doc. Name: IrriWise
Manager User Manual
Revision: 02
Crop Management Technologies
Page: 19 of 71 pages
USER MANUAL
IrriWiseTM Manager
3.4 The Graph Toolbar
The graph toolbar provides a set of tools for manipulating graphs.
Pointer- Lets you drag the graph image within the graph window after zooming, to
display hidden parts of the graph.
Click on the pointer icon to select it.
Place the cursor on the graph.
Press and hold down the mouse button, and drag as desired.
***The pointer'
s dragging action is enabled only after using the zoom option.
Zoom- Lets you zoom in on specific areas in the graph.
Click on the zoom icon to select it.
Place the cursor in a graph area you would like to enlarge.
Press and hold down the mouse button at the left of the area you wish to
enlarge, and drag to the right to select the desired graph area.
To zoom out, repeat the process in the opposite direction: Press and hold down
the mouse button at the right of the desired area, and drag to the
left. Alternatively you can press on the red points that are
enabled after zooming at the corner of the axes.
You can repeat this action again, to increase the zoom rate. Add
a blank control. This is useful for arranging the displayed controls
in groups, by adding additional space between items.
Show values according to mouse positionClick on the icon to select it.
Place the cursor on a desired point on the graph.
Press and hold down the mouse button; the point'
s value will be displayed.
Show data pointsClick to display the data points on the graph.
Hide All Notes- Hide the graph'
s notes.
Change data mode- Click on the arrow and select; Last Data or All Data to
determine the data displayed by the graph. The time frame for the data displayed
when you choose last data is what you set as the default in graph setting, but you
can set it for each graph individually.
Printing options- Click on the arrow and select:
Page setup- Setup print parameters.
Preview- Show a preview of the print.
Print- Print the graph.
Image options- Click on the arrow and select:
Save as- To save the graph image.
Copy to clipboard- To copy the graph image to the clipboard.
Rename the current graph- Open a dialog in which you can rename the current
graph. If you rename the graph or change any of the properties mentioned above,
you will be asked if you wish to save the new settings upon exiting the graph. If you
save the settings, a graph icon with the new name will appear on the Site Explorer.
Exit graph
TM
Doc. Name: IrriWise
Manager User Manual
Revision: 02
Crop Management Technologies
Page: 20 of 71 pages
USER MANUAL
IrriWiseTM Manager
Navigation Between Graphs:
Desired graph
in graph toolbar
Legend Menu:
On legend to show menu
Hide/Show- Toggles the appearance of the graph for the particular element on which you click. If
hidden, this item will change to Show
Set Thresholds- Open the threshold table for this element
Hide/Show Thresholds- Toggles the 2 threshold lines on the graph.
Find on browser- Highlight the graph'
s element in IrriWise Manager Explorer on the left pane
Properties- Opens the element configuration screen.
3.5 Flow Meter Graphs
Clicking on a bar in a flow meter graphs will display the various flow-meter
data according to the flow meter settings.
To hide the data display, click again.
TM
Doc. Name: IrriWise
Manager User Manual
Revision: 02
Crop Management Technologies
Page: 21 of 71 pages
USER MANUAL
IrriWiseTM Manager
3.6 Empty Graph
Empty Graph allows you to open a graph of a particular area and sensor.
On desired area in Site Explorer
Empty Graph
Transmitters and/or specific sensors from left pane and drag and
drop them into empty graph
As the graph'
s legend indicates, the above graph displays information from
North 01'
s 30cm and 60cm tensiometers as well as its water meter.
TM
Doc. Name: IrriWise
Manager User Manual
Revision: 02
Crop Management Technologies
Page: 22 of 71 pages
USER MANUAL
IrriWiseTM Manager
3.7 Empty Compare Graph
Empty Compare Graph allows you to compare information from multiple
transmitters and/or sensors.
On desired area in Site
Explorer
Empty Compare Graph
Transmitters and/or specific sensors from left pane and drag and
drop them into empty graph
As the graph'
s legend indicates, the above graph displays information from
North 01'
s 30cm and 60cm tensiometers as well as its water meter.
TM
Doc. Name: IrriWise
Manager User Manual
Revision: 02
Crop Management Technologies
Page: 23 of 71 pages
USER MANUAL
IrriWiseTM Manager
3.8 Create a Calculation Graph
IrriWise Manager can create graphs that are based on calculations of daily
sensor data. The results of the calculations are displayed as graphs. A
calculated daily point – like the daily average or maximum – will be displayed
at 12:00 noon as the time of the daily data.
To create a calculation:
Create Calculation
Location to expand
Desired sensors
Next
Field in the Calculation
column Desired
calculation Save
and Close
The calculation options may vary according to the sensor.
TM
Doc. Name: IrriWise
Manager User Manual
Revision: 02
Crop Management Technologies
Page: 24 of 71 pages
USER MANUAL
IrriWiseTM Manager
IrriWise Manager will display a graph with the selected calculations.
To save a calculation graph:
Rename the Current Graph icon
Enter Name
OK to save
Tensiometer 1&2
Exit icon
After the graph is saved, you will find it under the
location in the left pane.
You can now drag it and place it where convenient, i.e., under the sensor it
corresponds to.
Additional Options:
Right-clicking on a calculation graph will open a menu that allows you to open
the graph, delete it, and add a calculation.
To add calculations:
Add
Calculation
Desired
graph
Proceed as described above in "To create a calculation". You will be prompted
to save the added calculations when you exit the graph.
TM
Doc. Name: IrriWise
Manager User Manual
Revision: 02
Crop Management Technologies
Page: 25 of 71 pages
USER MANUAL
IrriWiseTM Manager
4. REPORTS
4.1 General
IrriWise Manager lets you display a water report for rain, water, drain and
fertilizer meters.
On Site
Explorer
Report
4.2 Settings
On a report
element
Report
OK- To view report
Yesterday- Show a water report for yesterday (the whole day)
Today- Show a water report for today from yesterday midnight up until now
Last Week- Show a water report of the previous week, from the first day of last week to the first
day of this week
This Week- Show a water report from the first day of this week up until now
Last Month- Show a water report from the first of last month to the first of this month
This Month- Show a water report from the first of this month up until now
Last Year- Show a water report from the first of January last year to the first of January this year
This Year- Show a water report from the first of January this year up until now
Custom- Show a water report for a custom period of time
Report Unit- Select the volume units for the report.
TM
Doc. Name: IrriWise
Manager User Manual
Revision: 02
Crop Management Technologies
Page: 26 of 71 pages
USER MANUAL
IrriWiseTM Manager
4.3 Reports
The report window is divided to 3 sections, one for each type of meter. If no
transmitters of a type are defined, that section will not be shown. The
information appearing on the report is as follows:
Section Title - The element for which the report was created
(location, transmitter etc'
), the time period and the units.
Section Table – The name of the meter, the path (on the site
explorer), the meter amount, the block amount (calculated
from the meter'
s settings), the water height.
At the end of each row and under the include column, there is
a check box indicating whether the meter is included in the
report or not.
By using the report window tool bar you can perform the following actions:
Export to Excel- Export the report to an Excel file.
Print- Print the report.
Close- the report.
TM
Doc. Name: IrriWise
Manager User Manual
Revision: 02
Crop Management Technologies
Page: 27 of 71 pages
USER MANUAL
IrriWiseTM Manager
5. SCADA VIEWS
5.1 Real Time Status
IrriWise Manager displays sensors graphically as gauges and controls on a
dashboard. The sensor data is updated in real time, each time data
transmission is received.
An entity or element'
s graphical display can be collapsed and expanded by
clicking on the arrows at the right of the item'
s title bar.
Find on Browser:
Right-clicking on the corresponding element opens a menu with various items,
according to the element type.
On display
Find on Browser
The corresponding element will be selected in the IrriWise Site Explorer in the
left pane.
Corresponding element to display a menu with various items
according to the type of the element
TM
Doc. Name: IrriWise
Manager User Manual
Location menu
Revision: 02
Crop Management Technologies
Sensor menu
Page: 28 of 71 pages
USER MANUAL
IrriWiseTM Manager
5.2 Creating a New Scada View
IrriWise Manager lets you create and customize graphical views of the Site
Explorer.
To create customized SCADA views:
New Scada
View
Drag desired sensors from the Site Explorer left pane and drop on
the right pane.
Optional:
You can rearrange the items in the new scada view (right pane):
Dragging and dropping
items
NOTE: When you drag an item to a different place, and before you release the mouse
button and drop it, a red line marks the spot where it will be dropped.
TM
Doc. Name: IrriWise
Manager User Manual
Revision: 02
Crop Management Technologies
Page: 29 of 71 pages
USER MANUAL
IrriWiseTM Manager
Optional:
Renaming a Scada View
Desired scada view
Rename Scada View button
Enter new name
Save and Close
Optional:
Deleting a Scada View
Desired scada view
TM
Doc. Name: IrriWise
Manager User Manual
Delete Scada View button
Revision: 02
Crop Management Technologies
Page: 30 of 71 pages
USER MANUAL
IrriWiseTM Manager
Scada view menu:
Once you populate a SCADA view, you can use the menu to perform several
actions on SCADA view items.
On an item in the scada view
Desired action
Remove Control- Remove the item from the Scada view
Add Blank- Add a blank control. This is useful for arranging the displayed controls in groups, by
adding additional space between items
Thresholds- Open the sensor'
s thresholds dialog box for editing
Find on browser- Mark the gauge'
s sensor in the Site Explorer pane
Properties- Open the sensor'
s properties for editing.
Send to desktop (optional):
IrriWise Manager offers an option to place a Scada view in an independent
window on the desktop and at the front of other programs'windows. This
allows you to keep an eye on certain IrriWise Manager elements while
continuing with your other work.
Desired scada view
Send to Desktop button
The new independent desktop Scada
View window will become available.
To display desktop Scada view and
bring it to the front of the application
you are in, click on the Scada view
window in the Windows task bar.
TM
Doc. Name: IrriWise
Manager User Manual
Revision: 02
Crop Management Technologies
Page: 31 of 71 pages
USER MANUAL
IrriWiseTM Manager
5.3 Threshold Settings
The way values are displayed and the colors used are determined by the
display'
s Threshold settings. You can adjust threshold in two ways:
Desired scada view
Thresholds
OR
Properties Set thresholds in
properties menu
Desired thresholds
TM
Doc. Name: IrriWise
Manager User Manual
Revision: 02
Crop Management Technologies
Page: 32 of 71 pages
USER MANUAL
IrriWiseTM Manager
1.
In the thresholds window, use the fields dropdown lists to select colors and options.
Select and enter values, or use the arrows on the right of the value fields to adjust
values.
2.
Drag the control sliders to the desired points. (Note that when placing the cursor above a
point on the gauges scale, the exact value is displayed in a tool tip.)
3.
You can also turn the display of some parameters off, by selecting/deselecting the
parameter checkbox on the right.
Threshold alert setting- When
before it in the dropdown list are
Popup Dialog, the alert will also
and log the alert'
s history. (See
Settings)
selecting 1 option, all other options listed
automatically activated. I.e., when selecting
change the scada view'
s background color
section 9.1 for more information on Alarm
Save and Close
TM
Doc. Name: IrriWise
Manager User Manual
Revision: 02
Crop Management Technologies
Page: 33 of 71 pages
USER MANUAL
IrriWiseTM Manager
6. IRRIGATION PLANS
6.1 Making and Editing an Irrigation Plan
IrriWise Manager allows you to create detailed irrigation plans per irrigation
block, and monitor their execution.
On desired
irrigation
block
Edit Irrigation Plan
NOTE: When editing an irrigation plan for a crop unit, the
plan will apply to all irrigation blocks under that same crop
unit. The amounts of water will be set proportionally
according to block size definitions. Later on, an irrigation
block's irrigation plan can be edited separately.
NOTE: When editing an irrigation plan for a crop unit, IrriWise Manager will prompt for
deletion of all irrigation plans of the blocks (if any plans exist) that fall under that same
crop unit. If you do not wish to delete all block plans, edit them individually.
Start date
Cycle- desired # of days
Plan Sensorsdesired sensors
for the plan
Place the cursor at the desired
time tip, click and hold down
the mouse button, and drag it
to include the desired irrigation
duration
TM
Doc. Name: IrriWise
Manager User Manual
Revision: 02
Crop Management Technologies
Page: 34 of 71 pages
USER MANUAL
IrriWiseTM Manager
Optional:
Parameters by selecting values from the dropdown lists using the
arrows to increase/decrease values
NOTE: The Irrigation Event Details screen has three layouts determined by the
configuration of the water meter.
Irrigation amount
details window
Irrigation amount details window
with total block amount and
volume/area details
OK
Irrigation amount details
window with total block
amount and volume/area
details, when editing for a
crop unit.
When necessary
Optional:
Renaming an irrigation plan
Rename Plan
button
Save and
Close
Enter new name
TM
Doc. Name: IrriWise
Manager User Manual
Revision: 02
Crop Management Technologies
Page: 35 of 71 pages
USER MANUAL
IrriWiseTM Manager
6.2 Irrigation Plan View
The irrigation plan view uses a color scheme to display the present status of
the various plan elements.
Irrigation Plan Cycle Results
You will find several tabs at the bottom of the screen, containing information
relevant to the irrigation plan.
Color Codes:
The current status of irrigation plan items is indicated by colors a follows:
Future irrigation plan.
Completed irrigation plan.
Problematic irrigation plan - An irrigation plan that was not executed (where it should
have been).
Not planned irrigation plan – an irrigation plan that took place although it was not
planed.
Planned irrigation event.
Drainage event.
TM
Doc. Name: IrriWise
Manager User Manual
Revision: 02
Crop Management Technologies
Page: 36 of 71 pages
USER MANUAL
IrriWiseTM Manager
NOTE: Some events may have a yellow exclamation mark icon
. It means that an
alarm was raised. If you move the mouse cursor above the icon, a tool tip with the
alarm message will appear.
Cycle Amount Deviation from Irrigation Events:
Tolerated deviation in percent, from values set for the irrigation
events.
NOTE: Deviations equal or smaller from the set deviation percentage will not trigger an
alarm event.
View:
This tab let you select/deselect irrigation event to be included in the irrigation
plan view.
Time:
This tab let you select the time range for displaying the irrigation plan status in
two ways:
Specify time values
Use a slider that narrows or widen the time range for
displaying the irrigation plan status
TM
Doc. Name: IrriWise
Manager User Manual
Revision: 02
Crop Management Technologies
Page: 37 of 71 pages
USER MANUAL
IrriWiseTM Manager
ADMINISTRATOR
7. BACKUP AND RESTORE
7.1 Backup and Restore Settings
IrriWise saves backup files automatically, which can be used to restore
deleted data and configuration. To configure backup and restore properties:
Tools
Options
IrriWise Manager
Backup and Restore
General Backup Settings:
The default locations for the backup files and support package are already
selected.
To change these settings: click on the browse button and select a different
location, or enter the required paths in Backup and Support fields.
Different location/required path
Browse
Auto Backup Settings:
Auto backup settings are defined during the software installation. To modify
the backup periods and retention time, enter new values in the appropriate
fields. To disable auto backup, deselect the Auto Backup checkbox.
TM
Doc. Name: IrriWise
Manager User Manual
Revision: 02
Crop Management Technologies
Page: 38 of 71 pages
USER MANUAL
IrriWiseTM Manager
7.2 Backup and Restore Features
IrriWise Manager allows you to backup your data and configuration, and use
the system backup to restore the data and configuration where necessary.
In IrriWise Manager:
Backup and Restore
(can also be accessed in Tools menu)
To Create a Backup:
Backup
A backup file is created in the directory specified during the installation
procedure. The backup settings can be changed from the Option'
s backup
section (Tools->Options->Backup) see Backup and Restore Settings in
section 7.1.
If you wish to place the backup file in a different location:
Backup To…
Navigate to the desired location
To Restore From Backup:
File to restore
from…
Restore
IrriWise Manager will check if the last backup is from today and alert you if it'
s
not. IrriWise Manager will display a dialog box. Backup files are in Zip format.
NOTE: In order to perform a system restore, IrriWise will restart automatically.
TM
Doc. Name: IrriWise
Manager User Manual
Revision: 02
Crop Management Technologies
Page: 39 of 71 pages
USER MANUAL
IrriWiseTM Manager
To Create a Support Package:
You can create a support package for the program. This package saves all the
user-defined settings and parameters into a file, intended for the Netafim
support personnel. Should you require assistance with your system and
contact the Netafim support team, you might be requested to create a support
package and send it to Netafim. The support package is created as a Zip file
on the desktop.
Create Support Package
Include Acquired Data: Select this option (by clicking on it) to include all the
acquired data in the support package file.
Import /Export:
IrriWise Manager lets you import and export data from and to external data
files. The data files produced by IrriWise Manager are in Zip format.
To Import Data:
Import/Export Import
From… Choose
import source
NOTE: Import is related to Contacts, and you must have at least one configured
Contact in the system in order to perform import.
Choose File
file Import
TM
Doc. Name: IrriWise
Navigate to
Select it
Manager User Manual
Revision: 02
Crop Management Technologies
Page: 40 of 71 pages
USER MANUAL
IrriWiseTM Manager
Rows to import
(SHIFT to select
+1 line)
Optional:
You can arrange the table data as follows (can be done in export window as
well):
New start and end dates (use field'
s arrows or select
value and type)
Columns:
Header:
1 click: arrange column in ascending order
2 clicks: arrange column in descending order
Import
The file will be imported, and the import progress will be displayed in the
progress bar at the bottom of the window.
To Export Data:
Import/Export
TM
Doc. Name: IrriWise
Export
Manager User Manual
Revision: 02
Crop Management Technologies
Page: 41 of 71 pages
USER MANUAL
IrriWiseTM Manager
Rows to export
(SHIFT to select +1 line)
Export
Location for export
files OK
The data you selected will be exported to an IrriWise Manager export file in
the location you specified. The progress of the export process will be
displayed in the progress bar at the bottom of the window.
For export to complete
Close
To Export to Excel:
You can choose to export the data to an excel file. The procedure is the same
as described above.
NOTE: Excel files are in Office 2003 format, which may not be compatible with earlier
Excel versions.
TM
Doc. Name: IrriWise
Manager User Manual
Revision: 02
Crop Management Technologies
Page: 42 of 71 pages
USER MANUAL
IrriWiseTM Manager
8. RADIO NETWORK
8.1 Radio Network Settings
The Radio Network window allows you to configure the network of radio
devices used to transmit data from the field.
To configure radio data:
Tools
Options
Radio Network
Raw Data:
The radio devices that are integrated in the system are capable of
accumulating data before it is sent on regular intervals, as well as saving data
that is already sent. Specify the number of days in which the acquired raw
data is saved by the IrriWise Manager software. (See section 8.4 for further
details.)
Radio Monitor:
To enable the radio monitoring tools, enable the Monitor Radio Devices
checkbox. (See section 8.3 for further details.)
NOTE: The number of lines kept on the Raw Data Transmissions screen or the Radio
Monitor screen will be as defined in the Maximum number of entries on the Monitor list
selection box.
TM
Doc. Name: IrriWise
Manager User Manual
Revision: 02
Crop Management Technologies
Page: 43 of 71 pages
USER MANUAL
IrriWiseTM Manager
8.2 Radio Network Topology
The system provides a display of all radio devices (transmitters, receivers and
repeaters) in a table that allows you to control and manage the network
components.
To view the radio network:
Radio Network button
Optional:
You can sort table lists as follows:
Desired column
heading
Ascending or
descending order
Table heading
TM
Doc. Name: IrriWise
Group by...
Manager User Manual
Revision: 02
Crop Management Technologies
Page: 44 of 71 pages
USER MANUAL
IrriWiseTM Manager
A path to
expand
Source to
expand
Ascending or descending
order if necessary
Additional options:
In addition to the common application options, IrriWise Manager allows you to
export the Radio Network to Excel, print it, and reset the status of the listed
devices.
Export to Excel- Click on the Export to Excel button above the table, and select a destination for
the Excel file
Print- Opens a print preview window in which you can adjust various printing options
Reset Status- Click to reset the status of all devices.
TM
Doc. Name: IrriWise
Manager User Manual
Revision: 02
Crop Management Technologies
Page: 45 of 71 pages
USER MANUAL
IrriWiseTM Manager
8.3 Radio Monitor
Radio Monitor allows you to see the value of each radio transmission.
Transmissions are color-coded according to signal strength.
Radio Monitor icon at bottom of left pane
Volume= Return signal strength
index of transmission
TM
Doc. Name: IrriWise
Manager User Manual
Revision: 02
Crop Management Technologies
Page: 46 of 71 pages
USER MANUAL
IrriWiseTM Manager
8.4 Raw Transmissions Data
Raw Transmissions Data acquires and saves raw data by radio transmitting
devices.
Raw Transmissions Data icon at bottom of left pane
ID- Communication module ID #
Transmission- Number of transmissions that were received the same communication module.
Event- Transmitter transmits data every 30 mins. but it takes a reading from the sensor every 15
mins.:
0= Reading taken in the first 15 mins.
1= Reading taken in the second 15 mins.
Sensor #- Number of the transmitter from which data is being received.
Date- Date and time of the transmission.
Received- Receiver # that the transmission was received from.
Value- Digital value of the raw data.
Type- Transmitter protocol type.
History- History of the transmission: Now and last 3 transmissions (Hist1,2,3).
Values 2, 3, 4...- Digital value of the raw data.
TM
Doc. Name: IrriWise
Manager User Manual
Revision: 02
Crop Management Technologies
Page: 47 of 71 pages
USER MANUAL
IrriWiseTM Manager
9. ALARM MODULES
9.1 Alarm Settings
IrriWise allows you to define alarms that are automatically activated when the
alarm criteria is met based on set thresholds. When an alarm is raised there
are 4 actions that can be taken (or none at all).
Each action includes all the actions above it (See section 5.3 for more
information on Threshold Settings):
Background- The color of the threshold generating the alarm will be displayed as a led on the
sensor'
s gauge
Log history- Logs the alarm on the Alarms screen
Popup windows- Pop up a message window when an alarm is raised
SMS messages- Sent by the system to predefined mobile telephone numbers (up to three).
To configure the Alarms:
Tools Options
Alarms
Show Alarm Popup Dialogs- Select this checkbox if you wish to show alarm pop-up dialogs.
Maximum number of concomitant alarms- The number of alarms that the alarms screen will
display. Change the number of alarms by using the up/down arrows.
TM
Doc. Name: IrriWise
Manager User Manual
Revision: 02
Crop Management Technologies
Page: 48 of 71 pages
USER MANUAL
IrriWiseTM Manager
9.2 System Alarms
The Alarms window displays all alarm messages issued by the system.
To view the Alarms list:
Date and Time- When the threshold was reached.
Path- Location of the alarm.
Source- Which sensor reached the threshold.
Message- Alarm status message.
Reading- Digital value of the reached threshold.
Optional:
You can sort table lists as follows:
Desired column
heading
Ascending or
descending order
Table
heading
TM
Doc. Name: IrriWise
Group by...
Manager User Manual
Revision: 02
Crop Management Technologies
Page: 49 of 71 pages
USER MANUAL
IrriWiseTM Manager
A path to
expand
Source to
expand
Ascending or descending
order if necessary
Additional Options:
In addition to the common application options, IrriWise Manager allows you to
remove a selected row or rows, export the alarm data to Excel and print it.
Remove Selected- Click on a row to select it and then click the Remove
Selected button
Remove All- Click on Remove All button to remove all alarm data from the
list
Export to Excel- Click on the Export to Excel button above the table, and
select a destination for the Excel file
Print- Opens a print preview window in which you can adjust various printing
options.
TM
Doc. Name: IrriWise
Manager User Manual
Revision: 02
Crop Management Technologies
Page: 50 of 71 pages
USER MANUAL
IrriWiseTM Manager
9.3 SMS Alarms
If SMS alarms are configured (and defined in a sensor'
s thresholds), a text
message that details the failure is sent to preset numbers.
To configure SMS alarms:
Tools
Options
Alarms
Phone Number and Name
SMS icon
Sending Method:
Modem
iRCU
Modem- Sending SMS messages using a modem through a serial port that
communicates with an SMS center. (SMS center number is a number given to
the user by the Cellular Provider from whom the user bought the SIM card for
the relevant modem.)
If you are using a modem as the sending device, the fields in the Modem
section are enabled:
COM port from Serial Port
dropdown list
TM
Doc. Name: IrriWise
Manager User Manual
SMS Center Number
Revision: 02
Crop Management Technologies
Page: 51 of 71 pages
USER MANUAL
IrriWiseTM Manager
iRCU- Sending SMS messages through the server.
Country Service/SMS provider
Password
Sender
User name
That all settings are correct. Send a test SMS as follows:
Type a message in the
text field on the toolbar
Send Test SMS
button
That a test message is
sent
Save and Close
TM
Doc. Name: IrriWise
Manager User Manual
Revision: 02
Crop Management Technologies
Page: 52 of 71 pages
USER MANUAL
IrriWiseTM Manager
10. MANAGING USERS
10.1 Adding a User
Users have two roles on the system: 1- To log on locally with permission
levels to perform different tasks. 2- To log on remotely (only when an iRCU is
installed in the field). The remote side creates a contact that has a username
and password corresponding to a user on the local side having access rights
to different locations and transmitters to be able to download from. To view
more information on remote users and creating a contact, see section 11.7.
Users
The users setup allows you to create, configure, manage and delete system
users.
Tools
Options
Users
To Add a user:
Add User
TM
Doc. Name: IrriWise
Manager User Manual
Revision: 02
Crop Management Technologies
Page: 53 of 71 pages
USER MANUAL
IrriWiseTM Manager
Select a name (description is optional)
password Choose access level
Create a username and
Access Level:
Configure the user'
s access privileges by selecting the desired option from the
dropdown list.
Read Only- The user will not be able to enter data or make any changes
Normal User- Full read & write privileges
Power User- Administrator privileges, including user management
Field Support (Installer)- Special user designed for use by field support
engineers.
TM
Doc. Name: IrriWise
Manager User Manual
Revision: 02
Crop Management Technologies
Page: 54 of 71 pages
USER MANUAL
IrriWiseTM Manager
Save and Close
When a new user is saved and a contact is then created, the contact icon will
appear on the Contacts list.
10.2 Editing a User
To edit user details:
Desired user
TM
Doc. Name: IrriWise
Properties
Manager User Manual
Revision: 02
Crop Management Technologies
Page: 55 of 71 pages
USER MANUAL
IrriWiseTM Manager
Edit details as
required
Save and Close
When editing the properties of an existing user, a button named Access
Settings is available.
Clicking the Access Settings button opens the permissions window.
In order to set permission:
Check or uncheck
desired permissions
Save and Close
TM
Doc. Name: IrriWise
Manager User Manual
Revision: 02
Crop Management Technologies
Page: 56 of 71 pages
USER MANUAL
IrriWiseTM Manager
Transmitter Access:
When this option is set, all new transmitters can be accessed by all users.
If you wish to set access for new transmitters manually, uncheck this option.
If you wish to grant specific users access to certain transmitters:
Desired transmitter from Site Explorer tree
Settings in Properties window
Properties
Access
Users you wish NOT to have
access to chosen transmitter
NOTE: They will appear as grey
shaded, all other colored users will
have access rights.
TM
Doc. Name: IrriWise
Manager User Manual
Revision: 02
Crop Management Technologies
Page: 57 of 71 pages
USER MANUAL
IrriWiseTM Manager
To delete a user:
Desired user
TM
Doc. Name: IrriWise
Remove User
Manager User Manual
Revision: 02
Crop Management Technologies
Page: 58 of 71 pages
USER MANUAL
IrriWiseTM Manager
11. COMMUNICATION
11.1 Incoming Call Settings
The communication window allows you to set up the properties of incoming
calls, downloads, and remote cellular units.
To configure incoming call settings:
Tools
Options
Communication
Incoming Calls icon
Server communication settings
TCP Port- The port used for the TCP protocol.
Using arrows (or type in new value)
Use Router- Select this option if you use a router for communication. If this option is selected, the
Router IP Address field is enabled.
IP address
TM
Doc. Name: IrriWise
Manager User Manual
Revision: 02
Crop Management Technologies
Page: 59 of 71 pages
USER MANUAL
IrriWiseTM Manager
Incoming Calls Schedule
The Incoming Calls window allows scheduling of incoming calls. Select options in the
Incoming Calls as follows:
Use modem for incoming calls- Select this checkbox if you use your modem for your
incoming calls, rather than the internet.
Never- Never accept incoming calls
Always- Always accept incoming calls
Only at- Accept incoming calls only if the calls are scheduled in the table below. If selected, the
table fields are enabled.
To schedule a specific time to receive calls:
Only at:
Add
Desired time and duration
by using the arrows
Steps to add as
many scheduling
items as needed
To delete a schedule:
Blue square with arrow of
desired row to highlight
item
Delete Selected
TM
Doc. Name: IrriWise
Manager User Manual
Revision: 02
Crop Management Technologies
Page: 60 of 71 pages
USER MANUAL
IrriWiseTM Manager
11.2 Download Settings
The Downloads section allows you to define the download properties of
contacts data. Contacts are remote locations that are displayed on your
computer, and allow you to download data from that location.
To configure download settings:
Tools
Options
Communication
Downloads icon
Don't perform automatic Downloads- If selected; IrriWise Manager will not download contacts
data automatically.
Automatically close completed download dialogs- Close completed download dialogs
automatically.
Automatic Download Schedule- Contains a table with scheduled downloads from contacts.
Optional:
You can sort table lists as follows:
Desired column
heading
Ascending or
descending order
To modify the download time in the Download column:
Select time field
(Download at)
TM
Doc. Name: IrriWise
Using arrows (or type in new value)
Manager User Manual
Revision: 02
Crop Management Technologies
Page: 61 of 71 pages
USER MANUAL
IrriWiseTM Manager
11.3 Remote Cellular Unit Settings
The Remote Cellular Units window allows you to configure the use of remote
cellular units.
To configure remote cellular unit settings:
Tools
Options
Communication
Remote Cellular Units icon
General
Use Remote Cellular Units in the System- Select this checkbox to enable the use of Remote
Cellular Units.
Maximum lines- The number of transmission lines that the cellular unit sends with each cellular
packet.
Cellular Units Server
IP address- Cellular units server
IP address
TCP Port- Number of TCP Port
Timeout- The time to wait before
aborting the cellular call, if the
server does not respond.
TM
Doc. Name: IrriWise
Manager User Manual
Save and Close
Revision: 02
Crop Management Technologies
Page: 62 of 71 pages
USER MANUAL
IrriWiseTM Manager
11.4 Internet Cellular Units Settings
The Internet Cellular Units window allows you to configure the use of the
iRCU. The iRCU also sends out an alert via SMS after setting thresholds
within the IrriWise Manager.
Tools Options
Communication
Remote Cellular
Units icon
General
Use Internet Cellular Units in the system
Update server lists on system start (optional)
Use Proxy server (optional)
Internet Cellular Units Server
User Name and Password
TM
Doc. Name: IrriWise
Manager User Manual
Save and Close
Revision: 02
Crop Management Technologies
Page: 63 of 71 pages
USER MANUAL
IrriWiseTM Manager
In Site Explorer:
My IrriWise
New Receiver
Name for receiver
Enter ID number of receiver
Connected through a
cellular unit checkbox
Comm. Port: IRCU
Configuration button
Unit: Choose unit listed by serial number from the dropdown list
NOTE: After choosing a unit, please close the window, get cellular unit
parameters, check and confirm the parameters.
Cellular Provider: Choose provider from dropdown list. (If you
cellular provider is not listed, contact your Netafim representative).
Enter SIM card number.
Enter an Emergency Phone Number for which to receive alarms
via SMS in case of lost connection.
Enter Cellular Unit Phone Number of the iRCU itself.
Poll unit: select how often you wish to connect to server and
receive data.
Close (to close this window)
Save and Close (receiver
properties settings)
TM
Doc. Name: IrriWise
Manager User Manual
Revision: 02
Crop Management Technologies
Page: 64 of 71 pages
USER MANUAL
IrriWiseTM Manager
11.5 iRCU (Internet Remote Cellular Unit) and SMS
The iRCU is a unit that uses GPRS technology to transfer data to remote
locations making the storage and retrieval of information simpler and more
efficient. All information collected is stored by the server and can be retrieved
via internet from any location using a selected User Name and Password. The
iRCU may also send an alarm via SMS after setting thresholds within the
IrriWise Manager.
Receiver with
iRCU
Desired action
from menu
Acquire data Now- Acquire data from the last time data was acquired up until
now.
Acquire Data From...- Presents a calendar where you can select a date from
which start to acquire data from.
Acquire last Data- Get the most current data only (from the last 45 minutes).
Test Receiver- Test the receiver'
s functioning and availability (through the
cellular unit).
Test Cellular Unit- Test the cellular unit'
s functioning and availability.
Delete- Delete the receiver.
Properties- Open the receiver properties for editing.
TM
Doc. Name: IrriWise
Manager User Manual
Revision: 02
Crop Management Technologies
Page: 65 of 71 pages
USER MANUAL
IrriWiseTM Manager
11.6 Create a New Download
To Create a new automatic download:
Tools Options Communication
contact... Select a contact
Downloads
Add event with
A new row appears in the automatic download table, displaying the name of
the contact and the current time.
To modify the download time in the Download column:
Using arrows (or
type in new value)
Time field (Download at...column)
TM
Doc. Name: IrriWise
Manager User Manual
Revision: 02
Crop Management Technologies
Page: 66 of 71 pages
USER MANUAL
IrriWiseTM Manager
To modify the interval in the Interval column:
Using arrows (or type in new
value)
Interval field column
NOTE: If intervals are configured, they overrule the configured download time in the
Download at field.
Apply Schedule Changes when done
The download is scheduled.
To delete an automatic download:
Row
Delete
Apply Schedule Changes when done
TM
Doc. Name: IrriWise
Manager User Manual
Revision: 02
Crop Management Technologies
Page: 67 of 71 pages
USER MANUAL
IrriWiseTM Manager
11.7 Add a New Contact
IrriWise Manager allows you to display and download data from a remote
location. The remote location is referred to as Contact.
To add a new contact:
On left pane (not
on an element)
Add Contact
Fill contact details on
the form
Save and Close
The user name and password are
allocated by the remote location.
See how the remote user is created
in section 10.1***
Download list: When creating a new contact, the Download List button is not available
until you save and close the preferences window, and then download the tree structure
of the remote location for the first time.
The new contact will be displayed at the bottom of the
Site Explorer, with a dedicated icon.
TM
Doc. Name: IrriWise
Manager User Manual
Revision: 02
Crop Management Technologies
Page: 68 of 71 pages
USER MANUAL
IrriWiseTM Manager
11.8 Downloading From a Remote Location
Download Now:
On the new contact
Download Now
The data structure of the remote location will be downloaded (without the data)
and displayed on your computer. The remote location elements that are
downloaded to your computer are determined by the user access rights, which
were configured on the remote location. The system will download the
contact'
s devices and lists.
On the new
contact
Download List
Devices to be automatically downloaded from every
time a Download Now (or automatic download) is done
TM
Doc. Name: IrriWise
Manager User Manual
Revision: 02
Crop Management Technologies
Page: 69 of 71 pages
USER MANUAL
IrriWiseTM Manager
On the new
contact
Download Now
This will actually download data for selected devices.
From this point onward, every download now or automatic download for that
contact will keep data up-to-date regarding devices selected.
Contact Menu:
IrriWise Manager offers you several options for downloading contact data.
Download Now- Right-click on a contact and select Download Now from the
menu. Data will be downloaded for items that are selected in the download list
(see above).
Advanced Download- Selecting Advanced Download will open the download
list and allow you to make a one-time selection of list items for which you want
to download data. This selection will overrule other system configuration, but
will only apply for the current download session, and will not be saved.
Download List- Select to open and configure the download list.
Remove Contact- Right click on a contact and select to remove the contact
from the Site Explorer.
Properties- Right click on a contact and select to open the Contact Details
window for editing.
Downloading Contact Data:
Download List
On a contact
TM
Doc. Name: IrriWise
Manager User Manual
Revision: 02
Crop Management Technologies
Page: 70 of 71 pages
USER MANUAL
IrriWiseTM Manager
Elements to download
data from
OK
For download to complete
List Manipulation:
The general table manipulation options of IrriWise Manager are also
applicable to the download list.
Remove Selected- Removing rows from the list: Select rows by clicking on the blue square to the
right of the row, and click. To select several consequent rows, hold down the mouse button and
drag the cursor to include the desired rows
Removing deleted rows- If elements on the list were removed on the remote location, their
status on the Download list will appear as Deleted. To remove all deleted items from the list, click
Remove Deleted
Add New- Click on Add New to select for download all the list items that are marked as New.
(Status = New).
Performing immediate download and Toggling Download on/off:
You can also perform immediate download by using the Download button in
the top button bar.
Download button
Contact Download
Selected Now
Automatic Downloads:
For automatic download configuration, please refer to section 11.6.
TM
Doc. Name: IrriWise
Manager User Manual
Revision: 02
Crop Management Technologies
Page: 71 of 71 pages