1
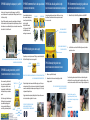
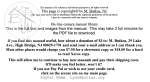
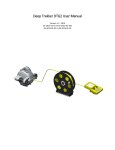
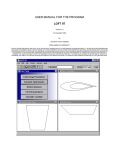
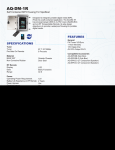
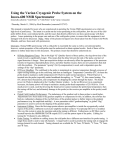
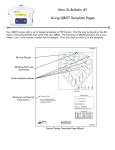
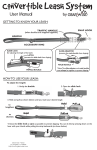
TIP ONE: Remove the shipping screws
(IF YOU ONLY READ ONE PART OF THE GUIDE, THIS SHOULD BE IT.)
1.Turn your ROV upside down so the handles
are facing downward.
2.Use a flathead screwdriver to turn both shipping screws counterclockwise until the heads are against the cover plate.
3. Gently rotate your ROV back to the level position.
TIP TWO: How to charge your ROV and Controller
Remove the charge port plug and insert the charger, the LED will be red
as the ROV charges and turn green
when it is fully charged. Re-insert
the charge port plug to the ROV
before you head out on a dive.
Thank you for purchasing the
The controller has its own
charging cable, again plug it in to the
charging port and the LED light will
illuminate green when the controller
is fully charged.
CHARGING COMPLETELY USUALLY TAKES ABOUT 3 HOURS
DEEP TREKKER DTG2 ROV
WWW.DEEPTREKKER.COM
QUICKSTART GUIDE
We’ve put together some quick tips for you to learn the basics of
discovering the underwater world with the DTG2 ROV. Once you have
mastered this quickstart guide, you will be well on your way
to becoming an expert operator of the only fully portable remotely
operated vehicle on the market.
(always read the user manual)
TIP THREE: Adjusting the bouyancy of your ROV
Before a dive, it is imporant to check the bouyancy of your ROV. It is
easiest to drive when it is completely neutral. Although, some like it to be
a little heavy or light.
Using a Phillips screwdriver, remove the screws holding on to the handles.
Add or remove the ballast plate provided to adjust the bouyancy. Put backthe handles and screws. More ballast plates can be added or removed from
the bottom ‘feet’ of the ROV as well.
SCREW
BALLAST PLATE
IF SWITCHING FROM FRESH TO SALT WATER, ABOUT 4 THICK BALLAST PLATES WILL
BRING THE ROV CLOSE TO NEUTRAL
TIP THREE: Learning how to drive your ROV
(THE MOST IMPORTANT PART OF BEING A DTG2 OPERATOR)
Take a moment to get familar with
the controls to drive the ROV. Don’t
forget you can rotate the camera
independently of the ROV body, this
will be important as you become an
expert.
The thrusters joystick will swim your
ROV in any direction on a horizontal
plane, while the pitching joystick
rotates your whole ROV body and
controls the grabber arm (optional).
RIGHT
LEFT
TIP FIVE: Auto-Heading and Auto Depth
(ONLY APPLICABLE FOR SMART AND WORKER DTG2 PACKAGES)
You must hold both joysticks at
the same time to swim up and
down. If you push the pitching
joystick only half
way the ROV will move at
a 45 degree angle. This will
be helpful when you are
making percise movements.
Auto-heading and depth makes driving a little bit easier for you,
You will know it is enabled when there are parenthesis around
the on-screen units.
TO SWIM UP
TO SWIM DOWN
BACKWARD
DECENDING
ROTATE
GRABBER
ROTATE
GRABBER
ASCENDING
PRESS DOWN ON THE RIGHT JOYSTICK FOR AUTO-DEPTH
TIP FOUR: Adjusting your camera angle
(ONLY APPLICABLE FOR THE WORKER DTG2 PACKAGE)
3. Remove the 4 pins that hold the grabber arm onto the ROV
4.Install the skis on each side of the ROV using the same 4 pins before
you set out on a dive.
At any time you can rotate your camera 270 degrees around the body of the
ROV, the LED flood light also tracks along with it.
GRABBER
OPEN/CLOSE
CAMERA
UP/DOWN
The photo displays how the camera will hold the angle you set it to as you
swim up or down. (In this case the camera stays horizontal). If you want the
camera to automatically look up when you are driving up etc. Set it to stay
in aligment with your thrusters.
Toggle between the two options by holding the fault reset and the cameraback-to-center buttons together for 4 seconds.
PITCHING
TIP SIX (CONTINUED): Removing the grabber arm
PRESS DOWN ON THE LEFT
JOYSTICK FOR AUTO-HEADING
OPTION: SET YOUR CAMERA TO HOLD THE ANGLE YOU SET IT TO WHEN THE ROV PITCHES
OR TRACK IN ALIGMENT WITH YOUR THRUSTERS.
FORWARD
THRUSTERS
TIP THREE (CONTINUED): How to swim up and down
(YES, WITH ONLY TWO THRUSTERS)
THE TOP LEFT JOYSTICK LED WILL TURN
ON FOR A MOMENT, AT THAT POINT
RELEASE BOTH BUTTONS SIMULTANEOUSLY
TIP SIX: Removing the grabber arm
(ONLY APPLICABLE FOR THE WORKER DTG2 PACKAGE)
1. Make sure your ROV is off and dry
2.Remove the electrical connector and plug the port with
the plug provided.*
To reattach the grabber arm, take off the skis and reattach the grabber
with the pins. Then, remove the plug; note the orientation of the pins on the
connector and reconnect the electrical connector. Tighten only by hand only.
*STEP 2 CAUTION: THIS PORT IS ELECTRICALLY ACTIVE,
CONTACTS MUST BE KEPT DRY
Thanks for taking some time
to get to know your Deep Trekker,
we look forward to hearing about your
experiences.
Connect with us!