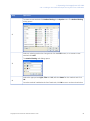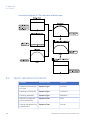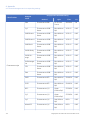
1
GE Healthcare
ImageQuant™ LAS 4000
User Manual
Table of Contents
Table of Contents
1
2
3
4
5
Introduction ..........................................................................................................
5
1.1
Important user information .............................................................................................................
5
The ImageQuant LAS 4000 .................................................................................
11
2.1
2.2
2.3
2.4
The ImageQuant LAS 4000 exterior .............................................................................................
Inside the ImageQuant LAS 4000 .................................................................................................
Connections ............................................................................................................................................
Parts and accessories ........................................................................................................................
11
12
13
16
Exchanging accessory parts ..............................................................................
19
3.1
Changing or installing a filter ..........................................................................................................
3.2
Installing or exchanging the lens ..................................................................................................
3.2.1
Removing the LAS High Sens. lens .............................................................................................
3.2.2
Installing the LAS High Sens. lens ...............................................................................................
3.2.3
Removing the wide view lens .......................................................................................................
3.2.4
Installing the wide view lens .........................................................................................................
3.3
Changing the light sources ..............................................................................................................
3.3.1
Changing the UV transilluminator or white light table ......................................................
3.3.2
Changing the Epi lights ....................................................................................................................
19
20
21
24
26
27
29
30
31
Operating the ImageQuant LAS 4000 ..............................................................
34
4.1
4.2
4.3
4.4
4.5
4.6
4.7
4.8
4.9
4.10
4.11
4.12
4.13
4.14
4.15
4.16
Layout of the ImageQuant LAS 4000 Control Software .....................................................
Preparation for exposure ..................................................................................................................
Calibration ................................................................................................................................................
Placing the sample ...............................................................................................................................
Exposing chemiluminescent samples .........................................................................................
Exposing fluorescent samples (EtBr) ............................................................................................
Exposing fluorescence (Epi illumination) ....................................................................................
Exposing dye stained samples and films (White Epi light) .................................................
Exposing dye stained samples and films (Trans illumination) .........................................
Exposing consecutively (Increment) .............................................................................................
Exposing repeatedly (Repetition) ...................................................................................................
Printing exposed images ...................................................................................................................
Saving exposed images .....................................................................................................................
Ending the session ...............................................................................................................................
Exposing large sample using wide view lens ..........................................................................
Creating a new method and performing flat frame calibration .....................................
34
35
36
37
40
45
51
56
61
66
71
76
77
80
80
84
Software reference guide ...................................................................................
87
5.1
5.2
5.3
5.4
5.5
87
88
89
90
92
Exposure type .........................................................................................................................................
Exposure time .........................................................................................................................................
Add digitization image .......................................................................................................................
Program settings ..................................................................................................................................
Focusing ....................................................................................................................................................
ImageQuant LAS 4000 User Manual 28-9607-42 AC
3
Table of Contents
5.6
5.7
5.8
5.9
5.10
5.11
5.12
5.12.1
5.12.2
5.12.3
5.13
6
Start .............................................................................................................................................................
Sensitivity/Resolution ..........................................................................................................................
Method/Tray position ..........................................................................................................................
File menu ..................................................................................................................................................
Edit menu .................................................................................................................................................
View menu ...............................................................................................................................................
Option menu ...........................................................................................................................................
CCD Calibration ...................................................................................................................................
Flat Frame Calibration .....................................................................................................................
Method Setting ....................................................................................................................................
Help menu ................................................................................................................................................
93
97
98
101
102
109
111
111
112
113
114
Installing ImageQuant LAS 4000 Control Software ....................................... 116
6.1
6.2
6.3
6.4
Installation sequence ..........................................................................................................................
Install ImageQuant LAS 4000 Control Software under Windows™ XP .......................
Install ImageQuant LAS 4000 Control Software under Windows Vista .......................
Install ImageQuant LAS 4000 Control Software under Windows 7 ..............................
116
116
120
124
7
Uninstalling and upgrading ImageQuant LAS 4000 Control Software ....... 133
8
After-sales service ............................................................................................... 136
8.1
8.2
A
136
136
Appendix ................................................................................................................ 137
A.1
A.2
A.3
A.4
A.5
A.6
4
Warranty ...................................................................................................................................................
Repairs .......................................................................................................................................................
Glossary ....................................................................................................................................................
Quick-reference functions ................................................................................................................
Detection Reagents and corresponding settings ..................................................................
Main specifications ..............................................................................................................................
Minimum computer requirements ................................................................................................
Service report fax sheet .....................................................................................................................
137
138
141
143
148
149
ImageQuant LAS 4000 User Manual 28-9607-42 AC
1 Introduction
1
Introduction
The ImageQuant LAS 4000
The ImageQuant LAS 4000 is a camera system for producing digital images of gel or
membrane samples or films. It is used together with the ImageQuant LAS 4000 Control
Software to:
•
Expose chemiluminescent samples or membranes.
•
Expose fluorescent samples using epi (incident) or trans (transmitted) light sources,
for example gels stained by ethidium bromide (EtBr).
The ImageQuant LAS 4000 can be supplied with NIR, Red, Green, Blue and UV epi
lights.
•
Expose dye-stained gels and membranes or films using epi or trans illumination.
•
Expose a sample repeatedly, incrementally or by programming exposure schemes.
Purpose of this manual
The ImageQuant LAS 4000 User Manual provides detailed instructions on using the
ImageQuant LAS 4000 and outlines the functions of the ImageQuant LAS 4000 Control
Software.
Note:
1.1
Be sure to refer also to the manual Getting Started with ImageQuant
LAS 4000 for regulatory information, specifications and the
troubleshooting guide.
Important user information
Read this before using the
ImageQuant LAS 4000
All users must read the safety instructions in Getting started with ImageQuant LAS 4000
before installing, using or maintaining the equipment.
ImageQuant LAS 4000 User Manual 28-9607-42 AC
5
1 Introduction
1.1 Important user information
Do not operate the ImageQuant LAS 4000 in any other way than described in the user
documentation. Otherwise, you may be exposed to hazards that can lead to personal
injury and you may cause damage to the equipment.
Intended use
The ImageQuant LAS 4000 is a camera system that produces digital images of
chemiluminescent, dyed or fluorescent gels and membranes. The ImageQuant LAS 4000
is intended for research use only, and shall not be used in any clinical procedures, or for
diagnostic purposes.
Safety notices
The user documentation contains WARNINGS, CAUTIONS and NOTICES concerning the
safe use of the product. See definitions below.
Warnings
WARNING
WARNING indicates a hazardous situation which, if not avoided,
could result in death or serious injury. It is important not to proceed
until all stated conditions are met and clearly understood.
Cautions
CAUTION
CAUTION indicates a hazardous situation which, if not avoided,
could result in minor or moderate injury. It is important not to
proceed until all stated conditions are met and clearly understood.
Notices
NOTICE
NOTICE indicates instructions that must be followed to avoid
damage to the product or other equipment.
6
ImageQuant LAS 4000 User Manual 28-9607-42 AC
1 Introduction
1.1 Important user information
Regulations and standards supplementary information
This equipment conforms to the regulations and standards described below.
EMC
VCCI Class A Conformance
FCC Part 15B Class A
ICES-003 Class A
IEC 61326-1: 2005
EN 61326-1: 2006
Safety
UL61010-1: second edition
CAN/CSA-C22.2 No. 61010-1, second edition
IEC61010-1: 2001, second edition
IEC61010-2-081, first edition
EN 61010-1: 2001
EN 61010-2-081: 2002
Laser
USA 21 CFR, Chapter I, Subchapter J, Part 1040.10 Laser Products
IEC 60825-1: 2001
CE
LV Directive 2006/95/EC (as amended)
EMC Directive 2004/108/EC (as amended)
Machinery Directive 2006/42/EC
Note:
This equipment has been tested and found to comply with the limits
for a Class A digital device, pursuant to Part 15 of the FCC Rules. These
limits are designed to provide reasonable protection against harmful
interference when the equipment is operated in a commercial
environment. This equipment generates, uses, and can radiate radio
frequency energy and, if not installed and used in accordance with the
instruction manual, may cause harmful interference to radio
communications. Operation of this equipment in a residential area is
likely to cause harmful interference in which case the user will be
required to correct the interference at his own expense.
This Class A digital apparatus complies with Canadian ICES-003. Cet
appareil numérique de la classe A conforme à la norme NMB-003 du
Canada.
Note:
This is a class A product. In a domestic environment this product may
cause radio interference in which case the user may be required to take
adequate measures.
ImageQuant LAS 4000 User Manual 28-9607-42 AC
7
1 Introduction
1.1 Important user information
Information for traceability
Manufacturer:
GE Healthcare
Contact information:
See back cover
Power cable
1
In Japan and North America:
Do not use cables other than the power cable that comes with the equipment.
2
In EU countries:
The cable is given the following CEE Certification Number.
VDE
6522-1570-8035/AIG
DEMKO
116773 ASC
SEMKO
9449029
KEMA
93.6830.04-KCS/LB
NEMKO
P94102620
CEBEC
8652
EI (FIMKO)
179615-02
OVE
0204-515-00
Mercury-containing products label
CAUTION
Ultraviolet ray lamps in this product contain mercury,
which must be recycled or disposed of in accordance
with local, state, or federal laws.
LED safety
This product is categorized as a class 1 laser (LED) device (IEC60825-1+A2:2001).
8
ImageQuant LAS 4000 User Manual 28-9607-42 AC
1 Introduction
1.1 Important user information
LED light sources
Red Epi light
Wavelength 630nm
Class 1
Green Epi light
Wavelength 520nm
Class 1
Blue Epi light
Wavelength 460nm
Class 1
RGB module
Wavelength 630,
520 and 460nm
Class 1
UV Epi light
Wavelength 365nm
Class 1M
NIR Epi light
Wavelength 710nm
Class 1
White Epi light
Wavelength 470-740nm
Class 1
CAUTION
Do not look at the light directly through optical instruments.
CAUTION
If the door is opened and the interlock is cancelled, class 1 laser
(LED) will be emitted.
CAUTION
Use of controls or adjustments or performance of procedures other
than those specified in the user documentation may result in
hazardous radiation exposure.
Notes and tips
Note:
A Note is used to indicate information that is important for trouble-free
and optimal use of the product.
Tip:
A tip contains useful information that can improve or optimize your
procedures.
ImageQuant LAS 4000 User Manual 28-9607-42 AC
9
1 Introduction
1.1 Important user information
Typographical conventions
Software items are identified in the text by bold italic text. A colon separates menu levels,
thus File:Open refers to the Open command in the File menu. Hardware items are
identified in the text by bold text (e.g., Power switch).
10
ImageQuant LAS 4000 User Manual 28-9607-42 AC
2 The ImageQuant LAS 4000
2
The ImageQuant LAS 4000
This chapter describes the features and part names of the ImageQuant LAS 4000
hardware, and the connectors that connect the various parts of the equipment.
2.1
The ImageQuant LAS 4000 exterior
1
2
3
4
5
7
6
Part
Name
Description
1
Camera head
CCD cooling and image data output
2
Indicator panel
Status lights
3
Power LED
Lights when the power is on
4
Busy LED
Lights when an exposure is in progress
5
Error LED
Lights when an error is detected
6
Power switch
7
Intelligent dark box (IDX)
ImageQuant LAS 4000 User Manual 28-9607-42 AC
I
Power ON
O
Power OFF
Dark box
11
2 The ImageQuant LAS 4000
2.2 Inside the ImageQuant LAS 4000
2.2
Inside the ImageQuant LAS 4000
5
1
6
7
2
3
8
4
9
Part
Name
Description
1
Epi light connector
Connects the epi light to the IDX
2
Epi light source
NIR Epi light (710 nm)
Red Epi light (630 nm)
Green Epi light (520 nm)
Blue Epi light (460 nm)
RGB Module (Epi light with red, green and blue LEDs)
UV Epi light (365 nm)
White Epi light
3
Sample tray
Supports the sample
4
Lifting table
Moves the sample to the selected tray position
5
Lens
F0.85/43 mm LAS High Sens. lens, or
F1.8/24 mm wide view lens
12
ImageQuant LAS 4000 User Manual 28-9607-42 AC
2 The ImageQuant LAS 4000
2.2 Inside the ImageQuant LAS 4000
Part
Name
Description
6
Lens connector
Connects lens to IDX
7
Automatic filter
changer
Used to hold filters selected in the control software.
The following filters are commonly used:
IR785 Alexa (filter for NIR LED)
R670 Cy5 (filter for red LED)
575DF20 Cy3 (filter for green LED)
605DF40 EtBr (filter for detecting EtBr)
510DF10 (filter for detecting GFP)
Y515 (filter for blue LED)
L41 UV (filter for UV LED)
8
Trans light source
connector
Connects the UV transilluminator or White light table
to IDX
9
Trans light source
312 nm UV transilluminator
White light table
2.3
Note:
Do not use connectors other than those supplied for the Epi light
sources.
Note:
Do not connect cables other than those supplied to the lens.
Note:
Do not connect anything other than the transmitted light sources to
the transmitted light source connector.
Connections
Camera head
2
1
ImageQuant LAS 4000 User Manual 28-9607-42 AC
13
2 The ImageQuant LAS 4000
2.3 Connections
No.
Name
1
Camera cable
2
USB cable
Note:
Do not connect cables other than the camera cable supplied with the
equipment.
Note:
Do not disconnect the camera cable other than when removing the
camera head.
LAS High Sens. lens
High Sens. lens cable
A cable used for connecting the LAS High Sens. lens and
the IDX. Make sure that the cable is securely connected.
Note:
•
Never remove the cable except when replacing the lens.
•
Be sure to turn off the equipment before replacing the lens.
Epi lights
Connector on Epi light source
The Epi light sources illuminate the object to be imaged
from the upper right and upper left.
Figure 2.1: Incident (Epi)
light source connector
(rear)
The connector is connected to the Epi light source connector inside the IDX.
Epi light source connector
A connector used for connecting the Epi light source.
Power is supplied to the Epi light source through this
connector.
Figure 2.2: Inside the instrument
14
ImageQuant LAS 4000 User Manual 28-9607-42 AC
2 The ImageQuant LAS 4000
2.3 Connections
Note:
•
The Epi light sources for the right and left sides are different.
Attach the appropriate source on respective sides.
•
The connector will be connected when the Epi light source is
inserted. Make sure that the connector is securely connected.
See Section 3.3.2 Changing the Epi lights, on page 31.
•
Be sure to use Epi light sources of the same type for the right
and left sides otherwise an incorrect image will be obtained.
•
Do not insert any connector other than those for the Epi light
sources.
USB cable
USB cable
Connects ImageQuant LAS
4000 and the analysis PC.
Read data will be sent from
ImageQuant LAS 4000 to the
analysis PC through the USB
cable. USB 2.0 is supported.
Analysis PC
Note:
ImageQuant LAS 4000
Connect one end with the ImageQuant LAS 4000 camera
head USB connector, and the
other to a USB port of the
analysis PC.
•
Use the USB cable supplied with the equipment.
•
Do not connect the instrument and the PC via a USB hub.
•
Do not connect USB equipment other than ImageQuant LAS
4000 to the PC. Similarly, do not use other USB equipment connected to the PC while ImageQuant LAS 4000 is in use. This may
result in the loss of image data.
•
The PC must be certified according to UL60950-1 (UL listed) and
IEC60950-1.
ImageQuant LAS 4000 User Manual 28-9607-42 AC
15
2 The ImageQuant LAS 4000
2.4 Parts and accessories
2.4
Parts and accessories
F0.85 43mm LAS high sensitivity lens
Epi tray
Cal plate GR (Pink)
Cal plate DI
Cal plate FL (Green)
White trans tray
NP tray
UV trans tray
Gel sheet
White light table
UV transilluminator
16
ImageQuant LAS 4000 User Manual 28-9607-42 AC
2 The ImageQuant LAS 4000
2.4 Parts and accessories
F1.8 24mm wide view lens
F-mount adapter
Blue Epi light (460 nm), set of two
Green Epi light (520 nm), set of
two
Red Epi light (630nm), set of two
RGB module, Epi lights, set of
two
UV Epi light (365 nm), set of two
NIR Epi light (710 nm), set of two
Filters:
Y515 filter (Y515)
GFP detection filter (510DF10/GFP)
EtBr detection filter (605DF40/EtBr)
Cy3 detection filter (575DF20/Cy3)
Cy5 detection filter (R670BP/Cy5)
Alexa Fluor 750 detection filter (IR785/Alexa)
Ultraviolet protection filter (L41/UV)
ImageQuant LAS 4000 User Manual 28-9607-42 AC
17
2 The ImageQuant LAS 4000
2.4 Parts and accessories
Note:
18
•
The combined accessories and light source vary depending on the
system that you purchase.
•
Make sure to retain the caps and filter cases.
•
Store the incident (Epi) light sources in a container box.
•
The UV trans tray will degrade after many UV illuminations. It can
be used up to approximately 1000 times if each exposure time is 1
second. New trays can be purchased separately.
ImageQuant LAS 4000 User Manual 28-9607-42 AC
3 Exchanging accessory parts
3
Exchanging accessory parts
3.1
Changing or installing a filter
Optical filters are installed in the filter turret localted under the lens inside the IDX. This
section describes how to install or change a filter on the filter turret.
Install a filter in the filter turrent and register it in the ImageQuant LAS 4000 Control
Software as follows:
3
6
2, 5
4
1
Ensure that the camera head and PC are connected. Turn on the instrument and the
PC, and start the ImageQuant LAS 4000 Control Software.
2
Close the instrument door
3
Select Filter Customization in the Option menu in the ImageQuant LAS 4000 Control
Software main window.
4
Click the Filter down button.
ImageQuant LAS 4000 User Manual 28-9607-42 AC
19
3 Exchanging accessory parts
3.1 Changing or installing a filter
The filter changer is lowered.
5
Open the instrument door.
6
Turn the filter changer so the desired position is easily accessible. If a filter is already
in place at this position, unscrew it carefully and put it back in its cover.
7
Screw the new filter into place.
8
Select the appropriate filter from the drop-down list and click the OK button.
Note:
3.2
The filter changer returns to the original position when you click the
Start, Focusing or Method/Tray position buttons.
Installing or exchanging the lens
Two lenses can be used with the ImageQuant LAS 4000, an F0.85 43mm LAS High Sens.
lens, and an optional F1.8 24mm wide view lens. The wide view lens can image samples
up to 250 x 250 mm in size. For all other applications, the LAS High Sens. lens is
recommended. This section describes how to install or exchange the lenses.
20
ImageQuant LAS 4000 User Manual 28-9607-42 AC
3 Exchanging accessory parts
3.2 Installing or exchanging the lens
3.2.1 Removing the LAS High Sens. lens
F0.85 43mm LAS High Sens. lens
3.2.1
F1.8 24mm wide view lens
Removing the LAS High Sens. lens
1
Close the instrument door. If the power is turned off and the filter changer is down,
proceed to step 4.
2
Select Option:Lens Exchange.
A message is displayed.
3
Click OK.
4
Turn off the instrument using the power switch.
ImageQuant LAS 4000 User Manual 28-9607-42 AC
21
3 Exchanging accessory parts
3.2 Installing or exchanging the lens
3.2.1 Removing the LAS High Sens. lens
5
Loosen and remove the lens hood, then place the lens cap over the lens.
Lens hood
Lens cap
6
Disconnect the lens cable connector by rotating the knurling ring.
Knurling ring
Connector of the lens cable
7
Turn the lens slightly to the left and loosen it while pushing the lens release lever.
Lens release lever
22
ImageQuant LAS 4000 User Manual 28-9607-42 AC
3 Exchanging accessory parts
3.2 Installing or exchanging the lens
3.2.1 Removing the LAS High Sens. lens
8
Rotate the lens to the left by 45 degrees.
The lens comes off downward.
Note:
9
Hold the lens with both hands so as to prevent the lens guide from
being damaged.
Take out the lens slowly along the lens guide toward you.
10 Place the end cap on.
End cap
ImageQuant LAS 4000 User Manual 28-9607-42 AC
23
3 Exchanging accessory parts
3.2 Installing or exchanging the lens
3.2.1 Removing the LAS High Sens. lens
Note:
3.2.2
•
Be sure to put the high-sensitivity lens sideways and lower it gently
when placing it on the desk. Placing the lens downward may affect
the mechanical precision of the lens barrel.
•
Make sure that the filter changer has come down far enough to
make room for replacing the lens.
•
Do not let the high-sensitivity lens hang on the lens guide. The lens
may fall causing injury or damage.
•
The high sensitivity lens weighs 4.5 kg. Be careful when handling
it.
Installing the LAS High Sens. lens
1
Close the instrument door.If the power is turned off and the filter changer is down,
proceed to step 4.
2
Select Option:Lens Exchange....
A message is displayed.
Click OK.
3
Turn off the instrument using the power switch.
24
4
Remove the end cap from the lens.
5
Insert the lens along the lens guide with the red points facing towards you.
ImageQuant LAS 4000 User Manual 28-9607-42 AC
3 Exchanging accessory parts
3.2 Installing or exchanging the lens
3.2.2 Installing the LAS High Sens. lens
Red points
6
Raise the lens into position and rotate it clockwise to lock in position.
7
Connect the lens cable.
Turn the knurling ring until it is securely fixed.
Knurling ring
Connector of the lens cable
Note:
Be sure to connect the lens cable. Otherwise, the high sensitivity
lens cannot be recognized. This may cause malfunction of the
equipment.
ImageQuant LAS 4000 User Manual 28-9607-42 AC
25
3 Exchanging accessory parts
3.2 Installing or exchanging the lens
3.2.2 Installing the LAS High Sens. lens
8
Remove the lens cap.
Lens cap
9
Install the lens hood.
Lens hood
3.2.3
26
Removing the wide view lens
1
Close the instrument door. If the power is turned off and the filter changer is down,
proceed to step 4.
2
Select Option:Lens Exchange....
ImageQuant LAS 4000 User Manual 28-9607-42 AC
3 Exchanging accessory parts
3.2 Installing or exchanging the lens
3.2.3 Removing the wide view lens
A message is displayed.
Click OK.
3
Turn off the instrument using the power switch.
3.2.4
4
Remove the F-mount adapter and lens while pushing the release button provided
on the lens.
5
Remove the wide view lens together with the F-mount adapter by rotating it.
6
Remove the lens hood from the lens.
7
Place the lens cap on.
8
Place the end cap on the lens and the cap on the F-mount adapter.
Installing the wide view lens
1
Close the instrument door. If the power is turned off and the filter changer is down,
proceed to step 4.
2
Select Option:Lens Exchange....
ImageQuant LAS 4000 User Manual 28-9607-42 AC
27
3 Exchanging accessory parts
3.2 Installing or exchanging the lens
3.2.4 Installing the wide view lens
A message is displayed.
Click OK.
3
Turn off the instrument using the power switch.
4
Remove the cap attached to the F-mount adapter by turning it to the right.
F-mount adapter
5
Remove the end cap from the wide view lens.
6
Align the White point mark of the F-mount adapter with the lens mark and turn to
lock them together. Hold the lens so that the red point is towards you.
F-mount adapter
Wide view lens
28
ImageQuant LAS 4000 User Manual 28-9607-42 AC
3 Exchanging accessory parts
3.2 Installing or exchanging the lens
3.2.4 Installing the wide view lens
7
Fix the lens in position be turning it to the right.
8
Remove the lens cap.
9
Placel the lens hood on the lens.
Lens hood
3.3
Changing the light sources
Both trans (transmitted) and epi (incident) light sources are available for exposure with
the ImageQuant LAS 4000. This section describes how to change both types of light
source.
The following table summarizes the properties of the various light sources.
Type
Name
Peak wavelength
UV transilluminator
312 nm
White light table
-
Transmitted
ImageQuant LAS 4000 User Manual 28-9607-42 AC
29
3 Exchanging accessory parts
3.3 Changing the light sources
3.3.1 Changing the UV transilluminator or white light table
Type
Incident
Name
Peak wavelength
UV Epi light
365 nm
Blue Epi light
460 nm
Green Epi light
520 nm
Red Epi light
630 nm
RGB module (3-color Epi light)
460nm or
520nm or
630 nm
3.3.1
NIR Epi light
710 nm
White Epi light
-
Changing the UV transilluminator or white light table
The UV transilluminator and white light table are exchanged as follows:
30
1
If neither the UV transilluminator or white light table are currently in place inside the
instrument, proceed to step 4.
2
Turn the lever holding the light source to unlock it.
3
Pull out the light source carefully along the guide while holding it with both hands.
4
Push the desired light source in along the guide at the bottom of the IDX.
ImageQuant LAS 4000 User Manual 28-9607-42 AC
3 Exchanging accessory parts
3.3 Changing the light sources
3.3.1 Changing the UV transilluminator or white light table
5
3.3.2
Turn the lever at the front to lock the light source into position.
Changing the Epi lights
This section describes how to change a set of Epi lights. The RGB module Epi lights are
also installed as described here.
Note:
The tray should be at tray position 4 before installing Epi lights. If the
tray is higher, then it should be lowered to tray position 4 using the
ImageQuant LAS 4000 Control Software before attaching the lights, as
described below.
Latch
Hook
Epi light base
1
If the tray is at Tray position 4, proceed to step 3. Otherwise, close the IDX door.
2
Click on Method/Tray position, set Tray position to 4, and click the OK button.
3
Open the IDX door. If no Epi light is currently in place inside the instrument, proceed
to step 7.
4
Spring up the latch to unlock the Epi light.
ImageQuant LAS 4000 User Manual 28-9607-42 AC
31
3 Exchanging accessory parts
3.3 Changing the light sources
3.3.2 Changing the Epi lights
5
Holding the latch with one hand, remove the Epi light by pulling it gently outwards.
6
Lift up and remove the Epi light.
7
Before installing the new Epi light, ensure that the latch is sprung open (upwards).
8
Hook the hanger located on top of the Epi light to the top edge of the Epi light base.
1
2
32
No.
Action
1
Two guide holes are located on the back of the Epi light base.
2
Slide the hook after attaching the guide pins to the guide holes.
ImageQuant LAS 4000 User Manual 28-9607-42 AC
3 Exchanging accessory parts
3.3 Changing the light sources
3.3.2 Changing the Epi lights
9
Push the Epi light while holding the latch open, and slide it inwards until a click sound
is heard.
10 Lower the latch to lock the Epi light in place.
11 Repeat this process for the opposite side.
Note:
•
The Epi lights are clearly labelled L for the left and R for the right
sides.
•
Install the Epi lights in matching pairs only. If Epi lights with different
wavelengths are used, the intended image will not be obtained.
ImageQuant LAS 4000 User Manual 28-9607-42 AC
33
4 Operating the ImageQuant LAS 4000
4
Operating the ImageQuant LAS
4000
This chapter describes the ImageQuant LAS 4000 Control Software and how to expose
gels, membranes or films to obtain digital images.
4.1
Layout of the ImageQuant LAS 4000 Control Software
The exposure of samples in the ImageQuant LAS 4000, the setting of exposure conditions
and the viewing of the digitized images are performed within the ImageQuant LAS 4000
Control Software.
The following illustration shows the features of the main window of the ImageQuant LAS
4000 Control Software.
1
2
3
4
5
6
7
8
9
10
No.
Description
No.
Description
1
Menu bar
6
The setting state such as the temperature condition of CCD is displayed.
2
Exposure Type
7
The state of the Intelligent dark box (IDX)
is displayed.
8
Method/Tray position
Sets the exposure method
3
Exposure Time
Sets the exposure time.
34
Sets the detection method and tray
position.
ImageQuant LAS 4000 User Manual 28-9607-42 AC
4 Operating the ImageQuant LAS 4000
4.1 Layout of the ImageQuant LAS 4000 Control Software
No.
Description
No.
Description
4
Sensitivity/Resolution
9
Focusing
Sensitivity can be set.
5
Adjusts the focus and position.
Add Digitization Image
10
Start
A digitization image is exposed simultaneously with a chemiluminescence image. (Chemiluminescence method only.)
The software needs to be started once after installing from an account
with administrator priveleges. This is to ensure that necessary folders
and files are created.
Note:
4.2
Starts the exposure.
Preparation for exposure
2
1
Analyzing PC
Step
Operation
1
Turn on the ImageQuant LAS 4000, computer and peripheral equipment.
ImageQuant LAS 4000 User Manual 28-9607-42 AC
35
4 Operating the ImageQuant LAS 4000
4.2 Preparation for exposure
Step
Operation
Start up ImageQuant LAS 4000 Control Software.
2
A message is displayed until the ImageQuant LAS
4000 is ready.
Note:
The power switches of the instrument and PC can be turned on in any
order.
Wait until the CCD has reached the preset cooling temperature and is ready for use.
3
Tip:
4.3
•
The instrument will be ready in a few minutes. The power LED on
the instrument is lit blue when the instrument is ready.
•
Method/Tray position and Focusing can be prepared even if the
CCD has not cooled completely.
•
The Start button can be clicked even when the CCD is not
completely cooled with the EtBr trans method.
Calibration
Ensure that the ImageQuant LAS 4000 is properly calibrated. See Section 5.12.1 CCD
Calibration, on page 111 and Section 5.12.2 Flat Frame Calibration, on page 112.
36
ImageQuant LAS 4000 User Manual 28-9607-42 AC
4 Operating the ImageQuant LAS 4000
4.4 Placing the sample
4.4
Placing the sample
This section describes how to choose an appropriate sample tray, and how to place the
sample for exposure.
1
Select a sample tray suitable for the type of exposure to be performed.
Detection
Sample type
Tray
Chemiluminescence
Membrane
Epi tray
Bioluminescence
Titer plate
NP tray
Fluorescence
Gel (UV Trans illumination)
UV trans tray
Gel (Epi illumination)
Epi tray
Membrane
Epi tray
Membrane
Epi tray
Gel (Coomassie, silver stain)
White trans tray
Digitization
ImageQuant LAS 4000 User Manual 28-9607-42 AC
37
4 Operating the ImageQuant LAS 4000
4.4 Placing the sample
2
Place a sample on the sample tray.
For Epi tray
a
Place the sample directly on the tray.
For UV or White Trans trays
a
Cut out a gel sheet slightly larger than the sample size.
b
Place the gel sheet on the Trans tray.
Gel sheet
c
Place the sample on the gel sheet.
Sample
Gel sheet
Note:
38
The gel sheet can be used repeatedly. After use, wash it with mild
detergent, rinse with water then dry well. A gel sheet can be reused
about 20 times.
ImageQuant LAS 4000 User Manual 28-9607-42 AC
4 Operating the ImageQuant LAS 4000
4.4 Placing the sample
3
Choose the exposure size and tray position
For Epi and Trans trays
•
The readable area varies depending on the tray position. Place the sample in
position according to its size.
Tip:
On the Epi tray, there are round dents marked on the tray for
positioning the sample. Line up the sample using the
appropriate dents.
For NP tray
•
The NP tray is to be used at tray position 3.
Note:
ImageQuant LAS 4000 User Manual 28-9607-42 AC
The readable area will be slightly smaller using the F1.8 wide
view lens.
39
4 Operating the ImageQuant LAS 4000
4.4 Placing the sample
4.5
4
Open the IDX door and insert the tray. Place the Epi or Trans trays in position with
the side with a hole facing outwards.
5
Ensure the lens cap is removed and close the IDX door.
Exposing chemiluminescent samples
This section describes how to take images of chemiluminescent samples. No illumination
is used for this application.
Place a sample on the Epi tray. Put the tray in the ImageQuant LAS 4000 then close the
door.
3
4
5
1
40
2
6
ImageQuant LAS 4000 User Manual 28-9607-42 AC
4 Operating the ImageQuant LAS 4000
4.5 Exposing chemiluminescent samples
Step
Action
Click the Method/Tray position button.
Result: The Method/Tray position dialog opens.
1
•
Select Chemiluminescence for Method.
•
Select Tray position according to the sample.
•
Click the OK button.
ImageQuant LAS 4000 User Manual 28-9607-42 AC
41
4 Operating the ImageQuant LAS 4000
4.5 Exposing chemiluminescent samples
Step
Action
Click the Focusing button.
Result: The focusing controls appear.
2
Check that the sample is correctly postioned and focus the image.
Click the Return button.
Tip:
Click on the image to magnify it. Click on the image again to return
to the original size.
Select Precision for Exposure Type.
3
42
ImageQuant LAS 4000 User Manual 28-9607-42 AC
4 Operating the ImageQuant LAS 4000
4.5 Exposing chemiluminescent samples
Step
Action
Select Auto or Manual for Exposure Time.
Auto
Manual
Select an exposure time from the drop-down list
or enter the exposure time manually. The exposure
time can be set from 0.01 seconds up to 30 hours.
Note:
4
Automatic
exposure
time setting
may not be
possible depending on
the sample
type and
method.
ImageQuant LAS 4000 User Manual 28-9607-42 AC
43
4 Operating the ImageQuant LAS 4000
4.5 Exposing chemiluminescent samples
Step
Action
Select Sensitivity/Resolution.
5
44
Note:
The check box for Add Digitization Image can be checked to also
perform a white-light exposure, for example to image dye-stained
molecular weight markers. In this case the white epi light should be
in place. Leave unchecked if this is not necessary.
Tip:
Select Help:Sensitivity/Resolution.... This opens the following diagram that describes the relation between sensitivity and resolution.
ImageQuant LAS 4000 User Manual 28-9607-42 AC
4 Operating the ImageQuant LAS 4000
4.5 Exposing chemiluminescent samples
Step
Action
Click the Start button.
Result: The exposure is started. The orange Busy LED lights on the instrument during
exposure.
6
Adjust the gradations of the exposed image, then save and print the image.
7
Click the Complete button.
Result: The display returns to the main screen.
4.6
Exposing fluorescent samples (EtBr)
This section describes how to expose ethidium bromide (EtBr) stained samples using the
UV transilluminator (312 nm).
ImageQuant LAS 4000 User Manual 28-9607-42 AC
45
4 Operating the ImageQuant LAS 4000
4.6 Exposing fluorescent samples (EtBr)
Place a gel sheet, which has been cut out to be slightly larger than the sample, onto the
UV trans tray. Place the sample on the gel sheet. Put the tray into the ImageQuant LAS
4000 and close the door.
Note:
The 605DF40 filter is normally used. If this filter is currently not in the
filter turret, it should be installed. Refer to Section 3.1 Changing or
installing a filter, on page 19.
Note:
Ensure that the UV transilluminator is installed. For instructions on
changing the trans light source, see Section 3.3.1 Changing the UV
transilluminator or white light table, on page 30.
3
4
5
1
46
2
6
ImageQuant LAS 4000 User Manual 28-9607-42 AC
4 Operating the ImageQuant LAS 4000
4.6 Exposing fluorescent samples (EtBr)
Step
Action
Click the Method/Tray position button.
Result: The Method/Tray position dialog opens.
1
•
Select Fluorescence as the Method, and choose EtBr from the pull-down menu.
The 605DF40 filter is automatically selected.
•
Select the Tray position.
•
Click the OK button.
ImageQuant LAS 4000 User Manual 28-9607-42 AC
47
4 Operating the ImageQuant LAS 4000
4.6 Exposing fluorescent samples (EtBr)
Step
Action
Click the Focusing button.
Result: The focusing controls appear.
2
Confirm the sample position and focus.
Click the Return button.
Tip:
Click on the image to magnify it. Click on the image again to return
to the original size.
Select Precision for Exposure Type.
3
48
ImageQuant LAS 4000 User Manual 28-9607-42 AC
4 Operating the ImageQuant LAS 4000
4.6 Exposing fluorescent samples (EtBr)
Step
Action
Select Auto or Manual for Exposure Time.
Auto
Manual
Select an exposure time from the drop-down list
or enter the exposure time manually. The exposure
time can be set from 0.01 seconds up to 30 hours.
Note:
4
Automatic
exposure
time setting
may not be
possible depending on
the sample
type and
method.
ImageQuant LAS 4000 User Manual 28-9607-42 AC
49
4 Operating the ImageQuant LAS 4000
4.6 Exposing fluorescent samples (EtBr)
Step
Action
Select Sensitivity/Resolution.
Tip:
Select Help:Sensitivity/Resolution.... This opens the following diagram that describes the relation between sensitivity and resolution.
5
Click the Start button. The orange Busy LED lights on the instrument during exposure.
6
50
ImageQuant LAS 4000 User Manual 28-9607-42 AC
4 Operating the ImageQuant LAS 4000
4.6 Exposing fluorescent samples (EtBr)
Step
Action
Adjust the gradations of the exposed image, then save and print the image.
7
Click the Complete button.
The display returns to the main screen.
Tip:
4.7
If the Method EtBr UV (Trans-illumination) is used, the Start button
can be clicked and exposure taken even if the temperature setting
state of the CCD is Not Ready.
Exposing fluorescence (Epi illumination)
This section describes how to expose fluorescent samples using Epi illumination.
Ensure that the correct Epi lights and filter are installed. See Chapter 3 Exchanging
accessory parts, on page 19.
Place a sample on the Epi tray. Put the tray into the ImageQuant LAS 4000 and close
the door.
Note:
•
Make sure that sample is suitably placed on the tray for the desired
tray position.
•
Ensure that a suitable method exists and that the ImageQuant LAS
4000 is properly calibrated. See Section 4.16 Creating a new method
and performing flat frame calibration, on page 84.
ImageQuant LAS 4000 User Manual 28-9607-42 AC
51
4 Operating the ImageQuant LAS 4000
4.7 Exposing fluorescence (Epi illumination)
3
4
5
1
Step
6
2
Action
Click the Method/Tray position button.
Result: The Method/Tray position dialog opens.
1
•
Select Fluorescence as the Method, choose the appropriate fluorescent marker
and the appropriate light source from the pull-down menus.
The appropriate filter is automatically selected.
52
•
Select the Tray position.
•
Click the OK button.
ImageQuant LAS 4000 User Manual 28-9607-42 AC
4 Operating the ImageQuant LAS 4000
4.7 Exposing fluorescence (Epi illumination)
Step
Action
Click the Focusing button.
Result: the focusing controls appear.
2
Confirm the sample position and focus.
Click the Return button.
Tip:
Click on the image to magnify it. Click on the image again to return
to the original size.
Select Precision for Exposure Type.
3
ImageQuant LAS 4000 User Manual 28-9607-42 AC
53
4 Operating the ImageQuant LAS 4000
4.7 Exposing fluorescence (Epi illumination)
Step
Action
Select Auto or Manual for Exposure Time.
Auto
Manual
Select an exposure time from the drop-down list
or enter the exposure time manually. The exposure
time can be set from 0.01 seconds up to 30 hours.
Note:
4
54
Automatic
exposure
time setting
may not be
possible depending on
the sample
type and
method.
ImageQuant LAS 4000 User Manual 28-9607-42 AC
4 Operating the ImageQuant LAS 4000
4.7 Exposing fluorescence (Epi illumination)
Step
Action
Select Sensitivity/Resolution.
Tip:
Select “Sensitivity/Resolution...” in the Help menu. You can display
Help that describes the relation between sensitivity and resolution.
5
6
Click the Start button. The orange Busy LED lights on the instrument and a progress
dialog is displayed during exposure.
Adjust the gradations of the exposed image, then save and print the image.
7
Click the Complete button.
The display returns to the main screen.
ImageQuant LAS 4000 User Manual 28-9607-42 AC
55
4 Operating the ImageQuant LAS 4000
4.8 Exposing dye stained samples and films (White Epi light)
4.8
Exposing dye stained samples and films (White Epi
light)
This section describes how to expose dye-stained samples using white Epi illumination.
For some applications, such as imaging gels stained with Coomassie Blue dye, results
may not be optimal using the white epi light. If the White trans tray is available, see
Section 4.9 Exposing dye stained samples and films (Trans illumination), on page 61 for
a more optimal method.
Place a sample on the Epi tray. Put the tray in the ImageQuant LAS 4000 then close the
door.
Note:
•
Prior to exposure, click on
the Digitization Epi-illumination tab in Edit:Preference and make sure that
YES is selected for Invert
Pixel-data. If this is set to
NO, the data will not be inverted and the quantitative
value will be reversed.
3
4
5
1
56
2
6
ImageQuant LAS 4000 User Manual 28-9607-42 AC
4 Operating the ImageQuant LAS 4000
4.8 Exposing dye stained samples and films (White Epi light)
Step
Action
Click the Method/Tray position button.
Result: The Method/Tray position dialog opens.
1
•
Select Digitization and Epi-illumination for Method.
•
Select Tray position according to the sample used.
•
Click the OK button.
ImageQuant LAS 4000 User Manual 28-9607-42 AC
57
4 Operating the ImageQuant LAS 4000
4.8 Exposing dye stained samples and films (White Epi light)
Step
Action
Click the Focusing button.
Result: The focusing controls appear.
2
Confirm the sample position and focus.
Click the Return button.
Tip:
Click on the image to magnify it. Click on the image again to return
to the original size.
Select Precision for Exposure Type.
3
58
ImageQuant LAS 4000 User Manual 28-9607-42 AC
4 Operating the ImageQuant LAS 4000
4.8 Exposing dye stained samples and films (White Epi light)
Step
Action
Select Auto or Manual for Exposure Time.
Auto
Manual
Select an exposure time from the drop-down list
or enter the exposure time manually. The exposure
time can be set from 0.01 seconds up to 30 hours.
Note:
4
Automatic
exposure
time setting
may not be
possible depending on
the sample
type and
method.
ImageQuant LAS 4000 User Manual 28-9607-42 AC
59
4 Operating the ImageQuant LAS 4000
4.8 Exposing dye stained samples and films (White Epi light)
Step
Action
Select Sensitivity/Resolution.
Tip:
Select “Sensitivity/Resolution...” in the Help menu. You can display
Help that describes the relation between sensitivity and resolution.
5
6
Click the Start button. The orange Busy LED lights on the instrument and a progress
dialog is displayed during exposure.
Adjust the gradations of the exposed image, then save and print the image.
7
Click the Complete button.
The display returns to the main screen.
60
ImageQuant LAS 4000 User Manual 28-9607-42 AC
4 Operating the ImageQuant LAS 4000
4.9 Exposing dye stained samples and films (Trans illumination)
4.9
Exposing dye stained samples and films (Trans
illumination)
This section describes how to expose dye-stained samples using white trans illumination.
Place a sample on the White trans tray. Put the tray in the IDX and close the door.
3
4
5
1
ImageQuant LAS 4000 User Manual 28-9607-42 AC
2
6
61
4 Operating the ImageQuant LAS 4000
4.9 Exposing dye stained samples and films (Trans illumination)
Step
Action
Click the Method/Tray position button.
Result: The Method/Tray position dialog opens.
1
62
1
Select Digitization:Trans-illumination for Method.
2
Select Tray position according to the sample used.
3
Click the OK button.
ImageQuant LAS 4000 User Manual 28-9607-42 AC
4 Operating the ImageQuant LAS 4000
4.9 Exposing dye stained samples and films (Trans illumination)
Step
Action
Click the Focusing button.
Result: The focusing controls appear.
2
Confirm the sample position and the focus.
Click the Return button.
Tip:
Click on the image to magnify it. Click on the image again to return to
the original size.
Select Precision for Exposure Type.
3
ImageQuant LAS 4000 User Manual 28-9607-42 AC
63
4 Operating the ImageQuant LAS 4000
4.9 Exposing dye stained samples and films (Trans illumination)
Step
Action
Select Auto or Manual for Exposure Time.
Auto
Manual
Select an exposure time from the drop-down list or
enter the exposure time manually. The exposure time
can be set from 0.01 seconds up to 30 hours.
Note:
4
64
Automatic exposure time
setting may
not be possible depending on the
sample type
and method.
ImageQuant LAS 4000 User Manual 28-9607-42 AC
4 Operating the ImageQuant LAS 4000
4.9 Exposing dye stained samples and films (Trans illumination)
Step
Action
Select Sensitivity/Resolution.
Tip:
Select “Sensitivity/Resolution...” in the Help menu. You can display Help
that describes the relation between sensitivity and resolution.
5
6
Click the Start button. The orange Busy LED lights on the instrument and a progress dialog
is displayed during exposure.
ImageQuant LAS 4000 User Manual 28-9607-42 AC
65
4 Operating the ImageQuant LAS 4000
4.9 Exposing dye stained samples and films (Trans illumination)
Step
Action
Adjust the gradations of the exposed image, then save and print the image.
7
Click the Complete button.
The display returns to the main screen.
4.10 Exposing consecutively (Increment)
The Increment exposure type enables a series of images to be exposed consecutively.
The data for each image is added to the previous images to provide accumulated
exposure data. This section describes how to perform this type of experiment.
Place a sample on the appropriate tray. Place the tray in the ImageQuant LAS 4000 then
close the door.
Note:
66
•
Make sure that the tray is placed at the required position.
ImageQuant LAS 4000 User Manual 28-9607-42 AC
4 Operating the ImageQuant LAS 4000
4.10 Exposing consecutively (Increment)
3
4
5
6
1
Step
2
7
Action
Click the Method/Tray position button.
Result: The Method/Tray position dialog is opened.
1
Select the Method and Tray Position.
Click the OK button.
ImageQuant LAS 4000 User Manual 28-9607-42 AC
67
4 Operating the ImageQuant LAS 4000
4.10 Exposing consecutively (Increment)
Step
Action
Click the Focusing button.
Result: The focusing controls appear.
2
Confirm the sample position and focus.
Click the Return button.
Tip:
Click on the image to magnify it. Click on the image again to return
to the original size.
Select Increment for Exposure Type.
3
Select Interval Time unit and enter a numeric value.
4
Note:
68
Interval Time can be entered in the range of 10 seconds to 2 hours.
ImageQuant LAS 4000 User Manual 28-9607-42 AC
4 Operating the ImageQuant LAS 4000
4.10 Exposing consecutively (Increment)
Step
Action
Select Sensitivity/Resolution.
Tip:
Select “Sensitivity/Resolution...” in the Help menu. You can display
Help that describes the relation between sensitivity and resolution.
5
To specify the maximum number of exposures to be taken, check the Set Limit check
box and specify the number of images.
6
ImageQuant LAS 4000 User Manual 28-9607-42 AC
69
4 Operating the ImageQuant LAS 4000
4.10 Exposing consecutively (Increment)
Step
Action
Click the Start button to begin exposure.
The index view and expanded view can be switched by clicking the Index or Image
tab.
Note:
Index view
The displayed expanded image is the latest image.
Image view
7
Exposure automatically stops after the number of images set in Repeat Limit.
70
Note:
Clicking the Stop button cancels the current exposure.
Tip:
It is possible to stop exposures automatically when the image is
saturated. This function is activated in Edit:Preference under the
Increment tab.
ImageQuant LAS 4000 User Manual 28-9607-42 AC
4 Operating the ImageQuant LAS 4000
4.10 Exposing consecutively (Increment)
Step
Action
Tip:
During exposure, the gradation conversion curve can be changed
and the gradation adjusted.
When the Apply All button is clicked, the adjusted gradation will be
applied to all images.
1
2
3
4
5
No.
Description
No.
Description
1
The range can be
changed by dragging
the mouse.
4
The changed gradation
is applied to all images.
2
The gradation conversion curve can be toggled between Linear or
Sigmoid.
5
Return to initial setting.
3
The gradation can be
changed by dragging
the mouse.
Adjust the gradations of the exposed image(s) as described above, then save and print
the image(s).
8
Click the Complete button.
The display returns to the initial screen.
Note:
Only the last 100 images can be kept. Previous images are discarded.
4.11 Exposing repeatedly (Repetition)
The Repetition exposure type enables a series of images to be exposed consecutively.
Each image is recorded separately and data is not accumulated. This section describes
how to perform this type of experiment.
Place a sample on the tray that you selected according to the type of a sample. Put the
tray in the ImageQuant LAS 4000 then close the door.
Note:
•
Make sure that the tray is placed at the required position.
ImageQuant LAS 4000 User Manual 28-9607-42 AC
71
4 Operating the ImageQuant LAS 4000
4.11 Exposing repeatedly (Repetition)
3
4
5
6
1
Step
2
7
Action
Click the Method/Tray position button.
Result: The Method/Tray position dialog is opened.
1
Select the Method and Tray Position.
Click the OK button.
72
ImageQuant LAS 4000 User Manual 28-9607-42 AC
4 Operating the ImageQuant LAS 4000
4.11 Exposing repeatedly (Repetition)
Step
Action
Click the Focusing button.
Result: The focusing controls appear.
2
Confirm the sample position and focus.
Click the Return button.
Tip:
Click on the image to magnify it. Click on the image again to return
to the original size.
Select Repetition for Exposure Type.
3
Select Interval Time unit and enter a numeric value.
4
Note:
Interval Time can be entered in the range of 10 seconds to 2 hours.
ImageQuant LAS 4000 User Manual 28-9607-42 AC
73
4 Operating the ImageQuant LAS 4000
4.11 Exposing repeatedly (Repetition)
Step
Action
Select Sensitivity/Resolution.
Tip:
Select “Sensitivity/Resolution...” in the Help menu. You can display
Help that describes the relation between sensitivity and resolution.
5
To specify the maximum number of exposures to be taken, check the Set Limit check
box and specify the number of images.
6
74
ImageQuant LAS 4000 User Manual 28-9607-42 AC
4 Operating the ImageQuant LAS 4000
4.11 Exposing repeatedly (Repetition)
Step
Action
Click the Start button to begin exposure.
The index view and expanded view can be switched by clicking the Index or Image
tab.
Note:
The displayed expanded image is the latest image.
Index view
Image view
7
Exposure automatically stops after the number of images set in Repeat Limit.
Note:
Clicking the Stop button cancels the current exposure.
ImageQuant LAS 4000 User Manual 28-9607-42 AC
75
4 Operating the ImageQuant LAS 4000
4.11 Exposing repeatedly (Repetition)
Step
Action
Tip:
During exposure, the gradation conversion curve can be changed
and the gradation adjusted.
When the Apply All button is clicked, the adjusted gradation will be
applied to all images.
1
2
3
4
5
No.
Description
No.
Description
1
The range can be
changed by dragging
the mouse.
4
The changed gradation
is applied to all images.
2
The gradation conversion curve can be toggled between Linear or
Sigmoid.
5
Return to initial setting.
3
The gradation can be
changed by dragging
the mouse.
Adjust the gradations of the exposed image, then save and print the image.
8
Click the Complete button.
The display returns to the initial screen.
Note:
Only the last 100 images can be kept. Previous images are discarded.
4.12 Printing exposed images
The exposed image can be output as a full-scale print or screen print (the window
displayed on the screen). The print can be done using the Print button displayed in the
post-exposure state or the File:Print. This section describes how to print an image.
Step
1
76
Action
For a screen print, first display the window you wish to output.
Click the Print button or select Print from the File menu.
ImageQuant LAS 4000 User Manual 28-9607-42 AC
4 Operating the ImageQuant LAS 4000
4.12 Printing exposed images
Step
Action
Select the output setting for the printer and the type (full-scale print, paper-size print
or screen print). Click the OK button.
Full-scale print
Paper-size print
Screen print
2
The Print dialog is displayed. Choose settings for the printer and click the Print button.
The image is printed.
Tip:
Exposure information is printed together with the image (except for
the Easy Print option). This is convenient since it is unnecessary to
note the exposure information and the conditions. The following
exposure information is included:
Exposure date, camera serial number, lens type, cooling temperature
at the time of exposure, exposure type, sensitivity, exposure time (or
interval time), name of Method, tray position number, values at both
ends of the range scope, values at both ends of the gradation, type
of gradation, Control Software version number.
Nov Wed 25 15:25:14 2009 Serial#1234567 FUJINON VRF43LMD Cooling:-25C Precision Standard
1sec Chemiluminescence Tray Position 1
Range:512-4607 Gradation:512-4607 Linear ImageQuant LAS 4000 mini 1.1.0.17
Image
4.13 Saving exposed images
The exposed image can be saved using the Save button displayed in the post-exposure
state or by File:Save. This section describes how to save an image.
Step
Action
1
Click on the Save button or select File:Save.
ImageQuant LAS 4000 User Manual 28-9607-42 AC
77
4 Operating the ImageQuant LAS 4000
4.13 Saving exposed images
Step
Action
When the Save Function screen is displayed, select one of the following 3 saving methods
to save the photographed image.
Click Next button.
1
2
3
4
5
No.
Description
No.
Description
1
Save Selected Image
4
Save Images in temporary folder
(Max84)
(Exposure Type: Increment, Repetition, Program)
2
Image files not displayed in the
Index view are saved in the 100
latest images (maximum 84 files).
For multiple files, specify the
range of files to be saved.
2
Save Display image (Max16)
(Exposure Type: Increment, Repetition, Program)
All image files displayed in the index view are saved (maximum 16
files).
3
5
Comment
When the file is saved in gel format (*.gel), a comment can be
entered in the file.
When the file is saved in TIFF format, the comment will not be
saved.
Make Increment Image
(Exposure Type: Program only)
Files of multiple exposures are
accumulated and saved.
The range of image files to be
processed in accumulation can
be specified.
78
ImageQuant LAS 4000 User Manual 28-9607-42 AC
4 Operating the ImageQuant LAS 4000
4.13 Saving exposed images
Step
Action
The Save dialog is displayed. Type in a File name and press the Save button to save the
file.
1
2
3
3
No.
Description
1
Select where to save the file.
2
The file name is set automatically but may be replaced.
File names for single and programmed exposures are automatically
set in the format <FileName>_n, where n is the next available index.
For images taken in exposure type Increment, file names are automatically set in the format <FileName>_n_N_<TotalTime>, where n is the
next available index, N the total number of exposures and TotalTime
is the total exposure time for the image.
3
Select a file format. The .gel format is a GE Healthcare format that
records details of the exposure. Such details are not saved in .tif format.
Tip:
To automatically launch an external application to view images upon
saving, refer to Launch Applicaton, on page 105.
Note:
Special characters such as \, *, / or other characters that have a special
meaning in Windows should not be used in a file name.
ImageQuant LAS 4000 User Manual 28-9607-42 AC
79
4 Operating the ImageQuant LAS 4000
4.14 Ending the session
4.14 Ending the session
This section describes how to end the current session with the ImageQuant LAS 4000.
The instrument should be switched off as described below when it will not be used for
some time.
Step
Operation
Select Quit from the File menu.
1
Select Stop the CCD cooling now and click OK.
2
Tip:
When Keep the CCD cooling after quit is selected, the cooling temperature of the CCD will be maintained and the instrument can be
used straight away the next time the ImageQuant LAS 4000 Control
Software is started. In this case, do not turn off the ImageQuant LAS
4000. However, if the instrument will not be used for a long period,
it should be turned off.
3
Shut down the computer.
4
Switch the ImageQuant LAS 4000 off using the power switch.
4.15 Exposing large sample using wide view lens
A larger sample (of up to 250 x 250 mm) can be exposed by replacing a high-sensitivity
lens with a wide view lens. This section describes how to expose large samples.
Step
Action
1
Install the wide view lens. See Section 3.2 Installing or exchanging the lens, on page 20.
80
ImageQuant LAS 4000 User Manual 28-9607-42 AC
4 Operating the ImageQuant LAS 4000
4.15 Exposing large sample using wide view lens
Step
Action
Place a sample on the tray that you selected according to the light source used.
Put the tray in IDX and close the door.
2
Click the Method/Tray position button.
3
1
Select the Method, Light source, Filter, Iris, and Tray position.
2
If FlatFrame Mode is set to manual in Edit:Preference, click the Next button.
3
Select the appropriate Flat Frame file.
4
Click the OK button.
ImageQuant LAS 4000 User Manual 28-9607-42 AC
81
4 Operating the ImageQuant LAS 4000
4.15 Exposing large sample using wide view lens
Step
Action
Click the Focusing button.
Using for example some printed text on the sample tray, turn the lens while viewing the
screen, and adjust the focus manually.
4
Click the Return button.
Tip:
Click on the image to magnify it. Click on the image again to return to
the original size.
Select Exposure Type.
5
6
82
Set the Exposure Time or Interval Time.
ImageQuant LAS 4000 User Manual 28-9607-42 AC
4 Operating the ImageQuant LAS 4000
4.15 Exposing large sample using wide view lens
Step
Action
Select Sensitivity/Resolution.
Tip:
Select Sensitivity/Resolution... in the Help menu. You can display Help
that describes the relation between sensitivity and resolution.
7
8
Click the Start button.
Exposure is started.
ImageQuant LAS 4000 User Manual 28-9607-42 AC
83
4 Operating the ImageQuant LAS 4000
4.15 Exposing large sample using wide view lens
Step
Action
Adjust the gradations of the exposed image, then save and print the image.
Click the Complete button.
9
The display returns to the main screen.
4.16 Creating a new method and performing flat frame
calibration
For most purposes a pre-existing method will be sufficient. For other filter, light source
and iris combinations a new method needs to be created. The following describes how
to create a new method and perform a Flat Frame calibration.
Step
Operation
In Preference in the Edit menu, select FlatFrame mode, and set this to Manual.
1
84
ImageQuant LAS 4000 User Manual 28-9607-42 AC
4 Operating the ImageQuant LAS 4000
4.16 Creating a new method and performing flat frame calibration
Step
Operation
To create a new method click Method Setting in the Option menu. The Method Setting
dialog opens.
2
Select an existing method to change and click the Edit button, or to create a new
method click Add.
The Method Setting edit dialog opens.
3
4
Select the appropriate Light, Filter and Iris, edit the Name for the method and click
OK.
Once the method is added to the list of methods, click OK to return to the main window.
ImageQuant LAS 4000 User Manual 28-9607-42 AC
85
4 Operating the ImageQuant LAS 4000
4.16 Creating a new method and performing flat frame calibration
Step
Operation
Insert the calibration plate appropriate for the light source into the ImageQuant LAS
4000.
5
Light source
Calibration plate
Red Epi light
Cal plate GR (pink)
Green Epi light
Cal plate GR (pink)
Blue Epi light
Cal plate FL (green)
RGB module
Use the Cal plate that corresponds to the chosen wavelength
(red, green or blue)
NIR Epi light
Cal plate GR (pink)
UV Epi light
Cal plate FL (green)
White Epi light
Cal plate DI (white)
Close the door of the instrument.
Note:
Ensure the the appropriate lights and filter are in place.
To perform a Flat Frame calibration, select FlatFrame Calibration in the Option menu.
The FlatFrame Calibration dialog opens.
6
Note:
Administrator priveleges are required in order to perform a Flat Frame
calibration.
7
Select the method to calibrate from the drop-down list. Choose which tray positions
to calibrate, then click Start to begin the calibration.
8
Once the calibration is complete, click the Close button to close the dialog. The calibration plate can now be removed.
86
ImageQuant LAS 4000 User Manual 28-9607-42 AC
5 Software reference guide
5
Software reference guide
5.1
Exposure type
This function is for selecting exposure methods. There are four types of exposure methods.
Exposure
Type
Description
Precision
Exposes for the entire time set in Exposure Time.
Increment
Exposes for each time set in Interval Time and accumulates images.
Repetition
Exposes for each interval time set in Interval Time and displays
images for each section.
Program
Exposure is made for the desired time and exposure intervals. A file
is created automatically for each read image, and the file of accumulated images is also saved automatically.
ImageQuant LAS 4000 User Manual 28-9607-42 AC
87
5 Software reference guide
5.1 Exposure type
5.2
Exposure time
This function is for setting the exposure time.
When exposure type is precision
•
88
Auto: The exposure time is automatically calculated by histogram analysis.
ImageQuant LAS 4000 User Manual 28-9607-42 AC
5 Software reference guide
5.2 Exposure time
•
Manual: Select a suitable exposure time from the drop-down list. Alternatively select
a time unit and type in an exposure time.
When exposure type is increment
or repetition
Choose a time unit from the drop-down list and enter an interval time.
5.3
Tip:
The interval time can be set from 10 seconds to 2 hours. For a UV
transmitting light source, the interval time can be set from 10 seconds
to 1 minute.
Note:
An image can be exposed for up to 30 hours in Precision mode.
However, the image quality and quantitative performance are only
guaranteed for a maximum of 2 hours.
Add digitization image
A chemiluminescence and a white-light epi-illuminated image are exposed by single-click
operation when this function is set to ON. After exposure, both chemiluminescence and
white epi-illuminated images can be saved.
This function can be used only when the method is chemiluminescence.
ImageQuant LAS 4000 User Manual 28-9607-42 AC
89
5 Software reference guide
5.3 Add digitization image
Tip:
5.4
Click on Digitization Epi-illumination in Preference in the Edit menu,
and select YES for Invert Pixel-data.
Program settings
Program Settings are used to set exposure time and exposure intervals when Program
mode is selected as Exposure Type. The input settings are saved as a template file.
12
11
1
10
2
3
9
4
8
5
90
6
7
ImageQuant LAS 4000 User Manual 28-9607-42 AC
5 Software reference guide
5.4 Program settings
No.
Description
No.
Description
1
A template file is selected. If a new
template is to be created, select New
Template.
7
Select the image file format to be saved.
When the selected
template is modified,
Modified will be displayed.
Note:
2
Set exposure intervals. This is the time
from the shutter closure until the start
of the next exposure.
Two types of format
can be selected, the
GE Healthcare gel
format (*.gel) and a
linear 16-bit
grayscale tiff file format (*.tif).
8
Close the settings window.
9
Enter a file name to be saved.
The wait time can be
set within the range
of 0 seconds to 30
hours.
Note:
3
Note:
Set exposure time.
This can be set within
the range of 0.01
seconds to 30 hours.
Note:
4
Save the template.
10
Enter a comment.
5
Settings will return to the initial settings.
11
Select the number of frames (between
1 and 16) to be preset.
6
Folder in which the template is saved
12
Select detection sensitivity.
Delete a template
Navigate to the folder chosen in step 6 above and delete the template file.
The default locations are as follows:
•
For Windows XP
C:\Document and Settings\All users\Application Data\GE Healthcare\ImageQuant
LAS 4000\ProgramTemplate
•
For Windows Vista
C:\GE Healthcare\ImageQuant LAS 4000\ProgramTemplate
ImageQuant LAS 4000 User Manual 28-9607-42 AC
91
5 Software reference guide
5.5 Focusing
5.5
Focusing
The Brightness function enables adjustment of the brightness of the Focusing screen,
and the Adjust function enables adjustment of the focus when the LAS High Sens. lens
is used.
1
2
3
4
5
No.
Description
No.
Description
1
Click on the image to expand or reduce
the display.
4
Coarse adjustment of focus.
2
The view of the focusing screen becomes darker.
5
Fine adjustment of focus
3
The view of the focusing screen becomes lighter.
Tip:
Select Pan Focus Fast in the View menu. The focusing speed then
increases.
This is effective for the alignment of a sample (see Pan Focus Fast, on
page 110).
Note:
92
•
When the NP tray is used, adjust so that the bottom of a plate is
focused. Adjustment using a printed paper facilitates focusing.
•
Check the tray positions to be exposed in advance.
ImageQuant LAS 4000 User Manual 28-9607-42 AC
5 Software reference guide
5.6 Start
5.6
Start
Exposure starts when you click the Start button.
During exposure (type Precision)
During exposure, a progress bar and ending time are displayed to indicate the progress
status of exposure.
Click Cancel to discontinue exposure. The current image is not saved.
ImageQuant LAS 4000 User Manual 28-9607-42 AC
93
5 Software reference guide
5.6 Start
During exposure (type Increment
or Repetition)
7
1
2
3
4
5
8
6
No.
Description
No.
Description
1
Range Scope can be changed by dragging the mouse.
5
The changed gradation is applied to all
images.
2
Gradation can be changed by dragging
the mouse.
6
Exposure is discontinued.
3
Gradation conversion curve can be
changed (linear or sigmoidal).
7
Click this tab to enter index view.
4
Returns the gradation to the initial setting.
8
Click this tab to magnify the selected
image.
Tip:
Note:
94
The current image is discarded.
•
Exposure is interrupted when you click the Stop button during
Precision exposure. In this case, the image in course of exposure
is not saved.
•
When you click the Apply All button during magnified image
display, the gradation changed in the expanded image display
state is applied to all magnified images.
Only the 100 latest exposed images can be saved for exposure types
Increment and Repetition.
ImageQuant LAS 4000 User Manual 28-9607-42 AC
5 Software reference guide
5.6 Start
During exposure (type Program)
10
9
6
1
2
3
4
5
8
7
No.
Description
No.
Description
1
The range can be changed by dragging
the mouse.
6
Exposure is discontinued.
2
Gradation can be changed by dragging
the mouse.
7
Click this tab to enter index view.
3
The gradation conversion curve can be
changed (linear or sigmoidal).
8
Click this tab to magnify the latest image.
4
Return to initial setting.
9
Preset conditions.
5
The changed gradation is applied to all
images.
10
The area where an image will be displayed.
Tip:
Note:
The current image is discarded.
•
Images for which exposure is completed are automatically saved
in a file with name format:
<FileName>_<PhotographNo.>_<ExposureTime>
•
An image, which is the accumulation of all exposed images is
saved in a file with name format:
<FileName>_<Sum>_<TotalExposureTime>
Only the 16 latest exposed images can be saved for exposure type
Program.
ImageQuant LAS 4000 User Manual 28-9607-42 AC
95
5 Software reference guide
5.6 Start
After exposure (type Precision)
1
4
2
5
3
6
No.
Description
No.
Description
1
The range can be changed by dragging
the mouse.
4
Print image or screen.
2
Gradation can be changed by dragging
the mouse.
5
Save image.
3
The gradation conversion curve can be
changed (linear or sigmoidal).
6
Return to main screen.
96
ImageQuant LAS 4000 User Manual 28-9607-42 AC
5 Software reference guide
5.6 Start
After exposure (type Increment,
Repetition or Program)
For magnified image view
For index image view
9
8
7
1
2
4
3
6
5
No.
Description
No.
Description
1
The range can be changed by dragging
the mouse.
6
Return to main screen.
2
Gradation can be changed by dragging
the mouse.
7
Save image.
3
The gradation conversion curve can be
changed (linear or sigmoidal).
8
Print image or screen.
4
The changed gradation is applied to all
images.
9
The selected image is marked by a yellow frame. Click on an image to select
it. Double-click an image or click the
Image tab to open the magnified image
view.
5
Returns the gradation to the initial setting.
5.7
Sensitivity/Resolution
This function sets the sensitivity and resolution.
The relation between the sensitivity and resolution is shown below.
ImageQuant LAS 4000 User Manual 28-9607-42 AC
97
5 Software reference guide
5.7 Sensitivity/Resolution
File size for each sensitivity
Tip:
5.8
High Resolution
12.6MB
Standard
3.15MB
High
3.15MB
Super
3.15MB
Ultra
3.15MB
High Binning
786MB
Super Binning
197MB
Ultra Binning
49.2MB
Select Sensitivity/Resolution… in the Help menu. The relation between
the sensitivity and resolution is displayed.
Method/Tray position
The window for setting the method and tray position is displayed when you click the
Method/Tray position button. Select a method and tray position most suitable for the
sample and click the OK button.
98
ImageQuant LAS 4000 User Manual 28-9607-42 AC
5 Software reference guide
5.8 Method/Tray position
Set the method and tray position
Method
The method (the combination of the optimum light source, filter, and iris) is registered
for each detection method. When a method is selected, the light source, filter, and iris
are set automatically. The contents of each setting are shown in the table below.
Note:
The RGB module may be used instead of the separate red, green and
blue Epi lights.
Method
Option
Light
Filter
Iris
None
Through
F0.85
SYBR Green
Blue (460nm Epi)
Y515 Di
F0.85
GFP
Blue (460nm Epi)
510DF10
F0.85
EtBr
UV (312nm Trans-illumination)
605DF40
F2.8
Cy2
Blue (460nm Epi)
Y515 Di
F0.85
Cy3
Green (520nm Epi)
575DF20
F0.85
Cy5
Red (630nm Epi)
R670
F0.85
Dy781
NIR (710nm Epi)
IR785
F0.85
DAPI
UV (365nm Epi)
L41
F2.8
Chemiluminescence
Fluorescence
ImageQuant LAS 4000 User Manual 28-9607-42 AC
99
5 Software reference guide
5.8 Method/Tray position
Method
Option
Light
Filter
Iris
Digitization
Epi-illumination
White (Epi-illumination)
Through
F2.8
Trans-illumination
White (Trans-illumination)
Through
F2.8
Note:
The method that can be used varies depending on the state of the light
source set in IDX. Unusable options cannot be selected.
Note:
Before clicking the OK button, be sure to close the IDX door.
Note:
Filter position 1 is dedicated for chemiluminescence. Do not put a filter
in it.
Tray position
The tray position is changed according to the sample size.
The tray size that can be read varies depending on the tray position.
Position
Width (mm)
Length (mm)
1
105
70
2
144
96
3
180
120
4
210
140
250 (wide view lens)
250 (wide view lens)
250mm 250mm
210mm 140mm
180mm 120mm
144mm 96mm
105mm 70mm
Maximum exposure size when a wide view lens is used
100
ImageQuant LAS 4000 User Manual 28-9607-42 AC
5 Software reference guide
5.8 Method/Tray position
Tip:
•
The display on the main window changes to reflect the current
choice of method and tray position.
•
The NP tray is to be used at tray position 3 using the
Chemiluminescence method and the NP check box should be
checked. The tray will not be detected otherwise.
Manual flat frame mode
In order to be able to manually specify a Flat frame file for the method and tray position,
set FlatFrame Mode to Manual in Edit:Preference. Click Next in the Method/Tray position
dialog to select the appropriate Flat Frame Correction.
Tip:
Only Flat Frame files that satisfy the currently selected exposure
conditions are displayed in the Flat Frame Correction list.
To create a Flat Frame file, see the description of the Flat Frame
Calibration function, Section 5.12.2 Flat Frame Calibration, on page 112.
Note:
5.9
Before clicking the OK button, be sure to close the instrument door.
File menu
Page Setup
Opens the settings for the printer, for example the direction of paper.
ImageQuant LAS 4000 User Manual 28-9607-42 AC
101
5 Software reference guide
5.9 File menu
Print
Outputs an image to a printer.
The image can be printed as a full-scale print or screen print. For the output method,
see Section 4.12 Printing exposed images, on page 76.
Save
Saves a file. The default setting for the file format to be saved is that selected in Preference
in the Edit menu. See Section 5.10 Edit menu, on page 102.
Quit
Exits ImageQuant LAS 4000 Control Software.
5.10 Edit menu
Cut
Cuts the selected characters. This function can be used during manual input of exposure
time and interval.
Copy
Copies the selected characters. This function can be used during manual input of exposure
time and interval.
Paste
Pastes the copied characters. This function can be used during manual input of exposure
time and interval.
102
ImageQuant LAS 4000 User Manual 28-9607-42 AC
5 Software reference guide
5.10 Edit menu
Preference
The available settings can be viewed by clicking the respective item.
CCD Cooling
Sets the CCD temperature.
Root Folder
Sets the folder in which files are saved.
ImageQuant LAS 4000 User Manual 28-9607-42 AC
103
5 Software reference guide
5.10 Edit menu
File Format
Select the default format for saving images.
•
Gel File Format (*.gel)
Linear 16-bit grayscale encoding. Can include additional information compared to
.tif format.
•
Original Image TIFF File-Linear 16bit Gray (*.tif)
This is a 16-bit TIFF format.
•
Window Image TIFF File-8bit Color (*.tif)
This is a TIFF format that has an eight-bit color gradation.
The changed gradation can be saved directly.
104
ImageQuant LAS 4000 User Manual 28-9607-42 AC
5 Software reference guide
5.10 Edit menu
FlatFrame Mode
Option
Description
Auto
Optimal correction data is automatically set.
Manual
Correction data can be selected in the Flat Frame selection screen.
Launch Applicaton
This option can be used to automatically launch an external application when an image
is saved.
To define an application to launch, do the following:
ImageQuant LAS 4000 User Manual 28-9607-42 AC
105
5 Software reference guide
5.10 Edit menu
•
Select the application to be launched from the drop down list, or locate the application
using the Select... button.
•
Check the Activate save and launch function checkbox.
Print Adjust
Adjusts the print output size.
106
ImageQuant LAS 4000 User Manual 28-9607-42 AC
5 Software reference guide
5.10 Edit menu
Increment
Option
Description
YES
During incremental imaging, exposure is automatically stopped when the amount
of saturated data is too large.
NO
During incremental imaging, exposure is continued until the Stop button is pressed.
ImageQuant LAS 4000 User Manual 28-9607-42 AC
107
5 Software reference guide
5.10 Edit menu
Digitization EPI
Option
Description
YES
Pixel data inversion is performed.
NO
Pixel data inversion is not performed.
Timer
If the ImageQuant LAS 4000 is not used during the chosen time, the cooling will be
automatically shut off and the system will enter power saving mode.
108
ImageQuant LAS 4000 User Manual 28-9607-42 AC
5 Software reference guide
5.10 Edit menu
Auto Range
An image whose gradations are adjusted automatically is displayed when exposure type
is Increment or Repetition.
•
None
An image is displayed without adjusting its gradations.
•
Semiautomated
An image is displayed with its light and shade highlighted.
•
Automated
An image is displayed with its light and shade more highlighted. (The effect is the
same as when exposure type is Precision.)
5.11 View menu
Paint saturated data red
This function toggles whether to display saturated data in red.
Negative Gray
This sets the display color of an image such that absorbing bands are darker and the
background lighter.
ImageQuant LAS 4000 User Manual 28-9607-42 AC
109
5 Software reference guide
5.11 View menu
Positive Gray
This sets the display color of an image such that absorbing bands are lighter and the
background darker.
Red
This sets the display color of an image such that illuminated regions are displayed in
red.
Green
This sets the display color of an image such that illuminated regions are displayed in
green.
Blue
This sets the display color of an image such that illuminated regions are displayed in
blue.
Pan Focus All
This function toggles the quality of a focus image. The image is displayed in high image
quality when this option is selected.
Pan Focus Fast
This function toggles the quality of a focus image. With this option selected the image
quality is lower than using Pan Focus All, but it is displayed faster.
Tip:
110
During sample alignment, a sample can be quickly aligned when Pan
Focus Fast is selected.
ImageQuant LAS 4000 User Manual 28-9607-42 AC
5 Software reference guide
5.12 Option menu
5.12 Option menu
5.12.1 CCD Calibration
This function creates a correction file that is used for correcting characteristics of the
CCD detector. The created correction file varies depending on the sensitivity, exposure
time (short or long), and CCD cooling temperature.
1
When CCD Calibration is selected in the Option menu, the following window is
shown.
5
3
1
4
2
2
No.
Description
No.
Description
1
Click here to check the boxes
for all resolutions for up to 2
hours.
4
Click here to check the boxes
for all resolutions for more
than 2 hours.
2
The time required for creation
is displayed.
5
Click on the buttons in this
column to check the boxes for
both correction files for specific resolutions.
3
Check individual check boxes
to generate specific correction
files.
Click the Start button to generate the file.
•
The progress of file creation is shown on the progress bar.
•
To stop file creation, click the Stop button. The file will not be saved.
ImageQuant LAS 4000 User Manual 28-9607-42 AC
111
5 Software reference guide
5.12 Option menu
5.12.2 Flat Frame Calibration
5.12.2 Flat Frame Calibration
This function creates a correction file (Flat Frame) that is required for correcting the
optical characteristics. The Flat Frame file varies depending on Light, Filter, Iris, and Tray
Position.
Note:
Administrator priveleges are required to perform Flat Frame calibration.
Flat Frame Calibration
1
Select Flat Frame Calibration in the Option menu. The window below is then
displayed.
2
Select a method from the drop-down menu at the top.
3
Put the displayed tray and Calibration Plate in the instrument.
4
Select the condition to be created.
5
Click the Start button.
Note:
112
Make sure that an appropriate filter and tray are in place.
6
A message window opens when the calibration is completed. Click OK.
7
Click the Close button to close the FlatFrame Calibration window.
ImageQuant LAS 4000 User Manual 28-9607-42 AC
5 Software reference guide
5.12 Option menu
5.12.2 Flat Frame Calibration
Flat Frame Calibration Pro
1
If FlatFrame Calibration Pro is selected in the Option menu, the window of the
conditions preset in the Method/Tray position window will be displayed.
2
Put the appropriate tray and calibration plate in the instrument.
3
Set the exposure time.
4
Enter a file name.
5
Click the Start button.
5.12.3 Method Setting
Method Setting is used to set the content displayed on the Method/Tray position screen.
•
To delete a method, select the method to be deleted and click Delete.
Note:
•
Only user-defined methods can be deleted.
To edit a method, select the method to be edited and click Edit.
ImageQuant LAS 4000 User Manual 28-9607-42 AC
113
5 Software reference guide
5.12 Option menu
5.12.3 Method Setting
Only user-defined methods can be edited.
Note:
•
To add a method, click Add.
Result: The following dialog is displayed.
1
Enter a Name for the method.
2
Select appropriate settings for Light, Filter and Iris.
3
Click OK.
Note:
Optical characteristics can be corrected using the Flat Frame Calibration
function for the added Method. See Section5.12.2 Flat Frame Calibration,
on page 112.
5.13 Help menu
User Manual
Opens the ImageQuant LAS 4000 User Manual in the default pdf browser.
Getting Started
Opens the Getting Started with ImageQuant LAS 4000 manual in the default pdf browser.
End-User License Agreement
Opens the End-User License Agreement in the default pdf browser.
114
ImageQuant LAS 4000 User Manual 28-9607-42 AC
5 Software reference guide
5.13 Help menu
Sensitivity/Resolution
The figure showing the relation between sensitivity and resolution is displayed. Click to
close the window.
About ImageQuant LAS 4000
Control Software
The version information of Image Reader is displayed.
Click to close the window.
ImageQuant LAS 4000 User Manual 28-9607-42 AC
115
6 Installing ImageQuant LAS 4000 Control Software
6
Installing ImageQuant LAS 4000
Control Software
Administrator priveleges
required
All tasks related to software installation or uninstallation require a computer account
with administrator priveleges.
6.1
Installation sequence
Software installation is performed in the following sequence:
6.2
1
Install the USB contol driver
2
Install the USB function driver (Windows XP only)
3
Install the ImageQuant LAS 4000 Control Software
Install ImageQuant LAS 4000 Control Software under
Windows XP
Before you begin
Log in using a Windows account with administrator privileges.
Install the USB Control Driver
(Windows XP)
116
Step
Action
1
Disconnect ImageQuant LAS 4000 from the computer.
2
Open the control panel and select Printers and Other Hardware.
3
Click Add Hardware.
4
Click the Next button in the Add hardware wizard.
ImageQuant LAS 4000 User Manual 28-9607-42 AC
6 Installing ImageQuant LAS 4000 Control Software
6.2 Install ImageQuant LAS 4000 Control Software under Windows™ XP
Step
Action
5
Select Yes, I have already connected the hardware and click the Next button.
6
Select Add a new hardware device and click the Next button.
7
Select Install the hardware that I manually select from a list [Advanced]
and click the Next button.
8
Select Show All Devices and click the Next button.
9
Click the Have Disk button in the Add hardware wizard.
10
Insert the ImageQuant LAS 4000 Control Software DVD and click the Browse
button.
11
Select to install the driver from the ImageQuant LAS 4000 Control Software
DVD.
ImageQuant LAS 4000 User Manual 28-9607-42 AC
117
6 Installing ImageQuant LAS 4000 Control Software
6.2 Install ImageQuant LAS 4000 Control Software under Windows™ XP
118
Step
Action
12
Open the USB Control folder.
13
Select the DevMng.inf file and click the Open button.
14
Click the OK button in the Install from disk dialog.
15
Click the Next button in the Add hardware wizard.
16
Click the Next button again.
17
Click the Continue Anyway button in the Hardware Installation dialog.
18
Click the Finish button to complete the driver installation.
ImageQuant LAS 4000 User Manual 28-9607-42 AC
6 Installing ImageQuant LAS 4000 Control Software
6.2 Install ImageQuant LAS 4000 Control Software under Windows™ XP
Install the USB function driver
(Windows XP)
Step
Action
1
Connect the computer and the ImageQuant LAS 4000 with a USB cable and
turn ON the power switch of ImageQuant LAS 4000. The scanner is automatically detected by the computer.
2
In the Found New Hardware Wizard dialog, choose No, not this time.
3
Click the Next button in the Found New Hardware Wizard dialog.
4
Insert the installation DVD.
5
Select Install the software automatically (Recommended).
6
Click the Next button in the Found New Hardware Wizard dialog.
7
Click the Finish button to complete the installation.
Install ImageQuant LAS 4000
Control Software (Windows XP)
Step
Action
1
Insert the ImageQuant LAS 4000 Control Software DVD.
2
Locate and double-click the file ImageQuant LAS 4000.msi.
3
In the ImageQuant LAS 4000 - InstallShield Wizard, click the Next button.
4
Read the license text. If the license agreement is not acceptable please
contact a GE Healthcare representative, see back cover of this manual for
contact information.
Select I accept the terms in the license agreement and click the Next button.
ImageQuant LAS 4000 User Manual 28-9607-42 AC
119
6 Installing ImageQuant LAS 4000 Control Software
6.2 Install ImageQuant LAS 4000 Control Software under Windows™ XP
6.3
Step
Action
5
Select destination folder in the dialog:
•
Click the Next button to install the software at the default folder C:\Program Files.
•
Click the Change button to install to a different folder.
6
Click the Install button in the installation dialog.
7
Click the Finish button.
8
Start the ImageQuant LAS 4000 Control Software. This will ensure that necessary folders and files are created.
Install ImageQuant LAS 4000 Control Software under
Windows Vista
Before you begin
Log in using a Windows account with administrator privileges.
120
ImageQuant LAS 4000 User Manual 28-9607-42 AC
6 Installing ImageQuant LAS 4000 Control Software
6.3 Install ImageQuant LAS 4000 Control Software under Windows Vista
Install the USB Control Driver
(Windows Vista)
Note:
During software installations, you may be asked to confirm your actions
in a dialog with the text Windows needs your permission to continue.
Enter an administrator password, if prompted, then click Continue to
proceed with the installation.
Step
Action
1
Disconnect ImageQuant LAS 4000 Control Software from the computer.
2
Open the control panel and click Classic View in the upper left corner.
3
Open Add Hardware.
4
In the Add Hardware dialog, click the Next button.
5
Select Install the hardware that I manually select from a list (Advanced)
and click the Next button.
6
Select Show All Devices and click the Next button.
7
Click the Have Disk button.
8
Insert the ImageQuant LAS 4000 Control Software DVD and click the Browse
button.
ImageQuant LAS 4000 User Manual 28-9607-42 AC
121
6 Installing ImageQuant LAS 4000 Control Software
6.3 Install ImageQuant LAS 4000 Control Software under Windows Vista
122
Step
Action
9
Select to install the driver from the ImageQuant LAS 4000 Control Software
DVD.
10
Select the USB Control folder and click Open.
11
Select the file DevMng and click the Open button.
12
Click the OK button in the dialog Install from disk.
ImageQuant LAS 4000 User Manual 28-9607-42 AC
6 Installing ImageQuant LAS 4000 Control Software
6.3 Install ImageQuant LAS 4000 Control Software under Windows Vista
Step
Action
13
Click the Next button in the wizard Add hardware.
14
Click the Next button once again.
15
The following warning is displayed. Proceed by cliking Install this driver
software anyway.
16
Click the Finish button in the Add Hardware wizard to complete the installation.
Install ImageQuant LAS 4000
Control Software and USB
function driver (Windows Vista)
Note:
During software installations, you may be asked to confirm your actions
in a dialog with the text Windows needs your permission to continue.
Enter an administrator password, if prompted, then click Continue to
proceed with the installation.
Step
Action
1
Insert the ImageQuant LAS 4000 Control Software DVD.
2
Locate and double-click the file ImageQuant LAS 4000.msi.
3
In the ImageQuant LAS 4000 - InstallShield Wizard dialog, click the Next
button.
4
Read the license text. If the license agreement is not acceptable, please
contact a GE Healthcare representative. See the back cover of this manual
for contact information.
Select I accept the terms in the license agreement and click the Next button.
ImageQuant LAS 4000 User Manual 28-9607-42 AC
123
6 Installing ImageQuant LAS 4000 Control Software
6.3 Install ImageQuant LAS 4000 Control Software under Windows Vista
Step
Action
5
Select destination folder in the dialog:
•
Click the Next button to install the software at the default folder C:\Program Files.
•
Click the Change button to install to a different folder.
6
Click the Install button.
7
If User Account Control (UAC) is enabled in Windows Vista, a dialog displays
the message An unidentified program wants access to your computer.
Click Allow.
8
Click Install this driver software anyway.
9
Click the Finish button.
The installation of ImageQuant LAS 4000 Control Software is now completed.
10
6.4
Install ImageQuant LAS 4000 Control Software under
Windows 7
Note:
124
Start the ImageQuant LAS 4000 Control Software. This will ensure that necessary folders and files are created.
Log in using a Windows account with administrator privileges before
attempting to install the software.
ImageQuant LAS 4000 User Manual 28-9607-42 AC
6 Installing ImageQuant LAS 4000 Control Software
6.4 Install ImageQuant LAS 4000 Control Software under Windows 7
Installation is performed in the following sequence.
1
Disable the computer sleep function
2
Installation of the USB Control driver
3
Installation of the ImageQuant LAS 4000 Control Software and USB function driver
Disable the computer sleep function
In order to prevent scanning errors, the computer should be set to never sleep as
described below.
1
Open the Control Panel and click System and Security. Click Change when the
computer sleeps below Power Options.
2
Select Never in the drop-down menu by Put the computer to sleep, then click Save
changes.
Installation of the USB Control Driver (Windows 7)
Note:
1
During software installations, you may be asked to confirm your actions
in a dialog with the text Windows needs your permission to continue.
Enter an administrator password, if prompted, then click Continue to
proceed with the installation.
Disconnect ProductNameHW from the computer.
ImageQuant LAS 4000 User Manual 28-9607-42 AC
125
6 Installing ImageQuant LAS 4000 Control Software
6.4 Install ImageQuant LAS 4000 Control Software under Windows 7
126
2
Open the control panel and click Hardware and Sound.
3
Click Device Manager under Devices and Printers.
4
Select Action:Add legacy hardware.
ImageQuant LAS 4000 User Manual 28-9607-42 AC
6 Installing ImageQuant LAS 4000 Control Software
6.4 Install ImageQuant LAS 4000 Control Software under Windows 7
5
In the Add Hardware dialog, click the Next button.
6
Select Install the hardware that I manually select from a list (Advanced) and click
the Next button.
7
Select Show All Devices and click the Next button.
ImageQuant LAS 4000 User Manual 28-9607-42 AC
127
6 Installing ImageQuant LAS 4000 Control Software
6.4 Install ImageQuant LAS 4000 Control Software under Windows 7
8
Click the Have Disk button.
ImageQuant LAS 4000 Control Software
9
Insert the ImageQuant LAS 4000 Control Software DVD and click the Browse button.
10 Select to install the driver from the ImageQuant LAS 4000 Control Software DVD.
11 Select the USB Control folder and click the Open button.
128
ImageQuant LAS 4000 User Manual 28-9607-42 AC
6 Installing ImageQuant LAS 4000 Control Software
6.4 Install ImageQuant LAS 4000 Control Software under Windows 7
12 Select the file DevMng and click the Open button.
13 Click the OK button in the Install from disk dialog.
14 Click the Next button in the Add Hardware wizard.
15 Click the Next button once again.
ImageQuant LAS 4000 User Manual 28-9607-42 AC
129
6 Installing ImageQuant LAS 4000 Control Software
6.4 Install ImageQuant LAS 4000 Control Software under Windows 7
16 The following warning is displayed. Proceed by clicking Install this driver software
anyway.
17 Click the Finish button in the Add Hardware wizard to complete the installation.
Installation of the ImageQuant LAS 4000 Control Software and USB function
driver (Windows 7)
Note:
130
During software installations, you may be asked to confirm your actions
in a dialog with the text Windows needs your permission to continue.
Enter an administrator password, if prompted, then click Continue to
proceed with the installation.
1
Insert the ImageQuant LAS 4000 Control Software DVD.
2
Locate and double-click the file ImageQuant LAS 4000.msi.
3
In the ImageQuant LAS 4000 - InstallShield Wizard dialog, click the Next button.
ImageQuant LAS 4000 User Manual 28-9607-42 AC
6 Installing ImageQuant LAS 4000 Control Software
6.4 Install ImageQuant LAS 4000 Control Software under Windows 7
4
Read the license text. If the license agreement is not acceptable, please contact a
GE Healthcare representative. See the back cover of this manual for contact
information.
Select I accept the terms in the license agreement and click the Next button.
5
Select the destination folder in the dialog:
•
Click the Next button to install the software in the default folder C:\Program
Files.
•
Click the Change button to select a different location.
6
Click the Install button.
7
If User Account Control (UAC) is enabled in Windows Vista, a dialog displays the
message An unidentified programs wants access to your computer. Click Allow.
ImageQuant LAS 4000 User Manual 28-9607-42 AC
131
6 Installing ImageQuant LAS 4000 Control Software
6.4 Install ImageQuant LAS 4000 Control Software under Windows 7
132
8
Click Install this driver software anyway in the Windows Security dialog.
9
Click the Finish button to complete the installation.
ImageQuant LAS 4000 User Manual 28-9607-42 AC
7 Uninstalling and upgrading ImageQuant LAS 4000 Control Software
7
Uninstalling and upgrading
ImageQuant LAS 4000 Control
Software
Before you begin
Log in using a Windows account with administrator privileges.
Uninstalling ImageQuant LAS
4000 Control Software under
Windows XP
Step
Action
1
Open the control panel and select Add or Remove Programs.
2
Select ImageQuant LAS 4000 and click the Remove button.
ImageQuant LAS 4000 User Manual 28-9607-42 AC
133
7 Uninstalling and upgrading ImageQuant LAS 4000 Control Software
Note:
Correction files created during calibration are required by the
ImageQuant LAS 4000 Control Software. They are not deleted during
the uninstallation, and remain in the Data folder of ImageQuant LAS
4000 Control Software folder.
Uninstalling ImageQuant LAS
4000 Control Software under
Windows Vista
134
Step
Action
1
Open the control panel and Select Uninstall a program under Programs.
2
Select ImageQuant LAS 4000 and then click Uninstall.
3
Confirm the uninstallation by clicking Yes when prompted.
4
If User Account Control (UAC) is enabled in Windows Vista, a dialog displays
the message An unidentified program wants access to your computer.
Click Allow.
ImageQuant LAS 4000 User Manual 28-9607-42 AC
7 Uninstalling and upgrading ImageQuant LAS 4000 Control Software
Uninstalling ImageQuant LAS
4000 Control Software under
Windows 7
Step
Action
1
Open the control panel and select Uninstall a program under Programs.
2
Select ImageQuant LAS 4000 and then click Uninstall.
3
Confirm the uninstallation by clicking Yes when prompted.
4
If User Account Control (UAC) is enabled in Windows 7, a dialog displays the
message An unidentified program wants to access your computer. Click
Allow.
Upgrading ImageQuant LAS 4000
Control Software
Step
Action
1
Uninstall the current version of ImageQuant LAS 4000 Control Software.
2
Install the new version of ImageQuant LAS 4000 Control Software.
ImageQuant LAS 4000 User Manual 28-9607-42 AC
135
8 After-sales service
8
After-sales service
8.1
Warranty
8.2
136
1
The warranty period will expire after 1 year from the date the system was delivered.
2
GE Healthcare will make repairs free of charge for failures during the warranty period,
provided that normal usage conditions and the instructions given in this manual,
etc., are followed.
3
Repairs of the following failures will be charged for even if the warranty period has
not yet expired.
•
Problems caused by incorrect usage and/or by any products other than those
authorized by GE Healthcare and/or problems caused by other equipment.
•
Problems and/or damage due to moving, transport and/or falling.
Repairs
1
Before asking for repairs, refer to the troubleshooting section in Getting Started with
ImageQuant LAS 4000.
2
If the problem persists, fill in the service report fax sheet at the end of this manual
and contact your GE Healthcare representative.
3
The guaranteed repair service period of this product is 5 years from the termination
of sales. Thereafter, repair service may not be provided if repair parts become out
of stock.
ImageQuant LAS 4000 User Manual 28-9607-42 AC
A Appendix
Appendix A Appendix
A.1
Glossary
CCD Calibration
Electric charges are accumulated on the CCD even if it is not exposed to light. The
accumulated electric charge is called a dark current noise. The process for eliminating
the noise component is performed by CCD calibration. The image constituted by the
dark current noise is called CCD calibration data. An image that is constituted by only
the electric charges accumulated during exposure can be created by subtracting the
CCD calibration data from the exposed image.
Flat Frame
In an exposure system using a 2D sensor such as a CCD, unevenness due to the lens or
lighting system appears on the image. By correcting the unevenness, an object that
radiates light at the same brightness is represented evenly in any section of an exposure
area. A correction file for correcting unevenness is called a flat frame. Under the same
conditions (tray position, iris, fluorescent filter, light source, and tray) as when exposing
an object sample, a flat frame records the image in a uniform fluorescent plate
(fluorescent mode) or white plate (digitize mode).
ImageQuant LAS 4000 User Manual 28-9607-42 AC
137
A Appendix
A.1 Glossary
Conceptual diagram of CCD calibration and flat frame
A.2
138
Quick-reference functions
Function
Function name
Set item
Exposing for a fixed exposure time
Exposure Type
Precision
Exposing consecutively
Exposure Type
Increment
Exposing repeatedly
Exposure Type
Repetition
Determining exposure
time automatically
Exposure Time
Auto
Entering and determining
exposure time
Exposure Time
Manual
ImageQuant LAS 4000 User Manual 28-9607-42 AC
A Appendix
A.2 Quick-reference functions
Function
Function name
Set item
Determining a desired
exposure time and expose.
Exposure Type
Program
Setting the exposure
time and the exposure
intervals.
Exposure Type
Program settings
Sensitivity/Resolution
High Resolution
Standard
High
Super
Setting sensitivity and
resolution
Ultra
High Binning
Super Binning
Ultra Binning
Exposing a chemiluminescence and a digitized
(white epi-illuminated)
image by single-click operation
Add Digitization Image
On
Method
Chemiluminescence
Fluorescence:EtBr
Fluorescence:SYBR Green
Fluorescence:GFP
Selecting detection
method
Fluorescence:Cy3
Fluorescence:Cy5
Fluorescence:Dy781
Fluorescence:DAPI
Digitization:DIA
Digitization:EPI
ImageQuant LAS 4000 User Manual 28-9607-42 AC
139
A Appendix
A.2 Quick-reference functions
Function
Changing tray position
Function name
Set item
Method/Tray position
Select the tray position
from 1 to 4.
Focusing
Fine-adjust the light using
Brightness and the focus
using Adjust.
Adjusting focus
Starting exposure
Start
Edit:Preference
Inverting image data
Yes
Digitization Epi-illumination tab
Invert pixel data
140
Saving a file in TIFF format
Edit:Preference
Select a 16-bit Linear TIFF
format
Saving window image directly
Edit:Preference
File Format tab
Select an 8-bit Color TIFF
format
Changing the temperature setting of CCD
Edit:Preference
Set the temperature
Changing the folder of
file saving
Edit:Preference
Root Folder tab
Specify the folder where
a file is saved
Fine-adjusting the print
size
Edit:Preference
Enter size in percent
Displaying saturated data in red
View:Paint saturated data
Red
Select and check
Displaying image in Negative Gray
View:Negative Gray
Select and check
Displaying image in Positive Gray
View:Positive Gray
Select and check
Creating CCD Calibration
file
Option:CCD Calibration
Select and set conditions
for Start
Creating Flat Frame
Option:Flat Frame Calibration
Select and set conditions
for Start
Checking software version information
Help:About ImageQuant
LAS 4000 Control Software
Select
File Format tab
CCD Cooling tab
Print Adjust tab
ImageQuant LAS 4000 User Manual 28-9607-42 AC
A Appendix
A.2 Quick-reference functions
A.3
Function
Function name
Set item
Checking the relation between sensitivity and
resolution
Help:Sensitivity/Resolution
Select
Detection Reagents and corresponding settings
Note:
Classification
Chemiluminescence
The RGB module may be used instead of the separate red, green and
blue Epi lights.
Reagent
name
ImageQuant LAS 4000 setting
Method
Light
Filter
Iris
ECL
Chemiluminescence
none
Through
0.85
ECL Plus
Chemiluminescence
none
Through
0.85
Lumi-Light
Plus
Chemiluminescence
none
Through
0.85
Renaissance
Chemiluminescence
none
Through
0.85
Super Signal
Chemiluminescence
none
Through
0.85
Bright-Star
Chemiluminescence
none
Through
0.85
CDP-Star
Chemiluminescence
none
Through
0.85
CSPD
Chemiluminescence
none
Through
0.85
ImageQuant LAS 4000 User Manual 28-9607-42 AC
141
A Appendix
A.3 Detection Reagents and corresponding settings
Classification
Fluorescence dye
142
Reagent
name
ImageQuant LAS 4000 setting
Method
Light
Filter
Iris
EtBr
Fluorescence:EtBr
UV (312nm
Trans)
605DF40
2.8
Cy2
Fluorescence:SYBR
Green
Blue (460nm
Epi)
Y515-Di
0.85
SYBR Green I
Fluorescence:SYBR
Green
Blue (460nm
Epi)
Y515-Di
0.85
SYBR Green II
Fluorescence:SYBR
Green
Blue (460nm
Epi)
Y515-Di
0.85
SYBR Gold
Fluorescence:SYBR
Green
Blue (460nm
Epi)
Y515-Di
0.85
SYPRO Ruby
Fluorescence:SYBR
Green
Blue (460nm
Epi)
Y515-Di
0.85
SYPRO Orange
Fluorescence:SYBR
Green
Blue (460nm
Epi)
Y515-Di
0.85
SYPRO tangerine
Fluorescence:SYBR
Green
Blue (460nm
Epi)
Y515-Di
0.85
FITC
Fluorescence:SYBR
Green
Blue (460nm
Epi)
Y515-Di
0.85
FAM
Fluorescence:SYBR
Green
Blue (460nm
Epi)
Y515-Di
0.85
EGFP
Fluorescence:GFP
Blue (460nm
Epi)
510DF10
0.85
ECFP
Fluorescence:GFP
Blue (460nm
Epi)
510DF10
0.85
RITC
Fluorescence:Cy3
Green
(520nm Epi)
575DF20
0.85
Cy3
Fluorescence:Cy3
Green
(520nm Epi)
575DF20
0.85
Cy5
Fluorescence:Cy5
Red (630nm
Epi)
R670
0.85
Alexa 633
Fluorescence:Cy5
Red (630nm
Epi)
R670
0.85
ImageQuant LAS 4000 User Manual 28-9607-42 AC
A Appendix
A.3 Detection Reagents and corresponding settings
ImageQuant LAS 4000 setting
Reagent
name
Classification
Fluorescence dye
(Chemifluorescence)
Method
Light
Filter
Iris
Alexa 660
Fluorescence:Cy5
Red (630nm
Epi)
R670
0.85
Alexa 680
Fluorescence:Cy5
Red (630nm
Epi)
R670
0.85
Q-dot
Fluorescence:DAPI
UV (365nm
Epi)
L41
2.8
Dy781
Fluorescence:IR
Infrared
(710nm Epi)
IR785
0.85
Alexa 680
Fluorescence:IR
Infrared
(710nm Epi)
IR785
0.85
Alexa 700
Fluorescence:IR
Infrared
(710nm Epi)
IR785
0.85
Attophos 1
Fluorescence:SYBR
Green
Blue (460nm
Epi)
Y515-Di
0.85
ECL Plus
Fluorescence:SYBR
Green
Blue (460nm
Epi)
Y515-Di
0.85
Silver stain
Digitization:Trans
White (Trans)
Through
2.8
CBB stain
Digitization:Trans
White (Trans)
Through
2.8
X-ray film
Digitization:Trans
White (Trans)
Through
2.8
NBT/BCIP
Digitization:Epi
White (Epi)
Through
2.8
Digitization
1
Attophos cannot be used for detecting nucleic acid on a nylon membrane.
Note:
A.4
With regard to patents owned by third parties related to, among other
things, sample preparation, we recommend that you consult with a
lawyer or patent attorney about obtaining a license from the third
parties.
Main specifications
CCD
3 200 000 pixels (Fujifilm super CCD)
Cooling temperature
-25°C
ImageQuant LAS 4000 User Manual 28-9607-42 AC
143
A Appendix
A.4 Main specifications
Number of gradations
Exposure time
Recorded image:
16 bit
Focusing:
8 bit
1/100 seconds to 2 hours
(Images can be continuously exposed for up to 30 hours using ImageQuant
LAS 4000 Control Software.)
Lens
High-sensitivity lens F0.85 43 mm
Wide view lens F1.8 24 mm
Shading correction
Software system
Maximum sample
size
250 x 250 mm with F1.8 24 mm lens
Dynamic range
4 orders of magnitude
Maximum image size
12.6 MB
Light source
Epi (class 1 light source)
210 x 140 mm with F0.85 43 mm lens
Blue Epi light
: 460 nm
Green Epi light
: 520 nm
Red Epi light
: 630 nm
RGB Module (Epi light)
: 460 nm, 520 nm or 630 nm
NIR Epi light
: 710 nm
Epi and Trans (class 1M light source)
144
UV Epi light
: 365 nm
UV transilluminator
: 312 nm
Size
: 322 x 313 x 87 mm
UV transmitted filter size
: 200 x 200 mm
White transmitted light table
: White LED
Size
: 322 x 313 x 87 mm
ImageQuant LAS 4000 User Manual 28-9607-42 AC
A Appendix
A.4 Main specifications
External dimensions
Camera head
: 224 x 161 x 252 mm (W/H/D)
IDX
: 510 x 730 x 480 mm (W/H/D)
Weight
Camera head
: 3.4 kg
IDX
: 49 kg (not including the light source, lens, and tray)
High-sensitivity lens
: 4.5 kg
Input voltage
: 100-240 V~
Voltage variation
: +/-10%
Phase
: Single phase
Power frequency
: 50/60 Hz
Rated input current
: 3.0-1.5 A
Power requirements
AC power cable
Use the cable supplied with the instrument.
Specifications of cables required for the use of ImageQuant LAS 4000
Voltage
: 100-120 V
Plug/connector
: 125 V AC, 13 A
Cable
: SJT3 x 16AWG 60°C
Power supply cord length
: Maximum 3 m
Voltage
: 200-240 V
Plug/connector
: 250 V AC, 10 A
Cable
: CENELEC OC 3 x 1.0 mm2 70°C
Power supply cord length
: Maximum 3 m
ImageQuant LAS 4000 User Manual 28-9607-42 AC
145
A Appendix
A.4 Main specifications
Installation conditions
Placement conditions
Free space required around ImageQuant LAS 4000
Secure space for maintenance work as follows:
Front
: 600 mm
Right
: 600 mm
Left
: 600 mm
Rear
: 200 mm
Top
: 1000 mm
Table strength
The allowable load must be 981 N/m2 (100kg/m2) or greater.
Other conditions
1
Decide on an installation location taking into consideration the work
flow and ancillary facilities to be used.
2
Required construction work and electricity/air conditioning work must
be completed in advance.
3
It is not desirable to have a heat source on the IDX right side face where
there is an air intake fan even if the environmental requirements have
been met.
4
Do not install the equipment near a window to avoid direct sunlight.
Attach a blind to nearby windows.
5
Do not place objects near the power outlet so that you can disconnect
the power cable from the outlet in case of emergency.
Floor oscillation conditions
(1) Operating time
(2) Non-operating time
146
Oscillation
: 0.03G (5 to 60 Hz)
Impact
: 1G
Oscillation
: 0.4G (5 to 60 Hz)
Impact
: 2G
ImageQuant LAS 4000 User Manual 28-9607-42 AC
A Appendix
A.4 Main specifications
Environmental conditions
Operating temperature/humidity conditions
Temperature
:15°C to 28°C
(with temperature fluctuation
below 10ºC per hour or lower)
Humidity
:30 % to 70 % RH
(no dew condensation)
When the above conditions cannot be satisfied, modify the facilities
accordingly.
Transportation/storage conditions
Temperature
: -25°C to 70°C
Humidity
: 5 % to 100 % RH (no dew condensation)
Installation location conditions
Analysis unit interface
1
Do not install the equipment in an area where the temperature varies
widely.
2
Do not install the equipment near a source of heat.
3
Do not install the equipment in an area where it may get wet or flooded.
4
Do not install the equipment in an area where it may be exposed to
corrosive gas.
5
Do not install the equipment in a dusty area.
6
Do not install the equipment in an area constantly or excessively exposed to oscillations or impacts.
7
Do not install the equipment in an area exposed to direct sunlight.
Operation site
: Indoors
Maximum operating altitude
: 2000 m or lower
Overvoltage category category II
: Transient overvoltage
Rated pollution applied
: Pollution Degree 2
USB 2.0
Do not connect the ImageQuant LAS 4000 USB connector to a computer
not certified with UL60950-1 (UL listed) and IEC60950-1.
ImageQuant LAS 4000 User Manual 28-9607-42 AC
147
A Appendix
A.4 Main specifications
Others
A.5
Noise : 70 dB (A) or lower
Minimum computer requirements
Operating system
Microsoft™ Windows XP SP3 (32-bit)
or
Microsoft Windows Vista Business SP2 (32-bit)
or
Microsoft Windows 7 Professional (32-bit)
148
Memory
1 GB or more
Processor
Intel Core 2 Duo processor
HD
80 GB or more
USB port version
USB 2.0
Optical drives
DVD-ROM
Monitor resolution
1280 × 1024 pixels or more
ImageQuant LAS 4000 User Manual 28-9607-42 AC
A Appendix
A.6 Service report fax sheet
A.6
Service report fax sheet
To:
SERVICE REPORT FAX SHEET
Customer information
1) Company name
2) Person in charge
3) TEL
4) FAX
5) E-mail
ImageQuant LAS 4000 system information
6) Serial No.
•
Camera head
•
Others
7) Analyzing unit type
•
Operating environment
•
Machine model
Windows
8) Usage frequency
9) Trouble occurrence frequency
10) Error code and failure description
ImageQuant LAS 4000 User Manual 28-9607-42 AC
149
For local office contact information, visit
www.gelifesciences.com/contact
GE, imagination at work and GE monogram are trademarks of General Electric
Company.
GE Healthcare Bio-Sciences AB
Björkgatan 30
751 84 Uppsala
Sweden
All third party trademarks are the property of their respective owners.
www.gelifesciences.com/quantitative_imaging
ImageQuant are trademarks of GE Healthcare companies.
© 2010 General Electric Company – All rights reserved.
First published Oct. 2009
All goods and services are sold subject to the terms and conditions of sale of
the company within GE Healthcare which supplies them. A copy of these terms
and conditions is available on request. Contact your local GE Healthcare
representative for the most current information.
GE Healthcare Europe GmbH
Munzinger Strasse 5, D-79111 Freiburg, Germany
GE Healthcare UK Limited
Amersham Place, Little Chalfont, Buckinghamshire, HP7 9NA, UK
GE Healthcare Bio-Sciences Corp.
800 Centennial Avenue, P.O. Box 1327, Piscataway, NJ 08855-1327, USA
GE Healthcare Japan Corporation
Sanken Bldg.3-25-1, Hyakunincho Shinjuku-ku, Tokyo 169-0073, Japan
imagination at work
28-9607-42 AC 07/2010