1
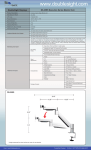
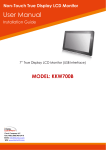
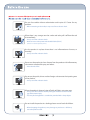
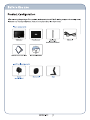
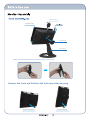
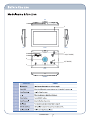
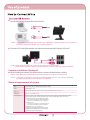
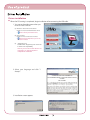
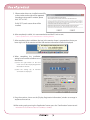
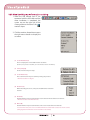
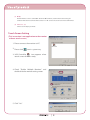
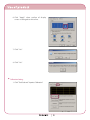
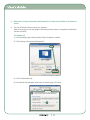
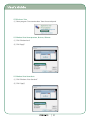
REV. 1.3
www.mimomonitors.com
※ Warning : It displays the cases where a mistaken handling may cause an infliction of
death or serious injury to a person.
It displays the cases where a mistaken handling may cause an infliction of
Caution
:
※
physical injury to a person or property damage to a person.
※ For environment, do not dispose this product to the waste can and make sure to
collect in separate disposal.
Do not disassemble without authorization and inquire A/S Center for any
problem.
- When contacting to the inside, it may cause fire or electric shock.
When there is any strange sound or smoke and odor, pull it off from the cab
le immediately.
- It may cause fire or electric shock.
- Make sure to use the power with the USB Cable (DC 5V)
(There is no need for separate power.)
Use the product in a place where there is no inflammation or furnace, or
humidity.
- It may cause fire or electric shock.
Do not use the product in close distance from the product with inflammatory
substance or combustible spray and others.
- It has the risk of fire.
Do not put chopstick, driver or other foreign substance to the inputting area
of the product.
- It may cause fire or electric shock.
When the product is cleaned, wipe off with soft fabric, not water mop.
- It may cause fire or electric shock by having the moisture to enter into the
gap of the external part.
- LCD may be damaged if it is scratched or pounded with a sharp object.
Do not install the product in a shaking place or out of reach of children.
- When dropping the product, it may damage to product or a child may
cause the product to fall.
DS-70 & DS-90U
DS
SSeries
Version 1.0
· Monitor Driver
· User’s Manual
Camera (Option)
Protective cover
Fixed handle
Stand (Option)
* Refer to the following picture when opening the protective cover
Remove the stand and facilitate the stylus pen when carrying
Horizontal installation
Vertical installation
TOP
1
2
3
LEFT
3
RIGHT
FRONT
7
4
5
8 (8.9” Model)
6
8 (7” Model)
9
REAR
BOTTOM
USB MONITOR
6
■
Use the USB cable to connect the monitor and PC.
or
Caution : Only use the provided USB cable to Power your USB Monitor. Alternate cables may not provide the
same power transfer and Monitor may not operate properly.
■
Terminal A (5Pin Min USB) connects the monitor and two terminal B (Serial A USB) to PC.
B
A
Note: A single USB connection will provide enough power from most computers.
A second USB connection to the PC may be required for computers with older USB specifications.
Camera installation (Optional)
■
When installing the camera, turn off the power switch on the back before installing.
Caution : If the Web Cam is inserted when the power is turned on, it may not operate property.
Caution : This Monitor is designed to work with a DoubleSight Web Cam only. Use of another Web Cam
(or another Device) may result in damage to your Monitor.
Minimal requirement of system
CPU
Intel Pentium/Celeron,AMD/K6/Athlon/Duton 1.2Ghz
RAM
512MB RAM or more
USB Port
2 or more of USB2.0 (It is recommended to use two with the difference of some PC spec.)
HARD Disk
Spare space of 50MB or more
Supporting OS
The OS spec of PC can be confirmed from the 'General' tap of the system registration information window
by selecting the 'attribute' with the right button of the mouse in 'My Computer' on the 'base screen.
(1) Windows XP (32bit: Support, 64bit: Not support)
- Service Pack 1 and previous version: Not support
- Service Pack 2 and following version: Support
(2) Windows 2000
- Service Pack 3 and previous version: Not support
- Service Pack 4 and following version: Support
(3) Windows Server 2003: Not support
(4) Windows Vista: Support (32bit or 64bit support)
(5) MAC OSX (Intel MAC) Require separate program
(6) Windows 7 (32bit or 64bit support)
Driver installation
■
When the PC booting is completed, begin installation after connecting the USB cable.
1. You can see the right screen when you
insert CD into CD-ROM.
(1) Monitor & Touch Driver Installation
Double click to install USB monitor driver.
*
Please check your model name.
(2) User's manual
Double click to see the user's manual.
* Please refer to Help unless you can see
the user's manual.
(3) Supporting OS
Double Click “Supporting OS” menu bar
to check OS compatibility.
Note: If your PC has an OS which is not
supported, you will not be able to
complete the installation. `
2. Select your language and click "I
Accept".
3. Installation screen appears.
5. When monitor driver was installed successfully,
as the window on the right will be appeared.
According to instruction in window, please
click “YES” or “NO”.
If click “YES”, touch screen driver will be
installed.
6. After completely installed, it is recommended to end the PC and re-start.
* When a problem arises, it is recommended to re-booting of the PC.
7. After completing the installation, the icon in the monitor shape is generated on the tray on
lower right side of the monitor and the USB monitor information installed is displayed.
8. When completing the installation,
setting has to be made as follows to use
the monitor.
(1) Press the right button on the base
screen to have the 'Display Registration
Information' window.
(2) Click the 'setting' tap, all monitors
connected are displayed.
9. Drag the monitors shown on the [Display Registration Information] window to arrange in
sequence of actual use.
10 After setting up by pressing the 'Application' button, press the 'Confirmation' button to end.
. * This USB monitor has the fixed resolution of 7":800x480, 8.9":1024x600.
1. When the USB monitor and PC are
connected with the USB cable and the
driver installation is completed, the
system tray on the right side of the
screen generates the icon of the
monitor shape.
2. Click the monitor-shaped icon to press
the right mouse button to display the
set menu.
(1) Screen Resolution (R)
This is to display the current USB monitor resolution.
(However, this product 7" 800*480, 8.9" is the fixed resolution of 1024*600.)
(2) Color quality (Q)
16-bit and 32-bit may be set up.
(3) Screen Rotation (T)
The screen direction may be set when pivoting the product.
* The initial set status is 0 degree.
(4) Extend To (X)
When extending the screen, it may set the USB monitor extension
location.
(5) Extend (E)
The USB monitor may be used with the screen extension mode of the main monitor.
* The initial set status is the 'Extend' mode.
(6) Mirror (M)
The USB monitor may be used with the same screen mode of the main monitor.
* For the mirror mode, the screen is modified with the recommended resolution of the two screens.
(Changing of the main monitor to lower resolution is not a defect.)
(7) Off (O)
The USB monitor screen is turned OFF. Under the Off condition, it still maintains the turning off
condition while the PC is turned off that select "E" or "M" to have the screen back on the USB monitor.
(8) Advanced.... (A)
It moves to the display set mode.
Touch Screen Setting
(This instruction is not application to the monitor
without touch screen.)
1. Please connect the monitor to PC.
2. Please click
icon in system tray.
3. USB Controller
icon appears when
touch screen driver is ready.
4. Check "Enable Multiple Monitors" and
double click the monitor setting screen.
5. Click "Yes"
6. Click "Apply" when outline of display
screen is changed to white line.
7. Click "Yes"
8. Click "Yes"
■
Calibration Setting
1. Click "Tools"tab and "4 points Calibration"
2. Hold pressing flickering point until it to finish
flickering and continue to enter next
calibrations. (Enter 4 points)
3. Calibration setting is completed After entering
4 points.
* Please reboot PC when driver installation is completed.
■
Support spec
●
This monitor is the USB monitor recognized as the USB device that the DOS screen shown in
the PC booting will not be displayed.
●
SW that uses the 3D acceleration function in HW cannot be used in the USB monitor.
-
Real Player (Do not support the extension mode.)
- Most of 3D game
- Program driven by the basis of Direct X
●
Supporting moving picture program
- Power DVD
- Win DVD (supporting version 5 or higher)
- Windows Media Player (supporting Version 10 or previous version)
- VLC
- Gom Player
●
On USB 1.0, the USB monitor may not normally operated.
●
The power at USB 1 Port is weak that it may not be operated in some PC that it is
recommended to use 2 USB Ports.
●
PC H/W spec possible for extension
- Connect 2 USB monitors: Minimum of 1.2GHz CPU / 512 MB Memory
- Connect 3 USB monitors: Minimum of 1.8GHz CPU / 1 MB Memory
- Connect 6 USB monitors: Minimum of 1.6GHz Dual core CPU / 512 MB Memory
■
When there is any problem, make sure to check the followings first.
Q : The USB monitor screen is not displayed.
A : (1) Check if the USB cable is correctly linked and if the USB Driver is installed.
(2) Check if the blue LED color on the USB monitor is come on and if the power button is
turned Off.
(3) Check if the tray monitor icon on the lower side of the monitor has 'Off'.
(4) The USB monitor reads the general USB device on the PC. If quick and repeated turning on
and off is made, the USB vice may have problems that you may refer to problem solving
method for the USB device from the Customer Support site of Microsoft.
- Press the right button from "My Computer" of the base screen to display the 'Attribute' window.
- Click the system administrator.
- Press the HW change search from the motion menu.
- Re-boot the PC.
Q : The screen on the USB monitor has stopped its motion.
A : Booting is not made after linking the USB monitor.
(1) In the PC with on-board type that uses the i815 chip set mother board has to re-boot by
changing the legacy USB support option to [No Change] at the BIOS set menu.
* The entry method of BIOS may differ depending on the PC that the manual of the PC in use has
to be referred to. For detailed information, refer to the homepage of Microsoft.
Q : How can I remove the installed program of the USB monitor?
A : Select Program 'Add/Remove' from the control board to select the Displaylink Graphics
from the list of 'currently installed programs' and click "Remove" to delete.
Q : Touch Screen doesn't work.
A : (1) After reconnecting USB cable, please check out the "USB Connection"
icon on touchside.
* If there is no icon, reconnect USB cable and on again.
(2) When you change USB port or calibration get twisted, click 'Touchside - Tool - 4Points
Calibration" and reset calibration.
(3) Reboot PC after driver installation.
Q : When you use Skype video chat with Window XP OS, there may be flicker or distortion in
screen.
A : The use of DirectX function causes this symptom.
Make sure not to use it on the graphic card setting because there is no option to disable this
function on SKYPE.
OS: Windows XP
(1) On the desktop, right-click to display 'Display Properties' window.
(2) Click 'Settings' tab and click Advanced (V).
(3) Click 'Troubleshoot' tap.
(4) Set 'hardware acceleration (H)'to None, and click 'Apply (A)' button.
OS:Windows Vista
(1) Select program 'Cumstomize colors' from the control panel
OS: Windows Vista Home premium, Business, Ultimate
(1) Click "Window Aero"
(2) Click "Apply"
OS: Windows Vista Home basic
(1) Click "Windows Vista Standard "
(2) Click "Apply"
iMo-70 Series
iMo-eye7 Series
iMo-90 Series
iMo-eye9 Series
Website : www.mimomonitors.com
Customer support : www.mimomonitors.com/pages/customer-support

![Streptex [FR] - Thermo Scientific](http://vs1.manualzilla.com/store/data/006430290_1-5bd1b177dbc913ad812e2278059e3928-150x150.png)