1
CONTENTS
1. Getting Started ......................................................... US/UK-6
Names of parts ......................................................................................................................... US/UK-6
Operation Panel ....................................................................................................................... US/UK-8
Paper Specifications ............................................................................................................. US/UK-10
Handling Ink Cartridges ........................................................................................................ US/UK-11
2. Let's Start Printing ................................................. US/UK-12
Taking advantage of Security Print ...................................................................................... US/UK-14
Taking Advantage of Security Print ..................................................................................... US/UK-16
Useful information about the HC5500 Series ...................................................................... US/UK-18
3. Frequently Used Basic Functions .......................... US/UK-24
Duplex printing ......................................................................................................................
Multi-up (Multi-page) .............................................................................................................
Job Separation .......................................................................................................................
RISO Console .........................................................................................................................
US/UK-24
US/UK-26
US/UK-28
US/UK-30
4. Other Useful Features ............................................ US/UK-32
Pause after a proof ................................................................................................................
Print Position Adjustment .....................................................................................................
Test Print ................................................................................................................................
Job comments .......................................................................................................................
Reprinting (Temporary Data Retrieve) .................................................................................
Using Forms ...........................................................................................................................
Storing Data and Settings (Storage) ....................................................................................
Making Booklets (Pagination) ..............................................................................................
Adjusting the Image ..............................................................................................................
Using the Optional Finisher ..................................................................................................
Using the Optional Scanner ..................................................................................................
US/UK-32
US/UK-32
US/UK-34
US/UK-35
US/UK-36
US/UK-38
US/UK-40
US/UK-42
US/UK-44
US/UK-48
US/UK-50
5. Troubleshooting..................................................... US/UK-52
If the printing quality is not as good as expected ..............................................................
If the printer has stopped... ...................................................................................................
Changing the ink cartridge ...................................................................................................
Head Maintenance .................................................................................................................
Optional Items ........................................................................................................................
US/UK-52
US/UK-52
US/UK-53
US/UK-54
US/UK-55
There are 2 types of printer controllers: RISO Controller HC3R-5000 (GDI) and RISO Controllers PS7R-9000
(PS).
The screen shots shown in this manual are from RISO Controller HC3R-5000. Please note that the screen
shots may differ from the ones shown depending on the printer controller in use.
US/UK-1
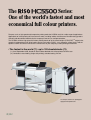
The
Series:
One of the world's fastest and most
economical full colour printers.
Features such as high-speed and inexpensive printing make the HC5500 useful in a wide range of applications.
Applications of colour printing will increase even more, including leaflets and direct mail for advertising, product
manuals and educational materials for the company's internal use, and presentations.
The HC5500 achieves high-speed full-colour printing thanks to its the control engine (FORCEJETTM engine) that
controls 4 independent in-line inkjet heads, one for each colour (CMYK - cyan, magenta, yellow, black). And the
optional scanner and finisher enhance the convenience of your company's colour printing environment.
• The fastest in the world (*1): up to 120 sheets/minute (*2)
(*1): As of September 2005; based on internal data obtained with colour printers for office use.
(*2): Continuous cross-feeding, single-side printing, standard setting, A4-size
The example shown in the photograph is
equipped with optional items.
US/UK-2
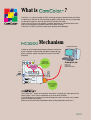
What is
?
ComColor.TM is a term invented by RISO, formed by merging Communication and Colour.
It represents a new form of colour printing targeted on high-speed, low-cost, and prompt
(on-demand) response, driven by our business and daily life needs.
Haven't you ever given up on printing a proposal document or a leaflet because of the
high cost and long time required for large-scale colour printing?
ComColorTM is RISO's answer to make colour printing more affordable.
Mechanism
Windows/Macintosh
In order to achieve high-speed colour printing, the data sent
by the computer are processed into optimal images by the
printer controller (colour management system: ComColorTM
Standard).
K
C
M
Y
Controls ink
output and
printing speed
FORCEJET™
ENGINE
Order print job
Paper size
Paper type
Colour information
Paper
Paper
Paper
Printer Controller
(Colour management:
ComColor™
Standard)
The FORCEJETTM engine is the printing mechanism created by the "high-speed in-line
inkjet system", which can be considered as the heart of the HC5500.
It was developed as a convergence of technologies to achieve full-colour, fast, durable,
and low-running-cost printing.
Welcome to the new world of affordable colour printing offered by ComColor.TM.
US/UK-3
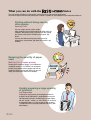
What you can do with the
Series
The high-speed HC5500 full-colour printer can be used in a wide range of applications.
Here we will explain what kind of printing the HC5500 is capable of, and introduce its most important features.
Printing without being seen by
other people
Security Print
You can assign security codes to jobs.
After sending a print command to the HC5500 from the
computer, the printing starts in front of you after typing
the security code on the HC5500's touch panel (optional).
You can print without having the printout seen by
anyone else, and the data (job) does not remain in the
HC5500.
Reducing the quantity of paper
used
Multi-Up (2 in 1) duplex printing
Reducing the number of pages is a fundamental
ecological measure. The HC5500 can do duplex
printing and paginate several pages into one. By
combining duplex printing with Multi-Up, you can
make your documents even more compact.
Quickly preparing a large quantity
of printouts
Job Separation
Preparing a large quantity of meeting documents or
materials to be distributed is straightforward using the
Job Separation function. Available types of job separation are "by job", "collate", or "non-collate". By inserting
a separation paper, it is easy to sort out the printouts.
The optional finisher provides additional efficiency with
offset output.
US/UK-4
Printing booklets with automatic
pagination
Printing repeated marks and
phrases
Booklet Pagination
Using Forms
The HC5500 can do double-page foldable pagination
without using an application software to prepare the
data. You can print data as they are, without deteriorating image quality and saving a significant amount
of time.
(Only when connected to RISO PS7R-9000)
Adding comments to the printing data as printing instructions
Using the scanner/finisher
Job Comments
(optional)
You can add comments to the data sent to the
person in charge of printing. The comments may
include type of paper, colour, size, and other information. This feature can be used as a convenient
printing specifications form.
With the scanner, you can use the HC5500 as a
colour copying machine. In addition, with the HC
finisher you can do stapling, hole punching, and
prepare booklets.
You can print documents and add a common mark or
text. By storing texts or images in the print controller
as forms, they can be easily used for printing.
Scanner/Finisher
US/UK-5
1
Getting Started
Names of parts
Ink Unit Cover ○ ○ ○ ○ ○ ○ ○ ○ ○ ○ ○ ○ ○ ○ ○ ○ ○ ○ ○ ○ ○ ○ ○ ○ ○ ○ ○ ○ ○ ○ ○ ○
Ink cartridges for 4 colours are installed
here. Open this cover to replace empty ink
cartridges.
[Changing the ink cartridge], page 53 of this
manual
User's Manual for Printer Main Body, page 3-18
○
○
○ ○ ○ ○ ○ ○ ○ ○ ○ ○ ○
○
○
○
○
○
○
○
○
Used for special paper such as postcards, cardboards, and
envelopes.
This tray should be left closed when not in use. (We recommend
setting conventional paper in Tray 1 and Tray 2.)
After printing, return the paper remaining on the feed tray to the
original package. Leaving paper on the tray may cause curling,
possibly resulting in paper jamming.
○
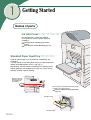
Standard Paper Feed Tray
Make sure that you
load the paper with
the printable side
face upward.
When setting the Standard Feed Tray for printing
envelopes, tilt it slightly upward.
See User's Manual for Printer Main Body
page 1-22.
Envelope setting
Standard setting
US/UK-6
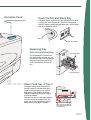
Operation Panel
Power Switch and Sleep Key
○ ○ ○ ○ ○ ○ ○ ○ ○ ○ ○ ○
[Operation Panel], page 8 of this
manual
The power switch located on the right side of the main body
is usually left in the ON position. To turn the sleep mode
ON/OFF upon the start and end of daily work, use the Sleep
Key on the Operation Panel.
Sleep Key
Main Power Switch
Receiving Tray
(Auto-Control Stacking Tray)
Stack Guide (Side)
○ ○ ○ ○ ○ ○ ○ ○ ○ ○ ○ ○
○ ○ ○ ○ ○ ○ ○
The printed paper is ejected here.
The stack guides calculate the size
based on the data received from the
computer and move automatically.
(Please do not force them manually.)
○ ○ ○ ○ ○ ○ ○ ○ ○ ○ ○ ○ ○
Stack Guide (End)
Paper Feed Tray 1/ Tray 2
The paper to be printed is loaded here.
Since the paper is inverted when taken
inside the printer from the tray, thick or
other special type of paper cannot be
loaded. Please check the types of paper
that can be loaded.
Load the tray with the same type of paper
that was used in the previous time. The
paper type can be checked on the Monitoring screen of the [RISO Console].
Make sure that you load the
paper with the printable side
face downward.
US/UK-7
Getting Started
Operation Panel
Message Display
○
Ready
Auto
○ ○ ○ ○ ○ ○ ○ ○ ○
○ ○ ○ ○ ○ ○
WAKE-UP Key
○ ○ ○ ○ ○ ○
FORCEJET™
link mark
○ ○ ○ ○ ○ ○
Remaining quantity
warning lamp
The operation panel performs menu settings and displays printing instructions.
In addition, it indicates paper jamming locations and depleted consumable
items.
○
○ ○ ○ ○ ○ ○ ○ ○ ○
○ ○ ○ ○ ○ ○ ○ ○ ○ ○
○
○ ○ ○ ○ ○ ○
○
Sleep Key
PRINT/PAUSE Key
Blinks while receiving data.
Turns the print mode ON and OFF.
[Printing Mode ON/OFF] - page 20 of
this manual
Goes on in case of errors that
are not indicated by marks,
and a message is displayed.
Keys used in operations
MENU Key
This key is used at the operation panel during
[Menu setting] operations.
○ ○ ○ ○ ○ ○ ○ ○
User's Manual for Printer Main Body, page 2-10
CANCEL/BACK Key
○ ○ ○ ○ ○ ○ ○ ○ ○
○ ○ ○ ○ ○ ○
○ ○ ○ ○ ○ ○ ○ ○ ○
OK Key
Confirms setup contents.
Cursor Key
Used to display the target menu and
change setting values.
US/UK-8
Mark display
The light of the operation panel display goes on and the printer stops during paper jamming or when a consumable
item such as ink runs out.
Please check the mark whose light is on and take appropriate measures.
INK CARTRIDGE
The ink cartridge is empty. Please change
the ink cartridge of the colour whose light is
on.
CHECK SETTINGS
A door or internal lever of the printer is not
properly fixed. Please check the area whose
light is on.
CALL SERVICE
An error that requires servicing has occurred.
Write down the error number and contact
your local dealer (or service representative).
FORCEJET™ link mark
The FORCEJET engine
adjusts printing speed, paper
size, and quality in a global
manner. This mark is ON
when these functions are
working properly.
User's Manual for Printer Main
Body, page 3-3
JAM
Indicates paper jam. Check the area where
the light is on and remove the jammed paper.
You will see a seal explaining the procedure
when you open the front cover.
MAINTENANCE CALL
The ink drain tank is full or the maintenance
time has come. Please contact your local
dealer (or service representative).
US/UK-9
Getting Started
Paper Specifications
Usable Paper:
Paper that conforms to the following specifications can be used for printing.
• Paper sizes that can be used in the Standard Feed Tray : 46g/m2 – 210g/m2 (12-lb bond to 56-lb bond)
Minimum size
Paper ejection
direction
Maximum size
Paper ejection
direction
90mm
(39/16")
148mm
(513/16")
297mm
(11")
Registering Paper Size :
340mm
(133/8")
420mm (17")
Registering paper size :
550mm (215/8")
• Paper sizes that can be used in Paper Feed Tray 1/2 : 52g/m2 – 104g/m2 (14-lb bond to 28-lb bond)
Maximum size
Minimum size
Paper ejection
direction (*)
182mm (73/16")
Paper ejection
direction
297mm (11")
257mm
(101/8")
* Both orientations are available.
420mm (17")
Registering paper size :
432mm (171/2")
Printing envelopes
The following settings are required for printing envelopes:
• Specify the envelope size in “Custom Size Entry.”
• Select “Envelope” as “Paper Type.”
• Select “Envelope” for “Paper Feed Control.”
See "Printing Envelopes" — page US/UK-22 of this Manual.
Types of paper that cannot be used:
Curled, ripped, wavy,
folded, or wet paper
US/UK-10
Regular inkjet paper
Certain types of paper designated as “for photograph” or “fine-grain” that are sold at computer or
stationery shops; they are glossy as a result of
processing and cannot be properly printed due to
ink incompatibility.
For superior printing
quality, we can provide the paper that
brings out the best of
your machine. Please
contact your local
dealer (or service
representative).
Handling Ink Cartridges
Do not store the ink for a long period
Do not shake the ink cartridge
Do not leave the ink under direct sunlight or in places
subject to large variations of temperature, nor store it
for a long period after purchasing. We recommend you
to use it as soon as possible.
Do not shake the ink cartridge when replacing it.
Shaking can cause bubbles that may clog the print
head or make the colour uneven.
Air intake cap
Ink feed opening cap
Take care to avoid contact with your
hands or clothes
Since the ink is made of oil-based pigment, any stains
in hand or clothes must be immediately washed with a
detergent.
Do not remove the cap
There is a small amount of ink inside the cartridge
when replacing it. Do not remove the caps at the ink
outlet or air inlet to fill with new ink or to drain the
remaining ink.
Be aware of ink/paper replacing times
Placing orders after running out of ink or paper and
having to reset the printer decreases its efficiency.
When the remaining quantity of ink or paper is low, the
corresponding places light up. Knowing in advance that
the remaining quantity is low lets you prepare the
replacements in time.
Black ink is low.
US/UK-11
2
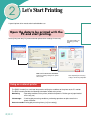
Let's Start Printing
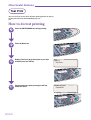
A special printer driver needs to be installed before use.
Open the data to be printed with the
PC and start printing.
Select [Print] from the [File] menu and enter printer driver settings if necessary.
○
○
○
○
The security code is set
in [Option] - [Security
Print].
○
○
○
○
○
Make sure to remove this check mark.
Define the [Collate] settings in the printer
driver screen.
○
○
○
○
○
○
○
○
○
○
○
○
○
After completing the necessary
settings, click on the [OK] button.
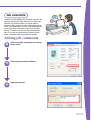
Using as a network printer
The [RISO Console] is a useful tool that permits verifying the conditions of the printer at the PC monitor.
The RISO console provides the following information related to the printer:
Monitoring
:Operating conditions of the printer (whether the power is ON/the type of paper loaded
on the tray, etc.)
Job manager
:Checking job processing conditions, performing operations on jobs stored in the
printer controller.
Account records:Viewing job processing history (in [User setting])
US/UK-12
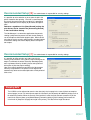
When set as [Security Print]
The job is [Requesting...]. Go to the main body of the HC5500 and send an output instruction from the
touch panel.
Select the job to be printed from the [Job status] screen of the Job Manager, press the output button, and
enter the security code to start printing.
(Similar instructions can be sent from the [RISO Console/Job Manager] of the computer.)
For [normal] printing
The printing procedure may vary depending on the setup performed by the
administrator. Please consult the
administrator to learn details about the
setting.
The printing starts when an instruction is sent
from the printer driver. Go to the printer and
take the printout.
Go to the printer and send an output instruction from the touch panel. Select the job to be
printed from the [Job status] screen of the Job
Manager and press the output button to start
printing.
In order to use the “Security Print”
function of the printer driver effectively,
an optional touch panel is needed.
US/UK-13
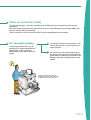
Let's Start Printing
Taking advantage of Security Print
You probably face the problems described below in your network printing environment.
Typical network printers are shared by a large number of people and their receiving trays accumulate multiple
printouts. The sizes of the printouts also show significant variations. Sometimes, your document is mixed in the
middle of many others. Some people do not come to take their printouts or take someone else's by mistake. In other
cases, printouts that you want to keep private may be seen by other people. The problems faced by such a printing
environment relate not only to security, but also the waste incurred by the need of reprinting or sending forgotten
printouts to the shredder. These issues can be associated with the use of network connection or centralised printers.
Cannot find
my printed
documents
Confidential
Customers who use network printers have the following requirements:
They do not want other
people to see their printouts.
They want to delete the
data (job) after printing.
US/UK-14
They do not want to have mixed
printouts.
They do not want to have titles, etc.
shown in [Account record] and [Processing status].
The HC5500 Series addresses such customer needs by offering security
function.
Since the Security Print assumes that you approach the HC5500 for the printing, it is necessary to install a touch
panel or a PC near the HC5500 where the RISO Console can be seen.
Security means safe, reassuring printing
The data to be printed is first converted into RIP
(printable status) and printing starts immediately after
you enter the security code directly at the HC5500.
The most effective form of security is to watch the
printing and take the output right away. And the data
must be completely erased from the printer. These
security functions improve safety and efficiency in the
current office workflow.
Using the PS7R RISO Controller, you can assign
security codes not only to data but also folders.
Intelligent control is possible by preparing separate
folders with security codes for each group or department.
Reducing waste also means preserving the
environment
Printing in front of your eyes when you need and
taking the printout as soon as they come out will save
you the effort of searching for your documents among
multiple printouts. In addition, problems such as
printouts left for ever or taken by mistake will disappear. This will save time and money previously spent
on reprinting and disposing of unclaimed printouts.
Daily workflow improvements really make a difference.
Turn to the next page to see the different usages of
the HC5500. >>
US/UK-15
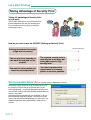
Let's Start Printing
Taking Advantage of Security Print
Taking full advantage of Security Print
in your work.
The HC5500 allows you to select a Security Print
function adapted to you and your working place.
First, find out what security level you and your
working place need.
How do you want to use the HC5500? (Setting up Security Print)
Recommended Setup
Printing documents that require
a high level of security.
○ ○ ○ ○ ○ ○ ○ ○ ○ ○ ○ ○ ○ ○ ○ ○ ○ ○ ○ ○ ○ ○ ○ ○ ○ ○ ○ ○ ○ ○ ○ ○
A
The security level depends on
the work at hand (and on the
people).
The required security level is
normally low or medium, but
some jobs require a high
security level.
○ ○ ○ ○ ○ ○ ○ ○
B
You want to solve problems of
mixed or missed printouts.
You want to preserve the
convenience of a network
printer as much as possible.
○ ○ ○ ○ ○ ○ ○ ○
C
Recommended Setup [A]: the security setting is defined by each one
For sending a print command using the printer driver, use
the [Security Print] function of the [Option] tab. The job
enters [Requesting...] and the printing does not start unless
you enter the security code. After printing, the data does not
remain in the printer.
Operations from the job manager are accepted. Try to use
[Recommended Setup B]. If you put a check mark in [Job
name is not indicated on Job Manager], the job name is not
displayed regardless of the administrator's setting in the
console.
US/UK-16
Recommended Setup [B]: the administrator is responsible for security settings
It is possible to select whether or not to store the job in the
printer controller after printing. "Discard" is recommended
for security, but even when jobs are stored, it is possible to
impose restrictions on the display of job names and operations.
Reference: regardless of the [Store/discard] setting, the
print history can be viewed in the [Accounting Record]
in the Console/User Setting.
The Job Manager is a convenient application that permits
viewing a job processing status, but with certain settings it
can also output or delete other people's jobs. When considering how to set the security configurations, the administrator
must define settings that restrict display details and operation scopes.
Recommended Setup [C]: the administrator is responsible for security settings
It is possible to define whether only jobs sent with the
Security Print function or every job will require waiting for the
output. To eliminate the waste caused by abandoned printouts or printouts taken by mistake, please select [Store all
direct jobs as jobs that require waiting].
Jobs set to require waiting accumulate in the job manager
until they are printed out. The printer can be adjusted to
automatically delete accumulated jobs after a fixed period of
time or not.
Keeping data
The HC5500 can be adjusted to store the last data (only the last page in the case of jobs that comprise
several pages) or not. It is convenient to store the last data if you constantly do additional printing such as
for advertising leaflets. When the Security Print function is used, the final data are not stored. If you do
not wish to store any data, go to [Administrator] [Controller setting 2] [Initial settings] and remove the
check mark in [Keep the last page of the job in the printer.]. The data will no longer be stored.
US/UK-17
Let's Start Printing
Useful information about the HC5500 Series
The HC5500 differs from ordinary inkjet printers in some ways. Here we will explain about those differences. Please
understand these features to take full advantage of the printer.
The ink is oil-based.
Personal inkjet printers often use water-based ink. The HC5500, on the other hand, uses special oil-based ink for
high-speed printing.
In order to take advantage of the features of oil-based ink and obtain superb printing quality, we recommend the
use of special paper.
Conventional types of paper for inkjet printers (especially glossy ones) are suitable for water-based ink and should
not be used with the HC5500.
Moreover, use PET files for storing printouts in order to retain their quality.
Special paper for the HC, the best appealing power.
The RISO IJ paper was especially developed for the RISO HC Series. A special colour profile was developed to
match the special paper, taking full advantage of the features of our special ink. For the best printing quality, combine the paper type set in the printer driver with the type of paper loaded in the tray. For the paper, contact your
local dealer (or service representative).
RISO IJ Double-Side Matte Paper
[No paper] error occurs even with paper loaded in the tray.
After loading paper in the tray, adjust the type and size of paper in the menu setting of the main printer body ([4.1
Standard Feed Tray] [4.2 Feed Tray 1] [4.3 Feed Tray 2]). If the settings do not match the paper type adjusted at the
printer driver during the printing, a [No paper] error occurs.
By setting the menu setting [5.8.17 Tray Selection Rule] in the main printer body to [Size], you will not have to mind
the paper type. Printing will be possible whenever the size matches. In that case, the printing quality may not be
good if the paper type does not match.
Personal computer
Main Setting
Printer driver
screen
Standard
papter
Feed Tray
Tray 1
Tray 2
4.1 Standard Feed Tray
Paper Size
4.1.1
4.1.2
Paper Type
US/UK-18
4.2 Feed Tray 1
Paper Size
4.2.1
4.2.2
Paper Type
4.3 Feed Tray 2
Paper Size
4.3.1
4.3.2
Paper Type
When "Paper Type" and the tray
setting do not match, you can
either select to define it as an
"error" or output the job as long as
the size fits.
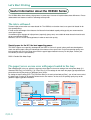
Does the quality of the printout
differ from other printers?
Whereas colours displayed in monitors and the like
are expressed in terms of the primary colours of light
- red, green, and blue (RGB), for ink printing the 3
primary colours are cyan, magenta, and yellow
(CMY). In general, CMY cannot form as many colours
as RGB, and as a consequence it is not possible to
print the same colours seen at the monitor. Therefore, it is necessary to convert RGB into CMY while
trying to reproduce colours as faithfully and naturally
as possible. This conversion mechanism is called
"colour management." Rules used in the conversion
vary from manufacturer to manufacturer; we, at RISO,
use a proprietary conversion table (colour profile).
HC5500's colour management is performed using our
proprietary colour profile ComColorTM Standard,
which focuses on the reproduction of colour images
based on our fundamental concept of fast, inexpensive, and instant printing.
ComColorTM Standard Features
- Colour tones are adjusted (colour profile
changes) according to the paper.
- Colour tones are adjusted according to the
original image mode (predominantly text or
predominantly photo).
- Colour photographs are adjusted to achieve
beautiful results with a limited range of colours.
Due to this feature, the item [Paper size and type]
adjusted at the printer driver should correspond to the
actual size and type when printing with the HC5500.
If the settings do not match, it is not possible to
achieve beautiful results.
In addition, the ink used is also important for the
reproduction of colours.
The FORCEJET Link mark of the HC5500 indicates
the usage of appropriate ink and correct colour
management.
Operating on the printer's
panel
tions/do adjustments from the operation panel by
setting the print mode to [OFF].
[More Useful Functions], page 32 of this manual
Select [Job Clear] from the
menu if you want to [Clear].
To interrupt or cancel the printing, execute [Menu 7
Job Clear]. Pressing the cancel key does not clear an
ongoing printing job.
After selecting [Job Clear] in Menu 7, make sure to
press the Print/Pause key and restore the print mode
to [ON]. If left in [OFF], the printer does not respond
to print commands sent from the computer.
Be careful with curled paper
A strongly curled paper cannot pass through the
printer.
If the paper is curled, the amount of curling should be
less than 3mm (0.12").
Make sure to use "fresh-pack" (brand-new) paper in
the standard paper feed tray, and wrap it with paper
for storage. When left for a long time, the paper
absorbs humidity from the air and tends to get curled.
If you frequently experience paper jam even when the
paper is curled by less than 3mm (0.12"), try to put
the curled surface facing down.
Curl should
be less than
3mm (0.12").
Use narrow margins
The HC5500 uses 5mm (5/16") vertical and horizontal
margins by default due to its high-speed paper feed
mechanism. These margins can be reduced to 1mm
(0.04") by selecting [Maximum] in [Menu 4.10 Image
Area].
The usual printing procedure consists of clicking on
[Print] [OK] at the Computer’s printer driver screen.
With the HC5500, it is possible to do it that way too.
However, in some situations such as when you want
to print a large amount of data or manipulate data
that have been already finished (for example, to print
someone else's data), it is possible to give instruc-
US/UK-19
Let's Start Printing
The printing mode is switched ON/OFF with the PRINT/PAUSE key
of the Operation Panel.
Printing mode ON
Prints upon a command from the printer controller.
Lit green
Printing Mode ON
Printing mode OFF
The printer does not accept commands from the printer
controller and keeps waiting for a command from the
Operation Panel. Panel operations permit changing
settings, as well as adjusting position and contrast of the
data currently being printed.
Not lit
Printing Mode OFF
US/UK-20
Sleep Mode and Stand-by Mode
When the printer is switched ON and is left unused for a certain period of time, it automatically enters an energy
saving mode.
Two types of energy saving modes are available: [Stand-by mode] and [Sleep mode].
Stand-by mode
WAKE-UP Key
In the Stand-by mode, power consumption drops from the usual 800W to less
than 150W. Any print operation sent from the computer calls the printer back
Ready
from the Stand-by mode to start printing. For menu operations, use the
WAKEAuto
UP key.
Sleep mode
The sleep mode is more economical than the wait mode. Power consumption
falls to less than 20W. To bring the printer back from the sleep mode to the
printable state on Macintosh machines, use the [RISO Wake-Up Tool] available
in the RISO Controller CD-ROM to send a command from the computer or
press the Sleep Key of the HC5500. (On Windows machines, the data is automatically received when sent.)
Sleep Key
It is possible to set up the times required to enter the stand-by and sleep modes.
HC5500 time setting relations
Menu
Contents
Adjusted item
Menu 5.8.1
Sleep
Defines whether or not to enter the sleep mode when the printer is left unused for a certain period, in order to save energy.
ON (Default)
OFF
Menu 5.8.2
Waiting Time
Defines the time required to enter the sleep mode when [Sleep] in menu
5.8.1 is set to [ON].
60 minutes (Default)
1 to 99 minutes
Menu 5.8.18
Print Mode Auto-ON
Defines whether or not the Print mode will be set to [ON] when left unused
in the OFF state for a certain period of time.
ON (Default)
OFF
Menu 5.8.19
Print Auto-ON Time
Defines the time required to set the Print mode to [ON] when [Print Mode
Auto ON] is set to [ON].
5 minutes (Default)
1 to 60 minutes
Menu 5.8.20
Menu Auto-Shut OFF
Defines whether or not to switch the Print mode to [OFF] when no operation is performed on the menu setting screen for a certain period of time.
ON (Default)
OFF
Menu 5.8.21
Menu Shut OFF Time
Defines the time required to set the Print mode to [OFF] when [Menu Auto
Shut OFF] is set to [ON].
5 minutes (Default)
1 to 60 minutes
Menu 5.8.22
Stand-by
Defines whether the printer enters the Stand-by mode to save energy
when not used for a certain period of time.
ON (Default)
OFF
Menu 5.8.23
Stand-by Period
Defines the time required to enter the Stand-by mode when the [Stand-by
Mode] in Menu 5.8.22 is set to [ON].
5 minutes (Default)
1 to 99 minutes
Operation on
the menu setting screen
C
Time elapsed without any
operation and menu screen
displayed
1.Automatic transition
to Print Mode OFF
B
Time elapsed without any
operation and Print Mode
OFF
2.Automatic transition
to Print Mode ON
3.Automatic transition
to Stand-by mode
A
B
C
D
4.Automatic transition
to Sleep mode
D
Time elapsed without any
operation and Print Mode ON
A
Time elapsed without any
operation and Print Mode
ON
In the HC5500, the time transitions shown in [1 to 4] are continuously repeated when settings [A to D] are performed.
When using a Macintosh, setting [A (Sleep)] makes the printer controller not receive data from the computer during sleep mode. Send the data
after waking up the HC5500 using the RISO Wake-Up Tool.
US/UK-21
Let's Start Printing
Duplex Printing = [Switch Back] + [Stackless] System
By default, the HC5500 can do duplex printing* in any size
varying from postcards to A3W (ledger) (46g/m2 - 210g/m2).
The printer uses the "switch back" method that consists of
printing the front page first, reversing the paper and then
printing the back page. This method tries to alleviate the
burden suffered by the paper and carefully considers the
size of the body. Furthermore, in order to take advantage of
high speed, the "stackless" method is used. Soon after
printing the front page and reversing the paper, the sheet
passes through the back of the print head. This mechanism
permits efficient duplex printing without losing speed.
Switch Back
Vertical
Paper feeder
Print head
Paper
Paper
After printing the front page of the sheet, it passes through
the vertical paper feeder and is turned over at the Switch
Back Paper Guide.
The reversed sheet enters the space between the sheets
fed by the feed trays and then passes under the print head
again.
The front and back pages are printed alternately. The back
page is printed according to the print unit specified by the
printer driver command, and the sheet is output to the
stacking tray.
Paper
Paper: Front side
Paper: Back side
*Except envelopes and special paper
Printing envelops
- The [Paper Size Entry] is necessary for printing envelopes.
The size (length) of the envelope to be registered must include
its flap.
Differently from the case of usual paper, the Maximum Print
Area (Image Area) corresponds to the registered value subtracted by a margin of 10mm (3/8").
- Load the envelope on the Standard Paper Feed Tray with the
flap on the left side.
- Some types of envelopes cannot be used for printing.
Example: windowed envelopes
For details, contact your local dealer (or sales representative).
Length (Horizontal)
10mm
Width
(Vertical)
Print area
10mm
10mm
10mm
Paper feed
direction
Be careful not to let the data be printed
beyond the flap of the envelope.
When the dashed area of the figure is
covered with the data to be printed, the
transportation belt inside the HC5500
gets soiled and may cause malfunction.
US/UK-22
10mm
10mm
10mm
10mm
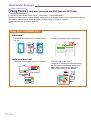
GDI and PS controllers
The output from a printer can use standard OS functions such as GDI (Windows) or QuickDraw (Macintosh), or
may use a page description language such as PS (PostScript) and PCL. The HC5500 Series uses a special GDI
controller and a PS controller.
The GDI controller (HC3R) uses drawing functions of the OS and sends data rasterized at the computer to the
printer controller for printing. The data rasterized for the HC5500 can only be used by the HC5500.
The PS controller (PS7R) uses PS as a page description language. The page data sent from the computer to the
controller (PS data) are converted into printable data (rasterized) and then sent to the printer. The data transfer from
the computer occurs at high speed and does not overload the computer, making it possible to immediately start the
next DTP work. The PS data can reproduce (print) pictures and characters regardless of the equipment. (The
printer controller is compatible with Adobe Postscript ® 3.TM)
HC5500
Windows (GDI)
The printer
driver creates
a BMP image
Prints out without
any conversion
HC3R-5000
PS data
HC5500
Windows / Machintosh
Prints out after the
controller rasterizes
the job (RIP).
PS7R-9000
US/UK-23
3
Frequently Used Basic Functions
Duplex printing
Consists of printing on both sides of the paper. By combining this function with the Multi-Up, you can make your
documents more compact.
See User's Manual for Printer Driver page 2-6.
By setting duplex printing as the printer's default in [Properties], you can save the effort of repeating the setting
every time.
This function can be combined with the (optional) HC Finisher, which performs stapling and hole punching automatically - the printout is ready for distribution or filing, for better efficiency.
How to do duplex printing
1
Click on the [Main Setting] tab of the Printer
Driver screen.
2
Choose the binding direction in [Duplex printing].
US/UK-24
Short edge binding
Long edge binding
Even more convenient ways of printing are possible by combining duplex printing with the Booklet (Pagination) function.
For example, 4 single-sided
pages (4 x A4)
You can print on one A3 sheet
(stapling is unnecessary)
In case of paper jam during duplex printing...
During printing, paper travels at high speed inside the
printer. For this reason, not only the jammed paper but
also the ones in motion should be removed.
This is especially true for the duplex transfer unit, which
may contain several papers. When paper jam occurs
during duplex printing, rotate dial B inside the printer
until all the paper is removed.
For your reference, a seal showing instructions related
to paper jam becomes visible by opening the front
cover of the printer.
Duplex Transfer Unit
Dial B
See User's Manual for Printer Main Body page 3-9.
US/UK-25
Frequently Used Basic Functions
Multi-up (Multi-page)
Prints multiple pages on 1 paper by pagination (arrangement). Pagination can be selected for 2, 4, 8, or 16* pages.
It is also possible to select the order of the pages.
* 16-page selection is only possible when connected with a RISO PS7R-9000 controller.
For HC3R-5000, see User's Manual for Printer Driver page 2-14.
For PS7R-9000, see User's Manual for Printer Driver page 3-14.
Multi-up
(Two pages in one)
How to Use Multi-Up
1
US/UK-26
Click on the [Layout] tab of the Printer Driver
screen.
2
Select [Multi-up].
Select [Pages per sheet]
Select [Page order] as well.
The usual setting is [Auto].
Vertical
Vertical & Reverse order (from right to left)
Horizontal
Horizontal & Reverse order (from right to left)
US/UK-27
Frequently Used Basic Functions
Job Separation
Preparing a large quantity of documents for meetings is straightforward using the Job Separation function.
For HC3R-5000, see User's Manual for Printer Driver page 2-26.
For PS7R-9000, see User's Manual for Printer Driver page 3-25.
Types of Job Separation
Between jobs
:Separation Paper
A separating paper is inserted after completing each job sent by the computer.
Every division
A separating paper is inserted after completing each section of a single job.
• For collate printing
Prints and groups by set.
Previously printed covers can be
used as separation papers.
“Loading separation
papaers” on page 29 of this
manual.
• For non-collate printing
Prints and groups by page.
US/UK-28
How to Do Job Separation
1
Click on the [Options] tab of the Printer Driver
screen.
2
Select the type of Job Separation
When [Every division] is selected, separation
papers are inserted according to [Ejection
mode] of the [Main setting] tab.
Loading separation papers
Define in advance in which tray the separation paper
will be loaded. In the explanation of this example, the
separation paper will be loaded in the Standard
Paper Feed tray.
1 Load the separation paper on the Standard Paper
Feed tray.
2 Press the Menu key on the printer.
3 In [Menu 5 Administration] - [5.3 Separation
paper], choose [Standard Feed Tray].
See User's Manual for Printer Main Body page 2-36.
Separation
paper
Standard
Paper Feed Tray
Paper Feed Tray 1
Paper Feed Tray 2
Use paper in Paper Feed Tray 1 or Paper Feed Tray 2 for printing
If you select [OFF], the printer will stop regularly for a
few seconds. During these intervals, it is possible to
attach labels or insert sheets that have been printed separately.
The tray (Standard Paper Feed tray) assigned to load separation paper cannot be selected by the printer
driver when the tray selection is set to [Auto tray selection]. To use it as a standard tray, change the
setting to [OFF].
US/UK-29
Frequently Used Basic Functions
RISO Console
When connected to the LAN, the HC5500 not only
is capable of high-speed data transfer but can use
the network, for several purposes. Operations can
be executed at the local computer rather than at
the printer itself.
The console screen is displayed when you enter
the IP address assigned to the HC5500 in the
browser address field.
See User's Manual for Console page 1-3.
Monitoring
The printer's current operation status can be checked. In addition, the conditions of consumable items are displayed
via icons and messages.
See User's Manual for Console page 1-4.
Status
The printer's current
status is displayed.
About...
1
2
5
3
6
The settings of the
printer controller and
the printer are displayed.
4
7
1 Message
Information related to the printer is displayed.
2 Comment
Complementary information related to the message is
displayed.
3 Printer Icon
Information related to the printer is displayed.
4 Power Icon
The status of the printer's power supply is displayed.
US/UK-30
5 Paper Information
The size, type, and direction of the paper loaded in the paper
feed trays are displayed.
6 Printer Information
The size of the paper loaded in the selected tray is displayed.
If [Auto tray selection] is selected in [Paper feed tray] for printing,
[Auto] is displayed.
7 Controller Information
Displays the space available in the hard disk, data receiving
conditions, and the name of the job being processed.
Job Manager
Job Manager lets you output the job currently being stored in the printer controller. Also, the status of the job
currently processed by the printer controller can be displayed.
See User's Manual for Console page 1-6.
Archive
Can check and output currently stored RIP-processed jobs.
(Only when connected with RISO Controller PS7R-9000)
Job status
The name, status, owner, number of
sets, and receiving date and time of
the job under process are displayed.
Storage
The stored job can be checked and output.
Forms
The job registered in the forms
can be checked and output.
(Only when connected with
RISO Controller PS7R-9000)
Scan and storage
The corresponding
screen is displayed
when clicked.
If the optional scanner (RISO
Scanner HS2000) is installed,
the scanned page data (data
stored by the copy) are stored
here.
Other functions
Custom setting ..... It is possible to view the history of jobs processed by the printer controller by clicking on
[Custom setting]. Data saved by the [Network scan] function can also be downloaded.
Administrator ........ Specifies operations of the printer controller, etc.
Settings can only be changed by users who logged in using the administrator's password.
Help ........................... Instructions on how to use the RISO Console are displayed.
US/UK-31
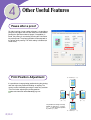
4
Other Useful Features
Pause after a proof
For jobs involving a large number of pages, it is possible to
print just one page or one set and check the results before
printing the specified number of pages. If no problem is
found, the printing is resumed by pressing the Print/Pause
key at the printer. The printing position can be adjusted at
the printer while pausing. The initial setting is disabled (no
check mark).
Print Position Adjustment
→
0 – 20.0mm (0" - 13/16")
It is possible to change printing position during the printing,
and also adjust the position for binding or stapling. The
results can be checked by pressing the menu key and then
"Test Print" after adjusting the printing position.
See User's Manual for Printer Main Body page 2-14.
→0 – 20.0mm
(0" - 13/16")
0 – 20.0mm
(0" - 13/16")
→
The position can change at the top,
bottom, left, and right, 0 – 20.0mm
(0” – 13/16”) from the current position,
by 0.5mm (3/16”) units.
→
0 – 20.0mm (0" - 13/16")
US/UK-32
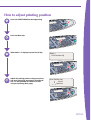
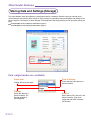
How to adjust printing position
1
Press the PRINT/PAUSE key during printing.
2
Press the Menu key.
3
When Menu 1 is displayed, press the OK key.
de OFF
Printing Mo
Menu 1
Adj
Print Position
Menu 1
Print Position Adj
Menu 1
n Adj
Print Positio
4
Adjust the printing position using cursor keys
and start printing by pressing the Print/Pause
key. It is also possible to check the results
using test printing. (Next page)
Print Position Adj
10 mm
00.0 mm
nt ?
Ready to Pri
Cancel/OK
US/UK-33
Other Useful Features
Test Print
You can check the results after adjusting printing position or density.
See User's Manual for Printer Main Body page 2-16.
How to do test printing
1
Press the PRINT/PAUSE key during printing.
2
Press the Menu key.
3
Display [Test Print] by pressing the cursor keys
and then press the OK key.
de OFF
Printing Mo
Menu 1
Adj
Print Position
Menu 2
Test Print
Menu 2
Test Print
4
Test printing starts after pressing the OK key.
Check the result.
Ready to Print ?
Cancel/OK
nt ?
Ready to Pri
Cancel/OK
US/UK-34
Job comments
Comments can be added to the data when a person who
prepares and edits the page sends the DTP data to the
controller and another person in charge of printing
executes printing. Comments may include paper type or
colour, size specifications, and any other information that
needs to be communicated to the person in charge of
printing. This feature can be used as printing specifications in case the environment where the data are prepared is separated from the printing environment.
Number
of pages
to print
Size
Colour
Adding job comments
1
Click on the [Main setting] tab of the Printer
Driver screen.
2
Click on [Specify output condition].
3
Input job comments.
US/UK-35
Other Useful Features
Reprinting (Temporary Data Retrieve)
After completing a printing job, it is possible to
reprint the last page specifying the desired number
of copies.
This feature is useful when you want to print a few
more copies than the specified number.
For reprinting, [Initial Setting] in [Administrator
Setting] of the RISO Console needs to be changed.
Use the printer's
control panel to
enter the number
of pages to be
reprinted.
See User's Manual for Console, page 2-18
Reprinting
1
Press the Menu key during the [Ready] state.
Ready
Auto
Ready
Auto
2
Display [Menu 3 Temp Data Retrieve] and press
the OK key.
Menu3
Temp Data Retrieve
Menu3 Data Retrieve
Temp
US/UK-36
3
Specify the number of copies with the cursor
keys. The printing starts when you press the
Print Quantity
0100
PRINT/PAUSE key.
Quantity
0100
U
Temporary Data (“Temp Date”)
After printing, the printer can internally store the last page of the printed job, which is called "Temp Data".
The printer keeps these data until the arrival of the next data (job). The following usage is possible by
selecting whether or not to keep temporary data.
Discarding temporary data
Keeping temporary data
The factory setting is to discard temporary data..
For printing private documents that you do not
wish to be copied such as examinations and
directories, you can avoid unwanted printing by
unselecting [Keep the last page of the job in the
printer].
If you check the option [Keep the last page of the
job in the printer] in the [Initial setting] of the
[Administrator] screen of the RISO Console, you
can print a specified number of copies of the last
printed page. This feature is useful when you
want to print a few more copies than the number
specified in the printer driver.
Printing PS or PDF data through FTP or LPR connection
It is possible to connect with the HC5500 via FTP (or LPR) to send and print PS (or PDF) data. PS data are
generated by putting a check mark on [Output to file] in the print dialog screen and clicking on the [Print]
button.
* To print data using the HC5500, the PPD information of the HC5500 needs to be in the correct order.
Login name: anonymous
Password : none
It is possible to specify the destination of the PS (or PDF) data. However, the setting may not work correctly for
PS (or PDF) data created without using HC5500's PPD.
US/UK-37
Other Useful Features
Using Forms
(only when connected with RISO Controller PS7R-9000)
It is possible to add constant marks or texts - called "forms" - to printed documents.
By previously storing texts or images as forms, adding them to the printout requires just a simple operation. You can
also combine different data for duplex printing by storing one page in the printer controller.
See User's Manual for Printer Driver page 3-29.
Using forms in different ways
In the office
• Confidential documents to be circulated in meetings, etc.
• Printing the company's logo on letter heads
Form
Open seminar
New product release
Form
Output data
Final output
Leaflets and direct mail
• Using forms to print leaflet frames or shop logos
US/UK-38
• Postcards used as direct mail
Combining the contents (including the shop or
the description of a promotion) and the destination address written by the application
software (by insertion) in one printout.
Selecting Forms
1
Click on the [Forms] tab of the Printer
Driver screen.
2
Select whether or not to do duplex printing in
[Form print pattern].
3
Select the data to be used as a form and click
on [OK].
Using watermarks (only when connected with RISO Controller HC3R-5000)
Previously registered strings of characters can be
applied as watermarks for printing.
See User’s Manual for Printer Driver, page 2-28.
Important
Confidential
US/UK-39
Other Useful Features
Storing Data and Settings (Storage)
The most common usage of the printer is printing data sent by a computer. However, when you need to select
several features at the printer driver screen for every printout, it is possible to store printing data and settings in the
printer controller. This feature is called "Storage". According to the data to be printed, you can just store data or just
print.
For HC3R-5000, see User's Manual for Printer Driver page 2-9.
For PS7R-9000, see User's Manual for Printer Driver page 3-9.
Four output modes are available
Direct print
Print & Storage
Printing directly on the paper.
Prints and stores the data in the
printer controller.
Storage
Stores the data in the
printer controller. The
printing condition is
stored together.
US/UK-40
Archive
Stores data as RIP (archive) in the
printer controller. (Only when
connected with RISO Controller
PS7R-9000)
The useful "Storage" function
Often used data can be stored as "storage data" in the printer controller. Storage data have the 2 features
below.
Feature 1: Output conditions stored together
It is possible to always use the same printing conditions without setting the driver every time.
Nine storage folders are available and can be used to store/control data separated by objective and type.
Data
New product promotion
Proposal
Output condition
Paper size
Duplex printing
Paper Feed Tray
Paper type
Ejection mode
---- A4
---- Long edge binding
---- Auto tray selection
---- Standard 1
---- Collate
Save as
storage data
Printer controller
Feature 2: OS-independent data storage format
(only when connected with RISO Controller PS7R-9000)
The data received from the computer are stored in the printer controller in the PS format. Storage data
can be called by any computer for duplex or paginated printing regardless of the OS (Windows,
Macintosh, etc.)
By converting to PS data, it is possible to avoid output errors due to OS type or version. Printing time is
also reduced because of the data that are not transmitted.
US/UK-41
Other Useful Features
Making Booklets (Pagination)
Using the [Layout] tab of the printer driver, it is possible
paginate booklets without the help of an application software to prepare the data. You can print data as they are,
without deteriorating image quality and saving a significant
amount of work.
For HC3R-5000, see User's Manual for Printer Driver page 2-14.
For PS7R-9000, see User's Manual for Printer Driver page 3-14.
Choose booklet
Preparing booklets from data
Data
US/UK-42
Duplex print / both sides
2-in-1 pagination
Booklet completed
with binding.
Binding
• Since booklets require duplex printing, please load papers that allow for that.
• Four pages are printed on one sheet. The first page of the original data becomes the first page of the booklet.
Fractional pages are left blank. Arrange the paper considering the size of the finished result.
• The pagination order can be selected.
Printing on large-sized paper
Do not use the stacking guide when printing on a paper larger than
320mm x 432mm (12 5/8" x 17").
In that case, set [4.8.2 Stack Guide] in the printer menu to [OFF].
US/UK-43
Other Useful Features
Adjusting the Image
In the printer driver, it is possible to adjust the reproduction of half-tone images such as photographs. Since the
adjustment applies uniformly to the entire image, individual pictures cannot be processed separately. For changing
colours or performing individual processing, use an image processing software.
To adjust image quality, click
on the [Image processing] tab
of the printer driver screen.
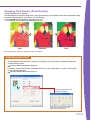
Changing the contrast of the entire image (Contrast)
Pictures with low contrast can be adjusted and transformed into sharper images. Selecting [High] stresses the
differences between bright and dark areas, resulting in a sharp image. On the other hand, [Low] reduces the
differences between bright and dark areas, resulting in images closer to gray.
For HC3R-5000, see User's Manual for Printer Driver page 2-19.
For PS7R-9000, see User's Manual for Printer Driver page 3-19.
Lower contrast: -
US/UK-44
Standard
Higher contrast: +
Changing Total Density (Print Density)
The total colour density is adjusted.
To make adjustments using the printer driver, select [Print density] in the [Options] tab; to make adjustments using
the printer's operation panel, select [Menu 4.7 Print Density].
For HC3R-5000, see User's Manual for Printer Driver page 2-19.
For PS7R-9000, see User's Manual for Printer Driver page 3-19.
Light
Standard
Dark
RISO Controller HC3R-5000 permits adjusting "Chroma" and "Lightness."
Adjusting gamma level
To adjust gamma levels for R (red), G (green), and B (blue), put a check mark in [Details] and open the
[Change Details] screen.
See User's Manual for Printer Driver page 2-20.
For RISO Controllers PS7R-9000, the gamma levels of C (cyan), M (magenta), Y (yellow), and K (black)
can be adjusted separately.
See User's Manual for Printer Driver page 3-19.
Setting the gamma level of the
colour to be adjusted.
Lower values for brighter images and
higher values for dark images.
US/UK-45
Other Useful Features
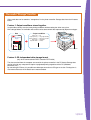
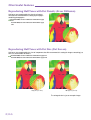
Reproducing Half Tones with Dot Density (Error Diffusion)
Half tones are reproduced by the density of component dots. We recommend this setting to print pages
containing photographs.
For HC3R-5000, see User's Manual for Printer Driver page
2-21.
For PS7R-9000, see User's Manual for Printer Driver page
3-20.
Reproducing Half Tones with Dot Size (Dot Screen)
Half tones are reproduced by the size of component dots. We recommend this setting for images containing just
one or a small number of colours.
For HC3R-5000, see User's Manual for Printer Driver page 2-21.
For PS7R-9000, see User's Manual for Printer Driver page 3-20.
70 lpi (lines per inch)
100 lpi (lines per inch)
The enlarged view is just an example image.
US/UK-46
Printing characters in higher quality
The characters to be printed undergo a smoothing process, resulting in more beautiful lines.
Click on [Line smoothing] in the [Image processing] tab.
Print characters in smoothed line.
Check [Line smoothing] in the [Image
processing] tab.
For HC3R-5000, see User's Manual for Printer Driver
page 2-22.
For PS7R-9000, see User's Manual for Printer Driver
page 3-21.
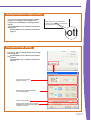
The special image setting
Click on the [Special setting] button of the [Image
processing] tab.
For HC3R-5000, see User's Manual for Printer Driver
page 2-23
For PS7R-9000, see User's Manual for Printer Driver
page 3-22
The image can be rotated.
Adjusts the printing
positions of the front and back pages.
Sets the printing quality.
Selects whether or not to
perform colour matching using ComColorTM
Standard.(Only when connected with RISO
Controller PS7R-9000)
US/UK-47
Other Useful Features
Using the Optional Finisher
When printing a large number of copies, it is possible
to staple, punch, and fold each set in the specified
size, and documents can be prepared in a very efficient manner.
HC Finisher
Punching/stapling
Punching and stapling are useful for
preparing business documents and presentations. It is possible to insert previously
printed sheets as covers, or papers whose
colour differs from the rest of the document.
US/UK-48
Preparing catalogues and bulletins
(Booklet)
You can prepare booklets by folding printed sheets in two.
This represents a great progress in terms of reducing the
cost required to prepare printed matter, considering how
expensive small-quantity colour printing used to be. Now
you can prepare exclusive plans and catalogues to satisfy
customer needs.
Offset output
The output position can be changed
for each set. This way, sets can be
easily separated even before
binding.
Slightly offset output
HC Auto Stocker or
HC Finisher
Paper folding
The finisher is capable of folding in half.
This feature is useful for preparing leaflets and
direct mail, as well as posters for events.
US/UK-49
Other Useful Features
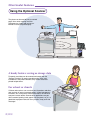
Using the Optional Scanner
The printer can be used to print a scanned
page, like a colour copying machine.
Operations are simple and can be performed on the touch panel display.
A handy feature: saving as storage data
Frequently used data can be scanned and saved (with the
"Storage" function). By storing reusable marks, texts, and
illustrations in the printer controller, they can be called and
printed multiple times.
For school or church
Children and teachers can scan their own illustrations and titles
and use them in internal communications (school newspapers),
invitations, etc. Having direct contact with colours will enhance
everyone's artistic talents. Several other applications are possible: seasonal greeting cards, paper craft, programs, etc. It is a
good idea to prepare frames for every season, ready to fill with
messages.
US/UK-50
In the office
Scanning documents containing comments written
by hand is practical in several ways.
Scanning and copying ("Copy" function)
The necessary number of pages can be printed or
stored ("Storage" function). Stored data can be used
for additional printing any time.
Data storage and transmission ("Network Scan"
function)
Scanned data can be stored and downloaded by a
PC via the network. It is also possible to attach data
to e-mail without needing to file the document.
Security
Assigning a security code to stored data prevents
access by other people.
Printing service
Different modes such as text or photograph can be selected according to the
type of document. Even a hardcopy
original can be entirely processed.
US/UK-51
5
Troubleshooting
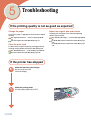
If the printing quality is not as good as expected
Change the paper
Adjust the original data and colours
Check if the paper is appropriate and has been loaded
correctly.
Changing the resolution of the data and adjusting
colours may be helpful.
See "Paper Specifications" — in this booklet page US/UK10.
See User's Manual for Printer Main Body page 1-7.
Clean the print head
See "Adjusting the images" — in this booklet page US/UK44.
For HC3R-5000, see User's Manual for Printer Driver page
2-18.
For PS7R-9000, see User's Manual for Printer Driver page
3-18.
In some cases the print head may get clogged. Head
cleaning can be performed from the operation panel.
See "Head Maintenance" — in this booklet page US/UK-54.
See User's Manual for Printer Main Body page 2-40.
If the printer has stopped
1
Check the operation panel display.
Has any error occurred?
Check the display.
2
Check the printing mode.
Isn't the printing mode set to OFF?
Lit green
US/UK-52
3
4
Have you tried test printing?
When the [Pause after a proof] checkbox is
checked, the printer keeps waiting for a print
command after printing the proof. If you find a
paper on the receiving tray, check the printed
contents and continue the printing.
de OFF
Printing Mo
Press the Print/Pause key
to restart printing.
1 Check the Console monitor and the status of
processed jobs in the job manager.
2 Refer to Chapter 3 "Troubleshooting" of the
User's Manual for Printer Main Body. If the
problem persists, contact your local dealer (or
service representative).
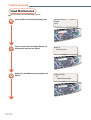
Changing the ink cartridge
See User's Manual for Printer Main Body page 3-18.
1
Detect the colour of the lamp that is on.
2
Remove the ink cartridge and install a new one.
US/UK-53
Trouble shooting
Head Maintenance
See User's Manual for Printer Main Body page 2-40.
1
Press the Menu key during the [Ready] state.
Ready
Auto
Ready
Auto
2
Press the cursor keys to display [Menu 5 Administration] and press the OK key.
Menu 5
Administration
Menu 5 nistration
Admi
3
Display [5.5 Head Maintenance] and press the
OK key.
Administration
5.5
Head Maintenance
n
Administratio
5.5
enance
Head Maint
US/UK-54
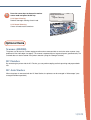
4
Press the cursor keys to choose the maintenance mode and press the OK key.
5.5.4 Hyper-Cleaning
Performs thorough cleaning of each head.
5.5.5 Normal Cleaning
Cleans all heads at the same time.
Head Maintenance
5.5.4
Hyper-Cleaning
enance
Head Maint
5.5.4
ning
Hyper-Clea
Optional Items
Scanner (HS2000)
The printer can be used as a colour copying machine when connected with an exclusive colour scanner (compatible to full A3-size/Ledger-size paper). The scanner is operated from a large touch panel (specified item). The
scanned data can also be stored in the printer controller (using the "Storage" function).
HC Finisher
By connecting the printer with the HC Finisher, you can perform stapling and hole punching and prepare booklets.
HC Auto Stacker
When the printer is connected with the HC Auto Stacker, the printouts can be arranged in "offset output" (sets
arranged in different positions).
US/UK-55
About the contents of the this manual
Riso shall not be responsible for any damage or expense that might result from the use of this manual.
As we are constantly improving our products, the machine may differ in some respects from the illustrations used in this manual.
Riso shall not be liable for any direct, incidental, or consequential damages of any nature, or losses or expenses resulting from the use of this
product or included manuals.
Trademarks
Adobe®, Adobe Type Manage®, AdobePS®, ATM®, PostScript®, PostScript®3TM , PostScriptLogo, PageMaker® are trademarks or registered
trademarks of Adobe Systems Incorporated.
AppleTalk®, Macintosh® or MacOS® are registered trademarks of Apple Computer, Inc. in the U.S.A. and other countries.
Microsoft®, Windows® is a registered trademark of Microsoft Corporation in the U.S.A. and other countries.
Netscape® and Netscape Navigator® are registered trademarks of Netscape Communications Corporation registered in the U.S.A. and other
countries.
ColorTune® is a trademark of Agfa-Gevaert N.V. registered at US Patent and Trademark Office and may be registered in other regions of
jurisdiction.
ComColor™, and FORCEJET™ are trademarks of RISO KAGAKU CORPRATION.
is a registered trademark of RISO KAGAKU CORPORATION in Japan and other countries.
All other product names and company names written in this manual are trademarks or registered trademarks of their respective companies.
Copyright © 2007 RISO KAGAKU CORPORATION
US/UK-56


![1 Click the [OK] button.](http://vs1.manualzilla.com/store/data/005894494_1-d1f52ee6fd3b2146a5f252d3f1858c3b-150x150.png)