1
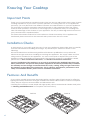
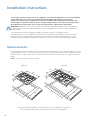
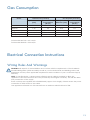
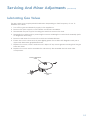
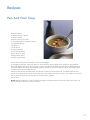
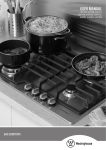
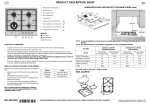
Operating and Care Instructions
Gas Cooktops
Model No’s
5667100 700mm Gas Cooktop
5669100 900mm Gas Cooktop
Contents
Safety Notes
3
Knowing Your Cooktop
4
Using The Appliance For The First Time
5
Control Panel Operation
5
Cooking Instructions
6
Cleaning And Maintenance
7-8
Troubleshooting Guide
9
Installation Instructions
10-11
Gas Connection Instructions
12
Gas Consumption
13
Electrical Connection Instructions
13
Servicing And Minor Adjustments
14-15
Recipes
16-18
Part Numbers
19
2
Important Points
Installation Checks
Features And Benefits
Gas Burner Controls
Recommended Cleaners
Routine Cleaning
Spills, Spatters And Accidents
Measurements
Required Clearances
Securing The Cooktop
Gas Supply Connection
Wiring Rules And Warnings
Setting Gas Pressure
Gas Simmer Flame Adjustment
Conversion From Natural Gas To LPG
Lubricating Gas Valves
Spaghetti With Clams
Pea And Ham Soup
Paella Valenciana
Safety Notes
!
• DON’T USE THE APPLIANCE AS A SPACE HEATER. The appliance must never be used for
warming or heating the surrounding room or for drying clothes or textiles or other items not
specifically recommended in the operation manual. Combustible materials or products must
never be placed on or near the appliance.
• DO NOT LEAVE CHILDREN ALONE. Children must not be left unsupervised in the area where
the appliance is in use. The appliance gets hot during use and retains heat for some time
after being turned off. Children must never be allowed to sit or stand on any part of the
appliance.
• DO NOT SPRAY AEROSOLS IN THE VICINITY OF THE APPLIANCE WHILST IT IS IN OPERATION.
• WEAR PROPER APPAREL WHEN USING THE APPLIANCE. Loose fitting, hanging or highly
flammable garments (such as synthetics) should never be worn while using the appliance.
• USE ONLY DRY POT HOLDERS. Moist or damp pot holders on hot surfaces may result in burns
from steam. Do not allow pot holders to touch hot heating elements. Do not use a towel or
bulky cloth when handling hot cooking utensils.
• DON’T STORE FLAMMABLE ITEMS NEAR THE APPLIANCE. Items, particularly flammable materials,
must never be stored on or near surface units.
• DO NOT USE OVERSIZE COOKWARE OR PLACE COOKWARE OFF-CENTRE OVER BURNERS.
Oversize cookware will deflect heat towards the cooktop and bench top surfaces.
Cookware with large bases, especially if placed off-centre over the burners, may cause
deterioration of the cooktop and bench top surfaces. Such damage is not covered under
the provisions of the warranty. Follow the illustrations and examples in the Cooktop Cooking
instructions.
• NEVER USE AN ASBESTOS MAT BETWEEN COOKWARE AND COOKTOP. Use of an asbestos mat is
both hazardous and will cause damage to the unit.
• ONLY PLACE COOKWARE ON PAN SUPPORTS. Other surfaces of the appliance, for example
trims, are not totally resistant to hard or sharp materials or direct heat and may be damaged
by such use.
• If the surface is damaged, switch off the appliance to avoid the possibility of electric shock.
• The appliance is not intended for use by young children or infirm persons without supervision.
• Young children should be supervised to ensure that they do not play with the appliance.
• VENTILATION SLOTS AND AIR VENTS MUST NOT BE COVERED OR OBSTRUCTED IN ANY WAY.
Recipes on pages 16-18 are all © The Margaret Fulton Cookbook.
Colour photographs are © Geoff Lung, 2004
3
Knowing Your Cooktop
Important Points
Thank you for purchasing an excellent product that we are sure will provide many years of great
cooking experiences. If you haven’t had the pleasure of cooking with one of our appliances
previously, you may find that it has different features and characteristics to your last appliance.
It is essential you read this operation manual thoroughly to fully understand all of the various
functions and operations. The aim is to encourage you to experiment with your cooking and
take full advantage of the features of your appliance. The key to achieving results that best suit
your personal taste is experimentation.
This manual should be retained for future reference. Should ownership of the appliance be
transferred, please ensure that the manual is also passed onto the new owner.
Installation Checks
In the interests of your safety and the care of your new appliance, please take time to carefully
read this manual before installing and using it. In particular your attention is drawn to the
following:
A licensed electrician and licensed gas fitter with relevant qualifications must perform all
electrical and gas work when installing or servicing the appliance. The supply cable and fuse
rating must be suitable for the appliance. You must never repair or replace any part of the
appliance unless specifically recommended in the operation manual. For installation details,
please refer to Gas Connection Instructions, and Electrical Connection Instructions.
Incorrect installation of the appliance as a result of not following the detailed instructions can
affect performance and pose a safety hazard. Appliances incorrectly installed may invalidate
the warranty and we strongly recommend that the cavity, venting, wiring and gas connection
be prepared as described in the instructions. This is critical to appearance, performance and
safety. For installation details, please refer to Installation Instructions.
Features And Benefits
Gas cooktop models incorporate electronic ignition and fast take-off gas burners for effective
lighting and heat production. Both gas models have Flame Failure Device control for complete
safety. All pan supports are removable and dishwasher safe.
Cleaning the cooktop is made simple with high quality vitreous enamel and stainless steel (refer
to Cleaning and Maintenance for complete care instructions).
5667100
4
5669100
Using The Appliance For The First Time
After installation remove all notification labels (not gas or electrical warning labels), advertising,
tape, packaging, etc. A quick wash with diluted soapy water should rinse away any adhesive
residue. Eucalyptus oil (small amounts) is also good for removing adhesive residue. Thoroughly
rinse cleaned surfaces and wipe them dry using a clean, soft cloth.
NOTE: People with sensitivity to cleaning chemicals must take the necessary precautions. It is
recommended that protective gloves be worn while cleaning the appliance.
INITIAL HEAT UP
Some smoke and smell may be noticed during the initial heat up cycle (see Using the
Appliance for the First Time). This should quickly dissipate. If abnormal levels of smoke are
observed (i.e. it is not food that is burning) have the appliance thoroughly checked.
Control Panel Operation
Gas Burner Controls
The cooktop burners are ignited by the in-built electronic ignition
controls. The controls must be turned anti-clockwise to operate
and can only be turned clockwise to the off position. Alternatively,
the burner may be ignited manually using matches, cooktop gas
lighters or similar devices, being careful not to risk injury or damage.
To operate the controls ensure the burners are correctly assembled
and positioned over the gas burner outlets and the pan supports
are correctly positioned then:
High
Low
1. Start the gas flow by pressing down and turning the control
knob corresponding to the burner you wish to use anticlockwise. Pressing down on the control knob causes the igniters
to spark.
NOTE: These units are fitted with Flame Failure Safety Devices. These require the controls to
be fully depressed during ignition to ensure correct operation. The controls should be held
fully down for at least 10 seconds during the ignition and flame establishment period to
ensure the valve remains open after the knob is released.
2. Once the flame is established the knob need no longer be pressed and may be turned to
your required setting.
3. The flame can then be turned down by turning the control knob further anti-clockwise.
4. For Wok Burner:
Once the flame is established using the normal procedure described above, it can be
turned down by turning the control knob further anti-clockwise.
Press the control knob again and continue turning anti-clockwise to extinguish the outer ring
flame and provide a full control high-to-low inner ring flame for simmering applications.
Check for a clear blue flame without excessive yellow tipping. If burners show any abnormal
combustion check they are correctly located on the burner base.
NOTE: Sometimes burners may not ignite immediately and may seem to “blow” slightly when
they do ignite. This is usually due to air in the gas line, which should clear itself.
For minor adjustments see Servicing and Minor Adjustments.
A 2 yearly inspection of the appliance by an authorised service agent will ensure many years of
trouble-free service. (NOTE: This is not provided under warranty).
5
Cooking Instructions
To achieve the best possible cooking results, the following points are recommended:
• Make sure that both the cooktop surface and the bottom of your cookware are clean and
dry before cooking. Clean and dry surfaces will help prevent scratches and stains on your
cooktop and cookware.
• Use good quality saucepans with thick ground bases (preferably 5mm thick) that effectively
cover the heating area. Pans which have smooth, slightly concave or flat bases when cold
will expand and become flat when hot. Thin, warped, dented or ridged bases can cause
irregular heat distribution resulting in uneven heating of food. Quality stainless steel pans are
recommended.
• The size of the pan should closely match the size of the cooking zone to be used – not much
wider or narrower. If the diameter of the base of the cookware is much smaller than the
diameter of the cooking zone, you will waste energy and increase the risk of burning spills. If
the cookware is too large for the burner, time to boil will be longer.
• When using the Wok burner, use pans with bases larger than the diameter of the burner.
When using the Wok burner at full power, it is recommended to use only Wok pans or frying
pans on the burner. Smaller pans may not provide enough clearance from the flame making
the handle/s too hot and unsafe to hold. For greater stability, use the supplied Wok ring.
• Use a set of twin or triple saucepans with dividers when individually cooking several
vegetables at the same time using only one burner.
• When steaming, use saucepans with close fitting lids.
• When cooking food such as cut vegetables or fruit, cut the food into pieces of uniform size to
obtain even cooking.
• When cooking vegetables use a minimum amount of hot water to obtain a crisp texture and
prevent over cooking. The quantity of water will depend on the type, quantity and quality of
the vegetables being cooked. With the exception of frying, etc., always cook with the lid on
the saucepan at the correct heat level to prevent boilovers.
•When cooking in woks or convex-bottom vessels, it is strongly recommended to use the Wok
ring supplied with the appliance.
!
WARNING: Oversize cookware will deflect heat towards the cooktop and bench top surfaces.
Cookware with large bases, especially if placed off-centre over the burners, may cause
deterioration of the cooktop and bench top surfaces. Such damage is not covered under the
provisions of the warranty.
HEAT DEFLECTED
TOWARDS
BENCHTOP
6
Match size of pan
to appropriate burner
HEAT EXTENDED
BEYOND BASE
OF PAN
Cleaning And Maintenance
Proper cleaning and maintenance of your appliance will provide you with years of pleasant
use. To maintain the appearance and durability of your appliance we encourage you to read
and follow the instructions, hints and warnings included throughout this manual. Care must
always be taken to prevent scratches on your appliance from hard or sharp objects.
NOTE: People with sensitivity to cleaning chemicals must take the necessary precautions. It is
recommended that protective gloves be worn while cleaning the appliance. Routine cleaning
of the appliance should only be performed when the appliance is at room temperature.
DO NOT USE ANY ACIDIC OR CAUSTIC CLEANERS, ABRASIVE POWDERS OR SCOURERS ON ANY
SURFACES OF THE APPLIANCE. Substances or items with these properties may discolour or
damage the finishes of your appliance. If any abrasive, acidic or caustic substance or cleaning
agent should come into contact with the appliance, rinse off immediately with water, taking
special care to avoid injury if surfaces are hot.
Recommended Cleaners
Mild detergents and warm water together with a clean, soft, non-abrasive cloth achieve good
results for normal cleaning.
Washing with diluted soapy water should rinse away any adhesive residue or gummy deposits
on the appliance surfaces. Eucalyptus oil (small amounts) is also good for removing adhesive
residues. Alcohol based products (e.g. methylated spirit, etc.) are not recommended.
Brand name cream cleansers and concentrates, without abrasive qualities, can be used in
small amounts to break down greasy deposits and dirt.
Aggressive chemical cleaners such as bleach or caustic oven cleaners may etch or discolour
surfaces or lift paint from trims and are specifically not recommended.
After cleaning, make sure cleaned surfaces are thoroughly rinsed to prevent any risk of bakedon cleaner residues, and wipe dry with a clean, soft cloth.
NOTE: When cleaning stainless steel surfaces, St George recommends using dedicated stainless
steel cleaning agents such as SteelPower by Hillmark, or any other reputable brand cleaners
specially formulated for cleaning stainless steel. When cleaning surfaces which have a brushed
stainless steel finish, take care to wipe in the same direction as the grain. Do not use steel soap
pads or abrasive scourers of any kind. The abrasive qualities of these pads will ruin the even
brushed finish of the stainless steel and any residual metal fibres may corrode causing a rusty/
dull appearance. Metal polishes with abrasive qualities are also not recommended.
7
Cleaning And Maintenance
(Continued)
DO NOT USE ANY ACID OR CAUSTIC CLEANSERS OR ABRASIVE POWDERS OR SCOURERS
ON THE INTERIOR OR EXTERIOR OF THE APPLIANCE
Spark Probe
Burner Cap
Gas outlets should
be free of obstructions
Flame Failure
Routine Cleaning
If possible, the cooktop should be wiped down after each use to prevent dirt and grease build
up. Ensure all controls are off and the appliance is cool before cleaning. To clean the exterior,
wipe the knobs, stainless steel and enamel surfaces regularly using a warm, damp, non-abrasive
cloth. Mild detergents may be safely used on all of these surfaces. When wiping stainless steel
surfaces which have a brushed finish, wipe in the same direction as the brushing. The pan
supports easily lift off and are dishwasher safe. The gas burner parts can be simply lifted off for
cleaning. After cleaning, check that the gas holes are clear before drying and correctly repositioning them.
After cleaning make sure all surface are thoroughly rinsed and then wiped dry with a clean, soft
cloth.
!
WARNING: Unclean surfaces, especially if allowed to build up, may in time damage or discolour
the appliance and such stains may not be removable.
Spills, Spatters And Accidents
When using the appliance, it may become soiled by food spills and spatters or foreign items such as
plastics accidentally coming into contact with warm or hot surfaces. Some foods, such as fruit
juices (especially citrus juices like lemon juice) and vinegars (i.e. acidic substances) or sugar (or
foods containing sugar) can discolour or damage enamel finishes.
The surfaces of your appliance have durable finishes which are resistant to wear and
discolouration. However, to maintain the appearance and durability of the finish any spills must
be wiped off immediately. This should be done as soon as possible and necessary precautions
must be taken to avoid injury from hot surfaces. Once cool, the affected area should be
thoroughly cleaned and rinsed using non-abrasive, mild cleaning detergents and water.
8
Troubleshooting Guide
Problem
Possible Cause
Action
No ignition
No spark
See next Problem
No gas
Check gas is not turned off or empty
Spark “escaping”
Clean around electrode and burner cap
No electric power
Check that the cooktop is plugged into the
power, and that power is available
Switch not pressed
Press the knob a bit harder, then try other
knobs
Did not press knob long
enough
Hold the knob down a bit longer
No spark
Flame not holding
Thermocouple not in flame Check the thermocouple is in place, is
clean and unobstructed
Not enough air entering
Flame falters
Flame irregularity
Check that air entry inlets are clean and
free of obstructions
Draught around appliance Ensure that there is not too much air
draught around the cooktop
Air in gas
Keep running for a while to see if it clears
itself, or contact your gas supplier
Burners not assembled
properly
Check that the burner is assembled
properly
For any other problems, or if the guidelines in this table could not resolve your problem, please
contact a qualified service technician to check your cooktop.
9
Installation Instructions
Your safety and the proper care of your appliance is extremely important. Incorrect installation
of the appliance as a result of not following these detailed instructions can affect the
appliance’s performance. Appliances incorrectly installed will invalidate the warranty and
we strongly recommend that the cavity, venting, wiring and gas connections be prepared as
described in the instructions. This is critical to appearance, performance and safety.
!
WARNING: Installation must comply with Standards Australia Wiring Rules (within Australia) as
well as your local electrical and building codes and regulations and any other applicable
requirements.
Your appliance must be properly installed and grounded by a qualified person.
This appliance must be installed according to the installation requirements of the local gas
authority and the appropriate installation code issued by
AS5601) and the building authorities’ requirements and any other applicable requirements.
Measurements
Unless otherwise noted, all dimensions provided are in millimetres (mm). The sizes allow for only a
small degree of error, so all cut-outs must be precise and square. To ensure the cabinetry is well
finished the cut edges must also be square and care taken to ensure the cut edges are free of
chips.
Note: Cutout is to have square corners.
5669100
5667100
520
520
700
900
52
52
488
875
488
560
77
77
The duplicate rating plate must be attached to an adjacent surface for
easy viewing, without the necessity of removal of the appliance.
10
Installation Instructions
(Continued)
Required Clearances
(Required Clearances Around Domestic Cooking Appliances – Extract from AS5601)
All cooktops, rangehoods and/or exhaust fans shall be installed in accordance with the
manufacturer’s instructions. However, in no case shall the clearance between the top of the
highest burner on the cooktop to the lowest extruding part of a rangehood be less than 650mm.
Minimum clearance for an exhaust fan is 750mm. (Clause 5.12.1.5)
Any other combustible materials less than 600mm above the top of the highest burner shall be
protected for the full width and depth of the cooking surface. However, in no case shall this
clearance be less than 450mm.
There shall be a clearance of at least 250mm between the closest edge of any burner and a
wall to the left, right or rear of the cooktop.
Overhead clearance shall be at least 650mm, measured from the top of the burners.
Securing The Cooktop
The final gas connection shall be made using a flexible hose or annealed copper tubing of
sufficient length to permit the insertion and removal of the appliance. For gas appliances
connected using flexible hose, the hose
.
For appliances fitted with a flexible electric lead and plug, the general purpose outlet and
switch must not be installed within the appliance recess and must be readily accessible without
having to remove the appliance.
The unit must be securely clamped to the benchtop, using the clamps supplied, once correctly
positioned. Refer to the diagram below for clamp arrangement.
Clamping cooktop to benchtop surface
BENCHTOP
COOKTOP
UNIT SHOWN CLAMPED TO
24mm BENCHTOP
USE SECOND SLOT IN
BRACKET FOR THICKER TOPS
11
Gas Connection Instructions
Gas Supply Connection
!
WARNING: This appliance must be installed by an authorised and qualified person, according
to the installation requirements of the local gas authority and the appropriate installation code
issued (within Australia) by
authorities’ requirements and any other applicable requirements.
1. Check the gas type of the appliance which is identified by a sticker attached to the
appliance.
2. Ensure the location of the gas supply and routing of the gas line is appropriate for the
appliance (see installation diagrams for gas connection location details).
3. Ensure that the supply connection point will be accessible when the appliance is installed.
4. Use of a hose assembly must comply with AS5601.
5. A restraining wire or chain of adequate strength is to be fixed to the appliance and the wall
within 50mm of each connection point. The length of the chain or wire is not to exceed 80%
of the length of the hose assembly.
6. It is recommended that a manual shut-off valve be installed in the gas supply line, in an
accessible position external to the appliance, such that the gas supply to the appliance
can be shut off in the event of an emergency or for servicing without having to remove the
appliance.
7. For LPG models, the gas supply for the appliance must be regulated to a pressure of 2.75kPa
(11” W.G.). The gas inlet is fitted with an adaptor incorporating a pressure test point and has
a ½” female BSP thread.
For Natural Gas models, the gas supply is connected to the regulator supplied with the
appliance, which has a ½” female BSP thread. IT IS ESSENTIAL THAT THE REGULATOR ON
THE APPLIANCE BE HELD FIRMLY WITH A SPANNER WHEN CONNECTING THE SUPPLY. DO NOT
OVERTIGHTEN. THE REGULATOR MUST NOT BE CONNECTED TO THE APPLIANCE OR THE GAS
SUPPLY WITHOUT THREAD SEALANT/LUBRICATION AS DRY CONNECTION MAY PERMANENTLY
BIND THREADS.
The regulated pressure for Natural Gas is 1.0kPa (4” W.G.).
8. After installing the gas supply and making all connections, the supply line connections must
be checked for possible leaks. With all controls of the appliance in the off position, open the
gas supply valve and using a soap and water solution check each gas connection one at a
time by brushing the solution over the connection. The formation of bubbles indicates a leak.
Tighten the fitting and recheck for leaks. If it is not possible to correct the leak by tightening,
replace the fitting. Matches and lighters must never be used to check for leaks.
9. Turn on each burner control and light in turn. Check for a clear blue flame without excessive
yellow tipping. If burners show any abnormal combustion check they are correctly fitted.
Sometimes burners may not ignite immediately and may seem to “blow” slightly when they
do ignite. This is usually due to air in the gas line, which should clear itself.
10. If, after following the instructions, satisfactory performance cannot be obtained, contact the
local gas authority for advice and assistance.
11. For minor adjustments see Servicing and Minor Adjustments.
12. A two (2) yearly inspection of the appliance by an authorised service agent will ensure many
years of trouble free service (Note: This is not provided under warranty).
12
Gas Consumption
Burner
Natural Gas (1.00 kPa)
LPG Propane (2.75 kPa)
Injector Diameter
(mm)
Nominal Gas
Consumption
(MJ/hr)
Injector
Diameter (mm)
Nominal Gas
Consumption
(MJ/hr)
Small
0.90
4.0
0.55
4.0
Medium
1.25
6.9
0.70
6.9
Large
1.45
10.2
0.88
10.2
2.20 + 0.75
22.0
1.20 + 0.53
22.0
0.75
2.6
0.53
3.2
Wok (Outer + Inner)
Wok (Inner)
Total: Model 5667100 = 43.1 MJ/hr
Total: Model 5669100 = 53.3 MJ/hr
Electrical Connection Instructions
Wiring Rules And Warnings
!
WARNING: All aspects of the installation must conform with the requirements of the Standards
Australia Wiring Rules (within Australia) as well as your local electrical and building codes and
regulations and any other applicable requirements and conditions of your Local Power Supply
Authority.
NOTE: To the Electrician – please ensure sufficient supply cable is provided to allow the
appliance to be removed from the cavity should any servicing be necessary. This will also allow
easy connection of the supply.
These cooktops are supplied with a flexible lead (approx 1m in length). Please ensure the power
connection is within reach of the cable.
Gas appliances referred to in this manual have a maximum electrical load of 5W.
13
Servicing And Minor Adjustments
All service work, minor or not, must be performed by a suitably qualified and licensed person.
Setting Gas Pressure
A pressure test point is provided on the pressure regulator (for Natural Gas models) or on the
inlet adapter (for LPG models) at the gas connection point of the appliance. The pressure
should be set with one burner fully on. The set pressure should be 1kPa for Natural Gas or
2.75kPa for LPG Propan.
Gas Simmer Flame Adjustment
The minimum gas flow for each burner is factory set but can be adjusted if necessary. The
minimum flow can be increased or decreased by removing the control knob and hob to gain
access to the adjustment screw on the valve body, and then turning the adjustment screw
using a small flat bladed screwdriver. Take care to not damage the head of the screw.
NOTE: The Wok burner valve has two adjusting screws, one for each of the burner flames.
Conversion From Natural Gas To LPG
The following must be carried out by an authorised person.
General Information
If the hob is supplied pre-adjusted for Natural Gas:
1. The injectors required for adapting this appliance to LPG are supplied in the conversion kit
(see sizes in the table under Gas Consumption).
2. When the appliance has been converted to LPG tick the box on the injector information
label.
3. Change the black Natural Gas labels to the red LPG labels.
Conversion
1. Remove the pan-support locating pins, pan supports, burner caps, burner ring/dress rings
and knobs.
2. Remove the hob.
3. Remove the fitted injectors one by one and replace with the LPG injector sized as the label
attached to the appliance and also in the users manual.
NOTE: Wok injectors are in the tubes leading to the burner.
4. Fit the Test Point Adaptor at the gas inlet.
5. After fully leak testing and working on each burner in turn, light each burner and then adjust
the minimum flame via the adjustment screw in the gas cock. With the gas cock set in the
low flame position, turn the adjustment screw clockwise to reduce the flow to the required
level. Two burners should be operating on full while adjusting each burner.
6. Replace the hob using all spacer rings.
7. Replace all the burner parts ensuring that they are correctly keyed to the mating part.
8. Replace the control knobs, pan support pins and pan supports.
14
Servicing And Minor Adjustments
(Continued)
Lubricating Gas Valves
The gas valves may require periodic lubrication depending on their frequency of use. To
lubricate the valves:
1. Turn off the gas and electricity supply to the appliance.
2. Remove the pan supports, control knobs and burner assemblies.
3. Disassemble the pan support locating pins and then remove the hob.
4. Dismantle the valve body by removing the screws retaining the control shaft assembly (refer
to diagram if necessary).
5. Remove and clean the cone with a cloth and suitable dilutant.
6. Ensure the cone is clean and dry and slightly grease the outside with Ragosine Moly LM or
approved alternative graphite lubricant.
7. Replace the cone, rotate it and remove it. Wipe off any excess grease ensuring that the gas
holes are clear.
8. Replace the cone and re-assemble the valve body. Re-assemble the hob and other
components.
Pressure adjustment
screw
Pressure test
point
15
Recipes
The recipes on these pages are provided to help you enjoy your cooktop.
All recipes are © The Margaret Fulton Cookbook.
Spaghetti With Clams
1.5kg clams
1 cup white wine
5 small ripe tomatoes, cut into large dice
½ small chilli, seeded and finely sliced
1 large clove garlic, finely chopped
2 tbsp extra virgin olive oil
¼ cup chopped parsley
salt and freshly ground pepper
375g spaghetti
Wash the clams thoroughly in several changes of water. Discard any that do not shut when
tapped. Soak them in cold water for 1 hour, then drain them to remove the sand, rinsing them
thoroughly again.
Heat the wine in a large saucepan. Add one-third of the clams, cover and cook until all are
open. Make sure you shake the pan to mix the clams several times during cooking. Repeat with
remaining clams in 2 more lots. When cool enough to handle, remove the clams from the shells,
leaving just a handful intact for the garnish. Discard the shells, reserving the flesh.
Meanwhile, combine the tomatoes, chilli and garlic in a bowl with the olive oil. Add the clams
and season well with salt and pepper. Stir in the parsley.
Boil the spaghetti in a large saucepan of boiling, salted water until done to the bite, al dente.
Drain thoroughly, return to the saucepan and toss with the clam sauce over a moderate heat,
until heated through.
Serves 4–6.
16
Recipes
Pea And Ham Soup
500g split peas
2 rashers bacon, diced
2 onions, sliced
2.5 litres (10 cups) water
½ tsp freshly ground black pepper
1 sprig fresh thyme
1 bay leaf
1 ham bone
2 carrots, diced
1 cup sliced celery
2 tsp salt or to taste
2 tbsp lemon juice
croutons (optional)
Cover the peas with cold water and soak overnight.
In a large saucepan, sauté the bacon, then add the onions and sauté until they are golden.
Add the drained peas, water, pepper, thyme and bay leaf. Add the ham bone. Bring slowly to
the boil, reduce the heat and simmer, half-covered, for 1 hour. Add the carrot and celery and
continue to cook for another hour.
Remove the thyme and bay leaf and discard. Take out the ham bone, cut all meat from the
bone, removing excess fat and any skin, dice and return the meat to the soup. Add the salt and
lemon juice just before serving. Serve with croutons, if liked.
Serves 6–8.
NOTE: Sliced frankfurts or spicy smoked sausage may be heated in the pea and ham soup. It is
then suitable as a main course for lunch.
17
Recipes
Paella Valenciana
½ tsp saffron threads
5 cups chicken stock
½ cup olive oil
4 half chicken breasts
2 onions, chopped
2 cloves garlic, chopped
1 red capsicum, seeded and cut into strips
2½ cups rice, washed and drained
2 tomatoes, peeled and cut into eights
1 cup shelled green peas
500g seafood such as scallops, prawns, calamari or mussels
Bring the saffron and stock to the boil and set aside, until ready to use.
Heat half the oil in a paella pan or frying pan. Sauté the chicken breasts until golden. Remove
and cut each one into 3. Add the onion, garlic and capsicum strips, with more oil if necessary,
and cook gently until soft. Remove the capsicum and set aside. Add the rice and fry gently for
3–4 minutes. Add the stock.
When bubbling, reduce the heat and start the decoration of the paella. Add the chicken,
capsicum, tomatoes and peas in a pattern, and the remaining foods around. If using seafood,
add it for the last 10 minutes of the cooking time.
Add more stock if necessary, cover with foil, and cook gently until the rice is cooked, for about
20–25 minutes.
Serves 8.
18
Part Numbers
4
1
2
3
7
6
8
10
11
12
9
5
15
14
18
17
13
16
Item No
Part No
Description
Quantity
5669100
Quantity
5667100
1
52243
Trivet Left
1
1
2
52478
Trivet Mid Large
1
‑
3
52244
Trivet Right
1
1
4
52479
Wok Ring
1
1
Hob
52249
52242
5
6
52480
Wok Burner GG-503
1
1
7
52482
Medium Burner GG-535A
1
1
8
52481
Large Burner GG-535B
2
1
9
52483
Small Burner GG-535H
1
1
10
52491
Fix Stud
12
8
11
52490
Air Entry Inserts
3
2
12
52489
Cooktop Knob
5
4
Drop-in Body
52476
52477
4
3
13
14
52492
Burner Bracket - Long
15
52493
Burner Bracket - Wok
1
1
Manifold Pipe
52318
52317
16
17
52485
LP Burner Valve
4
3
18
52484
Wok Burner Valve
1
1
19
52596 V0.1