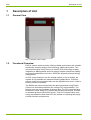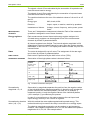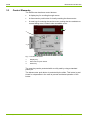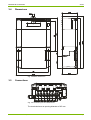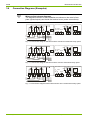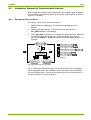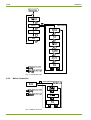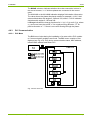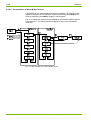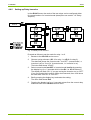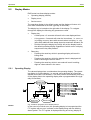
1
Electricity Meters IEC/MID
Residential
ZMX300Px (Software Version V09.xx.xx)
E450 PLC 3-phase S2
User Manual
Date: 04.07.2012
File name: D000030640 E450 ZMX300Px PLC 3ph S2 User Manual en k.docx
© Landis+Gyr
D000030640 en k
2/56
Revision History
Revision History
Version
Date
Comments
a
29.12.2009
First edition
b
06.07.2010
Corrected broken cross references
c
09.12.2010
Re-structuring and content update
d
18.04.2011
Note about inverse relay function added in sections 1.3 and 1.5.1.
New section 1.6 "Relay outputs".
Additional warning text added in section 4.3.2 (concerning inputs/outputs).
e
10.06.2011
New item "relays" in install menu list (Fig. 4.6).
Section 4.5.3.1 "PLC Menu" PLC device communication status updated.
Section 4.5.7 "Setting-up Relay Inversion" added.
Relay output numbers added in sections 1.3, 1.6 and 3.2.
Central system specific text removed from section 1.2.
Section 3.1: Slider is optional.
Connection diagram example without disconnector added in section 3.6.
Section 4.4: Correct status inserted and remark about disconnector state added.
Section 5.1.2, tampering and alarm: note added that tempering indications are
depending on configuration.
Adaptation to SW version V03.02.11: Wired M-Bus with 1 multi-energy device, no
wireless M-Bus, 5 independent measurement channels, 5 disconnector operating
modes, accuracy class, type designation.
f
24.10.2011
Layout of front page, 2nd page, last page, headers and footers adapted to new
template. Section 2 "Security" standardized. Other minor corrections.
g
07.11.2011
Section 1.2: Note concerning restriction of use in networks with significant
disturbances in the frequency range of 2 kHz to 150 kHz inserted.
h
21.05.2012
Generation 2 (MMI3D) changes. Section 1.2: Note concerning restriction of use
removed. Section 1.3: Compatible with micro-generation sources. Section 1.4:
Type designation updated. Section 5.4: Disconnector push button without LED.
Section 6.3: Minimum test times increased to 300 s.
k
04.07.2012
Generation 2 HW (MMI3D) changes: Software version updated. Reference
document names updated. Type designation table updated. Company name
changed to “Landis+Gyr AG”.
Nothing in this document shall be construed as a representation or guarantee in respect of
the performance, quality or durability of the specified product. Landis+Gyr accepts no liability
whatsoever in respect of the specified product under or in relation to this document.
Subject to change without notice.
© Landis+Gyr
D000030640 en k – E450 PLC 3-phase S2 ZMX300Px – User Manual
About this Document
3/56
About this Document
Range of validity
The present manual applies to the second generation E450 ZMX310Px
and ZMX320Px PLC 3-phase electricity meters.
For a detailed explanation of the type designation see section 1.4.
Purpose
The user manual contains all information required for meter applications for
the intended purpose. This includes:
•
Provision of knowledge concerning the characteristics, construction
and knowledge of meters
•
Information about possible dangers, their consequences and measures to prevent any danger
•
Details concerning the performance of all work throughout the service
life of the meters (parameterisation, installation, commissioning, operation, maintenance, decommissioning and disposal)
Target group
The content of this user manual is intended for technically qualified personnel of energy supply companies, responsible for system planning, installation and commissioning, operation, maintenance, decommissioning and
disposal of meters.
Reference documents
The following documents provide further information related to the subject
of this document:
Typographical
conventions
•
D000031863 "E450 ZMX300Px PLC 3ph S2 Technical Data"
•
D000031861 "E450 ZxX Functional Description"
The following typographical conventions are used throughout this document:
Font
Description
Bold
Font style used for menu items and keys in user interface and for
keys on keyboard.
Italics
Font style for new terminology and for references to other documents or other parts within this document. For example: A general
description of the display user interface is given in section 5.1
"Display".
i
Symbol for additional information, hints and other important notifications.
D000030640 en k – E450 PLC 3-phase S2 ZMX300Px – User Manual
© Landis+Gyr
4/56
Table of Contents
Table of Contents
1
Description of Unit ________________________________________________________ 6
1.1
General View __________________________________________________________ 6
1.2
1.3
Functional Overview _____________________________________________________ 6
Characteristics _________________________________________________________ 7
1.4
Type Designation _______________________________________________________ 8
1.5
Measuring Principle _____________________________________________________ 9
1.5.1
Overview ____________________________________________________________ 9
1.5.2
Signal Generation ____________________________________________________ 10
1.5.3
Signal Processing ____________________________________________________ 10
1.6
Relay Outputs _________________________________________________________ 12
1.7
Disconnector __________________________________________________________ 13
1.8
2
Software Tools ________________________________________________________ 13
Safety __________________________________________________________________ 14
2.1
Safety Information ______________________________________________________ 14
2.2
Responsibilities ________________________________________________________ 14
2.3
Safety Regulations _____________________________________________________ 15
3
Mechanical Construction __________________________________________________ 16
3.1
Case ________________________________________________________________ 16
3.2
3.3
Faceplate ____________________________________________________________ 19
Control Elements ______________________________________________________ 20
3.4
Dimensions ___________________________________________________________ 21
3.5
Connections __________________________________________________________ 21
3.6
Connection Diagrams (Examples) _________________________________________ 22
4
Installation ______________________________________________________________ 23
4.1
Introduction ___________________________________________________________ 23
4.2
4.3
Before Installation ______________________________________________________ 24
Mounting _____________________________________________________________ 24
4.4
Connecting ___________________________________________________________ 26
4.4.1
Connecting the Phase and Neutral Connection Wires ________________________ 26
4.4.2
Connecting Inputs and Outputs _________________________________________ 27
4.4.3
Checking the Phase Connections and the Input/Output Connections ____________ 28
4.5
Commissioning and Functional Check ______________________________________ 28
4.6
Installation Support for Communication Devices ______________________________ 29
4.6.1
Entering the Service Menu _____________________________________________ 29
4.6.2
Mains Connection ____________________________________________________ 30
4.6.3
PLC Communication __________________________________________________ 31
4.6.3.1 PLC Menu _______________________________________________________31
4.6.4
Wired M-Bus Communication ___________________________________________ 33
4.6.4.1 Installation of Wired M-Bus Devices ___________________________________33
4.6.4.2 De-installation of Wired M-Bus Devices ________________________________34
4.6.5
Setting-up Relay Inversion _____________________________________________ 35
4.7
© Landis+Gyr
De-installing the Meter __________________________________________________ 36
D000030640 en k – E450 PLC 3-phase S2 ZMX300Px – User Manual
Table of Contents
5
5/56
Operation ______________________________________________________________ 37
5.1
Display ______________________________________________________________ 37
5.1.1
Basic Layout ________________________________________________________ 37
5.1.2
Display Symbols _____________________________________________________ 37
5.2
Display Modes ________________________________________________________ 39
5.2.1
Operating Display ____________________________________________________ 39
5.2.2
Display Menu _______________________________________________________ 40
5.2.3
Service Menu _______________________________________________________ 41
5.2.3.1 Service List______________________________________________________ 42
5.2.3.2 Install __________________________________________________________ 42
5.2.3.3 Set List _________________________________________________________ 43
5.2.3.4 Test Mode on/off _________________________________________________ 44
5.2.3.5 Test Output LED Mode ____________________________________________ 44
5.2.4
OBIS Codes of Displayed Values ________________________________________ 45
5.3
Meter Configuration and Update __________________________________________ 47
5.4
6
Disconnector Control ___________________________________________________ 47
Maintenance ____________________________________________________________ 48
6.1
Service ______________________________________________________________ 48
6.2
Troubleshooting _______________________________________________________ 48
6.2.1
Error Codes ________________________________________________________ 48
6.2.1.1 Representation of Error Codes ______________________________________ 49
6.2.1.2 Error Definitions __________________________________________________ 50
6.3
Measuring Times for Meter Testing ________________________________________ 52
7
8
Decommissioning, Disposal _______________________________________________ 53
7.1
Decommissioning ______________________________________________________ 53
7.2
Disposal _____________________________________________________________ 53
Index __________________________________________________________________ 54
D000030640 en k – E450 PLC 3-phase S2 ZMX300Px – User Manual
© Landis+Gyr
6/56
Description of Unit
1
Description of Unit
1.1
General View
Fig. 1.1 General view of meter
1.2
Functional Overview
E450 is a smart electricity meter offering reliable performance with versatile
functionality including support for multi energy reading and control. Twoway communication using Power Line Carrier (PLC) technology enables
integration to AMM systems and multi-energy support extends the reading
and control possibilities even further. E450 also supports personal energy
management.
As PLC communication in the low voltage network is free of charge, the
network is fully available for advanced metering applications. Therefore,
mission critical communication tasks can be dispersed over time in order to
achieve maximum reliability.
The E450 meter communicates with the data concentrator using PLAN+
(Power Line Automation Network) low voltage PLC communication. The
protocol over the communication is always dlms. The PLC communication
between the meter with a PLC-module and the data concentrator is based
on standard protocols (IEC61334 series). Thus PLC communication technology represents the best trade-off in the context of conflicting technological and economic requirements.
© Landis+Gyr
D000030640 en k – E450 PLC 3-phase S2 ZMX300Px – User Manual
Description of Unit
1.3
7/56
Characteristics
E450 meters have the following main characteristics:
•
Recording of active and reactive energy in all 4 quadrants with up to 6
rates
•
Data display on LCD
•
Measuring element in DFS technology (Direct Field Sensor) with
excellent measuring characteristics, including flat load curve, high
stability and good protection against interference.
•
Active energy measurement accuracy: Class 1 (IEC 62052-11/6205321) and MID accuracy classes B (EN 50470-1/50470-3)
•
Reactive energy measurement accuracy: Class 2 (IEC62053-23)
•
Compatible with micro-generation sources.
•
Wide range measurement from starting current to maximum current
•
Serial interface with optical input/output for automatic readout of data
on the spot and for service functions
•
Two-way communication to metering system with integrated PLC
transceiver
•
Wired M-Bus interface supports 1 multi-energy device (gas, water,
district heating)
•
Internal disconnector for full disconnection of energy, controllable
remotely from AMM system, or locally with a push button or via local
communication interfaces
•
Inputs and Outputs
•
•
•
-
One digital input configured as S0, alert or local disconnector
command
-
2 relay outputs: Relay output 1 configured as solid state relay output or mechanical on-off latching relay, relay output 2 as normal
open relay (inverse relay function supported for both relays)
Installation aids (e.g. phase voltages and direction of energy)
-
Presence of phase voltages (voltage values are displayed)
-
Visual output (creep indicator) on LCD
-
Display of energy direction
-
Wrong phase rotation indication
Anti-tampering measures
-
Detection of terminal cover opening
-
Detection of strong DC magnetic field
-
Detection of disconnector tampering
Storage of event information (e.g. power outages)
D000030640 en k – E450 PLC 3-phase S2 ZMX300Px – User Manual
© Landis+Gyr
8/56
1.4
Description of Unit
Type Designation
The exact configuration of E450 meters is expressed in a type code printed
on the device faceplate. The type code can also be read by the metering
system.
Example
ZMX
-
3
10
C
P
U1
L1
D3
.3
1
S2
Network type
ZMX
ZFX
ZCX
3-phase, 4-wire (M-connected)
3-phase, 3-wire (F-connected)
1-phase, 2-wire (C-connected)
Build option
i
Standard variant
IDIS standard meter
Connection type
1
3
Direct connected (1-phase)
Direct connected (3-phase)
Accuracy class
10
20
MID class B; IEC class 1
MID class A; IEC class 2
Measured quantities
A
C
Active energy, bi-directional
Active and reactive energy (Combi)
System communication
P
G
PLAN+
GPRS/UMTS
Built-in local communication options
U0
U1
Optical port
Optical + Wireless M-Bus (868 MHz)
Extension port options
L0
L1
Not in use
Wired M-Bus
Disconnector options
D0
D1
D2
D3
No disconnector fitted
1-pole disconnector (1-phase meters only)
2-pole disconnector (1-phase meters only)
3-pole disconnector (3-phase meters only)
Relay
options
2
90 mA OptoMOS solid-state relay + 8 A mechanical relay
3
5 A mechanical latching relay + 8 A mechanical relay
Other options
0
1
Not in use
Supercap as RTC reserve power (PLC & 2G/3G)
S2
Second generation HW (E450 PLAN+ PLC)
© Landis+Gyr
D000030640 en k – E450 PLC 3-phase S2 ZMX300Px – User Manual
Description of Unit
9/56
1.5
Measuring Principle
1.5.1
Overview
Fig. 1.2 Block diagram
Inputs
Outputs
The main meter inputs are:
•
Phase connection (L1, L2, L3) and neutral for
energy measurement
power supply to the meter
PLC communication with communication module
•
Display key
•
Reset key
•
Disconnector push button
•
S0 pulse input
•
Wired M-Bus interface supporting 1 multi-energy device
The main meter outputs (some of which are also inputs) are:
•
LCD to display measured values and the corresponding OBIS code
•
Optical test output (red, for active and reactive energy)
•
Mechanical on-off latching relay 5 A, 230 VAC or digital solid state
relay 90 mA, 230 VAC (inverse function supported)
•
Mechanical, normal open relay 8 A, 230 VAC (inverse function supported)
•
Optical interface for automatic data readout on site by means of a suitable HHT (Hand Held Terminal) (also input)
•
PLAN+ PLC communication interface for connection to a metering
system via the low voltage network (also input)
D000030640 en k – E450 PLC 3-phase S2 ZMX300Px – User Manual
© Landis+Gyr
10/56
Description of Unit
Power supply
The supply voltage for the meter electronics is taken from the three-phase
system. It works correctly as soon as at least one phase and neutral are
connected to mains voltage. In the event of mains failure a voltage monitor
ensures the safe storage of meter data and manages the restart when
mains voltage is restored.
Memory
Meter parameters are stored in non volatile (FLASH) memory which protects the parameters in the event of power failure.
1.5.2
Signal Generation
Three DFS (Direct Field Sensor based on embedded coil measuring principle) measuring elements (one for each phase) measure the phase currents
using the magnetic field of the current loops, and the phase voltages over a
resistor divider. The analogue/digital converters transform both signals into
digital voltage and current data. This data is then multiplied by a digital
multiplier to produce an energy proportional value. The resulting value is
fed into the microprocessor, which adds the value to the corresponding
values of the other phases and the sum is then transferred into the corresponding energy registers (rate-dependent).
The microprocessor generates pulses for the test diode from the digital sum
of the measured phase values according to the meter constant R.
I L1
Phase L1
U
L1
I
L2
Phase L2
U
L2
I L3
Phase L3
U
L3
A
DFS
D
A
D
Digital Multiplier
A
Testoutput
Pulse
generator
DFS
D
A
D
Digital Multiplier
A
DFS
D
Digital
summation
Sum
Li
Single
phases
L1
L2
L3
A
D
Digital Multiplier
Fig. 1.3 Measurement block diagram
1.5.3
Signal Processing
The output values of the DFS are used as a basis for further calculations.
Calibration
The measurement system is calibrated during the manufacturing process of
the meter. Calibration data is stored in a non-volatile memory and cannot
be altered.
Start detection
The microprocessor compares the measured power with the minimum
starting power. Signals are only passed on for summation if the minimum
starting power is exceeded.
Measured quantities
The following energy values can be measured and stored in the registers:
© Landis+Gyr
•
Active energy (A)
•
Reactive energy (R)
•
Apparent energy (VA)
D000030640 en k – E450 PLC 3-phase S2 ZMX300Px – User Manual
Description of Unit
11/56
The signals +A and +R are calculated by the summation of imported measured active and reactive energy.
The signals -A and -R are calculated by the summation of exported measured active and reactive energy.
The combined totals are the sum of the absolute values of +A and -A or +R
and -R.
Energy type:
kWh, kvarh, kVAh
Direction:
Import, export, ± reactive, reactive by quadrant
Instantaneous Values:
Voltage, current, frequency, active power, power
factor
Measurement
channels
There are 5 independent measurement channels. Each of the measured
quantities is assigned to one of these channels.
Energy registers
Each measurement channel has a total energy register assigned to it.
24 rated energy registers can be assigned to one of the measurement
channels by means of parameterisation.
All internal registers have 9 digits. The internal register magnitude is Wh
(Watt-Hours). Internal registers cannot be reset, when the register reaches
999999999, it rolls over to 0. The display and readout formats vary from the
internal format.
Rates
The meter is designed for up to 6 rates. The assignment of the rate registers is done by means of parameterisation.
Rate control
Rate control is performed by the built-in time of use (TOU).
Summation methods
Summation of the single phase values is done as follows:
Calculation
method
Example 1
Example 2
A1
A2
A3
Register content
without sign
+A
-A
|+A| - |-A|
|+A| + |-A|
A1
A1
A2
A3
A2
A2
A3
A3
A1
A2
A3
A1
A2
A3
A3
A1
A2
A1
A2
A1
A3
Fig. 1.4 Phase summation examples
Summation by
magnitude: +A, -A
Summation by magnitude separates the positive from the negative values
of the individual phases. Measured quantity +A therefore only includes the
positive values of the individual phases (+A1 and +A2 in example 1),
measured quantity -A only the negative values of the individual phases
(-A3 in example 1), provided any are present.
In case of a connection error, the meter measures the real import and
export energy correctly in the +A and -A registers.
Summation by absolute
value: |+A| + |-A|
With this method the meter adds exported and imported energy. This
method should only be used if the utility is sure there is no energy export.
The absolute magnitude summation can be used as an anti-tampering
measure. Here negative magnitudes of A1, A2, A3 are added to the positive
magnitudes of A1, A2, A3. See example above.
D000030640 en k – E450 PLC 3-phase S2 ZMX300Px – User Manual
© Landis+Gyr
12/56
Description of Unit
Subtraction by absolute
value: |+A| - |-A|
With this method the meter subtracts the exported energy from the imported energy. It cannot detect a connection error.
Four-quadrant
measurement
The reactive energy (±Rc, ±Ri) is allocated to the four quadrants as follows:
+R
+ kvarh
+ kvarh
+Rc
+Ri
Quadrant II
Quadrant I
Export -A
+A Import
- kWh
Quadrant III
Quadrant IV
-Ri
-Rc
- kvarh
+ kWh
- kvarh
-R
Fig. 1.5 Four-quadrant measurement
Channel configuration
The 5 measurement channels register fixed defined measurement quantities
as given in the table below:
Description
1.6
OBIS code
ME1
Active energy import
+A (QI+QIV)
1.8.0
ME2
Active energy export
-A (QII+QIII)
2.8.0
ME3
Active energy combined total, absolute
value
|+A|+|-A|
15.8.0
ME9
Reactive energy import
+R (QI+QII)
3.8.0
ME10
Reactive energy export
-R (QIII+QIV)
4.8.0
Relay Outputs
Relay output 1 (terminals 23 and 24) can be configured either as 90 mA
solid state relay or as 5 A mechanical on-off latching relay.
Relay output 2 (terminals 25 and 26) is an 8 A mechanical normal open
relay.
Both relay outputs of the E450 meters can be operated in normal mode or
inverted mode. The inversion can be controlled either remotely or via the
user interface.
In the inverted mode the relay functions are inverted, i.e. the relay will
report state "open" if it is closed, and state "closed" if it is open. Similarly,
the inverted relay will open after command "close", and will close after
command "open".
The inverted mode allows to switch loads, e.g. boilers, by opening relay
contacts, as common in specific countries.
In order to avoid many meters switching at the same time, the meter can be
configured to randomly delay the switching instance for each relay output.
© Landis+Gyr
D000030640 en k – E450 PLC 3-phase S2 ZMX300Px – User Manual
Description of Unit
1.7
13/56
Disconnector
The E450 meter is equipped with a disconnector to connect or disconnect
the premises of the consumer. The disconnector can be operated manually
via push button, remotely by commands via any communication channel,
via input or locally through control functions integrated in the meter itself.
Disconnector control is designed so that it enables the customer to use the
disconnector as:
•
A manual switch for connecting or disconnecting the customer
premises
•
A manual switch for disconnecting the premises when the customers
move away
•
Disconnection if max. power has been exceeded over a specified time
•
Bad payers can be either completely disconnected, with no possibility
to reconnect locally or alternatively, the maximum demand can be
limited remotely.
•
Others
Disconnector not suitable as main switch
Do not use the disconnector as a main switch for installation or maintenance purposes. The disconnector is not equipped with a thermal and/or
short circuit protection device.
1.8
Software Tools
Landis+Gyr provide software tools to ensure optimum support of the meters
throughout the products life. The Landis+Gyr .MAP110 Service Tool is used
for the test and installation of meters and for field servicing.
Meter reparameterisation
Meter
testing and
certification
Meter
installation
Meter
service
.MAP110
For a list of functions available in the .MAP110 Service Tool, please see
.MAP documentation and the functional description of E450 meters.
D000030640 en k – E450 PLC 3-phase S2 ZMX300Px – User Manual
© Landis+Gyr
14/56
Safety
2
Safety
2.1
Safety Information
The following symbols are used to draw your attention to the relevant
danger level, i.e. the severity and probability of any danger, in the individual
chapters of this document:
Danger
Identifies an extraordinarily great and immediate danger that could lead to
serious physical injury or death.
Warning
Indicates a potentially hazardous situation that may result in minor physical
injury or material damage.
i
Note
Indicates general details and other useful information to help you with your
work.
In addition to the danger level, safety information also describes the type
and source of the danger, its possible consequences and measures for
avoiding the danger.
2.2
Responsibilities
The owner of the meters – usually the utility company – is responsible for
assuring that all persons engaged in working with meters:
•
Have read and understood the relevant sections of the user manual.
•
Are appropriately qualified for the work to be performed.
•
Strictly observe the safety regulations (laid down in section 2.3) and
the operating instructions as specified in the individual sections.
In particular, the owner of the meters bears responsibility for the protection
of persons, prevention of material damage and the training of personnel.
For this purpose, Landis+Gyr provides training on a variety of products and
solutions. Please contact your local Landis+Gyr representative if interested.
© Landis+Gyr
D000030640 en k – E450 PLC 3-phase S2 ZMX300Px – User Manual
Safety
2.3
15/56
Safety Regulations
The following safety regulations must be observed at all times:
•
The meter connections must be disconnected from all voltage sources
during installation or when opening.
•
Contact with live parts can be fatal. The main fuses should, therefore,
be removed and kept in a safe place until the work is completed so
that other persons cannot replace them unnoticed.
•
Local safety regulations must be observed. Only technically qualified
and appropriately trained personnel are authorised to install the
meters.
•
Protection earth connection must not be switched with the disconnector.
•
Only "useful" tools have to be used. This means a screw driver has to
have the correct size for the screws and the metallic part of a screw
driver has to be insulated.
•
The meters must be held securely during installation. They can cause
injuries if dropped.
•
Meters that have been dropped must not be installed, even if no
damage is apparent, but must be returned to the service and repair
department (or the manufacturer) for testing. Internal damage may
result in malfunctions or short-circuits.
•
The meters must never be cleaned under running water or with
compressed air. Water ingress can cause short-circuits.
D000030640 en k – E450 PLC 3-phase S2 ZMX300Px – User Manual
© Landis+Gyr
16/56
Mechanical Construction
3
Mechanical Construction
3.1
Case
The meter case is made of antistatic plastic (polycarbonate). The LCD display and the display key are always visible. The (optional) sliding cover
protects the optical port, pulse LED, disconnector push button and utility
sealable reset key.
Sliding cover
The E450 sliding cover has three positions:
•
Normal position (see Fig. 3.1)
•
Service position (see Fig. 3.2)
•
Read out position (see Fig. 3.3)
•
Installationsposition (see Fig. 3.4)
In the normal position the display and display key are visible but the optical port and disconnector push button are covered.
2
1
3
4
5
5
Fig. 3.1 Sliding cover in its normal position
1
2
3
4
5
© Landis+Gyr
Display
Display key
Sliding cover (optional)
Terminal cover
Sealing screw covers
D000030640 en k – E450 PLC 3-phase S2 ZMX300Px – User Manual
Mechanical Construction
17/56
When the cover is slid upwards to the service position the bar code is
visible underneath the sliding cover.
Fig. 3.2 Sliding cover in the service position
In the read out position the cover is slid downward so that the optical port
and disconnector push button are revealed. In this position the cover for the
reset key can be opened.
1
2
5
4
3
Fig. 3.3 Sliding cover in the read out position
1
2
3
4
5
Pulse output LED
Optical interface
Sliding cover (optional)
Sealable reset key cover
Disconnector push button
D000030640 en k – E450 PLC 3-phase S2 ZMX300Px – User Manual
© Landis+Gyr
18/56
Mechanical Construction
When the cover is slid downwards to the installation position the sealing
screw covers can be opened and the terminal cover can be removed together with the sliding cover.
1
2
2
3
Fig. 3.4 Sliding cover in the installation position
1
2
3
Terminal cover
Sealing screw covers
Sliding cover (optional)
1
2
4
2
3
Fig. 3.5 Removed terminal cover with sliding cover
1
2
3
4
© Landis+Gyr
Terminal cover
Sealing screw covers (open)
Sliding cover (optional)
Terminal cover sealing screw
D000030640 en k – E450 PLC 3-phase S2 ZMX300Px – User Manual
Mechanical Construction
3.2
19/56
Faceplate
1
12
2
11
10
9
8
3
4
5
6
7
Fig. 3.6 E450 faceplate
1
2
3
4
5
6
7
Display arrow inscription
Impulse constant of test LED and class for active and reactive measurement
Approval number
Nominal operating temperature range
Auxiliary terminal connection diagram
Property plate
Auxiliary terminal number inscription
23/24:
25/26:
30/31:
28/29:
8
9
10
11
12
90 mA solid state relay or optional 5 A latching relay (relay output 1)
8 A mechanical relay (relay output 2)
S0 input
Optional wired M-Bus
Remote communication type
Nominal connection values (voltage, frequency, current range)
Meter type (post-fix .S2 indicates second generation)
Year of manufacture
Serial number with a 2D bar code
D000030640 en k – E450 PLC 3-phase S2 ZMX300Px – User Manual
© Landis+Gyr
20/56
3.3
Mechanical Construction
Control Elements
The E450 meter has three control buttons:
•
A display key for scrolling through menus.
•
A disconnector push button for locally resetting the disconnector.
•
A reset key for entering the service menu, setting the time and date or
manual billing reset, located under a sealable cover.
1
3
2
Fig. 3.7 Control elements
1
2
3
Display key
Disconnector push button
Reset key
The reset key can be protected with an utility seal by using a standard
plastic pin.
The disconnector push button is protected by the slider. This button is positioned in a depression in the case to prevent accidental operation of the
button.
© Landis+Gyr
D000030640 en k – E450 PLC 3-phase S2 ZMX300Px – User Manual
Mechanical Construction
3.4
21/56
Dimensions
Fig. 3.8 Meter dimensions
3.5
Connections
Fig. 3.9 Terminal layout and dimensions
The terminals have an opening diameter of 9.5 mm.
D000030640 en k – E450 PLC 3-phase S2 ZMX300Px – User Manual
© Landis+Gyr
22/56
3.6
Mechanical Construction
Connection Diagrams (Examples)
i
Where to find relevant diagrams
The diagrams relevant for the installation are shown on the meter’s faceplate (inputs/outputs) and inside the terminal cover (mains connections).
M
1
3 4
6 7
9 10
12
12V +
UC 230V
–
IC 0.09A I C 8A
23 24 25 26
I1
+
M-BUS
–
30 31
28 29 28 29
L1
L2
L3
N
Fig. 3.10 Connection diagram with disconnector and 90 mA solid state relay option
M
1
3 4
6 7
9 10
12
12V +
UC 230V
–
IC 5A
I C 8A
23 24 25 26
I1
+
M-BUS
–
30 31
28 29 28 29
L1
L2
L3
N
Fig. 3.11 Connection diagram with disconnector and 5 A mechanical relay option
12V +
UC 230V
–
IC 5A
I C 8A
1
3 4
6 7
9 10
12
23 24 25 26
I1
+
M-BUS
–
30 31
28 29 28 29
L1
L2
L3
N
Fig. 3.12 Connection diagram without disconnector and 5 A mechanical relay option
© Landis+Gyr
D000030640 en k – E450 PLC 3-phase S2 ZMX300Px – User Manual
Installation
4
23/56
Installation
Do not touch live parts
Dangers can arise from live electrical installations to which the meters are
connected. Touching live parts is dangerous to life. All safety information
should therefore be strictly observed.
i
Intended environmental conditions for meter installations:
•
•
•
•
•
•
4.1
The meter is intended to be installed in a mechanical environment "M1",
with shock and vibrations of low significance, as per 2004/22/EC Directive.
The meter is intended to be installed in electromagnetic environment
"E2", as per 2004/22/EC Directive.
Meters are to be installed indoors.
Meters are to be installed in non condensing humidity conditions.
Meter should be installed with copper conductors. The use of aluminium
conductors can result in corrosion. Please seek advice before using this
meter with aluminium conductors.
The installation site must meet the requirements of the device’s protecttion class (IP53) and the operating temperature range (-40 … +70°C).
The E450 is intended for indoor use, but outdoor installation is possible
with external housing and warming/cooling (then other temperatures are
possible). Avoid installing the device on south-facing walls and direct
sunlight. If necessary, use an additional shield or visor to protect the
outdoor installation case from direct sunlight (shield not provided by
Landis+Gyr).
Introduction
The following conditions must be met for installation and commissioning of
the meter:
•
The work described below must only be conducted by technically
qualified and suitably trained persons.
•
These persons must be familiar with and observe the local safety
regulations.
•
Strict observance of the details contained in section 2 "Safety", in
particular the safety regulations, as well as safe operation.
•
Before starting work ensure that the materials and tools required are
all present.
D000030640 en k – E450 PLC 3-phase S2 ZMX300Px – User Manual
© Landis+Gyr
24/56
4.2
Installation
Before Installation
M
Main fuses
1
3 4
6 7
9 10
L1
L2
L3
N
12
Neutral looped
Consumption
equipment
Fig. 4.1 Meter connection with 3 phases and neutral
Dangerous voltage on conductors
The connecting wires at the place of installation must not be live when
fitting the meter. Touching live parts is dangerous to life. The main fuses
should be removed and kept in a safe place until work is completed, so that
they cannot be replaced by anyone unnoticed.
No overcurrent protection and automatic disconnection
As the meter has no internal overcurrent protection and no method of disconnection from the mains, this must be provided by the end installation.
Protect disconnector against overcurrent
In case the meter has a disconnector, this must be protected against overcurrent. As the disconnector is not equipped with a thermal and/or short
circuit protection device, it needs to be protected with an external fuse or
overload switch.
4.3
Mounting
i
Observe safety instructions
Prior to start mounting of the meter read and strictly observe the general
safety instructions given in section 4.2 "Before Installation".
The meter should be mounted as follows on the meter board or similar device provided for this purpose (see also section 3.4 "Dimensions"):
© Landis+Gyr
1.
Find the correct position for the meter. Ensure there are no wires
underneath the holes to be drilled.
2.
Determine the desired form of fixing (open or covered meter mounting).
D000030640 en k – E450 PLC 3-phase S2 ZMX300Px – User Manual
Installation
25/56
3.
Set the meter suspension eyelet in the correct position. It can be
moved up or down over the stop on the back side of the meter. See
following figure.
open
covered
Housing edge
lift tongue
and shift it
down over
the stop
Stop
Fig. 4.2 Suspension eyelet positions
4.
Check whether the connecting wires are live using a phase tester or
universal measuring instrument. Remove the main fuses and keep
them in a safe place until installation is completed.
5.
Mark the three fixing points on the mounting surface (see Fig. 4.3):
•
height of suspension triangle = 162/180 mm
75 mm
162 mm for covered mounting
horizontal base of suspension triangle = 150 mm
180 mm for open mounting
•
150 mm
Fig. 4.3 Drilling plan
6.
Drill the three holes.
7.
Move the sliding cover to its installation position, open the sealing
screw covers and unscrew the meter terminal cover.
8.
Fit the meter with the three fixing screws on the mounting surface.
9.
Connect the phase connection wires and the inputs and outputs as
described in section 4.4 "Connecting".
D000030640 en k – E450 PLC 3-phase S2 ZMX300Px – User Manual
© Landis+Gyr
26/56
4.4
Installation
Connecting
i
4.4.1
Observe safety instructions
Prior to start connecting of the meter read and strictly observe the general
safety instructions given in section 4.2 "Before Installation". The meter must
be mounted as described in section 4.3 "Mounting" before it is connected.
Connecting the Phase and Neutral Connection Wires
1.
2.
Cut the phase and neutral connecting wires to the required length and
strip their ends.
The insulation of the connecting line must extend as far as the terminal
indentation, i.e. there must be no further bare part of the connecting
line visible above the terminal edge. The stripped part of the connecting wire should be shortened if necessary.
If stranded wire is used as a phase and neutral connection line, it has
to be provided with a ferrule for connection.
Connector screws
Wire
Wire insulation
ends before
terminal
Terminal
Terminal block
Fig. 4.4 Phase connection terminal
3.
i
Insert the phase and neutral connecting wires in the relevant terminals
(the terminals are numbered as shown in the connection diagram) and
tighten the terminal screws firmly (torque max. 3 Nm).
•
For wires with small conductor cross-sections (≤ 6 mm2) the connecting line must be placed carefully in the middle of the terminal,
so that it cannot move sideways when tightening the terminal
screws. When tightening, ensure that the connecting line remains
between the copper inside the terminal and the screw.
•
It is recommended that the beginning and end of the relevant conductors are identified using a suitable test unit (e.g. buzzer) to ensure that the right consumer is connected to the meter output.
Insufficiently tightened screws causes power loss
Failure to tighten terminal screws sufficiently can lead to power loss and heating. Note: A contact resistance of 1 mΩ causes a power loss of 10 W at 100 A.
Do not withdraw connecting wires with closed terminals
Never withdraw connecting wires with the terminal closed, as this can damage the terminal.
© Landis+Gyr
D000030640 en k – E450 PLC 3-phase S2 ZMX300Px – User Manual
Installation
4.4.2
27/56
Connecting Inputs and Outputs
Avoid any contact of input and output wires with mains terminals
The inputs and outputs are usually insulated circuits or extra-low voltage
circuits. Avoid any contact of input and output wires with phase connection
terminals by proper arrangement of the wires under the terminal cover.
Make sure that the input and output wires are not squeezed or damaged in
the vicinity of the phase connection terminals.
Connect the respective wires to the S0-input, the relay outputs and the MBus interface (if required).
1
2
3
4
Fig. 4.5 I/O terminal positions
1
2
3
4
Relay output 1: connectors 23, 24
Relay output 2: connectors 25, 26
S0 input: connectors 30, 31
M-Bus: connectors 28, 29 (optional)
Relay outputs require overcurrent protection
The relay outputs 1 and 2 must be protected against overcurrent by external fuses. Overcurrent will damage the relay!
Relay output 1: 250 VAC/90 mA or optional 5 A maximum current
(depending on configuration)
Relay output 2: 250 VAC/8 A maximum current
D000030640 en k – E450 PLC 3-phase S2 ZMX300Px – User Manual
© Landis+Gyr
28/56
4.4.3
Installation
Checking the Phase Connections and the Input/Output Connections
Before putting the meter into operation the following points must be
checked and corrected if necessary:
4.5
1.
Has the correct meter (with correct identification number) been
installed at the measuring point of the relevant consumer?
2.
Are all thrust screws for the phase connections and neutral tightened
sufficiently?
3.
Are the mains inputs and outputs connected correctly? The conductor
from the house connection or from the main fuse must be present at
the input, those of the meter to the consumer at the output.
4.
Is the neutral conductor connected to terminals 10 and 12?
5.
Are the auxiliary inputs (S0, M-Bus) and outputs (relays) connected
correctly?
6.
Attach the terminal cover.
7.
Close the terminal cover’s sealing screw covers.
8.
Move the sliding cover to its normal position.
9.
Check the installation as described in section 4.5 "Commissioning and
Functional Check".
Commissioning and Functional Check
The installed meter should be put into service and checked as follows:
i
© Landis+Gyr
1.
Insert the main fuses removed before installation. The meter is
switched on.
2.
Check the display (no error message) and with no load connected that
the virtual output (creep indicator) is displayed.
3.
Connect a load and check that the output LED starts blinking.
4.
Check that the meter is measuring correctly. Display indicators and
their functions are described in section 5.1 "Display".
5.
Perform the set-up process for the required communication devices
(PLC interface, connected M-Bus devices) as described in section 4.6
"Installation Support for Communication Devices". If PLC concentrators have already been installed on the network and if the new meter
search has been activated in the concentrator also check the PLC
device communication status in the installation list: PLc100.00 must be
displayed.
PLC concentrators must have been installed
Communication check can be performed only if PLC concentrators have
already been installed on the network. A PLC concentrator automatically
identifies devices operating in its communication area and adds them to the
concentrator’s topology in the system and automatic reading can begin.
See concentrator and system documentation for more information.
6.
Check that the disconnector is closed (see disconnector state indication on display), otherwise press disconnector push button.
7.
When the meter is successfully installed and PLC device communication status is OK, seal the terminal cover and move the sliding cover to
its normal position.
D000030640 en k – E450 PLC 3-phase S2 ZMX300Px – User Manual
Installation
4.6
29/56
Installation Support for Communication Devices
Remote and local communication devices can be installed using the display
user interface. A general description of the display user interface is given in
section 5.1 "Display".
4.6.1
Entering the Service Menu
The service menu can be entered as follows:
1.
Briefly press the display key. The display check appears on the
display.
2.
Briefly press the reset key. The first item of the service menu
Ser_dAtA appears on the display.
3.
Once Ser_dAtA is displayed, the other menu items can all be obtained
by briefly pressing the display key. Press the display key until the
menu item InStALL is displayed and then press the display key for > 2
seconds.
Fig. 4.6 Entering the service menu
Fig. 4.7 shows the submenus which can be accessed from the installation
menu. Navigation within the installation menu follows the same guidelines
as for the display menu: One short key press to go to the next submenu or
a long key press to enter the submenu.
D000030640 en k – E450 PLC 3-phase S2 ZMX300Px – User Manual
© Landis+Gyr
30/56
Installation
Fig. 4.7 Install menu list
4.6.2
Mains Connection
Fig. 4.8 Mains menu list
© Landis+Gyr
D000030640 en k – E450 PLC 3-phase S2 ZMX300Px – User Manual
Installation
31/56
The MAInS submenu indicates whether the mains connection is done in
the correct manner, i.e. if all three phases are connected in the correct
order.
The L1-L2-L3 or the L1-L3-L2 indication displays field rotation information.
The value shows the phase directional rotation for example L1-L2-L3 indicates anticlockwise with angles 0, 240 and 120, while L1-L3-L2 indicates
clockwise with angles 0, 120 and 240.
L123-xyz indicates the energy directions for L1 (x), L2 (y) and L3 (z), where
x, y and z can have the values "n" for negative energy direction, "P" for
positive direction or "-" if there is no current flowing through the phase.
4.6.3
PLC Communication
4.6.3.1 PLC Menu
The PLC menu helps during the installation of a meter with a PLC module
or if communication problems are found. The PLC menu consists of four
displays (see Fig. 4.9): PLC device communication status, MAC address,
initiator MAC address and Reset PLC.
Fig. 4.9 PLC menu list
D000030640 en k – E450 PLC 3-phase S2 ZMX300Px – User Manual
© Landis+Gyr
32/56
PLC device communication status
Installation
The Plcxxx.xx indication displays the PLC device communication status,
where xxx.xx has the meaning shown in the following table:
Display (value field)
Description
Error (no information from PLC chip – failure).
Meter is not synchronised to the 50 Hz mains, the meter
at this time is not registered at data concentrator & data
concentrator is also still unknown (unlocked) – coldstart
state when no DC in the network.
Meter is not synchronised to the 50 Hz mains and meter
is not registered at data concentrator but data
concentrator known (locked).
Meter is not synchronised to the 50 Hz mains but meter
is registered at data concentrator.
Meter is synchronised to the 50 Hz mains and meter is
not registered at data concentrator, data concentrator
unknown (unlocked).
Meter is synchronised to the 50 Hz mains and meter not
registered at data concentrator but data concentrator
known (locked) – synchronisation in progress.
Meter is synchronised to the 50 Hz mains and meter is
registered at data concentrator – Correct installation!
MAC address
The MAC address indication displays the OBIS code (hex coded with 3
characters i.e. "FFE") together with MAcAddr in the value field.
Initiator MAC address
The Initiator MAC address indication displays the OBIS code (Hex coded
with 3 characters i.e. "FFE") together with IMAcAddr in the value field.
Reset PLC
When pressing the display key for > 2 seconds, the meter will be set to
PLC NEW state, i.e. the data concentrator and the meter get "un-bundled".
The PLC device communication status is displayed again afterwards.
© Landis+Gyr
D000030640 en k – E450 PLC 3-phase S2 ZMX300Px – User Manual
Installation
4.6.4
33/56
Wired M-Bus Communication
4.6.4.1 Installation of Wired M-Bus Devices
i
For a successful installation of an M-Bus device, the meter must be properly pre-configured. The configuration can be changed with the Landis+Gyr
.MAP110 Service Tool.
Fig. 4.10 shows the process for installation of a wireless M-Bus device to
channel 1. The same procedure applies to any of the 4 available channels.
Fig. 4.10 Installation of a wired M-Bus device
D000030640 en k – E450 PLC 3-phase S2 ZMX300Px – User Manual
© Landis+Gyr
34/56
Installation
4.6.4.2 De-installation of Wired M-Bus Devices
If an M-Bus device was already successfully installed, it is possible to deinstall the device from the selected channel by entering the unInSt menu.
After de-installing, the InStaLL display is shown again.
Fig. 4.11 shows the process for de-installation of a wireless M-Bus device
from channel 1. The same procedure applies to any of the 4 available
channels.
Fig. 4.11 De-installation of a wired M-Bus device
© Landis+Gyr
D000030640 en k – E450 PLC 3-phase S2 ZMX300Px – User Manual
Installation
4.6.5
35/56
Setting-up Relay Inversion
In the rELAYS menu the mode of the two relays can be configured either
for normal mode or for inverted mode (description see section 1.6 "Relay
Outputs").
Fig. 4.12 Relay mode selection
Proceed as follows to set the mode for relay 1 or 2:
1.
Browse to the rELAYS service menu.
2.
Choose a relay submenu (rEL 1 for relay 1 or rEL 2 for relay 2).
The data field shows the current mode: "Inut OFF" (normal mode, i.e.
inversion is off) or "Inut On" (inverted mode, i.e. inversion is on).
The index field shows "rELAY".
3.
Select normal mode Inut OFF or inverted mode Inut On by pressing
the display key for > 2 seconds while in the rEL 1 or rEL 2 submenu.
The display will flash "On" (if you are turning the inversion on) or "OFF"
(if you are turning the inversion off) for three seconds, then it will show
the new state "Inut On" or "Inut OFF".
4.
Briefly pressing the display key terminates the setting.
The value field shows End.
5.
Pressing the display key for > 2 seconds returns from the current relay
submenu back to the rELAYS service menu.
D000030640 en k – E450 PLC 3-phase S2 ZMX300Px – User Manual
© Landis+Gyr
36/56
4.7
Installation
De-installing the Meter
Remove main fuses before disconnecting
The connecting wires at the place of installation must not be live when
removing the meter. Touching live parts is dangerous to life. The corresponding main fuses should be removed and kept in a safe place until work
is completed, so that they cannot be replaced by anyone unnoticed.
Remove the meter from the network as follows:
1.
Switch off the voltage. The display goes off.
2.
3.
Move the sliding cover to the installation position.
Open the sealing screw covers and remove the seals.
4.
Release and remove the terminal cover.
5.
Ensure with a phase checker that the connecting wires have no voltage. If there is voltage, remove the main fuses.
6.
Remove the connecting wires of the inputs and outputs, if available.
7.
Loosen the terminal screws of the phase and neutral connecting wires
with a suitable screwdriver and withdraw the wires from the terminals.
8.
Unscrew and remove the meter.
9.
Fix a substitute the meter with the three fixing screws on the mounting
surface.
10. Connect the substitute meter as described in section 4.4 "Connecting"
and the following sections.
© Landis+Gyr
D000030640 en k – E450 PLC 3-phase S2 ZMX300Px – User Manual
Operation
37/56
5
Operation
5.1
Display
5.1.1
Basic Layout
The basic layout shows all indication possibilities of the display.
1
2
3
6
5
4
Fig. 5.1 LCD display
1
2
3
4
5
6
5.1.2
Energy direction and creep indication
Value field
Multi-energy measurement units
General purpose arrows and symbols (battery exhausted, alarm, phase
presence and field rotation, electricity measurements units)
Index field
Disconnector state indication
Display Symbols
Energy direction
The energy direction field shows energy flow by quadrants, e.g. if the
energy is in the 1st quadrant, +Q and +P arrows are lit. If in the same time
in at least in one of the phases the reverse active energy is measured also
the -P arrow is shown but as blinking.
Creep indication
As soon as the meter starts with the energy registration, active or/and
reactive, the corresponding symbol is turned off.
Event
Symbol
Active energy below starting current
Reactive energy below starting current
Active and reactive energy below starting current
Value field
Up to 8-digit values can be displayed in the value field. The 7 segment digits are able to display numeric data or limited alpha numeric text. Additional
decimal points and colons enhance the 7 segment digits. This allows the
representation of values with decimal places as well as date and time formats.
D000030640 en k – E450 PLC 3-phase S2 ZMX300Px – User Manual
© Landis+Gyr
38/56
Disconnector state
indication
Operation
The current state of the disconnector control unit is indicated by symbols on
the display (a square and a cross) as follows:
State
Display
Symbol
Premises connected
The square is turned on
Premises
disconnected
The cross is, additionally to the square,
turned on.
If the meter does not have a disconnector control unit fitted the two symbols
are not displayed.
Index field
Up to 5-digit indices are displayed in this field which define the value in the
value field with groups C, D and E of the OBIS identification code.
Examples:
1.8.0 indicates that the status (group D = 8) of total (group E = 0) active
energy import of all phases (group C = 1) is displayed in the value field.
0.9.1 indicates that the local time is displayed in the value field.
Phase voltage
presence indications
The phase voltage presence indication is shown in the segment fields as
"L1", "L2" and "L3". The segments are also used to show incorrect field
rotation or phase leakage.
Event
Display
Incorrect field rotation or phase leakage
L1 L2 L3 are blinking
All phase voltages applied and field rotation correct
L1 L2 L3 are turned on
st
L2 L3 are on
nd
L1 L3 are on
rd
L1 L2 are on
Phase failure in 1 phase
Phase failure in 2 phase
Phase failure in 3 phase
Tampering and alarm
Depending on the customer specific configuration various tampering
indications can be shown (as per the example below) with the general
purpose arrows, e.g.:
Event
Display
Terminal cover removed
Selected arrow is blinking.
Symbol
▼
Unit indications
© Landis+Gyr
Main cover opened
Selected arrow is lit.
▼
Clock invalid
Selected arrow is lit.
▼
Critical error detected
The alarm symbol is blinking. The error
code is displayed with obis code F.F.
With the electricity measurement units indications below and the multi-energy
measurement units on the right side of the value field the following units
can be displayed: V, A, kWh, kVah, kVarh, kW, kVa, kVar, m3, MJ, GJ.
D000030640 en k – E450 PLC 3-phase S2 ZMX300Px – User Manual
Operation
5.2
39/56
Display Modes
E450 meter has three display modes:
•
Operating display (default)
•
Display menu
•
Service menu
The operating display is the default mode and the display will return to it
from other modes after a set time (typically 60 seconds).
The display key is located on the right side of the display. To navigate
through the display the following key presses are used:
•
•
5.2.1
Display key
-
A short press < 2 seconds will scroll to the next displayed item.
-
A long press > 2 seconds will enter the item shown , i.e. menu, or
in jumping over any items with several values to display, i.e. registers with additional time stamp stored as maximum demand, etc.
-
Double clicking the display key briefly will set the display back to
the default operating display regardless of which menu or display
sequence the key was pressed.
Reset key
-
Pressing the reset key whilst in operating display will result in
billing reset.
-
Pressing the reset key whilst the display check is displayed will
result in entering the service menu.
-
Pressing the reset key whilst in set mode will result in editing
digits of values shown in the menu.
Operating Display
The values displayed are considered as the operating display. The operating display is a rolling display, i.e. several values alternate at a fixed rate
(default scroll rate is 10 seconds). The meter returns automatically from any
of the display lists to the operating display after a programmable time (typically 60 seconds).
Errors
Fig. 5.2 Basic navigation of the display menus
In the event of a critical error, the operating display is interrupted and the
F.F register with an error is shown on the display along with the blinking
alarm symbol. The F.F register is displayed as long as no key (display or
D000030640 en k – E450 PLC 3-phase S2 ZMX300Px – User Manual
© Landis+Gyr
40/56
Operation
reset) is pressed. After pressing the key or clearing the error register, the
meter goes into the operating display mode and it continuous in normal
operation.
5.2.2
Display Menu
The display menu contains the standard display list under the Std_dAtA
menu and the MID data is listed under the MId_dAtA menu item.
The different menu items can be obtained by briefly pressing the display
key.
Fig. 5.3 Display menu
Standard Display List
With the Std_dAtA menu a pre-configured list of all important metering
data can be shown on the display. To enter the standard display list, scroll
to the menu item Std_dAtA and press the display key for > 2 seconds and
release it, then the first value in the display list appears.
Within the display list the following navigation is available:
© Landis+Gyr
•
Briefly pressing the display key navigates form value to value.
•
A long press of the display key (> 2 seconds) skips the previous stored
values or "demands" i.e. the next main value will be shown.
•
If the display key is held down for more than 10 seconds, the display
scrolls through the main values at one second intervals (rapid traverse).
D000030640 en k – E450 PLC 3-phase S2 ZMX300Px – User Manual
Operation
41/56
Exit from the display list:
MID Data List
•
By holding down the display key for > 2 seconds at the end of the list
(End position) the menu item Std_dAtA re-appears when the key is
released.
•
By double clicking the display key (within 0.3 seconds) direct to the
operating display (interruption).
The MID_dAtA list contains data which are relevant for the meter approval
as:
•
1.8.0 - Total active energy register import
•
2.8.0 - Total active energy register export
•
0.2.8 - MID checksum of metering code
•
F.F
•
n.8.n - All rated energy registers (n = 1 … 8)
- Error register
To enter the MID data list, scroll to the menu item MID_dAtA and press the
display key for > 2 seconds and release it, then the first value in the list appears.
Within the MID data list the following navigation is available:
•
Briefly pressing the display key navigates form value to value.
•
If the display key is held down for more than 10 seconds, the display
scrolls through the main values at one second intervals (rapid traverse).
Exit from the MID data list:
5.2.3
•
By holding down the display key for > 2 seconds at the end of the list
(End position) the menu item Std_dAtA re-appears when the key is
released.
•
By double clicking the key (within 0.3 seconds) direct to the operating
display (interruption).
Service Menu
i
To access the service menu, the sealed reset key cover has to be opened
to get access to the reset key. The reset key cover has to be sealed again
after the operation.
The service menu contains the display lists under menu item SEr_dAtA,
InStALL, SEt, tESt and LEd_ModE.
The service menu is entered from the operating display via display check
by pressing the reset key. Once Ser_dAtA is displayed the other menu
items can all be obtained by briefly pressing the display key.
To enter any of the lists, press the display key for > 2 seconds until the first
value of the desired display list appears.
The menu scrolls from End to the first item again. To return to the operating
display from the service menu, double-click the key.
D000030640 en k – E450 PLC 3-phase S2 ZMX300Px – User Manual
© Landis+Gyr
42/56
Operation
Fig. 5.4 Service menu
5.2.3.1
Service List
SEr_dAtA displays additional service data which are not visible in the
standard display.
The following navigation is available:
•
Pressing the display key briefly scrolls from value to value.
•
Holding down the display key scrolls from main value to main value at
one second intervals (rapid traverse).
Exit from the service list:
5.2.3.2
•
Hold down the display key at the end of the menu list (End position)
until the menu item SEr_dAtA appears,
•
Or double click the display key to return direct to the operating display.
Install
The Install menu is used to support the installation procedure for remoteand local communication devices. This menu item is described in detail in
the section 4.6 "Installation Support for Communication Devices".
© Landis+Gyr
D000030640 en k – E450 PLC 3-phase S2 ZMX300Px – User Manual
Operation
5.2.3.3
43/56
Set List
The values listed in the set list can be changed by using the reset key and
the display key. Typical values in set list are time and date.
If one of the general purpose arrows is set to "set mode active" the arrow
will become visible as soon as the user enters the set list.
General use of the keys in set mode:
Setting Time and Date
•
Display key (hold down):
Enter the set mode.
•
Display key (short press):
Change the value of the selected
digit
•
Reset key (inside module cover):
Edit the digit i.e. go to the next digit
When installing the meter for the first time the time and date may be incorrect. This can be identified by:
•
a general purpose arrow set to "Clock invalid" symbol blinks
•
an error message in the display list shows F.F 00000001
•
the meter has reset the date to 1.1.2000 (00-01-01 or 01.01.2000 displayed) and the time-of-day to 00:00:00 or to the point in time when the
last voltage failure occurred and resumes with this time.
It is necessary to set the correct time and date to prevent incorrect time
data in the meter. This should be performed either
i
i
•
by using Landis+Gyr .MAP110 Service Tool,
•
during the set up of the metering system or
•
manually via keys (shown below).
New time and date values are always validated against the real time calendar before the meter rewrites the time and date register, invalid dates are
rejected (e.g. setting Feb 29 for a non-leap year is rejected).
To set the time manually, the service menu has to be accessed, i.e. the
sealed reset key cover has to be opened to get access to the reset key.
The reset key cover has to be sealed again after the operation.
Manual time-setting
1.
Browse to the service menu SEt.
2.
Hold down the display key for > 2 seconds while in the SEt menu.
3.
The first value (date) is shown in the display.
4.
Press the reset key to edit the value, or press the display key to move
to the next item (time).
5.
When the reset key has been pressed the first digit of the value is
blinking. It can now been changed by pressing the display key.
6.
Pressing the reset key stores the value and moves to the next digit.
7.
Repeat steps 5 and 6 for all digits of the value.
8.
When the last digit of the value has been set all digits are blinking.
D000030640 en k – E450 PLC 3-phase S2 ZMX300Px – User Manual
© Landis+Gyr
44/56
Operation
9.
Confirm the new value by pressing the reset key. To cancel press the
display key.
10. Press the display key to move to the next value (time).
11. Repeat now steps 4 to 10 for each item.
12. To exit the set mode go to the menu item End and press the display
key for > 2 seconds or double click the display key.
13. Double-check the correct time and date is displayed.
5.2.3.4
Test Mode on/off
This function allows switching of test mode by holding down the display key
when tESt is displayed. When test mode is switched on the tESt_On is
displayed in values field for 5 seconds.
When test mode is switched on the operating display shows the registers
with more decimal places. Auto scroll is disabled. Press display key briefly
to move to the next value. By double clicking the display button (or after
timeout), the test mode is disabled and the operating display is shown.
Fig. 5.5 Switching the test mode on/off
If one of the general purpose arrows is set to "test mode active" the arrow
will become visible as soon as the user enables test mode.
5.2.3.5
Test Output LED Mode
It is possible to change the operation mode of the test LED output by selecting the mode. Depending on the mode the test output LED shows active
or reactive energy.
When the LEd_ModE menu is entered (by holding down the display key)
string Act is displayed. By pressing the display key briefly one can scroll
between the two modes Act or rEAct.
•
If Act is shown on the display pulses for active energy are transmitted
by the LED.
•
If rEAct is shown on the display pulses for reactive energy are transmitted by the LED.
After a timeout (settable) the LED is switched back to default mode.
© Landis+Gyr
D000030640 en k – E450 PLC 3-phase S2 ZMX300Px – User Manual
Operation
45/56
Fig. 5.6 Switching between active or reactive energy on test LED
When choosing the mode, it is possible to exit by double clicking the display key. LED mode will be retained at the state present before entering the
LEd_ModE.
5.2.4
OBIS Codes of Displayed Values
The following table shows a list of commonly used display items and their
OBIS codes. The display list of the E450 meter is programmable and
therefore additional codes may appear. Please refer to the E450 functional
description for further details.
Value
Displayed
OBIS Code
Error
F.F
Time
0.9.1
Date
0.9.2
Actual FW version
0.2.0
Parameterisation ID
0.2.1
MID checksum of metering code
0.2.8
Active energy A+ (import), total
1.8.0
Active energy A- (export), total
2.8.0
Reactive energy R+, total
3.8.0
Reactive energy R-, total
4.8.0
Reactive energy +Ri (quadrant I), total
5.8.0
Reactive energy +Rc (quadrant II), total
6.8.0
Reactive energy -Ri (quadrant III), total
7.8.0
Reactive energy -Rc (quadrant IV), total
8.8.0
Apparent energy +VA, total
9.8.0
Apparent energy +VA, total
10.8.0
Active energy summation (A+) + (A-)
15.8.0
Active energy balance (A+) - (A-)
16.8.0
Active energy A+, rate x
1.8.x
Active energy A-, rate x
2.8.x
Active energy R+, rate x
3.8.x
Active energy R-, rate x
4.8.x
Current average demand A+
1.4.0
D000030640 en k – E450 PLC 3-phase S2 ZMX300Px – User Manual
© Landis+Gyr
46/56
Operation
Value
Displayed
OBIS Code
Current average demand A-
2.4.0
Current average demand R+
3.4.0
Current average demand R-
4.4.0
Last average demand A+
1.5.0
Last average demand A-
2.5.0
Last average demand R+
3.5.0
Last average demand R-
4.5.0
Maximum demand A+
1.6.0
Maximum demand A+, rate x
1.6.x
Maximum demand A-
2.6.0
Maximum demand A-, rate x
2.6.x
Maximum demand R+
3.6.0
Maximum demand R+, rate x
3.6.x
Maximum demand R-
4.6.0
Maximum demand R-, rate x
4.6.x
Power factor
13.7.0
Network frequency
14.7.0
Current L1
31.7.0
Current L2
51.7.0
Current L3
71.7.0
Voltage L1
32.7.0
Voltage L2
52.7.0
Voltage L3
72.7.0
Utility serial number 1 (ID2.1)
C.1.0
Utility serial number 2 (ID2.2)
C.1.1
Utility serial number 3 (ID2.3)
C.1.2
Utility serial number 4 (ID2.4)
C.1.3
IO control signal status register
C.3.0
Internal Control Status register
C.4.0
Internal operating status
C.5.0
Number of power failures in all phases
C.7.0
Number of long power failures in any phase
C.7.9
Number of power failures in any phase
C.7.21
Operating time
C.8.0
Operating time, rate x
C.8.x
where x is the number of the corresponding rate (range 1 … 6)
© Landis+Gyr
D000030640 en k – E450 PLC 3-phase S2 ZMX300Px – User Manual
Operation
5.3
47/56
Meter Configuration and Update
The initial configuration of the meter is defined when ordering the meter at
Landis+Gyr. Configuration files can be uploaded to the AMM system for
automatic configuration after the meter is installed to the system.
The configuration ID can be read from the meter by the metering system.
Later configuration of parameters and updates can be done remotely from
the AMM system, or locally through the optical port using the .MAP120
Parameter Editor (see also .MAP120 Parameter Editor and AMM system
documentation).
5.4
Disconnector Control
The E450 meter has an integrated disconnector to connect or disconnect
power to the customer premises. The disconnector can be controlled:
•
Manually, with an integrated push button or via a pulse input where an
external push button is wired
•
Remotely, from the metering system
•
Locally, with dlms commands via optical port or by demand supervision.
There are five different operating modes for disconnector control available.
These modes define in which situation the disconnector can be controlled
remotely, locally or manually.
The mode is defined within the meter configuration. Details on the operating modes are described in the E450 functional description.
Disconnector not suitable as main switch
Do not use the disconnector as a main switch for installation or maintenance purposes. The disconnector is not equipped with a thermal and/or
short circuit protection device.
The current state of the disconnector is displayed on the meter display (see
section 5.1 "Display").
When the disconnector push button is actuated, first the capacitor for the
disconnector motor activation will be charged (this lasts about 10 seconds).
The disconnector switches therefore with a delay of approx. 10 second
after actuating the push button.
D000030640 en k – E450 PLC 3-phase S2 ZMX300Px – User Manual
© Landis+Gyr
48/56
Maintenance
6
Maintenance
6.1
Service
The E450 meter has no serviceable parts.
Device service is available from the local Landis+Gyr representative.
6.2
Troubleshooting
If the meter is not operating correctly, check the error displays and LED
(see section 5.1 "Display" for instructions on how to use the display). The
following points should be checked first if there are problems in the meter
operation:
6.2.1
1.
Is the mains voltage present (check display of meter)?
2.
Is the PLC device communication status OK?
3.
Has the maximum ambient temperature not been exceeded?
4.
Is the meter visibly damaged?
5.
Is there any error code displayed (code F.F)?
The error codes are described in section 6.2.1 "Error Codes".
Error Codes
The meter performs regular internal self-tests. If a problem is detected
during self-test an error code is displayed.
Errors are assigned to an error category depending on severity:
Critical Errors
•
Critical errors
•
Communication errors
•
Other errors
Critical errors indicate severe problems but the device can still operate.
However the data measured and stored in the meter may be corrupted and
it is recommended that meters showing critical errors are returned to the
Landis+Gyr service centre.
If the device is displaying the F.F register with an error and blinking alarm
symbol there is a critical error.
The F.F register will continue to be displayed until either the display or reset
keys are pressed or the error register is cleared. If the error register is not
cleared, the failure code can be viewed in the installation/service menu or
by reading the F.F register through the communications interface.
Critical errors can only be cleared via communication with a reset command. In order to reset the required access right must be set in the parameterisation.
i
© Landis+Gyr
F.F register is not cleared with power cycling or key press
Power cycling or pressing the display or reset key do not clear the F.F
register. Pressing the display or reset key only sets the display to normal
operation.
D000030640 en k – E450 PLC 3-phase S2 ZMX300Px – User Manual
Maintenance
49/56
Communication
Errors
Due to the temporary nature of communication errors they do not cause the
F.F register to be displayed. However communication errors do get stored
in the error register. They are cleared when communication is restored.
Communication errors do not usually require meter replacement.
Other Errors
These errors do not cause the F.F register to be automatically shown on
the display but are stored in the error register. The meter continues normal
operation and doesn’t usually have to be replaced.
6.2.1.1
Representation of Error Codes
The error code is split up in four groups of two digits.
Each digit of the error code represents four errors (i.e. four bits of the error
register). The status of the four bits is shown in hexadecimal code i.e. the
single digits may show values between 0 (no error message set) and F (all
four error messages set).
i
Error codes are added
As all errors are shown in hexadecimal code, a single error can appear in
various ways depending on the presence of other errors.
Example:
Two errors are shown as:
FF 01000200
Another two errors occur:
FF 02000800
The register reads:
FF 03000A00
Byte 3
Byte 2
Byte 1
Error register
7654 32 10
Byte 4
76 54 321 0
7654 321 0
7654 321 0
Valency
8421 84 21
842 1 8421
8421 842 1
84 21 842 1
03
00
0A
00
Error code
03000A00
Fig. 6.1 Display of error codes
D000030640 en k – E450 PLC 3-phase S2 ZMX300Px – User Manual
© Landis+Gyr
50/56
6.2.1.2
Maintenance
Error Definitions
F.F 00 00 00 01
F.F 00 00 00 04
F.F 00 00 00 08
F.F 00 00 00 10
F.F 00 00 00 20
F.F 00 00 01 00
F.F 00 00 02 00
© Landis+Gyr
Clock Invalid Error
Purpose:
Indicates an invalid time and date. This error appears after long
mains power failure when the power reserve of the clock is
exhausted
Category:
Other errors
Reset:
The error is cleared automatically when the clock is reset.
Unknown or Unsupported Extension Board Error
Purpose:
Indicates an unsupported or corrupted extension board is fitted.
Category:
Other errors
Reset:
The error is cleared automatically when the board is replaced.
Contact a Landis+Gyr service centre.
Profile(s) Checksum Error
Purpose:
Indicates a logical error on at least one profile, i.e. a checksum
error. The checksum is calculated over the whole profile area.
Category:
Other errors
Reset:
The error is cleared automatically when the checksums are correct again, e.g. with the next read/write to the profiles or reset
via communication.
Disconnector Control Unit Failure Error
Purpose:
Indicates a possible failure of the disconnector control unit.
Category:
Other errors
Reset:
The error is cleared automatically when the next successful disconnector operation has been made.
One or more parameter could not be restored after firmware upgrade
Purpose:
Indicates that one or more parameters could not be restored
after a firmware upgrade. The objects with parameters which
could not be restored will run on the default parameters.
Category:
Other errors
Reset:
The error is cleared automatically when the next successful
firmware upgrade has been made or can be deleted via communication.
Program Memory Error
Purpose:
Indicates a checksum failure in the parameter data
Category:
Critical error
Reset:
The error is not reset automatically; the register must be cleared
via communication.
RAM Error
Purpose:
Indicates an error in the internal program memory (RAM)
Category:
Critical error
Reset:
No reset possible, the device must be replaced.
D000030640 en k – E450 PLC 3-phase S2 ZMX300Px – User Manual
Maintenance
F.F 00 00 04 00
F.F 00 00 08 00
F.F 00 00 10 00
F.F 00 01 00 00
F.F 00 02 00 00
51/56
Non volatile Memory Access Error
Purpose:
Indicates an access error (physical error) to the non-volatile
memory, i.e. Flash
Category:
Critical error
Reset:
The error is not reset automatically; the register must be cleared
via communication. Event 'Error register cleared' is triggered.
Measurement System Error
Purpose:
Indicates measuring system access failures
Category:
Critical error
Reset:
The error is not reset automatically; the register must be cleared
via communication. Event 'Error register cleared' is triggered. If
repeated the meter must be exchanged.
Watchdog Error
Purpose:
Indicates an invalid start-up sequence
Category:
Critical error
Reset:
The error is not reset automatically; the register must be cleared
via communication. Event 'Error register cleared' is triggered. If
repeated the meter must be exchanged.
Communication M-Bus Channel 1 Error
Purpose:
Indicates an error in accessing the M-Bus slave on Channel 1
Category:
Communication errors
Reset:
The error is cleared automatically if the communication is successful again.
Communication M-Bus Channel 2 Error
See F.F 00 01 00 00
F.F 00 04 00 00
Communication M-Bus Channel 3 Error
See F.F 00 01 00 00
F.F 00 08 00 00
Communication M-Bus Channel 4 Error
See F.F 00 01 00 00
F.F 00 10 00 00
Communication Error Home Area Network
Purpose:
Indicates an error in accessing any of the Home Area Network
devices, i.e. ecoMeter
Category:
Communication errors
Reset:
The error is cleared automatically if the communication is successful again.
D000030640 en k – E450 PLC 3-phase S2 ZMX300Px – User Manual
© Landis+Gyr
52/56
Maintenance
F.F 00 20 00 00
6.3
Remote Communication Error
Purpose:
Indicates an error in setting up a remote data push. This can be
initiated by any failure in the communication set-up.
Category:
Communication errors
Reset:
The error is cleared automatically if the communication is successful again.
Measuring Times for Meter Testing
For technical reasons, short measuring times result in higher measuring
deviations. Therefore, it is recommended to use long measuring times to
obtain the desired accuracy.
The following tables show the minimal test times needed to achieve the
stated uncertainty. The values do not include any uncertainty due to temperature variation.
Test conditions: nominal voltage (3 x 230V), all phase.
Active energy
Current
Phase
Uncertainty
Minimum Test Time
[% Iref]
[ °]
[%]
[s]
Imax
0
± 0.1
300
Imax
60
± 0.1
300
100
0
± 0.1
300
100
60
± 0.1
300
10
0
± 0.1
300
10
60
± 0.2
300
5
0
± 0.1
300
Current
Phase
Uncertainty
Minimum Test Time
[% Iref]
[ °]
[%]
[s]
Imax
90
± 0.2
300
Imax
30
± 0.2
300
100
90
± 0.2
300
100
30
± 0.2
300
10
90
± 0.2
300
10
30
± 0.3
300
5
90
± 0.3
300
Reactive energy
© Landis+Gyr
D000030640 en k – E450 PLC 3-phase S2 ZMX300Px – User Manual
Decommissioning and Disposal
53/56
7
Decommissioning and Disposal
7.1
Decommissioning
The procedure for disconnecting and removing the meter from the mains is
described in section 4.7 "De-installing the Meter".
7.2
Disposal
i
Electronic waste treatment
This product must not be disposed of in regular waste. Use a professional
electronic waste treatment process.
The components used to manufacture the device can, in the main, be broken down into constituent parts and sent for suitable recycling or disposal.
When the product is removed from use, the whole product must be sent to
a professional electronic waste treatment process. The waste treatment
company must be accepted by the officials.
End processing of the product and recycling of its components must always
be carried out in accordance with the local laws and instructions given by
the officials of the country where the end processing and recycling are
done.
By request, Landis+Gyr will give more information about the environmental
influence of the product.
i
Disposal and environmental protection regulations
The following are general guidelines and should NOT take priority over
local disposal and environmental policies which should be adhered to without compromise.
Components
Disposal
Printed circuit boards
Electronic waste: delivered to recycling plants.
Metal parts
Sorted and delivered to metal recycling plants.
Plastic components
Sorted and delivered to re-granulation if at all possible.
D000030640 en k – E450 PLC 3-phase S2 ZMX300Px – User Manual
© Landis+Gyr
54/56
8
Index
Index
.MAP110 Service Tool.................................. 14
About this document ...................................... 3
Anzeigetaste ................................................ 19
Block diagram .............................................. 10
Calibration .................................................... 11
Case of meter .............................................. 17
Channel configuration .................................. 13
Characteristics of meter ................................. 7
Checking connections .................................. 29
Commissioning............................................. 29
Communication device installation support... 30
Communication errors .................................. 50
Connecting
Inputs and outputs .................................... 28
Meter ........................................................ 27
Phases ..................................................... 27
Connection check......................................... 29
Connection diagrams ................................... 23
Connections ................................................. 22
Control elements .......................................... 21
Creep indication ........................................... 38
Critical error ................................................. 49
Danger level ................................................. 15
Date setting .................................................. 44
Decommissioning ......................................... 54
De-installation
Meter ........................................................ 37
Wired M-Bus devices ................................ 35
Description of unit .......................................... 6
Dimensions .................................................. 22
Disconnecting the meter............................... 37
Disconnector ................................................ 14
Control ...................................................... 48
Operating modes ...................................... 48
Push button .............................................. 21
State indication ......................................... 39
Display ......................................................... 38
Key ..................................................... 17, 21
Menu ........................................................ 41
Modes....................................................... 40
Symbols.................................................... 38
Disposal ....................................................... 54
Energy direction ........................................... 38
Energy registers ........................................... 12
Error codes .................................................. 49
Error definitions ............................................ 51
Faceplate ..................................................... 20
FLASH memory............................................ 11
Four-quadrant measurement ........................ 13
Functional check .......................................... 29
Functional overview ....................................... 6
Generation of signals ................................... 11
Index field..................................................... 39
Inputs ........................................................... 10
Install menu list ............................................ 32
© Landis+Gyr
Installation
Communication devices............................ 30
Wired M-Bus devices ................................ 34
Inverted relay function .................................. 13
LCD display ................................................. 38
Main characteristics of meter ......................... 7
Mains Connection ........................................ 31
Maintenance ................................................ 49
Measured quantities ..................................... 11
Measurement channels ................................ 12
Measuring principle ...................................... 10
Measuring times for meter testing ................ 53
Mechanical construction ............................... 17
Memory ........................................................ 11
Meter
Case ......................................................... 17
Configuration ............................................ 47
Connecting ............................................... 27
Connections ............................................. 22
Dimensions............................................... 22
Disconnection ........................................... 37
Mounting .................................................. 25
Testing ..................................................... 53
Update...................................................... 47
OBIS codes of displayed values ................... 46
Operating display ......................................... 40
Operation ..................................................... 38
Optical interface ........................................... 18
Outputs ........................................................ 10
Phase connection terminal ........................... 27
Phase connections ....................................... 10
Phase voltage presence indications ............. 39
PLC
Communication ........................................ 32
Device communication status ................... 33
Menu ........................................................ 32
Power Line Automation Network (PLAN+)...... 6
Power Line Carrier (PLC) ............................... 6
Power supply ............................................... 11
Processing of signals ................................... 11
Pulse output LED ......................................... 18
Purpose of this manual .................................. 3
Rates ........................................................... 12
Reference documents .................................... 3
Relay inversion ............................................ 36
Relay output ................................................. 13
Inverted mode .......................................... 13
Normal mode ............................................ 13
Random switching delay ........................... 13
Representation of error codes ...................... 50
Reset key ..................................................... 21
Responsibilities (safety relevant) .................. 15
Safety
Information ............................................... 15
Regulations .............................................. 16
D000030640 en k – E450 PLC 3-phase S2 ZMX300Px – User Manual
Index
Symbols .................................................... 15
Sealing screw cover...................................... 17
Service ......................................................... 49
List ............................................................ 43
Menu ......................................................... 42
Set list........................................................... 44
Setting time and date .................................... 44
Setting-up relay inversion ............................. 36
Sevice menu ................................................. 30
Signal
Generation ................................................ 11
Processing ................................................ 11
Sliding cover ................................................. 17
Software tools ............................................... 14
D000030640 en k – E450 PLC 3-phase S2 ZMX300Px – User Manual
55/56
Start detection .............................................. 11
Structure of error code .................................. 50
Summation methods..................................... 12
Target group of this manual ............................ 3
Terminal block .............................................. 22
Test mode .................................................... 45
Test output LED ........................................... 45
Testing of meter ........................................... 53
Time setting .................................................. 44
Troubleshooting ............................................ 49
Type designation ............................................ 8
Value field .................................................... 38
Wired M-Bus communication ........................ 34
© Landis+Gyr
Contact:
Landis+Gyr AG
Theilerstrasse 1
CH-6301 Zug
Switzerland
Phone: +41 41 935 6000
www.landisgyr.com