1
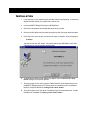
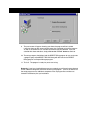
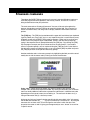
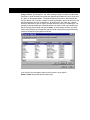
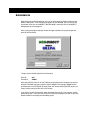
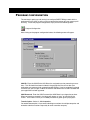
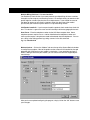
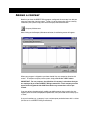
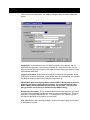
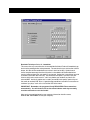
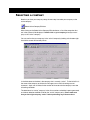
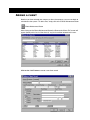
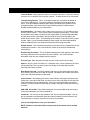
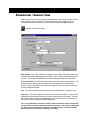
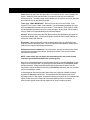
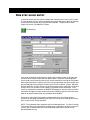
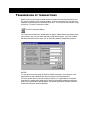
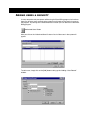
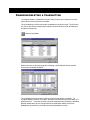
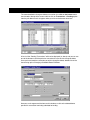
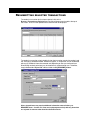
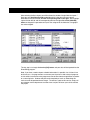
ACH DIRECT DIRECT BILLINGtm Version 2 Quick Start Users Manual COPYRIGHT 1998, 1999 by ACH DIRECT All rights reserved. This publication is protected by copyright and all rights are reserved by ACH Direct. It may not, in whole or in part, be copied, photocopied, reproduced, translated, or reduced to any electronic medium or machine-readable form without prior consent, in writing, from ACH Direct. This publication supports the software program DIRECT BILLING. It is possible that it may contain technical or typographical errors. ACH DIRECT provides this publication as is, without warranty of any kind, either expressed or implied. ACH Direct 42-450 Bob Hope Drive #105 Rancho Mirage, CA 92270 Trademark Acknowledgments: DIRECT BILLING is a registered trademark of ACH Direct. All other products and company names are trademarks of their respective owners. DIRECT BILLING End-User License Agreement for 1 Computer For use in the United States of America only - no export NOTICE TO USER: THIS IS A CONTRACT. BY INSTALLING THIS PROGRAM YOU ACCEPT ALL THE TERMS AND CONDITIONS OF THIS AGREEMENT. If you do not agree with the terms and conditions of this Agreement, erase this program from your computer, and return this program, along with the rest of the package, to ACH Direct or the location where you obtained it. This package contains software (“Software”) and related documentation (“Documentation”). The term “Software” shall also include any upgrades, modified versions and updates, additions, and copies of the Software licensed to you by ACH Direct. ACH Direct grants you a nonexclusive license to use the Software and Documentation, provided that you agree to the following: 1. Use of the Software. You mayInstall the Software in a single location on a hard disk or other storage device of up to the number of computers indicated in the upper left corner of this license agreement. Provided the Software is configured for network use, install and use the Software on a single file server for use on a single local area network for either (but not both) of the following purposes: (1) permanent installation onto a hard disk or other storage device of up to the number of end-user licenses purchased; or (2) use of the Software over such network, provided the number of different computers on which the Software is used does not exceed the number of end-user licenses purchased. For example, if there are 100 computers connected to the server, with no more than 15 computers ever using the Software concurrently, but the Software will be used on 25 different computers at various points in time, the number of end-user licenses which you need is 25. Special pricing for additional licenses is available through ACH Direct. Please contact them directly to purchase additional end-user licenses. The primary user of each computer on which the Software is installed or used may also install the Software on one home or portable computer. However, the Software may not be used on the secondary computer by another person at the same time the Software on the primary computer is being used. Make one (1) backup copy of the Software. 2. Copyright. The Software is owned by ACH Direct and its structure, organization, and code are the valuable trade secrets of ACH Direct. The Software is also protected by the United States Copyright Law and International Treaty provisions. You must treat the Software just as you would any other copyright material such as a book. You may not copy the Software or the Documentation, except as set forth in the “Use of the Software” section. Any copies that you are permitted to make pursuant to this Agreement must contain the same copyright and other proprietary notices that appear on or in the Software. You agree not to modify, adapt, translate, reverse engineer, decompile, disassemble, or otherwise attempt to discover the source code of the Software. Trademarks shall be used in accordance with accepted trademark practice, including identification of trademark owner’s name. The use of any trademark as herein authorized does not give you any rights of ownership in that trademark. Except as stated, this Agreement does not grant you any rights to intellectual property rights in the Software. 3. Transfer. You may not rent, lease, sublicense, or lend the Software or Documentation. You may, however, transfer all your rights to use the Software to another person or legal entity provided that you transfer this Agreement and transfer (or destroy) the Software, including all copies, updates, and prior versions, and all Documentation to such person or entity and provided that you retain no copies, including copies stored on a computer. Transferring your rights to use the Software does not obligate ACH Direct to process any transactions that are submitted from said person or entity. Each person or entity must submit an application to ACH Direct, and after approval by ACH Direct, can use the Software to process transactions. 4. Limited Warranty. ACH Direct warrants to you that the Software will perform substantially in accordance with the Documentation. If the Software does not perform substantially in accordance with Documentation, the entire and exclusive liability and remedy shall be limited to either, at ACH Direct’s option, the replacement of the Software or the refund of the license fee you paid for the Software. ACH Direct does not and cannot warrant the performance or results you may obtain by using the Software or Documentation. The foregoing states the sole and exclusive remedies for ACH Direct’s breach or warranty. Except for the foregoing limited warranty, ACH Direct make no warranties expressed or implied, as to non-infringement of third-party rights, merchantability, or fitness for any particular purpose, in no event will ACH Direct be liable to you for any consequential, incidental, or special damages, including any lost profits or lost savings, event if an ACH Direct representative has been advised of the possibilities of such damages, or for any claim by any third party. 5. Governing Law and General Provisions. This Agreement will be governed by the laws in force in the State of California excluding the application of its conflicts of law rules. This Agreement will not be governed by the United Nations Convention on Contracts for the International Sale of Goods, the application of which is expressly excluded. If any part of this Agreement is found void and unenforceable, It will not affect the validity of the balance of the Agreement, which shall remain valid and enforceable according to its terms. You agree that the Software will not be shipped, transferred, or exported into any country or used in any manner prohibited by the United States Export Administration Act or any other export laws, restrictions, or regulations. This Agreement shall automatically terminate upon failure by you to comply with its terms. This Agreement may only be modified in writing signed by an authorized officer of ACH Direct. 6. Notice to Government End Users: If this product is acquired under the terms of a: GSA Contract-Use, reproduction, or disclosure is subject to the restrictions set forth on the applicable ADP Schedule contract; DOD contract-Use, duplication, or disclosure by the Government is subject to restrictions as set forth in subparagraph (c)(1)(ii) of 252.2277013;Civilian agency contract-Use, reproduction, or disclosure is subject to 52.227-19(a) through (d) and restrictions set forth in the accompanying end user agreement. Unpublished rights reserved under the copyright laws of the United States. ACH Direct, 42-450 Bob Hope Drive #105, Rancho Mirage, CA 92270 INSTALLATION 1. If you are using a virus-detection utility, disable it before running Setup. If you do not disable the utility, Setup may conflict with it and not run. 2. Insert the DIRECT Billing CD into your CD-ROM Drive. 3. Click on the Start button on the lower left corner of your screen. 4. Click on the Run option from the menu that pops up after clicking on the Start button. 5. In the “Run” box, you can type a command to “Open” a program, at the prompt type: D:\Setup and then click on the “OK” button. If the drive letter of your CD-ROM is not D: then substitute the D: with the appropriate drive letter. 6. The Welcome to Setup screen (Above) will appear next and click on the “Next” button to begin the installation process. 7. The next screen will ask you to type the “Folder Name” that you would like to install the DIRECT Billing program into. Unless you have a need to install it to a different location, accept the default by clicking on the “Next” button. 8. The next screen will ask you which “Installation Type” you would like to use. Accept the default of “Complete” by clicking on the “Next” button. 9. The next screen will appear showing you where the program will be installed. It will also show you the amount of free space that is required to install the program as well as the amount that is available on the drive that you selected. If you are satisfied with these selections, simply click on the “Finish” button to continue. 10. The setup program should then load the DIRECT Billing program for you and create a program group called DIRECT BILLING along with the icons for the DIRECT Billing program and Import Manager program. 11. That’s it! The program is ready for you to start using. Networks: If you have installed the program on a network you will need create shortcuts for the additional computers that will be accessing the program. There is no need to run the setup program on the additional computers since all program files and data are located in the directory that you installed to. STANDARD COMMANDS Throughout the DIRECT Billing program we have used a standard Windows interface to make the program extremely powerful, user friendly, intuitive, fast to learn, as well as being streamlined to make your job easier. The main commands or “Standard Commands” that you will be using throughout the program include the use of the [TAB] key to move from field to field, using “locators” to search and retrieve data, and using “tabs” to display additional information and search options. The [TAB] key: The [TAB] key located towards the upper left hand side of your keyboard (typically above your “Caps Lock” key is a very important key that is used in literally every window or screen of the DIRECT Billing software program. When you have a data entry screen such as the program log-in screen below, you fill in the data entry prompts by typing in the response to each prompt followed by the [TAB] key. By pressing the [TAB] key the program accepts your input and moves on to the next prompt. If you need to return to a previous prompt, you can continue hitting the [TAB] key until it cycles back to the data entry prompt you need to modify, or you can hold the [Shift] key down and press the [TAB] key to return to the previous data entry prompt. Another method to select a data entry prompt is by highlighting the field you wish to enter/ modify data in with the mouse and by clicking on the left mouse button. Using “tabs”: When you pull up almost any screen in DIRECT Billing there will be multiple “tabs” located at the top of the window. By clicking on these tabs you are able to look at or modify additional information or present the information in a different sort order depending on what type of screen you are looking at. The two basic windows are (1) a listing of information and (2) a data entry screen. At the top of a listing or “browse” window you will typically see multiple “tabs” at the top of the window with the label “by ___” . e.g. By First Name, By Last Name, etc.. By using the mouse to click on these “tabs” you will change the sort order in which the data is displayed on the screen as well as giving you the opportunity to use a “locator” to search for a specific record. Using Locators: By clicking on a “tab” when viewing a listing or “browse” of information sometimes a white locator data entry box will appear directly below the “tab” that you click on. (Such as the example below - The white locator data entry box is directly below the “By First Name” tab). A locator is helpful in searching through a long list of data to try and find the information that you are looking for. By clicking on a “tab” which has a locator data entry box below it, you can type in a portion of the data that you are looking for. For example, if you were looking for someone with the last name of smith, you could click on the tab “By Last Name” below and type in: Smith (or some portion of Smith, like: Smi). Then hit the [TAB] key on the keyboard and the list will automatically jump to the closest match for the data that you typed in the locator. It isn’t import if you use upper or lower case characters, so you type in: Smith or smith and you will get the same results. LOGGING IN After you have installed the program you can run the program by double clicking on the DIRECT Billing icon. If the icon does not appear on your desktop, you can click on the start button, then click on the DIRECT BILLING folder, and finally click on the DIRECT Billing option to run the program. After starting the program the login screen will appear (below) asking you to type your User ID and Password. To login use the following User ID and Password: User ID: Password: SYS ADMIN After typing SYS for User ID, hit the [TAB] key on the keyboard to accept this and move onto the Password data entry prompt to type in ADMIN. After typing in ADMIN for the password you can hit [TAB] key to move to the “OK” button and hit [ENTER], or you can simply use the mouse to click on the “OK” button. If you haven’t read the information under “Standard Commands” in the previous section please do so now. It will save you much time in learning the program as well as give you powerful tools for searching for and modifying data. PROGRAM CONFIGURATION The next step in getting up and running is to configure DIRECT Billing to work with the equipment that you have as well as to set up some of the features that your company will be using. To start the program configuration, simply click on the following button: Program Configuration After clicking on the program configuration button, the following screen will appear: COM ID: Enter the COM ID that ACH Direct has assigned to you for processing transactions. This ID should have been included in the package that was sent to after your application was processed and accepted from ACH Direct. If you have not been assigned a COM ID yet, you can type a 100 for the COM ID and DEMO for the COM Password until your application has been approved. COM Password: Enter the COM Password that ACH Direct has assigned to you here. When you type the password in, the letters will appear as “stars” or astericks on the screen. This is normal and is just an added precaution to guard against prying eyes. Transfer Option: Select: 1 - All Companies You would choose option 2 if you were submitting transactions for multiple companies and wanted to submit transactions separately for each transmitter company. Multiple Billing Divisions?: Do not check this. You would only check this box if you were processing multiple billing divisions or entities through the same company and checking account. An example of why you would use this option might be a medical practice that has multiple doctors. If you wished the name of the doctor to appear on your client’s statement rather than the name of the medical practice then you would set up each doctor as a separate billing division. Chk Reader Installed?: If you have purchased the optional check reader then check this box. This device is a great time saver and will also help to eliminate typographical errors. Host Phone: Enter the telephone number for the ACH Host computer here. Some telephone systems require an 8 or a 9 to be dialed before the telephone number and some systems require a long distance code to be entered after the telephone #. You can put a delay in the dialing process by putting a comma in the dial command. e.g.: 9,1-760-862-9192 Modem Options: Click on the “Modem” tab near the top of the System Defaults window to configure your modem. Most of the options on the screen will not need to be changed other than the COM Port that your modem is attached to. If you need help configuring DIRECT Billing to work with your modem, you can contact our technical support department for help. After you have completed configuring the program, simply click on the “OK” button to save your changes. ADDING A COMPANY Now that you have the DIRECT Billing program configured, the next step is to add your company information into the system. To get a list of the companies that are currently installed in your system simply click on the Company Maintenance button. Company Maintenance After clicking on the Company Maintenance button, the following screen will appear: When your program is shipped to you there shouldn’t be any companies listed on this screen. To add your company to the system, simply click on the “ADD” button. IMPORTANT: For our purposes, the definition of Company is a business that you are employed by to conduct DIRECT Billing transactions. Each company must be approved and registered with ACH Direct before any transactions can be processed. If you are going to be electronically crediting or debiting money from an entity that just happens to be a business/employee/corporation/etc, then you would set that entity up as a “client”. Or to put it another way, a company is you, and everyone you do business with is a client. (At least as far as DIRECT Billing is concerned) After clicking on the “Add” button, the “Adding a Company Record” window (below) will appear. Company ID: Enter the ID# that you ACH Direct assigned to your company after it’s application was approved. If you have not yet gotten your Company ID#, then you can enter any number here and change it to the proper ID number when your company is fully registered with ACH Direct. Company Information: Simply enter your company’s information in these fields. Hit the [TAB] key to move from field to field. If you need to return to a previous field, you can hold the [Shift] key down and then hit the [TAB] key to move back up. IMPORTANT: When entering any address into the DIRECT Billing program it moves to the zip code before entering the city and state. If you enter the zip code, then DIRECT Billing will automatically fill in the proper city and state. Just one of the many great time savers that you’ll find when using DIRECT Billing. Default Entry Description: This is the default description that will appear on your client’s checking account statement that describes what a particular transaction is for. Examples might be: Ins. Payment, Membership, etc.. This description is only a default, you can override this description at any time for any transaction. Note: Unfortunately, due to banking standards, we only have room to place 10 characters of information in this field. Resubmit Technique: Select: 2 - Immediate This means that any transaction that is returned Non Sufficient Funds will immediately go back into the pending buffer to be processed. The next time that you click on the transmit button, this item will be resubmitted to your client’s bank for funding. Option three is similar to option two except that the transaction is scheduled to be resubmitted after a certain number of days (that you specify) has elapsed. Option four is used when you wish to resubmit each NSF item manually. You would use this option if you like to call your client or their bank to make sure it’s “safe” to try before you resubmit any item that is returned NSF. And lastly, option one is used if you would like to specify special days of the month to resubmit NSF items. A good strategy would be to resubmit a transaction on traditional “pay days” such as the 1st and the 15th of the month. IMPORTANT: Remember, the program will only RESCHEDULE the transactions automatically. You still need to click on the transmit button each day to actually send the transactions out to be funded. After you have completed entering your company information into this screen, click on the “OK” button to save your company. SELECTING A COMPANY Now that you have your company setup, the next step is to select your company as the active company. Select Active Company/Division After clicking on the Select Active Company/Division button, a list of the companies that are in the system will be displayed. Double-click on your company to load your company as the “active” company. You can confirm that your company is the “active” company by looking at the bottom right hand of the screen next to today’s date. In the field closest to the date is the company that is currently “active”. To the left of this is the name of the company or division that will appear on a client’s checking account statement. Again, we are limited in the number of characters for the company name due to banking standards. The definition of an “active” company is that all transactions scheduled, reports generated, and clients added or modified will be for the “active” company only. Please make sure that you have right company “active” before performing any of these actions. ADDING A CLIENT Now that you have selected your company as the active company, you can now begin to add clients to the system. To add a client, simply click on the Clients Maintenance button. Clients Maintenance Button After clicking on the Clients Maintenance Button the “Browse the Clients File” screen will appear (below) with a list of all the clients (if any) that have been entered for this company. Click on the “Add” button to create a new client record. First/Last Name: Simply type your client’s first and last name here. If you only have one name (such as a company) you can place a period “.” in either the first or last name field. Transit Routing Number: This is a nine-digit number that is located at the bottom of your client’s voided check. It is typically located at the bottom left hand corner of the check. If you purchased the optional check reader, you would simply slide the check through the reader at this time and the Transmit Routing Number and the Account Number would be filled in for you automatically. Account Number: The length of this number can be as many as 17 characters and can possibly contain dashes “-” as part of the number (although not commonly). The easiest way to identify this number is to eliminate the 9 digit number (Transmit Routing Number) and the check number (also listed at the top right of the check) from the digits at the bottom of your client’s check. The remaining set of numbers is your client’s bank account number. Again, if you purchased the optional check reader, this information would be filled out automatically for you simply by sliding the check through the reader. Default Amount: This is the default amount that your client will be charged when you are scheduling transactions. You can override this amount at the time you schedule the transaction(s). Default Entry Description: This is the default description that will appear on your client’s checking statement for the transactions that you schedule. You can override this description at the time you schedule the transaction(s). Account Type: Enter the type of account that your client’s check is drawn upon. Status: If you put a client “On Hold” or in a “Deleted” status, no transactions for this client will be processed. This way you may retain the history on the client without totally removing them from the system. Bank Name & Phone#: This field is optional and you may skip entering the rest of data entry fields by clicking the “OK” button at this time. Otherwise, you can enter your client’s bank name and phone number in these fields. Client Address: After entering your client’s street address, the program will jump to the field to key in your client’s Zip Code. By typing in your client’s zip code, the city and state fields will be filled in for you automatically. If the city or state information is not filled in correctly, you may override this information by typing in the proper information for the city and state. SSN, DOB, & Cust ID#: These fields are optional and are provided to help you locate a client in the method that you are accustomed to. Comments: You can click on the comments “tab” near the top of the window. You can put any comments and information about this client that doesn’t fit on the “General” tab. This information is strictly for your own use and is not transmitted. Click on the [OK] button to save your information NOTE: Clients are associated with a company and can be shared across multiple divisions. SCHEDULING TRANSACTIONS Now that you have setup your company and added one or more clients you are ready to start scheduling some transactions. To schedule a transaction simply click on the “Schedule Transactions” button and the Transaction Sceduler window will display: Schedule Transactions Button Billing Entity: This is the name that will appear on your client’s checking account as the name of the company conducting the transaction. If this is not the correct billing entity or “division”, click on the [CANCEL] button and select the proper company and division. 1st Transmit Date: This is the date of the first transaction that you are scheduling. It will default to today’s date but you can change it to any date you wish. If the date that appears initially is not today’s date, then your computer’s clock may not be set correctly and will need to be adjusted. Qty: This is the number of transactions that you are scheduling for a particular client. Frequency: This is the Frequency in which the transactions will reoccur. If you are only scheduling one transaction then it doesn’t matter what frequency you choose. Typically, transactions reoccur monthly, but depending on your business or the circumstances of this particular client it may be some other Frequency. TIP: If you would like to schedule a client to have transactions on the 1st and 15th of each month, schedule transactions for the client twice. Once with a starting date on the 1st of the month with a frequency of monthly, and the second time with a starting date on the 15th with a frequency of monthly. Client: When you get to this data entry field, a list of clients for the “active” company will appear. Select the client from the Client List screen that you wish to schedule the transaction(s) for. To select a client, simply double-click on the client or click on the client once and then click on the [SELECT] button. Trans Type: VERY IMPORTANT! Be sure you are very clear on this field. If you choose a Trans Type of “Debit” (most common), you will be deducting money from your client and depositing the funds into your account. If you choose a Trans Type of “Credit”, you will be deducting money from your account and give it to your client. An example of using a “Credit” trans type would be for payroll Direct Deposit. Amount: When you get to this field, the default amount you specified for your client will automatically display here. You may override this amount or simply hit the [TAB] key to accept this amount and continue. Description: When you get to this field, the default description you specified for your client will automatically display here. You may override this description or simply hit the [TAB] key to accept this description and continue. Show balance due on statement?: Check this box if you wish to show on your client’s checking statement the balance due or “pending transactions” each time on of these transactions are funded. NOTE: Some banks may not display this information and it may cause the time required to generate the transmit file to increase greatly. After you have completed entering the information for the Transactions Scheduler screen, simply click on the [OK] button. By clicking on the [OK] button the [CONFIRMED] button will become active. Please reread the information on the screen to confirm that the information is correct and then click on the [CONFIRMED] button only after you are 100% sure that everything is correct. In the example on the previous page, Demo Company is going to schedule 5 monthly payments of $600.00 for Lionel Hutz. The description that will appear on Mr. Hutz’s checking account is “Mort Pymnt” and the first transaction will occur on 12/7/1998 and will repeat 4 more times on the 7th day of each month following the first transaction. A balance due or payoff amount will not appear on Mr. Hutz’s checking account. ONE STEP QUICK ENTRY In instances where you only wish to schedule one transaction for a client (such as check by fax or lockbox) you can use the “One Step Quick Client/Item Entry” option to schedule a transaction much quicker than using the other methods. To perform this function, simply click on the “One Step Entry” button. One Step Entry If you have the optional check reader installed, simply swipe the check at this point and the client’s bank account information will appear above. If you don’t have the optional check reader, simply enter the client’s bank account information at the top of this window. After swiping the check or keying in the bank account information and check number and pressing the [tab] key the program will move to the “First/Last Name:” prompt. When the program does this, it means that there is no record of this client in the system at this point and you must fill in the client’s name, address, and phone number information. If the client has already been enrolled in the DIRECT Billing program then that client’s personal information will appear in these fields automatically and the program will move the cursor down to the amount field located near the bottom of the window. At this point, simply type in the amount and description of this transaction and then choose if you are going to be debiting your client’s bank account or crediting your client’s bank account for the amount specified. NOTE: This procedure works especially well for lockbox operations. If a client is already in the system then prior authorization has been given. Otherwise if the client is not in the system, then an authorization form must be obtained before the transaction can be processed electronically. TRANSMISSION OF TRANSACTIONS Now that you’ve successfully created some transactions the next step would be to transmit any transactions that are ready for funding. Only the transactions that are due to be funded or are past due to be transmitted will be sent. To transmit the transactions, simply click on the “Transmit Transactions” button. Transmit Transactions Button The “Communicate with Host” window will then appear (below) showing the details of the transactions (if any) that are about to be sent to the host computer. If you are satisfied with the information on the screen, click on the [DIAL] button to complete the process. NOTES: 1) If you do not have the correct COM ID or COM Password or if your company is not registered in our host computer then the transactions will not be processed. 2) Even if you do not have any transactions to submit, it is a good idea to call the host computer on a regular basis (especially for the days immediately following submitting a batch) so that the DIRECT Billing program can receive rejected transactions and confirmation of funding from the host computer. ADDING USERS & SECURITY In many companies only one person will be using the Direct Billing program, but in others there may be many users accessing the system that will need various levels of access to the program. By clicking on the “Authorized Users” button you can add users to the Direct Billing program. Authorized Users Button After you click on the “Authorized Users” button a list of all the users in the system will appear: To add a user, simply click on the [Add] button to bring up the “Adding a User Record” window. USER ID: Usually enter the User’s first name and the first letter of the last name here (e.g. JohnS), however you can type anything you like here. This is what the user would type when logging in on the “Log-in” screen when you first run the program. Name: The User’s First and Last Name. Password: The user’s password. A very common practice for passwords is to combine two unrelated words at the password. e.g. CATGREEN Multi-Company Access: By clicking this, the user can access any of the companies that are setup in the system. If this option is not selected, the user will only have access to the one company that is currently “active” when you created the user. Multi-Biller Access: By clicking this, the user can select different billing divisions to work with. If this option is not selected, the user will only have access to the division that is currently “active” when you created the user. Security: 1 - Administrator: Users with administrator access have total access to all features of the Direct Billing program. 2 - Transmit R/W: Users with Transmit R/W access can add, modify, and delete clients and transactions. They can also resubmit and transmit transactions, but they cannot access any of the administration features such as adding users and other admin functions. 3 - Read/Write: Users with Read/Write access can do everything that a Transmit R/W user can except for the transmit function. 4 - Read Only: User can only look at information and print reports. Once you have entered all the information in this window click on the [OK] button to save the user. CHANGING/DELETING A TRANSACTION To change or delete a scheduled transaction, there are two ways to retrieve a list of the transactions that have yet to be transmitted. The first method is to list the transactions scheduled for a particular client. To pull up this list, click on the “Clients Listing” button and then locate the client you wish to modify one or more transactions for. Clients Listing Button Double-click on the client to bring up the “Changing a Client Record” Screen and then click on the tab labeled “Schedule”. The scheduled transactions for this particular client will then display (as above). To change or delete a particular transaction, locate the transaction on the screen above and double-click on it. Once you have the transaction displayed in the “Changing a Schedule Record” window then you can change some of the information listed or click on the Deleted box to prevent this transaction from being submitted for funding. The second method to change or delete a transaction is to click on the browse menu item located at the top of the screen and then click on Transactions -> Pending option from the pull down menu that appears when you click on the browse menu item. A list of all the “Pending Transactions” will then be displayed (as above) and you can use one of the locators to find the particular transaction that you wish to change or delete. Once you have found the transaction you wish to change or delete, double-click on the item to bring up the “Changing a Schedule Record” Window. Here you can change one of the items on this window, or click on the deleted box to prevent this transaction from being submitted for funding. RESUBMITTING REJECTED TRANSACTIONS To resubmit a transaction that has been rejected, click on the: Browse->Transactions->Rejected item from the pull-down menu located at the top of the screen. A list of all the rejected transactions will then be displayed. To resubmit a transaction, simply double-click on the transaction you wish to resubmit and the “Changing a Schedule Record” window will appear. A simple NSF can be resubmitted without any additional information entered and (depending on how you configured your Direct Billing resubmit technique) may be automatically resubmitted for you. Otherwise, simply click on the “Reject Info” tab and click on the [RESUBMIT] button. Other rejected items may require additional information entered before you RESUBMIT them. Contact our client service department to help with any items that are rejected for reasons other than Non-Sufficient-Funds. IMPORTING DATA It is possible to import your client’s information from other programs you may have that information stored in. To be able to import this data, you must be able to export the data from the program into a standard comma delimited file. If your program does not have an export option or you need help in exporting your data you may call one of your technical support staff. We may not be able to help in all instances, but we have powerful tools to access a wide variety of database structures and can convert the data in the majority of the instances. If your program supports an export option you usually have the option to specify the file name. If possible, call the file: CLIENTS.CSV If this is not possible, don’t worry. The import program can import any file name. To import the file that you have created, choose the Admin->Import/Export->Import Client Information option from the Admin pull down menu. The Import Manager will then ask you to enter your UserID and Password. Next you will need to specify the name of the file which contains your client data (e.g. CLIENTS.CSV) as well as the location of the file. This is a standard Windows file browse/select window that you should have no problem in finding the file you are looking for. If your import file does not end with the .CSV extension then choose “All Files” from the “List Files of Type” prompt. NOTE: At the bottom right hand corner of the screen will be the name of the company that you will be importing the client information into. If this company is not the correct company then you can click on the [CANCEL] button and then the [SELECT COMPANY] button to select the proper company to import your client information into. After selecting the file to import you will be shown the window “Assign fields for import..”. Here you must highlight the field on the left (which is the data from your comma delimited file that you created) and the corresponding field on the right. After highlighting the field on the left and the corresponding field on the right click on the [ASSIGN] button and repeat this procedure until you have assigned all the fields that are appropriate to be assigned. The last step is to simply click on the [OK] button and your data will be imported into the Direct Billing program. Note: If you have a need to import schedule information it is possible - but it is best if we do this for you. Our programmers can convert your data from a wide variety of programs and in some circumstances write programs to convert files from one application to another on a recurring basis. Unfortunately due to the complexity of such an undertaking this service cannot be provided free of charge. To receive a quote on this service, simply call our customer service department and one of our analysts will return your call to evaluate the project. AUTHORIZATION It is important that you get proper authorization to process your transactions electronically. In fact, it is so important that we decided to devote an entire section to this topic. In order to have authorization to access a client’s bank account electronically you must have written permission from the owner or authorized agent of that bank account. Failure to follow this procedure is a federal offense and can land you in a heap of trouble including but not limited to large fines and jail time. Please keep the proof of authorization for two years after the late date a transaction was processed. We have included a sample authorization form with this program to give you an example of how to comply with the laws and rules and regulations. The example that we have included can be ordered in quantity for your use and also contains information for your client about the advantages of using Direct Billing. Authorizations can be included into your existing contracts between you and your clientele or can take the form of a separate item such as an authorization card or brochure. If you have any questions about authorization please contact us and one of our client service managers would be more than happy to answer your questions about compliance. As a further aid to help you understand all the laws and regulations we have included a copy of the “Electronic Fund Transfer Act” or “Regulation E” in this program. To view or print this information, simply click on the Help->Regulation E pull down menu located at the top right hand of the screen. If you have any questions regarding compliance to Regulation E that our service managers are unable to answer for you we recommend that you to discuss your concerns with your counsel.