1
FIRST CLASS PERIPHERALS
B-SIDER STREAMING TAPE SUBSYSTEM
****
USER’S GUIDE
(c)COPYRIGHT 1986 BY FIRST CLASS PERIPHERALS
All rights reserved. This publication contains proprietary information that
is protected by copyright; No part of this publication may be
reproduced, transcribed, stored in a retrieval system translated into any
language or computer language, or transmitted an any form whatsoever
without prior written consent of First Class Peripherals. For information
Contact
First Class Peripherals
3579 Highway 50 East
Carson City, NV 89701
1-800-538-1307
Apple is a registered trademark of Apple Computer.
Sider, Sider][, B-Sider and Siderware are registered trademarks ot First Class
Peripherals.
i
TABLE OF CONTENTS
Introduction.......................................................................... 1 - 1
B-Sider Overview............................................................ 1 - 1
Unpacking the ................................................................... 1 - 1
Hardware Installation........................................................ 2 - 1
Care and Feeding................................................................. 3 - 1
Cassette............................................................................ 3 - 1
Cassettes— Do's and Don'ts.......................................... 3 - 2
Mounting Cassettes ........................................................ 3 - 3
Dismounting Cassettes ................................................... 3 - 3
Cleaning the B-Sider......................................................... 3 - 4
Having Trouble??? ......................................................... 4 - 1
Technical Information ................................................. 5 - 1
FCC Compliance.............................................................
Warranty Information.........................................................
B-Sider Specifications......................................................
Dimension sand Requirements........................................
Tape Cassettes Sources.................................................
Subsystem Characteristics...............................................
5-1
5-2
5-5
5-5
5-5
5-6
Glossary................................................................................. 6 - 1
Index........................................................................................ 7 - 1
LIST OF FIGURES AND CHARTS
Figure 1 Daisy-chaining......................................................... 2 - 2
Figure 2 Cassette Details...................................................... 3 - 1
Figure 3 Cassette Mounting.................................................. 3 - 3
ii
INTRODUCTION
This guide accompanies the First Class Peripherals streaming tape
subsystem, B-Sider. It provides concise instructions that will help you
install The B-Sider on your Apple computer and operate Siderware utilities.
B-Sider Overview
The B-Sider is designed for use with the Apple computer in conjunctIon
with Sider hard disk subsystem product line. It expands the ease of use
and the flexibility of your Apple computer.
To use the B-Sider, you must have previously purchased a Sider. The
B-Sider is not recommended for nor supported by, First Class on any
hard disk other than those sold by First Class. B-Sider has been
especially designed not to require any additional expansion slots. It
shares the same host adapter and slot as the Sider.
Unpacking the B-sider
Before setting up our B-Sider tape subsystem, take a moment to inspect
the shipping carton and it's contents. You'll want to make sure that all
the parts you need to install the subsystem are in the carton and in good
condition.
The following items should in the accessories box from which you took this
guide
*
*
*
*
*
The input/output (I/O) cable.
The power cord.
Two data cassettes
Data cassette label
Cleaning Starter Kit
Select a solid, flat surface on which to set the subsystem, keeping, in
mind that it weighs 10 pounds. Now lift the B-Sider from the carton and
place it on the flat surface.
1-1
Be sure to save the packing materials in case you need to move the
subsystem or ship it to First Class Peripherals for service.
Carefully look at the subsystem and all of its part checking them for
damage. If anything is missing or has been damaged in transit, call your
First Class Peripherals customer service representative on the toll-free
hotline — (800)538-1307.
When you've examined all the parts and found them to be satisfactory,
return them to the accessories boy. Now you're ready to install the
B-Sider.
NOTES:
1-2
HARDWARE INSTALLATION
To install your new tape subsystem, you’ll need the following:
* A 110 volt. electrical outlet. Although a standard three-wire outlet
will suffice, local electrical power conditions may make it desirable
to connect your Apple computer and Its peripheral devices to
surge suppressor power strip, which you can obtain at computer
stores and many hardware stores,
* A solid, flat surface flea your current. Sider subsystem. The BSider’s I/O Cable is 12 inches long.
* A reasonably controlled operating environment. The B-Sider
operates trouble-free in temperatures ranging from 10 to 45
degrees centigrade (50 to 113 degrees Fahrenheit): and relative
humidity of 20 to 80 percent. However if the subsystem isn't being
used, it will withstand temperatures ranging from 4 to 50 degrees
centigrade (39 to 122 degrees Fahrenheit).
* Proper ventilation for your B-Sider, as depicted in figure 1.
The B-Sider doesn’t have a cooling fan; It maintains its operating temperature by convection cooling. Allow a minimum
of two Inches on each side of the subsystem, and never
place anything on top of it. Improper ventilation can cause
damage to the subsystem, rendering it inoperative
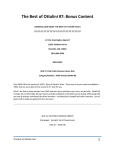
Now you. are ready to connect the B-Sider to you already existing Sider
and/or Sider ][. The B-Sider uses a technique called "daisy-chaining.”
Daisy-chaining allows the expansion of your apple without requiring any
additional expansion slots.
Place the B-Sider "beside" your current Sider hard disk subsystem.
Take special note that a minimum of two inches between the two units is
needed for ventilation.
Now retrieve the I/O cable and the power cord for the accessory box.
Remove the terminator plug from the rear of the Sider.
2-1
Attach one end of the B-Siders I/O cable to the connector from which
you previously removed the terminator. Now the other to the Upper 37
pin connector on the B-Sider itself. Hand-tighten the thumbscrews,
Install the terminator plug on the lower 37 pin connector on the rear of
the B-Sider. Figure 1 depicts the correct placement of the I/O cable.
No Jumper
Sider Sider B-Sider
Daisy-chaining
Figure 1
Make sure that the ON/OFF switch above the plug in the "OFF"
position ("-" is ON and “O” is OFF) then attach the power cord to the
three-pronged plug on the back of the subsystem.
Now you’ve completed the hardware installation sequence.
2-2
B-SIDER CARE & FEEDING
Unlike previous First Glass Peripherals products the B-Sider requires
periodical maintenance. Since the medium of data storage is removable, contaminants are introduced in the B-Sider mechanics. Periodic
cleaning and proper cassette handling will greatly reduce the chances
of loosing data on your valuable backups.
.
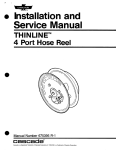
Cassettes
Data cassettes by nature have two sides; Side A and Side B which can
be distinguished by an asymmetrical slot. Figure 2 depicts the details.
This slot prevents the cassette from being placed into the B-Sider
upside down.
Exposed Tape
Data Cassette
Write Enable tab
Asymmetrical Slot
Cassette Details
Figure 2
Located on either side of the slot are two write enable tabs. Only the
write protect tab furthest from the Slot is used. See Figure 2 for details.
When this tab is removed, thus creating a hole, data can not be written to
the cassette.
3-1
Cassette— Do's and Don'ts
Below is a list of seven (7) item which should be followed when handlng the cassettes:
1. When a cassette is not nose, you, should place the cassette in its.
protective plastic case. This will lesson the amount of dust, lint, etc.
entering the cassette.
2. Always rewind the cassette, before removing it from the B-Sider. By
doing so,the clear leader section will be exposed. If the cassette has
not been rewound, the magnetic surface will be exposed Avoid
touching this surface with your fingers or any other object, due to the
fact that the magnetic surface can be damaged causing possible data
errors etc.
3. Do not use or store these data cassettes in a dusty environment or in
ambient environment conditions outside the ranges below:
10 to 45 degrees Centigrade (operating)
6 to 50 degrees Centigrade (storage) .
20 to 80 percent relative humidity.
If a tape has been stored in an environment outside this range, allow
the tape 8 hours in the specified operable range prior to usage.
4. These data cassettes contain your work, your program and maybe
your business, i.e. accounts payable, general ledger, payroll, etc. So,
do no stress the cassette case by stacking heavy objects on top of
them or flexing the plastic cassette. A!so transporting the cassettes,
store them in a place where they will not be exposed to strong vibration sun-light or impact.
5. Do not store or place cassettes near strong magnetic fields, i.e.
motors, transformers, magnetics, etc. The stored data could be
destroyed.
6. Do not cut, mar or sp!ice a tape. This will reduce the cassette’s
operating reliability.
7. Prewind. When using a cassette which has been stored a while, or
one that has experienced environmental changes, or even new
tape, you should prewind the cassette prior to usage. This Operation
will promote stable tape movement.
Following these recommendations will aid in the proper functionality of
the B-Side,
3-2
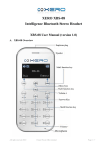
INSERTING CASSETTES
Hold cassette such that the clear leader is up and the asymmetrical slot
is positioned to your right. Insert the cassette into the B-Sider (as shown
below). Hold the cassette straight and level and push it into the vertical
opening in the front of the B-Sider. When the entire cassette is inserted
the mechanism will pull the cassette into the correct posit
Tape Mounting
Figure 3
REMOVING CASSETTES
To remove a data cassette, you should first rewind the cassette, to
insure that the magnetic strip is NOT exposed. Then press EJECT
button firmly, and the cassette will be ejected from the B-Sider. First
Class Peripherals recommends that you remove the write enable tab
from the cassette when you store Ito insure that the data will not be
accidentally written over. See figure 1 for location of write enable tab.
3-3
Besides the list of Dos and Don't described early in this section, there are
a few addition precautions which can increase the data integrity of your
backup.
Do not press the Eject button while the B-Sider is moving the tape.
Do not turn the power off the B-Sider while the tape is moving
Finally, always store your data cassettes in their plastic containers.
If these precautions are not followed, the tape could become. slack,
increasing the chances that the tape will be damaged during mounting
and/or dismounting. Tape slack does occur, tighten the tape by inserting
a pencil or similar object into the hub and rotate the hub gently to remove
that slack
Cleaning the B-Sider
Periodic Cleaning of the B-Sider mechanism wilt help prevent unreliable
read/write operation. The B-Sider cleaning cycle will differ from one
environment to another. Under normal use, the B-Sider should be
cleaned once a month or 50 backup and restore sessions which ever.
come first Even with periodic cleaning, some small amount of dirt and.
dust may accumulate on the head, causing data errors occurring suddenly during a read/write operation. If this happens, eject the cassette,
clean the head, and try the operation again.
* Power the B-Sider off.
* Insert the cleaning cassette Into the B-Sider
* Dip a cleaning stick into the cleaning solution.
* Insert the cleaning stick into he cleaning Cassette such that the blue
side of the cleaning stick is up. Gently push the stick to its fullest
extent —approx. 3 inches
* Remove the cleaning stick.
* Repeat this process — with the blue side up — ten times.
* Now, turn the cleaning stick over— white side up— and insert it into the
clean cassette. In and out, 10 more times.
* Eject the cassette, and let the heads dry about 1 minute before loading a data cassette,
3-4
HAVING TROUBLE ???
First, you should try to write down the steps which lead you to this
section. Then try to duplicate it. Try to log all actions which you took.
Examine the following possibilities.
Step 1
* Is the i/O cable securely fastened, to the back of the B-Sider?
Thumbscrews should be hand tight.
* Is the power cord connected to both the B-Sider and a 110-volt
electrical outlet?
* Is the B-Sider power on?
* Do your day to day activities with the Sider/Sider ][ work properly? Boot,
load programs
* Did you add/move any cards in you computer? If so check to make
sure that the host adapter is seated correctly, and that the 50
pin cable is also seated correctly.
Most of the above conditions can be resolved by getting power to the
B-Sider and/or by securely connecting the I/O cable between your
Sider/Sider ][ to the rear of the B-Sider,
Step 2
Did the Backup/Restore program load
* Is a cassette loaded? If so, eject it, check cassette for physical
damage, then reload it.
* Will the tape REWIND?
* Have you tried a different cassette?
4-1
Step 3
Once you have completed this check list, attempted to duplicate the
or condition, then call your customer service representative
NOTES:
4-2
TECHNICAL INFORMATION
The following sections describe First Class Peripherals compliance
with the federal Communication Commission (FCC): its limited warranty its warranty repair procedures; an technical specifications for the
Sider.
FCC Compliance
First Class Peripherals provides a shielded interface cable and host
adapter card that comply with FCC Class B computing regulations. USE
OF A NON-SHIELDED CABLE may result in RF radiation exceeding FCC
Class B limits.
It is possible, when not following these explicit instructions, to install the
Sider so that it isn't in compliance with FCC Class B computing
regulations.
First C!ass Peripherals takes no responsibility for such configurations.
liability for such actions rest solely with the users.
Information to Users
This equipment generates and uses radio frequency energy and if not
installed nd used properly — that is, in strict accordance with the
manufacturers instructions — may cause interference to radio and
television receptions.
It has been type-tested and found to comply with the limits for a Class B
computing device in accordance with the specifications in Subpart J of
Part 15 of FCC Rules, which are designed to provide reasonable protection against such interference in a residential installation. However,
there is no guarantee that interference will not occur in a particular
installation.
5-1
Instructions
If this equipment does cause interference to radio or television reception
— which can be determined by turning the equipment on and off and
noting the effect of the power surgeon The radio or television — you are
encouraged to try to correct the interference by one or more of the
following measures:
* Reorient the receiving
* Move the computer away from the receiver.
* Plug the computer into a different outlet so that the computer and
receiver are on different branch circuits.
If necessary, you should consult with First Class peripherals or an experienced radio/television technician for additional suggestions. You
may find the following booklet prepared by the FCC helpful: “How to
Identify and Resolve radio-TV Interference Problems” This booklet is
available from the U.S. Government Printing Office, Washington, D.C.,
20403, Stock No. 004-000-00345.4.
LIMITED WARRANTY
First Class Peripherals warrants all of its products, including spare parts
sold by First Class Peripherals, to be free from defects in material and
Workmanship for a period of one year from the date of delivery
This warranty is made to original purchasers only, and only original
purchasers may make any claim under the warranty. No Other party
shall have any rights under this warranty. The sole remedy for any
breach of this warranty shall be the repair or replacement of the defective product, as described herein.
First C!ass Peripherals disclaims all other representations and warranties including but not limited to, any implied warranty of merchantability
or fitness for a particular purpose. First Class Peripherals shall not be
liable for any special, indirect, incidental or consequential damages, lost
profits, costs or expenses, except as set forth in this policy, which may
be modified or amended only by written contract.
5-2
In-Warranty Repair
First Class Peripherals will repair at its factory or repair center, any
product that within the warranty period is returned to First Class Peripherals and, found to be defective in proper usage.
Warranty action is initiated by customer notification to First Class Peripherals of a product failure within the warranty period. The customer
must notify a customer service representative for in-warranty repairs.
First Class Peripherals will honor the warranty if notification of product
failure is provided within the one-year warranty period.
The original customer must obtain a Returned. Goods Authorization
(RGA) from First Class Peripherals and return the defective product to
the designated factory or repair center. One-way transportation charges
are at the customer’s expense. First Class Peripherals will return
repaired or replaced product by UPS Ground service at the expense of
First Class Peripherals.
First Class Peripherals reserves the right to reject any warranty claim on
any products that have been the subject of abuse, misuse, unauthorized
repair, alteration, accident, improper return handling or causes external
to the product but not limited to; improper power application, improper
environmental exposure or other improper use of the product.
First Class Peripherals, at its option, may replace the returned product
With a new or refurbished unit of the same type and model as defined by
the applicable specifications or published data sheet.
First Class Peripherals includes in its Limited Warranty policy, provisions for updating in accordance with any field change order which First
Class Peripherals determines is mandatory for reasons of product
safety. All other field changes, revisions or updates not deemed mandatory by First Class Peripherals may be implemented at the discretion of
First Class Peripherals or as required by contract.
5-3
Out-of-Warranty Repair
First Class Peripherals will provide repair or replacement services for all
products manufactured by or for First Class Peripherals and sold by First
Class Peripherals far a reasonable active product support period
extending beyond last date of standard manufacture and sale. This
period will normally be for a term three years from First Class Peripherals
standard product list, but such period may be decreased Class
Peripherals sole option.
Out-of-Warranty products and customer-related damage of in-warranty
products will be repaired
replaced in accordance with. First. Class.
Peripherals then-current active product repair price schedule. The customer is obligated for freight and handling charges both ways.
Below are the prices for Out-of-Warranty product manufactured or sold
by First C!ass PeripheraIs. The prices are effective March 1, 1986 and
are subject to change without notice. All price schedules in Revision A
(November 84) and Revision B (September 85) of the Sider Use Guide
are void as of March 1, 1986
Sider Sider ][ B-Sider
250.00 plus 15.00
Shipping Handling & Processing Charges.
Our flat rate includes all parts and labor.
Repair Warranty
First Class Peripherals warrants any product repaired in its factory or
repair center to be free from defects in material and workmanship for a
period of Three months from the date of return delivery or the end of the
original warranty period, whichever is greater.
Warranty Registration
Please take a moment to fill out the Warranty Registration card at the end
of this manual, and mail it to the following address:
First Class Peripherals
3579 HIghway 50 East
Carson City, Nevada 89701
Attn: Customer Service
5-4
B-SIDER SPECIFICATIONS
This section contains specifications for the B-Sider, including dimensions, subsystem requirements and tape characteristics.
Dimensions and Requirements
Following are the physical dimensions and power requirements of the
B-Sider.
Height
Width
Depth
Weight
Source
Line Frequency
Power Consump.
= 7.5 inches
= 3.4 inches
= 16.0 inches
= 10.0 pounds
= 100-126 volts
(factory configured)
= 50/60 herd (x/- 2%)
= 30 watts
Tape Cassette Sources
Below is a list of suitable cassette tapes which can be used in the
B-Sider.
Maxcell CS-500
Maxcell CS-600—Sider ][ Requirements
Teac
CT-500
5-5
Subsystem Characteristics
The following section provides additional specifications for the B-Sider
streaming tape subsystem.
Recording Method:
GCR
Recording format:
Single track,
serpentine mode
Recording Density:
8,000 BPI
Formatted Capacity:
20.7 Mbytes
Interface:
SCSI
Tracks:
4.
Tape Speed:
90 ips
Data Transfer Rate:
863. Kbytes/sec.
Repositioning Rate:
1.5 sec.
LSV:
+/- 4%
ISV:
+/- 4%
Errorr Rate:
Soft Error- 10 eighth
HardError- 10 tenth
MTBF:
8000 P.O.H.
MTTR:
0.5 hour
Tape Drive System:
DC motor direct
reel drive system
Temperature:
Operating
10-40 deg. C
Norioperating
-25-60 deg. C
Relative Humidity:
Operating
20-80% (noncondensing)
Nonoperating
10-90% (noncondensing)
Vibration:
Operating
0.2G (5-50Hz)
Nonoperating
26 (5-50HZ)
Shock:
Operating
5G (10 msec or less)
Nonoperating
40G (10 msec or ess)
5-6
GLOSSARY
BIock—referring to the 'chunk' size of data which is passed to/from
the tape subsystem — 512 bytes.
Byte— the basic unit of information within the computers memory,
comprising eight bits and any value from 0 to 255. Sometimes
called a character.
BPI — bits per inch.
Cassette —the medium which the B-Sider uses to store data Sometimes called a tape Sam physical size as ordinary auto cassette,
BUT the media is quite different.
Convection — the ability to maintain adequate ambient Cooling
temperature based on the raising of warm air causing cooler air
to be pulled into the unit.
Daisy-Chaining — multiple devises sharing the same host adapter.
Maximum of two Siders and one B-Sider on this bus.
GCR — Group-coded Recording.
Host Adapter — the means which external devices — Siders — can be
attached to your computer.
Image — The total set of tracks on the Sider. Meaning boot tracks, all
partitions and spares (if used)
ISV — Instantaneous Speed Variation.
Mbytes — short for Megabytes — 1,048,576 bytes.
MTBF — mean time between failures.
MTTR — mean time to repair
Partitioning— is an area on the Sider which was defined by the user
for a particular need, i.e. operating system.
P.O.H. — power on hours
6-1
INDEX
B-Sider ..........................................................................................1-1
cleaning ........................................................................................ 3-4
cassette .................................................................................. 1-1, 3-1
clear leader .................................................................................... 3-3
connector...................................................................................... 2-2
daisy-chaining ............................................................................ 2-1, 2
EJECT button ............................................................................... 3 -3
FCC Complacence ......................................................................... 5-1
Glossary ........................................................................................ 6-1
Interface ........................................................................................ 5-6
In-warranty Repair ...........................................................................5-3
I/O Cable ....................................................................................... 2-1
Limited Warranty ............................................................................ 5-2
Out-of-Warranty Repair ................................................................... 5-4
Side A .......................................................................................... 3-1
Side B .......................................................................................... 3-1
Subsystem Characteristics ..............................................................5-6
Tape Cassette Sources .................................................................. 5-5
Terminator plug .......................................................................... 2-1, 2
ventilation ......................................................................................2-1
write enable tabs ............................................................................ 3-1
7-1
NOTES:
7-2
WE’RE LISTENING ...
At Firs lass Peripherals we listen when you tell us what features you
want in your computer products:
*
MORE STORAGE MEMORY. The Sider provides you with 10 Megabytes of added storage memory while the Sider ][ delivers 20
Megabytes.
*
TAPE BACKUP SYSTEM. The 8-Sider is designed to efficiently
backup your Sider hard disk — and offers several different backup
formats.
*
AFFORDABLE PRICES. The Siders re the best-preforming,
lowest-priced hard disk drive systems and tape backup subsystems
on the market today.
*
OPERATING SYSTEM SUPPORT. The Siders are designed to
support the four primary operating systems in the Apple environment
*
TECHNICAL SUPPORT. Your Sider gives your access to to tollfree 800-telephone number hotline and trained technical support
staff.
*
DEFECT-FREE PRODUCTS. Your Sider is manufactured by a
first class manufacturer — XEBEC whose “Xero-Defect" policy
assures you that your Sider will work the first time and for years to
come.
*
FREE-TRIAL PERIOD. Your Sider comes With a 15-day free-trial
period — a first in the industry.
*
A REASONABLE WARRANTY. Your Side is backed by the best
warranty in industry — one full year.
So when FIRST CLASS PERIPHERALS says were listening, we are.
Over the years, your suggestions have helped design one of the most
respected product lines in the marketplace — The SIDER line
7-3
SIDER WARRANTY CARD
Name:
Address:
City
State
Phone:
Zip
(Days)
(Home)
Manufacturer’s Serial. Number:
Sider
Sider][
1. My Apple is primarily for:
2. My occupation is:
Personal Use
Student
B-Sider
Business
Own my own business
Education
Employee
3. I use the following programs in my Apple (check all that apply):
Apple Works
PFS File
Bank Street Writer
Mastertype
Mastertype
PFS Report
PFS Write
AppleWriter
Dollars & Sense
Multiplan
General Accounting; BPl
Write my own
4. I have the following for use with my Apple:
Printer
Modem
Drive
Monitor
Other:
5. I would like First Class Peripherals to offer the following computer
products at an affordable price:
6. Comments
Please return to:
FIRST CLASS PERIPHERALS
3579 HIGHWAY 50 EAST
CARSON CITY, NEVADA 89701