1
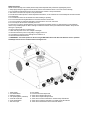
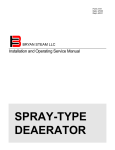
KFHM1000
Powerful combined fog and haze machine with LED FX
M
A
N
U
A
L
V
E
R
S
I
O
N
1
.
0
1 8 - 1 0 - 1 3
Due to continuous product development, please ensure that you have downloaded
the latest instruction manual for this product from the Kam website at www.kam.co.uk
For the latest updates and information on the entire Kam range visit:
www.kam.co.uk
Kam products are manufactured by: Lamba plc, Unit 1, Southfields Road, Dunstable, Bedfordshire, United Kingdom LU6 3EJ
Telephone: (+44) (0)1582 690600 • Fax: (+44) (0)1582 690400 • Email: [email protected] • Web: www.lambaplc.com
Made in China. Due to continuous product development, specifications and appearance are subject to change. © Copyright Lamba plc 2013. E&OE.
Thank you for purchasing this Kam product, we are sure that it will serve you for many years to come.
To optimise the performance of this product, please read these operating instructions carefully to familiarise yourself with the basic
operations of this unit. Please retain them for future reference. This unit has been tested at the factory before being shipped to you.
To prevent or reduce the risk of electrical shock or fire, do not expose the unit to rain or moisture. To prevent a fire hazard, do not
expose the unit to any naked flame sources. Unplug this apparatus during lightning storms or if it is unlikely to be used for long
periods of time.
When installing the unit, please ensure you leave enough space around the unit for ventilation. Slots and openings in the unit are
provided for ventilation to ensure reliable operation of the product and to protect it from overheating. To prevent fire hazard, the
openings should never be blocked or covered.
The unit is powered by mains electricity, always handle the power cable by the plug. Never pull out the plug by pulling on the cable.
Never touch the power cable when your hands are wet as this could cause an electric shock. Do not tie a knot in the cable. The
power cable should be placed such that it is not likely to be stepped on. A damaged power cable can cause a fire or give you an
electrical shock. Check the power cord periodicaly, if you ever find that it is damaged, replace it before using the unit again. Contact
your retailer for a replacement.
The voltage of the available power supply differs according to country or region. Be sure that the power supply voltage of the area
where this unit is to be used meets the required written on the unit.
The lightning flash symbol inside a triangle is to alert the user to the presence high voltage within the unit’s enclosure that
may be of sufficient power to constitute a risk of electrical shock to persons.
Caution: to prevent the risk of electric shock, do not attempt to open the unit. No user-serviceable parts inside. Refer all
servicing to qualified service personnel.
The exclamation mark inside a triangle is intended to alert the user to the presence of important operating and
maintenance instructions in the literature accompanying the appliance.
Select the installation location of your unit carefully. Avoid placing it in direct sunlight or locations subject to vibration and excessive
dust. Do not use the unit where there are extremes in temperature (below 41ºF / 5ºC or exceeding 95ºF / 35ºC).
Unpacking and safety Please unpack your new product carefully. Your new product should reach you in perfect condition. Please
check that no damage has occurred during transit. If any damage is found, do not operate your unit. Please contact the retailer you
purchased it from immediately. If there is any damage to the mains cable do not use the device. Always disconnect the unit from the
mains supply when carrying out any cleaning of the unit.
Power supply
Use the plug to connect to the main power supply with the following connections:
Wire
Connection
Brown
Live
Blue
Neutral
Yellow/Cyan
Earth
Manufacturer declarations
In compliance with the following requirements: RoHS Directive (2002/95/EU) and WEEE Directive (2002/96/EU).
If this product is ever no longer functional please take it to a recycling plant for environmentally friendly disposal.
CE declaration of conformity
R&TTE Directive (1999/5/EU), EMC Directive (2004/108/EU), Low Voltage Directive (2006/95/EU).
The declarations are available on application from [email protected]
Before putting the devices into operation, please observe the respective country-specific regulations.
Package contents
1 x fog/haze machine / 1 x timer remote control / 1 x instruction manual (this document) / 1 x mains cable
Safety instructions
Please read the following notes carefully because they include important safety information regarding this product.
1. Always plug in the power plug last and disconnect from the mains when the device is not in use or before cleaning.
2. Do not install and operate the device in rain or extreme heat, moisture or dusty environments.
3. This device is for indoor use only and in a dry environment.
4. If the device has been exposed to drastic temperature fluctuations, do not switch the unit on immediately but wait until it reaches
room temperature.
5. Do not shake the device and avoid brute force when installing or operating.
6. Do not use the device during thunderstorms. Disconnect the unit from the mains.
7. Do not use solvents or aggressive detergent to clean the device. Use a soft, clean cloth.
8. Do not modify the device or the connected power cord.
9. In the event of a serious operating problem, stop using the unit immediately. Never try to repair the unit by yourself. Repairs
carried out by unskilled people can lead to damage or malfunction. Please contact your Authorised Kam Retailer. Always use the
same type of spare parts.
10. Never connect the device to a dimmer pack.
11. Make sure the power cord is never crimped or damaged.
12. Never disconnect the power cord by pulling or tugging on the cord.
13. Avoid direct eye exposure to the LED light source while it is on.
14. Never drink the haze/smoke fluid.
15. IMPORTANT – the smoke aperture on the unit can get VERY HOT. Never touch this area whilst the unit is in operation
and always leave the unit to cool down before touching the area.
1.
2.
3.
4.
5.
6.
7.
Safety eyelet
LED On/Off button
Manual Fog button
Fan speed regulator (see below)
Controller connection
Power On/Off button
IEC mains input
8. Carry handle
9. Timer remote interval adjust knob
10. Timer remote duration adjust knob
11. Timer remote output level adjust knob
12. Timer remote manual overide button / machine ready LED indicator
13. Timer remote continous output button / machine power LED indicator
14. Timer remote On/Off button / timer active LED indicator
Setup and operation
1. Unpack your unit then remove the tank.
2. Unscrew the top cap of the tank.
3. Fill the tank with haze/smoke fluid (do not over fill the tank).
4. Screw on the cap securely. Replace the tank into the unit.
5. Check that the pipe is fed down towards the bottom of the bottle so that a consistent flow of fluid is supplied to the machine.
6. Connect the timer remote to the rear of the unit.
7. Connect the IEC mains cable to the rear of the unit and then to the mains power. Turn the unit on using the Power on button.
8. Heat up time is usually between 3-4 minutes. Please ensure no button is pressed during the heat up time.
9. When the machine is ready the LED light on the remote control will illuminate.
10. Turn the output to Max and press the green button on the remote control for 5 seconds so the fluid has a chance to flow through
the heater block making it ready to use.
11. After completing the above, adjust the settings on the unit to find the output level you desire.
The Manual fog button on the rear of the unit has priority over the controls on the Timer remote. To use the Timer remote control
functions, you will need to release the Manual fog button on the rear of the unit.
Fan speed control & fog/haze
The unit features a manually adjustable fan to regulate the amount of fog/haze. At it’s heart, the unit is a haze machine that can also
produce fog effects. As a general rule, if you need to produce both fog and haze effects, it is best to use haze fluid in the unit. By
using haze fluid, both effects can be created. If you wish to exclusively produce fog effects, smoke fluid can used in the unit. When
alternating between the two different types of fluid, always run the maintenance routines to clean the unit. These are described later
in this instruction manual.
To run the unit as a simple haze machine, simply set the unit’s output level so that it generates the amount of haze you require and
then use a higher fan speed to disperse the effect thoroughly and evenly.
To create fog effects from the unit you will need to reduce the fan speed, this then lessens the dispersment of the effect and allows
the fog to gather in a denser grouping.
Fan speed is increased by clockwise rotation of the Fan speed regulator on the rear of the unit and decreased when turning the knob
anti-clockwise. The fan speed cannot be controlled using the Timer remote.
Timer remote control mode
You can adjust the interval gap between each release (between 0-30 mins approx) using the Timer remote interval adjust knob (9.)
You can adjust the duration the effect is released at each interval (between 0-15 seconds approx) using the Timer remote duration
adjust knob (10.)
For best results select “continuous” and adjust output to achieve desired effect, note: it can take around 30 seconds for the machine
to produce the correct output.
Fuse Replacement:
Unplug the IEC power cable before replacing the fuse! Always replace with same type of fuse.
1. Using a flat head screwdriver, remove the fuse holder from the IEC housing.
2. Remove the bad fuse from the fuse holder.
3. Insert the new fuse into the fuse holder.
4. Install the fuse holder in the IEC housing.
Mounting :
Orientation: This fixture should only be mounted/used on a flat surface. This fixture should not be tilted.
Rigging: It is important never to obstruct the vents’ pathways. Mount the fixture using, a suitable “C” or “O” type clamp.
When selecting installation location, take into consideration the fluid reservoir access and routine maintenance.
Safety cables must always be used, utilising the provided safety eye bolt.
Never mount in places where the fixture will be exposed to rain, high humidity, extreme temperature changes or restricted ventilation.
General maintenance
To maintain optimum performance and minimise wear, the item should be cleaned frequently. Usage and environment are
contributing factors in determining the cleaning frequency. As a general rule, fixtures should be cleaned after use to avoid dust buildup and blockages, which can result in poor performance, overheating and breakages. Be sure to uplug the unit from the mains
before conducting any maintenance. Use a vacuum and a soft brush to remove dust collected on external vents and internal
components. Clean the external case when the unit has completely cooled down with a dry cloth or tissue.
Regular maintenance
Be sure to power off fixture before conducting any maintenance. Every 40 hours of continuous operation, it is recommended to run a
cleaning solution composed of 80% distilled water and 20% distilled white vinegar through the system to prevent the
accumulation of particulate matter in the heating element.
The recommended cleaning regime is as follows:
1. Empty all haze/smoke fluid from the machine.
2. Add the above cleaning solution to the tank (80% distilled water and 20% distilled white vinegar).
3. Plug the unit in to the mains and allow it to warm up.
4. Run the unit in a well-ventilated area until the tank is almost empty. Do not allow the pump to run dry.
Cleaning is now complete. Refill with haze/smoke fluid. Run the unit briefly to clear any cleaning solution from the system.
Trouble shooting
Symptom
No Power
No smoke/haze output
Breaker/fuse keeps blowing
Low smoke output
Unit is not heating up
Remote control does not work
Solution
Check mains power.
Check external fuse.
Check internal fuse.
Check fluid level.
Check timer remote.
Check if there is any blockage in the system.
Possible electrical short. Contact retailer/distributor for further instructions.
Run a cleaning solution through the smoke machine.
Check that the smoke machine is plugged into the correct voltage.
Check the external fuse.
Check the internal fuse.
Possible faulty part. Contact your retailer/distributor for further instructions.
Make sure connector is firmly connected to device.
Try using another controller.
Possible faulty controller.
Check the internal fuse.
Check the external fuse.
Specifications and features
Model
Power supply
Power
Fuse
Re-heat time
Output
Tank capacity
Timer remote
LED FX
Gross weight
Kam KFHM1000
230V AC - 50Hz
1000w
F5A
2-3 minutes
8,000 CuFt per minute (approx)
2.5 litres
Yes
Yes
6.63kg