1
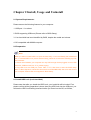
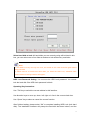
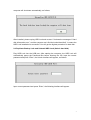
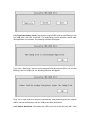
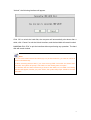
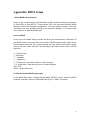
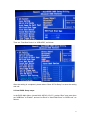
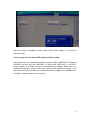
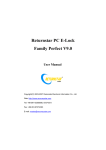
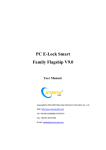
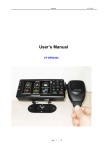
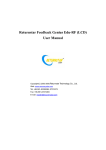
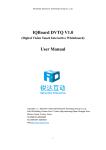
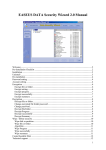
ReturnStar HDD Lock V3.0 User Manual Copyright(C) 2003-2007 Returnstar Electronic Information Co., Ltd. Web: http://www.recoverystar.com Tel: +86-591-83385086 87274373 Fax: +86-591-87274383 E-mail: [email protected] 1 Important Statements: 1. Use this product strictly according to detailed operation instruction in this User Manual so as to ensure proper use. Please read the instruction thoroughly to save the installation time. 2. If this product is defective, please return it to the appointed agent or our company, together with your original sales receipt or invoice for replacement. 3. Returnstar Electronic Information Co., Ltd. is not liable for any consequential, incidental or indirect damages (including damages for indirect personal injury, loss of business profits, business interruption, loss of business information and the like) arising out of the use or inability to use this product. 4. The product includes enclosed software, later issue and update as well as correlative electronic documents and printing material. By installing, copying, downloading, visiting or using this product in any way, you agree to the terms and conditions of all the clauses in this user manual. The agreement on these clauses has the same effect as one signed through formal negotiation. You may not use this product unless you have agreed to all the clauses in this user manual 5. Returnstar Electronic Information Co., Ltd. will not accept returns of opened packages. 6. Special Notice: ● Please do not deliberately attack or use other tool software to destroy the product’s normal running, or run FDISK/MBR, Repartition, or Low Level Format after boot from FD or CD. Otherwise this company assumes no liability for all losses arising herefrom, express or implied. ● Please do not apply in the important occasions such the important network service as the satellite launch, the missile guide, the military control, the national secret, etc, without authorization of Returnstar Electronic Information Co., Ltd. Otherwise this company assumes no liability for all losses arising herefrom, express or implied. ● Regular backup of important data is still necessary when using this product. Returnstar Electronic Information Co., Ltd. does not undertake any compensation responsibility for any losses of HD arising from the prompt sufficient backup. 2 Copyright Your purchasing of this product does not mean Returnstar Electronic Information Co., Ltd. has transferred the Intellectual Property Right. The product (includes but not limited to any trademarks, images, photos, flash, video, recording music, writing and additional procedure, and other relative product), enclosed printing material, and any copies made in authorization of Returnstar Electronic Information Co., Ltd. are products of Returnstar Electronic Information Co. Ltd., and their Intellectual Property are owned by Returnstar Electronic Information Co., Ltd. The name of this product and all its copies are consistent in CD and the manual. The framework, organization and source code of this product are Returnstar’s valuable commercial secret and may not be transferred. This product is protected by PRC Copyright Law, related international treaties, the laws in the product using country. No part of the product may be copied, modified, rented, leased, transferred in any ways without the writing permission or authorization of Returnstar Electronic Information Co., Ltd., You are allowed to use one product on one computer only. Any reverses engineering, re-compiling, and decoding of this product, and retrieving the source code of the product by other ways is also prohibited. Returnstar, Returnstar Jindun, Recoverystar, PC E-Lock are the registered trademarks of Fuzhou Returnstar Electronic Information Co., Ltd. Any modification of Copyright marks, product names and brand names of this product and its copies is strictly prohibited. Returnstar Electronic Information Co., Ltd. reserves all rights to charge the fee at anytime for product replacement, revision and update. The information in this document is subject to change at anytime without notice. 3 Chapter 1 Product Introduction Returnstar HDD Lock of Returnstar Electronic Information Co., Ltd. is the first top-class hard disk security product worldwide. Through years of research, it adopts the newest patent technology --- Hard Disk Power Control Technology to completely lock hard disk. The hard disk is unable to be booted and formatted even taken away and installed on the other computer, let alone stealing the data by any way, so the stolen hard disk is equal to a scrap iron. Returnstar HDD Lock has the following strong functions and characteristics: 1. PnP, Real-time Protecting. 2. Easy to install and use. Anyone who knew a little computer knowledge can master the operation of this product in the 10 minutes. 3. Support any OS. Its installation and usage is independent from the OS, and doesn’t have any compatible problem with any software. 4. Use USB Connection and support USB boot, doesn’t have any compatible problem with any hardware. 5. Can locked one to four disks synchronously, but unable to lock other disks without unlocking. 6. Without HDD Lock and your password, the hard disk data can’t be decoded, thus protect your important data from revelation. 7. Adopt triple protection technology---HDD Lock Firmware program protection, HDD Lock hardware protection and password protection, fully protect your hard disk data and provide you the highest security. 8. After installation, the HDD Lock is correspondent with the locked hard disk. Other HDD Lock is unable to unlock the hard disk。 So we strongly recommend Returnstar HDD Lock to be installed in any computer that has security requirement. It will be of great help to commercial person, governmental staff, financial staff, and anyone involved in security work worldwide. 4 Chapter 2 Install, Usage and Uninstall 2.1 System Requirements: Please ensure the following features in your computer: 1. USB port 1.1 or above 2. BIOS supporting USB boot (Please refer to BIOS Setup). 3. Your hard disk has been identified by BIOS, despite the model and volume 4. OS compatible with 80X86 computer 2.2 Preparation Note: When you want to install HDD Lock (lock the hard disk), or boot and identify the locked hard disk, or uninstall HDD Lock (unlock the hard disk), please be sure that the following 2 points are confirmed: 1. Please check whether your computer has any USB storage device plugged, such as USB flash disk, USB hard disk, etc. If so, please unplug. 2. Plug HDD Lock into USB port. Press “DEL” or “F2” after boot to enter the BIOS Setup Menu. In Boot Sequence, set the first boot device as USB RMD-HDD, then save and re-boot your computer. Please refer to the Appendix: BIOS Setup. 2.3 Install HDD Lock (Lock hard disk) Please note that after you install the HDD Lock, your hard disk will be locked. First, please confirm all the preparation is done, then plug HDD Lock into the USB port, you will see the HDD Lock Setting Interface before you enter into the OS, as follows, 5 Select hard disk to lock: All hard disks you are currently using will be listed in this box, you can select one to four disks at random to lock without any restriction. Note: 1. One HDD Lock only can only lock once, and unable to lock other hard disk again without being unlocked. 2. Please remove all mobile hard disk when you install the HDD Lock, otherwise black screen instead of setting interface will appear. HDD Lock Password Setting: You must set the HDD Lock password. You cannot lock the hard disk if the HDD Lock password is blank. Operating Key Instruction: Use “Tab” key to switch the current window in this interface. Use direction keys to move up, down, left, right or in line in the current check box. Use “Space” key to select or cancel the current function. After finished setting, please select “OK” to complete installing HDD Lock (lock hard disk). The Installation Interface will prompt the hard disk has been locked, and the 6 computer will shut down automatically, as follows. After installed, please unplug HDD Lock and re-start. If it shows the message of “Hard disk information error”, and the computer can’t find the locked hard disk”, it means the HDD Lock installation is successful. You will get the highest protection for hard disk. 2.4 Duplicate Backup Lock and Uninstall HDD Lock (Unlock hard disk) Plug HDD Lock into the USB port. After starting the computer, the HDD Lock will automatically popup the Password Box before entering the OS. Input the correct password and press “Enter”, the Unlock Interface will appear, as follows: Input correct password and press “Enter”, the following interface will appear. 7 2.4.1 Duplicate Backup Lock: Plug both the original HDD Lock and the Backup Lock into USB ports, and click “Duplicate”. The duplicating process will take a while. After the duplication is successful, the following interface will appear. If you click “Duplicated” without having plugged both the original HDD Lock and the Backup Lock into USB ports, the following interface will appear. Click “Ok” to shut down the computer automatically, and please plug both the original HDD Lock and the Backup Lock into USB ports before duplication. 2.4.2 Unlock Hard Disk: Uninstalling the HDD Lock will unlock the hard disk. Click 8 “Unlock”, the following interface will appear. Click “Ok” to unlock the hard disk, the computer will automatically shut down after a while; click “Cancel” to exit the Unlock Interface, and the hard disk will remain locked. 2.4.3 Exit: Click “Exit” to quit the interface without performing any operation. The hard disk will remain locked. Note: 1. If you have locked several hard disks (up to 4) at the same time, you need to unlock all of them simultaneously. 2. When unlocking the hard disk, if you insert a wrong HDD Lock which has locked other hard disk, the system will prompt “The HDD Lock has already been occupied.” 3. If the hard disk has been locked and you insert a new HDD Lock, the HDD Lock Setting interface will appear, but after you press “Enter”, the system will prompt “Unable to lock the hard disk.” 9 Chapter 3 How to use HDD Lock rightly? 3.1 Please don’t touch the metal terminal inside of HDD Lock USB port with your hand or metal. Keep HDD Lock away from water, fire, dropping, press, bending, punching, decomposing, high temperature, sunshine, humidity, or anything which may causes HDD Lock damaged. 3.2 If you want to boot or identify locked hard disk, please plug the HDD Lock before start or re-start. After the computer starts normally or the OS has identified the locked hard disk, you can unplug HDD Lock and keep it. You don’t need to plug the HDD Lock into the computer all the time. 3.3 Before you unlock the locked hard disk, please unplug all USB devices, such as USB hard disk, USB flash disk or other USB storage devices. Please plug the USB devices after HDD Lock boot the locked hard disk. 3.4 Please don’t plug or unplug HDD Lock so as to avoid HDD Lock damage while: Starting/Shutting down/Restarting Setting up BIOS Displaying any HDD Lock Interface 3.5 If you manage many computers with HDD Locks, please do not confuse them. Because the HDD Lock is correspondent with the locked hard disk after installed, other HDD Lock is unable to boot the locked hard disk. Therefore you must number the HDD Locks under your management. For example, put them into the envelope with serial number respectively or stick the marking on the hard disk. 3.6 You can use USB extension cable or USB HUB for HDD Lock connection. 10 Chapter 4 Examples in usage 4.1 What if my hard disk was stolen? A: Without the HDD Lock, the thief has not way to unlock the locked hard disk, let alone stealing the data in the hard disk. The locked hard disk is unable to be unlocked and accessed even by sending it to us or taking it to the professional data recovery company. Therefore the HDD Lock provides you the highest security for hard disk protection. 4.2 What if my HDD Lock was lost or stolen? A: Although your HDD Lock was lost or stolen, the person or thief who get your HDD Lock was unable to unlock hard disk without your HDD Lock password. 4.3 What if my HDD Lock Password was lost? A: Nothing can help. 4.4 After I unlocked the locked hard disk, can I unplug the HDD Lock? Will the hard disk be locked again? A: After the computer starts normally or the OS has identified the unlocked hard disk, you can unplug the HDD Lock and keep it. You don’t need to plug the HDD Lock into the computer all the time, and the hard disk will keep in unlocked state. Only will the hard disk be locked when you manually lock it again. 4.5 If I shift the locked hard disk to other computer, will the HDD Lock still work? A: Yes. But if the HDD Lock locked more than one disk, you have to shift all disks to other computer (you can’t just shift one disk), otherwise, HDD Lock can’t unlock the hard disks, both in original and new computer. Please also note the other computer must support USB boot. 4.6 Someone wants to access my data when I am absent or off duty? A: If you have locked your hard disk with HDD Lock, keep the HDD Lock and shut down the computer, without the HDD Lock, no one can unlock your hard disk to access your data. Even other people steal your hard disk and change the computer setting, without HDD Lock, they still can’t unlock the hard disk. 11 Chapter 5 Q & A 5.1 Why should I remove the USB devices before using HDD Lock? A: USB storage devices such as USB flash disk, USB hard disk may affect the HDD Lock Setup, so please remove them before you install HDD Lock (lock hard disk), boot the locked hard disk, or uninstall the HDD Lock (unlock hard disk). After finish the above operations, you can plug all the devices into the USB ports. 5.2 I can’t find the HDD Lock Setup interface. A: The BIOS has not been properly set, please set up BIOS and refer to Appendix: BIOS Setup. Or probably the HDD Lock is broken. 5.3 How many hard disks can be locked by one HDD Lock? How many computers can be locked by one HDD Lock? Can one computer be locked by many HDD Locks? A: One HDD Lock can lock maximum 4 hard disks in one computer, please note that all 4 hard disks must be in the same computer. One HDD Lock is unable to lock different computers. Only after unlocking the HDD Lock, can it be used to other computers. One computer can have several disks, but you can only use one HDD Lock to lock them. 5.4 It seems that my computer freezes when entering the Win XP. It takes a very long time. Why? A: If you use Win XP, your first boot hard disk is not locked, and you are not intend to unlock other locked hard disk when you start the computer (Not plug HDD Lock), then it may take a longer time to enter Win XP. It is a normal situation, not the crash problem. Please wait for a while to enter the OS. In case you plug the HDD Lock and unlock the locked hard disk when starting the computer, this problem will no longer exist. 5.5 If I remove the locked hard disk, does the computer still need the HDD Lock? A: Since there is no locked hard disk in the computer, the HDD Lock is needed no more when starting the computer. It is the locked hard disk that the correspondent HDD Lock should be with, anytime and anywhere. 5.6 Can I move the locked hard disk to other computer not using the HDD Lock? 12 A: Only have you shifted all locked hard disks to other computer, can they be unlocked by the HDD Lock. That is to say, if your have locked more than 1 disks, they should be moved together. In case you intend to move only part of them, please first unlock the hard disks you want to move, and re-lock them after they have been moved into other computer. Please note that the new computer must support USB booting. 5.7 Can I add other hard disk into the computer using HDD Lock? Can I add the locked hard disk into the computer using another HDD Lock? A: Adding an unlocked hard disk will not affect the function of computer and hard disk. If you want to lock the newly added hard disk, please first unlocked the former locked hard disk, and then lock them all together. If the newly added hard disk is locked by other HDD Lock, the computer won’t be successfully started. Please unlock it before adding. 5.8 Everything was fine, but now the HDD Locked takes no effect when plugged, a disk error occurs, or the whole disk disappears. A: First, you may plug the wrong HDD Lock, please make sure you have plugged the right one. Second, you might have modified the BIOS Setup, so please reset the BIOS Setup (must boot from USB, and the hard disk must be identified by BIOS). Third, your HDD Lock might be broken, please use the spare HDD Lock. Forth, your HDD Lock might be cleared by you or others with incaution. 13 Appendix: BIOS Setup 1. Enter BIOS Setup Interface Power on the computer and in the left bottom of this interface will appear a message of “Press DEL to enter SETUP”. Please press “DEL” key and enter the BIOS Setup Interface before the message disappeared. You may require pressing other key according to the real message showing in the interface. (Maybe F1, F2, please refer to the interface or Main Board Manual). 2. Set up BIOS On the top of the BIOS Setup Interface will show the manufacturer’s information of your BIOS System. Generally there are 4 kinds of BIOS manufacturers: AMI, Award, Phoenix-Award and Intel, their setup methods are very similar (other BIOS, please refer to the main board manual). The following is the basic Control Keys for BIOS operation: “↑”: Previous item “↓”: Next item; “←”: Leftward; “←”: Rightward; “+” or “Page Up”: Increase the value or make changes “-” or “Page Down”: Decrease the value or make changes “Esc”: Exit “Enter”: Select /Enter item 2.1 Phoenix-Award BIOS Setup steps: In the BIOS Main Menu (Phoenix-Award BIOS SETUP), select “Advanced BIOS Features” and enter, then set “USB Flash Disk Type” to “HDD”, as follows. 14 Then set “First Boot Device” to “USB-HDD”, as follows. After the setting is completed, please select “Save & Exit Setup” to save the setting and exit. 2.2 Intel BIOS Setup steps: In the BIOS Main Menu (Award BIOS SETUP UTILITY), select “Boot” and enter then set “USB Boot” to “Enable”, and set “1st Drive” in “Hard Disk Driver” to “HDD Lock”, as follows. 15 After the setting is completed, please select “Save & Exit Change…” to save the setting and exit. 2.3 If you can not find related USB options in Boot setting It is possible that your motherboard does not support USB or USB Boot. If it supports USB Boot, but you can’t find “USB HDD”, or cannot find “HDD Lock” in “1st Drive”, please update your BIOS through its manufacturer’s website. Since this is a complicated operation, please consult the expert or the computer company. If the options still can’t be found after you update your BIOS, probably your motherboard is outdated, so please replace with a new one. 16