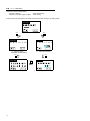
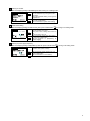
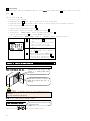
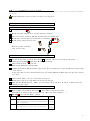
1
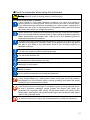
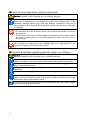
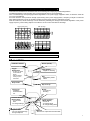
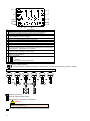
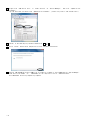
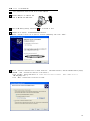
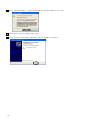
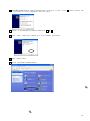
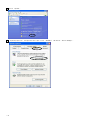
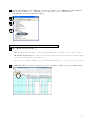
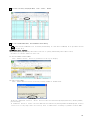
Introduction
Thank you for purchasing Corona Discharge Checker MK-720 hereinafter
called “the checker” . To ensure your safety and prevent the danger, please
read “Safety Cautions” carefully and make sure to use the checker correctly.
●JFE Advantech cannot accept any responsibility for misuse of this product, for
any damaged to the product that occurs during use, for any defects, or for any
damages resulting from use of this product, except in cases where it can be
proven legally responsible for these.
●JFE Advantech cannot accept any responsibility for damages or financial
losses resulting from loss of data caused by failure or repair of the checker,
battery drainage or any other reasons. We recommend that critically important
data be backed up on multiple data storage media. In addition, under any
circumstances we cannot accept any responsibility for loss or damage of data
stored in the instrument.
●Specifications and functions of this product including accessories are subject
to change without notice for the purposes of continual improvement.
●The contents of this users’ manual are subject to change without notice.
●If you find any errors in this manual or find its contents difficult to understand,
please contact us.
●JFE Advantech cannot accept any responsibility for a damages or financial
losses resulting from the use of this user’s manual or or the checker or on for
any claims from third party.
●If your user’s manual was incorrectly bound or incomplete, please contact us
for a replacement.
i
Safety cautions
Some important points to be observed are listed to ensure and correct use of
the product. It contains to avoid the danger of harming yourself or others and to
avoid the risk of property damage. Read all explanations carefully and make
sure to use the checker correctly.
Explanation of icon types
denotes "points to be careful about."
denotes "actions that must be done."
denotes "actions that must be avoided."
Meaning of specific icons:
Unspecified general cautions, warnings and danger alerts
Other general actions that should be taken
Do not disassemble
Do not wet or expose to moisture
Do not touch with wet hands
Other general actions that should be avoided
ii
●Points to remember when using the instrument
Ignoring this caution constitutes improper use of the instrument and
Wa i : presents a risk of causing fatality or serious injury.
Be careful of abnormal conditions.
If the checker is used under abnormal conditions, e.g. when the checker is
emitting smoke or a strange smell, there is a serious risk of fire or electric shock.
If you detect abnormal conditions, immediately turn off the power, unplug the AC
adapter from the outlet or disconnect the rechargeable battery pack and contact
the vendor from which you bought the product.
When object to be measured and peripheral devices are under hot line condition,
do not put yourself and the checker closer to high-voltage area while measuring.
When approaching high-voltage area, make sure to use insulated gloves or
implement measures for insulation.
When working with machines that are operating, never touch or try to touch any
movable or moving part of a machine. Also, do not position yourself or any part of
any part of your body in any area where there is risk of being caught by or
between machines.
Do not look into a laser light-emitting part.
Do not tune a laser to eyes of human or animals.
Do not let the children use.
Make sure to remember location of emergency stop button and circuit breaker
so that whenever and wherever you can.
Never position yourself or any part of your body inside a machine that is
operating, for any reason.
Never perform measurements in unsecured or unstable positions, or with both
hands occupied.
Do not perform measurements during thunderstorms.
Avoid water and foreign matter!
If any foreign matter (e.g. metal pieces, water, liquid) gets inside the product,
immediately turn off the power switch, remove a battery, and cotact the vendor
from which you purchased the checker.
Do not drop the instrument.
If the checker becomes damaged, is dropped or given a strong physical shock,
so that it becomes damaged, please contact the vendor from which you
purchased the instrument after turning off the power switch and taking out the
battery pack. Ignoring this warning and continuing to use the checker may lead to
result in fire or electric shock.
Do not disassemble the instrument.
To avoid the risk of fire or injury, do not disassemble or modify the instrument.
iii
●Points to remember when using the instrument
Ca i
Ignoring this caution constitutes improper use of the instrument and
: presents a risk of causing injury or property damage.
Memory protection
Make sure to always back up the data to PC or other data storage media. This is
necessary because data on the card may become corrupted or lost due to
deterioration or other reasons. Data may also be lost if the checker is damaged
or repaired.
Storage place
・To avoid the risk of fire or electric shock, do not leave the checker in humid or
dusty places.
・Do not leave the checker in a place where it is exposed to oily smoke or steam,
e.g. near a cooking stove or humidifier. Otherwise there is a risk of fire or
electric shock.
Do not place the instrument in an unstable place.
Do not place the instrument on an unsteady table or on high shelves. If the
instrument topples or falls it may cause injury.
●Points to remember regarding physical safety, e.g. clothing.
Ca i
:
Ignoring this caution constitutes improper use of the instrument and
presents a risk of causing injury or property damage.
If you have long hair, bind it at the back and roll it up, to avoid the risk of hair
getting entangled in any moving parts while working with operating machines.
Always wear appropriate safety equipment (helmet, dust-proof goggles, safety
shoes, Insulated glove, etc.).
Always wear a helmet when working in places where there are obstacles near
head level.
Wear proper safety shoes, with steel toecaps and oil-proof soles.
Do not wear ill-fitting work clothes (especially if very loose). Also, make sure to
button up or hook up the sleeves of your work clothes so that they cannot get
entangled in any moving machine parts.
Never work with the checker after taking medication with strong side effects,
non-prescription drugs or alcohol.
iv
Cautions on use
Since this checker is a precision device, if it is improperly used or roughly
handled, it may become damaged or fail to save data correctly. To ensure
proper use of the checker, carefully read and observe the following cautions.
●Do not continue using the checker when there is battery completely drained.
Data may be lost or corrupted.
Replace with a new battery immediately when the battery charge is very low.
●Do not leave the battery connected when the checker is left unused for a long time.
Liquid may leak from the battery.
Leaking liquid may damage the checker.
●Use the checker only under the following conditions:
・Temperature 0℃ to 40℃
・Humidity range 10 to 85% No condensation
If the checker is used out of this range, it will become damaged.
●Avoid using the checker in the following places:
Otherwise the checker may become damaged.
・Places where static electricity accumulates
・Places subject to very high or very low temperatures
・Places of high humidity
・Places subject to sudden temperature changes
・Places with a lot of dust
●Do not place the checker in high temperature such as in the car during the daytime in
summer.
●Do not place any heavy objects on the checker.
●Do not disassemble the instrument. (Otherwise the checker may be damaged.)
●Do not insert or allow foreign matter inside the connector.
●Do not spill liquids, including water, over the checker.
Cautions when discarding
When discarding the checker, please comply with the laws or regulations of
local government in your country.
v
vi
Table of Contents
Introduction The outline and measurement principle of the instrument ·····
1
C hapter 1 Preparation before use ·················································
1.1 Names and functions of parts ··················································
1.2 How to set dry battery ····························································
1.3 To turn on and to turn off ·························································
1.4 Initial setting ·········································································
2
2
4
5
5
C hap ter 2 Measurement and operation ·········································· 9
2.1 The method of measurement ··················································· 9
2.2 Button operation ··································································· 10
C hap ter 3 Data communications ···················································
3.1 Hardware requirement ···························································
3.2 Installation of a driver ·····························································
3.3 The directions for a download sheet (Excel file) ···························
13
13
13
24
C hap ter 4 Troubleshooting ·························································· 28
C hap ter 5 Specification ·······························································
5.1 Main part specification ···························································
5.2 Outline drawing ····································································
5.3 Standard configuration ···························································
5.4 Option article ········································································
30
30
31
31
32
vii
Introduction
The outline and measurement principle
This instrument measures and memorizes the corona discharge accompanying insulated degradation.
Insulated degradation is told according to the sound pressure state of corona discharge.
If the corona discharge accompanying insulated degradation of AC-power-supply equipment arises, an ultrasonic wave will
occur over a broadband.
Since this ultrasonic wave produces strength synchronizing with a power supply phase, if frequency analysis is conducted
after detecting detection sound, the double ingredient of power supply frequency will appear strongly.
With this instrument, electric discharge can be detected by detecting the strength of the double ingredient of this power
supply frequency, without being subject to the influence of sound other than electric discharge.
i i a
a
i
H
i
a a
T
a a
6
8
i
4 [H ]
Chapter 1 Preparation before use
◆ 1.1
◆◆
Names and functions of parts
1.1.1
Main unit
Parabolic antenna
Trigger
(Red button)
・To turn on, push
2 seconds or
more.
・MK-720 detects
while you push
this button
Sensor (inside)
Laser pointer
・It lights on checking
Grip
・It has battery holder
inside.
Strap holder
Grip end cap
LCD screen
・It displays
measured data
etc.
Function button 1
(Blue button)
・To memorize
data
・To change settings
◆◆ 1.1.2 LCD screen
Earphone Jack
・You can check discharge
through earphone.
Buzzer
・It sounds for
alarming.
Function button 2
(White button)
・To turn off
・To change range
・To change setting items
USB jack
・MK-720 can output data via USB cable.
№
Displayed item
Discharge component rate
(Intensity rate of double frequency (of power supply) to total intensity)
Converted sound pressure of double frequency (of power supply)
Level meter(for total ultrasound)
10 step display at measuring range( )
Current measuring range (L, M, H)
AUTO range indicator(displayed at Auto range setting)
Range over indicator(displayed at range excess at measuring range)
Rate excess of double frequency (from preset alarm level)
Frequency of currently measuring power supply
Type of memory data
([L]: Rate of double frequency Converted rate from ultrasound to sound pressure of
double frequency [W]: Waveform, FFT spectrum)
Index number of data which will be memorized next.
Can be chosen by pushing “L” and “W” button.
Memory indication (It indicates that there are memorized data at index number
which is currently displayed.)
Battery life indicator
:Full
:Low battery
:Almost empty. Please change battery.
Current time 24 hour clock
1 1 1 1 1 1 1 1 1 1 1
1
1
1 1 1
1 1 1 1
1 1
1
1 1 1
1 1 1
1 1 1
1
1
1
1 1 1 1 1 1 1 1 1 1 1
1 1 1 1 1 1 1 1 1 1 1
1
1
1 1 1
1 1
1
1 1 1
1 1 1
1
1
1
1 1 1 1 1 1 1 1 1 1 1
1 1 1 1 1 1 1 1 1 1 1
1
1
1 1 1
1
1 1 1
1
1
1
1 1 1 1 1 1 1 1 1 1 1
What is double frequency?
It means spectrum component of frequency which is twice of power supply frequency (100Hz or 120Hz).
◆
1.2
How to set dry battery
Unscrew grip end cap.
Snap off wire from battery holder.
Pull out battery holder and set 4 AA batteries.
Attention
Set batteries according to guidance on holder, not to make
mistake about polarity (+,-).
Set battery holder into grip and connect wire. And set grip end cap.
1.3
◆
To turn on and to turn off
To turn on at measuring mode
Push red button for 2 seconds or more.
Red
Clock setting screen is displayed in the case inner clock is
reset due to low battery etc.
To turn on at setting mode
Red
White
Keep pushing red button and white one until MK-720 turns on.
To turn off
White
Push white button until MK-720 turns off.
MK-720 automatically turns off after non-operation for 5 minutes.
(MK-720 does not execute automatic power off when it is connected with PC.
1.4
◆
Initial setting
MK-720 requires initial setting before measurement.
Turn on MK-720 at setting mode (to make settings).
1.4.1
◆◆
To turn on at setting mode
Push red button
Red
and white one
White
for 2 seconds or more.
If your MK-720 is already turned on, please turn off and restart
with procedure written in
By pushing red button
Red
.
for 2 seconds and more, MK-720 transitions from (any screen of) setting mode to measuring
mode.
Setting values which are finally displayed are memorized for this operation.
Setting values which are finally displayed are NOT memorized
with pushing white button
White
for 2 seconds or more.
by turning off by automatic power-off or turning
off
1.4.2
◆◆
Initial setting
There are 4 items in initial setting.
・Contrast of display
・Alarm level setting
・Frequency of power supply of object ・Clock setting
Screen of MK-720 transitions in the order showed below after turning on at setting mode.
8ettings
( 4 3 9 7 A 8 9
・・・・・・・
:R
White
:⇒
White
[Contrast of display]
8ettings
8ettings
2 E 2 4 7 Y ( 1 E A 7
A 1 A 7 2
1 E V E 1
1 0 %
:3
:R
:→
[Memory clear]
*Needless at initial setting
[Alarm level setting]
White
White
8ettings
'
White
1 2
/
0 9
/
0 1
2 3
:
4 5
:
1 【
:R
:⇒
:→
[Clock setting]
8ettings
F 7 E 6 U E 3 ( Y
【 0
:R
H z
:⇒
[Frequency of power supply]
Setting of contrast
MK-720 displays [Settings CONTRAST] first after turning on at setting mode.
Blue
8ettings
( 4 3 9 7 A 8 9
・・・・・・・
:R
:⇒
White
It is for adjusting of contrast.
You can make dark by pushing blue button
(12 steps).
After push at darkest setting, screen goes to
brightest one.
MK-720 is set at current contrast setting by
one push of white button.
MK-720 transitions to [Alarm level setting].
Alarm level setting
MK-720 displays [Settings ALARM LEVEL] after push of white button
8ettings
A 1 A 7 2
1 E V E 1
Blue
1 0 %
:R
:⇒
White
White
after turning on at setting mode.
It is for setting alarm level.
You can set from 0% to 50%
After push at 50%, setting value returns to
0%.
To cancel alarm, set it 0%.
MK-720 is set at current alarm level setting
by one push of white button.
MK-720 transitions to [Frequency of
power supply].
Setting of power supply frequency
White
MK-720 displays [Settings FREQUENCY] after two push of white button after turning on at setting mode.
Set power supply frequency used in
operation area. (50Hz or 60Hz)
8ettings
F 7 E 6 U E 3 ( Y
【 0
:R
H z
:⇒
Blue
White
MK-720 is set at current frequency by one
push of white button.
MK-720 transitions to “Clock setting”.
Clock setting
MK-720 ”isplays
白
Settings yy/mm/””, hh, mm, ss
after three push of white button
after turning on at setting
mo”e
<To set “lo“k of MK-720>
1. Turn on at setting mo”e.
2. Push white button
3. Push blue button
three times to transition to “lo“k setting mo”e
for 2 se“on”s or more. (ursor on s“reen appears after releasing of button.
4. Move “ursor by pushing white button
.
5. (hange values by pushing blue button
.
6. Move “ursor on spa“e for se“on”s, an” push blue button
7. Transition to
MEMORY (LEAR
()o not push white button
8. To transition from
'
1 2
/
0 9
/
0 1
2 3
:
4 5
:
1 【
:R
(hapter 2
◆
:→
s“reen, by pushing white button
s“reen to
(ONTRAST
2.1. How to “he“k
5oint 20-】20 at the obje“t
staying 1 – 1.5 meter away from
the obje“t.
5lease open the ”oor of obje“t
(power ”istribution box et“.) at
“he“king.
Warning!
9here is ”anger in “he“king obje“ts of high voltage at hot line
“on”ition.
0eep safe ”istan“e from obje“t.
◆◆
2.1.1.
How to use ultrasoni“ sensor
配電盤等 box et“.
5ower ”istribution
s“reen, push white button.
1. To transition to “lo“k setting s“reen,
push blue button
for 2 se“on”s or
more.
2. To set “lo“k, push blue button when
“ursor is on spa“e for se“on”s.
(After this operation, se“on”s goes to
00 .)
1. To transition from time setting s“reen
to MEMORY (LEAR s“reen, push white
button .
*MK-720 transitions from MEMORY (LEAR
s“reen by pushing white button.
2. To move “ursor, push white button .
ss→hh→mm→yy→mm→””→ss
4peration an” “he“king
5ower ”istribution box et“.
.
not to make MK-720 turns off,)
MEMORY (LEAR
Blue
button
8ettings
.
20-】20 has ”ire“tivity.
(he“k ”is“harge with i”entifying
sensing points
(he“k for 0.5 se“on” to 1 se“on” on ea“h sensing points.
◆◆ 2.1.2. 7e“ommen”ation of use of earphone
We re“ommen” using earphone while “he“king to re”u“e bur”en of “he“king. If you hear low soun” from earphone,
see s“reen.
20-】20 automati“ally turns off after 5 minutes of no operation.
◆
2.2 (he“king operation by button
◆◆
2.2.1.
8ensing
5ush re” button.
20-】20 “ontinues “he“king while you keep pushing re” button.
After you release re” button, 20-】20 in”i“ates ”ata you “he“ke” last.
20-】20 start sensing again by se“on” push of re” button.
20-】20 points sensing area by laser.
When you release re” button,
laser pointer stops.
◆◆
2.2.2.
7ange swit“hing
You “an swit“h range by pushing white button
at sensing (=while you are pushing re” button
).
7ange swit“hing “annot be ”one while 20-】20 is not sensing.
7ange swit“hing or”er is as follows.
AU94→1(low)→2(mi””le)→H(high)→AU94
At AU94 range setting, 20-】20 swit“hes range from 1. An” if sense” value is high, automati“ally swit“h range
to 2, an” to 1.
At the “ase that you start “he“king again after you stoppe”, 20-】20 (at AU94 range setting) start sensing
at 1 range.
7ange setting (AU94,1,2,H) is kept after turning off.
20-】20 starts sensing at range memorize” at previous sensing.
固 In the “ase 20-】20 ”isplays
4VE7
at fixe” range setting su“h as 1, 2, an” H, it means s“ale-over.
8wit“h to higher range.
◆◆ 2.2.3. How to memorize ”ata
)ata is memorize” by pushing blue button
while ”ata is hol” at i”le state.
)ata memorizing “annot be ”one at sensing state. (While you push re” button.
2aximum memory volume an” memory “ontents
“ontents
[L] )ouble frequen“y rate (onverte” value from of
”ouble frequen“y ultrasoun” to soun” pressure,
)ate of measuring
[W] Waveforms of envelope” ultrasoun”, ++T
spe“trum, Top 10 values )ate of measuring
Maximum
volume
500
re“or”s
10 sets
of
re“or”
)
You “an “hoose 1 an” W by pushing white button
at i”le state.
20-】20 stores ”ata un”er ”ata number whi“h is ”isplaye” on s“reen. )ata of L an” W is store” un”er ea“h
”ifferent number. )ata number is automati“ally issue”, an” ”ata number in“reases one by one.
You “an freely “hange ”ata number.
4nly at non-measuring “on”ition.
Blue
button
) A 9 A
[1] 3o.
:R
I 3 ) E X
0 2 5
::
1. MK-720 swit“hes into ”ata number
“hanging mo”e by pushing blue
button
for 2 se“on”s or more.
An” it will return to normal mo”e
by one more pushing of blue
button.
2. You “an “hange number whi“h is on
“ursor.
3. MK-720 ”oes not return to normal
mo”e when number you set is out of
range.
[L] range: 1 – 500
[W] range: 1 -10
1. You “an “hoose ”igit position by
pushing white button.
White
button
20-】20 in”i“ates 4verwrite? in the “ase that 20-】20 has ”ata un”er ”ata number whi“h is “urrently in”i“ate”.
By pushing blue button,
”ata is overwritten. By pushing white button, overwriting is suspen”e”
◆◆ 2.2.4. (learing of memorize” ”ata
(learing of memorize” ”ata “an be ”one at setting mo”e.
9urn on at setting mo”e.(5ush re” button
an” white button
)
5ush white button
four times to transition to
8ettings 2E247Y (1EA7 .
Blue
button
8ettings
To “lear memory, push blue button.
This is applie” to all ”ata.
(= All ”ata is “leare” by this operation.)
2 E 2 4 7 Y ( 1E A 7
:3
:→
White
button
To transition to Setting (ONTRAST
without “learing memory,
push white button.
(hapter 3. )ata “ommuni“ation
MK-720 is able to sen” memorize” measuring re“or” to “omputer via USB “able.
◆
3.1.
8ystem requirements
To utilize ”ata on P(, MK-720 requires environments showe” below.
Item
Re“ommen”e” environments
OS
Win”ows XP
Ex“el
Ex“el2002 2003 2007 2010
(omputer whi“h enables normal operation of Win”ows an”
Ex“el
()-ROM ”rive for installation only
(omputer
)isk ”rive
◆
◆◆
3.2.
Vista 7
Installation of ”river software
3.2.1.
For Win”ows Vista® an” Win”ows 】®
8et installation ”isk on ”isk ”rive of the “omputer.
(onne“t U8B port of “omputer an”
that of 20-】20 with U8B “able.
9urn on 20-】20 by pushing re” button
for 2 se“on”s or more.
(omputer may ”isplay a ”isplay win”ow as showe” below, on
Win”ows Vista®
(hoose
Ask me again later
or
)on’t show this message again for this ”evi“e
4pen
(li“k
“ontrol panel .
Har”ware an” 8oun”
.
.
(li“k
)evi“es an” 5rinters on Win”ows 】, an” ”o
On Win”ows 】
4n Win”ows Vista
)evi“e 2anager
on Win”ows Vista
7ight “li“k
20-】20 U8B ”river in 4ther ”evi“es an” ”o
Up”ate )rive 8oftware .
In the “ase you “annot fin”
Up”ate )rive 8oftware , please retry after a few se“on”s later.
(li“k
Browse my “omputer for ”river software
10
(li“k
Browse
button an” “hoose the fol”er whi“h has ”river software.
20-】20_U8B_”river .)
(li“k
3ext
button after sele“tion of fol”er.
11
(li“k
12
Installation of ”river software shall start
13
(li“k
14
4pen
Install this ”river software anyway
(lose
at the “ase that se“urity warning win”ow appears.
button.
(ontrol panel
(Most “ommon “hoi“e is
to install U8B serial port.
15
7ight-“li“k
U8B 8erial 5ort
in
4ther ”evi“es
at
software .
(In the “ase that you “annot fin”
Up”ate )river 8oftware
)evi“e 2anager , an” “li“k
Up”ate ”river
, please retry after a few se“on”s later.
1【
Install in the same way as pro“e”ure showe” from
1】
(li“k
1】
(onfirm 20-】20 U8B 8erial 5ort ((42 X) (☆ X is numeri“) is a””e” in 5orts((42 & 159) at )evi“e 2anager .
9ake note of the number
X . (42 number will be require” to utilize
)ownloa” sheet .
9his (42 number ”iffers by “omputer by “omputer.
(lose
to 12.
button after “ompletion of ”river software installation.
◆◆
3.2.1.
For Win”ows X5
8et installation ”isk on ”isk ”rive of the “omputer.
(onne“t U8B port of “omputer an”
that of 20-】20 with U8B “able.
9urn on 20-】20 by pushing re” button
for 2 se“on”s or more.
(omputer will ”isplay
Foun” 3ew Har”ware Wizar” .
(hoose
Install from a list of spe“ifi“ lo“ation [A”van“e”]
an” “li“k
3ext
.
(hoose 8ear“h for the best ”river in these lo“ations. an” “he“k on boxes ( 8ear“h removable me”ia [floppy,
()-742...] an”
In“lu”e the lo“ation in the sear“h: ) .
(li“k
Browse
button an” “hoose the fol”er whi“h has ”river software. (Most “ommon “hoi“e is
20-】20_U8B_”river .)
(li“k
3ext
button after sele“tion of fol”er.
(li“k
(ontinue anyway
. 5lease negle“t warning ”ialogue win”ow for this “ase.
Installation of ”river software shall start.
(li“k
Finish
button after “ompletion of ”river software installation.
Foun” 3ew Har”ware Wizar” shall be ”isplaye” after “li“king of
a list of spe“ifi“ lo“ation [A”van“e”] an” “li“k
3ext .
10
Install in the same way as pro“e”ure showe” from
11 (li“k
(lose
12
4pen
(ontrol 5anel .
13
(li“k
to
Finish
.
button after “ompletion of ”river software installation.
5erforman“e an” 2aintenan“e 。
in step
. (hoose
Install from
14
15
(li“k
8ystem .
8ystem properties
”ialogue box will open. (li“k
Har”ware
tab an” ”o
)evi“e manager
.
1【
(onfirm 20-】20 U8B 8erial 5ort ((42 X) (☆ X is numeri“) is a””e” in 5orts((42 & 159) at )evi“e 2anager .
9ake note of the number
X . (42 number will be require” to utilize
)ownloa” sheet .
9his (42 number ”iffers by “omputer by “omputer.
3.2. How to use ”ownloa” sheet (Ex“el files
4pen
20-】20 ”ata ”ownloa” sheet .
MK-720 requires Mi“rosoft Ex“el version Ex“el 2002, 2003, 2007, an” 2010. at use of Ex“el software.
20-】20 ”ata ”ownloa” sheet.xls file is store” in () in“lu”e” in stan”ar” “onfiguration of MK-720. Please
utilize after ”ownloa”ing to your “omputer.
Ma“ro fun“tion shoul” be enable” to use
MK-720 ”ata ”ownloa” sheet
. See page 28 to “he“k ”etails.
8et (42 number (whi“h is note” at installation of ”river software) on U8B serial port of ”ownloa” sheet.
(onne“t U8B port of “omputer an”
that of 20-】20 with U8B “able.
9urn on 20-】20 by pushing re” button
for 2 se“on”s or more.
20-】20 will automati“ally ”isplay
U8B )4W314A) .
U8B
) 4 W 3 1 4 A )
7ea”y
(li“k
)ownloa”
button on
)ownloa”ing shall start.
)ownloa” sheet
.
9o “lear “urrently ”isplaye” ”ata, “li“k
(lear
button.
。
9o store ”ownloa”e” ”ata, save ”atasheet with naming.
)ata store” in MK-720 is not “leare” by ”ownloa”ing. To “lear ”ata in MK-720, ”o in pro“e”ure written
in page 12.
●9o enable ma“ro fun“tion
(omputer may ”isplay warning about ma“ro fun“tion at opening ”ownloa”ing sheet (Ex“el file).
Set ma“ro or “ontents enable for this “ase.
(1) +or Ex“el2007 an” Ex“el2010
(li“k
Enable “ontent
button on yellow bar on the top of ”isplay.
(2) (2) +or Ex“el2003
(li“k
Enable Ma“ros button on se“urity warning win”ow as showe” below.
In the “ase )ownloa” button or (lear button is effe“tive without being ”isplaye” se“urity warning win”ow
pro“ee” filing.
If )ownloa” button or (lear button is NOT effe“tive an” se“urity warning win”ow is NOT ”isplaye”, se“urity
level is set at very high “lass. Set se“urity level to enable ma“ro a““or”ing to gui”an“e of Ex“el 2003.
(hapter 4 9roubleshooting
(he“k this list first for the “ases whi“h are to be “onsi”ere” as malfun“tions.
If any “ase whi“h is not in this list o““urs, or if the “ase it is not re“overe” even after “ountermeasure shown
here, “onta“t the agent from whi“h you pur“hase”. In the “ase you ha” pur“hase” from us ”ire“tly, please sen”
email to us.
<Tokyo@jfe-a”vante“h.“o.jp>
Please kin”ly let us know the mo”el name, type number, an” symptoms at “onta“ting us.
Symptoms
Mk-720 “annot be powere”
up.
S“reen ”oes not ”isplay.
)ouble frequen“y
“omponent rate an”/or
soun” pressure is seeme”
too small.
Possible “auses
(ountermeasure
Battery setting is
in“orre“t.
Batteries ”raine”.
Battery setting is
in“orre“t.
Batteries ”raine”.
(ontrast setting is not
appropriate.
MK-720 is not pointe”
towar” “orre“t
”ire“tion.
Soun” ”oes not leak from
”istributing box et“.
Measuring range setting
is not “orre“t.
Soun” is not au”ible from
an earphone
Earphone is not
“onne“te” properly.
Earphone is out of
or”er.
The soun” is too small.
(ommuni“ation
with
“omputer is impossible.
USB “able is not
“onne“te” properly.
)river software is not
installe”.
(OM port
in“orre“t.
number
is
Refer
page xx.
(he“k if the battery is inserte” “orre“tly.
P.2
Renew batteries.
P.2
(he“k if the battery is inserte” “orre“tly.
P.2
Renew batteries.
P.2
Set again at “ontrast a”justment win”ow in setting mo”e.
P.3
MK-720 has ”ire“tivity.
Please point MK-720 towar” “orre“t ”ire“tion.
P.4
MK-720 is an instrument whi“h “at“hes soun”. So it “annot
“at“h ”is“harge from fa“ilities whi“h ”o not allow soun”
leaking.
MK-720 may be not able to ”ete“t ”is“harge at the “ase of
measuring in - range for small soun”.
(hoose appropriate range su“h as L or M.
P.4
P.5
(onne“t earphone “o”e “orre“tly.
(he“k earphone. (ex. “onne“t earphone with other ”evi“e
su“h as ra”io.)
There may be a “ase that MK-720 “at“h ultrasoun” but soun”
from earphone is very small.
Please “he“k your MK-720 using referen“e os“illator et“.
(onne“t USB “able “orre“tly.
Install ”river software.
P.6
To enable “ommuni“ation between MK-720 an” “omputer, (OM
port number (in”i“ate” by “omputer) must be set on
”atasheet.
Set “orre“t (OM port number on ”atasheet.
P.9
(hapter 5
◆
8pe“ifi“ation
5.1. Har”ware 8pe“ifi“ations
Imputting part
Measuring part
Sensor type
Sensing “enter frequen“y
)ete“tion sensitivity
)ire“tivity
Piezoele“tri“ type
40k-z
-63③3”B @30“m As sensor
③8
Laser pointer
Semi“on”u“tor laser ”io”e
1Mw ((lass 2 JIS ( 6802 an” IE( 6825-1
Sampling frequen“y
Number of sample ”ata
+requen“y range
Resolution
A/) “onversion
)ynami“ range
Win”ow
)isplay
(ontents
Outputting part
Buzzer (for alarming),
Earphone ja“k (Signal output terminal, 3.5mm O) mini ja“k
USB port for ”ata output USB mini B port
Output
)ata storage
Other
spe“ifi“ations
)is“harge “omponent rate, (onverte” value in a“ousti“ pressure (Maximum 500 re“or”s),
10 sets of waveform of envelope” ultrasoun”, ++T spe“trums, an” top 10 ”ata
Power sour“e
Power “onsumption
Battery life
Operating temperature /
humi”ity
Storage temperature /
humi”ity
)imensions
Mass
◆
Wavelength 650nm
1280-z
256 points
500-z
By 5-z
16bit
65”B an” over
Re“tangular
STN liqui” “rystal ”isplay 128×64 ”ots
)is“harge “omponent rate
(onverte” value in a“ousti“ pressure
AA Alkaline ”ry battery X 4
・Automati“ power off after no operation for 5 minutes an” low battery
(un”er 4.2V)
1.2W
(ontinuous 8 hours at 0℃ to 50℃
0 - 40℃
-10 - 50℃
10 - 85% No “on”ensation
10 - 85% No “on”ensation
W 174 × - 268 × ) 98 (mm)
Approx. 400g
batteries are NOT in“lu”e”
5.2. 4utsi”e view
Trigger
Button 1,2
USB port
Earphone ja“k
Buzzer
◆
5.3. 8tan”ar” “onfiguration
(orona ”is“harge “he“ker
MK-720
1 unit
AA Alkaline ”ry battery
LR6A,
4 ea.
USB “able
KU-SLAMB510BK
1 ea.
(ommuni“ation software
(in 1 ()
MK-9804
1 ea.
Earphone
ME-L82
1 ea.
Strap
1 ea.
Instru“tion manual
1 ea.
◆
5.4. 4ption
Referen“e os“illator
MP-161
(arrying bag
MK-9702
(arrying “ase
MK-9703