1
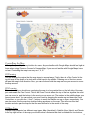
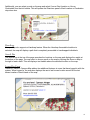
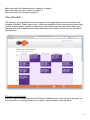
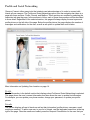
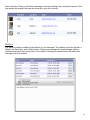
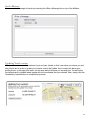
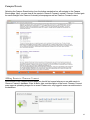
CLEMSON Connect
User Manual
© 2010 Spencer Avinger and Scott Dover
1
CLEMSON Connect - User Manual
Designed and Developed by Spencer Avinger and Scott Dover
Table of Contents
________________________________________________________________________________
Overview
Bottom Bar
Integrated Search Bar
Registration / Logging In
Register
Logging In
Forgot Your Password
Campus Map
Controlling the Map
(1) Panning
(2) Zooming
(3) Map Type
Reset Map
Map Legend
Map Filter
Directions
Handicap
Search Bar
Logged In Users
Class Schedule 3
3
4
4
4
5
5
5
6
6
6
6
7
7
7
7
8
8
8
9
Editing your Schedule
Adding a Class to your Schedule
Deleting a Class from your Schedule
Calendar
9
10
10
11
Profile and Social Networking
12
Profile
Friends
Mailbox
Send a Message
Updating Your Location
Campus Events
Adding Events to Clemson Connect
Adding Events to Your Calendar
Search Bar
Phonebook
Search Bar
12
12
13
14
14
15
15
16
16
16
16
2
User Manual
________________________________________________________________________________
Overview
Clemson Connect is a powerful toolbox tailored to incoming freshman and sophomore students that
eases the transition into college life here at Clemson University. It comes in two flavors: a web
application and an iPhone app. Students will have access to a campus map (complete with directions
to class!), quick access to their class schedule, the ability to find new friends, a database of campus
events, and the ability to search thousands of listings in the official Clemson phonebook all at their
fingertips!
Bottom Bar
Throughout your user experience with Clemson Connect, you will always be accompanied by an
orange navigation bar at the bottom of the window (can be seen above). This bottom navigation bar
allows for quick navigation between the main pages of the application: Campus Map, Class Schedule,
Profile and Social Networking, Campus Events, and Phonebook.
3
Integrated Search Bar
On the top right of every page is a search bar. This search bar has a different function on each page.
Note that the Search Bar does not always have a function.
See Information on the Campus Map Search Bar on page 8.
See Information on searching Friends on page 12.
See Information on searching Events on page 16.
See Information on searching Phonebook on page 16.
Registration / Logging In
Although a few features of Clemson Connect are available to non-registered users, you should
register in order to get the complete experience. When you first arrive at Clemson Connectʼs home
page, you will see two text boxes and some options at the very top right of your screen. These items
are detailed below.
Register
Choosing the Register option will navigate you to a Registration page where you can sign up with
Clemson Connect. All you need to do is fill in your Name as well as your official Clemson Username
and Password. We need your Clemson Username and Password for several reasons. The features
provided in this web application require that you are currently enrolled as a student at Clemson
University. We use your official Clemson credentials to access your Class Schedule, Clemson's
official Phonebook, and other Clemson specific information. If you so choose, you can also upload an
image that will display in your User Profile.
4
Logging In
If you have already registered with Clemson Connect, simply enter your username and password into
the appropriate fields in the top right corner of the page and click Login. You will be logged in and
automatically redirected to your Profile page.
Forgot Your Password
At one point, Clemson Connect could email you your password to your registered email address.
Clemson Connect has since upgraded to LDAP and no longer stores usersʼ passwords. Because of
this, we can no longer email you your password.
Campus Map
The backbone of Clemson Connect is itʼs Campus Map. The map loads up viewing Clemson
Universityʼs campus and fills itself with nodes that represent the buildings and other locations around
the campus. Clicking on the map nodes will display info bubbles above the location that show more
information about that particular location. The mapʼs functions are explained in detail below.
5
Controlling the Map
Utilizing Campus Map is very intuitive for users. Anyone familiar with Google Maps should feel right at
home when using Clemson Connectʼs Campus Map. If you are not familiar with Google Maps, have
no fear! Controlling the map is as easy as 1, 2, 3!
(1) Panning
You can change the region that the map views in several ways. Firstly, there is a Pan Control in the
top left map in the shape of a circle with a little hand in the middle. Pressing one of the four arrows
will pan the map in that direction. Also, you can click and hold the map and use your mouse to move
the map around.
(2) Zooming
The next control you should see overlaying the map is a long vertical bar on the left side of the map,
just underneath the Pan Control. This is the Zoom Control where the top of the bar signifies the most
you can zoom in, and the bottom is the most you can zoom out. The marker in the middle shows your
current zoom level. You can adjust your zoom level by dragging the marker up and down the Zoom
Control bar, or you click the ʻ+ʼ and ʻ-ʼ buttons to move the marker one up or down, respectively. You
can also zoom into the map buy double clicking anywhere on the map. This will zoom into that
location and also pan the map so that the area clicked is in the center of the map.
(3) Map Type
Campus Map supports four different map types: Map (the default), Satellite View, Hybrid, and Terrain.
In the top right corner of the map you should notice a horizontal bar that is divided into four buttons,
6
each one labeling one of the four map view types. Selecting one of the four types will change the map
to that map style.
Reset Map
If at any time you wish to return to the default region and zoom level of the map, you can select the
Reset Map button atop the map on the left. This will also remove any paths placed on the map for
Directions. Directions is detailed on page 7.
Map Legend
Below the map there are two panels, the left of which is the Map Legend. Firstly, this details what the
colored nodes on the map represent.
Map Filter
The Map Legend can also be used as a filter. Whether or not a category is checked determines if
nodes of that category display on the map. There is also an option to toggle all of the categories on
and off by clicking the Check All checkbox.
Directions
Below the map there are two panels, the right of which is the Directions panel. Here you can select a
Start Location and a Destination. After pressing Get Directions! , the map will add a path that details
the optimal way to get between the two locations.
7
Additionally, you can select a node on the map and select Use as Start Location or Use as
Destination from the info bubble. This will update the Directions panelʼs Start Location or Destination
drop-down box.
Handicap
Campus Map also supports a Handicap feature. When the Handicap Accessible checkbox is
selected, the map will display a path that is completely accessible to handicapped individuals.
Search Bar
The search bar at the top of the page searches the locations on the map and displays the results at
the bottom of the page. You can select to show a result on the map by clicking the Show on Map to
the right of each result. This will display a text bubble above the selected location on the map.
Logged In Users
Clemson Connectʼs Campus Map adds a few additional features to users that have logged in with the
system. When logged in, the map also displays the userʼs last known location as well as the last
known location of each friend on the map.
8
More Information on Registration and Logging In on page 4.
More Information on User Locations on page 14.
More Information on Friending on page 12.
Class Schedule
This feature is only accessible if the user is logged in. This page displays the userʼs weekly class
schedule, Monday to Friday, 8am to 8pm. Classes are displayed in boxes that detail the class name,
location, section number, number of credit hours, and the time when the class meets. Users must
manually enter their schedule before taking advantage of the feature. How to edit your schedule is
detailed below.
Editing your Schedule
From the Class Schedule page, select the Edit your Schedule option at the top left of the page. You
are navigated to a new page where you can add or remove classes to your schedule.
9
Adding a Class to your Schedule
The large purple panel at the top of the page holds a form that allows you to add a new class to your
schedule. Fill in all appropriate fields and click the New Class button to add the class. When the page
reloads, the bottom table will be updated with your new class.
Deleting a Class from your Schedule
At the bottom of the Edit Your Schedule page you will see a table that displays all the classes
currently in your Clemson Connect schedule. Beside each item is a Delete button. Click the button
and the class will be removed from your schedule.
10
Calendar
Each Clemson Connect user has their own personal calendar that stores events from the Campus
Events page for quick reference. To view the calendar, select Class Schedule from the navigation bar
at the bottom of the page. From the Class Schedule page, select the Calendar View option at the top
left of the page. The calendar automatically loads the current month.
You can change the current month by selecting the backward or forward arrows at the top of the
calendar. Your events will load up in the appropriate date on the calendar. Selecting them will bring up
a window displaying more information for the event.
More Information on Adding Events to Your Calendar on page 16.
11
Profile and Social Networking
Clemson Connect offers many tools that students can take advantage of in order to connect with
friends all over campus. The Profile and Social Networking option from the navigation bar takes to a
page with three sections: Profile, Friends, and Mailbox. These sections are reached by selecting the
respective tab atop the page. In the sections to follow, each of these three sections will be described
in more detail. Regardless of the selected section, this page will always display the userʼs personal
profile picture on the left side of the page. Below the profile picture, the page displays the number of
messages and notifications for the user, as well as an option to update their user location.
More Information on Updating Your Location on page 14.
Profile
The Profile section is the default section that displays when Profile and Social Networking is selected.
This page shows the userʼs current information and also allows the user to update his information.
For example, you can update your phone number, change your password, or update your profile
picture.
Friends
This section displays all userʼs friends as well as their information (profile picture, username, email,
and phone number). To add a new user to your list of friends, use the integrated search bar at the top
right of the page. Once the results are loaded, press the Request Friend button for the user that you
12
want to befriend. Doing so will send a message to that user asking if they accept the request. Once
they accept the request, that user will show up in your list of friends.
Mailbox
This section contains a mailbox that holds all of your messages. The mailbox shows the Sender, a
Subject, the Date Sent, and a Delete button. Selecting a message will reload the page with the
selected message in the bottom panel of the mailbox. Selecting the delete button will delete the
message from your mailbox.
13
Send a Message
You can send a message to friends by selecting the Write a Message link on top of the Mailbox.
Updating Your Location
Clemson Connect tracks the locations of you and your friends so that it can show you where you and
your friends are In order to update your location, select the Update Your Location link below your
profile picture. In the page that loads, use the map and click where you currently are. You will notice
the Latitude and Longitude labels update with the coordinates that you selected. Next, simply click the
Update My Location button to complete the process.
14
Campus Events
Selecting the Campus Events button from the bottom navigation bar will navigate to the Campus
Events page. Here, you can view all the events in Clemson Connectʼs system. Clemson Connect gets
its events straight from Clemson Universityʼs homepage as well as Clemson Connectʼs users.
Adding Events to Clemson Connect
At the bottom of the Campus Events page you should find a panel where you can add events to
Clemson Connectʼs database. Enter a name, date, and description of the event. Clemson Connect
even supports uploading images for an event. Please note, only logged in users can add events to
the database.
15
Adding Events to Your Calendar
To the right of each event listing is an Add to my Calendar! button. Clicking this will allow you to keep
track of this particular event in your personal Clemson Connect calendar.
More Information on Calendar on page 11.
Search Bar
The integrated search bar can be used to search the entire events database.
Phonebook
To search Clemson Universityʼs Official Phonebook, simply fill in the appropriate fields on the left and
click search. Clemson Connect will only display 50 results at a time, so be sure to be as specific as
possible. Clemson Connect also supports Department Searches. Select a department from the dropdown menu and click search to display all the listings from that Department.
Search Bar
The integrated search bar can be used to search the phonebook by name.
16