1
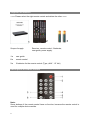
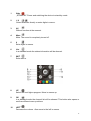
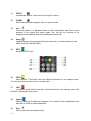
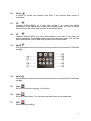
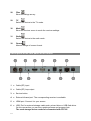
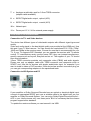
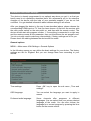
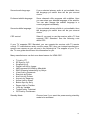
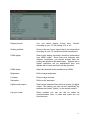
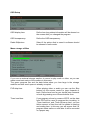
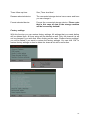
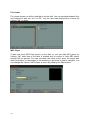
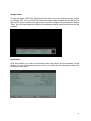
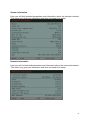
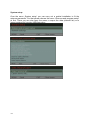
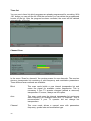
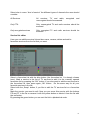
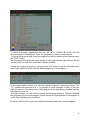
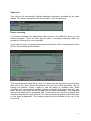
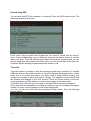
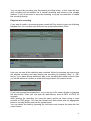
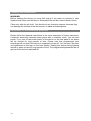
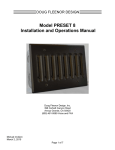
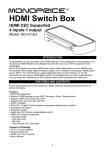
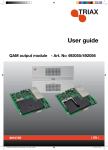
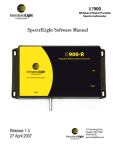
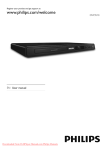
User Guide Digital HDTV cable receiver With Panaccess <<<< place your logo here >>>> 2 General information This user guide helps you to use the digital cable receiver in a right secure and effective way. We assume that user of the receiver have a general and right knowledge about using of consumer electronics devices. Each person who sets up, connects, operates, cleans or disposes of this receiver, must have read and taken note of the complete content of this user guide. Keep this user guide always near the receiver. The integrated helping texts that will be showed in every menu will make the using of the receiver easier for you, so that you don’t need to use the user guide often. Contents Contents Safety instructions Features Short description Service Warranty Declaration of conformity Supplied accessories Description of remote control Description of the rear panel of the device Overview of all connections Connection to TV- and Video devices Connection to Hifi-System and PC Installation and basic settings General options Time settings Audio / Video setup OSD setup Mass storage utilities Factory settings File viewer MP3 player Image viewer Systeminfo Software update Tuner information 3 5 6 6 6 7 7 8 8 12 13 13 13 14 14 16 16 18 18 19 20 20 21 21 22 22 3 Stream information Network information System setup Network settings Web radio Timer list Channel/services search Service list editor Day-to-day usage Adjust volume TV and Radio receiver setup Choosing a program Favourite lists Teletext Radio text Start a recording Record using EPG Timeshift Playback of a recording Cleaning and maintenance Instructions for environmental protection 4 23 23 24 25 25 26 26 27 28 28 28 28 30 30 31 31 32 32 33 34 34 Safety instructions Read these instructions. Heed all warnings. Follow all instructions. Do not use this apparatus near water. The apparatus shall not be exposed to dripping or splashing and no objects filled with liquids, such as vases, shall be placed on the apparatus. Clean only with dry cloth. Do not block any ventilation openings. Install it in accordance with the manufacturer’s instructions. Do not install near any heat sources such as radiators, heat registers, stoves, or other apparatus (including amplifiers) that produce heat. Only use attachments/accessories specified by the manufacturer. Unplug this apparatus during lightning storms or when unused for long periods of time. To avoid electronic-shock hazards, do not open the cabinet, refer all servicing to qualified service personnel. Servicing is required when the apparatus has been damaged in any way, such as the power-supply cord or plug is damaged, liquid has been spilled or objects have fallen into the apparatus, the apparatus has been exposed to rain or moisture, does not operate normally, or has been dropped. The receiver requires careful handling to avoid potential damage. Be sure to follow these requirements during transportation and installation. During Transportation to the Subscriber Home Transport the cable receiver in its shipping box or an equally padded container. Do not expose the receiver to rain or moisture. During Installation Do not place the cable receiver in an enclosed area where the cooling vents are blocked or the flow of air through the ventilation openings is impeded. Install the receiver so that its position does not interfere with its proper ventilation. For example, do not place the receiver on a bed, sofa, rug, or similar surface that could block the ventilation openings. Install the receiver away from heat sources such as radiators, heat registers and stoves. Installation of the receiver near consumer electronics devices, such as stereo receiver/amplifiers and televisions, is permitted as long as the air surrounding of the receiver does not exceed 40°C (104° F). Place the receiver on a flat surface and not prone to vibration or impact. 5 Features Digital HDTV cable receiver according to DVB Standard (DVB-S2) Convenient menu navigation Electronic program guide (EPG) and detailed program information. EPG supported recording Freely programmable favourites lists Convenient program lists with sorting function Fast teletext with 1800 pages memory HDMI output 576i/576p/720p/1080i/1080p Dolby Digital output S-PDIF visual and electric MP3 playback Representation of digital photos (Photo viewer) Webradio application Network connection for more network applications Software and program lists update over USB and Internet Power-saving power supply (Stand-by <1 Watt) Scope of supply: Receiver, remote control, 2 batteries, user guide Short description Brilliant picture quality, functionality and extremely short switching time, OSD Display, electronic program guide with detailed information and excellent graphical quality are the special features of this device. It was paid a special attention not only to the product safety, but also to the easy operation of the device both in everyday use and in programming. This digital cable receiver makes it possible to use the many advantages of the digital reception technology. It is the perfect choice for cable connection and enables the reception of many digital TV and radio programs. The receiver gives you also a lot of opportunities to configure it according to your wishes and habits. For example it is possible to change the program order quick and easy. Freely programmable favourites lists allow quick access to your favourite programs. The integrated teletext decoder makes the TV remote control unnecessary. Enjoy the digital sound over your Home Cinema system (AC3). Service <<<< Please specify service company >>>> 6 Warranty Warranty period for the digital cable receiver corresponds to the legal requirements at the time of acquisition. Declaration of conformity We declare that the product to which this declaration relates is in conformity with the basic requirements and other relevant instructions of the Standards 2004/108/EG and 2006/95/EG. The CE-symbol on the device means that the device is in conformity with the following guidelines: 7 Supplied accessories <<<< Please select the right remote control and delete the other >>>> 2 1 Scope of supply: 3 Receiver, remote control, 2 batteries, user guide, power supply 1= user guide 2= remote control 3= 2 batteries for the remote control (Type „AAA“ 1.5 Volt) Description of remote control Note: Some buttons of the remote control have no function, because the remote control is used for multiple device models. 8 1 Stby. „STAND-BY“ Power and switching the device to stand-by mode. 2 1-9 ; Select channels directly or enter digits in menus. 3 AV Without function at the moment. 4 Mute Mute. The sound is completely turned off. 5 0 Enter digits in menus. 6 List In a standard mode the status information will be showed. 7 EXIT Exits menus. 8 UP Select the next higher program. Move in menus up. 9 OK In a standard mode the channel list will be showed. This button also opens or confirms different menu positions. 10 LEFT Decrease the volume. Also move to the left in menus. 9 11 RIGHT Increase the volume. Also move to the right in menus. 12 DOWN Select the next lower program. Move in menus down. 13 Info Press this button in a standard mode to show information about the current program. If you press the button again, you will get an overview of all programs of the channel that are broadcasted at this day. 14 Swap Update/ change to the program that you chose last. In some menus you can affirm functions with this button. 15 EPG Access the EPG grid. 16 TEXT Show teletext. This button also has different functions in the settings menu. You can see which function it has in a help menu. 17 PVR In standard mode without function. Some functions in the settings menu, the function is displayed in help menu. . 18 Option Options switching for different operators. It is a function that is additional to the selection of audio or subtitle standard. 19 Play Play or show the recordings survey. 10 20 Pause A button to pause and resume time shift, if an external data carrier is connected. 21 FR Gradual (2/4/8/16/32/64 at a time) fast rewind if you press the button repeatedly. Press Play button to play the recording again. You can find more instructions in the online help function of the screen menu. 22 FF Gradual (2/4/8/16/32/64 at a time) fast-forward of the video if you press the button repeatedly. Press Play button to play the recording again. You can find more instructions in the online help function of the screen menu. 23 SkipR During playback this button returns to the skip value pre-selected in PVR/mass storage. 24 SkipF During playback this button returns to the skip value pre-selected in PVR/mass storage. 25 Stop Stop the recording or playing of the video. 26 Timer Show the timer menu. You can see here what timer are programmed. 27 REC Start manual recording. 11 28 Files Show recordings survey. 29 TV Switch the device to the TV mode. 30 Menü Show the receiver menu to reach the receiver settings. 31 Radio Switch the device to the radio mode. 32 Format Manual change of screen format. Description of the rear panel of the device 1 = Cable (RF) input 2 = Cable (RF) loop output 3 = Service button 4 = External infrared port. The corresponding receiver is available. 5 = HDMI port. Connect it to your screen. 6 = USB. Port for external storage media such as hard drive or USB flash drive. On this connection you can also update software and program lists. The used storage device needs to be formatted with FAT32! 12 7 = Analogue audio/video port for 3.5mm TRRS connector (adaptor cable available) 8 = S/PDIF Digital audio output , optical (AC3) 9 = S/PDIF Digital audio output, coaxial (AC3) 10 = Network port 11 = Power port 12 V / 2A for external power supply Overview of all connections Connection to TV- and Video devices The device has different types of video/audio outputs with different signal types and quality. Video and audio signal in the best digital quality are provided at the HDMI port. Use this port if your TV also has one. You can choose the resolutions 576i / 576p / 720p / 1080i and 1080p in the receiver menu. Choose the one that is recommended for your TV. If your TV supports CEC Standard, you can operate the receiver with TV remote control. TV manufacturer rarely use the name CEC, they use instead manufacturerspecific names such as Anynet, Easylink and so on. The supplier of your TV should have this information. 3.5mm TRRS connector provides only composite video (FBAS) and audio signals. Please use only an adaptor cable with TRRS connector and composite cinch or SCART end. Use this for devices with simple audio/video input, for example if you want to install a video or DVD recorder. If this device has another connection plug, so you can get corresponding adaptors in the specialized trade. Connection to Hifi-System and PC If your amplifier or Dolby-Surround-Decoder have an optical or electrical digital input, connect an appropriate SPDIF port over a suitable cable to the digital input on your amplifier or Dolby-Surround-System. You can enjoy Dolby-Digital-Surround-Sound – AC3 in your Home cinema only over these ports. But it is necessary that the chosen program supports this standard. To update the receiver software you can transmit it via USB. 13 Installation and basic settings The device is already programmed in an optimal way when you get it, so that you hardly need to do operations described here. We recommend you to do extensive changes of the device with the help of your specialist supplier if you do not feel confident. You get detailed information about chosen settings in all menus. After you plugged the device in the way it was described above, please choose the corresponding HDMI-input on TV, that you have chosen. At first turn the receiver with the main power switch on the rear panel on, and then with the remote control. The device should start with program number 1. If everything is connected in a right way and the receiver meets all the parameter, then you should see the set program now. You do not really need to make any other settings, if factory settings are ok for you. Please check the cabling between the device and the outlet. General options MENU > Main menu >Edit Settings > General Options In the following menus you can define the basic settings for your device. The factory settings are set for England. But you can change them here according to your wishes. Time settings: Press „OK“ key to open the sub menu „Time and settings”. OSD language: You can select the language you want to apply in menus. Preferred audio language: Some channels offer programs in different languages. You can select here your primary desired language of the audio. You can also choose the language for a current program by pressing the blue button on the remote control. 14 Second audio language: If your selected primary audio is not available, then the language you select here will be your second choice. Preferred subtitle language: Some channels offer programs with subtitles. Here you can select your desired language of the subtitle. You can also change the subtitle language in a current program individually. Second subtitle language: If your selected primary sibtitle is not available, then the language you select here will be your second choice. CEC control: Select if you want to use the receiver with a TV that supports CEC Standard. See the following note about CEC. If your TV supports CEC Standard, you can operate the receiver with TV remote control. TV manufacturer rarely use the name CEC, they use instead manufacturerspecific own names as you can see in the following list. The supplier of your TV or the TV user guide should have this information for you. Many manufacturers use their own brand names for HDMI-CEC. T-Link by ITT EZ-Sync by JVC Simplink by LG Digital Link HD by Loewe NetCommand for HDMI by Mitsubishi RIHD (Remote Interactivity) by Onkyo Viera Link by Panasonic EasyLink by Philips Kuro Link by Pioneer Anynet+ by Samsung Aquos Link by Sharp Bravia Sync by Sony Regza-Link by Toshiba I-Link by Yamaha TechniLink by Technisat CSTLink by Coolstream Standby Mode: Choose here if you want the power-saving stand-by mode to be activated. 15 This device with stand-by power consumption < 1 Watt meets the latest energy guideline 2005/32/EG (European Directive). This new guideline also demands that the device switches automatically to stand-by in 3 hours, if the program has not been changed in this period. This is no technical disorder but a component of the new guideline. If you do not like this function, so you can deactivate it. (Power-saving mode „Off“) But we recommend you to have this function activated to save power. If power-saving mode is on, so the LED display turns in stand-by completely off. In normal stand-by mode it shows current time. If the timer is programmed for a recording, so the device does not go completely down and current time is showed in stand-by darkened in the display. Time settings If you use the device in Germany, so you do not really need to change something in this menu. You can make changes you need if you use the device somewhere else. Time update will be carried out by data signals of TV programs if you activate the menu item. Audio / Video setup The parameters of the following menu are already set in a way they are used mostly. But you can also change them in a desired way. 16 Display format: You can select display format here. Choose according to your TV the setting 16:9 or 4:3. Scaling method: Choose the way how a signal that is not transmitted according to your TV format should be represented. HDMI signal: Select what display resolution should be transmitted over HDMI output. Since there are channels with different resolutions, you should choose here the setting that produces the best image. Signals with a higher resolution will be downscaled then and signals with a lower resolution will be upscaled. HDMI Audio: Select the desired audio standard over HDMI. Brightness: Define image brightness. Contrast: Define image contrast. Saturation: Define color saturation. Digital audio output: Select audio standard that will be a priority for digital output. This setting can also be set individually by pressing the button “Option” on the remote control. Lip sync mode: When needed you can set the so called lip synchronization here, if video and audio are not synchronized. 17 OSD Setup OSD display time: Define how long status information will be showed on the screen after you changed the program. OSD transparency: Define the OSD transparency. Radio Stillpicture: Select if the picture that is saved in software should be showed in radio mode. Mass storage utilities If you use an external storage medium to record or play audio or video, so you can make some basic setup of the medium in this menu. The green progress bar and the data below show you how large is the storage medium and how much space is already occupied. PVR skip time: When playing video or audio you can use the Skip buttons on the remote control to jump forwards or back. Define here how far you should jump forwards or back by pressing one of these buttons once. Timer lead time: If you program a timer by means of EPG, so the data from EPG will be used to program the recording. In „Timer lead time“ and „Timer follow-up time“ you can define amount of time that will be added to starting and ending time. In this way you will ensure that if a program starts earlier or ends later it will be recorded in a proper way. 18 Timer follow-up time: See „Timer lead time“. Rename selected device: The connected storage device has a name and here you can change it. Format selected device: Format the connected storage device. Please note that in this case all data in the storage medium will be irreversibly deleted! Factory settings With this function you can restore factory settings. All settings that you made before will be deleted then. All timer setup will be deleted as well. Only the channel list will not be changed if you wish that. After clicking on the menu „Restore factory settings“ you will be asked if you want to restore the factory settings. You can click “OK” to restore factory settings or also to delete the channel list with a red button. 19 File viewer File viewer shows you all the data that is on the disk. You can navigate between files and folders the way you do it on PC. You can also start playing each of them by clicking “OK” on them. MP3 Player If there are some MP3 files (music) on the disk, so you can start MP3 player by clicking „OK“ when one of the titles is marked and so confirm it. Now MP3 player window will be opened. You can see there the name of the song, the singer and other information. In the bottom of the window you get hints on how to navigate. You can change the volume if MP3 player is active by pressing the Skip buttons. 20 Image viewer If there are some JPEG files (pictures) on the disk, so you can start the image viewer by clicking „OK“ on one of the files. Now the image viewer window will be opened. In the bottom of the window you get hints on how to navigate. By pressing the button “Play” you will start slideshow. Before the slideshow starts some play options will be showed. Systeminfo With this function you can see information about the device and its software on the screen. In case of questions during service, you have all the information about the device that you need. 21 Software update The device will be developed also in the future and you can get from time to time new software versions for your device. There are two options for it. You can get information about new and currently available updates on our website. You can also download there these updates. Save the update on USB flash drive. After you plugged the USB stick in the receiver in, please open the menu “Software update” and confirm “Update from file”. Then choose the software and start update with OK button. If your device is connected to Internet, so you can also make update over Internet. Tuner information This menu displays the technical parameter and data of selected transponder. This is for information only and no adjustments are required. The quality of the received signal is also displayed. 22 Stream information Here you will find technical parameters and information about the selected channel. This menu only gives you information and does not need to be setup. Network information Here you will find technical parameters and information about the connected network. This menu only gives you information and does not need to be setup. 23 System setup Over the menu „System setup“ you can carry out a guided installation to fit the antenna parameter. For that please choose the menu “Antenna and program setup” at first. There you can also open the menu to export the data (channel list) or to import existing list from the USB flash drive. 24 Network settings In network settings you can define network parameters manually. Since the most networks have the so called DHCP server, the menu item „DHCP“ should be enabled. The same applies to the DNS settings. Webradio If your receiver has a LAN internet connection, then you can listen to the web radio programs (Internetradio) with your receiver. So you can listen to a wide range of internet radio stations. This function will be enabled over the menu “Extras web radio“. Mark a web radio program from the list and press the button „OK“. After the receiver has got the connection to internet, you can hear the sound over TV and audio outputs (that are connected to your music system for example). Please note that your internet connection must be fast enough, it needs some time to set up the connection and not all web radio programs broadcast 24 hours a day. If there are some problems with network, please contact your network operator. You can change volume with Skip buttons in an active mode. 25 Timer list You can see in timer list which programs are already programmed for recording. With „OK“ button you can edit the list. With the red button you can delete the programmed events off the list. After the program has been recorded, the event will be deleted automatically off the list. Channel Scan In the menu “Scan for channels” the receiver scans for new channels. The receiver stores a transponder list consisting of valid frequency and modulation parameters. Three different scan methods are available: Blind This scan mode builds a new internal transponder list and scans the signal for available carrier frequencies. This is necessary if your TV operator changed (added or removed) transponders. If unsure, always use this option. Auto This scan mode uses the internal transponder list and scans each frequency for available radio and TV channels. This is recommended if your TV operator did not change his transponders. Channel This scan mode allows a manual scan with parameters frequency, symbol rate and modulation type. 26 Select also in menu “kind of service” the different types of channels the scan should consider. All Services All services, TV and radio, unencrypted should be scanned. encrypted and Only FTA Only unencrypted TV and radio services should be scanned. Only encrypted services Only encrypted TV and radio services should be scanned. Service list editor Here you can edit the service list and also move, rename, delete and add to favourites services from the list that you want. Select a favourites list with the blue button (the favourites list 1 is already chosen here). Mark a service in the list of TV services to add it to the currently opened favourites list by pressing the “OK” button. If you also want to add the next service to the favourites list, then press again „OK“ button. Do the same way for all your favourite services in the list. Select with the „Swap“ button, if you like to edit the TV services list or a favourites list. Mark the service you want to edit. Now you can move this service with the buttons FR and FF in the list or rename it with the yellow button or delete it from the list with the red button. By pressing the green button you can sort the list in alphabetical order. 27 Day-to-day usage Some functions can be taken directly from the description on the remote control. Power on the device using the power button on the back. Then you can activate it using the remote control or the standby button on the front. After that make sure you switch to the HDMI input that was used to connect your signal to. Adjust volume Be aware that changing the volume will also affect recordings on external recorders. (However recordings onto the hard drive will not be affected.) To avoid this, adjust the volume directly on your TV. To mute the sound, press the "Mute" button. Press the "Mute" button once more to unmute again. In order to increase the volume press the "RIGHT ►" button. To decrease press the "◄LEFT" button. The sound level will be indicated by bar on the screen. TV and Radio receiver setup To switch to radio press the "RADIO" button. A note symbol next to the channel number indicates that you are in RADIO mode. To return to TV mode press the "TV" button. Choosing a program Your receiver is already pre-programmed to some common channels. To switch to the next program press the "UP ▲" button. To switch to the previous program press the "DOWN ▼" button. To directly jump to a specific program enter the number of it on the number field and wait two seconds or press the OK button. To return to the previously active program, press the "SWAP" button. If you want to select a program using the program list simply press the OK button when currently no other menu is open and you are watching a program. You should see the program list. 28 To select a program repeatedly press the "UP ▲" or "DOWN ▼" button until the desired program is highlighted. Press the OK button to switch to that channel. To cancel the process and close the program list without switching the channel press the "EXIT" button. You can page through the list more quickly by using the left and right buttons. On the first two lines you can see if and what is being recorded. During the running program you can press the "List" button to get the information bar that is also visible for a few seconds after changing to a new program. In the upper darker section you see the selected channel number and name. The "TV" symbol indicates that it is a TV program a 'note' indicates a radio. At the top right you can see the current time. If this program is currently being recorded it will be indicated by a red dot. The lower section you can see the current and following program. The bar indicated the progress of the current program. Small icons at the right indicate if the program is in HD, has subtitles and/or videotext. Press the INFO button to get more details information about the current program. 29 Press the INFO button a second time to get an overview over the full schedule of this program. Use the arrow buttons to navigate through the list and days. Favourite lists As already described you can save up to 10 favourite lists. While being within the channel list you can press 0-9 to select any of them. To return to the normal list press the red button. Teletext The teletext content changes from channel to channel. Select a Channel from which you want to see the teletext content. To open the teletext press the yellow "TEXT" button. To close it again press the „EXIT“ button. The current page number and page number you are currently trying to get will be displayed above the teletext. Enter the number of the desired page using the number buttons. Alternatively you can page trough the content using the arrow keys. Some pages are divided into subpages which will be displayed in the last line using 01 02 ... You can page trough them using the arrow keys. 30 Radio text Your device will automatically display additional information provided by the radio station. This can for example be the title or author of the current song. Start a recording If you have connected an appropriate data carrier to the USB-port, then you can record programs. There are two ways to start a recording: manually while the program is running or by timer recording. If you want to record a running program press the button „Rec“ on the remote control at first. The following window opens. The running program data will be used. You have also the opportunity to edit all this data now if you want. Select the position you want and press the button „OK“ to change the position. Press it again to use the preset or modified data. While recording you cannot watch another program, because this device has only one tuner. But you can watch another program on the same transponder. The programs that can be watched are presented dark in the service list and the programs that cannot be selected are light-coloured. You can record two programs at the same time on the same transponder. The running records will be showed at the top of the service list. 31 Record using EPG You can also use EPG for purposes of recording. Press the INFO button twice. The following window should open. Press cursor keys to select the program that you want to record with the help of timer. If the corresponding entry is darkened, so press the „Menu“ button to use the data in the timer. Then the window opens like for the manual recording and you can edit the used data. By pressing the button „Rec“ you will use the data in the timer list. Positions that are already programmed will be shown in red. Time shift Time shift makes it possible to stop the running program every moment (if a suitable USB hard disk is connected) and then to continue watching the program after a short break just at the same spot where you have made a break without missing any content (for example to get a drink out of a fridge). The operation occurs mainly with the buttons and displays of the PVR function. Press the Pause button to stop the running program and Play button to continue the program at the same spot. The button „List“ will show you how large is the time shift to the running program. Since time shift is comparable to a normal recording, so you can change the program location, but only for the programs of the same transponder. You can exit the time shift mode by pressing the Stop button. Then the following window opens. 32 You can stop the recording now by pressing the Stop button. In this case the time shift recording will be handled as a normal recording and saved on the storage medium. If you do not want to save the recording, so press the red button to delete the recording directly. Playback of a recording If you want to watch a recorded program, press the Play button to open the following playback list. You can also open this menu by pressing the button “Files”. Here you can see all the data that was recorded. Select by pressing the cursor keys the desired recording and start playing the recording by pressing „Play“ or „OK“ button. If you have already watched a part of the recording and made a pause, then you will be offered to continue to watch at the spot where you made a break. If you have opened the playback list, so you can go to file viewer directly by pressing the blue button. There you can open the data directly such as MP3 or JPEG for example. While playing the recording you have the same options as when using a video recorder or DVD player. You can fast forward and fast rewind with the appropriate buttons, use skip buttons and use the pause button. You can delete the data by pressing the red button and rename the data with the yellow button. 33 Cleaning and maintenance WARNING! Before cleaning the device you must first unplug it. No water or moisture or other liquids should come into the device. Otherwise there will be a risk of electric shock. Clean only with dry soft cloth. You should not use chemical cleanser, because they can damage the surface of the device and/ or labels and descriptions. Instructions for environmental protection Please follow the disposal instructions in the input description of these instructions. Consumer electronics consume some power also in stand-by mode. You can save power, if you turn off the power switch of the device on the rear panel if the device will be unused for long periods of time. Please note that programmed timer recordings will not start if the device is completely turned off. You can see if the timer is programmed on the sign on the front display. Unplug this device during lightning storms or when unused for long periods of time. The programmed parameters do not get lost if the device is switched off. 34 35 <<<< place your logo here >>>> User manual Panaccess P1000 HD, last changed 26.01.2012