1
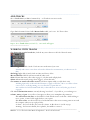
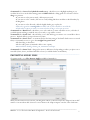
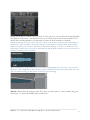
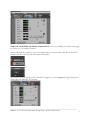
Using ProTools 10
with directions for Reaper, too
______________________________________________________________________________
The Hub (301 Swan Hall)
The support staff at the Hub are not trained in ProTools, so you may have to use the help files / user manual
from time to time. If you are stuck, send me an email.
When you arrive at the computer lab, you’ll need to exchange your student ID for an iLok (USB key). Plug
that into the computer and open ProTools. (If the iLok is not plugged in, you’ll get an error message since
the required license is stored on the iLok).
I recommend using keyboard shortcuts whenever possible. You can access a list of them from the main
course website.
______________________________________________________________________________
START A NEW SESSION
•The quick start box should open; if not, go to File – New Session, to see the window below.
•Enter these settings and click OK.
*If you’re using a PC, choose BWF (.WAV) instead, since AIFF is a Mac-only file type.
•Save as: Enter your file name
Where: Choose your USB drive
When you create a session, it creates an entire folder (this one is called “tutorial”) and subfolders shown
below to keep your files organized.
___________________________________________________________________________
MUS421–571.1: Electroacoustic Music Composition – ProTools 10 Tutorial
1
/////////////////////
Reaper opens a new session automatically when you open it. Or try File–New Project (Cmd+N)]
/////////////////////
•The edit window will open and look like this. If it disappears for any reason, try hitting Command+=
*You can close the extra transport window that appears (with playback functions shown above under the
“Window” menu)
/////////////////////
Reaper edit window looks like this
/////////////////////
___________________________________________________________________________
MUS421–571.1: Electroacoustic Music Composition – ProTools 10 Tutorial
2
______________________________________________________________________________
ADD TRACKS
•Go to Track–New (or Shift+Command+N) – we’ll make 8 new mono tracks.
•Choose the settings above.
•Type Shift+Command+N and add a Master Fader while you’re at it. We’ll use it later.
/////////////////////
Reaper: Go to Track–New (or Cmd+T) – a new track will appear
/////////////////////
______________________________________________________________________________
WORKING WITH TRACKS
•To change the vertical track size, click the tiny arrow button to the left of the track name.
•Renaming: Double click “Audio 1” and enter new track name if you want.
*Usually makes more sense when each track is dedicated to an instrument, so I almost never do
this).
•Deleting: Right-click (Conrol+click on a Mac) and choose delete.
•Record Enable: Click the red button with the white circle.
•Solo: S button that turns yellow when engaged – only that track will play back
•Mute: M button that turns orange when engaged – mutes that track
•To unmute or unsolo all tracks at once, hold down Option while you click the S or M
*Holding Option also works with other buttons to “apply to all tracks”, like to see all the volume
curves at once, or all the panning, or to set all tracks to a particular size.
*Be careful not to hold Command and click, as that will freeze it on or off (looks greyed out if
engaged)
•The view/automation menu is currently showing “waveform” – if you click it, you can change it to
volume, mute, and pan. You will see a line appear to allow you to manipulate the parameters.
•To add a dot to the line: use the Hand Tool and click the mouse on the line. Hold and drag to
move a point. Control+click (right click) to erase a point.
•To draw a line: use the Pencil Tool (avoid freehand since that creates so many points it can crash
the computer when you try to play it back).
•Volume – the lower the line, the lower the volume. 0 dB is about 2/3 of the way up.
•Panning – the bottom is hard R, the top hard L, the middle is centered.
___________________________________________________________________________
MUS421–571.1: Electroacoustic Music Composition – ProTools 10 Tutorial
3
/////////////////////
Reaper track controls look like this
•To change track size: Click the + or – signs below the vertical scroll bar on the far right border of the
window.
•Renaming: Right click and choose Track Manager (or Shift+Cmd+M) and rename there.
•Deleting: Click the track and hit delete.
•Record Enable: Click the red bulls-eye in the top left of track controls
•Solo / Mute: see above
•The view/automation menu is accessible by clicking the envelopes (^) button left of “input 1”
•You may also hit v to see the volume envelope, p for panning
•To add a dot to the line: click your cursor where you want the dot, right click and choose
Create new point; move with cursor
/////////////////////
______________________________________________________________________________
CURSORS / TOOLS
•Command+1 = Zoom Tool (magnifying glass)
I find it easier to hit Command+] (bracket) to zoom in, Command+[ to zoom out and never use this
•Command+2 = Trim Tool (arrows) – if you click this more than once there are other versions.
If you drag the end of a sound file with the trim tool, it will hide/extend the audio and play back
accordingly. You can always drag it back later if you need to change it.
•If you type Command+2 again, it will toggle forward to the TCE version with a little clock over
the arrows – dragging the edge of the sound file will change the length of the file, creating time
compression or expansion.
___________________________________________________________________________
MUS421–571.1: Electroacoustic Music Composition – ProTools 10 Tutorial
4
•Command+3 = Cursor Tool (shaded sound wave) – this allows you to highlight anything as you
would in Word. You can click the starting point and Shift+click the ending point of a selection as well as
drag over portions.
•If you want to select just one track, click in just one track.
•If you want to select 2 tracks, click once in each, holding shift down and then set final boundary by
clicking there.
•If you want to select all tracks, click the slightly darker grey top border.
*This tool is great for creating fades on either end of your sound file to avoid clicks.
*Click on the location you want to zoom in on before doing so to keep it on screen.
•Command+4 = Hand Tool – this allows you to select and move entire sound files at once, as blocks. If
you hold Option and drag a sound file onto a new track, a copy will be created.
•Command+5 = Scrub Tool – this will allow you to click and drag your mouse over a sound file to hear a
preview. Playback follows your speed/mouse location.
•Command+6 = Pencil Tool – as mentioned before the first setting is “freehand” which can use too much
CPU, so Command+6 twice to get to the straight line pencil tool.
•Click and drag to draw lines.
•Click to add a point. (Command+click to erase a point).
*Most useful for drawing volume, pan, automation envelopes.
•Command+7 = Smart Tool – changes the cursor to different tools depending on where you place it on a
sound file (Trim, Cursor, and Hand will all be selected, as will the border around them).
______________________________________________________________________________
IMPORTING AUDIO FILES
•To import audio, go to File–Import–Audio (or Shift+Command+I)
•Find your files in the browser window. Clicking them will move them down into the “Clips in Current File”
window. You must then click “Convert” to move them to the “Clips to Import” window. Then click Done.
___________________________________________________________________________
MUS421–571.1: Electroacoustic Music Composition – ProTools 10 Tutorial
5
•It will ask whether you want your tracks to go to new tracks or the Clips window – choose the Clips
window (which is the far right column, aka the library) – if it’s hidden, click the arrow with the line in the
bottom R corner.
•To preview a sound, hold down the Option key (the cursor will change to a speaker) and then click and
hold on a name in the clips window to hear it.
•Drag clips onto any track.
*Mono files will only go on mono tracks, stereo on stereo (or will split into two mono tracks).
*If you want only one half of the stereo track, you can click the little arrow left of the clip name in
the library and it will expand to show both the L and R.
•To rename a file, double-click it with the Hand.
/////////////////////
•Reaper Import audio: Place cursor where you would like the file to appear and choose Insert–Media file
•Clip window in PT = Media Explorer in Reaper. To view choose View–Media Explorer
(Opt+Cmd+X)
•Rename – double click
/////////////////////
______________________________________________________________________________
PLAYBACK
•To play back your mix, hit the Spacebar.
•To stop playback, hit the Spacebar. Normally, the cursor will return to the start of the playback.
•To move cursor to beginning of file, hit the Return key
*If you want the cursor to move to where you stopped (useful when editing), go to Setup–
Preferences–Operation tab–Timeline Insertion/Play Start Marker Follows Playback
(check the box, it’s first in top left corner under Transport).
/////////////////////
•Playback start in Reaper is also Spacebar. It will stop and start from the same place if you hit Spacebar
again. To stop/pause during playback, hit Return.
•To move cursor to beginning of file, hit w
/////////////////////
______________________________________________________________________________
THE CANVAS
•In the top left corner of the edit window, there is a grid of four words: Shuffle, Spot, Slip, Grid.
•SLIP: You’ll usually want to work in “Slip” mode where you can move items along the time scale in
infinitesimal increments.
•GRID: This snaps all sound files/data points to a grid, determined by what you set the increment to be.
Just left of the playback controls you’ll see the word Grid lit up in green. Click the down arrow right of the
numbers to change the spacing of the grid lines.
/////////////////////
Reaper has an auto-snap button (top left of window) that toggles on (grid) and off (slip)
/////////////////////
___________________________________________________________________________
MUS421–571.1: Electroacoustic Music Composition – ProTools 10 Tutorial
6
______________________________________________________________________________
DSP – AUDIO SUITE (affect one sound file)
•To apply an effect to a single sound file, select a file with the Hand Tool and go to Audio Suite
•Other–Normalize
•Other–Reverse
•Pitch Shift–Pitch Shift
•Other–Time Compression / Expansion (also can be done with Trim Tool showing clock,
drag edge of file to desired length)
•Click the preview button (little speaker icon in red below) or Render to save the new processed file.
*Bypass turns off the effect (this also appears on plug-ins/inserts)
/////////////////////
•Normalize – right click, Item Processing–Normalize (or Shift+Cmd+N) – only does 100%
•Reverse – right click, Reverse Items as New Take
•Pitch Shift – click the FX button in the track control menu, choose ReaPitch
•Time Compression / Expansion – Hold Opt and drag edge of file to desired length
/////////////////////
______________________________________________________________________________
DSP – INSERTS, aka PLUG-INS (affect an entire track)
•The inserts show up on the left side of each track (red box). If you don’t see them, click the icon outlined
in orange and make sure “Inserts A–E” is checked.
•Click one of those grey rectangles below “Inserts A–E” and choose plug-in to see a list of categories
containing various effects.
*Be sure to choose a mono effect if you’re working with a mono track
•REVERB: Click an insert–plug-in–reverb–D-Verb and this window should appear.
___________________________________________________________________________
MUS421–571.1: Electroacoustic Music Composition – ProTools 10 Tutorial
7
•Change the parameters of the reverb as you wish. To hear a preview, solo your affected track and playback
the region you want to hear. (You may also choose not to solo the track to hear the effect with the rest of
the mix, but it will be important to solo that track to bounce the file down with reverb added).
*When bouncing down reverb or delay, the effect will often extend the sound beyond the end boundary of
the file itself. Listen carefully to where the sound stops (watch the meter at the left in the track controls)
and be sure to place your selection end point beyond that time marking. To do this, use the hand to select
the file itself, switch to the selector cursor, hold shift and click the point at which you want your selection to
end before bouncing your reverbed file.
*If the sound behaves unexpectedly, check your volume and panning lines to be sure they are as you want
them to be. The example below shows an extra volume point that ProTools automatically added at the end
of the sound file resetting to 0 dB, which I would erase before bouncing.
•DELAY: click the Insert box–plug-in–delay–then choose one of the options… short, medium, long, and
other delays. I’ve shown the medium delay controls below.
___________________________________________________________________________
MUS421–571.1: Electroacoustic Music Composition – ProTools 10 Tutorial
8
TURN OFF YOUR PLUG-INS WHEN YOU’RE DONE! It uses a lot of CPU power and too many plugins open at once can crash the computer.
•After bouncing down your file be sure to turn off the plug-in so it doesn’t affect other files on your track.
Click the little dot to the left of the insert name under inserts
and choose no insert.
•If you want to keep your plug-in open to use those settings later, you may bypass the plug-in instead so it
doesn’t affect the audio files on your track.
/////////////////////
___________________________________________________________________________
MUS421–571.1: Electroacoustic Music Composition – ProTools 10 Tutorial
9
In Reaper, the plug-ins are accessible by clicking FX on the left side of the track.
You will then see an empty window with “Add” and “Remove” at the bottom. Click “Add” and you will see a
list of available plug-ins.
For delay, choose ReaDelay, for reverb, ReaVerberate.
Adjust your settings as desired, solo the track, select it and however much extra time beyond it that the
sound continues, and render to save your new effected sound file.
•To bypass the effect, uncheck the box in the upper right corner of the effect.
______________________________________________________________________________
BOUNCING DOWN (condensing your mix or any tracks into one file)
•Be sure to select exactly the time frame you want recorded to disk.
•Be sure that the appropriate solo buttons are engaged if you don’t want all the tracks to bounce down.
•When that is complete, click File–Bounce to–Disk (or Command+Option+B)
___________________________________________________________________________
MUS421–571.1: Electroacoustic Music Composition – ProTools 10 Tutorial
10
•If you’re bouncing a file down to be used in your session, use the above settings.
______________________________________________________________________________
•If you’re bouncing your final mix down to a stereo file, you’ll want to choose these.
*When bouncing your final mix, use the Hand Tool to select the first sound file, hold Shift and select the
very last sound file. Those two tracks will be highlighted. As long as the rest of the tracks are playing back
(not muted) the entire timeframe selected will bounce down appropriately without having to select them
with your mouse
•Name your new file and click OK.
*You can always use Shift+Command+I to import audio if you forget to click “Import After Bounce.”
/////////////////////
Select time frame and manage output (solo), then click File–Render or (Cmd+Opt+R) – name file and
click Render 1 item
/////////////////////
______________________________________________________________________________
BACKING UP YOUR SESSION
___________________________________________________________________________
MUS421–571.1: Electroacoustic Music Composition – ProTools 10 Tutorial
11
Because ProTools creates a directory structure within a folder (Audio Files, etc.), please be sure to go through each folder one by
one and copy over new files. I sort by date so it’s easy to see which files are new and need to be copied.
*When working on a larger piece, I like to save each day’s work as a new file “Name-day-month” so I can go back to an earlier
version if I decide I didn’t like the direction it went. The .ptx files are fairly small, so it won’t use all your drive space.
/////////////////////
Reaper puts all the files in one folder.
/////////////////////
ZIPPING YOUR SESSION
Find the folder associated with your ProTools, Logic, or Reaper session (it will have the same name as your session file) in Finder,
right-click (or CTRL+Click) it and choose “compress”. If you just send the .ptx, .logic, or .rpp file, there will be missing audio
files when I try to open the session.
/////////////////////
Read above. Same for Reaper.
/////////////////////
___________________________________________________________________________
MUS421–571.1: Electroacoustic Music Composition – ProTools 10 Tutorial
12