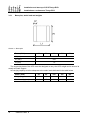
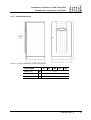
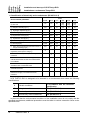
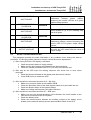
1
OPERATING MANUAL UPS
MANUALE OPERATIVO UPS
THETYS EVO 60–80–100–125–160kVA
OPERATING MANUAL UPS
MANUALE OPERATIVO UPS
Index of sections/Indice delle sezioni
Code/Codice
1 – WARNINGS AND GENERAL INFORMATION
AVVERTENZE E INFORMAZIONI GENERALI
2 – INSTALLATION AND START-UP OF UPS THETYS EVO
INSTALLAZIONE ED AVVIAMENTO
3 – UPS USER MANUAL
UTILIZZO DELL’UPS
Rev.
A
B
Descrizione
Description
Emissione
Added English language/Aggiunta lingua inglese
OMD10011
OMD10013
OMD10012
Data
Date
Emesso
Issued
Controllato
Checked
Approvato
Approved
Lingua
Language
Pagina
Page
18.11.10
21.12.10
G. Senesi
F. Berti
V. Gremoli
M. Mancini
V. Gremoli
V. Gremoli
E/I
1
di Pag.
of Pag.
1
Codice / Code
OMD10010
Warnings and general information
Avvertenze e informazioni generali
WARNINGS AND GENERAL INFORMATION
AVVERTENZE E INFORMAZIONI GENERALI
Index / Indice
ENGLISH LANGUAGE ............................................................................... 3
1
CONVENTIONS USED ........................................................................ 4
2
DOCUMENTATION NOTES ................................................................ 5
3
CONTACTS ......................................................................................... 5
4
FACTORY WARRANTY ...................................................................... 6
5
LIMITATION OF LIABILITY ................................................................ 8
LINGUA ITALIANA ..................................................................................... 9
1
CONVENZIONI UTILIZZATE............................................................. 10
2
NOTE SULLA DOCUMENTAZIONE ................................................. 11
3
CONTATTI ......................................................................................... 11
4
GARANZIA DI FABBRICA ................................................................ 12
5
LIMITAZIONE DI RESPONSABILITA’ .............................................. 14
Rev.
A
B
Descrizione
Description
Emissione
Added English language/Aggiunta lingua inglese
Data
Date
Emesso
Issued
Controllato
Checked
Approvato
Approved
Lingua
Language
Pagina
Page
18.11.10
21.12.10
G. Senesi
F. Berti
M. Mancini
M. Mancini
V. Gremoli
V. Gremoli
E/I
1
di Pag.
of Pag.
14
Codice / Code
OMD10011
Warnings and general information
Avvertenze e informazioni generali
2
OMD10011 REV. B
Warnings and general information
Avvertenze e informazioni generali
ENGLISH LANGUAGE
OMD10011 REV. B
3
Warnings and general information
Avvertenze e informazioni generali
Thank you for choosing an Astrid Energy Enterprises product. This section of the manual
contains indications regarding the symbols used in the UPS documentation as well as basic
information about the product, including the factory warranty terms.
1
CONVENTIONS USED
The following symbols have been used to indicate potential dangers and to highlight useful
information, so as to minimize the risks to persons and property.
HAZARD
“HAZARD” statements contain characteristics and basic instructions for the safety of
persons. Non-compliance with such indications may cause serious injury or death.
WARNING
“WARNING” statements contain characteristics and basic instructions for the safety
of persons. Non-compliance with such indications may cause injury.
CAUTION
“CAUTION” statements contain characteristics and important instructions for the
safety of things. Non-compliance with such indications may cause damage to
materials.
NOTE
“NOTE” statements contain characteristics and important instructions for the use of
the device and for its optimal operation.
4
OMD10011 REV. B
Warnings and general information
Avvertenze e informazioni generali
2
DOCUMENTATION NOTES
Storing documentation
This manual and any other supporting technical documentation relating to the product
must be stored and made accessible to personnel in the immediate vicinity of the
UPS.
Further information
In the event that the information provided in this manual is not sufficiently exhaustive,
please contact the manufacturer of the device, whose details are available in the
“Contacts” section.
3
CONTACTS
For any information about the UPS systems manufactured by ASTRID, please contact:
Astrid Energy Enterprises S.p.A.
Viale Europa, 22
52018 Castel San Niccolò
AREZZO
Tel. 0575 509701
Fax 0575 500032
[email protected]
www.astridups.it
For help with technical problems or for information concerning device use and maintenance,
please contact the technical help service by phoning the above-indicated telephone number,
specifying the following data:
Type of device and its nominal power
Serial number
Error code, if applicable.
OMD10011 REV. B
5
Warnings and general information
Avvertenze e informazioni generali
4
FACTORY WARRANTY
The factory warranty provided by Astrid Energy Enterprises S.p.A. is called “Green Base
Warranty” and is subject to the terms indicated below.
Validity
a) The present warranty terms only apply to the UPS systems manufactured by Astrid
Energy Enterprises and to their storage batteries, when supplied by Astrid.
Duration
a) The factory warranty provided by Astrid Energy Enterprises S.p.A. has a validity of 12
(twelve) months from the
startup date of the UPS. The warranty expires at the latest
18 (eighteen) months from the purchasing date (invoicing).
General conditions
b) The execution of one or more repairs within the warranty time will not alter the original
expiry of the warranty.
c) If a unit is faulty and/or damaged within the time frame covered by the warranty, it will be
repaired or replaced with an equivalent or similar product.
Costs
a) The warranty covers all the costs resulting from repairs and/or spares to restore the
correct operation of the product covered by our factory warranty.
b) All other costs, particularly shipping costs, travel and accommodation costs for the
service personnel of Astrid Energy Enterprises S.p.A. for on-site repairs, as well as costs
for the customer’s own employees, will not be covered by the factory warranty and will be
charged to the end customer.
c) In case of service performed following a call made by mistake, or in case our technicians
incur extra time and/or costs due to the site inaccessibility or due to work interruptions
required by the customer, such costs will be invoiced in accordance with ANIE rates
CLASS III COLUMN B.
Modes required
a) In the event of a fault covered by the warranty, the customer shall notify Astrid Energy
Enterprises S.p.A. in writing of the occurred fault, providing a short description of the
fault.
b) The customer shall also provide documents showing the validity of the warranty
(receipt/purchasing invoice with serial number of the product – report indicating the startup date).
Service at the installation site
a) During preventive maintenance visits or emergency service, access shall be ensured to
the installation site, and the device shall be made available in order to ensure
maintenance or repair with no waiting time.
b) During the intervention, the customer’s representative must attend service operations at
the installation site, so that he/she may operate the control devices outside the
equipment.
c) In case entry permits are necessary in order to enter the installation site, Astrid Energy
Enterprises S.p.A. must be notified of the time necessary to obtain the documentation
required, if any.
d) In case of customer’s non-compliance, Astrid Energy Enterprises S.p.A. reserves the
right to refuse warranty service. Astrid Energy Enterprises S.p.A. will not accept any
product returned for repair or replacement without prior agreement.
6
OMD10011 REV. B
Warnings and general information
Avvertenze e informazioni generali
Exclusions
a) Our warranty does not cover the products which are faulty or damaged due to:
Transport,
Installation or start-up defects caused by the customer’s non-compliance with the
installation and use instructions provided by Astrid Energy Enterprises S.p.A.
Tampering, alterations or repair attempts made without the specific written approval by
Astrid Energy Enterprises S.p.A.
Damage caused by work done by personnel not authorized by Astrid Energy
Enterprises S.p.A.
Damage to the device caused by improper use, negligence, voluntary damage or use
of the device beyond the allowed limits;
Damage caused by external factors such as dirt, fire, flooding, failed operation of the
air conditioning system, etc.;
Non-compliance with applicable safety standards;
Force majeure (e.g. lightning, surges, natural disasters, fire, acts of war, riots, etc.);
Fall or displacement due to incorrect installation;
Ordinary wear caused by proper and continuous use of the device.
b) Protective devices inside the units (fuses and dischargers) are also excluded from the
warranty, unless the failure is due to component faults.
Responsibility
a) In no event shall Astrid Energy Enterprises S.p.A. be liable for direct or indirect damage,
or any damage whatsoever connected with the execution of warranty services (e.g.
possible voltage interruptions during the repair period or assembly and dismantling
costs), except for the cases provided for by mandatory laws.
b) The present warranty terms do not affect the purchaser’s mandatory rights as by law.
OMD10011 REV. B
7
Warnings and general information
Avvertenze e informazioni generali
5
LIMITATION OF LIABILITY
All the information contained in the present documentation is the exclusive property of Astrid
Energy Enterprises S.p.A. Written consent by Astrid Energy Enterprises S.p.A. is required in
order to wholly or partially publish or disclose this information.
The present manual constitutes an integral part of the product technical support
documentation. Read the warnings with attention, as they give important instructions
concerning safe usage.
The equipment must be destined exclusively for the use for which it was expressly
designed. Any other use is considered improper and therefore hazardous. The
manufacturer cannot be held responsible for possible damage arising from improper,
erroneous or unreasonable usage.
Astrid Energy Enterprises assumes responsibility for the equipment in its original
configuration.
Any intervention that alters the structure or the operating cycle of the equipment must
be carried out and authorized directly by Astrid Energy Enterprises.
Astrid Energy Enterprises will not be held responsible for the consequences arising
from the use of non-original spare parts.
Astrid Energy Enterprises reserves the right to make technical modifications to the
present manual and to the equipment without prior warning. Whenever typographical
or other errors are found, the corrections will be included in new versions of the
manual.
Astrid Energy Enterprises assumes responsibility for the information given in the
original version of the manual in Italian language.
8
OMD10011 REV. B
Installation and start-up of UPS Thetys EVO
Installazione e avviamento Thetys EVO
INSTALLATION AND START-UP OF UPS THETYS EVO
INSTALLAZIONE E AVVIAMENTO UPS THETYS EVO
Index / Indice
ENGLISH LANGUAGE ............................................................................... 5
1
SCOPE ................................................................................................ 6
2
SAFETY RULES AND WARNINGS .................................................... 7
2.1
UPS USE ...................................................................................................................... 7
2.2
THETYS EVO RATING ................................................................................................ 8
2.3
SPECIAL SAFETY WARNINGS .................................................................................. 9
2.3.1
General warnings ................................................................................................ 9
2.3.2
Personnel ............................................................................................................ 9
2.3.3
Transport and handling ...................................................................................... 9
2.3.4
Installation ......................................................................................................... 10
2.3.5
Electrical connection ........................................................................................ 11
2.3.6
Operation ........................................................................................................... 12
2.3.7
Maintenance ...................................................................................................... 13
2.3.8
Storage .............................................................................................................. 14
2.4
3
ENVIRONMENTAL PROTECTION ............................................................................ 14
2.4.1
ISO 14001 certification ..................................................................................... 14
2.4.2
Recycling of packing materials ....................................................................... 14
2.4.3
Device disposal ................................................................................................. 14
INSTALLATION ................................................................................. 15
3.1
RECEIPT OF THE UPS.............................................................................................. 15
3.1.1
3.2
Rev.
A
B
C
D
Storage .............................................................................................................. 15
HANDLING OF THE UPS .......................................................................................... 16
Descrizione
Description
Emissione
Added English language/Aggiunta lingua inglese
Correzione/Revision
General revision/Aggiornamento generale
Data
Date
Emesso
Issued
Controllato
Checked
Approvato
Approved
18.11.10
21.12.10
19.01.11
08.02.11
F. Gangi
F. Berti
F. Gangi
F. Berti
G. Senesi
M. Mancini
A. Mangani
M. Mancini
V. Gremoli
V. Gremoli
V. Gremoli
V. Gremoli
Lingua
Language
Pagina
Page
E/I
1
di Pag.
of Pag.
74
Codice / Code
OMD10013
Installation and start-up of UPS Thetys EVO
Installazione e avviamento Thetys EVO
3.3
4
5
POSITIONING AND INSTALLATION......................................................................... 17
3.3.1
Base plan, static load and weights .................................................................. 18
3.3.2
Overall dimensions ........................................................................................... 19
3.3.3
Minimum distances from the walls and ventilation........................................ 20
3.3.4
Environmental installation conditions ............................................................ 21
ELECTRICAL CONNECTION ............................................................ 23
4.1
TERMINAL BOARDS ................................................................................................. 26
4.2
CONNECTION OF POWER CABLES ........................................................................ 28
4.3
CONNECTION OF AUXILIARY CABLES .................................................................. 29
4.3.1
External manual bypass ................................................................................... 30
4.3.2
Diesel generator (DIESEL MODE) .................................................................... 30
4.3.3
Auxiliary battery contact................................................................................... 30
4.3.4
Remote emergency power off (EPO) ............................................................... 30
4.4
SERIAL INTERFACES ............................................................................................... 31
4.5
RELAY CARD CONNECTION (OPTIONAL) .............................................................. 32
STARTUP AND SHUTDOWN ............................................................ 33
5.1
PRELIMINARY CHECKS ........................................................................................... 33
5.2
START-UP PROCEDURE .......................................................................................... 34
5.3
BASIC TROUBLESHOOTING.................................................................................... 35
5.4
SHUT-DOWN PROCEDURE ...................................................................................... 36
5.5
SWITCHING PROCEDURE TO MANUAL BYPASS ................................................. 37
5.6
RESTART FROM MANUAL BYPASS ....................................................................... 38
LINGUA ITALIANA ................................................................................... 40
1
APPLICABILITA’ ............................................................................... 41
2
REGOLE E AVVERTENZE DI SICUREZZA ...................................... 42
2
2.1
UTILIZZO DEL DISPOSITIVO .................................................................................... 42
2.2
DATI NOMINALI THETYS EVO ................................................................................. 43
2.3
INDICAZIONI PARTICOLARI SULLA SICUREZZA .................................................. 44
2.3.1
Avvertenze generali .......................................................................................... 44
2.3.2
Personale ........................................................................................................... 44
2.3.3
Trasporto e movimentazione............................................................................ 44
2.3.4
Installazione ....................................................................................................... 45
2.3.5
Collegamento elettrico ...................................................................................... 46
2.3.6
Funzionamento .................................................................................................. 47
2.3.7
Manutenzione .................................................................................................... 48
OMD10013 REV. D
Installation and start-up of UPS Thetys EVO
Installazione e avviamento Thetys EVO
2.3.8
2.4
3
TUTELA AMBIENTALE ............................................................................................. 49
2.4.1
Certificazione ISO 14001 .................................................................................. 49
2.4.2
Riciclaggio dei materiali di imballaggio ......................................................... 49
2.4.3
Smaltimento del dispositivo ............................................................................ 49
INSTALLAZIONE .............................................................................. 50
3.1
RICEZIONE DELL’UPS ............................................................................................. 50
3.1.1
4
5
Immagazzinamento ........................................................................................... 49
Immagazzinamento ........................................................................................... 50
3.2
MOVIMENTAZIONE DELL’UPS ................................................................................ 51
3.3
POSIZIONAMENTO ED INSTALLAZIONE ............................................................... 52
3.3.1
Pianta di base, carico statico e pesi ............................................................... 53
3.3.2
Dimensioni di ingombro ................................................................................... 54
3.3.3
Distanze minime dalle pareti e ventilazione ................................................... 55
3.3.4
Condizioni ambientali di installazione ............................................................ 56
ALLACCIAMENTO ELETTRICO ...................................................... 58
4.1
MORSETTIERE .......................................................................................................... 61
4.2
COLLEGAMENTO CONDUTTORI DI POTENZA ..................................................... 63
4.3
COLLEGAMENTO CAVI AUSILIARI......................................................................... 64
4.3.1
Manual bypass esterno .................................................................................... 65
4.3.2
Generatore diesel (DIESEL MODE) ................................................................. 65
4.3.3
Contatto ausiliario batteria .............................................................................. 65
4.3.4
Spegnimento remoto (EPO) ............................................................................. 65
4.4
INTERFACCE SERIALI ............................................................................................. 66
4.5
COLLEGAMENTO SCHEDA RELÈ (OPZIONALE) .................................................. 67
AVVIAMENTO E ARRESTO ............................................................. 68
5.1
VERIFICHE PRELIMINARI ........................................................................................ 68
5.2
PROCEDURA DI AVVIAMENTO ............................................................................... 69
5.3
RICERCA GUASTI DI BASE ..................................................................................... 70
5.4
PROCEDURA DI ARRESTO ..................................................................................... 71
5.5
PROCEDURA DI TRASFERIMENTO SU BYPASS MANUALE ............................... 72
5.6
RIAVVIO DA BYPASS MANUALE ............................................................................ 73
OMD10013 REV. D
3
Installation and start-up of UPS Thetys EVO
Installazione e avviamento Thetys EVO
Index of pictures / Indice delle figure
Picture 1 – Rating plate of THETYS EVO .................................................................................................... 8
Picture 2 – Handling of UPS THETYS EVO ............................................................................................... 16
Picture 3 – Base plan.................................................................................................................................. 18
Picture 4 – Overall dimensions of UPS THETYS EVO .............................................................................. 19
Picture 5 – Minimum distances from the walls ........................................................................................... 20
Picture 6 – Position of power terminals of THETYS EVO .......................................................................... 26
Picture 7 – Position of auxiliary terminals of THETYS EVO ....................................................................... 29
Picture 8 – Auxiliary terminals of THETYS EVO ........................................................................................ 30
Picture 9 – Interfaces of UPS THETYS EVO ............................................................................................. 31
Picture 10 – Relay card .............................................................................................................................. 32
Figura 1 – Targhetta caratteristiche THETYS EVO .................................................................................... 43
Figura 2 – Movimentazione UPS THETYS EVO ........................................................................................ 51
Figura 3 – Pianta di base ............................................................................................................................ 53
Figura 4 – Ingombri UPS THETYS EVO .................................................................................................... 54
Figura 5 – Distanze minime dalle pareti ..................................................................................................... 55
Figura 6 – Posizione morsetti potenza THETYS EVO ............................................................................... 61
Figura 7 – Posizione morsetti ausiliari THETYS EVO ................................................................................ 64
Figura 8 – Morsetti ausiliari THETYS EVO ................................................................................................ 65
Figura 9 – Interfacce THETYS EVO ........................................................................................................... 66
Figura 10 – Scheda relè ............................................................................................................................. 67
4
OMD10013 REV. D
Installation and start-up of UPS Thetys EVO
Installazione e avviamento Thetys EVO
ENGLISH LANGUAGE
OMD10013 REV. D
5
Installation and start-up of UPS Thetys EVO
Installazione e avviamento Thetys EVO
1
SCOPE
The instructions contained in the operating manual are applicable to the whole production
range of THETYS EVO UPS systems, as indicated below.
ASD10
THETYS EVO 60kVA
ASD11
THETYS EVO 80kVA
ASD12
THETYS EVO 100kVA
ASD13
THETYS EVO 125kVA
ASD14
THETYS EVO 160kVA
Storing documentation
This manual and any other supporting technical documentation relating to the product
must be stored and made accessible to personnel in the immediate vicinity of the
UPS.
Further information
In the event that the information provided in this manual is not sufficiently exhaustive,
please contact the manufacturer of the device, whose details are available in the
“Contacts” section.
6
OMD10013 REV. D
Installation and start-up of UPS Thetys EVO
Installazione e avviamento Thetys EVO
2
SAFETY RULES AND WARNINGS
2.1
UPS USE
Congratulations on choosing a product from Astrid Energy Enterprises for the safety of your
equipment. To obtain the best performance from your THETYS EVO
UPS
system
(Uninterruptible Power Supply), we suggest that you take your time to read the following
manual.
The purpose of this manual is to give a short description of the parts composing the UPS and
to guide the installer or the user through the installation of the unit in its using environment.
The installer or the user must read and correctly perform the instructions included in the
present manual, with particular reference to the requirements regarding safety, in compliance
with the current regulations.
Read the technical documentation
Before installing and using the device, make sure you have read and understood all
the instructions contained in the present manual and in the technical supporting
documentation.
OMD10013 REV. D
7
Installation and start-up of UPS Thetys EVO
Installazione e avviamento Thetys EVO
2.2
THETYS EVO RATING
UPS THETYS EVO is provided with an identification plate containing the operation ratings.
The plate is fixed on the inside of the door.
Picture 1 – Rating plate of THETYS EVO
Check the technical characteristics
Before carrying out any installation or start-up operation on the UPS, make sure its
technical characteristics are compatible with the AC supply line and with the output
loads.
8
OMD10013 REV. D
Installation and start-up of UPS Thetys EVO
Installazione e avviamento Thetys EVO
2.3
SPECIAL SAFETY WARNINGS
2.3.1 General warnings
UPS THETYS EVO is provided with various stickers with indications regarding specific
dangers. These stickers must be always well visible and replaced in case they are damaged.
The present documentation must be always available in proximity to the device. In case of
loss we recommend to request a copy to the manufacturer, whose details are available in the
“Contacts” section.
2.3.2 Personnel
Any operation on UPS THETYS EVO must be carried out by qualified personnel.
By qualified and trained person we mean someone skilled in assembling, installing, starting
up and checking the correct operation of the product, who is qualified to perform his/her job and
has entirely read and understood this manual, especially the part regarding safety. Such training
and qualification shall be considered as such, only when certified by the manufacturer.
2.3.3 Transport and handling
Avoid bending or deforming the components and altering the insulation distances while
transporting and handling the product.
Undistributed weight
The weight of the UPS is not uniformly distributed. Pay attention when lifting.
Please inspect the device before installing it. In case any damage is noticed from the
conditions of the package and/or from the outside appearance of the equipment, contact the
shipping company or your dealer immediately. The damage statement must be made within 6
days from receipt of the product and must be notified to the shipping carrier directly. Should the
product need to be returned to the manufacturer, please use the original package.
Injury hazard due to mechanical damage
Mechanical damage to the electrical components constitutes a serious danger to
persons and property. In case of doubt regarding the non-integrity of the package or
of the product contained therein, contact the manufacturer before carrying out the
installation and/or the start-up.
OMD10013 REV. D
9
Installation and start-up of UPS Thetys EVO
Installazione e avviamento Thetys EVO
2.3.4 Installation
The product must be installed in strict compliance with the instructions contained in the
technical back-up documentation, including the present safety instructions. In particular, the
following points must be taken into account:
The product must be placed on a base suitable to carry its weight and to ensure its
vertical position;
The UPS must be installed in a room with restricted access, according to standard
IEC EN62040-1-2;
Never install the equipment near liquids or in an excessively damp environment;
Never let a liquid or foreign body penetrate inside the device;
Never block the ventilation grates;
Never expose the device to direct sunlight or place it near a source of heat.
Special environmental conditions
UPS THETYS EVO is designed for normal climatic and environmental operating
conditions as defined in the technical specification: altitude, ambient operating
temperature, relative humidity and environmental transport and storage conditions. It
is necessary to implement specific protective measures in case of unusual
conditions:
harmful smoke, dust, abrasive dust;
humidity, vapour, salt air, bad weather or dripping;
explosive dust and gas mixture;
extreme temperature variations;
bad ventilation;
conductive or radiant heat from other sources;
strong electromagnetic fields;
radioactive levels higher than those of the natural environment;
fungus, insects, vermin.
Use authorized personnel only
All transport, installation and start-up operations must be carried out by qualified and
trained personnel.
The installation of UPS THETYS EVO must be carried out by authorized personnel,
in compliance with national and local regulations.
10
OMD10013 REV. D
Installation and start-up of UPS Thetys EVO
Installazione e avviamento Thetys EVO
Do not modify the device
Do not modify the device in any way: this may result in damage to the equipment
itself as well as to objects and persons. Maintenance and repair must be carried out
by authorized personnel only. Contact the manufacturer for details of the nearest
service centre.
2.3.5 Electrical connection
The UPS connection to the AC power must be carried out in compliance with the current
regulations.
Make sure the indications specified on the identification plate correspond to the AC power
system and to the actual electrical consumption of all of the equipment connected.
Check the conformity of the documentation
The UPS must be installed according to the requirements of HD 384.4.42 S1/A2 and
in compliance with standard IEC 60364-4-482 – Chapter 482: protection against fire.
Before connecting the unit to the distribution network, make sure you have received
the approval of the electrical power distribution Authority, so as provided for by the
current national regulations.
All the electrical connections must be carried out by authorized personnel. Before connecting
the device make sure that:
the connection cable to the AC line is properly protected;
the nominal voltages, the frequency and the phase rotation of the AC supply are
respected;
the polarities of the DC cables coming from the battery have been checked;
no leakage current to earth is present.
The device is connected to the following voltage supplies:
DC battery voltage;
AC mains voltage;
AC bypass voltage.
OMD10013 REV. D
11
Installation and start-up of UPS Thetys EVO
Installazione e avviamento Thetys EVO
Injury hazard due to electric shock!
The device is subject to high voltages, thus all safety instructions must be
scrupulously adhered to before performing any operation on UPS THETYS EVO:
Isolate the battery via DC circuit breakers before connecting it to the UPS;
Connect the ground cable to the relevant bar before carrying out any other
connection inside the device.
Injury hazard due to electric shock!
If primary power isolators are installed in an area other than the UPS one, you must
stick the following warning label on the UPS. “ISOLATE THE UNINTERRUPTIBLE
POWER SUPPLY (UPS) BEFORE WORKING ON THIS CIRCUIT”
2.3.6 Operation
The installations to which the UPS systems belong must comply with all the current safety
standards (technical equipment and accident-prevention regulations). The device can be
started, operated and disconnected only by authorized personnel.
The settings can only be changed using the original interface software.
Injury hazard due to electric shock!
During operation, UPS THETYS EVO converts power characterized by high voltages
and currents.
All the doors and the covers must remain closed.
Injury hazard due to contact with toxic substances
The battery supplied with the UPS contains small amounts of toxic materials. To
avoid accidents, the directives listed below must be observed:
Never operate the UPS if the ambient temperature and relative humidity are
higher than the levels specified in the technical documentation.
Never burn the battery (risk of explosion).
Do not attempt to open the battery (the electrolyte is dangerous for the eyes
and skin).
Comply with all applicable regulations for the disposal of the battery.
12
OMD10013 REV. D
Installation and start-up of UPS Thetys EVO
Installazione e avviamento Thetys EVO
2.3.7 Maintenance
Service and repairs must be carried out by skilled and authorized personnel. Before carrying
out any maintenance operation, UPS THETYS EVO must be disconnected from AC and DC
supply sources.
The device is provided with internal isolators which allow to isolate the internal power circuits.
However the voltages of the supply sources are present on the terminals. To isolate the device
completely, provide external circuit breakers on the lines.
The device contains dangerous voltages even after shutdown and disconnection from the
supply sources, due to the internal capacitors which discharge slowly. Thus we recommend to
wait at least 5 minutes before opening the device doors.
Injury hazard due to electric shock!
Any operation must be carried out only when voltage is absent and in compliance
with safety directives.
Make sure the battery circuit breaker that may be placed near the battery has
been opened.
Isolate the device completely by operating the external circuit breakers.
Wait at least 5 minutes in order to allow the capacitors to discharge.
After switching off and disconnecting the device there still might be very hot components
(magnetic parts, heat sinks); therefore we recommend to use protective gloves.
High temperature of components
It is strongly recommended to use protective gloves due to the high temperatures that
may be reached during the operation.
OMD10013 REV. D
13
Installation and start-up of UPS Thetys EVO
Installazione e avviamento Thetys EVO
2.3.8 Storage
If the product is stored prior to installation, it should remain stored in its original package in a
dry place with a temperature ranging from -10°C to +45°C.
Special environmental conditions
It is necessary to implement specific protective measures in case of unusual
environmental conditions:
harmful smoke, dust, abrasive dust;
humidity, vapour, salt air, bad weather or dripping;
explosive dust and gas mixture;
extreme temperature variations;
bad ventilation;
conductive or radiant heat from other sources;
fungus, insects, vermin.
2.4
ENVIRONMENTAL PROTECTION
2.4.1 ISO 14001 certification
Astrid Energy Enterprises is particularly sensitive to the environmental impact of its products.
That is why UPS THETYS EVO has been manufactured with cutting-edge eco-design criteria
(ISO 14001 certification).
Special care was taken in using fully recyclable materials and in reducing the amounts of raw
materials used.
2.4.2 Recycling of packing materials
Packing materials must be recycled or disposed of in compliance with applicable local and
national laws and regulations.
2.4.3 Device disposal
At the end of their product life, the materials composing the device must be recycled or
disposed of in compliance with the current local and national laws and regulations.
14
OMD10013 REV. D
Installation and start-up of UPS Thetys EVO
Installazione e avviamento Thetys EVO
3
INSTALLATION
3.1
RECEIPT OF THE UPS
Please inspect the device before installing it. In case any damage is noticed from the
conditions of the package and/or from the outside appearance of the equipment, contact the
shipping company or your dealer immediately. The damage statement must be made within 6
days from receipt of the product and must be notified to the shipping carrier directly. Should the
product need to be returned to the manufacturer, please use the original package.
Danger to persons due to transport damages
Mechanical damage to the electrical components constitutes a serious danger to
persons and property. In case of doubt regarding the non-integrity of the package or
of the product contained therein, contact the manufacturer before carrying out the
installation and/or the start-up.
3.1.1 Storage
The package normally ensures protection from humidity and possible damages during
transport. Do not store the UPS outdoor.
Risk of damage due to inappropriate storage
For the environmental storage conditions, refer to the indications given for the
installation of the device.
The device must only be stored in rooms protected from dust and humidity.
The device cannot be stored outdoor.
OMD10013 REV. D
15
Installation and start-up of UPS Thetys EVO
Installazione e avviamento Thetys EVO
3.2
HANDLING OF THE UPS
The UPS is packed on a pallet. It is handled from the transport vehicle to the installation (or
storage) place via a fork lift.
The device has a heavy weight
Avoid turnover during the transport of the UPS.
Cabinets must always be handled in upright position.
During loading and unloading operations, always respect the indications
regarding the device barycentre marked on the package.
To handle the UPS remove the lower front and rear panel and insert the forks of a fork lift.
Picture 2 – Handling of UPS THETYS EVO
16
OMD10013 REV. D
Installation and start-up of UPS Thetys EVO
Installazione e avviamento Thetys EVO
3.3
POSITIONING AND INSTALLATION
UPS THETYS EVO must be installed indoor, in a clean and dry room, preferably without dust
or humidity infiltrations. For the environmental conditions in the place of installation, in
compliance with the current legislation, please refer to the “Ventilation” section.
Special environmental conditions
It is necessary to implement specific protective measures in case of unusual
environmental conditions:
harmful smoke, dust, abrasive dust;
humidity, vapour, salt air, bad weather or dripping;
explosive dust and gas mixture;
extreme temperature variations;
bad ventilation;
conductive or radiant heat from other sources;
fungus, insects, vermin.
OMD10013 REV. D
17
Installation and start-up of UPS Thetys EVO
Installazione e avviamento Thetys EVO
3.3.1
Base plan, static load and weights
Picture 3 – Base plan
Power (kVA)
60
80
100
L1 (mm)
815
P1 (mm)
825
L2 (mm)
70
125
160
The supporting base of the UPS must be designed to carry the UPS weight and to ensure its
steady and safe support.
Its carrying capacity must be adequate to the static loads indicated in the table below.
18
Power (kVA)
60
80
100
125
160
Weight (kg)
570
600
630
662
720
Static load (kg/m2)
948
998
1048
1101
1198
OMD10013 REV. D
Installation and start-up of UPS Thetys EVO
Installazione e avviamento Thetys EVO
3.3.2 Overall dimensions
Picture 4 – Overall dimensions of UPS THETYS EVO
Power (kVA)
60
80
100
Width (mm)
W
815
Depth (mm)
D
865
Height (mm)
H
1705
125
160
OMD10013 REV. D
19
Installation and start-up of UPS Thetys EVO
Installazione e avviamento Thetys EVO
3.3.3 Minimum distances from the walls and ventilation
The UPS must be so installed as to ensure its serviceability and to allow a correct air flow as
much as possible.
With regard to the minimum distances from the walls, for all of the UPS sizes the same
installation conditions apply as indicated in the table below.
Picture 5 – Minimum distances from the walls
A (mm)
B (mm)
C (mm)
D (mm)
1000
700
200
300
The table below shows the air volume required for an optimal ventilation and cooling of the
UPS.
Power (kVA)
60
3
Air volume (m /h)
20
OMD10013 REV. D
80
1600 1800
100
125
160
2100
2300
2500
Installation and start-up of UPS Thetys EVO
Installazione e avviamento Thetys EVO
3.3.4 Environmental installation conditions
The air is classified by the EN 60721-3-3 standard (Classification of environmental
parameters and their severities – Stationary use at weather-protected locations) based on
climatic and biological conditions as well as on mechanically and chemically active substances.
Therefore the place of installation must meet specific requirements to ensure compliance
with the conditions for which the UPS was designed.
Climatic conditions according to the technical specification of THETYS EVO
Environmental parameter
Minimum operating temperature (°C)
– 10
Maximum operating temperature (°C)
+ 40
Minimum relative humidity (%)
5
Maximum relative humidity (%)
95
Condensation
NO
Rainfall with wind (rain, snow, hail, etc.)
NO
Water with an origin other than rain
NO
Ice formation
NO
Classification of biological conditions (EN 60721-3-3)
Class
Environmental
parameter
3B1
3B2
3B3
a) Flora
NO
Presence of mildew, fungus,
etc.
Presence of mildew, fungus,
etc.
NO
Presence of rodents and
other animals that are
harmful to products,
excluding termites
Presence of rodents and
other animals that are
harmful to products,
including termites
b) Fauna
Classification of mechanically active substances (EN 60721-3-3)
Environmental parameter
Class
3S1
3S2
3S3
3S4
No
30
300
3000
b) Dust (suspension) [mg/m3]
0,01
0,2
0,4
4,0
c) Dust (sedimentation) [mg/(m2·h)
0,4
1,5
15
40
a) Sand [mg/m3]
Places where precautions have been taken to minimize the presence
of dust. Places away from dust sources
Places without any special precaution to minimize the presence of
sand or dust, however not in proximity to sand or dust sources
Places in proximity to sand or dust sources
X
X
X
Places in proximity to working processes that generate sand or dust,
or in geographic areas having a high proportion of sand brought by
the wind or of dust suspended in the air
X
OMD10013 REV. D
21
Installation and start-up of UPS Thetys EVO
Installazione e avviamento Thetys EVO
Classification of chemically active substances (EN 60721-3-3)
Environmental parameter
Class
3C1R
3C1L
3C1
3C2
3C3
3C4
No
No
No
Salt
fog
Salt
fog
Salt
fog
0,01
0,1
0,1
1,0
10
40
c) Hydrogen sulphide [mg/m3]
0,0015
0,01
0,01
0,5
10
70
d) Chlorine [mg/m3]
0,001
0,01
0,1
0,3
1,0
3,0
e) Hydrochloric acid [mg/m3]
0,001
0,01
0,1
0,5
5,0
5,0
f) Hydrofluoric acid [mg/m3]
0,001
0,003
0,003
0,03
2,0
2,0
g) Ammonia [mg/m3]
0,03
0,3
0,3
3,0
35
175
h) Ozone [mg/m ]
0,004
0,01
0,01
0,1
0,3
2,0
i) Nitric oxide (expressed in equivalent values of
0,01
0,1
0,1
1,0
9,0
20
a) Sea salt
b) Sulphur dioxide [mg/m3]
3
nitrogen dioxide) [mg/m3]
Places where atmosphere is strictly monitored and
regulated (“clean spaces” category)
Places where atmosphere is permanently
monitored
X
X
Places located in rural and urban regions where
industrial activities are few and where traffic
is moderate
X
Places located in urban regions with industrial
activities and/or considerable traffic
X
Places in proximity to industrial sources with
chemical emissions
X
Places located in industrial installations.
Emissions of highly concentrated chemical
pollutants
X
UPS THETYS EVO is designed to be installed in an environment that meets the following
classifications.
K
Climatic conditions
In accordance with the technical
specification
B
Biological conditions
3B1 (EN 60721-3-3)
C
Chemically active substances
3C2 (EN 60721-3-3)
S
Mechanically active substances
3S2 (EN 60721-3-3)
In the event that the environmental conditions of the installation room do not comply with the
specified requirements, additional precautions must be taken to reduce excessive values to the
specified limits.
22
OMD10013 REV. D
Installation and start-up of UPS Thetys EVO
Installazione e avviamento Thetys EVO
4
ELECTRICAL CONNECTION
The electrical connection is part of the work which is normally provided by the company that
carries out the product installation. For this reason, the UPS manufacturer shall not be held
responsible for any damages due to wrong connections.
Use qualified personnel only
All the operations related to the electric connection must be carried out by qualified
and trained personnel.
Work in compliance with the local standards
The installation of UPS THETYS EVO must be carried out in compliance with
national and local regulations.
Connection of ground cable
The grounding of the UPS via the relevant terminal is mandatory. It is strongly
recommended to connect the ground terminal as first terminal.
Check the position of selector “SR”
Before using the UPS, make sure changeover switch “SR” (Service switch) is in
“NORMAL” position and keep it in the same position during operation. To use this
changeover switch, refer to the service manual.
OMD10013 REV. D
23
Installation and start-up of UPS Thetys EVO
Installazione e avviamento Thetys EVO
The electrical connection is part of the work which is normally provided by the company that
carries out the electrical installation and not by the UPS manufacturer. For this reason, the
following recommendations are only an indication, as the UPS manufacturer is not responsible
for the electrical installation. In any case we recommend to carry out the installation and the
electrical input and output connections in compliance with the local standards.
Cables must be selected bearing in mind technical, financial and safety aspects. The
selection and the sizing of cables from a technical viewpoint depend on the voltage, on the
current absorbed by the UPS, on the bypass line and on the batteries, on the ambient
temperature and on the voltage drop. Finally, the kind of cable laying must be taken into
particular consideration.
For more explanations regarding the selection and the sizing of cables, please refer to the
relevant IEC standards, in particular to IEC 64-8 standard.
“Short-circuit currents” (very high currents with a short duration) and “overload currents”
(relatively high currents with a long duration) are among the main causes of cable damage. The
protection systems normally used to protect the cables are: thermal magnetic circuit breakers or
fuses. Protection circuit breakers must be selected according to the maximum short-circuit
current (max Isc) that is needed to determine the breaking power of automatic circuit breakers,
and to the minimum current (min Isc) that is needed to determine the maximum length of the
line protected. The protection against short-circuit must operate on the line before any thermal
and electrothermal effects of the overcurrents may damage the cable and relevant connections.
During the electrical installation take particular care to respect the phase rotation. The
terminal boards for cables connection are positioned at the front of the UPS, under the
breakers. To access the terminals remove the front protection, extracting the fixing bolts.
Mains connection
The connection to the mains must be carried out with protection fuses between the
mains and the UPS.
The use of differential protection devices in the line supplying the UPS is
unadvisable. The leakage current to ground due to the RFI filters is rather high
and it can cause spurious tripping of the protection device.
According to IEC EN62040-1 standard, in order to take into account the UPS’
leakage current, residual current devices having adjustable threshold can be used.
24
OMD10013 REV. D
Installation and start-up of UPS Thetys EVO
Installazione e avviamento Thetys EVO
Electrical connection data
Power (kVA)
Input Fuses (A)
Input cables
(mm2)
60
80
100
125
160
Rectifier
3x125
3x150
3x200
3x250
3x315
Bypass
3x150
3x200
3x315
3x315
3x400
Rectifier
3x50
3x70
3x95
3x95
3x120
Bypass
4x95
4x120
4x150
4x185
4x185
Ground cables
(mm2)
95
120
185
240
240
Output cables
(mm2)
4x95
4x120
4x150
4x185
4x185
Battery cables
(mm2)
2x50
2x70
2x95
2x120
2x150
OMD10013 REV. D
25
Installation and start-up of UPS Thetys EVO
Installazione e avviamento Thetys EVO
4.1
TERMINAL BOARDS
UPS THETYS EVO is provided with terminal boards for the connection of power cables and
of auxiliary connections.
Picture 6 – Position of power terminals of THETYS EVO
26
OMD10013 REV. D
Installation and start-up of UPS Thetys EVO
Installazione e avviamento Thetys EVO
Power (kVA)
60
80
100
125
X (mm)
270
260
Y (mm)
18
30
Z (mm)
598
615
160
Connection data of terminal boards
Power (kVA)
60
80
100
125
160
Section (mm2)
35
35
70
25x6
30x5
Hole diameter (mm)
11
11
11
11
11
M6
M6
M8
M10
M10
Max. cable section (mm )
35
35
70
2x95
2x150
Tightening force (Nm)
5
5
10
15
20
Cable terminal hole
2
OMD10013 REV. D
27
Installation and start-up of UPS Thetys EVO
Installazione e avviamento Thetys EVO
4.2
CONNECTION OF POWER CABLES
For the electric connection of UPS THETYS EVO, connect the following cables:
DC supply from the battery;
AC supply from the rectifier and bypass supply mains;
AC output to the loads.
Injury hazard due to electric shock!
Very high voltages are present at the ends of the cables coming from the battery:
Isolate the battery via DC circuit breakers before connecting it to the UPS;
Connect the ground cable to the relevant bar before carrying out any other
connection inside the device.
Risk of damages to the device due to insufficient insulation
The cables must be protected from short-circuits and leakage currents to earth;
The connection points must be hermetically sealed to prevent the air from
being sucked through the cable passage.
Risk of damages to the device due to incorrect wiring
To connect the device, follow the electrical drawing scrupulously and respect the
polarity of cables.
28
OMD10013 REV. D
Installation and start-up of UPS Thetys EVO
Installazione e avviamento Thetys EVO
4.3
CONNECTION OF AUXILIARY CABLES
The UPS systems of the THETYS EVO line can be connected to external
controls/components specifically designed to improve the safety and reliability of the device.
External manual bypass;
Diesel generator;
Auxiliary battery contact;
Remote emergency power off button (EPO).
The auxiliary cables are connected using a special terminal board placed aligned with the
power terminal boards.
The section of the terminals used is 6 mm2.
Picture 7 – Position of auxiliary terminals of THETYS EVO
OMD10013 REV. D
29
Installation and start-up of UPS Thetys EVO
Installazione e avviamento Thetys EVO
Picture 8 – Auxiliary terminals of THETYS EVO
4.3.1 External manual bypass
Auxiliary contact of the External Manual Bypass Switch on terminals MBY1-MBY2.
A normally open contact has to be connected to the UPS terminals (MBY1-MBY2); when the
contact is closed (see Manual Bypass procedure), the microprocessor will acquire the status of
the contact and shut down the inverter.
4.3.2 Diesel generator (DIESEL MODE)
Auxiliary contact of the Diesel Generator on terminal XD1-XD2.
A normally open contact has to be connected to XD1-XD2 terminals, when the contact is
closed (if diesel mode is enable) the microprocessor will acquire the status of the contact and
the rectifier will reduce the voltage to the value set.
4.3.3 Auxiliary battery contact
Aux battery contact on terminals BAC1-BAC2.
This auxiliary contact is necessary to indicate the position of the isolator (open-closed) and the
fuse status.
4.3.4 Remote emergency power off (EPO)
Aux EPO contact on terminals EAC1-EAC2.
The voltage supply to the loads can be interrupted from a remote location by using this contact
(i.e. for safety requirements). A normally closed contact must be connected to the UPS
terminals (EAC1-EAC2); when this contact is open the static inverter and by-pass switches are
opened so that the output supply is interrupted.
30
OMD10013 REV. D
Installation and start-up of UPS Thetys EVO
Installazione e avviamento Thetys EVO
4.4
SERIAL INTERFACES
The UPS is provided with serial interfaces for the external communication of the operating
status and parameters.
RS232/USB: is used for connection to the proprietary programming and control
software.
MODBUS: is used for the transmission of data to the outside via MODBUS protocol
(RS485).
PARALLEL (OPTIONAL): is used for communication between paralleled UPS units.
SNMP (OPTIONAL): is used for the external transmission of data via LAN.
NORMAL/BYPASS SELECTOR
NORMAL/SERVICE SELECTOR.
Picture 9 – Interfaces of UPS THETYS EVO
OMD10013 REV. D
31
Installation and start-up of UPS Thetys EVO
Installazione e avviamento Thetys EVO
4.5
RELAY CARD CONNECTION (OPTIONAL)
UPS THETYS EVO, in its full configuration, is provided with a relay card for repeating alarms
and operating statuses remotely. Its electric connection is carried out directly on the terminals
located on the card.
Picture 10 – Relay card
Relay
Alarms/Status
Status
RL1
Alarm = General alarm
RL2
Alarm = Mains fault
RL3
Alarm = Battery low
RL4
Alarm = Inverter out of tolerance
RL5
Alarm = Bypass feeds load
Not
energized
RL6
Status = Booster OK
Energized
RL7
Status = Inverter feeds the load
Energized
RL8
Status = Bypass OK
Energized
Not
energized
Not
energized
Not
energized
Not
energized
Relay output characteristics:
120 VAC voltage
1A current
50 VDC voltage
1A current resistive load
32
OMD10013 REV. D
Pins
2-3
1-2
5-6
4-5
8-9
7-8
11-12
10-11
14-15
M1
Status
Open
Closed
Open
Closed
Open
Closed
Open
Closed
Name
Led
Status
D1
Off
D2
Off
D3
Off
D4
Off
D5
Off
D6
On
D7
On
D8
On
Open
13-14
Closed
17-18
16-17
20-21
19-20
23-24
22-23
Closed
Open
Closed
Open
Closed
Open
Installation and start-up of UPS Thetys EVO
Installazione e avviamento Thetys EVO
5
STARTUP AND SHUTDOWN
Read the technical documentation
Before installing and using the device, make sure you have read and understood all
the instructions contained in the present manual and in the technical supporting
documentation.
Further information
In the event that the information provided in this manual is not sufficiently exhaustive,
please contact the manufacturer of the device, whose details are available in the
“Contacts” section.
5.1
PRELIMINARY CHECKS
Before starting up the unit, make sure that:
all installation and electric connection works have been performed professionally;
all power and control cables have been properly and tightly connected to the relevant
terminal boards;
the ground cable is properly connected;
the battery polarity is correct and the voltage is within the operating values;
the phase rotation of the line is correct and the voltage is within tolerance with the
operating values.
the emergency power off “EPO” push-button, if installed, is not pressed (if not, press
it back to the rest position).
OMD10013 REV. D
33
Installation and start-up of UPS Thetys EVO
Installazione e avviamento Thetys EVO
5.2
START-UP PROCEDURE
EPO push-button and phase rotation
Before switching the UPS on, make sure that:
1) the emergency power off “EPO” push-button, if installed, is not pressed. If not,
press it back to the rest position;
2) the input and output phase rotation is correct.
Circuit breaker BCB
Battery circuit breaker BCB is external to the UPS system.
Do not close the battery breaker BCB before it’s required by the front panel. Serious
damages to the UPS internal parts and/or to the battery may occur.
No.
LCD DISPLAY
1
BLANK
ACTION
Close RCB
2
BOOT LOADING
3
EEPROM READING
4
UPS START UP
WAIT PLEASE
RECTIFIER START UP
WAIT PLEASE
5
6
INVERTER START
WAIT PLEASE
7
BYPASS START UP
CLOSE SBCB
34
OMD10013 REV. D
OPERATING CHECKS
A few seconds after the closing of input
circuit breaker RCB the pre-charging phase
of the capacitive bank will start. The control
logic will be started and the front panel will
be activated.
“BOOT” phase where the UPS firmware can
be updated following the appropriate
procedure. All the LED’s on the front panel
are on.
Reading of the configuration parameters
stored in the EEPROM.
All the LED’s on the front panel are off.
UPS start-up. LED #1 is on - input voltage
present.
The IGBT rectifier bridge starts to modulate;
VDC voltage reaches the nominal value.
LED #3 is lit green: DC voltage present.
The modulation of the inverter bridge is
started. The AC output voltage reaches the
nominal value. After a few seconds the static
inverter switch is closed. LED #5 is lit
green: static switch SSI closed.
Close SBCB
Installation and start-up of UPS Thetys EVO
Installazione e avviamento Thetys EVO
8
BYPASS START UP
WAIT PLEASE
9
BATTERY START UP
CLOSE BCB
BATTERY START UP
WAIT PLEASE
10
11
12
End
5.3
UPS START UP
CLOSE OCB
START UP END
WAIT PLEASE
The control logic checks that all the bypass
parameters
(voltage,
phase
rotation,
frequency) are correct. LED #2 is lit green:
bypass voltage present
Close BCB
The control logic checks the closing of the
circuit breaker to go to the following step.
Led #4 lit green.
Close OCB
UPS MODEL
OUTPUT VOLTAGE
The control logic checks that all the output
parameters (voltage, current, frequency) are
correct. LED #7 is lit green: output voltage
present.
The default screen is displayed after a short
time with the UPS model and the values of
output voltage.
BASIC TROUBLESHOOTING
This paragraph provides the basic information if any problems occur during the start-up
procedure. In case the problem cannot be solved, contact the service department.
1) After closing RCB the LCD display is still blank
Check the phase rotation of supply voltage.
Make sure the input voltage and frequency are within tolerance.
Check the rectifier protection fuses F1-F2-F3; they are inside the unit.
2) After step #1 the UPS stops the starting sequence and shows one or more alarm
messages
Check the alarms indicated on the display and remove their causes.
Close RCB and try to restart the UPS.
3) After step #2 the unit shows the alarm A15 – Byp fault
Make sure you have closed circuit breaker SBCB.
Check the protection fuses of the static bypass switch; they are inside the unit.
Check the phase rotation of the bypass voltage.
Make sure voltage and frequency are within tolerance.
4) After step #3 the unit shows the alarm A7 – BCB open
Make sure you have closed the battery circuit breaker; the circuit breaker or the
fuse carrier is external to the UPS system.
Check the battery fuses.
Check the interconnection between the auxiliary contact of the battery circuit
breaker (in the external cabinet) and the terminals Bac1-Bac2 of the UPS.
OMD10013 REV. D
35
Installation and start-up of UPS Thetys EVO
Installazione e avviamento Thetys EVO
5.4
SHUT-DOWN PROCEDURE
No. ACTION
LCD DISPLAY
OPERATING CHECKS
1
Open OCB
A30 GENERAL ALARM
The supply to the load is interrupted.
LED #7 off.
2
Open BCB
A30 GENERAL ALARM
The battery is disconnected from the
rectifier. Led #4 red flashing.
3
Open SBCB
A30 GENERAL ALARM
The bypass supply is disconnected. LED
#2 off.
4
Open RCB
A30 GENERAL ALARM
Rectifier and inverter shutdown.
5
36
BLANK
OMD10013 REV. D
End of shutdown procedure.
Installation and start-up of UPS Thetys EVO
Installazione e avviamento Thetys EVO
5.5
SWITCHING PROCEDURE TO MANUAL BYPASS
The load is transferred to Manual Bypass with no interruption of supply to the loads. In this
configuration, the system can be restarted via the return procedure from load on manual
bypass, without the need to de-energize the loads.
Manual bypass
To perform the switching procedure correctly, make sure no alarms are present on
the system.
During Manual Bypass the load is supplied directly by the input mains, therefore
continuous supply cannot be guaranteed to the loads.
ACTION
No.
1 Move the
bypass
selector SW
to BYPASS
LCD DISPLAY
OPERATING CHECKS
A30 GENERAL ALARM
The load is transferred to the bypass
line. LED #5 off, LED #6 lit orange.
2
Close MBCB
A30 GENERAL ALARM
The inverter is switched off. The load is
supplied by the input mains through the
manual bypass switch.
The static
bypass switch is still closed. Led #8 lit
orange.
3
Open BCB
A30 GENERAL ALARM
The battery is disconnected from the DC
bus bar. Led #4 red flashing.
4
Open RCB
A30 GENERAL ALARM
The supply input is opened; the rectifier
shuts down. LED #1 off.
5
Open OCB
A30 GENERAL ALARM
The load remains fed by the manual
bypass switch. LED #8 off.
6
Open SBCB
A30 GENERAL ALARM
The bypass line is disconnected. The
display goes out.
BLANK
The load is supplied directly by the
mains
through the manual bypass
switch. The UPS is isolated.
7
OMD10013 REV. D
37
Installation and start-up of UPS Thetys EVO
Installazione e avviamento Thetys EVO
5.6
RESTART FROM MANUAL BYPASS
Before restarting the UPS from manual by-pass, make sure the “Bypass_Sw" selector is in
BYPASS position and the MBCB isolator is closed.
No.
LCD DISPLAY
1
2
BLANK
BOOT LOADING
3
EEPROM READING
2
UPS START UP
WAIT PLEASE
5
RECTIFIER START UP
WAIT PLEASE
6
START UP FROM
MBCB
CLOSE BCB
BYPASS START UP
WAIT PLEASE
7
8
9
10
38
START UP FROM
MBCB
CLOSE BCB
START UP FROM
MBCB
CLOSE OCB
START UP FROM
MBCB
OPEN MBCB
OMD10013 REV. D
ACTION
OPERATING CHECKS
Close RCB
“BOOT” phase where the UPS firmware
can be updated following the appropriate
procedure. All the LED’s on the front
panel are on.
Reading of the configuration parameters
stored in the EEPROM.
All the LED’s on the front panel are off.
The rectifier is supplied and the DC
voltage reaches the nominal value. All
the LED’s on the front panel are on.
The microprocessor checks that all the
start-up conditions are good for restart.
Led #1 lit green. Led #8 lit orange.
The IGBT rectifier bridge starts to
modulate; VDC voltage reaches the
nominal value. LED #3 is lit green: DC
voltage present.
Close SBCB
Close BCB
The microprocessor checks that all the
bypass parameters (voltage, phase
rotation, frequency) are within tolerance.
Led #2 lit green. The static bypass
switch is closed. LED #6 lit orange.
Closing of the battery circuit breaker.
Led #4 lit green.
Close OCB
The load is fed by the static bypass
switch. Circuit breaker MBCB is still
closed. Led #7 lit green.
Open MBCB
The load is fed by the static bypass
switch and the inverter can be started.
LED #8 off.
Installation and start-up of UPS Thetys EVO
Installazione e avviamento Thetys EVO
11
INVERTER START
WAIT PLEASE
12
START UP FROM
MBCB
MOVE BYP - SWITCH
START UP END
WAIT PLEASE
13
14
The modulation of the inverter bridge is
started. The AC voltage reaches the
nominal value. The microprocessor
checks the synchronization with the
bypass line.
The load is transferred to the inverter.
Move the selector
“NORMAL-BYPASS” Led #5 lit green.
to NORMAL
The microprocessor checks that all the
output parameters (voltage, current,
frequency) are within the tolerance limits.
UPS MODEL
OUTPUT VOLTAGE
OMD10013 REV. D
39
UPS user manual
Utilizzo dell’UPS
UPS USER MANUAL
UTILIZZO DELL’UPS
Index / Indice
ENGLISH LANGUAGE ............................................................................... 5
1
SCOPE ................................................................................................ 6
2
SAFETY RULES AND WARNINGS .................................................... 7
3
GENERAL UPS DESCRIPTION.......................................................... 8
3.1
TYPOLOGY .................................................................................................................. 8
3.2
SYSTEM DESCRIPTION ............................................................................................. 8
3.2.1
Rectifier ............................................................................................................... 8
3.2.2
Inverter................................................................................................................. 9
3.2.3
Battery and battery charger ............................................................................... 9
3.2.4
Static bypass ....................................................................................................... 9
3.2.5
Manual bypass .................................................................................................... 9
3.3
3.3.1
Normal operation .............................................................................................. 10
3.3.2
Bypass operation .............................................................................................. 10
3.3.3
Battery operation .............................................................................................. 11
3.3.4
Manual bypass .................................................................................................. 12
3.4
4
A
B
C
CONTROL AND OPERATION DEVICES .................................................................. 13
3.4.1
Isolators (DC input and AC output) ................................................................. 13
3.4.2
Emergency power off button (EPO) ................................................................ 13
3.4.3
Normal/Bypass selector (SW1) ........................................................................ 14
3.4.4
LCD control panel ............................................................................................. 14
FRONT PANEL.................................................................................. 15
4.1
Rev.
OPERATING STATUS ............................................................................................... 10
FUNCTION BUTTONS ............................................................................................... 15
Descrizione
Description
Emissione
Added English language/Aggiunta lingua inglese
Updating alarms description/Agg. descriz. allarmi
Data
Date
Emesso
Issued
Controllato
Checked
Approvato
Approved
18.11.10
21.12.10
08.02.11
G. Senesi
F. Berti
F. Berti
M. Mancini
M. Mancini
M. Mancini
V. Gremoli
V. Gremoli
V. Gremoli
Lingua
Language
Pagina
Page
E/I
1
di Pag.
of Pag.
96
Codice / Code
OMD10012
THETYS Parallel System – Operating Manual
THETYS PARALLEL REDUNDANCY SYSTEM
OPERATING MANUAL
Index
INTRODUCTION......................................................................................... 3
1.
TYPOLOGY OF THE PARALLEL REDUNDANCY SYSTEM............. 3
2.
PARTS THAT CONSTITUTE THE SYSTEM ...................................... 4
3.
OPERATIONAL STATUS.................................................................... 5
4.
5.
6.
Rev.
A
3.1
”N” UPS IN NORMAL OPERATING MODE ....................................................5
3.2
“N-1” UPS NORMAL FUNCTIONING MODE ..................................................6
3.3
MAINS FAULT ..................................................................................................7
3.4
“N” BYPASS AVAILABLE ...............................................................................8
3.5
“N-1” BYPASS AVAILABLE............................................................................9
3.6
MANUAL BYPASS .........................................................................................10
INSTALLATION................................................................................. 11
4.1
SUPPLEMENTARY HARDWARE ..................................................................11
4.2
POSITIONING.................................................................................................11
4.3
CONNECTION ................................................................................................12
4.4
INTERCONNECTION CAN CABLE ...............................................................13
SYSTEM PERFORMANCE ............................................................... 13
5.1
OVERLOAD ....................................................................................................13
5.2
SHORT CIRCUIT ............................................................................................13
START-UP ......................................................................................... 14
6.1
CASE OF 2 UPS – DIRECT START-UP.........................................................14
6.2
CASE OF 2 UPS – MANUAL BYPASS START-UP.......................................14
6.3
CASE OF N UPS – START-UP FROM MANUAL BYPASS...........................14
6.4
PROCEDURE FOR TRANSFERRING TO MANUAL BYPASS .....................15
Descrizione
Description
First Issue
Data
Date
Emesso
Issued
Controllato
Checked
Approvato
Approved
06.11.07
G. Senesi
V. Gremoli
V. Gremoli
Lingua
Language
Pagina
Page
di Pag.
of Pag.
E
1
17
Codice / Code
OM594056
THETYS Parallel System – Operating Manual
6.5
PROCEDURE TO RETURN FROM MANUAL BYPASS................................15
6.5.1
7.
Case of 2 or N UPS – Restart up from manual BYPASS .....................15
UPS COMMUNICATION AND CONFIGURATION CONTROL......... 16
Index of pictures
Picture 1 – Block diagram............................................................................................................................. 4
Picture 2 – “N” UPS in normal functioning mode ........................................................................................ 5
Picture 3 – “N-1” UPS in normal functioning mode ...................................................................................... 6
Picture 4 – Mains failure ............................................................................................................................... 7
Picture 5 – “n” bypass available ................................................................................................................... 8
Picture 6 – “N-1” bypass available ............................................................................................................... 9
Picture 7 – Manual Bypass......................................................................................................................... 10
Picture 8 – Positioning................................................................................................................................ 11
Picture 9 – Connection UPS THETYS 3 units............................................................................................ 12
Picture 10 – Connection scheme of BUS signal cable............................................................................... 13
2
OM594056 Rev. A
THETYS Parallel System – Operating Manual
INTRODUCTION
The purpose of this manual is to guide the installer or user in the correct installation
of the parallel redundancy system in the plant.
Before reading this manual, the user must carefully read the UPS
OPERATIONAL MANUAL and correctly follow the instructions for the individual
units, especially the safety requests according to CEI 64-8 and to 46-90.
The maker declines all responsibility for damages caused to persons or things,
deriving from the non-compliance of the above.
1.
TYPOLOGY OF THE PARALLEL REDUNDANCY SYSTEM
The parallel redundancy system is constituted by “N” UPS (up to a maximum of 6
units), configurated as redundant parallel units. Only the Manual Bypass can be
external and individual for all the units.
In addition to the standard functions of a UPS such as power continuity, protection of
the load from mains distortions etc., the parallel redundancy system guarantees a
continuity of power even if more than one system failure is ascertained.
This is possible because all the units are constantly operative and feed the load in
paralle, furnishing each with a current equal to “total load /n”, where “n” is the number
of the units that are being supplied at that moment.
The automatic distribution control of the AC current equalizes the currents of the “n”
units and reduces the unbalance to less than 10%, under all load conditions.
The load is fed by the parallel inverters even when an instantaneous overload “n x
200%” of the nominal load of every individual unit is verified.
In the event of a breakdown of one of the units, the load is fed by the others. Only in
the event that ulterior breakdowns are verified in the other units will the load be
transferred to the Emergency Mains (Bypass).
OM594056 Rev. A
3
THETYS Parallel System – Operating Manual
2.
PARTS THAT CONSTITUTE THE SYSTEM
All the units are constituted by six functional operating sub-system:
-
IGBT Rectifier (R)
Inverter (I)
Battery (B)
Static Switch: Static Switch Inverter (SSI) e Static Bypass (SB)
Manual Bypass (MB) (on all the units or single and external)
Front Panel
For the description of the single parts, see: “UPS OPERATING MANUAL”
Picture 1 – Block diagram
4
OM594056 Rev. A
THETYS Parallel System – Operating Manual
3.
OPERATIONAL STATUS
If a breakdown occurs for which a UPS can no longer distribute on the load, during
the state of “n UPS in normal functioning”, the parallel redundancy system gets
transferred to the “n-1 UPS in normal operational status. Under these conditions, a
further irregularity of a UPS which prevents the feeding of the load, transfers the system
to the “Emergency Bypass Line, feed the load” condition, every additional irregularity,
may or may not, according to the type of irregularity, interrupt the feed to the load. The
irregularies are registered by each UPS with alarms and visualized on the same front
panel of the UPS.
In the event that a system mode has a rectifier breakdown or mains loss, in the “n
UPS in normal functioning”, the UPS will continue to distribute the load discharging the
battery, automatically isolating itself from the system until the end of the back-up time
and transfers the system to the “n-1” UPS normal operating mode.
If the system is transferred to the Manual Bypass (MB), the load gets fed directly
from the mains, therefore not guaranteeing the continutity of the load and the entire
parallel system becomes separated from the load.
3.1
”N” UPS IN NORMAL OPERATING MODE
Load fed by inverter and possibility of a continuity breakdown.
Picture 2 – “N” UPS in normal functioning mode
OM594056 Rev. A
5
THETYS Parallel System – Operating Manual
3.2
“N-1” UPS NORMAL FUNCTIONING MODE
Load on inverter and, in case of breakdown, transfer to bypass (if available).
Picture 3 – “N-1” UPS in normal functioning mode
6
OM594056 Rev. A
THETYS Parallel System – Operating Manual
3.3
MAINS FAULT
Load on inverter feed by battery.
Picture 4 – Mains failure
OM594056 Rev. A
7
THETYS Parallel System – Operating Manual
3.4
“N” BYPASS AVAILABLE
Load on bypass in the event of at least two inverter breakdowns or overload.
Picture 5 – “n” bypass available
8
OM594056 Rev. A
THETYS Parallel System – Operating Manual
3.5
“N-1” BYPASS AVAILABLE
Load on bypass in the event of at least two inverter breakdowns or overload.
Picture 6 – “N-1” bypass available
OM594056 Rev. A
9
THETYS Parallel System – Operating Manual
3.6
MANUAL BYPASS
Picture 7 – Manual Bypass
10
OM594056 Rev. A
THETYS Parallel System – Operating Manual
4.
INSTALLATION
Before installing the redundant parallel system, follow carefully the “INSTALLATION”
chapter in the “UPS OPERATIONG MANUAL” for the individual units, to be aware of all
the information regarding:
4.1
reception of UPS
size and weight
distance from walls
cable sections, fuses and terminal board
SUPPLEMENTARY HARDWARE
In order to transform “N” standard “Individual” unit into a redundancy parallel system,
it is necessary to obtain a Parallel N kit.
Each Parallel Kit contains:
N. 1 Parallel interface card PB214 SLOT-PAR
N. 1 Connection cable CAN (DB9-DB9)
N. 1 CD Parallel Software
N. 1 Parallel Kit Manual
The output of the “N” units must be a parallel connection on the load.
Refer to the instructions in the Parallel Kit manual to correctly install the SLOT-PAR
cards and configurate the parallel system.
4.2
POSITIONING
It is advisable to place the two UPSs at a distance of at least 10 cm from each other
in order to facilitate the passage of power and signal cables.
Picture 8 – Positioning
OM594056 Rev. A
11
THETYS Parallel System – Operating Manual
4.3
CONNECTION
The following figure shows a simple connection scheme between N UPS in parallel
redundancy configuration.
Picture 9 – Connection UPS THETYS 3 units
NOTE
It is advisable to connect the outputs of the UPS to the load with cables of the same
section and length.
After having appropriately installed the UPS in Parallel with power connections, hook
up the CAN connection cable between the UPS, connect the cables from one UPS to
the other and vice versa forming a connection ring. The CAN-IN and CAN-OUT
connectors are completely equivalent.
For example: in the case of 4 UPS, it is necessary to connect with one cable the
UPS1 to the UPS2, with a cable the UPS2 to the UPS3, with a cable the UPS3 to the
UPS4 and finally, with a cable from UPS4 return to the UPS1, in order to form a
connection ring.
WARNING
Accurately control that the CAN (DB9-DB9) interconnection cables are connected
only and exclusively on the SLOT-PAR and do not connect any of the other DB9 ports
on the back of the UPS. An incorrect cable connection can seriously damage the card
on the inside of the UPS and/or compromise the correct functioning of the system.
12
OM594056 Rev. A
THETYS Parallel System – Operating Manual
4.4
INTERCONNECTION CAN CABLE
The following figure depicts the connection scheme of the BUS-CAN signal cable.
Picture 10 – Connection scheme of BUS signal cable
5.
SYSTEM PERFORMANCE
The static and dynamic performance of the parallel redundancy system improves
with every individual unit since, thanks to the redundance, the total available power is
superior to the nominal load of the system.
5.1
OVERLOAD
The overload limit in a parallel redundancy system depends on the number of units
connected to the load:
Imax = n * In
where “n” = number of the units that distribute on the load, “In” = nominal current of
the individual units
If the load exceeds this limit, there is an indication on the front panel of the UPS, an
overload alarm with relative sound signal; this alarm activates the algorithm of thermic
image and after a certain time the load gets transferred on to the bypass (if available).
5.2
SHORT CIRCUIT
If a short circuit is verified at the output, the system automatically transfers the load
on to the bypass (if available), otherwise all the units distribute a current equal to 200%
ln for 5 cyles, (100 msec), afterwards if the short circuit condition has not been
removed, a current equal to 125% ln for 5 seconds is distributed.
OM594056 Rev. A
13
THETYS Parallel System – Operating Manual
6.
START-UP
6.1
CASE OF 2 UPS – DIRECT START-UP
When the redundancy system is comprised of two UPS, it is possible to start up the
system directly. To proceed with the start up of a UPS, close the RCB switch and follow
the guided procedures on the display. After this, the other UPS may be started up
normally, closing the RCB and following the procedure on the display.
6.2
CASE OF 2 UPS – MANUAL BYPASS START-UP
In the case of two UPS, it is also possible to start up the parallel system starting with
the manual bypass.
If the UPS are already in the Manual Bypass, verify the first two points:
The procedure is as follows:
o
Close the Manual Bypass MBCB of both UPS
o
Switch both Bypass Switches to the BYPASS position
o
Close RCB on both of the UPS
WARNING
When “OPEN ALL MBCB” is requested, all the MBCE of all the UPS and/or MBCB
external cabinets must be opened.
o
o
o
6.3
Follow the start up instructions on the front panel proceeding for each UPS until
the “MOVE BYPASS SWITCH” appears.
Close the Bypass Switch, the UPS feeds the load.
Close the Bypass Switch, the UPS feeds the parallel and the “START-UP
FINISHED” message appears.
CASE OF N UPS – START-UP FROM MANUAL BYPASS
When there ups are more than two UPS it is possible to start up the parallel system
only by starting from the manual bypass. This serves to insert all the ups onto the load
bar contemporaneously.
If the UPS are already in Manual Bypass control the first two points.
The procedure is as follows:
o
o
o
Close the Manual Bypass MBCB on all of the UPS
Switch all the Bypass Switches to BYPASS
Close RCB on all of the UPS
WARNING
When “OPEN ALL MBCB” is requested, all the MBCB of all the UPS and/or MBCB
on the external cabinets must be opened.
14
OM594056 Rev. A
THETYS Parallel System – Operating Manual
o
Follow the start up instructions on the front panel proceeding for each UPS until
the “CLOSEBYPASS SWITCH” message appears.
o
Close the Bypass Switch on the UPS. The parallel system feeds the load when
N-1 Bypass Switch is on Normal mode.
o
Close the Bypass Switch of the remaining UPS.
o
The UPS feed the parallel load and the message “START UP FINISHED”
appears.
The Bypass Switch in a parallel redundancy system, in normal operating conditions,
assumes the function of removing the UPS from the load-feeding bar.
The load gets transferred to the Emergency Line (Bypass) if there are at least two
Bypass Switches set to Bypass.
6.4
PROCEDURE FOR TRANSFERRING TO MANUAL BYPASS
Set all the Bypass Switches to “Bypass”, making the system change over to the
Bypass system, orange Led 6 illuminates on the front panel of all the UPS of the
system.
Close one or more MBCB (all the inverters stop with relevant alarm).
Parting from each UPS comprising the parallel system open the switches OCB,
SBCB, BCB and RCB, in this order.
6.5
PROCEDURE TO RETURN FROM MANUAL BYPASS
The system is under the Manual Bypass condition with one or more MBCB switches
closed and ALL the Bypass Switches set to BYPASS according to the procedure
describe in Paragraph 6.4.
To re start the system with continuity of loads, follow the procedure below:
6.5.1 Case of 2 or N UPS – Restart up from manual BYPASS
o
o
o
o
Close RCB on all the UPS
Follow the start up instructions on the front panel proceeding for each UPS until
the “CLOSE BYPASS SWITCH” message appears.
Move the Bypass Switch on the UPS. The parallel system feeds the load when
the N-1 Bypass Switches are set in the Normal Mode.
Move the Bypass Switch of the remaining UPS,the UPS feed the load and the
message “START UP FINISHED” appears.
WARNING
When the request “OPEN ALL MBCB” appears, all the MBCB of all the UPS and/or
MBCB on the external cabinets must be opened.
PLEASE NOTE
In systems with more than 2 UPS, the inverter is controlled by the N-1 Inverter logic
on N.
Therefore, if there are 3 UPS, normal operating mode is restored once the Bypass
Switch of the second unit is set to the Normal Mode, and completes the start up of two
UPS.
OM594056 Rev. A
15
THETYS Parallel System – Operating Manual
7.
UPS COMMUNICATION AND CONFIGURATION CONTROL
After having correctly installed the parallel system, the operation of the system may be
verified.
To do this it is advisable to start up the system from MBCB following the generic N UPS
procedure described in Paragraph 6.3.
o As soon as the message “START UP FROM MBCB” “OPEN ALL MBCB”
appears, it is possible to verify the correct communication of the UPS
comprised in the parallel system with the two lines below:
Es:
[1]
M
2
S
3
S
4
-
5
-
6
-
E
-
The UPS which comprise the system are indicated with a number.
M: Indicates the Master. (During normal operation, the Master is in the lowest
UPS index position which distributes on the load).
S: Indicates the Slave
[ ]: Indicates the index position of the UPS in the system.
UPS1 the parentheses will appear at number 1
UPS2 the parentheses will appear at number 2
..
and so on
?: Indicates that the UPS is not communicating with the rest of the UPS of the
system.
-: Indicates that the UPS is not physically present in the system.
*: Appears only under the E to indicate the ECO-MODE configuration.
WARNING
In the event:
The message on the display is “OPEN MBCB” instead of “OPEN ALL MBCB”.
This means that the UPS has an incorrect configuration and has been set up as
an SINGLE UPS.
There are two or more “M”, namely two or more UPS are contemporaneously
MASTER.
Two or more UPS have the square parentheses “[ ]” on the same number.
Incorrect position configuration of the UPS in the system.
There are “?” under the numbers, UPS is unable to communicate with the other
machines.
For all these problems, it is necessary to contact Customer Service to resolve the
problem.
16
OM594056 Rev. A
THETYS Parallel System – Operating Manual
WARNING
If the parallel system is configurated in ECO-MODE, each UPS must be individually
configuraged in ECO-MODE. This means that it must be verified that in the previously
described menu all the UPS have a “*” under the letter E.
If this is not verified, it is necessary to contact Client Service to resolve the problem.
Once the configuration of each UPS has been ascertained, the start up from MBCB
“OPEN ALL MBCB” may begin
Proceed by moving the Bypass Switch on the UPS. The system feeds the load
when the N-1 Bypass Switch is set to Normal Mode.
Move the Bypass Switch of the remaining UPS.
The parallel system feeds the load and the message “START UP FINISHED”
appears.
OM594056 Rev. A
17
FACTORY & HEAD OFFICE
SEDE E STABILIMENTO
Viale Europa, 22 - Loc. Ponte d’Arno
52018 CASTEL SAN NICCOLO’ (AR)
Phone: +39-0575-509701
Fax: +39-0575-500032
http://www.astridups.it