1
Tutorial session 4 examples
1.
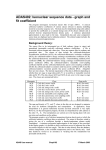
ADAS412 Test Case
1. Move to your directory /.../<uid>/adas/pass/ . Start ADAS412.
2. The Input window is different from the usual you have encountered so far.
3. In the top part of the screen you can choose a data set to interrogate directly. Try /
…/adas/adf11/acd89/acd89_n.dat for nitrogen.
4. Then try to lower screen search method. Select iso-nuclear master c-r class ACD. Then
enter 96 as the year, 89 as the default year and n as the element. Select Standard for the
type for master file. Click the Search button.
5. On the pop-up choose one of the files offered and click Select to return to the input
screen.
6. On the processing screen you can make the usual choices of temperature and density pairs
by default or using the editor.
7. Move on to the output screen and finally obtain the graph.
8. You may like to go into the data base and explore ADF11 a bit further. Also look at the
ADAS User manual entry appxa-11.
1.
ADAS506 Test Case
9. Move to your directory /.../<uid>/adas/scripts405/. Check if you have files NULL and
rfx_test_c. If not, copy them both from /.../adas/adas/scripts405/.
10. Move back to your /.../<uid>/adas/pass/ directory. Start ADAS and move to the ADAS4
series menu. Select ADAS405.
11. The Input window is complex. Note the Isonuclear Classes - click the SELECT button.
On the drop down choice click on the buttons for ACD, SCD, PRB, QCD, XCD, PLT.
then click Done.
12. Note the Select directory branch - click on the button and select Central.
13. Enter Year of data [96{return}]. Enter Default year 96.
14. Enter Isonuclear element symbol c.
15. Note Type of master files - click on the button and select Partial. Note the Specify
partial type code - click on the button and select Resolved.
16. Look at the lower section on the Line and Analysis Selection File. Click on the button
for User data. Select the file NULL. Click Done to move to the processing window.
17. Click the Default temperature/density values button. You will need to choose an
electron density, 1.00E9 say, and a hydrogen density, 1.00 say. Then click Done to move
to the Output options window.
18. Click the button for Graphical output. Then click the button for Fractional abundance
plot. Finally click Done to see the graph.
19. Click Done to return to the Output options screen. You can Exit to menu using the icon in
this program.
2.
ADAS 601 Test Case
1. Move back to your pass directory /.../<uid>/adas/pass. Start ADAS407
2. The code can operate in interactive or automatic mode. On the Analysis Choice window
select Interactive
3. The code works on the adf04 files for adjacent ionisation stages. These adf04 files must
have recognizable Eissner configuration format. In practice this restricts you to
/copmm#<nucchg> libraries.
4. On the upper part of the Input screen select copmm#54/ls#xe10.dat. If a
copmm#<nucchg> file is selcted then the adjacent ionised ion file is automatically
selected in the lower part of the screen. Otherwise you must make an explicit choice.
5. On the upper left side of the Processing window, click Selections. You must choose the
lowest level, that is the ground state. (ADAS407 has another mode for which additional
metastable choices are required).
6. On the upper right side of the Processing window the same for the ionised ion.
7. On the Parameter Form section, select A for all items.
8. On the Matching Temperature part, select 2.420e+06.
ADAS-EU Course at CEA
26 September - 4 October 2012
9.
10.
11.
12.
13.
14.
15.
16.
Click on the select ionising ion ground state, just above the Selection button on the upper
left side. This sets transitions in the lower right sub-window.
You assign a bundle index to each transition in turn in the lower right editable box.
{Return} to record the value on the list. You can re-edit your choices.
Choose a Specific Line Index also and then click Done.
On the Output window, select the ATOMPARS Passing File and the usual paper.txt file.
Click View graph
Click Done and then on the Output window click Output files and back to input.
Exit and look at the ATOMPARS passing file.
Note the top line of the ATOMPARS passing file. There are two sets of ?? marks. Edit
10 into both these locations, that is the initial and final ion charge state – you have only
done one stage so both are 10.
ADAS-EU Course at CEA
26 September - 4 October 2012